1
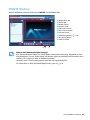
User’s Guide
1
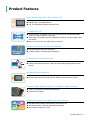
Product Features
Small but Strong UMPC (Ultra Mobile PC)
● Intel Celeron M ULV Processor
● 256MB~Up To 1GB DDR2 Memory
● 1.8", 20~60GB High-Capacity Hard Disk Drive
7" WVGA TFT LCD
● Basic Resolution of 800x480 Pixels, Maximum Resolution of 2048x1536 Pixels
(when an external display is connected)
● Auto Scaler (Automatic Resolution Adjustment) Function to Support High Resolution Output
● Easy-to-Use Touch Screen usable with your fingers.
Microsoft Windows XP Tablet PC Edition
● Resolve PDA and Pocket PC restrictions
● Usability Similar to a Normal PC with Windows
Powerful Multimedia Functions
● Various Multimedia Programs Such as AVStation etc.
● 2 Built-in Array Microphones for Higher Audio Recording Quality SRS Surround
Sound
Multiple Network Support
● Wired LAN, Wireless LAN, Bluetooth (Optional)
● Resolves Space Restrictions through the Wireless Communication Function
Compact, Light-Weight Design for Portability / Polished Design
● A mere 779g (Without the Bluetooth modules)
● High-Gloss Front Panel
Optional Accessories for Additional Convenience
● USB Data Cable Enabling Data Exchange with another PC.
● USB External ODD, Ultra-Slim USB External Keyboard
● Power Bank to Extend Use Time
Product Features 2
Using Your Document
Congratulations on your purchase of a computer with the Windows® XP operating system. Whether you
are new to using a portable computer or are an experienced user, this user’s manual can help you get the
most from your computer.
Manual Documentation Conventions
Some devices and software may differ from the descriptions in the User's guide or may not be
supplied with the product depending on your computer model.
The actual appearance of the computer may differ from the pictures printed on the cover and in
the User's guide.
This manual describes procedures with both the Stylus Pen and Mouse.
'Single-Click' in this manual also means 'Single-tap' for the Stylus Pen.
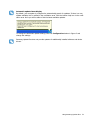
Information Icons
Three icons and their associated messages appear in this manual. The information icons are placed
before the step/information they apply to:
Warning
Indicates the possibility of personal injury.
Caution
Warns you of possible damage to equipment or data.
Note
Informs you of special circumstances.
Before you start !
Informs you of special requirements or limitations for use of item(s).
p.xx
Shows the page number you can refer to for more detailed information.
Using Your Document 3
Contents
Product Features
2
Using Your Document
3
Contents
4
Safety Precautions
6
Proper Posture During Computer Use
11
Chapter 1. Getting Started
Overview
Front View / Status Indicators
Top View
Right View
Left View
Rear View
Turning the Computer On and Off
To turn on the computer
To turn off the computer
14
14
15
16
16
17
18
18
18
Chapter 2. Using the Computer
Stylus Pen
20
Entering Text
22
Using the Tablet PC Input Panel
Dialkeys
22
25
Volume Control
26
Using the Buttons
27
The Menu Button
The Quick Launch Button
The Auto Scaler Button
27
28
30
CF Card Slot
31
Connecting a Monitor
33
Connecting a Monitor
Viewing on a Monitor
Dual View
33
33
34
Chapter 3. Using Microsoft Windows XP
About Microsoft Windows XP
37
Get Going with Tablet PC
Tablet PC Tutorials
Reinstalling Windows XP
37
38
38
The Windows XP Screen Layout
39
Desktop
Understanding the Start Menu
Understanding a Window
39
40
41
Control Panel
42
Opening the Control Panel
User Account
Changing the Resolution and Colors
42
43
45
Chapter 4. Using the Network
Connecting Through a Wired LAN
47
Connecting Through a Wireless LAN
49
Connecting to an Access Point (AP)
Connecting to computer-to-computer
networks (peer-to-peer or ad hoc)
Wireless Network Setup
Using the Wireless LAN Setup Program
50
Using Samsung Network Manager
Setting Up a Network
Using the network after moving location
Sharing Internet Access
Network Status Diagnosis
51
54
55
55
58
58
61
Using Bluetooth Devices
62
Bluetooth Software Setup
Using Bluetooth
63
65
Contents 4
Chapter 5. Using Applications
Chapter 7. Troubleshooting / Appendix
Introducing Programs
70
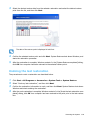
Using Magic Doctor
114
Using Samsung Update Plus
73
Using Norton AntiVirus
115
Program Launcher
75
Restoring the System
116
Program Launcher Screen Layout
Using Program Launcher
Using AVStation premium
75
76
77
Start and Screen Layout
MUSIC Station
PHOTO Station
MOVIE Station
77
78
81
84
Using AVStation NOW /
AVStation Viewer
88
Start / Exit AVStation NOW
Start / Exit AVStation Viewer
Screen Layout
MUSIC Station
PHOTO Station
MOVIE Station
88
89
90
90
92
93
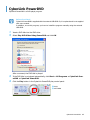
CyberLink PowerDVD
95
Voice Recorder
97
Recording
97
Chapter 6. Settings
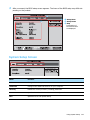
Using System Setup
Starting System Setup
System Setup Screen
100
100
101
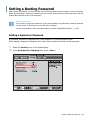
Setting a Booting Password
103
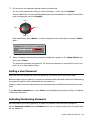
Changing the Booting Priority
106
Using the Battery
107
Removing and Attaching Battery
Charging the Battery
Monitoring the Battery Charge
Extending the Battery Usage Time
107
108
108
110
Creating a Restore Point
Returning your computer
to an earlier restore point
Undoing the last restoration
116
117
118
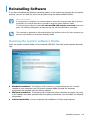
Reinstalling Software
119
Running the system software Media
Installing drivers and programs
119
120
Reinstalling Windows XP
121
Running the System Recovery Media
Quick Installation
Standard Installation
Installing Windows
When You Cannot Run Windows
Questions and Answers
121
122
123
125
126
Windows Related
Display Related
Sound Related
Wired LAN Related
Wireless LAN Related
Games and Programs Related
Security Center
Other
126
126
128
129
130
134
135
137
Specifications
138
Glossary
140
Index
143
Important Safety Information
144
Regulatory Compliance Statements
145
WEEE Symbol Information
151
Contact SAMSUNG WORLD WIDE
152
Contents 5
Safety Precautions
For security purposes and to prevent damage, please read the following safety instructions carefully.
Warning
Failing to follow the instructions marked with this symbol, may cause personal injury and even
fatality.
Caution
Failing to follow the instructions marked with this symbol, may cause slight injury to yourself or
damage to the product.
Warning
Installation Related
•
Do not install the product in places exposed to humidity such as bathrooms.
There is a danger of electric shock. Use the product within the operating conditions specified in
the User Guide.
•
Keep the plastic bags out of reach of children.
There is a danger of suffocation.
Power Related
•
Do not touch the power cord when hands are wet.
There is a danger of electric shock.
•
Take care not to exceed the standard capacity (voltage/current) of a multi-tap or
power outlet extension when using it for the product.
Electric leakage may cause electric shock or fire.
•
If the power cord or power outlet makes a noise, disconnect the power cord from
the wall outlet and contact a service center.
There is a danger of electric shock or fire.
•
Do not use a damaged or loose power cord or power outlet.
There is a danger of electric shock or fire.
•
Plug the power cord into the power outlet firmly.
Failing to do so may cause fire.
•
Do not unplug the power cord by pulling the cable.
If the cord is damaged, this may cause electric shock.
Safety Precautions 6
•
Do not bend the power cord excessively or do not place a heavy object over the
power cord. Keep the power cord out of reach of infants and pets.
If the cord is damaged, this may cause electric shock or fire.
•
Use a wall outlet or multi-tap with a grounding port.
Otherwise, there is a danger of electric shock.
•
If water or another substance flows into the power input jack or into the computer,
disconnect the power cord and contact the service center.
Damage to the device within the computer may cause electric shock or fire.
•
Keep the power cord and power outlet clean.
There is a danger of fire.
Use Related
•
Do not place a cup or container filled with water or chemicals over or near the computer.
If water or chemicals flow into the computer, it may cause fire or electric shock.
•
When dropping the computer or the computer is broken, disconnect the power cord
and contact a service center for a safety check.
If you use a broken computer, there is a danger of electric shock or fire.
•
Avoid direct sunlight when it is in an air-tight location such as inside a vehicle.
The computer may become deformed or fire may be caused by high temperatures.
•
Do not scratch the surface of the LCD with a sharp object such as a knife.
LAMP(S) INSIDE THIS PRODUCT CONTAIN MERCURY AND MUST BE RECYCLED OR DISPOSED OF ACCORDING TO LOCAL, STATE OR FEDERAL LAWS. For details see lamprecycle.org,
eise.org, or call 1-800-Samsung.
Upgrade Related
•
Never disassemble the power supply or AC adapter.
There is a danger of electric shock.
•
Use only authorized parts (multi-bay, battery and memory) and never disassemble
parts.
There is a danger of damage to the product, electric shock or fire.
Custody and Movement Related
•
Follow the instructions of the relevant location (e.g. airplane, hospital, etc.) when
using a wireless communication device (wireless LAN, Bluetooth, etc.).
Safety Precautions 7
Caution
Installation Related
•
Do not block the ports (hole), vents, etc. of the product and take care not to insert
alien substances into the product.
Damage to the device within the computer may cause electric shock or fire.
•
Do not place a heavy object over the product.
This may cause a problem with the computer. In addition, the object may fall and cause injury
or damage the computer.
Battery Use Related
•
Dispose of worn-out batteries properly.
Failing to do so may cause fire or an explosion.
Follow the proper disposal method relevant to your region. The battery disposal method may
differ depending on your location.
Dispose of the used battery in the appropriate way.
•
Do not throw or disassemble the battery.
This may cause injury, fire or an explosion.
•
Use only batteries authorized by Samsung Electronics.
Otherwise, there is a danger of an explosion.
•
Avoid contact with metal objects such as car keys or clips when storing or carrying
a battery.
Contact with a metal part may cause an excessive current and a high temperature. It may damage the battery or cause fire.
•
Change the battery according to the instructions in the manual.
Otherwise, the product might be damaged.
•
Do not place the battery into a fire or heat it.
There is a danger of fire or explosion.
Safety Precautions 8
Use Related
•
Do not place a candle, lighted cigar, etc. over the product.
There is a danger of fire.
•
Make sure to test the product for safety by a service engineer after repairing the
product.
Using a repaired product without testing it for safety might cause electric shock or fire.
•
In case of lightning, immediately turn the system off and disconnect the power
cord from the wall outlet.
There is a danger of electric shock or fire.
•
Connect only permitted devices to the connectors or ports of the computer.
Otherwise, it may cause electric shock or fire.
•
When using the computer for a long time, there may be an odd smell.
Ventilate the room frequently and use the computer carefully.
•
Do not press the Eject Button while the CD-ROM drive is operating.
You might lose data. The disk may suddenly eject and this may cause injury.
•
When using a walkie-talkie, please keep the distance between the walkie-talkie
and the computer at least at 1m.
Since a walkie-talkie's transmission power is very high, this may cause a computer malfunction.
•
Avoid dropping the product while using it.
– Dropping the product may damage the product or cause data loss.
– Take care not to drop the product when using the computer on the stand.
•
Do not touch the antenna and power outlet.
There is a danger of electric shock.
Upgrade Related
•
Take care when touching the product or parts.
The device may be damaged or cause injury.
•
Take care not to drop any computer part or device.
Dropping a device or part may cause injury or damage to the product.
•
Use parts authorized by Samsung Electronics only.
Otherwise, there is a danger of fire or damage to the product.
•
To connect a device that is not manufactured or authorized by Samsung Electronics, ask at a service center before connecting the device.
Otherwise, there is a danger of damage to the product.
Safety Precautions 9
Custody and Movement Related
•
When moving the product, turn the power off and separate all connected cables
first.
Otherwise, the product might be damaged or users may trip over the cables.
•
Keep the Stylus Pen out of reach of children.
Children may injure themselves by swallowing it or damaging their eyes.
•
Use a computer cleansing solution when cleaning the product.
Using a cleansing solution or chemical that is not developed for a computer may damage the
product.
•
Do not use or watch the computer while driving a vehicle.
This may cause a traffic accident. Concentrate on driving.
Avoiding Data Loss (HDD Management)
•
Take care to not damage the data on a hard disk drive.
– A hard disk drive is extremely sensitive to external impact that any external impact may
cause data loss on the surface of the disk.
– The company is not liable to any loss of user data due to a user's carelessness or any
external impact.
•
Causes that may damage the data of a hard disk drive.
– The data may be lost when there is an external impact to the disk while disassembling or
assembling the computer.
– Data may be lost when the computer is turned off or reset by a power failure while the
hard disk drive is in operation.
– Data may be lost if the power is turned off while running a program.
– Moving the computer or any impact caused to it while the hard disk drive is in operation,
may damage the data on the hard disk drive.
To prevent data loss due to damage to the hard disk drive, please backup your data
frequently.
Safety Precautions 10
Proper Posture During Computer Use
Maintaining a proper posture while using the computer is very important for avoiding physical discomfort
or even harm.
The following instructions are about keeping the proper posture during computer use developed
through human engineering. Please read and follow them carefully when using the computer.
Otherwise, the probability of (RSI: Repetitive Strain Injury) through repeated operations may increase and serious physical bodily harm may be caused.
The recommendations (System specification,
p.138) have been prepared so that they can be
applied within the coverage of general users.
If users are not included in the coverage, the recommendations are to be applied according to
the user's needs.
Proper Posture
•
Do not use the computer on your lap or close to your skin for a long time.
There is a danger of burns due to the high temperature of the computer.
•
To use the computer while talking over the telephone, use the ear-microphone phone.
When using the computer while holding a phone over your shoulder and talking on the phone,
your posture becomes bad.
•
Keep frequently used work items within an easy working range (where you can reach them
with your hands easily).
Eye Position
Keep a distance of at least 50cm between the LCD and your eyes.
•
•
•
•
Adjust the height of the LCD screen so that its top height is equal to or lower than your eyes.
Avoid setting the LCD excessively bright.
Keep the LCD screen clean.
When wearing glasses, clean them before using the computer.
Hand Position
•
•
•
It is recommended to connect and use an external keyboard and mouse when using the computer for a long time.
Do not hold the Stylus Pen with excessive force.
Do not press the touch screen with excessive force.
Proper Posture During Computer Use 11
Volume Control (Headphone and Speaker)
Check the volume level before listening to music.
•
•
•
Check if the volume level is too high before using headphones.
Do not set the volume to the maximum from the beginning. Set the volume low and find a
comfortable level while turning it up.
Do not use the headphones for long periods of time.
Use Time (Break Time)
•
•
When working for more than one hour, take a 10 minute break after every 50 minutes of work.
Using this computer for two hours or less a day is recommended.
Illumination
•
•
Do not use the computer in a dark location. The illumination level for computer use must be
bright so that you can read a book.
Indirect illumination is recommended. Use a curtain to prevent the reflection of the LCD screen.
Operating Conditions
•
•
Do not use the computer in hot and humid locations.
Use the computer within the allowed temperature and humidity ranges specified in the User
Guide.
Proper Posture During Computer Use 12
Chapter 1. Getting Started
Overview
Front View / Status Indicators
Top View
Right View
Left View
Rear View
Turning the Computer On and Off
To turn on the computer
To turn off the computer
14
14
15
16
16
17
18
18
18
Overview
Before You Start!
The actual appearance and color of the contents may differ from the pictures used in the material.
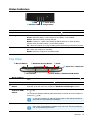
Front View / Status Indicators
z LCD
x Speaker(R)
x Speaker(L)
c Joystick
. Quick Launch Button
v Auto Scaler
, Enter Button
Button
m Menu Button
n Array Microphone
b Status Indicators
z LCD
The screen images from the computer are displayed here.
x Speaker
Used to generate sound.
c Joystick
Plays the same role as the direction keys ( ← , → , ↑ , ↓ ) on the keyboard.
Used as a joystick when playing games.
v Auto Scaler Button (Automatic Resolution Adjustment Button)
Press this button to change the screen resolution.
Auto Scaler provides 3-step resolutions. Whenever you press this button, the screen
resolution changes to 800x480 (Default Resolution) > 800x600 > 1024x600 sequentially. ( p.30)
b Status Indicators
Shows the operating status of the computer. The corresponding operating LED is lit
when the corresponding function operates. ( p.15)
n Array Microphone
Used to record sound. (
m Menu Button
Press this button to launch the Menu Program. ( p.27)
The Menu Program provides shortcuts to frequently used functions on the computer.
You can easily change the settings.
, Enter Button
Press this button to select an item. It is the same as the Enter key on the keyboard.
. Quick Launch
You can register a frequently used program to launch it just by pressing this button.
( p.28)
Button
p.97)
Overview 14
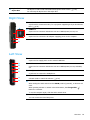
Status Indicators
v Power Status
z HDD
x Wireless LAN c Charge Status
z HDD
This turns on while the hard disk drive is being accessed.
x Wireless LAN
This turns on when the wireless LAN is operating. (
c Charge Status
This shows the power source and the battery charge status.
Green: When the battery is fully charged or the battery is not installed.
Amber: When the battery is being charged.
Blinks: It blinks for a while when sliding the HOLD switch up or when pressing
a button when the HOLD switch is in the HOLD position.
Off : When the computer is running on battery power without being connected to AC power.
v Power Status
This shows the computer operating status.
On : When the computer is operating.
Blinks: When the computer is in Standby mode.
p.49)
Top View
z Wired LAN Port
c Windows Security Button
b Vents
n Stylus Pen / Stylus Slot
x CF Card Slot
v Power Switch / AVStation NOW Switch
z Wired LAN Port
A port to which an Ethernet cable is connected; connects the computer to a LAN. (
p.47)
x CF Card Slot
A slot into which a CF card is inserted. (
p.31)
c Windows Security Pressing this button is the same as pressing the <Ctrl>+<Alt>+<Del> keys on the
Button
v Power Switch /
AVStation NOW
Switch
keyboard. Press the Stylus Pen, display the Windows Task Manager window.
You can turn the computer on or off by sliding this switch to the right and releasing
it. ( p.18)
You can launch AVStation NOW by sliding this switch to the left when the computer is
turned off. ( p.88)
To turn the computer on, slide the Power switch to the right and hold it for
more than 0.1 seconds before releasing it.
b Vents
The internal heat of the computer is emitted through these holes.
If the vents are blocked the computer may over-heat. This may be dangerous, so avoid blocking the vents.
Overview 15
n Stylus Pen /
Stylus Slot
The Stylus is used to enter information through the touch screen. (
You can keep the Stylus Pen in the Stylus Slot.
p.20)
Right View
z Monitor Port
A jack used to connect a monitor, TV or projector supporting a 15-pin D-SUB interface. ( p.33)
z
x USB Port
A port used to connect a USB device such as a USB keyboard, mouse, etc.
c DC-in Jack
A port used to connect the AC adapter supplying power to the computer.
x
c
Left View
z External ODD Power Port
A port used to supply power to the external USB ODD.
z
x
c
v
x USB Port
A port used to connect a USB device such as a USB keyboard, mouse, USB ODD,
etc.
c Headphone Jack
A jack used to connect the headphones.
v Volume Control Button
b
n
A button used to control the volume. (
p.26)
b HOLD Switch
When sliding the HOLD switch into the HOLD position (upwards), no buttons will
work.
When pressing a button or switch in the HOLD status, the Charge LED (
blinks for a moment.
)
To use the computer again, slide the HOLD switch down.
n Hand Strap Hole
You can connect the Hand Strap here.
Overview 16
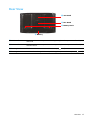
Rear View
z 20° Stand
x 80° Stand
c Battery Latch
v Battery
z 20° Stand
You can position the computer at a 20° degree angle so that you can comfortably
enter text.
x 80° Stand
You can position the computer at an 80° degree angle so that you can comfortably
view the screen.
c Battery Latch
The latch used to remove or install the battery. (
v Battery
A Lithium Ion rechargeable battery which supplies power to the computer. (
p.107)
p.107)
Overview 17
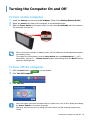
Turning the Computer On and Off
To turn on the computer
1
2
3
Install the battery and connect the AC adapter. (Refer to the Getting Started Guide.)
Adjust the stand at the back of the computer to a comfortable angle.
Slide the Power Switch to the right, hold it for more than 0.1 seconds and then release it.
The computer is turned on.
When running the computer on battery power, the LCD brightness is automatically dimmed to
save battery power.
To increase the LCD brightness, press the Menu button and press Brightness Up. ( p.27)
Alternatively, press the +, - Volume Control buttons while holding down the Menu button to
adjust the LCD brightness.
To turn off the computer
1
2
Click the start button (
3
Click Turn Off.
) on the taskbar.
Click Turn Off Computer.
When the system cannot be shut down due to a system error, turn it off by sliding and holding
the Power Switch for more than 4 seconds.
After that, when turning it on by sliding the Power Switch, the disk checking program may
launch.
Turning the Computer On and Off 18
Chapter 2. Using the Computer
Stylus Pen
20
Entering Text
22
Using the Tablet PC Input Panel
Dialkeys
22
25
Volume Control
26
Using the Buttons
27
The Menu Button
The Quick Launch Button
The Auto Scaler Button
27
28
30
CF Card Slot
31
Connecting a Monitor
33
Connecting a Monitor
Viewing on a Monitor
Dual View
33
33
34
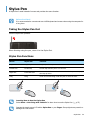
Stylus Pen
A Stylus Pen is used instead of mouse and provides the same function.
Before You Start!
It is recommended to connect and use a USB keyboard and mouse when using the computer for
a long time.
Taking the Stylus Pen Out
Pull the Stylus Pen upwards.
When finishing using the pen, return it to the Stylus Slot.
Stylus Pen Functions
Mouse
Stylus Pen
Function
Single-click
Single-tap
Single-tap with the pen to select an item.
Double-click
Double-tap
Double-tap with the pen to run an item.
Right-click
Press and Hold
Press and hold for more than 3 seconds with the pen to display
the Pop-up menu.
Drag
Drag
Press an item and drag it with the pen to move the item.
Learning How to Use the Stylus Pen
Select Start > Get Going with Tablet PC to learn how to use the Stylus Pen. (
p.37)
Operate the touch screen LCD with a Stylus Pen or your finger. Sharp objects may scratch or
damage the LCD surface.
Stylus Pen 20
Calibrating the Stylus Pen
When using the Stylus Pen for the first time or the pointing position of the Stylus Pen is incorrect,
you can correct the pointing position using the TouchKit program.
1
2
Select Start > All Programs > Touchkit > Configure Utility.
In the Tools tab, press the 4 Points Calibration.
Enhancing the Accuracy
If a more precise correction is required, you can correct the pointing position by using 9-Points
or 25-Points Calibration.
z In the Linearization Style item in the Settings tab, select 9-Points or 25-Points and
then press the Apply button.
x In the Tools tab, press Linearization. The higher the number, the more precise a correction
is provided.
3
Press and hold the X-symbol displayed on the screen until it stops blinking. The X-symbol
appears repeatedly according to the selected number of points.
4
If the Calibration Result window appears, click the OK button. The pointing position of the
Stylus Pen is corrected.
Stylus Pen 21
Entering Text
You can enter text by using the Tablet PC Input Panel or DialKeys on this computer.
Before You Start!
Using a USB keyboard is more convenient over long periods of use.
For example, to enter texts in Notepad, select Start > All Programs > Accessories > Notepad and run Notepad.
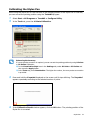
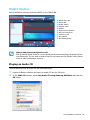
Using the Tablet PC Input Panel
The Tablet PC Input Panel is an on-screen letter input pad provided by Windows. Using it, you
can enter letters with the Stylus Pen when a keyboard is not available.
You can enter letters using the Tablet PC Input Panel in 3 ways.
Click on the Tablet PC Input Panel (
) icon on the taskbar.
Writing Pad
Close
Character
Pad
Tools and
Options
On-Screen
Keyboard
Help
You can learn
detailed usage
for the Tablet PC
Input Panel.
Tablet PC Input Panel icon
Entering text using the Writing Pad
You can enter text on the Writing Pad using the Stylus Pen.
1
2
In the Tablet PC Input Panel, click the Writing Pad icon (
).
Write text in the input area of the Writing Pad with the Stylus Pen and wait a moment. The
written letters are converted into the corresponding computer characters. Press the Insert button to enter the converted letters.
Insert
Entering Text 22
Editing Letters
Overwrite wrong letters or press the lower part of a letter to select another letter from the displayed letters.
Entering text using the Character Pad
You can write a letter in each cell of the Character Pad with the Stylus Pen.
1
2
In the Tablet PC Input Panel, click the Character Pad icon (
).
Write a letter in the cell of the Character Pad with the Stylus Pen and wait a moment. The written letter is converted into the corresponding computer character.
Press the Insert button to enter a converted letter.
Insert
Entering Text 23
Entering text using the On-Screen Keyboard
The On-Screen Keyboard displays a standard keyboard on the screen so that you can enter a letter
by pressing the corresponding key on the screen.
1
2
In the Tablet PC Input Panel, click the On-Screen Keyboard icon (
).
Press a key on the screen with the Stylus Pen.
Entering Text 24
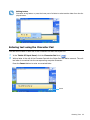
Dialkeys
DialKeys is an on-screen keyboard designed to be used with compact touch screen computers.
You can enter letters using the DialKeys by pressing a key on the screen with your thumbs while
holding both of the lower corners of the computer with your hands.
To launch the DialKeys for the first time, click Start > All Programs > Microsoft Touch Pack
for Tablet PC > DialKeys. You can launch the DialKeys as follows after the first launch.
1
Click on the Dialkeys icon (
) on the taskbar for more than 3 seconds and select Show/
Hide DialKeys from the pop-up menu.
2
Dialkeys appears on both lower corners of the screen. Enter letters using your thumbs.
Corresponds to the Enter key on a keyboard.
Corresponds to the space bar on a keyboard.
Minimizes the Dialkeys.
Corresponds to the Backspace on a keyboard.
Move the current window upwards.
To View Detailed Usage of the Dialkeys
Click on the Dialkeys icon (
) on the taskbar for more than 3 seconds and select Help from
the pop-up menu.
Entering Text 25
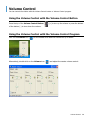
Volume Control
You can control the volume with the Volume Control button or Volume Control program.
Using the Volume Control with the Volume Control Button
Press the top of the Volume Control Button (
) (+) to turn up the volume or press the bottom
of the button (-) to turn down the volume.
Using the Volume Control with the Volume Control Program
Click on the Volume icon (
) on the taskbar and slide the volume bar up or down.
Alternatively, double-click on the Volume icon (
) and adjust the master volume control.
Volume Control 26
Using the Buttons
The procedures to use the Menu, Quick Launch and Auto Scaler buttons are described below.
The Menu Button (
)
Press the Menu button to launch the Menu Program. The Menu Program provides shortcuts to frequently used functions on the computer. You can easily change the settings.
Press the Menu button again or press a point on the screen to hide the Menu Program.
Menu Items
Function
Brightness Up
Whenever this item is pressed, the LCD brightness is increased by one step.
Brightness Down
Whenever this item is pressed, the LCD brightness is decreased by one step.
Wireless LAN ON (OFF)
Press this item to turn the Wireless LAN on or off.
Wired LAN ON (OFF)
Press this item to turn the Wired LAN on or off.
Sound ON (OFF)
Press this item to turn the volume on or off.
Backlit OFF
Press this item to turn the LCD backlight off. To turn it on again, press a point on
the LCD screen once.
Etiquette Mode ON (OFF) You can select Etiquette Mode when you need a tranquil work environment.
Using the Buttons 27
Press the item to view screen images on an external monitor.
When pressing this item once, screen images are displayed on the LCD. When
pressing this item twice, screen images are displayed on both the LCD and the
CRT (external monitor) simultaneously.
LCD/CRT
CRT Output Only is not supported.
Press this item to set up the SRS function.
SRS provides surround sound even with 2 speakers by extending the space perception.
Whenever this item is pressed, the following function is selected.
SRS
WOW XT: For listening to music.
Trusurround: For watching movies.
SRS OFF: Turns the SRS function off.
Battery
Shows the remaining battery charge.
Whenever this item is pressed, the screen rotates by 90 degrees to the left.
■ When rotating the screen, a part of the screen image may not be displayed in some software programs.
■ Since the Rotation function is supported for the 800x480 pixels resolution only, if the Rotation function does not work when pressing the
item, set the screen resolution to 800x480 pixels first by pressing the
Auto Scaler button.
Rotation
The Quick Launch Button
You can register a frequently used program to launch the program, just by pressing this button.
The procedures to change the default settings are described below.
Default Setting
Quick Launch button is defined as follows by default.
Button
Function
Description
u1
Mouse Scroll Up
Scrolls up in the current window.
u2
Back
Moves to the previous page in Internet Explorer or Windows Explorer.
u3
Mouse Scroll Down
Moves to the next page in Internet Explorer or Windows Explorer.
Scrolls down in the current window.
u4
Forward
Scrolls down in the current window.
Using the Buttons 28
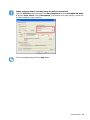
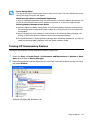
Changing the Settings
The procedures to change the default settings are described below.
1
2
3
Double-click the Magic Keyboard icon (
4
Select the Run Program option, click the Browse button, select a program to be launched
and click the Open button.
) on the taskbar.
Click the add button.
Enter a name in the Group Name field and select a shortcut key in the Select Shortcut Key
field.
Example) C:\Program Files\Internet Explorer\IEXPLORE
To use the keyboard shortcut function, select the Keyboard Effect option and then define a
shortcut key combination.
5
Click the Apply button and click the OK button to complete the settings.
Using the Buttons 29
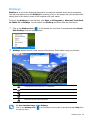
The Auto Scaler Button
The default resolution of this computer is 800x480 pixels. In the default resolution, the complete
screen image of programs designed for high resolutions may not be displayed properly. In this case,
press the Auto Scaler button(Automatic Resolution Adjustment Button) on the left side of the
computer and select a higher screen resolution.
When pressing the Auto Scaler button, the Auto Scaler menu appears. Whenever this button is
pressed, the screen resolution changes to 800 x 480 (Default Resolution) > 800 x 600 > 1024 x 600
sequentially.
Example)
Selecting a 800 x 480 pixels resolution
Example)
Selecting a 800 x 600 pixels resolution
The Auto Scaler button provides a function that fits high resolution screen images to the screen
size and does not support all resolutions supported by the graphics chipset. To select a resolution, which is not supported by Auto Scaler, use the Display Properties. ( p.45)
Using the Buttons 30
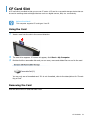
CF Card Slot
A CF card slot is provided so that you can use CF cards. A CF card is a removable storage device that can
be used to exchange data with digital devices such as a digital camera, PDA, etc. conveniently.
Before You Start!
This computer supports CF card types I and II.
Using the Card
1
Insert a card into the slot in the correct direction.
2
3
The card drive appears. If it does not appear, click Start > My Computer.
Double-click the removable disk and you can save, move and delete files on and to the card.
You can only use a formatted card. If it is not formatted, refer to the descriptions for 'Formatting a Card'.
Removing the Card
Hold the end of the CF card and take it out.
CF Card Slot 31
Formatting the Card
You have to format a card first to use it.
If a card is formatted, all data will be deleted. Before formatting a card, please backup your data.
1
2
Select Start > My Computer.
3
Click the Start button to begin formatting the card.
Press a removable disk with the Stylus Pen for more than 3 seconds and select Format from
the pop-up menu.
To use a CF card on both a computer and another digital device (such as a digital camera), we
recommend formatting the memory card in the digital device. When formatting the memory card
in the computer, you may have to format the memory card for the other digital device again to
use the memory card with that device.
CF Card Slot 32
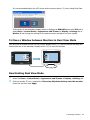
Connecting a Monitor
Using an external display device is useful when you are giving a presentation or watching a movie through
your TV.
Connecting a Monitor
Open the Monitor OUT port cover by pulling the groove of the cover and connecting a monitor.
Viewing on a Monitor
1
2
Press the Menu button.
Press the LCD/CRT item once to display screen images on the LCD screen.
When pressing the item twice, you can view screen images on both the LCD and CRT screens
simultaneously.
LCD: Computer Screen
CRT: External Monitor Screen
Outputting to CRT only is not supported.
Connecting a Monitor 33
Dual View
Dual View is a function that enables you to view a computer screen over two display devices.
The Menu button does not support Dual View mode. You have to use the 'Display Properties' of
Windows to use Dual View.
When using Dual View, use a USB mouse.
Using a mouse to move between screens is convenient. You cannot move between screens with
the Stylus Pen.
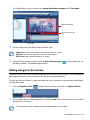
Using Dual View to View an Extended Screen
Check if an external display device has been properly connected and configure Dual View.
1
2
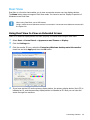
3
Select Start > Control Panel > Appearance and Themes > Display.
4
If you have set the LCD as the primary display device, the primary display device (the LCD) is
indicated as '1', and the secondary display device is indicated as '2'. Now you can view the
screen through two monitors.
Click the Settings tab.
Click the monitor '2' icon, select the 'Extend my Windows desktop onto this monitor'
check box and click Apply and then the OK button.
Connecting a Monitor 34
It is recommended setting the LCD screen as the primary device ('1') when using Dual View.
If the screen of the secondary display device is displayed at 640x480 pixels with 256 colors,
select Start > Control Panel > Appearance and Themes > Display > Settings tab >
Monitor 2 and change the settings to the desired screen resolution and color quality.
To Move a Window between Monitors in Dual View Mode
Click and hold a window title bar on the primary display device ('1') with the mouse and drag the
window title bar to the secondary display device ('2') to move the window.
Deactivating Dual View Mode
1
2
Select the Start > Control Panel > Appearance and Themes > Display > Settings tab.
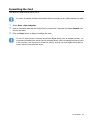
Click the monitor '2' icon, unselect the 'Extend my Windows desktop onto this monitor'
check box and then click Apply.
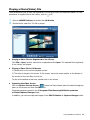
Connecting a Monitor 35
Chapter 3. Using Microsoft Windows XP
About Microsoft Windows XP
37
Get Going with Tablet PC
Tablet PC Tutorials
Reinstalling Windows XP
37
38
38
The Windows XP Screen Layout
39
Desktop
Understanding the Start Menu
Understanding a Window
39
40
41
Control Panel
Opening the Control Panel
User Account
Changing the Resolution and Colors
42
42
43
45
About Microsoft Windows XP
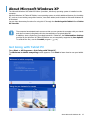
The Microsoft Windows XP Tablet PC Edition (hereafter, Windows) operating system is installed on this
computer.
Microsoft Windows XP Tablet PC Edition is an operating system to which additional features for the tablet
PC, such as a hand-writing recognition function, have been added, and is based on Microsoft Windows XP
Professional.
You can learn elementary functions for using this PC through the Get Going with Tablet PC and Tablet
PC Tutorials.
The computer has adopted touch screens so that you can operate the computer with your hands
and does not accord completely with the characteristics of a typical tablet PC.
In addition, since a Stylus Pen is provided instead of a Tablet Pen, the Tablet and Pen Settings
provided by the Windows XP Tablet PC Edition are not completely supported by Pen Options.
To calibrate the Pen, use the Touchkit program. ( p.21)
Get Going with Tablet PC
Select Start > All Programs > Get Going with Tablet PC.
The Welcome to tablet computing screen appears. Click Start to learn how to use your tablet
PC.
About Microsoft Windows XP 37
Tablet PC Tutorials
You can tour elementary functions of your tablet PC and learn how to hand-write on the Writing Pad
through the Tablet PC Tour.
Tablet PC Tutorials only supports the 1024x768 pixels resolution.
Before running the Tutorials, select the Start > Control Panel > Appearance and Themes
> Display > Settings tab and change the screen resolution to 1024x768 pixels.
Select Start > All Programs > Tablet PC > Tablet PC Tutorials.
The Tablet PC Tour screen appears. Click Next to learn how to perform 'Note Writing', 'Entering
texts with the Tablet PC Input Panel', etc.
Reinstalling Windows XP
If you cannot start up Windows due to damage to the system or errors frequently occur, you can
reinstall Windows using the System Recovery Media (DVD). ( p.121)
You can use the system recovery media by connecting the external USB ODD to the system.
About Microsoft Windows XP 38
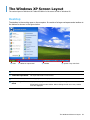
The Windows XP Screen Layout
The screen layout of Windows XP Tablet PC Edition is the same as that of Windows XP.
Desktop
The desktop is the working area on the computer. It consists of a large workspace and a taskbar at
the bottom as shown in the figure below.
z Start
x Tablet PC Input Panel
c Taskbar
v System Tray with Clock
z Start
Opens the Start menu.
x Tablet PC Input Panel
The Input Pad used to enter letters.
c Taskbar
Running programs are displayed here.
v System Tray with
Displays some program icons that are currently running.
Infrequently used icons are hidden. When clicking the left arrow icon, hidden
icons are displayed.
Clock
The Windows XP Screen Layout 39
Understanding the Start Menu
The Start menu includes everything that is required to start Windows. From the Start menu it is possible to run a program, open a file, assign system users with Control Panel, receive support by clicking Help and Support, and search desired items from the computer or Internet by clicking Search.
My Computer
Control Panel
Frequently used
programs
Help and Support
All Programs
Start Button
My Computer
Displays the contents of the hard disk, the CD-ROM drive, the network
drive(s), and floppy disks. It can also be used to search and open files and
folders.
Control Panel
Enables users to configure settings on the computer.
Help and
Support
Provides on-line help, information on Windows and troubleshooting.
Search
Enables users to search for information in files or the Internet.
Run
Run programs or documents.
The Windows XP Screen Layout 40
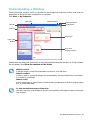
Understanding a Window
The My Computer window, which is a window for the computer's hard drive, will be used as an example here to show the basic composition of a window.
Click Start > My Computer.
Menu Bar
Title Bar
Minimize Button
Maximize Button
Close Button
Tool Bar
Folder Icon
Quick Task
Window
Drive Icon
(Storage Device)
Double-click the hard drive (local disk) to view internal folders and files stored in it. If the contents
do not appear, click Show the contents of this folder.
What is a drive?
A storage device in which files and folders are saved in, and read from.
What is a folder?
A folder is used to group and manage files systematically, and may include files in sub-folders.
It is similar to a bookshelf.
What is a file?
A file is a document or various kinds of material that is generated as a result of program operation. It is also called data.
To view the entire structure of the drive
Click the Folder icon in the taskbar to view the entire structure. Click again to return to the Quick
Task Window.
The Windows XP Screen Layout 41
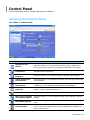
Control Panel
In the Control Panel, tools to configure Windows are collected.
Opening the Control Panel
Select Start > Control Panel.
Icon
Name
Function
Appearance and
Themes
Used to change the appearance of Windows.
Using this function, you can change the Desktop, apply a theme and a
screen saver to the computer, and change the Start menu and Taskbar.
Network and Internet
Connections
Using this function, you can configure the network settings or configure
and add Internet connections.
Add or Remove
Programs
Using this function, you can add or remove a program from Windows.
Sound, Speech and
Audio Devices
Using this function, you can adjust the volume, select a sound scheme, and
set up speakers.
Performance and
Maintenance
Using this function, you can set Windows performance options.
In addition, you can manage the hard disk drive and hardware.
Printers and Other
Hardware
Using this function, you can add or configure a printer, mouse, keyboard,
scanner, camera, or gaming device, etc.
User Accounts
Using this function, you can add or set a Windows XP user account.
Date, Time, Language
and Regional Options
Using this function, you can configure the date, time, language, regional
settings.
Accessibility Options
Using this function, you can select options for weak-eyed and disabled persons.
Security Center
Using this function, you can check the current security status to protect the
user's computer and configure the security settings for the firewall, virus
anti-virus program, etc.
Control Panel 42
User Account
Windows XP allows each user to use a computer with his user account. The procedures to add a
user account and switch between user accounts are described below.
Adding a User Account
1
2
Select Start > Control Panel.
3
4
Click the Tablet PC Input Panel icon, enter a name and then click the Next button.
Double-click User Accounts and click Create a New account.
Select an account type, click Create Account, and then check the newly created account in
the user account screen.
If you cannot see the bottom of the screen, press and drag the scroll bar of the window with
the Stylus Pen.
5
To change the user account information, click an account to be changed.
You can change the account name, password, type and picture.
Control Panel 43
Deleting a User Account
1
2
Select Start > Control Panel > User Accounts.
Click a user account to be deleted and click Delete Account.
You cannot delete the current login user account.
Switching Users
1
2
Select Start > Log Off.
3
Click a user account to login to the Start screen.
Click Switch User.
Login with a new user account.
Control Panel 44
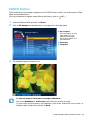
Changing the Resolution and Colors
The resolution means the number of pixels displayed on the screen. When setting the resolution
higher, items on the Desktop become smaller and more items can be displayed on the screen. The
higher the color quality, the more colors are displayed on the screen.
1
2
Select Start > Control Panel > Appearance and Themes > Display.
Click Settings and change the Screen Resolution and Color Quality and then click OK.
You can check your graphics chipset.
To set the color quality, select a color
quality in the Color quality field.
To set the resolution, slide the resolution slide bar to a
desired resolution in the Screen resolution field.
• If 1024x768 or a higher resolution is selected, the entire screen is not displayed on the LCD
screen. In this case, you have to move the mouse pointer up, down, left or right to view the
hidden part of the screen image.
• If the 800x480 resolution is not available
When selecting the 800x600 or 1024x600 resolution by pressing the Auto Scaler button, the
800x480 resolution may not appear in the Display Properties window. In this case, press the
Auto Scaler button and select the 800x480 resolution.
About the 1024X768 Pixels Resolution
The 1024x768 pixels resolution is also fitted to the screen size. You can select the 1024X768
pixels resolution by selecting the Start > Control Panel > Appearance and Themes > Display > Setting tab.
Control Panel 45
Chapter 4. Using the Network
Connecting Through a Wired LAN
47
Connecting Through a Wireless LAN
49
Connecting to an Access Point (AP)
Connecting to computer-to-computer networks
(peer-to-peer or ad hoc)
Wireless Network Setup
Using the Wireless LAN Setup Program
Using Samsung Network Manager
Setting Up a Network
Using the network after moving location
Sharing Internet Access
Network Status Diagnosis
50
51
54
55
55
58
58
61
Using Bluetooth Devices
62
Bluetooth Software Setup
Using Bluetooth
63
65
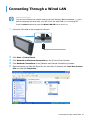
Connecting Through a Wired LAN
Before You Start!
You can also configure the network settings using the Samsung Network Manager. (
p.55)
Before configuring the Wired LAN, you have to turn the Wired LAN on, if it is turned off.
Press the Menu button and press the Wired LAN ON item to turn it on.
1
Connect a LAN cable to the computer’s LAN port.
2
3
4
5
Click Start > Control Panel.
Click Network and Internet Connections in the [Control Panel] window.
Click Network Connections in the [Network and Internet Connections] window.
Right-click(press and hold the Stylus Pen for more than 3 seconds) the Local Area Connection icon and click Properties.
Connecting Through a Wired LAN 47
6
On the General tab, select “Internet Protocol(TCP/IP)” and click Properties.
z
x
7
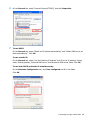
To use DHCP:
On the General tab, select “Obtain an IP address automatically” and “Obtain DNS server address automatically”. Click OK.
To use a static IP:
On the General tab, select “Use the following IP address” and fill in the IP address, Subnet
mask, Default gateway, Preferred DNS server, and Alternative DNS server fields. Click OK.
To use both DHCP and static IP simultaneously:
On the Alternate Configuration tab, click User configured and fill in the fields.
Click OK.
Connecting Through a Wired LAN 48
Connecting Through a Wireless LAN (Optional)
A wireless network (Wireless LAN) environment is a network environment that enables communication between multiple computers at home or a small-size office through wireless LAN devices.
Using the wireless network connections between the systems, you can use normal network functions
such as sharing of files, folders and printers. When a computer-to computer network has been established, a computer that is not connected to the Internet can share the Internet by accessing another computer connected to the Internet. For details, see “Sharing Internet Access” on page 58.
A wireless LAN card is optional. The model of the wireless LAN card is determined by the relevant
product.
To view the installed wireless LAN card, click Start > Control Panel > Performance and Maintenance > System > Hardware tab > Device Manager.
The wireless LAN connection settings will be described on the basis of the Windows XP Service
Pack 2 installed computer.
It is recommended using the default settings provided by Windows XP for the wireless LAN settings for Windows XP installed computers.
To setup using the software supplied by the wireless LAN card manufacturer, refer to "Wireless
Network Setup Using the Wireless LAN Setup Program" (p54).
To use the Wireless LAN, you have to turn the Wireless LAN on first, if it is turned off.
Press the Menu button and press the Wireless LAN ON item to turn it on. If the Wireless LAN
is turned on, the Wireless LAN LED ( ) is lit.
Wireless network connections can be classified into two categories.
1) Access Point (AP)
You can connect to an AP to use the network. This is possible only in an environment equipped with
an AP. For details, see “Connecting to an Access Point (AP)” on page 50.
What is an Access Point (AP)?
An AP is a network device that bridges wired and wireless LANs, and corresponds to a wireless
hub in a wired network. You can connect multiple wireless LAN installed computers to an AP.
2) Computer-to-computer (ad hoc)
This is also called a peer-to-peer network.
In computer-to-computer wireless networks, you can wirelessly connect 2 or more computers that
have wireless LAN modules. For details, see “Connecting to computer-to-computer networks (peerto-peer or ad hoc)” on page 51.
Connecting Through a Wireless LAN (Optional) 49
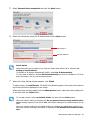
Connecting to an Access Point (AP)
This section describes how to connect to an AP. You can use the network when you are connected
to an AP.
For more detailed information such as the network key (encryption key), ask your network administrator.
1
Right-click(press and hold the Stylus Pen for more than 3 seconds) on the Wireless Network
Connections (
) icon on the taskbar, and select View Available Wireless Networks.
2
Select an AP (E.g. Test) to connect to and click Connect.
If there is a configured network key for the AP to connect to, the Enter Network Key window
appears. Enter the Network Key in the window and then click the Connect button.
When a network key is not defined for a selected AP, click on Link to display the warning message box. Then click Connect again in the box.
Now when Connected in AP is displayed, and you can access the network.
Checking the connection status
Move the mouse pointer over the Wireless Network Connection (
the connection status is displayed.
) icon on the taskbar, and
Connecting Through a Wireless LAN (Optional) 50
Connecting to computer-to-computer networks (peer-to-peer or ad hoc)
In computer-to-computer wireless networks, you can wirelessly connect 2 or more computers that
have wireless LAN modules. Using this method, a computer that is not connected to the Internet
can share the Internet by accessing another computer connected to the Internet. (Refer to "Sharing
Internet Access" on page 58.)
You can connect by completing the following steps:
•
•
Step 1. Set up a computer-to-computer network on a computer.
Step 2. Connect to the configured computer from other computers.
Step 1. Setting up a computer-to-computer network
1
Right-click(press and hold the Stylus Pen for more than 3 seconds) on the Wireless Network
Connection (
) icon on the taskbar, and select View Available Wireless Networks.
2
Click Change the order of Preferred Networks.
3
4
On the Wireless Network tab, click Advanced.
5
In the Wireless Networks tab, click Add.
Clear 'Automatically connect to non-default network' check box, if it is selected. Select 'Computer-to-computer (ad hoc) networks only', and click Close.
Connecting Through a Wireless LAN (Optional) 51
6
Enter the network name (e.g. samsung), and unselect 'The key is provided for me automatically'. Enter the encryption key in the Network key field, and click OK.
To prevent a network connection from an unauthorized user, it would be better to configure a
network key (encryption key). A network key consists of 5 ~ 13 alphanumeric characters (e.g.
magic), or of 10 ~ 26 hexadecimal numbers (a hexadecimal number is represented by numbers
'0' to '9' or letters 'a' to 'f').
7
Check that the configured network name (e.g. samsung) is in the ’Preferred networks’ item,
and click OK.
Now your wireless network setup has been completed.
Connecting Through a Wireless LAN (Optional) 52
Step 2. Connecting to the configured computer
1
Right-click(press and hold the Stylus Pen for more than 3 seconds) on the Wireless Network
Connection (
) icon on the taskbar, and select View Available Wireless Networks.
2
Select the wireless network name (e.g. samsung) specified in ”Connecting to computer-to-computer networks (peer-to-peer or ad hoc)” on page 51, and click Connect.
3
Enter a cryptographic key in the network key box and click Connect.
If the network key is not configured in ”Connecting to computer-to-computer networks (peer-topeer or ad hoc)” on page 51, just click Connect, without any keystrokes.
When connected to the wireless network, the system displays Connected in the selected network of the Network Connection window.
Checking the connection status
Move the mouse pointer over the Wireless Network Connection (
the connection status is displayed.
) icon on the taskbar, and
Connecting Through a Wireless LAN (Optional) 53
Wireless Network Setup Using the Wireless LAN Setup Program
The procedures to connect to an access point using a wireless LAN configuration program are described below. Since the wireless LAN configuration program is included on the System Software
Media, the user has to install the program.
Before You Start!
To use the system software media, the external USB ODD must be connected to the computer.
The following descriptions presuppose that the external ODD is connected.
1
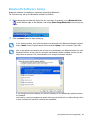
Insert the System Software Media into the CD drive and install the wireless LAN configuration program (ACU: Atheros Client Utility).
Select System Software Media > User Installation > Wireless LAN Driver ReadMe,
click ReadMe and install the program according to the instructions.
2
Right-click( press and hold the Stylus Pen for more than 3 seconds) on the wireless LAN configuration program (
) on the taskbar and select Open Atheros Client Utility.
Alternatively, click Start > All Programs > Atheros Client Utility > Atheros Client Utility.
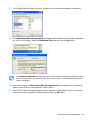
3
4
In the Profile Management tab, click Scan to search for available wireless networks.
5
Enter a profile name to be used for the connection and select the security settings of the AP to
be connected to in the Security tab.
Select the name of an access point (AP) to connect to from the network name (SSID) and then
click Activate.
The network authentication, encryption type and password of an access point are configured
through the access point management program. For the security information, check the security
settings of an access point or ask your wireless network administrator.
Refer to the following when setting a WEP key.
• Data encryption (WEP): The IEEE 802.11 WEP (Wired Equivalent Privacy) standard
defines two levels of encryption, a 64-bit key (this is sometimes represented by 40bits) and a
128-bit key.
When connecting to an Atheros access point, you can use the 152-bit key (32 hexadecimal
digits or 16 ASCII characters).
• Key index: Select the current encryption key index used by the access point from between
1 to 4.
• Using an encryption key: Enter 5 (for 64-bit) or 13 (for 128-bit) alphanumeric characters
(represented by 0-9, a-z, or A-Z).
6
Click OK and then OK again in the Profile Management window.
If the profile is created, the profile appears in the list in the Profile Management tab and the
connection is established using the profile.
Connecting Through a Wireless LAN (Optional) 54
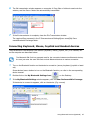
Using Samsung Network Manager
Samsung Network Manager is a program that has been developed to enable users to use the network easily.
Samsung Network Manager provides the following features.
•
•
You can easily set up the network and printer settings.
You can immediately use the network without defining new network settings again
after moving locations.
By setting the network settings (IP address, printer settings, etc.) for each location, you can immediately access the network without following network setting procedures each time regardless of your location.
•
You can easily share Internet Access.
You can share your Internet connection by setting up a computer with 2 LAN interfaces (wired
and wireless, or 2 wired LAN) as the sharing server. Then, you can access the Internet on a
sharing client by connecting to the sharing server.
•
You can diagnose the network status.
You can diagnose the network status when the network is not properly connected.
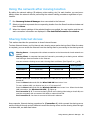
Setting Up a Network
This section describes the procedures to connect to the Internet by setting up a network. The setting
up procedures include the procedures to add a printer to the network.
1
To use a wired LAN, connect the LAN cable to the LAN port and turn the wired LAN on, if it is
turned off.
Press the Menu button and click the Wired LAN ON item to turn it on.
To use a wireless LAN, you have to turn it on, if it is turned off.
Press the Menu button and click the Wireless LAN ON item to turn it on. When the wireless
LAN is turned on, the Wireless LAN LED ( ) lights up.
2
Run Samsung Network Manager.
Select Start > All Programs > Samsung > Samsung Network Manager > Samsung
Network Manager or double click the Samsung Network Manager(
) icon on the
Desktop.
3
4
Click the Add button.
Select a network location icon and enter the name of the location (e.g. Home). Click the Next
button.
Using Samsung Network Manager 55
5
Select Internet direct connection and click the Next button.
6
Select the LAN device, setup the IP address and click the Next button.
Select Device
Setup IP Address
Select Device
Select a device to be connected to the Internet. Select either Wired LAN or Wireless LAN.
Setting up the IP Address
To allocate an IP address automatically (DHCP), select Get IP Automatically.
To use a static IP address, unselect Get IP Automatically and enter an IP address. For IP address information, ask your network administrator.
7
When the Printer Setting window appears, click Finish.
To add a printer, click Add Printer. The Add Printer Wizard appears. Set up the printer according to the instructions displayed on the screen.
When the printer has been added, click the Show printer button, select the newly added printer and then click the Finish button.
To not add a printer, select No Default Printer and then click the Finish button.
When the network setting is complete, the ’Do you want to move to newly added location
now?’ message appears. If you select ’Yes’, the network settings for the added location are applied.
When the network settings for the added location are applied, the added place and the corresponding network connection information is displayed in The detailed Information for window.
Using Samsung Network Manager 56
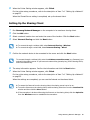
When the network setting is complete, an icon for the added location is created within the
Saved Locations window. Now you can use the Internet or add a new network location.
Menu
Current Place
Information
Saved Locations
Wireless LAN AP Connection Procedures
To use a wireless LAN, first connect to a wireless LAN AP and then you can access the network
even when moving location. Or moving location and then you can access the network even when
connecting to a wireless LAN AP
z Right-click over the Wireless Network Connection (
) icon on the Taskbar and click
View Available Wireless Networks.
x Click Search AP from the Wireless menu to search for wireless LAN APs.
Select an available wireless network (e.g. SAMSUNG) and click the Connect button. For information on available wireless LAN APs, ask your network administrator.
Available AP
Connect
c The network key (security key) input window appears.
- If a network key has been set for the wireless LAN AP, enter the network key and click the
Connect button. For the network key information, ask your network administrator.
- If no network key has been set for the wireless LAN AP, click the Connect button without
entering the network key.
v When the computer is connected to the wireless LAN AP, the Connected message will appear on the Wireless Network icon in the Taskbar.
Using Samsung Network Manager 57
Using the network after moving location
By setting the network settings (IP address, printer setting, etc.) for each location, you can immediately access the network without performing the network setting procedures regardless of your
location.
1
2
Run Samsung Network Manager when connected to the Internet.
3
When the network settings of the selected location are applied, the new location and the network connection information are displayed in The detailed Information for window.
Select an icon that represents the corresponding location from the Saved Locations window and
then click Move.
Sharing Internet Access
This section describes the procedures to share Internet Access.
To share Internet Access, you first have to set a sharing server and a sharing client. When the setup
is complete, you can access the Internet from the sharing client by connecting to the sharing server.
Sharing Server : A computer with a direct connection to the internet and a local network connection.
Sharing Client : A computer that uses the Internet by connecting to a sharing server without
itself having a direct connection to the Internet.
You can connect a sharing server and a sharing client as follows. (See Figure 5 on
Sharing Server
p.56)
Sharing Client
External Internet Device
Client Device
Connection 1
Wired LAN
Wireless LAN
Wireless LAN
Connection 2
Wireless LAN
Wired LAN
Wired LAN
Connection 3
Wired LAN
Wired LAN
Wired LAN
To use a wired LAN, connect the LAN cable to the LAN port and turn the wired LAN on, if it is
turned off.
Press the Menu button and click the Wired LAN ON item to turn it on.
To use a wireless LAN, you have to turn it on, if it is turned off.
Press the Menu button and click the Wireless LAN ON item to turn it on. When the wireless
LAN is turned on, the Wireless LAN LED ( ) lights up.
For Connection 2, 3: To connect a sharing server and a sharing client using a wired LAN, connect the computers with a crossover LAN cable or network hub first.
For Connection 3: You have to connect a LAN card in advance.
As an example, Internet sharing procedures for [Connection 1], which connect the sharing server
and the Internet through a wired LAN and connect the sharing server and the sharing client through
a wireless LAN, are described below.
Using Samsung Network Manager 58
Setting Up a Sharing Server
1
2
3
4
5
Run Samsung Network Manager on the computer to be used as the sharing server.
Click the Add button.
Select a network location icon and enter the name of the location (e.g. Home). Click the Next
button.
Select Internet direct Connection for sharing and click the Next button.
Set up the network device to be connected to the external Internet. Determine whether to use
a firewall and select a network device to be connected to the external Internet (e.g. Wired LAN).
Set the IP address and then click the Next button.
Determine whether
to use a firewall
Select a device
Set an IP address
• To protect against external intrusion attempts, using a firewall is recommended.
• For more information on selecting a device and setting the IP address, refer to the description of item 6 of "Setting Up a Network" on page 55.
6
Select a network device to connect to the sharing client (e.g. wireless LAN) and click the Next
button.
To Share Internet Access through a Wireless LAN
• In the Select Device field, select Wireless.
• In the Wireless Connection Name (e.g. Samsung) field, enter the network name.
• To use the network key (security key), select the "Use Password ,,," option and enter a
network key. Remember the network key because you have to re-enter the key on the sharing client to connect to the sharing server.
7
The setup information is displayed. Confirm the settings and click the Next button.
Using Samsung Network Manager 59
8
When the Printer Setting window appears, click Finish.
For the printer setup procedures, refer to the description of item 7 of "Setting Up a Network"
on page 55
When the Shared Server setting is completed, set up the shared client.
Setting Up the Sharing Client
1
2
3
4
Run Samsung Network Manager on the computer to be used as a sharing client.
Click the Add button.
Select a network location icon and enter the name of the location. Click the Next button.
Select Internet Sharing and click the Next button.
• To connect through a wireless LAN, select Internet Sharing - Wireless.
• To connect through a wired LAN, select Internet Sharing - Wired.
5
Confirm the network device to be connected to the server and click the Next button.
To connect through a wireless LAN, enter the wireless connection name (e.g. Samsung) you
entered in the sharing server. If you have set a network key (security key) for the sharing server,
enter the network key.
6
7
The setup information appears. Confirm the information and click the Next button.
When the Printer Setting window appears, click Finish.
For the printer setup procedures, refer to the description of item 7 of "Setting Up a Network"
on page 55
When the settings are completed, you can use the Internet on the shared client.
• To access the Internet from the sharing client, the sharing server has to be on.
• To use the Internet on the sharing client, select a sharing client icon from the Location List
window and then click the Move button.
• If the connection is broken while using the Internet on the sharing client, click the Ap Active
from the Wireless menu to reestablish the connection.
Using Samsung Network Manager 60
Network Status Diagnosis
You can diagnose the network status when the network is not properly connected.
1
2
3
Run Samsung Network Manager.
4
When the diagnosis is complete, out of order devices are marked by the exclamation mark icon.
For detailed device status, read the description in the lower part of the window.
Select Auto Diagnosis from the Manage menu.
The Network Connections figure window appears. Click the Start button to start the network
diagnosis.
Reconnect and set up the device according to the diagnosis result.
Using Samsung Network Manager 61
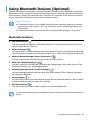
Using Bluetooth Devices (Optional)
Bluetooth is a wireless communication technology that allows access to devices nearby such as a computer,
mobile phone, printer, keyboard or mouse without a cable connection. Bluetooth enables file transmissions,
Internet access, a private area network function, and access to a keyboard, mouse and printer between
devices supporting the Bluetooth function without a cable connection.
Before You Start!
• The Bluetooth function is only available between devices supporting Bluetooth (computers,
mobile phones, PDAs, printers, etc.), and the function may be restricted depending on the
device profile.
• The Bluetooth function is optional and may not be supported depending on your model.
Bluetooth Functions
•
File Transmission (
)
You can exchange files between 2 Bluetooth devices. You can exchange files with other computers, mobile phones, PDAs, etc.
•
Network Access (
)
You can connect to another computer with the Bluetooth function as you access a wireless LAN
in Ad-Hoc mode or connect to the Internet through an AP or Internet Connecting Sharing Server.
•
Network Access through a Phone Connection (
)
You can connect to the Internet through a Bluetooth mobile phone.
•
Data Sync (Synchronization) (
)
You can synchronize the PIMS data (Outlook E-mail address data) with mobile phones, PDAs,
notebook computers, etc. supporting Bluetooth.
•
Electronic Business Card (Vcard) Exchange (
)
You can exchange electronic business cards with mobile phones, PDAs, notebook computers,
etc. supporting Bluetooth.
•
Sound Output (
)
You can listen to audio from the computer through another Bluetooth device or listen to audio
of another Bluetooth device through the computer.
•
HID Connections (
)
You can connect a keyboard, mouse, joystick, etc. supporting Bluetooth.
For more information about using the Bluetooth function, refer to the online help of the Bluetooth
Device.
Using Bluetooth Devices (Optional) 62
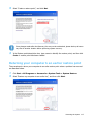
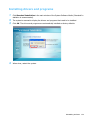
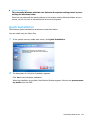
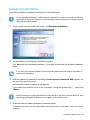
Bluetooth Software Setup
Bluetooth software is installed on computers supporting Bluetooth.
For first time use, set up the Bluetooth software as follows.
1
Right-click(press and hold the Stylus Pen for more than 3 seconds) on the Bluetooth icon
( ) at the bottom right of the taskbar, and select Start Using Bluetooth from the pop-up
menu.
2
Click the Next button to start setting up.
In the setting up steps, enter a device name to be displayed in the Bluetooth Manager program.
Enter a Name in the Computer Name field and select Laptop for the Computer Type field.
Also, a step appears for selecting the services to be provided by your Bluetooth device for other
Bluetooth devices. At this point, the program automatically detects available services and displays them as selected. It is recommended not to change the default selection.
If you change the service settings, the drivers necessary for the additionally selected services
are installed.
At this point, a warning message may appear informing you that there is no Microsoft logo. Since
it does not affect the operation, continue the installation.
Using Bluetooth Devices (Optional) 63
3
If the driver installation is complete, the next step proceeds which searches for nearby Bluetooth devices. Since you do not have to search while setting up, click the Skip button and finish
the settings.
4
When the settings are complete, the Bluetooth icon menu of the notification area changes as
shown in the figure.
Using Bluetooth Devices (Optional) 64
Using Bluetooth
Describes how to exchange files between computers supporting Bluetooth and how to use other
Bluetooth devices.
Bluetooth Help
Bluetooth Help provides detailed procedures on using Bluetooth functions.
Double-click on My Bluetooth Settings on the Desktop and click Help > Bluetooth Help from
the top menu.
Select Start > Help and Support > Networking and the Web > Networking > Wireless networking
> Bluetooth devices (wireless) to view Windows Help.
Exchanging Files between Bluetooth computers
The procedures to exchange files and folders between Bluetooth computers are described below.
1
On the computer which is sending a file (hereafter Computer A), right-click(press and hold the
Stylus Pen for more than 3 seconds) the Bluetooth icon ( ) on the taskbar and select Quick
Connection > File Transmission > Search for Device.
Using Bluetooth Devices (Optional) 65
2
In the Select Device window, click on a computer to be connected (hereafter Computer B).
3
If the Bluetooth PIN code requested notification window appears on the bottom right taskbar, click on the window, enter the Bluetooth PIN code and click the OK button.
The Bluetooth PIN Code is a password used for the connection between two Bluetooth devices, the user just enter the same PIN Code (E.g. same numbers) on both Bluetooth devices to
make a connection.
4
After a short while, the Bluetooth PIN Code required dialog box appears on Computer B,
enter the code that you have entered in Step 3 above.
5
If the FTP File Access Privilege Request window appears on Computer B, click on the window.
If the Select Access Permission window appears, click the OK button.
Using Bluetooth Devices (Optional) 66
6
The file transmission window appears on computer A. Drag files or folders to send onto the
window, and the files or folders are automatically transmitted.
7
If the file transmission is complete, close the File Transmission window.
The received files are saved in the C:\Documents and Settings\[user name]\My Documents\Bluetooth Exchange folder.
Connecting Keyboard, Mouse, Joystick and Headset devices
The procedures to use Bluetooth HID devices (keyboard, mouse, joystick, etc.) or a headset, etc.
on the computer are described below.
The Bluetooth PIN Code is a password used for the connection between two Bluetooth devices,
the user just enter the same PIN Code on both Bluetooth devices to make a connection.
1
Turn on the Bluetooth function on the device to connect to (mouse, keyboard, joystick or headset).
Some devices have a button to turn on the Bluetooth function, so refer to the corresponding
device manual.
2
Double-click on the My Bluetooth Settings icon (
3
If the My Bluetooth Settings window appears, click on View Devices within Coverage.
) on the Desktop.
If the device to connect to appears, click on the device. (E.g. mouse)
Using Bluetooth Devices (Optional) 67
If the device does not appear, click the View Devices within Coverage. If the device has not
appeared yet, since this menu changes to Search Devices within Coverage, click the Search
Devices within Coverage to show the device.
4
If the Bluetooth PIN Code input window appears, enter a PIN code referring to the manual
of the corresponding device. The PIN code for an HID device is generally printed in the manual
of the corresponding device.
5
If you enter the PIN code, you can immediately use the device.
A Bluetooth keyboard and mouse work only in Windows. They will not work in MS-DOS mode or
in Hibernation mode.
Stopping a Bluetooth device
Right-click(press and hold the Stylus Pen for more than 3 seconds) the Bluetooth icon (
the taskbar and select Stop the Bluetooth Device.
) on
To use a Bluetooth device after stopping it, select Start Bluetooth device as above.
Use Instructions
•
•
•
•
•
Bluetooth devices must be within a 3m (10 ft.) distance.
For a better communications environment, use the devices in an open space where no wall or
obstacle exists.
For a telephone connection, data synchronization, electronics business card exchange, fax
transmission/reception, sound related functions, and serial port function, you can connect with
only one Bluetooth device.
Using the network connection or file transmission function, multiple Bluetooth devices can be
connected. However, since connecting with multiple devices may slow down the data rate or
make the connection unstable, connecting with one device at a time is recommended.
The Bluetooth function of a Bluetooth PDA, mobile phone, mouse or keyboard may be turned
off. To use them in connection with a Samsung computer supporting Bluetooth, you must
check if the Bluetooth function of the device to connect to is turned on.
For the procedures on turning on the Bluetooth function of a device, refer to the manual of the
device.
•
The services provided by Bluetooth devices may vary depending on their capability. For the
services provided by Bluetooth devices, refer to the manual of the device.
Using Bluetooth Devices (Optional) 68
Chapter 5. Using Applications
Introducing Programs
70
Using Samsung Update Plus
73
Program Launcher
75
Program Launcher Screen Layout
Using Program Launcher
Using AVStation premium
Start and Screen Layout
MUSIC Station
PHOTO Station
MOVIE Station
Using AVStation NOW / AVStation Viewer
Start / Exit AVStation NOW
Start / Exit AVStation Viewer
Screen Layout
MUSIC Station
PHOTO Station
MOVIE Station
75
76
77
77
78
81
84
88
88
89
90
90
92
93
CyberLink PowerDVD
95
Voice Recorder
97
Recording
97
Introducing Programs
Using software supplied with the Samsung computer, you can easily use functions and troubleshoot problems. For detailed information, refer to the help of the corresponding software.
Before You Start!
Every software program may not be provided or the version may differ depending on your computer model.
Multi Media Functions
•
Program Launcher
The Program Launcher categorizes frequently used programs, folders, web sites so that you can
easily manage and access them. This program is designed for the small LCD size so that you can
easily use this program with the Stylus Pen or your fingers. ( p.75)
•
AVStation premium (
)
AVStation premium is an integrated multimedia program that enables users to enjoy better music, photographs, video, movies, etc. quality all with a single program. ( p.77)
•
AVStation Viewer
AVStation Viewer is a program that enables you to easily run AVStation premium in full screen.
( p.88)
•
AVStation NOW
AVStation NOW is an integrated multimedia program that enables users to enjoy photographs,
video, DVDs, music, etc. all with a single program and without booting Windows even when the
computer is turned off. ( p.88)
Introducing Programs 70
•
CyberLink PowerDVD (
)
CyberLink PowerDVD is a DVD player program supplied with the external USB ODD. To use this
program, you have to install this program manually. ( p.95)
•
Voice Recorder (
)
Voice Recorder is a program which enables users to make and play recordings. (
p.97)
Management Functions
•
Samsung Update Plus (
)
Samsung Update Plus is software that examines and updates the Samsung software and drivers
installed on your Samsung computer to the most recent versions. ( p.73)
•
Samsung Network Manager (
)
Samsung Network Manager is a program that has been developed to enable users to configure
the network and internet sharing settings easily. You can configure the network settings by the
location and you can configure the Internet sharing settings and perform a network diagnosis.
( p.55)
•
Samsung Battery Manager (
)
Samsung Battery Manager is a power management program that provides easy-to-use power
management and power saving settings so that the battery usage time can be extended. (
p.110)
•
Samsung Display Manager
Samsung Display Manager is a program that displays the setting status of some buttons on the
screen.
Example) The icon that appears when pressing the Menu button and clicking Brightness Up.
•
Touchkit (
)
Touchkit is a program used to calibrate the Stylus Pen when the pointer position is not correct.
p.21
Introducing Programs 71
Troubleshooting Functions
•
Magic Doctor (
)
Magic Doctor is troubleshooting software provided by Samsung Computer. A user can diagnose
system problems via one-click or by selecting diagnostic items. ( p.114)
•
Norton AntiVirus (
)
Norton AntiVirus is a program that examines a computer and deals with found viruses. Since
viruses may damage the files and data on your computer, it is recommended to examine your
system frequently with the Norton AntiVirus program. ( p.115)
Introducing Programs 72
Using Samsung Update Plus
Samsung Update Plus is software that examines and updates Samsung software and drivers installed on
your Samsung computer to the latest version. To use Samsung Update Plus, your computer has to be connected to the Internet.
To Update Samsung Software and Drivers
1
Select Start > All Programs > Samsung > Samsung Update Plus > Samsung Update
Plus.
If this is the first time you are running the program, a window will appear asking you if you agree
to the agreement in the window.
Click Agree to use this software.
2
Click Search for and Install Updates and click the Search for New Updates button.
3
If there are available software or driver updates for your computer, the available updates will
be listed. Select the required updates from the list and click Install Update to start the update.
(The update list on the screen may differ depending on the computer model.)
Updates that must be installed separately.
If you select Install as an update item that must be installed separately, a message appears
informing you of this. Follow the instruction message to correctly install it.
Using Samsung Update Plus 73
Automatic update items display
By default, your computer is configured to automatically search for updates. If there is a new
update available, this is notified in the notification area. Click the balloon help icon in the notification area. Here you will be able to find the latest available updates.
To change the automatic update settings, click the Configuration button in Figure 2 and
change the settings.
Samsung Update Plus does not provide updates for additionally installed software and device
drivers.
Using Samsung Update Plus 74
Program Launcher
The Program Launcher categorizes frequently used programs, folders, web sites so that you can easily
manage and access them.
This program is designed for the small LCD size so that you can easily use this program with the Stylus Pen
or your fingers.
Program Launcher Screen Layout
To launch the Program Launcher, click Start > All Programs > Microsoft Touch Pack for Tablet PC > Program Launcher.
The Program Launcher is launched.
Battery Charge Status
When clicking the icon, the Power Option Properties window appears.
Wireless LAN Status
When clicking the icon, the Network Connections window appears.
View Taskbar
Clock
Minimize
Close
Shortcut Icon
Category
Program Launcher 75
Using Program Launcher
For example, the procedures to launch the Calculator on the Program Launcher are described below.
1
2
Run the Program Launcher.
Select More Programs > Calculator. The Calculator program is launched.
• For more detailed usage
For more detailed usage, click Program Launcher Help from the Tools category.
• Program Launcher User Setting functions
You can add a category and add or delete a shortcut icon.
Click on Customize Launcher from the Tools category to change the settings.
Program Launcher 76
Using AVStation premium
AVStation premium is an integrated multimedia program that enables users to enjoy music, photographs, video, movies, etc. all with a single program.
Before You Start!
• AVStation premium is optional and may not be provided depending on the model.
• The screens used in this manual may differ from actual screens according to the program
version.
• TV Station is only available for systems supporting the TV function.
• To play an audio CD or DVD, you have to connect the external USB ODD to the computer.
The following descriptions presuppose that the external ODD is connected.
• For detailed usage, refer to the program help.
Start and Screen Layout
To launch the program, select Start > All Programs > Samsung > AVStation premium >
AVStation premium.
Alternatively double-click the AVStation premium icon (
) on the Desktop.
v
x
z
c
z Station Bar
x Menu Bar
c Library
v Exit
Press the Exit button to exit
the program.
MUSIC
You can play a music file or an audio CD.
PHOTO
You can view or edit a photograph (image), and also view the photographs through a SlideShow.
MOVIE
You can play a video (movie) file or a DVD/VCD title.
Using AVStation premium 77
MUSIC Station
Launch AVStation premium and click MUSIC on the Station Bar.
z
x
c
b
n
v
m
,
z MUSIC Menu Bar
x Station Bar
c MUSIC Library
v Register a File
b Playlist
n Playlist Control Buttons
m Play Control Buttons
, Volume Control
. Play Options
/ EDS Setting Button
.
/
What is EDS (Enhanced Digital Sound)?
EDS (Enhanced Digital Sound) is a sound quality enhancement technology developed by Samsung Electronics. You can listen to clearer sound if you enable the EDS function when playing
music or video on AVStation premium.
Playing an Audio CD
The procedures to play an audio CD are described below.
1
2
Launch AVStation premium and insert an audio CD into the CD drive.
In the Audio CD window, select Play Audio CD using Samsung AVStation and click the
OK button.
Using AVStation premium 78
3
The tracks on the audio CD are displayed in the Playlist and the first track is automatically
played.
If an audio CD is already in the CD drive, double-click the album title in the Audio CD folder
of the Library and add the tracks to the Playlist. The tracks added to the Playlist are played.
Playing a Music File
If a music file is registered to the MUSIC Library, you can easily play the music file.
For the procedures to register tracks to the Library, refer to (
1
2
p.80).
Move to MUSIC Station and double-click on All Music.
Double-click a music file. The file is added to the playlist and played.
Using AVStation premium 79
• Play a Track not registered to the Library
Click File > Open, select a music file to be played and click Open. The selected track is registered to the Library and played.
• Creating My Playlist
My Playlist is a personal album with which you can collect, manage and play your favorite music files. For the procedures to create My Playlist, refer to the descriptions of MUSIC Station
in Help.
Adding Music Files to the Library
MUSIC Library is a library holding music files used by MUSIC Station. The procedures to add music
files saved on the computer to the Library are described below.
You can add files, folders or search and add files. As an example, the procedures to add a folder are
described below.
1
Click on the Register a File (
2
Select a folder which included music files and click the OK button. The music files in the folder
are added to the Library.
) button below the Library and click on Add by Folders.
The tracks used in AVStation are automatically added to the Library.
Using AVStation premium 80
PHOTO Station
Launch AVStation premium and click PHOTO on the Station Bar.
z
x
c
,
b n
m
z PHOTO Menu Bar
x Station Bar
c PHOTO Library
v Register a File
b Image Viewer Tab
n Image Editor Tab
m Move to a Higher-Level Folder
, Preview/Zoom-in
v
Viewing an Image
The procedures to view images registered to the PHOTO Library one by one and through a SlideShow are described below.
For the procedures to register image files to the Library, refer to (
1
2
p.83).
Move to PHOTO Station and double-click on All Images.
Click on a folder which includes images, and the images in the folder are displayed in the Image
Viewer window.
Image Viewer Window
Image
Using AVStation premium 81
3
•
Double-click on an image. The selected image is zoomed in on.
Viewing an Image not registered to the Library
Click File > Open, select an image file to view and click Open.
The selected image file is registered to the Library and displayed in the Image Viewer window.
•
Viewing an Image in Full Screen or through a SlideShow.
Click the Full Screen (
window.
) button or SlideShow (
) button below the Image Viewer
To return to the Image Viewer window, double-click on the screen.
•
Watching a SlideShow while Listening to Music
To watch a SlideShow while listening to music, play music from MUSIC Station and run SlideShow.
•
Setting an Image as the Background.
Click the Set as Background (
) button below the Image Viewer window. The selected
image is set as the Desktop background.
Editing an Image
You can change the shape of an image, edit an image or apply special effects to an image. The image editor functions are described below.
1
Select an image to edit in the Image Viewer window, and select the Image Editor tab. The
Image Editor screen appears.
Using AVStation premium 82
The Image Editor screen consists of an Image Workspace window and 3 Tool tabs.
Image Workspace
Zoom In / Zoom Out
Tool Tabs
2
Edit the image using the Shape, Edit and Effect tools.
Shape tool: Change the shape of an image through cut, resize.
Edit tool: Draw a line, add some clip art or enter letters.
Effect tool: Apply various effects to an image.
3
When finishing editing an image, click the Save Edited Image (
age Editor window. The edited image is saved.
) button below the Im-
Adding Images to the Library
The PHOTO Library is a library holding image files to be used by PHOTO Station. The procedures to
add image files saved on the computer to the Library are described below.
You can add files, add folders or search and add files. As an example, the procedures to add folders
are described below.
1
Click the Register a File (
2
Select a folder which includes image files and click the OK button. The image files in the folder
are added to the Library.
) button below the Library and click on Add by Folders.
The image files used in AVStation are automatically added to the Library.
Using AVStation premium 83
MOVIE Station
Launch AVStation premium and click on MOVIE on the Station Bar.
z
x
c
v
b
n
z MOVIE Menu Bar
x Station Bar
c MOVIE Library
v Register a File
b Video Play window
n Play Control Buttons
m Volume Control
, EDS Setting Button (
. EDI Setting Button
/ Capture Button
p.78)
m
,.
/
What is EDI (Enhanced Digital Image)?
EDI (Enhanced Digital Image) is a visual quality enhancement technology developed by Samsung Electronics. You can view a clearer and sharper picture by enabling the EDI function when
watching TV or playing a video on AVStation premium.
However, some TV tuners and graphics cards are not supported by EDI.
For information on EDS (Enhanced Digital Sound), refer to
p.78.
Using AVStation premium 84
Playing a DVD
The procedures to play a DVD title are described below.
To play a DVD title, DVD playing software (e.g. CyberLink PowerDVD) must be installed. Install
the DVD playing software first.
1
2
3
Launch AVStation premium and insert a DVD title into the DVD drive.
In the 'What do you want Windows to do?' window, select Play DVD Video using Samsung AVStation and click the OK button.
The DVD title is played.
If a DVD title is already in the DVD drive, double-click the DVD title in the DVD / VCD folder
of the Library. The DVD title is played.
Using AVStation premium 85
Playing a Movie(Video) File
The procedures to play a video file registered to the MOVIE Library are described below. For the
procedures to register files to the Library, refer to
p.87.
1
2
•
Move to MOVIE Station and double-click All Movies.
Double-click a video file. The file is played.
Playing a Video File not Registered to the Library
Click File > Open, select a video file to be played and click Open. The selected file is registered
to the Library and played.
•
Playing a Video File in Full Screen
1) Double-click on the current playback screen.
2) The video is played in full screen. In full screen, move the mouse pointer to the bottom of
the screen to show the Play Control bar.
To play at the default screen size, double-click on the screen.
•
Capturing the Video Screen
Click on Capture Current Screen (
) below the Play window when the desired image appears on the screen and click the OK button.
Captured images are saved in the C:\Program Files\Samsung\AVStation premium
x.x\Data\Captured Images folder.
In addition, you can view captured images in the PHOTO Station > Captured Images folder.
Using AVStation premium 86
Adding Videos to the Library
The MOVIE Library is a library holding video files to be used by MOVIE Station. The procedures to
add video files saved on the computer to the Library are described below.
You can add files, add folders or search and add files. As an example, the procedures to add folders
are described below.
1
Click the Register a File (
2
Select a folder which includes video files and click the OK button. The video files in the folder
are added to the Library.
) button below the Library and click Add by Folders.
The video files used in AVStation are automatically added to the Library.
Using AVStation premium 87
Using AVStation NOW / AVStation Viewer
Using these programs, you can play music, photographs, video and movies in full screen. You can enjoy
multimedia using AVStation NOW when the computer is off and using AVStation Viewer when the computer
is on.
Before You Start!
• AVStation NOW and AVStation Viewer are optional and may not be provided depending on
the model.
• AVStation NOW Restrictions
You can only use AVStation NOW when the computer is turned off.
Using AVStation NOW, you can play files registered to the AVStation premium Library, saved
to My Computer, and saved on the multi-card slot. (For the procedures to register files to the
Library, refer to
p.80, p.83 and p.87.)
If you define a login password for a Windows user account or if the folder is protected, you
cannot play the files in the folder on AVStation NOW.
• AVStation Viewer Restrictions
Using AVStation Viewer, you can only play files registered to the AVStation premium Library.
p.80, p.83 and p.87.)
(For the procedures to register files to the Library, refer to
• Since the screen layout and usage of the two programs are similar, the manual describes the
functions and screens on the basis of AVStation NOW.
• The screen figures may differ from actual ones depending on the program version.
• TV Station is only available for systems supporting the TV function.
• In AVStation NOW, the Auto Scaler function is not available.
Start / Exit AVStation NOW
Starting
To turn the computer on, slide the Power switch/AVS NOW switch to the left (
for more than 0.1 seconds.
) and hold it
If the HOLD switch on the left side of the computer is slid upwards all buttons of the computer
are locked and do not work. If AVStation NOW is not launched, check the position of the HOLD
switch.
Using AVStation NOW / AVStation Viewer 88
Exiting
Move the mouse pointer to the top screen and click the Exit (
) button.
Alternatively, slide and hold the Power switch/AVS NOW switch to the right for more than 0.1
seconds.
Start / Exit AVStation Viewer
Starting
Select Start > All Programs > Samsung > AVStation premium > AVStation Viewer from
Windows.
Exiting
Move the mouse pointer to the top of the screen and click the Exit (
) button.
Using AVStation NOW / AVStation Viewer 89
Screen Layout
MUSIC
You can play a music file or audio CD.
PHOTO
You can view a photograph or image file one by one or in a SlideShow.
MOVIE
You can play a video, DVD or VCD title.
Settings
You can set the Music, Photo and Movie settings.
To move to the start screen while using the program
Click over the top left in the current screen. Then the
icon appears. If you click this icon,
you can move to the start screen.
MUSIC Station
The procedures to play a music file or an audio CD are described below.
Playing a Music File
The procedures to play a music file registered to the MUSIC Library are described below. (For the
procedures to register files, refer to p.80.)
1
Launch AVStation NOW and click on Music.
Using AVStation NOW / AVStation Viewer 90
2
Click on All Music and double-click a file in the right pane. The music file is played.
z My Computer
z
x
v
c
This only appears in AVStation NOW. You can
manually find and play
files on My Computer or a
removable disk.
x All Music
c Playlist Window
v Music File
Playing an Audio CD
1
2
3
Launch AVStation NOW and insert an audio CD into the CD drive.
In the AVStation NOW start screen, click on Music.
Double-click the Audio CD in the left pane and double-click on an album or music file in the
right pane. The selected music file is played.
Using AVStation NOW / AVStation Viewer 91
PHOTO Station
The procedures to view images registered to the PHOTO Library one by one and through a SlideShow are described below.
(For the procedures to register image files to the Library, refer to
1
2
p.83.)
Launch AVStation NOW and click on Photo.
Click on All Images and double-click on an image file in the right pane.
z My Computer
z
x
c
This only appears in AVStation NOW. You can
manually find and play
files on My Computer or a
removable disk.
x All Images
c Image File
3
The selected image is zoomed in on.
To view an image in Full Sreen or through a SlideShow.
Click on the SlideShow or Full Screen button below the zoomed in image.
To return to the previous status in the SlideShow or Full Screen, double-click on the screen. In
AVStation NOW, double-click and click on Back.
Using AVStation NOW / AVStation Viewer 92
MOVIE Station
The procedures to play a video (movie) file or DVD/VCD title are described below.
Playing a Movie File
The procedures to play a video file registered to the MOVIE Library are described below. (Refer to
p.87.)
1
2
Launch AVStation NOW and click the Movie.
Click on All Movies and double-click a movie file in the right pane.
The movie file is played.
z My Computer
z
x
c
This only appears in AVStation NOW. You can
manually find and play
files on My Computer or a
removable disk.
x All movies
c movie File
Showing the Play Control window
When clicking on the screen once, the Play Control window appears at the bottom.
Using AVStation NOW / AVStation Viewer 93
Playing a DVD
1
2
3
Launch AVStation NOW and insert a DVD title into the DVD drive.
In the AVStation NOW start screen, click on Movie.
Click on DVD/VCD and double-click on the DVD title. The DVD title is played.
Using AVStation NOW / AVStation Viewer 94
CyberLink PowerDVD
CyberLink PowerDVD is a DVD player program.
Before You Start!
CyberLink PowerDVD is supplied with the external USB ODD. So, it is optional and is not supplied
with some models.
In addition, to use this program, you have to install the program manually using the external
USB ODD.
1
2
Insert a DVD title into the DVD drive.
Select Play DVD Video Using PowerDVD and click OK.
z
x
After a moment, the DVD title is played.
3
If the DVD title is not played automatically, click Start > All Programs > CyberLink PowerDVD > CyberLink PowerDVD.
4
Click the Play button in the CyberLink PowerDVD play control panel.
z
x
z PLAY
x SETTINGS
CyberLink PowerDVD 95
For more detailed usage
For more detailed usage, click Start > All Programs > CyberLink PowerDVD > PowerDVD
Help.
DVD Region Code
A DVD title has a region code according to the international specifications so that it can be played
only in that specific region. DVD titles with a region code will only play on a DVD drive with the
same region code.
A DVD drive is sold with an empty region code and the region code is set when the user inserts
a DVD title into the drive for the first time. Whenever DVD title is inserted with a region code
that is different from that of the DVD drive, the region code of the DVD drive is automatically
changed to the region code of the DVD title. However, the region code changes of a DVD drive
is limited to 5 changes. After that, the region code is permanently fixed to the last region code.
CyberLink PowerDVD 96
Voice Recorder
Voice Recorder is a program which enables users to make recordings.
Recording
1
2
Click Start > All Programs > Samsung > Voice Recorder > Voice Recorder.
Start recording near the built-in microphone at the front of the computer by clicking the Record
(
) button.
HELP
OPEN
PLAY
3
STOP
RECORD
SETTING
If the recording is complete, click the Stop (
name and click Save.
) button. In the Save window, enter the file
A recording file is saved to the 'C:\My Recorded Files\' folder.
4
To play a recorded file, click the Play (
) button.
To play a previously recorded file, click the Open (
) and select the file.
Voice Recorder 97
When unable to make a recording using the built-in microphone
Click the SETTING button and check if the Recording device is set to SoundMAX HD Audio
I, and the Input Source is set to Microphone. If the setting is not done properly, you will not
be able to make a proper recording.
For more detailed usage, click the Help button.
Voice Recorder 98
Chapter 6. Settings
Using System Setup
Starting System Setup
System Setup Screen
100
100
101
Setting a Booting Password
103
Changing the Booting Priority
106
Using the Battery
107
Removing and Attaching Battery
Charging the Battery
Monitoring the Battery Charge
Extending the Battery Usage Time
107
108
108
110
Using System Setup
The System Setup (BIOS) program enables you to configure your computer hardware.
Before You Start!
• Use the BIOS setup to define a booting password, change the booting priority or add a new
device.
Since incorrect settings may cause your system to malfunction or crash, take care when setting up the BIOS.
• The functions of the BIOS setup are subject to change for product function enhancement
purposes.
• To adjust the LCD brightness, press the +, - Volume Control buttons while holding down
the Menu button.
Starting System Setup
1
2
Slide the Power switch to the right to turn the computer on.
The booting screen (SAMSUNG logo) appears. Press the Menu button (
) on the right side
of the computer. When an external keyboard is connected, press the F2 key.
Using System Setup 100
3
After a moment, the BIOS setup screen appears. The items of the BIOS setup may differ depending on the product.
z
c
x
z Setup Menu
x Setup Items
c Help
Descriptions of
the selected item
are displayed.
System Setup Screen
Menu
Function
Main
Changes the basic system.
Advanced
Configures the advanced functions on your computer.
Security
Enables the security functions, including passwords.
Boot
Specifies the order of the boot devices and configures them.
Exit
Specifies how to exit System Setup.
Using System Setup 101
System Setup Buttons(Keys)
The following Buttons(keys) are used in System Setup.
When an external keyboard is connected, you can use the keys enclosed in parenthesis. For example, you can press the F1 key instead of the Auto Scaler button.
Setup Key
Button
Function
Auto Scaler Button (F1)
When pressing the Auto Scaler button, Help appears.
When pressing the button again, Help disappears.
Up & Down Keys ( ↑ , ↓ )
Move the Joystick up or down to move the cursor up and
down.
Left & Right Keys ( ← , → )
Move the Joystick left or right to move the cursor left or
right.
u3(F5) / u1(F6)
Press the u3 (F5) / u1 (F6) u3 and u1 buttons to change
the value of an item.
u4(Esc)
Press the u4 button to return to a higher-level menu or to
move to the Exit menu.
Enter
Selects an item or opens a submenu.
(F9)
To initialize the setup settings, press the F9 key on the
external keyboard.
If an external keyboard is not connected, select Exit >
Load Setup Default from the setup menu.
(F10)
To save the changes press the F10 key on the external
keyboard.
If an external keyboard is not connected, select Exit >
Exit Saving Changes from the setup menu.
Exiting the System Setup
z Move to Exit menu > Exit Saving Changes using the Joystick and press Enter.
x Select Yes and press the Enter button. The System Setup is closed and Windows is started.
Using System Setup 102
Setting a Booting Password
When setting a password, you have to enter the password to start up the computer or enter the System
Setup. By configuring a supervisor password, you can restrict system access to authorized users only and
protect data and files saved on the computer.
Before You Start!
Do not lose or forget your password. If you have forgotten your password, contact a Samsung
service center. In this case, a service fee will be charged.
For the setup buttons, refer to the description of 'System Setup Buttons(Keys)'.
p.102
Setting a Supervisor Password
A Supervisor Password is required to turn the computer on or to start System Setup.
When setting a Supervisor Password, users other than a supervisor cannot use the computer.
1
2
Select the Security menu in the System Setup.
In the Set Supervisor Password item, press <Enter>.
Setting a Booting Password 103
3
On the screen, the password setting buttons are described.
You can set a password by entering numbers between 1 and 4 with the Joystick.
Since the u2 button is used as Delete (BackSpace) and the u4 button is used as Cancel (Esc),
enter the password using the Joystick.
Up: 1
Left: 4
Right: 2
Next: 3
Enter a password, press <Enter>, re-enter the password for confirmation, and press <Enter>
again.
4
When a message confirming the password configuration appears in the [Setup Notice] window, press <Enter>.
The supervisor password has been set. The supervisor password is required to turn the computer on or to enter System Setup.
Setting a User Password
Users can start the system with their user password, but cannot enter the System Setup.
Before configuring a user password, a supervisor password must have been configured. Deactivating
the supervisor password also deactivates the user password.
However, please note that deactivating a user password does not deactivate the supervisor password.
In the Set User Password item, press <Enter> and complete the procedures of Step 3 of Setting
a Supervisor Password.
Activating the Booting Password
Before activating the booting password, a supervisor password must have been configured.
Set the Password on boot option to Enabled. From now on, system booting will not proceed without the password.
Setting a Booting Password 104
Deactivating the Password
1
On the password to be deactivated, press <Enter>. For example, to deactivate a supervisor
password in the Set Supervisor Password item, press<Enter>.
2
In the Enter Current Password item, enter the currently configured password and press
<Enter>.
3
4
5
Leave the Enter New Password item field empty, and press <Enter>.
Leave the Confirm New Password field empty, and press <Enter>.
In the [Setup Notice] window, press <Enter>.
The password is deactivated.
Setting a Booting Password 105
Changing the Booting Priority
The default booting priority of your computer is the CD-ROM, a removable device and the hard disk drive
in this order. You can change the booting priority using the Boot menu of the System Setup.
1
2
Select the Boot menu in System Setup.
3
4
Use the u1 or u3 button to move a booting device up.
Press <Enter> on the Boot Device Priority item.
Exit from the Boot menu by pressing the u4 button and move to the Exit > Exit Saving
Changes menu using the Joystick and press <Enter> to save the settings and exit the setup.
Changing the Booting Priority 106
Using the Battery
Please refer to the following instructions when running the computer on battery power, without connecting
the AC power. A Lithium-Ion smart battery is supplied with this computer.
Before You Start!
Carefully read and follow the precautions printed on the battery before using the battery.
Precautions
• Use only charges specified in the user's guide.
• Never heat the battery pack, put it near or in a fire or use at a temperature higher than
60°C, as this may cause fire.
• Never cause a short circuit between the battery pack terminals or disassemble the battery
pack.
• Carefully read and follow the precautions printed on the battery and the safety instructions in
the user's guide before using the battery.
• Please refer to the system operation environment of this manual and operate and the store
the battery at room temperature. (
p.138)
Removing and Attaching Battery
1
2
Shutdown the system and place the computer upside down on a flat surface.
Pull the two battery latches outwards (
), then remove the battery.
Battery latch
3
To install the battery again, slide the battery into the system. The battery latches move inwards
and fix the battery automatically.
Check if the battery latch has been moved inwards.
Using the Battery 107
Charging the Battery
1
Attach the battery and connect the AC adapter to the DC-in jack of the computer.
The battery will then be charged.
2
When a charge is complete, the Charge LED turns green.
Status
Charge LED
Charging
Amber
Charging complete
Green
AC adapter not connected
Off
Monitoring the Battery Charge
You can view the battery charge status by completing the following procedures.
Viewing through the Menu button
Press the Menu button and press on Battery.
Viewing through the Control Panel
Select the Start > Control Panel > Performance and Maintenance > Power Options >
Power Meter tab.
z
z Power Supply Status
x Remaining Battery Charge
x
Using the Battery 108
Viewing on the battery
Separate the battery and press the PUSH button on the battery. The remaining battery charge (%)
will be displayed.
Battery Warning
• You will hear an alarm when the remaining battery charge reaches below 10%.
In this case, connect the AC adapter or turn off the computer and install a fully charged battery.
• When the remaining battery charge is under 3%, the computer automatically saves the current work and turns off. This may differ according to the settings in the Control Panel >
Performance and Maintenance > Power Options > Alarms tab.
Using the Battery
A battery is an expendable supply, so when using it for a long time, the capacity/battery life is shortened. If the battery life is reduced to under half of the initial time, we recommend that you purchase
a new battery.
For long periods of not using the battery, keep the battery after discharging it. This extends the battery life time.
Using the Battery 109
Extending the Battery Usage Time
Using Samsung Battery Manager
Battery Manager is a power management program that enables using battery power efficiently. You
can select an optimized power mode according to your requirements.
Click Start > All Programs > Samsung > Samsung Battery Manager > Samsung Battery
Manager.
Change Power
Mode
Power Saving Effects
You can only change the
detailed configuration in
Custom Mode.
Maximum Battery Saving Mode
This mode is appropriate for conditions which require the maximum battery usage time. This may
degrade the performance of the system.
Normal Mode
This mode is appropriate for normal conditions. Both system performance and battery usage time
are optimized.
Maximum Performance Mode
This mode is appropriate for conditions that require maximum system performance. Therefore, the
battery usage time may be reduced in this mode.
Custom Mode
In this mode, a user can configure a detailed configuration to save the battery usage time. You can
adjust the LCD brightness, the system standby time, the screen color quality, and the graphic mode
values.
Using the Battery 110
Power Saving Effect
This shows the relative battery usage time for each power mode. The more effective the power
saving, the longer the graph will appear.
When Running a Game or Multimedia Application
A game or multimedia application may not work smoothly in Maximum Battery Saving Mode. Using this is recommended when the AC adapter is connected or in Normal or higher modes.
Samsung Battery Manager Power Modes
• Since the Maximum Battery Saving Mode of the Samsung Battery Manager controls the system operating speed to extend the battery usage time, the performance of the system may
be degraded.
• When changing the power settings in Custom Mode in the Samsung Battery Manager, the
settings of the Power Options Properties window are changed accordingly.
• To use Normal Mode in Samsung Battery Manager after reinstalling Windows XP, you have to
install the Samsung Battery Manager using the system software media.
Turning Off Unnecessary Devices
Turning off unnecessary devices extends the battery usage time.
1
Select the Start > Control Panel > Performance and Maintenance > System > Hardware tab and click on Device Manager.
2
Right-click(press and hold the Stylus Pen for more than 3 seconds) a device you are not using,
and select Disable.
Example) Wireless LAN, Bluetooth, etc.
Using the Battery 111
Battery Calibration
When charging/discharging the battery repeatedly for only a short time, the battery usage time may
be reduced by the difference between the actual battery charge and the remaining charge display.
In this case, the actual battery charge and the remaining charge display will be the same by discharging the battery completely using the Battery Calibration function, and then recharging it again.
1
2
Disconnect the AC power adapter after turning off the system.
3
Using the arrow keys, select Smart Battery Calibration in the Boot menu and press Enter.
4
Highlight Yes in the [Battery Calibration Confirmation] window and press Enter.
Restart your computer and press the Menu button when the SAMSUNG logo appears, to start
System Setup.
The Battery Calibration function is activated and the battery is discharged by force. To stop the
operation press the u4 (Esc) button.
This operation requires 3~5 hours depending on the battery capacity and the remaining battery
charge.
Using the Battery 112
Chapter 7. Troubleshooting / Appendix
Using Magic Doctor
114
Using Norton AntiVirus
115
Restoring the System
116
Creating a Restore Point
Returning your computer to an earlier restore point
Undoing the last restoration
Reinstalling Software
Running the system software Media
Installing drivers and programs
Reinstalling Windows XP
Running the System Recovery Media
Quick Installation
Standard Installation
Installing Windows When You Cannot Run Windows
Questions and Answers
Windows Related
Display Related
Sound Related
Wired LAN Related
Wireless LAN Related
Games and Programs Related
Security Center
Other
116
117
118
119
119
120
121
121
122
123
125
126
126
126
128
129
130
134
135
137
Specifications
138
Glossary
140
Index
143
Important Safety Information
144
Regulatory Compliance Statements
145
WEEE Symbol Information
151
Contact SAMSUNG WORLD WIDE
152
Using Magic Doctor
Magic Doctor is troubleshooting software provided by Samsung Computer. A user can diagnose system
problems via one-click or by selecting diagnostic items.
1
2
Click Start > All Programs > Samsung > Magic Doctor > Magic Doctor.
Click on an icon at the top of the screen.
– OneClick Diagnosis: You can diagnose problems affecting the system connections and
system operations via one-click.
– User Diagnosis: You can select the necessary diagnostic items and diagnose system
problems.
– System Recovery: Launches the Restoring the System function of Windows XP.
3
p.116
When the system diagnosis is completed, the diagnostic result appears.
If problems are found, click the Cure button to correct the problem. Magic Doctor starts the
correction operations.
Using Magic Doctor 114
Using Norton AntiVirus
The Norton AntiVirus software is provided as the virus inspection program.
Before You Start!
• When you first run Norton AntiVirus, the Norton AntiVirus Configuration window pops up. If
you complete the configuration and your computer is connected to a network, you can
download and install the latest updates via the network. When the live update is done, virus
scanning starts automatically. To stop scanning, click on Stop.
• If you didn’t configure the Norton AntiVirus program, a security alert icon (
) appears in
the notification area on the right of the task bar. This indicates that the current security state
of your computer is not secure. Configure the virus-scanning program to make the security
alert icon disappear.
1
2
Select Start > All Programs > Norton AntiVirus > Norton AntiVirus 200x.
Click Scan Virus, select drive to inspect, and click Scan.
Vaccines for the latest viruses can be downloaded by connecting to Symantec’s homepage.
3
If a virus is detected, select Automatic in Norton AntiVirus, and click Next to delete the virus.
Using Norton AntiVirus 115
Restoring the System
This description is only for models running Window XP.
The System Restore function allows you to restore your computer to an earlier copy (called restore
point), and restores the settings if a problem occurs.The System Restore function is provided by
Windows XP to enable the resolution of various problems without reinstalling Windows XP completely.
You can use System Restore in the following cases.
•
•
•
•
The system files are deleted or damaged by mistake.
The system is unstable or a problem occurs in a device driver.
A problem occurs after changing system files such as the registry.
A problem occurs after installing a new program.
Creating a Restore Point
Restore points are created at predetermined times and at times of significant system events such as
when a program or a driver is installed. You can also decide when to create your own restore points.
There has to more than 200MB of free space on the hard disk drive. If the disk space is insufficient, a saved restore point might be deleted.
You are recommended to create a restore point when you have purchased a new computer and
before installing new programs or device drivers. Before creating a restore point, check that the
computer is operating properly.
The procedures to create your own restore point are described below.
1
Click Start > All Programs > Accessories > System Tools > System Restore.
Restoring the System 116
2
Select "Create a restore point", and click Next.
Since changes made after the Recovery Point may not be maintained, please back-up all necessary files to another location before performing system recovery.
3
In the Restore point description box, type a name to identify the restore point, and than click
Create. A restore point has been created.
Returning your computer to an earlier restore point
The procedures to return your computer to an earlier restore point when a problem has occurred
are described below.
1
2
Click Start > All Programs > Accessories > System Tools > System Restore.
Select "Restore my computer to an earlier time", and then click Next.
Restoring the System 117
3
Select the desired restore date from the calendar restoration and select the desired restore
point from the list, and then click Next.
The date of the restore point is displayed in bold font.
4
Confirm the selected restore point and click Next. System Restore shuts down Windows, and
starts the restoration processes.
5
After the restoration is complete, Windows restarts. In the [System Restore completed] dialog,
click OK.Your computer has been restored to the selected restore point.
Undoing the last restoration
The procedures to undo a restoration are described below.
1
2
3
Click Start > All Programs > Accessories > System Tools > System Restore.
4
After the undo restoration is complete, Windows restarts. In the [Undo the last restoration completed] dialog, click OK.Your computer has been restored to the point prior to the last restoration.
Select "Undo my last restoration", and then click Next.
Confirm the restoration information to undo, and than click Next. System Restore shuts down
Windows and starts undoing the restoration.
Restoring the System 118
Reinstalling Software
If you have reinstalled the Windows operating system, or the system and program do not operate
properly, you can re-install the driver and program using the system software Media.
Before You Start!
If a program has a problem, it is recommended to remove the program using Add or Remove
Programs in the Control Panel and to reinstall it using the system software media.
To use the system software media, the external USB ODD must be connected to the computer. The following descriptions presuppose that the external USB ODD is connected.
This computer is optimized for Microsoft Windows XP, therefore drivers for other operating systems are not included on the System Software Media.
Running the system software Media
Insert the system software Media into the external USB ODD. The initial screen appears automatically.
•
•
•
Standard Installation: This displays a list of drivers or programs that are not currently
installed on your computer from the system software Media provided. All necessary
components are installed using the factory defaults.
Minimum Installation: This displays the components (driver, Windows programs, etc) that,
if not installed, may cause problems with the system performance. You can install only required
components.
Custom Installation: You can customize the installation of drivers and programs.
Reinstalling Software 119
Installing drivers and programs
1
Click Standard Installation in the main window of the System Software Media. (Standard Installation is recommended)
2
3
The system is scanned to display the drivers and programs that need to be installed.
4
When done, restart the system.
Click OK. The drivers and programs are automatically installed as factory defaults.
Reinstalling Software 120
Reinstalling Windows XP
If Windows XP is not operating properly due to an error in the system, or if you have replaced the hard
disk drive, you can reinstall Windows XP using the system recovery media.
Before You Start!
• To use the system recovery media, the external USB ODD must be connected to the computer. The following descriptions presuppose that the external ODD is connected.
• There are two Windows installation modes: Standard Installation, which allows users to
change options, and Quick Installation, which allows users to install Windows easily.
• If you cannot run Windows, refer to p.125 to install Windows.
• When Windows does not run or when trying to install Windows using the Standard Installa-
tion of the system recovery media, a USB external keyboard is necessary.
Before turning the computer on, connect the USB keyboard. Then, install Windows.
If you connect the USB keyboard during the installation, the system will not recognize the USB
keyboard.
Reinstalling Windows may delete the data on the hard disk drive such as files, programs, etc. In
order to minimize damage from data loss, please remember to always back up your data. Samsung Electronics is not liable for any data loss.
Running the System Recovery Media
Insert the system recovery media into the external USB ODD. The start screen automatically appears.
•
Standard Installation
You can change the settings for Regional and Language Options, Date and Time,
Computer Name, User Accounts, etc. during the Windows installation.
However, after reinstalling Windows, you have to manually reinstall device drivers and programs
using the system software media.
Reinstalling Windows XP 121
•
Quick Installation
This reinstalls Windows with the user data and the system settings intact by overwriting the Windows folder.
Since the user data and the system settings in the already existing Windows folders are preserved, you do not have to reinstall device drivers and programs.
Quick Installation
The Windows Quick Installation procedures are described below.
You can install using the Stylus Pen.
1
In the system recovery media start screen, click Quick Installation.
2
The description for the Quick Installation appears.
Click Yes to start Windows installation.
When the installation is complete, the Windows Desktop appears. Remove the system recovery media from the ODD.
Reinstalling Windows XP 122
Standard Installation
The Windows Standard Installation procedures are described below.
For the Standard Installation, a USB keyboard is necessary. You have to connect the USB keyboard before turning the computer on. The descriptions assume that you are using an external
USB ODD and USB keyboard.
1
In the system recovery media start screen, click Standard Installation.
2
The description for the Standard Installation appears.
Click Yes to start the Windows installation. The system restarts and the Windows installation
begins.
If you have set a booting password, enter the booting password when booting the system to
continue the installation.
3
After the system has restarted, the message 'Press any key to boot from DVD' appears. Do
not press any key at this time.
After awhile the partition setting screen appears.
To not change the partition, move to the C:Partition 2 using the direction key ( ↓ ) and press
<Enter>.
Partition setting is a function that divides the hard disk drive into one or several partitions. Note
that changing the partition deletes all of the data on the hard disk drive.
4
Select the folder to install the Windows operating system.
To delete the previous version of Windows and install in the current folder, press <L> on the
keyboard.
Reinstalling Windows XP 123
If you press the ESC key to select another folder for the installation, new Windows folders are
created causing a risk of dual booting.
5
After the installation process copies the necessary folders for the Windows installation, restart
the system, and the message "Press any key to boot from DVD" is displayed. You do not
need to enter anything. In a moment, the Windows XP installation screen will appear to proceed
with the installation.
6
7
When the Regional and Language Options window appears, click Next.
When a window that requires your name and organization pops up, enter your name and
the organization and click Next.
A window that requires the computer name and the administrator password appears. Enter the
computer name and the administrator password and click Next.
8
When the Date and Time Settings window appears, click Next. Setup continues and the system restarts.
9
When the system restarts, the message "Press any key to boot from DVD" is displayed. You
do not need to enter anything. In a moment, the Windows XP Desktop appears. When you see
the Windows desktop, this means that the installation process is completed.
10 Remove the system recovery media and install the device drivers and applications from the
system software media. (
p.119)
Reinstalling Windows XP 124
Installing Windows When You Cannot Run Windows
If you cannot run Windows, you have to boot the system with the system recovery media and reinstall Windows.
An external USB ODD and USB keyboard must be connected before starting the installation.
You have to connect the USB keyboard before turning the computer on.
If you connect the USB keyboard during the installation, the system will not recognize the USB
keyboard.
1
2
Insert the system recovery media into the external USB ODD and turn the computer on.
3
After awhile the partition setting screen appears. To install Windows in the selected partition
without change, press <Enter>.
4
5
Select a file system (format). To keep the current file system, press <Enter>.
When the system restarts, the message "Press any key to boot from DVD" is displayed. You
do not need to press anything.
Select the folder to install the Windows operating system.
To delete the previous version of Windows and install in the current folder, press <L> on the
keyboard.
6
The subsequent procedures are the same as those after Step 5 of <Standard Installation>.
( p.124)
Reinstalling Windows XP 125
Questions and Answers
This section provides information on possible problems, solutions and other references for system use.
Windows Related
Q1
The system does not shutdown properly.
A
When the system does not shutdown normally, press and hold the Power button until the system manually shuts off. If the Power-Saving Mode is configured into the Power button, press
and hold for more than 4 seconds to shut the system off. When the system is turned on after
such manual shutdown, Scandisk will run to check errors in the system.
Q2
The system freezes during program operation
A1
There is an error with the program currently being used. Press the <Ctrl>, <Alt>, and <Del>
keys (Windows Security Button) simultaneously and click End Task in the [Windows Task
Manager] window.
A2
There is an error with the Windows OS. Reboot the system by using the Power button.
Display Related
Q1
The LCD screen is too dark or too bright
A
Adjust the LCD brightness. Press the Menu button and click on Brightness UP or Brightness Down.
Alternatively, press the +, - Volume Control button while holding down the Menu button to
adjust the LCD brightness.
Q2
The screen saver disturbs Media Player playing a movie or video clip after the
screen saver is activated while Media Player is playing.
A
Unselect Tools > Options > Player > Allow screen saver during playback in the Media
Player.
Q3
In the following cases, the screen blinks or displays noise for a short time.
Click the Graphics Related tab, Change Resolution, Change Display Device,
Remove the AC Adapter, Restart the System, Change Power Mizer level.
A
This may happen while the video driver is examining the connected device. While busy detecting, any connected display devices may blink or some noise may occur.
In addition, when pressing the Auto Scaler button, the screen may blink or display noise for a
short time while the resolution changes or the Down Scale (resolution zoom out) function operates.
Questions and Answers 126
Q4
When I connect a projector, and change the settings to display the screen image
on both the LCD and the projector by pressing the Menu button, the screen is not
displayed properly.
A
Press the Menu button and press the LCD/CRT twice to select LCD+CRT. If the screen image
or some part of it is not displayed on the screen, this is because the LCD resolution is low or
the current resolution is too wide and cannot be supported by the projector. Press the Auto
Scaler button and change the resolution to 800x600 pixels.
Q5
The shortcut icons are not displayed on the screen.
A
The shortcut icons only appear when both the Magic Keyboard and Samsung Display Manager
programs are installed.
Q6
When I connect an external monitor and select the monitor, no screen image is displayed (Clone Mode).
A
This may happen when the current resolution is inappropriate or Dual View (Extended Mode)
is selected. Try the following methods.
1. When the current resolution is inappropriate
This computer supports the 800x480 WVGA resolution. Since this resolution is lower than that
of the operating system, the above symptom may appear when the external monitor cannot
support this resolution. Change the resolution to 800x600 pixels, press the Menu button and
press the LCD/CRT twice to select LCD+CRT.
2. When Dual View (Extended mode) is selected
When Dual View is selected, the Clone Mode is not supported. In this case, unselect the Dual
View, press the Menu button to select the Clone Mode.
For the procedures to deactivate the Dual View, refer to (
p.35).
Q7
In the Display Properties window, resolution starts from 800x600.
A
Even if the current resolution is 800x480 pixels, it may be represented as 800x600 in the Display Properties. This is because the lowest resolution of the operating system is 800x600 and
is unable to show the 800x480 resolution in the Display Properties window.
Q8
Pressing [Start] displays a [Some items cannot be shown] message.
A
This message appears when all start menu items cannot be displayed in the default resolution
(800x480 pixels). In this case, change the screen resolution to 800x600 pixels or press the
Auto Scaler button to change the resolution.
Q9
The whole screen image is not displayed on the screen.
A
This may happen when a program or game is designed for at least 800x600 pixels. In this case,
press the Auto Scaler button and change the resolution. Whenever the button is pressed, the
screen resolution changes to 800X480 > 800x600 >1024x600 pixels, in this sequence.
Q10 When I press the Auto Scaler button, letters on the screen are blurry.
A
In resolutions provided by Auto Scaler, the letters on the screen may be blurred because these
are not the optimal resolutions of the LCD panel.
In this case, press the Auto Scaler button again and change the screen resolution to 800x480
pixels which is the default resolution of the LCD panel.
Questions and Answers 127
Sound Related
Q1
How to install and uninstall the sound driver
A
To install or uninstall the sound driver from this system, please follow the procedures below.
•
Sound Driver Components
The sound driver consists of the following 3 components. The components are automatically
installed during the installation.
- High Definition Audio - KB888111: Microsoft UAA Bus Driver for High Definition Audio
- SoundMAX: SoundMAX Integrated Digital HD Audio
- WOW XT and TSXT Filter Driver: SRS
•
Uninstalling the Sound Driver
To remove the sound driver due to a problem or for an update, follow the procedures below.
If you do not follow the sequence below, the sound driver may not be removed or the reinstalled driver, or may not work properly.
z Select Start > Control Panel > Add or Remove Programs.
x Remove WOW XT and TSXT Filter Driver first.
c Remove SoundMAX and restart the computer.
•
Reinstalling the Sound Driver
If there is an already installed sound driver, uninstall the driver according to the procedures
above.
The sound driver is included on the System Software Media.
z Connect the external USB ODD and insert the System Software Media into the ODD.
x Select the Sound Driver on either Standard Installation or Custom Installation, then the 3
components of the sound driver are automatically installed.
Q2
How can I use an additional function when making a recording using the microphone?
A
To use an addition function so as to record sound by emphasizing the sound between the two
microphones, configure the settings as follows.
z Click Start > Control Panel > Sound, Speech and Audio Devices > SoundMAX.
x In the Microphone Peripherals, select 'Directional Beam' and click the OK button.
Questions and Answers 128
Wired LAN Related
Q1
The <Wake On LAN> function
A
<Wake On LAN> is a function that activates the system from standby (S3) when a signal (such
as ping or magic packet commands) arrives from the network (wired LAN).
Using the <Wake On LAN> function
z Click on My Network Place> View network connections on the Desktop.
x Right-click(press and hold the Stylus Pen for more than 3 seconds) the Local Area Connection and click Properties.
c Click Configure, and select the Power Management tab. Select 'Allow this device to
bring the computer out of standby', then click OK. Restart the system.
- If the system in standby mode is activated when there is no received signal, use the system
after disabling the <Wake On LAN> function.
- When turning the power off when <Wake On LAN> is disabled, the LAN LED may continue
to be lit up.
- The <Wake On LAN> function operates only when the LAN is ON.
- Connecting a wired LAN while using a wireless LAN may not activate the <Wake On LAN>
function. Set the Wireless LAN to 'Disable' to use the <Wake On LAN> function.
z Click on My Network Place> View network connections on the Desktop.
x Right-click(press and hold the Stylus Pen for more than 3 seconds) over Wireless Network Connection and select Disable.
Q2
When I am connected to a 100Mbps wired LAN and the computer exits standby/
hibernation mode, a message appears informing of a connection to a 10Mbps wired
LAN.
A
When the computer exits standby/hibernate mode, restoring the network takes about 3 seconds. When the network is restored, it operates at 100Mbps.
Q3
To use the network at the maximum data rate, configure the following options.
A
Click Start > Control Panel > Performance and Maintenance > System > Hardware
> Device Manager > Network adapters and Right-click(press and hold the Stylus Pen for
more than 3 seconds) Marvell Yukon88E8036 PCI-E Fast Ethernet Controller and click
Properties > Advanced.
Configure as follows and click the OK button.
z BatteryModeLinkDetection : EnergyDetect™
x BatterySpeedSettings : FullSpeed
Questions and Answers 129
Wireless LAN Related
Q1
The Wireless LAN device is operating properly, but I cannot connect to the Internet
or to another computer.
This is due to an incorrect configuration, or a configuration error. Check the following check lists:
A1
If you are using a computer-to-computer (Ad Hoc) network connection, check that the name
of the configured network (SSID) is correct. The network name (SSID) is case sensitive.
A2
If you are using a network key (encryption key), you have to use the same network keys for
an AP (Access Point) or a computer-to-computer network (Ad Hoc). The network key of the
AP is configured in the AP management program. Ask your network administrator or AP manager for more detailed information.
A3
Check that the device driver is properly installed. If the driver is not properly installed, you will
find a yellow exclamation mark on the network icon by clicking Start > Control Panel > Performance and Maintenance > System > Hardware tab > Device Manager > Network adapters >
Wireless LAN adapter. If there is a yellow exclamation mark, please reinstall the device driver
with the system software Media.
A4
Referring to A2 of Q3, Check that the network bridge configuration is correct.
Q2
The signal strength is excellent, but I cannot connect to the network.
Even if the signal strength is excellent, the network connection may not operate
properly if the TCP/IP properties are not properly configured, or the network key
(encryption key) is incorrect.
A1
Check that the TCP/IP properties are configured properly. When you connect to an AP, click
the Wireless Network Connection icon on the taskbar and select the Support tab. If the IP is
not allocated properly, the IP address will be displayed as follows (e.g. 169.254.xxx.xxx).
If the network does not provide DHCP, you have to specify the correct IP address by asking
your network administrator.
Even if the network provides DHCP, the server may not allocate an IP address to the client
properly, and the client station cannot connect to the network.
A2
Referring to A2 of Q1, check that the network key is correct.
A3
Referring to Q4, check that AP is operating properly.
Q3
I cannot connect to the AP.
Check the Computer Settings
A1
Verify whether the wireless LAN function of the computer is on by doing the following. If the
wireless LAN function is off, turn it on.
- For Windows XP, verify that the wireless network connection has been set to "Enable" in Start
> Control Panel > Network Connections.
- Check if the wireless LAN is turned on.
A2
Verify whether the same network key (encryption key) has been entered in both the AP and
the computer.
The network key is an encryption key for encrypting data transmitted between the AP and the
computer. It is recommended setting the network key manually.
Questions and Answers 130
Check the AP Settings
For the AP settings, refer to the User's Guide provided by the AP manufacturer.
A3
Verify whether the environment is suitable for using a wireless LAN.
The use of a wireless LAN may be restricted according to the environment and distance. Obstacles such as walls or doors affect the use of a wireless LAN. Install the AP in a high and
open space 50cm from the wall and far removed from any other radio signal sources.
A4
Verify whether the AP is operating properly.
- When the AP is not operating normally, turn off the AP and after a short while turn it on again.
- Verify whether the AP's firmware is the most recent version. (Contact the AP manufacturer
or the place where you purchased the AP for details of the AP firmware.)
A5
Verify whether the AP has been properly connected to the network.
Verify whether the network is operating normally by connecting the wired network cable,
which has been connected to the AP, to your computer.
A6
Check the network key settings (encryption key).
When automatic code conversion (a passphrase function) has been selected and data communication is not functioning even with a normal wireless connection, it is recommended entering
the network key (encryption key) manually.
A7
Check the AP settings as follows. (The following is recommended for a standard environment
and thus may differ according to the specific wireless network environment.)
- When several APs are present simultaneously, check the channel setting for each AP. When
different APs are using nearby channels, interference may occur between electronic waves. Set
the APs' channels further apart from each other. (Ex: Ch1, Ch5, Ch9, Ch13)
- When an AP's SSID (Service Set ID) option is set to "Hide", you cannot search for that AP on
the computer. We recommend canceling the "Hide" option for an AP. The SSID is a name for
distinguishing one wireless LAN from another wireless LAN.
- It is recommended using Long Preamble. Preamble is a signal for data transmission synchronization. Short Preamble may be supported by some types of APs but may cause compatibility
problems.
- It is recommended using a static IP.
- Since static channel selection is more reliable than auto channel selection, it is recommended
setting a static channel.
Q4
In the Windows XP 'Available wireless networks' window, the Wireless Network
Connection is displayed as 'Not Available'.
A1
Check if the wireless LAN is turned on.
A2
Check if there is additional program for a wireless LAN connection installed. Windows XP supports wireless LAN connections through the Wireless Zero Configuration (WZC) service. Therefore, an additional program for wireless LAN connection is not required, unless the network
requires a specific program. However, installation of some wireless LAN related programs may
sometimes disable the [View Available Wireless Networks] window supported by WZC service.
Exit the wireless LAN related program then check whether the window is enabled.
A3
Initialize the device driver.
Click Start > Control Panel > Performance and Maintenance > System > Hardware tab > Device Manager > Network adapters, and select the wireless LAN adapter. Right-click the network adaptor and select 'Disable'. Then right-click over the network adaptor and select 'Enable'
after a short wait to check that the device is operating properly.
Questions and Answers 131
A4
Right-click the My computer icon, and select Manage. When the Computer Management window appears, double-click Services and Applications on the left, and then click Services from
the sub menu tree. Select the Standard tab in the right pane, double-click Wireless Zero Configuration and check that Startup Type is configured to Automatic, and the Service status is
Started.
A5
In the case of Windows XP, click Advanced in the [Wireless Network Connection] dialog box
(see "Connecting to an Access Point (AP)" (p50)) and make sure that 'Use Windows to configure my wireless network settings' is selected.
This may happen when a third-party wireless network setup program other than Windows XP
default program is installed. For setting up a wireless network using the Windows XP program,
this option should be selected.
Q5
When connecting to a computer-to-computer (Ad Hoc) network, I cannot connect
to another computer connected to the same computer-to-computer network.
A1
Make sure that the security settings and network name of the computer-to-computer (Ad Hoc)
network is correct.
A2
Check the TCP/IP properties of the computers to be connected through the computer-to-computer (Ad Hoc) network. All of the computers to be connected through a computer-to-computer (Ad Hoc) network should be configured so that their IP addresses are within the same
subnet range.
- If the TCP/IP Settings are configured to DHCP, the address is automatically configured to an
address within the subnet IP range. This will take about 2~3 minutes.
- If the IP address is configured to static IP in TCP/IP properties, select Use the following IP
address in the TCP/IP properties of the wireless adapter, configure IP address:10.0.0.1~10.0.0.254, and Subnet mask: 255.255.0.0, and then try again.
- A fixed IP is recommended for a small-size network.
Q6
When using a computer-to-computer (Ad Hoc) network, sometimes I cannot
search the access point.
A
It may happen occasionally when you are using a computer-to-computer (Ad Hoc) network
connection. Even if you cannot find some access points, the computer-to-computer (Ad Hoc)
network is operating properly. Click Refresh to view the latest search result.
Q7
The network does not operate properly when both the wireless and the wired network connections are simultaneously configured with the same IP address.
A
You cannot use the wireless and the wired network connections using the same IP address
simultaneously. To use either the wireless or the wired network in turn with the same IP address, you have to Disable whichever network device will not be used in the network connection of the Control Panel.
Q8
The wireless LAN does not work properly when there is a device operating on an
adjacent frequency in the vicinity of the product.
A1
Channel interference may occur when a wireless video transceiver or a microwave oven is being used.If you experience channel interference from other equipment, we recommended
changing the channel to connect to the AP. For more information about AP settings, refer to
the User Manual supplied by the AP manufacturer.
Questions and Answers 132
A2
Since IEEE802.11g equipment operates in hybrid mode when there is active IEEE802.11b
equipment, the data rate may be degraded.
Q9
An established wireless LAN connection is disconnected after 2~3 minutes, and the
connection is not recovered.
A1
This may be caused by channel interference. Change the channel of the AP, and reconnect.
A2
This may be caused by selecting the ’Use IEEE 802.1x network authentication’ option when
IEEE 802.1x authentication is not available.
Check the properties of the AP in the wireless network settings. If the ’Use IEEE 802.1x authentication in this network’ option is selected, deselect the option on the Authentication tab.
For more detailed information about authentication server, ask your network administrator.
A3
If the AP is configured to ’Use network authentication (Shared Key)’
If the AP is configured to authentication shared mode, all computers to be connected should
be configured as follows:
If you are using Windows XP, select network authentication(shared mode) in the wireless network settings.
Select Start > Control Panel > Network and Internet Connections > Network Connections,
right-click the Wireless Network Connection icon and then select View Available Wireless Networks.
Select Change Advanced Settings from the left menu, select an AP from Preferred networks
window in the Wireless Networks tab, and click the Properties button. Select Shared Mode in
the Network Authentication field of the Association tab, and then click the OK button.
If the Preferred networks window in the Wireless Network tab is empty, click View Wireless
Networks, select an AP to connect to, and select Shared Mode in the Network Authentication
field of the Connection Information tab as described above.
For more detailed network authentication procedures, ask your AP (Access Point) administrator.
Q10 After Wireless LAN Setup Program is installed, The “AEGIS Protocol (IEEE 802.1x)
v2.2.1.0” appears in the [Local Area Connection Properties] window.
A
The AEGIS Protocol is a security authentication protocol that is automatically installed when
Wireless LAN Setup Program is installed and does not affect the operation of other programs.
Q11 I want to use the Wireless LAN power saving function to extend the system battery
use time.
A
You can configure this in the Samsung Battery Manager program. Run the Samsung Battery
Manager and select Options > Wireless LAN Power Saving > On from the menu.
However, this setting may affect the performance of the Wireless LAN.
In addition, the wireless LAN connection might be disconnected while configuring this.
Questions and Answers 133
Games and Programs Related
Q1
3D game is not executed, or some functions are not working.
A
Change the graphic setting of the game to '2D' or 'Software Renderer', then execute the program again.
Q2
While playing a game, pressing the Menu button or pressing the LCD/CRT item
does not work or the screen is not properly displayed.
A
Some games and 3D application programs may change the display device control. Therefore,
pressing the Menu button and clicking the LCD/CRT item may terminate the running program
or may display an abnormal screen.
Press the Menu button and press the LCD/CRT item before launching a program and do not
press these buttons while running the program.
Q3
Running speed of a game is too slow or fast.
A
Change the setting of Power Schemes to 'Always On'.
(Click Start > Control Panel > Performance and Maintenance > Power Options > Power
Schemes tab, then configure the Power schemes field to 'Always On'.)
Q4
Some part of a game image is not displayed or is displayed in black.
A
This may happen when running a game designed for DirectX 8.1, such as NHL 2003, MVP
Baseball 2003, etc.
Q5
The game screen is displayed small.
A
z Right-click on the Desktop and select Properties from the pop-up menu.
x In the [Display Properties] window, select the Settings tab > Advanced > Intel Graphics Media Accelerator Driver for Mobile tab.
c Select the Display Device menu and click on 'Notebook' in the 'Single Display' field.
v Select the Display Setting menu, click 'Full Screen' in the Extended Display field and
click the Apply button.
Q6
The picture is not displayed properly for some games.
A
Some games such as 'Harry Potter and the Sorcerer's Stone', 'Harry Potter and the Chamber
of Secrets', etc. may not display the picture properly when the screen resolution is set to
1024x768 and the color quality is set to 32 bit.
For these games, set the screen resolution to 1024x768, and the color quality to 16 bit.
Q7
Game play is not displayed smoothly on the screen.
A
For 3D games, the texture data for the 3D screen display is saved to the system memory. If
there is insufficient system memory, the data is saved to the hard disk drive and loaded to
memory when required. This operation may temporarily stop displaying the picture on the
screen.
In this case, lower the game resolution or the screen settings. (For Delta Force: Black Hawk
Down, Medal of Honor, Battle Field, 1942, etc.)
Questions and Answers 134
Q8
If I run a program, an error message appears or the program does not launch.
A
This may happen when the program does not support the 800x480 pixels resolution.
This is caused by a program that is designed for a minimum resolution of 800x600 pixels and
fails to support a resolution lower than its minimum resolution.
In this case, change the screen resolution to 800x600 pixels or press the Auto Scaler button
to change the resolution.
Security Center
Q1
To change the popup window display settings when connected to the Internet.
In the Windows XP SP2 environment, you can decide whether to display a
popup window when connected to the Internet, for user convenience and security.
A1
To display most of the popup windows when connected to the Internet:
z Click on Internet Options in Start > Control Panel > Security Center > Manage security settings for.
x In the Privacy tab of Internet Properties, clear Block pop-ups.
A2
To display popup windows only from the current site when connected to the Internet:
Place the cursor on the notification area at the bottom of the Internet address bar and rightclick to display a menu, from which you can select Temporarily Allow Pop-ups or Always Allow
Pop-ups from This Site.
A3
To display popup windows from a particular site:
z Click on Internet Options in Start > Control Panel > Security Center > Manage security settings for.
x In the Privacy tab of Internet Properties, click on Settings from Block pop-ups.
c Enter a URL to want to allow pop-ups into Address of Web site to allow and click on Add.
v You will find that the entered address is added to the allowed sites list. The next time you
connect to the Web site, you will see pop-ups appearing.
When you need to re-block a permitted site, select the Web site address that you want to block
from the Allowed Sites and click on Remove.
Q2
When you connect to a Web site, you see the message, “To help protect your security, Internet Explorer stopped this site from installing an ActiveX control on your
computer” or “This site might require the following ActiveX control” below the address bar.
A
Windows XP SP2 blocks unsigned ActiveX controls from being installed when connected to certain Web sites for security reasons. On some Web sites that have no ActiveX controls installed,
applications are not started or do not display properly.
In this case, to install ActiveX controls, right-click the notification area to display a menu from
which you can select Install ActiveX control.
Q3
When you see a Windows Security Alert icon (
task bar.
) appear on the right part of the
With the Security Center feature added, Windows XP SP2 checks the Firewall,
the automatic updates configuration and installation of virus-checking proQuestions and Answers 135
grams to display a Windows Security Alert icon on the right part of the task
bar when it judges that the computer is vulnerable to attacks from the Internet. In this case, check the following to install the necessary components.
A1
Set up the Windows Firewall.
When you set up the Windows Firewall, you will be protected from unauthorized access
through the Internet or the network.
z Click on Windows Firewall in Start > Control Panel > Security Center > Manage security
settings for.
x From the General tab of Windows Firewall, select ON (recommended).
c If you want to allow a certain program or service to gain access to your computer using the
Firewall, select and check the program or service that you want to allow access from, in the
Exceptions tab of the Windows Firewall. If you want to add a program to Programs and
Services, click on Add Program and select it.
A2
Set up Windows Automatic Updates.
This automatically downloads and installs critical updates via the Internet to keep your computer up to date.
z Click on Automatic Updates in Start > Control Panel > Security Center > Manage security
settings for.
x From general tab of Automatic Updates window, select Automatic (recommended).
A3
Keep your computer current with the latest virus updates. (ex: Norton Antivirus)
Even when you have installed Norton AntiVirus on your computer, Windows cannot recognize
the program until you configure the settings, displaying a Security Alert icon.
When you first use or install Norton AntiVirus for the first time, follow the Registration Wizard
steps to configure the registration settings.
To protect your computer from virus attacks with the latest updates, click on Options to display
the Norton AntiVirus Options window. From the left menu of the window, check Run Automatic
Protection to select Automatic Protection and check Run LiveUpdate to select LiveUpdate.
A4
Two virus scanning programs on one computer may cause system conflicts. Remove one of
the programs from the system.
A5
If Windows does not recognize the existence of an anti-virus program even when it has been
installed, your computer could be vulnerable to attacks from the Internet. You should install
an anti-virus program that your computer is able to identify.
Check the following programs which Windows can detect and select one from the list.
A list of anti-virus programs that Windows can detect:
-Symantec Norton Anti-Virus
-NetworkAssociates (McAfee)
-TrendMicro
-ComputerAssociates
-Panda
-Kaspersky
-Ahnlabs (AhnLab)
Visit the Microsoft Web site (www.microsoft.com) regularly to check the latest list.
Questions and Answers 136
Other
Q1
I cannot run any functions.
A1
This may happen when the computer is in the HOLD status. When pressing a button or switch
in the HOLD status, the Charge LED ( ) blinks for a moment. Slide the HOLD switch downwards and try again.
A2
If the computer is running on battery power, check the battery charge status.
Q2
The [Power Switch] and the [AVStation NOW] switch do not work.
A1
This may happen when the computer is in the HOLD status. When pressing a button or switch
in the HOLD status, the Charge LED ( ) blinks for a moment. Slide the HOLD switch downwards and try again.
A2
To use the switch, you have to slide and hold the switch for more than 0.1 seconds. Slide and
hold the switch for more than 0.1 seconds before releasing it.
A3
If the computer is running on battery power, check the battery charge status.
Q3
I've hidden the Taskbar, but I cannot display it again.
A
If the Taskbar is behind the screen, you cannot display it with the Stylus Pen. In this case,
press the Menu button to display the Taskbar again.
Questions and Answers 137
Specifications
System Specification
The system specifications will be described below. The system specifications may differ depending
on the derived models.
Item
Specification
Remarks
CPU
Intel Celeron M ULV
Optional
Cache memory
Celeron (512KB)
Optional
Main memory
256MB ~ Max 1GB, Memory type : DDR2 SODIMM
Optional
Main Chipset
Intel 915GMS / 400 MHz FSB Support, Intel ICH6-M
Optional
Hard disk drive
(HDD)
1.8" HDD 20 ~ 60GB
Optional
Graphics
Intel 915GMA 900 Graphics
Optional
Sound
AD1986 (2CH)
Network Interface
Wired LAN: Marvell Yukon 88E8036 PCI-E Fast Ethernet Controller
Wireless LAN: 802.11BG
Bluetooth 2.0+EDR
CF Card Slot
Type I and II Compatible
Ports
USB 2.0 x 2, Video (Monitor) Out Port, Headphone Jack, Wired LAN
Port, DC-in Jack, External ODD Power Port
Optional
Dimensions (mm)
227.5 x 138 x 24~25.7
WxDxH
LCD
7" WVGA (800x480)
Weight
779g (without Bluetooth)
Optional
Battery
Lithium-Ion smart battery: 3 Cells or 6 Cells
Optional
Operation Environment
Temperature (storage) : -5 ~ 40°C (operation) : 10 ~ 32° C
Humidity (storage) : 5% ~ 90%
(operation) : 20% ~ 80%
Operation Voltage
100 - 240 VAC
Frequency
50 - 60 Hz
Output Power
60W
Output Voltage
19.0VDC
Optional
Optional
Optional
The system specifications are subject to change without notice. For detailed system specifications, refer to the
product catalog.
Specifications 138
Wireless LAN Specification (Optional)
Atheros AR5006EX Wireless Network Adapter Device
Product Specification
Item
Detailed Specifications
Dimensions
Physical
Specifications
Power Specification
Network
Specifications
(Width X Height) 30 X 50.95 mm
operation temperature
and humidity
Same as system operation
Temperature: 0°C ~ 70°C
Humidity: 85%
Power Saving Mode
726mW
Receiving Mode
1.353W
Transmission Mode
2.046W
Power
3.3V
Compatibility
IEEE 802.11g, IEEE 802.11b
Operating System
Microsoft Windows XP
- NDIS5 Miniport Driver
Media Access Protocol
CSMA/CA (Collision Avoidance) with Acknowledgement(ACK)
Security
Wired Equivalent Privacy support (WEP) 64bit / 128bit
*WPA, *CCX
* This piece of equipment supports the Wi-Fi wireless LAN security standard, WPA (Wi-Fi Protected Access) and
CCX (Cisco Compatible eXtensions). To connect to a wireless network consisting of the WPA and CCX, certificates or Atheros Client Utility may be required depending on the network settings. For more information, ask your
network administrator.
Radio Specifications
RF Band
2.4 GHz
Support Channels
Channels allowed per country.
Device
Transceiver
Modulation Scheme
11b Mode: DSSS, CCK 11g Mode: OFDM
Standard Output Power
MAX 10 mW
*Transmission Rate
**11g mode: 54, 48, 36, 24, 18, 12, 9, 6
11b mode: 11, 5.5, 2, 1
Antenna Type
1ea internal antennas (main)
* The data rate may differ from the real data transmission rate.
**11g mode is supported only when device is connected with an IEEE 802.11g device. (e.g. Access Point supported IEEE 802.11g)
Specifications 139
Glossary
You can find the terminologies in this User Guide listed in alphabetic order. For terminologies other than
these, find them in the Windows Help.
Backup
A way to save the current data to later restore it if necessary. Backup is a way to restore computer
data when the data or computer is damaged.
Client
This refers to a computer that uses a shared network resource provided by a server.
DDR SDRAM (Double Date Rate Synchronous Dymamic Random Access Memory)
DRAM is a memory type whose cells consists of a capacitor and transistor manufactured at a low
price.
SDRAM is a memory type whose performance has been improved by synchronizing the clock with
the external clock of the CPU.
DDR SDRAM is a memory type whose performance has been improved by doubling the operating
speed of the SDRAM and is widely used nowadays. This computer uses DDR SDRAM.
Device Manager
A administrative tool used to manage computer devices. You can add or remove hardware or update
a device driver using the Device Manager.
Direct X
An application interface that has been developed to enable Windows application programs to access
hardware devices at a very high speed. Since the operating speed of graphics, memory and sound
cards must be very fast to provide high quality video and sound for games, Direct X enables a faster
control and interaction between applications and hardware devices. By using Direct X, the multimedia performance of Windows has been hugely improved.
Driver
Software that interacts between the hardware and the operating system. An operating system
knows the hardware information and controls the hardware. In general, a driver is supplied with the
corresponding hardware device.
DVD (Digital Versatile Disk)
DVD has been developed to replace CD (compact disk). Although the shape and size of the disc are
the same as a CD, the capacity of a DVD is at least 4.7GB while the capacity of a CD is 600MB. DVD
video is digital unlike VHS video and supports MPEG2 compression and digital audio. To play a DVD,
a DVD drive is required.
Firewall
A security system that is used to protect an internal network or intranet from external networks
through an authentication procedure.
Glossary 140
Hibernation Mode
A power mode that saves all data in memory to the hard disk and turns the CPU and hard disk off.
When canceling Hibernation Mode, all application programs that were running are restored to their
last state.
Icon
This refers to a small image that represents an object that a user can use.
LAN (Local Area Network)
A communication network connecting computers, printers and other devices within a local area such
as within a building. A LAN enables all connected devices to interact with other devices on the network. The current LAN uses the Ethernet media access control method developed in the early 1980s.
To connect to an Ethernet, a network card called a LAN card, Ethernet card or network interface
card is required. To exchange data between computers, a protocol is required besides the hardware
equipment. Windows XP uses TCP/IP as the default protocol.
LCD (Liquid Crystal Display)
There are Passive Matrix and Active Matrix LCD types. This computer uses the Active Matrix type
LCD called TFT LCD. Since an LCD is implemented by transistors instead of a cathode-ray tube unlike
a CRT, it can be slim. Because it does not blink, it reduces eye strain.
Network
A group of computers and devices, such as a printer and scanner, connected by a communications
link. A network can be either small or large and can be connected permanently through cables or
temporarily through a telephone lines or a wireless link. The biggest network is the Internet, a worldwide network group.
Network Administrator
A user who plans, configures and manages network operations. Sometimes, a network administrator
is called system administrator.
Notification Area
This refers to the right area of the Taskbar including program icons such as the volume control, the
power options and the time.
Power Schemes
This refers to a pre-determined power management option group. For example, you can set the time
the computer waits before entering Standby Mode, or before the monitor or hard drive turns off.
The settings are saved as a power scheme.
Quick Launch
This refers to a toolbar that can be configured so that you can launch a program such as Internet
Explorer or display Windows Desktop with one click. You can add any icon to the quickly launch area
of the Taskbar and launch frequently used program by clicking that icon.
Server
In general, a server refers to a computer that provides shared resources for network users.
Share
This refers to setting a resource of a computer such as a folder or printer so that other users can
also use them.
Glossary 141
Shared Folder
A folder that can be used by other users on the network.
Standby Mode
A power mode that enables a computer to save power consumption while not in use. When a computer is in Standby Mode, the data on the computer memory is not saved onto the hard disk. If the
power is tuned off, the data in memory will be lost.
System Restore
A tool that tracks computer changes and creates a restoration point when a change is made. If you
restore your computer to a restoration point, you can restore your computer to the previous status
that has been saved before the change, which caused a problem.
System File
System Files refer to files that are read and used by the Windows operating system. In general, system files must not be deleted or moved.
USB (Universal Serial Bus)
This refers to a serial interface standard developed to replace the conventional interface standards
such as Serial and PS/2.
While USB 1.1 supports 12Mbps (12 million bits per second), USB 2.0 supports a data rate that is 40
times (480Mpbs) faster then that of USB 1.1. The data rate of USB 2.0 is equivalent to that of
IEEE1394. Therefore USB 2.0 is used for A/V devices supported by IEEE 1394 and 2nd HDD and CDRW that require a high data rate.
Windows
The name of an operating system developed by Microsoft Corp. Windows XP Tablet PC Edition is
installed on this computer,.
Windows Media Player
A multimedia program included with Windows. Using this program, you can play a media file, create
an audio CD, listen to a radio broadcast, search and manage media files, copy files to a portable
device, etc.
Glossary 142
Index
A
AP / AP Connection
Auto Scaler Button
AVStation NOW
AVStation premium
B
Battery
Battery Calibration
Battery Remaining Charge
BIOS (BIOS, Setup) Setting
Bluetooth / Help
Booting Priority
50
30
88
77
107
112
112
100
62
106
C
Charge
Click
Control Panel
CyberLink PowerDVD
108
20
42
71, 95
D
Desktop
Dual View
DVD Play
39
34
85, 95
I
Internet Sharing
58
M
Magic Doctor
Maximum Battery Saving Mode
Menu Button
Monitor Connection / Output
Multimedia
Music Play
114
110
27
33
70
90
N
Network
Network Status Diagnosis
Norton AntiVirus
46
61
115
O
Overviews
P
Password
Playlist
Program
Program Launcher
103, 104
80
70
75
Q
Quick Launch Button
28
R
Resolution / Color
45
S
Samsung Battery Manager
Samsung Network Manager
Samsung Update Plus
Shared Server
Shared Client
Slideshow
Specifications
SRS
Status Indicators
Stylus Pen
110
55
73
58
58
92
138
28
15
20
T
Tablet PC Input Panel
Writing Pad
Character Pad
On-Screen Keyboard
Touchkit
22
22
23
24
21
U
User Account / Switch User
43
V
Video Play
Volume Control
W
Windows XP
Wired Network
Wireless Network
86, 93
26
37
47
49
14
Index 143
Important Safety Information
Battery Disposal
Do not put rechargeable batteries or products powered by non-removable rechargeable batteries
in the garbage.
Contact the Samsung Helpline for information on how to dispose of batteries that you cannot use or
recharge any longer. Follow all local regulations when disposing of old batteries.
Laser Safety
All systems equipped with CD or DVD drives comply with the appropriate safety standards, including
IEC 825. The laser devices in these components are classified as “Class 1 Laser Products” under a
US Department of Health and Human Services (DHHS) Radiation Performance Standard. Should the
unit ever need servicing, contact an authorized service location.
Laser Safety Note
Use of controls or adjustments or performance of procedures other than those specified in this
manual may result in hazardous radiation exposure. To prevent exposure to laser beams, do not
try to open the enclosure of a CD or DVD drive.
Power Cord Requirements
The power cord set (wall plug, cable and AC adapter plug) you received with your computer meets
the requirements for use in the country where you purchased your equipment.
Power cord sets for use in other countries must meet the requirements of the country where you
use the computer. For more information on power cord set requirements, contact your authorized
dealer, reseller, or service provider.
General Requirements
The requirements listed below are applicable to all countries:
•
•
•
•
The length of the power cord set must be at least 6.00 feet (1.8m) and a maximum of 9.75 feet
(3.0m).
All power cord sets must be approved by an acceptable accredited agency responsible for
evaluation in the country where the power cord set will be used.
The power cord set must have a minimum current capacity of 7 A and a nominal voltage rating
of 125 or 250 volts AC, as required by each country’s power system.
The appliance coupler must meet the mechanical configuration of an EN 60 320/IEC 320
Standard Sheet C7 connector, for mating with appliance inlet on the computer.
Important Safety Information 144
Regulatory Compliance Statements
Wireless Guidance
Low power, Radio LAN type devices (radio frequency (RF) wireless communication devices), operating in the 2.4 GHz Band, may be present (embedded) in your notebook system. The following section is a general overview of considerations while operating a wireless device.
Additional limitations, cautions, and concerns for specific countries are listed in the specific country
sections (or country group sections). The wireless devices in your system are only qualified for use
in the countries identified by the Radio Approval Marks on the system rating label. If the country you
will be using the wireless device in, is not listed, please contact your local Radio Approval agency for
requirements. Wireless devices are closely regulated and use may not be allowed.
The power output of the wireless device or devices that may be embedded in your notebook is well
below the RF exposure limits as known at this time. Because the wireless devices (which may be
embedded into your notebook) emit less energy than is allowed in radio frequency safety standards
and recommendations, manufacturer believes these devices are safe for use. Regardless of the power levels, care should be taken to minimize human contact during normal operation.
This transmitter must not be collocated or operate in conjunction with any other antenna or transmitter except the installed Bluetooth transmitter.
Some circumstances require restrictions on wireless devices. Examples of common restrictions are
listed below:
Radio frequency wireless communication can interfere with equipment on commercial aircraft.
Current aviation regulations require wireless devices to be turned off while traveling in an airplane. 802.11B/G (also known as wireless Ethernet or Wifi) and Bluetooth communication devices are examples of devices that provide wireless communication.
In environments where the risk of interference to other devices or services is harmful or perceived as harmful, the option to use a wireless device may be restricted or eliminated. Airports,
Hospitals, and Oxygen or flammable gas laden atmospheres are limited examples where use of
wireless devices may be restricted or eliminated. When in environments where you are uncertain
of the sanction to use wireless devices, ask the applicable authority for authorization prior to use
or turning on the wireless device.
Every country has different restrictions on the use of wireless devices. Since your system is
equipped with a wireless device, when traveling between countries with your system, check with
the local Radio Approval authorities prior to any move or trip for any restrictions on the use of a
wireless device in the destination country.
If your system came equipped with an internal embedded wireless device, do not operate the
wireless device unless all covers and shields are in place and the system is fully assembled.
Wireless devices are not user serviceable. Do not modify them in any way. Modification to a wireless device will void the authorization to use it. Please contact manufacturer for service.
Regulatory Compliance Statements 145
Only use drivers approved for the country in which the device will be used. See the manufacturer
System Restoration Kit, or contact manufacturer Technical Support for additional information.
United States of America
USA and Canada Safety Requirements and Notices
Do not touch or move antenna while the unit is transmitting or receiving.
Do not hold any component containing the radio such that the antenna is very close or touching any
exposed parts of the body, especially the face or eyes, while transmitting.
Do not operate the radio or attempt to transmit data unless the antenna is connected; if not, the
radio may be damaged.
Use in specific environments:
The use of wireless devices in hazardous locations is limited by the constraints posed by the safety
directors of such environments.
The use of wireless devices on airplanes is governed by the Federal Aviation Administration (FAA).
The use of wireless devices in hospitals is restricted to the limits set forth by each hospital.
Explosive Device Proximity Warning
Do not operate a portable transmitter (such as a wireless network device) near unshielded
blasting caps or in an explosive environment unless the device has been modified to be qualified
for such use.
Use On Aircraft Caution
Regulations of the FCC and FAA prohibit airborne operation of radio-frequency wireless devices
because their signals could interfere with critical aircraft instruments.
Other Wireless Devices
Safety Notices for Other Devices in the Wireless Network: Refer to the documentation supplied with
wireless Ethernet adapters or other devices in the wireless network.
The Part 15 radio device operates on a non-interference basis with other devices operating at
this frequency. Any changes or modification to said product not expressly approved by Samsung
could void the user's authority to operate this device.
Regulatory Compliance Statements 146
Unintentional Emitter per FCC Part 15
This device complies with Part 15 of the FCC Rules. Operation is subject to the following two conditions:(1) this device may not cause harmful interference, and (2) this device must accept any interference received, including interference that may cause undesired operation.
This equipment has been tested and found to comply with the limits for a Class B digital device
pursuant to Part 15 of the FCC Rules. These limits are designed to provide reasonable protection
against harmful interference in a residential installation. This equipment generate uses and can
radiate radio frequency energy and if not installed and used in accordance with the instructions
may cause harmful interference will not occur in a particular installation. If this equipment does
cause harmful interference to radio or television reception, which can be determined by turning
the equipment off and on, the user is encouraged to try to correct the interference by one or
more of the following measures:
• Reorient or relocate the receiving antenna.
• Increase the separation between the equipment and receiver.
• Connect the equipment into an outlet on a circuit different from that to which the receiver is
connected.
• Consult the dealer or an experienced radio/TV technician for help.
If necessary, the user should consult the dealer or an experienced radio/television technician for additional suggestions. The user may find the following booklet helpful: “Something About Interference.” This is available at FCC local regional offices. Our company is not responsible for any radio
or television interference caused by unauthorized modifications of this equipment or the substitution
or attachment of connecting cables and equipment other than those specified by our company. The
correction will be the responsibility of the user. Use only shielded data cables with this system.
Intentional emitter per FCC Part 15
Low power, Radio LAN type devices (radio frequency (RF) wireless communication devices), operating in the 2.4 GHz Band, may be present (embedded) in your notebook system. This section is
only applicable if these devices are present. Refer to the system label to verify the presence of wireless devices.
Wireless devices that may be in your system are only qualified for use in the United States of America
if an FCC ID number is on the system label.
This transmitter must not be collocated or operate in conjunction with any other antenna or transmitter except the installed Bluetooth transmitter.
Operation of this device is subject to the following two conditions: (1) This device may not cause
harmful interference, and (2) this device must accept any interference received, including interference that may cause undesired operation of the device.
Wireless devices are not user serviceable. Do not modify them in any way. Modification to a wireless device will void the authorization to use it. Contact manufacturer for service.
Regulatory Compliance Statements 147
European Union
European Union CE Marking and Compliance Notices
Products intended for sale within the European Union are marked with the Conformité Européene
(CE) Marking, which indicates compliance with the applicable Directives and European standards and
amendments identified below. This equipment also carries the Class 2 identifier.
The following information is only applicable to systems labeled with the CE mark
.
European Directives
This Information Technology Equipment has been tested and found to comply with the following
European directives:
•
EMC Directive 89/336/EEC with amending directives 92/31/EEC & 93/68/EEC as per
– EN 55022 Class B
– EN 61000-3-2
– EN 61000-3-3
– EN 55024
•
Low Voltage Directive (Safety) 73/23/EEC as per EN 60950(A1/A2/A3/A4/A11)
•
Radio and Telecom Terminal Equipment Directive 199/5/EC as per
– CTR21 (if fitted with a modem device)
– ETS 300 328 (if fitted with a 2.4 GHz band embedded wireless device)
– ETS 301 489-1 (if fitted with a 2.4 GHz band embedded wireless device)
– ETS 301 489-17 (if fitted with a 2.4 GHz band embedded wireless device)
European Radio Approval Information (for products fitted with EU-approved radio devices)
This Product is a Notebook computer; low power, Radio LAN type devices (radio frequency (RF)
wireless communication devices), operating in the 2.4 GHz band, may be present (embedded) in
your notebook system which is intended for home or office use. This section is only applicable if
these devices are present. Refer to the system label to verify the presence of wireless devices.
Wireless devices that may be in your system are only qualified for use in the European Union or
associated areas if a CE mark
with the Alert Symbol is on the system label.
The power output of the wireless device or devices that may be embedded in you notebook is well
below the RF exposure limits as set by the European Commission through the R&TTE directive.
See 802.11b and 802.11g restrictions for specific countries or regions within countries under the
heading “European Economic Area Restrictions” below.
Regulatory Compliance Statements 148
Translated Statements of Compliance
European Economic Area Restrictions
Local Restriction of 802.11b/802.11g Radio Usage
[Note to integrator: The following statements on local restrictions must be published in all end-user
documentation provided with the system or product incorporating the Wireless product.]
Due to the fact that the frequencies used by 802.11b/802.11g wireless LAN devices may not yet
be harmonized in all countries, 802.11b/802.11g products are designed for use only in specific
countries or regions, and are not allowed to be operated in countries or regions other than those
of designated use.
As a user of these products, you are responsible for ensuring that the products are used only in
the countries or regions for which they were intended and for verifying that they are configured
with the correct selection of frequency and channel for the country or region of use. Any deviation from permissible settings and restrictions in the country or region of use could be an infringement of local law and may be punished as such.
Regulatory Compliance Statements 149
The European variant is intended for use throughout the European Economic Area. However, authorization for use is further restricted in particular countries or regions within countries, as follows:
General
European standards dictate maximum radiated transmit power of 100 mW effective isotropic radiated power (EIRP) and the frequency range 2400 – 2483.5 MHz.
Belgium
The product may be used outdoors, but for outdoor transmissions over a distance of 300m or more,
a license from the BIPT is required.
This restriction should be indicated in the manual as follows:
Dans le cas d'une utilisation privée, à l'extérieur d'un bâtiment, au-dessus d'un espace public, aucun
enregistrement n'est nécessaire pour une distance de moins de 300m. Pour une distance supérieure
à 300m un enregistrement auprès de l'IBPT est requise. Pour une utilisation publique à l'extérieur
de bâtiments, une licence de l'IBPT est requise. Pour les enregistrements et licences, veuillez contacter l'IBPT.
France
For Metropolitan departments:
2.400 - 2.4835 GHz for indoor use.
2.400 -2.454 GHz (channels 1 to 7) for outdoor use.
For Guadeloupe, Martinique, St Pierre et Miquelon, Mayotte:
2.400 - 2.4835 GHz for indoor and outdoor use.
For Reunion, Guyane:
2.400 - 2.4835 GHz for indoor use.
2.420 - 2.4835 GHz for outdoor use (channels 5 to 13)
Regulatory Compliance Statements 150
WEEE Symbol Information
Correct Disposal of This Product
(Waste Electrical & Electronic Equipment)
(Applicable in the European Union and other European countries with separate
collection systems)
This marking shown on the product or its literature, indicates that it should not be disposed with
other household wastes at the end of its working life. To prevent possible harm to the environment
or human health from uncontrolled waste disposal, please separate this from other types of wastes
and recycle it responsibly to promote the sustainable reuse of material resources.
Household users should contact either the retailer where they purchased this product, or their local
government office, for details of where and how they can take this item for environmentally safe
recycling.
Business users should contact their supplier and check the terms and conditions of the purchase contract. This product should not be mixed with other commercial wastes for disposal.
WEEE Symbol Information 151
Contact SAMSUNG WORLD WIDE
[U.S.A. / U.K. / AUSTRALIA / HONG KONG / INDIA / MALAYSIA / SINGAPORE]
Contact SAMSUNG WORLD WIDE
If you have any comments or questions regarding a Samsung products, contact the SAMSUNG customer care center.
Customer Care Center
TEL
Web Site
U.S.A.
1 800 SAMSUNG (7267864)
www.samsung.com
U.K.
0870 242 0303
www.samsung.com/uk
AUSTRALIA
1300 362 603
www.samsung.com/au
HONG KONG
2862 6001
www.samsung.com/hk
INDIA
3030 8282 / 1600 1100 11
www.samsung.com/in
MALAYSIA
1800-88-9999
www.samsung.com/my
SINGAPORE
1800-SAMSUNG(7267864)
www.samsung.com/sg
[FRANCE] Comment contacter Samsung dans le monde
Si vous avez des suggestions ou des questions concernant les produits Samsung, veuillez contacter
le Service Consommateurs Samsung.
Customer Care Center
TEL
Web Site
FRANCE
08 25 08 65 65
www.samsung.fr
[GERMANY] Kontakt zu Samsung
Falls Sie Fragen oder Anregungen zu Samsung-Produkten haben, wenden Sie sich bitte an den Samsung-Kundendienst.
Customer Care Center
TEL
Web Site
GERMANY
01805 121213
www.samsung.de
[SPAIN] Contacte con SAMSUNG WORLD WIDE
Si tiene alguna pregunta o comentario referente a nuestros productos, por favor contacte con nuestro Servicio de Atencion al Cliente.
Customer Care Center
TEL
Web Site
SPAIN
902 10 11 30
www.samsung.com/es
Contact SAMSUNG WORLD WIDE 152
[PORTUGAL] Contacte SAMSUNG GLOBAL
Se tem algumas dúvidas ou comentários sobre os produtos Samsung, contacte por favor a nossa
linha de apoio a clientes Samsung.
Customer Care Center
TEL
Web Site
PORTUGAL
808 200 128
www.samsung.pt
[RUSSIA / UKRAINE] Связывайтесь с SAMSUNG по всему миру
Если у вас есть предложения или вопросы по продуктам Samsung, связывайтесь с
информационным центром Samsung.
Customer Care Center
TEL
Web Site
RUSSIA
8-800-200-0400
www.samsung.ru
UKRAINE
8-800-502-0000
www.samsung.com/ur
[CHINA]
Customer Care Center
TEL
Web Site
CHINA
800-810-5858 / (010) 64751880
www.samsung.com.cn
Customer Care Center
TEL
Web Site
THAILAND
1800-29-3232 / 02-689-3232
www.samsung.com/th
[THILAND]
Rev.1.1
Contact SAMSUNG WORLD WIDE 153