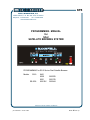
1
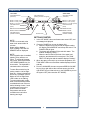
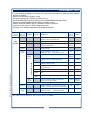
675
WELLS BLOOMFIELD, LLC
2 ERIK CIRCLE, P. O. Box 280 Verdi, NV 89439
fax: 775-689-5976
telephone: 775-689-5707
www.wellsbloomfield.com
PROGRAMMING MANUAL
for
SS-2
SATELLITE BREWING SYSTEM
PROGRAMMING for SS-2 Series Dual Satellite Brewers
Models
SS-2:
SS-2EX:
9421
9520
9521
9521EX
9520FB
9521FB
9522HK
PRINTED IN UNITED STATES OF AMERICA
p/n 74346 Rev.C ECN-13385
M 675
07 1108
c ps
TABLE OF CONTENTS
Thank You for purchasing
this Wells Bloomfield
appliance.
Proper installation,
professional operation and
consistent maintenance
of this appliance will ensure
that it gives you the very best
performance and a long,
economical service life.
PRECAUTIONS & GENERAL INFORMATION
OPERATION
PROGRAMMING
CONTROL PANEL CONFIGURATIONS
PROGR AMMING CH ART
PROCEDURES
BREW SETTINGS
TIME FUNCTIONS
SERVICE & COUNTERS
MACHINE SETTINGS
FACTOR Y SETTINGS
CALIBR ATION
PULSE BREW, PRE-INFUSION AND BYPASS
DIAGNOSTICS - TEST PROGR AM
FAULT PROTECTION
1
2
6
7
10
10
10
11
12
12
13
15
19
APPLICATION
This manual contains the
information needed to perform
operator level programming,
and to setup initial program
parameters for this appliance.
This manual applies to the following domestic satellite brewers:
9421
9520
9520FB
9521
9521FB
This manual also applies to the following export satellite brewers:
9521EX
9522HK
xi
675 p/n 74346 SS-2 Programming Manual
Proper setup is essential to
achieving the optimum
performance this appliance
can provide.
PRECAUTIONS AND GENERAL INFORMATION
WARNING: EL ECTRIC SHOCK HAZARD
All servicing requiring access to non-insulated components must be performed by qualified
service personnel. Do not open any access panels which require the use of tools. Failure to
heed this warning can result in electrical shock.
WARNING: INJURY HAZARD
All installation procedures must be performed by qualified personnel with full knowledge of all
applicable electrical and plumbing codes. Failure could result in property damage and
personal injury.
WARNING: EL ECTRIC SHOCK HAZARD
Brewer must be properly grounded to prevent possible shock hazard. DO NOT assume a
plumbing line will provide such a ground. Electrical shock will cause death or serious Injury.
WARNING: BURN HAZARD
This appliance dispenses very hot liquid. Serious bodily injury from scalding can occur from
contact with dispensed liquids.
This appliance is intended for commercial use only.
This appliance is intended for use to brew beverage products for
human consumption. No other use is recommended or
authorized by the manufacturer or its agents.
675 p/n 74346 SS-2 Programming Manual
This appliance is intended for use in commercial establishments,
where all operators are familiar with the appliance use,
limitations and associated hazards. Operating instructions and
warnings in the corresponding Service Manual must be read and
understood by all operators and users.
CAUTION:
EQUIPM ENT DAMAGE
DO NOT plug in or energize this
appliance until all Installation
Instructions are read and followed.
Damage to the Brewer will occur if
these instructions are not followed.
CAUTION:
BURN HAZARD
Except as noted, this piece of equipment is made in the USA
and has American sizes on hardware. Please note: Metric
hardware is used to mount the inlet (Fill) solenoid. All metric
conversions are approximate and can vary in size.
Exposed surfaces of the
appliance, brew chamber and
decanter may be HOT to the
touch, and can cause serious
burns.
Any trouble shooting, component views and parts lists included
in this manual are for general reference, and are intended for
use by qualified service personnel.
CAUTION:
This manual should be considered a permanent part of this
appliance. The manual must remain with the appliance if it is
sold or moved to another location.
BURN HAZARD
To avoid splashing or overflowing
hot liquids, ALWAYS use an
empty decanter before starting the
brew cycle.
CAUTION:
BURN HAZARD
After a brew cycle, brew basket
contents are HOT. Remove the
brew basket and dispose of used
grounds with care.
1
OPERATION
LEFT SIDE
LED INDICATORS
(selection)
SELECT ½ GAL (2 liter)
SELECT 1 GAL (4 liter)
SELECT 1-1/2 GAL (6 liter)
LED INDICATOR
(brew)
BREW INITIATE
RIGHT SIDE
LED INDICATOR
(heating element energized)
Mon 09:12am
LED INDICATORS
(selection)
SELECT ½ GAL (2 liter)
SELECT 1 GAL (4 liter)
SELECT 1-1/2 GAL (6 liter)
LED INDICATOR
(brew)
BREW INITIATE
BREW CANCEL
BREW CANCEL
LED INDICATOR
(satellite installed)
LED INDICATOR
(satellite installed)
ON-OFF KEY
GETTING STARTED
NOTE:
If water is not sensed at the
water level sensor within 20
minutes:
Heater will be disabled
Error message "NO WATER
SENSED" will be displayed.
NOTE:
If the keypad lockout is enabled,
pressing a key will have no
effect. To temporarily bypass
the lockout, press and hold the
LEFT BREW CANCEL key for
six seconds. The keyboard is
unlocked until the next brew.
2. Press the POWER key to turn the brewer ON.
a. When the brewer is first turned ON, the digital readout
will display "BLOOMFIELD'" and a beep will sound. The
POWER LED will glow.
b. The brewer will attempt to fill the tank with water. The
readout will display "Filling…".
c. When the tank is filled to the level of the water level
probe the tank heaters will be energized. The TANK
HEAT LED will glow and the readout displays "Heating".
3. When the water in the tank is up to the set temperature, the
TANK HEAT LED turns off and the readout displays the time
and day.
4. From the ON MODE, the user can press a BREW VOLUME
key on left or right side to select a brew amount, the left or
right START key to initiate a brew, or the POWER key to turn
the system OFF (this enters the OFF MODE).
675 p/n 74346 SS-2 Programming Manual
To enter Brew mode from On
mode, press the Left or Right
Start key. A beep is heard each
time a key is pressed. In Brew
Mode, the Left or Right Brew
LED is either on or flashing.
To ensure high quality coffee,
water volume and temperature
considerations have to be met
before initiating a brew. If such
conditions are not met, the
system waits until water
temperature and volume
conditions are met before
brewing can begin.
1. In the OFF MODE, valves and heaters are turned OFF, and
no message is displayed.
2
OPERATION (continued)
BREWING
In regular operating mode, the SS-2 maintains the temperature of
the water in the tank within ± 1ºF of the brew temperature.
Normally, the brew will start as soon as the BREW START key is
pressed. However, there may be a slight delay if a second brew is
started immediately after a brew is completed. If the tank temperature is below the Precise Temperature Brewing™ point, the brew
will be delayed going into the "Brew Wait" mode, with the brew light
flashing and the display message "heating…". As soon as the
PTB™ is reached, the brew will start. The brew light will remain on
for the duration of the brew, and the time remaining will be
displayed.
NOTE: The following safety features have been incorporated to
prevent multiple unattended brews.
A. When the brew light is on or flashing, repeated pressing of the
BREW START key will be ignored (however, an beep will
sound each time the key is pressed).
B. A brew will only be initiated, or placed in "brew wait" when the
brew light is off.
To bypass the BREW WAIT,
press and hold the BREW
START key for three seconds.
The brew will start, even though
the water may not be up to the
Precise Temperature Brewing™
point. This feature is most
useful when adjusting volumes
and is not generally used for
normal brewing.
During a brew, if the brew key is
pressed, it will be ignored. Only
when a brew is complete can
another brew begin.
NOTE: The brew can be cancelled at any time by pressing
the BREW STOP key.
BREWING COFFEE
PAPER
FILTER
Prepare the Brew Baskets:
Make sure the wire rack is properly installed in each brew
chamber.
WIRE
RACK
Insert one (1) Bloomfield paper filter into each brew chamber.
Make sure the filter is properly supported by the wire rack.
BREW
CHAMBER
Add a measured amount of grounds to each brew basket.
Gently shake the basket to level the grounds.
675 p/n 74346 SS-2 Programming Manual
Slide one brew chamber under each brew head.
Insert Satellites:
CAUTION:
Slide one satellite under each brew chamber until it is fully
seated. When the satellite is properly installed, SATELLITE
LED for left or right side will glow.
Select Brew Volume:
Press either the 1/2 GALLON, 1 GALLON or 1-1/2 GALLON
key. The corresponding LED will glow.
Start the Brew:
Press either the right or left START BREW key. The LED for
the selected side will glow. At the end of the brew, the brewer
will beep. When the TANK HEAT LED goes out, the brewer is
ready to run another brew cycle.
Empty the Brew Basket:
Discard the grounds and the paper filter. Rinse the brew
chamber under clear water.
3
BURN HAZARD
Basket and contents are hot to
the touch and may cause burns
on contact.
OPERATION (continued)
View Water Temperature in
Tank:
To view the water temperature
on the screen, the SS2 brewer
must be ON, and not brewing or
in the filling mode. Press and
hold the 3rd key, and depress
the 6th key. The actual water
temperature will be displayed for
3 seconds.
NOTE:
When brewing both sides at
same time or one side only,
countdown timer on time
remaining for brew complete will
be shown in minutes and seconds.
Normal Operation (Non Brew ing)
When the unit is not brewing, the SS2 maintains the water temperature at the Precise Temperature for Brewing™ (PTB ™). The
heating element will cycle on and off automatically to maintain this
temperature.
ON/OFF - Non Automatic Timer:
To turn the brewer OFF, press the ON/OFF switch: 2 beeps will be
heard and the brewer will be turned OFF, indicated by all lights
being off. To turn the brewer ON, press the ON/OFF switch: 2
beeps-will sound, all lights will flash once, then the "Power" light
will remain on, (the "Heat' light may come on if water temperature
is too low).
ON/OFF - Automatic Timer Feature:
The factory programmed SS2 has the automatic timer turned off.
To set the automatic timer, refer to the Programming section in
this manual, "Time Functions" Menu. If the Automatic Timer
feature is programmed off, the brewer can be turned on and off by
depressing the ON/OFF switch, as noted above.
When the Automatic Timer feature is programmed ON the SS2 will
turn on and off automatically, at a programmed time, Monday to
Friday; with a separate on and off programmed time schedule for
Saturday and Sunday.
Automatic Start-UP in Prev ious Mode:
If the SS2 automatic timer is OFF (the factory setting) and power
is disconnected, the brewer will start up when power is restored, in
the mode it had been in prior to the power disconnection. If the
SS2 has the timer setting ON and power is disconnected, the
brewer will start up in the mode that it should be in at the time the
power is restored.
Brew Volume - View ing Programmed Brew Volume:
The SS2 can have up to 6 different brew volumes, see
programming table to change.
Clock:
Time - Battery Backup. The SS2 has a battery backup system
which will maintain the proper time during power failures, or when
the brewer is unplugged (even for very prolonged periods of time).
Normally there will not be a need to set the time except for Daylight Saving Time changes, or moving the brewer to different time
zones.
4
675 p/n 74346 SS-2 Programming Manual
Temporarily Ov erriding the
Automatic On/Off function:
While in the automatic timed
OFF mode the brewer can be
started by depressing the ON/
OFF switch. The brewer will
remain on until the automatic
programmed off time, when it will
turn off and resume normal
automatic timed functioning.
Similarly, if turned OFF during
the automatic timed ON mode
the brewer will remain OFF until
the next programmed on time,
when it will turn on and resume
normal automatic timed
functioning.
Brew Cancellation
Brewing can be canceled at any time by pressing the Stop key or
another Brew Batch switch. Once canceled, there will not be any
indication as to when it will be safe to begin another brew. If
brewing is canceled, the valves close and the Brew LED turns off,
two beeps are heard and "Cncl" is displayed on the appropriate
side. In addition, the Satellite indicator light will flash.
OPERATION (continued)
Refer to page 2 for key designations
Changing Day and Time:
To change time, (Brewer in on mode.) Press the 3rd and 4th key at
the same time to access the time change mode. In the time change
mode the screen will read 'Day:" followed by the current day
setting. Use the 6th key to advance the day, or the 5th key to reverse. When day has been properly set press the 3rd key. The
screen will now read "Time:" with the set time on the screen, the
hour and am or pm flashing. Use the 5th key to go back or the 6th
key to advance the hour, making sure that the am or pm is correct.
When the hour and
am/pm is correctly set press the 3rd key,
and the screen will read "Time:" with the set time on the screen,
minutes flashing. As previously, use the 5th or 6th keys to adjust
the minutes, and press the 3rd key when complete. )
After Hour™:
The factory programming has the After Hours™ mode turned ON.
The After Hours™ can be programmed to come on from 1 to 6
hours after the last brew. When the SS2 goes into the After
Hours™ mode, the water in the tank will be allowed to drop from
the normal brewing temperature and will reheat less frequently.
This feature saves energy and extends component life. When the
BREW switch is pressed the SS2 automatically reverts back to
normal operation, heating the water to the Precise Temperature for
Brewing™ (PTB™), before starting the brew. The Brew light will
flash until the correct water temperature is reached.
675 p/n 74346 SS-2 Programming Manual
Countdow n Quality Timer™:
The SS2 factory programming has the Countdown Quality Timer™
turned ON for satellite brewing.
Keypadlock™:
This feature is OFF in the standard factory settings. If the
Keypadlock™ feature is activated, there will be no response by the
brewer when the keys are depressed (except for the beep after a
key is depressed).
To temporarily "unlock" the keypad, press and hold the CANCEL
key for 6 seconds. A beep will be heard indicating the keypad is
now "unlocked", - a brew can be initiated, etc. The keypad will
remain unlocked until the brew is completed, then automatically
return to Keypadlock™ mode. If a brew is not initiated 60 seconds
after "unlocking", the system will time out and return to the "locked"
position.
Pulse or Pre-infusion Volume System:
To set these features, refer to the Programming section in this
manual, Brew Settings Menu. This feature maybe set for any
volume key.
Bypass Valve System:
Refer to programming section under brew settings menu item. This
feature may be set for any volume key.
5
Changing time can also be
done in the regular
programming mode.
Consult the Programming
section in this manual to set
the After Hours™ mode.
Consult the Programming
section in this manual to
change the Countdown Quality
Timer™ feature:
To set the Keypadlock™ refer
to the Programming section in
this manual, Machine Settings
Menu.
PROGRAMMING - CONTROL PANEL CONFIGURATIONS
MENU PROGRAM
PRESS AT SAME TIME
(POWER OFF)
MENU
MENU EXIT
ITEM
INCREASE (+)
1
START
DECREASE (-)
2
7
3
Mon 09:12am
8
4
5
10
9
STOP
6
11
ON-OFF KEY
CLOCK SET
PRESS AT SAME TIME
(POWER ON)
The brewer can be
programmed with a
personal computer.
Please contact your
local Bloomfield
Representative for
more information.
NOTE:
Brewer will not brew
while in the FILLING
mode.
QUICK NAVIGATION TIPS
1. To enter PROGRAMMING mode:
a. Press ON-OFF (POWER) key until the brewer is OFF
b. Press and hold 3rd and 6th keys for 3 seconds
2. Advance thru MENUS by pressing 1st key
a. Access and advance thru ITEMS by pressing 3rd key
b. Advance thru SUB-MENU and SUB-ITEMS by pressing 3rd key.
3. To EXIT PROGRAMMING mode:
Press 2nd key
4. For clock settings:
a. Press ON-OFF (POWER) key until the brewer is ON
b. Press 3rd and 4th keys
5. To check tank temperature
a. Press ON-OFF (POWER) key until the brewer is ON
b. Press 3rd and 6th keys
675 p/n 74346 SS-2 Programming Manual
6
PROGRAMMING CHART
To enter Programming Mode, turn brewer OFF, then press 3rd and 6th key. Hold until "Brew Settings"
appears on readout.
Advance thru MENUS by pressing 1st key
Access and advance thru ITEMS by pressing 3rd key
See ITEM DESCRIPTION for procedure to access SUB-MENUS and SUB-ITEMS.
Advance thru SUB-MENU and SUB-ITEMS by pressing 3rd key.
Change settings by pressing 5th key (decrease) or 6th key (increase).
Press 2nd key at any time to EXIT programming mode.
See page 10 for detailed explanation of all programming topics.
MENU
LEFT 1/2
GAL (ke y 1)
ITEM
LEFT 1-1/2
GAL (ke y 3)
SUB-MENU
RANGE
Key 5 dec.
Key 6 inc.
DEFAULT
none
N/A
185-205ºF
85-96ºC
197ºF
Y/N
N
Airpot
Satellite
Satellite
Number of se conds b rew valve is open. Pre ss RIGH T
1/2 GAL (ke y 4) to a ccess Pulse Brew Settings
0 - 655 se c.
see Fa ctory
Settings
InitVlvTime
Initial Valve Time. Number of se conds Bre w Valve open
initially before beginning pulses
0 - 540 se c.
N/A
PulseDelay
Number of se conds in pulse cycle to delay before
opening Brew Valve
0 - 255 se c.
0
PulseValve
Number of se conds in pulse cycle Brew Valve is open
2- 255 se c.
0
Bypass
Delay1
Number of se conds afte r brew start s to open Bypa ss
Valve.
0-540 se c.
0
Bypass
Time1
Number of se conds B ypass Valve is open
0-540 se c.
0
Number of se conds afte r Brew Valve close s for all
product to drip out of bre w chambe r
0 - 255 se c.
see Fa ctory
Settings
Set RIGHT side volumes to the same setting s as LEF T
"Y" ad vance s to MENU "N" ad vance s to "ChangeRight?
Y/N
N/A
Change RIGH T Volumes
"Y" ad vance s to T ype4… "N" ad vance s to MENU
Y/N
N
SUB-ITEM
Press LE FT 1-1/2 GAL (key 3 ) to advan ce thru item s
Press LE FT 1 GAL (ke y 2) to EXIT menu
MENU
1
BRE W
WaterTemp
Actual water temp is displayed in ºF or ºC
S ETTI NG S
BrewTemp
Brew Temperatu re. Must be 5 ºF below Ma xTemp
See Machine Settings Menu
Brew
Volumes
Calculate volume of water delivered both thru b rew
chamber and b ypass
Change
LVols?
Change Left Volumes Y (ye s) or N (no)
"y" advan ce s to Type1 … "N " ad vance s to Ser R=L?
Type1
Satellite
Select container for 1 st (1/2 GAL) Brew
PUL S E BR E W S YS T E M
TotalValve
675 p/n 74346 SS-2 Programming Manual
DESCRIPTION
Brew
Complete1
Left Brew Volumes 2 (T ype2...) and 3 (T ype3…) appea r in order and are set a s above
Set R=L?
Change
Right?
Right Brew Volumes 4 (T ype4...), 5 (Type5 …) and 6 (Type6 …) appear in orde r and are set as abo ve
When display returns to " WaterTemp", press 1s t key to advanc e to next MENU
7
PROGRAMMING CHART (continued)
MENU
LEFT 1/2
GAL (ke y 1)
ITEM
LEFT 1-1/2
GAL (ke y 3)
SUB-MENU
SUB-ITEM
DESCRIPTION
RANGE
Key 5 dec.
Key 6 inc.
DEFAULT
Press LE FT 1-1/2 GAL (key 3 ) to advan ce thru item s
Press LE FT 1 GAL (ke y 2) to EXIT menu
MENU
2
TIME
After-Hours
FUNCTIONS
Puts brewer into low energ y mode if unused for a time
0 (off) or 1
- 6 (hours)
3
Quality
Time
Countdown Quality Timer flashe s satellite LED after a
time.
0 (off) or
0-180 min.
45 min.
TIMER
Activates various timed fun ctions If "On" a ccess Wkda y
On. If "Off" a ccess Day
On or Off
Off
Set hour and AM/PM for brewer to tu rn on - Weekda ys
01 - 12
AM/PM
07:00A
Wkda y on
Hour
AM or PM
Minute
Wkda y off
Hour
AM or PM
Minute
Wkend on
Hour
AM or PM
Minute
Wkend off
Hour
AM or PM
Minute
SET DAY
AND TIME
Set minute for brewer to turn on - Wee kda ys
00 - 59
07:00A
Set hour and AM/PM for brewer to tu rn off - Weekda ys
01 - 12
AM/PM
07:00 P
Set minute for brewer to turn off - Wee kda ys
00 - 59
07:00P
Set hour and AM/PM for brewer to tu rn on - Weekend
01 - 12
AM/PM
07:00A
Set minute for brewer to turn on - Wee kend
00 - 59
07:00A
Set hour and AM/PM or brewer to tu rn off - Weekend
Set same on and off times to have b rewer remain off
01 - 12
AM/PM
07:00A
Set minute for brewer to turn off - Wee kend
00 - 59
07:00A
Set brewer for toda y's time and date. Setting is battery
backed. Change fo r daylight sa vings or time zone move
Day
Set today's da y of wee k
Mon - Sun
none
Time: Hour
Set hour and AM or PM
01- 12
AM/PM
none
Time - Min
Set minute
0 - 60
none
000000 G/L
none
Press 1 st key to ad vance to ne xt MENU
S ER VIC E
TotalVol
Displays Total Volume of water in Gallons or Liters
&
BrewCycs
Total number of brew cycles perfo rmed
000000
none
COUNTERS
FltrLife
Filter life in 100 gallon increments. "0" disable s
0-10000
0
1, 2 or 3
or 0 for off
0
Reset volume and cycles counter to 0
N/A
none
A message to be displayed on readout may be
programmed with a personal computer
N/A
none
Filter
Message
Reset Totals
Call for
Service
Select one of 3 message s for filter problem, or 0 fo r off.
Programmable with personal compute r.
Press 1 st key to ad vance to ne xt MENU
8
675 p/n 74346 SS-2 Programming Manual
Tracks usage totals
MENU
3
PROGRAMMING CHART (continued)
MENU
LEFT 1/2
GAL (ke y 1)
ITEM
LEFT 1-1/2
GAL (ke y 3)
SUB-MENU
SUB-ITEM
RANGE
Key 5 dec.
Key 6 inc.
DESCRIPTION
DEFAULT
Select measurement units and default function s
MENU
4
MAC HIN E
Temp.Unit
Select temperature units a s ºF or ºC
F or C
ºF
S ETTI NG S
Vol.Unit
Select volume unit as ounce s or liters
Oz o r L
Oz
KeyPad
Lock
Locks ke ypad. When ON hold LEFT BREW S TOP key
for 6 se c. to unlock momenta rily
On or Off
Off
MaxWt
Temp
Maximum water temperatu re. Must be 5 ºF o ver Bre w
Temperature
195 - 210
208
Brew Wait
"Y" = Wait to initiate brew until water temperature is at
Precise Tempe rature fo r Brewing™.
"N" = brew rega rdless of temperature
Y or N
Y
Y = Beeper on
Y or N
Y
Y or N
N
0.00 to 1.00
gallon/min.
Factory set
@ 0.75
-20ºF to
+20ºF
none
Beeper
Load
Defaults?
Y = Reload factory default settings
To access from Ma chine Settings press and hold 3rd and
6th keys until "Fa ctory Settings" is displa yed
HIDDE N
MENU
FACT OR Y
S ETTI NG S
N = Beeper off
InflRate
Calibration
Inflow Rate. Number required to calculate volumes.
To change: pre ss 4th ke y when "Calibration" is displayed
Offset required to make temp senso r reading match
actual temperature
TotalVol.
Independent volume total - not re-settable
000000
none
BrewCycs
Independent cycle counter - not re -settable
000000
none
675 p/n 74346 SS-2 Programming Manual
Press 2nd ke y to EXIT or 1 st ke y to scroll thru MENUS.
See page 10 for detailed explanation of all programming topics.
9
PROGRAMMING PROCEDURES
All 6 volumes are set
Independently.
Left and right side may
be set the same or
different. See program
chart.
Maximum Water temp is
factory set at 208ºF. It
may be adjusted from
195ºF to 210ºF.
Maximum Brew Temp.
can be set no higher than
5ºF below the Maximum
Water Temperature.
Time Functions Menu
• "After Hours:" When After Hours™ is activated, the brewer will allow the
water temperature to drop by 20'F before reheating. Can be turned off
by setting to "0".
• "Quality Time:" - Countdown Quality Timer™. Flashes SATELLITE
LED after a set time to remind server that coffee is aged. Can be
turned off by setting to "0", or set from 0 minutes to 180 minutes. See
program table.
• "Timer:" Turn the timer on if automatic startup and stop is required.
Time for the brewer is maintained with a battery backup system that will
last up to 20 years. This system also handles power fluctuations by
maintaining the power time during power outages. When setting times,
make sure that the AM or PM is set properly to activate the timer at the
correct time. On and Off times for weekdays and weekends are set
individually. Weekend may be turned "OFF" by setting the start and
stop time at the same time.
• "Day:" Set the day of the week by using the 5th and 6th keys.
• "Time:" Use the 5th and 6th keys to set Hour, AM or PM and Minutes.
Service & Counters Menu
• "TotalVol:" - Total Volume. Indicates total water volume processed by
the brewer.
• "Brew Cycs:" - Brew Cycles. Displays total number of brew cycles since
last reset.
• "Filter Message" - Select one of three messages to be displayed if filter
exceeds life expectancy, or "0" to turn filter message "OFF".
• "FltrLife:" - Filter Life. If a filter is used, input the number of gallons of
expected filter life capacity, in increments 100 gallons.
• "Message" Trouble message to be displayed. Programmed with
personal computer.
10
675 p/n 74346 SS-2 Programming Manual
When using the timer be
sure to allow at least 30
minutes for the brewer to
reach proper temperature
from the time it is turned
on.
Brew Settings Menu
• "Water Temp:" is actual water temperature in the tank.
• "Brew Temp:" is desired brew temperature. This temperature +/-IºF will
be maintained in the tank. Adjust by pressing 5th or 6th keys. The
brew temperature cannot be set any higher than 5ºF below the
Maximum Water Temperature, which is factory set at 208ºF. This
means maximum brew temperature will be 203ºF. If a higher
temperature is required, first increase the Maximum Water
Temperature in Machine settings (maximum is 210ºF), then increase
brew temperature (maximum brew temperature is 205'F if Maximum
Water Temperature is increased to 210ºF).
• Pulse Brew. To access the pulse or pre-infusion programs, see Pulse
Brew System details.
• "Total Valve:". This is the number of seconds the dump (or brew) valve
will remain open and determines total water volume.
• Brew Type for each volume can be set as airpot or satellite container.
• Note: "Airpot" brew type bypasse s any satellite interlock system.
• "Brew Complete...:" (Dripout Time)- This is the number of seconds after
the dump valve is closed that is required until all of the water flows
through the brew basket. If different weights of coffee or tea are used,
this number may need to be increased or decreased.
PROGRAMMING PROCEDURES (continued)
675 p/n 74346 SS-2 Programming Manual
Machine Settings Menu
• "Temp. Unit:" - Temperature Unit. Set to "F" for ºF and "C" for ºC.
• "Vol. Unit:" - Volume Unit. Set to either "Oz" for ounces or "L" for liters.
• "KeyPadLock:" Turn to "On" or "Off". If "On" the keypad switches can
only be activated by pressing and holding the LEFT BREW STOP key
for 6 seconds.
• "MaxWt.Temp.:" - Maximum Water Temperature. The maximum water
temperature is factory set at 208'F degrees, but can be adjusted up as
high as 210ºF. The brew temperature cannot be set any higher than
5ºF below the maximum temperature. Maximum temperature should
be set at least 2ºF degrees below the local boiling point. The brewer
will display "overheat error' if the water temperature in the tank is
sensed to be at or above the Maximum Water Temperature. Therefore
in higher altitude locations, adjust the Max. Water Temp accordingly:
•
•
"Brew Wait:" The Precise Temperature Brewing™ feature can be
overridden by setting Brew Wait to "N" for No.
"Load Debuits?" Reloading of default settings will reset many of the
programmed settings to those outlined in the programming table. In the
table those items with "none" noted in the Default column would not be
reset when defaults are re@-loaded. Where a value is noted, this
would be the re-loaded value if defaults are loaded. Re-loading of
defaults should be used only if major programming problems have
occurred and it is necessary to return to factory settings.
11
The keypadlock can be
momentarily bypassed by
pressing and holding the
LEFT BREW STOP key
for 6 seconds. The keys
will be active until a brew
has been completed. Or
if a brew is not started,
the keypad will revert to
the locked mode after 60
seconds.
By setting "Brew Wait" to
"N", the brewer will start
a brew regardless of the
water temperature. There
will be no delay to heat to
the proper temperature.
This is not the
recommended setting.
"Brew Wait" is factory set
at "Y" for yes. In this
mode the brewer will only
start a brew at the
Precise Brew
Temperature™.
PROGRAMMING PROCEDURES (continued)
The factory settings
menu can only be
accessed by going into
the programming mode,
and pressing the 1st key
until "Machine Settings"
is displayed. Then press
and hold the 3rd and 6th
keys for three seconds
until "Factory Settings" is
displayed.
IMPORTANT:
Only qualified personnel
should make changes to
these Factory Settings.
NOTE:
The probe has been
factory calibrated. If a
controller board is
changed it is
recommended that the
previous calibration be
checked and entered on
the new board.
If this is not possible, or if
a new probe is used,
calibration should be
completed as at right:
Factory Settings Menu
•
•
•
•
"InflRate:" - Inflow Rate. The inflow rate is factory set at 0.75 gallons
per minute. This value is required to calculate the water volume.
Generally the .75 setting will be quite accurate unless there is
unusually low or high water pressure and volume, in which case the
Inflow Rate can be changed.
"Calibration". To access the calibration program, press the 4th key
when "Calibration" is displayed. The probe is factory set and should
not need resetting, unless the controller board or probe is changed.
See Calibration Instructions below for detailed instructions.
"TotaiVol:" - Total Volume. Total water volume is stored in the
Factory Settings menu as well as in the Service & Counters menu.
This total is not re-settable.
"BrewCvcs:" - Brew Cycles. Total brew cycles is stored in the
Factory Settings menu as well as in the Service & Counters menu.
This total is not re-settable.
Calibration Instructions:
1. Turn brewer on and allow to heat to proper temperature, and the
heat light will go out.
2. Turn brewer off.
3. Access the programming mode, go to Factory Settings, go to
Calibration and press the 4th key to access calibration.
4. Using an accurate thermometer, determine the actual tank
temperature by measuring the temperature of the water coming out
of the faucet. It is important to run the water over the thermostat long
enough to get a proper reading. (An alternate method of establishing
water temperature is to remove the top cover of the brewer, then pull
out the level sensor. Insert the thermometer into the brewer. Allow
time for the thermometer temperature to stabilize.)
6. Make sure the temperature on the left of the screen agrees with the
actual temperature of the water determined with the accurate
thermostat. Once this has been completed the SS2 will maintain the
calibrated setting.
7. Once calibrated, press the 3rd key to continue in the Factory
Settings menu, press the 1st key to return to Brew Settings menu, or
press the 2nd key to exit programming.
12
675 p/n 74346 SS-2 Programming Manual
5. Once the actual tank temperature has been established, look at the
values on the screen. As an example, it may read "199F Corr. + 0"
This would indicate that the water temperature in the tank is 199ºF
with no correction (or calibration) of the probe. If the actual
temperature according to the thermostat was:
a. HIGHER by 3F (i.e. 202ºF in this example), press the 6th key 3
times until the screen reads as follows: "202F Corr. + 3".
b. LOWER by 3F (i.e. 196F in this example), press the 5th key 3
times until the screen reads as follows: "196F Corr. - 3".
PROGRAMMING PROCEDURES (continued)
PULSE BREW PRE-INFUSION CAPABILITY
BYPASS SYSTEM
Applications:
1. Pre-infuse (or Pre-soak) the Bed of Coffee or Tea.
The brew valve can be opened for a -short period of time to
allow the bed of coffee or tea to be pre-infused. After a delay
while the pre-soaking is taking place, the brew valve can be
opened to start and complete the brew.
2. Extend Contact Time With the Coffee.
The brew valve can be programmed to "pulse" by opening
and closing for programmed periods during the brew. This
capability will allow for longer contact with the coffee or tea if
higher extraction rates are required.
3. Prevent Brew Chamber Overflow.
The pulse feature allows the delivery time of the water to be
extended. Overflow problems can also be experienced if
particularly fine grind coffee is used. The SS2 can be
programmed to extend the delivery of the water over a longer
period of time, thus preventing any overflow problems.
Access the Pulse System:
1. Select the Brew Volume that will be using the "pulse" brew
system. (i.e. Brew Volume 1, 2, 3 etc.)
675 p/n 74346 SS-2 Programming Manual
2. With the selected volume on the screen (e.g.: BrewVoI1:),
change volume if necessary (must not be "0") and press the
4th key (while in total valve time display) to go to the Pulse
Programming options (as opposed to pressing the 3rd key
which would bypass Pulse Programming).
3. The first three menu items below will appear in this order.
a. InitVlv Time: Initial Valve Time (seconds) to open before
pulse cycle(s) begin.
b. Pulse Delay: Number of seconds valve is closed
beginning pulse cycle(s).
c. Pulse Valve On: Number of second's valve is open
during pulse cycle(s).
d. Total Valve: Total number of seconds valve is to be open
(pulse + initial). This determines your total volume out of
brew chamber, which must be set if total volume changes
from factory settings.
e. Drip Out Time: Time after valve is closed before all water
drips through brew chamber as brewed product and the
brew is complete.
13
Pre-infusion is used to pre-wet
the bed of grounds or tea leaves
prior to the actual brew. This may
be used to improve the brew
quality in certain situatons.
Pulsing the delivery of brew water
extends the time the water is in
contact with the coffee grounds or
tea leaves. This can be adjusted
to optimize extraction rates.
Pulsing the delivery of brew water
allows more time for the water to
drip out of the brew chamber.
This can be set to prevent brew
chamber overflow when very fine
grind coffee is used.
Bypass System delivers a portion
of the total volume of water
directly to the container. This is
used in situations where delivery
of all water through the coffee
grounds or tea leaves would
result in too strong a product.
PROGRAMMING PROCEDURES (continued)
The pulse feature will be active
only if it has been programmed.
See page 13.
The brewer will calculate the
number of seconds for the full
brew and display it on the LCD
to begin the brew. It will also
calculate how many pulse
cycles are required to complete
the brew. (If a final partial "Pulse
Valve On" is required this will
also be calculated
automatically.)
Vol total = (T bre w x Rspr ay h ea d) +
(T byp ass x Rb yp ass )
or
To t al d eli ve re d vo l u m e i s e q u al t o:
B re w V al ve Ti m e ti m e s
S p ra yh e a d Fl o w R a t e
Pl u s
B yp a ss V a l ve Ti m e ti m e s
B yp a ss Fl o w R a t e
Pulse Feature Operation:
When the pulse brew begins, the brew valve will be opened for
the number of seconds programmed for "Initial Valve Time"
(Init Vlv Time). The valve will then close for the number of
seconds in "Pulse Delay", then open for the number of seconds
in "Pulse Valve On". The pulse cycle (Pulse Delay plus Pulse
Valve) will be repeated continuously until the brew valve has
been opened for the time programmed as "Total Valve ".
Water Outflow (Delivery) Rates:
The outflow rate of water from the sprayhead is required to
calculate valve time for different volumes. Sprayhead outflow
rates are based on the standard 64-ounce coffee brew requiring
approximately 117 seconds of the brew valve being open. This is
an outflow rate of approximately .50 ounces per second.
To calculate Total Valve time, the total ounces required should be
divided by .50 oz/second. Each brewer may have a slightly
different flow rate based on whether the brewer is level, scale
build up on lines, etc. Minor adjustments may be required to get
precise volume.
Bypass Valve System:
Access the Bypass System from the "Brew Settings" menu,
"Total Valve" sub-menu (same as Pulse Brew).
1. Bypass delay: Number of seconds after brew starts valve will
open.
2. Bypass Valve Time: Number of seconds valve is on.
3. Bypass Flow Rate is approximately 0.27 oz/seconds.
675 p/n 74346 SS-2 Programming Manual
14
PROGRAMMING PROCEDURES (continued)
SAMPLE PROGRAM
Position 1 & 4
Position 2 & 5
Position 3 & 6
Type Satellite
Total Valve
142
Press 4 th Key
Intit Valve Time 30
Pulse Delay
5
Pulse Valve On 10
Bypass Dly
30
Bypass Time 50
Brew Complete 30
Type Satellite
Total Valve
215
Press 4 th Key
Intit Valve Time 30
Pulse Delay
5
Pulse Valve On 10
Bypass Dly
30
Bypass Time 150
Brew Complete 45
Type Satellite
Total Valve
322
Press 4 th Key
Intit Valve Time 30
Pulse Delay
5
Pulse Valve On 25
Bypass Dly
30
Bypass Time 200
Brew Complete 60
Approximate Flow Rates
To determine brew time for a volume divide ounces by flow rate:
EX: 1 64oz (1/2 Gallon) ¸ .50oz Sec = 128 Sec. (approx.)
EX: 2 192oz (1 ½ Gal w/bypass) ¸ .27oz Sec = 249 Sec. (approx.)
Factory Settings
With “MACHINE SETTINGS” displayed, press and hold keys 3 & 6
• Infl. Rate 0.75 G.M.
• Calibration
• Press Key #4
• Core + 0°F
• Total Val: 000000G
• Brew Cycle: 000000
675 p/n 74346 SS-2 Programming Manual
Press #2
• Check Complete
15
Brew Settings
Water Temp:
Brew Temp: 195°F
Brew Volumes
Change L. Vol. Y
Set R=L Y
Change R. Vols N
Time Functions
• After Hours: Off
• Quality Time 180m
• Timer: ON
• Day:
• Time: Hours
• Time: Min.
3 Serv ice Count
• Total Volume 000000G
• Brew Cycle 000000
• Filter Life 10000
• Filter Message
• Reset Total: N
• Service Number:
888-492-2782
Machine Settings
• Temp. Unit: F
• Vol. Unit: G
• Key Pad Lock: Off
• Max Temp.: 208F
• Brew Wait: Y
• Beeper: Y
• Load Defaults? N
PROGRAMMING - DIAGNOSTIC TEST
This is a built-in test of the
following system components:
a) Verification of Firmware/
EEPROM data
b) Keypad switches / interlock
switches
c) Volume, brew start/stop,
power and satellite LEDs
d) Inlet valve, left and right
dump valves, left and right
bypass valves, solenoid
valves (optional)
e) Heater
f) Water level probe,
temperature probe
DUAL SATELLITE SYSTEM BUILT-IN DIAGNOSTIC TEST
Entering Test Mode:
1. Press POWER key OFF .
2. Press and hold the 3rd (Left 1-1/2 GAL) key and the 4th
(Right 1/2 GAL) key, then POWER key ON.
3. At the sound of the beep, release the keys.
If successful, a message containing the revision of the
firmware will be on the display. (e.g. "WW 291 Rev. 3.1)
Verify that the revision of the software is correct, and then
press the POWER key. Each key press should be followed
by an audible beep.
Check Date Revision:
The next display contains the revision number of the data
programmed into the EEPROM. (e.g. "Data Rev 3.0"). Ensure
that the correct version has been loaded into the EEPROM, then
press POWER key to continue.
Sw itch Test:
If a key or toggle switch is not
detected within 5 seconds, then
the "Switch Error" message will
be displayed followed by 2
beeps. If an error occurred with
the correct key pressed, the
control board has failed the test.
1. Press the left 1/2 GAL key. You will hear a beep, and the
display will change to: "Test Switch 2".
2. Press the left 1 GAL key. You will hear a beep, and the
display will change to: "Test Switch 3".
4. Check the safety interlock switches (if equipped):
Toggle the left interlock by removing and reinstalling the left
brew chamber when the controller displays "L Interlock".
Check the right interlock in the same way when the controller
displays "R Interlock".
16
675 p/n 74346 SS-2 Programming Manual
3. Continue testing keys in order:
Test Switch 1
Left 1/2 GAL key
Test Switch 2
Left 1 GAL key
Test Switch 3
Left 1-1/2 GAL key
Test Switch 4
Right 1/2 GAL key
Test Switch 5
Right GAL key
Test Switch 6
Right 1-1/2 GAL key
Test Switch 7
Left BREW START key
Test Switch 8
Left BREW STOP key
Test Switch 9
POWER key
Test Switch 10
Right BREW START key
Test Switch 11
Right BREW STOP key
PROGRAMMING - DIAGNOSTIC TEST (continued)
LED Test
Display will read: "Testing LEDs"
1. The top left LED should turn on first. After one second, the
LED immediately right of it will turn on and the top left LED
will turn off. Observe that the LEDs turn on in order - moving
from left to right along the top row, then left to right along the
bottom row. Ensure that only one LED is on at a time and
that each of the eleven LEDs turn on.
If any one of the LEDs does not
turn on, if more than one LED
turns on at any given time
during this test, or if the LEDs
do not turn on in the correct
order then the controller has
failed the test.
2. Also ensure that the color of each LED is correct:
GREEN
GREEN
YELLOW
GREEN
3. Press the POWER key to advance to the next test.
Valves/Heater Test
The display will read: "Valvc I Off"
1. Verify that all the valves are off, and that the heater is off.
Valve I corresponds to the inlet valve.
675 p/n 74346 SS-2 Programming Manual
2. Press the POWER key and the inlet valve should turn on with
the message: "Valve I On"
3. Press the POWER key to advance to Valve 2 (left dump
valve). Continue testing components. Each of the following
components should turn on then off in the following order:
Valve I
Inflow
Valve 2
Left Brew
Valve 3
Right Brew
Valve 4
Left Bypass
Valve 5
Right Bypass
Heater
Heater - DO NOT leave on for an
extended period of time.
L Solenoid Lock Out Solenoid (optional)
R Solenoid Lock Out Solenoid (optional)
4. If each one of the components turn on in order, and if only
one of them is on at any time, then the controller has passed
this test. In this case, press the POWER key to advance to
the next test.
17
If a -Valve Fault" message
appears on the display during
this test, the controller fails the
test.
PROGRAMMING - DIAGNOSTIC TEST (continued)
Probe Test:
Two numbers will be displayed:
1. The left number determines whether the WATER-sensing
probe is in contact with water.
a. A number of "0" (or close to 0) means that water is in
contact with the probe.
b. A number of "255" (or close to 255) means water is not in
contact with the probe.
2. The right number represents what the TEMPERATUREsensing probe reads. The table below is an approximate
correlation between the value and the temperature the probe
is sensing:
a. A number less than "10" indicates that the probe is not
properly connected to the board
b. A number higher than "155" indicate a defective probe.)
Number
(Right Side)
20
74ºF
25
83ºF
30
92ºF
↓
↓
120
181ºF
125
186ºF
130
191ºF
135
196ºF
140
201ºF
150
206ºF
≥ 155
Defective
Probe
Testing Complete!
18
675 p/n 74346 SS-2 Programming Manual
The message "Test Done"
should be on the display.
Press the POWER key to reset
the controller. The controller
should restart with the message
"BLOOMFIELD" and date.
≤ 10
Approximate
Water Temp.
Probe not
connected
FAULT DETECTION
Fault Detection:
Software-level fault detection is performed using the temperature
probe, and the water level sensor.
Fault detection is performed at
all times, except in Off mode.
In the event of a fault, solenoid valves are closed, the heater
triac is turned off, all LEDs flash, an error message is displayed
and the system halts by entering Error Mode.
The system can be reset by removing the power to the system or
by holding down the 8th (Left Stop Brew key) for 2 seconds.
These errors are monitored at all times:
1. Probe/Heater Error
If the temperature of the water does not increase 4ºF in 4
minutes with the heater on, then either there is a probe and/
or heating element failure, or the water is boiling. In either
case, the system halts with a "probe/heater err" message.
2. Maximum Temperature Reached
If the temperature exceeds a limit, then an overheat error
message is produced. This error can occur if the heater triac
fails "on". The maximum temperature should be set in the
menu system as to prevent boiling.
675 p/n 74346 SS-2 Programming Manual
3.
Water Level Sensor Timeout
If the inflow valve is opened and water is not detected within
30 minutes, the message no water sensed is produced.
This can be caused by level sensor failure or water inflow
valve failure. After the tank is filled to full capacity, the time
limit varies with the state of the outflow valves:
a. Two sides brewing: 5 minutes
b. One side brewing: 3 minutes
c. No brewing being performed: 1 minute
4. Internal Component Fault
The controller is also capable of verifying the proper
functioning of internal components:
a. "Keypad locked" message indicates that a key has been
held down for an extended amount of time. This is
perceived as a fault in the keypad controller.
b. "Valve fault" message indicates that the valves are not
responding properly.
19
IMPORTANT:
The boiling temperature of
water will vary with altitude.
See chart, page 11.
Commercial Food Equipment Service Association
Wells Bloomfield proudly supports CFESA
Commercial Food Equipment Service Association
SERVICE TRAINING - QUALITY SERVICE
Genuine Parts
Protect - YOU - All - Ways
CUSTOMER SATISFACTION
WELLS BLOOMFIELD, LLC
2 ERIK CIRCLE, P. O. Box 280 Verdi, NV 89439
fax: 775-689-5976
telephone: 775-689-5707
www.wellsbloomfield.com
PRINTED IN UNITED STATES OF AMERICA