1
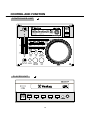
OWNER'S MANUAL
This owner's manual for CDX-35,
CDX-35C and CDX-35P.
VESTAX CORPORATION
1-18-6 Wakabayashi, Setagaya-ku, Tokyo 154-0023 Japan
Phone:03-3412-7011 Fax: 03-3412-7013
VESTAX America
2750C 29th Ave Suite. 115 Hollywood. Fl33020
Phone:303-766-5269 Fax: 303-766-2196
VESTAX (Europe)Ltd.
Unit 5 Riverwey Industrial Park Alton, Hampshire GU34 2QL England
Phone:44-1420-83000 Fax: 44-1420-80040
CONGRATULATIONS !
Thank You for purchasing the VESTAX CDX-35, CD PLAYER. Please
read this owner's manual carefully before you start to use, so that you
will fully understand all of the special features and enjoy the full use of
the product.
C A U T I O N
FCC
IMPORTANT SAFE GUARDS
F E AT U R E S
BEFORE USE
CONTROL AND FUNCTION
CONTROLLER UNIT
P L AY E R U N I T
TECHNIQUES FOR DJ PLAY
CONNECTION
SPECIFICATION
1
2
3
4
5
6
7
12
14
19
20
CAUTION
RISK OF ELECTRIC SHOCK DO NOT OPEN
C A U T l 0 N : TO REDUCE THE RlSK OF ELECTRlC SHOCK
DO NOT REMOVE COVER(OR BACK)
NO USER-SERVICEABLE PARTS INSIDE
REFER SERVlCING T0 QUALIFIED SERVlCE PERSONNEL
The lightning flash with arrowhead symbol,within an equilateral triangle,is intended to alert the user to
the presence of uninsulated dangerous voltage within the product's enclosure that may be of sufficient
magnitude to consitute a risk of electric shock to persons.
The exclamation point within an equilateral triangle is intended to alert the user to the presence of important
operating and maintenance(servicing)instructions in the literature accompanying the appliance.
T0 REDUCE THE RISK 0F FIRE 0R ELECTRlC SHOCK,DO NOT
EXPOSE THIS APPLIANCE T0 RAIN 0R M0ISTURE.
C A U T I O N : TO PREVENT ELECTRIC SHOCK,MATCH BLADE OF
PLUG TO WIDE SLOT,FULLY INSERT
ATTENTION:P 0 U R E V I T E R L E S C H 0 C S E L E C T R I Q U E S ,
INTRODUIRE LA LAME LA PLUS LARGE DE LA
FICHE DANS LA BORNE CORRESP0NDANTE DE LA
PRISE ET P0USSER JUSQU AU F0ND
1
NOTE
This equipment has been tested and found to comply with the limits for a Class B
digital device, pursuant to Part 15 of the FCC Rules. These limits are designed to
provide reasonable protection against harmful interference in a residential
installation. This equipment generates, uses and can radiate radio frequeney energy
and, If not installed and used in accordance with the lnstructions, may cause harmful
interference to radio communications. However, there is no guarantee that
interference will not occur in a particular installation. If this equipment dose cause
harmful interference to radio or television reception, which can be determined by
turning the equipment off and on, the user is encouraged to try to correct the
interference by one or more of the following measures.
●Reorient or relocate the recelving antenna.
●Increase the separation between the equipment and receiver.
●Connect the equipment into an outlet on a circuit different from that to which the
receiver is connected.
●Consult the dealer or an experiencced radio/TV technician for help.
NOTE
Changes or modifications may cause this unit to fail to comply wiht Part 15 of the
FCC Rules and may void the user's authority to operate the equipment.
This Class B digital apparatus meets all requirements of the Canadian Interference-Causing Equipment
Regulations.
Cet appareil numérique de la Classe B respecte toutesles exigences du Réglement sur le matérier brouilleur du
Canada.
HOW TO CONNECT A PLUG
IMPORTANT
The wires in the mains lead are coloured in
This apparatus is fitted with an approved moulded 13
accordance with the following code:
Amp plug.To change a fuse in this type of plug
BLUE-"NEUTRAL"("N")
proceed as follows:
BROWN-"LIVE"(L")
1.Remove fuse cover and fuse.
1.The BLUE wire must be connected to the terminal
2.Fix new fuse which should be a BS1362 5A.
which is marked with the letter "N" or coloured
A.S.T.A. or BSI approved type.
BLACK.
3.Refit the fuse cover.
2.The BROWN wire must be connected to the
If the fitted plug is not suitable for your sockel
terminal which is marked with the letter "L" or
outlets, It should be cut off and an appropriate plug
coloured RED.
fitted in its place. It the mains plug conlains a fuse.
3.Do
not connect either wires to the earth terminal in
this should have a value of 5A. If a plug without a
the plug which is marked by the letter "E" or by the
fuse is used, the fuse at the distribution board
safely earth symbol ↓or coloured green or greenshould not be greater than 5A.
and-yellow.
NOTE
Betore replacing the plug cover, make cenain that the
cord grip is clamped over the sheath of the lead-not
simply over the two wires.
The severed plug must be destroyed to
avoid a possible shock hazard it be
inserted into a 13A socket elsewhere.
CLASS 1 LASEN PNOOCUT
LUOKAN 1 LASENLAITE KLASS 1
LASENAPPANAT
42
IMPORTANT SAFEGUARDS
READ BEFORE OPERATING EQUIPMENT
This product was designed and manufactured to meet strict quality and
safety standards. There are, however, some installation and operation
precautions which you should be particularly aware of.
1. Read instructions-All the safety and operating
instructions should be read before the appliance
is operated.
2. Retain instructions-The safety and operating
instructions should be retained for future
reference.
3. Heed Warnings-All warnings on the appliance
and in the operating instructions should be
adhered to.
4. Follow Instructions-All operating and use
instructions should be followed.
5. Cleaning-Unplug this product from the wall
outlet before cleaning. Do not use liquid cleaners
or aerosol cleaners. Use a damp cloth for
cleaning.
6. Attachments-Do not use attachments not
recommended by the product manufacturer as
they may cause hazards.
7. Water and Moisture-Do not use this product near
water-for example, near a dath tub, wash bowl,
kitchen sink, or laundry tub, in a wet basement,
or near a swimming pool, and the like.
8. Accessories-Do not place this product on an
unstable cart, stand, tripod, or table. The product
may fall, causing serious injury to a child or
adult, and serious damage to the appliance. Use
only with a cart,. stand, tripod, bracket, or table
recommended by the manufacturer, or sold with
product. Any mounting of the appliance should
follow the manufacturer's instructions, and
sholud use a mounting accessory recommended
by the manufacturer.
9. Ventilation-Slots and openings in the cabinet are
provided for ventilation and to ensure reliable
operation of the product and to protect it from
overheating, and these openings must not be
blocked or covered. The openings should never
be blocked by placting the product on a bed, sofa,
rug, or other similar surface. This product should
never be placed near or over a radiator or heat
register. This product should not be placed in a
built-in installation such as a bookcase or rack
unless proper ventilation is provided or the
manufacturer's instructions have been adhered to.
10. Power sources-This product should be operated
only from the type of power source indicated on
the marking label. If you are not sure of the type
of power supply to your home, consult your
appliance dealer or local power company.
11. Grounding or Polarization-This product is
equipped with a polarized alternating-current
line plug (a plug having one blade wider than the
other). This piug will fit into the power outlet
only one way. This is safety feature. If you are
unable to insert the plug fully into the outlet, try
reversing the plug. If this should still fail to fit,
contact your electrician to replace your obsolete
outlet. Do not defeat the safety purpose of the
polarized plug.
12. Power-Cord Protection-Power supply cords
should be routed so that they are not likely to be
walked on or pinched by intems placed upon or
against them, paying particular attention to cords
at plugs, convenience receptacles, and the point
where they exit from the appliance.
13. Protective Attachment Plug-The appliance is
equipped with an attachment plug having
overload protection. This is a safety feature. See
Instruction Manual for replacement or resetting
of protective device. If replacement of the plug
is required, be sure the service technician has
used a replacement plug specified by the
manufacturer that has the same overload
protection as the original plug.
14. Lightning-For added protection for this product
during lightning storm, or when it is left
unattended and unused for long periods of time,
unplug it from the wall outlet. This will prevent
damage to the product due to lightning and
power-line surges.
15. Overloading-Do not overload wall outlets and
extension cords as this can result in a risk of fire
or electric shock.
3
to its normal operation.
e. If the product has been dropped or cabinet has
been damaged.
f. When the product exhibits a distinct change in
perfromance-this indicates need for service.
19. Replacement Parts-When replacement parts are
required, be sure the service technician has used
replacement parts specified by the manufacturer or
have the same characterristics as the original parts.
Unauthorized substitutions may result in fire,
electric shock or other hazards.
20. Safety Check-Upon completion of any service or
repairs to product, ask the service technician to
perfrom sefety checks to determine that the
product is in proper operating condition.
21. Carts and Stands-The appliance should be used
only with a cart stand that is recommended by
manufacturer.
22. An appliance and cart combination should be
moved with care. Quick stops, excessive force,
and uneven surfaces may cause the appliance and
cart combination to overturn.
16. Object and Liquid Entry-Never push objects of
any kind into this product through openings as
they may touch dangerous voltage points or
short-out parts that could result in a fire or
electric shock. Never spill liquid of any kind on
the product.
17. Servicing-Do not attempt to service product
yourself as opening or removing covers may
expose you to dangerrous voltage or other
hazards. Refer all servicing to qualified
sersonnel.
18. Damage Requiring Service-Unplug this product
from the wall outlet and refer servicing to
qualified service personnel under the following
conditions:
a. When the power-supply cord or plug is
damage.
b. If liquid has been spilled or objects have fallen
into the product.
c. If the product has been exposed to rain or
water.
d. If the product dose not operate normally by
following the operating instructions. Adjust
only those controls that are coverd by the
operating instructions as an improper
adjustment of other, controls may result in
damage and will often require extensive work
by a qualified technician to restore the product
FEATURES
●Analog-touch cueing system
and play around with the loop on the fly.
Thanks to a large buffer memory and ultra-fast DSP, ●Master tempo / master key
In addition to regular pitch control, the CDX-35
the cue point can be searched for with a jog wheel,
offers two advanced tempo and key controls. Thanks
just like an analog player. The sound is produced as
to the DSP technology, the tempo can be changed +the wheel is spun, back and forth, slow or fast, just
10% without changing the key, and the key can be
like cueing vinyl. The new way of CD cueing, point
changed +-20% without changing the tempo. This
focus an alternative way of cueing is also provided.
feature allows DJs to mix music in perfect pitch and
The CDX-35 produces a short loop of sound around
key.
the laser pick up, just like any other CD player. The
difference with the CDX-35 is that the length can be ●Reverse play
The CDX-35 even plays music in reverse. The
adjusted from 0.013 to 3 seconds. Therefore, exactly
special technique, which was only possible with a
one beat, half bar or full bar can be monitored in a
special analog turntable is now available by just
loop and the loop can be moved around. This
touching a button.
advanced monitor system makes the CD cueing no
●Three plus one instant cue positions
longer a pain but fun.
The CDX-35 also offers more playability with the
●Seamless loop
total of four cue / memory points. This feature makes
Up to 20 seconds of sound can be looped
the CDX-35 almost endless multi-sampling machine.
instantaneously by pressing buttons. Dedicated start,
stop and re-loop / exit buttons allow the DJs to create
84
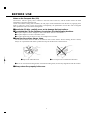
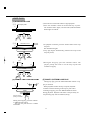
BEFORE USE
Notes on the Compact Disc (CD)
The surface which is glossy like a ralnbow is the front side of the CD, and the surface where the label
information is printed is the back side.
Unlike conventional analog disk turntables, the CD player reads information from the disc by applying laser
beam, in place of a stylus, on the front surface. Consequently, the performance of CD discs will not degrade
after repeated use like conventional analog disks.
■Handle the CD disc carefully so as not to damage the front surface.
■To maintain the CD disc flawless, do not place it in the following locations.
●In a place subject to direct sunlight or near a heat source such as a room heater.
●In a place subject to excessive moisture or dirt.
●In a place which may be subject to rain, for example near a window.
■Keep the disc surface always clean.
UP to about 6 billion items of data are recorded on the Cd disc surface. When cleaning the disc surface,
always use a specialized CD cleaner product and wipe in the direction as shown below.
●Wipe in the radial direction.
●Do not wipe in the circumference direction.
●Never use record cleaner designed for conventional analog disks, for this may degrade the CD disc surface.
■Always store disc properly in the case.
5
CONTROL AND FUNCTION
CONTROLLER UNIT
PLAYER UNIT
12
6
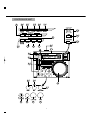
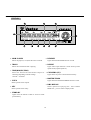
CONTROLLER UNIT
5
12 17
18 19 16
22
23
6
24
21
20 8
27
7
26
11
25
10
13 14
9
15
4
3
1
2
7
next track. The number of tracks skipped ahead.
① PLAY/PAUSE KEY
Each press of the PLAY/PAUSE button cause the
operation to change from play to pause or from pause ⑧ PREVIOUS KEY
Used for skipping backwards to the starting point of
to play.
the current track(one press). Pressing twice returns to
the starting point of the previous track. Pressing
② CUE KEY
additional times will return to the corresponding
Pressing cue button returns the CD to the last set
previous track.
"CUE" point and pauses it. The CUE point is either
the position at which "PLAY" was last actually
started or the "LOOP IN" point it was previously set. ⑨ SEARCH DIAL
This search dial serves two functions depending on
Pressing the "CUE" button a second time allows the
the mode you are working in.
music to be played from the "CUE" position until it is
a, The search dial will act as a slow flame search
released.
control when the CD is not playing but either
Repeatedly pressing the cue button allows the CD to
paused or set to a cue point.To set a new flame cue
be played from the same position any number of
point, spin the dial then press play when you have
times. The CUE LED will light up from the time the
determined the proper position. Press CUE to
CUE button is pressed until the CD has reset to the
return the 'CUE POINT'.
position at which play was started. Steady lighting of
b, The search dial will temporarily bend the pitch of
this LED indicates the ready condition.
the music up to +/- 10% if the song is already
playing by rotating the dial clockwise to speed up
③ MONITOR KEY
or counterclockwise to slow down. The amount of
When the monitor button is pressed during the
pitch change is determined by the speed of
PAUSE mode ,a short loop sound of the paused
rotation.
position is played back for monitoring. Then exact
position for the next start can be searched and set by
⑩ PITCH CONTROLLER
using the SEARCH DIAL.
The pitch can be changed up to +/- 10% by moving
sliding fader.
④ POINT FOCUS KEY
Used for changing time of monitor sound.
⑪ KEY CONTROL
The key can be change up to +/- 1 octave by rotating
⑤ CUE MEMORY
volume.
Press the cue memory button. The CUE BANK
indicater lights. You can select any cue bank. Press
BANK button (1,2,3).The controller memorizes cue ⑫ MASTER TEMPO
Press the MASTER TEMPO button. The MASTER
point.
TEMPO indicater lights. You can change the playing
speed by moving PITCH CONTOROLLER.
⑥ CUE MEMO 1,2,3 KEY
Even when the music's speed changes, the music
Used for setting and recall cuepoint.
pitch does not change.
⑦ NEXT KEY
Used for skipping forward to the starting point of the
8
21 OPEN/CLOSE
◯
⑬ LOOP START
Press to load or eject the disc. Each press will open or
Used for setting a start loop point and new cue
close the disc tray on the transport. Tray will not
point during play.
open unless the disc has been paused.
⑭ LOOP END
22 PLAYER SELECT SWITCH
Used for setting the end loop point and and ◯
The switch for select main player.
releasing loop action.
23
◯ SUB CUE
Cue switch for second player unit.
⑮ RELOOP/EXIT
This button is for cancel and return loop play .
24 SUB PLAY/PAUSE KEY
During the loop play , press the RELOOP/EXIT ◯
The play/pause switch for second player unit.
button. When playback reaches the loop out point ,
playback continues without returning to the loop in
25 PITCH INDICATER
◯
point.
Shows the present pitch value.
⑯ REVERSE
26 DISPLAY
Press the REVERSE button. The REVERSE ◯
Shows the information of playback. (Refer to
indicater lights. The player starts reverse play.
"DISPLAY")
During the reverse play, press REVERSE or STOP
button . Player will return normal playback.
27 CONNECTOR
◯
Plug your control cables for player unit.
⑰ REPEAT
Used to activate REPEAT mode. All repeat (Play
the next song and then repeat the whole CD) is
selected by pressing this button once. Single repeat
(repeat current song only) is selected by pressing
one more time. Repeat off is selected by one more
push.
⑱ DISPLAY KEY
Used to change DISPLAY MODE. Usually display
shows TRACK REMAIN TIME. TRACK
PLAYING TIME is selected by pressing button
once. DISC TOTAL REMAIN TIME is selected by
pressing one more time.
⑲ RING DISPLAY KEY
Used to change RING DISPLAY MODE.
⑳ STOP
Used to stop CD spinning.
9
DISPLAY
A MAIN PLAYER
Shows the player (A or B) that the unit is selected.
G REVERSE
Lights when the REVERSE function is used.
B TRACK
Shows the track that the unit is playing.
H REPEAT
Lights when repeat function is used. Shows present
repeat mode (repeat1/repeat all)
C TIME (MIN/SEC/FRM)
Shows the minutes/seconds/frames elapsed or I CUE MEMO 1,2,3
remaining depending on mode settings.
Lights when cue point is memorized in memory.
1 second = 75 frames
J MASTER TEMPO
D PITCH
Lights when the MASTER TEMPO function is used.
Shows present value of pitch.
K RING DISPLAY
Shows operation of playing disc . Press "RING
E KEY
DISPLAY" , you can select 2 display mode.
Shows present value of key.
F STAND-BY
Lights when the amount of data is stored in shock
proof memory.
10
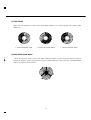
[1] TIME MODE
Shows the time information of disc. In this mode, RING DISPLAY is working together time counter (TIME
DISPLAY ).
1. TRACK REMAIN TIME
2. TRACK PLAYING TIME
3. TOTAL REMAIN TIME
[2] DISK OPERATION MODE
Shows the operation of disc. In this mode, RING DISPLAY rotates in various speed and direction. Speed is
changed by playback speed. During normal playback, RING DISPLAY rotates clockwise. When REVERSE
mode is on, rotates counterclockwise.
11
21
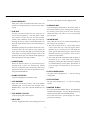
PLAYER UNIT
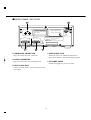
●FRONT PANEL SECTION
29
28
30 31 32
33 34 35 3637
28 POWER SWITCH
◯
Turn on and turn off the machine from this button.
The unit should always be shut down with this button
first before any external power is removed.
29 DISK TRAY
◯
Place your CD in here.
30 LINK/TRACK DISPLAY
◯
Connecting with controller, display shows setting of
player (A or B). Without controller, shows track
number.
◯
31 OPEN/CLOSE KEY
Press to load or eject disc. each press will open or
close the disc tray on the transport.
note: Tray will not open unless the disc has been
stopped.
◯
32 STOP KEY
◯
33 PREVIOUS KEY
Used for skipping backwards to the starting point of
the current track(one press). Pressing twice returns
12
22
to the starting point of the previous track. Pressing
additional times will return to the corresponding
previous track.
◯
34 NEXT KEY
Used for skipping forward to the starting point of the
next track. The number of tracks skipped ahead.
◯
35 PLAY/PAUSE KEY
Each press of the PLAY/PAUSE button cause the
operation to change from play to pause or from pause
to play.
◯
36 HEADPHONE LEVEL
Adjusts the headphone output level.
◯
37 HEADPHONE JACK
Connect the headphones to this jack. Headphones
with its impedance from 8 ohm to 600 ohm can be
used.
●REAR PANEL SECTION
42
40
CD OUT
R
CD B
L
VESTAX CORPORATION
MODEL NO.CDX-35
CLASS1 LASER PRODUCT
KLASSE1 LASER PRODUCT
I.H.T. IEC825
230V〜 50Hz 18W
CAUTION:SHOCK HAZARD, DO NOT REMOVE SCREWS.
CONTROLLER
MAX 5V 0.5A
MADE IN JAPAN
FABRIQUE AU JAPON
DE CHOC ELECTRIQUE,
ATTENTION:RISQUE
NEPAS ENLEVER VIS.
OPEN/
CLOSE
SERIAL NO.
ON OFF
39
38
41
◯
38 CONTROLLER CONNECTOR
Plug your control cables for control unit.
39 PLAYER CONNECTOR
◯
Plug your control cable for second player unit.
41 OPEN/CLOSE LOCK
◯
When this switch is on, OPEN/CLOSE KEY of
player and controller is unavailable during playback.
42 AC POWER CABLE
◯
Should be plugged into your power outlet.
40 CD OUT JACK (RCA)
◯
Connect your CD player to your mixer from this line
level output.
13
19
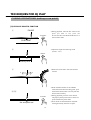
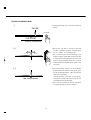
TECHNIQUES FOR DJ PLAY
CUEING OPERATIONS (setting a cue point)
[1] USE PAUSE MONITOR FUNCTION
PAUSE
①
①During playback, when the disc comes to the
“PLAY/PAUSE”
point you wish to cue, press the
PLAY/PAUSE and MONITOR button to
enter monitor mode.
CUE POINT
direction of play back
②
②Adjust the length of monitoring sound
(0.039s ~ 3.0 s).
“MONITOR”
adjust the length of
monitoring sound
③
③Rotate the search dial to search for desired
location.
A
B
B
A
④When the flame number or the audiable
④⑤⑥
PLAY/PAUSE
the cue point set
14
sound reaches the desired cueing point, press
the PLAY/PAUSE button. The cue point has
been stored in memory.
⑤During playback, press the "CUE" button.
The player's pickup will return to set the cue
point and enter the pause mode.
⑥Press the PLAY/PAUSE button. Playback
will begin instantly from the cue point.
[2] USE THE SEARCH DIAL
①
①During playback, press the PLAY/PAUSE
PAUSE
button.
PLAY/PAUSE
CUE POINT
direction of play back
②Rotate the jog dial to search for desired
②③
A
B
B
A
④⑤
location. (Playback speed is changing from
0% to +/- 300% by rotating speed.)
③To set the cue point while listening to the
sound, using the search dial to return the disc
to a point just before the point at which you
wish to begin playback from the cue.(The
sound heard in the audible pause mode is the
cue point.)
④When the flame number or the audiable
sound reaches the desired cueing point, press
the PLAY/PAUSE button. The cue point has
been stored in memory.
During playback, press the "CUE" button.
The player's pickup will return to set the cue
point and enter the pause mode.
⑤Press the PLAY/PAUSE button. Playback
will begin instantly from the cue point.
the cue point set
15
CUE POINT MEMORY
One player of CDX - 35 can memorize 3 cue points.
[1] Setting the cue point memory
①②
①Set the cue point. (See the " cueing
operation")
②Press the "MEMO" button. The " 1 2 3 "
indicator lights on and off.
1 2 3
③Select any memory bank, and press bank
③④
button.(EX : BANK 1)
④The bank indicator lights. (EX: BANK 1)
The cue point has been stored in memory
bank.
[2] Recall the cue point memory
①Press the bank button (The cue point is already set.)
②Press the "CUE" button , the player's pickup will return to set the cue point and enter the pause mode.
③Press the PLAY/PAUSE button. Playback will begin instantly from the cue point.
[3] Clear the cue point memory
①When you press " STOP " button twice, the cue point memory is cleared.
②Turn off power of CDX-35, the cue point memory is cleared too.
16
LOOP PLAY
[1] DESIGNATE A LOOP
①②
①Press the PLAY /PAUSE button to begin playback.
set loop-in point
②Press the "START" button at the desired loop in point.
S
The START button lights, and the END ,RELOOP/EXIT
button lights on and off.
direction of playback
③④
MAXIMUM 20 second
S
E
set loop
out point
③As playback continues, press the "END" button at the loop
out point.
The END button lights.
④Loop play begins automatically (between the loop-in and
loop-out points).
LOOP
back
⑤
⑤During the loop play, press the "START" button. The
S
player's pickup will return to set the loop in point and
continues loop play.
E
LOOP
[2] CHANGE THE LOOP END POINT
A
B
S
[3] CANCEL /RETURN LOOP PLAY
During loop play, press the "RELOOP/EXIT" button. Loop
play is canceled.
When playback reaches the loop out point, Playback
continues without returning to the loop in point. After
LOOP
A
B
adjust end pointby
pressing A or B button
canceling loop play, press the "RELOOP/EXIT" button
during playback. Playback will return to the previously set
loop and loop play will be resumed (reloop).
During the loop play, press the "NEXT"
or "PREVIOUS" button.
The loop out point moves in 1-flame
increments.
17
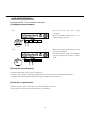
11
MASTERTEMPO
Press the MASTER TEMPO button. The MASTER TEMPO
indicator lights.
PITCH INDICATER
Shows position of memorized tempo by LED.
Please refer to following example.
1
◯
2
◯
PLAYSELECT
3
◯
4
◯
Change to
the B side.
Change
PLAYERSELECT
SW from A to B
Adjust the tempo
(ex.tempo:-6%)
Adjust the tempo
(ex. player A)
(ex.tempo:0%)
(ex. player B)
5
◯
6
◯
Change to
the Aside.
turn off the LED you can
controll pitch normally
Present fader position:0%
Memorized tempo:-6%
keep memorized
tempo(:-6%)
(ex. player A)
Pitch indicater
lights on minus side
The pitch indicater shows which side of present
fader position memorized tempo is set.
18
10
When the pitch controller return the position
of memorized tempo(:-6%), the memorized
tempo is release.
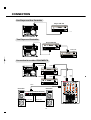
CONNECTION
One Player and One Controller
Player CDX-35P
CONTROLLER
Controller CDX-35C
Two Player and Controller
Player CDX-35P
CD, B
CONTROLLER
CONTROLLER
Controller CDX-35C
Player CDX-35P
Connection for another EQUIPMENTS
CONTROLLER
CD OUT
CD, B
Controller CDX-35C
CONTROLLER
CD OUT
LINE
1, 2
LINE
4, 5
INPUT
MASTER OUT
MAIN SPERKER
MAIN SPERKER
Power amplifier [Vestax PT-X1000A]
CHANNEL A
MINI
MAX
CHANNEL B
MINI
MAX
Sperker cable
PROTECT
B.T.L
POWER
PEAK
PEAK
POWER
INPUT
INPUT
ON / OFF
Sperker cable
DJ MIXER PMC-170A
19
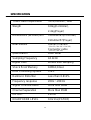
SPECIFICATION
Total Power requirement
115V/230VAC, 18W
Weigth
0.8kg(Controller),
2.4kg(Player)
Demensions (WxHxD)mm
210x49x165(Controller)
190x82x257(Player)
Attachments
Owner's manual
(CDX-35, CDX-35C, CDX-35P)
Connector cable
(CDX-35, CDX-35P)
Quantization
16bit linear
Sampling Frequency
44.1kHz
Digital Filter
8times over sampling
Shock Proof Memory
16Mbit,10sec
Error Correcting System
CIRC
Harmonic Distortion
Less than 0.011%
Frequency response
20Hz〜20KHz
Signal To Noise Ratio
More than 96dB
Channel Separation
More than 85dB
CD OUT
2Vrms
HEADPHONE LEVEL
0.6Vrms(1%THD)
20
Vestax Corporation
443 S 851250