1
Terrain 650
Private mobile radio with d U al charger
USER GUIDE
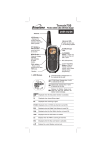
Antenna
LCD Screen
- Displays the
current channel
selection and other
radio symbols.
Ear/Mic/Charge
jack
PTT (PUSH to
TALK) button
–Press and hold to
transmit.
PWR(POWER)
Button – Press
and hold to turn
the unit ON or
OFF.
CALL button
-Press to send
Ringing tone to
other PMR units.
MENU Button
-Press to change
To switch between
Modes.
UP/DOWN
Buttons –
Press to change
channels, volume,
and to select
settings during
programming.
MIC (Microphone)
Speaker
1. LCD Screen
Channel Number. Changes from 1 to
8 as selected by the user.
CTCSS Code. Changes from 1 to 38
as selected by the user.
Displays the Battery change level.
When the bars are reduced, the
battery needs recharging.
TX
Displayed when transmitting a signal.
RX
Displayed when receiving a signal.
DCM
Displayed when the Dual Watch function is turned ON.
DCS
Displayed when the Digital Code System is turned On.
VOX
Displayed when the VOX feature is enabled.
SC
Displays when the PMR is scanning all channels.
Displayed when the Key Lock feature is activated.
Displays the current Speaker volume level.
Displays when the call signal is ON.
2. Installation
2.1 Removing the Belt Clip
a. Pull the Belt Clip latch forward
(away from the Terrain 650)
b. While pulling the Belt Clip
latch, push up the Belt Clip as
shown in Figure1.
Belt Clip latch
2.2 Installing the Belt Clip
a. Slide the Belt Clip into the
slot as shown in Figure2.
A “click” indicates the Belt
Clip is locked into position.
Figure 1
2.3
Figure 2
Installing the Battery pack
Figure 3
Figure 4
Caution: Observe the proper battery polarity orientation when
installing batteries. Incorrect positioning can damage both the
batteries and the unit.
a. Slide down the Battery Compartment Cover.
b. Install the rechargeable battery pack by following the orientation
as shown in Figure 3 (the arrow is showing and pointing upward.)
c. Replace the Battery Compartment Cover. See Figure 4.
Important
Read these Safety Warnings before you charge the batteries.
When placing the Terrain 650 in the charger, use only the power supplies
listed in the user instructions supplied with the Terrain 650 .
Don’t try to recharge non-rechargeable batteries.
Make sure the battery compartment cover is securely locked in place
when you are charging the batteries.
Dispose of used batteries safely and in a way that will not harm the
environment- never try to burn them or put them anywhere, they
could get burnt or punctured.
Don’t leave dead batteries in your Terrain 650 units.
They might leak if you do.
2.4
a.
b.
c.
Charging the battery pack
Insert the small plug on the end of the mains adaptor into the
Power-in Connection Jack at the back of the desktop charger.
Plug the mains adaptor into a 240V AC, 50Hz main socket with
the switch on the socket set to OFF.
Switch ON the main socket.
The Terrain 650 must be charged using the mains adaptor provided.
Using any other adaptor will result in non-compliance with
EN60950-1 and will invalidate any approvals & warranty.
d. Place the Terrain 650 units in the charge cradle in an upright position
and facing outward. The charge LED indicators will light up.
e. It takes about 10 hours to fully recharge the batteries if they are
completely run down. New batteries takes up to 14 hours to fully
charge.
Main socket
Important:
Always turn off the PMR units
when charging. This will
shorten the charging time.
f. Charging the battery pack (using adaptor)
Lift up the charge socket cover located on
the right side of the handset.
Insert the round connector of
the 9.0V DC/200mA adaptor
into the charge jack.
Mic/spk jack
Charge jack
Plug the mains adaptor into a
240V AC, 50Hz main socket
with the switch on the socket
set to OFF. Use only power
supplies listed in the user
instruction. Csec AC Adaptor
brand ; Model -CSD0900200G
power supply
Then switch ON the main socket.
Battery meter
The battery meter is located in the left corner of the LCD Screen. It
appears like a battery with three bars inside. These indicate the
amount of power available. When the battery level reaches it
minimum level in PMR on mode, unit will emit two beep tones and
automatically the unit will power off.
The Terrain 650 can detect the battery charge in 4 levels;
Battery charge at high level.
Battery charge at medium level.
Battery charge at low level. At this level, the Terrain 650 will emit
a “beep” sound for every 10 seconds in normal mode.
Battery charge at very low level. When the battery level
reach it minimum level while unit is on mode, unit will emit
two beep tone and automatically turn off the unit.
Important: Charge the unit for 10-14 hours.
CAUTION : Risk of explosion if battery is replaced by an incorrect type.
Disposed of used batteries according to the instructions.
Battery life
The Terrain 650 has a built in power saver to make the batteries last
longer. But when you are not using the units, turn them OFF to
conserve battery power.
3. Operation
3.1 Transmitting range
The talk range depends on the environmental and terrain. It will be
reach (up to about 8km) in wide open space, without obstructions
such as hills or buildings. Don’t try to use two PMR units which are
less than 1.5m (5feet) apart. If you do, you may experience
interference.
Important safety warning
To reduce radio frequency exposure when you are using your
Terrain 650, hold the unit at least 5cm (2 inches) away from your face.
Never use your Terrain 650 outdoors during a thunderstorm.
Don’t use the Terrain 650 in the rain.
If your Terrain 650 gets wet, turn it off and remove he battery. Dry the
battery compartment and leave the cover off for a few hours. Don’t
use the unit until it is completely dry.
Keep the Terrain 650 out of reach babies and young children.
3.2 Turning the Unit ON/OFF
To Turn ON;
a. Press and hold the POWER button until the LCD Screen
turns ON and displays the current channel.
To switch OFF;
b. Press and hold the POWER button until the LCD screen
turns blank.
You can hear a musical tone each time to confirm.
3.3 Adjusting the Speaker volume
The volume level is shown by vertical bars on the LCD screen. You
can change the volume while using your Terrain 650, or while the unit
is idle (switched on but not in use).
Press UP button to increase, or press DOWN button to decrease the
speaker volume.
3.4 Changing Channels
The Terrain 650 has 8 available channels, to communicate with other
Terrain 650 users within a range, you must all have your Terrain 650 tuned
in to the same channel.
a. Press the MENU button once, the current channel
number flashes on the LCD Screen.
b. Press the UP or DOWN button to select the desired
channel. The channel changes from 1 to 8, or vice versa.
c.Press the PTT button to confirm the channel setting.
Note: Refer to the “Channel Table” section of this Owner’s Manual
for detailed frequency listing.
3.4.1 Setting the CTCSS sub-channel
Each channel also has 38 sub-channels to let you set up group of
users within the same channel for more private communication. If
you have set the sub-channel, you can only communicate with other
PMR users tuned to the same channel and sub-channel.
To turn the sub-channel function off, simply set the sub- channel
to 0 (zero). You can communicate with any Terrain 650 user set to the
same channel who also turns off the sub-channel operation (or
whose Terrain 650 unit does not have the feature).
a. Press the MENU button twice, the current CTCSS
sub-channel number flashes on the LCD Screen.
b. Press the UP or DOWN button to select one of the 38
CTCSS sub-channels.
c. Press the PTT button to confirm the sub-channel setting.
3.4.2 SETTING THE DCS ADVANCED DIGITAL CODE.
Each channel also has 83 digital codes to let you set up group of
users for more secured private communication.
a. Press the MENU button 3 times. DCS code is blinking on
the LCD screen.
b. Press UP or DOWN button to select the desired DCS
code.
c. Press the PTT button to confirm the DCS channel setting.
Transmitting and Receiving
The Terrain 650 transmission is “one way-at-a-time.” While you
are speaking, you can not receive a transmission.
The Terrain 650 is an open-license band. Always identify
yourself when transmitting on the same channel.
3.4.3 Transmitting (sending a speech)
The unit is continuously in the Receive mode when the unit is turned
ON and not transmitting. When a signal is received on the current
channel, “RX” icon will be displayed on the LCD Screen and the
receiver LED lights up.
3.4.4 Transmitting (sending a speech)
a. Press and hold the PTT (push to talk) button to transmit
your voice. “TX’ icon will be displayed on the LCD
Screen.
b. Hold the unit in a vertical position with the MIC
(Microphone) 5 cm away from the mouth. While holding
the PTT button, speak into the MIC (microphone) in a
normal tone of voice.
c. Release the PTT button when you have finished
transmitting.
3.4.5 Monitor
You can use the Monitor feature to check for weak signals on the
current channel.
a. Press and hold the MENU and DOWN buttons at the
same time. “RX” icon will be displayed on the LCD
Screen. Your Terrain 650 will pick up signals on the
current channel, including background noise.
b. Press the MENU button to stop the channel monitoring.
3.5 Setting the VOX (Voice Activated) Sensitivity
In VOX mode, the Terrain 650 will transmit a signal only when
it is activated by your voice or other sounds around you. The unit
will transmit further for 2 seconds even if you stop talking.
Binatone Help Line - 0845 345 9677
The level of VOX sensitivity is shown by a number on the LCD
Screen. At the highest level, the units will pickup softer noise
(including background noise); at the lowest level, it will pick up only
quite loud noise.
a. Press the MENU button 4 times, “VOX” icon will be
displayed and “OF” flashes on the LCD Screen.
b. Press UP button to set the VOX sensitivity into maximum
level (the maximum level is “3”.) To deactivate the VOX
function, press the DOWN button until “OF” appears on
the LCD Screen.
c. Press the PTT button to confirm your setting. “VOX” will
steadily appear on the LCD Screen as along as the VOX
feature is activated.
VOX operation is not recommended if the Terrain 650 will be used in
a noisy or windy environment.
3.6 Activating the auto Channel Scan
Channel scan perform searches for active signals in an endless loop
for all 8 channels, 38 CTCSS codes and all 83 DCS codes.
a. Press the MENU button 5 times, “SC” icon will
display on LCD Screen.
b. Press UP or DOWN button to begin scanning
channels when an active signal is detected, channel
scan pauses on the active channel.
c. Press the MENU button six times, CTCSS flashes on
the LCD screen press UP or DOWN button to begin
scanning the CTCSS from 1-38.
d. Press the MENU button seven times, DCS flashes on
the LCD screen. Press UP or DOWN button to begin
scanning DCS code 1-83.
e. Press the PTT button to confirm your setting.
3.7 Call alert
Your Terrain 650 can alert you to incoming signal by emitting an audible
call tone signal.
3.7.1 Call-Ring tone
You can send a Call-ring tone to other PMR users to give an
alert that you wanted to communicate with them.
Press the Call button
You will hear a ring tone for about two seconds; “TX” icon
appears on the LCD Screen. Any other units within the
transmitting range and tuned in to the same channel and
sub-channel (if applicable) will hear the Call-ring tone.
3.7.2 Selecting a Call- Ring tone
The Terrain 650 is equipped with 5 different types of Call-Ring tones.
a. Press the MENU button eight times, the “CA” icon will
display and “01” is blinking on the LCD Screen.
b. Press UP or DOWN button to select the desired Call-ring
tone. A respective Call-ring tone sound will be played
when changing from one tone to another.
c. Press the PTT button to confirm your setting.
Binatone Help Line - 0845 345 9677
3.8 Setting the Roger Beep
The Roger Beep is a tone which is automatically transmitted
whenever the PTT button is released. This alerts the receiving party
to inform that you have intentionally ended the transmission, and you
are now in receive mode.
a. Press the MENU button 9 times, the “ON” icon is blinking
on the LCD Screen.
b. Press the UP or DOWN button to select the Roger beep
On/Off.
c. Press the PTT button to confirm your setting.
3.9 Setting the Key Tone ON or OFF
This feature allows the Terrain 650 to emit a confirmation tone after
pressing each button.
a. Press the MENU button 10 times, the “ON” icon is
blinking on the LCD Screen.
b. Press the UP or DOWN button to select the Key tone
On/Off.
c. Press the PTT button to confirm your setting.
4. Setting the Dual Watch Mode
Your Terrain 650 is capable of monitoring two channels, the current and
another (dual watch) channel. If the unit detects a signal on either
channel, it will stop and receive the signal.
a. Press the MENU button 11 times, “DCM” icon will be
displayed while “OF ” flashes on the LCD Screen.
b. Press the UP or DOWN button to select the Dual Watch
channel (1-8, except the current channel).
c. Press the MENU button to change the CTCSS code.
d. Press the UP or DOWN button to select the desired
CTCSS code (1-38)
e. Press the MENU button to change the DCS code.
f. Press the PTT button to confirm your setting.
5. Auxiliary Features
5.1 Key Lock
The Key Lock feature allows user to disable the UP,
DOWN and MENU buttons so that the Terrain 650
settings could not be changed accidentally.
a. To activate the Key Lock feature, press and hold the
MENU button until key lock “
”icon appears on
the LCD Screen.
b. To deactivate the key Lock feature, press and hold the
MENU button until key lock “
” icon disappears
on the LCD Screen.
Note: The PTT, and POWER buttons will remain
functional even if the Key Lock feature is activated.
5.2 LCD Screen Back Light
Every time a button is pressed (except PTT and CALL
button), the LCD Screen back light will illuminate for 4
seconds.
5.3 Microphone/Earphone/Charge Jack
The Terrain 650 is equipped with an auxiliary microphone,
earphone, and charge jack located at the opposite side of
the PTT button.
3.8 Setting the Roger Beep
The Roger Beep is a tone which is automatically transmitted
whenever the PTT button is released. This alerts the receiving party
to inform that you have intentionally ended the transmission, and you
are now in receive mode.
a. Press the MENU button 9 times, the “ON” icon is blinking
on the LCD Screen.
b. Press the UP or DOWN button to select the Roger beep
On/Off.
c. Press the PTT button to confirm your setting.
3.9 Setting the Key Tone ON or OFF
This feature allows the Terrain 650 to emit a confirmation tone
after pressing each button.
a. Press the MENU button 10 times, the “ON” icon is
blinking on the LCD Screen.
b. Press the UP or DOWN button to select the Key tone
On/Off.
c. Press the PTT button to confirm your setting.
4. Setting the Dual Watch Mode
Your Terrain 650 is capable of monitoring two channels, the current
and another (dual watch) channel. If the unit detects a signal on either
channel, it will stop and receive the signal.
a. Press the MENU button 11 times, “DCM” icon will be
displayed while “OF ” flashes on the LCD Screen.
b. Press the UP or DOWN button to select the Dual Watch
channel (1-8, except the current channel).
c. Press the MENU button to change the CTCSS code.
d. Press the UP or DOWN button to select the desired
CTCSS code (1-38)
e. Press the MENU button to change the DCS code.
f. Press the PTT button to confirm your setting.
5. Auxiliary Features
5.1 Key Lock
The Key Lock feature allows user to disable the UP,
DOWN and MENU buttons so that the Terrain 650
settings could not be changed accidentally.
a. To activate the Key Lock feature, press and hold the
MENU button until key lock “
”icon appears on
the LCD Screen.
b. To deactivate the key Lock feature, press and hold the
MENU button until key lock “
” icon disappears
on the LCD Screen.
Note: The PTT, and POWER buttons will remain
functional even if the Key Lock feature is activated.
5.2 LCD Screen Back Light
Every time a button is pressed (except PTT and CALL
button), the LCD Screen back light will illuminate for 4
seconds.
5.3 Microphone/Earphone/Charge Jack
The Terrain 650 is equipped with an auxiliary microphone,
earphone, and charge jack located at the opposite side of
the PTT button.
Binatone Help Line - 0845 345 9677
6. Specifications
Channels Available
CTCSS Sub-channel
Digital Code
Output Power (TX)
Range
8 Channels
38 for each Channel
83 for each Channel
0.5 W
Up to 10 Kms.
Channel Frequency Table
Channel
Frequency (MHz)
1
2
3
4
446.00625
446.01875
446.03125
446.04375
7. Safety
Channel
5
6
7
8
Frequency (MHz)
446.05625
446.06875
446.08125
446.09375
CAUTION
Damaged Antenna
Do not use any Terrain 650 that has a damaged antenna. If a damaged
antenna comes in contact with the skin, a minor burn may result.
Batteries
All batteries can cause property damage and/or bodily injury such as
burns if conductive material such as jewelry, keys, or beaded chains
touches exposed terminals. The material may complete an electrical
circuit (short circuit) and become quite hot. Exercise care in handling
any charged battery, particularly when placing it inside a pocket,
purse, or other container with metal objects.
WARNING
For Vehicles with an Air Bag
Do not place your Terrain 650 in the area over an air bag or in the air bag
deployment area. Air bags inflate with great force. If a Terrain 650 is
placed in the air bag deployment area and the air bag inflates, the
Terrain 650 may be propelled with great force and cause serious injury
to the occupants of the vehicle.
Potentially Explosive Atmospheres
Turn your Terrain 650 OFF when in any area with a potentially explosive
atmosphere, unless it is a type especially qualified for such use (for
example, Factory Mutual Approved). Sparks in such areas could
cause an explosion or fire resulting in injury or even death.
Batteries
Do not replace or charge batteries in a potentially explosive
atmosphere. Contact sparking may occur while installing or removing
batteries and cause an explosion.
Blasting Caps and Areas
To avoid possible interference with blasting operations, turn your
Terrain 650 OFF near electrical blasting caps or in a “blasting area” or
in areas posted: “Turn off the two way radio.” Obey all signs and
instructions.
NOTE: Areas with potentially explosive atmospheres are often, but not always
clearly marked. They include fueling areas such as below deck on boats; fuel or
chemical transfer or storage facilities; areas where the air contains chemicals or
particles, such as grain, dust, or metal powders; and any other area where you
would normally be advised to turn off your vehicle engine.
8. Cleaning and Care
To clean your Terrain 650, use a soft cloth dampened with water. Do not
use cleaners or solvent, which may cause damage that may not be
covered by guarantee.
Binatone Help Line - 0845 345 9677
Edited by Foxit PDF Editor
Copyright (c) by Foxit Software Company, 2004
For Evaluation Only.
9. Guarantee
The Binatone Terrain 650 is fully guaranteed for 12 months from the date
of purchase shown on your sales receipt. The guarantee does not cover
damage by misuse or negligence, or by excessive voltage.
Please keep your sales (till) receipt - this is your guarantee. You should
also keep the original packaging materials.
When unpacking your Binatone Terrain650 , check for visible damage. If
you see any damage, do not use the PMR - return the whole unit to where
you bought it.
If your Binatone Terrain650 develops a fault, refer to the
“Troubleshooting Guide.” section of this manual. If you can’t solve the
problem, return the whole unit as follows;
Terrain650,usingtheoriginal
packaging. Remember to include the main adaptor.
Terrain 550 to our
Repair after the Guarantee has expired
If the unit is no longer covered by Guarantee, first follow steps 1 as for
repair under Guarantee, Then...
2. Call our service Department on 0845 345 9677 and ask for a
quotation of the repair charge, and details of where to send your
Terrain 550 for repair.
3. Return your Terrain650 to the address given by the Service
Department, making sure to include your name and address, and a
cheque or postal order for the value of the repair charge.
This does not affect your statutory rights.
Binatone Telecom plc operates a policy of continuous product
improvement, and so reserves the right to make changes to the product
and functions without prior notice.
Effective Range
The Transmission range of the product is dependent on the environment
terrain where it is being used, the following diagram attempts to guide
the user on the sort of performance to expect for everyday use.
Signal Strenght
Optimum (open area) (1)
Medium ground based
obstruction (2)
Heavily built up area (3)
0Range(Km)10
Range Slope
Range Check
The Transmission range will be affected as shown in the above diagram.
The transmitting range typical values for different environment conditions
willbe(1)10km(2)4km(3)2km.Itshouldberememberedthat
these are only guide values as actual achieved distances will be
dependent on the environment and terrain.
Binatone Help Line - 0845 345 9677
10.Troubleshooting Guide
Solution
Symptom
Check if the batteries are installed properly.
The battery may be weak.
Replace the old batteries with new one.
No power.
Press the UP button to increase the receiver volume level.
The receiving signal may be weak and/or out of range.
If this happens, press the MENU and DOWN buttons at the same
time to activate the Monitor function.
Reception
is weak.
Cannot change
CTCSS subchannels.
Key lock mode must be deactivated if the Key lock icon (
) is
displayed on the LCD Screen.
To change CTCSS sub-channels, press the MENU button twice, the
CTCSS sub-channel number flashes on the LCD Screen.
Press the UP or DOWN button to change the CTCSS sub-channel.
Batteries may be weak.
Range is limited.
Batteries may be weak.
Replace with new batteries if the charge level indicator gets low.
See the “Effective Range” diagram.
The maximum range will vary depending on terrain and environment.
Open fields provide the maximum range, while steel/concrete
structures, heavy foliage, and use in buildings and in vehicles may
limit the range significantly.
Wearing the radio close to the body, such as in a pocket or on a
belt, will decrease range; change the location of the radio.
Sound distortion
problems.
If you are transmitting, speak in a normal tone of voice, 5 cm
away from the MIC (microphone.).
If you are receiving, lower the volume to a comfortable level.
Radios too close. Radios must be at least 2 meters apart; increase
your distance.
Radios too far apart. Obstacles interfere with transmission. Talk
range is up to 10 Kms. in a clear unobstructed conditions.
No
communication
Check the Channel and the CTCSS code setting. Both the
Transmitting and Receiving PMR units should have tuned to the
same Channel and CTCSS code (if applicable).
This equipment is intended for use in:
Spain
Austria
Finland
Latvia
Belgium
France
Liechtenstein
Sweden
Bulgaria
Germany
Luxemburg
Switzerland
Croatia
Greece
The Netherlands
Turkey
Cyprus
Hungary
Norway
UK
Czech
Iceland
Poland
Romania
Denmark
Ireland
Portugal
Slovakia
Estonia
Italy
Slovenia
Countries of use
Declaration of Conformity
The Binatone Terrain 650 complies with the essential requirements
And conforms to the following relevant standards:
Waste electrical products must not be
ETSI EN 300 296-2 V1.1.1
disposed of with household waste.
ETSI EN 301 489-5 V1.3.1
This equipment should be taken to
your local recycling centre for safe
ETSIEN301489-1V1.6.1
treatment.
EN60065-1:2001
Binatone Telecom plc operates a policy of continuous product
improvement, and so reserves the right to make changes to the product
and functions without prior notice.
UK (BTP) Ver 2 Mar.09