1
Quick Start — CrossPoint 42 HVA
Installation
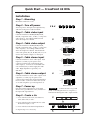
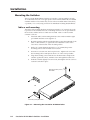
Step 1 - Mounting
Mount the switcher in a rack.
Step 2 - Turn off power
Turn off power to the input and output devices,
and remove the power cords from them.
3&4
Step 3 - Cable video input
Cable the switcher for RGBHV, RGBS, RGsB,
RsGsBs, component video , S-video, or composite
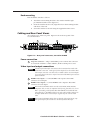
video input (3). See Cabling and Rear Panel
Views in Chapter 2 for details.
Tip
Sleeve
5
Tip
Sleeve
Unbalanced Input
Step 4 - Cable video output
(high impedance)
Cable the switcher for RGBHV, RGBS, RGsB,
RsGsBs, component video , S-video, or composite
video output (3). See Cabling and Rear Panel
Views in Chapter 2 for details. Ensure that the
same video planes (R, G, B, H/HV, and/or V) are
used on the switcher output as on the input.
600 ohms
Tip
Ring
Sleeve (s)
Tip
Ring
600 ohms
Balanced Input
(600 ohms)
Step 5 - Cable stereo input
Tip
Ring
Sleeve (s)
Tip
Ring
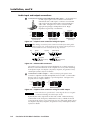
Cable the switcher for stereo audio input. Each
input has a 3.5 mm, 5-pole captive screw
connector for balanced or unbalanced stereo
audio input (5). Connectors are included with
each switcher, but you must supply the audio
cable. High impedance is generally over
800 ohms.
Step 6 - Cable stereo output
Balanced Input
(high impedance)
Tip
See caution
Sleeve
Tip
See caution
6
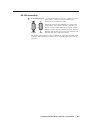
Cable the switcher for stereo audio output. Each
output has a 3.5 mm, 5-pole captive screw
connector that outputs the selected unamplified,
line level audio. Connect an audio device, such
as an audio amplifier or powered speakers (6).
Unbalanced Output
Tip
Ring
Sleeve (s)
Tip
Ring
Balanced Output
Step 7 - Power up
Plug the switcher, input devices, and output
devices into a grounded AC source, and turn on
the input and output devices.
CAUTION
Connect the sleeve to ground
(Gnd). Connecting the sleeve to a negative (-)
terminal will damage the audio output circuits.
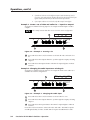
Step 8 - Create a tie
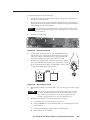
1. Press and release the Conf/Save button to
select audio and/or video.
8
LED key:
= off,
= on,
B
= blinking,
C
2. Press and release the output button to select
the desired output (1 or 2).
INPUTS
OUTPUTS
1
2
3
4
I/O
VIDEO/+dB
1
3. Press and release the desired input button.
2
CONF/SAVE
4. Repeat steps 1-3 as necessary.
B
A
AUDIO/-dB