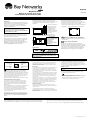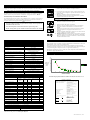
1
English
BayStack UPS45
204458-A
Uninterruptible Power Supply
User’s Manual
Installation
Wall Mounting
The brackets on the UPS can be rotated 90° for wall
mounting. Remove the screws, rotate the brackets,
and insert the screws in the appropriate holes.
BayStack UPS 45
To obtain warranty coverage, please fill out and
return the warranty registration card now.
Inspection
Inspect the BayStack UPS45 Uninterruptible Power
Supply (UPS) upon receipt. Notify the carrier and
dealer if there is damage. The packaging is
recyclable; save it for reuse or dispose of it properly.
Warning! Changes or modifications to this unit
not expressly approved by the party responsible
for compliance could void the warranty.
Rack Mounting
The UPS comes with standard 46.5 cm (19") rack
mount brackets. It is supplied with four (4) screws to
attach the mounting brackets (ears) to the chassis.
The recommended placement of the feet is shown by
a small + on the bottom corners of the unit:
The illustrations above show the proper positions for
wall mounting the unit.
Warning!
45
Select a rack location with adequate air flow that is
free from excessive dust. Ensure that the air vents on
the sides of the UPS are not blocked. Do not operate
the UPS where temperature or humidity are outside
the limits in the Specifications section of this
manual.
Wall-mount the unit
with the controls
towards or at the
top, not at the
bottom of the unit.
Desktop Use
This UPS is provided with four adhesive-backed
rubber “feet” for desktop use. Attach the feet to the
bottom of the unit and remove the ears to use it on a
desktop.
Do not mount the unit
on the wall as shown
in the illustrations at
left. Doing so could
result in a safety
hazard.
Rear View
Computer Interface Port
The interface port is used for factory test and
calibration.
Charge the battery pack
The UPS charges its battery pack whenever it is
connected to utility power. The battery pack will
charge fully during the first 4 hours of normal
operation. Do not expect full battery back-up
runtime during this initial charge period.
Once the UPS is mounted, please follow the
installation instructions in the BayStack Quick
Reference Guide.
Operating Instructions
Switch On — Switch Off
BayStack UPS 45
On- Line
Overload
On Battery
Replace Battery
I/O
With the UPS plugged in, press and release the
on/off/test button to supply power to the loads.
The loads are immediately powered while the UPS
performs a self-test. Press and release the button
again to turn off power to the loads. It may be
convenient to use the UPS as a master on/off switch
for the protected equipment.
The green on-line LED illuminates when the UPS is
supplying utility power to the loads.
Self-test
The UPS performs a self-test automatically when
turned on, and every two weeks thereafter.
Automatic self-test eases maintenance requirements
by eliminating the need for periodic manual selftests.
During the self-test, the UPS briefly powers the loads
on-battery. If the UPS passes the self-test, it returns
to on-line operation.
If the UPS turns off during the self-test and emits a
fading tone, the batteries are not connected properly.
The loads are not affected by a failed test. Recharge
the battery pack overnight and perform the self-test
again. If the replace battery LED is still on, replace
the battery pack using the Replacing the Battery
Pack procedure.
On Battery
During on-battery operation, the yellow on-battery
LED illuminates and the UPS sounds an audible
alarm consisting of 4 beeps every 30 seconds. The
alarm stops when the UPS returns to on-line
operation.
Overload
When loads exceed the UPS’s capacity, the red
overload LED illuminates and the UPS emits a
sustained tone. The alarm remains on until the
overload is removed. Disconnect nonessential load
equipment from the UPS to eliminate the overload.
If the overload is severe, the input circuit breaker
may trip (the resettable center plunger of the circuit
breaker pops out). Disconnect nonessential load
equipment from the UPS to eliminate the overload
and press the plunger back in.
If there is AC power and the circuit breaker does not
trip during overload, the loads are still powered. If
the circuit breaker trips or the UPS attempts to
transfer to battery, the loads’power will be shut off.
Turn the UPS off then back on to power the loads.
Low Battery
When the UPS is operating on-battery and the
energy reserve of the battery pack runs low, the UPS
beeps continuously until the UPS shuts down from
battery pack exhaustion or returns to on-line
operation, if the utility power returns before the
battery pack is exhausted.
Cold Start
Note: Cold start is not a normal operating
condition.
When the UPS is off and there is no utility power, it
is possible to cold start the UPS to power the loads
from the UPS’s battery pack.
·
Press and hold the on/off/test button until the
UPS emits a constant tone.
· Release the on/off/test button during the tone to
start the UPS.
Replace Battery
If the battery pack fails a self-test, the UPS emits
short beeps for one minute and the red replace
battery LED illuminates.
The UPS repeats the alarm every five hours. Perform
the self-test procedure to confirm replace battery
conditions. The alarm stops when the battery pack
passes the self-test.
Storage
Storage Conditions
Before storing, charge the UPS for at least 8 hours. Cover the UPS and store it lying
flat in a cool, dry location, with its battery pack fully charged.
Extended Storage
At -15 to +30 °C (+5 to +86 °F), charge the UPS’s battery pack every 6 months.
At +30 to +45 °C (+86 to +113 °F), charge the UPS’s battery pack every 3 months.
990-7062 Revision 1, 10/98
Replacing the Battery Pack
This UPS has an easy to replace hot-swappable battery pack.
1.
APC
Note: Please read the cautions in the BayStack Safety Guide.
Reach into the finger pull and remove the front cover.
2.
Use a flat-blade screwdriver to turn the two battery door
screws ¼ turn counterclockwise; open the door.
3. Grasp the clear plastic tab and gently pull the battery pack
out of the UPS until the battery connector is visible.
Warning! Do not force the battery pack out. This may
damage internal wiring!
Replacement Batteries
See your dealer or call the number in this manual for information on replacement
battery pack kits. The order number for the battery pack is RBC18.
Battery Pack Replacement Procedure
Battery pack replacement is a safe procedure, isolated from electrical hazards. You
may leave the UPS and loads on for the following procedure.
4.
Disconnect the battery connector by gripping both sides of
the connector and firmly pulling them apart.
5.
6.
Slide the battery pack out of the UPS.
Slide the new battery pack three-fourths of the way into the
UPS.
Connect the battery connector attached to the unit to the
connector attached to the new battery pack.
Notes
·
Once the battery pack is disconnected, the loads are not protected from
power outages.
·
Be careful removing the batteries - they are heavy.
·
Small sparks at the battery connectors are normal during connection.
7.
8.
Push the battery pack in as far as it will go. There are stops
in the back to prevent it from going too far.
9. Close the battery door, turn the battery compartment screws
¼ turn clockwise, and replace the front cover.
10. Batteries must be recycled. Deliver the battery to an
appropriate recycling facility or ship it to the supplier in the
new battery’s packing material. See the new battery
instructions for more information.
Specifications
Service
Acceptable input voltage
Input voltage (on-line operation)
Output voltage
Input Over Current Protection
Frequency limits (on-line operation)
Transfer time
Maximum load
On-battery output voltage
On-battery frequency
0 - 320 VAC
165 - 283 VAC
208 - 253 VAC
Resettable circuit breaker
47 - 63 Hz (auto-sensing)
4 ms typical, blackout response time
450 VA 280 W
230 VAC
50 or 60 Hz, ±0.1 Hz; unless synchronized to
utility during brownout
Stepped sine-wave
Overcurrent and short-circuit protected, latching
shutdown on overload
Spill proof, maintenance free, sealed lead-acid
3 to 6 years, depending on number of discharge
cycles and ambient temperature
4 to 8 hours from total discharge
0 to +40 °C (+32 to +104 °F)
-15 to +45 °C (+5 to +113 °F)
5 to 95%, non-condensing
0 to +3,000 m (0 to +10,000 ft)
0 to +15,000 m (0 to +50,000 ft)
<38 dBA
4.5 x 44.5 x 33 cm.
(1.75 x 17.5 x 13.0 in.)
9.77 (11.82) kg.
21.5 (26) lbs
VDE licensed to EN50091 and EN60950
EN55022
IEC 801-2 Level IV, 801-3 Level III,
801-4 Level IV
On-battery waveshape
Output Over Current Protection
Battery type
Typical battery life
Typical recharge time
Operating temperature
Storage temperature
Operating and storage relative humidity
Operating elevation
Storage elevation
Audible noise at 1 m (3 ft)
Size (H x W x D)
Weight - net (shipping)
Safety and approvals
EMC certification
Electromagnetic Immunity
How to Get Help
For product assistance, support contracts, or information about educational services,
go to the following URL: http://www.baynetworks.com/corporate/contacts/ or
telephone the Bay Networks Technical Solutions Center at:+011-978-916-3700.
When asked for the Emergency Response Code, dial 177, and then the pound (#)
sign.
Information about customer service is also available on the World Wide Web at:
support.baynetworks.com.
Run Time
PowerStack 450 On-Battery Run-time vs. Loads over Operating
Temperature Range At 25'C
Run
Time
(min)
150
140
130
120
110
100
90
80
70
60
50
40
30
20
10
0
115
25 `C
51
32.5
23
0
LEDs and Audible Alarms
40
80
120
19.5
15
13
160
10
200
8.5
240
6
280
Output Load (watts)
Function
LED
On Battery
On-Line Overload
Tone*
Replace Battery
UPS is on
l
m
l
l
—
UPS is running on battery
m
l
—
—
4
UPS is performing self-test
m
X
l
l
—
Overload
—
—
m
—
1
—
m
—
1
Overload shutdown
—
Output short circuit
—
—
m
—
1
Transformer failure
—
—
m
—
1
Low Battery (while on battery)
m
—
—
—
1
Replace battery condition
—
—
—
m
2
Battery disconnected in self test
l
l
l
l
3
X
X
X
X
X
l
l
1
X
X
X
1
—
—
UPS internal alarms:
boost/trim failure
transfer relay weld
Sleep Mode
—
Typical On-Battery Run Time vs. Load at 25° C
Declaration of Conformity
Application of Council Directives:
Standards to Which Conformity Declared:
Manufacturer's Name and Address:
Importer's Name and Address:
Type of Equipment:
Model Numbers:
Serial Numbers:
Years of Manufacture:
Note:
89/336/EEC,73/23/EEC,92/31/EEC,
93/68/EEC,91/157/EEC
EN55022, EN50082-1, EN50091, EN60950
American Power Conversion
132 Fairgrounds Road
West Kingston, Rhode Island, 02892, USA
-orAmerican Power Conversion (A. P. C.) b. v.
Ballybritt Business Park
Galway, Ireland
-orAmerican Power Conversion Phillipines
Second Street
Cavite EPZA
Roserio, Cavite Phillipines
American Power Conversion (A. P. C.) b. v.
Ballybritt Business Park
Galway, Ireland
Uninterruptible Power Supply
PowerStack Models250 and 450, BayStack
Model UPS45
X9801 000 0000 — X9899 999 9999*
X9901 000 0000 — X9999 999 9999*
1998, 1999
Where X = B, O, W, or D
We, the undersigned, hereby declare that the equipment specified above conforms to the above directives.
Key:
— = irrelevant to condition
m = on steady
X = flashing
l = Off
*
1 = sustained tone
2 = 1 minute of beeping every 5 hours
3 = fading tone
4 = 4 beeps every 30 seconds
Billerica, MA
Place
10/1/98
Date
Galway, Ireland
Place
10/1/98
Date
Stephen A. Lee
Regulatory Compliance Engineer
Ray S. Ballard
Managing Director, Europe
For further troubleshooting information, refer to “Troubleshooting” in the BayStack
Quick Reference Guide.
990-7062 Revision 1, 10/98
Español
BayStack SAI45
204458-A
Manual del usuario de la fuente
ininterrumpible de alimentación (SAI)
Instalación
Para validar la cobertura de la garantía, por favor llene y
envíe ahora la tarjeta de registro de la garantía.
Inspección
Inspeccione la fuente ininterrumpible de alimentación 45
(UPS) BayStack al ser recibida. Notifique a la compañía
del envío y a la proveedora si hay algún defecto. El
envoltorio es reciclable; consérvelo para reutilizarlo o
deposítelo adecuadamente.
Montaje en la pared
Uso en escritorios
Para instalar el SAI, se puede dar un giro de 90° a las
abrazaderas situadas en el mismo. Retire los tornillos, gire
las abrazaderas e inserte los tornillos en los agujeros
adecuados.
Este SAI viene con cuatro “patas” de goma con
revestimiento de material adhesivo para ser usado en
escritorios. Para usarlo en un escritorio, acople las patas a
la parte inferior de la unidad y retire las orejetas.
Al montar la unidad en
la pared, oriente los
controles hacia arriba
o colóquelos en la
parte superior de la
unidad. No los coloque
en la parte inferior de
la unidad.
Las posiciones recomendadas para las patas se indican por
una pequeña + en las esquinas inferiores de la unidad:
¡Advertencia! Los cambios o las modificaciones hechas
a esta unidad que no hayan sido expresamente
aprobadas por la parte responsable del cumplimiento
podrían invalidar la garantía.
Montaje en bastidor
El SAI viene con abrazaderas estándar de 46,5 cm (19
pulg.). Se suministran cuatro (4) tornillos para fijar las
abrazaderas (orejetas) al bastidor.
Las ilustraciones que figuran más arriba indican las
posiciones correctas para montar la unidad en la pared.
¡Advertencia!
Instale el bastidor en un área protegida que esté aireado
adecuadamente y libre de polvo excesivo. Asegúrese de
que los respiraderos de los lados del SAI no estén
bloqueados. No opere el SAI donde la temperatura y la
humedad no estén dentro de los límites indicados en la
sección de Especificaciones de este manual.
No monte la unidad en la
pared de la forma
indicada en la
ilustración de la
izquierda, ya que puede
ser peligroso.
Vista trasera
Puerto de interfaz con la computadora
El puerto de interfaz se utiliza para las pruebas de fábrica
y la calibración.
Cargue el juego de baterías
El SAI carga el juego de baterías siempre que está
conectado a una fuente de alimentación externa. El juego
de baterías se cargará completamente durante las primeras
4 horas de operación normal. Durante este período de
carga inicial, no espere obtener un tiempo completo de
funcionamiento con la carga de reserva de la batería.
Una vez que haya montado el SAI, por favor siga las
instrucciones de instalación de la Guía de Referencia
Rápida de BayStack.
Instrucciones de operación
Interruptor encendido — Interruptor apagado
BayStack UPS 45
On- Line
Overload
On Battery
Replace Battery
I/O
Funcionamiento con batería
Batería con poca carga
Cuando el SAI funciona con batería, se ilumina el LED amarillo de
funcionamiento con batería y el SAI emite una alarma de cuatro
señales sonoras cada 30 segundos. La alarma se detiene cuando el
SAI vuelve a funcionar en línea.
Cuando el SAI está funcionando con batería y la reserva de energía
del juego llega a un nivel bajo, el SAI emite una señal sonora
continua hasta que se apaga por batería agotada o pasa a funcionar
en línea, si se recupera la fuente de alimentación externa antes de que
el juego de baterías se descargue completamente.
Sobrecarga
Arranque “en frío”
Después de enchufar el SAI, oprima y suelte el botón de
encendido/apagado/prueba para alimentar energía a las cargas.
Si las cargas superan la capacidad del SAI, se encenderá el LED rojo
de sobrecarga y el SAI emitirá un señal de alarma sostenida. La
alarma permanecerá activada hasta que la sobrecarga desaparezca.
Desconecte del SAI las cargas de los equipos que no sean esenciales
para eliminar la sobrecarga.
Las cargas recibirán energía de inmediato, mientras el SAI realiza en
línea una prueba automática de funcionamiento. Oprima y suelte de
nuevo el botón para apagar la alimentación de energía a las cargas.
Puede ser conveniente usar el SAI como interruptor principal de
encendido y apagado del equipo protegido.
Si la sobrecarga es severa, se puede disparar el interruptor de circuito
(el pistón reajustable del centro del interruptor de circuito se dispara
hacia fuera). Desconecte del SAI las cargas de los equipos que no
sean esenciales para eliminar la sobrecarga y oprima el pistón para
bajarlo de nuevo.
El LED verde en línea se ilumina cuando el SAI alimenta las cargas.
Si hay fuente de alimentación de CA y el interruptor de circuito no se
dispara durante la sobrecarga, esto indica que la alimentación de las
cargas permanece activada. Si el interruptor de circuito se dispara y
el SAI intenta pasar a funcionar con batería, se desactivará la
alimentación de las cargas. Apague el SAI y vuelva a encenderlo
para alimentar energía a las cargas.
Prueba automática de funcionamiento
Al encenderse, el SAI ejecuta automáticamente una prueba de
funcionamiento y a partir de ese momento, las repetirá cada dos
semanas. La prueba automática facilita el mantenimiento de la
unidad, eliminando la necesidad de realizar pruebas manuales
periódicamente.
Durante la prueba automática, el SAI alimenta energía brevemente a
las cargas conectadas a la batería. Si el SAI pasa la prueba de
funcionamiento, vuelve inmediatamente a funcionar en línea.
Si el SAI se apaga durante la prueba automática y emite un señal
sonora que baja de tono gradualmente, las baterías no están
conectadas correctamente.
Nota: El arranque “en frío” no debe ser la condición normal de
operación.
Cuando el SAI está apagado y no hay alimentación de la línea
externa, se puede arrancar “en frío” para alimentar las cargas
conectadas al juego de baterías del SAI.
·
Mantenga oprimido el botón de encendido/apagado/prueba
hasta que el SAI emita una señal sonora continua.
· Suelte el botón de encendido/apagado/prueba mientras el SAI
emite la señal sonora continua para encenderlo.
Cambio de la batería
Si la batería no pasa la prueba de funcionamiento, el SAI emite
señales sonoras cortas durante un minuto y se ilumina el LED rojo de
cambio de batería.
Si el SAI repite la alarma cada cinco horas, realice la prueba
automática de funcionamiento y confirme las condiciones del cambio
de baterías. La alarma se detiene cuando el juego de baterías pasa la
prueba automática.
Si la prueba fallida no afectará las cargas. Recargue el juego de
baterías durante la noche y realice de nuevo la prueba automática. Si
el LED de la batería permanece encendido, reemplace el juego de
baterías conforme al procedimiento de Reemplazo del juego de
baterías.
Almacenamiento
Condiciones de almacenamiento
Almacenamiento prolongado
Antes de almacenar el SAI, cárguelo por un mínimo de 8 horas. Cubra el SAI y almacénelo
en posición horizontal en un lugar fresco y seco, con el juego de baterías totalmente cargado.
De -15 a +30 °C (de +5 a +86 °F), cargue el juego de baterías del SAI cada 6 meses.
De +30 a +45 °C (de +86 a +113 °F), cargue el juego de baterías del SAI cada 3 meses.
990-7062 Revision 1, 10/98
Cambio de juego de baterías
Este SAI tiene un juego de baterías de fácil reemplazo.
Nota: Por favor lea las precauciones de la Guía de Seguridad de BayStack.
1.
APC
Cambio de baterías
2.
Con un destornillador de punta plana, dé ¼ de vuelta en dirección
contraria al reloj a los dos tornillos de la puerta del compartimiento
de la batería y abra la puerta.
3. Tome la pestaña de plástico translúcido y tire suavemente del juego
de baterías para extraerlo del SAI, hasta que se pueda ver el
conector de la batería.
¡Advertencia! ¡No fuerce la batería para sacarla, ya que se podrían
dañar los cables internos de conexión!
Comuníquese con el distribuidor o llame al número indicado en este manual para obtener
información sobre los accesorios para el cambio del juego de baterías El número de orden
para el paquete de baterías es RBC18.
Procedimiento de cambio de juego de baterías
El cambio de baterías es un procedimiento seguro y aislado de todo riesgo. Puede dejar
activados el SAI y las cargas durante el siguiente procedimiento.
Notas
·
Si el juego de baterías está desconectado, las cargas no están protegidas contra
cortes de energía.
·
Proceda con cuidado al extraer las baterías, ya que son pesadas.
·
Durante la conexión, es normal la presencia de chispas en los conectores de la
batería.
Abra la traba manual y saque la tapa frontal.
4.
Desconecte el conector de la batería sujetando ambos lados del
mismo y tirando de ellos firmemente para separarlos.
5.
6.
Deslice el juego de baterías hacia fuera para extraerlo del SAI.
Deslice el nuevo juego de baterías hasta cubrir tres cuartas partes
del compartimiento para baterías del SAI.
7.
Conecte el conector de baterías acoplado a la unidad al conector
acoplado al nuevo juego de baterías.
8. Empuje el juego de baterías hasta el fondo. Hay topes en la parte
trasera para evitar que traspase el límite adecuado.
9. Cierre la puerta de la batería, dé ¼ de vuelta en dirección del reloj
a los tornillos del compartimiento de las baterías y coloque la tapa
frontal.
10. Las baterías deben ser recicladas. Entregue la batería a una
facilidad apropiada de reciclaje o devuélvalas al proveedor original
en el embalaje de las baterías nuevas. Consulte las instrucciones de
las baterías nuevas para obtener más información al respecto.
Servicio técnico
Especificaciones técnicas
Voltaje admisible de entrada
Voltaje de entrada (funcionamiento con línea
externa)
Voltaje de salida
Protección de entrada contra sobrecorriente
Límites de frecuencia (funcionamiento con línea
externa)
Tiempo de transferencia
Carga máxima
Voltaje de salida con batería
Frecuencia con batería
Forma de onda en funcionamiento con batería
Protección de salida contra sobrecorriente
Tipo de batería
Vida útil normal de la batería
Tiempo normal de recarga
Temperatura de funcionamiento
Temperatura de almacenamiento
Humedad relativa de servicio y almacenamiento
Altura de servicio
Altura de almacenamiento
Ruido audible a 1 m (3 pies)
Tamaño (Altura x Ancho x Largo)
Peso - neto (de envío)
Seguridad y aprobaciones
Certificación EMC
Inmunidad Electromagnética
Cómo obtener ayuda
0 - 320 V CA
165-283 V CA
208-253 V CA
Interruptor de circuito reajustable
47 - 63 Hz (autosensible)
4 ms típico, tiempo de respuesta a corte
450 VA 280 W
230 V CA
50 o 60 Hz, ±0.1 Hz; a menos que esté
sincronizada con línea externa durante corte
Onda sinusoidal de baja distorsión
Protegida contra sobrecorriente y cortocircuito.
Inactivación por sobrecarga
A prueba de derrame, libre de mantenimiento,
sellado ácido de plomo
De 3 a 6 años, según el número de ciclos de
descarga y de la temperatura ambiente
De 4 a 8 horas a partir de la descarga total
De 0 a +40 °C (De +32 a +104 °F)
De -15 a +45 °C (De +5 a +113 °F)
De 0 a 95%, sin condensación
De 0 a +3,000 m (de 0 a +10,000 pies)
De 0 a +15,000 m (de 0 a +50,000 pies)
<38 dBA
4,5 x 44,5 x 33 cm.
1.75 x 17.5 x 13.0 in.
9.77 (11.82) kg.
21.5 (26) lbs.
VDE autorizada a EN50091 y EN60950
EN55022
IEC 801-2 Nivel IV, 801-3 Nivel III,
801-4 Nivel IV
Para asistencia con el producto, contratos del producto, o información sobre
servicios educativos vaya a la siguiente URL:
http://www.baynetworks.com/corporate/contacts/ o llame al Centro de Servicios
Técnicos de Bay Networks al: +011-978-916-3700. Cuando se le solicite el Código
de respuesta de emergencia, marque 177 y luego el símbolo de la libra (#).
Para información sobre el servicio al cliente también se dispone de la Red mundial
en: support.baynetworks.com.
Tiempo de trabajo
PowerStack 450 On-Battery Run-time vs. Loads over Operating
Temperature Range At 25'C
Tiempo
de
trabajo
(min.)
150
140
130
120
110
100
90
80
70
60
50
40
30
20
10
0
115
25 `C
51
32.5
23
0
40
80
120
19.5
15
13
160
10
200
8.5
240
6
280
Output de
Load
(watts)
Cargas
salida
(vatios)
Indicadores LED y alarmas sonoras
Función
LED
Sobrecarga
Señal sonora*
Enlínea
SAI encendido
l
m
l
l
—
SAI funcionando con batería
m
l
—
—
4
SAI realizando prueba automática de
funcionamiento
Sobrecarga
m
X
l
l
—
—
—
m
—
1
Inactivación por sobrecarga
—
—
m
—
1
Cortocircuito de salida
—
—
m
—
1
Falla del transformador
—
—
m
—
1
Batería con poca carga (mientras
funciona con batería)
Condición de cambio de batería
m
—
—
—
1
—
—
—
m
2
l
l
l
l
3
Batería desconectada durante prueba
automática
Alarmas internas del SAI:
Declaration of Conformity
Application of Council Directives:
Standards to Which Conformity Declared:
Manufacturer's Name and Address:
Importer's Name and Address:
Type of Equipment:
Model Numbers:
Serial Numbers:
Years of Manufacture:
Note:
X
X
falla de aumento/reducción
soldadura de relé de transferencia
Modalidad de funcionamiento
suspendido
—
X
X
X
X
X
X
X
X
1
—
—
1
Clave:
— = irrelevante para la condición
Tiempo de trabajo típico en-batería vs. Carga a 25° C
Batería de
repuesto
En la
batería
*
89/336/EEC,73/23/EEC,92/31/EEC,
93/68/EEC,91/157/EEC
EN55022, EN50082-1, EN50091, EN60950
American Power Conversion
132 Fairgrounds Road
West Kingston, Rhode Island, 02892, USA
-orAmerican Power Conversion (A. P. C.) b. v.
Ballybritt Business Park
Galway, Ireland
-orAmerican Power Conversion Phillipines
Second Street
Cavite EPZA
Roserio, Cavite Phillipines
American Power Conversion (A. P. C.) b. v.
Ballybritt Business Park
Galway, Ireland
Uninterruptible Power Supply
PowerStack Models250 and 450, BayStack
Model UPS45
X9801 000 0000 — X9899 999 9999*
X9901 000 0000 — X9999 999 9999*
1998, 1999
Where X = B, O, W, or D
We, the undersigned, hereby declare that the equipment specified above conforms to the above directives.
Billerica, MA
Place
10/1/98
Date
Galway, Ireland
Place
10/1/98
Date
Stephen A. Lee
Regulatory Compliance Engineer
Ray S. Ballard
Managing Director, Europe
1 = señal sonora sostenida
m = iluminado continuamente
2 = 1 señal sonora cada 5 horas
X = destellante
3 = señal sonora que baja de tono gradualmente
l = apagado
4 = 4 señales sonoras cada 30 segundos
Use la sección de Resolución de problemas de la Guía de Referencia Rápida
BayStack para eliminar los "problemas comunes".
990-7062 Revision 1, 10/98
Français
BayStack UPS45
204458-A
Guide d’utilisation
Source d’alimentation sans interruption
Installation
Pour faire débuter la garantie, remplissez la carte et
renvoyez-la aujourd’hui.
Inspection
Montage mural
Utilisation sur surface de bureau
Les supports de l’UPS peuvent être tournés de 90 degrés pour un
montage mural. Enlevez les vis, tournez les supports et introduisez
les vis dans les bons trous.
L’UPS est livrée avec quatre “pieds” en caoutchouc
adhésifs pour utilisation sur surface de bureau. Fixez les
pieds sous l’appareil et enlevez les pattes pour cette
utilisation.
Examinez l’onduleur BayStack UPS45 dès réception. En
cas d’avarie, avisez le transporteur et le distributeur. Le
conditionnement est recyclable ; conservez-le pour nouvel
emploi ou disposez-en correctement.
En montage mural, les
commandes doivent se
trouver en haut, et non
en bas de l’appareil.
Le placement des pieds recommandé est indiqué par un
petit + aux angles inférieurs de l’unité :
Avertissement ! Tous changements ou modifications à
cet appareil sans l’approbation expresse de la partie
responsable de la conformité risquent d’annuler la
garantie.
Montage du bâti support
L’UPS est livrée avec des supports de montage de bâti
standards de 46,5 cm (19 pouces), et avec quatre (4) vis
pour le montage des supports (pattes) sur le boîtier.
L’illustration montre les positions correctes pour montage
mural.
Avertissement !
Ne pas monter l’appareil
sur un mur de la façon
illustrée à gauche, ceci
pouvant entraîner des
problèmes de sécurité.
Le bâti support doit être situé dans un endroit bien aéré,
sans poussière excessive. Vérifiez que les ouvertures
d’aération situées sur les côtés de l’UPS ne sont pas
bloquées. L’UPS ne doit pas fonctionner dans les endroits
où la température ou l’humidité dépassent les limites
indiquées dans la section specifications de ce manuel.
Vue arrière
Port d’interface avec ordinateur
Le port d’interface est utilisé pour la phase d’étalonnage
et de testage en usine.
Pour charger la batterie
L’UPS charge sa batterie lorsqu’elle est branchée sur
l’électricité. 4 heures de fonctionnement normal assurent
la recharge totale de la batterie. Pendant la première
période de recharge, la batterie n’assurera pas la durée
normale de fonctionnement de secours.
Une fois l’onduleur assemblé, veuillez suivre les
instructions d’installation du Guide de référence rapide
BayStack.
Mode opératoire
Contacteur en position de marche — Contacteur
en position d’arrêt
BayStack UPS 45
On- Line
Overload
On Battery
Replace Battery
I/O
L’UPS étant branchée, appuyez puis relâchez la
touche on/off/test pour alimenter les charges.
Les charges sont immédiatement alimentées, pendant que
l’UPS procède au test automatique. A nouveau, appuyez
puis relâchez la touche pour interrompre l’alimentation
des charges. Il peut être utile d’employer l’UPS en tant
que contacteur maître on/off (marche/arrêt) pour les
matériels protégés.
Le DEL vert en ligne s’illumine lorsque l’UPS assure
l’alimentation d’utilités aux charges.
Test automatique
L’UPS procède à un test automatique à sa mise en marche,
puis une fois toutes les deux semaines par la suite. Le test
automatique facilite la maintenance en éliminant le besoin
de procéder à des tests automatiques périodiques.
Pendant le test automatique, l’UPS alimente brièvement
les charges sur batterie. Si l’UPS passe le test
automatique, elle retourne au fonctionnement en ligne.
Si l’UPS s’arrête pendant le test automatique et émet un
signal sonore décroissant, ceci signifie que la batterie n’est
pas correctement branchée.
Sur batterie
Faible batterie
Pendant le fonctionnement sur batterie, le DEL jaune “On
Battery” est illuminé et l’UPS émet un signal sonore
consistant en 4 bips toutes les 30 secondes. Le signal
d’alarme s’arrête lorsque l’UPS retourne en
fonctionnement en ligne.
En fonctionnement sur batterie, si cette dernière
s’affaiblit, l’UPS émet des signaux sonores continus
jusqu’à son arrêt du fait de l’épuisement de la batterie, ou
jusqu’à son retour en fonctionnement en ligne si
l’électricité de service revient avant l’épuisement de la
batterie.
Surcharge
Si les charges dépassent la capacité de l’UPS, le DEL
rouge “overload” (surcharge) s’illumine et l’UPS émet un
signal soutenu. Ce signal se poursuit jusqu’à l’élimination
de la surcharge. Débranchez les matériels non essentiels
de l’UPS pour éliminer la surcharge.
En cas de surcharge importante, le disjoncteur de circuit
d’arrivée peut se déclencher (le piston central du
disjoncteur à réenclenchement ressort). Débranchez les
matériels non essentiels de l’UPS pour éliminer la
surcharge, puis appuyez sur le piston pour le faire rentrer.
En courant alternatif, si le disjoncteur ne se déclenche pas
pendant une surcharge, les charges sont encore alimentées.
Si le disjoncteur se déclenche ou que l’UPS tente de faire
le transfert sur la batterie, l’alimentation des charges sera
interrompue. Arrêtez l’UPS, puis remettez-la en marche
pour alimenter les charges.
Démarrage à froid
Remarque : Le démarrage à froid n’est pas une
condition de fonctionnement normale.
En cas d’absence d’électricité alors que l’UPS est à
l’arrêt, il est possible de la faire démarrer à froid pour
alimenter les charges à partir de la batterie de l’UPS.
·
Appuyez et maintenez appuyé le bouton
on/off/test jusqu’à l’émission d’un signal sonore
constant par l’UPS.
· Relâchez le bouton on/off/test pendant le signal pour
faire démarrer l’UPS.
Changement de la batterie
Si la batterie ne passe pas un test automatique, l’UPS
émet de courts signaux sonores pendant une minute, et le
DEL rouge “Replace Battery” s’illumine.
L’UPS répète ce signal d’alarme toutes les cinq heures.
Procédez au test automatique pour confirmer les
conditions de changement de la batterie. Le signal s’arrête
lorsque la batterie passe le test automatique.
Les charges ne sont pas affectées par un test qui n’a pas
réussi. Rechargez la batterie toute la nuit et procédez de
nouveau au test automatique. Si le DEL “Replace battery”
est toujours illuminé, changez la batterie conformément
aux instructions contenues au paragraphe Changement de
la batterie ci-dessous.
Entreposage
Conditions d’entreposage
Entreposage prolongé
Avant l’entreposage, chargez l’UPS pendant au moins 8 heures. Recouvrez-la et placez-la à
plat dans un endroit frais et sec, avec la batterie chargée à fond.
Entre -15 à +30 °C (+5 à +86 °F), chargez la batterie de l’UPS tous les 6 mois.
Entre +30 à +45 °C (+86 à +113 °F), chargez la batterie de l’UPS tous les 3 mois.
990-7062 Revision 1, 10/98
Changement de la batterie
Cette UPS comporte une batterie à changement rapide, qu’il est facile de remplacer.
Remarque : Veuillez lire les précautions des Consignes de sécurité BayStack.
1.
APC
Changement de la batterie
2.
A l’aide d’un tournevis plat, dévissez les deux vis de la porte des
batteries d’un quart de tour vers la gauche; ouvrez la porte.
3. Saisissez la patte en plastic transparent et tirer doucement pour
sortir les batteries de l’UPS; continuez à tirer jusqu’à ce que le
connecteur de batterie soit visible.
Avertissement ! Ne forcez pas pour sortir la batterie; ceci risque
d’endommager le montage électrique intérieur!
Consultez votre distributeur ou appelez le numéro indiqué dans ce manuel pour tous
renseignements concernant les kits de changement de batterie. Le numéro de commande pour
le bloc de batteries est RBC18.
Marche à suivre pour le changement de la batterie
Le changement de la batterie est un procédé sans risques électriques. Vous pouvez laisser
l’UPS et les charges en fonctionnement pendant le procédé ci-dessous.
Remarques
·
Une fois la batterie débranchée, les charges ne sont plus protégées contre les
interruptions de courant.
·
Prenez toutes précautions utiles lors de la sortie des batteries. Elles sont lourdes.
·
De petites étincelles aux connecteurs de batterie sont normales pendant le
branchement.
4.
Débranchez le connecteur de batterie en le tenant des deux côtés et
en tirant fermement pour les séparer.
5.
6.
Sortez les batteries de l’UPS en les faisant glisser.
Faites glisser les nouvelles batteries à trois quarts de l’intérieur de
l’UPS.
7.
Branchez le connecteur de batterie relié à l’appareil au connecteur
des nouvelles batteries.
8. Poussez les batteries au maximum. Des arrêts sont situés à
l’arrière, pour empêcher d’aller trop loin.
9. Fermez la porte des batteries, vissez les vis du compartiment des
batteries d’un quart de tour vers la droite et replacez le couvercle
avant.
10. Les batteries doivent être recyclées. Déposez la batterie dans des
installations de recyclage appropriées, ou expédiez-la au
fournisseur dans le conditionnement d’origine. Voir les directives
concernant les nouvelles batteries pour de plus amples
renseignements.
Service
Spécifications
Tension d’arrivée acceptable
Tension d’arrivée (fonctionnement en ligne)¬
Tension de sortie
Protection contre les surintensités d’arrivée
Limites des fréquences (fonctionnement en ligne)
Temps de transfert
Charge maximale
Tension de sortie sur batterie
Fréquence sur batterie
Formes d’ondes sur batterie
Protection contre les surintensités de sortie
Genre de batteries
Vie utile normale des batteries
Temps de recharge normal
Température de service
Température d’entreposage
Humidité relative de service et d’entreposage
Altitude de service
Altitude d’entreposage
Bruit audible à 1 m (3 pieds)
Dimensions (H x L x P)
Poids - net (expédition)
Sécurité et homologations
Homologation EMC
Immunité électromagnétique
0 - 320 VAC
165 - 283 VAC
208 - 253 VAC
Disjoncteur réenclenchable
47 - 63 Hz (détection automatique)
4 ms normal, temps de réponse au noir
450 VA 280 W
230 VAC
50 ou 60 Hz, ±0.1 Hz; à moins de synchronisation
avec la puissance de service pendant les pannes
localisées.
Régime sinusoïdal échelonné
Protection contre surintensités et court-circuits, arrêt
verrouillé en surintensité
Batterie au plomb étanche, libre d’entretien
et anti-fuites
3 à 6 ans, en fonction du nombre de cycles de
décharge et de la température ambiante
4 à 8 heures après décharge totale
0 à+40 °C (+32 à+104 °F)
-15 à+45 °C (+5 à+113 °F)
0 à 95%, sans condensation
0 à +3,000 m (0 à +10,000 pieds)
0 à +15,000 m (0 à +50,000 pieds)
<38 dBA
4.5 x 44.5 x 33 cm.
(1.75 x 17.5 x 13.0 in.)
9.77 (11.82) kg
21.5 (26) livres
VDE sous licence à EN50091 et EN60950
EN55022
IEC 801-2 Niveau IV, 801-3 Niveau III, 801-4, Niveau IV
DEL et Alarmes Sonores
Fonction
DEL
Signal*
Comment obtenir de l’aide
Pour obtenir de l’aide concernant des contrats de support ou des informations sur
des services éducationnels rendez vous au localisateur URL suivant :
http://www.baynetworks.com/corporate/contacts/ ou téléphonez au centre technique
Bay Networks Technical Solutions Center au +011-978-916-3700. Lorsque le
service vous demande le code de réponse d’urgence, composez le 177 puis appuyez
sur la touche #.
Des informations relatives au service clientèle sont également disponibles sur le
World Wide Web à l’adresse : support.baynetworks.com.
Durée d’exécution
PowerStack 450 On-Battery Run-time vs. Loads over Operating
Temperature Range At 25'C
150
140
130
120
110
Durée
100
d’exécution
90
(min)
80
70
60
50
40
30
20
10
0
115
25 `C
51
32.5
23
0
Batterie
activée
En ligne
UPS en service
l
m
l
l
UPS fonctionne sur batteries
m
l
—
—
4
UPS en cours de test autonome
m
X
l
l
—
Surcharge
—
—
m
—
1
Arrêt causé par surcharge
—
—
m
—
1
Court-circuit à la sortie
—
—
m
—
1
Panne de transformateur
—
—
m
—
1
Batteries faibles (fonctionnement
sur batteries)
Changer l’état des batteries
m
—
—
—
1
—
—
—
m
2
Batteries débranchée pendant le
test autonome
Alarmes internes de l’UPS :
l
l
l
l
3
Défaut charge rapide/trim
X
X
l
l
1
Relais de transfert soudé
X
X
X
X
1
—
X
X
—
—
Mode inactif
Enlevez le couvercle avant en introduisant le doigt dans l’orifice.
Surcharge Remplacement
de la batterie
40
80
120
13
160
10
200
8.5
240
6
280
—
Durée d’exécution de batterie activée vs. Chargement à 25º C
Declaration of Conformity
Application of Council Directives:
Standards to Which Conformity Declared:
Manufacturer's Name and Address:
Importer's Name and Address:
Type of Equipment:
Model Numbers:
Serial Numbers:
Years of Manufacture:
Note:
*
15
Output Load
(watts)
Courant
de charge
(watts)
Clé :
— = ne concerne pas la situation
19.5
1 = signal soutenu
m = fonctionnement régulier
2 = 1 minute de signaux bip toutes les 5 heures
X = clignotement
3 = signal décroissant
l = arrêt
4 = 4 signaux bip toutes les 30 secondes
Pour de plus amples informations de dépannage consultez la section «Dépannage»
dans le Guide de référence rapide BayStack.
89/336/EEC,73/23/EEC,92/31/EEC,
93/68/EEC,91/157/EEC
EN55022, EN50082-1, EN50091, EN60950
American Power Conversion
132 Fairgrounds Road
West Kingston, Rhode Island, 02892, USA
-orAmerican Power Conversion (A. P. C.) b. v.
Ballybritt Business Park
Galway, Ireland
-orAmerican Power Conversion Phillipines
Second Street
Cavite EPZA
Roserio, Cavite Phillipines
American Power Conversion (A. P. C.) b. v.
Ballybritt Business Park
Galway, Ireland
Uninterruptible Power Supply
PowerStack Models250 and 450, BayStack
Model UPS45
X9801 000 0000 — X9899 999 9999*
X9901 000 0000 — X9999 999 9999*
1998, 1999
Where X = B, O, W, or D
We, the undersigned, hereby declare that the equipment specified above conforms to the above directives.
Billerica, MA
Place
10/1/98
Date
Galway, Ireland
Place
10/1/98
Date
Stephen A. Lee
Regulatory Compliance Engineer
Ray S. Ballard
Managing Director, Europe
990-7062 Revision 1, 10/98
Deutsch
BayStack USV45
204458-A
Benutzerhandbuch für
unterbrechungsfreie Stromversorgung
Installation
Die Garantieregistrierungskarte ausfüllen und
einsenden, um den Garantieschutz zu aktivieren.
Überprüfung
Die unterbrechungsfreie Stromversorgung BayStack
USV45 nach Empfang untersuchen. Etwaige
Beschädigungen müssen umgehend dem Spediteur und
dem Händler mitgeteilt werden. Die Verpackung ist
recyclefähig; sie sollte aufbewahrt und wieder
verwendet, oder entsprechend entsorgt werden.
Befestigung an der Wand
Die Montagewinkel an der USV können zu
Befestigungszwecken an der Wand 90° gedreht
werden. Dazu die Schrauben entfernen, die Winkel
drehen und die Schrauben dann in die jeweiligen
Löcher einlegen.
Bei der Befestigung
an der Wand muß
beachtet werden,
daß sich die
Bedienungselemente
oben, und nicht
unten am Gerät
befinden.
Vorsicht! Änderungen oder Modifikationen am
Gerät, die nicht vorher durch die verantwortliche
Stelle genehmigt werden, können u.U. zur
Nichtigkeit der Garantieverpflichtungen führen.
Einbau in Rahmen
Der Lieferumfang der USV umfaßt Montagewinkel
zum Einbau in einen Standard-46,5 cm-Rahmen (19”).
Ebenfalls enthalten sind vier (4) Schrauben zur
Befestigung der Montagewinkel an der USV.
Obige Abbildung zeigt, wie das Gerät richtig an der
Wand positioniert ist.
Vorsicht!
Das Gerät nicht wie in
der linken Abbildung
gezeigt an der Wand
befestigen. Dies
könnte zu einem
Sicherheitsrisiko
führen.
Einen Rahmenstandort mit ausreichender
Luftzirkulation und ohne extremes Staubvorkommen
auswählen. Darauf achten, daß die Lüftungsöffnungen
an den Seiten der USV nicht blockiert sind. Die USV
nicht betreiben, wenn die Temperatur bzw.
Feuchtigkeit außerhalb der in diesem
Benutzerhandbuch angegebenen Spezifikationen liegt.
Rückansicht
Benutzung auf dem Arbeitstisch
Der Lieferumfang dieser USV beinhaltet auch vier
selbstklebende „Gummifüße“, die bei der Installation
auf dem Arbeitstisch zur Anwendung kommen. Diese
Füße dazu unten am Gerät anbringen und die
Montagewinkel entfernen.
Die kleinen „+“ in der nachfolgenden Abbildung
zeigen die empfohlene Plazierung der Füße an den
unteren Ecken des Gerätes:
Computer-Schnittstellenport
Der Schnittstellenanschluß wird zur Werksprüfung und
Kalibrierung verwendet.
Aufladen der Batterie
Die USV lädt die Batterien auf, sobald das Gerät am
Stromnetz angeschlossen ist. Die volle Batterieladung
wird nach den ersten 4 Stunden Normalbetrieb
erreicht. Während dieser ersten Ladeperiode kann die
USV nicht die volle Batterielaufzeit
(Überbrückungszeit) erbringen.
Nachdem die USV eingebaut ist, die
Installationsanleitungen in der Kurzübersicht zur
BayStack-USV befolgen.
Betriebsanleitung
Einschalten — Ausschalten
BayStack UPS 45
On- Line
Overload
On Battery
Replace Battery
I/O
Nachdem die USV eingesteckt ist, den Knopf
On/Off/Test drücken und wieder loslassen, um den
angeschlossenen Geräten Strom zuzuführen.
Den Geräten wird sofort Strom zugeführt während die USV
einen Selbsttest durchführt. Den Knopf erneut drücken und
wieder loslassen, um die Stromversorgung abzuschalten. Es
könnte sich als praktisch erweisen, die USV als
Hauptschalter zum Ein- und Ausschalten der geschützten
Ausrüstung zu verwenden.
Die grüne On-line-LED-Anzeige leuchtet auf, wenn die USV
den Geräten Strom aus dem Netz zuführt.
Selbsttest
Die USV führt jedesmal, wenn sie eingeschaltet wird und
nach jeweils zwei Wochen, automatisch einen Selbsttest
durch. Automatische Selbsttests erleichtern die
Wartungsanforderungen, da dadurch periodische, manuelle
Selbsttests überflüssig sind.
Bei einem Selbsttest versorgt die USV die angeschlossenen
Geräte kurzzeitig über die Batterie. Schließt die USV den
Selbsttest erfolgreich ab, kehrt sie zum Betrieb mit der
normalen Stromversorgung zurück.
Schaltet sich die USV im Verlauf des Selbsttests ab und gibt
ein schwindendes akustisches Signal aus, sind die Batterien
nicht richtig angeschlossen.
Batteriebetrieb
Werden die Geräte über die Batterie betrieben, leuchtet die
gelbe LED-Anzeige „Batteriebetrieb“ auf und die USV gibt
alle 30 Sekunden einen Signalton aus, der aus 4 einzelnen
Pieptönen besteht. Der Alarm schaltet ab, sobald die USV
zum Netzbetrieb zurückkehrt.
Überlast
Wenn die angeschlossenen Geräte die Kapazität der USV
überschreiten, leuchtet die rote LED-Überlastanzeige auf und
die USV gibt einen anhaltenden Signalton aus. Der Alarm
schaltet erst ab, nachdem die Überlast nicht mehr besteht.
Die Belastung der USV durch Abziehen von nicht
notwendigen Geräten reduzieren.
Handelt es sich um eine ernsthafte Überlast, kann der
Eingangsüberlastschalter aktiviert werden (der
zurücksetzbare Stift des Überlastschalters springt heraus).
Die Belastung der USV durch Abziehen von nicht
notwendigen Geräten reduzieren und den Überlastschalter
durch Eindrücken des Stifts zurücksetzen.
Liegt Wechselstrom an und wird der Überlastschalter beim
Auftreten einer Überlast nicht aktiviert, werden die Geräte
weiterhin mit Strom versorgt. Wird der Überlastschalter
aktiviert oder die USV versucht auf Batterie umzuschalten,
wird die Stromzufuhr zu den angeschlossenen Geräten
abgeschaltet. In diesem Fall die USV erst aus- und dann
wieder einschalten, um den Geräten wieder Strom
zuzuführen.
Niedrige Batteriekapazitaet
Befindet sich die USV im Batteriebetrieb und neigen sich die
Energievorräte dem Ende zu, gibt die USV einen
kontinuierlichen Piepton aus, bis die USV abschaltet weil die
Batterie entladen ist oder zum Netzbetrieb zurückkehrt,
wenn die Stromversorgung aus dem Netz wiederhergestellt
wird, bevor die Batterie leer ist.
Kaltstart
Hinweis: Bei einem Kaltstart handelt es sich nicht um
normale Betriebsbedingungen.
Ist die USV abgeschaltet und die Stromzufuhr aus dem Netz
unterbrochen, kann die USV über einen sogenannten
Kaltstart eingeschaltet werden, um die Geräte über die
Batterien der USV mit Strom zu versorgen.
·
Den Knopf On/Off/Test gedrückt halten bis die
USV einen kontinuierlichen Signalton ausgibt.
· Den Knopf On/Off/Test wieder loslassen während der Ton
ausgegeben wird, um die USV einzuschalten.
Batteriewechsel
Schließen die Batterien einen Selbsttest nicht erfolgreich ab,
gibt die USV eine Minute lang kurze Pieptöne aus und die
rote LED-Anzeige zum Batteriewechsel leuchtet auf.
Die USV wiederholt diesen Alarm alle fünf Stunden. Zur
Bestätigung, daß die Batterien ausgewechselt werden
müssen, einen Selbsttest durchführen. Der Alarm schaltet ab,
wenn die Batterien den Selbsttest erfolgreich abschließen.
Die angeschlossenen Geräte werden durch einen
fehlgeschlagenen Test nicht in Mitleidenschaft gezogen. Die
Batterien müssen über Nacht erneut aufgeladen, und der
Selbsttest dann am nächsten Morgen erneut durchgeführt
werden. Leuchtet die LED-Anzeige zum Batterieersatz
immer noch auf, müssen die Batterien ausgewechselt
werden. Dazu die Anleitungen unter Batteriewechsel
befolgen.
Lagerung
Lagerung
Lanzeitlagerung
Vor der Lagerung die USV mindestens 8 Stunden lang aufladen. Die USV abdecken
und flach an einem kühlen, trockenen Ort mit der voll geladenen Batterie aufbewahren.
Bei -15 bis +30 °C, die Batterie der USV alle 6 Monate aufladen.
Bei +30 bis +45 °C, die Batterie der USV alle 3 Monate aufladen.
990-7062 Revision 1, 10/98
Batteriewechsel
Diese USV verfügt über eine während des Betriebs auswechselbare Batterie.
Hinweis: Bitte die in den BayStack-Sicherheitsrichtlinien enthaltenen
Vorsichtsmaßnahmen lesen.
1.
APC
In die Öffnung greifen und die Vorderseitenabdeckung entfernen.
2.
Die beiden Schrauben der Batteriefachklappe mit Hilfe eines
Flachschraubendrehers ¼ Umdrehung gegen den Uhrzeigersinn
drehen und die Klappe öffnen.
3. Die durchsichtige Plastiklasche ergreifen und die Batterie vorsichtig
aus der USV herausziehen bis die Batterieanschlüsse sichtbar sind.
Achtung! Beim Herausnehmen keine Gewalt anwenden. Dadurch
könnte die interne Verdrahtung beschädigt werden.
Ersatzbatterien
Für Informationen zu Ersatzbatterien bitte einen Fachhändler kontaktieren oder die in diesem
Handbuch aufgeführte Rufnummer anrufen. Die Bestellnummer für den Batteriesatz lautet
RBC18.
Verfahren zum Batteriewechsel
Das Auswechseln der Batterie ist ungefährlich und frei von elektrischen Gefahren. Die USV und
die angeschlossenen Geräte können während des Batteriewechsels eingeschaltet bleiben.
4.
Den Batterieanschluß durch festes Auseinanderziehen der
Anschlüsse trennen.
Hinweise
·
Wenn die Batterie von der USV getrennt ist, sind die Geräte nicht mehr gegen Stromausfälle
geschützt.
·
Vorsicht beim Entfernen der Batterien – sie sind schwer.
·
Beim Anschluß können an den Batterieanschlüssen kleine Funken auftreten.
5.
6.
7.
Die Batterie aus der USV ziehen.
Die neue Batterie zu ¾ in die USV einschieben.
Die Batterieanschlüsse der USV an die Klemmen der neuen
Batterie anschließen.
8. Die Batterie nun so weit wie möglich in das Fach einschieben.
Hinten im Fach befinden sich Anschläge, die ein zu weites
Einschieben verhindern.
9. Die Klappe zum Batteriefach schließen, die Schrauben ¼
Umdrehung im Uhrzeigersinn drehen und die Abdeckung wieder
anbringen.
10. Batterien müssen dem Recycling zugefuehrt werden. Die alten
Batterien einer Recyclingstelle zuführen oder im
Verpackungsmaterial der neuen Batterie zurück an den Händler
schicken. Weitere Informationen sind in den Anleitungen der neuen
Batterien zu finden.
Spezifikationen
Service
Akzeptable Eingangsspannung
Eingangsspannung (Netzbetrieb)
Ausgangsspannung
Eingangsüberlastschutz
Frequenzgrenze (Netzbetrieb)
Übertragungszeit
Max. Ladung
Ausgabespannung bei Batteriebetrieb
Frequenz bei Batteriebetrieb
0 - 320 VAC
165 - 283 VAC
208 - 253 VAC
Zurücksetzbarer Schutzschalter
47 - 63 Hz (autom. Erkennung)
Typische Transferzeit bei Totalausfällen 4 ms
450 VA, 280 W
230 VAC
50 oder 60 Hz, ±0.1 Hz; es sei denn, mit
Netzfrequenz bei Unterspannung abgestimmt
Abgestufte Sinuswelle
Geschützt durch zuruecksetzbaren Überstromund Kurzschlussunterbrecher
Auslaufsichere, wartungsfreie, verschlossene
Bleigelbatterie
3 bis 6 Jahre, je nach Anzahl der
Entladungszyklen und der
Umgebungstemperatur
4 bis 8 Stunden bei vollständiger Entladung
0 bis +40 °C
-15 bis +45 °C
5 bis 95%, nicht kondensierend
Wellenform bei Batteriebetrieb
Ausgangsüberlastschutz
Batterietyp
Normale Lebensdauer der Batterie
Normale Aufladezeit
Betriebstemperatur
Lagerungstemperatur
Relative Luftfeuchtigkeit bei Betrieb und
Lagerung
Betriebshöhe
Lagerungshöhe
Hörbares Signal bei 1 m
Abmessungen (H x B x T)
Nettogewicht (Transportgewicht)
0 bis +3.000 m
0 bis +15.000 m
<38 dBA
4,5 x 43,5 x 35 cm
9,77 (11,82) kg
Sicherheit und Freigaben
EMC-Zertifizierung
Elektromagnetische Störfestigkeit
VDE-lizenziert bis EN50091 und EN60950
EN55022
IEC 801-2 Level IV, 801-3 Level III,
801-4 Level IV
LED-Anzeigen und Signaltöne
Produktunterstützung, Supportverträge oder Informationen zu Ausbildungsfragen finden sie unter
der Internet Adresse http://www.baynetworks.com/corporate/contacts/ oder ueber das Technical
Solutions Center von Bay Networks unter (+01) 978 916 3700. Bei der Frage nach dem
“Emergency Response Code” 177 eingeben und die Taste mit dem Symbol # drücken.
Informationen zum Kundendienst sind auch via E-Mail im World Wide Web zu finden:
[email protected].
Lauf-/Überbrückungszeit
PowerStack 450 On-Battery Run-time vs. Loads over Operating
Temperature Range At 25'C
150
140
Lauf-/
130
Überbrückungs- 120
zeit
110
(Min)
100
90
80
70
60
50
40
30
20
10
0
115
25 `C
51
32.5
23
0
40
80
19.5
120
15
160
13
10
200
8.5
240
6
280
Ausgangslast
(Watt)
Output Load
(watts)
Typische Batterie-Lauf/Überbrückungszeit gegenüber Last bei 25º C
Funktion
LED
Ton*
Batteriebetrieb
Online
USV eingeschaltet
l
m
l
l
USV im Batteriebetrieb
m
l
—
—
4
USV führt Selbsttest aus
m
X
l
l
—
Überlast
—
—
m
—
1
Abschalten durch Überlast
—
—
m
—
1
Kurzschluß am Ausgang
—
—
m
—
1
Trafo-Fehler
—
—
m
—
1
Batterie niedrig (bei Batteriebetrieb)
m
—
—
—
1
Batteriewechsel notwendig
—
—
—
m
2
Batterie bei Selbsttest nicht
angeschlossen
Interner USV-Alarm:
l
l
l
l
3
Überlast
Batterie
ersetzen
Declaration of Conformity
Application of Council Directives:
—
Standards to Which Conformity Declared:
Manufacturer's Name and Address:
Importer's Name and Address:
Type of Equipment:
Model Numbers:
Serial Numbers:
Years of Manufacture:
Note:
89/336/EEC,73/23/EEC,92/31/EEC,
93/68/EEC,91/157/EEC
EN55022, EN50082-1, EN50091, EN60950
American Power Conversion
132 Fairgrounds Road
West Kingston, Rhode Island, 02892, USA
-orAmerican Power Conversion (A. P. C.) b. v.
Ballybritt Business Park
Galway, Ireland
-orAmerican Power Conversion Phillipines
Second Street
Cavite EPZA
Roserio, Cavite Phillipines
American Power Conversion (A. P. C.) b. v.
Ballybritt Business Park
Galway, Ireland
Uninterruptible Power Supply
PowerStack Models250 and 450, BayStack
Model UPS45
X9801 000 0000 — X9899 999 9999*
X9901 000 0000 — X9999 999 9999*
1998, 1999
Where X = B, O, W, or D
We, the undersigned, hereby declare that the equipment specified above conforms to the above directives.
X
X
Zuschaltungs-/Abgleichfehler
Transferrelaisfehler
Ruhemodus
Schlüssel:
— = irrelevant für Zustand
m = anhaltend an
X = blinkt
l = aus
Wenn Hilfe benötigt wird
—
*
X
X
X
l
l
1
X
X
X
1
—
—
Billerica, MA
Place
10/1/98
Date
Galway, Ireland
Place
10/1/98
Date
Stephen A. Lee
Regulatory Compliance Engineer
Ray S. Ballard
Managing Director, Europe
1 = kontinuierlicher Ton
2 = alle 5 Stunden 1 Minute Pieptöne
3 = schwindender Ton
4 = alle 30 Sekunden 4 Pieptöne
Weitere Informationen zur Fehlerbehebung unter “Fehlerbehebung” in der BayStackKurzübersicht.
990-7062 Revision 1, 10/98
Italiano
BayStack UPS45
Gruppo di continuità
Manuale di istruzioni
204458-A
Installazione
Per ottenere la copertura prevista dalla garanzia, si prega di
compilare e di rispedire immediatamente la cartolina relativa
alla garanzia stessa.
Ispezione
Montaggio a parete
Le mensole del gruppo di continuità possono essere ruotate di
90° per il montaggio a parete dello stesso. Togliere le viti,
ruotare le mensole e inserire le viti nei fori appositi.
BayStack UPS 45
Ispezionare il gruppo di continuità (Uninterruptible Power
Supply: UPS) BayStack UPS45 all’atto del ricevimento.
Informare lo spedizioniere e il rivenditore in caso di danni.
L’imballaggio è riciclabile, si consiglia di conservarlo per l’uso
in tempo successivo o di eliminarlo in modo opportuno.
Avvertenza! I cambiamenti o le modifiche all’apparecchio
che non siano stati espressamente approvati dal
responsabile della conformità dell’apparecchio, possono
determinare l’annullamento della garanzia.
Montaggio a telaio
Il gruppo di continuità viene fornito con mensole di montaggio
standard da 46,5 cm (19 pollici). Il gruppo di continuità è
corredato di quattro (4) viti per fissare le mensole al telaio.
Il gruppo di continuità è fornito di quattro piedini adesivi in
gomma per l’impiego da tavolo. Per l’impiego da tavolo,
incollare i piedini alla parte inferiore dell’apparecchio e
rimuovere le orecchiette.
La posizione consigliata dei piedini è indicata da una crocetta
(+) in corrispondenza degli angoli inferiori dell’apparecchio:
L’illustrazione riportata sopra mostra la posizione corretta per il
montaggio a parete dell’apparecchio.
Avvertenza!
45
Scegliere una posizione per il telaio che abbia una circolazione
d’aria sufficiente e che non sia esposta ad eccesso di polvere.
Assicurarsi che le aperture per la ventilazione che si trovano sui
lati del gruppo di continuità non siano bloccate. Non mettere in
funzione il gruppo di continuità quando la temperatura o
l’umidità eccedono i limiti indicati in sezione Specifiche
tecniche del presente manuale.
Montare a parete
l’apparecchio, con i
dispositivi di regolazione
rivolti verso l’alto o nella
parte superiore
dell’apparecchio. Non
montare l’apparecchio
con i dispositivi di
regolazione nella parte
inferiore o rivolti verso il
basso dell’apparecchio.
Impiego da tavolo
Non montare
l’apparecchio a parete nel
modo indicato
nell’illustrazione a sinistra
in quanto questo può
comportare pericoli per la
sicurezza.
Vista posteriore
Porta di interfaccia del computer
La porta di interfaccia viene usata per prove e la calibrazione in
fabbrica.
Carica delle batterie
Il gruppo di continuità carica le batterie tutte le volte in cui
viene collegato ad una presa di corrente. Le batterie vengono
caricate completamente durante le prime 4 ore di normale
funzionamento. Durante la ricarica iniziale non ci si dovrà
aspettare che le batterie possano assicurare il funzionamento
per l’intero periodo di tempo previsto.
Una volta montato il gruppo di continuità, seguire le
istruzioni riportate in Guida rapida BayStack.
Istruzioni relative al funzionamento
Accensione — Spegnimento
BayStack UPS 45
On- Line
Overload
On Battery
Replace Battery
I/O
Con il gruppo di continuità collegato alla presa di corrente,
premere e rilasciare il pulsante di accensione, spegnimento e
prova in modo di fornire alimentazione agli apparecchi collegati
Gli apparecchi collegati vengono immediatamente alimentati
mentre il gruppo di continuità esegue un test autodiagnostico.
Premere e rilasciare di nuovo il pulsante in modo da togliere
l’alimentazione agli apparecchi collegati. Per ragioni pratiche,
può essere consigliabile usare il gruppo di continuità come
interruttore delle apparecchiature protette dallo stesso.
Il LED verde che indica l’alimentazione di rete si accende
quando il gruppo di continuità fornisce corrente elettrica agli
apparecchi collegati.
Test autodiagnostico
Il gruppo di continuità esegue automaticamente un test
autodiagnostico all’accensione e successivamente ogni due
settimane. Il test autodiagnostico facilita le esigenze di
manutenzione eliminando la necessità di eseguire
periodicamente test diagnostici manuali.
Nel corso del test autodiagnostico, il gruppo di continuità
alimenta brevemente a batteria le apparecchiature. Se il gruppo
di continuità supera il test autodiagnostico, ritornerà al
funzionamento con alimentazione di rete.
Se nel corso del test autodiagnostico il gruppo di continuità si
spegne ed emette un segnale acustico in calando, significa che
le batterie non sono collegate nel modo corretto.
Gli apparecchi collegati non vengono influenzati da prove non
superate. Ricaricare le batterie durante la notte ed eseguire di
nuovo il test autodiagnostico. Se il LED che indica che è
necessario sostituire la batteria rimane acceso, sostituire le
batterie seguendo la procedura descritta in Sostituzione delle
batterie.
necessaria la sostituzione della batteria. L’allarme viene
interrotto quando le batterie superano il test autodiagnostico.
Funzionamento della batteria
Batteria scarica
Durante il funzionamento a batteria, si accende il LED giallo
che indica appunto che l’apparecchio funziona a batteria e il
gruppo di continuità emette un allarme che consiste di 4 brevi
segnali acustici ogni 30 secondi. L’allarme cessa quando il
gruppo di continuità ritorna a funzionare con l’alimentazione di
rete.
Quando il gruppo di continuità funziona a batteria e la riserva
di energia delle batterie è scarsa, il gruppo di continuità
emetterà di continuo un breve segnale acustico fino a spegnersi
per esaurimento totale delle batterie, o per ritornare al
funzionamento con alimentazione di rete quando la corrente
elettrica ritorna prima dell’esaurimento totale delle batterie.
Sovraccarico
Avviamento in assenza di corrente
Quando gli apparecchi collegati o carichi superano la capacità
del gruppo di continuità, si accende il LED rosso di
segnalazione dei sovraccarichi e il gruppo di continuità emette
un segnale acustico in un’unica tonalità sostenuta. L’allarme
rimane acceso fino a quando non verrà eliminato il sovraccarico.
Per eliminare il sovraccarico, scollegare le apparecchiature non
essenziali dal gruppo di continuità.
Nota: L’avviamento in assenza di corrente non è una
condizione normale.
Se il sovraccarico è serio, scatterà l’interruttore automatico di
sicurezza (il pulsante centrale dell’interruttore scatta in fuori).
In questi casi, scollegare le apparecchiature non essenziali dal
gruppo di continuità in modo da eliminare il sovraccarico, e
spingere di nuovo in dentro il pulsante.
·
Se c’è alimentazione CA e l’interruttore automatico di sicurezza
non scatta quando si verifica un sovraccarico, significa che gli
apparecchi collegati al gruppo di continuità sono ancora
alimentati. Quando l’interruttore di sicurezza scatta o quando il
gruppo di continuità passa al funzionamento a batteria,
l’alimentazione di corrente degli apparecchi collegati verrà
interrotta. Per alimentare di nuovo gli apparecchi collegati,
spegnere e riaccendere il gruppo di continuità.
Quando il gruppo di continuità è spento e non c’è corrente di
rete, è possibile avviare il gruppo di continuità per alimentare
gli apparecchi collegati per mezzo della batteria.
Premere e tenere premuto il pulsante di accensione,
spegnimento, prova, fino a quando il gruppo di continuità
emetterà un segnale acustico costante.
· Rilasciare il pulsante di accensione, spegnimento e prova
durante l’emissione del segnale acustico in modo da avviare il
gruppo di continuità.
Sostituire la batteria
Qualora le batterie non superino il test autodiagnostico, il
gruppo di continuità emetterà brevi segnali acustici per un
minuto e si accenderà il LED rosso che indica che è necessario
sostituire le batterie.
Il gruppo di continuità ripete l’allarme ogni cinque ore. Eseguire
la procedura autodiagnostica per confermare che si rende
Conservazione in magazzino
Condizioni di conservazione in magazzino
Conservazione a magazzino per periodi prolungati
Prima di riporlo, ricaricare il gruppo di continuità per almeno 8 ore. Coprire il gruppo di continuità e
riporlo appoggiandolo in modo che risulti piatto, in un luogo asciutto, con le batterie totalmente
cariche.
Da -15 a +30°C (da +5 a +86°F): caricare le batterie del gruppo di continuità ogni 6 mesi.
Da +30 a +45°C (da +86 a +113°F): ricaricare le batterie del gruppo di continuità ogni tre mesi.
990-7062 Revision 1, 10/98
Sostituzione delle batterie
Il gruppo di continuità dispone di batterie che sono facili da sostituire anche sotto tensione.
1.
APC
Nota: Leggere per avvertenze fornite nella Guida ala sicurezza BayStack.
Inserire il dito, tirare e rimuovere la copertura frontale.
2.
Con un cacciavite a lama piatta, ruotare in senso antiorario di ¼ di
giro le due viti che trattengono lo sportello delle batterie e aprire lo
sportello stesso. .
3. Afferrare la linguetta in plastica trasparente ed estrarre
delicatamente le batterie dal gruppo di continuità fino a quando il
connettore delle batterie non sarà visibile.
Avvertenza! Non estrarre con forza le batterie! Questo potrebbe
danneggiare i cablaggi interni!
Batterie sostitutive
Per informazioni sui kit di sostituzione delle batterie, consultare il rivenditore o chiamare il
numero contenuto nel presente manuale. Il numero di catalogo delle batterie è: RBC18.
Procedimento per la sostituzione delle batterie
La sostituzione delle batterie consiste in un procedimento sicuro, isolato dai rischi presentati
dalla corrente elettrica. Per eseguire la procedura che segue, si può lasciare acceso tanto il
gruppo di continuità che le apparecchiature collegate allo stesso.
4.
Note
·
Una volta scollegate le batterie, le apparecchiature collegate non sono protette da
eventuali mancanze di corrente.
·
Fare attenzione quando si rimuovono le batterie in quanto sono pesanti.
·
Durante il collegamento, piccole scintille sui connettori delle batterie sono normali.
Specifiche tecniche
Scollegare il connettore delle batterie afferrando entrambi i lati
dello stesso e tirandoli in direzione opposta.
5.
6.
7.
Estrarre le batterie dal gruppo di continuità.
Inserire per tre quarti le nuove batterie nel gruppo di continuità.
Collegare il connettore delle batterie che si trova sulle nuove
batterie.
8. Spingere fino in fondo le batterie. Sulla parte posteriore esistono
arresti che impediscono di spingere le batterie oltre la loro
posizione.
9. Chiudere lo sportello delle batterie, ruotare le viti in senso orario di
¼ di giro e rimettere la copertura anteriore.
10. Riciclare le batterie. Portare le batterie ad un centro di riciclaggio
opportuno oppure inviarle al fornitore nel materiale di imballaggio
delle nuove batterie. Per maggiori informazioni, vedere le istruzioni
contenute nelle batterie nuove.
Assistenza
Tensione d’ingresso accettabile
Tensione d’ingresso (alimentazione di rete)
Tensione in uscita
Protezione da sovracorrenti in ingresso
Limiti della frequenza (alimentazione di rete)
Tempo di trasferimento
Carico massimo
Tensione di uscita a batteria
Frequenza a batteria
Forma d’onda durante il funzionamento a batteria
Protezione da sovraccorrenti in uscita
Tipo di batterie
Normale durata delle batterie
Normale tempo di ricarica delle batterie
Temperatura d’esercizio
Temperatura di conservazione in magazzino
Umidità relativa d’esercizio e di conservazione in
magazzino
Elevazione d’esercizio
Elevazione per la conservazione in magazzino
Allarme udibile a 1 m (3 piedi)
Dimensioni (A x L x P)
0 - 320 V CA
165 - 283 V CA
208 - 253 V CA
Interruttore automatico di sicurezza
47 - 63 Hz (rilevamento automatico)
Tempo di risposta in assenza di corrente:
tipicamente 4 ms
450 VA 280 W
230 V CA
50 o 60 Hz, ±0,1 Hz; in caso non vi sia
sincronizzazione con l’alimentazione di rete durante
le momentanee assenze di corrente
Onda sinuisoidale a gradini
Protezione da sovraccorrenti e da cortocircuiti; in
caso di sovraccarico l’apparecchio si spegne e
rimane spento
Batterie al piombo-acido sigillate, antiversamento,
che non necessitano manutenzione
Da 3 a 6 anni, a seconda del numero di volte in cui le
batterie vengono scaricate e della temperatura
ambiente
Da 4 a 8 ore quando le batterie sono totalmente
scariche
Da 0 a +40°C (da +32 a +104°F)
Da -15 a +45°C (da +5 a +113°F)
Dal 5 al 95%, senza condensa
Da 0 a +3.000 m (da 0 a +10.000 piedi)
Da 0 a +15.000 m (da 0 a +50.000 piedi)
<38 dBA
4,5 x 44,5 x 33 cm.
(1,75 x 17,5 x 13,0 pollici)
9,77 (11,82) kg.
21,5 (26) libbre
Licenza VDE EN50091 ed EN60950
EN55022
IEC 801-2 Livello IV, 801-3 Livello III,
801-4 Livello IV
Peso netto (alla spedizione)
Sicurezza ed autorizzazioni
Certificazione EMC
Immunità elettromagnetica
Come ottenere assistenza
Per l’assistenza relativa al prodotto, contratti di manutenzione o informazioni sui servizi di
addestramento, visitare il sito web all’indirizzo URL:
http://www.baynetworks.com/corporate/contacts/ oppure telefonare al Centro soluzioni
tecniche Bay Networks al numero:+011-978-916-3700. Quando viene richiesto il codice per
le risposte d’emergenza, comporre il numero 177 seguito dal cancelletto (#).
Informazioni riguardanti il servizio ai clienti sono inoltre disponibili sul World Wide Web
all’indirizzo: support.baynetworks.com.
Tempo di funzionamento
PowerStack 450 On-Battery Run-time vs. Loads over Operating
Temperature Range At 25'C
Tempo di
funzionamento
(min.)
150
140
130
120
110
100
90
80
70
60
50
40
30
20
10
0
115
25 `C
51
32.5
23
0
40
80
120
19.5
15
13
160
10
200
8.5
240
6
280
OutputinLoad
(watts)
Carichi
uscita
(watt)
LED e allarmi acustici
Funzione
LED
Segnali
acustici*
Normale tempo di funzionamento a batteria in relazione al carico a 25°C
Funzionamento a
batteria
Alimentazione di
rete
Il gruppo di continuità è acceso
l
m
l
l
Il gruppo di continuità funziona a batteria
m
l
—
—
4
Il gruppo di continuità sta eseguendo il
test autodiagnostico
Sovraccarico
m
X
l
l
—
—
—
m
—
1
Spegnimento per sovraccarico
—
—
m
—
1
Cortocircuito in uscita
—
—
m
—
1
Guasto del trasformatore
—
—
m
—
1
Batterie scariche (durante il
funzionamento a batteria)
Sostituire le batterie
m
—
—
—
1
Type of Equipment:
Model Numbers:
Sovracca- Sostituire le batterie
rico
Declaration of Conformity
Application of Council Directives:
—
Standards to Which Conformity Declared:
Manufacturer's Name and Address:
Importer's Name and Address:
—
—
—
m
2
Serial Numbers:
Scollegamento delle batterie durante il
test autodiagnostico
Allarmi interni del gruppo di
continuità:
Mancato aumento/diminuzione
l
l
l
l
3
Years of Manufacture:
Note:
X
X
l
l
1
Saldatura del relé di trasferimento
X
X
X
X
1
—
X
X
—
—
Modalità di conservazione d’energia
89/336/EEC,73/23/EEC,92/31/EEC,
93/68/EEC,91/157/EEC
EN55022, EN50082-1, EN50091, EN60950
American Power Conversion
132 Fairgrounds Road
West Kingston, Rhode Island, 02892, USA
-orAmerican Power Conversion (A. P. C.) b. v.
Ballybritt Business Park
Galway, Ireland
-orAmerican Power Conversion Phillipines
Second Street
Cavite EPZA
Roserio, Cavite Phillipines
American Power Conversion (A. P. C.) b. v.
Ballybritt Business Park
Galway, Ireland
Uninterruptible Power Supply
PowerStack Models250 and 450, BayStack
Model UPS45
X9801 000 0000 — X9899 999 9999*
X9901 000 0000 — X9999 999 9999*
1998, 1999
Where X = B, O, W, or D
We, the undersigned, hereby declare that the equipment specified above conforms to the above directives.
Billerica, MA
Place
10/1/98
Date
Galway, Ireland
Place
10/1/98
Date
Stephen A. Lee
Regulatory Compliance Engineer
Ray S. Ballard
Managing Director, Europe
Spiegazione dei simboli:
— = irrilevante per la condizione esistente
*
1 = tonalità sostenuta
m = allarme continuo
2 = allarme di 1 minuto ogni 5 ore
X = lampeggiante
3 = allarme a calare
l = Spento
4 = 4 segnali acustici ogni 30 secondi
Per informazioni sulla ricerca e la soluzione dei guasti in futuro, consultare la sezione
“Identificazione dei guasti” nella Guida rapida BayStack
990-7062 Revision 1, 10/98
Português
BayStack UPS45
204458-A
Sistema de Alimentação Ininterrupta
Manual do usuário
Instalação
Para obter cobertura da garantia, preencher e
devolver agora o cadastro da garantia.
Inspeção
Inspecione o UPS45 BayStack assim que o receber.
Comunique a transportadora e o revendedor ser
houver algum dano. A embalagem é reciclável,
guarde-a para reutilizá-la ou descarte-a de maneira
adequada.
Montagem em parede
As braçadeiras no UPS podem ser giradas em 90°
para montagem em parede. Retire os parafusos, gire
as braçadeiras e introduza os parafusos nos orifícios
apropriados.
Monte o aparelho na
parede com os
controles na direção
para cima, não na
parte inferior do
aparelho.
Advertência! Mudanças ou modificações
efetuadas neste aparelho não aprovadas
expressamente pela parte responsável pelo
cumprimento poderão invalidar a garantia.
Montagem em rack
O UPS conta com braçadeiras para montagem em
rack de 46,5 cm (19 pol) padrão. A mesma é
fornecida com 4 (quatro) parafusos para prender as
braçadeiras (orelhas) de montagem ao chassi.
Uso sobre mesa
Este UPS é fornecido com quatro “pés” de borracha
com adesivo para uso sobre mesa. Instale os pés na
parte inferior do aparelho e retire as orelhas para uso
em mesa.
O colocamento recomendado dos pés é indicado por
um pequeno + nos cantos inferiores da unidade.
As ilustrações acima mostram as posições adequadas
para a montagem do aparelho em parede.
Advertência!
Não monte o aparelho
na parede conforme as
ilustrações à esquerda.
Caso isso seja feito,
poderá resultar em
risco à segurança.
Escolha um local para o rack com fluxo de ar
adequado e que esteja isento de poeira excessiva.
Verifique se as ventoinhas de ar nas laterais do UPS
não estejam bloqueadas. Não opere o UPS onde a
temperatura ou umidade estejam fora dos limites na
seção Especificações deste manual.
Vista posterior
Porta de interface de computador
A porta de interface é usada para testes e calibragens
efetuados pela fábrica.
Carregue a bateria
O aparelho carrega a bateria sempre que estiver
conectado à energia elétrica. A bateria irá carregar
completamente durante as primeiras 4 horas de
operação normal. Não conte com autonomia total
durante este período de carga inicial.
Uma vez que o UPS estiver montado, siga as
instruções de instalação no Guia de Referência
Rápida do BayStack.
Instruções de funcionamento
Interruptor ligado — Interruptor desligado
BayStack UPS 45
On- Line
Overload
On Battery
Os equipamentos não foram afetados por um teste
falho. Recarregue a bateria durante um noite inteira
e execute um autoteste novamente. Se o LED de
troca de bateria ainda estiver aceso, troque a bateria
usando o procedimento Troca da Bateria.
Replace Battery
I/O
Com o UPS conectado, pressione e libere o
botão on/off/test para fornecer energia aos
equipamentos.
É fornecida carga aos equipamentos enquanto o UPS
efetua um autoteste. Pressione e libere a tecla
novamente para desativar a energia fornecida aos
equipamentos. Pode ser conveniente usar o UPS
como um interruptor master ligar/desligar para
proteger o equipamento.
O LED on-line verde ilumina quando o UPS está
fornecendo energia aos equipamentos.
Autoteste
O UPS executa um autoteste automaticamente
quando ligado e posteriormente a cada duas horas. O
autoteste automático facilita os requisitos de
manutenção ao eliminar a necessidade de autotestes
manuais periódicos.
Durante o autoteste, o UPS fornece energia da
bateria aos equipamentos. Se o UPS passar no
autoteste, o mesmo volta à operação em linha.
Se o UPS desligar-se durante o autoteste e emitir um
tom de falha, as baterias não estão conectadas
adequadamente.
Bateria acesa
Durante a operação da bateria, o LED de bateria
ligada amarela ilumina-se e o UPS emite um som de
alarme audível consistindo de 4 bipes a cada 30
segundos. O alarme pára quando o UPS volta ao
funcionamento em linha.
Sobrecarga
Quando a carga excede a capacidade do UPS, o LED
de sobrecarga vermelho acende e emite um tom
contínuo. O alarme continua a soar até que seja
eliminada a sobrecarga. Desconecte os equipamentos
não essenciais do UPS para eliminar a sobrecarga.
Se a sobrecarga for séria, o disjuntor pode desativar
(o êmbolo central reajustável do disjuntor salta para
fora). Desconecte todo o equipamento não essencial
do UPS para eliminar a sobrecarga e pressione o
êmbolo para dentro.
Se houver energia de corrente alternada e o disjuntor
não desativar durante a sobrecarga, os equipamentos
ainda terão energia. Se o disjuntor desativar ou o
aparelho tentar transferir para a bateria, a energia
dos equipamentos será desligada. Desligue o UPS e
depois ligue-o novamente para fornecer energia aos
equipamentos.
Troca da bateria
Se a bateria falhar no autoteste, o UPS emite bipes
curtos por um minuto e o LED vermelho de troca da
bateria se acende.
UPS repete o alarme a cada cinco horas. Execute o
autoteste para confirmar as condições de troca da
bateria. O alarme pára quando a bateria passa no
autoteste.
Bateria fraca
Quando o UPS está operando com a energia da
bateria e a mesma se extingüe, o UPS emite bipes
contínuos até que o UPS desligue a bateria por
exaustão ou volte à operação em linha, isso se a
energia elétrica retornar antes da bateria ter se
esgotado.
Acionamento a frio
Observação: o acionamento a frio não é uma
condição normal de operação.
Quando o UPS está desligado e não há energia
elétrica, é possível fazer o acionamento a frio do UPS
para fornecer energia aos equipamentos a partir da
bateria do UPS.
·
Pressione e segure o botão on/off/test até que
o UPS comece a emitir um tom constante.
· Libere o botão on/off/test durante o bipe para
iniciar o UPS.
Armazenagem
Condições de armazenagem
Antes de armazenar, carregue o UPS por pelo menos 8 horas. Armazene o aparelho
coberto e na posição vertical, em local fresco e seco, com a bateria completamente
carregada.
Armazenagem prolongada
De -15 a +30 °C (+5 a +86 °F), carregue a bateria do aparelho a cada 6 meses.
De +30 a +45 °C (+86 a +113 °F), carregue a bateria do aparelho a cada 3 meses.
990-7062 Revision 1, 10/98
Troca da bateria
Este UPS tem uma bateria de fácil reposição que pode ser trocada sem a necessidade de
desligar os equipamentos.
1.
APC
Puxe o anel e retire a tampa frontal.
2.
Procedimento de troca de bateria
Use uma chave de fenda comum para virar os dois parafusos da
porta da bateria ¼ de volta no sentido horário, abra a porta.
3. Puxe cuidadosamente a bateria para fora do UPS apertando a
lingüeta de plástico transparente até que o conector da bateria fique
visível.
Advertência! Não force a bateria para fora. Isto pode danificar a
fiação interna!
A troca da bateria é um procedimento seguro, isolado de riscos elétricos. Pode-se deixar o
aparelho e os equipamentos ligados para o procedimento seguinte.
4.
Desconecte o conector da bateria ao segurar ambos os lados do
conector e puxe firmemente para lados opostos.
Deslize a bateria para fora do UPS.
Deslize a nova bateria três quartos dento do UPS.
Observação: leia as precauções no Guia de Segurança do BayStack.
Baterias de reposição
Veja seu revendedor ou ligue para o número neste manual para informações sobre os kits de
troca da bateria O número de pedido para o conjunto da bateria é RBC18.
Notas
·
Quando a bateria estiver desconectada, os equipamentos não ficam protegidos
contra falhas no fornecimento de energia elétrica.
5.
6.
·
Tenha cuidado ao retirar as baterias – elas são pesadas.
7.
·
É normal que apareçam pequenas faíscas nas conexões da bateria durante a
conexão.
Especificações
Conecte o conector da bateria instalado no aparelho ao conector
instalado à nova bateria.
8. Empurre a bateria o máximo possível. Há lingüetas que evitam que
a bateria vá muito para o fundo.
9. Feche a porta da bateria, vire os parafusos do compartimento da
bateria ¼ de volta no sentido horário e recoloque a tampa frontal.
10. As baterias devem ser recicladas. Descarte a bateria usada na
instalação apropriada para reciclagem ou envie-a ao fornecedor na
embalagem de acondicionamento da nova bateria. Consulte as
instruções da nova bateria para maiores informações
Serviço
Voltagem de entrada aceitável
Voltagem de entrada (funcionamento em linha)
Voltagem de saída
Entrada além da proteção de corrente
Limites de freqüência (funcionamento em linha)
Tempo de transferência
Carga máxima
Voltagem de saída em bateria
Freqüência em bateria
Formato de onda em bateria
Saída além da proteção de corrente
Tipo de bateria
Vida útil típica da bateira
Tempo típico de recarregamento
Temperatura de funcionamento
Temperatura de armazenamento
Umidade relativa em funcionamento e em
armazenamento
Altitude de funcionamento
Altitude de armazenamento
Ruído audível em 1 m (3 pés)
Dimensões (A x L x P)
Peso - líquido (transporte)
0 a 320 VCA
165 a 283 VCA
208 a 253 VCA
Disjuntor reajustável
47 a 63 Hz (detecção automática)
4 ms típico, tempo de resposta a blackout
450 VA 280 W
230 VCA
50 ou 60 Hz, ±0,1 Hz; a menos que seja
sincronizada à energia elétrica durante a queda
de tensão
Onda senoidal escalonada
Proteção contra sobrecorrente e curto circuito,
desligamento de engate quando há sobrecarga
À prova de vazamentos, isenta de manutenção e
vedada com ácido de chumbo
3 a 6 anos, dependendo do número de ciclos de
descarga e temperatura ambiente
4 a 8 horas a partir de descarga total
0 a +40 °C (+32 a +104 °F)
-15 a +45 °C (+5 a +113 °F)
0 a 95%, não condensante
0 a +3.000 m (0 a +10.000 pés)
0 a +15.000 m (0 a +50.000 pés)
<38 dBA
1,75 x 17,5 x 13,0 pol
9,77 (11,82) kg
21, 5 (26) lb
UL1778, CSA 107,1
Licenciado VDE para EN50091 e EN60950
EN55022
IEC 801-2 nível IV, 801-3 nível III,
801-4 nível IV
Segurança e aprovações
Segurança e aprovações
Verificação EMC
Imunidade eletromagnética
Como obter ajuda
Para obter assistência dos produtos, contratos de suporte ou informações sobre
serviços educacionais, visite o seguinte endereço:
http://www.baynetworks.com/corporate/contacts/ ou ligue para o Centro de Soluções
Técnicas da Bay Networks no número :+011-978-916-3700. Quando for solicitado a
fornecer o código de resposta de emergência, disque 177, em seguida, sustenido (#).
As informações sobre o atendimento ao cliente também encontram-se disponíveis na
World Wide Web no endereço: support.baynetworks.com.
Autonomia
PowerStack 450 On-Battery Run-time vs. Loads over Operating
Temperature Range At 25'C
Autonomia
(min.)
150
140
130
120
110
100
90
80
70
60
50
40
30
20
10
0
115
25 `C
51
32.5
23
0
40
80
120
19.5
15
13
160
10
200
8.5
240
6
280
Outputde
Load
(watts)
Carga
saída
(watts)
LEDs e alarmes audíveis
Função
LED
Tom*
Autonomia típica com energia de bateria comparada a uma carga de 25º C
Operação
por bateria
Em linha
Sobrecarga
Troque a
bateria
UPS está ligado
l
m
l
l
—
UPS está rodando em bateria
m
l
—
—
4
UPS está executando autoteste
m
X
l
l
—
Sobrecarga
—
—
m
—
1
Desligamento por sobrecarga
—
—
m
—
1
Curto-circuito de saída
—
—
m
—
1
Falha no transformador
—
—
m
—
1
Bateria fraca (enquanto em
funcionamento de bateria)
Condição de troca de bateria
m
—
—
—
1
Importer's Name and Address:
—
—
—
m
2
Type of Equipment:
Model Numbers:
Bateria desconectada no autoteste
l
l
l
l
3
Serial Numbers:
X
X
X
X
X
X
X
X
X
X
1
—
—
soldagem do relé de transferência
Modo de dormência
Tecla:
— = condição irrelevante
m = contínuo
X = piscando
l = desligado
Standards to Which Conformity Declared:
Manufacturer's Name and Address:
Years of Manufacture:
Note:
Alarmes internos do UPS:
falha de intensificação/equilíbrio
Declaration of Conformity
Application of Council Directives:
—
*
1
89/336/EEC,73/23/EEC,92/31/EEC,
93/68/EEC,91/157/EEC
EN55022, EN50082-1, EN50091, EN60950
American Power Conversion
132 Fairgrounds Road
West Kingston, Rhode Island, 02892, USA
-orAmerican Power Conversion (A. P. C.) b. v.
Ballybritt Business Park
Galway, Ireland
-orAmerican Power Conversion Phillipines
Second Street
Cavite EPZA
Roserio, Cavite Phillipines
American Power Conversion (A. P. C.) b. v.
Ballybritt Business Park
Galway, Ireland
Uninterruptible Power Supply
PowerStack Models250 and 450, BayStack
Model UPS45
X9801 000 0000 — X9899 999 9999*
X9901 000 0000 — X9999 999 9999*
1998, 1999
Where X = B, O, W, or D
We, the undersigned, hereby declare that the equipment specified above conforms to the above directives.
Billerica, MA
Place
10/1/98
Date
Galway, Ireland
Place
10/1/98
Date
Stephen A. Lee
Regulatory Compliance Engineer
Ray S. Ballard
Managing Director, Europe
1 = tom contínuo
2 = 1 minuto de bipe a cada 5 horas
3 = tom fraco
4 = 4 bipes a cada 30 segundos
Para maiores informações a fim de diagnosticar problemas, consulte a seção
"Diagnóstico de problemas" no Guia de Referência Rápida do BayStack.
990-7062 Revision 1, 10/98
204458ÐA
BayStack UPS 45
On-Line
Overload
On Battery
Replace Battery
I/O
•
•
°
°
°
°
990-7062 Revision 1, 10/98
1.
2.
3.
4.
¥
¥
5.
6.
¥
7.
8.
9.
10.
°
°
°
°
Run
Time
(min)
°
●
❍
❍
—
—
—
—
❍
❍
●
✸
—
—
—
—
—
●
—
●
❍
❍
❍
❍
—
●
—
●
—
—
—
—
—
—
4
—
1
1
1
1
1
—
●
—
●
—
●
❍
●
2
3
✸
✸
—
✸
✸
✸
●
✸
✸
●
✸
—
1
1
—
—
❍
✸
●
990-7062 Revision 1, 10/98
BayStack UPS45
BayStack UPS 45
On-Line
Overload
On Battery
——
——
Replace Battery
I/O
•
•
——
1.
2.
3.
4.
•
•
5.
6.
7.
•
8.
9.
10.
Run
Time
(min)
—
❍
✸
●
●
❍
❍
—
—
—
—
❍
❍
●
✸
—
—
—
—
—
●
—
●
❍
❍
❍
❍
—
●
—
●
—
—
—
—
—
—
●
—
●
—
●
❍
●
✸
✸
—
✸
✸
✸
●
✸
✸
●
✸
—
—
—