1
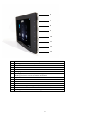
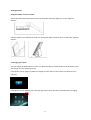
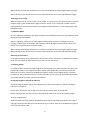
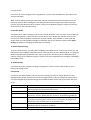
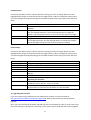
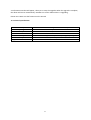
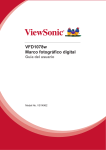
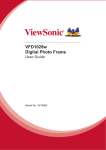
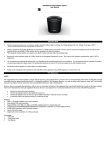
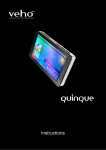
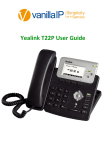
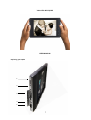
Veho VPA-001-QUDO
USER MANUAL
Exploring your Qudo
1
2
3
4
5
1
6
7
8
9
10
11
12
13
No
1
2
3
4
5
6
7
8
9
10
11
12
13
Description
Holding the frame in Landscape: Move left button
On/Off Switch
SD Card Slot
USB Port
Charging Port
Holding the frame in Landscape: Move right button
Holding the frame in Portrait: Move left button
Up Button
Down Button
OK Button
Exit/Back Button
Press once: Change viewing mode/ Press and hold: Option Menu
Slideshow button
Holding the frame in Portrait: Move right button
2
Getting Started
Using the leather cover as a stand
Attach the lower end of the leather sleeve to the photo album by clipping on to the magnetic
buttons.
Fold the leather cover backwards to form a rectangular shape and then clip on to the other magnetic
buttons.
r
1. Charging your Qudo
You can charge the Qudo when it is off or on. Open the flap on the left hand side of the Qudo. Insert
the charger into the charging port (5).
If the Qudo is off an image of a battery will appear in the centre of the screen to indicate that it is
charging.
If the Qudo is on the battery icon in the top right hand corner will flash to indicate that is charging.
3
This means that you can still use the Qudo whilst it is being charged e.g. the Qudo can be attached to
the mains whilst playing a slideshow.
The Qudo will take at up to 3 hours to reach a full charge.
Please note: You can only charge the Qudo via the supplied mains charger. It is NOT possible to
charge the Qudo via a USB connection.
2. Turning the Qudo on and off
On the left of your album, there is an on/off switch (2).
Slide it up to the on position to turn it on.
Slide it back down to the off position to turn it off.
3. Inserting an SD card
Open the flap on the left hand side of the Qudo. Hold the Qudo so that it is facing you and hold the
SD card with the gold contacts facing up. Insert the SD card, gold contacts first, into the SD slot (3)
until it is firmly in place and cannot go in any further. Please note that the SD slot is not spring
loaded and therefore to remove the SD card you simply need to pull it out of the slot.
4. Connecting to a computer
The Qudo must be on when you connect it to your computer. Open the flap on the left hand side of
the Qudo. Plug the supplied USB lead into your computer and then plug the other end of the USB
cable into the USB port under the flap (4). The Qudo will give you the following options:
Connect to PC…
Connect Printer
Use the up and down buttons (7 & 8) to choose connect to PC. Press the OK button (9) to confirm
your choice. Your Qudo will then appear as a removable disk in My Computer. If you have an SD card
inserted the Qudo will appear as two removable disks, one for the internal memory and one for the
SD card (external memory). If you do not have an SD card inserted only one removable disk will
appear. Select which removable disk you would like and double click on it. You can then drag and
drop photos from your computer to the Qudo’s internal memory or the SD card. We recommend
that you sort your images into files for easier access when viewing on your Qudo.
Please note: The Qudo can only read photos that are in .jpg or .bmp format.
5. Disconnecting the Qudo from your computer
When you have finished disconnect the Qudo by pressing the Exit button on the Qudo (10) and then
remove the USB cable.
4
Using your Qudo
6. Viewing your pictures
Selecting photo source
When an SD card is inserted you can choose between viewing pictures on from the internal memory
or from the SD card. If an SD card is not inserted the card option in the main menu will not be
highlighted (see below).
To view pictures from a specific source (internal or SD card), use the left and right arrows (1 & 6) to
select from Internal or Card as the source. Press the OK button (9) when you have selected the
source you would like to view pictures from.
To view all pictures, press the play button near the bottom left of the device
Viewing modes
After selecting the required source for your images, the Qudo will automatically go to the default
display mode (see section 11. Qudo Settings for further details on the default display mode).
However you can also choose to display photos in one of the following modes:
A. Thumbnail Mode
While viewing photos in slideshow mode or browse mode, press the back button (10) to change to
thumbnail. In thumbnail mode the pictures are smaller and you can view multiple pictures at once.
Use the top left and right buttons (1 & 6) to move left and right, and use the up and down buttons (7
& 8) to move up and down rows of photos. To view a particular image, navigate to the image that
you want and press the OK button (9) to enter browse mode (see below).
B. Browse Mode
While viewing photos in slideshow mode, press the M button (11) to change from slideshow to
browse. While viewing photos in thumbnail mode, press the OK button (9) on the image that you
want to view to change from thumbnail to browse. The Qudo will state Browse Mode in the bottom
right hand corner.
When in browse mode you can view images in landscape or portrait. To change to portrait viewing,
hold the Qudo in landscape and rotate the album 90 degrees anti-clockwise. Return the album to the
original position to rotate it back.
5
When viewing in landscape use button 1 to move left and button 6 to move right between images.
When viewing in portrait use button 6 to move left and button 13 to move right between images.
Zooming in on an image
When in browse mode you can zoom in on an image. To zoom in press the OK button (9) to view the
image at 125%, press the OK button again to zoom in closer, up to a maximum of 250%. Use the
left/right buttons and up/ down buttons to navigate around the picture. To exit zooming press the
back button (10).
C. Slideshow Mode
To enter slideshow mode from any other mode press the slideshow button (12). The Qudo will enter
slideshow mode immediately.
When in slideshow mode you can view images in landscape or portrait. To change to portrait
viewing, hold the Qudo in landscape and rotate the album 90 degrees anti-clockwise. Return the
album to the original position to rotate it back.
When viewing in landscape use button 1 to move left and button 6 to move right between images.
When viewing in portrait use button 6 to move left and button 13 to move right between images.
Returning to main menu
In Thumbnail mode press the back button (10) to return to the main menu. In Slideshow or Browse
mode press and hold the back button (10) to return to the main menu.
7. Deleting photos
In browse mode or thumbnail mode navigate to the image that you want to delete, then press and
hold the M button (11) to bring up the option menu. Select Delete files? and then press the OK
button (9) to confirm, then press the OK button again to select Yes and delete the file. To delete
multiple files we recommend that you connect the Qudo to your computer and delete through the
removable disk for your own ease and convenience.
8. Copying images to the internal memory.
The Qudo supports direct copying from the SD card to the internal memory, without needing to
connect to a computer.
Please note: you cannot copy images from the internal memory back to the SD card.
Before copying make sure that you have selected the SD card as the source for viewing images.
To copy a single photo:
View the photo in browse mode or thumbnail mode and press and hold the M button (11). Select
copying to internal then then press the OK button (9) to confirm, then press the OK button again to
select Yes and copy the file.
6
To copy all files:
From the main menu navigate to File using buttons 1 and 6, press the OK button, then select card
and press OK again.
Mark all of the files by pressing the M button and then select Mark/Unmark all and press the OK
button to confirm. After marking all of the files press the M button again, then select copying to
internal, press the OK button (9) to confirm, then press the OK button again to select Yes and copy
all of the files to the internal memory.
9. Calendar Mode
The Qudo has an option to display a full screen calendar and clock. From the main menu navigate to
Calendar using buttons 1 and 6 and press the OK button (9) to display the calendar. Press the M
button (11) to switch between showing the monthly calendar, daily calendar or clock mode. All
modes other than clock mode will display a slideshow next to the calendar. Please see 11. Qudo
Settings for details on changing the date and time settings.
10. Direct Photo Printing
To print a photo directly, you will need a PictBridge compatible printer. Connect the device with the
USB cable to any PitcBridge compatible printer. View the photo in either Browse Mode or Thumbnail
Mode. Press and hold the M button (11), select Print Photo? and then press the OK button (9) to
confirm, then press the OK button again to select Yes and the image will print through the PictBridge
compatible printer.
11. Qudo Settings
From the main menu navigate to Settings using buttons 1 and 6 and press the OK button (9) to
display the settings menu.
Photo Setup
Use the up and down buttons (7 & 8) to select the setting you want to change. When you have
highlighted the setting you need use the left and right buttons (1 & 6) to change the setting. Once
you have changed the required setting press and hold the back button (10) to go back to the main
menu.
Setting
Display Mode
Display Ratio
Slideshow Duration
Slideshow Repeat
Slideshow Effect
PhotoFrom
Description
Select from Slideshow, Browse or Thumbnail for viewing images after
selecting image source from Internal or Card.
Select from Full Screen, Fit to Screen or Crop to Fill.
Select how long an image is on the screen before changing to the next
from 5 secs, 15 secs, 30 secs, 60 secs, 5 mins or 15 mins during slideshow.
Select to repeat slideshow so that after all images have been shown once,
the slideshow starts again or select to once so that after all images have
been shown once the Qudo goes to Thumbnail mode.
Choose from different effects for transition from one image to the next in
Slideshow mode or random for all effects.
Select from All Dir or Current Dir.
7
Calendar Setup
Use the up and down buttons (7 & 8) to select the setting you want to change. When you have
highlighted the setting you need use the left and right buttons (1 & 6) to change the setting. Once
you have changed the required setting press and hold the back button (10) to go back to the main
menu.
Setting
Display Mode
Date
Clock Mode
Clock
Description
Select from Monthly Calendar, Calendar or Clock for the default display for
Calendar.
Change the date that is displayed on the calendar. The day, month and
year are changed separately. Use the left/right button to change the
number, and the up/down button to move to the next option to change.
Change the time display between 12 and 24 hour modes
Change the time that is displayed on the calendar. The hour and minutes
are changed separately. Use the left/right button to change the number,
and the up/down button to move to the next option to change.
System Setup
Use the up and down buttons (7 & 8) to select the setting you want to change. When you have
highlighted the setting you need use the left and right buttons (1 & 6) to change the setting. Once
you have changed the required setting press and hold the back button (10) to go back to the main
menu.
Setting
Language
Brightness
Contrast
Saturation
Disk Space
Version
System Upgrade
ScreenSaver Time
Reset default setting
Description
Change the language that the Qudo displays in.
Adjust the brightness of the Qudo screen.
Adjust the contrast of the Qudo screen.
Adjust the saturation of the Qudo screen.
Press the OK button (9) to see available space on the Qudo’s internal
memory.
Press the OK button (9) to see the version of Qudo software that you have.
Press the OK button (9) to upgrade the Qudo system (see section 12.
Upgrading the firmware)
Adjust the time it takes for the Qudo to go to screensaver when not in use
from None, 30 secs, 60 secs, 2 mins or 10 mins.
Reset all of the Qudo settings to the original settings. Press the OK button
(9) then select Yes and press the OK button to reset the Qudo.
12. Upgrading the firmware
If you are experiencing problems with your Qudo please contact our Technical Team at
http://www.veho-world.com/main/ask_expert.aspx and they will provide you with a firmware
upgrade.
Once you have received the firmware upgrade copy the new firmware file (.bin) to an SD card. Insert
the SD card and go to setting in the main menu, then select system setup and then system upgrade.
8
A confirmation window will appear, select yes to start the upgrade. When the upgrade is complete,
the album will restart automatically. DO NOT turn off the album while it is upgrading.
Please note: ONLY save the firmware on the SD card
13. Technical specifications
Battery
Battery charge time
Battery life
Data Transfer
Memory
Memory Card
Supported Picture Formats
Internal rechargeable lith-ion battery
Up to 3 hours
Up to 3 hours
USB
2GB internal (up to 2000 photos depending on quality)
SD/SDHC up to 16GB
JPG and BMP
9