1
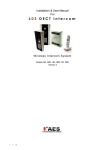
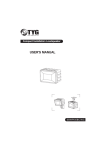
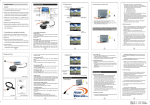
HD A e r i a l P h o t o g r a p h i c
Instrument
Functional lllustrations
@
Lens
@
Microphone
@ TF Card Slot
@ Fixing screw hole
@ Image-UP key
@ Video-Down key
Before use, please read c o m p l e t e l y this manual.
Thank you for purchasing this product.
@ Status indicator
@ ) Power Switch
Safety Notice
waming
flHH^^HHMHHRHHHHHHHBIHH
A The magnetic field of certain frequency may affect the Image and sound of this
instrument.
^
If data transmission interrupts (fails) due to static or electromagnetism, be sure to
@
Replay
®
Menu key
@ Mullifunctional USB port
disconnect or restart the application program and reconnect the communication cable
(USB, etc.).
A Do not install or place this instrument in the closed Space such as cabinet, doset and
so on in Order to avoid fire due to overheat.
A,
Do not install or place this Instrument on the flammable or explosive article to avoid
^
Multifunction port
such risks as fire, explosion and so on due to overheat.
A Do not place this instrument near for example open fire.
Functions of Components
Notices for the useof this instrumenM
Power button:
A
1. Before use, please try taking a photo or Video firstly to make sure this Instrument
can vKork normally.
2. Press this button again about 2s to switch it off.
A
2. As this instrument Is not dustproof or v^^aterproof, be careful v^/hen using It.
^
3. Do not place this Instrument in a humid environment. The entry of moisture into this
Instrument may damage It and it may not be repalred In some circumstances.
A 4. Do not use this instrument near the place with strong »/ireless waves or radioactive
rays; otherwise, it cannot be used normally.
A
1. Press the power button to switch on the instrument and wait for a moment to enter
standby Status.
5. Do not point the camera of this inslrument against sunshine or strong ray, otherwise
failure may be caused.
Menu button
1 In standby State, press this button 3s to enter the menu Setup State.
2.ln menu Setup State, press this button shortly to browse the Option; in the Setup
State, press this button 3s to back to the prevlous menu and continue pressIng It to exit
from the menu.
3.In replay State, press this button shortly to stop; in file browse State, press this
button shortly to enter the file Operation menu and long to exit.
Table of Contentsi
Replay button
1. In standby State, press this button shortly to enler the replay State; in the replay
process, you may <Play/Pause>.
2. In menu Setup State, as <0K> key.
Image button
Power cord
Main unit
Mullifunctional
connection cable
1. In standby State, as Image key.
2. In menu Setup State, as <UP> key.
Video button
1. In standby State, as Video key.
2. In menu Setup State, as <DOWN> key,
.......
USB data cable
AV connection cable
Multifunctional USB port
^
User manual
CONTENTS
1. Used to connect to a PC for data transmission.
2. AV Output.
3. IR Signal input.
Status indicator
I. F u n c t i o n a l l l l u s t r a t i o n s
05
1. In Standby State, normally ON, red.
II. Aerial Photograph Connection -
09
2. In Video State, quickly flashing.
III. Connect t o Display for Setup -
12
System Menu Setup —
12
Video Menu Setup
—
14
Image Menu Setup
—
15
IV. U p g r a d e P r o g r a m
17
V. S p e c i f i c a t i o n s
18
3. In Image State, slowly flashing.
Multifunctional port
1. Power input
2. AV outpul
3. Remote data input
II. Aerial Photograph Connection
1. Firstly fix the main unit and the transmission module onto the mode! airplane.
3pcs
Take 3 photos continuously
5pcs
Take 5 photos continuously
(When the main unit is on, you may transmit Video Signals via the wireless transmission
10pcs
Take 10 photos continuously
module.)
pcs/3s
Take 1 photo every other 3s.
pcs/5s
Take 1 photo every other 5s.
pcs/10s
Take 1 photo every other 10s.
pcs/30s
Take 1 photo every other 30s.
pcs/60s
Take 1 photo every other 60s.
2. Connect the main unit and the transmission module properly with the multifunctlonal
connection cable.
ContinuGus
3. Connect the other connector of the multifunctlonal connection cable to the data Output
path Of the wireless RC receiver.
(In remote control State, when the remote control Signals received by the Instrument
Auto
shooting
reach certain v a l u e , it will have automatic Video recording; when the Signal returns to t h e
original State, the Video recording will stop.)
4. After the Installation is over, press the power key to power on the main unit and press
the Video key, then the main unit will Start recording Videos; the default is the highest
Setup o f Images and Videos. (To set the main unit, connect it to an external display.)
.
^^^Ktf
• Remote
Control
.HD19
^HHHI
^^^^^^
1
Plane^^BI^^B
X)
• W i r e l e s s AV
Trans m i t t e r
( S c h e m a t i c Diagram)
. Wireless RC Receiver
II. Connect t o Display f o r Setup
1- Via the USB porl, you may connect the main unit to a n external display through which
you may s e t the m a i n unit and have a replay.
2. Press the M key long to enter the menu and shortly to switch to the desired m e n u list
for Setup. To set one item, press the UP/DOWN key to choose it. After choosing, press
the OK key to enter and s e t it. After that, press t h e OK k e y t o confirm a n d b a c k to t h e
previous level.
3. If Setup is over, press the M k e y t o back to standby State.
Video Menu Setup
Time
watermark
W h e n this setup is activated, date and time w/ill be
e m b e d d e d on the upper left corner on the Image.
System Menu Setup
Items
M e n u Setup
Language
English
English
Date
2012-01-01
Set date.
Time
00:00
Set time in 24h System.
Auto
screen
off
Off, 30s,
60s, 120s
Set t h e t i m e to a u t o m a t i c a l l y t u r n off t h e s c r e e n .
Auto
p o w e r off
Off, 30s, 60s, Set a u t o m a t i c swItch-off d u r a t i o n . When there is
no O p e r a t i o n , the p o w e r s u p p l y w i l l b e
120s, 300s
Motion
detection
High, m i d d l e ,
low/
Light
frequency
50Hz, 6 0 H z
Functional description
Press any key to wake it up.
a u t o m a t i c a l l y t u r n e d off.
TV
Output
NTSC, P A L
CSD
on/off
Set the t o u c h sensitivity
Set according to the power grid frequency of the
country to avoid interference
Choose a proper v i d e o O u t p u t f o r m a l according
to the V i d e o S y s t e m in the c o u n t r y
o f f f o r FPV m o d e
Format
Default
settings
Firmware
update
Remove the current user settings and restore
the factory settings
See <Upgrade Program> f o r detaiied O p e r a t i o n
method.
IV. U p g r a d e P r o g r a m
1. Before program upgrading, make sure the external p o w e r supply is stable.
Item
System
Functional description
2. Please p r e p a r e t h e U p g r a d e files and copy them o n t o t h e m e m o r y c a r d (do n o t
Resolution
1080p
16:9, füll HD resolution, 1920x1080p 30 frames/s
change their name freely) and insert the memory card with the Upgrade files into the
card Slot on the side of t h e Instrument body.
3. Switch on the Instrument, then t h e System will a u t o m a t i c a l l y U p g r a d e . After t h e
720pH
16:9, max. visible area, 1280x720p 60 frames/s.
4. After the upgrading is o v e r , the S y s t e m will automatically delete the files for program
720p
16:9, m a x . visible area, 1280x720p 30 frames/s.
Resolution
Quality
JH
High V i d e o quality
m
Intermediate V i d e o quality
Low V i d e o quality
JL
m
Metering
mode
Video
section
Time
stamp
Slow
shooting
5.
20.
Average fest mode
Center photometry mode
In continuous V i d e o recording, the video file will
be saved as one file for such time and then one
30min. new file w i l l be created to continue recording.
10. 15,
On/Off
Off, frame/1s,
W h e n t h i s setup is activated, date and t i m e will be
e m b e d d e d on the upper left corner o n the video.
On/Off
Microphone
On/Off
V. Specifications
V i d e o Sensor:
1/2.5 ClvlOS
Effeclive pixel:
5.0 mega pixels
Lens:
Fixed focus, f=2.8mm, angle of view=170°
Exposure control:
Automatic:
White balance:
Automatic;
Photo:
JPEG,Pixel, 2,592x1,944;
D y n a m i c Video:
H.264 compressed;
Set the time interval to capture 1 frame.
W h e n this function is activated, you may circularly
use the memory card space to have continuous
Video recording; after the memory card is füll, the
System will automatically delete the earliest
created file and continue recording.
After this function is activated, sound can be
recorded synchronously with video recording.
imag« M e n u S e t u p
Photo pixel
upgrading.
10s, 30s, 60s
loop
recording
Items
u p g r a d i n g is over, t h e S y s t e m will a u t o m a t i c a l l y s w i t c h off the i n s t r u m e n t .
M e n u Setup
5M
3M
Recording medium:
16:9
1920x1080 (30 frames/s);
4:3
1440x1080 (30 frames/s);
16:9
1280x720 (60 frames/s);
16:9
1280x720 (60 f r a m e s / s ) ;
h i g h - s p e e d Micro SD c a r d (TF c a r d ) ;
Max, 32GB s u p p o r t e d ;
Multifunctlonal USB
port:
AV Output, USB2.0 h i g h - s p e e d c o m m u n i c a t i o n port
( c o m p a t i b l e w i t h S t a n d a r d um
Multifunction port:
USB p l u g ) , DC i n p u t ;
DC12V input, AV Output, r e m o t e c o n t r o l input;
Dimensions:
Approx. 37x37x31 mm L/W/T (not including the s t a n d ) ;
Weight:
Approx. 58g (not i n c l u d i n g memory c a r d a n d b a t t e r y ) ;
Functional description
Operating
2592x1944
temperature:
-10C-60C;
2048x1536
USB p o w e r adapter:
5V/1.5A.