1
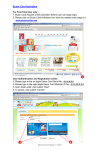
APPLICATION NAME ‐ COMPUTERIZED BILLING AND COLLECTION SYSTEM OF CABAGAN WATER DISTRICT. SOFTWARE ‐ MICROSOFT VISUAL STUDIO 6.0, MICROSOFT SQL SERVER ‐‐‐‐‐‐‐‐‐‐‐‐‐‐‐‐‐‐‐‐‐‐‐‐‐‐‐‐‐‐‐‐‐‐‐‐‐‐‐‐‐‐‐‐‐‐‐‐‐‐‐‐‐‐‐‐‐‐‐‐‐‐‐‐‐‐‐‐‐‐‐‐‐‐‐‐‐‐‐‐‐‐‐‐‐‐‐‐‐‐‐‐‐‐‐ USERS MANUAL HOW TO OPEN THE PROGRAM On the Desktop double click WDNameBCS.exe LOG IN Enter the user name on the first box and password on the second box. On the server, type the computer name. Click the OK button to continue. SETTING OF ACCESS AND PASSWORD FOR SYSTEM ADMINISTRATOR 1. Enter your user ID, password and confirmed password. Click OK to continue, choose the YES button to save or update your password. 2. The message “Do you wish to add more?” appears. If YES, you can add more users, if NO, then the procedure ends. HOW TO ADD NEW CONNECTION 1. 2. 3. 4. 5. 6. 7. 8. 9. 10. 11. 12. Go to Process Enter Service Application (Click) Click the new Icon. (Yellow boxes should have contents) You may change the date applied. Enter Last Name or Company’s Name, First Name, Middle Initial (Optional) Select Combo Box, Customer Type, Zone Number, Book No. Enter Home Address, Billing Address. (You may use the Copy Paste command for Billing Address) Tel. No. Fax No. (Optional) Click the assessment Select particulars, e.g., Installation fee, application fee, meter rental fee, etc. Enter amount payable in installment basis, installment duration and first installation date. The first installment date is usually on the following month date. Click SAVE icon to save. Click X box to close or click close icon on the menu. HOW TO ADD METER 1. 2. 3. 4. 5. Click Maintenance/ Meters. Select Meter Size and Status ex. ½ and OK. Click New Icon or F11 to add New Enter Meter Number, Brand, click Meter Size and Status Click the diskette icon or F12 to save. HOW TO APPROVE SERVICE APPLICATION 1. 2. 3. 4. 5. Click Approve Service Application. Enter control number and click RETRIEVE BUTTON to retrieve data. Enter last name and click SEARCH BUTTON. After retrieval of data, enter the 10 digit Account Number. Enter Meter Number and press tab to check the meter number. METER INSTALLATION 1. On the process menu, click meter installation. 2. Enter Account Number and click RETRIEVE BUTTON or ENTER key. 3. Select INSTALLED BY or DATE INSTALLED should be last month or previous month if “pahabol na account” 4. Click on the diskette Icon or F12 to Save 5. Click OK in question box. BEGINNING BALANCES 1. Click PROCESS, click BEGINNING BALANCE. 2. Select the Zone and Book. 3. Enter latest Bill Number (bill number should be unique and no duplication), reading, consumption and latest amount of water bill. 4. The latest water bill amount is the ending balance of last month’s billing. Click SAVE icon. Select YES button to confirm. NOTE: Yes means all billings and collection will be deleted or replaced with these balances. HOW TO ENTER BEGINNING BALANCE 1. 2. 3. 4. 5. 6. 7. Click process Click Beginning Balances Click Zone and Desired Books, Billing Date and Due Date. Then click Meter Reading Schedule and Billing Date and Due Date of previous month billing. Click the latest schedule bill number. Enter beginning balance per customer account. Enter the bill number align to the bill amount (Zone 1, Book 1, etc.) (NOTE: an error message such as “violation of primary key” appears if there is a duplicate bill number.) 8. Click on the diskette Icon or F12 to Save 9. Close SAVING OF BEGINNING BALANCE In case of error on saving message like “violation of primary key”, 1. Go to SQL Query Analyzer. 2. Select Master to Billing Collection Database. 3. Type Select * from bill master where bill_no. >= ‘100000250’ and bill_no<=’100000313’ (Sample syntax command only). BILLING CYCLE BILLING SCHEDULE 1. Click PROCESS, BILLING SCHEDULE (Billing Schedule should be done on the first day of the month.) 2. Click the PRINT icon to print. 3. Click the SAVE icon to save. (NOTE: Meter Reading Date should be within the month.) PREPARE METER READING SHEET 1. 2. 3. 4. Click PROCESS, PREPARE METER READING SHEET. Select Zone, Book no. and Meter Reader. Click OK to print VIEW. Click the PRINT icon to print. NOTE: you can define starting page and last page and click OK to proceed with printing. MANUAL METER READING 1. 2. 3. 4. Click PROCESS, click MANUAL METER READING or press F3. Select Zone No., Book No. and Meter Reading. You may now enter current reading, remarks and consumption. Consumption can be edited. Click PRINT icon to view and print Meter Reader proof list. (ctrl+P) (NOTE: worksheet last row number should be equal to Meter Reader Proof list to Total Number of Records). METER READING PROOFLIST 1. You are inside the Manual Meter Reading. 2. Click the print icon in the tool bars and the report is displayed. 3. Click the PRINT icon. You may chose to print per page or all 4. Click X to quit printing. COMPUTING WATER BILL THIS MODULE WILL USE THE ACTUAL BILL NUMBER IN THE WATER BILL FORM. 1. Click PROCESS, click COMPUTE WATER BILL. 2. Select Zone No., Book No., Bill Number. NOTE: Bill Number can be edited. 3. Click OK to confirm Water Bill Computation. PRINTING OF WATER BILLS 1. Click PROCESS, click PRINT WATER BILL. 2. Select Zone No., Book No. and Bill No. should be the actual number in the Water Bill form. NOTE: A. How to Reprint in case of Printing error or paper jam (No damage of Water bill Forms.) B. How to Reprint in case of Printing Error or paper jam (Paper is Damaged) 1) Click QUERY ANALYZER. 2) Click OK. 3) Select CLICK, the drop down list master to Billing Collection. 4) Type SELECT from bill master where bill no. between 100000002 and 100000002. Delete from bill master. 5) Go to Water Bill Computation. Select Zone No., Book No., Bill No. should be the same with actual Water Bill Form. POSTING OF WATER BILLS PRINTED 1. 2. 3. 4. Click PROCESS and click VERIFY PRINTED BILLS. Select Zone No. and Book No. Click SAVE button to save and click OK to continue. Click CANCEL button or X button to close or quit Windows. END‐OF‐DAY PROCESSING 1. Click PROCESS, End‐of‐Day Processing 2. Enter the Date of the next working day. 3. Click OK to save system date. (Administrative use only) PROCESSING OF APPLICATION OF PENALTY 1. Click PROCESS, Application of Penalty. 2. Select ZONE and click OK. Do this after End‐of‐Day Processing. (NOTE: You may delay the application of penalty if there is approval from WD Management) HOW TO ADD NEW USER 1. 2. 3. 4. 5. Go to Maintenance, Setting of Access and Password/ Access Click and select employee name Enter User ID – sample VICKY Click access Modules boxes to activate Click OK HOW TO EDIT BEGINNING BALANCE / CURRENT BILLS 1. 2. 3. 4. 5. 6. 7. 8. 9. 10. 11. 12. 13. 14. 15. 16. Go to others Update bill details Enter Account Number Click on paper Icon or F11 for new record. Edit Data on receivable/Collected/Adjustment Click on diskette Icon or F12 to Save Click Okay button Click X to exit Go to others Update Ledgers Enter Account Number Click on paper Icon or F11 for new record. Edit Data on Debit Click on diskette Icon or F12 to Save Click Okay button Click X to exit HOW TO CHANGE ACCOUNT NO. 1. 2. 3. 4. 5. Go to process Customer Service/ Update Customer/ Change Account Number Enter Account No. to be changed Click Retrieve button Enter New Account No. HOW TO EDIT BILL DETAILS 1. 2. 3. 4. Go to Others menu Click update bill details Enter Account No. Click New button 5. Edit data in Receivable/ Collected/ Adjustment as the case maybe 6. Click on diskette Icon or F12 to Save 7. Click X to exit. HOW TO ADD OTHER CHARGES/ A/R OTHERS 1. Go to Others, Apply Other Charges. 2. Enter Account Number and click Retrieve button or click Search button to search account by last name. 3. Click OK button 4. Click folder with caption A/R. 5. Enter Particulars, Required Down Payment, Amount Payable in Installment Basis, Months Payable and Months Left. 6. Tick/Check Add to Ledger button for charges to be included in the customer ledger card. 7. Use tab key to add new charges and to go to next row, and repeat nos. 5 and 6 until all the charges are accounted for. 8. Click on diskette Icon or F12 to Save 9. Click X to quit (NOTE: the amount of charges will be included on the water bill on the first installment date.) HOW TO PRINT REPORTS 1. Go to process/ Report Generation and; 2. Select the following reports to print 1) Customer Ledger Card 2) Ageing of Accounts Receivable 3) Acknowledgement Report 4) Billing Report 5) Penalty Report 6) Collectors Report 7) Billing Adjustment Summary 8) Master List of Service Application 9) Master List of Service Connection 10) Monthly Billing Summary 11) Billed Connections by Category and Size 12) Billing with Abrupt Consumption of Over/ Below 50% 13) Accounts with Zero Consumption HOW TO EDIT LEDGERS 1. Go to Others menu 2. Click update Ledgers 3. 4. 5. 6. 7. Enter Account No. Click on the paper icon or F11 for new record. Edit data. Click on the diskette Icon or F12 to Save Click X to quit HOW TO UPDATE CUSTOMER (F4) Tag as New Service Connection Temporary Disconnection Permanent Disconnection Voluntary Disconnection Reconnection Change Meter Change Zone/Book Change Name Change Classification Change Billing Address Change Home Address Change Tel. no. 1 Change Tel. no. 2 Tag Exemptions Tag Government Tax Illegal Connection 1. Go to process 2. Customer Service/Update Customer/Update Customer Information 3. Enter Account Number and click Retrieve Button or click Search Button to search account by Last name 4. Click OK button 5. Click the update type button and select the update type 6. Enter the new data to its corresponding location 7. Click on the diskette Icon or F12 to Save 8. Click X to quit HOW TO VIEW THE LEDGERS DURING UPDATE CUSTOMER 1. Click F4. Click the folder Customer Ledger. 2. Click the type of Ledger to View by Water Bill only, A/R only or Water Bill and A/R. 3. Click the print ledger button to print preview on screen. HOW TO ADD BEGINNING BALANCE WITHOUT PREVIOUS BILL 1. Update customer to temp zone (For new concessionaires) Process/ Customer Service/ Update Customer Information Enter Account Number Change Zone/Book to temp 17 Enter Beginning Balance Enter Bill number Process/ Beginning Balance/ Latest water bill amount Click on the diskette Icon or F12 to Save Exit 2. Update Customer Process/ Customer Service/ Update Customer Information Enter Account Number Change Zone/ Book Exit HOW TO MAKE WATER BILL ADJUSTMENTS Go to Process, Water Bill Adjustments. Click on the paper icon or F11 for new record. Type Account No., click Retrieve or type last name, click Search. Enter Adjusted Reading, Consumption Inc/Dec .appears. Encode Particulars, i.e., “Error in meter reading”. Enter GL Code 500, SL Code 600, Encode Debit Amount. (Tip: Amount of wrong consumption – amount of correct consumption=Debit Amt.) Enter GL Code 125, SL Code 125‐01, Encode equivalent Credit Amount. Click on the diskette Icon or F12 to Save HOW TO COLLECT NON WATER BILL COLLECTION New Service Application 1. 2. 3. 4. 5. 6. 7. 8. Go to collection, Click Non water bill collection. Click paper icon or F11 for new record. Click New Service Application Enter Service Application No. & click Retrieve button (OK) Enter Last Name & click Search button Edit OR# or Enter OR# Enter Particulars Enter Cash Received amount Select Check – check box for check a) Enter check amount b) Enter check # c) Bank d) Branch 9. Click Distribute or type the amount paid 10. Click on the diskette Icon or F12 to Save BILLING AND COLLECTION SYSTEM INSTALLATION OF VISUAL STUDIO (VISUAL BASIC) Upon inserting CD into drive, Auto play commences, or click Open. If the option Click Open is used, Click Set‐up. If new installation is chosen, enter CD key, otherwise if there was a previous installation, click Custom and tick what software in the Visual Studio you want installed Click Continue. Click OK The comment A Previous installation of Visual SourceSafe was detected at C:\Program Files\Microsoft Visual Studio\Common\VSS appears. Click YES. (Note : skip this portion if necessary) Click Continue. Check Register Environment Variables and Click OK. Installation set‐up commences… Click Finish Restart Windows to complete installation INSTALLATION OF CRYSTAL 85 Go to Folder CRYSTAL85 and click set‐up Welcome to the Crystal Reports Installation Wizard appears. Click Next Tick I accept the license agreement. Click Next Enter Name and Organization (optional). You can put a period (.) for each. Enter CD key (tip: CD key can be seen at serial‐text document. Use Ctrl C and Ctrl V to copy and paste CD key numbers) Click Next Tick Typical or Complete (preferably Typical installation) Click next Click next Installation process starts… Click Register Later Click Finish INSTALLATION OF SPREAD 3.0 (FARPOINT) Click folder FPInstall Click folder INSTALL_PRODUCTS Click folder Spread Click set‐up Tick Install or Reinstall, as the case may be. Click next Tick I accept the agreement Click continue Enter product key and serial number (NOTE: Product key and serial number can be found at folder FPInstall, with Serial‐Text Document. Use Ctrl C and Ctrl V to copy and paste CD key numbers.) Click next Click Install Installation process commences… Click OK The message. Do you want to read the README file? Click NO. INSTALLATION SQL 2000 Go to folder SQL 2000 Click AUTORUN Click SQL server 2000 Components Click Install Database Server Installer appears, click next Tick local computer Tick Create a new instance of SQL Server… Enter Name and Company (NOTE: you can put a period (.) for this information. Tick I accept license agreement Tick Client Tools only Tick Next Tick Next Go to folder MSDE Click set‐up Restart for SQL engine appearance (lower right) Go to SQL enterprise manager If computer name exists, right Edit SQL Server…., otherwise click New SQL Server … for new computer name Go to Properties, folder Security Tick SQL Server and Windows Tick Audit Level None Tick system Account Click OK Click plus (+) sign of folder Security Click Logins, and double‐click sa Type password Confirm and re‐type password Click OK Right‐click computer name and proceed to edit SQL Server Registration properties… Tick use SQL Server Authentication Type Log‐in Name and Password The message Connection information has been changed for the active connection. Do you wish to disconnect? Appears Click YES Right‐click computer name and go to connect If no message appears, then computer name for SQL is OK TO CHANGE ON‐SCREEN SIZE OF BCS Go to HIGH COLOR (16 BIT), and screen area should be set to 800 x 600 pixels (Note: Depending on the screen configuration of the Windows Operating System, and the user). CREATING BCS EXECUTION FILE Go to PrjBCS Click File, go to Make BCS.exe. Type preferred BCS exe file name and click pulldown for desired destination. Click OK to start compilation in order to create exe file. FOR COMPUTER NAME Go to My Computer Right‐click and go to Properties Go to folder Network ID Click Properties Change computer name Tick Work Group Click OK Message appears Click OK Reboot computer to effect changes in the system CREATING SQL DATABASE FILES Go to SQL Server Enterprise Manager Click plus (+) sign of Microsoft SQL Servers Click plus (+) sign of SQL Servers Group Click plus (+) sign of Computer name (Window NT) Right‐click folder Database In folder General, enter database name Click OK BACK‐UP OF SQL DATABASE FILES Go to SQL Server Enterprise Manager, and double‐click Click plus (+) sign of Microsoft SQL Servers Click plus (+) sign of SQL Servers Group Click plus (+) sign of Computer name (Window NT) Right‐click folder Database Go to all Tasks, Backup Database In folder General, if there are contents under destination, click Remove, otherwise skip this instruction and proceed to the next one. Click Add Click three dots ( . . . ) Enter database filename and click OK Click OK again Proceed to folder Options Check Verify backup upon completion Go back to folder General, tick overwrite existing media and click OK When backup commences and ends, message appears Click OK Backup procedure completed successfully. RESTORING SQL DATABASE FILES Go to SQL Server Enterprise Manager Click plus (+) sign of Microsoft SQL Servers Click plus (+) sign of SQL Servers Group Click plus (+) sign of Computer name (Window NT) Right‐click folder Database Go to all Tasks, Backup Database Tick from device Click Select Devices Click Add Click three dots ( . . . ) Enter database filename and click OK Click OK (3x) Go to folder Options Check Force restore over existing database Go back to folder General Click OK Restore procedure completed successfully NETWORK ID Go to My Computer Right‐click and go to Properties Go to folder Network ID Click Next Tick Computer is part of a business network … Click Next Tick My Computer uses a network without a domain Click Next Click Finish FOR NETWORK OF COMPUTER (TWO OR MORE UNITS) Go to My Network Places Click Network and Dial‐up Connections Right‐click Local Area Connection and go to Properties Highlight Internet Protocol (TCP/IP), and click Properties Tick Use the following IP address Type IP address as 192 168 0 n, with n as workstation number Click OK Click OK BILLING AND COLLECTION SYSTEM PROCEDURES 1. 2. 3. 4. 5. 6. 7. 8. 9. 10. 11. 12. 13. 14. 15. MAINTENANCE (ALL SUB‐MENUS UNDER IT) PROCESS – Enter Service Application COLLECTION – Non‐Water Bill Collection (FOR NEW CONCESSIONAIRES) PROCESS – Approve Service Application PROCESS – Meter Installation PROCESS – End of Day Processing PROCESS – Billing Schedule PROCESS – Prepare Meter Reading Sheet PROCESS – Manual Meter Reading PROCESS – Compute Water Bill PROCESS – Print Water Bill PROCESS – Verify Printed Bills (SAVE) COLLECTION – Office‐Online COLLECTION – Non‐water Bill Collection APPLICATION OF PENALTY – will be used once the concessionaire fails to pay on its due date.