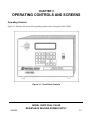
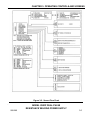
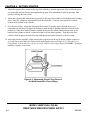
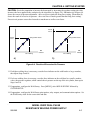
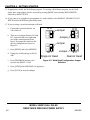
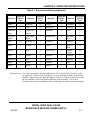
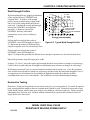
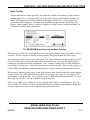
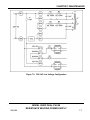
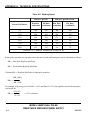
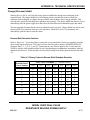
1
USER'S MANUAL 990-280
Revision H
March 2004
250DP DUAL PULSE
STORED ENERGY RESISTANCE WELDING
POWER SUPPLIES
Model
Stock No.
250DP
1-250-XX
250DP/208
1-250-XX-01
250DP/230
1-250-XX-02
250DP/100
1-250-XX-03
250DPS
1-254-XX
250DPS/208
1-254-XX-01
250DPS/230
1-254-XX-02
250DPS/100
1-254-XX-03
NOTE: Units with the built-in Weld Sentry
Option also require User's Manual No. 990-291.
Copyright © 1998, 2002, 2004 Miyachi Unitek Corporation
The engineering designs, drawings and data contained herein are the proprietary work of
MIYACHI UNITEK CORPORATION and may not be reproduced, copied, exhibited or
otherwise used without the written authorization of MIYACHI UNITEK CORPORATION.
Printed in the United States of America.
Revision Record
Revision
EO
Date
Basis of Revision
A
ENRG-RLSE
1/94
Released Original Manual.
B
17215
11/97
Ɣ Reorganize data and update format.
Ɣ Incorporate Addendum 995-280, Rev A
(10/97); and Errata 996-280, Rev B.
C
17405
4/98
Add operating features.
D
17574
6/98
Correct Test Point designation.
E
18282
5/00
Ɣ Add CAUTION statement about polarity in
chained weld schedules.
Ɣ Add Declaration of Conformity.
F
18577
11/00
Ɣ Add tolerance to pulse output voltage.
Ɣ Clarify operation of relay outputs.
G
19146
01/02
Complete Update
H
20002
3/04
Updated Schematics. Minor formatting changes.
MODEL 250DP DUAL PULSE
RESISTANCE WELDING POWER SUPPLY
ii
990-280
CONTENTS
Revision Record ......................................................................................................................................... ii
Contents .................................................................................................................................................... iii
Contact Us ................................................................................................................................................. ix
Safety Notes ................................................................................................................................................x
Declaration of Conformity ........................................................................................................................ xi
CHAPTER 1: SYSTEM DESCRIPTION ....................................................................................... 1-1
Applications .................................................................................................................................... 1-1
Features ....................................................................................................................................... 1-2
CHAPTER 2: INSTALLATION ...................................................................................................... 2-1
Location .......................................................................................................................................
Power Line ......................................................................................................................................
Welding Cables...............................................................................................................................
Rear Panel Components..................................................................................................................
Firing Switch Connections..............................................................................................................
Mechanical Firing Switch .........................................................................................................
Optical Firing Switch................................................................................................................
3 Wire Firing Switches .............................................................................................................
Air Actuated Weld Head Connections............................................................................................
Air Valve Driver .......................................................................................................................
Non Miyachi Unitek Air Actuated Weld Heads .......................................................................
Air Actuated Weld Heads without Force Firing Switches........................................................
Second Air Head .......................................................................................................................
Footswitch .......................................................................................................................................
1-Level Footswitch ...................................................................................................................
2-Level Footswitch ...................................................................................................................
Remote Schedule Selection.............................................................................................................
Relay Outputs..................................................................................................................................
Interconnection Diagram ................................................................................................................
2-1
2-1
2-1
2-3
2-4
2-4
2-4
2-4
2-5
2-6
2-7
2-7
2-7
2-7
2-7
2-8
2-8
2-8
2-9
CHAPTER 3: OPERATING CONTROLS AND SCREENS........................................................ 3-1
Operating Controls.......................................................................................................................... 3-1
Screen Formats................................................................................................................................ 3-3
MODEL 250DP DUAL PULSE
RESISTANCE WELDING POWER SUPPLY
990-280
iii
CHAPTER 4: GETTING STARTED .............................................................................................. 4-1
Powering Up ................................................................................................................................... 4-1
Adjusting an Air Actuated Weld Head ........................................................................................... 4-1
CHAPTER 5: OPERATING INSTRUCTIONS ............................................................................. 5-1
Successful Welding.........................................................................................................................
Resistance Welding Parameters......................................................................................................
Weld Schedule Development..........................................................................................................
Weld Head Parameters..............................................................................................................
250DP Power Supply Parameters .............................................................................................
Making a Weld................................................................................................................................
Evaluating the Weld........................................................................................................................
Weak Weld................................................................................................................................
Electrode Sticking.....................................................................................................................
Causes of Imperfect Welds .............................................................................................................
Electrode Force and %Energy ..................................................................................................
Polarity......................................................................................................................................
Weld Strength Profiles....................................................................................................................
Destructive Testing .........................................................................................................................
Electrode Maintenance....................................................................................................................
5-1
5-1
5-1
5-2
5-4
5-4
5-4
5-5
5-5
5-5
5-5
5-6
5-7
5-7
5-8
CHAPTER 6: PROCESS DEFINITIONS AND WELD FUNCTIONS ....................................... 6-1
250DP States...................................................................................................................................
RUN State .................................................................................................................................
STANDBY State.......................................................................................................................
PROGRAM State......................................................................................................................
MENU State..............................................................................................................................
HELP State................................................................................................................................
NO WELD State .......................................................................................................................
FIRE State.................................................................................................................................
Weld Function Field .......................................................................................................................
Basic Function ..........................................................................................................................
Repeat Function ........................................................................................................................
Rollspot Function......................................................................................................................
6-1
6-1
6-2
6-2
6-3
6-4
6-4
6-4
6-4
6-5
6-6
6-7
CHAPTER 7: MAINTENANCE ...................................................................................................... 7-1
Modification and Calibration.......................................................................................................... 7-1
Cover Removal ......................................................................................................................... 7-1
Capacitor Bank Modifications .................................................................................................. 7-1
MODEL 250DP DUAL PULSE
RESISTANCE WELDING POWER SUPPLY
iv
990-280
Line Voltage Changes ................................................................................................................. 7-2
Calibration ................................................................................................................................... 7-8
Troubleshooting .............................................................................................................................. 7-10
Repair Service ................................................................................................................................. 7-11
Telephone Service ..................................................................................................................... 7-11
Factory Service Repair .............................................................................................................. 7-11
APPENDIX A: TECHNICAL SPECIFICATIONS .......................................................................A-1
250DP Power Supply .....................................................................................................................A-1
Power Requirements ......................................................................................................................A-1
Capacitor Bank ...............................................................................................................................A-1
Output Pulse Characteristics ....................................................................................................A-1
Weld Fire Lockout ...................................................................................................................A-2
Line Voltage Regulation ..........................................................................................................A-2
Turndown Circuit .....................................................................................................................A-2
Line Failure Turndown ............................................................................................................A-2
Over-Voltage Lockout .............................................................................................................A-3
Charge Lockout Circuit ............................................................................................................A-3
Polarity Selection ...........................................................................................................................A-3
Welding Speed ...............................................................................................................................A-3
Weld Schedules ..............................................................................................................................A-6
Weld Schedule Definition ........................................................................................................A-6
Options .......................................................................................................................................A-6
Schedule Number at Power-Up ...............................................................................................A-7
Utilities
......................................................................................................................................A-7
Information ....................................................................................................................................A-7
Weld Sentry ...................................................................................................................................A-7
System Set-up ................................................................................................................................A-8
Weld Functions ..............................................................................................................................A-8
Head Type ......................................................................................................................................A-8
Squeeze Line ............................................................................................................................A-8
Cool Time ................................................................................................................................A-9
Hold Time ................................................................................................................................A-9
Footswitch Type .............................................................................................................................A-9
FOOTSWITCH Connector ......................................................................................................A-9
Footswitch Weld Abort Feature .....................................................................................................A-10
Footswitch Weld Abort On ......................................................................................................A-10
Footswitch Weld Abort Off .....................................................................................................A-10
Firing Switch Type ........................................................................................................................A-10
Firing Circuit ............................................................................................................................A-10
Switch Debounce Time ............................................................................................................A-11
Mechanical Firing Switch Cable ..............................................................................................A-11
MODEL 250DP DUAL PULSE
RESISTANCE WELDING POWER SUPPLY
990-280
v
Optical Firing Switch Connector .............................................................................................A-11
Initiation Switch .............................................................................................................................A-12
Manual Head Operation ...........................................................................................................A-12
Air Head Operation ..................................................................................................................A-12
Chain Schedules Feature ................................................................................................................A-12
Step Count ................................................................................................................................A-12
Next Schedule ..........................................................................................................................A-13
Audible Buzzer ..............................................................................................................................A-13
End of Cycle Buzzer ON/OFF .................................................................................................A-13
Key Click .................................................................................................................................A-13
Weld Counter .................................................................................................................................A-14
Alarms
......................................................................................................................................A-14
Air Valve Driver ............................................................................................................................A-14
Air Valve Driver 1 ...................................................................................................................A-14
Air Valve Driver 2 ...................................................................................................................A-15
Air Valve Driver Receptacles ..................................................................................................A-15
Control Signals Connector .............................................................................................................A-15
Emergency Stop .......................................................................................................................A-16
Charge (Process) Inhibit ..........................................................................................................A-17
Remote Weld Schedule Selection ............................................................................................A-17
Binary Schedule Selection Code ..............................................................................................A-18
Relay Outputs .................................................................................................................................A-19
Accessory Port ...............................................................................................................................A-20
Input/Output Cable Connectors and Fusing ...................................................................................A-20
Input Line Power ......................................................................................................................A-20
Circuit Breakers .......................................................................................................................A-20
Fuses ......................................................................................................................................A-20
Power Input Connector ............................................................................................................A-20
Front Panel Switches ......................................................................................................................A-21
Microprocessor CPU ......................................................................................................................A-21
Display .......................................................................................................................................A-21
Cooling .......................................................................................................................................A-21
Physical Characteristics .................................................................................................................A-22
Index ................................................................................................................................................ Index-1
MODEL 250DP DUAL PULSE
RESISTANCE WELDING POWER SUPPLY
vi
990-280
ILLUSTRATIONS
Figure
Title
Page
1-1
250DP Dual Pulse Resistance Welding Power Supply ............................................................... 1-1
2-1
2-2
2-3
2-4
2-5
Cable Routing Examples
.......................................................................................... 2-2
Terminal Connection Examples
.......................................................................................... 2-2
Rear Panel Components
.......................................................................................... 2-3
Typical Solenoid Air Valve Assembly with a Single egulator ................................................... 2-6
250DP Equipment Interconnection Diagram .............................................................................. 2-9
3-1
3-2
Front Panel Controls
Screen Flow Chart
4-1
4-2
4-3
4-4
4-5
Typical Solenoid Air Valve System with Dual Regulators ........................................................ 4-2
Typical Solenoid Air Valve System with a Single Regulator ..................................................... 4-3
Measuring Preset Firing Force of the Weld Head with a Force Gauge ...................................... 4-4
Results of Excessive Air Pressure .......................................................................................... 4-5
Weld Head Configuration Jumper Selection .............................................................................. 4-6
5-1
5-2
Effects of Excessive or Insufficient Heat, Time and Pressure .................................................... 5-2
Typical Weld Strength Profile
.......................................................................................... 5-7
7-1
7-2
7-3
7-4
7-5
Line Voltage and Capacitor Bank Jumpering ............................................................................. 7-2
100 VAC Line Voltage Configuration ........................................................................................ 7-4
115 VAC Line Voltage Configuration ........................................................................................ 7-5
208 VAC Line Voltage Configuration ........................................................................................ 7-6
230 VAC Line Voltage Configuration ........................................................................................ 7-7
A-1
A-2
A-3
A-4
A-5
A-6
A-7
Rep/Hit Rate with 1500 μF Capacitor Bank .............................................................................. A-5
Rep/Hit Rate with 3000 μF Capacitor Bank .............................................................................. A-5
Pin Numbers as Viewed from the Rear Panel .......................................................................... A-11
Jumper Selection for Air Valve Driver Control ....................................................................... A-15
CONTROL SIGNALS Connector ....................................................................................... A-16
Remote Schedule Selection with a Remote Binary Switch ..................................................... A-18
250DP Dimensions
....................................................................................... A-22
.......................................................................................... 3-1
.......................................................................................... 3-5
MODEL 250DP DUAL PULSE
RESISTANCE WELDING POWER SUPPLY
990-280
vii
TABLES
Table
Title
Page
5-1
5-2
Recommended Electrode Materials .......................................................................................... 5-3
Causes of Imperfect Welds
.......................................................................................... 5-5
7-1
Power Supply Voltage Range Specifications ............................................................................. 7-9
A-1
A-2
A-3
A-4
Pulse Characteristics
......................................................................................... A-2
Welding Speed
......................................................................................... A-4
Binary Codes for Remote Weld Schedule Selection ............................................................... A-17
Input Power Specifications
....................................................................................... A-21
MODEL 250DP DUAL PULSE
RESISTANCE WELDING POWER SUPPLY
viii
990-280
CONTACT US
Thank you for purchasing a Miyachi Unitek™ Model 250DP Dual Pulse Resistance Welding Power
Supply.
Upon receipt of your equipment, please thoroughly inspect it for shipping damage prior to its
installation. Should there be any damage, please immediately contact the shipping company to file a
claim, and notify Miyachi Unitek Corporation at:
1820 South Myrtle Avenue
P.O. Box 5033
Monrovia, CA 91017-7133
Telephone: (626) 303-5676
FAX:
(626) 358-8048
[email protected]
e-mail:
The purpose of this manual is to supply operating and maintenance personnel with the information
needed to properly and safely operate and maintain the Model 250DP Dual Pulse Resistance Welding
Power Supply.
We have made every effort to ensure that the information in this manual is accurate and adequate.
Should questions arise, or if you have suggestions for improvement of this manual, please contact us at
the above location/numbers.
Miyachi Unitek Corporation is not responsible for any loss due to improper use of this product.
MODEL 250DP DUAL PULSE
RESISTANCE WELDING POWER SUPPLY
990-280
ix
SAFETY NOTES
This instruction manual describes how to operate, maintain and service the Model 250DP Dual Pulse
Resistance Welding Power Supply, and provides instructions relating to its SAFE use. Procedures
described in this manual MUST be performed, as detailed, by QUALIFIED and TRAINED personnel.
For SAFETY, and to effectively take advantage of the full capabilities of the tester, please read these
instruction manuals before attempting to use the workstation.
Procedures other than those described in this manual or not performed as prescribed in it, may expose
personnel to electrical hazards.
After reading this manual, retain it for future reference when any questions arise regarding the proper
and SAFE operation of the tester.
Please note the following conventions used in this manual:
WARNING: Comments marked this way warn the reader of actions which, if not followed, might
result in immediate death or serious injury.
CAUTION: Comments marked this way warn the reader of actions which, if not followed, might result
in either damage to the equipment, or injury to the individual if subject to long-term exposure to the
indicated hazard.
MODEL 250DP DUAL PULSE
RESISTANCE WELDING POWER SUPPLY
x
990-280
MODEL 250DP DUAL PULSE
RESISTANCE WELDING POWER SUPPLY
990-280
xi
CHAPTER 1
SYSTEM DESCRIPTION
Applications
The 250DP (figure 1-1) is a versatile, 250 watt-second stored energy, capacitor discharge, dual pulse power
supply which can effectively solve most precision, small parts, resistance welding problems. Its exclusive,
context sensitive, user help screens quickly guide you through even the most complex program.
Figure 1-1. 250DP Dual Pulse Resistance Welding Power Supply
MODEL 250DP DUAL PULSE
RESISTANCE WELDING POWER SUPPLY
990-280
1-1
CHAPTER 1: SYSTEM DESCRIPTION
You can program up to 128 weld schedules and save them in battery backup memory. A built-in schedule
protection feature protects weld schedules from unauthorized or inadvertent changes. Schedule 0 serves as a
scratch-pad which anyone can use to perform occasional jobs without jeopardizing the integrity of the
production line. The exclusive weld fire lockout feature guarantees that weld quality is independent of line
voltage fluctuations and the speed at which the power supply is operated.
Dual pulse welding, an exclusive and unique feature of Unitek Peco power supplies, improves weld quality
and eliminates weld splash. Dual pulse means each weld is performed with two pulses with independent
energy levels. The first pulse displaces the plating or contamination and reforms the surface so that it is in
intimate contact with the electrode. The second pulse welds the base metals. You can also use the
automatic step feature to step to a new schedule, after a preset number of welds, in order to compensate for
electrode wear.
The optional built-in Unitek Peco Weld Sentry adds a weld monitoring capability to the 250DP which
improves process control by detecting subtle changes in voltage, current, and power. The remote schedule
feature allows the 250DP to reliably select weld schedules in automated applications.
The 250DP can be used with manual, user actuated, or air actuated weld heads. It is a multi-voltage unit
designed for operation at 100, 115, 208, or 230 VAC, 50/60 Hz.
Features
x Multi-function microprocessor control provides repeatable process control and is compatible with air or
manually actuated weld heads. Facilitates multiple applications at a single work-station and protects
weld schedules from changes by unauthorized personnel.
x Dual pulse welding eliminates weld splash. Improves weld quality, especially when welding plated
materials.
x Three weld functions available:
– Basic
– Rollspot (seam weld)
– Sequence Repeat.
x User-friendly programming serves as a built-in manual, quickly guiding you through the most complex
programs. Menu-driven utilities make it easy to copy schedules and calibrate the power supply.
x Two air valve drivers are provided to sequentially control two separate air operated weld heads. Air
Valve Driver 1 controls a 24 VAC or 115 VAC air actuated weld head. Air Valve Driver 2 is
programmed by Output Relay 1 (refer to the next-listed feature).
x You can use two relays to provide status signals to external devices. You can also use Relay 1 to
program Air Valve Driver 2 to control a second 24 VAC air actuated weld head.
MODEL 250DP DUAL PULSE
RESISTANCE WELDING POWER SUPPLY
1-2
990-280
CHAPTER 1: SYSTEM DESCRIPTION
x You can specify the polarity of the output pulse for each weld schedule.
CAUTION: If weld schedules are chained together, do NOT change polarity. All schedules in the chain
must have the same polarity or the relay contacts may be damaged.
x An optional built-in Weld Sentry monitors the process, signals reject alarms, calculates statistical and
SPC data, displays graphs and charts and transmits, via an RS-232 interface, to a printer or PC.
x Remote schedule selection simplifies use in automated systems. A CONTROL SIGNALS connector
accepts remote control signals for Emergency Stop, Remote Weld Inhibit, and Remote Weld Schedule
Selection.
x The chain schedule feature allows any number of schedules to be chained together in a user specified
sequence.
x The automatic step feature increases electrode life and reduces downtime for electrode dressing by
automatically changing weld energy to compensate for electrode wear.
x Schedule protection and system security features protects weld schedules, except Schedule 0, from
changes by unauthorized personnel.
x The schedule lock feature allows you to restrict welding to one selected weld schedule.
x Power-up schedule selection allows any of the 128 schedules, or the last schedule used, to be specified
as the default power-up schedule.
x The digital display allows operators to set welding energy accurately and quickly.
x The 250DP is compatible with manually actuated weld heads and air actuated heads with 1-level or 2level foot switches.
x The 250DP is compatible with force fired and non-force fired weld heads. Squeeze (delay) time is
adjustable from 0 to 9.9 seconds. An end of cycle buzzer sounds at the end of each weld sequence as a
signal to the operator to release the foot pedal.
x Built-in weld counters allow you to control events which are a function of the number of welds made.
x The firing circuit uses single pole, double pole or optical firing (pressure) switches.
x Weld fire lockout helps prevent poor welds caused by firing the power supply before the capacitor bank
is properly charged or discharged.
MODEL 250DP DUAL PULSE
RESISTANCE WELDING POWER SUPPLY
990-280
1-3
CHAPTER 1: SYSTEM DESCRIPTION
x The foot switch weld abort safety feature causes the 250DP to abort the welding process if you release
the foot switch, on an air actuated system, before the end of the welding sequence.
x The line failure turndown safety feature discharges the capacitor bank when input power is interrupted.
x The 250DP is protected from radio frequency interference and electromagnetic interference, resulting in
reliable operation even in high electrical noise environments. Input switch debounce circuitry eliminates
false triggering.
MODEL 250DP DUAL PULSE
RESISTANCE WELDING POWER SUPPLY
1-4
990-280
CHAPTER 2
INSTALLATION
Location
Install the 250DP in a well-ventilated area that is free from dirt and moisture. Allow sufficient clearance
around the sides and rear of the unit so that cooling air may flow properly. Position the 250DP as close as
practical to the weld head.
Power Line
CAUTION: Do not connect the line cord at this time.
This power supply was wired for the specific input line voltage marked on the line cord at the factory. The
standard 250DP is wired for 115 VAC. Reconnection for operation at another voltage may be made by a
qualified technician. Refer to Chapter 7 under Modifications and Calibration.
Welding Cables
Position the 250DP on the work bench approximately 5 inches behind the weld head. Use the cables
furnished with the weld head to connect the terminals on the back of the weld head to the appropriate
terminals on the front of the 250DP. Convention is to connect the lower electrode of the weld head or handpiece to the (+) output terminal and the upper electrode to the ( - ) output terminal of the 250DP. If the weld
head cables are unserviceable, use the following criteria in selecting new cables:
x Use No. 2 AWG welding cables, or No. 2/0 AWG welding cables if the cables are more than 12 inches
long. The diameter of the cables should be as large as practical.
x Use the shortest possible welding cables. It is not uncommon to have losses up to 50% per foot for No.
6 cable and 20% for No. 2 cable.
To reduce energy losses, follow these recommendations:
x Route cables so that they do not surround magnetic materials such as air solenoids, tooling, or steel weld
heads (see figure 2-1).
MODEL 250DP DUAL PULSE
RESISTANCE WELDING POWER SUPPLY
990-280
2-1
CHAPTER 2: INSTALLATION
x Tape cables together to minimize the inductive losses. A separation of weld cables surrounding an area
of one square foot could result in losses of up to 65% (figure 2-1).
DO
DON’T
Cables taped together and routed
away from steel structure and
electromagnetic field
Weld
Head
Steel Fixture
Steel Weld
Head
Cables not dressed together
and close to steel fixture
Solenoid
Figure 2-1. Cable Routing Examples
x Bolt connections directly together. Do not place washers between the terminals of the 250DP and the
terminals of the cables. Tighten connections securely, they must be free from oxidation, dirt and/or
grease (see figure 2-2).
N o te: Attac h b oth w elding c ab les on the sam e sid e of th e we ld hea d.
C ap H e a d S c re w a n d
F la t W a s h e r
U pp e r W e ld ing C a b le
L o w e r Ele c tr od e
H old e r
S c re w , F lat
W a s h er , N u t
(2 Pla c e s )
Insta ll fla t w ash e r u n de r
s c re w h e a d, n o t w e ld in g
c a b le te rm ina l
L o w e r W eld in g C a b le
Figure 2-2. Terminal Connection Examples
MODEL 250DP DUAL PULSE
RESISTANCE WELDING POWER SUPPLY
2-2
990-280
CHAPTER 2: INSTALLATION
Rear Panel Components
The input and output connections located on the rear panel of the 250DP (figure 2-3) are listed below.
A
C
B
F
CB 1
CO NT RO L SIG NA L ;S
CB 2
ACC ESSO R Y PO R T O P TIC AL FI RING SW IT CH
2 AIR VA LV E D RIVER 1
ME CH ANICAL
F OO T SW IT CH F IRING S W ITC H
D
PO W ER
I
E
H
J
G
Figure 2-3. Rear Panel Components
A CONTROL SIGNALS: 15-pin, subminiature D-type connector used for remote schedule selection,
output relays, process inhibit and emergency stop (refer to Appendix A under Control Signals).
B ACCESSORY PORT: 25-pin, subminiature D-type connector used to interface with other Unitek
Peco devices.
C OPTICAL FIRING SWITCH: 5-pin receptacle is used to connect the 250DP to weld heads with
either a 3-wire firing switch or an optical switch.
D AIR VALVE DRIVER 2: Provides 24 VAC to control a second Unitek Peco air actuated weld head.
E AIR VALVE DRIVER 1: Provides either 24 or 115 volts (AC) to control a Unitek Peco air actuated
weld head.
MODEL 250DP DUAL PULSE
RESISTANCE WELDING POWER SUPPLY
990-280
2-3
CHAPTER 2: INSTALLATION
F FOOTSWITCH: This receptacle is used to connect either a 1-level or 2-level Unitek Peco
footswitch. Footswitches are only used with air or electrically actuated weld heads.
G MECHANICAL FIRING SWITCH: 4-foot cable is used to connect the 250DP to the force firing
switch in all Unitek Peco weld heads and hand-pieces.
H POWER CABLE: 5-foot cable is terminated with the appropriate 115 or 230 volt plug. The
standard plug for the 115 VAC power supply a NEMA 5-15P rated for 15 amps.
I
CB1, CB2: Circuit breakers are used to protect the incoming power line.
J
COVER PLATE : Used when the Weld Sentry option is not installed.
Firing Switch Connections
Connect the weld head or hand-piece to the appropriate firing cable or switch located on the rear panel of
the 250DP.
Mechanical Firing Switch
Unitek Peco weld heads and hand-pieces are force fired and have two-pin firing switch connectors
which can be connected directly to the mating connector of the MECHANICAL FIRING SWITCH
located on the rear panel of the 250DP.
Users of manually actuated weld heads which do not have force firing switches must connect the two
pins in the mechanical firing switch to an external switch in order to initiate the 250DP.
Air actuated weld heads which do not have force firing switches rely on the squeeze time to ensure that
the weld head has time to close and apply the proper force to the workpieces. Use the squeeze time
option and select NO FIRING SWITCH from the Options Menu (refer to Chapter 3).
Optical Firing Switch
Users of weld heads with pressure switches using a 3-wire switch or an optical device should use the
OPTICAL FIRING SWITCH receptacle located on the rear panel of the 250DP (refer to Appendix A
under Initiation Switch).
3-Wire Firing Switches
Users of weld heads with single pole, double throw, 3-wire pressure switches should also use the
OPTICAL FIRING SWITCH connector. The 250DP will automatically detect that the system is using a
3-wire switch if Pin 2 is low at power-up.
MODEL 250DP DUAL PULSE
RESISTANCE WELDING POWER SUPPLY
2-4
990-280
CHAPTER 2: INSTALLATION
Air Actuated Weld Head Connections
Solenoid valve/regulator assemblies which are not mounted on the weld head should be located as close as
possible to the weld head. Use the shortest air lines possible to obtain the fastest mechanical response.
Connect the inlet port on the air valve (solenoid) to a properly filtered air supply (100 psig maximum). Use
0.25-inch OD plastic hose with a rated burst pressure of 250 psi to connect the outlet ports of the
solenoid/regulator assembly to the flow controls on the air cylinders. Figure 2-4 illustrates a typical single
regulator installation for a Unitek Peco Series 80 Weld Head. Turn the regulator(s) fully counter-clockwise
to ensure minimum air pressure. Turn on the air supply. Repair leaks if necessary.
All Thinline weld heads are capable of cycling at a rate of 1 weld per second, provided that the tubing
between pressure regulators and the air cylinder is kept as short as possible. Increasing the length of the
tubing produces very sluggish mechanical motion. Do not use lubrication on the input air line because, as
the internal seals on the air cylinder wear, lubricating oil will leak past these seals and contaminate the
electrode and the workpiece with a fine oil mist. Once every six months or every 1 million operations,
whichever occurs first, remove the top flow control valve and place two drops of light machine oil in the top
of the air cylinder.
MODEL 250DP DUAL PULSE
RESISTANCE WELDING POWER SUPPLY
990-280
2-5
CHAPTER 2: INSTALLATION
Figure 2-4. Typical Solenoid Air Valve Assembly with
a Single Regulator
Air Valve Driver
Connect the solenoid air valve to the AIR VALVE DRIVER 1 receptacle located on the rear panel of the
250DP. Weld heads with 4-pin 24/115 VAC connectors can be plugged directly into the power supply.
Weld Heads with standard 115 volt plugs (NEMA 5-15P) require an adapter, Unitek Peco Model
VDAC, Valve Driver Adapter Cable. When the connection has been made, the 250DP will
automatically recognize that an air head has been connected.
MODEL 250DP DUAL PULSE
RESISTANCE WELDING POWER SUPPLY
2-6
990-280
CHAPTER 2: INSTALLATION
Non Unitek Peco Air Actuated Weld Heads
Users of air actuated weld heads not manufactured by Unitek Peco should connect the air solenoid valve
on the head or regulator valve assembly to either the appropriate 24 volt or 115 volt pins of the
receptacle on the rear of the 250DP. Refer to Appendix A under Control Signals for detailed
information.
Air Actuated Weld Heads without Force Firing Switches
Users of air actuated weld heads not having force firing switches must use sufficient squeeze time to
allow the head to close and to apply the proper force to the workpieces.
Second Air Head
Connect the solenoid air valve of a second air actuated Unitek Peco weld head to the AIR VALVE
DRIVER 2 receptacle. Only weld heads with 4-pin 24 VAC connectors can be plugged directly into the
power supply.
Users of air actuated weld heads not manufactured by Unitek Peco should connect the air solenoid valve
on the head, or regulator valve assembly, to the appropriate 24 volt pins of the receptacle on the rear of
the 250DP. Refer to Appendix A under Control Signals for detailed information.
Footswitch
Connect either a 1-Level or 2-Level Footswitch to the FOOTSWITCH receptacle located on the rear panel.
The 250DP will automatically recognize which type Unitek Peco Footswitch has been connected.
1-Level Footswitch
When the operator fully depresses the 1-level footswitch, the 250DP will energize the air valve on the
weld head. The upper electrode will close and apply force to the workpiece. If the operator releases the
footswitch before the weld head applies the preset firing force, the 250DP will remove the voltage from
the air valve and the upper electrode will return to the open position.
If the FOOTSWITCH WELD ABORT option has been set to ON by changing the status on the
OPTIONS menu, the welding sequence will be terminated if the footswitch is released before the
welding sequence is completed.
If the FOOTSWITCH WELD ABORT option has been set to OFF, the welding process will continue to
its conclusion, regardless of the position of the footswitch, once the preset firing force has been applied
to the workpiece by the upper electrode of the weld head.
MODEL 250DP DUAL PULSE
RESISTANCE WELDING POWER SUPPLY
990-280
2-7
CHAPTER 2: INSTALLATION
2-Level Footswitch
When a 2-level footswitch is pressed to the first level, the weld head will close and apply force to the
workpiece. At this point, if the operator does not press further (harder) and actuate the second level, the
footswitch can be released so that the workpiece can be re-positioned. Once the second level has been
actuated, a 2-level footswitch will operate in the same manner as a 1-level footswitch.
Remote Schedule Selection
A 15-pin, subminiature D-type CONTROL SIGNALS connector, located on the rear panel, is provided for
seven single-pole inputs which are used to:
x Remotely select Weld Schedules 1 through 127 in a binary sequence.
x Remotely inhibit (prevent) the flow of weld current, which is the same function provided by the front
panel WELD/NO WELD Switch.
x Invoke the emergency stop condition, which abruptly terminates the welding sequence. Refer to
Appendix A, under Control Signals, for detailed connector information.
Relay Outputs
Two output relays can be used to provide status (timing) signals to external devices. They can also provide
an on (closed) state during a Run state or if there is an alarm.
Relay 1 can also be used to control a second 24 VAC air actuated weld head. (Refer to Air Actuated Weld
Head Connections for the appropriate hook-up connections and figure 4-5 for appropriate jumper
connections.)
Relay 2 can provide a 5 to 50 VDC signal.
When used to provide status (timing) signals, the relays can be independently programmed as follows:
x In Basic Mode, each relay can be programmed on (closed) or off (open) during either of the two weld
periods.
x In Roll Spot Mode, each relay can be programmed on (closed) or off (open) during either of the two
weld periods or during the cool period (between each spot weld cycle).
x In Repeat Mode, each relay can be programmed on (closed) or off (open) during either of the two weld
periods or during the off period (between each Repeat cycle).
In all of the above cases, if the relay is programmed to be on (closed), it will close at the beginning of the
scheduled period and open at the end of that period. If scheduled to be closed during any successive
periods, it will not open at the end of the first period, but will remain closed during both (or all) periods for
which it is scheduled to be closed.
MODEL 250DP DUAL PULSE
RESISTANCE WELDING POWER SUPPLY
2-8
990-280
AC
Power output
Firing switch cable
4
3
2
1
0
(See note 4)
Weld Head
Pneumatic
input
Air solenoid
24/115V AC
Electrodes
Force firing switch
(See note 2)
Notes:
1. Tie weld cables together.
2. For non-force-fired operation, short pns 1 and 2
on the firing switch connector.
3. If an optical firing switch is used, the firing
switch connection is not used.
4. Dashed lines represent air actuated weld head
connections.
1
2
3
4
(See note 2)
2
Weld cables (See note 1)
1
Figure 2-5. 250DP Equipment Interconnection Diagram
Initiate
L1 L2
Weld schedule
select
User-supplied
Programmable Logic Control
CHG Emergency
Inhibit
Stop
5
2 2 2 2 2 2 2
6
24V AC
Air valve
Return
driver
115V AC
Auto sense
Control signals
Footswitch
IN B GND EMR GND 26 25 24 23 22 21 20 GND LV1 LV2 COM
9 11 10 11 14 5 12 4 3 2 1 11
2 3
4 1
1
250DP
Power Supply
2
3
4
5
1
NO COM NC +5V DC COM
Firing switch (See note 3)
+
5-50V DC 24-115V DC
Relay 2
Relay 1
User-supplied
power
Load
DC DC+ AC AC
13
6 15
8
Load
990-280
Power
115V AC, 15A
50/60 Hz, 1Ø
HOT COM GND
(BLK)(WHT)(GRN)
CHAPTER 2: INSTALLATION
Interconnection Diagram
Refer to figure 2-5 for a wiring diagram of the 250DP as it is interconnected with external equipment.
MODEL 250DP DUAL PULSE
RESISTANCE WELDING POWER SUPPLY
2-9
CHAPTER 3
OPERATING CONTROLS AND SCREENS
Operating Controls
Figure 3-1 illustrates the layout of the operating controls on the front panel of the 250DP.
Figure 3-1. Front Panel Controls
MODEL 250DP DUAL PULSE
RESISTANCE WELDING POWER SUPPLY
990-280
3-1
CHAPTER 3: OPERATING CONTROLS AND SCREENS
The controls on the front panel are identified as follows:
NOTE: Instructions in the manual to “press [ ]” means that you are to press the key or button described
inside the brackets. For example, “Press [PROG]” means that you should press the key labeled PROG on
the front panel. “Press [VW]” means that you should press either the W SELECT or the V SELECT key,
whichever is appropriate.
KEY
DESCRIPTION
[KEYPAD]
Use the 10 numeric keys to enter numeric information. [.] is used to enter decimal
values.
[VW]
In the run state, this key changes ([V] increases and [W] decreases) the schedule
number displayed.
In program and menu states, the [V] and [W] SELECT keys are used to move up and
down on the screen to select fields.
[
]
In the program and menu states, this key is used to select the parameter to the right
( ]) or left ( ]) of the parameter which is highlighted.
[PROG]
Causes the 250DP to enter the program state so that you can make changes to
Schedules 0 through 127. If a Weld Sentry is installed, when [PROGRAM] is
pressed a second time, you can make changes to the Weld Sentry programs related to
each weld schedule. Press [PROGRAM] to return to the PROGRAM screen (refer to
Screen Formats next in this chapter).
[RUN]
Causes the 250DP to exit the program state without saving the changed schedule.
The changed schedule will become Schedule 0 and will not be written to permanent
memory. If no changes are made to the schedule or the Weld Sentry program, then it
will not be transferred to Schedule 0. Welding is done in the run state.
[SAVE]
In the program state, pressing this key saves (writes) any schedule and its related
Weld Sentry programs to permanent memory. The 250DP will then exit the program
state and return to the run state. This key has no function in the run state.
MODEL 250DP DUAL PULSE
RESISTANCE WELDING POWER SUPPLY
3-2
990-280
CHAPTER 3: OPERATING CONTROLS AND SCREENS
KEY
DESCRIPTION
[MENU]
In either the run or program state, [MENU] will provide you with a menu which
allows you to select or change options which are common to all schedules.
[HELP]
The 250DP contains a built-in operation manual. Press this key whenever you
need HELP or additional information from the built-in manual. Press this key a
second time to return to the original state.
[CHNG]
Changes the contents of alphanumeric fields in the program or menu state.
Changes the RUN screen, Lines 6 and 7, to display either a:
x graphic bar showing the energy level of the capacitor bank, or
x the status of the output relays, or
x the Weld Sentry Program Line (if the Weld Sentry is installed).
[ENTER]
Use this key to signify that the data entry you have entered using the keypad is
complete.
WELD / NO
WELD
SWITCH
Welding current will not flow when this switch is in the NO WELD position.
However, the control will actuate the weld head and execute the welding
sequence (Squeeze, Weld and Hold). This switch must be in the WELD
position in order to make a weld.
ALARM
VOLUME
Adjusts the volume of the alarm buzzer. It is located on the front, right-hand
side of the cover.
DISPLAY
CONTRAST
Adjusts the contrast of the LCD Display. It is located on the front, right-hand
side of the cover.
Screen Formats
Illustrated below is the information displayed in RUN, PROGRAM, NO WELD, HELP and MAIN MENU
screens. Note that the 250DP operational state is displayed at the bottom right corner of the operation
screens. Figure 3-2 shows the detailed sequence of the screens.
MODEL 250DP DUAL PULSE
RESISTANCE WELDING POWER SUPPLY
990-280
3-3
CHAPTER 3: OPERATING CONTROLS AND SCREENS
A.
B.
C.
D.
E.
F.
G.
H.
I.
J.
Schedule number (0 - 127)
Polarity of output welding pulses
Energy of Weld Pulse 1
Energy of Weld Pulse 2 (dual pulse)
Type of weld head and foot switch
Graphic display of Weld Pulse 1 energy
Weld counter step count for next schedule
Pulse width of Weld Pulses 1 and 2
Next schedule number (1-127) in chain
Present state of 250DP
K.
L.
M.
N.
O.
P.
Q.
Weld Sentry program lines – Program (A-E),
last weld results, measurement unit, upper/lower
limits, Sentry status
Weld function: basic, repeat or roll-spot
Weld counter step count for next schedule
Pulse width of Weld Pulses 1 and 2
Switching status of output relays
Run state with NO WELD switch ON
Typical multi-page help screen
MODEL 250DP DUAL PULSE
RESISTANCE WELDING POWER SUPPLY
3-4
990-280
CHAPTER 3: OPERATING CONTROLS AND SCREENS
Figure 3-2. Screen Flow Chart
MODEL 250DP DUAL PULSE
RESISTANCE WELDING POWER SUPPLY
990-280
3-5
CHAPTER 4
GETTING STARTED
Powering Up
1
Set the front panel POWER Switch to ON.
2
To prevent the 250DP from firing until you are ready to weld, select [NO WELD].
3
Press [
4
Press [CHNG] to change the format of the RUN state screen.
5
Press [HELP] to obtain help.
6
Press [MENU] to change any of the system options or to use any of the 250DP utilities.
7
Press [PROG] to make changes to weld schedules 0 to 127. Schedules 1 through 127
cannot be changed when the system security is PROTECTED. If SCHEDULE LOCK is also ON, only
the schedule displayed can be used to weld. To change system security and/or turn OFF SCHEDULE
LOCK, press [MENU] and select SYSTEM SECURITY.
] to change the weld schedule number.
NOTE: To override the security code, refer to Appendix A under Weld Schedules.
8
If appropriate, change the output relay configuration with the PROGRAM screen.
Adjusting an Air Actuated Weld Head
NOTE: If an alarm occurs, press [RUN] to silence the alarm, then press [HELP] to receive an explanation.
Alarm messages will be erased from the display as soon as the alarm condition is corrected or when [PROG]
is pressed. Refer to Appendix A under Control Signals to remotely clear alarms.
MODEL 250DP DUAL PULSE
RESISTANCE WELDING POWER SUPPLY
990-280
4-1
CHAPTER 4: GETTING STARTED
1
Refer to the appropriate weld head manual instructions on how to install the welding electrodes.
2
To adjust the pressure regulators and flow controls, refer to the following instructions or those which are
printed on the side of the weld head.
3
To prevent the 250DP from firing until you are ready to weld, select [NO WELD]. Remove the
workpiece from between or beneath the electrodes.
4
Set the force indicator on all Unitek Peco weld heads to 3. For more detailed information on setting up
each specific weld head, refer to their respective manuals. See figures 4-1 and 4-2 for illustrations of
typical air actuated systems.
Figure 4-1. Typical Solenoid Air Valve System with Dual
Regulators
MODEL 250DP DUAL PULSE
RESISTANCE WELDING POWER SUPPLY
4-2
990-280
CHAPTER 4: GETTING STARTED
Figure 4-2. Typical Solenoid Air Valve System with
a Single Regulator
5
Unlock the regulator(s) by pulling the red ring up. Set the air gauge(s) for 25 psig. Fully open both
flow controls.
6
The operational sequence with an air head is as follows:
The first level of a 2-Level foot switch actuates the weld head, moving the electrodes together.
The weld period cannot begin until the second level of the foot switch and the force firing switch
in the weld head close. The 250DP will enter a standby state until these conditions are met.
When the firing force is reached, the weld period will start. Assuming that an alarm does not
occur, the welding sequence will continue to completion and the weld head will rise at the end of
the hold period. If FOOT SWITCH WELD ABORT is ON, releasing the foot switch at any time
during the welding sequence will terminate the sequence.
MODEL 250DP DUAL PULSE
RESISTANCE WELDING POWER SUPPLY
990-280
4-3
CHAPTER 4: GETTING STARTED
7
Adjust the upspeed flow control on the top of the cylinder so that the upper arm of the weld head moves
at a reasonable rate but does not slam against the up-stop. This adjustment is made by pressing, then
quickly releasing, the foot switch.
8
Adjust the regulator that controls the air pressure on the top of the cylinder to obtain the desired welding
force. Place the workpiece in position between the electrodes. Close the down speed flow control
located on the bottom of the cylinder.
9
Press the foot switch. Adjust the downspeed flow control so that the upper electrode moves at a
reasonable rate and does not impact the workpiece hard enough to damage either the electrode or the
workpiece. If the flow controls interact, readjust the air pressure which controls the pressure on the
bottom of the cylinder so that it is identical to that set on the other regulator. Then adjust the flow
control so that the upper electrode does not slam against the bottom electrode or the downstop.
10 Adjust the pressure regulator, which controls the air pressure on the top of the air cylinder so that it is
just sufficient to cause the Force Firing Switch in the head to close (see figure 4-3). When the Force
Firing Switch in the head closes, the screen on the 250DP will no longer display STANDBY. Re-adjust
both flow controls, as necessary.
Figure 4-3. Measuring Preset Firing Force of
the Weld Head with a Force Gauge
MODEL 250DP DUAL PULSE
RESISTANCE WELDING POWER SUPPLY
4-4
990-280
CHAPTER 4: GETTING STARTED
CAUTION: Resist the temptation to increase the downspeed by increasing the regulator setting since this
increases the force applied to the workpiece by the electrodes (see figure 4-4). Illustration (a) in figure 4-4
shows the correct air pressure adjustment – the actual force equals the firing force setting. Illustration (b)
shows the result of excessive air pressure – the actual force is much greater than the firing force setting.
Excessive air pressure causes the electrodes to mushroom as well as wear faster.
Welding Force
Welding Force
Actual
Force
Actual
Force
Firing Switch Closes
Firing Switch Closes
Dial
Indicator
Dial
Indicator
Force Setting
a)
Force Setting
b)
Figure 4-4. Results of Excessive Air Pressure
11 If a higher welding force is necessary, reset the force indicator on the weld head to a larger number,
then repeat Steps 9 and 10.
12 If a lower welding force is necessary, reset the force indicator on the weld head to a smaller number,
reduce the pressure regulator, which controls the air pressure on the top of the air cylinder, then repeat
Steps 9 and 10.
13 If appropriate, configure the Weld Sentry. Press [MENU], select WELD SENTRY followed by
SYSTEM SETUP.
14 If appropriate, configure the Weld Sentry print options, relay outputs, and communications options. Set
the Weld Sentry clock for the correct time and date.
MODEL 250DP DUAL PULSE
RESISTANCE WELDING POWER SUPPLY
990-280
4-5
CHAPTER 4: GETTING STARTED
15 If appropriate, modify the Weld Sentry program. To develop a Weld Sentry program, use the Weld
Sentry basic setup option, which is accessed by pressing [MENU] and selecting WELD SENTRY
followed by BASIC SETUP.
16 If you want to see a graphical representation of a weld schedule, select DISPLAY GRAPH OF LAST
WELD from the Weld Sentry print utility menu.
17 If you are using a second air actuated weld head:
a
Connect the second air head to Air
Valve Driver 2.
b
There are two jumper headers, E10 and
E11, located on the lower right hand
area of the control printed circuit
board. Re-jumper the headers to the
dual air configuration as shown in
figure 4-5.
c
E10
E10
Jumper
Jumper
Jumper
Press [MENU] and select OPTIONS.
E11
Single Air Head
d
Change the weld head type to DUAL
AIR.
e
Press [PROGRAM] and move the
cursor to the RELAY 1 field.
f
Press [CHNG] until AIR HEAD 2 is displayed.
g
Press [SAVE] to store the changes.
Jumper
E11
Dual Air Head
Figure 4-5. Weld Head Configuration Jumper
Selection
MODEL 250DP DUAL PULSE
RESISTANCE WELDING POWER SUPPLY
4-6
990-280
CHAPTER 5
OPERATING INSTRUCTIONS
Successful Welding
This chapter is a guide to be used in establishing the parameters required to make a successful weld, then
making and evaluating a weld. The development of an optimum weld schedule will aid in achieving a
repeatable, reliable process.
Resistance Welding Parameters
The three basic welding parameters are heat, time, and pressure. These welding parameters are controlled
by:
Parameter
Controlling Factors
Heat
%ENERGY selected on 250DP
Time
PULSE WIDTH selected on 250DP.
Number of pulses selected on 250DP.
Pressure
Electrode firing force set on weld head.
Surface area of electrode faces.
The effects of excessive or insufficient heat, time and pressure on a weld are illustrated in figure 5-1. You
should consider the interaction between these basic welding parameters when developing a weld schedule.
Weld Schedule Development
Developing a weld schedule is a methodical procedure consisting of making sample welds and evaluating
the results. You should make the first weld at low energy settings. Then, you make adjustments to each of
the parameters one at a time until a successful weld is made.
MODEL 250DP DUAL PULSE
RESISTANCE WELDING POWER SUPPLY
990-280
5-1
CHAPTER 5: OPERATING INSTRUCTIONS
HEAT
PROBLEM
Parts Overheating
Weak Weld
Insufficient Nugget
Metal Expulsion
Warping
Discoloration
Electrode Damage
PROBLEM
CAUSE
Excessive
Insufficient
TIME
Parts Overheating
Weak Weld
Insufficient Nugget
Metal Expulsion
Warping
Discoloration
Electrode Damage
CAUSE
Excessive
Insufficient
FORCE
PROBLEM
Parts Overheating
Weak Weld
Insufficient Nugget
Metal Expulsion
Warping
Discoloration
Electrode Damage
CAUSE
Excessive
Insufficient
Figure 5-1. Effects of Excessive or Insufficient Heat, Time and Pressure
Weld Head Parameters
There are two critical weld head parameters that you must pay particular attention to: electrode force and
electrode face area.
Electrode Force: 1 Install the correct electrodes in the electrode holders on the weld head. Refer to
table 5-1 for electrode material recommendations.
2
Set the force adjustment knob on the weld head to set the firing force. Start at a
moderate force setting, 3 on a Unitek Peco Weld Head. Figure 5-1 illustrates the
effect of electrode force on the work piece.
3
Adjust the air pressure for air operated weld heads.
MODEL 250DP DUAL PULSE
RESISTANCE WELDING POWER SUPPLY
5-2
990-280
CHAPTER 5: OPERATING INSTRUCTIONS
Table 5-1. Recommended Electrode Materials
Material
Electrode
RWMA
Type
Material
Electrode
RWMA
Type
Material
Electrode
RWMA
Type
Material
Electrode
RWMA
Type
Alumel
2
Evanohm
14
Kulgrid
2
Palladium
14
Aluminum
1
Gold
11
Magnesium
2
Rhenium
2
Aluminum
Alloys
1
Gold Plated
Dumet
2
Manganin
2
Silver
11
Beryllium
Copper
2
Gold Plated
Kovar
2
Molybdenum
2
Stainless
Steel
2
2, 11
Hastalloy X
2
Nichrome
2
Tantalum
2
Brass
Bronze
2
Inconel
2
Nickel
2
Tinned
Brass
14
Chromel
2
Invar
2
Nickel Alloy
2
Tinned
Copper
14
Consil
11
Iridium
2
Niobium
2
Titanium
2
Constantan
2
Iron
2
NiSpan C
2
Tungsten
2
Copper
14
Karma
2
Platinum
2
Zinc
14
Dumet
2
Kovar
2
Paliney 7
2
Electrode Face: Use a flat electrode face for most applications. Use a “domed” face if surface oxides
are a problem. If either of the work pieces is a wire, the diameter of the electrode face
should be equal to or greater than the diameter of the wire. If both work pieces are flat,
the face should be at least one-half the diameter of the electrodes. Pencil point
electrodes reduce the overall quality of the welding process, and are not recommended.
MODEL 250DP DUAL PULSE
RESISTANCE WELDING POWER SUPPLY
990-280
5-3
CHAPTER 5: OPERATING INSTRUCTIONS
250DP Power Supply Parameters
You can develop weld schedules using Schedule 0, then copy it to any other schedule number.
Single Pulse Operation. Select pulse width and % energy as follows:
x
x
x
Pulse Width:
% Energy, Pulse 1:
% Energy, Pulse 2:
Short
10%
0%
Dual Pulse Operation. Dual pulse operation can be helpful when welding plated materials,
materials with heavy oxidation, or small wires. For these applications start as follows:
x
x
x
Pulse Width:
% Energy, Pulse 1:
% Energy, Pulse 2:
Short
5%
15%.
NOTE: Pulse 1 should be ½ to ̃ the energy of the Pulse 2.
Making a Weld
CAUTION: Always observe safety precautions when welding. Wear your safety glasses.
1 Select [RUN] and [WELD] on the 250DP.
2
Position the parts between the electrodes.
3
Press the footpedal or footswitch to initiate the 250DP. Assuming no weld occurred, increase
%ENERGY in increments of 5% until the parts begin to weld. If you are using dual pulse operation,
increase Pulse 2 in increments of 5% and change the energy of Pulse 1 to maintain the ½ to ѿ ratio.
Evaluating the Weld
Use pliers to peel the welded materials apart. A satisfactory weld will show residual material pulled from
one material to the other. Tearing of base material around the weld nugget indicates a material failure, not a
weld failure. Electrode sticking and/or "spitting" should define a weld as unsatisfactory.
MODEL 250DP DUAL PULSE
RESISTANCE WELDING POWER SUPPLY
5-4
990-280
CHAPTER 5: OPERATING INSTRUCTIONS
Weak Weld
If the parts pull apart easily, or there is little or no residual material pulled, the weld is weak. Increase
the %ENERGY in increments of 1% to 2%. The actual weld strength is a user defined specification.
Electrode Sticking
Electrode sticking includes burning, sparking, and "blown welds." These problems indicate that either
the %ENERGY is too high or the electrode force is too low. Refer to figure 5-1.
Examine the electrode face. Resurface it if it is pitted, contaminated or burned. See Electrode
Maintenance later in this chapter. Increase electrode force and/or decrease %ENERGY and save it to
the weld schedule you are using.
Causes of Imperfect Welds
Table 5-2 lists the effects of the basic welding parameters on weld quality.
Table 5-2. Causes of Imperfect Welds
Problem
Electrode
Energy
Force
Time
Size
Weak Weld
Too Low
Too High
Too Large
Too Short
Blow Holes.
Expulsion.
Too High
Too Low
Too Small
Too Long
Burned, Pitted
or Cracked
Electrodes
Too High
Too Low.
Requires
Maintenance
Poor
Maintenance
Too Short
Electrode Force and %ENERGY
The heat of resistance welding is produced, in part, by the resistance of the interface between the work
pieces to the flow of electricity (the contact resistance).
Sufficient electrode force is required to contain the molten material produced during the weld.
However, as the force is increased, the contact resistance decreases.
Lower contact resistance requires additional energy to produce the heat required to form a weld.
MODEL 250DP DUAL PULSE
RESISTANCE WELDING POWER SUPPLY
990-280
5-5
CHAPTER 5: OPERATING INSTRUCTIONS
The higher the electrode force, the greater the energy (current and/or time) required to produce a given
weld. Low force usually results in lower bond strength. Increased force requires higher energy but
usually results in a stronger bond. Energy is proportional to time and the square of the welding current.
Polarity
Users of stored energy equipment have found that the direction of current flow can have a marked effect
on the weld characteristics of some material combinations. This effect occurs when welding:
x Materials with large differences in resistivity, such as copper and nickel.
x Identical materials with thickness ratios greater than 4 to 1.
Since polarity can be an important consideration in resistance welding of some material combinations,
be sure to check the weld schedule results using both positive and negative polarity. Polarity can be
changed in the PROGRAM state. The general rule is that the more resistive material, or the thinner
material, should be placed against the negative (-) electrode.
CAUTION: If weld schedules are chained together, do NOT change polarity. All schedules in the
chain must have the same polarity or the relay contacts may be damaged.
MODEL 250DP DUAL PULSE
RESISTANCE WELDING POWER SUPPLY
5-6
990-280
CHAPTER 5: OPERATING INSTRUCTIONS
Weld Strength Profiles
Electrode Force
Weld strength profiles are graphic presentations
of the varying effects of %ENERGY and
electrode force. To make a weld strength
profile, start at an initial energy setting, make
four or five welds, and perform pull tests for
each weld. Calculate the average pull strength.
Increase the %ENERGY and repeat the
procedure. Continue to increase the
%ENERGY until any unfavorable
characteristic occurs, such as sticking or
spitting.
Perform pull tests and plot the results of
%ENERGY versus Pull Strength (see figure 52). Repeat this procedure for different forces
and plot a separate curve for each electrode force.
A
A = 8 lbs
B = 10 lbs
C = 12 lbs
D = 14 lbs
14
B
12
C
10
D
8
MOLY
6
.032 DIA TINNED
COPPER WIRE
0.010 X 0.030 Ni RIBBON
RWMA 2
4
2
20
30
40
50
60
70
80
90 100
Energy (watt seconds)
Figure 5-2. Typical Weld Strength Profile
Perform pull tests and plot the results of
%ENERGY versus Pull Strength (see
figure 5-2). Repeat this procedure for different forces and plot a separate curve for each electrode force.
Repeat this procedure using the longer pulse width.
In figure 5-2, Curve C shows the highest pull strengths but the lowest tolerance to changes in weld energy.
Curve B shows a small reduction in strength but considerably more tolerance to changes in weld energy.
Weld energy/current will vary as a result of material variations and electrode wear. Curve B is preferred
since it shows more tolerance to changes in weld energy and has nearly the same bond strength as Curve C.
A comparison of weld schedules for several different applications might show that they could be
consolidated into one or two weld schedules. This would have obvious manufacturing advantages.
Destructive Testing
Destructive Testing can be performed on the actual work piece or on test specimens. For small, inexpensive
parts, actual production samples, taken on a random basis, should be used. Destructive tests made on spot
welds include tension, tension-shear, peel, impact, twist, hardness, and macro-etch tests. Fatigue tests and
radiography have also been used. Of these methods torsional shear is preferred for round wire and a 45
degree peel test for sheet stock.
MODEL 250DP DUAL PULSE
RESISTANCE WELDING POWER SUPPLY
990-280
5-7
CHAPTER 5: OPERATING INSTRUCTIONS
Electrode Maintenance
Depending on use, periodic tip resurfacing is required to remove oxides and welding debris from electrodes.
On the production line, you should use No.400-600 grit electrode polishing disks. For less critical
applications, you can use a file to clean a badly damaged tip. After filing, however, use polishing disks to
ensure that the electrode faces are smooth and parallel. If you don’t, the rough surface of the electrode face
will have a tendency to stick to the work piece; or, if the faces are not parallel, energy will be concentrated
at the point of contact and a blowout will result.
To dress the electrode tip:
1 Select [NO WELD].
2
On air actuated weld heads, reduce the air pressure to a value just sufficient to lower the upper electrode
arm.
3
Place the polishing disks between the electrodes and actuate the footpedal or footswitch to bring the
electrodes into light contact with the polishing disk. Move the polishing disk in a rotary motion.
MODEL 250DP DUAL PULSE
RESISTANCE WELDING POWER SUPPLY
5-8
990-280
CHAPTER 6
PROCESS DEFINITIONS AND WELD
FUNCTIONS
250DP States
The 250DP has seven states: RUN, NO WELD, PROGRAM, MENU, HELP, STANDBY and FIRE.
The [MENU], [RUN], and [PROG] keys cause the 250DP to change to the state defined by that key.
RUN State
In this state, the 250DP is ready to make a weld. You can select, but not change, any weld schedule by
using the or keys on the front panel. You can also change weld schedules by keying in the
appropriate schedule number, 000 through 127. [CHNG] will change lines 6 and 7 of the RUN state
screen, as shown below (a through d) to display either:
x
(a) and (c) graphic below, showing the energy of Pulse 1 for a manual or air head, or
x
(b) the status of the output relays, or
x
(d) the status of the Weld Sentry.
If [NO WELD] has been selected, the legend ű R U N ű in the right lower corner will be replaced
by ű NO WELD ű , as shown in (b).
Press [CHNG] to display different information on Line 6 and Line 7.
(a) RUN State Showing Pulse 1 Energy Level.
Head using Basic Weld Function.
(b) NO WELD State showing Relay Manual
Status.
MODEL 250DP DUAL PULSE
RESISTANCE WELDING POWER SUPPLY
990-280
6-1
CHAPTER 6: PROCESS DEFINITIONS AND WELD FUNCTIONS
(c) Run State showing Weld 1 Energy Level.
Head using Rollspot Weld Function.
(d) Run State with the Weld Sentry Air
Installed and Sentry Status Displayed
STANDBY State
The 250DP is waiting for a mandatory event to occur such as:
x
The force firing switch in an air head to close, or
x
The schedule number information to be placed on the terminals of the CONTROL SIGNALS
connector, or
x
Waiting to be reset to another schedule after a stop command in a chained schedule.
PROGRAM State
In this state, the 250DP will allow you to change and save (write to permanent memory) any weld
schedule. Press [PROG] to enter the PROGRAM state, which is signified by the legend
ű ( PROGRAM ű ( in the lower right-hand corner of the screen. In those units which include the
Weld Sentry option, the PROGRAM state also allows you to change the measurement unit, the limits
related to the Weld Sentry program, and the other parameters associated with the Weld Sentry.
MODEL 250DP DUAL PULSE
RESISTANCE WELDING POWER SUPPLY
6-2
990-280
CHAPTER 6: PROCESS DEFINITIONS AND WELD FUNCTIONS
Use the cursor to move to the field you wish to change. After you have made the changes, press
[SAVE] to exit to the RUN state and save the changes.
MENU State
In this state, the 250DP will display a menu which allows you to select options which are common to all
weld schedules, to access the Weld Sentry option, and obtain general information. The OPTIONS
selection of the MAIN MENU screen has three sub-screens: OPTIONS 1, OPTIONS 2, and OPTIONS
3.
MODEL 250DP DUAL PULSE
RESISTANCE WELDING POWER SUPPLY
990-280
6-3
CHAPTER 6: PROCESS DEFINITIONS AND WELD FUNCTIONS
HELP State
The 250DP offers you context sensitive help when running or programming. Press [HELP] whenever
you have a question. Press [HELP] again to return to the original screen. For example, if you press
[HELP] from the RUN state, information on the function of the 250DP keys will be displayed as
illustrated below:
Typical HELP screens. If there is more than one page of Help, the number of
pages will be displayed in the upper right-hand corner. Use [ ] or [ ] to
move from page to page. Press [HELP] to return to the previous state.
NO WELD State
The WELD/NO WELD switch is in the NO WELD position. The 250DP will execute any weld
schedule, but the capacitor bank will not be discharged and no welding current will flow.
FIRE State
The firing switch in the weld head has closed and the welding sequence is proceeding.
Weld Function Field
The 250DP allows you program 127 weld schedules. Each schedule can use one of its three weld
functions. There are two versions of the basic and rollspot functions: one for an air actuated weld head
and the other for a manually actuated weld head. The repeat function only applies to an air actuated
weld head.
MODEL 250DP DUAL PULSE
RESISTANCE WELDING POWER SUPPLY
6-4
990-280
CHAPTER 6: PROCESS DEFINITIONS AND WELD FUNCTIONS
Basic Function
This function makes a simple spot weld. It provides the solution for the majority of the resistance
welding applications. It is designed for both air actuated weld heads and manually actuated weld
heads. The example shown below illustrates the dual pulse feature; that is, energies have been
specified for both weld pulses. The name of the weld function appears in the second line of the
display. In this example, Relay 1 would be switched to ON in the event of an alarm and Relay 2 is
switched to ON during both weld periods.
The PROGRAM State Screen for the Basic Function
When the firing switch in the weld head closes, the weld sequence (Pulse 1 followed by Pulse 2) will be
executed. The next sequence will not be executed until the firing switch opens and closes again.
The weld period consists of one or two weld pulses. The weld period starts after the second level of a 2level foot switch closes and after the firing switch in the head closes. It includes the time required to
recharge the capacitor bank for the second pulse. In AC welding, a hold period is usually included as
part of a basic weld function. It allows the electrodes to cool the work piece. However, the energy level
of the 250DP is not sufficient to require a hold period, so, it has been omitted from the basic function.
Weld energy is measured as the energy stored in the capacitor bank which provides the current required
to make a weld. The USER OPTION menu permits you to display this energy as a percentage of 250
watt-seconds or as watt-seconds. You can set the energy for both weld pulses independently. If you set
the energy level of Pulse 2 to 0, the weld will consist of one pulse.
There are two output relays which you can use to provide status signals to external devices. You can
also use Relay 1 to control a second air actuated weld head or to signal an alarm condition. When used
for status signals, these relays can be independently programmed to close:
MODEL 250DP DUAL PULSE
RESISTANCE WELDING POWER SUPPLY
990-280
6-5
CHAPTER 6: PROCESS DEFINITIONS AND WELD FUNCTIONS
x
When the 250DP is initiated, or
x
After Pulse 1, or
x
After Pulse 2, or
x
During the cool or off periods, or
x
When the 250DP is in the RUN state waiting for the welding sequence to start.
The status of each relay, shown on Lines 6 and 7, is set in the PROGRAM state and is confirmed, in real
time, in the RUN state.
Repeat Function
This function provides an automatic repeat of the weld sequence for simple automated air actuated
applications. It is ideal for volume production which requires a single schedule.
NOTE: Repeat can only be used with an air actuated weld head.
You should specify the off time so that it is sufficient to allow the weld head to open the electrodes, and
to allow you to reposition the work piece before the entire welding sequence repeats. Footswitch Weld
Abort OFF is not permitted with the repeat function.
The PROGRAM State Screen for the Repeat Function.
NOTE: The OFF Period is only used with this function.
MODEL 250DP DUAL PULSE
RESISTANCE WELDING POWER SUPPLY
6-6
990-280
CHAPTER 6: PROCESS DEFINITIONS AND WELD FUNCTIONS
Rollspot Function
While the force firing switch remains closed, the weld/cool sequence will be repeated. The cool time
and the rotational speed of the wheel electrodes determines the distance between spots. Assuming a
reasonable wheel speed, the cool period could be reduced so that the spots would overlap. The energy
required for the first spot, Weld 1, should be less than that required for all subsequent spots, Weld 2, in
the sequence.
Rollspot cannot be used in a chain. Dual pulse and/or Footswitch Weld Abort OFF are not permitted in
Rollspot.
The PROGRAM State Screen for the Rollspot Weld Function
In the rollspot application shown on the above screen, the welds would not overlap if the rotational
speed of the wheel exceeded 0.25 inches/second, assuming a spot which is 1/16 inch long, because the
recharge time was approximately 0.050 seconds (refer to Appendix A under Welding Speed) and the
cool time was set to 0.250 seconds.
MODEL 250DP DUAL PULSE
RESISTANCE WELDING POWER SUPPLY
990-280
6-7
CHAPTER 7
MAINTENANCE
Modification and Calibration
Unless you are a skilled technician, we suggest you telephone the Unitek Miyachi Repair Department at
the telephone number shown in the Foreword of this manual for advice before attempting calibration
and/or modification.
WARNING: Contact with voltages present in this power supply may cause serious or fatal injuries.
Cover Removal
It will be necessary to remove the outside cover to perform calibration or modifications. Use the
following procedure:
1. Set the front panel POWER switch to OFF.
2. Disconnect the power supply from its power source.
3. Remove the top two screws on each side of the cover.
4. Loosen the bottom two screws on each side and lift the cover straight upwards.
Capacitor Bank Modifications
To operate the 250DP as a 125 watt-second unit, disconnect one half of the capacitor bank. This will
cause the 250DP to operate as per specifications listed in Appendix A for a 1500 μF capacitor bank, and
the maximum capacity of the 250DP will change from 250 watt-seconds to 125 watt-seconds.
To disconnect the right half of the capacitor bank from the left half, refer to figure 7-1 and proceed as
follows:
WARNING: After turning power OFF, wait at least 5 minutes for the capacitors to discharge before
starting this procedure.
MODEL 250DP DUAL PULSE
RESISTANCE WELDING POWER SUPPLY
990-280
7-1
CHAPTER 7: MAINTENANCE
Figure 7-1. Line Voltage and Capacitor Bank Jumpering
1. Display units should be set to % Energy not Watt-Seconds.
2. Set the front panel POWER switch to OFF.
3. Remove the cover.
4. Remove Jumper A connecting the center terminals.
5. Remove Jumper B connecting the positive terminals.
6. Replace the cover.
Line Voltage Changes
You may reconnect the power supply to operate at different line voltages: 100, 115, 208 or 230 VAC,
50/60 Hz. To reconfigure the line power input circuitry, proceed as follows:
1. Set the front panel POWER switch to OFF.
MODEL 250DP DUAL PULSE
RESISTANCE WELDING POWER SUPPLY
7-2
990-280
CHAPTER 7: MAINTENANCE
2. Remove the cover.
3. Select the schematic of the primary circuit for the required voltage, figures 7-2 through 7-5.
Check the connections and reconfigure the following components:
x Jumpers E3 and E4, located in the top center area of the control printed circuit board.
x Bead Pins BP1-BP14 and Terminals E2 and E3, located along the top edge of the control
printed circuit board.
x The taps on Charging Transformer T3, located on the floor of the power supply housing
(refer to figure 7-1).
4. Install the correct circuit breaker. Refer to Appendix A under Input/Output Cable Connections
and Fusing.
5. Install the line cord plug appropriate to your line voltage supply.
6. Change all labels and tags so that they indicate the correct line voltage.
7. Replace the cover.
MODEL 250DP DUAL PULSE
RESISTANCE WELDING POWER SUPPLY
990-280
7-3
CHAPTER 7: MAINTENANCE
Figure 7-2. 100 VAC Line Voltage Configuration
MODEL 250DP DUAL PULSE
RESISTANCE WELDING POWER SUPPLY
7-4
990-280
CHAPTER 7: MAINTENANCE
Figure 7-3. 115 VAC Line Voltage Configuration
MODEL 250DP DUAL PULSE
RESISTANCE WELDING POWER SUPPLY
990-280
7-5
CHAPTER 7: MAINTENANCE
Figure 7-4. 208 VAC Line Voltage Configuration
MODEL 250DP DUAL PULSE
RESISTANCE WELDING POWER SUPPLY
7-6
990-280
CHAPTER 7: MAINTENANCE
Figure 7-5. 230 VAC Line Voltage Configuration
MODEL 250DP DUAL PULSE
RESISTANCE WELDING POWER SUPPLY
990-280
7-7
CHAPTER 7: MAINTENANCE
Calibration
The 250DP should not require any regular adjustments. Use the following procedure as a guideline to
check the calibration. Take care not to make unnecessary adjustments; however, if any components or
software are replaced, check the calibration. Do not hesitate to call the Unitek Miyachi Repair
Department with any questions.
Calibration should be performed only by a qualified technician. Test equipment should be calibrated for
accuracy.
Test Equipment Required.
x Digital Voltmeter, Keithley Model 2002 or equivalent.
x Oscilloscope
Pre-Calibration Procedures. Calibration is performed using the instructions displayed on the screen and
the HELP messages. The procedure consists of verifying power supply voltages and capacitor bank
values, and adjusting five trimpots on the control printed circuit board. As each trimpot adjustment is
performed, it must be displayed on the screen with the cursor positioned
next to the instruction.
NOTE: 250DP power should be on for at least 5 minutes before attempting calibration.
1. Switch power OFF.
2. Remove the cover.
CAUTION: Exercise static protection procedures so that no IC chips are damaged.
3. Switch power ON. Use a DVM to check the voltage at each of the points listed in table 7-1. Use
TP0 as reference ground.
MODEL 250DP DUAL PULSE
RESISTANCE WELDING POWER SUPPLY
7-8
990-280
CHAPTER 7: MAINTENANCE
Table 7-1. Power Supply Voltage Range Specifications
Power Supply
Test Point
Acceptable Range (V)
+15V
C 21 (+)
+14.25 to +15.75V
-15v
C 23 (-)
-14.25 to -15.75V
+5V
C 26 (+)
+4.75 to +5.25V
CR 35 Cathode
+101.5 to +106.5*
U19, Pin 6
+4.98 to +5.02
Commutation Supply
+5V Reference
* NOTE: With line voltage at nominal, ±0.1 volt
4. Switch power OFF and disconnect BP13 on the control printed circuit board and remove IC chip
U5. Push power ON.
NOTE: It is not necessary to turn the trimpots (Steps 5 and 6) if you are only performing a
calibration check.
5. Turn R12 and R36 fully counter-clockwise.
6. Turn R108, R97, and R104 to mid-range.
7. Press [ENTER] to display the calibration screen.
Entering Capacitor Bank Values. Press [ENTER] to display the next calibration screen and
follow the instructions on that screen.
Adjustment Potentiometers. Seven trimpots are located on the control printed circuit board. These
adjustments are set at the factory and, with the possible exception of the alarm volume and display
contrast, should not require adjustment in the field. The potentiometers and their specific functions
are:
R 108 Calibrate Display
R 104 Reference Adjustment
R 97
Offset Adjustment
R 135 Alarm Volume
R 36
EOut
R 131 Display Contrast
R 12
Overvoltage Adjustment
MODEL 250DP DUAL PULSE
RESISTANCE WELDING POWER SUPPLY
990-280
7-9
CHAPTER 7: MAINTENANCE
To adjust the trimpots, press [ENTER] to display the calibration screen listing the trimpot
adjustments. Adjust the trimpots as instructed on the screen.
NOTE: The current measured at TP5 must not drift more than ±1.5?A.
µA.
Replace the cover and top screws. Securely tighten all screws.
Troubleshooting
If the circuit breaker trips repeatedly, one of the following is probably the cause:
x Overload - Exceeding the duty cycle. Reduce the duty cycle.
x Control printed circuit board malfunction. Replace the board.
x Defective circuit breaker. Replace the circuit breaker.
x Defective charging transformer. Replace the transformer.
x Misconnected charging transformer. Refer to figures 7-2 through 7-5, as appropriate to the
input line voltage.
x Capacitor bank. Charge the bank with an external 400 volt DC power supply. After 5
minutes, the steady state current should be less than 10 milliamps. If it is not, one or more of
the capacitors is shorted. Discharge the capacitor bank with a 500 to 2000 ohm, 25 watt
resistor to ground and replace the defective capacitor.
WARNING: Do not discharge the capacitor bank by shorting it directly to ground. The stored energy
could be sufficient to melt the shorting tool in an explosive manner.
After making any repairs and checking the results, replace the cover and tighten all screws.
MODEL 250DP DUAL PULSE
RESISTANCE WELDING POWER SUPPLY
7-10
990-280
CHAPTER 7: MAINTENANCE
Repair Service
Telephone Service
Call the Unitek Miyachi Repair Department at the telephone number shown in the Foreword of
this manual. Before calling, please obtain the model number and serial number from the
identification plate on the rear panel.
Factory Service Repair
Unitek Miyachi provides a repair service for both warranty and non-warranty repairs. Call the
Customer Service Department at the telephone number shown in the Foreword of this manual for
a Return Material Authorization number. All equipment to be returned to Unitek Miyachi for
repair must be shipped PREPAID.
Please include information concerning the type of problem you are experiencing. Include with
the shipping information the name and telephone number of the person whom we should call
with the estimated cost of repairs.
MODEL 250DP DUAL PULSE
RESISTANCE WELDING POWER SUPPLY
990-280
7-11
APPENDIX A
TECHNICAL SPECIFICATIONS
250DP Power Supply
1.5 to 250 watt-second (joules) stored energy power supply which can operate in a single or dual pulse
mode. Is capable of operating with air or manually actuated weld heads. Compatible with 1-level or 2-level
footswitches. It can sense single pole, double pole or optical firing (pressure) switches.
Power Requirements
Approximately 2700 watts charging and 25 watts standby. Line voltage is single phase 100, 115, 208, or
230 volts, 50/60 Hz.
Capacitor Bank
The full bank of eight capacitors totals 3000 μF nominally. The capacitors are grouped in two half-banks of
four capacitors, each half-bank totaling 1500 μF nominally. At full rating, the capacitor banks are operated
at a voltage dependent on the actual capacitance. The following specifications are related to the capacitor
bank:
Output Pulse Characteristics
Pulse width and Polarity can be specified for each of 127 weld schedules. Internal switching relays are
used to implement this feature. Pulse characteristics are measured at the power output terminals, across
a non-inductive 0.001 ohm load (with a tolerance of no greater than 2%), including weld cable. Rise
time is measured between zero and peak amplitude and pulse width is measured between the 10%
amplitude points. When half of the capacitors are disconnected, the 250DP operates on one bank of four
capacitors, totaling 1500 μF. The amount of energy stored is 125 watt-seconds total and the pulse
characteristics are changed (see table A-1).
MODEL 250DP DUAL PULSE
RESISTANCE WELDING POWER SUPPLY
990-280
A-1
APPENDIX A: TECHNICAL SPECIFICATIONS
Table A-1. Pulse Characteristics
Pulse Transformer
Connections
Capacitor
Bank
Rise
Time
Pulse
Width
Pulse Height
1.6 ms
6.7 ms
6.7 V - 7.4 V
2.1 ms
7.8 ms
5.7 V - 6.4 V
LONG (Series)
2.6 ms
10.7 ms
4.4 V - 4.8 V
SHORT (Parallel)
1.2 ms
4.5 ms
5.7 V - 6.4 V
1.6 ms
5.4 ms
4.8 V - 5.3 V
2.1 ms
11.0 ms
4.0 V - 4.4 V
SHORT (Parallel)
MEDIUM
3000 μF
MEDIUM
1500 μF
LONG (Series)
Weld Fire Lockout
Output of the error amplifier inhibits the firing circuit during the charge and turndown intervals. This
helps prevent poor welds caused by firing the power supply before the capacitor bank is properly
charged or discharged.
Line Voltage Regulation
Maintains voltage on the capacitor bank within ± 0.25% of setting for a ± 13% change from the nominal
rated line voltage.
Turndown Circuit
When voltage from the error amplifier exceeds that required to turn off the charging circuit, a resistor is
connected across the capacitor bank, discharging the bank to the required level. The turndown circuit
deadband is approximately 0.6% of full scale voltage.
Line Failure Turndown
When input power is interrupted, a turndown resistor is automatically connected, discharging the
capacitor bank.
MODEL 250DP DUAL PULSE
RESISTANCE WELDING POWER SUPPLY
A-2
990-280
APPENDIX A: TECHNICAL SPECIFICATIONS
Over-Voltage Lockout
Protects the capacitor bank from damage due to circuit malfunction or improper calibration. The circuit
breaker opens, removing primary power, and the line failure turndown circuit automatically discharges
the capacitor bank. The circuit is adjusted to operate when 440 ± 1 volts is placed across the capacitor
bank.
Charge Lockout Circuit
Nominal 60 millisecond commutation pulse, generated in the microprocessor, inhibits the charging
circuit until the output SCR has been switched off.
Polarity Selection
Positive (+) and negative (-) polarity can be specified for each weld schedule. Polarity sets the initial
direction of the weld current flow through the workpiece. This feature is useful for welding applications
which are sensitive to the direction of weld current flow because of dissimilar materials and/or materials
with thickness ratios greater than 4 to 1.
Welding Speed
Repetition rate is the average number of welds allowable in 1 minute based upon the thermal rating of the
system components. The averaging period used to determine the repetition rate can be as long as 20
minutes. Hit rate, or maximum intermittent welding speed, defines how fast the power supply can make
consecutive welds on a non-continuous basis. See table A-2 and figures A-1 and A-2.
MODEL 250DP DUAL PULSE
RESISTANCE WELDING POWER SUPPLY
990-280
A-3
APPENDIX A: TECHNICAL SPECIFICATIONS
Table A-2. Welding Speed
1500 μF Capacitor
Percent Full Energy
3000 μF Capacitor BANK
Rep Rate
Hit Rate
Rep Rate
(welds/min) (welds/min) (welds/min)
Hit Rate
(welds/min)
2%
300
300
300
300
10%
290
290
250
280
25%
260
260
175
180
50%
210
240
120
124
75%
160
160
95
99
100%
125
125
65
70
Conditions: 25qC Ambient, Nominal Line Voltage, 60 Hz.
In dual pulse operation, the repetition rate or hit rate for each individual pulse may be calculated as follows:
RR1 = First Pulse Rep Rate (Hit Rate)
RR2 = Second Pulse Rep Rate (Hit Rate)
Calculate RR(1+2), Rep Rate (Hit Rate) for dual pulse operation.
(RR1) (RR2)
RR(1+2) =
RR1 + RR2
For example, if the energy level of Pulse 1 is 25% and Pulse 2 is 75%, the repetition rate for the dual pulse
weld would be:
(175) (95)
RR(1+2) =
175 + 95
= 61.57 welds/min.
MODEL 250DP DUAL PULSE
RESISTANCE WELDING POWER SUPPLY
A-4
990-280
APPENDIX A: TECHNICAL SPECIFICATIONS
% ENERGY
300
200
INTERMITTENT AND
CONTINUOUS REP RATE
100
0
0.6
1
2
5
10
20
50
100
125
WATT-SECONDS
Figure A-1. Rep/Hit Rate with 1500 μF
Capacitor Bank
% ENERGY
300
INTERMITTENT
REP RATE
CONTINUOUS
REP RATE
200
100
0
0.6
1
2
5
10
20
50
100 200
WATT-SECONDS
Figure A-2. Rep/Hit Rate with 3000 μF
Capacitor Bank
MODEL 250DP DUAL PULSE
RESISTANCE WELDING POWER SUPPLY
990-280
A-5
APPENDIX A: TECHNICAL SPECIFICATIONS
Weld Schedules
You can save (write) 127 different weld schedules in SRAM (Static Random Access Memory.) In this
manual, SRAM is referred to as permanent memory. Weld schedules are numbered 1 through 127.
Weld Schedule Definition
A weld schedule is defined as the following information:
a
Schedule number (0 - 127)
g Energy of Pulse 1 and Pulse 2
b
Weld Function
h Cool Time (Rollspot Function)
c
Weld Polarity
i Off Time (Repeat Function)
d
Pulse Width
j Status of Relay 1
e
Next Schedule
k Status of Relay 2
f
Step Count
l Weld Sentry Program(s) A-E of the same number (if the Sentry option has
been installed).
Weld schedules 1 through 127 can be protected from unauthorized or inadvertent changes by Unitek
Peco's system security feature. When the system security is protected, Schedule 0 can still be modified
and used as a "scratchpad.” When schedule lock is also turned ON, no other schedules can be displayed
or used to weld except the currently displayed schedule.
NOTE: If the security code is lost: Select SYSTEM SECURITY from the main menu. Switch the
WELD SWITCH to NO WELD, press and hold the [SAVE] button, then the press the [ m ] key. The
status will change to UNPROTECTED.
Options
You can change the following options from the main menu:
a
Units of Measure for Energy
f Weld Head Type
b
Schedule Number at Power-Up
g Footswitch Type
c
End of Cycle Buzzer ON/OFF
h Footswitch Weld Abort ON/OFF
d
Chain Schedule ON/OFF
i Firing Switch Type
e
Squeeze Time
j Switch Debounce Time
k Hold Time
MODEL 250DP DUAL PULSE
RESISTANCE WELDING POWER SUPPLY
990-280
A-6
APPENDIX A: TECHNICAL SPECIFICATIONS
Schedule Number at Power-Up
This option determines which schedule will be used when the 250DP is switched to ON. The option
will be either Schedule Number 0 - 127 or the schedule which was selected just before the power was
switched to OFF.
Utilities
The following Utilities are available to the operator from the main menu:
a
Change System Security Status c Reset Default Parameters
b
Copy a Schedule
d Set Weld Counters
Information
Information on the following subjects is available to the operator from the main menu:
a
Calibration
d Description of Relay Outputs
b
Installation
e Description of Control Signals
c
Description of Keyboard
f Description of Valve Outputs
Weld Sentry
When the Weld Sentry option is installed, the Sentry Menu provides the following options and utilities:
a
Basic Setup
f Set Time and Date
b
Print Utilities
g System Setup
c
Print Options
h Calibrate Sentry
d
Relay Output
i Communications
e
SPC
MODEL 250DP DUAL PULSE
RESISTANCE WELDING POWER SUPPLY
990-280
A-7
APPENDIX A: TECHNICAL SPECIFICATIONS
System Setup
Default System Parameters are:
a
Head Type = Auto
g Power-Up Schedule = 0
b
Footswitch = Auto
h End Cycle Buzzer = Off
c
Footswitch Weld Abort = On
i Chain Schedule Feature = Off
d
Force Firing Switch = 2-Wire
j Switch Debounce = 0.01 sec
e
Display Units = % Energy
k Squeeze Time = 0.00 sec
f
System Security = Unprotected
l Hold Time = 0.00 sec
Weld Functions
Three weld functions can be selected: Basic, repeat and rollspot. The duration of the squeeze (system
option), cool (rollspot) and off time (repeat) periods can be set between 0 and 9.99 seconds.
Head Type
The 250DP can be used with a manual, user actuated, or air actuated weld head. Air actuation means that
the 250DP will provide a 24 or 115 VAC output which can be used to control an air valve (solenoid) on an
air actuated weld head. The 250DP can automatically detect the presence of a Unitek Peco actuated weld
head.
You can indicate the presence of a user-supplied non-Unitek Peco air head by jumpering Pin 4 to Pin 2 on
the VALVE DRIVER connector. If Pin 4 is not connected to Pin 2, the 250DP assumes that a manual head
is being used. The options menu can be programmed to override the automatic selection feature.
Squeeze Time
For Manual Heads or Air Heads with 1-Level Foot Switch, squeeze time is the delay from the
firing switch closure until the start of the weld period.
For Air Heads with 2-Level Foot Switch, squeeze time is the delay from the combination of both
firing switch closure and second-level foot switch closure until the start of the weld period.
MODEL 250DP DUAL PULSE
RESISTANCE WELDING POWER SUPPLY
A-8
990-280
APPENDIX A: TECHNICAL SPECIFICATIONS
Cool Time
Cool time is the time between welds. In the rollspot function, the electrodes are wheels. The cool time
and the rotational speed of the wheels determine the distance between welds. An air head will not open
until the footswitch is released. Cool time can be set between 0.00 and 9.99 seconds.
Hold Time
Hold time is the delay from the end of the weld pulse until the head valve opens. Hold time applies only
to an air head. The delay can be set from 0.00 to 9.99 seconds.
Footswitch Type
The 250DP requires the use of a 1-level or 2-level footswitch in order to control an air actuated weld head.
The 250DP will automatically detect whether a Unitek Peco 1-level or 2-level footswitch is connected to the
FOOTSWITCH connector located on the rear panel.
The 250DP assumes that a 1-level footswitch is used if the input to the 2nd level is continuously closed.
The 250DP determines whether it is connected to a 1-level or 2-level footswitch whenever it enters the RUN
state. The options menu can be used to override the automatic selection feature.
FOOTSWITCH Connector
The FOOTSWITCH connector is a 4-pin Amphenol 91-PC4F (Unitek Peco PN 550-006) that mates
with an Amphenol 91-MC4M (Unitek Peco PN 520-009). Connect Pin 2 to Pin 3 on a user supplied 1level footswitch. This connector is wired as follows:
Pin
Description
1
2
3
4
Chassis Ground
Footswitch Level 1 or Single Level Footswitch
Footswitch Level 2
Common
MODEL 250DP DUAL PULSE
RESISTANCE WELDING POWER SUPPLY
990-280
A-9
APPENDIX A: TECHNICAL SPECIFICATIONS
Footswitch Weld Abort Feature
The footswitch weld abort feature is controlled from the options menu.
Footswitch Weld Abort On
With FOOTSWITCH WELD ABORT ON selected, the welding sequence is initiated by the closure of
the initiation switch, and continues to its conclusion as long as the initiation switch remains closed. If
the initiation switch or the force firing switch open during the welding sequence, the sequence will
terminate. FOOTSWITCH WELD ABORT ON is preferred since it allows the operator to abort the
welding sequence by releasing the footswitch, or footpedal in the case of a manual head.
Footswitch Weld Abort Off
With FOOTSWITCH WELD ABORT OFF selected, the welding sequence is initiated by a single,
momentary, closure of the initiation switch. Opening the initiation switch during the welding sequence
will not terminate the welding sequence.
The initiation switch must open and re-close in order to start the next sequence. FOOTSWITCH WELD
ABORT OFF is used in automated process control systems where operator intervention is not an issue.
Firing Switch Type
The 250DP can use as an input signal either a:
x Single pole, single throw switch
x Double pole, double throw (3-wire) switch, or an
x Optical switch.
The input signal will indicate when the weld head has applied the proper force to the workpiece. Weld
heads with single pole firing switches should be connected to the MECHANICAL FIRING SWITCH
connector. A 3-wire switch or optical firing switch, either of which should be connected to the OPTICAL
FIRING SWITCH connector, eliminates switch bounce (which causes false triggering), and should be used
when the welding speed exceeds 1.5 welds per second.
Firing Circuit
The firing circuit requires external contact closure or low logic level for firing. Internal filtering
prevents premature firing due to radio frequency interference. The 250DP will automatically detect that
the system is using a 3-wire switch whenever it enters the RUN state if Pin 1 is shorted to Pin 2.
MODEL 250DP DUAL PULSE
RESISTANCE WELDING POWER SUPPLY
A-10
990-280
APPENDIX A: TECHNICAL SPECIFICATIONS
Switch Debounce Time
Single pole mechanical firing switch contacts 'bounce' when they close. The switch debounce time
feature allows you to specify that the firing switch must remain closed for 0, 10, 20 or 30 milliseconds
before the weld period can be initiated. The 250DP will automatically set the switch debounce time to
0.0 milliseconds whenever a 3-wire or optical switch is selected.
Mechanical Firing Switch Cable
This cable is 5 feet long. It is a Type 2/C, 600 volt cable containing two shielded, twisted 22 AWG
conductors of high-flex stranded wire. The firing switch connector is a 2-pin Amphenol 80-MC2FI
(Unitek Peco PN 520-008), with strain relief. It mates with an Amphenol 80-MC2M (Unitek Peco PN
520-001). Pin 2 is ground.
Optical Firing Switch Connector
This connector is a 5-pin AMP 212044-1 (Unitek Peco PN 550-064) located on the rear panel (see figure
A-3). It mates with an AMP Assembly consisting of an AMP 212437-3 Plug, 212435-7 Ferrule and
212800-1 Strain Relief.
The connector is wired as follows:
Pin
Description
Shell
1
2
3
4
5
Shield
Switch Normally Closed
Switch Common
Switch Normally Open
+5 VDC
Switch Common
Figure A-3. Pin Numbers as
Viewed from the Rear Panel
MODEL 250DP DUAL PULSE
RESISTANCE WELDING POWER SUPPLY
990-280
A-11
APPENDIX A: TECHNICAL SPECIFICATIONS
Initiation Switch
Manual Head Operation
If the 250DP is connected to a manual head, the initiation switch is the force firing switch located in the
weld head.
Air Head Operation
If the 250DP is connected to an air actuated head, the initiation switch is the footswitch. The first level
of a 2-level footswitch instructs the 250DP to:
x Switch the valve driver to ON, which causes the upper electrode of the weld head to apply force, as
determined by the air regulator connected to the top of the air cylinder on the weld head, to the
workpiece.
x Start the squeeze period.
The 2nd Level initiates the start of the Weld Period, provided that the Force Firing Switch has closed
and the Squeeze Period has ended. A 1-Level Footswitch combines the functions of both levels of a 2Level Footswitch.
Chain Schedules Feature
The chain schedules feature is used to automatically change the weld schedule in use to another specified
schedule. Chain schedules is a system feature, and is turned ON using the options menu.
When chain schedules is turned ON, the RUN screen and PROGRAM screen for each schedule will have
additional fields for both STEP COUNT and NEXT SCHEDULE. STEP COUNT and NEXT SCHEDULE
are used to chain schedules together.
Step Count
STEP COUNT is a weld counter which counts down to 0. Any number from 00001 to 99999 can be
entered as a step count. When the step count reaches 0, the schedule will change as specified by the
NEXT SCHEDULE. If a weld sequence is not completed and/or the WELD/NO WELD switch is set to
NO WELD, the step counter will not count down.
MODEL 250DP DUAL PULSE
RESISTANCE WELDING POWER SUPPLY
A-12
990-280
APPENDIX A: TECHNICAL SPECIFICATIONS
Next Schedule
NEXT SCHEDULE is the number of the weld schedule to be used when the step count reaches zero.
Any schedule number from 001 to 127 can be used and any number of schedules can be chained
together, with some exceptions as follows:
x Next Schedule = 0: Can only be used at the beginning of a chain.
x Next Schedule = Current Schedule: Prevents chaining. When the step count reaches 0, it will
reset and the current schedule will remain in use.
x Next Schedule = [ . ] period: Causes the 250DP to stop after the step count has reached 0 and
issue a standby stop command alarm.
x Weld Function = Rollspot: Can only be used as the last schedule in a chain.
CAUTION: If weld schedules are chained together, do NOT change polarity. All schedules in the
chain must have the same polarity or the relay contacts may be damaged.
Audible Buzzer
During alarm conditions, an audible tone (buzzer) is generated for 5 seconds. It can be immediately
silenced by pressing [RUN]. It is also used to signal the operator of an incorrect keyboard entry. The
volume can be adjusted with a potentiometer on the control printed circuit board. The potentiometer is
accessible for adjustment through a hole in the upper, front, right-hand corner of the cover.
End Of Cycle Buzzer ON/OFF
This feature is normally used with manual heads. ON means that an audible signal will be given at the
end of each weld sequence as a signal to the operator to release the footpedal. The end of cycle buzzer
is controlled from the options menu.
Key Click
Whenever a key is pressed, a click sound is generated.
MODEL 250DP DUAL PULSE
RESISTANCE WELDING POWER SUPPLY
990-280
A-13
APPENDIX A: TECHNICAL SPECIFICATIONS
Weld Counter
A seven-digit weld counter automatically increments after each complete weld sequence. This counter can
be reset back to 0 at any time unless the system security is in the protected state.
The Weld Sentry option allows you to set upper and lower limits for each Weld Sentry program. To
implement this feature, there are three additional counters which keep track of the number of welds: under
the lower limit (999,999), over the upper limit (999,999), and within these limits (9,999,999). These
counters can be independently reset to 0 at any time, unless system security is in the protected state.
Note that all counters retain their counts when the input power is interrupted, because the contents of these
counters are stored in battery-backed-up memory.
Alarms
The 250DP issues three alarms. All alarms terminate or inhibit the welding sequence. To clear an alarm,
press [RUN] or toggle the remote process inhibit line. Alarm conditions are processed in a priority order
corresponding to the following list:
1
ALARM SCR: The output SCR, which discharges the capacitor bank into the pulse transformer, may be
defective.
2 ALARM EMERGENCY STOP: An emergency stop signal was received via the CONTROL SIGNALS
connector.
3
ALARM FIRING SWITCH: The force firing switch in the weld head either did not stay closed during
the weld sequence, or did not close within 10 seconds after the 1-level footswitch or the second level of
a 2-level footswitch closed.
Air Valve Driver
The air valve driver provides power to control the solenoid of an air actuated weld head. The 250DP can
sequentially operate two separate air actuated weld heads using two receptacles on the rear panel, AIR
VALVE DRIVER 1 and AIR VALVE DRIVER 2.
Air Valve Driver 1
The output from the AIR VALVE DRIVER 1 receptacle is 12 volt-amps at 24 or 115 volts AC. This
circuit is fused, together with the control printed circuit board, by Fuse F1 located on the control printed
circuit board. The receptacle is wired so that either 115 or 24 volts are available. Air Valve Driver 1 is
configured through the options menu, WELD HEAD TYPE, and selecting either AIR or AUTO.
MODEL 250DP DUAL PULSE
RESISTANCE WELDING POWER SUPPLY
A-14
990-280
APPENDIX A: TECHNICAL SPECIFICATIONS
Air Valve Driver 2
Rear of Unit
The output of the AIR VALVE DRIVER 2
receptacle provides 24 VAC to power a second air
actuated weld head. Jumpers E10 and E11,
located near the lower right hand corner of the
control board must be moved to the correct
positions, as shown in figure A-4.
Air valve driver 2 is wired only for 24 VAC
through receptacle Pins 1 and 2. Pins 3 and 4 are
not provided. To provide power to Air valve
driver 2, move Jumpers E10 and E11 and program
WELD HEAD TYPE to DUAL AIR.
E10
Jumpers
E11
Single Air Head
NOTE: When air valve driver 2 is used, Relay 1
cannot be used.
E10
Jumpers
E11
Dual Air Head
Figure A-4. Jumper Selection for
Air Valve Driver Control
Air Valve Driver Receptacles
The 4-pin receptacles located on the rear panel are AMP P/N 206430-1 (Unitek Peco PN 550-062). The
mating plug is an AMP 206429-1 (Unitek Peco PN 520-107), which uses a cable clamp, Amp 206358-2
(Unitek Peco PN 245-084). Air Valve Driver 1 is wired as follows:
Pin
Description
1
2
3
4
24 VAC
115 and 24 VAC return
115 VAC
Air head sensing - externally connected to Pin 2
NOTE: Connect Pin 2 to Pin 4 on a non-Unitek Peco air actuated weld head.
Control Signals Connector
A 15-pin, sub-miniature D-type CONTROL SIGNALS connector, located on the rear panel, is provided for
the two relays and seven single pole inputs. The relays and switch inputs are used to:
x Remotely select Weld Schedules 1 through 127
x Remotely inhibit recharging the capacitor bank
x Invoke an emergency stop condition to abruptly terminate the welding sequence.
MODEL 250DP DUAL PULSE
RESISTANCE WELDING POWER SUPPLY
990-280
A-15
APPENDIX A: TECHNICAL SPECIFICATIONS
The CONTROL SIGNALS connector ( figure A-5) is
a Viking DMRST15RA05CG (Unitek Peco PN 250195). The mating connector, which included in the
shipping kit, is a TRW Cinch Connector comprised of
a DA-15P (Unitek Peco PN 250-199) male connector
and a DE-51210-1 (Unitek Peco PN 250-200) plastic
junction shell. The pin assignments are listed below:
8
1
15
9
Figure A-5. CONTROL SIGNALS
Connector
Pin
Function
1
2
3
4
5
6
7
8
9
10
11
12
13
14
15
Remote Weld Schedule Selection, Control Line 20
Remote Weld Schedule Selection, Control Line 21
Remote Weld Schedule Selection, Control Line 22
Remote Weld Schedule Selection, Control Line 23
Remote Weld Schedule Selection, Control Line 25
Relay 2 Input
No Connection
Relay 1 Input
Process and Charge Inhibit
Emergency Stop
Signal and Chassis Ground
Remote Weld Schedule Selection, Control Line 24
RELAY 2 Return
Remote Weld Schedule Selection, Control Line 26
RELAY 1 Return
Emergency Stop
Emergency stop, or any other external function that should abort the welding sequence, can be
implemented by continuously shorting Pin 10 to Pin 11 of the CONTROL SIGNALS connector. If
either Pulse 1 or Pulse 2 has been initiated before the emergency stop signal occurs, that pulse will not
be interrupted. After that, no further operation can be initiated until the short has been removed.
MODEL 250DP DUAL PULSE
RESISTANCE WELDING POWER SUPPLY
A-16
990-280
APPENDIX A: TECHNICAL SPECIFICATIONS
Charge (Process) Inhibit
Shorting Pin 9 to Pin 11 will close the charge (process) inhibit line and prevent recharging of the
capacitor bank. The charge inhibit line is used during remote schedule selection to prevent the
capacitors from recharging to a higher energy schedule when loading a lower energy schedule. This
saves the time required to discharge the capacitors unnecessarily. The charge inhibit line must be closed
immediately after the power supply fires and before the 60 millisecond commutation pulse has ended.
The line must then be opened before the next schedule can be executed. Charge inhibit can also be used
instead of [RUN] to remotely clear any error stop alarm. Short Pin 9 to Pin 11 momentarily and
immediately open the short to clear the alarm.
Remote Weld Schedule Selection
Refer to figure A-6. To use this feature, connect the seven control lines from a user supplied, normally
open contact (open collector or TTL logic levels can also be used) to mating CONTROL SIGNALS
connector Pins 1, 2, 3, 4, 12, 5, and 14. Connecting any one of these inputs to Pin 11 will cause the
250DP to load the weld schedule defined by the corresponding pin combination, immediately after the
initiation switch closes. Weld schedules are selected according to the binary pattern shown in the table
A-3.
Table A-3. Binary Codes for Remote Weld Schedule Selection
INPUT PIN NUMBERS ( 1 = Switch Closure )
Schedule Panel
Control Number
1(20)
1(21)
1(22)
1(23)
1(24)
1(25)
1(26)
0
0
0
0
0
0
0
0
1
1
0
0
0
0
0
0
2
0
1
0
0
0
0
0
4
0
0
1
0
0
0
0
8
0
0
0
1
0
0
0
16
0
0
0
0
1
0
0
32
0
0
0
0
0
1
0
64
0
0
0
0
0
0
1
MODEL 250DP DUAL PULSE
RESISTANCE WELDING POWER SUPPLY
990-280
A-17
APPENDIX A: TECHNICAL SPECIFICATIONS
Binary Schedule Selection Code
To select a schedule, connect the pin(s) corresponding to the schedule number to Pin 11. The schedules
listed below are selected using the pin indicated by the 1 marked under the pin number. To select any
other schedule number, select the schedule numbers whose sum equals the desired schedule, then
connect all of the corresponding pins.
For example, to select Schedule 127, connect the pins which correspond to the numbers totaling 127.
Schedule 127 = 1 + 2 + 4 + 8 + 16 + 32 + 64
Connect Pins 1, 2, 3 , 4, 12, 5 and 14 to Pin 11 (ground)
!
!
!
!
!
!
20
1
2
1
2
2
2
2
3
2
4
2
5
2
6
COM
BINARY SW ITCH
20
21
3
22
4
23
12
24
5
25
14
26
11
COM
250DP
Figure A-6. Remote Schedule Selection with a
Remote Binary Switch
When all input pins are open, control of the power supply remains at the front panel. When any one of
the pins is shorted, the front panel controls are disabled. The capacitor bank will begin to recharge 60
milliseconds after the end of the previous pulse unless the charge inhibit line is grounded. Therefore,
any change in the schedule selection code should be made during this 60 millisecond period and/or
while the charge inhibit line is grounded.
Alarm stop conditions can also be cleared remotely by toggling the charge inhibit line.
MODEL 250DP DUAL PULSE
RESISTANCE WELDING POWER SUPPLY
A-18
990-280
APPENDIX A: TECHNICAL SPECIFICATIONS
Relay Outputs
Two output relays can be used to provide status (timing) signals to external devices. They can also provide
an on (closed) state during a Run state or if there is an alarm.
Relay 1 can also be used to control a second 24 VAC air actuated weld head. (Refer to Air Actuated Weld
Head Connections for the appropriate hook-up connections and figure A-3 for appropriate jumper
connections.)
Relay 2 can provide a 5 to 50 VDC signal.
When used to provide status (timing) signals, the relays can be independently programmed as follows:
x In Basic Mode, each relay can be programmed on (closed) or off (open) during either of the two
weld periods.
x In Roll Spot Mode, each relay can be programmed on (closed) or off (open) during either of the
two weld periods or during the cool period (between each spot weld cycle).
x In Repeat Mode, each relay can be programmed on (closed) or off (open) during either of the two
weld periods or during the off period (between each Repeat cycle).
In all of the above cases, if the relay is programmed to be on (closed), it will close at the beginning of the
scheduled period and open at the end of that period. If scheduled to be closed during any successive
periods, it will not open at the end of the first period, but will remain closed during both (or all) periods for
which it is scheduled to be closed.
The 24 to 115 VAC input and output for Relay 1 are Pins 8 and 15, respectively, of the CONTROL
SIGNALS connector. The 5 to 50 VDC input and output for Relay 2 are Pins 6 and 13, respectively. You
must supply the voltage source and, in each case, the ungrounded side of the AC power source for Relay 1.
The DC power source for Relay 2 should be connected to the 250DP as illustrated in figure 3-5 in Chapter
3. Either relay is capable of switching up to 250 ma.
RELAY 1 is also used to control Air Valve Driver 2.
The options menu can be used to specify Dual Air Head 2. Under this condition, Relay 1 will display Dual
Air. In the program state, the options for Relay 1 then must be either AIR HEAD 2 or NOT USED. The
second air head will be actuated in any schedule in which Relay 1 is defined as AIR HEAD 2. The standard
valve driver will be actuated in any weld schedule in which Relay 1 is defined as NOT USED.
MODEL 250DP DUAL PULSE
RESISTANCE WELDING POWER SUPPLY
990-280
A-19
APPENDIX A: TECHNICAL SPECIFICATIONS
Accessory Port
A 25-pin, sub-miniature D-type connector, located on the rear panel, is provided to control other devices
contemplated for the future.
Input/Output Cable Connectors and Fusing
Input Line Power
The 250DP may be connected to any 100, 115, 208, or 230 volt outlet that is capable of supplying the
peak currents specified in table A-4.
Circuit Breakers
Circuit breakers are used to protect the incoming power line. The circuit breakers may need to be
replaced if the power supply is reconnected for a different line voltage (see table A-4).
Fuses
A ¾ amp fuse, F1, is located near the top center of the control printed circuit board. The 250DP is
shipped wired for 115 VAC unless otherwise specified.
Power Input Connector
The standard power connector is an IEC-320 with a harmonized, molded power cord.
MODEL 250DP DUAL PULSE
RESISTANCE WELDING POWER SUPPLY
A-20
990-280
APPENDIX A: TECHNICAL SPECIFICATIONS
Table A-4. Input Power Specifications
Nominal
Line Voltage
(Volts RMS)
Line
Voltage
Range
(Volts
RMS)
Line
Frequency
(Hz)
Peak Input
Current *
(Amps)
Circuit
Breaker
Size
(Amps)
Circuit
Breaker
Quantity
100
87 - 113
50/60
28
10
1
115
100 - 130
50/60
32
10
1
208
180 - 235
50/60
15
5
2
230
200 - 260
50/60
16
5
2
* First half-cycle.
Front Panel Switches
There are 22 electro-statically shielded membrane switches which are integral to the front panel. The
function of each key is defined in Chapter 4.
Microprocessor CPU
The 250DP uses a Motorola M68HC11A1 CPU with an 8.0 Mhz clock, 8K bytes of random access memory,
512 bytes of electrically programmable read only memory and 128K bytes of ultra-violet erasable and
programmable read only memory.
Display
This is an electro-statically shielded, 8 row by 40 column, rear lit liquid crystal cold cathode display. A
contrast level adjustment potentiometer can be accessed through a hole in the right side of the cover. The
energy display accuracy is 0.5%. The resolution of the display ranges from 0.1% to 0.6% energy,
depending upon the amount of energy selected. Energy can be displayed in either watt-seconds or % of 250
watt-seconds.
Cooling
Cooling within the housing is provided by a muffin-type fan that operates on 115 VAC, 50/60 Hz power.
The air inlet is underneath the unit, and exhaust is through the rear panel. No restriction to air flow should
be closer than 2 inches to the sides and rear of the 250DP. Do not place the 250DP on a soft pad, or on any
other surface, which could block the air inlets on the bottom of the housing. Do not allow the 250DP to sit
on surfaces which are covered with heavy dirt or dust.
MODEL 250DP DUAL PULSE
RESISTANCE WELDING POWER SUPPLY
990-280
A-21
APPENDIX A: TECHNICAL SPECIFICATIONS
Physical Characteristics
Figure A-7. 250DP Dimensions
NOTE: Dimensions are inches/centimeters
Weight is 99 Pounds/45 Kilograms
MODEL 250DP DUAL PULSE
RESISTANCE WELDING POWER SUPPLY
A-22
990-280
Index
-C- (continued)
-AAccessory port ......................................
Air actuated weld head:
Adjustments ....................................
Connections ....................................
Excessive air pressure results .........
Air valve driver connections.................
Air valve driver specifications..............
Alarms
.......................................
Application of system ...........................
Audible buzzer ......................................
A-20
4-1
2-5
4-5
2-6, A-14
A-14
A-14
1-1
A-13
-BBasic weld function .............................. 6-5
Binary Schedule Selection Code........... A-18
Buzzer, audible ..................................... A-13
-CCalibration .......................................
Capacitor bank:
Modifications ..................................
Specifications..................................
Caution, definition of ............................
Chain schedules feature ........................
Charge inhibit .......................................
Circuit breakers.....................................
Components:
Front panel ......................................
Rear panel .......................................
Connections:
3-wire firing switch.........................
Air actuated weld heads ..................
Air valve driver ...............................
Control signals ................................
Footswitch .......................................
Mechanical firing switch ................
Non Unitek Peco air actuated
weld heads..........................
7-1, 7-8
7-1
A-2
iv
A-12
A-17
7-3, A-20
3-1
2-3
2-4
2-5, 2-7
2-6, A-14
A-15
2-7
2-4
2-7
Optical firing switch .......................
Second air head...............................
Controls, front panel .............................
CONTROL SIGNALS connector.........
Cool time definition..............................
Cooling, 250DP ....................................
Cover removal ......................................
CPU, microprocessor............................
2-4
2-7
3-1
A-15
A-9
A-21
7-1
A-21
-DDebounce time, switch.......................... A-11
Declaration of Conformity.................... following
CE Operator Guide
Default parameters, system................... A-8
Destructive testing ................................ 5-7
Dimensions ........................................... A-22
Display.................................................. A-21
Display screen flowchart ...................... 3-5
Display screen formats ......................... 3-4
-EElectrode force considerations..............
Electrode maintenance..........................
Electrode materials, recommended.......
Electrode sticking .................................
Emergency stop ....................................
End of cycle buzzer ..............................
Excessive air pressure in weld head .....
5-5
5-8
5-3
5-5
A-16
A-13
4-5
-FFactory repair service ...........................
Features of system ................................
FIRE state .............................................
Firing switch connections:
3-wire
......................................
Mechanical......................................
Optical
......................................
710
1-2
6-4
2-4, A-10
2-4, A-10
2-4, A-10
MODEL 250DP DUAL PULSE
RESISTANCE WELDING POWER SUPPLY
990-280
INDEX-1
INDEX
-M-
-F- (continued)
Firing switch specifications ..................
Footswitch connections.........................
1-Level .......................................
2-Level .......................................
Footswitch specifications......................
Footswitch weld abort...........................
Force gauge usage.................................
Foreword
.......................................
Front panel switches .............................
Fuses
.......................................
A-10
2-7
2-7
2-8
A-9
A-10
4-4
iii
3-1, A-21
A-20
-G-
-H-
5-8
7-2
ii
2-4
6-3
A-21
7-1
Next schedule ...................................... A-13
NO WELD state.................................... 6-4
-O-
HELP state ....................................... 6-4
HOLD time definition........................... A-9
-Iiii
A-7
A-12
2-1, A-20
2-1
2-9
-JJumper selection of weld heads ............ 4-6, A-15
-KKey click
A-7
A-7
-N-
Getting started ....................................... 4-1
Guide, Operator’s, CE .......................... following
Contents
If you need assistance ...........................
Information, maintenance .....................
Initiation switch specifications .............
Input power line ....................................
Installation instructions.........................
Interconnection wiring diagram............
Main menu information ........................
Main menu utilities ...............................
Maintenance:
Electrodes ......................................
Power supply ..................................
Manual Revision Record ......................
Mechanical firing switch connections ..
MENU state ......................................
Microprocessor CPU ............................
Modification ......................................
....................................... A-13
-L-
Line power, input .................................. 2-1, A-20
Line voltage changes ............................ 7-2
Locating system for installation............ 2-1
Operating controls ................................ 3-1, A-21
Operating Instructions .......................... 5-1
Operator’s Guide, CE .......................... following
Contents
Optical firing switch connections ......... 2-4
Options specifications........................... A-6
Output relays ...................................... 2-8
-PPercent (%) energy considerations .......
Physical characteristics.........................
Polarity (of current flow) considerations
Polarity selection ..................................
Power requirements ..............................
Power line, input...................................
Power supply (250DP) parameters .......
Powering up ......................................
Process definitions ................................
Process inhibit ......................................
Profiles, weld strength ..........................
PROGRAM state ..................................
5-5
A-22
5-6
A-3
A-2
2-1
5-4
4-1
6-1
A-17
5-7
6-2
MODEL 250DP DUAL PULSE
RESISTANCE WELDING POWER SUPPLY
INDEX-2
990-280
INDEX
-S- (continued)
-RRear panel components .........................
Recommended electrode materials .......
Relay outputs .......................................
Remote schedule selection....................
Removing the cover ..............................
Repair service .......................................
Repeat weld function ............................
Resistance welding parameters .............
Revision record (manual)......................
Rollspot weld function..........................
RUN state
.......................................
2-3
5-3
2-8, A-19
2-8, A-17
7-1
7-10
6-6
5-1
ii
6-6
6-1
-SSafety Notes .......................................
Screen flowchart ...................................
Screen formats ......................................
Second air head connections.................
Selecting remote schedules ...................
Size, 250DP .......................................
Specifications:
Air valve driver ...............................
Capacitor bank ................................
Firing switch ...................................
Footswitch .......................................
Initiation switch ..............................
Options .......................................
Polarity selection.............................
Power, input ....................................
Weld counter...................................
Weld schedule.................................
Welding speed.................................
Squeeze time definition ........................
STANDBY state ...................................
States (250DP):
FIRE
.......................................
HELP
.......................................
MENU
.......................................
NO WELD ......................................
PROGRAM.....................................
RUN
.......................................
STANDBY......................................
iv
3-5
3-3
2-7
2-8
A-22
A-14
A-2
A-10
A-9
A-12
A-6
A-3
A-1
A-14
A-6
A-3
A-8
6-2
6-4
6-4
6-3
6-4
6-2
6-1
6-2
Step count
......................................
Sticking electrodes................................
Switch debounce time...........................
System:
Default parameters..........................
Features ......................................
Location considerations ..................
A-12
5-5
A-11
A-8
1-2
2-1
-TTechnical specifications .......................
Telephone repair service.......................
Testing, destructive...............................
Three-wire firing switch connections ...
Troubleshooting....................................
Turning power on .................................
A-1
7-10
5-7
2-4
7-10
4-1
-UUtilities, main menu.............................. A-7
-VVoltage changes, line............................ 7-2
Voltage range specifications................. 7-8
-WWarning, definition of .........................
Weak welds ......................................
Weight, 250DP .....................................
Weld counter specifications..................
Weld evaluation ....................................
Weld functions:
Basic
......................................
General
......................................
Repeat
......................................
Rollspot ......................................
Weld head compatibility.......................
Weld head configuration jumpering .....
Weld head parameters...........................
Weld schedule:
Development...................................
Specifications..................................
iv
5-4
A-22
A-14
5-4, 5-5
6-5
6-1, A-8
6-6
6-6
A-8
4-6, A-15
5-2
5-1
A-6
MODEL 250DP DUAL PULSE
RESISTANCE WELDING POWER SUPPLY
990-280
INDEX-3
INDEX
-W- (continued)
Weld Sentry options and utilities..........
Weld strength profiles...........................
Welding
.......................................
Welding cable installation ....................
-W- (continued)
A-7
5-7
5-4
2-1
Welding considerations ........................
Welding parameters ..............................
Welding schedule specifications ..........
Welding speed specifications ...............
Wiring diagram, interconnection ..........
5-1
5-1
A-6
A-3
2-9
MODEL 250DP DUAL PULSE
RESISTANCE WELDING POWER SUPPLY
INDEX-4
990-280