1
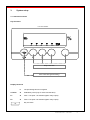
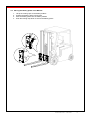
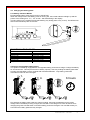
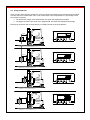
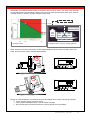
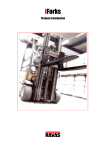
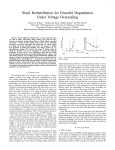
User Manual Rev.27.09.11 USER MANUAL – MForks 1 PLEASE RETAIN THESE INSTRUCTIONS FOR FUTURE REFERENCE If you have any queries concerning the duration and terms of the guarantee, please contact your supplier. We would also refer you to our General Sale and Supply Conditions, which are available on request. The manufacturer accepts no liability for any damage or injury caused by failure to follow these instructions, or from negligent operation or assembly, even if this is not expressly stated in this instruction manual. In light of our policy of continuous improvement, it is possible that details of the product may differ from those described in this manual. For this reason, these instructions should only be treated as guidelines for the installation of the relevant product. This manual has been compiled with all due care, but the manufacturer cannot be held responsible for any errors or the consequences thereof. All rights are reserved and no part of this manual may be reproduced in any way. USER MANUAL – MForks 2 Table of contents Page 1. Introduction 2. Warnings & Safety measures 3. System setup 3.1 Indicator functions 3.2 Placing battery packs in the MForks 3.3 Switching on the MForks 3.4 Switching off the MForks (Sleep mode) 3.5 Switching off the MForks completely 3.6 Charging the battery packs 4. Use 4.1 Before Use: zero check 4.2 Using the MForks 4.3 Error messages 4 5 5 6 7 8 8 9 10 10 11 13 USER MANUAL – MForks 3 1. Introduction This manual describes the installation and use of the MForks. Read this manual carefully. The installer must be informed of the contents of this manual. Follow the contents of the manual precisely. Always do things in the correct order. This manual should be kept on a safe and dry place. In case of damage or loss the user may request a new copy of the manual from RAVAS. 2. Warnings & Safety measures When using the MForks, please observe carefully the instructions and guidelines contained in this manual. Always perform each step in sequence. If any of the instructions are not clear, please contact RAVAS. READ CAREFULLY - All safety regulations that apply on the truck remain valid and unchanged No weighing operations are allowed if any persons or objects are in the vicinity; around, under or close to the load. RAVAS is not responsible for any physical harm done to the operator because of the presence of the indicator in the cabin. Any modifications done to the system must be approved in writing from the supplier, prior to any work being completed. It is the sole responsibility of the purchaser to train their own employees in the proper use and maintenance of this equipment. Do not operate this unit unless you have been fully trained of its capabilities. Check the accuracy of the scale on a regular basis to prevent faulty readings. Only trained and authorized personnel are allowed to service the scale. Always follow the operating, maintenance and repair instructions of this truck and ask the supplier when in doubt. RAVAS is not responsible for errors that occur due to incorrect weightings or inaccurate scales. min -10°C 15°F max 40°C 105°F 0 0 IP65 Should you have any further questions after reading this manual then you can contact us at: RAVAS Europe B.V. Toepadweg 7 Postbus 2023 5300 CA Zaltbommel Nederland Tel: +31 (0)418-515220 Fax: +31 (0)418-515320 Internet: www.ravas.com Email: [email protected] Changes reserved USER MANUAL – MForks 4 3. System setup 3.1 Indicator functions Key functions Front view indicator % e1 e2 e3 F1 F2 CLR Keys not active Zero correction (press shortly) Display functions ▬ The percentage shown is negative e1/e2/e3 ▼ Calibration points (only for service technicians) F1 ▼ Fork 1 / set point 1 is activated (option relay output) F2 ▼ Fork 2 / set point 2 is activated (option relay output) % e1 e2 e3 F1 Key not active F2 CLR 5 sec. USER MANUAL – MForks 5 3.2 Placing the battery packs in the MForks 1. 2. 3. 4. Lift up the locking clips on the battery holders Position the battery packs in both forks Click the battery packs into the battery holders Push the locking clips down to secure the battery packs 1. 2. 4. 3. USER MANUAL – MForks 6 3.3 Switching on the MForks 1 Switch on the forks: Only execute this step after a battery pack change, not needed when the blue LED’s are already blinking! 2. LED 1. 1. Switch on the forks by pressing the blue buttons on both battery pack holders 2 2. The blue LED’s on the MForks will start blinking automatically Switch on the indicator: 1. 3 2. The indicator will be switched on automatically after switching on the truck 4 % % e1 e2 e3 F1 e1 F2 e2 e3 F1 F2 CLR CLR 5 sec. Momenload in % MAX = 100% USER MANUAL – MForks 7 3.4 Switching off the MForks (Sleep mode) 1 % e1 e2 e3 F1 F2 CLR Both forks will stay in Sleep mode, the blue LED’s are blinking slowly. Both forks will be activated automatically after switching on the indicator The indicator will be switched off automatically after switching off the truck -> Both forks will go into Sleep mode 3.5 Switching off the MForks completely 1 2 % e1 e2 e3 F1 F2 CLR 8 sec. The indicator will be switched off automatically after switching off the truck -> Both forks will go into Sleep mode Switch off the forks by pressing the blue buttons for 8 seconds USER MANUAL – MForks 8 3.6 Charging the battery packs Low battery indication Mforks Exchangeable battery packs supply power to the MForks. When the voltage level of the battery packs is running low, the low bat indicator will light up and the pointer of the relating fork - “F1”, ”F2” or both - will start blinking in the display. The blue LED’s on the relating fork will start blinking very slowly (twice every 10 sec). The MForks will switch off automatically after 10 minutes. % e1 e2 e3 F1 F2 CLR FUNCTIONALITY BLUE LED DURING POWERING ON ON for 5 sec. FULL BATTERY Working mode Sleep mode LOW BATTERY Working mode Sleep mode Blink time interval Once every 1,5 sec. Once every 4 sec. Twice every 10 sec. Twice every 10 sec. Charge the rechargeable battery packs The system is standardly equipped with rechargeable battery packs and a charger. Charge the battery for at least 6 hours. This will prevent loss of battery capacity. Check by reading the battery pack label to make sure this battery pack is equiped with recharable batteries. Only battery packs with recharable D-cells can be re-charged. 1. 4. 2. 6 hours 3. First position the battery pack inside the charger module, then plug the adaptors into the mains voltage. When the battery is being charged, the red LED on the charger is lit. After at least 6 hours charging the green LED will switch on and the battery packs are full again. The red LED will stay on, even when the battery packs are fully charged. USER MANUAL – MForks 9 4. Use 4.1 Before use: check zero point % NET e1 ID CODE e1 e2 PT e2 e3 F1 TOTAL e3 F1 F2 PCS KG/LB Check the zero point every day! F2 CLR CLR When the MForks are unloaded and lifted freely from the floor, the indicator should show a value of 0%. If the zero deviation is in between -6% and +6%, then the zero point must be corrected manually by pressing the >0< key. If the zero deviation is more than +/- 6%, please contact the RAVAS service department. USER MANUAL – MForks 10 4.2 Using the MForks When a load is being lifted by the MForks, then the indicator will display the load that has been applied onto the forks as a Loadmoment value. This Loadmoment value is expressed as a percentage unit of the maximum capacity: The heavier the weight of the applied load, the higher the displayed percentage The bigger the load center point of the applied load, the higher the displayed percentage Example for a lift truck with a rated capacity of 2.000kg at load center point 600mm: % 600mm e1 1000kg e2 e3 F1 F2 Capacity: 2000kg CLR % 600mm e1 e2 e3 F1 F2 2000kg Capacity: 2000kg CLR % ? e1 e2 e3 F1 F2 2000kg Capacity: 2000kg CLR % ? e1 e2 e3 F1 F2 2000kg Capacity: 2000kg CLR USER MANUAL – MForks 600mm % % 11 e1 e2 e3 F1 F2 1000kg Capacity: 2000kg CLR Standardly, the maximum allowed value for overload control is set to 100%. This 100% value normally corresponds with the nominal lifting capacity of the lift truck at the specified load center point, which is normally 500mm or 600mm, and at the lowest height range: % 600mm Loadmoment= 100% e1 2000kg Capacity: 2000kg ? Loaddiagram MForks2000kg Capacity: 2000kg L i f t i n g h e i g h t e2 e3 F1 F2 CLR 7000 1900 1600 1340 5500 2100 1800 1540 4000 2300 2000 1740 400 600 800 e1 e2 e3 F1 % F2 Loaddiagram lifttruck (Example: 2000kg @ 600mm) Load center point CLR When the lift truck is being overloaded, so the applied loadmoment becomes more than 100% (red area), then the buzzer will be activated automatically: % ? e1 e2 e3 F1 F2 2000kg Capacity: 2000kg CLR % ? 2000 kg city: Capa g k 2000 e1 e2 e3 F1 F2 CLR During an overload situation, the lift truck becomes less stable! So in case the buzzer is activated: Lower the forks directly, never lift further! Tilt the mast backwards directly, never tilt further forwards! Do not brake fast, but reduce the lift truck’s driving speed slowly if possible! USER MANUAL – MForks 12 4.3 Error messages Display Err01 Err02 Err03 Err04 Err05 Err06 Err08 Err09 Err10 Err14 Err97 Err98 Err99 ErrF1 ErrF2 ---+F1 +F2 BltF1 BltF2 Meaning Load cell signal is unstable Overload on full scale Gross negative. This action is not allowed Out of zero range Sampling accuracy too low Input signal too high Calibration out of range (negative) Calibration out of range (signal too low) Calibration count 2nd(3rd) point lower than count 1st(2nd) point Set point value 2 < set point value 1. This is not allowed Legal for trade version: not allowed action Out of error mode Automatic Automatic after removing weight Automatic Press any key Press any key Automatic after correcting input Automatic Automatic Automatic Calibration point must be higher than previous one Action only allowed in start-up units Problem with fork 1 (no communication) Problem with fork 2 (no communication) Sensor signal negative Problem with power supply to indicator Battery of fork 1 is empty Battery of fork 2 is empty Automatic When action is intended, install jumper JP1 ( attention: after this action a complete new calibration and stamping of the system is necessary ) Automatic Automatic Restart indicator. Restart forks & indicator Restart indicator. Restart forks & indicator Lift up the forks from the ground Check 12Vdc to indicator Charge both battery packs Charge both battery packs Successful Bluetooth link with Fork 1 Successful Bluetooth link with Fork 2 No error No error USER MANUAL – MForks 13