1
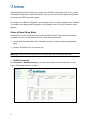
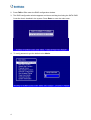
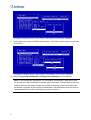
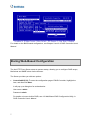
RAID Controller
Quick Start Guide
This guide provides importance notices to use the RAID Controller system, short instructions
to build a RAID 5 with BIOS-based configurations and methods to start web-based
configurations. For more information about setting up RAID arrays, please see RAID
Controller User’s Manual.
Important Notice
Before you start the RAID Controller to manage your hard disk drives, please pay attention to
the following notices:
Recommended Hard Drive
To avoid incompatibility between RAID Controller and hard disk drives, we strongly suggest
you use Seagate Barracuda® ES drives. For details on the drives, see Seagate’s website:
http://www.seagate.com/www/en-us/products/servers/barracuda_es/
The following is the available models of Barracuda® ES drives:
Model
Capacity
ST3250620NS
250GB
ST3320620NS
320GB
ST3400620NS
400GB
ST3500630NS
500GB
ST3750640NS
750GB
Begin with BIOS Configuration
The GV-DVR system provides two methods to configure RAID arrays:
•
BIOS Configuration
•
Web-Based Configuration
1
When building RAID for the first time, please use the BIOS configuration only. If you use the
web-based configuration, RAID build will fail. Later you can use the web-based configuration
to manage the RAID Controller system.
For details on the BIOS configuration, see Chapter 2 and 3 of RAID Controller User’s Manual.
For details on the web-based configuration, see Chapter 4 and 5 of RAID Controller User’s
Manual.
Order of Hard Drive Slots
Remember the order of hard drive slots on the GV-DVR system. When there is a warning
message or buzzer on the failed hard drive, follow these procedures:
1. Check which hard disk failed from “RaidSet Hierarchy” of the web-based configuration
page.
2. Remove the failed one in the correct slot.
Warning: If you remove the hard drive in the wrong slot, you could suffer data loss.
•
RaidSet Hierarchy:
In \ Information \ RaidSet Hierarchy, you can view the status of each hard drive. In this
figure, Ch05 (hard drive No. 5) failed.
2
•
Order of hard drive slots:
1
4
5
2
3
6
7
8
Quick Build with BIOS-Based Configuration
Here is an example of using the quick setup function of the BIOS-based configuration to
create a RAID 5 set. To build a RAID 5, you must install at least 3 physical disks in the GVDVR system.
Note: It is recommended that you install the drives of the same capacity. If you use drives
with different capacities in an array, all drives in the RAID set will be set to the capacity of
the smallest drive in the RAID set.
1. Turn on the GV-DVR system. This message will display during the startup sequence.
PCI-X RAID Controller – DRAM: 128 (MB) / #Channels: 8
BIOS V1.17b / Date: 2006-08-07 – F/W: V1.42 / Date: 2006-10-13
f Bus / Dev / Func = 4/14/0, I/O-Port: FDBFF000h, IRQ = 10, BIOS= CC00: 0h
fff No BIOS disk found. RAID controller BIOS not installed!
fff Press <Tab/F6> to enter SETUP menu. 5 second(s) left <ESC to Skip>
3
2. Press TAB or F6 to enter the RAID configuration window.
3. The RAID configuration window appears and shows a dialog box listing the SATA RAID
Controller that is installed in the system. Press Enter to enter the main menu.
4. To verify password, type the default value Admin.
4
5. Select Quick Volume/RAID Setup. All possible RAID levels with hot spare for the
current volume set drive are displayed.
6. Select RAID 5, and press the Enter key. A single volume set is created.
7. In the Available Capacity dialog box, define the capacity of the volume set. Use UP and
DOWN arrow keys to select the specific capacity and press the Enter key to accept this
value.
8. The available strip sizes for the current volume set are displayed. This parameter
specifies the size of the stripe written to each disk in a RAID 0, 1, 5, or 6 logical drive.
You can set the stripe size to 4 KB, 8 KB, 16 KB, 32 KB, 64 KB, or 128 KB. A larger
stripe size produces better-read performance, especially if your computer does mostly
sequential reads. However, if you are sure that your computer performs random reads
more often, select a smaller stripe size.
5
9. Select Yes in the Create Vol/RAID Set dialog box. The RAID set and volume set will start
to initialize it.
10. Select Foreground Initialization or Background Initialization for initialization.
Note: In the background initialization, the initialization proceeds as a background task,
the volume set is fully accessible for system reads and writes. The operating system can
instantly access to the newly created arrays without requiring a reboot and waiting the
initialization complete. In the foreground initialization, the initialization proceeds must be
completed before the volume set ready for system accesses.
6
For details on the BIOS-based configuration, see Chapter 2 and 3 of RAID Controller User’s
Manual.
Staring Web-Based Configuration
The ArcHTTP Proxy Server starts at system startup, allowing you to configure RAID arrays,
Mail alerts and SNMP alerts via the browser.
The Server provides you with two options:
•
Controller#01(PCI): To enter the configuration page of RAID Controller, highlight the
item, and then click Start.
It will pop up a dialog box for authentication.
User name: admin
Password: admin
For details on how to build a RAID, see 4.2 Web-Based RAID Configuration Utility, in
RAID Controller User’s Manual.
7
•
Cfg Assistant: To enter the configuration page of ArcHTTP Proxy Server, highlight the
item, and then click Start.
In the ArcHTTP configuration page, you have these options: General Configuration,
Mail Configuration and SNMP Trap Configuration.
For details on these configurations, see 4.1 ArcHTTP Proxy Server Configurations, in
RAID Controller User’s Manual.
Note: If your GV-DVR system is behind a firewall, make sure the default ports 81 and 82
are open; otherwise, you cannot configure the Server and RAID Controller.
Caution:
•
The GV-desktop mode is designed without system tray, so please do not “minimize” the
ArcHTTP dialog box. Otherwise you cannot call it up again.
•
After you “close” the ArcHTTP dialog box, please click the Programs button on the GVDesktop and then select RAID Controller to bring it up again.
8
Access Options on GV-Desktop
To access configuration pages easily, direct links are also provided on the GV-Desktop.
On the GV-Desktop, click the Programs button and select the following options to the
desired configuration page:
• RAID Controller: Brings up the ArcHTTP dialog box.
• RAID Console: Links to the web-based RAID configuration page.
• RAID Mail Alert Configuration: Links to the Mail configuration page.
Note: If you have modified the default blind IP 127.0.0.1 of ArcHTTP Proxy Server, the links
“RAID Console” and “RAID Mail Alert Configuration” will be invalid. For blind IP setting, see
4.1.1 General Configuration, in RAID Controller User’s Manual.
9