1
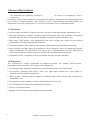
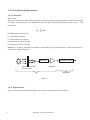
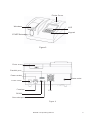
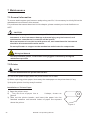
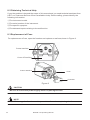
BIOLAB-310
Chemistry Analyzer
BIORAYS . PAKISTAN
www.biorays.com.pk
Table of Contents
Copyright and Declaration. ................................................................ .
1
Preface ........................................................................................................ . 3
Markings .................................................................................................. . 3
Safety Guidelines ..................................................................................... . 4
1 General Description ................................................................................. .
6
1.1 Features ............................................................................ .......................... 6
1.2 Structure ...................................................................................................... . 6
1.3 Specification ......................................................................................... ......... 7
1.4 Principle and Appearance .............................................................................. . 8
2 Unpacking and Installation ....................................................................... . 10
2.1 Unpacking ......................................................................................... . 10
2.2 Installation ........................................................................................ . 10
3 Operation Brief ............................................. ............................................
3.1 Explanation of keypad ......................................................................... .
3.2 Startup ........................................................................................... ....
3.3 Preparations ...................................................................................... .
3.4 Setup of Item Parameters .................................................................... .
3.5 Item Test ............................................................................................ .
3.6 Print and Review ................................................................................ .
3.7 Ending.............................................................. ................................. .
12
4 Operation Details..................................................................................... .
4.1 Item Test........................................................................................... .
4.2 Curve Test......................................................................................... .
4.3 ABS Test ............................................................................................
4.4 Result Data ....................................................................................... .
4.5 QC Data ........................................................................................... .
4.6 Maintenance.......................................................... .............................
15
12
12
13
13
13
13
14
15
17
17
18
19
19
4.7 Tube Wash ............................................................................. 21
5 QC Analysis and Calibration...................................................................... .
5.1 General Information ........................................................................... .
5.2 QC and QC Procedure......................................................................... .
5.3 Analysis of QC Results .............................................. ..........................
5.4 Treatments for Abnormality ................................................................. .
5.5 Calibration .. .......................................................................... .
.
.
22
22
22
23
23
24
Table of Contents
6 Reagent, Sample and Waste .......................................................................
25
6.1 Reagent ............................................................................................. . 25
6.2 Detergent ........................................................................................... .
25
6.3 Precautions ........................................................................................ .
25
7 Maintenance ............................................................. ................................. 26
7.1 General Information ............................................................................ . 26
7.2 Printer ................................................................................................ . 26
7.3 Peristaltic Pump ................................................................................. . 27
7.4 Keypad.............................................................................................. . 28
7.5 Cell .................................................................................................... . 28
7.6 Cleaning ............................................................................................. .
29
7.7 Precautions for Usage ............................................... ........................... 30
8 Troubleshooting ......................................................................................... . 31
8.1 Steps for Troubleshooting .................................................................... . 31
8.2 Obtaining Technical Help ..................................................................... .
32
8.3 Replacement of Fuse ........................................................................... .
32
8.4 Troubleshooting Table ........................................................................... 33
9 Storage and Transportation ...........................................................................
35
9.1 Storage ......................................................................................... .......
35
9.2 Transportation ..................................................................................... . 35
Appendix A List of Replaceable Components ................................................. . 36
Appendix B Item Sequence and Abbreviation .................................................. . 37
.
Copyright and Declaration
Copyright : URIT Medical Electronic Co., Ltd (URIT)
Thank you very much for your purchase of the BIOLAB-310 chemistry analyzer.
All contents in this manual were strictly compiled according to the related laws
and regulations in china, as well as the specific condition of BIOLAB-310
chemistry analyzer, covering all the updated information before printing.
URIT is fully responsible for the revision and explanation of the manual, and
reserves the right to renovate the relevant contents without separate notice. Some
of the demonstration pictures in this manual are for reference and subject to real
object if any differences.
All the information included is protected by copyright. No any part of this
document may be reproduced, stored or transmitted in any form, or by any means
unless written authorization by URIT.
All instructions must be followed strictly in operation. In no event should URIT be
responsible for f ailures, e rrors and other liabilities resultin g from user's
noncompliance with the procedures and precautions outlined herein.
Limitation of Liability
URIT warrants to the original purchaser that this instrument will be free from
defects in materials and workmanship for a period of one year from the later of the
date of original purchase or installation.
URIT assumes no liability in the following situations even during the period of
warranty.
1.
Failure due to abuse the instrument or neglect the maintenance.
2.
Use reagents and accessories other than manufactured or recommended by
URIT.
3.
Failure due to operate not under the instructions described in the manual.
4.
Replace accessories not specified by URIT, or after maintenance or repair by a
service agent not approved or authorized by URIT.
NOTE:
URIT makes no warranties, either express or implied, as to product quality,
performance, and value as a commodity or applicability for any particular
purpose.
BIOLAB-310 Operating Manual
1
Technical service and troubleshooting are provided by URIT.
If the instrument has malfunction, please contact the agency authorized by URIT .
If the problem cannot be solved through telephone directions, professional
technician and sale representative will be sent to offer you timely service.
URIT Medical Electronic Co., Ltd
•
Add: No.4 East Alley, Jiuhua Road, Guilin, Guangxi 541001, PR China
•
Tel: +86(773)2883225
•
Fax: +86(773)2804668
•
Web: www.urit.com
•
E-mail: [email protected]
Supplied by:
URIT Medical Electronic Co., Ltd
EC
REP
Wellkang Ltd t/a Wellkang Tech Consulting
Suite B, 29 Harley Street, LONDON W 1G 9QR, UK
Version: 200808
2
BIOLAB-310 Operating Manual
Preface
This document is the operating manual for BIOLAB-310 Chemistry Analyzer. It describes in
detail the structure, operation, maintenance and troubleshooting concerning the instrument.
User should operate the instrument following the instructions in this manul.
Markings
Danger! High voltage
Power off
Burn
Power on
Caution
Grounded
Biological Hazard
In vitro diagnostic
Recovery
SN
Serial number
Manufacturer
Protect from heat and radioactive sources
EC
REP
Authorized representative in European Community
BIOLAB-310 Operating Manual
3
Safety Guidelines
Before using the instrument, be sure to read the precautions below. If they are neglected,
human injury or instrument damage may be caused.
CAUTION
If user dose not follow the instructions presented in this manual when operating
the instrument, the protective measures provided by the system may be failed.
Preventing electric shock
CAUTION
When the power supply is on, DO NOT open the instrument cover other than the
authorized maintenance man.
If liquid leaks inside the instrument, cut off the power supply immediately.
Improper manner may cause electric shock and system damage.
Preventing eye injury
CAUTION
When the instrument is active, do not directly look at the light emitting from the
lamp source, which may cause injury to your eyes.
Preventing chemical injury
Biological Hazard
If chemical adheres to the human body, infection may occur. Do not directly touch
the sample, mixed solution and waste solution. Be sure to put on protective
gloves, clothes, or even goggles when necessary.
Some reagents are strong acid or basic. Please use them carefully and avoid
direct contact. If the reagent sticks to hands or clothes, immediately wash it off
with water and soap. If reagent splashes into eyes accidentally, wash it off with
water and consult an oculist.
4
BIOLAB-310 Operating Manual
•
Disposing waste solution
Biological Hazard
D ischarge and disposal of reagent, control solution, calibration solution,
detergent, and waste solution are regulated by certain standard provisions.
Please observe the local regulation to discard waste or consult the reagent
supplier or distributor.
•
Intended use
CAUTION
The instrument is mainly intended for quantitatively measuring the serum,
plasma, urine and cerebrospinal fluid etc. If the instrument is to be used beyond
this scope, consult URIT first.
Take clinical symptoms and other test results into consideration before making
any clinical determinations.
•
Installation
CAUTION
Installation not complying with the specified requirement in this manual will cause
erroneous test result or even damage to the instrument.
If relocation is necessary, contact URIT or your local distributor firstly.
•
Usage
CAUTION
1) Failing to operate the instrument as the instructions presented in the operating
manual will cause erroneous result, or even damage to the instrument and
injury to the operator.
2) For the first time using the instrument, perform calibration and QC tests before
sample tests.
3) QC test should be done before sample tests, or else, inexact results may occur.
4) Use the special connecting cable provided by URIT to connect the instrument
with computer. Do not pull out the connecting cable before cutting off the
power .
5) DO NOT touch the LCD or keypad with wet or chemical-stuck hands.
BIOLAB-310 Operating Manual
5
1 General Description
The BIOLAB-310 chemistry analyzer (“
for short) is intended for use in
instrument”
conjunction with certain reagents to quantitatively perform chemistry and immunology tests
on a variety of clinical samples, such as serum, urine, cerebrospinal fluid and plasma. The
instrument is only for professional, in vitro use in hospitals, clinics, and laboratories.
1.1 Features
• Various assay methods: Endpoint, kinetics, two-pont, dual-wavelength, absorbance, etc.
• Optional calculation methods: Reagent blank and sample blank are available. Calculation
methods include: factor, single-point calibration and multi-point calibration, etc.
•
Data bank: Test results, item parameters and item settings are stored in the memory
permanently for further analysis and statistics.
• Powerful software: Item parameters are user-defined and can be saved permanently.
• User-friendly interface: Menu-led operation. All information, such as operating prompts,
status indications, QC calculation, test results, etc., is displayed on the LCD. Data can be
exported through the internal printer or via the RS 232 and parallel interfaces.
• Computer control: Computer control is available through relevant software.
1.2 Structure
The instrument is mainly composed of sampling system, cell system, MCU system,
temperature control system, LCD, printer, and keypad, etc.
•
•
•
•
•
•
•
6
Sampling system: Aspirates sample into cell and drains waste into waste bottle.
Cell system: Includes light source, filter, cell, light signal sensor etc. Light signal is
transformed into electric signal here.
MCU system: Collects system signals, processes data, and controls light signals and
temperature, etc.
Temperature control system: Controls the temperature in the cell.
LCD: Displays test results and operating information.
Printer: Prints test results.
keypad: For entering numerical digits and commands.
BIOLAB-310 Operating Manual
1.3 Specifications
1) Light Source: Halogen lamp, 6V/10W
2) Wavelengths: 300nm~800nm
3) Assay Methods: Endpoint, absorbance, kinetic, two-point, dual-wavelength,etc.
4) Measuring Range: -0.3~3.0Abs
5) Resolution: 0.001Abs(Display),0.0001Abs(Interal calculation)
6) Drift: ≤ 0.003Abs/20min
7) Flow Cell: 32μ L quartz cell; Optical path: 10mm
8) Sampling Volume: 100μ L~9999μ L (auto-compensation), 500μ L is recommended
9) Temperature Control: Room,25℃,30℃,37℃, 0.1℃
10) Cross-contamination:≤ 1%
11) Repeatability: CV≤ 1.0%
12) Memory: 0~999sec, variable
13) Memory: Up to 320 items and 20,000 test results
14) Export: Standard RS232 interface and parallel interface(LPT)
15) Software: The system management software includes QC and statistic program, which
can display item curves and QC curves, and print the latter.
16) Power Dissipation: 130VA
17) Dimension: 392mm 375mm 205mm(length * width * height)
18) Weight: About 7.7Kg
19) Insulation Limit for External Circuit: ≤ 0.1Ω (under single-fault condition)
20) Ambient:
o
o
Extreme Temperature: 5 C~40 C
Recommended Temperature: 10 o C~30 o C
RH:≤ 80%
21) Power Supply: AC 100~240V,50/60Hz. Fuse varies with different power input, refer
to Appendix A for details.
22) Atmospheric Pressure: 75kPa~106kPa
BIOLAB-310 Operating Manual
7
1.4 Principle and Appearance
1.4.1 Principle
Beer's law:
When a parallel monochrome light beam goes through an light-absorbent object (gas, liquid
or solid), some photons are absorbed and the light intensity decreases from Io to I. The
formula is:
I
-lg — = KLC
I0
K: Absorbance coefficient
L: Thickness of object
C: Concentration of object
Io: Intensity of shoot-in light
I: Intensity of shoot-out light
Measure I, Io and L, and then calculate C according to the formula above. Data conversion is
outlined as below (Figure1) :
Receiver
Selective Filter and
Conversion system
Amplifier
Focus System
Digit Area
Figure 1
1.4.2 Appearance
Figure 2 and Figure 3 show the appearance of the instrument, front and rear.
8
BIOLAB-310 Operating Manual
Printer Cover
Window
LCD
Keypad
START Button
Figure 2
Pinter cover
Parallel port
Power socket
Waste outlet
Power switch
Fuse box
Fan
RS 232
Grounded pole
Figure 3
BIOLAB-310 Operating Manual
9
2 Unpacking and Installation
CAUTION
User shall not attempt installation of this instrument after its delivery. The service
representative will install the instrument for its safe and exact operation.
Before installation, user shall make preparations for satisfying the installation
requirements in accordance with this manual.
2.1 Unpacking
Please check the carton according to the following procedures:
1) Carefully unpack the package and take out the BIOLAB-310 Chemistry Analyzer and
the accessories.
2) Inspect the instrument and accessories for quantity and visible signs of damage according
to the accompanying Packing List.
3) If any loss or damage exists, contact the distributor or manufacturer immediately.
2.2 Installation
2.2.1 Requirements of installation
1) Only for room installation and use.
2) Worktable must be level, with gradient less than1/200.
3) Good ventilation for the room.
4) Free from direct sunlight and dust.
5) Free from corrosive and flammable gas.
6) Free from hot and wind source.
7) No shake with the worktable.
8) Free from strong noise and electricity interference.
9) Keep away from brush-motor and the electric equipment that are turned on or off
frequently.
10) Keep away from electromagnetic wave equipments, such as mobile phone, wireless
transceiver, etc.
11) Power supply: AC 100~240V,50/60Hz, three-core power cord, grounded.
12) A well-grounded electrical receptacle is required, and its maximum power consumption is
1kVA, zero to earth voltage is ≤ 6V. The instrument should be connected with an
exclusive cable, if possible.
13) The distance between electric receptacle and the instrument should be less than 5
meters.
14) Operating temperature should be within the range of 5℃~40℃, with fluctuation < 2℃
/H.
10
BIOLAB-310 Operating
Manual
2.2.2 Procedures of installation
1) Take out the instrument and place it on the level, stable worktable. For heat dispersion, the
rear of the instrument should keep away from wall or obstacles at least 20cm. The bottom
of the instrument should keep good air circulation.
2) Insert the power cord in the power input terminal on the rear of the instrument.
3) Connect the joint end of the waste tube to the waste outlet, and the other end to the waste
bottle.
4) Before initial running, check the waste tube for bend and jam, and make sure the waste
solution can be discharged into the waste bottle smoothly.
5) Before operation, warm up the instrument for 20~30 minutes until the temperature is
balanced and the light source is stable.
BIOLAB-310 Operating
Manual
11
3 Operation Brief
Biological Hazard
To avoid infection, put on protective gloves, clothes and even goggles when
To avoid unnecessary damage to the instrument, please read the Operating Manual carefully
before operation.
3.1 Explanation for Keypad
The keypad is shown as Figure 4, for example:
F1
F2
F3
1
2
3
4
5
6
7
8
9
F4
0
F5
ESC
ENTER
Figure 4
1) Digit keys (0~9): For entering digits .
2) Radix point key (.): For entering radix point.
3) ENTER key: For entering into edit status and confirming entry.
4) ESC key: Exits the current status, returns to the last screen.
5) Function keys (F1~F5) : Corresponds with the operation prompts displayed on the lower of
the screen. There are some operation prompts displayed in different screens but in
common use, such as:
•
•
•
•
•
•
•
•
•
12
WASH: Washes the cell with distilled water or detergent.
PgDn/PgUp: Displays the next/ last screen.
PUMP: Aspirates sample.
RUN: Starts testing.
REPT: Repeats testing.
QC: Performs quality control analysis.
DEL: Deletes selected item.
↑ : Moves cursor up.
↓ : Moves cursor down.
BIOLAB-310 Operating
Manual
3.2 Startup
Turn on or off the instrument by pressing the power switch on the rear of the instrument. “ I”
denotes ON,“ O” denotes OFF.
3.3 Preparations
1) Check if the waste bottle is full and, if so, empty the waste bottle, then prepare enough
distilled water.
2) Wash the instrument with distilled water by executing the WASH function from the Main
Menu screen. The instrument then goes into standby status.
3) Keep standby status for 30 minutes until the light source is stable and the temperature
reaches the expected level.
4) Clean the instrument with distilled water by executing WASH five times.
5) Selec t MAINTENANCE f r om t he Main Menu scr een t o ent e r the Maintenance
scr een . Then, selec t A/D ADJUST t o ent er t he A/D scr ee n . Pr ess F5 [ADJ] t o
automatically adjus t t he A/ D. Aft er adjust m ent , a shor t t one is heard and
t he adjust e d A/ D valu e is saved aut om at ically . I f pr oblem s occur dur in g t he
adjust m ent , r ef er t o Troubleshooting .
3.4 Setup of Item Parameters
Press “1” or “2” from the Main Menu to enter the Item Screen. Each item is marked with a
number (Item ID) ahead. Enter the desired item ID then press the [ENTER] key to display the
relative Item Parameter screen. Refer to chapter “4.1.1” for details. Refer to Appendix B for
item sequence and abbreviation.
3.5 Item Test
Press the F1 [RUN] from the Item Parameter screen.
Place the sample under the probe, then press the START button on the instrument. The
instrument will automatically aspirate sample and measure it according to the preset
parameters.
If you need to cancel the measurement in the progress, press the [ESC] key.
3.6 Print and Review
After measurement, return to the Main Menu. Press 4 [RESULT DATA] to enter the Review
screen. The latest test results are displayed first, and other results can be reviewed by
pressing the [↑ ] or [↓ ].
Pressing the [OUT] key will print all test results that are subject to the date displayed on the
current screen.
If you just want to print the result of a specified sample, press the [ID] key first to enter the
desired sample ID, then press the [OUT] key .
BIOLAB-310 Operating Manual
13
3.7 Ending
Follow below steps after daily work:
1) Put reagent into icebox.
2) Dispose of used serum cuvettes according to relevant regulations.
3) Wash instrument 10~20 times.
4) Cut off power supply
5) Clean worktable with soft cloth.
14
BIOLAB-310 Operating Manual
4 Operation Details
The Main Menu includes following six submenus: Item Test, Curve Test, ABS Test, Result
Data, QC Date and Maintenance. Following is the detailed description.
4.1 Item Test
4.1.1 Setup of Item Parameters
Setting item parameters is an essential step for item measurement. Proper item parameters
can ensure the measurement accuracy.
You can select item parameters by moving the cursor [↓ ], turn to other pages by pressing
[PgDn].
For editing the parameters of the selected item, press the [ENTER] key.
After edit, Press [ENTER] to save, [ESC] to cancel and return.
1) Item Name
The item name can be entered using the cursor and numeric keyboard displayed on the
screen.
2) Test Method
Four methods are available: Endpoint, kinetic, Twopoint and Bichwave (Dual-wavelength).
3) Wavelength 1 and wavelength 2
Both wavelength 1 and wavelength 2 has the range of 300nm~800 nm. Wavelength 2 is
available when Dual-wavelength method is active.
4)Time
DELAY(s): For endpoint and dual-wavelength, delay time is the length from the moment the
sample is pipetted into cell to the beginning of measurement; for kinetic and twopoint, delay
time is the length from the moment the sample is pipetted into cell to the beginning of the first
point measurement.
MEAS TIME(s): The measurement time, only applied to kinetic and twopoint, is the length
from the first point being measured to the last point being measured.
5) Blank
Blank mediums include reagent, distilled water and sample. Accordingly, blank methods
include reagent blank, water blank and sample blank.
6) Volume
The volume of reaction solution to be aspirated.
BIOLAB-310 Operating
Manual
15
7) Units
Units for test results
8)Temperature
Temperature choices include: --(Room),25DC, 30DC, and 30DC.
9) Print
Turns on or off the printer. Selecting ON, test results will be printed out following each
measurement; Selecting OFF, the printer will not work.
NOTE: In RESULT DATA, press [ID ]will print the comprehensive report. See chapter
“4.4.2 ” for details.
10) Standard
Standard concentration used for calculating K value.
11) Factor
Factor is the K value. It can be entered manually or calculated automatically by the system
after a standard test. For the latter, when the standard concentration has been entered and
the K value is 0, a standard test is required by the system before sample test is done. After the
standard test, the system will calculate the K value automatically.
NOTE: Factor method is available.
After completion of parameters setup, you can select following operation:
[RUN]: Starts testing current item.
[WASH]: Rinses the liquid path with water or detergent.
[ESC]: Returns to Main Menu.
4.1.2 Process of Item Test
Press the FI [RUN] to enter the Testing screen. Place the sample under the probe, then press
the START button, the instrument then automatically perform measurement according tothe
preset item parameters.
If there are more than one test to be done, the tests will be processed following the sequence:
blank , standard, samples(If blank and standard parameters are set up in advance ).
[REPT]: If you have doubt in test result, press F4 [REPT] to retest the sample. The retest
result will replace the previous one.
[PLOT]: Press F2[PLOT] to enter the Reaction Curve screen, where the reaction curves are
presented in real time for convenient observation.
16
BIOLAB-310 Operating Manual
[ ID ]: You can edit sample ID by pressing F1[ID]. After edit, press [ENTER] to save, or [ESC]
to cancel. The subsequent sample ID will automatically add 1 each time a sample is
tested.
[QC]: Pressing F5[QC], the system prompts to perform QC test. Refer to Chapter 5 for
details.
4.2 Curve Test
Press “2” from the Main Menu screen to enter the Curve Item screen. This function is mainly
used for testing samples that need 2~5 standards to calibrate.
4.2.1 Setup of Standard Curve
Up to 20 standard curves for 20 items can be created and the item parameters are userdefined. The minimum of two standard samples (Maximum five) are available. Standard
concentrations should be entered in ascending order. If you predefined the ABS, just enter it.
So far the curves are created.
If you do not know the ABS or if you want to recalibrate, just enter the standard
concentrations, then set the ABS to “0.0000”. The system will prompt to perform standard
test before sample test. The standard results will be saved and standard curves are created.
4.2.2 Process of Curve Test
After setup of parameters, press F5[RUN] from Curve Parameter screen to start testing.
System prompt will be displayed if parameters are inadequate. In this case, press [ESC] to
return and complete the parameters entry. Test result will be displayed after testing.
[REPT]: If you have doubt in test result, press F4 [REPT] to retest the sample. The retest
result will replace the previous one.
[PLOT]:Press F2[PLOT] to enter the Reaction Curve screen, where the reaction curves are
presented in real time for convenient observation.
[ ID ]: You can edit sample ID by pressing F1[ID]. After edit, press [ENTER] to save, or
[ESC] to cancel. The sample ID will automatically add 1 each time a sample is tested.
[ . ]: Pressing the radix point key on the keypad will compulsorily print the current test
result even when the printer is set OFF.
4.3 ABS Test
Press “3” from the Main Menu screen to enter the ABS Parameter screen.
BIOLAB-310 Operating Manual
17
4.3.1 Setup of Parameters
1) Test Method
ABS---- Absorbance of sample
TIME-----Change rate of absorbance
2) Delay
For ABS method, the delay time is the length from the moment the sample is aspirated into
cell to the beginning of measurement
For TIME method, the delay time is the length from the moment the sample is aspirated into
cell to the beginning of first point measurement.
3) Meas time (measuring time)
The measuring time, only applied to TIME method, is the length from the first point being
measured to the last point being measured.
Other parameters setup are the same as “4.1.1 Setup of Item parameters”.
4.3.2 Process of ABS test
Press F3[RUN] from the ABS Parameter screen to start testing. The system will prompt to
pump water and test the absorbency of water before the sample absorbency test.
[ZERO]: Zeros the water blank or reagent blank.
[REPT]: Repeat the test.
[OUT]: Prints test result.
4.4 Result Data
4.4.1 Result Review
Press “4” from the Main Menu screen to enter the Review screen. The latest result will be
displayed at first, including sample ID, item name, test result, unit, prompt and measuring
date.
[↑ ] : Displays the previous stored result.
[↓ ]: Displays the next stored result .
[OUT]: Prints test result.
[ID]: Enters sample ID to print specified test result.
4.4.2 Result Print
Pressing F3[OUT] from the Review screen, all test results that are subject to the displayed
measuring date will be printed. Or you can just print the specified results by pressing [ID] to
enter the desired sample ID following by pressing [OUT].
18
BIOLAB-310 Operating
Manual
4.5 QC Data
QC data of 300 items can be stored in memory for 2 months. Press “5” from the Main Menu
screen to enter the QC Item screen. Select an item by entering the number ahead of each
item then press the [ENTER] key to show the QC screen.
If you pre-define the target value and SD value, the QC chart will be plot using those entered
values; if not, the QC chart will be plot using the mean value and SD automatically calculated
by system.
MEAN: The automatically calculated mean value or the manually entered target value; the
latter has the priority of display.
SD: The automatically calculated SD value or the manually entered SD value. The latter has
the priority of display.
CV: CV of QC data.
QT.(QUANTITY): the quantity of current QC data.
[↓ ]:Turns to QC data of another month.
[DEL]: Deletes QC data.
[PLOT]: Displays QC chart.
[OUT]: Prints QC data.
[IN]: Enters QC target and SD values.
4.6 Maintenance
This function is intended for instrument maintenance and debugging. Press “6” from the
Main Menu screen to enter the Maintenance Submenu screen.
4.6.1 A/D Adjust
The A/D initial value of the instrument has been adjusted before leaving factory. The gain,
A/D and dark level values vary with different filters. Generally, the gain is 3 or 4, the A/D is
about 34000 and the dark level is within 70~130(never 0); this profile is the optimum initial
values.
Pressing F5 [ADJ], the system will automatically adjust the gain and dark level for different
filters. After adjustment, the buzzer rings and the adjusted values are saved as reference for
future adjustment.
NOTE: Press F4 [PUMP] to fill the cell with water before adjustment.
[SET]: This function is only for factory debugging use.
[TEST]: This function is only for factory debugging use.
It is suggested to adjust initial value under following situations:
•
When installing the instrument
BIOLAB-310 Operating Manual
19
•
•
•
•
•
After long-distance delivery
When replacing a halogen lamp
When replacing a cell
When filer has deteriorated
Whenever test results show abnormal fluctuation.
4.6.2 Pump Adjust
This function is for adjusting the parameters of peristaltic pump. It is not necessary to change
the parameters in general circumstances as they have been set up to optimum condition by
the factory.
1) Volume
Liquid volume, usually 500 uL, pumped at a time. If the volume is 1000uL, the pump needs to
move twice.
2) Speed
The speed of pump motor
3)Step
The moving step for pump motor
4) Wash times
The wash times for liquid path.
4.6.3 Temperature
Only for factory debugging use.
4.6.4 System
1) LCD Contrast
Move cursor to SYSTEM then press [ENTER] to enter the Contrast screen .
[ + ]: Increases the LCD contrast.
[ - ]: Decreases the LCD contrast.
[SAVE]: Saves the adjustment
[ESC]: Cancels and exits the current screen.
2) Language
Select language for user interface. English is default.
20
BIOLAB-310 Operating
Manual
3) PC Control
Moving cursor to PC CONTROL and pressing [ENTER], the instrument is controlled by PC.
Pressing [ESC] cancel the PC control.
4) Printer
Move cursor to PRINTER and press [ENTER] to change the selection between ON and OFF.
5) RS232 (Serial Port)
Move cursor to RS232 and press [ENTER] to change the selection between ON and OFF.
6) LPT (Parallel Port)
Move cursor to LPT and press [ENTER] to change the selection between ON and OFF.
4.6.5 Date&Time
Move cursor to DATE TIME and press [ENTER] to enter the Date&Time screen. Move the
cursor to the appropriate digit that needs to be changed. Then, enter the appropriate digits by
pressing the proper numeric keys.
4.6.6 Calibration
Only for factory debugging use.
4.7 Tube Wash
Washing tube frequently can keep the tube and cell clean and reduce cross-contamination.
Place water or detergent under the probe, then press the [WASH] key, which is displayed on
various screen. The instrument will then automatically wash the tube.
It is recommended to wash tube in the following situations:
•
•
•
•
•
At the start of day’s run.
At t he end of days r un.
After testing high concentration solution.
A long time for disuse.
Abnormal A/D values.
CAUTION
For the air bubble or foreign body that is difficult to wash off from the cell, try to use the
absolute alcohol or detergent recommended by URIT.
BIOLAB-310 Operating
Manual
21
5 QC Analysis and Calibration
5.1 General Information
The reliability of test results depends on two aspects: One is precision, i.e. the repeatability
of test results, which mainly aims at eliminating or minimizing the influence caused by
random error and depends on the sound room QC system to guarantee. The other one is
accuracy, i.e. the test results are correct and close to the true values, which mainly aims at
eliminating or minimizing the influence caused by system error and depends on the proper
assay method and calibration to guarantee. Therefore, it is necessary to strictly select
certified control sample and calibration solution, and use them according to their instructions.
5.2 QC and QC Procedure
To minimize test error, it is required to keep the control sample stable in storage.
5.2.1 Class of Control Sample
•
Mixed serum, freeze-dried and liquid control sample, classified by the different physical
properties of control samples.
•
Fixed value and non-fixed value control sample, classified by the presence and absence
of measurement value.
You can select one kind of control sample listed above as the room control sample as
required.
5.2.2 Usage and Storage
• Strictly use control sample according to the instructions provided by the control supplier.
• Make sure the high quality of the solution redissolved from freeze-dried control sample.
• Make sure the added volume is accurate and consistent each time redissolving the freezedried control sample.
• Fierce shake is avoided by all means when redissolving the freeze-dried control sample.
• Store the control sample according to requirement; do not use the expired products.
• Test the control sample in the same condition as patient sample.
5.2.3 Setup of QC Target and Control Limit
The QC target and control limit value can be obtained from the control sample manufacturer
or from the following methods:
• Setup of temporary target value: Test a new lot of control sample. Obtain the results of at
lest 20 control tests, and calculate their mean value and standard deviation (SD) as the
temporary target value and temporary SD respectively.
• Setup of regular target value: Obtain the accumulative mean values of the original 20 data
and all the tested data collected for 3~5 months as the regular value and SD respectively.
22
BIOLAB-310 Operating Manual
• Setup of control limit: A new lot of control sample is required to confirm the control limit that
is usually denoted with the multiple of SD. The control limit of different items (quantitative
test) depends on their QC regulations.
5.2.4 Control Procedure
In “Item Test”, press F5[QC] from the Testing screen to test the control sample. The QC
results will be stored automatically in memory for further analysis.
5.3 Analysis of QC Results
5.3.1 Entry of QC Target and SD
In “QC Data”, press F2 [IN] from the QC screen to enter target and SD value.
5.3.2 Analysis of QC Chart
Press F5[PLOT] from the QC screen to display the QC chart.
In the QC chart, the middle line denotes the target value, while the lines up and down denote
+1SD、+2SD、and +3SD.
5.3.3 Normal Distribution
• About 95% data are within X
2SD.
•
5 continuous data in the same side are not allowed.
•
5 continuous data step-up or step-down are not allowed.
•
2 continuous points outside X
•
Points outside X 3SD are not allowed.
2SD are not allowed.
5.3.4 Abnormality
• Drift: System error exists
•
Tendency change: The capability of reagent or instrument has been changed.
•
Precision change: Accidental error is large, e.g. the instrument or reagent shows
instability.
5.4 Treatments for Abnormality
For abnormality, carry out following procedures to deal with.
1) Fill in abnormality report and report to your lab manager.
2) Simply and quickly review the operation process to find out the possible cause.
3) If no evident error is found, take the following steps.
BIOLAB-310 Operating Manual
23
•
Retest the same control sample strictly as the operation procedures. If the retest results
are normal, it means that personal error or random error existed in previous testing; If the
retest result still falls outside the allowable range, proceed to the next step.
•
•
•
•
•
Test a new bottle of control sample. If the test results are normal, the previous bottle of
control sample has expired or been contaminated; if the test result still falls outside the
allowable range, proceed to the next step.
Test a new lot of control sample. If the test results are normal, the previous lot of control
sample has problem. Inspect the storage environment and expiration date for possible
cause. If the test result still falls outside the allowable range, proceed to the next step.
Maintain the instrument. Inspect the instrument status and check whether it is necessary
to replace the light source and filter, clean cell or change reagents. Test control sample
after maintenance. If the test result still falls outside the allowable range, proceed to the
next step.
Perform recalibration. Recalibrate the instrument with new calibration solution. If the test
result sill falls outside the allowable range, proceed to the next step.
Obtain help from technician. If the test result still falls outside the allowable range after
the five steps above, the instrument or reagent may be to blame. Contact URIT or reagent
manufacturer to get more technical help.
5.5 Calibration
The calibration sample is to minimize or eliminate the system error caused by instrument or
reagent. It is recommended than human serum matrix be used to reduce the matrix error.
5.5.1 When to Calibrate
It is suggested that calibration be carried out every six months or under the following
conditions:
1) When initially installing and running the instrument.
2) When changing the reagent type or lot, unless otherwise specified by the laboratory that
the change will not influence the precision.
3) When carrying out a protective maintenance or replacing an important component , which
may influence the instrument capability.
4) When QC chart reflects abnormal tendency and drift, or exceeds the allowable range and it
can not be corrected by routine steps.
5.5.2 Calibration Procedure
In “Item Test ”, enter the concentration value given by the calibration sample supplier into the
STANDARD field. Save and exit. The calibration will be automatically carried out before
testing sample, and the result will be stored as reference for the next calibration.
It is suggested that all calibration or validation work should be written down and compiled into
documents. What should be emphasized is that the fix-value serum should never be used as
calibration sample because the huge difference between.
24
BIOLAB-310 Operating
Manual
6 Reagent, Sample and Waste
6.1 Reagent
The reagent parameters are customized
Only the certified and qualified reagents can be used.
Carefully read the instructions provided by reagent supplier before use.
6.2 Detergent
Detergent is optional.
6.3 Precautions
1) When performing tests and daily maintenance, be sure to obey the operation procedures,
and avoid contacting samples directly.
2) All clinic samples should be handled according to the operation regulations as they may
carry potential infectious disease. Put on protective clothes, gloves and goggles . No
smoking and eating in working area. Do not blow or suck the tubes.
3) Carefully dispose of wastes as they may carry potential contaminations and cause biologic
and chemical hazard. Obey local regulations to dispose and drain the waste solution.
4) Store reagents according to the instructions offered by reagent supplier. User should
establish and maintain the keeping- and- using system for reagents, to avoid using expired
reagent. Storage should keep away from extremely hot or cold environment.
BIOLAB-310 Operating Manual
25
7 Maintenance
7.1 General Information
To ensure stable system performance and prolong use life, it is necessary to strictly follow the
maintenance instructions in this manual.
For problems that cannot be solved in this chapter, please contact your local distributor or
URIT.
CAUTION
Do not perform any maintenance not specified or authorised in the manual to the
instrument, or else instrument damage or human injury may be incurred, and
maintenance commitment in contract will be invalid.
Most maintenance is carried out with power off, and sometimes the instrument
should be disconnected from the mains.
Do not spill water or reagent on the mechanism and electronic components.
Biological Hazard
Put on protective gloves, clothes and even goggles if necessary during the
maintenance process
7.2 Printer
NOTE
Do not disassemble the printer head at will.
1) Turn off the power supply when the printer works out of order.
2) When replacing printer paper, blow away the wastepaper on the printer head, if any.
3) Keep the printer circuitry away from dust.
Installation of Printer Paper
1) Open the printer cover.
2)
Tr im t he fr ont of paper int o a
figure 5
V shape , shown as
3) Take out the printer header, and insert the paper into the
formfeed entrance until several inches of paper are exposed
above the printer.
Figure 5
26
BIOLAB-310 Operating Manual
7. 3 Peristaltic Pump
The peristaltic pump(Figure 6-1 and Figure 6-2) is an important part for liquid flow. If the
pump tube is old or wore out, replacement with the same model is necessary. Replace the
pump tube as following steps:
7.3.1 DC Motor Pump
1) Drain off the liquid from path, open the window on the left side of the instrument, and
disconnect the tubes connected with the pump.
2)
Forcibly nip the two clamps on the pump base with your thumb and index finger, and then
take out the pump from the base.
3)
Forcibly nip the two clamps on the upper cover of the pump with your thumb and index
finger, and then take out the lower cover.
4)
Take down the wore pump tube from the upper cover, then take down the two closing
rings from the wore tube and clip them in the new tube.
5)
Push the new tube into the interspace between the wheels and the inner wall of the upper
cover. Hold down the two closing rings to clip the outlet of the upper cover, with the
opening upward.
6)
Join the upper cover with the lower cover. Forcibly press until the covers join with each
other totally.
7)
Aim the center of the pump at the motor shaft, and press the pump until it is set on the
base.
8)
Connect the tubes back to the pump.
7.3.2 Step Motor Pump
1) Drain off the liquid from path, open the window on the left of the instrument, and
disconnect the tubes connected with the pump.
2) Unscrew the two screws on the fixing clip.
3) Take out the pump tube and replace it with a new.
4) Circle the new tube around the pump head and clip it with the adjustable clip.
5) Screw the fixing clip but DO NOT block the reel of the pump head.
Base clamps
Adjustable clip
Upper cover clamps
Pump head
Fixing clip
Pump tube
Upper cover
Lower cover
Pump tube
Wheels
Closing rings
Pump
Figure 6-1 DC Motor
Pump
Figure 6-2 Step Motor Pump
BIOLAB-310 Operating Manual
27
7.4 Keypad
A short tone shall be heard when gently pressing the keypad. DO NOT press it hardly.
7.5 Cell
If the test result is not exact and stable, the unclean or damaged cell may be to blame for. If
the test result is not yet satisfactory after rinsing the cell, replacement of cell is possible.
The precisely designed flow cell(Figure 7), with a stainless steel quartz window, can keep an
accurate heat balance inside. The temperature in the cell is controlled by Peltier element.
For replacement of the cell, first open the instrument window. Drain off the liquid from the cell
and path. Then, press the cell and take off the inlet tube and outlet tube. Finally, loosen the
fixed clips on the cell and take out the cell from the cell hole.
For installation of the cell, properly embed the cell in the hole, and fix it with the fixed clip.
Then, connect the tubes back to the corresponding inlet and outlet respectively (the inlet is
narrow while the outlet is wider).
Cell
Fixed clip
Figure 7
CAUTION
For cleanliness of the cell, do not touch the quartz window. After each testing,
wash the cell and fill it with water before turning off the instrument.
Wash the cell with detergent at least once every week. Aspirate 2ml detergent and
keep it in the cell for 5 minutes, then wash it off with 20ml water.
Biological Hazard
DO NOT touch the cell directly. Put on protective gloves when replacing the cell.
NOTE
Improper installation of cell may influence the accuracy of test result.
28
BIOLAB-310 Operating
Manual
7.6 Cleaning
Biological Hazard
Put on protective gloves during cleaning. If chemical sticks to human body, wash
it off with water immediately.
7.6.1 Daily Cleaning
1) Wash 10~15 times after turning on the instrument and 10~20 times before turning off.
2) Empty the waste bottle.
7.6.2 Weekly Cleaning
1) Aspirate detergent containing active enzyme to soak the cell for certain time(not a long
time if the detergent is strong caustic). Then, wash the cell with water several times.
2) Perform WASH 10~15 times with absolute alcohol.
3) Shut off the power supply. Wipe the appearance of the instrument with clean gauze, or
gauze moistened with water or disinfector when necessary.
Biological Hazard
Do not discard the used gauze at will after wiping the instrument. Dispose of it
according to relevant regulations.
7.6.3 Monthly Cleaning
1) The operation is the same as weekly cleaning.
2) Inspect the cell for air bubble and foreign bodies.
BIOLAB-310 Operating Manual
29
7.7 Precautions for Usage
1)
Free from dust and moist. Air conditioner is recommended. The optimum ambient
temperature is 15~25℃.
2)
Free from electric leakage and static electricity. Make sure the instrument is well
grounded. For the absence of earth wire on the power socket, the ground pole outside
the instrument should be grounded to ensure safety and stability.
3)
It is suggested that the electrical receptacle be for instrument exclusive use.
4)
Be sure to use certified and qualified reagents.
5)
Reagents taken out from icebox should not be used immediately until they reach the room
temperature.
6)
To avoid confusion, different samples should be registered with different IDs
7)
After turning on the instrument, execute “ WASH”
routine test.
8)
30
After work, execute “ WASH” several times.
BIOLAB-310 Operating
Manual
and wait for half an hour prior to
8 TROUBLESHOOTING
Your BIOLAB-310 Chemistry Analyzer will give you troublefree operation if you follow
the directions for using and cleaning the instrument. If an operational or
instrument problem occurs, however, an alarm will be heard, along with a prompt
message of the problem. This section of the manual lists the various errors and
messages, along with probable causes and recommended remedies to quickly
and easily correct the problem. If the problem persists after following the
recommended remedy, contact URIT Customer Service office for assistance.
The troubleshooting is based on the replacement of components. The major
replaceable components are listed in Appendix A.
CAUTION
Make sure the power supply has been cut off before maintenance.
Biological Hazard
Put on protective gloves ,clothes and even goggles when necessary.
8.1 Steps for Troubleshooting
In general, you can follow the three steps below to carry out troubleshooting.
The First Step: Confirming Malfunction
You should first have an idea of the malfunction what the instrument should be when it is in
order.
The Second Step: Classing Malfunction
The instrument malfunction can be classed into three categories:
1) Malfunction relating to hardware
2) Malfunction relating to software
3) Malfunction relating to operation
If the malfunction relates to the hardware or software, contact your URIT Customer Service
office . If the malfunction relates to the operation, refer to this section for solution.
The Third Step: Eliminating Malfunction
The maintenance man authorized by URIT will take proper measures to get ride of the
malfunction. User can also eliminate it under directions of maintenance man.
BIOLAB-310 Operating
Manual
31
8.2 Obtaining Technical Help
If you the problem is beyond the scope of this manual and you need technical assistant from
URIT, our Customer Service office is available to help. Before calling, please identify the
following information:
1) The instrument model.
2) The serial number of the instrument.
3) The specific symptom.
4) The data and reports relating to the malfunction.
8.3 Replacement of Fuse
For replacement of fuse, open the fuse box and replace a new fuse,shown in Figure 8.
Power Interface
Cover of Fuse Box
Power Interface
Fuse
Fuse Box
Figure 8
CAUTION
Be sure to cut o ff the power s upply before replacing the fuse.
NOTE
DO NOT damage the fuse box or the power interface when replacing the fuse.
32
BIOLAB-310 Operating Manual
8.4 Troubleshooting Table
Table 1 lists the various malfunction, along with probable causes and recommended
remedies for user to quickly and easily correct the problem. If the problem cannot be solved
or additional assistance is required concerning an instrument problem, contact URIT
Customer Service Office.
Table 1
SN
1
2
SYMPTOM
Fan and lamp do not
work.
Fuse problem.
Fan works while lamp
does not.
Defective lamp.
Pr es s in g t he S TA RT
3
4
5
POSSIBLE CAUSE
k ey , no l i qu id is
aspirated.
No water runs out
when rinsing.
REMEDY
1. Replace the fuse (T 0.8A delay
fuse).
2. If the problem persists, contact
URIT.
Please contact URIT.
1. The pump is not installed
well.
2. Deteriorated or cracked
pump tube.
3. Improper parameter for
the pump.
1. Reinstall the pump properly.
2. Replace the pump tube.
3. Set up proper parameters for
the pump.
4. If the problem persists, contact
URIT.
1. Air Leakage with tube.
2.Deteriorated and cracked
pump tube.
1. Reconnect the tube.
2. Replace the pump tube.
3. If the problem persists, contact
URIT.
1. Defective lamp.
2. Water in the cell is
insufficient, or air bubbles
A/D Adjustment failed.
exist in the cell.
3. Dirty cell.
BIOLAB-310 Operating Manual
1. Contact URIT.
2. Drain off water from the cell,
then aspirate water again and
perform adjustment. If still
failed, reset the parameters of
pump.
3. Wash the cell with detergent or
absolute alcohol several
times.
4. If the problem persists, contact
33
SN
6
34
SYMPTOM
Inaccurate test results
or poor repeatability.
POSSIBLE CAUSE
1. Air bubble in the cell.
2. Deteriorated or cracked
pump tube.
3. Defective lamp.
4. Improper item
parameters.
5. Power supply without
earth wire.
BIOLAB-310 Operating Manual
REMEDY
1. Rinse the cell with medical
alcohol and water respectively.
2. Replace the pump tube.
3. Adjust A/D value.
4. Set proper item parameter.
5. Ground the instrument using
the onboard ground pole.
6. If the problem persists, contact
URIT.
9 Storage and Transportation
9.1 Storage
The packaged instrument should be stored in a breezy room with the temperature of -20℃ ~
55℃, relative humidity ≤ 95%. Stroge mixed with poison, injurant and corrosive is forbidden.
The storage life is 15 years. Using the instrument beyond expiration date may fall short the
precision. In this case, it is recommended to check the instrument before operation.
9.2 Transportation
The transportation must strictly follow the terms and conditions specified in order contact.
Transportation mixed with poison, injurant and corrosive is forbidden.
Transportation environment: -40℃~55℃;RH≤ 95%.
BIOLAB-310 Operating
Manual
35
Appendix A: List of Replaceable Components
No
Item
Remark
T800mAL 250V
(Power input is 220V)
1
Fuse
T1A/125V
(Power input is 110V)
2
Switching power supply
3
Power switch
4
Power supply filter
5
Step motor (Optical path)
With plug
6
Step motor (Pump)
With plug
7
Power cord
8
Connecting cable
9
Mainboard
10
Amplifying board
11
Pump tube
12
Pump subassembly
13
14
Keypad
15
Fan
16
Halogen lamp
17
36
Cell
Temperature sensor
18
Peltier
19
Filter
BIOLAB-310 Operating
Manual
With plug
6V 10W
With plug
With plug
300nm~800nm
Appendix B: Item Sequence and Abbreviation
01.ALT
(Alanine aminotransferase)
02.r-GT
03.ALP
04.CHE
05.D-Bil
06.T-Bil
07.ALB
08.TP
09.UREA
10.BUN
11.Cr
12.UA
13.CO2 -CP
14.GLU
15.CHO
16.LDL-C
17.HDL-C
18.TG
19.Cl
20.Ca
21.Fe
22.P
23.Mg
24.AST
25.LDH-L
26.CK
27.CK-MB
28.α -HBDH
29.LD-1
30.PK
31.Ams
32.Ams
33.Ams
34. Hb
35.CO2
36. ACP
(r-Glutamyltranspeptidase)
(Alkaline phosphaatase)
(cholinesterase)
(Direct bilirobin)
(Total bilirobin)
(Albumin)
(Total protein)
(Urea)
(Blood urea nitrogen)
(Creatinine)
(Uric acid)
(Carbon dioxide combining power)
(Glucose)
(Cholesterol)
(Low-density cholesterol)
(High-density cholesterol)
(Triglyceride)
(Chlorine)
(Calcium)
(Ferrum)
(Phosphor)
(Magnesium)
( Aspartate aminotransferase)
(Lactate dehydrogenase)
(Creatine kinase)
(Creatine kinase-MB isoenzyme )
(α -hydrooxybutyrate dehydrogenase)
(Lactate dehydrogenase)
(Pyruvate kinase)
(Amylase)(Blood)
(Amylase)(Urine)
(Amylase)
(Hemoglobin))
(Carbon dioxide)
(Acid phosphatase)
BIOLAB-310 Operating Manual
37
Tel: +86(773)2883225
Fax:+86(773)2804668