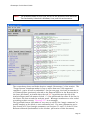
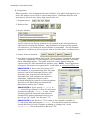
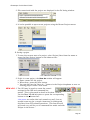
1
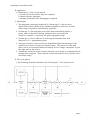
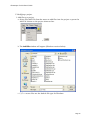
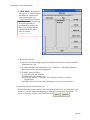
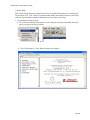
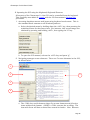
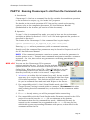
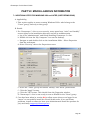
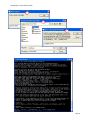
Cleanscape C++lint
User’s Guide
Version 3.1
Sales and Service Office
13170-B Central Ave. SE, #353
Albuquerque, NM 87123
Toll-free 800-94-4LINT
505-246-0267
Fax 505-514-0721
www.cleanscape.net
[email protected]
[email protected]
Cleanscape C++lint User’s Guide
Note: Licensed users may photocopy for distribution.
Direct comments concerning this manual to the address on the title page or
[email protected]
Copyright © 2006-2010
Portions Copyright © 1985-2010 Gimpel Software
CLEANSCAPE
NOTICE OF COPYRIGHTS
Copyrighted by Cleanscape as an unpublished work. All rights reserved. In claiming any
copyright protection which may be applicable, Cleanscape reserves and does not waive any other
rights that it may have (by agreement, statutory or common law, or otherwise) with respect to this
material. See Notice of Proprietary Rights.
NOTICE OF PROPRIETARY RIGHTS
This manual and the material on which it is recorded are the property of Cleanscape. Its use,
reproduction, transfer and/or disclosure to others, in this or any other form, is prohibited except as
permitted by a written License Agreement with Cleanscape. Cleanscape reserves the right to
update this document without prior notification.
C++lint is a trademark of Cleanscape Software International.
PC-lint and Flexelint are trademarks of Gimpel Software.
All other trademarks and registered trademarks are the property of their respective owners.
Acknowledgements
Inflate/Deflate © 1995-2005 Mark Adler.
NOTE: Some screenshots in this document may be of older versions. In such cases the
salient feature(s) on that screen are unchanged in the newer version.
Page 2
Cleanscape C++lint User’s Guide
PART I
Introduction .................................................................................................................................. 4
1.1 WELCOME ............................................................................................................................................ 4
1.2 DOCUMENTATION ............................................................................................................................... 4
1.3 PURPOSE ............................................................................................................................................. 4
A. Function ............................................................................................................................................... 4
B. Application ........................................................................................................................................... 5
C. Advantages ......................................................................................................................................... 5
D. Flow of Analysis .................................................................................................................................. 5
PART II
Requirements, Installation, and Uninstallation ............................................................................ 6
2.1 WINDOWS............................................................................................................................................. 6
A. System Requirements ......................................................................................................................... 6
B. Software Setup Procedure .................................................................................................................. 6
C. Uninstallation ....................................................................................................................................... 7
2.2 UNIX/LINUX ........................................................................................................................................... 8
A. System Requirements ......................................................................................................................... 8
B. Software Setup Procedure .................................................................................................................. 8
C. Uninstallation – manual process ......................................................................................................... 8
PART III
Activation; Initial Test ................................................................................................................... 9
A. Registration Process – GUI ................................................................................................................. 9
B. Registration Process – IDE integration and command line .............................................................. 10
C. Initial Test .......................................................................................................................................... 10
PART IV
Running the Cleanscape C++lint GUI ....................................................................................... 12
A. Overview ........................................................................................................................................... 12
B. Components ...................................................................................................................................... 15
C. Creating a new project ...................................................................................................................... 17
D. Opening an existing project .............................................................................................................. 17
E. Saving a project................................................................................................................................. 18
F. Modifying a project ............................................................................................................................ 19
G. Execute Analysis ............................................................................................................................... 21
H. Review reports .................................................................................................................................. 22
I. Online Help ......................................................................................................................................... 27
J. Sub-Menu Functions .......................................................................................................................... 28
K. Operating the GUI using the Keyboard; Keyboard Shortcuts ........................................................... 29
L. Changing fonts / sizes ....................................................................................................................... 30
M. The Cleanscape GUI and a <CSIproject>.lnt file..................................................................... 31
PART V
Running Cleanscape C++lint from IDEs .................................................................................... 32
A. Overview ........................................................................................................................................... 32
B. Installation ......................................................................................................................................... 32
C. Operation .......................................................................................................................................... 32
D. Uninstallation ..................................................................................................................................... 36
PART VI
Running Cleanscape C++lint from the Command Line ............................................................. 37
A. Introduction ........................................................................................................................................ 37
B. Operation ........................................................................................................................................... 37
C. Return Codes ................................................................................................................................... 38
PART VII
MISCELLANEOUS INFORMATION ...................................................................................... 39
7.1 ADDITIONAL STEPS FOR WINDOWS 2000 and LATER (USER PERMISSIONS) .......................... 39
A. Applicability ....................................................................................................................................... 39
B. Details ............................................................................................................................................... 39
7.2 ADDING AN EXTERNAL EDITOR TO THE GUI USING SETEDITOR .............................................. 40
A. Introduction ........................................................................................................................................ 40
B. Operation ........................................................................................................................................... 40
7.3 USING SETUPGCC and SCAVENGE; file mycompiler.lst ......................................................... 42
A. Introduction ........................................................................................................................................ 42
B. Operation ........................................................................................................................................... 42
C. Fully automated gcc/g++ setup using setupgcc ............................................................................. 42
D. Using scavenge to install a new compiler to C++lint ........................................................................ 43
E. Changing a compiler’s default Include directory ............................................................................... 43
Page 3
Cleanscape C++lint User’s Guide
PART I
Introduction
1.1 WELCOME
Thank you for your product purchase! With Cleanscape C++lint, you have the most
powerful static source (lint) analysis available for C/C++ code. You also get several
different user interface options, one of which, we trust, will provide the perfect level
of integration for the way you develop software.
Cleanscape C++lint is a set of exclusive report content and ease-of-use
enhancements and to the venerable PC-lint/ Flexelint product from Gimpel
Software (hereinafter referred to as simply PC-lint). C++lint includes a fully
licensed copy. PC-lint is the longest-running tool available for C/C++
programmers, dating back to the 1980s. It is a living product with ongoing product
enhancements to keep up with the evolution of C/C++ standards.
1.2 DOCUMENTATION
This is the “quick start” guide for the Cleanscape C++lint static analyzer. There are
three modes of operation:
A. Cleanscape GUI
B. Integration into IDEs using Cleanscape automation
C. Command line
This document’s sole purpose is to describe the ease-of-use enhancements provided
by Cleanscape Software. PC-lint is very rich in analysis controls and reporting; to
gain the most benefit from your product purchase, we urge you to read and keep
handy the companion document, PC-Lint Reference Manual (bookmarked in the
Acrobat .pdf version of this document).
While on the topic of documentation: if you choose Cleanscape GUI or use the GUI
to build the control settings for IDE or command line modes, be sure to check out
the Online Help facility! It’s concise yet useful information. The Table of Contents
and many interrelated items in the help text are hyperlinked to make information
access quick and easy.
New features for each version are marked with, for example, NEW v3.1.
1.3 PURPOSE
A. Function
1. Cleanscape C++lint is a programming tool that simplifies the debugging and
maintenance of both large and small C and C++ programs. Cleanscape
C++lint provides ease-of-use enhancements to, and a fully licensed copy of,
the venerable PC-lint/Flexelint product from Gimpel Software, in addition to
exclusive report content.
2. The PC-lint source code analyzer that can detect over 1000 potential
problems, including:
a. Inappropriate arguments passed to functions
b. Inappropriate library calls
c. Non-portable code
d. Type usage conflicts across different modules
e. Unused variables and dead code
Page 4
Cleanscape C++lint User’s Guide
B. Application
1. Cleanscape C++lint can be used to:
a. Check source files before they are compiled
b. Isolate obscure problems
c. Identify problems before debugging is required
C. Advantages
1. The diagnostic messages produced by Cleanscape C++lint are more
detailed than those produced by standard compilers, and cover a much
wider range of syntactic and semantic problems.
2. Cleanscape C++lint analyzes source files both individually and as a
group, and can therefore identify problems that are beyond the
scope of a compiler ─ especially the global (program) scope.
3. Cleanscape C++lint is effective in reducing development time and
improves C/C++ programming style.
4. Analysis and other report results are hyperlinked from the message to the
related line of source using your favorite editor. This saves you time and
effort, and is a convenient method of adding PC-lint “magic comments” at just
the right spot in the source.
5. Cleanscape exclusive report content enhances your ability to comprehend and
manage your program. These reports include inheritance trees, include trees,
and stack usage.
D. Flow of Analysis
1. The following flowchart illustrates the Cleanscape C++lint test process:
Page 5
Cleanscape C++lint User’s Guide
PART II
Requirements, Installation, and Uninstallation
2.1 WINDOWS
A. System Requirements
1. Hardware
Any configuration sufficient to run Windows is sufficient for C++lint.
2. Operating System
a. Microsoft Windows
b. Microsoft Windows
c. Microsoft Windows
d. Microsoft Windows
e. Microsoft Windows
f. Microsoft Windows
7
Vista®
XP® with Service Pack 2 (SP2)
2000® with Service Pack 2 (SP2)
NT® 4.0 with Service Pack 6a (SP6a)
98® and 98® SE
3. Web Browsers
a. Firefox® 1.2 or above
b. Microsoft Internet Explorer® 5.x or above
c. Opera® 6.x or above
B. Software Setup Procedure
1. Installation
a) Download cpplintgui<ver>_win.exe to a temporary directory, then run it.
b) An installer window will appear and extract a number of files to the installation directory you specify (hereinafter referred to as <install_dir>; the
default is c:\cleanscape\cpplint). The installer exits automatically, and no
reboot is required, though you must close/reopen any command prompts.
NEW v3.1
The installer will upgrade you to x64 versions of key executables if applicable.
c) The installer automatically creates a shortcut for the Cleanscape C++lint
GUI on the desktop. To run the GUI, double-click the shortcut follow the
instructions to obtain a license key as described in Section 3.
d) The installer searches for any supported versions of Visual Studio on your
machine and if found, automatically installs the Cleanscape tools.
NEW v2.0
Care has been taken to allow users who are not logged in as “owner” to
successfully install the Visual Studio tools; if you encounter problems,
reinstall as owner (or have your Administrator install) and notify us.
NOTE: Automatic installation is not possible on Windows 98; if you are a
Win98 IDE user, please contact [email protected].
e) Finally, the installer adds the main subdirectory to your system PATH –
necessary for running C++lint (or any of its associated support programs)
from the command line. To do this manually, enter the following command:
set PATH=<install_dir>\main;%PATH%
2. Additional steps for Windows 2000+ user privileges / access control
If you’re installing C++lint under Windows 2000 or later as Administrator,
and you want to make the program accessible to ordinary Users, some
additional steps are required. For more information, see Section 6.1.
Page 6
Cleanscape C++lint User’s Guide
For Visual Studio integration, it may be necessary to install as Administrator
for installation/access by all users.
C. Uninstallation
NOTE: You will need owner privileges if that is how the product was installed.
1. Using the included uninstaller
There is an uninstaller named uncpp.exe in the main subdirectory. To run,
double-click on it or run it by name in a command prompt. By default (with
no operands), the uninstaller will remove all components – after confirmation –
as described in step 2 below. It’s also possible to delete each component on a
piece-by-piece basis. Run any of the following from a command prompt:
● uncpp -ICON
Remove the C++lint GUI icon from the Desktop.
● uncpp -PATH
Remove Cleanscape C++lint from the system PATH.
● uncpp –VS [ver]
Uninstall the Cleanscape tools from Visual Studio
on your system. NOTE: Not available for Win98; use
part 2d) below instead
● uncpp -DIRS
Queues <install_dir> for deletion upon next login.
2. Manual uninstallation
a) Delete the installation directory and its subdirectories.
b) Delete the Cleanscape C++lint GUI icon from the desktop
c) Remove the Cleanscape directory from your PATH:
● In Windows 98, delete the appropriate “set path=” statement from your
c:\autoexec.bat file.
● In Windows NT/2K/XP/Vista, right click your “My Computer” icon on the
desktop, select “Properties”, click the “Advanced” tab, click the
“Environment Variables” button, double-click the text field “Path” in the
System Variables area, and from that string, delete <install_dir>\main
d) If Microsoft Visual Studio is installed on your machine, tools were
automatically integrated upon C++lint installation (see Section 5). Delete
these tools using the following steps:
● Open your Visual Studio IDE.
● Select the Tools dropdown menu.
● Select “External Tools…” (for VS 6, select “Customize…”, then click the
“Tools” tab in the dialog).
● Click on each Cleanscape tool in turn, then click on the Delete button (for
VS 6, delete each tool by clicking the red ‘X’ in the top right).
3. Restore your system to the point just before Cleanscape C++lint installation –
not available for Windows NT/2k
The installer created a system restore point just prior to installation. If you
have not added new programs in the interim, you can safely roll your system
back to this point. For Win98, use scanreg /restore
Page 7
Cleanscape C++lint User’s Guide
2.2 UNIX/LINUX
A. System Requirements
1. Hardware
A minimum of 256 MB memory is required for Cleanscape C++lint.
2. Operating System. Note the GUI version may differ amongst the various hosts.
a. Most GNU/Linux OSes, including RedHat®, SuSE®, Debian®, Ubuntu®
b. HP HP-UX®
c. IBM AIX®
d. SGI Irix®
e. Sun Solaris®
f. Mac OS-X® Tiger
3. Web Browsers
a. Firefox® 1.2 or above
b. Seamonkey® 1.0 or above
c. Opera® 6.x or above
d. Mozilla® 1.7 or Netscape Navigator® 4.7x or above
B. Software Setup Procedure
Installation – installation as root is easier and recommended. Refer to the
installation notes for details. The ‘#’ below represents the root prompt.
a) Download the latest version of cpplintgui<ver>_<OS>.taz to a temporary
directory, e.g., /tmp.
b) Create installation directory, e.g., /usr/local/cleanscape, and cd to it.
c) Use the following commands to extract the files:
# gunzip /tmp/cpplintgui<ver>_<OS>.taz
# tar xpvf /tmp/cpplintgui<ver>_<OS>.tar
NEW v3.1
If you have an x86-64 machine, run a script to install 64-bit executables:
# ./upgrade64.sh
d) Start the GUI:
# cpplintgui &
and follow the instructions to obtain a license key as described in Section 3.
e) If you intend to run Cleanscape C++lint from the command line or on an
application server, these are also required (examples below are for sh/bash):
#
#
#
#
#
export CSIAPPBASE=<install_dir>
export IPTLINT=$CSIAPPBASE/cpplintgui.dir/main
export PATH=$IPTLINT:$PATH
cpplint –license-activate
# see Sec. 3-B.2
startup
# see Sec. 3-B.3
NOTE: The daemon must be running via startup before clients can access/
use the product or before the command line version can be run.
C. Uninstallation – manual process
a) Delete the installation directory and its subdirectories.
b) Delete .myeditor.lst, .mycompiler.lst, & .ctemplate.csi from all users’ $HOME.
Page 8
Cleanscape C++lint User’s Guide
PART III Activation; Initial Test
A. Registration Process – GUI
The first time you run the program, a registration prompt will be displayed. You
must "register" the program before you can use it. This will run again if the
activation key (provided by Cleanscape) expires.
1. If Cleanscape C++lint is not registered, a notification will be displayed. To
continue, press OK. The following dialog will appear (NOTE: your server code
will be different!):
2. To obtain your activation key, contact Cleanscape Software and provide the
server code listed on the “Register Cleanscape C++lint” window. The “Server
Code” is on the line with a yellow background. HINT: Highlight the server
code with your mouse. Unix users, you now have a copy; Windows users,
type CTRL-C on your keyboard to copy the server code.
To reach Cleanscape, call 800-94-4LINT or +505-246-0267, or send email to
[email protected].
3. Enter your name, company name and the activation key. HINT: Copy the
activation key from your email from Cleanscape, then paste it in the
activation code text box (Windows users, type CTRL-V on your keyboard).
When ready, press OK.
4. You should then see an “About Cleanscape C++lint” dialog box. At this stage,
Cleanscape C++lint is now registered and operational. If you do not see this
dialog box, contact Cleanscape for further assistance (see #2 directly above
for contact info).
Page 9
Cleanscape C++lint User’s Guide
B. Registration Process – IDE integration and command line
0. If you wish, you can register the product using the GUI – the license key is
created and stored correctly using either method. Just be sure to set up the
environment variables per the instructions in Section 2.1.B.1.e or 2.2.B.f
above! If you use the GUI method, you can skip the rest of this section.
1. Be sure you have set up the environment variables per the instructions in
Section 2.1.B.1.e or 2.2.B.f above.
2. Run the command, cpplint –license=activate
Hit <Enter> to leave the number of license servers at its default of 1.
The next line from the activation program will contain your server code. On
Windows machines, it starts with “30720/”; on *nix, it is purely numeric.
To obtain your activation key, contact Cleanscape Software and provide this
server code. To reach Cleanscape, call 800-94-4LINT or +505-246-0267, or
send email to [email protected].
3. On *nix, run the shell script, startup, which was created during step 2 above.
This starts the license management daemon, which is required for command
line, Eclipse IDE, or application server operation. Place it in one of your init
files so it will be restarted each time the machine is. Note: each time the
daemon is started, there is a 3-minute delay while it attempts to synchronize
with compatible apps on the network; this is a one-time delay on each start.
C. Initial Test
If you are running in an IDE, skip this section and proceed to Chapter 5.
If you have any difficulties with this step, email [email protected]
Once registered, you need to verify that the system (“library”) include directories
are properly identified and located by C++lint. Most Windows compilers use the
INCLUDE environment variable, which C++lint reads automatically; verify that
the order within INCLUDE is correct, or override as described below.
NOTE: If you have a custom compiler – one not listed in the GUI’s Target System
dropdown or for which there is no co-xxx.lnt file in the main/lbin/lf
subdirectory – run the scavenge program as described in Section 7.3.D first.
GUI
1. Select your target compiler, e.g., AIX if running a native AIX host, gcc_latest
for Linux or compiling with gcc, or other native or embedded processor.
Select Errors_only in the Warning Level dropdown.
2. Click the Add Files button. In the resulting dialog box, navigate to the
examples subdirectory, then select testcfg.c or testcfg.cpp, depending on
whether you are building C or C++ applications.
3. Click the Run button.
If you selected gcc_latest or g++, command line program setupgcc will start
automatically to determine site-specific internal settings such as defines,
macros, and include directories. Read more about setupgcc in Section 7.3.C.
Page 10
Cleanscape C++lint User’s Guide
Check the results in the Reports window (right side of GUI). If there are no
errors, you are ready to run; if there are errors, add the system include
directories separated by spaces (e.g., /usr/include) to the Include Directories
text box on the Misc Options tab in the lower left frame of the GUI, and add
the same directory to the System include textbox, e.g., +libdir(/usr/include).
Command Line
1. If you intend to gcc or g++, run command line program setupgcc first to
determine internal settings such as defines, macros, and include directories.
2. Specify your target compiler by adding the appropriate co-xxx.lnt file from
the main/lbin/lf subdirectory.
3. Test your command line against examples/testcfg.c or testcfg.cpp
Observe the results produced. If there are no errors, you are ready to run; if
there are errors, add the system include directories, e.g.,
-i/usr/include +libdir(/usr/include)
to the command line.
IDE
1. Skip this section and proceed to Chapter 5.
The next three sections describe in detail
the operation of Cleanscape C++lint
• from the GUI
Part IV
• integrated within IDEs
Part V
• from the command line
Part VI
Page 11
Cleanscape C++lint User’s Guide
PART IV Running the Cleanscape C++lint GUI
A. Overview
The Cleanscape GUI is a tried-and-true graphical interface used successfully for
years on Cleanscape’s Fortran-lint and Lint-Plus for C static source analyzers. It
is also the planned interface for future C/C++ and Java analyzers and test tools.
The Cleanscape GUI is ideal if your primary development environment centers on
a programming editor (as opposed to an IDE, as we’ll discuss in the next section).
The Cleanscape GUI provides hyperlinking between the results (in the Reports
frame) and the line of source in the source file that caused the message.
Advantages of the Cleanscape GUI include:
• Fast
• Easy to learn, navigate, and use
• Information readily at the programmer’s fingertips
• Point-and-click control for options-laden PC-lint command-line product.
• Access code at the relevant point using your favorite editor!
NEW v3.0 The GUI has two new reports: inheritance tree, which displays the class hierarchy for the selected files (or entire program if all are selected), and include tree
with optional redundant file check. For details, see Sections 4.B and 4.H below.
NEW v2.0 The GUI now supports the creation and inclusion of an indirect file with the
same basename as the project (hereinafter <CSIproject>.lnt). This enables the
user to supply customized settings unavailable in the GUI and override the coxxx.lnt file so that file may remain pristine. For details, see Section 4.M below.
NEW v1.3 The GUI may be used to create the control settings for the IDE and command
line modes as described in Sections 5 and 6 of this document. As of version 3.0,
NEW v3.0 Cleanscape offers a free external tool for VS that exports <IDEproject>.lnt and
std.lnt from IDE projects to the Cleanscape GUI for inheritance, include tree,
stack, and statistics reports ─ contact [email protected] if you’d like this.
Supported code editors are listed below. It is also possible for users to integrate
their own editor; see Section 7.2 for details on the seteditor program. For usercontributed editors, visit http://www.cleanscape.net/products/contributed_editors.html.
Windows editors:
• Borland CodeWright
• Crimson Editor
• Emacs
• Epsilon
•
•
•
•
Gvim
GWD Text Editor
MultiEdit
Starbase CodeWright
Unix/Linux editors:
• Elvis
• Joe *
• Emacs
• Nano *
• Jed *
• Nedit
• Pico *
• Vi *
• Vim *
•
•
•
•
TextPad
UltraEdit
Visual SlickEdit
Visual Studio 6 ─ 2010 *
• Xemacs
* Multiple instances of these editors will open with each link click.
All elements of the GUI are also controllable from the keyboard; this is discussed
in Section K below.
Page 12
Cleanscape C++lint User’s Guide
NOTE:
The screenshot below is from Linux; the rest in this section are from Windows.
The functionality is identical in Windows, Linux, and Unix environments.
The screenshots above and below depict a sample Cleanscape C++lint session. The
“Target System” dropdown makes it easy to select from over 100 supported
compilers – native as well as embedded. On the next page, the lower screenshot is
of Crimson Editor (previously selected as the External Editor in the Reports tab in
the lower left frame), activated when the red “40” hyperlink near the top of the
Analysis Report was left-mouse-clicked. C++lint positioned the editor to the line in
the source file that caused the analysis result. Messages numbers are color-coded
according to their severity; "Warning 527" is an example.
The hyperlink feature also makes it very easy to add PC-lint “magic comments” to
modify analysis at the block or even statement level. For more information on inline control of PC-lint through comments, see Sections 5.1 and 5.2 of the PC-Lint
Reference Manual (bookmarked in the Acrobat .pdf version of this document).
Page 13
Cleanscape C++lint User’s Guide
Also, it is possible to open any file listed in the Project window (upper left frame of
the GUI) by right-mouse-clicking on the desired filename.
The Cleanscape C++lint GUI remembers settings (e.g., checkboxes, target system,
external editor) from the previous session in a file named template.csi in the main
subdirectory or $HOME (preceded by ‘.’) if Unix/Linux. There is no template file upon
installation, and it can be bypassed by adding -BLANK to the end of the GUI startup.
Finally, note that it is possible to add compilers to the Target System dropdown by
editing file <install_dir>/bin/mycompiler.lst; see Section 7.3 and the comments in
that file for details. (Cleanscape uses the same method with file <install_dir>
/bin/newcomps.lst when adding newly supported compilers.)
Page 14
Cleanscape C++lint User’s Guide
B. Components
Where possible, each component features “balloon” help which will appear if you
hover the mouse over an item or control description. Additional help for each
item may be found in the Online Help (see Section 4.I).
1. Program menu:
2. Shortcut bar:
3. Project window:
Any file listed in the Project window can be opened in the selected editor by
right-mouse-clicking the filename. Any filenames too long to fit the window
are shorted to ~60 characters and an ellipsis is prepended. The full filename
appears in a balloon tip if hovering the mouse over the name, as shown above.
4. Project shortcut buttons:
5. Lint/Source options window (below with “Target System” dropdown activated).
Currently, Cleanscape C++lint supports 100+ compilers/versions, including
many embedded targets. This point-and-click control makes using the
options-laden PC-lint command-line product easy! NOTE: Your suggestions
to improve this feature are appreciated – email them to [email protected].
USAGE NOTE 1: Due to the rich extent of PClint analyses, it is recommended that first-time
projects turn off all Warnings (“Errors_Only”
selected), then progressively add levels of
warnings once prior analyses are assessed/
addressed. Individual analyses can be
enabled/disabled by number in the appropriate
text box on the Miscellaneous Options tab,
discussed in subsection 7 below.
USAGE NOTE 2: If you specify Gcc_Latest or
g++ as the Target System, its first use will cause
an external program, setupgcc, to run. Follow
the dialog box and onscreen instructions to
automatically gather information about your
specific gcc/g++ build. See Section 7.3.C.
USAGE NOTE 3: See Section 7.3.D to make a new compiler available to
C++lint using external program scavenge. You can also override the default
include directory for your compiler by adding a “change line” to the
mycompiler.lst file as described in Section 7.3.E.
Page 15
Cleanscape C++lint User’s Guide
6. Report Options window (with External Editor
dropdown activated):
Examples for all reports in Section 4.H below.
NEW v3.0
• Inheritance: a Cleanscape exclusive, the
class hierarchy, indicating parents and
unconnected nodes.
• Include: a Cleanscape exclusive, the
inclusion of header files, with options to
report redundant includes (same-name files
in include path) or exclude system headers.
NEW v2.0
• Statistics: a Cleanscape exclusive, melding
information from several analysis options.
• Stack Usage: tabular list of auto storage and
stack requirements for each function.
• Source Listing: Add source to the analysis report ─ great for documentation.
7. Miscellaneous Options window (with “Browse Includes” feature activated).
NEW v2.0
You can now create a <CSIproject>.lnt file to enhance/refine the analysis for
your project; it will override settings in the co-xxx.lnt file associated with the
Target System. Clicking this button will allow you to view/edit both files.
Individual analyses can be enabled/disabled by number in the like-named text
box (e.g., +e710 –e844 –e322). For more information on all the settings controlled from this tab, see Chap. 5 of the PC-Lint Manual. For a complete list
of analyses by number, see http://www.cleanscape.net/products/cpplchecks.html
Cleanscape C++lint also adds various control mechanisms based on the file
extension and the Language option on the Lint/Source Options tab; these can
be viewed in the Statistics report. Override as needed in this text box.
NEW v2.0
The bottom text box has been repurposed to support –sem, –strong, or a catchall for a few extra PC-lint directives without creating a <CSIproject>.lnt file.
Page 16
Cleanscape C++lint User’s Guide
8. Report windows:
Example reports appear in Section H below.
C. Creating a new project
0. In Cleanscape terminology, a project is a collection of file names, include
directories, define/undefine definitions, and analysis controls. Actual files are
not relocated on the disk, nor are they deleted if removed from a project.
1. To create a new project, select Project/New from the menu or press the
New Project button on the shortcut bar. Note: If a project is already open, a
dialog box will prompt you to save the old project first.
2. A new project name appears in the title, but can be renamed upon a save.
D. Opening an existing project
1. To open an existing Cleanscape GUI project, select Project/Open from the
menu or press the Open Project button on the shortcut bar:
2. A standard Open dialog
box will appear:
a. Browse to find/select
a project file (with
extension .csi).
b. When ready, press the
Open button in the
lower right corner.
Page 17
Cleanscape C++lint User’s Guide
3. Files associated with the project are displayed in the file listing window:
4. It is also possible to open recent projects using the Recent Projects menu:
E. Saving a project
1. To save the current state of a project, select Project/Save from the menu or
press the Save Project button on the shortcut bar:
2. If this is a new project, the Save As window will appear.
a. Enter a name for the project.
b. When done, press the Save button.
c. You can also use the “Save As…” feature in the Project dropdown to save an
existing project under a new name.
NEW v2.0 3. The GUI may be used to create the control
settings for the IDE and command line
modes. This is discussed in detail in Sections 5 and 6.
Use the Save VS std.lnt option or press the corresponding
button on the shortcut bar:
*nix users: we realize this isn’t named very well, but we
needed some way (in a couple characters) to distinguish
this Save from GUI-related operations. This function will
still work very well for you in command-line mode and with
Eclipse in the future…
Page 18
Cleanscape C++lint User’s Guide
F. Modifying a project
1. Add files to a project
a. Select File/Add File from the menu to add files into the project or press the
Add File button on the project shortcut bar:
b. The Add file window will appear (Windows version below):
c. C/C++ source files are the default file type for Windows.
Page 19
Cleanscape C++lint User’s Guide
d. UNIX NOTE: The default
file type is .c, which can be
modified by entering the
appropriate type (e.g.,
*.cpp) in the Filter textbox
at the bottom of the dialog.
It is also possible to
permanently modify the
filter type by editing the
“Default Add File filter”
line in text file
~/cpplint.ini.
e. Multi-file selection:
1) The file-selection dialog supports multiple-file selection under both MSWindows and *nix.
2) To add multiple files individually, use <Control> + Left Mouse Button.
Each selected file will be highlighted.
3) To add a group of files:
(i) Left-click on the first file.
(ii) Hold down the <Shift> key.
(iii) Click the last file. The first, last, and all in-between will be
highlighted.
(iv) When done, press the Open (Windows) or Accept (*nix) button.
2. Selecting files for the analysis run
Files within the project may be selected/deselected before an analysis is run.
To do so, use the same highlighting techniques as described just above. To
select or deselect all files, use these buttons:
Page 20
Cleanscape C++lint User’s Guide
3. Removing files from a project
a. To remove individual source files from a project, select the files to be
removed (see previous section for explanation of selection process) and
then press the Remove File button. To remove all files from a project (i.e.,
to clear the file list), first press the Select All button, and then press the
Remove File button.
b. Press the OK button to confirm the removal operation:
c. The updated file list is displayed in the project window.
d. Note that this operation has no effect on the actual file on-disk.
G. Execute Analysis
1. Create a new project or open an existing project.
To create a new project, see Section 4.C.
To open an existing project, Section 4.D.
2. Select the files to be analyzed as explained in Section 4.F.1.
3. Modify options as necessary, using the tabs in the lower left frame of the GUI,
as displayed in Sections 4.B.5-7. See balloon help, Online Help, and the PCLint Reference Manual (bookmarked in the Acrobat .pdf version of this
document) for descriptions of each option.
4. To analyze the selected files, use Run/Go from the menu or press the Execute
test button on the shortcut bar:
or
Page 21
Cleanscape C++lint User’s Guide
H. Review reports
1. To view the generated reports, click on the appropriate report tab in the right
frame of the GUI:
2. To print reports, or to save them to disk, use the Report menu dropdown at
the top of the screen. Reports may be printed or saved collectively or
individually.
3. Samples of each of the reports are depicted below. Remember that clicking
any entry in red will open the source file at the appropriate source line in the
specified External Editor.
Sample Analysis Report:
Page 22
Cleanscape C++lint User’s Guide
NEW v2.0 Sample Statistics Report, a Cleanscape exclusive:
Page 23
Cleanscape C++lint User’s Guide
NEW v3.0 Sample Inheritance Report, a Cleanscape exclusive:
Page 24
Cleanscape C++lint User’s Guide
NEW v3.0 Sample Include Tree Report, a Cleanscape exclusive:
Page 25
Cleanscape C++lint User’s Guide
NEW v2.0 Sample Stack Usage Report, a Cleanscape exclusive:
Sample Prototype Report:
Page 26
Cleanscape C++lint User’s Guide
I. Online Help
The Online Help System contains concise yet useful information for running the
Cleanscape GUI. The Table of Contents and many interrelated items in the help
text are hyperlinked to make information access quick and easy.
1. Accessing the Help System
a. To access the online help system, select Help/Contents and Index from the
menu or press the Help button:
b. The Cleanscape C++lint Help browser will appear:
Page 27
Cleanscape C++lint User’s Guide
J. Sub-Menu Functions
There are several “right-mouse-click” options available while in the Reports frame
on the right hand side of the GUI. These features should be self-explanatory for
those familiar with graphical environments. The more commonly used features
are shown in detail below.
1. Copy
a. Click and hold the left mouse button while dragging to select text.
b. Press the right mouse button inside reports frame
c. Select Edit -> Copy
d. The text can now be pasted into other applications (e.g., Microsoft Word).
2. Search
a. Press the right mouse button inside a report frame.
b. Select Search -> Find.
c. Enter string to search and select the desired options:
d. The search result(s) will be highlighted.
Page 28
Cleanscape C++lint User’s Guide
K. Operating the GUI using the Keyboard; Keyboard Shortcuts
All aspects of the Cleanscape C++lint GUI can be controlled from the keyboard.
This capability was added to comply with the US Government’s Section 508
provisions.
1. Accessing dropdown menus and items using keyboard accelerators. This is
the standard mode common to all Windows products.
a. Select the desired menu by holding down the <ALT> key, then pressing the
underlined letter for that menu item. For instance, this screen image was
obtained by pressing and holding <ALT>, then typing the “h” key:
b. To open the GUI manual, release the <ALT> key and press “g”.
2. Navigating amongst screen elements. There are 5 screen elements in the GUI,
as shown below:
1
2
5
3
4
a. The <TAB> key scrolls between these five screen elements and all active
items within each element. <SHIFT>+<TAB> reverses the scrolling. The
item with focus will have a dotted line around its border. Note: Because
Page 29
Cleanscape C++lint User’s Guide
of the background color, the icon buttons in Element 1 will not show the
dotted-line highlighting.
b. For buttons (including radio buttons), pressing the space bar will “push”
the button.
c. For checkboxes, pressing the space bar will “check/uncheck” the box.
d. For dropdown boxes, pressing the space bar will open the dropdown; the
up/down arrows will navigate the dropdown, and the <ENTER> key will
select.
3. Keyboard shortcuts.
a. The standard Windows shortcuts are available. For instance, pressing
<F1> will bring up the Help listing; <ALT>+<F4> exits the program.
b. Use the alt-key combination to access a menu, then type just the
underlined letter to access a submenu item. For instance, to invoke
Project-Save As, one would type <ALT>+<p>, then <a>. Alternately, the
arrow keys can be used to navigate submenu selections once the menu
dropdown has been activated with <ALT>+<p>.
c. The following keyboard shortcuts are also available within the GUI:
<ALT>+<o>
Open Project
<ALT>+<g>
Run the Analysis (Go)
<ALT>+<x>
Exit GUI
<ALT>+<l>
Jump to Lint analysis tab (in Element 4)
<ALT>+<r>
Jump to Reports tab (in Element 4)
<ALT>+<m>
Jump to Misc Options tab (in Element 4)
<ALT>+<1>
Jump to Report #1 (Analysis report in Element 5)
<ALT>+<2>
Jump to Report #2 (Statistics report in Element 5)
<ALT>+<3>
Jump to Report #3 (Inheritance report in Element 5)
<ALT>+<4>
Jump to Report #4 (Include Tree report in Element 5)
<ALT>+<5>
Jump to Report #5 (Stack Usage report in Element 5)
<ALT>+<6>
Jump to Report #6 (Prototype report in Element 5)
L. Changing fonts / sizes
To change the fonts and sizes used within the GUI, edit the text file cpplint.ini
located in the main subdirectory on Windows or your $HOME directory if *nix.
In that file, you will see a section starting with [fonts]. Change the values from
default to a value specified as follows:
name size style
where name
is any font name on your system (enclose in curly braces if spaced),
size is an integer font size, and
style is one of:
normal
bold
italic
underline
Example: report text = {Lucida Console} 9 normal
Specifying all three font characteristics is recommended.
NOTES: The GUI will attempt to substitute Helvetica 10 or Courier for invalid
fonts. The case of the font name can be a factor.
Page 30
Cleanscape C++lint User’s Guide
M. The Cleanscape GUI and a <CSIproject>.lnt file
NEW v2.0 The Cleanscape C++lint GUI now automatically looks for a PC-lint indirect file
with the same basename as your saved project. For instance, if you saved your
project as myproj (C++lint adds a .csi extension), the associated indirect file
C++lint searches for is myproj.lnt in the same directory as myproj.csi.
Because of where C++lint places <CSIproject>.lnt in its control commands to
PC-lint, that file will override any conflicting directives present in the co-xxx.lnt
file for the compiler you selected in the Target System dropdown. This allows
you to make customizations on a per-project basis while leaving the co-xxx.lnt
file unaltered – important for perhaps other users on the project and because the
co-xxx.lnt file could be overwritten during a C++lint product update!
You can create <CSIproject>.lnt manually, or a new file of that name will be
created if you click the View… button on the Misc Options tab in the lower left
frame of the GUI (see Section 4.B.7). This button will also open co-xxx.lnt –
which we recommend you simply view – and make any adjustments in
<CSIproject>.lnt.
Finally, <CSIproject>.lnt allows you to add refinements to certain PC-lint
commands enabled by the GUI, or to add PC-lint operations not supported by the
GUI at all. This makes perfect sense, since some PC-lint operations (e.g.,
-strong) will vary so much between individual users that automation (or even
semi-automation) in the GUI offers little benefit.
Order of precedence. The options specified in co-xxx.lnt are at the lowest level
of precedence. Any like-named operations specified in <CSIproject>.lnt
override those in co-xxx.lnt. Any operations specified in the GUI (whether
enabled by clicking its checkbox or not) will override the same options specified
in <CSIproject>.lnt, except for the following:
• -passes(n, opt1, opt2)
• -a(standard)
• -zero(n)
This is due to the inconsistent nature of these commands. Thus, for example, if
you have selected ‘3’ in the Passes dropdown on the GUI’s Lint/Source Options
tab, but you have specified –passes(4, ,+e551) in your .lnt file, the latter will
run, not the former.
Non-overridable. The following options set by the GUI should not be overriden by
the user, since proper handling of the PC-lint output depends on their being set
correctly. Contact [email protected] if this becomes a problem for you:
• -format_stack()
• -format_summary()
• -h()
• -od()
Allowable/recommended. The following options are allowed and in some cases
recommended:
NEW v2.0 • -strong() // an extremely powerful feature with new dimensional analysis
capability; see Chapter 9 of the PC-lint user’s manual
• -stack()
// if you want to specify precise settings for your program
• -source() // if you want to customize the source listings in analysis output
Page 31
Cleanscape C++lint User’s Guide
PART V
Running Cleanscape C++lint from IDEs
A. Overview
For customers who develop their code in Integrated Development Environments
(IDEs), it is more useful to operate C++lint from within the environment.
Advantages include:
• Cleanscape C++lint reads project information (especially the file list, include
directories, and definitions) – no need to re-specify.
• Deep integration: C++lint uses the output window of the IDE for results and
hyperlinks to the source files using the IDE’s internal editor.
• Fewer windows to shuffle between.
All Microsoft Visual Studio versions are supported: VS6, VS2003.NET, VS2005,
VCX2008, VS2008, VCX2010, and VS2010. Other IDEs may be supported via
the External Editor option in the Cleanscape GUI (see Sec. 4.B.6).
NEW v3.0 Eclipse integration is available. To obtain integration instructions or request
deep integration for your IDE, email [email protected].
B. Installation
NOTE: The installers will not operate in Windows 98! If you are a Win98 IDE
user, please contact [email protected].
To run C++lint from IDEs, you need to have registered and activated the product
as described in Section 3.
Installation for all Visual Studio versions occurred automatically when you
installed Cleanscape C++lint. If you added a new version of Visual Studio or
otherwise want to rerun an IDE installer, please read on.
NOTE: Care has been taken in version 2.0 to allow users who are not logged in
as “owner” to successfully install the Visual Studio tools; if you encounter
problems, install as owner (or have your Administrator install the product for
you) and notify [email protected] .
Available installers are in directory <install_dir>\ideinstall
Select the installer corresponding to the version of the IDE you wish to integrate
with. Other IDEs will be supported in the future; to request deep integration
with your IDE, email [email protected].
From the ideinstall directory, type the name of the installer you wish to run.
After a few moments, you will see
The operation completed successfully
in the command window. This indicates that the Cleanscape tools have installed
correctly and that Cleanscape C++lint is available directly within your IDE! If
you encounter any problems, please email [email protected].
C. Operation
For Microsoft Visual Studio, the installer placed five “External Tools”, found in
the “Tools” dropdown menu. A description of each tool follows. In the titles for
Page 32
Cleanscape C++lint User’s Guide
each tool, below as well as on the “Tools” dropdown menu, the underlined letter
indicates the default “accelerator key” for that tool.
Clicking ALT-T then the underlined accelerator key represents a shortcut to
running that tool. For details on the actual operation of PC-lint and its control
and reporting options, refer to the companion document, PC-Lint Reference
Manual (bookmarked in the Acrobat .pdf version of this document).
NEW v3.1
Tools have been reordered.
1. PC-lint Project Setup - tool by Cleanscape
NOTE: This option must be run first to successfully analyze projects or
modules with tools 2, 3, and 4.
This option does not run any analyses, but instead parses the Visual Studio
project file for the list of source files, include directories, and defines
comprising the current project. These values are then placed in a PC-lint
<IDEproject>.lnt file, created and maintained by this tool.
Rerun this tool each time the project changes (changes to the source file list,
include directories, or defines). Because the <IDEproject>.lnt file will be
rewritten each time the tool is run, do not edit the file!
HINT: Be sure to save your project before running this tool!
Separate from <IDEproject>.lnt, a std.lnt file is used to specify analysis
control settings to PC-lint. std.lnt is never changed automatically, and is
therefore the place to set PC-lint options on a per-project basis.
NEW v2.0 You can use the Cleanscape GUI to generate
analysis switches for you. To do so, set the
analysis options within the GUI as described in Sections
4.B.5-7 and the Online Help. When done, select File – Save
VS std.lnt or use the corresponding button on the shortcut
bar; std.lnt will be saved to your project’s root directory.
The Project Setup tool will ask you if you wish to use the
Cleanscape GUI in this manner. If the GUI is not used and
no std.lnt exists already, Project Setup will create a skeleton
std.lnt file in the project’s root directory.
USAGE NOTES:
1. The GUI’s “Target System” setting is saved within a comment – for IDEs,
the compiler value is set automatically by the Cleanscape tools. Do not
uncomment this line if using an IDE.
2. If std.lnt already exists, it will not be altered.
3. Files are automatically determined when running the Visual Studio Project
Setup tool; any GUI entries are ignored.
After creation, this tool opens std.lnt in Notepad. This provides your first
chance to manually enter project-specific control settings for PC-Lint. Read
the comments in the std.lnt file for startup information.
Rerun this tool each time the project contents change (e.g., when files are
added or deleted). If a std.lnt file exists, its contents are preserved.
Page 33
Cleanscape C++lint User’s Guide
2. PC-lint Single Module - tool by Cleanscape
Use this tool (after having set up the project by using tool #2 above) to run
PC-lint over a single module. The difference between this tool and tool #6 is
that all your project information is made available to the analysis; that is, it is
analyzed within the context of all your build settings.
Analysis results appear in the Output window. Double-clicking on any error
message will cause Visual Studio’s built-in editor to jump to the line number
in the source file causing the analysis message.
The system include directories for the version of Visual Studio you’re running
are obtained automatically for each analysis ─ great if you have multiple
versions installed or you don’t have the INCLUDE environment variable set.
3. PC-lint Entire Project - tool by Cleanscape
Use this tool (after having set up the project by using tool #2 above) to run
PC-lint over the entire project sourcebase. As with the single file tool (#1
above), analysis results appear in the Output window. Double-clicking on
any error message will cause Visual Studio’s built-in editor to jump to the line
number in the source file causing the analysis message.
The system include directories for the version of Visual Studio you’re running
are obtained automatically for each analysis ─ great if you have multiple
versions installed or you don’t have the INCLUDE environment variable set.
NEW v3.1 4. PC-lint Entire Solution - tool by Cleanscape
Use this tool (after having set up the project by using tool #2 above) to run
PC-lint over the entire solution set. This tool scans the specified solution file
for .vc(x)proj files and for each project, searches for an <IDEproject>.lnt file;
if found, a project analysis occurs as defined by its .lnt files.
Analysis results appear in the Output window. Double-clicking on any error
message will cause Visual Studio’s built-in editor to jump to the line number
in the source file causing the analysis message.
The system include directories for the version of Visual Studio you’re running
are obtained automatically for each analysis ─ great if you have multiple
versions installed or you don’t have the INCLUDE environment variable set.
NEW v2.0 5. PC-lint Edit LNT Files - tool by Cleanscape
This tool conveniently invokes Notepad to edit the std.lnt and the
<IDEproject>.lnt files (described in #2 above) associated with the current
project. Do not edit the <IDEproject>.lnt file as it can be overwritten at any
time; it is opened here for quick reference only.
6. PC-lint Single File - tool by Cleanscape
Select this command to run Gimpel PC-lint over the currently selected file.
Analysis results appear in the Output window. Double-clicking on any error
message will cause Visual Studio’s built-in editor to jump to the line number
in the source file causing the analysis message.
This is a “standalone” mode and can be applied to any single file.
Page 34
Cleanscape C++lint User’s Guide
The system include directories for the version of Visual Studio you’re running
are obtained automatically for each analysis ─ great if you have multiple
versions installed or you don’t have the INCLUDE environment variable set.
NEW v3.1 7. Invoke C++lint GUI - tool by Cleanscape
Select this command to scan your existing project and extract relevant
information into a Cleanscape C++lint GUI .csi file, and then invoke the GUI
using these settings. This is useful to take advantage of new reports available
from the GUI (e.g., class hierarchy, include tree, stack, and statistics).
The screenshot below shows the Cleanscape tools installed in Visual Studio’s
Tools dropdown menu. It also shows the analysis results of the current project.
The highlighted (_blue background_) line in the Output window (bottom) was
double clicked, resulting in Visual Studio’s editor (top window) jumping to the
source file / source line (line 11) that caused the analysis message.
The hyperlink feature also makes it very easy to add PC-lint “magic comments” to
refine analysis at the block or statement level. For more information on this
advanced feature, see Sections 5.1 and 5.2 of the PC-Lint Reference Manual.
Page 35
Cleanscape C++lint User’s Guide
D. Uninstallation
To uninstall these tools from Visual Studio, you can use the Uninstaller located
in the main subdirectory. From a command prompt, type
uncpp –VS
Or, to manually remove any of them:
0. Open the Visual Studio IDE.
1. From the Tools dropdown menu, select “External Tools…” (in VS 6 select
“Customize…” then click on the “Tools” tab in the resulting dialog).
2. Click the tool you wish to delete.
3. Click the “Delete” button in the right side of the dialog box (in VS6 click
on the red ‘X’ in the upper right corner).
Page 36
Cleanscape C++lint User’s Guide
PART VI Running Cleanscape C++lint from the Command Line
A. Introduction
Cleanscape C++lint has a command line facility suitable for standalone operation
or for inclusion in scripts, e.g., for “make lint” purposes.
For details on the actual operation of PC-lint and its control and reporting
options, refer to the companion document, PC-Lint Reference Manual
(bookmarked in the Acrobat .pdf version of this document).
B. Operation
To run C++lint in command line mode, you need to have set the environment
variables as defined in Section 2.1.B.1.e or 2.2.B.f and registered the product as
described in Section 3.
The format of the Cleanscape C++lint command line is quite simple:
cpplint <parameters_to_be_supplied_to_PC_lint> <file_list>
Entering cpplint without parameters yields a command summary.
Details on all the command line parameters may be found in Chapters 4 and 5 of
the PC-Lint Reference Manual.
NOTE: If the command parameter contains a comma, enclose the parameter in
double quotes or use ‘!’ instead: most command interpreters consider a comma a
separator. On *nix, also enclose any parameters containing parentheses in
double quotes.
NEW v2.0 You can use the Cleanscape GUI to generate
analysis switches for you. To do so, set the analysis
options within the GUI as described in Sections 4.B.5-7 and the
Online Help. When done, select File – Save VS std.lnt or use the
corresponding button on the shortcut bar, then navigate to the
directory in which you wish it to be saved. Usage notes:
1. *nix users: we realize this isn’t named very well, but we needed
some way (in a couple characters) to distinguish this Save from
GUI-related operations. This function will still work very well
for you in command-line mode and with Eclipse in the future…
2. For compatibility with C++lint’s Visual Studio mode, the GUI’s
“Target System” setting is stored within a comment. Uncomment this value
when running from the command line, as described in the comments within
the file.
3. If std.lnt already exists, you will be prompted before overwriting.
4. For compatibility with the Visual Studio mode, filenames entered in the GUI’s
project are entered into the std.lnt file as comments at the bottom;
uncomment them for this command-line mode. Additional files may be
entered on the command line or appended to the std.lnt file one per line,
with double-quotes surrounding filenames with spaces, as described in the
comments within the file.
Page 37
Cleanscape C++lint User’s Guide
A sample std.lnt file is shown below; yours may of course vary considerably.
// *** This file created by Cleanscape C++lint GUI on 21-Nov-08 ***
// Refer to the PC-Lint Users Manual for details on control settings.
+fdi
+macros
+linebuf
+linebuf
-width(0)
-zero(400)
-ic:\progra~1\cleanscape\cpplint\main\lbin\lf
// Uncomment the next line(s) for command line (non-IDE) operation:
//co-msc71.lnt
//--iC:\PROGRA~1\MICROS~1.NET\Vc7\include
//+libdir(C:\PROGRA~1\MICROS~1.NET\Vc7\include)
-summary(c:\progra~1\cleanscape\cpplint\main\reports\cpplint.stt)
+stack(&file=c:\progra~1\cleanscape\cpplint\main\reports\cpplint.stk)
-wlib(1)
-w2
-passes(2)
+byph(common.h)
-vf
-d_WIN32
// Add any additional PC-lint controls next:
// For command line operation, uncomment the sourcefile names below. Add
// additional files as necessary; enclose in double quotes if name has
spaces.
//C:\PROGRA~1\cleanscape\cpplint\examples\example1.c
//C:\PROGRA~1\cleanscape\cpplint\examples\example2.c
C. Return Codes
A return code of zero (0) indicates that Cleanscape C++lint ran and ran
successfully without encountering any source errors.
A return code >1 indicates that either
• There was a problem securing a valid license key to run the program, or
• There were one or more messages resulting from the PC-lint analysis over the
source code.
A description of each result is of course available in the analysis report. For a
complete list of analyses by number – including a link to detailed explanations,
see http://www.cleanscape.net/products/cpplchecks.html
If there was a problem starting the program or securing a key, contact
Cleanscape Technical Support at [email protected]. If you are under
maintenance, you may also contact Cleanscape Support for questions regarding
any analysis output message.
For more information PC-lint’s return codes and their uses, see Section 4.2 of the
PC-Lint Reference Manual (bookmarked in the Acrobat .pdf version of this
document). Of particular note in that section is the possible use of the –zero (#)
feature, which can keep the return code at zero when warnings – but not errors –
are encountered during the analysis. For this mode, –zero(400) is recommended.
Page 38
Cleanscape C++lint User’s Guide
PART VII MISCELLANEOUS INFORMATION
7.1 ADDITIONAL STEPS FOR WINDOWS 2000 and LATER (USER PERMISSIONS)
A. Applicability
1. This section applies to users running Windows 2000+ who belong to the
“Users” group, and only to that group.
B. Details
1. For Cleanscape C++lint to run correctly, users must have “write” and “modify”
access rights to the installation directory and all its subdirectories.
a. Log in as “administrator” and finish installing Cleanscape C++lint.
b. Double-click on the “My Computer” icon on the desktop.
c. Navigate to and double-click on the installation folder. Select Properties
from the sub-menu.
d. Select “Security” tab on the Properties screen:
e. Select the “Users” group and enable “Modify” and “Write” permissions.
f. Click the “Apply” button.
g. Click the “OK” button. This should close the Properties window.
h. Cleanscape C++lint is now ready to run on Win2k for the “Users” group.
2. Care has been taken in version 2.0 to allow users who are not logged in as
“owner” to successfully install the Visual Studio tools; if you encounter
problems, install as owner (or have your Administrator install the product for
you) and notify [email protected] .
Page 39
Cleanscape C++lint User’s Guide
7.2 ADDING AN EXTERNAL EDITOR TO THE GUI USING SETEDITOR
A. Introduction
By popular demand, Cleanscape has added the ability for users to specify their
own favorite editor to any Cleanscape product (as opposed to submitting a
feature request to Cleanscape Support). This is implemented via an external
program called seteditor, located in the ‘bin’ subdirectory.
User contributions welcome! Send them to [email protected]; any
contributions will receive appropriate credit and be placed in a “master” file
located at http://www.cleanscape.net/products/contributed_editors.html.
B. Operation
On any platform, it is possible to edit file myeditor.lst manually; see the
comments inside the file, which is located in bin subdirectory on Windows or
$HOME (preceded by ‘.’) on Unix/Linux. The Unix/Linux session on the next page
shows the contents of .myeditor.lst (substantially similar under Windows).
Windows.
You can either run seteditor from the command line or via Explorer.
From a DOS shell (cmd or command prompt), run the following command:
"<install_dir>\bin\seteditor"
From Explorer, navigate to the above directory and then double-click
seteditor.exe.
Unix.
From a shell prompt, run the following command:
<install_dir>/bin/seteditor
Three pop-up dialogs (Windows) or a sequence of shell interactions (Unix/Linux)
will guide you through
1. Naming the editor (a label identifier)
2. Locating the editor executable itself
3. Setting command line parameters to open a file and jump to a line number.
A sample Windows session depicting the dialogs for all three steps (and labeled
as such) is shown on the next page, as is a Unix/Linux shell session.
NOTE: Refer to your editor’s documentation to get the editor’s command line
information required (i.e., specifying the filename to open and the line number to
jump to when opening the file). If your editor does not support jumping to line
numbers from the command line, you can still invoke the editor but it will be
impossible to align the analysis message to the “offending” source line.
We also recommend setting your editor to run as a single instance.
Any number of editors may be added in this fashion. Added file information is
stored in file (.)myeditor.lst; once successfully added, email your (.)myeditor.lst
file to [email protected] for inclusion in a Master file to share with other
Cleanscape customers!
Page 40
Cleanscape C++lint User’s Guide
1
2
3
Page 41
Cleanscape C++lint User’s Guide
7.3 USING SETUPGCC and SCAVENGE; file mycompiler.lst
A. Introduction
When running gcc/g++ or compilers that aren’t supported by PC-lint already (i.e.,
no corresponding co-<xxx>.lnt file exists), certain internal information is
required to eliminate spurious analysis messages. In the case of gnu, this
internal info is based on options selected when building the compiler on-site; for
non-supported compilers, it’s obviously information not previously obtained.
Two external companion programs, setupgcc and scavenge, are provided
exclusively by Cleanscape exclusively to help you extract this information in an
automated fashion.
With setupgcc, helper files are uniformly named if you follow the steps; the
information will be made available in an automated fashion to C++lint. With
scavenge, the procedure is similarly automated but at the end some additional
information must be manually entered into an automatically created template.
B. Operation
The programs are located in <install_dir>\bin.
You can run either program via the command line; using Windows Explorer, you
can navigate to the above directory and then double-click the desired program.
Once started, follow the on-screen instructions.
C. Fully automated gcc/g++ setup using setupgcc
Since gcc and g++ are custom-built at each site, it is not possible to know
beforehand all the defines, macros, include directories, etc., specified during the
build. Cleanscape provides an exclusive tool to automate extraction of this
information and place it in helper (.h and .lnt) files later consumed by C++lint.
The result is a comprehensive analysis of code with no false positives.
A setupgcc session on Linux is shown next; user input has been colored green.
redhat:/usr/local/cleanscape/bin# setupgcc
This program extracts unique settings (internal defines/macros and default
include directories) for gcc/g++ on this system for use by C++lint. An
interactive command line session confirms the correct compiler, gathers
the info, and stores it. If your gnu compiler is rebuilt, then force
this program to retrieve new data by running setupgcc –FORCE
Both gcc and g++ found; which do you use (gcc/g++)? g++
To get the right predefined macros, enter the compiler options you specify
during builds, or <ENTER> to accept the default in parentheses below.
(-O)
Built /home/lint/build/unixbcsi/prod/cpplintgui.dir/main/lbin/lf/mygpp.lnt
and
/home/lint/build/unixbcsi/prod/cpplintgui.dir/main/lbin/lf/mygpp.h.
Command line: Add 'co-gpp.lnt' as a parameter when running 'cpplint'.
GUI: Select 'g++' in the Target System dropdown.
To test your configuration, try the command line or GUI on file
'testcfg.cpp' located in the examples subdirectory.
Press <ENTER> to exit...
Page 42
Cleanscape C++lint User’s Guide
D. Using scavenge to install a new compiler to C++lint
scavenge is an interactive command-line program that extracts internal, built-in
macros used by the compiler. This scavenged data, along with the system
include directory information you provided along the way, is saved to a template
compiler options file hereinafter referred to as co-<name-you-gave>.lnt. By filling
in the other sections of this template, you will have captured all the data
necessary for a robust – and accurate – analysis using this new compiler!
scavenge will automatically open co-<name-you-gave>.lnt using a system editor,
during which you can enter additional information in each section.
Lastly, scavenge will edit file mycompiler.lst located in the bin subdirectory, or
$HOME (preceded by ‘.’) if *nix. This file is used to load your new compiler in the
GUI’s Target System dropdown. See the comments inside (.)mycompiler.lst if
you’d like to know more. To delete an added compiler, delete its corresponding
entry in this file.
Any number of compilers may be added using scavenge.
A sample scavenge session is shown on the next page; user input has been
colored green. The resulting co-BCC55.lnt file is shown on the page after that.
The template file for creating the compiler options file is
<install_dir>/main/lbin/lf/mycompiler.lnt.
User contributions welcome! Send your co-<name-you-gave>.lnt file and your
entry in (.)mycompiler.lst to [email protected]; any contributions will
receive appropriate credit and be placed in a “master” file located at
http://www.cleanscape.net/products/contributed_compilers.html.
E. Changing a compiler’s default Include directory
The Cleanscape GUI automatically adds the default include directory created
when the compiler itself was installed. If you installed to a directory other than
the default chosen by the compiler’s installer, this directory will be incorrect.
Change it by editing (.)mycompiler.lst to contain the correct directory path in 8.3
format. For instance, if your Microsoft C 6.0 include directory is
c:\progra~1\micros~4\vc98\include instead of the GUI’s default of
c:\progra~1\micros~3\vc98\include, edit mycompiler.lst to add the line,
Microsoft_6x___co-msc60.lnt___c:\progra~1\micros~4\vc98\include
Page 43
Cleanscape C++lint User’s Guide
c:\cleanscape\cpplint\bin> scavenge
This program extracts built-in macros for compilers not yet supported in
C++lint. An interactive command line session obtains compiler basics,
gathers the info, and creates a co-xxx.lnt template which you later edit.
In this interactive session, you will need the following data:
- The full pathname of your compiler
- The full pathname to or the compiler options for an internal preprocessor
- The compiler options specified during builds (or within makefile)
- The preprocessor options to output to a named file
- The directories containing the compiler's header files (the ones specified
using angle brackets in your #include statements)
If you don't have this info, hit <CTRL-C> now to exit and rerun later, or
press <ENTER> to continue...
Great! Let's get started.
We need a short label name for your compiler which will be used to name your
co-xxx.lnt compiler. For instance, if your compiler is the Greenhills C
compiler for the i960 processor, you might choose GHC960, whereupon the
resulting compiler options file would be named 'co-GHC960.lnt'.
Enter a label name for your compiler: BCC55
Is your project C or C++? (c/cpp): cpp
Enter the full pathname of your compiler: c:\borland\bcc55\bin\bcc32.exe
Now we need some preprocessor information.
Is it a unique program or just compiler switches? (P/S): p
Enter the full pathname of the preprocessor: c:\borland\bcc55\bin\cpp32.exe
Now enter the preprocessor options to
- Enable preprocessor output, if necessary.
- Disable any source line info, if necessary.
- Output to a specified file; use the word FILE place the filename.
If the preprocessor only outputs to 'stdout', type the word STDOUT.
EX. 1: Microsoft.
/EP STDOUT
EX. 2: Borland.
-P- -oFILE
EX. 3: Generic Unix. -P STDOUT
Enter the preprocessor options: -P- -oFILE
Next, we need the directories containing the compiler's include files (the
'system header files'). If already present in the INCLUDE environment variable,
type just the single word INCLUDE; type DONE when done.
NOTE: The contents of INCLUDE env. var. are EXcluded by default, so you must
specify the word INCLUDE if you want its contents.
Enter dir path, INCLUDE, or DONE: c:\borland\bcc55\include
c:\borland\bcc55\include added OK.
Enter dir path, INCLUDE, or DONE: done
Enter the compiler options you specify during builds (e.g., as specified in
your makefile), or press <ENTER> to accept the default in parentheses below.
(-O)
Obtaining built-in macros; this may take a couple minutes... done.
Processing macro list... done.
Cleaning up... done.
Building co-BCC55.lnt... done.
Adding bcc32.exe to GUI Target System dropdown... done.
To remove it later, delete the BCC55 line from file
C:\PROGRA~1\cleanscape\cpplint\bin\mycompiler.lst
Now opening in Notepad; add data for each section as described in the comments.
Now you are ready to test your configuration:
- Add co-BCC55.lnt on the command line -ORSelect BCC55 in the GUI Target System dropdown.
- Specify '-w1' (command line) -OR- select 'Errors_only' (GUI).
- Specify '+fdh' (command line) -OR- select 'Append .h'
(GUI)
if your compiler uses the same .h header file for both C and C++.
- Use input file 'testcfg.cpp' located in the examples subdirectory.
Press <ENTER> to exit...
Page 44
Cleanscape C++lint User’s Guide
//
co-BCC55.lnt - Compiler options file for bcc32.exe
// Template by: Cleanscape Software
// Date:
30 Nov 2008
// Author:
<your name here>
// This file can be used to create a PC-lint compiler options file for
// compilers not yet standardized at Gimpel.
// A similar file is created when you run program scavenge (located in the bin
// subdirectory); scavenge will fill in the macro section for you.
// Each comment below is a section header of required information; when filled
// in, you will get robust and accurate analyses using your new compiler! See
// any of the existing co-xxx.lnt files in main/lbin/lf as examples.
// Section 1: include GENERIC co.lnt options file
co.lnt
// Section 2: Compiler/machine architecture data sizes and alignment
//
Format: -sb# /* &etc. Numerous; see section 5.3 of the manual */
// Section 3: Exclude/include compiler reserved words
//
Format: -/+rw(word1, word2...)
/* See section 5.7 of manual */
// Section 4: Simple defines (e.g., machine architecture; MACROS -> Sec. 9)
//
Format: -dname[=value]
/* See sec. 5.7; NO space after -d */
// Section 5: Flag options (e.g., wprintf formats, scoping, header naming)
//
Format: -/+f<op>
/* See section 5.5 of manual */
// Section 6: Exclude/include error messages
//
Formats: -/+e#
/* See section 5.2 of manual */
//
-/+esym(#,sym1,sym2...)
//
-/+elib(#)
// Section 7: System (library) Include directories supplied with compiler
//
Format: -ipath
/* See sec. 5.7; NO space after -i */
//
+libdir(path) /* Controls analysis depth with -wlib() */
-ic:\borland\bcc55\include
+libdir(c:\borland\bcc55\include)
// Section 8: Miscellaneous controls, e.g., -function(), -wprintf(), -/+v, -$
// Section 9: Macro definitions - extracted automatically by scavenge program
-d__FLAT__{1}
-d_WCHAR_T{}
-d_WCHAR_T_DEFINED{}
-d__cplusplus{1}
-d_CPPUNWIND{1}
-d_M_IX86{300}
-dabs{abs}
-d_PUSHPOP_SUPPORTED{}
-d__TURBOC__{0x0551}
-d__CGVER__{0x0200}
-dalloca{alloca}
-d_INTEGRAL_MAX_BITS{64}
-d_STDCALL_SUPPORTED{}
-dstrcmp{strcmp}
-dstrcpy{strcpy}
-d_WIN32{1}
-d_Windows{1}
Page 45


![User Manual [PDF 779 kB]](http://vs1.manualzilla.com/store/data/005781460_1-49b4dd0a8e6377162bdb6a1daefcc9f3-150x150.png)