1
Oracle® Hospitality Suite8
Setup Miscellaneous User Manual
Release 8.9
July 2015
Copyright © 1987, 2015, Oracle and/or its affiliates. All rights reserved.
This software and related documentation are provided under a license agreement containing
restrictions on use and disclosure and are protected by intellectual property laws. Except as
expressly permitted in your license agreement or allowed by law, you may not use, copy,
reproduce, translate, broadcast, modify, license, transmit, distribute, exhibit, perform, publish, or
display any part, in any form, or by any means. Reverse engineering, disassembly, or
decompilation of this software, unless required by law for interoperability, is prohibited.
The information contained herein is subject to change without notice and is not warranted to be
error-free. If you find any errors, please report them to us in writing.
If this software or related documentation is delivered to the U.S. Government or anyone licensing it
on behalf of the U.S. Government, then the following notice is applicable:
U.S. GOVERNMENT END USERS: Oracle programs, including any operating system, integrated
software, any programs installed on the hardware, and/or documentation, delivered to U.S.
Government end users are "commercial computer software" pursuant to the applicable Federal
Acquisition Regulation and agency-specific supplemental regulations. As such, use, duplication,
disclosure, modification, and adaptation of the programs, including any operating system,
integrated software, any programs installed on the hardware, and/or documentation, shall be
subject to license terms and license restrictions applicable to the programs. No other rights are
granted to the U.S. Government.
This software or hardware is developed for general use in a variety of information management
applications. It is not developed or intended for use in any inherently dangerous applications,
including applications that may create a risk of personal injury. If you use this software or
hardware in dangerous applications, then you shall be responsible to take all appropriate fail-safe,
backup, redundancy, and other measures to ensure its safe use. Oracle Corporation and its
affiliates disclaim any liability for any damages caused by use of this software or hardware in
dangerous applications.
Oracle and Java are registered trademarks of Oracle and/or its affiliates. Other names may be
trademarks of their respective owners.
Intel and Intel Xeon are trademarks or registered trademarks of Intel Corporation. All SPARC
trademarks are used under license and are trademarks or registered trademarks of SPARC
International, Inc. AMD, Opteron, the AMD logo, and the AMD Opteron logo are trademarks or
registered trademarks of Advanced Micro Devices. UNIX is a registered trademark of The Open
Group.
This software or hardware and documentation may provide access to or information on content,
products, and services from third parties. Oracle Corporation and its affiliates are not responsible
for and expressly disclaim all warranties of any kind with respect to third-party content, products,
and services. Oracle Corporation and its affiliates will not be responsible for any loss, costs, or
damages incurred due to your access to or use of third-party content, products, or services.
Contents
Preface ........................................................................................................................... 6
Audience ............................................................................................................................ 6
Customer Support ............................................................................................................. 6
Documentation .................................................................................................................. 6
Revision History ................................................................................................................ 6
1 Form Customization ................................................................................................. 7
How to access form customization ................................................................................... 8
How to define a new form ................................................................................................ 8
Component Palette ............................................................................................................ 9
Component Palette - Objects available on FidResPanels Tab ................................ 13
Component Palette - Objects available on FidResLabel ......................................... 14
Component Palette - Objects available on FidResEdit ........................................... 15
Component Palette - Objects available on FidResButton ....................................... 17
Component Palette - Objects available on FidResSelect ......................................... 19
Component Palette - Objects available on FidResCheckbox .................................. 20
Component Palette - Objects available on FidResMisc .......................................... 21
Component Palette FidProfilePanels Tab ................................................................ 21
Component Palette FidProfileButtons Tab .............................................................. 22
Component Palette FidProfileCheckbox Tab .......................................................... 22
Component Palette FidProfileCustomEdit .............................................................. 23
Component Palette FidProfileSelect Tab ................................................................. 24
Component Palette - Objects available on FidProfileEdit ...................................... 25
Component Palette - Objects available on FidBookingScreen ............................... 28
Properties ......................................................................................................................... 34
User Assignment.............................................................................................................. 35
Form Customization Tips and How To's ....................................................................... 37
How to add an option button to the reservation screen ......................................... 37
How to add the video check-out option to the reservation screen ........................ 40
How to add page up and page down buttons to the reservation screen .............. 40
How to add desired room type selection to the reservation screen....................... 41
How to add user defined check boxes on individual or company profiles .......... 42
How to add currency exchange rate display to the reservation screen ................. 42
How to add a web login to the profile screen ......................................................... 43
How to allow a profile to be marked as do not transfer ......................................... 44
How to combine the entries of two character fields into a third field ................... 44
How to combine the entries of two numeric fields into a third field .................... 45
How to set the discount amount and discount % fields to read only based on the
rate code .................................................................................................................... 46
How to add customized fields ................................................................................. 50
Displaying HTML files - Guest Recognition ........................................................... 51
More information on fields and procedure names used on the reservation detail
.................................................................................................................................... 58
3
Correcting customized screens ................................................................................ 61
Scripting ........................................................................................................................... 64
How to show a message ........................................................................................... 64
How to set a default number of adults on a new reservation ................................ 65
How to enter long stay messages............................................................................. 66
How to make a field mandatory .............................................................................. 66
How to fill the field infoboard with the booking name.......................................... 69
How to run a query using Oracle functions ............................................................ 69
Using customized fields, which should update the field 'Discount' as soon as a
value .......................................................................................................................... 70
How to enter string controls .................................................................................... 70
2 Miscellaneous ........................................................................................................ 71
License .............................................................................................................................. 74
V8 Hotel License ....................................................................................................... 74
V8 Sublicenses ........................................................................................................... 75
Export ........................................................................................................................ 79
Import ........................................................................................................................ 79
System Maintenance ........................................................................................................ 79
Cashiering.................................................................................................................. 79
CRM ........................................................................................................................... 86
Database .................................................................................................................... 91
Miscellaneous .......................................................................................................... 100
Reservation .............................................................................................................. 120
Translation............................................................................................................... 123
XML Import............................................................................................................. 123
Updates .......................................................................................................................... 124
Executable Updates................................................................................................. 124
Database Structure Update .................................................................................... 128
Translation Update ................................................................................................. 128
Mailing Update ....................................................................................................... 129
Materials Control Import .............................................................................................. 130
Materials Control .................................................................................................... 130
Setting Up Materials Control ................................................................................. 131
Materials Control Import........................................................................................ 132
3 Index .................................................................................................................... 137
4 137
5 138
4
5
Preface
Audience
This user manual is intended for system users and system administrators.
Customer Support
To contact Oracle Customer Support, access My Oracle Support at the following URL:
https://support.oracle.com
When contacting Customer Support, please provide the following:
Product version and program/module name
Functional and technical description of the problem (include business impact)
Detailed step-by-step instructions to re-create
Exact error message received
Screen shots of each step you take
Documentation
Oracle Hospitality product documentation is available on the Oracle Help Center at
http://docs.oracle.com
Revision History
Date
6
Description of Change
July, 2005
8.5.0.0 - First Issue Small Business
Edition
May, 2008
8.7 - Updated for Version 8.7
June, 2008
8.7.3.1 - Updated for Version 8.7.3.1
May, 2009
8.8 - Updates for Version 8.8
Sept, 2010
8.8 - Updates for Oracle 11gR1
Jan, 2012
8.9 - Updated for Version 8.9
Nov, 2012
8.9 - New cover page
July, 2015
8.9 – Oracle template applied
Preface
1
Form Customization
This option allows custom screen painting and modification of the Fidelio Suite8 screens; it is
intended to be used by installers and expert users only. You may add, delete and move fields as
well as specify various conditions. The edited screen is saved as a user customized form and can be
linked to users or user groups. Screens can be exported and imported, and this option may be used
to recover original screens. Pre-defined forms cannot be changed.
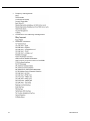
The following screens may be customized:
Reservation
Reservation edit main tab
Alternative reservation editor
Company Profile
Company profile edit main tab
Company profile edit second tab
Individual Profile
Individual profile edit main tab
Individual profile edit second tab
Small Business Edition individual profile edit main tab
Booking
Booking edit
Quick Booking edit
Booking event edit
Note: The Booking Master Edit, Booking Event Edit and Quick
Booking Edit screens are only available if the Conference and Catering
Management sub-licence is activated.
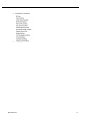
The following screen painting commands are available:
Move
Resize
Delete
Inserting standard components
Inserting user definable fields
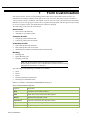
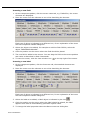
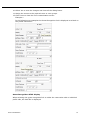
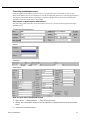
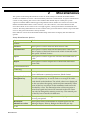
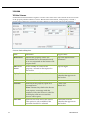
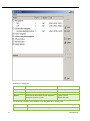
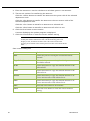
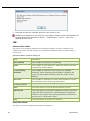
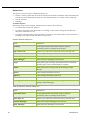
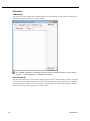
Options available on the form customization dialog box:
Form Customization Options
Option
Does this:
New
Creates a new form (screen).
Edit
Edits the screen name and description.
Delete
Deletes the selected screen.
Customize
Used to customize the selected screen.
Export
Used to create an export file.
Import
Used to import a screen file.
Form Customization
7
Clean
Removes (cleans) all form customizations from the selected screen.
Refresh
Refreshes the screen display.
Reset c. palette
Resets the customization palette, after using this option the
application must be restarted.
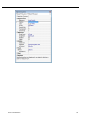
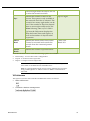
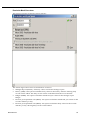
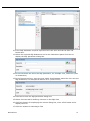
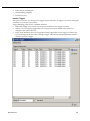
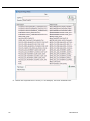
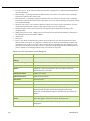
How to access form customization
1. Click the SETUP menu and select FORM CUSTOMIZATION.
The form customization screen is displayed with a list of the screens that can or
have been customized.
2. Select the form to be customized and click the CUSTOMIZE button.
3. Four separate dialog boxes are displayed, they are:
The FORM to be customized.
The COMPONENT PALETTE - used to select the objects that should be placed on the screen.
The OBJECT INSPECTOR - used to change the properties of the selected objects.
The SCRIPT dialog box - used to set controls for mandatory fields and prompt users for
action on click, exit or changing an event.
4. The form can now be customized as required.
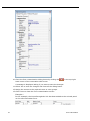
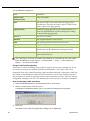
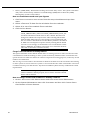
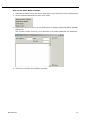
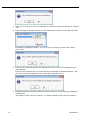
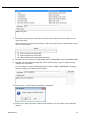
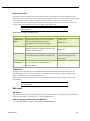
How to define a new form
1. Click the SETUP menu and select FORM CUSTOMIZATION.
The form customization screen is displayed with a list of the screens that can or
have been customized.
2. Select the screen to be modified and click the NEW button.
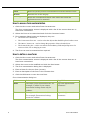
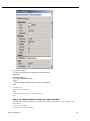
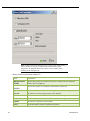
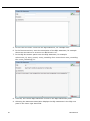
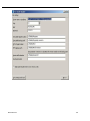
3. The form customization dialog box is displayed.
4. Enter a NAME for the new form (screen).
5. Enter a description of the form in the COMMENT box.
6. Click the OK button to save the new form.
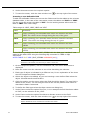
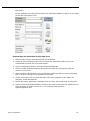
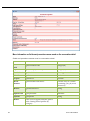
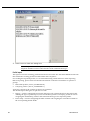
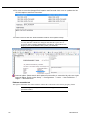
Form Customization dialog box
8
Field
Definition
Legal Values
Name
The name of the customized form. For
example, 'Cashier' if you create a
reservation lookup screen only for
cashiers.
Up to 60 alphanumeric
characters.
Comment
Description of the customized form.
For example, 'Reservation lookup
screen for cashiers'.
Up to 60 alphanumeric
characters.
Form Customization
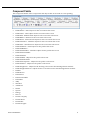
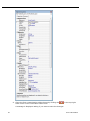
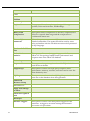
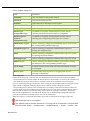
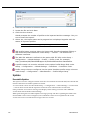
Component Palette
The Component Palette offers components and objects that can be used in screen painting.
The following tabs can be used to modify the Fidelio Suite8 screens:
FidResPanels - Panel objects for the reservation edit screen.
FidResLabel - Label objects for the reservation edit screen.
FidResEdit - Editable field objects for the reservation edit screen.
FidResButton - Buttons for the reservation edit screen.
FidResSelect - Selection field objects for the reservation edit screen.
FidResCheckbox - Checkbox objects for the reservation edit screen.
FidResMisc - Miscellaneous objects for the reservation edit screen.
FidProfilePanels - Panel objects for the profile edit screen.
FidProfileButtons -
FidProfileCheckBox - Checkbox objects for the profile edit screen.
FidProfileCustomEdit
FidProfileSelect
FidProfileEdit - Objects for the profile edit screen.
FidProfileIndividuals
FidProfileCompanies - Objects for the profile 2 edit screen.
FidProfileMore - Objects for the profile 2 edit screen.
FidBookingScreen - Objects for the booking edit screen in the Meeting Planner module
FidBookingEventScreen - Objects for the event edit screen in the Meeting Planner module
FidSkin
FidResScreen
FidFASelect
FidFACurtomEdit
FidFAMisc
duffy
Standard
Additional
Win32
System
Dialogs
Win 3.1
Dream Company
Dream Memo
Dream Edit
Dream Designer
Form Customization
9
Note: If any of the tabs are not displayed, click the RESET C. PALETTE
button on the From Customization dialog box and restart Fidelio
Suite8.
Objects can be placed on the screen from each tab of the component palette. Each object type that
can be found on the different tabs is described in the Component Palette objects table.
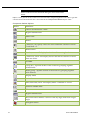
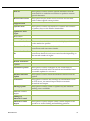
Component Palette Objects
Button
Definition
Label to be attached to a field.
Regular editable field
Memo field
Button
Check box; can specify values for check and blank. Default is check =
T and blank = F.
Radio button
List box; arrow will display list box that allows a single selection.
Combo box; arrow will display list box that allows selection of more
than one choice.
Scrollbar
Group box - separate section of the screen for grouping together
related fields.
Radio group - separate section of the screen for grouping together
radio buttons.
Display Panel
Action list
Date/Time field, arrow will display either a calendar or a clock.
Numeric editable field
Bitbutton
Regular editable field
Bevel field -Bevel defines a surface with any angle other than a right
angle
Navigator button
10
Form Customization
Inserting a new field
1. On the component palette, click the screen name tab, e.g. FIDRESEDIT, the screen
elements are displayed.
2. Place the cursor over the element to see a hint describing the element.
Each type of object is indicated by a different icon, for an explanation of the icons
see the Component Palette dialog box.
3. Select the object to be added, for example to add the field CRS No, select the
object ‘FidResEditCrsNumber’.
4. Click the position on the screen where the field should be placed.
5. The new field is added to the screen. You can drag the field to the correct position
and resize as described in Basic Commands.
6. To save the screen, click the close window icon
on the top right of the screen.
Inserting a new label
1. On the component palette, click the STANDARD tab, the standard elements are
displayed.
2. Place the cursor over the element to see a hint describing the element.
Each type of object is indicated by a different icon, for an explanation of the icons
see the Component Palette dialog box.
3. Select the label to be added, a label object is indicated by the icon
.
4. Click the position on the screen where the label should be placed, the label
appears now with an automatically generated caption name.
5. To change the label properties select the OBJECT INSPECTOR dialog box.
Form Customization
11
6. Under APPEARANCE enter the required caption.
7. To save the screen, click the close window icon
on the top right of the screen.
Inserting a user definable field
To add user definable fields to the screen the fields must first be added to the relevant
database table, in the case of the reservation screen the tables are YRCF and YRDF.
For the event edit screen the table is YECF. For the booking master edit screen the
table is YBCF. See Table usage.
Table usage for YRCF, YRDF, YBCF and YECF
Table
Definition
YRCF
Table containing user-definable fields which are related to the table
YRES. The values can not change during the stay of the guest.
YRDF
Table containing user -definable fields which are related to the table
YDET. The values can change during the stay of a guest.
YBCF
Table containing user-definable fields which are related to the table
YBOM.
YECF
Table containing user-definable fields which are related to the table
YEVM.
In the following example the field YRCF_STRING with the data type ‘varchar2 ‘ was
added to the table YRCF using the following SQL command in TOAD or SQL
worksheet:
ALTER TABLE YRCF ADD (YRCF_STRING VARCHAR2(100));
Note: When adding user definable numeric fields with more than 10
characters via TOAD, it is necessary to enter a scale of 1.
1. On the component palette, click the FIDRESEDIT tab, the screen elements are
displayed.
2. Place the cursor over the element to see a hint describing the element.
3. Each type of object is indicated by a different icon, for an explanation of the icons
see the Component Palette dialog box.
4. Select the object to be added, as you are inserting a user defined field select the
object TFIDRESSTRINGCUSTOMFIELDEDIT.
5. Click the position on the screen where the field should be placed. The new field is
added to the screen. You can drag the field to the correct position and resize as
described in Basic Commands.
6. To define the field type select the OBJECT INSPECTOR dialog box.
7. Under FIDELIO select the option FIELDTYPE, in our example the field has been added
to YRCF, so the selection is RES_YRCF.
8. Under FIDELIO select the option FIELDNAME to allocate a name to the field.
9. To save the screen, click the close window icon
on the top right of the screen.
Note: Each time fields have been added to the tables YRCF and YRDF,
Fidelio Suite8 has to be restarted to load the new fields.
12
Form Customization
Data Types and Fields which require Fidelio Suite8 to be restarted
Data Type
Field
Varchar2
FidResStringCustomFieldEdit
Number without
decimals
FidResIntegerCustomFieldEdit
Number without
decimals
FidResIntegerCustomFieldSpinEdit
Number with decimals
(currency)
FidResExtendedCustomFieldEdit
Date
FidResDateCustomFieldEdit
Number (1)
FidResCustomFieldCheckBox
Long / Long Raw
Not supported
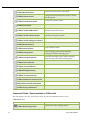
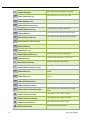
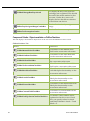
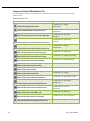
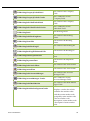
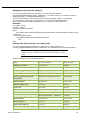
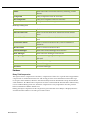
Component Palette - Objects available on FidResPanels Tab
This tab displays all PANEL objects that can be moved to the Edit Reservation screen:
FidResPanels Tab
Button
Definition
FidResPriceDisplayPanel
Display Panel for the Price detail on the
reservation edit screen
FidResChildAgeDisplayPanel
Display Panel for the Child Age Categories
on the reservation edit screen
FidResAttributeDisplayPanel
Display Panel for the Reservation
Attributes (Source and Channel) on the
reservation edit screen
FidResDayNavigatorPanel
Display Panel for the Days on the
reservation edit screen
FidResProfileDetailsPanel
Display Panel for the Profile details on the
reservation edit screen
FidResInventoryPanel
FidReslinkedProfilesPanel
FidResPackageGridPanel
FidResGridPanel
FidResAttributesPanel
FidResFixedChargesPanel
Form Customization
The panel for the Inventory Tab.
Panel for the Linked Profiles Tab
Panel for the Package Grid Tab
Panel for the Reservation Grid Tab
Panel for the Attributes Tab.
Panel for the Fixed Charges Tab
13
FidResMainEditPanel
FidResIndicatorPanel
FidResGuestProfilesPanel
FidResNotesPanel
The main Reservation Edit Panel
The panel where indicators such as 'share'
are displayed
The guest profiles panel
The notes panel
FidResCreditCardResPanel
The credit card panel for credit cards
related to the reservation
FidResCreditCardGuestPanel
The credit card panel for credit cards
related to the guest profile
FidResCreditCardApprovalPanel
FidResMealPlanPanel
FidResAmenityPanel
The credit card approval panel
The Meal Plan Panel
The Amenity Panel
FidResPackagePanel
The Packages panel when selecting
Packages from the Package grid.
FidResPackageFreqPanel
The Rate Packages panel when selecting
Rate Packages from the Package grid.
FidResUniversalPanel
FidResCustomEditPanel
FidResBillingInfoPanel
FidResCCContainerPanel
FidResAttributesContainerPanel
FidResMiniLinkedProfilesPanel
FidResTransponderPanel
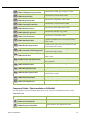
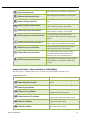
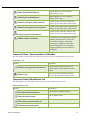
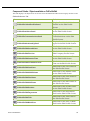
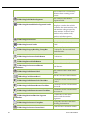
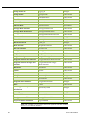
Component Palette - Objects available on FidResLabel
This tab displays all LABEL objects that can be moved to the Edit Reservation screen:
FidReslabel Tab
Button
FidResDataChangeLabel
14
Definition
Defines the Data Change Label
Form Customization
FidResChildAgeCategoryLabel
FidResArrivalLabel
FidResDepartureLabel
FidResCurrentRoomLabel
FidResRateMealLabel
FidResModifyLogLabel
FidResCancelledLabel
Defines the Child Age Category Label
Defines the Arrival Date Label
Defines the Departure Date Label
Defines the Current Room Label
Defines the Rate Meal Plan Label
Defines the Modify Log Label
Defines the Cancelled Label
FidResAttributeLabel
Label for attribute box on the reservation
edit screen
FidResDayNavigatorLabel
Label for the Day field on the Days on the
reservation edit screen
FidResCustomFieldChangeLabel
Label for Custom Fields change on the
reservation edit screen
FidResPriceLabel
Label for the Price Field on the reservation
edit screen
TFidResExchLastUpdateLabel
To display the date the exchange rate was
last updated
FidResExchRateLabel
FidResWeeklyRateLabel
FidResDayNavigatorLabel
FidResPromotionLabel
FidResFreeNightLabel
Displays the current exchange rate.
Displays the weekly rate
Displays the days function on the edit
reservation screen.
Displays Promotions on the screen by day
Displays free night rebates on the screen
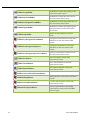
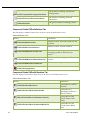
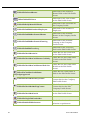
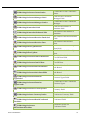
Component Palette - Objects available on FidResEdit
This tab displays all EDITABLE field objects that can be moved to the Edit Reservation screen:
FidResEdit Tab
Button
FidResArrivalDateEdit
FidResDepartureDateEdit
Form Customization
Definition
Edit field for the Arrival Date
Edit field for the Departure Date
15
FidResEditNights
FidResEditRoomType
FidResEditRateCode
FidResEditRateRoomType
FidResEditRateAmount
FidResEditRoom
FidResEditDesiredRoom
FidResEditDesiredRoomType
FidResEditBlock
FidResEditGroup
FidResEditRateDifference
FidResEditParty
FidResEditCreditLimit
FidResEditDiscountPercentage
Edit Field for the room type field
Edit Field for the Rate Code field
Edit field for the Rate Room Type field
Edit Field for the Rate Amount
Edit Field for the Room number Field
Edit Field for the desired room number
Edit Field for the desired room type
Edit Field for the Block code
Edit Field for the Group Code
Edit Field for the Rate Difference
Field to edit the Name of the Party
Field to edit the Credit Limit
Edit Field for the Discount Percentage
FidResEditFree1
Edit field of the free formatted text
field1
FidResEditFree2
Edit field of the free formatted text
field2
FidResEditCRSNumber
FidResEditFlightNumber
FidResEditCancellationNumber
FidResCheckInTimeEdit
FidResCheckOutTimeEdit
FidResOptionDateEdit
FidResSaleDateEdit
16
Edit Field for the Number of nights
Edit field for the CRS Number field
Edit Field for the Flight Number field
Edit field for the Cancellation Number
field
Edit Field for the Check in time
Edit Field for the Check out time
Edit Field for the Option Date
Edit Field for the Sale Date
Form Customization
FidResAdultSpinEdit
FidResNoOfRoomsSpinEdit
Edit Field for the number of adults box
Edit Field for the number of rooms box
FidResChildAgeSpinEdit
Edit Field for the number of child age
box
FidResStringCustomFieldEdit
Custom Field Edit on the reservation
edit screen for string value fields
FidResIntegerCustomFieldEdit
Custom Field Edit on the reservation
edit screen for integer value fields
FidResIntegerCustomFieldSpinEdit
Custom Field Edit number on the
reservation edit screen for integer value
fields
FidResExtendedCustomFieldEdit
Custom Field Edit on the reservation
edit screen for extended custom fields
FidResDateCustomFieldEdit
Custom Field Edit on the reservation
edit screen for date value fields
FidResEditExchUpdateValue
FidResDayNavigatorSpinEdit
To display the value of days, used if
selected refresh method is DAYS OF
MONTH or X DAYS AFTER ARRIVAL.
Edit field for the number of days on the
days selection on the reservation edit
screen
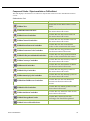
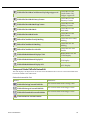
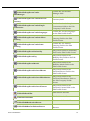
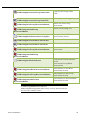
Component Palette - Objects available on FidResButton
This tab displays all Button objects that can be moved to the Edit Reservation screen:
FidResButton Tab
Button
FidResNightDownBitBtn
FidResNightUpBitBtn
Definition
Button to move number of nights
down.
Button to move number of nights up.
FidResRoomTypeBitBtn
Bit Button to select the room type on
the reservation edit screen.
FidResRateRoomTypeBitBtn
Bit Button to select the rate room
type on the reservation edit screen.
FidResRoomBitBtn
Bit Button to select the room on the
reservation edit screen.
FidResBlockBitBtn
Bit Button to select the block on the
reservation edit screen.
Form Customization
17
FidResGroupBitBtn
Bit Button to select the group on the
reservation edit screen
FidResRateCodeBitBtn
Bit Button to select the rate code on
the reservation edit screen.
FidResProfileQuickLinkBitBtn
Bit Button to select the profile link on
the reservation edit screen.
FidResFlightsBitBtn
Bit Button to select the flights (guest
transportation) on the reservation
edit screen.
FidResPartyBitBtn
Button to edit, delete or create a
Party.
FidResDayNavigatorDownButton
Navigator down button for the days
selection on the reservation edit
screen.
FidResDayNavigatorUpButton
Navigator up button for the days
selection on the reservation edit
screen.
FidResDayNavigatorOpenCloseButton
OPEN/CLOSE button on the DAYS of
the reservation edit screen.
FidResSaveButton
The Save Button on the edit
reservation screen.
FidResCancelButton
The Cancel Button on the edit
reservation screen.
FidResOptionsButton
The Options Button on the edit
reservation screen.
FidResUniversalPanelSelectorButton
FIdResBillingButton
Billing Button on the edit reservation
screen.
FidResCurrentRoomButton
Current Room Button on the edit
reservation screen.
FidResPoliceExportButton
18
Police Export Button on the edit
reservation screen used with SBM
Police Export
Form Customization
Component Palette - Objects available on FidResSelect
This tab displays all Selection or Combo box objects that can be moved to the Edit Reservation
screen:
FidResSelect Tab
Button
Definition
FidResColor
Edit Field for the Reservation Colour
field.
FidResMarketComboBox
Combo Box for the market codes on
the reservation edit screen.
FidResSourceComboBox
Combo Box for the source codes on
the reservation edit screen.
FidResChannelComboBox
Combo Box for the channel codes on
the reservation edit screen.
FidResRoomFeaturesComboBox
Combo Box for the room feature
codes on the reservation edit screen.
FidResGuaranteeCodeComboBox
Combo Box for the guarantee codes
on the reservation edit screen.
FidResDefPaymentMethodComboBox
Combo Box for the payment method
codes on the reservation edit screen.
FidResCurrencyComboBox
Combo Box for the currency codes on
the reservation edit screen.
FidResmealComboBox
Combo Box for the number of Meals
on the reservation edit screen.
FidResPolicyComboBox
Combo Box for the policy codes on
the reservation edit screen.
FidResAmenityCycleComboBox
Combo Box for the amenity cycles on
the reservation edit screen.
FidResRateDiffReasonComboBox
Combo Box for the rate difference
reasons on the reservation edit
screen.
FidResProfileComboBox
Combo Box for linked profiles on the
reservation edit screen.
FidResAttributeComboBox
Combo Box for attribute codes on the
reservation edit screen.
FidResExhangeRateCombo
Combo Box, choice of how the
exchange rate should be updated.
FidResUniversalPanelSelector
Form Customization
19
FidResExhangeRateDayofweek
FidResDayNavigatorRangeComboBox
FidResTaxExcemptionCombo
To display the day of the week the
exchange rate is updated. This should
be used if the refresh method is DAY
OF WEEK. Combo box; arrow will
display list box that allows selection
of more than one choice.
Combo Box for the day navigator
range
Combo Box for tax excemption
Component Palette - Objects available on FidResCheckbox
This tab displays all Checkbox objects that can be moved to the Edit Reservation screen:
FidResCheckbox Tab
Button
FidResManualPriceCheckBox
Check Box for the Manual Price
field on the reservation edit screen
FidResPrintRateCheckBox
Check Box for the Print Rate field
on the reservation edit screen
FidResNoPostCheckBox
Check Box for the No Post field on
the reservation edit screen
FidResTaxFreeAdultsCheckBox
Check Box for the Tax Free Adults
field on the reservation edit screen
FidResBreakfastCheckBox
FidResLunchCheckBox
FidResDinnerCheckBox
FidResCustomFieldCheckBox
FidResExchUpdateAtCheckinCheckBox
20
Definition
Check Box for the Breakfast field
with Meal plan functionality on the
reservation edit screen
Check Box for the Lunch field with
Meal plan functionality on the
reservation edit screen
Check Box for the Dinner field with
Meal plan functionality on the
reservation edit screen
Check Box for custom fields on the
reservation edit screen.
To display if the exchange rate is
updated at check in or not. Check
box; can specify values for check
and blank. Default is check = T and
blank = F.
Form Customization
FidResTypeDefRadioButton
Radio Button for the Definite
Reservation Type
FidResTypeTentRadioButton
Radio Button for the Tentative
Reservation Type
FidResDayNavigatorAllDaysButton
Label for the All Day field on the
Days on the reservation edit screen
FidResDayNavigatorDaysAfterButton
Label for the Days After field on the
Days on the reservation edit screen
FidResDayNavigatorOneDayButton
FidResLockRoomCheckBox
Label for the One Day field on the
Days on the reservation edit screen
Check Box for 'Lock Rooms'. When
adding the check box to the edit
reservation screen, a warning
message is displayed when this
field is selected, a room number
assigned and the room number is
changed.
Component Palette - Objects available on FidResMisc
This tab displays all miscellaneous objects that can be moved to the Edit Reservation screen:
FidResMisc Tab
Button
FidResDayNavigatorShowHidePanel
FidResEvents
Definition
The show/hide panel of the DAYS
functionality on the edit reservation
screen.
Edit Events from Meeting Planner
field on the reservation edit screen.
Component Palette FidProfilePanels Tab
This tab displays all PANEL objects that can be moved to the Edit Profile screen:
FidProfilePanels Tab
Button
FidProfileLinkedProfilePanel
FidProfileAddressPanel
FidProfileCommunicationPanel
FidProfileMembershipPanel
Form Customization
Definition
The Panel for linked Profiles
The Address Panel
The Communication Panel
The Panel for Membership types
21
The Panel for entering transponder
arrangements
FidProfileTransponderArrangementsPanel
The Panel for entering personal
documents.
FidProfilePersonalDocumentsPanel
The general Panel for editing profiles
FidProfilePanel1
Component Palette FidProfileButtons Tab
This tab displays all Button objects that can be moved to the Edit Profile screen:
FidProfileButton Tab
Button
FidProfileBtnRateCodes
FidProfileBtnVirtualNumber
FidProfileBitBtnInactiveReasons
FidProfileBitBtnCreditStatusReasons
FidProfileBitBtnPreferredRooms
Definition
Button to show rate codes linked to the
profiles.
Button to show Virtual numbers.
Bit Button for entering reasons for
turning a profile to the status not
active.
Bit Button for entering the credit status
reason.
Bit Button for the preferred rooms.
FidProfileImageButton
Component Palette FidProfileCheckbox Tab
This tab displays all Checkbox objects that can be moved to the Edit Profile screen:
FidProfileCheckbox Tab
Button
FidProfileCheckBoxActive
FidProfileCheckBoxDisabledforHC
FidProfileCheckBoxCreditStatusCashonly
FidProfileCheckBoxCreditStatusBlackList
22
Definition
Check Box for Active
Profiles
Check Box for
disabling Profiles for
Suite8 Central
Check Box for the
Credit Status Cash
Only
Check Box for the
Credit Status Black
List
Form Customization
FidProfileCheckBoxCreditStatusCityLedgerApproved
Check Box for the
Credit Status City
Ledger Approved
FidProfileCheckBoxPrimaryContact
Check Box for the
Primary Contact
FidProfileCheckBoxMailingContact
Check Box for the
Mailing Contact
FidProfileCheckBoxMale
Check Box for the
field Male
FidProfileCheckBoxFemale
Check Box for the
field Female
FidProfileCheckBoxFamilyMailing
Check box for Family
Mailing
FidProfileCheckBoxNoMailing
Check box for No
Mailing
FidProfileCheckBoxSaveProfile
Check box for Save
Profile
FidProfileRadioButtonDisplayCCM
Radio Button for the
CCM Display
FidProfileRadioButtonDisplayFO
Radio Button for the
FO Display
FidProfileRadioButtonDisplayALL
Radio Button for the
ALL Display
Component Palette FidProfileCustomEdit
This tab displays all objects that can be moved to the Edit Profile screen for customized fields that
have been added to the table YPCF:
FidProfileCustomEdit Tab
Button
FidProfileStringCustomFieldEdit
FidProfileIntegerCustomFieldEdit
FidProfileExtendedCustomFieldEdit
FidProfileDateCustomFieldEdit
Form Customization
Definition
For custom fields with a string value.
For custom fields with integer value.
For custom fields with integer value.
For custom date fields.
23
Component Palette FidProfileSelect Tab
This tab displays all objects for Selection or Combo box objects that can be moved to the Edit
Profile screen.
FidProfileSelect Tab
Button
FidProfileSingleFMCombo1
Combo Box for single
preferences
FidProfileMultiFMComboPreferences
Combo Box for multiple
preferences
FidProfileDropDownComboSalesManager
Combo Box for the sales
manager
FidProfileDropDownComboPreferredCurrency
FidProfileDropDownComboSimpleComission
FidProfileDropDownComboLanguage
FidProfileDropDownAddressGreeting
FidProfileDropDownLetterGreeting
FidProfileDropDownNationality
FidProfileDropDownDay
FidProfileDropDownMonth
FidProfileDropDownPreferredRooms
FidProfileDropDownPreferredDistribution
FidProfileDropDownContactPreference
FidProfileDropDownWPHS_ID
FidProfileDropDownTaxExemption
FidProfileFMComboSimpleCommission
24
Definition
Combo Box for preferred
currency
Combo Box for simple
commission
Combo Box for language
Combo Box for address greeting
Combo Box for letter greeting
Combo Box for nationality
Combo Box for day
Combo Box for month
Combo Box for preferred rooms
Combo Box for preferred
distribution
Combo Box for contact
preference
Combo Box for wphs_id
Combo Box for tax exemption
Combo Box simple commission
Form Customization
Component Palette - Objects available on FidProfileEdit
This tab displays all objects that can be moved to the Edit Individual and Company Profile screen:
FidProfileScreen Tab
Button
FidProfileLinkedProfilesPanel
Definition
Display Panel for the linked
Profiles on the Edit Profile
Screen.
FidProfileAddressPanel
Display Panel for the Address
on the Edit Profile Screen.
FidProfileCommunicationsPanel
Display Panel for the
Communications on the Edit
Profile Screen.
FidProfileMembershipPanel
Display Panel the Membership
types on the Edit Profile Screen.
FidProfileEditSearchName
Edit Field for the Search Name
on the Edit Profile Screen.
FidProfileEditDivision
Edit Field for the Division on the
Edit Company Profile Screen.
FidProfileEditInactiveTime
Edit Field for the Inactive Time
on the Edit Profile Screen.
FidProfileEditCreditStatusTime
Edit Field for the Credit Status
Time on the Edit Profile Screen.
FidProfileEditLastName
Edit Field for the Last Name on
the Edit Profile Screen.
FidProfileEditMiddleName
Edit Field for the Middle Name
on the Edit Profile Screen.
FidProfileEditFirstName
Edit Field for the First Name on
the Edit Profile Screen.
FidProfileEditMailName
Edit Field for the Mail Name on
the Edit Profile Screen.
FidProfileEditPosition
Edit Field for the Position Field
on the Edit Profile Screen.
FidProfileEditDepartment
Edit Field for the Department
Field on the Edit Profile Screen.
FidProfileEditTitle
Edit Field for the Title Field on
the Edit Profile Screen.
FidProfileEditBirthPlace
Edit Field for the Place of Birth
Field on the Edit Profile Screen.
Form Customization
25
FidProfilePreferredRooms
Edit Field for the Preferred
Rooms Field on the Edit Profile
Screen
FidProfileMaskEditYear
Edit Field for the Year of Birth
on the Edit Profile Screen.
FidProfileDuffyMemoFullName
Edit Field for the Full Name on
the Company Profile.
FidProfileEnhEditNumberofEmployees
Edit Field for the Number of
Employees.
FidProfileEnhEditRevPotentialRooms
FidProfileEnhEditRevPotentialCatering
Edit Field for the Potential
Rooms on the Company Profile
Screen.
Edit Field for the Potential
Catering on the Company
Profile Screen.
FidProfileEnhEditTraceFreq
Edit Field for the Trace Freq
Field on the Edit Profile Screen.
FidProfileCheckBoxActive
Check Box for the Active field
on the Edit Profile Screen.
FidProfileCheckBoxCreditStatus CashOnly
FidProfileCheckBoxCreditStatus BlackList
FidProfileCheckBoxCreditStatus
CityLedgerApproved
FidProfileCheckBoxPrimaryContact
FidProfileCheckBoxMailingContact
FidProfileCheckBoxFemale
Check Box for the Credit Status
C field on the Edit Profile
Screen.
Check Box for the Credit Status
R field on the Edit Profile
Screen.
Check Box for Credit Status A
field on the Edit Profile Screen.
Check Box for the Primary
Contact field on the Company
Edit Profile Screen.
Check Box for the Mailing
Contact field on the Edit
Company Profile Screen.
Check Box for the Female field
on the Edit Profile Screen.
FidProfileSingleFMCombo1Box
FidProfileMultiFMPreferences
26
Combo Box for the multi
selection on preferences.
Form Customization
FidProfileDropDownCombo
SalesManager
FidProfileDropDownComboPreferred
Currency
FidProfileDropDownComboSimple
Commission
FidProfileDropDownComboLanguages
Combo Box for the Sales
Manager field.
Combo Box for the Preferred
Currency field.
Combo Box for the Simple
Commission field on the Edit
Company Profile Screen.
Combo Box for the Languages
on the Edit Profile Screen.
FidProfileDropDownComboAddress
Greeting
Combo Box for Address
Greeting Field on the Edit
Profile Screen.
FidProfileDropDownComboLetter
Greeting
Combo Box for Address
Greeting Field on the Edit
Profile Screen.
FidProfileDropDownNationality
Drop Down field for Nationality
Field on the Edit Profile Screen.
FidProfileDropDownDay
Drop Down field for the
Birthday Day Field on the Edit
Profile Screen.
FidProfileDropDownMonth
FidProfileDropDownPreferredRooms
FidProfileDropDownPreferredDistribution
FidProfileDropDownPreferredContact
FidProfileDateEdit1
FidProfileTimeEdit1
FidProfileBitBtnInactiveReason
FidProfileBitBtnCreditStatusReason
Form Customization
Drop Down field for the
Birthday Month Field on the
Edit Profile Screen.
Drop Down field for the
Preferred Rooms Field on the
Edit Profile Screen.
Drop Down field for the
Preferred Distribution Field on
the Edit Company Profile
Screen.
Drop Down field for the
Preferred Contact Field on the
Edit Profile Screen
Edit field for the Date.
Edit Field for the Time.
Button to edit Inactive Reasons.
Button to edit Credit Status
Reasons.
27
FidProfileBitBtnPreferredRooms
FidProfileColorBox1
Button to edit Preferred Rooms.
Edit Field for the colour Box.
FidProfileRadioButtonCCM
The Radio Button to mark
Display in CCM only.
FidProfileRadioButtonFO
The Radio Button to mark
Display in FO only.
FidProfileRadioButtonAll
The Radio Button to mark
Display ALL.
FidProfileSpinEdit1
FidProfileLabel1
FidResPriceLabel
Label for the Price Field on the
reservation edit screen.
FidProfileImageButton1
FidProfilePanel1
FidProfileEvents
FidProfileEditWebLogin
FidProfileEditWebPassword
Edit Field for the Web Login.
Edit Field for the Web
Password.
Component Palette - Objects available on FidBookingScreen
This tab displays all objects that can be moved to the Edit Booking and Edit Event Booking screen:
FidBookingScreen Tab
Button
28
Definition
FidBookingGeneralInformation Panel
Display Panel for the General
Information.
FidBookingInformationPanel
Display Panel for the
Information.
FidBookingLinkedProfilesPanel
Display Panel for the Linked
Profiles.
FidBookingLabelContactonSite
The Label for the Contact on
Site.
FidBookingContactonSiteEdit
The Edit Field for the Contact
on Site.
Form Customization
FidBookingCompanyLinkedLabel
The Label for the Company
Field.
FidBookingCompanyLinked Combo
The Combo Box for the
Company Field.
FidBookingIndividulLinkedLabel
The Label for the Company
Field.
FidBookingIndividualLinked Combo
The Combo Box for the
Individual Field.
FidBookingPanel
The Booking Panel.
FidBookingLabelBookingName
The Label for the Booking
Name.
FidBookingNameEdit
Edit field for the Booking
Name.
FidBookingLabelBookingId
FidBookingBookingIDEnhanced Edit
The Label for the Booking ID.
Edit field for the Booking Id.
FidBookingLabelDepartureDate
The Label for the Departure
Date.
FidBookingDepartureDate
Edit field for the Departure
Date.
FidBookingLabelArrivalDate
FidBookingArrivalDate
The Label for the Arrival Date.
Edit Field for the Arrival Date.
FidBookingLabelAccountManager
The Label for the Account
Manager Field.
FidBookingAccountManager Combo
The Combo Box for the
Account Manager Field.
FidBookingLabelMainMarket
The Label for the Main Market
Segm. Field.
FidBookingMainMarketSegmentCombo
Form Customization
Displays a combo box which
combines the market codes
with their main market code
grouped by main market code.
It shows market code/
description / main market code
/ description of main market
code.
29
This combo box is inserted by
default when creating a new
screen.
FidBookingLabelMarketSegment
FidBookingMainandMarketSegmentCombo
FidBookingSourceLabel
Displays a combo box which
combines the main market code
and market code grouped by
main market. It shows main
market code, market code,
market code description.
The Label for the Source Field.
FidBookingSourceCombo
The Combo Box for the Source
Field.
FidBookingCategoryBooking GroupBox
The Group Box for the
Conference, Rooms and Both
Radio Buttons.
FidBookingConference RadioButton
Selection Button for
Conference.
FidBookingRoomsRadioButton
FidBookingConferenceandRooms
RadioButton
FidBookingCreditStatusLabel
FidBookingCreditStatusBevel
Selection Button for Rooms.
Selection Button for Conference
and Rooms.
The Label for the Credit Status
Field.
The Box for the Credit Statuses.
FidBookingCreditStatusCash CheckBox
Check Box for the Credit Status
Cash C.
FidBookingCreditStatusRooms CheckBox
Check Box for the Credit Status
Rooms R.
FidBookingCreditStatusAccount CheckBox
Check Box for the Credit Status
Accounts A.
FidBookingMainAndMarket Segment
ComboBox
FidBookingConference GroupBox
FidBookingConference StatusLabel
30
The Label for the Market
Segment Field.
Combo Box for the main
market and the market
segments.
Group Box for the Conference
Booking Information.
Label for the Conference Status.
Form Customization
FidBookingConference StatusCombo
Combo Box for the Conference
Status.
FidBookingConferenceManager Label
Label for the Conference
Manager Field.
FidBookingConferenceManager Combo
Combo Box for the Conference
Manager.
FidBookingNrAttendeesLabel
Label for the number of
attendees field.
FidBookingNrAttendeesEnhanced Edit
Edit Field for the number of
attendees.
FidBookingConferenceDecision DateLabel
The Label for the Decision Date
Field.
FidBookingConferenceDecision Date
Edit Field for the Decision
Date.
FidBookingFollowUpDateLabel
The Label for the Follow Up
Date Field.
FidBookingFollowUpDate
Edit Field for the Follow Up
Date.
FidBookingConferenceCutOff DateLabel
The Label for the Conference
Cut Off Date Field.
FidBookingConferenceCutOff Date
Edit Field for the Conference
Cut Off Date.
FidBookingConferenceInfo BoardLabel
The Label for the Conference
Info Board.
FidBookingConferenceInfor BoardEdit
Edit field for the Conference
Info Board.
FidBookingConferenceFunction
TypesLabel
FidBookingConferenceFunction
TypesCombo
The Label for the Conference
Function Types Field.
Combo Box for the Conference
Function Types.
FidBookingConference CurrencyLabel
The Label for the Conference
Currency Field.
FidBookingConfence CurrencyCombo
The Combo Box for the
Conference Currency Field.
FidBookingConferenceDetailConfirmed
CheckBox
FidBookingConference
FSDistributedCheckBox
Form Customization
Check Box for the Details
Confirmed Field.
Check Box for the FS
Confirmed Field.
31
FidBookingConferenceContract
NumberLabel
FidBookingConferenceContract
NumberEdit
FidBookingRoomsGroupBox
FidBookingRoomsInformation Panel
Edit field for the Conference
Contract Number.
Group Box for the Rooms
Section on the Booking Screen.
The Rooms Information Panel.
FidBookingRoomStatusLabel
Label for the Room Status
Field.
FidBookingRoomStatusCombo
Combo Box for the Room
Status Field.
FidBookingRoomManagerLabel
Label for the Room Manager
Field.
FidBookingRoomManager Combo
Combo Box for the Rooms
Manager Field.
FidBookingRoomsDecision DateLabel
Label for the Rooms Decision
Date Field.
FidBookingRoomsDecision Date
Edit Field for the Rooms
Decision Date.
FidBookingRoomsFollowUp DateLabel
Label for the Rooms Follow Up
Date Field.
FidBookingRoomsFollowUpDate
Edit Field for the Rooms Follow
Up Date.
FidBookingIndividualReservation
GroupBox
FidBookingNumberofIndividual
ReservationLabel
FidBookingNumberofIndividual
ReservationEnhancedEdit
FidBookingNewIndividual
ReservationButton
FidBookingAttachedIndividual
ReservationButton
FidBookingGroupsReservations GroupBox
32
The Label for the Conference
Contract Number Field.
Group Box for the Individual
Reservation Section.
Label for Number of
reservations field.
Edit field for the Number of
reservations.
Button for New Reservation.
Button for Attached
Reservation.
Group Box for the Group
Reservations Section.
Form Customization
FidBookingReservationGroup NameLabel
FidBookingReservationGroup NameEdit
FidBookingNewGroup ReservationButton
FidBookingAttachedGroup
ReservationButton
FidBookingBlocksReservations GroupBox
FidBookingReservationBlock NameLabel
FidBookingReservationBlock NameEdit
FidBookingNewGroup ReservationButton
FidBookingAttachedGroup
ReservationButton
FidBookingProfilesSelectPanel
Label for the Group Name
Field.
Edit field for the Group Name.
Button for New Group
Reservation.
Button for Rooming List.
Group Box for the Block
Reservations Section.
Label for the Block Name Field.
Edit field for the Block Name.
Button for New Block
Reservation.
Button for Room Grid.
Panel for the Profile Selection
on the
Reservation/Group/Block
Reservations.
FidBookingSelectBlock ReservationButton
Select Button on the Block
Reservation Section.
FidBookingSelectGroup ReservationButton
Select Button on the Group
Reservation Section.
FidBookingSelectIndividual
ReservationButton
Select Button on the Individual
Reservation Section.
Note: FidBookingMainMarketSegmentCombo should be used instead
of FidBookingMainMarketCombo and
FidBookingMarketSegmentCombo as they are now obsolete and will
be removed in a future release.
Form Customization
33
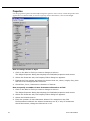
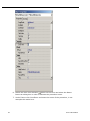
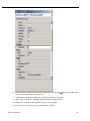
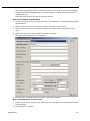
Properties
Use the properties options from the Object Inspector panel to select a font, control the position and
appearance of a field or label, as well as to specify control information, such as field length.
How to change a font or style
1. Click on the label or field you want to change to select it.
The Object Inspector dialog box displays the field/label properties and events.
2. Select the PROPERTIES tab, the Property Editor dialog box appears.
3. Expand the FONT options and select the desired char set, colour, height, font, pitch
and size from the appropriate list boxes
4. Check BOLD, ITALIC, UNDERLINE or STRIKEOUT if desired.
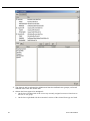
How to specify a number of max characters allowed on a field
1. Click on the label or field you want to change to select it.
The Object Inspector dialog box displays the field/label properties and events.
2. Select the PROPERTIES tab, the Property Editor dialog box appears.
3. Select the field MAXLENGTH.
4. Enter the number of max characters allowed. For example on the field
FIDPROFILEEDITLASTNAME1 the allowed characters are 35, if only 25 characters
should be entered, change the MAXLENGTH to 25.
34
Form Customization
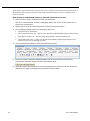
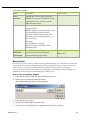
How to display only attributes to users or user groups that are assigned
1.
2.
3.
4.
5.
Select a RESEDIT form
Press CUSTOMIZE Button
On the Resedit form click on the TFIDRESATTRIBUTEDISPLAYPANEL
The Object Inspector dialog box displays the properties and events of this panel
On the PROPERTIES tab, navigate to the option ATTRUSERLINKED and select this
Save the form and assign it to users or user groups
Users or user groups using this form will only see attributes belonging to attribute
categories marked as being displayed on the First Page of the Reservation edit
dialog box.
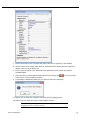
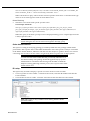
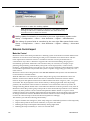
User Assignment
This option is used to assign specific users or user groups to specific screens and is accessible via
the option FORM CUSTOMIZATION on the Setup menu.
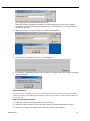
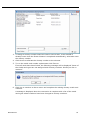
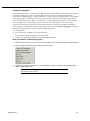
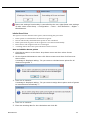
How to assign screens to users or user groups
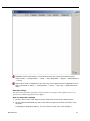
1. Click the SETUP menu and select FORM CUSTOMIZATION.
The form customization screen is displayed divided into two tabs:
Forms - used to customize screens.
User assignment - used to assign screens to users or user groups.
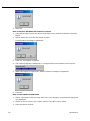
3. Click the USER ASSIGNMENT tab.
The User assignment screen is displayed split into two sections:
Form Customization
The available form types are listed in the upper part of the screen.
The users and user groups are listed in the lower part of the screen.
35
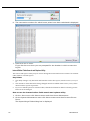
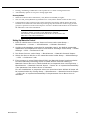
3. The GROUPS tab is selected by default and lists the defined user groups, to list all
defined users click the USERS tab.
4. Select the form type to be assigned:
36
On the lower left-hand side of the screen any currently assigned screens are listed next to
the user or user group.
On the lower right-hand side the customized versions of the selected form type are listed.
Form Customization
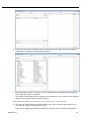
5. Select the user or user group to which the screen layout is to be assigned.
6. Select the customized version of the screen which is to be assigned from the list
on the right.
7. Click the ASSIGN button, the selected screen name is now listed next to the
selected user or user group.
8. The screen assignment can be removed by clicking the NONE button and the
original screen can be assigned by clicking the ORIGINAL button.
9. Click the CLOSE button to save the screen assignment.
Form Customization Tips and How To's
The following is a list of the available tips and tricks for form customization:
How to add customized buttons to the reservation screen
How to add the video check-out option to the reservation screen
How to add page up and page down buttons to the reservation screen
How to add desired room type selection to the reservation screen
How to add user defined check boxes on individual or company profiles
How to add currency exchange rate display to the reservation screen
How to add a web login to the profile screen
How to allow a profile to be marked as do not transfer
How to combine the entries of two character fields in a third character field
How to combine the entries of two numeric fields into a third field
How to set the discount amount and discount % fields to read only based on the selected rate
code
How to add customized fields
How to add customized fields2
Displaying HTML files - Guest Recognition
More information on fields and procedure names used on the reservation detail
Correct customized screens
How to add an option button to the reservation screen
Items from the options menu of the reservation edit screen such as confirmation letter, billing
instructions or guest comments can be added to the edit reservation screen as a button for fast
access.
Form Customization
37
In the Object Inspector the menu options which are available are listed either under MENUITEM or
MENUITEM2; if the required option is listed under MenuItem2 then the option USEMENUITEM2
must be selected.
How to add a customized button to the edit reservation screen
1. Click the SETUP menu and select FORM CUSTOMIZATION.
The form customization screen is displayed with a list of the screens that can or
have been customized.
2. Select the form to be customized and click the CUSTOMIZE button.
3. Four separate dialog boxes are displayed, they are:
The FORM to be customized.
The COMPONENT PALETTE - used to select the objects that should be placed on the screen.
The OBJECT INSPECTOR - used to change the properties of the selected objects.
The SCRIPT dialog box - used to set controls for mandatory fields and prompt users for
action on click, exit or changing an event.
4. On the Component Palette, click the FIDRESBUTTON tab.
5. Click the button FIDRESOPTIONMENUITEMBUTTON and then place the button by
clicking the required location on the reservation form.
6. With the button still selected on the reservation form select the OBJECT INSPECTOR
dialog box in order to change the properties of the button.
38
Form Customization
7. Under APPEARANCE click CAPTION and enter the text to appear on the button.
8. Under FIDELIO click either MENUITEM or click MENUITEM2 and select the required
option from the drop-down list.
9. If the required option was selected from MENUITEM2 then select the option
USEMENUITEM2.
7. Close the form customization dialog boxes by clicking the
hand corner of the FRESEDIT screen.
in the top right
8. A message is displayed asking if you want to save the changes.
11. Select YES to save the changes and close all the dialog boxes.
12. Click CLOSE to close the Form customization screen.
Note: To display the customized form in the application it must be
assigned to a user or group of users.
Form Customization
39
How to add the video check-out option to the reservation screen
The form customization option may be used to add the video check-out check box to the
reservation edit screen; this check box works in conjunction with the video interface so as to allow
the guest to check-out via video check-out.
How to add the video check-out option to the edit reservation screen
1. Click the SETUP menu and select FORM CUSTOMIZATION.
The form customization screen is displayed with a list of the screens that can or
have been customized.
2. Select a reservation form to be customized and click the CUSTOMIZE button.
3. On the Component Palette, click the FIDRESCHECKBOX tab.
4. Click the check box FIDRESVIDCHKOCHECKBOX and then place the check box by
clicking the required location on the reservation form.
5. With the button still selected on the reservation form select the OBJECT INSPECTOR
dialog box in order to change the properties of the button.
6. Under APPEARANCE click CAPTION and enter the text to appear on the button.
7. Close the form customization dialog boxes by clicking the
corner of the FRESEDIT screen.
in the top right hand
A message is displayed asking if you want to save the changes.
8. Select YES to save the changes and close all the dialog boxes.
9. Click CLOSE to close the Form customization screen.
Changes are displayed in the user log if the option Reservation Video checkout flag
is selected in Setup → Configuration → Users → User Log → Reservation.
How to add page up and page down buttons to the reservation screen
The form customization option may be used to add page up and page down buttons to the edit
reservation screen in order to scroll through reservations in edit mode.
How to add page up and page down buttons to the edit reservation screen
1. From the Setup main menu click FORM CUSTOMIZATION.
The form customization screen appears displaying a list of the screens that can or
have been customized.
2. Select the form to be customized and click the CUSTOMIZE button.
3. Four separate dialog boxes are displayed, they are:
The FORM to be customized.
The COMPONENT PALETTE - used to select the objects that should be placed on the screen.
The OBJECT INSPECTOR - used to change the properties of the selected objects.
The SCRIPT dialog box - used to set controls for mandatory fields and prompt users for
action on click, exit or changing an event.
4. On the Component Palette, click the FIDRESBUTTON tab.
40
Form Customization
5. Click the button FIDRESPAGEUP and then place the button by clicking the required
location on the reservation form, the button size can be adjusted if required.
6. Repeat steps 4 and 5 for the button FIDRESPAGEDOWN.
7. Close the form customization dialog boxes by clicking the
corner of the FRESEDIT screen.
in the top right hand
8. A message is displayed asking if you want to save the changes.
9. Select YES to save the changes and close all the dialog boxes.
10. Click CLOSE to close the Form customization screen.
Note: To display the customized form in the application it must be
assigned to a user or group of users.
How to add desired room type selection to the reservation screen
The form customization option may be used to add a room type selection button and a desired
room type selection field to the reservation edit screen for informational purposes.
How to add desired room type selection to the edit reservation screen
1. Click the SETUP menu and select FORM CUSTOMIZATION.
The form customization screen is displayed with a list of the screens that can or
have been customized.
2. Select a reservation form to be customized and click the CUSTOMIZE button.
3. On the Component Palette, click the FIDRESBUTTON tab.
4. Click the button FIDRESDESIREDROOMTYPEBITBTN and then place the button by
clicking the required location on the reservation form.
5. With the button still selected on the reservation form select the OBJECT INSPECTOR
dialog box in order to change the properties of the button.
6. Under APPEARANCE click CAPTION and enter the text to appear on the button.
7. On the Component Palette, click the FIDRESEDIT tab.
Form Customization
41
8. Click the field FIDRESEDITDESIREDROOMTYPE and then place the field next to the
room type selection button.
9. Close the form customization dialog boxes by clicking the
corner of the FRESEDIT screen.
in the top right hand
A message is displayed asking if you want to save the changes.
10. Select YES to save the changes and close all the dialog boxes.
11. Click CLOSE to close the Form customization screen.
How to add user defined check boxes on individual or company profiles
In this example we have added the field YPCF_CHECKBOX with the data type NUMBER 1 to the
reservation edit table YPCF:
alter table ypcf add ypcf_checkbox number(1);
1. Click the SETUP menu and select FORM CUSTOMIZATION.
2. Create a new profile form or select a profile form to be customized and click the
CUSTOMIZE button.
3. On the Component Palette, click the FIDPROFILE CHECKBOX tab.
4. Click the field object FIDPROFILECUSTOMFIELDCHECKBOX and place the field by clicking
the required location on the form.
5. With the field still selected on the reservation form select the OBJECT INSPECTOR
dialog box and enter the field name under CAPTION.
6. Close the form customization dialog boxes by clicking the
hand corner of the screen.
in the top right
A message is displayed asking if you want to save the changes.
7. Select YES to save the changes and close all the dialog boxes.
8. Assign the screen to the required users or user groups.
9. Click CLOSE to close the Form customization screen.
How to add currency exchange rate display to the reservation screen
The form customization option may be used to the currency exchange rate display to the
reservation edit screen.
How to add currency exchange rate display to the edit reservation screen
1. Click the SETUP menu and select FORM CUSTOMIZATION.
The form customization screen is displayed with a list of the screens that can or
have been customized.
2. Select a reservation form to be customized and click the CUSTOMIZE button.
3. On the Component Palette, click the FIDRESLABEL tab.
4. Click the field FIDRESEXCHRATELABEL and then place the field by clicking the required
location on the reservation form.
5. With the field still selected on the reservation form select the OBJECT INSPECTOR
dialog box in order to change the properties of the field.
6. Under FIDELIO click DISPLAYLIKECURRENCY if the exchange rate should be displayed
with the same number of decimals as the currency of the rate.
7. Under FIDELIO click NumberFormat and enter the format in which the currency
should be displayed.
42
Form Customization
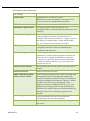
Placeholders are independent from the regional settings of the computer, but the
display of the exchange rate in the reservation edit screen is based on the regional
setting. The following placeholders for digits can be used:
0 Always digits, no matter if there is a value or not
# Digits are only shown if there is a value
, Thousand separator
. Decimal separator
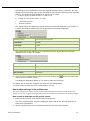
The setup below will display the digits before the decimal separator only if there is
a value, but always display the four digits after the decimal separator.
Exchange Rate
Exchange Rate Display
1.22000000
1.2200
0.64600000
.6460
122.46710000
122.4671
The setup below will display up to a maximum of four digits after the decimal
separator only if there is a value.
Exchange Rate
Exchange Rate Display
1.22000000
1.22
0.64600000
.646
122.46710000
122.4671
8. Close the form customization dialog boxes by clicking the
corner of the FRESEDIT screen.
in the top right hand
A message is displayed asking if you want to save the changes.
10. Select YES to save the changes and close all the dialog boxes.
11. Click CLOSE to close the Form customization screen.
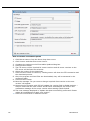
How to add a web login to the profile screen
The form customization option may be used to add web login and web password fields to the
profile screen. The assigned web login and password can then be used for the web booking engine.
How to add a web login to the profile screen
1. Click the SETUP menu and select FORM CUSTOMIZATION.
The form customization screen is displayed with a list of the screens that can or
have been customized.
2. Select a profile form to be customized and click the CUSTOMIZE button.
Form Customization
43
3. On the Component Palette, click the FIDPROFILEE DIT tab.
4. Click the field FIDPROFILEEDITWEBLOGIN and then place the field by clicking the
required location on the profile form.
5. Click the field FIDPROFILEEDITWEBPASSWORD and place next to the web login field on
the profile form.
6. Close the form customization dialog boxes by clicking the
corner of the screen.
in the top right hand
A message is displayed asking if you want to save the changes.
7. Select YES to save the changes and close all the dialog boxes.
8. Click CLOSE to close the Form customization screen.
Note: User names for the web login are case sensitive. If a user name
that already exists is entered via web booking or on a profile an error
message is displayed.
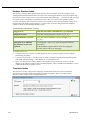
How to allow a profile to be marked as do not transfer
The form customization option may be used to create a check box on the profile screen which can
be used for marking profiles as 'Do not transfer' in a Suite8 Central environment.
How to add the do no transfer checkbox to the profile screen
1. Click the SETUP menu and select FORM CUSTOMIZATION.
The form customization screen is displayed with a list of the screens that can or
have been customized.
2. Select a profile form to be customized and click the CUSTOMIZE button.
3. On the Component Palette, click the FIDPROFILE CHECKBOX tab.
4. Click the field FIDPROFILECHECKBOXDISABLEDFORHC and then place the field by
clicking the required location on the profile form.
5. Close the form customization dialog boxes by clicking the
corner of the screen.
in the top right hand
A message is displayed asking if you want to save the changes.
6. Select YES to save the changes and close all the dialog boxes.
7. Click CLOSE to close the Form customization screen.
How to combine the entries of two character fields into a third field
The form customization option may be used to combine the entries of two character fields into a
third character field on both the reservation and CCM booking edit screens.
The fields must first be added to the required tables via TOAD or SQL Developer, YRCF for
reservations and YBCF for CCM booking.
For example: Entering the string MICROS in field1 and FIDELIO in field 2 will result in MICROS
FIDELIO being display in the field 3 when saving the reservation or booking.
How to combine the entries of two character fields into a third character field
In this example we have added three VARCHAR2 fields to the booking edit table YBCF:
alter table ybcf add ybcf_test1 varchar2(10);
alter table ybcf add ybcf_test2 varchar2(10);
alter table ybcf add ybcf_result varchar2(20);
44
Form Customization
1. Click the SETUP menu and select FORM CUSTOMIZATION.
2. Create a new booking edit form or select a booking edit form to be customized and
click the CUSTOMIZE button.
3. On the Component Palette, click the FIDBOOKING SCREEN tab.
4. Click the field FIDBOOKINGCUSTOMSTRINGFIELDEDIT and place the field by clicking the
required location on the form.
5. Repeat step 5 twice so that you have three FIDBOOKINGCUSTOMSTRINGFIELDEDIT on
the form.
6. Select one of the fields on the form and select the OBJECT INSPECTOR dialog box in
order to allocate the field name.
7. Under FIDELIO click FIELDNAME and enter the name of the field, in our example this
would be ybcf_test1.
8. Repeat step 8 for the fields ybcf_test2 and ybcf_result.
9. Select the SCRIPT dialog box and enter the following script:
procedure beforevalidation;
begin
booking.setCustomFieldByName('YBCF_RESULT'):=booking.getCustomFieldByNam
e('YBCF_test1')+' '+booking.getCustomFieldByName('YBCF_test2');
end;
10. Close the form customization dialog boxes by clicking the
corner of the booking edit screen.
in the top right hand
A message is displayed asking if you want to save the changes.
11. Select YES to save the changes and close all the dialog boxes.
12. Assign the screen to the required users or user groups.
13. Click CLOSE to close the Form customization screen.
How to combine the entries of two numeric fields into a third field
The form customization option may be used to combine the entries of two numeric fields into a
third numeric field on both the reservation and CCM booking edit screens.
The fields must first be added to the required tables via TOAD or SQL Developer, YRCF for
reservations and YBCF for CCM booking.
For example: Entering the amount 2.50 in field1 and 3.50 in field 2 will result in 6.00 being display
in the field 3 when saving the reservation or booking.
How to combine the entries of two numeric fields into a third numeric field
In this example we have added three NUMBER fields to the booking edit table YBCF:
alter table ybcf add ybcf_testnum1 number(30,4);
alter table ybcf add ybcf_testnum2 number(30,4);
alter table ybcf add ybcf_result1 number(30,4);
1. Click the SETUP menu and select FORM CUSTOMIZATION.
2. Create a new booking edit form or select a booking edit form to be customized and
click the CUSTOMIZE button.
3. On the Component Palette, click the FIDBOOKING SCREEN tab.
Form Customization
45
4. Click the field FIDBOOKINGCUSTOMNUMBERFIELDEDIT and place the field by clicking the
required location on the form.
5. Repeat step 5 twice so that you have three FIDBOOKINGCUSTOMNUMBERFIELDE DIT on
the form.
6. Select one of the fields on the form and select the OBJECT INSPECTOR dialog box in
order to allocate the field name.
7. Under FIDELIO click FIELDNAME and enter the name of the field, in our example this
would be ybcf_testnum1.
8. Repeat step 8 for the fields ybcf_testnum2 and ybcf_result1.
9. Select the SCRIPT dialog box and enter the following script:
procedure beforevalidation;
begin
booking.setCustomFieldByName('YBCF_RESULT1'):=booking.getCustomFieldByNa
me('YBCF_testnum1')+booking.getCustomFieldByName('YBCF_testnum2');
end;
10. Close the form customization dialog boxes by clicking the
corner of the booking edit screen.
in the top right hand
A message is displayed asking if you want to save the changes.
11. Select YES to save the changes and close all the dialog boxes.
12. Assign the screen to the required users or user groups.
13. Click CLOSE to close the Form customization screen.
How to set the discount amount and discount % fields to read only based on the
rate code
The form customization option may be used to set the discount amount and discount % fields on
the reservation screen as accessible only for specific rate codes; for all other rate codes or when no
rate code is entered the discount amount and discount % fields are read only.
The script required for this functionality contains two procedures:
formshow - sets the fields discount amount and discount % to read only when opening a
reservation with none of the defined rate codes.
b - verifies that the two fields are set to read only / not read only whenever you change the
rate code by manually entering it, choosing it from the rate code selection screen or removing
it from the reservation.
Note: The second procedure can be named as required; in our
example script the procedure is called b.
How to set the discount amount and discount % fields to read only based on
the rate code
1. Click the SETUP menu and select FORM CUSTOMIZATION.
The form customization screen is displayed with a list of the screens that can or
have been customized.
2. Select the reservation form to be customized and click the CUSTOMIZE button.
3. Select the SCRIPT dialog box and enter the following script:
46
Form Customization
Note: Amend the script to include the rate code header id of the rate codes for
which a discount can be assigned. In this example script the rate code header id's
1003 (Rack Rate) and 1024 (Tennis Package) are used.
procedure formshow;
var requestscreenrefresh: boolean;
var d: ReservationDetail;
begin
d:= reservation.getDetailByIndex(0);
if FidResEditRateDifference1.enabled then begin
if (d.yrch_id<>1003) or (d.yrch_id<>1024) then begin
FidResEditRateDifference1.ReadOnly:=TRUE; end; requestscreenrefresh:= true;
if (d.yrch_id<>1003) or (d.yrch_id<>1024) then begin
FidResEditDiscountPercentage1.ReadOnly:=TRUE; end; requestscreenrefresh:=
true;
if (d.yrch_id=1003) or (d.yrch_id=1024) then begin
FidResEditRateDifference1.ReadOnly:=FALSE; end; requestscreenrefresh:= true;
if (d.yrch_id=1003) or (d.yrch_id=1024) then begin
FidResEditDiscountPercentage1.ReadOnly:=FALSE; end; requestscreenrefresh:=
true;
end;
end;
procedure b;
var requestscreenrefresh: boolean;
var d: ReservationDetail;
begin
d:= reservation.getDetailByIndex(0);
if (d.yrch_id<>1003) or (d.yrch_id<>1024) then begin
FidResEditRateDifference1.ReadOnly:=TRUE; end; requestscreenrefresh:= true;
if (d.yrch_id<>1003) or (d.yrch_id<>1024) then begin
FidResEditDiscountPercentage1.ReadOnly:=TRUE; end; requestscreenrefresh:=
true;
if (d.yrch_id=1003) or (d.yrch_id=1024) then begin
FidResEditRateDifference1.ReadOnly:=FALSE; end; requestscreenrefresh:= true;
if (d.yrch_id=1003) or (d.yrch_id=1024) then begin
FidResEditDiscountPercentage1.ReadOnly:=FALSE; end; requestscreenrefresh:=
true;
scriptMakeVisibleIfTabsheetNotActive(self);
end;
4. Select the RATE CODE field on the form and select the OBJECT INSPECTOR dialog box in
order to allocate the procedure name.
5. Under FIDELIO click EXITEVENT and enter the name of the procedure, in our example
this would be B.
Form Customization
47
6. Select the RATE CODE selection
button on the form and select the OBJECT
INSPECTOR dialog box in order to allocate the procedure name.
7. Under FIDELIO click CLICKEVENT and enter the name of the procedure, in our
example this would be B.
48
Form Customization
8. Close the form customization dialog boxes by clicking the
corner of the reservation edit screen.
in the top right hand
A message is displayed asking if you want to save the changes.
9. Select YES to save the changes and close all the dialog boxes.
10. Assign the screen to the required users or user groups.
11. Click CLOSE to close the Form customization screen.
Form Customization
49
Note: Rate Code Promotions are not affected by the screen painting.
How to add customized fields
The form customization option may be used to add user-definable fields to various screens.
Before fields can be placed on a screen they must first be added to the relevant database table via
TOAD or SQL Developer:
Reservation screen the tables are YRCF and YRDF
Booking master edit screen the table is YBCF
Event edit screen the table is YECF
Profile edit screen the table is YPCF
How to add customized fields
In this example we have added the field yrcf_string with the data type VARCHAR2 to the
reservation edit table YRCF:
alter table yrcf add yrcf_string varchar2(100);
1. Click the SETUP menu and select FORM CUSTOMIZATION.
2. Create a new reservation form or select a reservation form to be customized and
click the CUSTOMIZE button.
3. On the Component Palette, click the FIDRESEDIT tab.
4. Click the field object FIDRESSTRINGCUSTOMFIELDEDIT and place the field by clicking
the required location on the form.
5. With the field still selected on the reservation form select the OBJECT INSPECTOR
dialog box in order to allocate the field name.
6. Under FIDELIO click FIELDNAME and enter the name of the field, in our example this
would be yrcf_string.
7. Under FIDELIO the option FIELDTYPE has automatically been completed with
Res_YRCF, as in our example the field was added to YRCF.
8. Close the form customization dialog boxes by clicking the
corner of the booking edit screen.
in the top right hand
A message is displayed asking if you want to save the changes.
9. Select YES to save the changes and close all the dialog boxes.
10. Assign the screen to the required users or user groups.
11. Click CLOSE to close the Form customization screen.
Note: Each time fields have been added to the tables YRCF, YRDF,
YBCF, YECF or YPCF Fidelio Suite8 has to be restarted to load the
new fields. Customised fields added to the table YPCF can be
included in the profile edit screens when selecting FIDPROFILEMORE
tab. When adding user definable numeric fields with more than 10
characters via TOAD, it is necessary to enter a scale of 1.
FidBookingEventCustomStringFieldEdit1 - FidBookingEventScreen
tab
FidBookingEventCustomNumberFieldEdit1
FidBookingCustomerNumberFIeldEdit
FidBookingCustomNumberFieldEdit1
50
Form Customization
Displaying HTML files - Guest Recognition
Guest Recognition HTML files can be called from either the edit reservation or edit profile screen
or both. or from the reservation.htm or individualprofile.htm file by implementing a hyperlink.
HTML and query files for guest recognition have been added to the standard HTML files called:
guestrecognition.htm
and guestrecognition.qry.
When calling the HTML file from a profile or reservation edit dialog box, information about the
guest such as stays, preferences, history and comments is displayed.
To use this feature, the corresponding forms have to be customized and the files:
GuestRecognition.htm and GuestRecognition.qry have to reside in the defined HTML directory
of Fidelio Suite8.
Customising the reservation edit form
Form Customization
51
1. Click the SETUP menu and select FORM CUSTOMIZATION.
2. Create a new reservation form or select a reservation form to be customized and
click the CUSTOMIZE button.
3. On the Component Palette, click the FIDRESLABEL tab.
4. Click the label FIDRESHTMLLABEL
required location on the form.
and place the label by clicking the
5. With the label still selected on the reservation form select the OBJECT INSPECTOR
dialog box in order to change the properties of the label.
6. Under APPEARANCE click CAPTION and enter the text to appear on the label, for
example, Guest Recognition.
7. Define any other appearance settings such as colour and word wrap as required.
8. Under FIDELIO click HTMLFILE and enter the name of the html file located in the
html directory of Fidelio Suite8, in our example this would be
guestrecognition.htm.
9. Under FIDELIO the option IDTOSEND has been automatically completed with
IdProfile.
52
Form Customization
Form Customization
53
10. Close the form customization dialog boxes by clicking the
hand corner of the reservation edit screen.
in the top right
A message is displayed asking if you want to save the changes.
11. Select YES to save the changes and close all the dialog boxes.
12. Assign the screen to the required users or user groups.
13. Click CLOSE to close the Form customization screen.
Example 1
In this example, the Guest Recognition link has been added to the arrivals panel
on the edit reservation form.
54
Form Customization
Example 2
In this example, the GUEST RECOGNITION link has been added to a panel on the right
of the edit reservation form.
Customising the individual Profile edit form
1. Click the SETUP menu and select FORM CUSTOMIZATION.
2. Create a new individual profile form or select an individual profile form to be
customized and click the CUSTOMIZE button.
3. On the Component Palette, click the FIDPROFILE MORE tab.
4. Click the label FIDPROFILEGRLABEL and place the label by clicking the required
location on the form.
5. With the label still selected on the profile form select the OBJECT INSPECTOR dialog
box in order to change the properties of the label.
6. Under APPEARANCE click CAPTION and enter the text to appear on the label, for
example, Guest Recognition.
7. Define any other appearance settings such as colour and word wrap as required.
8. Under OTHER click HTMLFILENAME and enter the name of the html file located in the
html directory of Fidelio Version 8, in our example this would be
guestrecognition.htm.
Form Customization
55
9. Close the form customization dialog boxes by clicking the
hand corner of the reservation edit screen.
in the top right
A message is displayed asking if you want to save the changes.
56
Form Customization
10. Select YES to save the changes and close all the dialog boxes.
11. Assign the screen to the required users or user groups.
12. Click CLOSE to close the Form customization screen.
Example 1
In the following two examples the Guest Recognition link is displayed as a label on
the profile edit screen.
Guest Recognition HTML display
When selecting the guest recognition link on either the reservation edit or individual
profile edit, the html file is displayed:
Form Customization
57
More information on fields and procedure names used on the reservation detail
Fields and procedure names used on reservation detail
58
Field
Procedure name
Return value
Guarantee
code
getGuaranteeCode
integer(id)
Pay Method
getdefaultpaymentdept
integer(id)
Credit Limit
getCreditLimit
floatingpointnumber
Print Rate
getPrintrate
boolean
no post
getNoPost
boolean
Room
features
getLinkedRoomFeatures
variant array of variants
containing yrft_id (room
feature id)
Reason
getratediffreason
string
Option Date
getoptiondate
datetime
Specials
getspecials
string
Booker
This is not a regular function, please
refer Getting linked profiles by
category
Form Customization
Getting linked profiles by category
To refer to linked profiles by category, use the following syntax:
getLinkedProfileByCategory(day: tdatetime; var name: string; var xcmsid: integer;
internalcategory: TXCCAInternalCategory);
The internal category should refer to one of the following values: 1=Company,
2=TravelAgent, 3=Source, 4=Individual, 5=Vendors, 6=MeetingPlanner.
Name and xcmsid are var parameters; they need to be declared first.
Example:
var name: string;
xcmsid: integer;
procedure aftercompleted;
begin
reservation.getLinkedProfileByCategory(reservation.getExpectedArrivalDate,name,
xcmsid,4);
showmessage(name);
scriptMakeVisibleIfTabsheetNotActive(self);
end;
end;
Getting data which changes on a daily basis
To refer to data which changes on a daily basis, use the following
syntax:getDetailDataRecord(date: tdatetime; var detailRecord: ReservationDetail);
Note: detailrecord is a var parameter, the result is given in the
variable only if it is defined first. The reservation detail is a packed
record.
Fields available on the reservation detail
Field
Procedure name
Return value
Number of rooms
noofrooms
Integer
Number of adults
adultno
Integer
The room type
dispRoomType
OleVariant
Rate code Header
dispRateCodeHeader
OleVariant
Room Type used for price
calculation
dispRoomTypeFor PriceCalc
OleVariant
Room number
dispRoom
OleVariant
Market Segment id
xcma_id
Integer
Source id
sourceid
Integer
Channel id
channelid
Integer
Block name
blockname
OleVariant
ReservationDetail_ DUMMY
SYSINT
Rate amount
rateamount
OleVariant
Room Type id
ycat_id
Integer
Rate code header id
yrch_id
Integer
Block detail id
ybld_id
Integer
Form Customization
59
Group name id
ygrp_id
Integer
Group name
groupname
OleVariant
Rate difference
ratedifference
OleVariant
Rate Discount
ratediscount
OleVariant
Manual Rate Amount
manualrateamount
OleVariant
Manual Rate
ismanualrate
WordBool
Foreign Rate amount
foreignrateamount
OleVariant
Foreign Rate Difference
foreignratedifference
OleVariant
Foreign Manual Rate amount
foreignmanualrate amount
OleVariant
Share number
sharenum
Integer
Room Id
yrms_id
Integer
Block Header Id
yblh_id
Integer
Rate amount
dispRateAmount
OleVariant
Net rate amount
netamount
OleVariant
Foreign net rate amount
foreignnetamount
OleVariant
Original rate amount
originalRateAmount
OleVariant
Original foreign rate amount
originalForeign RateAmount
OleVariant
Original manual rate amount
originalManual RateAmount
OleVariant
Original manual foreign rate
amount
originalManualForeign
RateAmount
OleVariant
Breakfast
breakfast
OleVariant
Lunch
lunch
OleVariant
Dinner
dinner
OleVariant
Mealplan
ratemealplan
Integer
newDetail
OleVariant
Original share number
originalSharenum
Integer
Date
date
OleVariant
Room type id for price
calculation
pricecalcycatid
Integer
Free nights id
yfrnid
Integer
Rate modifier
ratemodifier
OleVariant
Foreign rate modifier
foreignRatemodifier
OleVariant
Top Line Profit validated
tlpvalidated
OleVariant
Note: The variable FOCUSCONTROL has been replaced with the variable
SETFOCUS as of Fidelio Suite8.5.
60
Form Customization
Correcting customized screens
After the update from Fidelio Suite8.3 to 8.4 it is possible that the customized screens for the
Reservation Edit screen are not displayed correctly and that the panels for Company/Agent/Source
information and Profile details are missing. To fix this, the panels have to be moved from their
original location and copied into a new panel.
The Panels on Reservation Edit Screen:
The following panels from the reservation edit screen have to be moved and copied in the steps
detailed below:
TFidResProfileDetailsPanel1
Panel1
TopPanel
DownPanel
How to open the customized screen
1. Open SETUP → MISCELLANEOUS → FORM CUSTOMIZATION.
2. Select the customized screen from the FRESEDIT customized forms that should be
fixed.
3. Click the CUSTOMIZE button.
Form Customization
61
4. Open the COMPONENT PALETTE.
5. Open the OBJECT INSPECTOR.
6. Drag the FRESEDIT screen next to the OBJECT INSPECTOR and Component PALETTE so
you see the Object Inspector, Component Palette and fResEdit screen together.
How to configure panels in order to move them
1. On the Object Inspector TFIDRESPROFILEDETAILSPANEL1 should be selected.
If it is not selected, click on the upper left side of the FRESEDIT screen until
TFIDRESPROFILEDETAILSPANEL1 is shown as the selected panel the Object Inspector.
On the FRESEDIT screen, the border of TFIDRESPROFILEDETAILSPANEL1 should be
highlighted with the black anchors.
2. On the Object Inspector, select the field ALIGN and choose Align
ALNONE.
3. On the FRESEDITSCREEN with the panel TFIDRESPROFILEDETAILSPANEL1 still selected
place the cursor on the middle black anchor until it changes to an up/down arrow.
Drag the panel to the bottom of the screen, until the approximate size of 568 x
104 is indicated.
The group box with the reservation detail will become available on the screen.
4. On the FRESEDITSCREEN, select PANEL1 (COMPANY/AGENT/SOURCE) on the upper right
side and click the selected panel until the border is highlighted with the black
anchors.
5. The Object Inspector should indicate PANEL1:TPANEL, select the field ALIGN and
choose Align ALNONE.
6. On the FRESEDIT screen with the panel PANEL1 still selected, place the cursor on the
middle black anchor until it changes to an up-down arrow. Drag the panel to the
bottom of the screen, until the approximate size of 226 x 120 is indicated.
The group box with the fields Room Features, Reservation Colour, Booker and
Option Date will become available.
7. On the FRESEDIT screen, select the DOWN PANEL.
(Click in the grey area next to the FidLogModifyLogLabel1 on the bottom of the
FRESEDIT screen).
8. The Object Inspector should indicate
choose Align ALNONE.
PDOWN:TPANEL,
select the field ALIGN and
9. On the FRESEDIT screen, select TOPPANEL.
(Click in the area above the field Market Code of the FRESEDIT screen).
10. The Object Inspector should indicate PTOP:TPANEL, select the field ALIGN and choose
Align ALNONE.
11. On the FRESEDIT screen, select PDOWNTPANEL again.
(Click in FRESEDIT screen now on the light grey line above the field Room Features,
until PDOWN: PANEL is indicated in the Object Inspector). The border is highlighted
with the black anchors.
12. Move the whole box down until approximate size of 8,16 is indicated. The size
indicator is just a reference it may differ as it depends on how the box was
selected, so if it is not indicated, just move the box down.
13. Select PTOP:PANEL.
(Click in FRESEDIT screen the upper group box containing arrival date until PTOP:
PANEL is indicated in the Object Inspector)The border of the panel is highlighted
with the black anchors.
62
Form Customization
14. Move the whole box down until approximate size 0,112 is indicated (above the
PDOWN: PANEL that was dropped before). The size indicator is just a reference it
may differ as it depends on how the box was selected, so if it is not indicated, just
move the box down.
How to add a new panel
1. Select the STANDARD tab from the COMPONENT PALETTE.
2. Select a new panel by double-clicking on the PANEL button. PANEL2 will be placed in
the fResEdit screen.
3. Select PANEL2, then use CTRL X to cut the panel.
4. Move the cursor above the PTOPPANEL, paste PANEL2 using Ctrl V right above the
PTOPPANEL.
5. Select PANEL2 again, the Object Inspector should indicate PANEL2: TPANEL.
6. In the Object Inspector, select the field ALIGN.
7. Choose Align
ALTOP.
8. Select the field CAPTION from the Object Inspector.
9. Remove the text PANEL2.
10. Select the field BVOUTER from the Object Inspector.
11. Choose BVNONE.
12. On
FRESEDIT
screen, drag the bottom line down until the Top Panel starts.
How to move panels to their original position (Cut and paste)
1. Select PANEL1 (Company/Agent/Source group box).
2. Use CTRL X to cut the panel.
3. Move the cursor to the upper right side into PANEL2, use CTRL V to paste the panel
back to its original position.
4. Select PANEL1 again, the Object Inspector should now indicate PANEL1.
5. In Object Inspector, select the field ALIGN.
6. Choose Align
ALRIGHT.
7. Select TFIDRESPROFILEDETAILSPANEL1.
8. Use CTRL X to cut the panel.
9. Move the cursor to the upper left side into PANEL2, use CTRL V to paste the panel
back to its original position.
10. Select PANEL1 again, the Object Inspector should indicate PANEL1.
11. In Object Inspector, select the field ALIGN.
12. Choose Align
ALRIGHT.
13. Select TFIDRESPROFILEDETAILSPANEL1 again.
14. The Object Inspector should indicate TFIDRESPROFILEDETAILSPANEL1.
15. In the Object Inspector, select the field ALIGN.
16. Choose ALIGN ALCLIENT.
Form Customization
63
Close & Verify
1.
To save the screen, click the close window icon
on the top right of the screen.
2.
On the FORM CUSTOMIZATION dialog box select USER ASSIGNMENT.
3.
Assign the corrected screen to the current user.
4.
Click the CLOSE button.
5.
Open the RESERVATION NAVIGATOR and EDIT a reservation to make sure the screen
display is now correct.
Scripting
The scripting functionality allows experienced users to show messages, make fields mandatory
and force actions by using FIDELIO E VENTS.
Script functionality uses Delphi Syntax. Running queries in form customization can use database
objects, such as oracle functions.
All controls have either:
Click Events
Exit Events
Change Events
Standard Events are:
FormShow
BeforeValidation
BeforeSave
AfterCompleted
FormShow
The following objects may be used in scripting:
runquerywithoutresultset for update statements
runquerywithresultset for select statements without parameters
runquerywithparameters for select statements with parameters
Select SQL statements return a query object.
Data can be retrieved by calling 'fieldbyname method.'
Navigation between rows is possible with '.next method'
To check if the last row is reached use: 'check .eof'
How to show a message
1. Select the component from the FRESEDIT screen.
2. Select the OBJECT INSPECTOR.
3. Double-click on the field EXITEVENT under the category Fidelio and enter a name, if
no name is entered, the name of the component + _EXIT will be filled
automatically. For example: FIDRESADULTSSPINEDIT1_EXIT.
64
Form Customization
4. Select SCRIPT.
5. Enter the procedure entered under EXITEVENT.
Example:
//Show Message
Procedure AdultsWarning;
begin
showmessage('Please enter number of Adults');
end;
//Show Message
Procedure AdultsWarning;
begin
showmessage('Please enter number of Adults');
end;
How to set a default number of adults on a new reservation
The following example shows how to default the number of adults to 2 when creating a new
reservation:
var d: reservationdetail;
var requestscreenrefresh: boolean;
Form Customization
65
procedure formshow;
begin if reservation.isnew then
begin
d:=reservation.getDetailByIndex(0);
if d.adultno<>2 then begin reservation.changeNoOfAdults(0,0,2); end;
requestscreenrefresh:= true;
end;
scriptMakeVisibleIfTabsheetNotActive(self);
end;
end;
How to enter long stay messages
The following example shows how to enter a long stay message:
var exceptiontext: string;
var abortneeded: boolean;
var waslong;
function islong: boolean;
begin
result:= (reservation.getexpecteddeparturedate-reservation.getexpectedarrivaldate>2);
end;
procedure datechange;
begin
if (not waslong) and islong then showmessage('Please offer Longstay Rate');
waslong:= islong;
end;
procedure FormShow;
begin
waslong:= islong;
end;
How to make a field mandatory
To make a field mandatory:
66
2 variables EXCEPTIONTEXT and ABORTNEEDED have to be declared
The reservation variable is always declared automatically and defines the reservation which is
opened
The variable EXPECTIONTEXT will be created after this procedure is finished and will be shown
and stop the validation process
The variable SETFOCUS refers to the name of the control (the control can be retrieved from
Object Inspector → Name)
Form Customization
Note: Fidelio Suite8 offers saving profiles, reservations or bookings
also from different tabs when editing a profile, reservation or booking.
Therefore it is necessary to call a procedure within a script for
mandatory fields in order to make a form (tab) visible (active) before
focusing a control. The procedure is called:
SCRIPTMAKEVISIBLEIFTABSHEETNOTACTIVE(self), (self) referring to the
field name. This procedure will ensure that the edit tab will be the
active page before focusing the control. It is necessary using this with
the variable setfocus and recommended to add this procedure to all
scripts for mandatory fields on the edit reservation, profiles or
booking screen.
Example of how to make the field freetext1 a mandatory field
var exceptiontext: string;
var abortneeded: boolean;
procedure beforevalidation;
begin
if reservation.getfreetext(1)= '' then begin
exceptiontext:= 'Freetext 1 can not be empty';
scriptMakeVisibleIfTabsheetNotActive(FidResEditFree11);
fidreseditfree11.setfocus;
end;
end;
Example of how to make the field option date a mandatory fieldvar exceptiontext: string;
var abortneeded: boolean;
procedure beforevalidation;
begin
if (reservation.getResStatus=0) and (reservation.getoptiondate = 0) then begin
exceptiontext:= 'Please enter Option date for tentative reservations!';
scriptMakeVisibleIfTabsheetNotActive(FidResOptionDateEdit1);
FidResOptionDateEdit1.setfocus;
end;
end;
Example of how to make the first name field mandatory in the individual profile screen
The following example shows how to make the first name field mandatory in the
individual profile screen:
var exceptiontext: string;
procedure beforevalidation;
begin
if FidProfileEditFirstName1.Text='' then exceptiontext:='First Name mandatory.';
scriptMakeVisibleIfTabsheetNotActive(self);
FidProfileEditFirstName1.setfocus;
end;
Example of how to control the field gender
The following example shows how to control if the field GENDER is filled, if it is not filled
the message: 'Please enter gender' will display:
var exceptiontext: string;
var abortneeded: boolean;
procedure beforevalidation;
begin if (not FidProfileCheckBoxMale1.checked) and (not
FidProfileCheckBoxFemale1.checked)
then begin exceptiontext:= 'Please enter gender';
scriptMakeVisibleIfTabsheetNotActive(FidProfileCheckBoxMale1);
Form Customization
67
FidProfileCheckBoxMale1.setfocus;
end;
end;
Example of how to control the field division on all tabs of the company profile edit
screen
The following example shows how to make the field DIVISION mandatory on the
Company Profile Edit screen, even if the company profile is saved via a different tab
and the field is not filled:
var exceptiontext: string;
var abortneeded: boolean;
procedure beforevalidation;
begin
if FidProfileEditDivision1.text= '' then begin
exceptiontext:= 'Division can not be empty';
scriptMakeVisibleIfTabsheetNotActive(FidProfileEditDivision1);
FidProfileEditDivision1.setfocus;
exit;
end;
end;
Example of how to make the field Function Type mandatory
The following example shows how to make the field FUNCTION TYPE mandatory on the
Booking Edit Screen:
var exceptiontext: string;
var abortneeded: boolean;
procedure BeforeValidation;
begin
exceptiontext:='';
if FidBookingConferenceFunctionTypeCombo1.Text='' then
begin
exceptiontext:= 'Function Type is mandatory';
scriptMakeVisibleIfTabsheetNotActive(FidBookingConferenceFuctionTypeCombo1);
FidBookingConferenceFunctionTypeCombo1.SetFocus;
exit;
end;
end;
Example of how to make the field Booking Name mandatory
The following example shows how to make the field BOOKING NAME mandatory on the
Booking Edit Screen:
var exceptiontext: string;
var abortneeded: boolean;
procedure BeforeValidation;
if FidBookingNameEdit1.Text='' then
begin
exceptiontext:= 'Booking Name is mandatory';
scriptMakeVisibleIfTabsheetNotActive(FidBookingNameEdit1);
FidBookingNameEdit1.SetFocus;
exit;
end;
end;
Example of how to make the field Booker a mandatory field if a company profile is
linked to the reservation
var exceptiontext: string;
var abortneeded: boolean;
procedure beforevalidation;
68
Form Customization
var i: integer;
det: reservationdetail;
name: string;
xcmsid: integer;
begin
for i:= 0 to reservation.getdetailcount-1 do begin
det:= reservation.getdetailbyindex(i);
reservation.getlinkedprofilebycategory(det.date,name,xcmsid,1);
if xcmsid<>0 then begin
reservation.getlinkedprofilebycategory(det.date,name,xcmsid,4);
if xcmsid=0 then begin
exceptiontext:= 'Please enter booker';
ScriptMakeVisibleIfTabsheetNotActive(FidResProfileCombo1);
FidResProfileCombo1.setfocus;
exit;
end;
end;
end;
end;
Note: If you are using a customized screen, the control name
FIDRESPROFILECOMBO1 has to be changed to the one used on the
customized screen.
Example of how to fill the field Guarantee Code with a default value
The following example shows how to fill the field GUARANTEE CODE with the default
guarantee code '6 PM':procedure beforevalidation;
begin
if reservation.getGuaranteeCode=0 then begin
reservation.changeGuaranteeCode(1002);
end;
end;
In this example ‘1002’ is the guarantee code id for ‘6 PM’ , the ‘ygco_id’ from the table
YGCO.
How to fill the field infoboard with the booking name
The following scripting can be used on the field infoboard when the information from the field
booking name should be transferred to the field infoboard:
procedure BeforeValidation;
begin
if fidbookingconferenceinfoboardedit1.text='' then
begin
fidbookingconferenceinfoboardedit1.text:=fidbookingnameedit1.text;
callcontrolmethod(fidbookingconferenceinfoboardedit1, 'StoreValue');
end;
end;
How to run a query using Oracle functions
In the following example the number of adults entered on the reservation is multiplied by 10 and
the result is filled in the discount amount field on the reservation edit screen.
First the function for the discount calculation has to be created by running the following statement:
create or replace FUNCTION getdiscount(adultno in number) return number is BEGIN
return adultno*10;
END getdiscount;
Form Customization
69
Then in Fidelio Suite8 under Setup → Miscellaneous → Form Customization, the procedure "b" has
to be assigned to the "exitevent" (property of the adult edit control) and the following query has to
be entered as script:
var requestscreenrefresh: boolean;
procedure b;
var q: tfquerywrapper;
r: ReservationDetail;
begin
r:= reservation.getdetailbyindex(0);
q:= database.runquerywithparameter('select getdiscount(:p) d from dual','p',r.adultno,otinteger);
reservation.changeratedifference(0,0,-q.fieldbyname('d'),false);
q.free;
requestscreenrefresh:= true;
end;
Using customized fields, which should update the field 'Discount' as soon as a
value
In the following example, the field discount will be updated with '30' if the customized field is
filled with 1:
var exceptiontext: string;
var requestscreenrefresh: boolean;
procedure testintegerexit;
begin
if reservation.getCustomFieldByName('yrcf_testinteger')=1
then begin
reservation.changeRateDiscount(0,0,30);
requestscreenrefresh:= true;
end;
if reservation.getCustomFieldByName('yrcf_testinteger')=0
then begin
reservation.changeRateDiscount(0,0,0);
requestscreenrefresh:= true;
end;
end;
How to enter string controls
Setting string controls forces the user to start or not to start text with a certain letter. In the
following example the user can not start the text with 'a' for the field Freetext1:
var exceptiontext: string;
var abortneeded: boolean;
procedure beforevalidation;
begin
if (FidResEditFree11.text<>'') and (copy(FidResEditFree11.text[1],1,1)='a') then begin
exceptiontext:= 'Custom string can not begin with letter a.';
ScriptMakeVisibleIfTabsheetNotActive(FidResEditFree11);
FidResEditFree11.setfocus;
end;
end;
70
Form Customization
2
Miscellaneous
The options in the Setup Miscellaneous menu are used mainly to maintain the Fidelio Suite8
modules. In addition to licence code functionality and form customization, an option which allows
custom screen painting, this section offers utilities that should only be used by the system
supervisor and the Fidelio Suite8 support department. These utilities are used to fix issues in the
Fidelio Suite8 database tables such as note fix, rate code order fix, reservation details fix and
reservation check. It also offers tools to see SQL log files, control performance and maintain user
sessions. The Setup Miscellaneous section contains some powerful features and it is important that
access to this part of the menu is strictly limited.
Select MISCELLANEOUS from the Fidelio Suite8 Setup main menu to display the miscellaneous
options.
Setup Miscellaneous Options
Option
Definition
License
V8 Hotel
This option is used to enter the hotel licence code.
V8 Sublicense
This option is used to enter all the valid licence codes with
the exception of the hotel licence code which is entered under
the option V8 Hotel Licence.
Export
This option is used to export the V8 Hotel and Sublicenses to
a file.
Import
This option is used to import the V8 Hotel and Sublicenses
from a file.
System Maintenance
Cashiering
AR Old Balances
This option is used to enter accounts receivable balances
from a different or manual system into Fidelio Suite8.
Change Credit Card
Encryption key
This option is used for adding a part of the encryption but
not the complete key. It can be used to re-encrypt all credit
card details in the database. The whole value is not displayed
to the user when decrypting credit card data manually. Other
parts of the key are unique to the installation and can not be
touched by a user. The manual portion of the encryption is
stored encrypted and can not be returned to the user. Data
can only be changed by entering a new key. The manual part
of the key has to contain 12 characters.
Enter Past Revenue
This option allows entering past revenue by department code
for any past period.
Recalculate
Month/Year values
This option allows recalculation of statistic figures for the
Manager Report, History, Budget and Revenue per day.
CCM
Miscellaneous
71
CRM
Address Batch
Validate
Profile Import
Replace Users
This option allows the replacing of assigned Managers on
profiles, Tasks and Activities, and Bookings.
Database
Binary Field
Compression
This option allows compression of all folios, compression of
folios for a specific date range and the compression of
confirmation letters text.
Custom SQL
statements
Select this option to run custom SQL statements on the
Fidelio Suite8 tables. This option should be used by users
who are familiar with the V8 table structure and experienced
in SQL language.
Database Full CPU
Test
Gather database
statistics
This option calls an analyzing package provided by
ORACLE. This package enables better performance and
response time of the ORACLE database.
ID Lookup
Sequence Fix
The sequence fix option updates the table SEQ with the last
used ID for each table.
Support SQL
This option is used to run SQL query scripts to check
performance, memory, sessions, and views and to view the
data dictionary view.
SQL log
This option is used to view the SQL log file queries that have
been run on the database from the application.
Switch DB
Resource Group
Miscellaneous
Apply user settings
to others
Check user rights in
code
Developer
Interface Triggers
72
This option is used to view and process triggers for the
interfaces. A trigger is an action causing the automatic
invocation of a procedure.
Miscellaneous
Note fix
This option is used to remove special characters from the
notes field. It is used after conversion or update to remove
special characters.
Reset Form Position
This option may be used to resize all forms and set them
back to their original screen position.
Support Check
System Check
This option is used to run checks for contents and existence
of primary keys on the Fidelio Suite8 tables.
Update IFC Error
Types
Reservation
JetWeb Export
Rate code order fix
The rate code order fix is used to fix the display order for rate
codes attached to profiles.
Reservation Check
This option is used to search for and fix errors on
reservations and reservation details.
Reservation Detail
Fix
This option is required after conversion to create multiple
reservation details for each reservation header depending on
the entered number of nights.
Translation
Reload Translation
Updates
Executable Updates
This option is used to configure an FTP connection for
automatic download and/or download and install the latest
executable updates for version 8.
Database Structure
Update
This option is used to check the database structure after an
update.
Translation
This option is used for the exchange of translated files from
an FTP Server, via manual import and/or automatic
download and import.
Mailing Update
This option is used to create or update only the standard
mailing views and fields.
Materials Control
Import
Setting Up
Materials Control
Materials Control
Import
Miscellaneous
This option is used to import outlets, run the import for all
products as well as linking and unlinking products.
73
License
V8 Hotel License
Each Fidelio Suite8 installation requires a license code. The license code is based on the exact name
of the property and the number of rooms. Based on this information, each property is issued a
license code. If the name or number of rooms changes, a new license code must be obtained.
License Code dialog box
Field
Definition
Legal Values
Hotel name
Defines the property name. The
information has to be entered exactly
as it was requested on the license code
request form.
Up to 60 alphanumeric
characters.
Max no of
rooms
Exact number of rooms in the
property, as listed in the request for
the license.
Up to 4 digits.
Expiry date
Expiration date of the license code.
Valid date from the
calendar that appears in
the list box.
Code
License code exactly as received.
Seasonal
Indicates if the property opens on a
seasonal basis.
Note: Thirteen days before the license
code expires, a message with the
number of days the license is valid for
will display and reoccur until the
license code expires.
Check: YES
Indicates the start date of the season.
This option is only available if the
seasonal check box is selected.
Valid date from the
calendar that appears in
the list box.
Start date
74
Blank: NO
Miscellaneous
The first night audit can only be run on
or after the entered start date.
Number of
days
Defines the number of days in the
season. This option is only available if
the seasonal check box is selected. This
controls how many night audits can be
run. If the number of days has elapsed
then no more night audits can be run.
Note: Selecting ABOUT (Ctrl + Shift +
Q) from the Help menu displays the
date the license starts and expires, as
well as the number of days left until
expiration.
Up to 3 digits.
Master
Hotel
Defines the master hotel when Suite8
Central is activated and controls the
records from the connected partner
hotels.
Check: YES
Partner
Hotels
Defines the number of partner hotels
Blank: NO
From the V8 Hotel licence screen the following options are available:
Room Setup - to access the room's configuration.
Export - to create a license export file.
Import - to import a license import file.
Note: If the license code is imported from an XML file, the import has
to be made on V8 Hotel and on V8 Sublicenses.
Note: A separate Master Hotel License can be obtained for properties
using a Head Quarter as 'Master' where no PMS or CCM license is
activated.
V8 Sublicenses
This option is used to enter and edit all additional licenses as follows:
Main sublicenses
Customer relation management
Miscellaneous
75
76
Property management
Conference and catering management
Software interfaces
Miscellaneous
Interface functions
Property interfaces
Miscellaneous
77
Sublicense dialog box
Field
Definition
Legal Values
Name
Description of the license.
View only
Code
License code exactly as received.
Active
Indicates if the license for the Interface
function is active or not.
Check: Active
Blank: Inactive
The following options are available from the sublicense dialog box:
78
Option
Does this
Edit
Edits the sub-license or change the active status.
Miscellaneous
Delete
Deletes the selected sublicense.
Export
Used to create a License Export file.
Import
Used to import a License Import file.
Expand
Expands the list of licenses
Collapse
Collapses the list of licenses
New
Used to enter a new sublicense.
Set active
Activates the license.
Set inactive
Deactivate the license.
Export
This option is used to create a license export file.
Import
The license import option allows for the import of the licence code.
System Maintenance
The system maintenance options should only be used when advised by Fidelio Suite8 support, or
when using options from special interfaces, such as Jetweb or address doctor. Most options consist
of utilities to fix inconsistencies in the Fidelio Suite8 tables and utilities to run after conversion of
data.
Cashiering
AR Old Balances
This option is used to enter accounts receivable balances from a different or manual system into
Fidelio Suite8.
How to enter old balances
1. Click AR OLD BALANCES to open the Accounts Navigator.
2. Select either an existing Accounts Receivable Account or create a new Account.
3. Select the date of the invoice from the calendar
4. Select an aging period.
5. Enter the invoice number
6. Enter the original amount of the invoice.
7. Enter the total payments received for the invoice.
8. Leave the guest name or enter a comment next to the guest name
9. If reminder letters were sent, select the Reminder letter which was sent last
Miscellaneous
79
A/R Old Balance dialog box
Field
Definition
A/R Account
Number/Name
View only fields
Date
The invoice date or the date when the aging period
should start. The date can only be past or today. Enter
either a date or an aging period.
Aging Periods
Defines the aging period for the entered amount. If a
date was entered before it will be changed according
to the selected aging period.
Invoice #
The invoice number
Amount
The original amount of the invoice.
Paid
The total payments received for the invoice.
Open Balance
This field is calculated: Amount - Paid.
Guest Name
The name of the guest and invoice number, additional
information can be added next to the guest name
Reminder Sent
The reminder letter last sent for this invoice can be
selected from list box
The entering of accounts receivable old balances is controlled by the user rights
Enter Old Balances under Setup → Configuration → Users → User Definition →
Rights → Accounts Receivable.
Change Credit Card Encryption Key
This option is used for adding a part of the encryption but not the complete key. It can
be used to re-encrypt all credit card details in the database. The whole value is not
displayed to the user when decrypting credit card data manually. Other parts of the key
are unique to the installation and can not be touched by a user. The manual portion of
the encryption is stored encrypted and can not be returned to the user. Data can only be
changed by entering a new key. The manual part of the key has to contain 12 characters.
How to decrypt credit card keys
1. Click Setup Miscellaneous, SYSTEM MAINTENANCE, CASHIERING
2. Select CHANGE CREDIT CARD CRYPT KEY
A message is displayed asking you if you want to change the encryption
3. Click YES.
The New Credit Card Encryption Key dialog box is displayed.
80
Miscellaneous
The existing key is not displayed to the user.
Only part of the encryption is entered, the manual portion of the key is stored
encrypted and can not be returned to the user. The data can only be changed by
entering a new key.
4. When entering a new key, it has to contain 12 characters.
5. Click OK
6. The data is encrypted and saved in the database.
7. A message is displayed when the encrypting is complete with the number of credit
cards encrypted.
Enter Past Revenue
This option allows entering past revenue by department code for any past period. This would be
used when starting with Fidelio Suite8 and the revenue from another system should be taken over
for past periods.
How to enter past revenue
1. Enter the year for the past period in the YEAR field.
2. Select the DEPT CODES to view from the list box of defined department codes
3. Select a row from the department code list to enter past revenue
Miscellaneous
81
4. Enter the amount or use the calculator to calculate gross or net amounts.
5. There are 4 options for transferring the amount:
Click the <GROSS button to transfer the amount to the gross cells of the selected
department code.
Click the <NET button to transfer the amount to the net revenue cells of the
selected department code
Click the <CELL button to transfer an amount to a selected cell.
Click the <ROW button to transfer an amount to all cells in a row.
6. Click the SAVE button to save entries.
A screen displaying the update progress is displayed.
7. Click the CLOSE button to close the screen without saving
Note: The first date found with a posting will display in blue, this is
usually the Fidelio Suite8 start date. All the following cells will
display in red, all entries in these cells will not be saved when
pressing SAVE button as the actual posted revenue will remain in the
table
Past revenue dialog box
82
Field
Definition
Year
Select the year for which past revenue should be
entered.
Dept Code(s)
Select the department code(s) for which past revenue
should be entered.
<Cell
Select this button to copy the entered amount to the
selected cell.
<Row
Select this button to copy the entered amount to the
selected row.
<Gross
Select this button to copy the entered amount to all
Gross amount cells of the selected row.
<Net
Select this button to copy the entered amount to all
Gross amount cells of the selected row.
Save
Press the save button to save entries.
Close
Press the close button to close the screen without
saving.
Miscellaneous
Recalculate Month/Year values
This option is used to recalculate various statistics.
The statistic figures that can be recalculated are as follows:
Manager Report (SMAN) - all history values used for the manager report.
History (SHIS) - this option recalculates daily values for the history statistics. Missing daily
records will be added. The daily records will be recalculated from the reservation file.
Budget (SMBD) - this option recalculates month and year values for the manager report
budget.
Revenue per department code (SRPD) - this option recalculates month and year values for the
revenue statistics per day.
Revenue per department code (SRPD) - this option recalculates daily values for the revenue
statistics per day. Missing daily records will be added.
Miscellaneous
83
History (SHIB, SHIE) - Recalculates bookings and events daily values - this option recalculates
daily values for the history statistics for CCM Bookings (SHIB) and CCM Events (SHIE).
Missing daily records will be added.
How to recalculate month and year figures
1. Click RECALCULATE MONTH YEAR FIGURES from the setup miscellaneous drop-down
menu.
2. Select a FROM and TO date for the calculation from the calendar.
3. Select all or one of the statistic files to calculate.
4. Click the RUN button.
Note: Since Fidelio Suite8 Version 8.9.0.3, the fields:
'ZPOS_ORIGINATED_YRES' and 'ZPOS_ORIGINATED_ZFAC_ID'
are filled with NULL instead of 0 if no 'ID' is linked. This has been
changed to enhance the response time when selecting information
from the table ZPOS. However, this change was not announced and
the view used for the financial accounts History Statistics calculation
in: SHIS was not adapted. Properties already running Fidelio Suite8
Version 8.9. are strongly recommended to run a recalculation on the
History (SHIS) file. In addition, all custom views should be checked.
(This note is relevant as of release 8.9.0.2.)
Change Credit Card Numbers to Dummy Numbers
This option should be used in Fidelio Suite8 demo or training systems to make sure that all credit
card numbers used in the training or demo system are dummy numbers and to avoid fraud. This
option must be run when live-data from a hotel is imported for testing purposes, so that any stored
numbers are eliminated.
The user log CHANGE CREDIT CARD NUMBERS TO DUMMY NUMBERS must be activated in the training
or demo system as well as in the live system to record each time the credit card number conversion
is launched and to prove that the PCI - Payment Card Industry Data Security standards have been
implemented.
Note: When executing this option all credit card data will be replaced
with test numbers and all passport, drivers license and date of birth
details will be deleted.
How to change credit card numbers to dummy numbers
1. On the SETUP menu click MISCELLANEOUS and then select SYSTEM MAINTENANCE.
2. On the System Maintenance menu click CASHIERING and then click CHANGE CREDIT
CARD NUMBER TO DUMMY NUMBERS.
84
Miscellaneous
3. To assign a dummy number select the CREDIT CARD SCHEMA, if the schema is
already known then the DUMMY NUMBER is completed automatically, otherwise enter
the dummy number.
4. Click ASSIGN to allocate the dummy number to the schema.
5. To run the credit card number replacement click EXECUTE.
If not all cards have been linked, the following message will be displayed "Some of
the Credit card types are not assigned with Dummy numbers. Would you like to
continue"
6. Click YES to continue or NO to return and complete the missing dummy credit card
numbers.
A message is displayed when the conversion is complete with a list of the credit
card types whose numbers have been changed to dummy numbers.
Miscellaneous
85
7. Click OK to close the message and then click CLOSE to exit.
Changes are displayed in the user log if the option Change Credit Card Numbers to
Dummy Numbers is selected in Setup → Configuration → Users → User Log →
Application and users.
CRM
Addresses Batch Validate
This option is used with the address doctor integration interface. It allows validation of all
addresses in a batch. An URL address has to be defined under Batch URL in Global Settings →
Profile 2 tab.
Addresses Batch Validate dialog box
Field
Definition
Not validated
The number of addresses not validated
Valid
The number of valid addresses. Addresses which have been
validated by address doctor
To be manually
validated
The number of addresses which need to be validated
manually. When running manual address validation, the
process is interrupted and allows selection of the correct
address
Not valid
The number of addresses not valid. These addresses can not
be validated because of missing information
Available Buttons
Start
Press this button to activate batch validation process
Run manual
Press this button to run batch validation manually, the batch
stops and allows selection of valid addresses for addresses
which are not unique. This option should run if the field TO
BE MANUALLY VALIDATED is not 0
Stop
Press this button to stop batch validation
Emails Batch Validate
This option is used to validate all the profile email address's.
86
Miscellaneous
How to run Email Batch Validate
1. Click MISCELLANEOUS from the SETUP drop-down menu and then SYSTEM MAINTENANCE.
2. On the System Maintenance menu click CRM.
3. Click EMAILS BATCH VALIDATE on the CRM menu to display the Emails Batch Validate
dialog box.
The number of NOT VALIDATED, VALID and NOT VALID email addresses are displayed.
4. Click START to start the validation process.
Miscellaneous
87
5. Click CLOSE to close the dialog box.
Note: The procedure will stop if, for example, invalid text such as a
telephone number has been entered in the email communication type.
Profile Import
This option is used for inserting profile data based on Excel files into the Suite8 Database and with
this information creating profiles for Individuals and Companies.
For tracking the imported profiles, it is recommended using a dedicated user when importing.
Before importing, please make sure that the information on the Excel worksheets is split into 2
groups:
Individual profiles ( XCCA_XCMSTYPE=2 )
Company profiles ( XCCA_XCMSTYPE=1 )
Verify the contents of the columns on the Excel worksheet.
The Profile Import dialog box is split into two tabs:
88
Import - used for entering the user name and password, selecting the file for the import and
defining the type of profile import, such as individual profiles or company profiles as well as
assigning the membership, address and communication types for imported profiles
Excel Setup - used for configuring the table contents and assigning the worksheet columns to
the corresponding Profile Fields
Miscellaneous
Profile Import dialog box
Field
Definition
Username
The user name for the profile import
Password
The password for the user
Filename
Select the file for the import from a path
Individual Profiles
Select this option to import individual profiles
Company Profiles
Select this option to import company profiles
Profile Type
(Companies only)
Available if Company Profile import is used. Allows
selecting the defined profile types for companies
Profile Type for
Contacts
(Companies only)
Available if Company Profile import is used. Allows
selecting the configured profile types for contacts.
Membership Type 13
Allows selecting configured membership types, used to link
the corresponding membership type
Telephone Type 1-3
Allows selecting configured communication types for
linking the telephone type
Email
Allows selecting configured communication types for email
for linking the email address
Homepage Type
Allows selecting configured communication types for WEB
Address Type
Allows selecting the defined address type used for linking
the address to the corresponding address type
Try to merge
If selected and a profile with the same information is found,
it is merged
Halt on error
If selected the import process is stopped and an error
message is displayed
Excel Setup Tab
On the Excel Setup tab, on the left side, the fields from the profile tables are displayed and the
corresponding Excel columns where the information for the V8 field is located can be selected from
a list. Fields for which no information is available on the Excel worksheet can be left empty,
however a warning message will display when starting the import and fields not assigned. On the
right side the configured marketing information of Fidelio Suite8 is displayed and the
corresponding Excel column can be entered. The row number of the Excel Worksheet where the
actual contents starts and reading of data should begin is entered in the field Start Import at Row.
Once the information is entered, this setup can be saved by pressing SAVE button, an INI file is
then stored on the directory selected on the import tab. To load already configured setup files,
press the LOAD button. Pressing CLEAR, removes all information.
When the import is completed, the number of profiles is displayed on the upper right side.
XML Interface has to be installed
The address where the XML Interface is running has to be entered in the field XML
IFC URL under Setup → Configuration → Global Settings → Profile → Profile 1 tab.
Miscellaneous
89
Replace Users
This option is used to replace assigned managers on:
Profiles - On the profile edit screen the SALES MANAGER field is indicated with P and under the
LINKED PROFILES tab the linked employees are indicated with an A on the search result grid.
Task & Activities
Bookings
Available Options
Depending on the selected option, different search criteria can be entered.
To activate the search, click SEARCH.
To replace all profiles, task & activities or bookings on the search result grid with the NEW
MANAGER, click REPLACE ALL.
To replace selected profiles, task & activities or bookings, select the profiles, task & activities or
bookings to be replaced and click REPLACE SELECTED.
Profiles Search dialog box
Field
Definition
Country
If the replacement should be valid for specific
countries, select a country from list box
Zip Code From
Enter a zip code from which the search should start
To
Enter a zip code until which the search should end
Current Manager
Select the current Manager from list box
New Manager
Select the new Manager from list box
Type
Select the Type of Profile, from the list box of defined
profile types, such as Individual, Company
Status
Select the status of the profile by selecting a radio
button.
Active
Only Profiles marked as Active
Inactive
Only Profiles marked as Inactive
All
Active and Inactive Profiles
Unassigned Profiles only
Select this box, to view only unassigned profiles and
assign a Sales Manager
Task & Activities Search dialog box
90
Field
Definition
Start Date From
If the replacement should be valid for specific
countries, select a country from list box
Start Date To
Enter a zip code from which the search should start
Current Manager
Select the current Manager from list box
New Manager
Select the new Manager from list box
Miscellaneous
Status
Select the tasks & activities status by selecting a radio
button.
Completed
Only completed Tasks & Activities
Not Completed
Only not completed Tasks & Activities
All
Completed and not completed Tasks & Activities
Bookings dialog box
Field
Definition
Arrival Date From
Select an arrival date from which the search should
start.
Arrival Date To
Enter an arrival date until which the search should
end.
Conference Status
Select a status from the list box, such as definite or
tentative.
Rooms Status
Select a status from the list box.
Current Manager
Select the current Manager from list box.
New Manager
Select the new Manager from list box.
Manager Type
Select the manager type, multiple selections are
allowed.
Conference
Conference Manager.
Rooms
Rooms Manager.
Accounts
Accounts Manager.
Database
Binary Field Compression
This option allows compression of all folios, compression of folios for a specific date range and the
compression of confirmation letters text. The storing of folios and confirmation letters takes up a
lot of space in the database, therefore this functionality has been introduced to keep and maintain
clean databases. In addition the compression of folios created with the internal editor functionality
is now standard during check out, therefore compression is only required for all folios printed
before installation of Fidelio Suite8.5.0.8.
During and upon completion of the compression procedure the size in Kbyte is displayed before
and after and the number of records processed is listed.
Miscellaneous
91
Note: At the moment the billing history compression functionality is
only available for invoices created with Internal Editor (RTF
templates). In addition, the menu option is not available when
running V8 in debug mode.
Binary Field Compression dialog box
92
Field
Definition
Billing History
(ZINB)
Select this option to compress invoices created with the Internal
Editor (RTF templates).
Confirmations
(WTXT)
Select this option to compress confirmation letter text.
Update all
records
Defines if all records found in billing history will be compressed.
If selected, no date range needs to be defined.
From
Enter a date from which the folios should be compressed.
Until
Enter a date until which the folios should be compressed
Update
Starts the compression procedure.
Close
Exits the Binary Field Compression option.
Miscellaneous
Custom SQL statements
Select this option to run or create custom SQL statements on the Fidelio Suite8 tables. This option
should be used by users who are familiar with the table structure of Fidelio Suite8 and are
experienced in SQL language. To enter statements a group needs to be defined and a role assigned
to the SQL group. All statements are listed when entering. Defined Custom SQL Statements can
also be used in the advance query on Reservation, Profile and Room Search if the corresponding
role is assigned. If no custom SQL should be used on a search dialog box, the role has to be
removed from the SQL group. If the custom SQL statement is used to run on the Custom SQL
View dialog box from the Miscellaneous drop down menu, the role Custom SQL grid is assigned.
The Custom SQL definition consists of four configuration parts:
THE SQL TEXT
PARAMETERS for defining user input parameters
COLUMNS for defining columns for the SQL View
SETTINGS for defining a HTML file name and HTML id field
How to create a custom SQL group
1. Click MISCELLANEOUS from the SETUP drop-down menu and then SYSTEM MAINTENANCE.
2. On the System Maintenance menu click DATABASE.
3. Click CUSTOM SQL STATEMENTS on the Database menu to display the Custom SQL
statements dialog box.
Note: A Custom SQL group must be created before any custom SQL
statements can be created.
Miscellaneous
93
4. Place the cursor in the SQL Statements panel on the left-hand side of the screen
and right-click to display the short-cut menu.
5. Click NEW GROUP on the shortcut menu to display the Custom SQL group name
dialog box.
94
Miscellaneous
6. In the CODE box enter a code for the SQL group, up to five alphanumeric
characters is allowed.
7. In the DESCRIPTION box, enter the description of the SQL group.
8. Click OK to save the SQL Group.
How to link a role to a custom SQL group
1. Click MISCELLANEOUS from the SETUP drop-down menu and then SYSTEM MAINTENANCE.
2. On the System Maintenance menu click DATABASE
3. Click CUSTOM SQL STATEMENTS on the Database menu to display the Custom SQL
statements dialog box.
Note: A Custom SQL group must be created before any custom SQL
statements can be created.
4. Select the required SQL Group from the SQL Statements panel on the left-hand
side of the screen.
5. Click the ROLE button.
6. Select where in the application the statements from the selected group should be
available: Profile search, Reservation search, Room search or on the Custom SQL
grid.
7. Click OK to save the SQL Group Role assignment.
How to create a custom SQL statement
1. Click MISCELLANEOUS from the SETUP drop-down menu and then SYSTEM MAINTENANCE.
2. On the System Maintenance menu click DATABASE.
3. Click CUSTOM SQL STATEMENTS on the Database menu to display the Custom SQL
statements dialog box.
Note: A Custom SQL group must be created before any custom SQL
statements can be created.
4. Select the required SQL Statements group from the panel on the left-hand side of
the screen and click NEW ON LOWER SQL panel to display the Custom SQL Statement
dialog box.
Miscellaneous
95
5. In the CODE box enter a code for the SQL statement, for example PROF.
6. In the DESCRIPTION box, enter the description of the SQL statement, for example
SEARCHING FOR PROFILES BY SELECTING THE NO MAILING FLAG.
7. In the SQL STATEMENTS panel enter the SQL statement, for example:
select xcms_id, xcms_name1, xcms_nomailing from xcms where xcms_nomailing
like :xcms_nomailing||'%'
8. Click OK, the custom SQL statement is listed in the SQL statements panel.
9. Selecting the statement description displays the SQL statement in the SQL text
panel in the lower right-hand side.
96
Miscellaneous
10. If the SQL statement requires input from the user then this can be done via
PARAMETERS.
11. Select the required SQL Statement and in the Parameters panel click NEW to
display the SQL parameter dialog box.
12. In the PARAMETER box enter the SQL parameter, for example
20 characters).
XCMS_NOMAILING
(max
13. In the DESCRIPTION box, enter the text which should appear when the user runs the
SQL statement, for example NO MAILING FLAG (0=NO 1=YES).
14. Click OK to close the SQL parameter dialog box.
15. Select COLUMNS tab for defining columns on the SQL View
16. Click NEW button for displaying the column dialog box, enter a field name and a
display name or
17. Click ADD button for selecting a field
Miscellaneous
97
18. Select a field and press OK button
19. Select the SETTINGS tab for applying a HTML file and HTML ID field
20. Click Close button and apply the changes to close the Custom SQL statements
screen.
How to display columns to display in colors
On the custom SQL dialog box click
to display the following help text:
In the example above:
The column XCMS_ID is displayed with a white background color and a violet font
color.
The column XCMS_NAME is highlighted in light blue and the font color in steel blue.
Detailed below are some custom SQL query examples:
Reservations
Search for a calculated rate in the advance query of the reservation navigator
Custom SQL statement:
select yres_id from yres,ydet where ydet_id=yres_current_ydet_id and ydet_rateamount between
:FromRateAmount and :ToRateAmount
Parameters:
FromRateAmount and ToRateAmount
When this query is run from the reservations navigator then a prompt screen is displayed
asking you to complete the from rate amount and to rate amount> All reservations with a
calculated rate within the amount range are listed.
Customer Profiles
Search for incorrect email address on customer profiles
Custom SQL statement:
select xcom.XCOM_XCMS_ID from xcom, xcmt where xcom.XCOM_XCMT_ID = xcmt.XCMT_ID
and xcmt.XCMT_TYPE = 1 and xcom.XCOM_VALUE not like '%@%'
When run the above query will list all the customer profiles which have an email
communication type which does not contain @ and is therefore incorrect.
Search for wrong email type on customer profiles
Custom SQL statement:
98
Miscellaneous
select xcom.XCOM_XCMS_ID from xcom, xcmt where xcom.XCOM_XCMT_ID = xcmt.XCMT_ID
and xcmt.XCMT_TYPE <> 1 and xcom.XCOM_VALUE like '%@%'
When run the above query will list all the customer profiles which have a communication type
which is not an email type but with an email address in it.
Room Blocking
Search for reservations with specific specials codes:
Custom SQL statement:
select yres_id from yres where exists (select 1 from yrlr,xpda where yrlr_yres_id=yres_id and
yrlr_xpda_id=xpda_id and yrlr_xpac_id=18 and (upper(xpda_shortdesc) like upper(:SPECIAL1) or
upper(xpda_shortdesc) like upper(:SPECIAL2)))
When this query is run then a prompt screen is displayed asking you to complete Special Code
1 and/or Special Code 2.
Note: The custom SQL statements are not displayed on the respective
search dialog box if a role has not been assigned to the SQL group.
Gather database statistics
This option is calling an analyzing package provided by ORACLE. This package enables better
performance and response time of the ORACLE database. Select this option to analyze actual data
in the Fidelio Suite8 database, ORACLE will then use this analysis to produce better, less resource
consuming data. For the user this will be recognised by better response time on SQL Queries.
Note: The use of DBMS_STAT_GATHER and its _STALE option is
covered in detail in the related PDF file provided by ORACLE or in
the ORACLE Help. The package should be applied only by System
Administrators or Installers after having read the PDF or ORACLE
Help file. During gathering statistics process, the response time of the
clients will be slow.
ID Lookup
This option may be used to display a specific record or all the records in a table:
To list a specific record in a table - select the TABLE NAME, enter the ID number and click the
LOOKUP button.
To list all the records in a table - select the TABLE NAME and click the LIST TABLE button.
Note: This option is only available when starting Suite8 with the
parameter DEBUG.
Miscellaneous
99
Sequence Fix
Each table in the Fidelio Suite8 database has a corresponding sequence table. The sequence fix
option checks each table and updates the corresponding sequence table with the highest
(maximum) used ID.
To run sequence fix, select SEQUENCE FIX and click the START button.
Note: It is recommended to run this option only after the installation
has been completed, especially if the installation was performed with
the 'all script' which is a script file used to fill certain tables with
default values.
Support SQL
This option is used to run SQL query scripts to check performance, memory, sessions, and views
and to view the data dictionary view. It is only used by the support department.
SQL log
This option is used to view the SQL log file queries that have been run on the database from the
application. This information gives information from the time SQL queries were run and is helpful
for developers and support.
Miscellaneous
Apply user setting to others
This option can be used to apply the user settings defined for the logged in user to all other users.
Note: This option is only available when starting Suite8 with the
parameter DEBUG.
100
Miscellaneous
User settings are defined via the option User Settings under the Miscellaneous
Menu.
Miscellaneous
101
Developer
This option should only be used by system supervisors, developers or when advised by support.
Note: This option is only available when starting Suite8 with the
parameter DEBUG.
The Developer page is divided into 2 tabs:
Available Options on the first tab:
102
Show reservations in memory
Show Fidelio V8 Record Locks
Set Fideliodate to PC date
Roll on Fideliodate
Store not printed folios
Test reservation read speed
Miscellaneous
SQL translate
Check ydet links
Fix ydet links
Sman month year fix
Database object statistics
Reset database statistics
Clear db object query cache
Fill new package fields
Fix missing folios
Object counts
Update Report System Param.
Upload statistic
Reservation Rate Recalc
Virtual private database info
Note: Available only in debug mode.
Miscellaneous
103
Available Options from the second tab:
104
Feature and User right log - allows viewing changes made to all features, such as activated
flags and licenses and changes made to user rights. The log can be cleared by pressing CLEAR
button.
Fix Missing Tax Records
Fix Old Allowances - fixes old allowances with missing profit postings for checked in guests
and fixes missing profit postings in cancelled room charge postings
Fix Elmau Taxes
App Log
TAPI Log Test
ASP User Rights
Test Run, only 1 Posting
BNBData Licence modulenames
Miscellaneous
Daily charge rounding test
Execute debug script file
Double byte test
Interface Triggers
This option is used to view and process triggers for the interfaces. A trigger is an action causing the
automatic invocation of a procedure.
Trigger handling points for the V8 Online Interface:
If the same trigger exists and it was not processed then no new trigger is created
If there is an overlapping trigger that was not processed, the 'fromdate' and 'todate' are
changed to the widest interval.
If any of the interfaces processed (zipf) the existing trigger then a new trigger is created. The
processed flag is turned to 1 after reading a trigger. This ensures indicating that the interface
started to process a trigger.
Miscellaneous
105
Note fix
This option is used to remove special characters from the notes field. It is used after conversion or
update to remove special characters.
There are two fix options:
FIX 1 - Removes <fid$d> characters. In earlier versions the notes were stored in a different way
which resulted in showing the <fid$d> on print outs.
FIX 2 - Removes special characters from the notes field which came from conversion from
Fidelio Version 6 or Version 7.
Reset form positions
This option may be used to resize all forms and set them back to their original screen position.
Occasionally after setting a screen to full mode and then opening it a second time the screen is not
displayed correctly. If this happens then the forms can be repositioned using this functionality.
System Check
This option is used to run checks for contents and existence of primary keys on the Fidelio Suite8
tables.
The screen is divided into 2 sections:
The left side displays the possible system checks: Reservation, Profile, Database, Content,
Suite8 Central and Duplicates.
The right side displays Messages for the system checks
System Check Options
106
System Check Option
What it does
Expand all
Expands the folders to show all available
options.
Collapse all
Collapses all the folders to the uppermost
level.
Check all
Selects all the options by marking the check
box next to the option with a tick mark.
Uncheck all
Clears all the options by removing the tick
mark from the check box next to the option.
Reverse check
Reverses the current selection.
Check selected
Selects the options highlighted in the check
grid.
Uncheck selected
Clears the options highlighted in the check
grid.
Check group
Certain check options have been grouped
into groups Allows you to select all the
options which belong to the group Profile or
all the options which belong to the group
Suite8 Central.
Execute sel.
Runs the system checks which have been
selected.
Miscellaneous
Save log to file
Saves the results of the system check to a log
file.
Enable error fix
Depending on the type of system check run,
the system may offer to fix any errors found.
The system checks available are as follows:
Reservation Check
System Check
What it does
Res< → block room type
mismatch
The reservation detail file (ydet) will be checked for
records that have a different room type than linked
block (ybld) records.
Profile Checks
System Check
Checks for:
Invalid birth dates
Individual customers with suspicious birth
dates.
xpal_xpac_id values
Inconsistent xpal_xpac_id values.
Duplicate xpal records
Duplicate xpal records.
Duplicate customer predefined attribute links.
No wmlg record for profiles
No wmlg record for profiles.
Profile duplicate notes
Same notes duplicated.
Meaningless notes
Empty notes or notes containing only spaces
and line end characters. Functional only if
xcno_notesvarchar exists
Merged but active profiles
Locally merged but active profiles.
Merged to self profiles
Profiles locally merged to self.
Wrong xcms type of company
individual links (xcil)
Wrong xcms type of company individual links
(xcil).
Wrong xcms type of individual
individual links (xciil)
Wrong xcms type of individual individual links
(xiil).
Wrong xcms type of master sub
company links (xmsl)
Wrong xcms type of master sub company links
(xmsl).
Self individual individual links
(xciil)
Individual individual links (xiil) linking the
same profile for itself.
Self company company links
(xccl)
Company company links (xccl) linking the same
profile for itself.
Self master - sub company links
(xmsl)
Master - sub company links (xmsl) linking the
same profile to itself.
Membership card level number
Nonexistent level number for bonus point cards.
Miscellaneous
107
Database Check
System Check
What it does
Primary key
existence
Checks if primary key exists for every table. Primary keys are one
of several possible attributes which can be used to uniquely
identify a record in the database table.
Content Checks
System Check
What it does
Log timestamp in future
(wmlg)
Log timestamp in future (wmlg)
Profile timestamp in future
(xcms)
Profile timestamp in future (xcms)
Block forecast records (YBOS)
Checks for block forecast records (YBOS) that have
no valid block details.
Missing block forecast records
(YBOS)
Notes format
Notes with bad or obsolete format. Functional only
if xcno_notesvarchar exists.
Guest package - Reservation
package consistency (YRGPYPAL)
Reservation sharenum check
Reservation sharenum check
for the last 90 days
AR balance speed fields
AR transfer speed fields
Reservation customer link
(YCLN)
Checks for duplicate records in the reservation
customer link table. This option should be run
after data conversion.
Reservation customer link
(YCLN) invalid profile
Checks for records in the reservation customer link
table that have an invalid profile linked. This
option should be run after data conversion.
Suite8 Central checks
108
System Check
What it does
Same profile global id
Profiles with same global id
Address global id
Address with global id linked to not matched
profile
Miscellaneous
Address with invalid global
id
Incorrect on screen explanation.
Communication global id
Communication with global id linked to not
matched profile
Communication with invalid
global id
Communication with 0 or negative global id.
Notes global id
Notes with global id linked to not matched profile.
Notes with invalid global id
Notes with 0 or negative global id.
Profile global id in central
Profile global id existence in central hotel.
Address global id in central
Address with global id existence in central hotel.
Works only if central hotel is hosted by same
oracle server instance.
Communication global id in
central
Communication with global id existence in central
hotel. Works only if central hotel is hosted by same
oracle server instance.
Notes global id in central
Notes with global id existence in central hotel.
Works only if central hotel is hosted by same
oracle server instance.
Country unique code
Country with non unique or empty code.
Duplicate Checks
System Check
What it does
Notes duplicate check
Same notes duplicated.
Double wmlg records
Double wmlg records.
Duplicate individual
individual links (xiil)
Duplicate individual individual links (xiil).
Duplicate company company
links (xccl)
Duplicate company company links (xccl).
Duplicate master - sub
company links (xmsl)
Duplicate master - sub company links (xmsl).
Duplicate company
individual links (xcil)
Duplicate company individual links (xcil).
Duplicate communications
Keeps the newest record and all referencing 'ID's'
in other tables are changed to point to the new
record.
Duplicate primary
communications
Keeps the newest record and all referencing 'ID's'
in other tables are changed to point to the new
record.
Miscellaneous
109
Duplicate primary address
flag
Keeps the newest record and all referencing 'ID's'
in other tables are changed to point to the new
record.
Duplicate address
Duplicate address.
Duplicate customer
preference
Duplicate customer preference.
Duplicate membership
Checks for duplicate membership numbers. In
addition considers XMTY_ID which is the unique
internal ID in the table XMTY (Membership Types
table), as well as the table XMNR for the
membership numbers.
Duplicate linked rate code
Duplicate linked rate code (xcrl).
Update IFC error types
This option is only available when starting Fidelio Suite8.6 in debug mode and should be run after
the update to Fidelio Suite8.6.0.4. This will update old entries from the Interface Log table (WILG)
and add the following filters to this table:
EF = EFT Interface
RS = Room Status Change
TV = Top Vital Interface
MB = Minibar Postings
AG = Allgau Interface
UN = Unknown
When accessing the IFC Error Log screen, the new filters allow only errors related to the
corresponding interface to be displayed instead of displaying all errors.
Note: This option is only available when starting Suite8 with the
parameter DEBUG.
Database Locks
This option may be used to monitor and clear database locks.
Selecting this option displays all database locks with the Type, ID, Time stamp, Workstation, User,
Login time and Database site ID.
With the appropriate rights a record lock can be cleared by selecting the record and clicking the
REMOVE button.
Note: Monitoring database locks is a support tool, therefore it is not
recommended to clear locked records without the advice of the local
support office.
110
Miscellaneous
Database locks functionality is controlled by the user rights View and Remove
under Setup → Configuration → Users → User Definition → Rights → Miscellaneous
→ Locks.
Removal of locks is displayed in the user log if the option Remove database lock in
wlck is selected in Setup → Configuration → Users → User Log → Application and
Users.
Reset User Settings
This option may be used to partially or fully reset the user settings of the signed in user or of a
specific user (with the appropriate user rights).
How to reset user settings
1. On the SETUP menu click MISCELLANEOUS and then select SYSTEM MAINTENANCE.
2. On the System Maintenance menu click MISCELLANEOUS and then click RESET USER
SETTINGS.
A message is displayed asking: "Do you want to clear your own settings ?"
Miscellaneous
111
3. Click YES to clear only your own settings or click NO to clear the settings of another
user.
4. If the settings of another user are to be cleared then select the user and click OK.
A message is displayed asking: "Do you want to perform a partial user setting
clear only ?"
5. Click YES to perform a partial user setting clear only or click NO to delete all the
user settings.
If all the user settings are to be cleared then a message is displayed asking: "Are
you sure you want to delete all user settings of selected user ?"
6. Depending on the selections made previously then one of the following messages
is displayed:
"All settings of the user are cleared." or "Some settings of the user are cleared."
112
Miscellaneous
Reset user settings functionality is controlled by the user rights Reset user settings
of other users under Setup → Configuration → Users → User Definition → Rights →
Miscellaneous.
Initialize Bonus Points
This option is used to initialize bonus points; when running this procedure:
Bonus points are calculated for all checked out guests.
Guests with already calculated bonus points are not considered.
Bonus point cards of guests can be assigned to reservations automatically.
Reservations with assigned cards are not changed.
A starting date for the bonus point calculation can be selected.
How to initialize bonus points
1. Click MISCELLANEOUS on the SETUP drop-down menu and then select SYSTEM
MAINTENANCE .
2. On the System Maintenance menu click MISCELLANEOUS and then click INITIALIZE
BONUS POINTS.
A message is displayed asking: "Do you want to calculate bonus points for all
checked out guests ?"
3. Click YES to continue.
A message is displayed asking: "Do you want to assign bonus point cards of guests
to reservations automatically ?"
4. Click YES to continue.
5. Enter the starting date for the calculation and click OK.
Miscellaneous
113
6. The reservation numbers for which bonus points have been calculated is displayed.
7. Click SAVE LOG or CLOSE.
If you click SAVE LOG then you are prompted for the location in which to save the
log file.
Internal Editor Fields Search and Replace Utility
This search and replace utility may be used to change the name and formula content of an internal
editor field for selected reports.
Key Points
The utility changes only the fields and formulas used in the reports; not the source (views) of
it.
The content to which the field is being changed must be available in the source (views) of the
internal editor reports in question.
If you use default queries for internal editor, then the field must be added or already present
before it can be changed.
How to use the internal editor fields search and replace utility
1. On the SETUP menu click MISCELLANEOUS and then SYSTEM MAINTENANCE.
2. On the System Maintenance menu click MISCELLANEOUS and then INTERNAL EDITOR
FIELDS.
The Report Merge Fields dialog box is displayed
114
Miscellaneous
3. Click the LOAD button to display a list of all the FIELD CAPTIONS and FIELD FORMULAS
used in the configured internal editor reports.
4. The field whose name or content is to be replaced can be located by entering the
full or partial CAPTION or FORMULA.
The search criteria can also be entered using wildcards (%) in order to list captions
and formulas which contain a partial match.
In the following example we will replace CONF_RATE with CONF_RATE_NOADDON.
5. To locate all fields whose formula contains conf_rate, complete the FORMULA box
with %CONF_RATE% and then click FILTER.
A list of the fields and formulas meeting the entered search criteria is displayed.
Miscellaneous
115
6. Select the required FIELD CAPTION, in our example, we have selected RATE.
116
Miscellaneous
7. All reports containing a field with the same name and formula are listed on the
right-hand side.
All the reports are selected by default, clear the check box for reports that do not
need to be changed.
8. Change the FIELD FORMULA to RES.CONF_RATE_NOADDON (view V8_EDITOR_RES).
9. Change the FIELD NAME as required, this is optional but it may be logical to also
change the field name.
In our example we have changed the field name to RATE_NOADDON in keeping
with the change we made to the formula.
10. Click UPDATE, a confirmation message is displayed.
11. Click YES to apply the name and formula change to all the fields in the selected
reports.
Miscellaneous
117
12. In order to see the changed field caption and formula click LOAD to update the list
of field captions and field formulas.
13. Click CLOSE to exit the Internal Editor search and replace utility.
Note: It is strongly recommended to check at least one of the reports
to verify that the content has changed and that the report runs as
expected. In this report example the field RATE_NOADDON now
displays the formula @RES.CONF_RATE_NOADDON.
Internal editor fields search and replace functionality is controlled by the user right
Internal Editor Fields under Setup → Configuration → Users → User Definition →
Rights → Miscellaneous.
Database connection test
This option should be run in the situation where the connection to the master property failed.
Note: This option is only available when starting Suite8 with the
parameter DEBUG.
118
Miscellaneous
Miscellaneous
119
Reservation
JetWeb Export
This option is only available if the JetWeb Interface is installed and a valid license code has been
entered. The JetWeb Interface is used in Austria.
The JetWeb Interface is controlled by the licence JetWeb Interface under Setup →
License → V8 Sublicences → Software interfaces.
Rate code order fix
The rate code order fix is used to fix the display order for rate codes attached to profiles. In earlier
versions the internal display number for rate codes attached to the guest profile was set to higher
than 3 digits, this resulted in an error message. Use this option to fix this and change the display
order for rate codes on the profile to the correct order.
120
Miscellaneous
Reservation check
This option is used to search for and fix errors on reservations and reservation details.
The errors are generally related to packages and occur after a conversion or when changing
packages on rate codes for checked in reservations. When selected, this option first checks if there
is a reservation detail for each reservation. All reservations and reservation detail records with the
status ‘checked in’ or ‘expected’ are verified for the following problem types and found issues will
be fixed. The list of problem types will display after selection and when activating the CHECK FOR
ERRORS button.
The following reservation check options can be selected:
Package price – if the package or package detail has a different price than in package
configuration
Miscellaneous
121
Forecast (ypos) – if the forecast in the forecast table (YPOS) stores a different amount than the
amount calculated
Rate package – if package frequencies linked to the reservation are not the same as package
frequencies linked to the selected rate
Package detail – if package frequencies linked to the reservation are not the same as package
frequencies linked to the selected rate. This check does not consider package frequencies which
were linked manually
Block forecast (ybos) - Reservations linked to a block reservation will be checked for an entry
in the block forecast table. Details of the source of any errors are displayed.
Mealplan (ybof) - Reservations linked to a mealplan will be checked for an entry in the
mealplan table.
Multi guest price records - Multi guest reservations will be checked and filled for amounts in
the multi guest reservation table (YRGA)
Allowances -
Rate price -
Policy - the check recalculates the policies based on the rate code link and checks the value
linked on the reservation, if a difference is found, the one from the recalculation is taken and
replaces the one on the reservation. The message 'Please note that Policy Fix might overwrite
manually selected Policies for Reservation' is displayed, indicating that when running this fix,
policies which were manually linked to the reservation are replaced.
Options on the reservation check dialog box
122
Click this option
To do this
Add In House &
Future
Select all in house & future reservations.
Add Date Range
Check only reservations for a specific date range.
Clear
Clears the list of reservations.
Filters
Displays a rate code selection box in order to filter the
reservation by rate code.
Check for errors
Check for errors.
Edit reservation
Edit the reservation.
Fix errors
Fix the errors.
Select all
Select all reservations.
Select none
Deselect all selected reservations.
Invert selections
Invert selection, for example if Meyer and Browne were
selected and all other reservations deselected, invert
selection would deselect Meyer and Browne and select all
others.
Select items with
errors
Select only reservations with errors. This can only be done
after the option ‘Check for errors’ has been run.
?
View the help - a list of problem types that are checked is
displayed.
Miscellaneous
Reservation detail fix
This option creates multiple reservation details in the reservation details table (YDET) for each
reservation record in the reservation header table (YRES). The number of reservation detail records
created depends on the number of nights entered on the reservation. The handling of the
reservation records in Fidelio Suite8 is different from Fidelio Version 6 or Version 7 as version 8
stores a reservation detail record for each night of the guest's stay.
Note: This option must be run after a conversion from Fidelio Version
6 or Version 7.
Reservation Detail Fix dialog box
Field
Definition
Legal Values
Continue on
error
Mark this checkbox if the reservation
detail creation should continue
regardless of any error messages.
Check: YES
From Date
Mark this checkbox if the reservation
details should be created only from the
entered date onwards.
Check: YES
Date Field
Select the date from which the
reservation detail creation should start.
Valid date from the
calendar that appears in
the list box.
Fix
Sharenums
This option searches for and corrects
any discrepancies with reservation
share numbers.
Click button.
Blank: NO
Blank: NO
Translation
This option may be used to reload translated text from within Suite8 and is accessible via the
option RELOAD TRANSLATION on the MISCELLANEOUS menu; this option is only available when
Fidelio Suite8 has been started in debug mode.
Selecting this option will reload the translated text so that the translation changes can be seen
immediately.
Note: This option is only available when starting Suite8 with the
parameter DEBUG.
XML Import
XML Import
This option may be used to import profiles from an XML file and is accessible via the option XML
IMPORT under Setup → Miscellaneous → System Maintenance.
How to import profiles from an XML file
1. Click XML IMPORT to open the XML Import dialog box.
Miscellaneous
123
2. Click the LOAD button to load the XML file.
3. Locate the file and click OPEN.
4. Click the START button.
Suite8 prompts the number of profiles to be imported and the message: 'Are you
sure to start the import?'
5. Select YES; the import starts and a progress bar is displayed together with the
status of imported profiles.
Note: The import can be stopped by clicking the STOP button.
XML profile import requires either the licence XML Interface Standard Edition or
XML Interface Enhanced Edition under Setup → License → V8 Sublicences →
Software interfaces.
The XML URL address is defined via the option XML IFC URL under Setup →
Configuration → Global Settings → Profile → Profile 1 tab. For example,
http://localhost/V8/FidelioIISWrapper.dll/FidelioXMLInterface.DataHandler
A profile match rule must be selected via the option Profile Merge Rule under
Setup → Configuration → Global Settings → Interfaces → Interfaces 3 tab.
Profile merge rules are configured via the option Interface profile merge rule sets
under Setup → Configuration → Miscellaneous → Profile Merge Setup.
Updates
Executable Updates
This option is used to configure an FTP connection for automatic download and/or download and
install of the latest executable updates for Suite8.
A version check can be activated under Setup → Configuration → Global Settings → Generic2 tab
→ Check client version and the required version has to be entered in the version field.
If the parameter is activated a message will display when starting version 8 with a different
version than entered under Global Settings.
When performing the executable update a message prompt will allow updating this field to the
downloaded version. Once configured, all workstations which are not updated to the actual
version will receive a notification message of the new version.
124
Miscellaneous
Miscellaneous
125
How to launch executable update
1. Click MISCELLANEOUS from the SETUP drop-down menu.
2. Click UPDATES and then EXECUTABLE UPDATE.
3. Complete the options on the Executable Update dialog box.
4. Click the NEXT button.
5. The FTP server will be checked for newer versions and all newer versions on the
FTP server will be listed for selection.
6. Select the version for the download.
7. Click the NEXT button to continue, a dialog screen will show the FTP connection and
the download process.
8. Once the program and html files are downloaded, they will be extracted in the
configured path.
9. Click the NEXT button.
10. Next the message "Do you want to change required client version to the new
version" will appear.
11. Answering the question with YES will update the version field in Global settings →
Generic 2 tab with the new version and all other workstations will receive the
notification message of the newer version when starting Fidelio Suite8.
12. The next message displayed is "Update has been successfully performed. Please
reboot all workstations to apply new version".
13. Click the CLOSE button to close the screen.
126
Miscellaneous
Executable updates dialog box
FTP settings
FTP Account
Defines the FTP account to be used.
Note: FTP accounts are defined via the option FTP
ACCOUNT SETUP on the Miscellaneous menu.
FTP Folder
The name of the remote path on the FTP server.
Executable Target location
The target location on the local server. The
compressed files are downloaded and extracted to this
directory.
Executable backup path
The backup path. Use <version> parameter to use the
current program version in the path name. For
example if the directory entered is c:\temp\<version>,
the directory created under c:\temp will be called
8_5_0_8, if the previous version was 8.5.0.8.
HTML Target location
The target location on the local server. The
compressed html files will be downloaded and
extracted to this directory
HTML backup path
The backup path for the html files. Use <version>
parameter to use the current program version in the
path name. For example if the directory entered is
c:\temp\rtf\<version>, the directory created under
c:\temp\rtf will be called 8_5_0_8, if the previous
version was 8.5.0.8.
Version ini file location
The location of the version ini file, used with version
control.
Download location
Enter the download location.
Night Audit should check
for new version on FTP
Select this flag to enable check of new executable files
during night audit. At the end of the night audit
process, a connection to the FTP server is established
using this connection information. If there is a newer
version on the FTP server, the message: "New
program version is available on FTP: 8_6_0_1" will
appear when starting Version 8. The user can then
launch the exe update and turn off the notification by
selecting "Don't show notification again for this
version".
Save settings and close
Press this button to save the FTP connection
configuration and close the dialog box
Next
Press this button to launch download and update on
the server.
Miscellaneous
127
Database Structure Update
This option is used to check the database structure after an update. It will also display when
starting Fidelio Suite8 with a Fidelio V8 version not matching the database structure and the flag
DISABLE DATABASE VERSION CHECK not activated under Global Settings → Generic tab. The message:
"Program version is different from database version. Do you want to open database update
screen?" will appear and if answered with YES, the update process uses the defined settings from
the db update tab under global settings to connect to the ftp server and perform the database
update or check for downloaded update scripts.
The following information is listed:
Logged in to:
Lists the user name and database, e.g. v8live@v8
Program version:
Lists the current program version, e.g. 8_5_0
Current database version:
Lists the current database version number, e.g.
8_5_0_0
Statement as to whether
the database needs to be
updated.
For example, "There is no need to update database
structure."
If the database version differs from the program
version, there will be no message.
Available options are:
OVERRIDE PROGRAM VERSION - use this option to enter a specific program version without
performing an update
VALIDATE DB STRUCTURE - use this option to select an update script from the defined update
path under Global Settings → Miscellaneous → DB Update 1 tab
NEXT - use this option to either check for new update scripts on the ftp server or run the
update script and the scripts for the executable updates. Only available if the database version
is different from the program version.
Translation Update
This option is used to configure the languages and the FTP connection for the translation
download, viewing the status of the import and the last update, and is accessible via the
MISCELLANEOUS section of the configuration menu.
128
Miscellaneous
Translation Update
Field
Definition
FTP
Account
Defines the FTP account to be used.
Filename
The name and the path of the
translation file.
Note: Using the version parameter will
automatically find the currently
installed Fidelio Suite8 version and
select the corresponding directory on
the FTP server.
Legal Values
Note: FTP accounts are defined via the
option FTP ACCOUNT SETUP on the
Miscellaneous menu.
Example:
ftp//ip address of the ftp
server/<version> /the name of the
translation file.
Night Audit
download
and import
Defines if the file should be
automatically downloaded and
imported during night audit.
Check: YES
Blank: NO
Mailing Update
This option is used to create or update only the standard mailing views and fields. All fields and
views which have been customized by the property will be kept, however standard views and
fields will be set to the latest standard and new standard views or fields will be added.
To have an identifier which views/fields are belonging to the standard a system flag has been
added and will be displayed when editing the according view.
How to run the mailing update
1. Click MISCELLANEOUS from the SETUP drop-down menu.
2. Select UPDATES and then MAILING UPDATE.
The Update Mailing dialog box is displayed.
3. Click the BROWSE button.
4. Locate the mailing.SQL and click OPEN.
5. The path to the mailing.SQL is displayed in the IMPORT FILE box.
Miscellaneous
129
6. Click OK button to start the mailing update.
Note: Running the mailing.SQL via TOAD or a SQL Editor deletes all
existing records and re-creates the standard ones. This means any
customized views or fields are deleted.
Mailing Update functionality is controlled by the user right Mailing Update under
Setup → Configuration → Users → User Definition → Rights → Miscellaneous.
The editing of system fields is controlled by the user right Edit system fields under
Setup → Configuration → Users → User Definition → Rights → Mailing → Views and
Fields.
Materials Control Import
Materials Control
Materials Control is the Enterprise Resource Planning system for both the restaurant and the hotel
industries. It uses the newest technologies with proven standards and connects these with the
latest requirements. Materials Control is suitable for internal or non-operational tasks of
centralization. If you have a Windows supported PC with network binding, the program is
immediately operational. Materials Control ensures that you can settle, for example, recipe
planning and purchasing with flexibility and speed. Goods employments, actual revenue,
inventory - all the data which is relevant for you, may be set in relation to and evaluated according
to individual requirements. Beyond that the system is capable of supporting you with your own
order advices.
Materials Control can be integrated in to the MICROS FIDELIO POS Systems with the Materials
Control Interface in Fidelio Suite8.
With the Materials Control Interface, product and product groups from Materials Control are
linked to menu items in Fidelio Suite8. The data is maintained in Materials Control and the
interface imports and updates menu items in Fidelio Suite8 with their categories, rates, cost prices
and outlets. The import/update can be done manually or during night audit. After importing
products, the menu item names need to be checked as some menu item names may need to be
changed. Existing Fidelio Suite8 items can be linked to Materials Controls products at any time. In
Materials Control the product groups and products which should be imported have to be defined,
so that only these products will be created and updated in Fidelio Suite8. Cost prices will be
updated each time when running night audit and all other fields will be checked by date and time
of change in Materials Control. In Fidelio Suite8 items which have been changed in Materials
Control since the last import will be checked and updated accordingly.
The interface provides the following functionality:
130
Import of Menu item Categories (Note: Only categories with linked products will be imported)
Import and Update of menu items with rates, cost prices and outlets
Running the import and update automatically during night audit
Running the import manually as well as for selected items
Miscellaneous
Linking/ Unlinking of Materials Control products to or from existing menu items
Automatically update of cost prices during night audit
Prerequisites
Materials Control Fidelio Suite8.4.00 / 9.65 (Release 01.04.2006) or higher.
The view MF_CCM_PRODUCT_DETAIL has to exist (Fidelio Suite8 reads from this view).
Configuration of the product groups which should be imported to Fidelio Suite8. The field
CCM has to be filled with 1 for all Food product groups and with 2 for all Beverage product
groups for products considered for import to Version 8. Detailed information can be found in
the Materials Control documentation.
Note: With Materials Control Fidelio Suite8.4.0.2/10.46 a parameter is
available to fill the view MF_CCM_PRODUCT_DETAIL
automatically. Detailed information about this can be found in the
Materials Control Documentation.
Setting Up Materials Control
1. Enter a valid MATERIALS CONTROL INTERFACE licence code under Setup →
Miscellaneous → License → V8 Sublicenses → Software Interfaces.
2. Configure the database connection for materials control, the default responsible
department and department code for food and for beverage under Setup → Global
Settings → CCM → Conference 2 tab.
3. Run IMPORT OUTLETS under Setup → Miscellaneous → Materials Controls Import.
4. Select the DEFAULT MC OUTLET for materials control under Setup → Global Settings
→ CCM → Conference 2 tab
5. If the property is using Fidelio Suite8 CCM, the Materials Control products should
be linked manually to existing items in Fidelio Suite8. Products existing in
Materials Control but not in Fidelio Suite8 can be imported when running Setup →
Miscellaneous → Materials Controls Import → IMPORT ALL or imported automatically
if the parameter RUN IN NIGHT AUDIT is activated.
For new installations or properties where no items have been defined all items will
be imported either by running Setup → Miscellaneous → Materials Controls Import
→ IMPORT ALL or imported automatically if the parameter RUN IN NIGHT AUDIT is
activated.
Miscellaneous
131
Materials Control Import
This option is used to import outlets, run the import for all products as well as linking and
unlinking products. The import includes the creation and updating of items with the defined
defaults.
Note: The cost prices of all items will be updated each time night
audit runs regardless if the parameter RUN IN NIGHT A UDIT is
activated or not.
Import options available are:
IMPORT OUTLETS - used to import the materials control outlets to Fidelio Suite8. In order to
define the DEFAULT MC OUTLET under Setup → Configuration → Global Settings → CCM →
Conference 2 tab the materials control outlets have to be imported, so this option has to be run
as part of the setup process. If a product has been created or changed with the outlet in
Materials Control, the outlet will be updated by running Import all option or via night audit.
Newly created outlets in Materials Control will be imported with the general import as soon as
they are linked to a product.
IMPORT ALL - after the setup steps for Materials Control have been completed then the IMPORT
ALL option has to be run. When it is run for the first time then all Materials Control items
where the category has been defined for CCM are imported.
Each time this option is run newly created Material Control products are imported and
existing ones updated if changes were made since the last import of Materials Control. Newly
created outlets in Materials Control will be imported with the general import as soon as they
are linked to a product. If the parameter RUN IN NIGHT AUDIT is activated then the items will
be imported during night audit and if the parameter is not activated then the items have to be
imported and updated on a regular basis using this import option.
132
Miscellaneous
Note: If Fidelio Suite8 items already exist, it is recommended to link
these items manually to prevent double entries. Remaining items will
be imported either by running Import all or by running the night
audit if the flag Run in Night Audit is activated.
Link MC/ V8 Items
This option is used to query the Fidelio Suite8 and Materials Control items and is split into two
sections.
FIDELIO SUITE8 search criteria are located on the left-hand side of the screen and can be listed
by specific category, all, only linked or only not linked items.
MATERIALS CONTROL search criteria are located on the right-hand side of the screen and can be
listed by specific category or all..
All items and products can be listed by either selecting all categories or by pressing the REFRESH
button.
Options available are:
NEW - Select an item from the materials control list and click the NEW button to create the item
with all the rate details. If the category is not linked then it will also be created.
NEW IN CATEGORY - to create a product from a Materials Control category in another Fidelio
Suite8 category, click the NEW IN CATEGORY button. An item of the corresponding Fidelio
Suite8 category and the Materials Control product that should be created in that category has
to be selected, then by pressing New in category button, the selected Materials Control items
will be created in that category.
LINK - a Materials Control product can be linked with a Fidelio Suite8 item by selecting first
the Fidelio Suite8 item and then the Materials Control item, then pressing the LINK button,
however, although the name of the items is not changed, the article number as well as all rates
will be overwritten with the defaults from Material Controls and the valid to date of the rate
period will be filled with valid from plus 20 years. When a linked Fidelio Suite8 item is
selected then the corresponding Materials Control product will be selected and vice versa.
Linked items/products are highlighted grey.
UNLINK - to remove a link from a Materials Control product, click the UNLINK button. All
details except the Materials Control Name and MC POS Interface will remain. The unlinked
product will be created then as a new item when running import or night audit.
How to Import Outlets
1. Click MISCELLANEOUS from the SETUP drop-down menu and then MATERIALS CONTROL
IMPORT.
2. Select IMPORT OUTLETS and click the IMPORT button.
A confirmation message is displayed.
3. Click YES, the import is started.
4. When the import is finished an 'Import finished' message is displayed.
Miscellaneous
133
5. Click OK.
How to Import All Materials Control Products
1. Click MISCELLANEOUS from the SETUP drop-down menu and then MATERIALS CONTROL
IMPORT.
2. Select IMPORT ALL and click the IMPORT button.
A confirmation message is displayed.
3. Click YES, the import is started.
4. The import progress is displayed in a progress bar at the bottom of the screen.
5. When the import is finished an 'Import finished' message is displayed.
6. Click OK.
How to list Fidelio Suite8 items
1. Select a CATEGORY from the drop-down list, if no category is selected all categories
are displayed.
2. Select to list ALL items, only LINKED items or only NOT LINKED items.
3. Click the SEARCH button.
134
Miscellaneous
The items meeting the search criteria are listed in the grid, by food and beverage
category and then alphabetically by long description. Linked items/products are
highlighted grey.
Click the CLEAR button to clear the search criteria.
How to edit Fidelio Suite8 items
1. Select a CATEGORY from the drop-down list, if no category is selected all categories
are displayed.
2. Select to list ALL items, only LINKED items or only NOT LINKED items.
3. Click the SEARCH button, the items meeting the search criteria are listed in the
grid.
4. Select the item to be edited and click the EDIT button.
The Menu Item Edit Screen is displayed.
5. Edit the item as required and click OK to save the changes.
How to list Materials Control items
1. Select a CATEGORY from the drop-down list, if no category is selected all categories
are displayed.
2. Click the SEARCH button.
Miscellaneous
135
The items meeting the search criteria are listed in the grid, by food and beverage
category and then alphabetically by long description. Linked items/products are
highlighted grey.
Click the CLEAR button to clear the search criteria.
136
Miscellaneous
3
C
L
Component Palette
FidResButton Tab.................................. 17
FidResCheckbox Tab ............................ 20
FidResEdit Tab...................................... 15
FidResLabel Tab ................................... 14
FidResMisc Tab .................................... 21
FidResPanels Tab ................................. 13
FidResProfile Tab .................................. 25
FidResSelect Tab .................................. 19
License Codes
License Export ...................................... 79
License Import ...................................... 79
V8 Hotel ................................................ 74
V8 Sublicenses ..................................... 75
Correcting Customised Screens ................ 61
Custom SQL Statements........................... 93
D
Database Structure Update ..................... 128
E
Enter Past Revenue .................................. 81
Executable Updates ................................ 124
F
FidResButton Tab ..................................... 17
FidResCheckbox Tab................................ 20
FidResEdit Tab ......................................... 15
FidResLabel Tab....................................... 14
FidResMisc Tab ........................................ 21
FidResPanels Tab .................................... 13
FidResProfile Tab ..................................... 25
FidResSelect Tab ..................................... 19
License Export .......................................... 79
License Import .......................................... 79
M
Maintenance
Custom SQL Statements ....................... 93
Enter Past Revenue .............................. 81
Gather Database Statistics .................... 99
Interface Triggers ................................ 105
Maintenance ......................................... 79
Note Fix .............................................. 106
Rate Code Order Fix ........................... 120
Recalculate month year values.............. 83
Replace Users ...................................... 90
Reservation Check .............................. 121
Reservation Detail Fix ......................... 123
Reset Form Positions .......................... 106
Sequence Fix ...................................... 100
SQL Log ............................................. 100
Support Sql ......................................... 100
System Check ..................................... 106
Maintenance Options ................................ 79
Miscellaneous Licence .............................. 75
N
Form Customization
Accessing form customization .................. 7
Component Palette .................................. 7
Currency Exchange Rate Display .......... 42
Customising a new screen ....................... 7
Defining a new form................................. 7
Defining a new screen ............................. 7
Object Inspector .................................... 34
Properties .............................................. 34
Scripting ................................................ 64
User Assignments ................................. 35
Note Fix.................................................. 106
G
Reservation Check ................................. 121
Gather Database Statistics ........................ 99
H
Index
Index
O
Object Inspector ....................................... 34
R
Recalculate month year values ................. 83
Replace Users .......................................... 90
Requirements
Roomplanner ...................................... 140
Reservation Detail Fix ............................. 123
Reset Form Positions ............................. 106
Hotel Licence ............................................ 74
Roomplanner
Requirements...................................... 140
I
S
Internal Editor Fields ............................... 114
Scripting ................................................... 64
How to enter long stay messages .......... 66
137
How to enter long string controls ............ 70
How to make a field mandatory .............. 66
How to show a message ........................ 64
Sequence Fix .......................................... 100
Setup Miscellaneous ................................. 71
Miscellaneous License ........................... 75
Note Fix............................................... 106
Rate Code Order Fix............................ 120
Reservation Check .............................. 121
Reservation Detail Fix.......................... 123
Sequence Fix ...................................... 100
Setup Miscellaneous Options................. 71
SQL Log .............................................. 100
Support Sql ......................................... 100
User Assignment ................................... 35
V8 License ............................................ 74
Setup Miscellaneous Options .................... 71
138
SQL Log ................................................. 100
Support SQL........................................... 100
System Check ........................................ 106
U
Updates
Database Structure Update ................. 128
Executable Updates ............................ 124
FTP Settings ....................................... 124
User Assignments .................................... 35
V
V8 Hotel License Code ............................. 74
V8 Licence ............................................... 74
V8 Sublicense Codes ............................... 75
139