1
Oracle® Hospitality Suite8
How To Manual
Release 8.9
July 2015
Copyright © 1987, 2015, Oracle and/or its affiliates. All rights reserved.
This software and related documentation are provided under a license agreement containing
restrictions on use and disclosure and are protected by intellectual property laws. Except as
expressly permitted in your license agreement or allowed by law, you may not use, copy,
reproduce, translate, broadcast, modify, license, transmit, distribute, exhibit, perform, publish, or
display any part, in any form, or by any means. Reverse engineering, disassembly, or
decompilation of this software, unless required by law for interoperability, is prohibited.
The information contained herein is subject to change without notice and is not warranted to be
error-free. If you find any errors, please report them to us in writing.
If this software or related documentation is delivered to the U.S. Government or anyone licensing it
on behalf of the U.S. Government, then the following notice is applicable:
U.S. GOVERNMENT END USERS: Oracle programs, including any operating system, integrated
software, any programs installed on the hardware, and/or documentation, delivered to U.S.
Government end users are "commercial computer software" pursuant to the applicable Federal
Acquisition Regulation and agency-specific supplemental regulations. As such, use, duplication,
disclosure, modification, and adaptation of the programs, including any operating system,
integrated software, any programs installed on the hardware, and/or documentation, shall be
subject to license terms and license restrictions applicable to the programs. No other rights are
granted to the U.S. Government.
This software or hardware is developed for general use in a variety of information management
applications. It is not developed or intended for use in any inherently dangerous applications,
including applications that may create a risk of personal injury. If you use this software or
hardware in dangerous applications, then you shall be responsible to take all appropriate fail-safe,
backup, redundancy, and other measures to ensure its safe use. Oracle Corporation and its
affiliates disclaim any liability for any damages caused by use of this software or hardware in
dangerous applications.
Oracle and Java are registered trademarks of Oracle and/or its affiliates. Other names may be
trademarks of their respective owners.
Intel and Intel Xeon are trademarks or registered trademarks of Intel Corporation. All SPARC
trademarks are used under license and are trademarks or registered trademarks of SPARC
International, Inc. AMD, Opteron, the AMD logo, and the AMD Opteron logo are trademarks or
registered trademarks of Advanced Micro Devices. UNIX is a registered trademark of The Open
Group.
This software or hardware and documentation may provide access to or information on content,
products, and services from third parties. Oracle Corporation and its affiliates are not responsible
for and expressly disclaim all warranties of any kind with respect to third-party content, products,
and services. Oracle Corporation and its affiliates will not be responsible for any loss, costs, or
damages incurred due to your access to or use of third-party content, products, or services.
Contents
Preface ........................................................................................................................... 6
Audience ............................................................................................................................ 6
Customer Support ............................................................................................................. 6
Documentation .................................................................................................................. 6
Revision History ................................................................................................................ 6
1 Introduction ............................................................................................................. 7
Starting Fidelio Suite8 ....................................................................................................... 7
Customising Fidelio Suite8 Grids ..................................................................................... 7
Customising the HTML display ..................................................................................... 11
Manager on Duty ............................................................................................................. 13
Favourites ......................................................................................................................... 13
2 Fidelio Startup Parameters ..................................................................................... 15
Fidelio Startup Parameters .............................................................................................. 15
3 Fidelio XML Interface ............................................................................................ 17
XML Interface Installation Guide ................................................................................... 18
4 XML Profile Import ................................................................................................ 19
5 Fidelio Server ......................................................................................................... 21
Database Setup on the Fidelio Server ............................................................................. 22
Fidelio Server - Exclusivity Setup ................................................................................... 24
Fidelio Server - Mail Server ............................................................................................. 25
Transponder Make Key ................................................................................................... 27
Fidelio Server - Activity Log ........................................................................................... 28
Automatic Cancellation ................................................................................................... 29
6 Online Info Board Interface ................................................................................... 31
7 Email Sending ........................................................................................................ 35
Configuration of e-mail sending ..................................................................................... 35
Email Template ................................................................................................................ 37
8 Automatic Night Audit........................................................................................... 39
9 Fax Sending Configuration .................................................................................... 43
Using Tobit FaxWare ....................................................................................................... 44
10 HTML..................................................................................................................... 45
HTML Expressions .......................................................................................................... 45
HTML and Editing dialog boxes .................................................................................... 46
HTML Copy Information ................................................................................................ 47
HTML Style Sheets .......................................................................................................... 47
Billingheader.htm file ...................................................................................................... 47
Expressions using Global Settings, Features and Sublicences ...................................... 48
HTML and Multiple Parameters..................................................................................... 48
11 V8 Oracle & SQL Information ................................................................................ 51
12 Word Merge ........................................................................................................... 53
3
Word Merge ..................................................................................................................... 53
Suite8 Configuration........................................................................................................ 55
Reports.............................................................................................................................. 58
Word Merge Report ......................................................................................................... 58
HTML Reports ................................................................................................................. 60
Report Parts...................................................................................................................... 62
Importing the report examples ....................................................................................... 63
Create a new Word Merge Report .................................................................................. 73
Adding and adjusting the HTML sections in the word template ................................. 75
Adding merge fields to the word report ........................................................................ 79
Adding or changing fields to the main HTML report ................................................... 80
Executing the word merge report ................................................................................... 83
Microsoft Word and HTML ............................................................................................ 84
Tips ................................................................................................................................... 84
Word Features such as Pictures, Logo's and Shapes ..................................................... 85
Word Merge for HTML email body ............................................................................... 86
Printed Examples ............................................................................................................. 88
Translation ....................................................................................................................... 94
Appendix A - The Macro................................................................................................. 95
Appendix B - V8WordMerge.CSS................................................................................... 97
Appendix C - Sample Reports in Demo Database ......................................................... 98
Appendix D - Naming Conventions............................................................................... 99
Appendix E - Suite8 Scripting and Functions .............................................................. 100
Appendix F - Translated Static Fields .......................................................................... 102
Appendix G - Tables styles used in the CSS file .......................................................... 104
13 How To's .............................................................................................................. 109
Crystal Runtimes ........................................................................................................... 111
How to activate email validation .................................................................................. 111
XML Export for VEOS from CST .................................................................................. 113
Signature ........................................................................................................................ 116
How to setup lost & found ............................................................................................ 121
How to use myTaxi........................................................................................................ 121
How to set up a returnable item ................................................................................... 123
How to setup mail import for exchange....................................................................... 136
Automatic Cash Drawer Opening ................................................................................ 150
How to configure Telephony ........................................................................................ 151
Signature Pads ............................................................................................................... 154
Social Media Network Interaction ................................................................................ 161
How to set up and use early arrival and late departure policies ................................ 167
How to setup voucher management ............................................................................ 174
How to set up calendar events with rebates ................................................................ 181
How to setup an alternative letter greeting ................................................................. 182
How to setup trigger based scheduled tasks for automated email sending .............. 183
How to add calendar appointments to email .............................................................. 189
How to configure multiple key cards ........................................................................... 190
4
Israel Trial Balance......................................................................................................... 191
How to setup function sheet with changes .................................................................. 191
How to set up the Kiosk Interface ................................................................................ 212
14 Index .................................................................................................................... 213
5
Preface
Audience
This user manual is intended for system users and system administrators.
Customer Support
To contact Oracle Customer Support, access My Oracle Support at the following URL:
https://support.oracle.com/
When contacting Customer Support, please provide the following:
Product version and program/module name
Functional and technical description of the problem (include business impact)
Detailed step-by-step instructions to re-create
Exact error message received
Screen shots of each step you take
Documentation
Oracle Hospitality product documentation is available on the Oracle Help Center at
http://docs.oracle.com
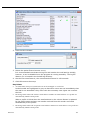
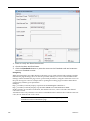
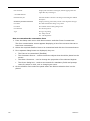
Revision History
Date
6
Description of Change
July, 2005
8.5.0.0 - First Issue Small Business Edition
May, 2008
8.7 - Updated for Version 8.7
June, 2008
8.7.3.1 - Updated for Version 8.7.3.1
May, 2009
8.8 - Updates for Version 8.8
Sept, 2010
8.8 - Updates for Oracle 11gR1
Jan, 2012
8.9 - Updated for Version 8.9
Nov, 2012
8.9 - New cover page
July, 2015
8.9 – Oracle template applied
Preface
1
Introduction
Starting Fidelio Suite8
If an index is missing for any one of the tables listed below then an alert is displayed when starting
Fidelio Suite8:
WMLG
WLOG
ZPOS
WDAT
SHIS
SRPD
WRPD
It could happen that a table has no indices in the event that a table was renamed for support
purpose. Renaming a table carries the indices to the renamed table.
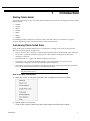
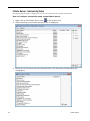
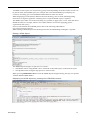
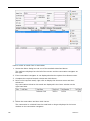
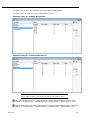
Customising Fidelio Suite8 Grids
Many of the grids in Fidelio Suite8 may be customized according to the needs of the property.
The customization options available are:
DISPLAY FIELD NAMES - displays a list if the grid column names with their field name and type.
CUSTOMIZE - opens the customize dialog box so that columns on the grid can be added,
changed or removed.
RESTORE DEFAULTS - applies the default settings for this grid.
SHOW DEFAULTS - applies the default settings to the current grid view, however, any
customized settings are used the next time the grid is displayed.
Select PRINT to print or export the existing grid layout, the possible export formats are ASCII
File, CSV Format, HTML Document or an Excel Document.
Note: The print or export function should be used before changes to
the grid will be saved.
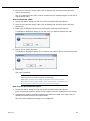
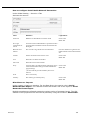
How to display field names
1. Place the cursor in the grid and right-click to display the short-cut menu.
2. Select DISPLAY FIELD NAMES.
A list of the column names with their field name and field type is listed.
Introduction
7
The list can be copied to the clipboard or saved to a file.
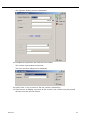
3. Click OK to close the list.
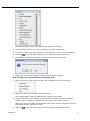
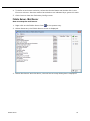
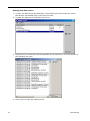
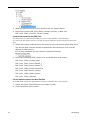
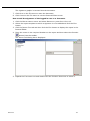
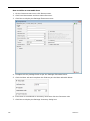
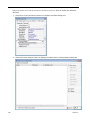
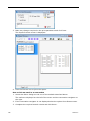
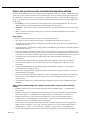
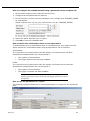
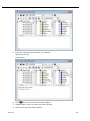
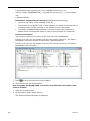
How to customize a grid
1. Place the cursor in the grid and right-click to display the short-cut menu.
2. Select CUSTOMIZE to open the customize screen.
8
Introduction
The fields already used are marked with a green check mark.
3. Click the PENCIL button to view or change the column properties.
4. To move a field to the grid, select the field and drag it to the required position.
5. Click the
in the top right-hand corner to close the customize screen.
6. A message is displayed asking if you want to store the grid layout.
7. Select YES to save the changes or NO not to save any changes.
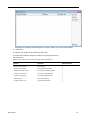
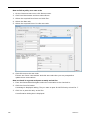
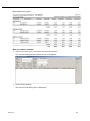
How to remove a column from a customized grid
1. Place the cursor in the grid and right-click to display the short-cut menu.
2. Select CUSTOMIZE to open the customize screen.
The fields already used are marked with a green check mark.
3. On the grid point to the column to be removed and drag it to the customize
screen; yellow arrows are displayed at each end of the column name.
Once the column has been removed the green check mark is removed from the
field name on the customize screen.
4. Click the
Introduction
in the top right-hand corner to close the customize screen.
9
5. A message is displayed asking if you want to store the grid layout.
6. Select YES to save the changes or NO not to save any changes.
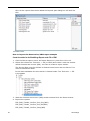
Column Properties
Field
Description
Field name
The field name as it is defined in the database table.
Caption
The field caption.
Fixed
Defines if the column will be fixed to the left side, when scrolling to the
right to view additional fields of the grid. Columns marked as fixed are
highlighted grey.
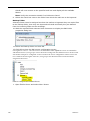
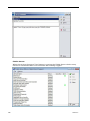
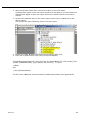
How to create a customised grid view for profile search
Users familiar with the Fidelio Suite8 table structure and fields can create a
customised grid view for the profile search.
This functionality is controlled by the parameter Custom view in Profile Search
under Setup → Configuration → Global Settings → Miscellaneous → Search
Screens 2 tab.
To add fields to the Grid Customization dialog box, the view
V8_sys_customxcmssearch has to be amended.
Example: "Adding the financial account long description to the profile navigator"
The view has to be changed as follows:
CREATE OR REPLACE FORCE VIEW v8_sys_customxcmssearch
(customxcmssearch_xcms_id, zfac_longdesc)
AS SELECT xcms_id customxcmssearch_xcms_id,
(select zfac_longdesc from zfac where zfac_actvalidfrom is not null and
zfac_actvaliduntil is null and xcms.xcms_id=zfac.zfac_xcms_id and rownum=1)
zfac_longdesc
from xcms;
The fields from the custom view are automatically added to the grid.
How to create a customised grid view for reservation search
Users familiar with the Fidelio Suite8 table structure and fields can create a
customised grid view for the reservation navigator.
This functionality is controlled by the parameter Custom view in Res. Navigator
under Setup → Configuration → Global Settings → Miscellaneous → Search
Screens 2 tab.
To add fields to the Grid Customization dialog box, the view
V8_sys_customxcmssearch has to be amended.
Example: Adding the housekeeping status to the reservation navigator
The view has to be changed as follows:
CREATE OR REPLACE VIEW v8_sys_customressearch
AS SELECT yres_id customressearch_yres_id, yhks_shortdesc HSK_Status
FROM yhks, yrms, ydet,yres
WHERE yhks_id = yrms_yhks_id
10
Introduction
AND yrms_id= ydet_yrms_id
and yres_current_ydet_id=ydet_id;
The fields from the custom view are automatically added to the grid.
How to create a customised grid view for booking search
Users familiar with the Fidelio Suite8 table structure and fields can create a
customised grid view for the event booking search.
This functionality is controlled by the parameter Custom view in Booking Search
under Setup → Configuration → Global Settings → Miscellaneous → Search
Screens 2 tab.
To add fields to the Grid Customization dialog box, the view
V8_sys_customybomsearch has to be amended, however it must contain the field
customybomsearch_ybom_id.
Example: "How to display the function type description"
The view has to be changed as follows:
CREATE OR REPLACE FORCE VIEW V8_SYS_CUSTOMYBOMSEARCH
AS
SELECT
ybom_id customybomsearch_ybom_id,
yfty_longdesc
from
ybom, yfty
where
ybom_yfty_id=yfty_id(+);
Customization functionality is controlled by the user right Edit under Setup →
Configuration → Users → User Definition → Rights → Miscellaneous → Grid layout
Customization.
Print functionality is controlled by the user right Print Grid under Setup →
Configuration → Users → User Definition → Rights → Miscellaneous.
Customising the HTML display
The HTML display may be customized according to the requirements of the property.
The customization options available when placing the cursor on the HTML display and rightclicking are:
Introduction
11
PRINT - prints an exact copy of the HTML display. The print page margins and the actions to
take if the HTML printout is too large for the defined paper size can be defined in the
configuration.
PRINT WITH SETUP - displays the printer options and then print the HTML display.
VIEW SOURCE - displays the HTML code; no changes can be made.
EDIT TEMPLATE WITH NOTEPAD - opens the relevant *.htm and *.qry in notepad. Users with
HTML programming knowledge can edit these files to meet the requirements of the property.
EDIT TEMPLATE WITH ASSOCIATED APPLICATION - opens the relevant *.htm and *.qry with the
program associated with these file types. Users with HTML programming knowledge can edit
these files to meet the requirements of the property.
How to use HTML Expressions to customize the HTML display
Properties can configure and store customised html files in the Version 8 directory for
htm files. The files are displayed in Suite8 either by logged in user, user language,
customised htm files for all users or language specific htm files for all users.
The priority Suite8 uses to determine which file to use is in the sequence as listed:
Customised htm file by user initials
To display a customised htm file by user initials, the htm file has to be called
USR_USERINTIALS_HTMFILENAME. HTM.
Example: For a user with the initials DS the file has to be called usr_ds_quickinfo.htm.
Customised htm file by user language
To display a customised htm file by user language, the htm file has to be called
CUST_ LANG_LANGUAGE SHORT DESCRIPTION_QUICKINFO. HTM.
Example: If the language short description is F for French, the user has to select this language
under User Settings → Startup → Language and the file, such as quickinfo.htm has to be called
cust_lang_f_quickinfo.htm.
Customised version for all users
To display a customised version of htm files for all users, the html files have to be called
CUST_ HTMLFILENAME.HTM.
Example: cust_quickinfo.htm.
Customised version by language
To display a customised version by language, the html files have to be called
DESCRIPTION OF THE LANGUAGE_HTMLFILE.HTM.
LANG_SHORT
Example: lang_f_quickinfo.htm, where f stands for the short description of the language.
If none of these files can be found then the standard htm file is displayed
How to hide or show expressions depending on activated features or license
The following expression can be used to hide for example, Conference Information on
the HTM file when working with the small business edition:
if ({const isBnB})=(1)}{/if}{else} {if {feature Meeting Planner}} Conference
{runquery 2}
Customization functionality is controlled by the user right HTML source view and
edit under Setup → Configuration → Users → User Definition → Rights →
Miscellaneous.
The print page margins and the actions to take if the HTML printout is too large for
the defined paper size are defined via the option HTML printout under Setup →
Configuration → Global Settings → Miscellaneous → Visual Appearance 4.
12
Introduction
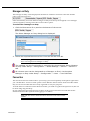
Manager on Duty
The manager on duty can be displayed at the bottom of Suite8 screen next to the date and the
name of the logged in user.
If this functionality is activate then a manager on duty must always be assigned; a new manager
can be assigned by clicking on the MANAGER ON DUTY panel.
To select the manager on duty
1. Click the MANAGER ON DUTY panel at the bottom of the screen.
The Select Manager on Duty dialog box is displayed.
2. Select the required MANAGER ON DUTY from the list and click OK.
Note: Only logged in users who are designated as a MANAGER ON
DUTY can assign a new manager on duty.
The manager on duty functionality is controlled by the parameter Assign Manager
on Duty under Setup → Configuration → Global Settings → Generic → Generic 3
tab.
All relevant users can be designated as a 'Manager on Duty' via the option
Manager on Duty under Setup → Configuration → Users → User Definition.
Favourites
The Favourites shortcut toolbar allows you to keep your most frequently used options right where
you can find them. Your most used options can be added to the Favourites shortcut toolbar where
they are more noticeable and more easily organized to suit your purposes.
To make the most of the Favourites shortcut toolbar, you need to organize the options in it; this can
be done using drag and drop.
In user settings the Favourites shortcut toolbar can be set to be listed first and will then be the
default shortcut toolbar opened when logging on to Fidelio.
Note: The Favourites shortcut toolbar cannot be removed from the
toolbar.
Introduction
13
How to add an option to the Favourites shortcut bar
1. Click one of the coloured shortcut toolbars on the left to list the options on that
toolbar.
2. Right-click the option that you want to add, and then click ADD TO FAVOURITES on
the shortcut menu.
The option is now listed on the Favourites shortcut toolbar.
3. Repeat Steps 1 and 2 for each option that you want to add.
Note: Options from Web Services cannot be added to the Favourites
shortcut toolbar.
How to delete an option from the Favourites shortcut bar
1. Click the FAVOURITES shortcut toolbar on the left to list the options.
2. Right-click the option that you want to remove, and then click DELETE BUTTON on
the shortcut menu.
The option is removed from the Favourites shortcut toolbar.
3. Repeat Steps 1 and 2 for each option that you want to remove.
How to reorganise the options on the Favourites shortcut bar
1. Click the FAVOURITES shortcut toolbar on the left to list the options.
2. Select the option to be moved and then left-click and hold the mouse button while
you drag the option to its new location on the toolbar.
3. Repeat Steps 1 and 2 for each option that you want to move.
On the toolbar the Favourites shortcut bar can be listed first by selecting the
option Favourite buttons on top under Miscellaneous → User Settings →
Appearance Tab.
14
Introduction
2
Fidelio Startup Parameters
Fidelio Startup Parameters
The following parameters can be used on the Fidelio Suite8 command line:
debug - starting Fidelio Suite8 with this parameter will run Fidelio Suite8 in debug mode.
remotedebug - starting Fidelio Suite8 with this parameter deactivates the database version
check, the client version check and the status bar to allow faster access when performing
remote support. It should be used for support purposes only.
nofidserverwarning - this parameter can be used to start Suite8 in a test environment. This
may be used to deactivate the warning message displayed if there is no successful log entry
within the last 1 hour on the Fidelio server for properties with CRS installed.
foliolog - if Fidelio Suite8 is started with this parameter all activities when printing invoices are
written to the log file: fidInvPrint.log. This has been implemented to help find causes for
missing invoices.
noballoon - if Fidelio Suite8 is started with this parameter, balloons prompted by the
IfcBusi.Dll are suppressed.
noELF - if Suite8 is started with this parameter then no eureka log file is created, however, the
eureka information is still available in the application error log.
CrystalGCNoRun - if Suite8 is started with this parameter then no forced Garbage Collection is
executed when running Crystal reports.
nochrome - chrome is the default internal browser and uses LocalV8.css; to use the internal
HTML browser Suite8 has to be started with the parameter nochrome and will then use
NoChromeLocalV8.css instead of LocalV8.css.
noext - useful for online demos or fairs Fidelio Suite8 can be started with the parameter NOEXT
on the command line to disable access to external applications. The option EXTERNAL
APPLICATION can be selected from the miscellaneous drop down menu, but the message:
'External Applications are not allowed' is displayed upon selecting an external application.
allowduplicateifctriggers - may be used so that a new interface trigger is always created.
multipleInstances - allows multiple instances of Fidelio Suite8 to be started on a single
machine.
Fidelio Startup Parameters
15
3
Fidelio XML Interface
XML License code
With Fidelio Suite8.6 the XML Interface is subject to a license code. Two licenses are available
under Setup → Miscellaneous → License → V8 Sublicenses → Software Interface:
XML Interface Standard Edition - The standard edition includes support of standard functions
from the generic XML Interface.
XML Interface Enhanced Edition - The enhanced edition includes in addition to the standard
functions the execution of custom sql select statements to be parsed to
It is only possible using custom update/insert statements on the tables: SHIS, SMAN and
SRPD when using another table, the message: 'Table modification is not allowed' will be
displayed.
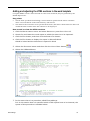
How to configure the Fidelio XML Interface via HTTP protocol
Prerequisites
Fidelio V8 Version 8.4.0.9 or higher
Web Server
Microsoft Internet Information Server v 5.0 or higher
Apache 1.3.x
Apache 2.0.x
Standard V8 DLLs
MSXML 3.0
Installation
Make sure the following files are in the Fidelio Program Directory:
FidelioXMLInterface.dll
ScktSrvCommon.dll
FidelioWebAppSetup.exe
FidelioIISWrapper.dll
Copy FidelioIISWrapper.dll (provided with each new release of Version 8 and located in the
Fidelio Suite8 program folder) to a folder accessible for Internet Information Service (for example
C:\INETPUB\V8).
Register the Dll’s:
Open a DOS box and change to your Fidelio Program Directory, register the dll files as follows:
regsvr32 FidelioXMLInterface.dll
regsvr32 FidelioScktSrvr.dll
Configure Fidelio XML Interface
1. Double click on FIDELIOWEBAPPSETUP.EXE on the server machine.
2. Select DB SETUP from the OPTIONS Menu.
3. Configure the Database connection details.
4. Select ALLOWED WEB APPLICATIONS from the OPTIONS Menu.
5. Click the NEW button.
6. Enter FidelioXMLInterface.DataHandler in the object name field.
7. Close the FidelioWebAppSetup.
Fidelio XML Interface
17
The Fidelio XML Interface is accessible via the following URL address:
HTTP://YOUR_SERVER_NAME/VIRTUAL_DIRECTORY_NAME/
FIDELIOIISWRAPPER.DLL/FIDELIOXMLINTERFACE.DATAHANDLER
Using multiple connections
1. Double click on FIDELIOWEBAPPSETUP.EXE on the server machine.
2. Select DB SETUP from the OPTIONS Menu.
3. Configure the Database connection details for all database connections.
To access Fidelio XML Interface use parameter ?ic=code in the URL address:
HTTP://YOUR_SERVER_NAME:PORT/V8/FIDELIOIISWRAPPER.DLL/FIDELIOXMLINTERFACE.DATAHA
NDLER?IC=MAS
XML Interface Installation Guide
See the XML Interface Installation Guide.pdf for a guide to configuring the Fidelio Suite8 XML
Interface to work via TCP/IP Sockets or via HTTP protocol.
18
Fidelio XML Interface
4
XML Profile Import
The XML Profile Import is used to import profiles from one oracle database to another. Based on
views and functions in the source database, data is imported and translated into the relevant fields
in the target database.
Membership type handling has been added to the standard edition of the XML interface.
Functionality has been added allowing the retrieving of reservations and block reservations, but
not creating and updating.
See the XML Profile Import.pdf for a guide to configuring the interface for XML Profile Import.
XML Profile Import
19
5
Fidelio Server
The module FIDELIO SERVER is used to run various processes. It is currently used to run the
following, but it is designed to run additional processes:
E-Mail server - to enable sending emails
Socket server - used for the Top Vital Interface
Automatic Night Audit
The graphical user interface (GUI) is designed in a similar style to the Windows Service manager.
The module can be installed as a service or may be run as regular application.
Interface Notifier
The interface notifier available with Fidelio Server sends notifications to the following 3rd party
interfaces about changes in V8:
HIS- sending reservation ID of all modified reservations.
BellaVita - sending reservation ID and profile ID if changes are done for guests or reservations
found in the bookingdetaillist view.
EMS (Energy Management) - hours before arrival time, depending on the configured time in
global settings.
Third Party MPY Interface- sending global ID of merged profile read from standard trigger
setup.
The service is available if any of the above licenses are entered in Fidelio Version8.
Installing Fidelio Server as service on a workstation
1. Select RUN from the windows start menu or open a DOS Box.
2. Type FidelioServer/ install.
The server is installed.
Installing Fidelio Server as a Windows Service on a Windows 2008 Server
1. Download the batch file WIN2K8_SESSION0.BAT from the following location on the
MICROS-Fidelio FTP Server: .../V8/Tools/Win2K8Session0/Win2K8_Session0.bat
2. Open SERVICES and make sure that the Windows Service INTERACTIVE SERVICE
DETECTION is started.
3. Install Fidelio Server as a Windows Service and start it.
4. Create a shortcut to the Win2K8_Session0.bat on the desktop.
5. To access the Fidelio Server configuration options, either double click on the short
cut or alternatively press the VIEW THE MESSAGE button in the INTERACTIVE SERVICE
DETECTION pop up message.
Note: This message will pop up on a regular basis as it is controlled by Windows.
6. Configure the Fidelio Server by clicking on the DETAILS button.
Note: The CLOSE button and the X on the upper right corner have been disabled as
using these would close the Fidelio Server making it no longer accessible.
7. To return to the Desktop, select the RETURN NOW button.
8. The Fidelio Server can now be configured in the normal manner.
Fidelio Server
21
Removing the Fidelio Server Service from a workstation
1. Select RUN from the windows start menu or open a DOS Box
2. Type FidelioServer/ uninstall.
The Fidelio Server is removed.
Using more than one database instance
When running Fidelio Server as a service, the service has to be installed with the
following command:
FidelioServer.exe /install /instance=ESP
ESP is the code used under Setup → Options → DB instance setup. The same
command has to be used upon uninstall.
If Fidelio Server is not running as a service the command line on the short cut should
be as follows:
C:\fidelio\program\FidelioServer.exe /instance ESP
All services running with Fidelio Server will then use the entered DB instance.
Database Setup on the Fidelio Server
The Fidelio Server has to be configured to connect to the correct database.
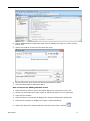
How to setup the database on the Fidelio Server
1. Right-click on the Fidelio Server Icon
in the system tray.
2. Select PROPERTIES, the Fidelio Server screen is displayed.
3. Select DB SETUP from the OPTIONS Menu, the Database Instance Setup dialog box is
displayed.
22
Fidelio Server
Note: An instance for the DB Service V8 is setup by default and cannot
be deleted.
4. Click NEW to enter a new instance setup.
5. Enter the CODE.
6. Enter the NAME.
7. Enter the DB SERVICE.
8. Enter the USER NAME.
9. Enter the PASSWORD.
10. Click CLOSE to close the DB Instance Setup screen.
11. Click CLOSE to close the Fidelio Server screen.
Fidelio Server
23
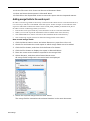
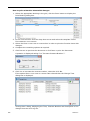
Fidelio Server - Exclusivity Setup
This option may be used to setup up services to run exclusively on a specific workstation.
How to configure exclusivity setup on the Fidelio Server
1. Right-click on the Fidelio Server Icon
in the system tray.
2. Select PROPERTIES, the Fidelio Server screen is displayed.
3. Select EXCLUSIVITY SETUP from the OPTIONS Menu, the Exclusivity Config dialog box
is displayed.
24
Fidelio Server
4. To define a service as exclusive, select the Service Name and double click in the
EXCLUSIVE column. Services marked as exclusive are indicated by a green tick mark
5. Click CLOSE to close the Exclusivity Config screen.
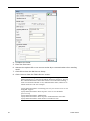
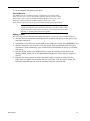
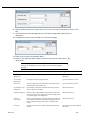
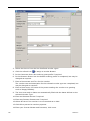
Fidelio Server - Mail Server
How to setup the mail server
1. Right-click on the Fidelio Server Icon
in the system tray.
2. Select PROPERTIES, the Fidelio Server screen is displayed.
3. Select MAIL SERVER and click SETUP, the mail server setup dialog box is displayed.
Fidelio Server
25
4. Complete the fields.
5. Enter the PASSWORD.
6. Activate the option SSL to use secure socket layer communication when sending
email.
7. Click OK to close the Mail Server Setup.
8. Click CLOSE to close the Fidelio Server screen.
Note: When running Fidelio Server in debug mode a log file called
'fideliosmtplog.txt' is stored in the Fidelio Suite8 log directory. The log
file contains information about the current session of Email sending,
such as connected with SSL or not, authentication status, addresses to
which emails are sent. For example:
12/30/2010 3:21:59 PM - Connecting user xx\xxxx to host xx.xx.xx.xxx
using SSL support
12/30/2010 3:21:59 PM - Host response: xxxx.xx.xxxx.int Hello
[xx.xx.xx.xxx]
12/30/2010 3:21:59 PM - Authenticate
12/30/2010 3:21:59 PM - Host response: Authentication successful
12/30/2010 3:21:59 PM - Send email to [email protected]
26
Fidelio Server
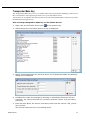
Transponder Make Key
The Transponder Make Key service is available when using Transponder Handling with an active
Key Card Interface. The required parameters are set via the Fidelio Server.
All activities are recorded in the daily log files in the TRANSPONDERMAKEKEY sub directory under
the default Suite8 log directory.
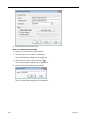
How to setup transponder make key on the Fidelio Server
1. Right-click on the Fidelio Server Icon
in the system tray.
2. Select PROPERTIES, the Fidelio Server screen is displayed.
3. Select TRANSPONDER MAKE KEY and click SETUP, the Transponder Make Key Settings
dialog box is displayed.
4. Complete the make key settings by entering in seconds the MAKE KEY TIME OUT
(SECONDS), the TIMEOUT BETWEEN KEYS (SECONDS) and the TIMEOUT AFTER EACH BATCH
(SECONDS).
5. Enter the VIEW NAME; the source view name must have the column: zfac_id and
ztra_number.
The service reads the view in the default order.
Fidelio Server
27
6. Click OK to save the transponder make key settings.
Transponder functionality is controlled by the parameter Transponder Handling
under Setup → Configuration → Global Settings → Generic → Generic 2 tab.
The skipping of the make key procedure when checking in a transponder financial
account is controlled by the parameter Skip Make Key at Check In for Transponder
FAs under Setup → Configuration → Global Settings → Interfaces → Interface
(IFC8) 2 tab.
The skipping of the make key at transponder check in can be set per terminal via
the option Skip Make Key at Transponder Check In under Setup → Configuration →
Miscellaneous → Terminals & Printers → Terminals Tab.
Fidelio Server - Activity Log
The following activities are recorded in the server activity log for Fidelio Server:
Suite8 Central Profile sync
CRS Configuration sync
CRS Item sync
The last 10 successful and unsuccessful entries are kept.
If CRS is installed in the property then Suite8 prompts a warning window after login if there is no
successful log entry within the defined number of hours for each activity.
The CRS monitoring dialog also shows the status 'Warning' for properties that have no successful
log entry within the defined number of hours.
The number of hours after which a warning message is displayed is defined via the
option Fidelio server activity warning (hours) under Setup → Configuration →
Global Settings → Generic → Generic 3 tab.
The deactivation of the display of the warning message for users is controlled by
the parameter Disable warning for users under Setup → Configuration → Global
Settings → Generic → Generic 3 tab.
28
Fidelio Server
Automatic Cancellation
The Transponder Make Key service is available when using Transponder Handling with an active
Key Card Interface. The required parameters are set via the Fidelio Server.
How to setup automatic cancellation on the Fidelio Server
1. Right-click on the Fidelio Server Icon
in the system tray.
2. Select PROPERTIES, the Fidelio Server screen is displayed.
3. Select AUTOMATIC CANCELLATION and click SETUP, the Auto Cancel Setup dialog box is
displayed.
4. Select RESERVATION CANCEL BY GUARANTEE CODE, and enter an interval in minutes when
this service should run.
5. Enter the INTERVAL MINUTES;
The service reads the view in the default order.
6. Click OK to save the automatic cancellation settings.
Note:
Automatic cancellation by guarantee code is applied only to reservations
were no postings are involved. The following message are prompted if there
are reservations which cannot be cancelled:
Fidelio Server
29
Error while cancelling reservation:
Error while cancelling reservation for 'Last Name', 'First Name'
Operation is aborted because user interaction is required.
Internal error: Not in database transaction. Can not save reservation
Question: Balance is not zero. Do you want to move postings to a Financial Account?
This reservation cannot be cancelled automatically. Please cancel manually
To activate this, the flag: 'Automatic Cancel by Guarantee Code' has to be activated under
Global Settings->Reservation4 Tab and a Reason for the automatic Cancellation as well as a
User for the automatic Cancellation has to be selected.
Automatic cancellation functionality is controlled by the parameter Automatic
cancel by guarantee code under Setup → Configuration → Global Settings →
Reservations → Reservation 4 tab.
30
Fidelio Server
6
Online Info Board Interface
The Online Info Board interface is used post electronic signs for conference and function spaces.
The Online Info Board requires installation of the Fidelio XML Interface Standard Edition and
activation of the CCM Info Board Interface license under Setup → Miscellaneous → License → V8
Sub Licenses → Software Interfaces.
There are two options available for the transmission of booking and event information:
The provider of the doorcard system sends a request for the info board information – in this
case MICROS-Fidelio provides a XML file called EventInfoBoardRequest.xml. This is standard
for online info board.
Fidelio Suite8 creates the file EventInfoBoardRequestResult.xml and the data can be retrieved
from this file.
With both options the file contains only events:
With an event status defined as DEF.
Which are within the defined date and time range.
The field Info board is completed on the event edit screen.
A function space is linked.
The XML request includes the BOOKING ID which can be used to display the online info board
information on the television in the guest rooms.
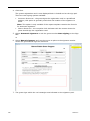
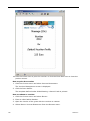
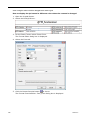
Configuring Fidelio Server
The Info Board may be configured by selecting Info Board from Fidelio Server and clicking the
SETUP button to display the Info Board dialog box.
Info Board dialog box
Field
Definition
Export File
The location of the EventInfoBoardRequestResult.xml.
Note: The file name is hard coded to EventInfoBoardRequestResult.xml so the path
should be specified without the file name.
Interface URL
The URL address of the XML interface, for example:
http://localhost/V8/FidelioIISWrapper.dll/FidelioXMLInterface.DataHandler
User name
Online Info Board Interface
The user name of the XML Interface to log on to Suite8.
31
Password
The password of the XML interface user.
Event Day
System Date + number
of days
The number of days to be included in the export (WGBS date + x days).
Export Start Time
The time interval determining how often the data should be exported.
Note: After configuration the info board has to be stopped and started to accept the new settings.
Make sure the user has not been blocked in Suite8 as auto attempts of Fidelio server to login
without success may result in the user no longer being able to login.
Response from V8 XMLinterface
The following example shows an xml response file:
STATUS - OK means the command or request was successful. If the response code is
not OK, the element always contains the attribute message which provides additional
information about the cause of the error.
32
Online Info Board Interface
The field EVENTPROFILENAME will show:
The "Company name" if the booking has been made for a company and a
contact
The "Contact name" if the booking has been made for a contact only
If an entry was made in the field INFO BOARD PROFILE on the Event Edit screen then:
The entry in the field Info Board Profile replaces the "Company Name" if the
booking has been made for a company and a contact.
The entry in the field Info Board Profile replaces the "Contact Name" if the
booking has been made for a contact only.
Note: Info Board Profile is mainly used in conjunction with the
doorcard interface; this option allows the property to enter a different
name. For example, the booking was made by Star Conferences for the
company IBM; so on the doorcard IBM should be displayed.
Online Info Board Interface
33
7
Email Sending
Configuration of e-mail sending
To enable e-mail sending, Fidelio Suite8 uses FIDELIO SERVER (FidelioServer.exe). For continuous email sending, this module should run on a dedicated machine.
When starting FIDELIO SERVER for the first time, the following configuration tasks have to be
completed:
Database Setup on the Fidelio Server
Configuring the Mail Server
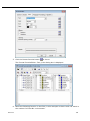
How to configure the mail server to send emails:
1. Right-click on the Fidelio Server Icon
in the task bar.
2. Select PROPERTIES.
3. Select MAIL SERVER from the list and click SETUP to display the setup screen.
4. Enter the name of the OUTGOING MAIL SERVER.
5. Enter the ACCOUNT (Login name) and PASSWORD for the Mail Server.
6. Click OK to close the setup screen.
Email Sending
35
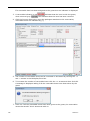
Starting the mail server:
1. To start the Mail Server automatically, when starting the FIDELIO SERVER, select
MAIL SERVER and double click in the AUTO RUN field.
2. To start the Mail Server manually click START.
3. Click DETAILS to check the processing details of the mail server, a screen similar to
the following will open:
4. Click CLOSE to close the details screen.
36
Email Sending
Email Template
The email template is defined under Miscellaneous → Reports with the section role Email
Template and then selected under Global Settings → Report tab → Email Template. When sending
confirmation letters via email, the letter/email can be printed and is saved using the email
template. This functionality is for emails sent as body text not as an attachment.
Note: When using the compression functionality for confirmations
WTXT, it is necessary changing the field 'EmailBody' on the default
email template report under Miscellaneous → Reports to
'EmailBodyUnzipped'. If the body field is not changed but
compression for the table WTXT activated, it may happen when
printing already sent email that the email body is missing.
Email Sending
37
8
Automatic Night Audit
Properties such as sales offices which do not operate 24 hours/7 days a week can use this feature to
automatically run night audit.
The user for the automatic night audit has to have the user rights to be able to start night audit.
Fidelio Suite8 can only run as one instance, therefore it is required that on the workstation where
automatic night audit will be performed, no other instance of Fidelio Suite8 is running.
There are two ways to configure the automatic night audit:
Fidelio Server - the setup is defined on the Fidelio Server Setup.
Control Panel → Scheduled Tasks - a task will start Fidelio Suite8 with the parameter autona.
Fidelio Server:
If the Fidelio Server is installed as a Service and the Fidelio Server Icon is not displayed in the task
bar, select SERVICES from the CONTROL PANEL → ADMINISTRATIVE TOOLS and double click on the
service name to start the service.
If the Fidelio Server is not installed as a service, double click on the FidelioServer.exe in the Fidelio
Suite8 program directory. The Fidelio Server icon will then display in the task bar.
How to configure Fidelio Server for automatic night audit:
1. Right click on the Fidelio Server Icon
in the task bar.
2. Select PROPERTIES.
3. Select NIGHT AUDIT SCHEDULER from the Fidelio Server Menu.
4. Click the SETUP button.
5. Complete the options as per the night audit settings dialog box.
Automatic Night Audit
39
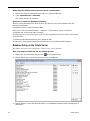
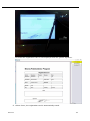
Fidelio Server Night Audit Settings dialog box
Field
Definition
Day of the week (Sunday- Saturday)
Check defines that the day of week is selected for automatic night
audit.
Time
Select a time for the automatic night audit to start.
Login as user
The user name that will run the automatic night audit. This user must
have rights to start night audit and optionally to start night audit when
not all due outs are checked-out.
Command line
The complete run path and parameters for Fidelio Version 8.
For example:
C:\Fidelio\programs\fideliov8.exe v8 v8live live c:\Fidelio\HTML
[Program directory] [DB alias] [user] [password] [HTML directory]
Enable all
Click this button to select all week days for automatic night audit.
Disable all
Click this button to clear all selections.
Same time
Click this button to apply the same time to all week days.
Test time
Click this button to test the time for the next automatic night audit. The
date and time refers to the workstation and not to the date in Fidelio
Suite8.
Control Panel → Scheduled Tasks Parameter Autona
Use Scheduled Tasks from the Windows Control Panel to define a task and configure specific
schedules.
1. Open the CONTROL PANEL.
2. Select SCHEDULED TASKS.
3. A new task can be added by selecting ADD SCHEDULED TASK and setting up the task
using the SCHEDULED TASK WIZARD.
or
4. By right-clicking anywhere in the window and selecting NEW → SCHEDULED TASK
from the displayed menu.
5. Allocate the task a name.
6. Right-click and select PROPERTIES, the TASK tab is opened by default.
7. Enter the command line parameters in the RUN box or click the BROWSE button to
locate the FidelioV8.exe. Fidelio Suite8 must be started using the parameter
AUTONA.
40
Automatic Night Audit
8. Click the SCHEDULE tab to define the schedule for running the automatic night
audit.
Automatic Night Audit
41
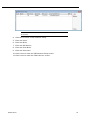
9. Enter how often the task should be run, the start time and every how many days.
10. Click OK to save the task.
42
Automatic Night Audit
9
Fax Sending Configuration
Fidelio Suite8 does not need external fax software but uses the Windows fax components to enable
fax sending. The fax services have to be installed on the workstations from which the faxes will be
sent. For example, from the reservation menu it is possible to send confirmation letters via the FAX
button.
The following workstation and server combinations are possible:
OS Windows 2000 and Server Windows 2000
The fax letters can be sent one by one from each workstation.
The Windows 2000 Server can not be used as a Fax Server; a modem has to be
installed on each workstation.
OS Windows 2000 and Server Windows 2003
The fax letters can be sent one by one from each workstation.
The Windows 2000 Server can not be used as a Fax Server; a modem has to be
installed on each workstation.
OS Windows XP and Server Windows 2000
The fax letters can be sent one by one from each workstation.
The Windows 2000 Server can not be used as a Fax Server; a modem has to be
installed on each workstation.
OS Windows XP and Server Windows 2003 (Best choice)
The fax letters can be sent from the Windows 2003 Server. Windows XP can
transfer the fax letters to the Windows Server 2003 which will then serve as the
Fax Server. A modem has to be installed on the Windows 2003 Server and the
name of the fax server entered under SETUP → CONFIGURATION → MISCELLANEOUS →
GLOBAL SETTINGS → GENERIC 2 TAB.
For more information on Microsoft Fax sending see:
http://msdn.microsoft.com/library/default.asp?url=/library/en-us/fax/faxlegacy_1u42.asp
Using external Fax Software can be driven by a printer; usually fax numbers are not transferred to
printer.
Note: For TOBIT fax software, the support fax API (Application
Program Interface) has to be installed. The fax number can be
transferred via @@ codes.
Installing the Windows Fax component
1. Click START and select CONTROL PANEL, click ADD OR REMOVE PROGRAMS.
2. Click the ADD/REMOVE WINDOWS COMPONENTS icon on the left hand side of the screen.
3. Select FAX SERVICES from the windows component wizard.
4. Click NEXT.
5. Click FINISH.
Fax Sending Configuration
43
Using Tobit FaxWare
Prerequisites
Install the support fax API (Application Program Interface).
Install Tobit Client as a printer on the workstation (Tobit FaxWare).
Setup
In Fidelio Suite8 the printer has to be configured under Setup → Configuration → Miscellaneous
→ Terminals & Printers.
1. Open the TERMINALS tab.
2. Select the Terminal (workstation).
3. Click NEW button on the printer and application section, the printer tab will open by
default.
4. Enter the DESCRIPTION.
5. Select the Tobit FaxWare Printer.
6. Click the SAVE button to save settings.
7. Select the Print job on terminals tab.
8. Click the NEW button.
9. Select the Terminal.
10. In the Print Job field, select FAX OUTPUT.
11. Select the Tobit FaxWare Printer as both the Primary and Secondary Printer.
12. Click the SAVE button.
Miscellaneous Reports
Under Miscellaneous Reports at least two sections need to be defined for confirmation letters. One
section for all confirmation letters sent via fax and one for other confirmation letters. These
sections should only differ in the print jobs.
The section for Fax confirmations needs to be defined with the print job FAX OUTPUT.
The section for other confirmation letters needs to be defined with the print job CONFIRMATION
LETTERS.
In Fidelio Suite8 the templates used for the fax need to be configured with the @@ codes so that
corresponding parameters such as the fax number can be transferred to Tobit FaxWare. A list of all
@@ codes is included in the online help of Tobit. At least the @@ code ‘Nummer’ (database field of
the number or email address has to be configured.
For example: @@NUMMER<<com.communication_value>>@@
All values used with the @@ codes, will be transferred to Tobit FaxWare as long as the parameter is
valid. The codes will not print on the fax.
Reservations → Options → Confirmation letters
The selected communication type should be fax.
From Fidelio Suite8.6
With Fidelio Suite8.6, the Fax button can be used when activating the flag: USE PRINTER FOR FAX
SENDING under Configuration → Global Settings → Report tab. The print job has to be defined in
the field FAX PRINTER SETUP. The print job will be issued to the corresponding fax printer when
pressing Fax button. Using Tobit, the @@ codes will be translated and a dialog box will open
allowing entering the fax number. If the Global Setting is not activated, the regular MS FAX API is
used.
44
Fax Sending Configuration
10
HTML
HTML Expressions
Properties can configure and store customised HTML files in the directory for htm files used by
Fidelio Suite8. The files will show in Fidelio Suite8 either by logged in user, user language or just a
customised set by either property or language specific htm files available for all users. The priority
Version 8 uses to determine which file to use is in the sequence as listed, if none of these files can
be found; the standard htm file is shown.
Following options and sequence are available:
Customised htm file by user initials
To display a customized htm file by user initials, the htm file has to be called
_userinitials_htmfilename.htm. For a user with the initials DS the file has to be
called usr_ds_quickinfo.htm.
Customised htm file by user language
To display a customized htm file by user language, the htm file has to be called
cust_lang_language short description _quickinfo.htm. For example, if the language
short description is F for French, the user has to select this language under user
settings → startup → language and the file, such as quickinfo.htm has to be called
cust_lang_f_quickinfo.htm
Customised version for all users
To display a customised version of htm files for all users, the HTML files have to
called cust_HTMLfilename.htm, for example: cust_quickinfo.htm
Customised version by language
To display a customised version by language, the HTML files have to be called
lang_short description of the language_HTMLfile.htm, for example
lang_f_quickinfo.htm, were f stands for the short description of the language
How to hide or show expressions depending on activated features or license
The following expression can be used to hide Conference Information on the HTM file
for example when working with the small business edition:
if ({const isBnB})=(1)}{/if}{else} {if {feature Meeting Planner}} Conference
{runquery 2}
If and Dif conditions
The Delphi script evaluation component called DIF can be used for all conditions allowing usage of
more than one logical expression on HTML files.
For example:
{dif (({field6.YRES_EXPARRTIME.0}=0) and ({field4.arrivaldate.0}=0) and ({field11.arrivaldate.0}=0)
and ({field12.arrivaldate.0}=0))}{/dif}{else}{dif ({field 6.YRES_EXPARRTIME.0}=0)}
Note: IF conditions can be used in conjunction with DIF, therefore it is
not necessary to change all IF conditions in the HTML files.
Some more information about the difference of IF and DIF:
The IF function is string based and the DIF function is based on the Delphi syntax check, therefore
some expressions working using IF do not work when using DIF, for example the string {if () =(1)} is
a valid expression, using the same expression with DIF does not work.
All logical and comparing operators can be used with DIF, this is not possible when using IF.
HTML
45
String variables or constants:
Using DIF, string variables or constants have to be in single quotation marks ('), for example:
{dif '{field 1.xcms_creditstat}'='B'} Blacklist {/dif} or
{dif '{const freetext1}'=''} {/dif} {else} {const freetext1}
→ If the field freetext1 is empty then an empty space will appear otherwise the contents of the field
will display, string constants without contents will always return an empty space
Numeric variables or constants with no decimal places:
Values with no decimals require no additional expression they can be used as follows:
{dif {field 1.YDET_ADULTNO}=0} no Persons {/dif} or
{dif {const RoomsToSell0}>0} {/dif} {const RoomsToSell0} {else} no Rooms to sell {/else}
Numeric variables or constants with decimal places:
A keyword has been defined called NUMERICCONST, regardless of the regional settings a point will
be used as decimal separator when using DIF. Comparing numeric variables or constants with
decimal places can be used as follows:
{dif {field 16.GrossRevenue}<>0} not Zero {/dif} {else} Zero {/else} or
{dif {const balance}=0} no Balance{/dif} or
{dif {field 16.GrossRevenue}>9999.99} Top Producer {/dif}
No value returned {null}:
If a query or a view returns the value {null}, a point has to be added after the field name when
using DIF followed by a value, usually 0
For example: {dif {field 13.xcno_id.0}=0} {/dif} {else} Notes {/else}
Variable Userid
The name of the logged in user can be displayed on HTML files with the variable: USERID.
For example: {runquerywithparameter 4.parameter.{userid}}
HTML and Editing dialog boxes
HTML functionality is available allowing standard screens and dialog boxes to be opened and
edited from within an HTML.
Detailed below are the screens which can be opened and an example HTML expression:
Screen/dialog box HTML Code Example
Reservation
<a href=action://editreservation?parameter={field 1.yres_id}>
Profile
<a href=action://editprofile?parameter={field 1.yres_xcms_id}>
Booking
<a href=action://EditBooking?parameter={field 19.ybom_id}>
Group Reservation
<a href=action://editgroup?parameter={field 1.YGRP_ID}>
Block
<a href=action://editblock?parameter={field 1.yblh_id}>
Event
<a href=action://EditEvent?parameter={field 5.yevm_id}>
Billing Instructions
<a href=action://
EDITBILLINGINSTRUCTIONSOFRES?parameter={parameter}>bi</a><br>
Locators
<a href=action://
EDITLOCATOROFRES?parameter={parameter}>locator</a><br>
Traces
<a href=action://
EDITTRACESOFRES?parameter={parameter}>traces</a><br>
Messages
<a href=action://
EDITMESSAGESOFRES?parameter={parameter}>messages</a><br>
46
HTML
Note: The standard HTML files provided with Fidelio include this
functionality.
HTML Copy Information
It is possible copying information from HTML files to clipboard by selecting items from HTML,
using right mouse short cut menu and selecting COPY TO CLIPBOARD or short cut key CTRL.+C. This
information can then be pasted to any open file by using right mouse menu option PASTE or short
cut key CTRL.+V.
The menu option Copy to clipboard is controlled by the user right Copy to clipboard
from HTML under Users → User Definition → Rights → Miscellaneous
HTML Style Sheets
The following HTML style sheets are available for use and are supplied along with the standard
HTML files:
FidelioV8.css - font type Tahoma
FidelioV8_Arial.css - font type Arial
FidelioV8_Times.css - font type Times New Roman
Note: The standard HTML's are linked to the 'FidelioV8.css' style
sheet. When using a style sheet other than the standard, you must
rename the used style sheet to FidelioV8.css (after saving the original)
otherwise you have to change the file name in each HTML file.
Billingheader.htm file
The standard billingheader.htm supplied with Fidelio Suite8 uses the constant {const persons} to
display the number of persons; this figure includes both adults and children; however additional
constants are available to display only adults and/or only children.
The following constants can be added to the billingheader.htm file:
{const persons} - includes adults + children (default).
{const adults} - includes only adults.
{const children} - includes only children.
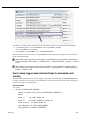
Part of the billingheader.htm showing {const persons}
How to use the function EditTracesOfRes on the billingheader.HTML file
The following HTML text has to be used:
<a href=action://EditTracesOfRes?parameter={field 1.id}><img border="0" src="{file LinkArrow.gif}"
alt="Edit"></a>
Note: Use {field 1.id} instead of {field 1.yres_id}
HTML
47
Expressions using Global Settings, Features and Sublicences
The following expressions can be used in HTML queries:
Global Settings - {globalsetting wussname}= 'wussvalue'
Sub-Licences - {sublicence slname} will be replaced with true or false. On screen names or
shorter idnames from constantsandtypes.pas unit can be used.
Features - {feature featurename} will be replaced with true or false. On screen names need to
be used.
Global Setting Query Example:
This expression in the HTML defines if the HTML can be seen in the master property only. Any
global setting can be used in queries, not only true (1) or false (0 or empty ('')).
{dif {globalsetting ThisHotelisMaster}='1'}this hotel is master{/dif}
Sublicences Query Example:
This expression shows the 'welcomeccm.jpg if only the license for CCM is activated.
{dif ({sublicence v8ccm}=true) and ({sublicence v8pms}=false)}<img border="0" src="{const
rtfpath}\WelcomeCCM.jpg" width="1120" height="110">{/dif}{else}
<img border="0" src="{const rtfpath}\WelcomePE.jpg" width="1120" height="110">{/else}
Features Query Example:
This expression checks if the feature block reservations is activate for the Small Business Edition.
{dif {feature Block Reservation}}
<tr class="Std8Text" valign="top">
<td width="50%">Blocks</td>
<td width="50%">{const BlockName}</td>
</tr>
{/dif}
HTML and Multiple Parameters
It is possible to use more than one parameter when opening a new HTML window from a link
within an HTML file.
Adding a hyperlink to an HTML file
Adding the example below to the INDIVIDUALPROFILE.HTM file inserts a hyperlink to and opens the
p2_guest details.htm file in Fidelio Suite8 when clicking on the hyperlink. The parameter used on
the first htm file is passed on to the newly opened second htm file.
Example:
href=app:\\P2_GuestDetails.htm?parameter={parameter}
Using more than one parameter
More than one parameter can be used in HTML files, however, the second parameter must be
separated by '&'.
In the example below 'hehe' is the second parameter.
Example:
<href=app:\\GuestRecognition.htm?parameter={parameter}&hehe=77>
On open HTML files the parameter can be used as follows:
<body>
value of parameter={parameter}
value of hehe={parameterhehe}
The default parameter called 'parameter' is not changed.
The new parameter should have the prefix 'parameter' and then immediately the name of the
parameter without a space.
Special Characters
48
HTML
When special characters or spaces are involved in the link, the parameter 'urlencode' can be used.
(this will convert all special characters to a format suitable for links.)
For example:
<a href=app:\\GuestsFromTown.htm?parameter={urlencode {field 17.STADT}}>
This refers to the htm and qry files: 'Guestsfromtown.htm', 'Guestfromtown.qry' and returns all
guests from the same town.
Running HTML reports with non standard parameters
To run HTML reports with non standard parameters the runquery must be called as
'runquerywithautoparameters', such as {runquerywithautoparameters 1}
{runquerywithautoparameters 2}. This is used for example in the files:
'Tablereservation_Status.HTML' and 'Tablereservation_Status.qry'.
HTML
49
11
V8 Oracle & SQL Information
See the V8 Oracle and SQL Information PDF for a basic understanding of Oracle and SQL
Terminology and how it relates to Fidelio Suite8. Topics covered include, Oracle Database Objects,
Alias, Export and Import, and SQL.
V8 Oracle & SQL Information
51
12
Word Merge
Word Merge
Word Merge for Suite8 extends existing report functionality from Crystal, Internal Editor and
HTML. Word Merge is available in all modules of Suite8 for printing letters or reports, such as:
Designing contracts and function sheets in meeting planner
Confirmation letters in reservations
Profile letters in customer relations
Message templates in front desk
Voucher or Gift Certificates in Cashiering.
Merge fields are inserted into a main document and Suite8 replaces the merge fields in the main
document with information retrieved from the data source. Using Word Merge for reports allows
taking advantage of the easy to use Microsoft Word features, such as sizing, aligning objects and
formatting content, and there is no limitation on the number of merge fields and text.
Word Merge is available in all version of Suite8 and requires the following:
Microsoft Word 2007 or higher (PDF Conversion Function is required), several features have to
be activated.
Suite8 Version 8.9.4.1
V8merge.css (This is provided with the HTML files in the rtf.zip, and located in the HTML
directory of Suite8)
Font Corpos.ttf (This true type font is included in the reports.zip, it is used on the Report:
75401 Contract with rooms 2 (WM). To install this font, double click on the Corpos.TTF file
Definition of Terms
HTML – HYPER TEXT MARKUP LANGUAGE used to return data in HTML layout in a
Browser
CSS – Cascade Style Sheet used for general formatting and layout of the HTML pages
MHTML – short for MIME HTML, is a web page archive format used to combine resources
that are typically represented by external links (such as images, Flash animations or audio
files) with HTML code into a single file
Word Merge
53
Word Merge Concept
Microsoft Word
The Developer functionality must be active in order to access and work with macros. It is
recommended to enable this option only on the machines where it is needed.
Macros are not supported by the new .docx document format and therefore all documents have to
be saved as .doc.
How to activate the developer option in Word 2007
1. Open Microsoft Word and click the Microsoft Office Button
2. Select the Word Option button to display the Word Option dialog box.
3. Click Popular, select the option Show Develop Tab in the Ribbon. on the
4. Click OK; the Developer Tab is displayed on the Ribbon.
How to activate the developer option in Word 2010 and 2013
1. Open the Word 2010/2013 program
2. Click the File tab.
3. Select Options button to display the Word Option dialog box.
4. Click Customize Ribbon.
5. In the Customize the Ribbon column, choose Main Tabs.
6. Select the option Developer.
7. Click OK; the Developer Tab is displayed on the Ribbon.
Note: The version of Word must be 2007 or higher. The PDF
conversion function used when sending a letter as a PDF is not
available in older versions of Word. The Format of Word 2010 does
not support Macros therefore all documents have to be saved using
Office 2007 compatibility doc format.
54
Word Merge
When changing a word merge report in the report configuration or when running such a report in
Suite8, other Word documents apart from Suite8 can be opened and MS Word can be used as
usual.
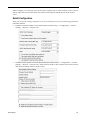
Suite8 Configuration
There are no specific settings required to activate word merge, however, the following parameters
should be defined:
Definition of Internal Editor as the default EDITOR under Setup → Configuration → Global
Settings → Reports → Report 1 tab.
Definition of the INTERNAL EDITOR REPORT SETTINGS under Setup → Configuration → Global
Settings → Reports → Report 1 tab. All the numeric fields in the examples refer to the numeric
and decimal settings defined via this option.
Word Merge
55
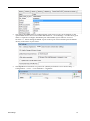
The display of HTML reports directly in the default browser installed on the workstation is
controlled by the parameter DISPLAY PRODUCED HTML REPORT IN BROWSER under Setup →
Configuration → Global Settings → Reports → Report 1 tab. For example, when executing the
report and pressing the VIEW button.
Definition of the CSSFILE key under Setup → Configuration → Global Settings → Generic →
General Hotel Info 5 tab. This is required so that the CSS file is not overwritten in a later
version. See: How the key is used?
The HTML sub reports which are linked to the word template use a CSS file for
the styling of the HTML page.
This is specified in the <Head> section of the HTML page: “<link
rel="stylesheet" type="text/css" href="file://{file V8Wordmerge.css}">”
The {file …} is V8 code which points to the HTML directory of Suite8 where the
CSS file is located.
The query in the query part of the HTML report selects the value and it is
added to the <Head> section as follows:
Query
--14 CSS File from global settings
select WUSS_VALUE from WUSS where WUSS_NAME='UDEF_CSSFILE';
HTML
<html>
{runquerywithautoparameters 14}
<head>
<meta http-equiv="Content-Type" content="text/html; charset=windows1252">
<link rel="stylesheet" type="text/css" href="file://{file {field
14.WUSS_VALUE}}">
</head>
Note: It is recommended to use file name other than V8Wordmerge.css for
your standard and your customers. The demo database on the FTP server
contains this key and all HTML reports have been configured to use it.
The CSSFILE key should be added to your standard database.
56
Word Merge
The path for the HTML editor for configuring the word merge reports can be defined via the
option HTML EDITOR EXECUTABLE under Miscellaneous → User Settings → Profile tab.A good
editor is required to configure the HTML part of the HTML reports and here we used
NOTEPAD ++ . When editing the HTML reports in the report section Suite8 opens the HTML
directly in the editor of your choice.
The Signature is furnished as a picture file (mhtml) and linked to users under Setup →
Configuration → Users → User Definition → Signature.
Word Merge
57
Reports
From the Reports Menu, the Word Merge Reports are created or edited.
A word merge report is composed of following elements:
A WORD document template, created in a Report section with the Source Type WORD.
An HTML REPORT (MAIN.HTML) which delivers the data source from Suite8 for the merge
fields in the word template, located in a Report Section with the Source Type HTML REPORT.
HTML PARTS which act as separate section sub reports, returning data for the merge fields of
the word template (DETAILSXXX.HTML), these HTML reports are located in the same report
section as the MAIN.HTML with the Source TypeHTML REPORT.
The signature picture file (signature.MHTML) of the user, linked under the HTML Part,
located in a General Report Section with the Source TypeHTML REPORT.
A CSS file which defines the layout of the HTML report. The Style Sheet is called
V8WordMerge.CSS and is provided with the HTML files in the RTF.ZIP. This CSS file must be
placed in the HTML directory, normally c:\fidelio\HTML.
A macro in visual basics code, present in the word document which converts the main data
source to merge fields and inserts the separate HTML Parts in the template. The macro is
activated via the DEVELOPER option in MS Word.
Word Merge Report
The Word Merge Reports are created in a Report Section with the Source Type WORD, the Source
Type identifies that MS WORD is used for the report.
On the Word Reports, when pressing EDIT on the Report File tab, the document is opened and the
Text and Suite8 Variables can be adjusted.
Report File table of a Word Report
Since Suite8 Version 8.9.5.0 with the introduction to send Reports as Email Body or Attachment, all
Word Merge Reports are flagged by default as Body under Email sending preferences:
The Word Merge Report can then be send as HTML Body in an Email using the defaults from
Suite8 Configuration under Email Settings or as Email Attachment.
Word merge reports can be defined to be sent as HTML body text when sending a confirmation by
email.
The example word merge report 75402 CONTRACT WITH ROOMS 2 (EMAIL BODY) (contract Letter
including rooms sent with email attachment and email subject and body) is provided with the
release of Suite8 Version 8.9.5.0 in the reports.zip.
58
Word Merge
In the report configuration when defining the report the Email sending preference can be defined
As Body or As Attachment; by default As Body is selected for all reports.
Note: The update script to 8.9.5.0 will ensure that all existing word
merge reports are defined AS ATTACHMENT.
Word Merge
59
Edit or Open when Load Button is pressed
It is possible to save the Word Document or load an existing report from a specific Path, only
MSOffice 2007 format is supported (*.doc).
HTML Reports
The HTML reports are created in a report section with the Source Type HTML REPORT, the Source
Type identifies that HTML EDITOR is used and these reports can be opened in the Browser installed
if the global setting parameter DISPLAY PRODUCED HTML REPORT IN BROWSER is active.
The HTML Reports return the data for the merge fields and the HTML sections of the word
document. There is the MAIN HTML report which needs to run first to build the main relation to
the Data Source. All data which is not grouped or repeated can be placed on this report. It uses
only one to one relationships, such as:
Reservation ID,
Contact Information,
Company Information
Guest Information,
Communication Information
Arrival, departure, number of persons, notes
The HTML sub reports
The HTML Section sub reports use a one to many relationship and return the details belonging to
the main.html data:
Examples of section sub reports could be:
60
Reservation details belonging to a reservation
Event details belonging to a booking
Block details belonging to a block
Group details belonging to a group
Deposits belonging to a booking or reservation
Word Merge
An HTML section report can contain many groups. Data depending on the ID of other records can
be placed in the same HTML report, for example, the event details HTML report displays all
events for a booking. per event all F&B and Miscellaneous items are shown.
When displaying records directly linked to the main booking, such as when indicating billing
instructions or deposits applied to a booking, then a separate HTML report is required.
The HTML report takes care of the formatting, it is possible to apply styles, colors, fonts and others
HTML elements, for example, tables or div’s (DIV elements are used for applying generic
organization and styles.)
For more information about HTML please refer to the following URL address:
http://www.w3schools.com/html
When editing a HTML Report from the Report Section, the HTML Report Designer is opened:
Editing a HTML Report
The HTML Report Designer is split into two sections:
The HTML section, using HTML code to return the result of the Query in the desired layout
The QUERY section using the SQL queries to retrieve Data
When pressing HTML Editor Button from the HTML Report Designer dialog, the report is opened
with the defined HTML Editor:
Displaying the HTML Report by pressing the HTML Editor button
Word Merge
61
Report Parts
The HTML Parts are linked to the Word Merge Report by selecting the Word Merge Report and
pressing Report Parts Button on the Reports Menu:
With the definition of the Report Parts, the HTML Reports are linked to the Word Report:
Reports Parts dialog
Pressing the New button opens the Report Parts dialog:
Field
Definition
Report
The HTML Report Name.
Filename
Defines the file name in the macro, please also refer to the section Some basics about
the Macro
This is used for the sections in the Word Merge Report, to insert the complete HTML
section
The <ID> is required and used for completing the Booking ID. The macro identifies by
this ID which Report from the Cache to insert.
Execution step
62
The sequence of the report of the Cache folder. This is assigned when running the
reports, for processing the macros and for the sections in the word document.
Word Merge
Importing the report examples
Several Word Merge Reports are provided with the release of Suite8 Version 8.9.4.1 in the
reports.zip.
The reports (*.S8R) from Suite8 need to be imported and the Word Documents (*.DOC) need to be
loaded.
The macro used in these examples can be exported and imported on newly created Word Reports.
The following reports are available:
730900 Confirmation Individual Changes (WM)
730901 Confirmation Individual Details (WM)
730902 Confirmation Party (WM)
75400 Contract with rooms 1 (WM)
75401 Contract with rooms 2 (WM)
730910 Confirmation Group (WM)
730920 Confirmation Block (WM)
73620 Message Template (WM)
The signature picture file is imported to a general HTML Report Section and is
then linked as the last item on the report parts for each report.
How to import the Signature User Report
1. Click the MISCELLANEOUS menu and select REPORTS or press CTRL+SHIFT+R.
2. Create a new sub-section called GENERAL HTML PARTS.
The SECTION ROLE must be defined as CONFIRMATION LETTER and the SOURCE TYPE
must be defined as HTML REPORT.
In the demo database this sub-section is located under OTHER TEMPLATES.
4. With the GENERAL HTML PARTS section selected click the IMPORT button.
5. Locate the report FCR_PMS_73920_SIGNATURE_USER and click OPEN to import it.
How to import the Conference report examples
The example reports for Conference Management are:
FCR_CCM_75400_Contract_Rooms_1 (WM)
FCR_CCM_75401_Contract _Rooms_2(WM)
Create the section for the Word Merge Reports/Templates
1. Click the MISCELLANEOUS menu and select REPORTS or press CTRL+SHIFT+R.
2. Select the sectionTEXT TEMPLATES -> CCM and create a new sub-section called CCM
CONTRACTS- see How to create a report section
The SECTION ROLE must be defined as CONFERENCE and the SOURCE TYPE must be
defined as WORD.
In the demo database this sub-section is located under TEXT TEMPLATES -> CCM.
Word Merge
63
3. With the CCM CONTRACTS section selected click the IMPORT button.
4. Import the reports FCR_CCM_75400_Contract_Rooms_1 (WM) and
FCR_CCM_75401_Contract _Rooms_2(WM).
Create the sub-section for the HTML Parts
You may create as a subsection beneath your word section but this is not mandatory.
You can create the section wherever you like as long as it has the correct section role and source
type.
5. Select the section CCM CONTRACTS and create a new sub-section called HTML PARTS.
The SECTION ROLE must be defined as CONFERENCE and the SOURCE TYPE must be
defined as HTML REPORT.
In the demo database this sub-section is located as follows:
6. Import the following HTML reports in to the HTML PARTS sub-section:
FCR_CCM_75410_Contact_Main
FCR_CCM_75411_Event_Details_1
FCR_CCM_75412_Event_Details_2
FCR_CCM_75420_Rooms_Individual
FCR_CCM_75421 Rooms_Groups
FCR_CCM_75422_Rooms_Blocks
FCR_CCM_75430_Deposits
Link the imported reports to the Word Template
Now that all the reports are imported they need to be linked to the word template.
7. Select the report 75400 CONTRACT WITH ROOMS 1 (WM).
8. Click the REPORTS PARTS button.
64
Word Merge
Complete the Report part dialog box for each report as per the table below.
9. Click NEW.
10. Select the REPORT from the drop-down list.
11. Enter the FILENAME and the number of the EXECUTION STEP.
12. Click SAVE.
Repeat steps 9 to 12 for each report listed in the table below:
Report
Filename
Execution step
75410 Contract Main
main.HTML
1
75411 Event Details1
Eventdetails(ID).HTML
2
75420 Rooms Individual
RoomsIndividual(ID).HTML
3
75421 Rooms Groups
RoomsGroups(ID).HTML
4
75422 Rooms Blocks
RoomsBlocks(ID).HTML
5
75430 Deposit
Deposit(ID).HTML
6
73920 Signature User
Signature(ID).HTML
7
Word Merge
65
Once all the reports have been added the Reports part dialog box will look like
this:
13. Click CLOSE.
How to import the Reservation/CRM report example
Create the section for the Word Merge Reports under FO or CRM
1. Click the MISCELLANEOUS menu and select REPORTS or press CTRL+SHIFT+R.
2. Select the sectionTEXT TEMPLATES -> FO (or CRM) and create a new sub-section
called CONFIRMATION LETTERS (WM)- see How to create a report section
The SECTION ROLE must be defined as CONFIRMATION LETTER and the SOURCE TYPE
must be defined as WORD.
In the demo database this sub-section is located under TEXT TEMPLATES -> FO.
3. With the CONFIRMATION LETTERS (WM) section selected click the IMPORT button.
4. Import the reports:
FCR_PMS_730900_Confirm_Ind_Chg (WM)
FCR_PMS_730901_Confirm_Ind_Det(WM)
FCR_PMS_730902_Confirm_Party(WM)
66
Word Merge
Create the sub-section for the Word Merge Templates
5. Select the newly created section and create a new sub-section called HTML PARTS.
The SECTION ROLE must be defined as CONFIRMATION LETTERS and the SOURCE TYPE
must be defined as HTML REPORT.
In the demo database this sub-section is located as follows:
6. Import the following HTML reports in to the HTML PARTS sub-section:
FCR_PMS_7309000_Confirmation_Main
FCR_PMS_7309001_Reservation_Changes
FCR_PMS_7309002_Reservation_Details
FCR_PMS_7309003_Party_Details
Linking the imported reports to the Word Template
7. Select the report 730900 CONFIRMATION INDIVIDUAL CHANGES (WM).
8. Click the REPORTS PARTS button.
Complete the Report part dialog box for each report as per the table below.
9. Click NEW.
10. Select the REPORT from the drop-down list.
11. Enter the FILENAME and the number of the EXECUTION STEP.
12. Click SAVE.
Repeat steps 9 to 12 for each report listed in the table below:
Report
Filename
Execution step
7309000 Confirmation Main
main.HTML
1
7309001 Reservation Changes
Reservationdetails(ID).HTML
2
73920 Signature User
Signature(ID).HTML
3
Once all the reports have been added the Reports part dialog box will look like
this:
Word Merge
67
13. Click CLOSE.
How to import word merge reports from group
Create the section for the Word Merge Reports
1. Click the MISCELLANEOUS menu and select REPORTS or press CTRL+SHIFT+R.
2. Select the sectionTEXT TEMPLATES -> FO and create a new sub-section called
CONFIRMATION LETTERS (WM)- see How to create a report section
The SECTION ROLE must be defined as GROUP CONFIRMATION LETTER and the SOURCE
TYPE must be defined as WORD.
In the demo database this sub-section is located under TEXT TEMPLATES -> FO.
3. With the CONFIRMATION LETTERS (WM) section selected click the IMPORT button.
4. Import the report FCR_PMS_730910_Confirm_Group (WM)
Create the sub-section for the Word Merge Templates
5. Select the newly created section and create a new sub-section called HTML PARTS.
The SECTION ROLE must be defined as GROUP CONFIRMATION LETTERS and the SOURCE
TYPE must be defined as HTML REPORT.
In the demo database this sub-section is located as follows:
68
Word Merge
6. Import the following HTML reports in to the HTML PARTS sub-section:
FCR_PMS_7309100_Confirmation_Group_Main
FCR_PMS_7309101_Group_Details
Linking the imported reports to the Word Template
7. Select the report 730910 CONFIRMATION GROUP (WM).
8. Click the REPORTS PARTS button.
Complete the Report part dialog box for each report as per the table below.
9. Click NEW.
10. Select the REPORT from the drop-down list.
11. Enter the FILENAME and the number of the EXECUTION STEP.
12. Click SAVE.
Repeat steps 9 to 12 for each report listed in the table below:
Report
Filename
Execution step
7309100 Confirmation Group Main
main.HTML
1
7309101 Group Details
Groupdetails(ID).HTML
2
73920 Signature User
Signature(ID).HTML
3
Once all the reports have been added the Reports part dialog box will look like
this:
13. Click CLOSE.
Word Merge
69
How to import word merge reports from block
Create the section for the Word Merge Reports under Front Desk or Reservation
1. Click the MISCELLANEOUS menu and select REPORTS or press CTRL+SHIFT+R.
2. Select the sectionTEXT TEMPLATES -> FO and create a new sub-section called
CONFIRMATION LETTERS (WM)- see How to create a report section
The SECTION ROLE must be defined as BLOCK and the SOURCE TYPE must be defined
as WORD.
In the demo database this sub-section is located under TEXT TEMPLATES -> FO.
3. With the CONFIRMATION LETTERS (WM) section selected click the IMPORT button.
4. Import the report FCR_PMS_730920_CONFIRMATION_BLOCK.
Create the sub-section for the Word Merge Templates
5. Select the newly created section and create a new sub-section called HTML PARTS.
The SECTION ROLE must be defined as BLOCK and the SOURCE TYPE must be defined
as HTML REPORT.
In the demo database this sub-section is located as follows:
6. Import the following HTML reports in to the HTML PARTS sub-section:
FCR_PMS_7309200_Confirmation_Block_Main
FCR_PMS_7309201_Block_Details
Linking the imported reports to the Word Template
7. Select the report 730920 CONFIRMATION BLOCK (WM).
8. Click the REPORTS PARTS button.
Complete the Report part dialog box for each report as per the table below.
9. Click NEW.
10. Select the REPORT from the drop-down list.
11. Enter the FILENAME and the number of the EXECUTION STEP.
12. Click SAVE.
70
Word Merge
Repeat steps 9 to 12 for each report listed in the table below:
Report
Filename
Execution step
309200 Confirmation Block Main
main.HTML
1
7309201 Block Details
Blockdetails(ID).HTML
2
73920 Signature User
Signature(ID).HTML
3
Once all the reports have been added the Reports part dialog box will look like
this:
13. Click CLOSE.
How to import word merge reports from message
Create the section for the Word Merge Reports
1. Click the MISCELLANEOUS menu and select REPORTS or press CTRL+SHIFT+R.
2. Select the sectionTEXT TEMPLATES -> FO and create a new sub-section called
MESSAGE (WM)- see How to create a report section
The SECTION ROLE must be defined as MESSAGE and the SOURCE TYPE must be defined
as WORD.
In the demo database this sub-section is located under TEXT TEMPLATES -> FO->
MESSAGES.
Word Merge
71
3. With the MESSAGE (WM) section selected click the IMPORT button.
4. Import the report FCR_PMS_73620_MESSAGE(WM).
Create the sub-section for the Word Merge Templates
5. Select the newly created section and create a new sub-section called HTML PARTS.
The SECTION ROLE must be defined as MESSAGE and the SOURCE TYPE must be defined
as HTML REPORT.
In the demo database this sub-section is located as follows:
6. Import the following HTML reports in to the HTML PARTS sub-section:
FCR_PMS_736201_Message_Main
FCR_PMS_736202_Message_Details
Linking the imported reports to the Word Template
7. Select the report 73620 MESSAGE TEMPLATE (WM).
8. Click the REPORTS PARTS button.
Complete the Report part dialog box for each report as per the table below.
9. Click NEW.
10. Select the REPORT from the drop-down list.
11. Enter the FILENAME and the number of the EXECUTION STEP.
12. Click SAVE.
Repeat steps 9 to 12 for each report listed in the table below:
Report
Filename
Execution step
736201 Messages Main
main.HTML
1
736202 Message Details
Messagedetails(ID).HTML
2
73920 Signature User
Signature(ID).HTML
3
Once all the reports have been added the Reports part dialog box will look like
this:
72
Word Merge
13. Click CLOSE.
Create a new Word Merge Report
When starting a new Word Document, the Macro needs to be exported from an existing Word
Template and imported to the new empty document.
Steps involved in creating a report from an empty word document
Create the report section
Create the empty word document
Export the V8merge macro from an existing report template
Import the macro to the new report template
How to create an empty word document for an individual confirmation letter
1. Click the MISCELLANEOUS menu and select REPORTS or press CTRL+SHIFT+R.
The Reports screen is displayed.
2. In the report tree on the left hand side of the screen select the report section for
the word reports- see How to create a report section
The SECTION ROLE must be defined as CONFIRMATION LETTER and the SOURCE TYPE
must be defined as WORD.
Word Merge
73
3. Click the NEW button to display the Report Edit dialog box.
4. Click the NEW BINARY button, the Create Binary Report dialog box is displayed.
5. In the REPORT NAME box enter the name of the report.
6. Click OK, the Report Edit dialog box is displayed with the Report File tab selected
and the report DESCRIPTION completed.
7. Click the EDIT button.
Microsoft Word is opened; at this point Suite8 is no longer accessible.
8. Create the word document with the styles, fonts, headers and footers as required.
9. Save and close the document in Word.
10. Click OK on the Report Edit screen
11. The word document is now saved in the database.
74
Word Merge
Adding and adjusting the HTML sections in the word template
Complete HTML sections can be inserted in to the word document; they are produced by the
HTML Report Parts.
Key points
The file name specified when linking a section must be specified in the macro so that the
macro can locate the file in the cache directory and insert it.
The name for the section has to be specified in the macro; the name is then entered on the word
document at the location where the content is to be displayed.
How to add or view the HTML sections
1. Click the MISCELLANEOUS menu and select REPORTS or press CTRL+SHIFT+R.
2. Search for and locate the word report to which the macro is to be imported.
3. Click the EDIT button, and then click the REPORT FILE button.
4. Click the EDIT button to display the report in Microsoft Word.
Suite8 is locked and the document is opened in Word
5. Select the DEVELOPER button and then click the VISUAL BASIC button
.
6. Select the V8MERGEMODULE.
7. In the macro there is a procedure called ExecuteMerge.
It is in this section that it is specified which HTML reports have to be inserted; the
syntax of this procedure is detailed below:
Word Merge
75
In the above example there are 2 sections which can be inserted
RESERVATIONDETAILS and SIGNATURE:
Each statement is made up of two parts:
<<RESERVATIONDETAILS>> - is the string which the macro will search for in
the word document.
"reservationdetails+ID+”.html” - is the name of the file which will be created in
the cache.
The content of this file will be inserted where word finds the string
<<RESERVATIONDETAILS>>.
As many HTML sections as required may be added by copying the line and
replacing the string and the filename with the HTML report created.
Note: The filename must be identical to the file name given upon
linking the report.
How to export the V8MergeModule macro
1. Open a sample word document with Word, in our example we will open
FCR_PMS_730900_Confirm_Ind_Chg.doc (newreports.zip)
A message is displayed 'Opening this document will run the following SQL
command:'
2. Select NO; this message is displayed because the visual basic code in the macro
performs the SELECT command on the main.html data source.
3. Select the DEVELOPER button and then click the VISUAL BASIC button
.
All the macros belonging to the Project (FCR_PMS_730900_Confirm_Ind_Chg) are
displayed.
76
Word Merge
4. Select V8MERGEMODULE and then right-click to display the short-cut menu, select
EXPORT FILE.
5. Select the location to save the file and click SAVE.
6. On the File menu click CLOSE AND RETURN TO MICROSOFT WORD.
7. Close the document in Microsoft Word.
How to import the V8MergeModule macro
1. Click the MISCELLANEOUS menu and select REPORTS or press CTRL+SHIFT+R.
2. Search for and locate the word report to which the macro is to be imported.
3. Click the EDIT button.
4. Click the REPORT FILE button to display the Report Configuration dialog box.
5. Click the EDIT button to display the report in Microsoft Word.
6. Select the DEVELOPER button and then click the VISUAL BASIC button
Word Merge
.
77
Make sure the project (report_name_XXX) is selected; in our example
DEMO_NEW_REPORT
7. Select PROJECT (DEMO_NEW_REPORT) and then right-click to display the short-cut
menu, select IMPORT FILE.
8. Locate the V8MERGEMODULE.BAS and click OPEN to select it.
9. The V8MERGEMODULEis now listed under the folder MODULES.
78
Word Merge
10. On the File menu click CLOSE AND RETURN TO MICROSOFT WORD.
11. Save and close the document in Microsoft Word.
12. Click OK on the Report Edit screen to save the report with the imported macros.
Adding merge fields to the word report
In order to insert merge fields to the newly created word document and to create the Data Source,
it is necessary to link one of the HTML main sub reports. In this example we will take the main
report for individual confirmation letters which is FCR_PMS_7309000_CONFIRMATION_MAIN.
In order to insert or add merge fields you have to:
Execute the word report with any reservation ID in order to create the main.html
When you close the report the main.html will be available in the cache directory
The V8MERGEMODULE macro will look for the main.html in the cache directory
The word merge report can now be edited and merge fields can be added
How to add merge fields
1. Click the MISCELLANEOUS menu and select REPORTS or press CTRL+SHIFT+R.
2. Search for and locate the word report to which merge fields are to be added.
3. Click the EDIT button, and then click the REPORT FILE button.
4. Click the EDIT button to display the report in Microsoft Word.
5. Place the cursor at the location required for the merge field.
6. Select MAILINGS, and then select INSERT MERGE FIELDS.
All merge fields configured in the main.html are displayed.
7. Select the required merge field and click INSERT.
The merge field is inserted at the selected location in the word document.
Word Merge
79
8. Click CANCEL to close the Insert Merge Field dialog box.
9. Repeat steps 5-8 for all the required merge fields.
10. Save and close the document.
11. Click OK on the Report Edit screen
The word document is now saved in the database,
12. The report can now be tested by executing the report with an existing ID.
Adding or changing fields to the main HTML report
Adding or changing fields to or in the main.html is demonstrated based on the
FCR_PMS_7309100_CONFIRMATION_GROUP_MAIN report which is used for group confirmation
letters.
When creating an HTML report in the appropriate section, the queries used in the Internal Editor
are automatically inserted.
Queries can be changed or replaced and fields can be formatted.
How to add or change a field
1. Open the Reports dialog from the MISCELLANEOUS menu or press CTRL+SHIFT+R
2. Search for and locate the Word report
3. Click the EDIT button, and then click the REPORT FILE button
4. Click the Edit button; two sections are displayed:
The Query Section (Bottom Section)
The HTML Part (Top Section)
5. To change the Query Section, select the section, add or change a field, then press
SAVE, CLOSE and OK.
6. In order to change the HTML Part select HTML Editor,press SAVE and then close the
External Editor Tool.
80
Word Merge
7. On the Report Edit dialog click SAVE.
The HTML part
The HTML part of a main.html report is understood as a simple table.
There are two rows - one for the headers (labels) and one for the content.
The headers cells are placed within the HTML header cell tag <th><\th>.
The body columns between the html regular cell tag <td> <\td>.
Each column represents one merge field with its header (title) and content.
Note: It is very important that there as exactly as many header cells as
regular cell tags; the order must be consecutive. The first <TH> will be
paired to the first <TD> and so on. There is no check if the sets of data
(Header vs. Detail) are meant to be together.
Adding a field
The following example demonstrates adding the address of query 4 to the Customer address:
1. Add the field to one of the existing queries or add a new query in the query part,
and then click SAVE.
2. Add a title in the first row of the table of the HTML part using <th>ADDRESS</th>
3. Add the content in the second row in the same order as the title field using the
expression {field 4.address}, this refers to the field address of query 4, and then
click SAVE.
4. Run the HTML report from Reports Menu, enter an existing Group ID and an
existing CONF_XADR_ID on the parameters dialog and verify that the output is
correct.
5. Execute the word report to which the main report is linked to make sure the
main.html is created in the cache with the new field . Edit the word report, the
field with title address can now be inserted from the merge fields.
Word Merge
81
The SQL part of a main HTML report
82
Word Merge
HTML section of main.HTML
Executing the word merge report
Running word reports from the print menu of any module is identical to running reports created
with the internal editor, crystal or HTML reports except for the display of the WORD EDITOR
window.
Word Merge
83
The WORD EDITOR window ensures that the Word document is opened maximized on top of all
other open windows and that Suite8 is not accessible until the word document is closed. The Word
Editor window acts independently of any other word document which might be open before the
execution of a word merge report.
In the event that Microsoft Word hangs and that the document cannot be closed then ALT+F4 can
be used to close the Word Editor window.
Note: It is important to be aware that Suite8 is not accessible when the
word document is open.
How does the execution of a word merge report work
Select the required word merge template report in the confirmation screen, then click the PRINT
or PREVIEW button.
Suite8 creates the linked HTML reports in the cache directory of the Suite8 programs directory.
Suite8 opens the word document and activates the macro.
The macro then returns the data of the main.HTML and inserts it in to the merge fields.
Then all the linked HTML reports parts are inserted from the cache directory and produced on
the word document.
Microsoft Word and HTML
Sometimes Word does not always respect the rules of HTML and the result in word can be slightly
different than the output when executing the HTML reports directly in a browser. Some newer
HTML syntax is not understood by MS Word and some of the more advanced HTML or CSS
syntaxes might be interpreted incorrectly. In the Tips section some of the limitations are indicated.
Fonts used in the sample word templates
CCM Contract Headers uses the font LTWIESBADENSWING in word.
Depending on your word version this font might not be available and should be
changed as required.
75401 Contract with rooms 2 (WM) report uses the font CORPOS.
This is not a standard word font.
Tips
In the samples provided most of the HTML reports have comments.
HTML Section
Place comments directly next to the fields and not under the fields; Word sometimes interprets
it as a carriage return.
84
Do not put characters as < > in the comments.
Word can only interpret one CSS class; referring to two classes will not work.
The right padding of the cells of a table does not function properly when inserting the HTML
in word.
Therefore the right padding has been added directly in the HTML.
For example <th style="padding-right:5px; width:16%;" class="right">{field 9.TTR_Rate}</th> on
the event details report.
Word Merge
HTML measurements - measurements can be expressed in pixels, PT, % and cm.
PX - pixel is the smallest and most correct measurement.
PT - can be used for fonts
% - can be used in tables when a column or cell has to be a specific size, e.g. 10% of the table.
A length expressed in the absolute units, such as CM, MM, IN, PT and PC in the HTML
measurements appear as exactly that size.
SQL Queries
The HTML report queries use mainly the Suite8 Internal Editor views; they are inserted
automatically when creating a new HTML report.
Several views and functions are provided with the release of Suite8 Version 8.9.4.1 for better
reflection and presentation of data
Number the queries by using comments such as -1-
Queries are only executed when called in the HTML part using the commands RUNQUERY and
RUNSUBQUERY.
Adding a query which is not executed in the HTML part will have no have impact on the
performance.
To enhance performance only specify the fields that you need when referring to large views,
instead of using SELECT * FROM.
Create all the queries in Toad or another SQL tool and test them before pasting in to the query
section of the report.
Use the formatting and other Suite8 functions to format fields of views rather than creating
views with those functions.
See Appendix E - Suite8 Scripting and functions
Word Features such as Pictures, Logo's and Shapes
There are many tools available to compress pictures with almost no loss of quality, before inserting
them in the document.
Using Microsoft Picture Manager, provided with a standard Office Installation, pictures can be
compressed for Web pages. In the example below the picture was compressed for Web pages and
was reduced from 630 to 25 KB.
However, be careful when inserting pictures to not to create large files; it is important to not send
large PDF or Word documents to your customers. In addition, the Oracle database tables should
not be overloaded with oversized files.
There is no limit on the file size, however, we recommend staying under 1 MB when configuring
the word templates.
Word Merge
85
Note: When starting to use word merge in a new installation it is
important to verify with the customer the font and font size to be used
for their correspondence. The CSS and Word document template (all
styles) should be adjusted accordingly BEFORE starting to configure.
Word Merge for HTML email body
Word merge reports can be defined to be sent as HTML body text when sending a confirmation by
email.
The example word merge report 75402 CONTRACT WITH ROOMS 2 (EMAIL BODY) (contract Letter
including rooms sent with email attachment and email subject and body) is provided with the
release of Suite8 Version 8.9.5.0 in the reports.zip.
86
Word Merge
In the report configuration when defining the report the Email sending preference can be defined
As Body or As Attachment; by default As Body is selected for all reports.
For example; reports such as '730900 Confirmation Individual Changes (WM)' and '75400 Contract
with rooms 1 (WM)' would be set with the Email sending preference AS ATTACHMENT as these are
letters which are normally attached to the email. A report such as '75402 Contract with rooms 2
(Email body') would be set with the Email sending preference AS BODY as this would normally be
sent as HTML body in the email.
Note: Any existing NON word merge letters which are sent most of the
time as an attachment should be adjusted toAS ATTACHMENT.
Restrictions:
Word functionality is used to convert the documents to HTML, however, Microsoft Word does not
support HTML 5 or CCS 3 syntax, therefore the following restrictions apply:
No possibility to use text boxes.
Pictures must be placed inside tables.
Use one header & one footer; there is no possibility to use different headers and footers.
Note: The update script to 8.9.5.0 will ensure that all existing word
merge reports are defined AS ATTACHMENT.
Word Merge
87
Printed Examples
In the Demo Database there are the following examples:
88
CCM Booking (1316) - with Deposits, Billing Instructions, Packages, individual
Reservations; Groups and Blocks
Word Merge
Contract with rooms via email (75402)
Word Merge
89
90
Group Reservation (1208) - demonstrates the concept of having two sections, one for the
group reservation and one for picked up reservations
Word Merge
Block Reservation (DEMO1013) - demonstrates the concept used for blocks; the sample
report uses only one grid which groups picked upand non-picked upreservations together
Word Merge
91
92
Word Merge
Party Reservation (3778) - displays a nice example of a PMS party reservation confirmation
letter
Word Merge
93
Message Template (1024)- to be checked under Reports by entering the Message ID
via REPORTS run the 73620 Message Template with message_id 1024 to display an example of
what can be done in word.
Translation
All HTML reports are completely translatable. The query sections contain a query for static text in
each report using the function V8_REP_STATICTEXT.
v8_rep_statictext('Adult', :CONF_WLAN_ID ) TTR_Adult,
The static text used in HTML reports is not linked with a specific report but can be translated via
the option GENERAL under Setup → Configuration → Miscellaneous → Report Translation. The
GENERAL option displays all existing translations in the database; you can search for a specific
string andyou can add a string and complete the translation.
The HTML reports using Suite8 features are translatable, however, the word document has to be
created per language. When you need to create a template per language you should link exactly
the same HTML reports.
94
Word Merge
Most of the translated fields used in the sample HTML reports are detailed in Appendix F Translated Static Fields.
Appendix A - The Macro
The macro consists of Visual Basic code with the following functionality:.
Reads the main data source (main.HTML) when opening the word document.
Inserts the data to the merge fields in the Word document from the main data source
When executing or editing the Word Merge Report, the macro will first locate the file MAIN.HTML
and select all content of the file (select *).
This is completed each time a report is edited in Word from the Suite8 Report Menu or when
running the Report from Print dialog boxes in the Modules. The Procedure EXECUTEMERGE(), is
activated and returns data from the MAIN.HTML to the corresponding merge fields.
The Macro then looks for the placeholders where the output of the section reports is inserted, such
as <<EVENTDETAILS>> and then replaces this with the content of the file
EVENTDETAILSXXX.HTML (xxx is the booking- or reservation_ id). The names of the file or the
placeholders are freely definable, however, the file name has to be identical to the file name
specified in the Macro.
An unlimited number of sections can be added to the macros:
Word Merge
95
V8MERGEMODULE MACRO - indicating the Merge fields and HTML Parts Reports:
96
Word Merge
Appendix B - V8WordMerge.CSS
The CSS file contains the general formatting of the HTML sample reports, it is located in the HTML
directory and must be present on all workstations where word merge will be used.
When changing the CSS file, a copy must be made, so as not to be overwritten when applying an
update of Suite8.
If a new CSS is created or the original CSS renamed then all references to the CSS in the HTML
reports will have to be changed.
Guidelines for creating or changing a CSS file:
Start with basic defaults for the HTML elements, for example, the font size required
Add some general classes which can be used for any HTML element in your HTML reports,
such as, alignment.
Start with specific classes, for example, different table style classes.
Document your classes for support purposes.
For all styles configured in the CSS file see Appendix G - Tables styles used in the CSS file
Word Merge
97
Appendix C - Sample Reports in Demo Database
Section
Sub Section
Type
Report
Report Name
Parameter to test
7309
73090
Word
730900 Confirmation Individual Changes (WM)
FCR_PMS_730900_Confirm_Ind_Chg
CONF_YRES_ID
Word
730901 Confirmation Individual Details (WM)
FCR_PMS_730901_Confirm_Ind_Det
CONF_YRES_ID
Word
730902 Confirmation Party (WM)
FCR_PMS_730902_Confirm_Party
CONF_YRES_ID
Html
7309000 Confirmation Main
FCR_PMS_7309000_Confirmation_Main
CONF_YRES_ID
Html
7309001 Reservation Changes
FCR_PMS_7309001_Reservation_Changes
CONF_YRES_ID
Html
7309002 Reservation Details
FCR_PMS_7309002_Reservation_Details
CONF_YRES_ID
Html
7309003 Party Details
FCR_PMS_7309003_ Party_Details
CONF_YRES_ID
73091
Word
730910 Confirmation Group (Wm)
FCR_PMS_730910_Confirmation_Group
CONF_YGRP_ID
730910
Html
7309100 Confirmation Group Main
FCR_PMS_7309100_Confirmation_Group_Main
CONF_YGRP_ID
Html
7309101 Group Details
FCR_PMS_7309101_Group_Details
CONF_YGRP_ID
73092
Word
730920 Confirmation Block (Wm)
FCR_PMS_730920_Confirmation_Block
CONF_YBLH_ID
730920
Html
7309200 Confirmation Block Main
FCR_PMS_7309200_Confirmation_Block_Main
CONF_YBLH_ID
Html
7309201 Block Details
FCR_PMS_7309201_Block_Details
CONF_YGRP_ID
7392
Html
73920 Signature User
FCR_PMS_73920_Signature_User
NONE
754
Word
75400 Contract with rooms 1 (WM)
FCR_CCM_75400_Contract_Rooms_1
CONF_YBOM_ID
.
Word
75401 Contract with rooms 2 (WM)
FCR_CCM_75401_Contract_Rooms_2
CONF_YBOM_ID
7541- 7543
HTML
75410 Contract Main
FCR_CCM_75410_Contract_Main
CONF_YBOM_ID
HTML
75411 Event Details 1
FCR_CCM_75411_Event_Details_1
CONF_YBOM_ID
HTML
75412 Event Details 2
FCR_CCM_75412_Event_Details_2
CONF_YBOM_ID
730900
754
98
Word Merge
736
HTML
75420 Rooms Individual
FCR_CCM_75420_Rooms_Individual
CONF_YBOM_ID
HTML
75421 Rooms Groups
FCR_CCM_75421 Rooms_Groups
CONF_YBOM_ID
HTML
75422 Rooms Blocks
FCR_CCM_75422_Rooms_Blocks
CONF_YBOM_ID
HTML
75430 Deposits
FCR_CCM_75430_Deposits
CONF_YBOM_ID
7362
Word
73620 Message Template (WM)
FCR_PMS_73620_Message
MESSAGE_ID
73620
HTML
736201 Messages Main
FCR_PMS_736201_MESSAGES_MAIN
MESSAGE_ID
HTML
736202 Message Details
FCR_PMS_736202_Message_Details
MESSAGE_ID
Appendix D - Naming Conventions
This is the naming convention used in the Demo Database.
Used in
Convention
main.HTML
reports (Merge SP_XX
fields)
TR_
Example
Description
SP_LETTERUSER
SP_HOTELNAME
Parameter fields. Whenever we used a parameter
field to be used as a merge field we use its
parameter name
TR_FUNCTIONTYPE
Translated data fields from database.
TR_ROOMTYPE_DESC
TR_ARRIVAL
TR_PRINT_DATE
The field takes the translation if translation is
available in the configuration of Suite 8 or
translated during the booking process.
A V8 function is manipulated the field.
Translated static text.
TTR_
File names
(linking of
reports)
Word Merge
TTR_Adult
TTR_Arrival_Date
xxx.HTML
main.HTML
xxx<ID>.HTML
eventdetails<ID>.HTML
The field takes the translation of the static text, if
available. The field show exactly what will be
returned separated with “_.” EG : TTR_Adult will
return the translation of Adult. TTR_ADULT will
return the translation of “ADULT”. (All uppercase)
File names always in lower case.
99
xxx<ID>.mHTML
Sections in
word merge
reservationdetails<ID>.HTML
<<EVENTDETAILS>>
<<XXXXXX>>
<<RESERVATIONDETAILS>>
<<GROUPDETAILS>>
Sections names between << >> and always upper
case.
Field no format
Numeric fields
Field name view or
in queries part
table.
HTML report
TOT_NET_REV
Field formatted using
V8_FNC_NUM_TO_CHAR_FORMATING()
FTOT_NET_REV
FCTOT_NET_REV
Field formatted using
V8_FNC_VALCURR_FORMATING()
Appendix E - Suite8 Scripting and Functions
Some functions used in the queries were added or modified.
Some scripting functions were added for the HTML part of the report.
Scripting is referred to when using functions of code provided by Suite8 in the HTML part.
Some views and functions were added or modified to better support the word merge reports.
All SQL functions are documented in the function itself.
Most common Suite8 Scripting and Functions
100
Section
Function /Scripting
Use
SQL queries
V8_FNC_NUM_TO_CHAR_FORMATING()
Format of numbers, decimals
V8_FNC_NUM_TO_CHAR_FORMATING()
Format of number, decimals with currency.
V8_FNC_REPLACE_NONHTML()
Replaces or strips carriage returns in the result of
existing functions with its HTML equivalent. Eg if
the address field of a view contains chr(13), chr(10)
the function will replace it with <br> to have the
address aligned correctly.
v8_rep_translatedate()
Translates a date field in the appropriate format.
Similar to TranslateDate() in internal editor.
Word Merge
V8_FNC_CCM_MENUITEM_QUANTITY()
Returns the quantity of a menu item if different
then the quantity of the menu. The parameter DIFF
offers the possibility to have the quanity followed
by the “x” sign.
wtrl_translate()
To translate data
V8_REP_STATICTEXT()
Translation of static text.
This function returns the translation of a given field
of a given table.
V8_FNC_WTRL_Translate()
It can be used in Functions. Views are directly in
the queries of the HTML Reports.
The function is already prepared for 8.9.5.0 where a
new translation user interface will be implemented.
Please refer to the comments in the function for
more details
Returns the salutation and letter greeting according
the provided wlan_id.
V8_FNC_XCID_TRANSLATE()
This function is very useful in case of profiles
when, for example, the profile language is German
and the letter being sent is in English.
See FCR_PMS_7309000_Confirmation_Main for an
example of the use of this function
V8 Scripting
Word Merge
{file V8Wordmerge.css}
.file : locates the file in the HTML directory. Used to
locate the css file.
{runquerywithautoparameters 1}
Runs query xx with one of the parameters available
in the report setup.
{runsubquery 2.1.ygrp_id}
Runs query number 2 where the main query is
query number 1 and the parameter is field ygrp_id
from the main query number 1.
{runsubquerywithautoparameters 6.5.YEMN_ID}
Gives the possibility to use 2 parameters in the
query. One auto parameter (from the report
101
configuration) and one parameter from the main
view. In our case the field yemn_id from query 5.
{if({field 3.NOTESFLAG})>(0)}XXXXX{\if}
Condition using if. Please have a look at the
samples for more examples of if, else
{if}does not support and or or
{dif ({parameter CONF_XCMS_ID}>0) and
({parameter CONF_GREETINGTYPE}=1) and
('{field 1.LETTGREET}'<>'')} {field
1.FAM_LETTGREET_LASTNAME},{/dif}
Condition using dif. Please have a look at the
samples for more examples of dif, else.
{dif} supports also and or or
Start looping over all records of query 2.
Attention the execute statement of the query must
be specified before the forall.
{forall 2}
{/forall}
{signature?parameter={parameter SP_USER_ID}}
When you need to loop over the records of a
subquery within a loop of a query, you must first
specify the forall of the main query and within this
forall run the subquery and then do a forall of the
subquery. See FCR_CCM_75411_Event_Details_1
and 2 for examples.
Returns the signature of the user configuration
equal to the user parameter supplied. See
FCR_PMS_73920_Signature_User
Appendix F - Translated Static Fields
102
Translated Static Field
Field
v8_rep_statictext('Accommodation', :CONF_WLAN_ID )
v8_rep_statictext('Adult', :CONF_WLAN_ID )
v8_rep_statictext('Adults', :CONF_WLAN_ID)
v8_rep_statictext('Allotment Details', :CONF_WLAN_ID)
TTR_Accomodation
TTR_Adult
TTR_Adults,
TTR_Allotment_Details
Word Merge
v8_rep_statictext('Arrival', :CONF_WLAN_ID)
TTR_Arrival,
v8_rep_statictext('Arrival Date', :CONF_WLAN_ID)
TTR_Arrival_Date
v8_rep_statictext('Child', :CONF_WLAN_ID)
TTR_Child,
v8_rep_statictext('Children', :CONF_WLAN_ID)
TTR_Children,
v8_rep_statictext('Code', :CONF_WLAN_ID)
TTR_Code
v8_rep_statictext('Confirmation Nr', :CONF_WLAN_ID)
TTR_Confirmation_Nr
v8_rep_statictext('Daily Rate', :CONF_WLAN_ID)
TTR_Daily_Rate,
v8_rep_statictext('Date', :CONF_WLAN_ID)
TTR_Date
v8_rep_statictext('Departure', :CONF_WLAN_ID)
TTR_Departure
v8_rep_statictext('Departure Date', :CONF_WLAN_ID)
TTR_Departure_Date
v8_rep_statictext('Dear Sir, Madame', :CONF_WLAN_ID) TTR_Dear_Sir_Madame
v8_rep_statictext('End Date', :CONF_WLAN_ID)
TTR_End_Date
v8_rep_statictext('Food & Beverage', :CONF_WLAN_ID)
TTR_Food_Beverage
v8_rep_statictext('From', :CONF_WLAN_ID)
TTR_From
v8_rep_statictext('Group Details', :CONF_WLAN_ID)
TTR_Group_Details
v8_rep_statictext('Guest Name', :CONF_WLAN_ID)
TTR_Guest_Name
v8_rep_statictext('Miscellaneous', :CONF_WLAN_ID)
TTR_Miscellaneous
v8_rep_statictext('Nights', :CONF_WLAN_ID)
TTR_Nights
v8_rep_statictext('Packages', :CONF_WLAN_ID)
TTR_Packages
v8_rep_statictext('Payable by', :CONF_WLAN_ID)
TTR_Payable_by
v8_rep_statictext('Per Night', :CONF_WLAN_ID)
TTR_Per_Night
v8_rep_statictext('Pers', :CONF_WLAN_ID)
TTR_Pers
v8_rep_statictext('Reservation Status', :CONF_WLAN_ID) TTR_Reservation_Status
v8_rep_statictext('Reservation Changes', :CONF_WLAN_ID) TTR_Reservation_Changes
v8_rep_statictext('Reservation Details', :CONF_WLAN_ID) TTR_Reservation_Details
v8_rep_statictext('Room Rental', :CONF_WLAN_ID)
TTR_Room_Rental
v8_rep_statictext('Room Type', :CONF_WLAN_ID)
TTR_Room_Type
v8_rep_statictext('Room Number', :CONF_WLAN_ID)
TTR_Room_Number
v8_rep_statictext('Rooms', :CONF_WLAN_ID)
TTR_Rooms
Word Merge
103
v8_rep_statictext('Sincerely yours', :CONF_WLAN_ID)
v8_rep_statictext('Start Date', :CONF_WLAN_ID)
v8_rep_statictext('Status', :CONF_WLAN_ID)
v8_rep_statictext('To', :CONF_WLAN_ID)
v8_rep_statictext('Total', :CONF_WLAN_ID)
v8_rep_statictext('Total amount rooms', :CONF_WLAN_ID)
v8_rep_statictext('Total Overview', :CONF_WLAN_ID)
v8_rep_statictext('Total Stay Rate', :CONF_WLAN_ID)
TTR_Sincerely_yours
TTR_Start_Date
TTR_Status
TTR_To
TTR_Total
TTR_Total_amount_rooms
TTR_Total_Overview
TTR_Total_Stay_Rate
Appendix G - Tables styles used in the CSS file
Table 1 - Simple Table
Table 2 - Table with header background
Table 3 - Table with header and table background
104
Word Merge
Table 4 - Table with header background and navy blue font
Word Merge
105
Table 5 - Table with odd and even zebra effect and navy blue font
Table 6 - Simple table used in Event Details 2 for the food and beverage section with double border
Table 7 - Simple table used in Event Details 1 to display Miscellaneous and F&B items one below the other
106
Word Merge
Word Merge
107
13
How To's
The following provides information on how to set up or user various features in the system:
How to print multiple guest registration cards
1. Activate the parameter PRINT REGCARD PER MULTIGUEST.
2. In the option VIEW NAME FOR FILTERING GUESTS under Setup → Configuration → Global
Settings → Reservation → Reservation 3 tab enter the view
V8_SYS_GETMULTIGUESTFORREGCARD if the standard view should be used.
For Crystal Report templates use the parameter YRES_ID.
For Internal Editor Templates either the parameters RESERVATION_ID or YRES_ID can
be used, if YRES_ID is used it must be the first parameter listed.
How to configure short message sending
Short message sending allows sending short messages for example for advising a
guest per short message that the reservation is confirmed or that the room is ready
for check in, sending birthday wishes or newsletter alerts via short message from the
profile or informing maintenance employees about new or reminding them of
maintenance tasks to be completed.
This feature is available in both the Professional and Small Business Editions and is
controlled by the parameter SMS Sending under Global Settings→Interface4 tab. This
feature is released with Version 8.8.0.0.
Configuration
1. Activate the parameter: Enable SMS Sending and enter the service provider
information under Global Settings→Interface 4 tab. Currently Clickatell is the
only supported gateway for short message sending. Clickatell's SMS gateway
enables any application, website or system to send mobile messages globally via a
variety of connection options. A valid user name and password as well as the API
key have to be configured for this gateway.
2. If a Clickatell Sender ID should be send, it has to be entered in the field Hotel
Mobile Phone on the Generic 1 tab under Global Settings.
How to get a Clickatell account
Step 1 - register for a Clickatell account
If you do not already have a Clickatell account, you need to register for one as per
below. Otherwise proceed to Step 2.
• Go to http://www.clickatell.com/products/sms_gateway.php, and choose the
appropriate API sub product (connection method) you wish to use.
• Click on the registration hyperlink
• Fill out the registration form
After successfully submitting the form you will automatically be logged into your
new account and taken to a page where you can add your chosen API connection.
Step 2 - add a registered API connection (sub-product)
If you are not already logged into your account, then you must do so at
http://www.clickatell.com/login.php
• Select Manage my Products from the top menu.
• Select the API connection type you wish to use from the drop down menu (Add
Connection).
How To's
109
• Complete the form.
If you register more than one API connection, the description name you enter for
each must be unique - you cannot have multiple APIs with the same name.
After successfully submitting the form, your authentication details will be
displayed, including each connection's unique API ID (api_id). These
authentication details are required when connecting to the Clickatell gateway to
send a message.
Note: For more information on managing your API connections within your
Clickatell account see our API guide at
http://support.clickatell.com/guides/clickatell/api_guide.php.
Fidelio Server
Start SMS Sending
Maintenance tasks
1. On the maintenance type definition, it is configured if an automatic short message
and if a reminder short message is send for the task. The priority of the task is
defined under due minutes. Reminder cycles for the short message sending are set
in the fields before minutes and after minutes
2. When selecting the task and choosing SMS log, all information about the
recipient’s number, the date sent and the last attempt is displayed
3. Selecting Details displays all details and allows sending the short message again.
4. Start Maintenance Reminder on the Fidelio Server
Configuring short message sending for confirmation letters
Short messages can be send to inform the guest that the room is ready for check in or
for sending a reservation confirmation number.
1. Create a, templates with the role confirmation letter under
Miscellaneous→Reports. The characters used should not be more than 160 for
the short message.
2. The defined template can then be selected under Confirmation Letter.
3. When pressing SMS button the template is opened and can be changed.
4. Pressing Send button sends the short message.
Configuring short message sending for Profiles
Short messages sending to any guest profile via correspondence is possible.
1. Create a template for each short message purpose with the role profile letter
under Miscellaneous→Reports.
2. The template can then be selected under Correspondence from the Customer
Profiles Navigator.
3. When pressing SMS button the short message text is displayed and can be
changed
4. Pressing Send button sends the short message
110
How To's
Configuring short message sending for Messages
To use short message sending for message, a template for the short message sending
needs to be defined under Reports using Internal Editor. The characters used should
not be more than 160 for the short message. The template is then selected under
Global Settings->Reservation1 tab.
1. Create a template for each short message purpose with the section role Message
under Miscellaneous→Reports.
2. The template is then selected under Message SMS Template under Global
Settings→ Reservation1 tab.
3. Under Configuration→ CRM→ Communication Types, the communication types
for mobile phone need to be identified as such by selecting the field Mobile
Phone when editing the communication type.
4. When entering a message and selecting a profile with a communication type
marked as Mobile Phone, the SMS button can be pressed to display and change
the text of the message.
5. Pressing Send button sends the short message.
Crystal Runtimes
With Fidelio Suite8 Version 8.8.4.0 support for Crystal.net runtimes has been added. Crystal
Runtimes 12 SVP2 is required on all clients running Fidelio Suite8. The file FidelioCrystalNET.dll
in the Fidelio Suite8 program directory, supplied with this version, covers these requirements and
need to be registered using the Assembly Registration Tool (Regasm.exe) which is automatically
performed when starting Fidelio Suite8 once logged on to Windows with Administrative Rights.
Note: For XML-IFC workstations the Regasm.exe needs to be executed
with the additional parameter '/codebase', if Crystal Reports are used)
or starting Suite8 once as Administrator on all workstations not used
as XML-Interface. The register.bat shipped with this release has been
also adapted to include the registration of the new Dll, however it
needs to be modified for XML-Interface PCs.
Additional information:
The registration key for FidelioCrystalNET.dll is stored in the following directory of the
registry: HKEY_CLASSES_ROOT\FidelioCrystalNET.CrystalNET
The following error message will occur when printing a report and the FidelioCrystalNET.dll
is missing, not properly registered or Crystal Runtime 12 SP1 instead of SP2 are used:'The
system cannot find the class specified, ClassID: {02373E95-5F6C-307E-AE98-EC92F2B13F2D}'
How to activate email validation
Functionality is available in Fidelio Suite8 to use a public web service in order to validate the email
address's entered on a guest profile.
The parameter VALIDATE EMAIL ADDRESS has to be activated and the EMAIL VALIDATION URL
completed.
The third party public web service which has been used for testing is called VALIDATE EMAIL
and the web service URL is: http://www.webservicex.net/ValidateEmail.asmx
Note: As this service is a third party product MICROS-Fidelio
(Ireland) Ltd. shall not be liable for errors contained herein or for
incidental or consequential damages in connection with the
furnishing, performance, or use of this service.
How To's
111
When entering the email address on the profile the address is automatically validated;
Valid email address's are highlighted in green
Invalid email address's highlighted in red.
The option EMAILS BATCH VALIDATE may be used to validate all the existing
profile email address's in the database.
How to run Email Batch Validate
1. Click MISCELLANEOUS from the SETUP drop-down menu and then SYSTEM MAINTENANCE.
2. On the System Maintenance menu click CRM.
3. Click EMAILS BATCH VALIDATE on the CRM menu to display the Emails Batch Validate
dialog box.
The number of NOT VALIDATED, VALID and NOT VALID email addresses are displayed.
4. Click START to start the validation process.
112
How To's
5. Click CLOSE to close the dialog box.
Note: The procedure will stop if, for example, invalid text such as a
telephone number has been entered in the email communication type.
Email validation functionality is controlled by the parameter Validate Email Address
and the completion of the Email Validation URL under Setup → Configuration →
Global Settings → Profile → Profile 2 tab.
XML Export for VEOS from CST
CST International is a provider of video enhanced online surveys - VEOS for short. Video
enhanced online surveys provide the properties with the opportunity to exhort, enthuse and
explain on the same screen as the survey itself.
With VEOS the video appears to the left of the screen while the survey is running on the right; the
video can be paused, restarted or replayed.
XML Export for VEOS from Fidelio Suite8 is based on an XML Report using scheduled tasks.
Fidelio Suite8 Requirements
An HTML report has to be created and the file VEOS_IFC.qry imported - Create Report.
A hotel identifier has to be added to the global settings hotel information tab under Generic
Hotel Info 5.
A new scheduled task configured under Scheduled Tasks.
Setup
Copy the files VEOS_IFC.QRY and VEOS_IFC.XML to the HTML directory; the files can be obtained
from your Fidelio Suite8 Support contact.
Create HTML Report
1. Click the MISCELLANEOUS menu and select REPORTS or press CTRL+SHIFT+R.
2. Create a new or use a report section with the Source Type HTML REPORT.
How To's
113
3. Create a new report in this section with the name: V8 XML EXPORT VEOS IFC.
4. Select NEW BINARY.
5. Import the file VEOS_IFC.QRY.
6. Save the report.
7. On the Report File tab enter the date parameters: FROMDATE and TODATE.
8. On the Report tab define the default value with SYSDATE – 1.
Add the hotel identified to Global Settings
1. Click the SETUP menu and select CONFIGURATION.
2. Select GENERIC from the GLOBAL SETTINGS menu and then select GENERIC HOTEL INFO.
3. Click ADD KEY and enter the hotel identified name VEOSEXPORTHOTELID in the User
Defined Setting field.
4. In the VALUE column enter the Hotel Identifier provided by the VEOS system; in
the following example, the identifier ABC is used.
Create the scheduled task
1. Click the SETUP menu and select CONFIGURATION.
2. Select SCHEDULED TASKS from the MISCELLANEOUS menu.
3. Create a new scheduled task; the FTP Configuration and File Name must be
adapted to the provided ftp connection details and the Result File Name must be
changed to replace ABC with the proper Hotel Identifier:
114
How To's
Running a manual export
1. Click the SETUP menu and select CONFIGURATION.
2. Select SCHEDULED TASKS from the MISCELLANEOUS menu.
3. Selecting the task and click the EXECUTE button; if the export should run for a
specific date range, click the PROMPT RUN button and complete the dates.
How To's
115
Note: This functionality is available for CST International, a provider
of video enhanced online surveys.
Note: A full description of the setup is available in the document
Fidelio Suite8 XML Export-VEOS.PDF.
Signature
A signature can be defined per user and can then be added via the Internal Editor to emails and
correspondence.
Signature functionality requires the following:
The user signature in graphic format; jpg, bmp or XCED.
The signature graphic linked to the user name in the configuration.
The addition via the internal editor of the function Signature([userID]) to the relevant
document.
Signature functionality can be defined for the logged in user or for a specific type of user id, such
as the conference manger or responsible employee. (Selected from the Data Source).
If the same signature is to be used on the document, for example, the signature of the General
Manager, then the scanned signature should be placed directly in the document and not via the
signature function.
How to define a user signature
1. On the SETUP menu select CONFIGURATION to display the configuration options.
2. Click USERS and then select USER DEFINITION.
3. Select the required user and click EDIT to display the User Definition screen.
4. Click the SIGNATURE button.
If there is already a signature attached then this will be displayed in the internal
editor.
5. To attach a signature click GRAPHIC (EMBEDDED) or GRAPHIC (LINKED) on the INSERT
menu.
6. Locate the required signature graphic and click OPEN.
116
How To's
The signature graphic is inserted into the document.
7. Click SAVE on the File menu to save the document.
8. Click CLOSE on the File menu to exit the Internal Editor screen.
How to add the signature of the logged in user to a document
1. Click the MISCELLANEOUS menu and select REPORTS or press CTRL+SHIFT+R.
2. Select the report template to which a signature is to be added and click the EDIT
button.
3. Click the REPORT FILE tab and then click the EDIT button to display the report in the
Internal Editor.
4. Place the cursor in the required location on the report and then select the function
button from the toolbar.
The Insert Field dialog box is displayed.
5. Expand the FUNCTIONS tree and double-click the function SIGNATURE to select it.
How To's
117
An explanation of the signature function is displayed in the top right hand side.
6. The function DESCRIPTION is the text that is displayed in the report template.
The description can be changed to a name that is easily recognisable, for example,
SignatureLoggedInUser, SignatureConfMgr or SignatureRmsMgr.
7. Click OK to insert the function into the document, for example, here we changed
the function description to UserSignature.
8. Click SAVE on the FILE menu to save the document.
9. Click CLOSE on the FILE menu to exit the Internal Editor screen.
10. Click OK to save the changes and exit the Report Edit screen.
11. When the report is run the user signature will be displayed as follows:
118
How To's
How to add the conference managers signature to a document
1. Click the MISCELLANEOUS menu and select REPORTS or press CTRL+SHIFT+R.
2. Select the report template to which a signature is to be added and click the EDIT
button.
3. Click the REPORT FILE tab and then click the EDIT button to display the report in the
Internal Editor.
4. Place the cursor in the required location on the report template and then select the
function
button from the toolbar.
The Insert Field dialog box is displayed.
5. Expand the FUNCTIONS tree and double-click the function SIGNATURE to select it.
By default the signature function takes the logged in user, in order to take another
user the appropriate field must be selected.
6. Expand the DATA SOURCES tree and select BOOKING which is where the link to the
booking users are stored.
7. In the selected SIGNATURE function highlight [userID].
8. Double-click YBML_CONF_XCMS_ID to select the field for the conference manager
user id, the function now looks like this:
Signature(BOOKING.YBML_CONF_XCMS_ID)
9. The function DESCRIPTION has been changed to Signature_ConfMgr in order to be
more recognisable.
10. Click OK to insert the function into the document.
How To's
119
11. Click SAVE on the FILE menu to save the document.
12. Click CLOSE on the FILE menu to exit the Internal Editor screen.
13. Click OK to save the changes and exit the Report Edit screen.
14. When the report is run the conference managers signature will be displayed as
follows:
User Signature Examples
Module
User
Suggested Function
Description
Field
CRM
Logged In User
SignatureLoggedInUser
Signature()
Tasks &
Activities
Logged In User
SignatureLoggedInUser
Signature()
Responsible
Employee
SignatureRespEmp
Signature(ACT.EMP_XCMS_ID)
Logged In User
SignatureLoggedInUser
Signature()
CCM
120
Conference Manager SignatureConfMgr
Signature(BOOKING.YBML_CONF_XCMS_ID)
Rooms Manager
Signature(YBML_RMS_XCMS_ID)
SignatureRmsMgr
How To's
How to setup lost & found
Lost and found functionality may be used to record, track and match lost & found items and is
accessible via the FRONT DESK menu. Users are also able to enter any actions which are taken on
the lost & found items.
This option is parameter controlled and only available in the Professional Edition.
Lost & Found functionality requires the following setup:
Activation of the parameter LOST & FOUND under Setup → Configuration → Global Settings →
Generic → Generic 3 tab.
Definition of a NUMBER CYCLE with the type LOST AND FOUND NUMBERS under Setup →
Configuration → Cashiering. A number cycle is required in order to automatically assign a
number to a found item.
Linking of the defined number cycle via the option LOST & FOUND NUMBER CYCLE under Setup
→ Configuration → Global Settings → Generic → Generic 3 tab.
Assignment of rights under Setup → Configuration → Users → User Definition → Rights →
Lost & Found for the users who should access LOST & FOUND and/or ITEMS and ACTIONS from
the Front Desk menu.
Definition of ACTION CATEGORIES under Setup → Configuration → Miscellaneous → Lost &
Found. Action Categories are used to define actions taken on lost, found or both objects, such
as Informed owner as an action taken on lost items or Handed to Lost & Found as an action for
found items.
Definition of GROUPS under Setup → Configuration → Miscellaneous → Lost & Found. Groups
are used to order lost & found objects, either by department where the item was lost or found
or by item group, such as personal items, clothes, shoes or miscellaneous items.
Changes to lost and found actions are displayed in the user log if the options LOST AND FOUND
ACTION DELETE, NEW and UPDATE are selected under Configuration → Setup → Users → User
Log → Lost & found.
Changes to lost and found items are displayed in the user log if the options LOST AND FOUND
ITEM DELETE, NEW, RESOLVE, UNRESOLVE and UPDATE are selected under Configuration →
Setup → Users → User Log → Lost & found.
How to use myTaxi
The ordering of a taxi via the myTaxi application is available in Suite8 from the Reservation Details
HTML on the Reservation Navigator.
myTaxi requires the following setup:
Activation of the parameter USE MYTAXI INTERFACE under Setup → Configuration → Global
Settings → Interfaces → Interface 6 tab.
Each hotel has to register on the myTaxi site; click the REGISTER ON MYTAXI button; a message is
displayed to confirm the registration.
How To's
121
How to book a taxi
1. Click RESERVATION from the coloured shortcut bar and then click RESERVATION.
2. On the Reservation Navigator locate and point to the required reservation.
The RESERVATION DETAILS are displayed in HTML format in the lower part of the
screen.
3. Click the
button.
The myTaxi online booking form is opened in the web browser.
4. Complete the details and click ORDER to order a taxi.
122
How To's
How to set up a returnable item
A returnable item is one which is lent to the guest and must be returned before the guest leaves the
property. Depending on the item being lent a deposit may be required and a fee may be charged if
the item is not returned.
For example, properties which sell a golf package may also have golf equipment available for the
guest to rent subject to a deposit. This functionality is parameter controlled.
Key Points for returnable items
Fidelio Suite8 uses package functionality to handle returnable items.
A returnable item can be defined so that a deposit is required, this is then posted automatically
when the guest receives the returnable item and refunded automatically when the item is
returned.
The deposits posted and returned are according to the number of returnable items taken and
returned. If an additional item is taken then another deposit is posted.
A 'No-Return Fee' can be defined which is charged if the item is not returned.
Possibility to not to post a charge on the folio if the charge is zero. If no deposit or return fee is
defined or if the amount results in zero, then nothing is posted on the invoice of the guest.
Upon check-in a message is displayed asking if the guest has received the returnable items; the
check-in cannot be completed until the guest has received the items.
Returnable items are indicated by an indicator on the reservation screen; if the indicator is
colored red then the returnable item is currently with the guest.
Upon check out a message is displayed asking if all items have been returned; the check out
cannot be completed until all returnable items have been returned or marked as lost.
Returnable items can be returned during the stay or at the time of departure. If not returned
then the item can be marked as lost and if a no-return fee is configured then a charge is posted.
Returnable items can be marked as lost during the stay or at the time of departure. The ret/lost
button on the package grid lets you set returned/lost items at any time.
Returnable item functionality requires the following:
Activate the parameterRETURNABLE ITEMS under Setup → Configuration → Global Settings →
Reservation → Reservation 4 tab.
Assign a cashier via the option CASHIER NUMBER FOR DEPOSIT under Setup → Configuration →
Global Settings → Reservation → Reservation 4 tab. This cashier will be used to post the
deposit for the returnable item if the logged in user does not have an open cashier.
Define a package items as returnable by completing the MORE fields tab:
Charge a no-return fee - defines the fee if to be charged if the time is not returned.
Charge a deposit - defines if a deposit is required, the deposit amount is the defined fee if the
item is not returned and is posted on the specified department code.
Possibility not to post if it the charge is zero - if a deposit is posted and the item is then
returned resulting in a zero charge then nothing is posted on the invoice of the guest.
Assign the package item to the reservation via the PACKAGE GRID.
How To's
123
How to define a returnable item
1. On the CONFIGURATION menu click RESERVATIONS.
2. Click RATE MANAGEMENT and then select PACKAGES.
3. Click NEW to display the Package Elements screen.
4. Complete all the package fields as per the Package Edit table below.
5. Click the MORE tab and complete the fields as per the More tab table below.
6. If the item is considered an inventory item then click the INVENTORY tab.
7. Click NEW to display the Package Inventory dialog box.
124
How To's
8. Select the INVENTORY ITEM type, the CALCULATION TYPE and the NUMBER OF ITEMS; click
OK.
9. Click OK to save the package setup; the Detail configuration dialog box is
displayed.
10. Complete the START DATE and END DATE for the package.
11. Click SAVE to save the package dates.
12. Click on the package date range and enter the price as a flat rate or per
adult/child.
Note: If a package item is defined as an inventory item then a warning
message is displayed if no more items exist when booking the
package.
Field
Definition
Legal Values
Code
Code assigned to the package element.
Up to 3 alphanumeric
characters.
Description of the package element.
Up to 30 characters of text.
Folio Text
Text to be printed on the guest folio. Overrides what is
defined in the department code.
Up to 30 characters of text.
Department Code
Department code under which this element is posted,
such as dinner or breakfast.
Select from list box
Default Frequency
Indicates the posting rhythm, when and how often the
charge is posted; every night, just on the last night, only
on specific nights. See Frequencies
Select from list box
Show in
reservation
If true is selected then the package element is displayed
as available for selection on the manual package screen
of the package frequency tab on the reservation edit
screen.
Select from list box
Currency
Indicates the currency in which the package should be
posted.
Select form list box the defined
currencies.
(Required)
Description
(Required)
(Required)
How To's
125
Forecast method
This field is used for Reporting purpose. It declares how
the package is used and indicates the boarding types:
Select from drop-down list.
Normal - every day
Next Day - next day
Both- both, for example half board.
Report Group
Defines the package report group
Select from list box
Percentage
This option is only available if the flag PERCENTAGE
PACKAGES (DEFAULT VALUES) has been activated under
Global Settings → Reeservation2 tab. It defines if
packages will internally be split on a percentage level of
the rate code. The price entered per adult, child or flat
will then be used as percentage. For example if the price
on the package is 10 per adult and the rate code it is
linked to is 150.00, 10% (15.00) will be split from the rate
code and posted on the department code of the package.
Check: YES
Apply manual
price if entered
Defines if a manual rate is entered on reservation level,
this will be the base amount to calculate the package
price.
Check: YES
Add non perc.
packages to base
rate amount
Defines if packages configured with a price and no
percentage linked to the reservation will be included in
the percentage calculation. For example if a percentage
package is set up with 15%, the rate code it is linked to
with an amount of 150.00 and another package with a
price of 10.00 is linked to the reservation, the calculation
of the 15% will be based on an amount of 160.00. The
price of the percentage package will be 24.00.
Check: YES
Add fixed charges
to base rate
amount
Defines if the fixed charges will be included in the
percentage calculation. For example if a percentage
package is set up with 15%, the rate code it is linked to
with an amount of 150.00 and a fixed charge with a price
of 10.00 is added to the reservation, the calculation of the
15% will be based on an amount of 160.00. The price of
the percentage package will be 24.00.
Check: YES
Apply discounts to
base rate amount
Check: YES
Defines if calculation for discounts is included in the
percentage calculation. Discounts will be deducted from Blank: NO
the rate amount and the result will be the base for the
package calculation. For example if a percentage package
is set up with 15%, the rate code it is linked to with an
amount of 150.00 and a discount of 10.00 is given. The
package price will be 21.00 which is 15% of 140.00.
Deduct included
packages from
base rate amount
Defines if inclusive packages are subtracted from the
base price and the percentage calculation is on room
charge only.
Check: YES
Included
Indicates if the package will be included in the rate code
or added to the rate code.
Check: YES
Defines if the package will be excluded when calculating
a discount. If the No Discount parameter is selected then
entered discounts will only apply to the room charge.
Check: YES
No Discount
Blank: NO
Blank: NO
Blank: NO
Blank: NO
Blank: NO
Blank: NO
Blank: NO
Note: Not valid for packages configured as percentage
packages.
Print separate
Indicates if the package will be excluded from the rate
code and printed as a separate item on the folio.
Check: YES
Blank: NO
Note: If this option is selected then the allowance setup
for packages is not available.
126
How To's
Single per
reservation
Only available if the parameter PACKAGES PER GUEST is
activated, defines if the package is by default attached to
one guest only. However, the package can be linked
manually on the package screen when editing a
reservation.
Check: YES
Reduced Package
Amount with
Discount
Defines that the package amount (and not the rate
amount) will be reduced by the percentage discount.
Check: YES
Blank: NO
Blank: NO
This option applies only to percentage discounts entered
manually in the reservation edit screen or if a rate code is
marked as a Dependent Rate with a percentage value
applied.
Note: This option does not apply to percentage
promotion discounts.
Note: If the option NO DISCOUNT is selected then this
option is not available as the package is not discountable.
Allowance
An allowance is the amount the guest is allowed to
consume.
Check: YES
Blank: NO
Select this option if the package is to be setup with an
allowance; the allowance can then be configured on the
Allowance tab.
This option is only available if the parameter ADVANCED
PACKAGE HANDLING is active.
Field
Definition
Legal Values
Returnable
Defines if the package element is a returnable item.
Check: YES
Note: Only available if the parameter RETURNABLE ITEMS
is active under Global Settings → Reservation 4 tab.
Blank: NO
No-Return Fee
Defines the fee for the package item if it is not returned
Enter a charge for not returned
items
Deposit
Defines if a deposit is required for the item.
Check: YES
Blank: NO
Department Code
Defines the department code on which the deposit
and/or no-return fee is posted.
Select from list box.
Don't post zero
Defines if the charge results in zero it is not posted.
Check: YES
Blank: NO
Wellness
Defines if this package is available for Leisure bookings.
Check: YES
Blank: NO
Statistical Value
Defines a statistical value for the package. This may be
used, for example, to calculate covers for packages.
Numeric value of up to 30
digits with 4 decimal places
Suppress on Rate
Query
Defines if the package is displayed on the Rate Query,
XML Interface and Fidelio Suite8 Homepage.
Check: Package not displayed
Blank: Package displayed.
Note: This option is only available on packages not
defined as INCLUDED.
How To's
127
Board Type
Defines the board type for the package. Packages linked
to a board type are updated on the meal plan tab when
linked to a reservation. The following board types are
available:
Select from list box.
Breakfast
Half Dinner
Half Lunch
Full Board
All inclusive
Only Lunch
Only Dinner
How to book a returnable item
1. From the Reservation Navigator select the required reservation.
2. Click EDIT to display the reservation edit screen and then select the PACKAGE GRID
tab.
The package grid is displayed with any packages currently attached to the
reservation.
3. Click the ADD button to display the Package configuration screen with a list of
available packages.
128
How To's
4. Click the package name to display the package details in the column on the righthand side.
How To's
129
5. Select the required package from the list displayed and then click SELECT to add
the package to the reservation.
The package is displayed in the grid on the days for which it is valid; returnable
items are indicated by [r].
6. Click OK to save the package addition and close the reservation.
How to check in a guest with a returnable item
1. From the Reservation Navigator select the reservation to be checked-in.
2. Click the CHECK IN button.
If a returnable item has been assigned to the guest then a message is displayed.
3. Click YES if all the returnable items have been given to the guest.
The guest is checked in and any defined deposit is automatically posted.
Note: If the question regarding the returnable items is answered with
NO then the check-in process is cancelled.
How to mark a returnable item as returned or lost during a guest's stay
1. From the Reservation Navigator select the required reservation.
2. Click the EDIT button; an indicator is displayed if the guest has a returnable item.
A returnable indicator in red
when coloured grey
indicates that the item is with the guest;
this indicates that the item has been returned.
3. Click the PACKAGE GRID tab to view the packages attached to this reservation;
returnable item packages are indicated by [r].
130
How To's
4. Select the returnable package to be marked as returned or lost and click the
RET/LOST button.
A message is displayed asking if the returnable item has been returned by the
guest.
5. Click YES if the returnable item has been returned by the guest, otherwise, click
NO.
If NO is selected then a message is displayed asking if the returnable item has
been lost?
How To's
131
6. Click YES if the returnable item has been lost.
If a fee is charged for lost returnable items then this is posted automatically.
Manual packages with no frequency link which are no longer valid for any day of
the reservation are removed completely from the package grid.
Manual packages with a frequency link which are no longer valid for any day of the
reservation remain on the package grid; however, a message is displayed asking if
the package should be removed completely.
7. Click YES to remove the package from the reservation.
8. Click OK to save and close the reservation.
Note: Returnable packages cannot be removed without setting the
package as either returned or lost.
How to mark a returnable item as returned or lost on the day of departure
1. From the Reservation Navigator select the required reservation.
2. Click the EDIT button; an indicator is displayed if the guest has a returnable item.
Red indicates that the item is with the guest
Grey indicates that the item has been returned.
3. Click the RETURNABLE indicator to display a list of the returnable items attached to
this reservation.
A returnable item can be marked as LOST or RETURNED on this screen only if all the
package items have been posted and/or the guest is checking out today.
132
How To's
4. Select the returnable item to be marked as returned or lost.
5. Click the RETURNED button to mark the item as returned or click the LOST button to
mark the item as lost.
If the quantity of returnable items is greater than 1 then the user is asked to enter
how many items are being returned or marked as lost.
6. Enter the number of items and click OK.
The returnable item is updated with the date and time of return.
7. Click CLOSE to close the Returnables screen.
8. Click OK to save and close the reservation.
Note: On the Package Grid screen the package multiplier is not
available for due out reservations; partial return or loss can only be set
via the returnables screen.
How to increase or decrease the amount of returnable items
1. From the Reservation Navigator select the required reservation.
2. Click the EDIT button.
How To's
133
If a returnable item has been assigned to the guest then an indicator is displayed.
3. A returnable indicator in red
when coloured grey
indicates that the item is with the guest;
this indicates that the item has been returned.
4. Click the PACKAGE GRID tab to view the packages attached to this reservation;
returnable items are indicated by [r].
5. The number of returnable items can be increased or decreased by clicking the +1
and -1 arrows in the Multiplier/Price box.
6. To increase the number of returnable items click the +1 arrows and then click OK.
A message is displayed asking if all the returnable items have been taken by the
guest.
7. Click YES if all the returnable items have been given to the guest; the reservation
cannot be saved if this is answered with no.
134
How To's
8. To decrease the number of returnable items click the -1 arrow; a message is
displayed asking if the returnable item has been returned by the guest.
9. Click YES if the returnable items have been returned by the guest; this can only be
used to decrease but not remove completely the returnable item.
10. Clicking NO displays a message asking if the returnable items has been lost.
11. Click YES if the returnable item has been lost.
If a fee is charged for lost returnable items then this is posted automatically.
12. Clicking NO displays a message that the returnable package cannot be removed
without setting it as returned or lost.
13. Click OK to close the message
14. Click OK to save and close the reservation.
Note: On the Package Grid screen the package multiplier is not available for due out
reservations; partial return or loss can only be set via the returnables screen.
Returnable item functionality is controlled by the parameter Returnable items
under Setup → Configuration → Global Settings → Reservation → Reservation 4
tab.
A cashier number must be defined for deposits via the option Cashier Number for
deposit under Setup → Configuration → Global Settings → Reservation →
Reservation 4 tab.
How To's
135
How to setup mail import for exchange
This functionality may be used to manage emails sent to the property; often properties have an
email address such as info@property_name.com or reservations@property_name.com.
The reservation department may use this functionality to manage reservations which are sent by
email. Emails sent to such address's are stored in an Outlook or Exchange folder when using
Outlook Web Access.
This option is parameter controlled and only available in the Professional Edition.
Key Points
Ability to integrate specific mail boxes from Exchange to Suite8
Backup of folder on the exchange
Mail Import is available for Central Properties when using Suite8 Central.
Confirmation letters can be generated and sent to the guest from the Central Property.
From the Partner Properties it is possible to look up the sent central correspondence in the
Central Property. (Parameter controlled)
Mail Import functionality requires the following setup:
Activation of the parameter MAIL IMPORT under Setup → Configuration → Global Settings →
Generic → Generic 4 tab.
136
Definition of the MAIL REFRESH INTERVAL under Setup → Configuration → Global Settings →
Miscellaneous → Search Screens 2 tab. The refresh interval is defined in seconds and is used to
refresh the mails dialog and check for emails received from the Exchange.
Mail import functionality is controlled by the user rights VIEW, DELETE, CHANGE PROCESSED
FLAG, IMPORT and REMOVE LOCK under Setup → Configuration → Users → User Definition →
Rights → Mails. The subgroup SOURCES indicates the specific Outlook Mailboxes and these are
only available after they have been assigned under the menu option MAILS on the
Miscellaneous menu.
Creation of a backup folder on the email client of the user for each mail folder imported in to
Suite8.
The functionality to look up sent central correspondence in the central property from a partner
property is controlled by the parameter CENTRAL CORRESPONDENCE LOOKUP under Setup →
Configuration → Global Settings → Suite8 Central → Suite8 Central 1 tab.
Internal editor templates can be created with the role MAILS. An example of a central
confirmation letter referring to several reservations from an imported email is available with
the standard reports FCR_PMS_73100_Central_Confirmation.rpt. Sample confirmation
letter for multiple reservations.
How To's
Steps to configure mail import
Test the Outlook Web connection by entering the details in your local web browser before
defining the URL, User and Password in Suite8.
How To's
137
Define the folders from which email boxes should be imported - How to define the Outlook
Sources
1. Click MAILS from the MISCELLANEOUS to display the Mails dialog box.
2. Click the IMPORT CONFIG button to display the Mail source configuration dialog box.
138
How To's
3. Click NEW SOURCE to display the Mail source dialog box.
4. Select the TYPE:
Outlook - if using a local outlook folder and email is performed only from the
workstation where the outlook folder resides.
WebDav - if using an Exchange, the folder should be accessible from all
workstations.
Outlook
5. Select the Outlook folder and then click NEW FOLDER to display the Select mail
folder dialog box.
6. Select the check box next to the folder from which the mails are to be imported
and then click OK.
WebDav
7. Complete the URL address of the Exchange Server, this can be entered either with
the IP address or the Computer Name.
8. Enter the USER name and PASSWORD.
How To's
139
Suite8 will now connect to the specified mail box and display all the available
folders.
Note: Verify the connection details if no folders are listed.
9. Select the check box next to the folder from which the mails are to be imported.
Backup Folder
A backup folder must be assigned as when the mails are imported they are copied first
to the backup folder, then they are imported to Suite8 and finally they are deleted
from the incoming folder on the exchange.
10. With the required folder selected click PROPERTIES to display the Mail folder
properties dialog box.
11. Select the Backup folder and click OK.
12. Click OK to close the Mail source configuration screen.
User rights for sources - once the sources are defined the user rights have to be set. and define
which Suite 8 users / User groups can see the mails coming from the defined sources. In the screen
shot In this example we configured 2 sources in the mail source configuration. Those sources are
now visible in the user rights. All users / user groups who should see those mails should be
assigned to the source.
How to configure the Fidelio Server
1. Open Fidelio Server and select MAILS IMPORT.
140
How To's
2. Click the SETUP button.
3. Select the option ENABLE LOGGING TO FILE.
It is recommended to activate the log file and monitor the mail activity initially,
however, it can be disabled once the program is running smoothly. The log file
WEBDAV.LOC is located in the Suite8 log directory.
4. Set the EXECUTION INTERVAl; the recommended interval is 120 seconds.
5. Click OK to save the setup.
Key Points
An email must always be locked before it can be managed or worked on.
Locked emails are highlighted in grey so that other users can see immediately that
the mail is not accessible. Only users with the necessary user rights can override
the lock.
Incoming emails where the senders email address matches an email address on a profile are
automatically linked to that profile.
When a profile is linked then the email address in the column SENDER is replaced
by the profile name and any new emails received from this sender are linked
automatically to the profile.
Incoming emails where the recipients email address matches an email address on a profile are
automatically linked to that profile.
How To's
141
When a profile is linked then the email address in the column RECIPIENT is replaced
by the profile name and any new emails received for this recipient are linked
automatically to the profile.
If a received Email has an attachment it is opened by double mouse click.
next to a profile on the profile grid indicates that there are mails attached to the profile.
Emails can be accessed in one of the following ways:
Via the option MAILS on the MISCELLANEOUS menu.
Via the OPTIONS button on the profile grid.
Via the OPTIONS menu of the reservation navigator.
Via the MAIL indicator on the edit reservation screen.
How to access and lock an email
1. Access the MAILS dialog box via one of the methods described above.
The mails are displayed on the left of the screen and the reservation navigator on
the right.
2. The reservation navigator can be removed by removing check mark next to SHOW
RESERVATIONS.
3. Complete the required search criteria and click SEARCH.
142
How To's
All the emails meeting the entered search criteria are listed.
4. The email details can be displayed in the lower half of the screen by selecting the
check boxHTML.
5. Point to the required email, right-click to display the shortcut menu and then
selectLOCK.
An X is displayed in the L column to indicate that this email is locked and not
available to any other user.
The email can now be worked on.
How to link the sender to a profile
1. Access the MAILS dialog box via one of the methods described above.
2. Point to the required email, right-click to display the shortcut menu and then
selectLOCK.
3. To link the sender of the email to a profile click SENDER.
The profile search screen is displayed; any profiles with a communication type
matching the senders email are listed.
4. Select the required profile or create a new profile.
Note: When creating a new profile the email address must be completed.
5. Once the profile is linked then the email address in the column SENDER is replaced
by the profile name.
Note: When new emails are sent from this sender email address then
they will be automatically linked to this profile.
How to link the recipient to a profile
1. Access the MAILS dialog box via one of the methods described above.
2. Point to the required email, right-click to display the shortcut menu and then
selectLOCK.
3. To link the recipient of the email to a profile click RECIPIENT.
The profile search screen is displayed; any profiles with a communication type
matching the recipients email are listed.
4. Select the required profile or create a new profile.
Note: When creating a new profile the email address must be completed.
5. Once the profile is linked then the email address in the column RECIPIENT is
replaced by the profile name.
How to assign a profile automatically to an email
1. Access the MAILS dialog box via one of the methods described above.
2. Point to the required email, right-click to display the shortcut menu and then
selectLOCK.
3. Click the AUTO PROFILE SEARCH button.
How To's
143
A message is displayed asking if you want to assign profiles automatically to the
selected mails.
4. Click YES to activate the search.
Matches are made using the email address and any matching profiles are linked
automatically.
The email address in the column SENDER and/or RECIPIENT is updated with the
profile name.
5. The guest profile details can be displayed by selecting the HTML option and then
clicking the PROFILE tab at the bottom of the screen.
How to mark an email as processed
1. Access the MAILS dialog box via one of the methods described above.
2. Point to the required email, right-click to display the shortcut menu and then
selectLOCK.
3. Right-click to display the shortcut menu again and then select PROCESSED.
The email is removed from mail queue.
Mails which have been marked as processed are not listed by default in the mail
queue.
4. Select the option SHOW PROCESSED MAILS in order to display all emails which have
been marked as processed.
5. An X is displayed in the P column to indicate that this email has been processed.
Note: Processed emails are only displayed if the option SHOW
PROCESSED is selected.
How to mark an email as unprocessed
1. Access the MAILS dialog box via one of the methods described above.
Mails which have been marked as processed are not listed by default in the mail
queue.
2. Select the option SHOW PROCESSED MAILS in order to display all emails which have
been marked as processed.
144
How To's
3. Point to the required email, right-click to display the shortcut menu and then
select UNPROCESSED.
The X is removed from the P column and the mail is displayed again in the list of
unprocessed mails.
How to delete an email
1. Access the MAILS dialog box via one of the methods described above.
2. Point to the required email, right-click to display the shortcut menu and then
selectLOCK.
3. Right-click to display the shortcut menu again and then select DELETE.
A message is displayed asking if you are sure you want to delete the mail.
4. Select YES to delete the mail.
A message is displayed asking if you want to set mail to Ignore at the same time
5. Select NO.
The mail is deleted.
Note: The functionality to set the mail to ignore is only relevant to
mail imported via Outlook and not via Exchange.
Note: Mails which were deleted by mistake can be moved on the
Exchange from the backup folder to the folder which is configured for
import and the Fidelio Server will import the mails again.
How to print the email list report
1. Access the MAILS dialog box via one of the methods described above.
Print functionality prints a report of the emails currently displayed on the screen
2. Complete the search criteria to display the required emails, then right-click to
display the shortcut menu and select PRINT.
The Print Grid Parameters dialog box is displayed.
How To's
145
3. Make any changes required to the print parameters and click PRINT.
The Report Preview screen is displayed.
4. Click the PRINTER icon to print the report.
How to link an email to a reservation
1. Access the MAILS dialog box via one of the methods described above.
The mails are displayed on the left of the screen and the reservation navigator on
the right.
2. If the reservation navigator is not displayed select the option SHOW RESERVATIONS.
3. Complete the required search criteria and click SEARCH.
146
How To's
4. Point to the required email, right-click to display the shortcut menu and then
selectLOCK.
5. In the reservation navigator, search for an existing reservation or create a new
reservation.
6. With the email locked and selected on the left hand side and the reservation
selected on the right-hand side click LINK.
Reservations linked to this mail are listed in the lower window on the right-hand
side. Emails which refer to more than one reservation may be linked to all the
relevant reservations and then multiple reservation would be listed.
How To's
147
How to unlink an email from a reservation
1. Access the MAILS dialog box via one of the methods described above.
The mails are displayed on the left of the screen and the reservation navigator on
the right.
2. If the reservation navigator is not displayed select the option SHOW RESERVATIONS.
3. Complete the required search criteria and click SEARCH.
4. Point to the required email, right-click to display the shortcut menu and then
selectLOCK.
Any reservations linked to this email are displayed in the lower window on the
right-hand side.
5. Select the reservation and then click UNLINK.
The reservation is unlinked from the email and no longer displayed in the lower
window on the reservation navigator.
148
How To's
Mails dialog box
Field
Definition
Show Reservations
Toggles the display of the reservation navigator.
Extended Monitor
If a separate monitor is attached then selecting this option displays the mails on one
monitor and the reservations on the second monitor.
Age in days
Select this option and enter the number of days to be displayed in the past.
Date range
Select this option and then enter the date range for the query.
Subject
Enter the subject to search for.
Show processed mails
Only mails which have been processed are displayed.
Only my locked emails
Only the logged in users locked emails are displayed
Filters
Activates additional filter options.
Sender or Recipient
Defines that any emails where either the Sender or Recipient matches the entered
name or email are displayed.
Sender name or email
Enter the senders name or email address or select the required profile on the profile
search.
Recipient name or email
Enter the recipients name or email address or select the required profile on the
profile search.
Refresh
The refresh interval is displayed in seconds and checks for emails received from the
Exchange.
Note: The interval is defined in the global settings configuration.
Options available on the mails dialog box
How To's
SEARCH- to activate the search based on the entered criteria
CLEAR- to clear the search criteria
SENDER- used to link the sender of the email to a guest profile
RECIPIENT- used to link the recipient of the email to a guest profile
PRIMARY RECIP.-
AUTO PROFILE SEARCH- used to link the sender and/or recipient of the email to a
guest profile automatically
HTML- displays the mail and linked profile details in HTML format in the lower
part of the screen
IMPORT- imports the mails manually; only used when Outlook is defined as the
source as Outlook does not use the Fidelio Server to import the emails. This
option only imports mails which have not already been imported to Suite8.
RE-IMPORT - re-imports the mails manually; only used when Outlook is defined
as the source as Outlook does not use the Fidelio Server to import the emails.
Only mails which have not been deleted in Suite8 or not marked 'ignored' can
be re-imported.
IMPORT CONFIG - used to define the mail source configuration
LINK - used to link an email to a reservation
UNLINK - used to unlink an email from a reservation
CORRESP. - used to access the correspondence screen.
CLOSE - to close the mail import screen.
149
Options available on the right-click shortcut menu
LOCK - locks the email so that no other user can work on the email at the same
time.
UNLOCK - unlocks the email; only users assigned the right REMOVE LOCK can
remove the lock on an email.
LOCKED BY: - displays the name of the user who locked the email.
PROCESSED - used to indicate that this email request has been completed, for
example, the contact added or a reservation added, changed or cancelled.
Processed emails are only displayed if the option SHOW PROCESSED is selected.
UNPROCESSED - used to remove the processed status from the email.
DELETE - deletes the selected email.
MAIL LOOKUP - only used when OUTLOOK is configured as the source.
PRINT - prints a report of the emails currently displayed on the screen.
Automatic Cash Drawer Opening
Fidelio Suite8 supports automatic cash drawer opening; SLIMLINE provided by Cash Bases UK.
(http://www.cashbases.co.uk/) was used to test the functionality.
Automatic cash drawer functionality is available on the following options:
• Petty Cash
• Paid Outs
• Payments
• Close Cashier
• Currency Exchange
Requirements
150
Workstations have to be connected to a cash drawer via the com port.
Each workstation equipped with an automatic cash drawer has to be configured for the cash
drawer and under Setup→Configuration→Miscellaneous→Terminals & Printers
On the department code setup the field OPEN CASH DRAWER has to be selected for cash
department codes that should automatically open the cash drawer when using this
department code in Cashiering.
How To's
How to configure Telephony
Fidelio Suite8 supports the TAPI (Telephony Application Programming Interface), a Microsoft
Windows API, which provides computer telephony integration and enables PCs running on
Microsoft Windows to use telephone services. Fidelio Suite8 communicates with the TAPI client.
Telephony functionality in Fidelio Suite8 allows calling a number directly by 'voice over ip' and
accepting incoming calls. Calls can be placed from the following options:
When editing a communication of a profile and clicking on the Telephone icon displayed in
the communications panel
When selecting a communication on the profile tree and selecting the Call option from the
right mouse click short cut menu.
From the Telephone book the contact is reached by selecting and pressing the Call button next
to the telephone icon.
For incoming calls, the phone rings and the number of the caller is displayed in Fidelio Suite8 with
a HTML view. The dialog box for incoming calls can be minimized and will be closed
automatically if the next call is notified. Then a new notification window opens.
Requirements
A Tapi device or TSP (Telephony Service Provider) installed on the workstations using
Telephony functionality
If a TAPI Server is used, the TAPI device has to be installed on each client workstation. The
communication flow is: Fidelio Suite8 -> Microsoft TAPI Client -> Microsoft TAPI Server ->
Telephone System.
Each workstation used for Telephony has to be configured under
Setup→Configuration→Miscellaneous→Terminals & Printers
Note: only TAPI 3 is supported
Using a TAPI Server
A TAPI server has to be configured, and on each client workstation using the telephony device, the
TAPI client has to be installed. On the DOS prompt of the client workstations, the command:
TCMSETUP /C [Name of TAPI Server] has to be entered. In Fidelio Suite8 Configuration under
Terminals & Printers->Terminals tab the Telephony Settings have to be activated.
Note: When using Windows TAPI, it is remcommended for telephony
to deactivate the windows service RasMan. This is true for the TAPI
Server as well as for the clients. Using the Microsoft RAS service and
the Microsoft Telephony at the same time could result in instabilities.
Installing a TAPI device or TSP on the workstation
Under Control Panel->Phone & Modem Options, the TAPI device or TSP is installed:
How To's
151
Troubleshooting
If the telephony is not working in Fidelio Suite8, Microsoft dialer.exe can be used for testing. If it
does also not work when using dialer exe, it means that the TAPI Interface is not running on the
workstation where the test is performed.
Terminals & Printers
The TAPI device or TSP has to be installed on the workstation before the telephony settings can be
configured. The telephony settings are configured under
Configuration→Miscellaneous→Terminals & Printers by selecting the corresponding workstation
and pressing the Telephony Settings tab.
Global Settings
The options on the Telephone 6 tab under Generic are used to configure the details for the TAPI
Interface.
Placing & receiving calls using Telephony
Next to the client workstation a normal telephone is installed, the phone and the client are
connected via TAPI Server.
Outgoing calls
In Fidelio Suite8 under Customer Profiles on the communication dialog box, the telephone icon is
clicked and the entered number is dialed from the connected phone. Hang up is performed via
Fidelio Suite8 or the phone.
Since Version 8.8.1.0 support for accepting incoming calls has been added:
Incoming calls
If a call arrives, the phone rings and the number of the caller pops up in Fidelio Suite8 in HTML
view. If the phone number is found on a profile, the name is displayed, if a picture is linked to the
profile it is also displayed. To use this, the corresponding HTM and QRY files:Incomincallinfo
have to reside in the Fidelio Suite8 HTML directory:
152
How To's
The call can be accepted or declined via Fidelio Suite8 or using the phone.
Note: sometimes only 3 digits are transmitted with internal phone
numbers, Fidelio Suite8 searches for the related number and displays,
depending on the internal line, all customer profiles with these 3
digits in the telephone number.
Customer Profiles
When editing a profile, the customer can be called by pressing the Telephone Icon or from the
Profile Tree, when selecting communication and using the right mouse click short cut menu
Telephone Book
From the telephone book, the contact is reached by selecting and pressing Call button
How To's
153
Signature Pads
Signature pads may be used to electronically sign documents such as registration cards. The
signature pad is connected to the terminal, the registration card is displayed on the signature pad
and guests are able to view and digitally sign. The electronically signed document is then stored
with the guest's profile.
The signature pad natureSign Pad Colour - StepOver GmbH is supported as of version 8.9.6.1.
StepOver GmbH
Otto-Hirsch-Brücken 17
D- 70329 Stuttgart
Tel. +49-711-120 269 – 59
naturaSign Pad Colour:
GTIN order no.: 4260130060572
Signature API:
GTIN order no.: 4260130060442
Key Points
Registration cards can be digitally signed and stored via the signature pad interface.
Signed registration cards are stored in PDF format and can be retrieved via the option
Correspondence Lookup.
There are 2 possibilities for signing the document:
AUTOMATIC SIGNATURE - the guest signs the registration card in a predefined
position; this option is generally used when the location of the signature is
fixed on the document.
MANUAL SIGNATURE - the reception clerk will as part of the signing process
indicate with the mouse where the guest should sign; this option is generally
used when the signature location is not in a fixed position and requires a staff
member to indicate where to sign.
Signature Pad functionality requires the following setup:
Connect the signature device to the terminal, the installation of the software installation is
prompted and after completing the installation of the API, the following steps must be
configured in Suite8.
154
The signature pad must be defined via the option Sign Pads under Setup→ Configuration→
Miscellaneous→ Terminals & Printers.
Each workstation equipped with a signature pad has to be configured via Terminals under
Setup→ Configuration→ Miscellaneous→ Terminals & Printers.
How To's
Configuration of the report template to include a signature section; both Internal Editor and
Crystal reports are supported.
The possibility to use automatic signature functionality requires that the report template
contains the formula for automatic signature.
The following registration card template examples are supplied with the Suite8
demo database:
73402 Registration Card Sign Pad (E) for internal editor.
73411 Registration Card Sign Pad (CR) for crystal reports.
How does the signature pad work with Suite8
1. From the Reservation Navigator select the required reservation.
2. Select REGISTRATION CARD from the OPTIONS menu.
or
Click EDIT to display the reservation edit screen and then select REGISTRATION CARD
from the OPTIONS menu.
The Print Registration Card dialog box is displayed.
3. Select the REGISTRATION CARD template required from the drop-down list.
How To's
155
4. Click SIGN.
The guests registration card is now displayed both in Suite8 and on the sign pad.
There are two signing options available:
AUTOMATIC S IGNATURE - the guest signs the registration card in a predefined
position; this option is generally used when the location of the signature is
fixed.
Note: This option is only available if the report template contains the formula
for automatic signature.
MANUAL SIGNATURE - the reception clerk indicates with the mouse where the
guest should sign the registration card.
5. Select Automatic signature or ask the guest to select Start signing on the Sign
Pad.
or
6. Select Manual signature and use the mouse to point to the signature section
where the guest should sign the document.
7. The guest signs within the red rectangle area indicated on the signature pad.
156
How To's
In Suite8 the registration card is now displayed with the guest’s signature.
8. Select CLOSE; the registration card is automatically saved.
How To's
157
Note: The signed document can be viewed directly in acrobat reader by selecting
OPEN SIGNED PDF.
How to view saved electronically signed documents
1. From the Reservation Navigator select the required reservation.
2. Select CORRESPONDENCE LOOKUP from the OPTIONS menu.
or
Click EDIT to display the reservation edit screen and then select CORRESPONDENCE
LOOKUP from the OPTIONS menu.
The correspondence Lookup dialog box is displayed.
3. Select the category REGISTRATION CARDS and click the plus sign to expand the list of
available correspondence.
4. Select the document required and click the PREVIEW button to view the registration
card.
Note: The option correspondence lookup is also accessible from the
OPTIONS menu of the profile navigator.
How to define a report template via Internal Editor
1. Display the required registration card template in the Internal Editor.
2. The field CLIENTSIGNATURE is available under Fields→ Standard→ Client and can be
addedto a registration card template in order to define the signature area.
158
How To's
3. The field contains the function
, the
parameters are the width and height of the signature area and can be adjusted as
required, it is recommended to use 300,50 as the initial testing values.
4. Select the opening brackets of the function
and change to font colour to white
so that the actual field is not displayed when previewing the registration card or on
the sign pad, but is still displayed when editing the template.
73402 Registration Card Sign Pad (E)for internal editor
5. Complete any other changes and save the registration card template.
How To's
159
How to define a report template via Crystal Reports
1. Display the required registration card template in Crystal Reports.
2. Define a formula field as follows: IF {?CONF_OUTPUTDEVICE} = 0 THEN "" ELSE
"CLIENTS IGNATURE_WIDTH=100_HEIGHT=50" andadjust the parameters as required.
3. Use a format field Color formula “CRWHITE” in order to hide the content on the
report output.
Registration card templates are defined under Miscellaneous → Reports → Text
Templates.
The default registration card template is defined under the option Registration
Card Template under Setup → Configuration → Global Settings → Reservation 3
tab.
160
How To's
Social Media Network Interaction
Fidelio Suite8 Social Network Interaction allows posting rates and events from the Rate Query and
from the Calendar Events to the social network platforms Twitter and Facebook. With the growing
demand on Social Network Platforms more properties in the hospitality business decide to present
their property also on Twitter or Facebook or both. Fidelio Suite8 has been enhanced allowing
posting Rate Offers, Events and Calendar Events from Fidelio Suite8 Rate Query and from
Calendar Events on these Social Network Platforms and redirecting the rate offers to Fidelio Suite8
home page allowing other users to directly book these offers on Fidelio Suite8 home page.
Social Media Network Interaction can only be configured by users with the right
Manage Settings assigned under Setup → Configuration → Users → Rights →
Social Networks.
Posting to Social Network Platforms is controlled by the right Post under Setup →
Configuration → Users → Rights → Social Networks.
Posting to Social Network Platforms from the rate query requires that the user are
assigned the user right Allow skip Turn Awayunder Setup → Configuration → Users
→ Rights → Rates→ Rate query.
Functionality
Posting messages and events from the rate query and from calendar events in Fidelio Suite8 to the
Social Network Platforms Twitter and Facebook is supported.
Twitter is a social networking and micro blogging service, owned and operated by Twitter Inc.,
that enables its users to send and read other users' messages called tweets. Tweets are text-based
posts of up to 140 characters displayed on the author's profile page. Tweets are publicly visible by
default, however senders can restrict message delivery to their friends list. Users may subscribe to
other author tweets—this is known as following and subscribers are known as followers. All users
can send and receive tweets via the Twitter website, the service is free
Facebook is a social networking web site operated and privately owned by Facebook, Inc.. Users
can add people as friends and send them messages, and update their personal profiles to notify
friends about themselves. Additionally, users can join networks organized by workplace, school,
or college.
The property has to have an account on Twitter or Facebook, or both and activate these under
Global Settings->Generic 4 tab. From the Rate Query a rate can be selected, by pressing Post
Networks button, a report is generated. The message is displayed in a text box and can be edited.
Post is performed by pressing Twitter or Facebook button.
Passing Parameters when posting rates to social media such as Facebook
It is possible to add market, source & channel codes to the URL when posting rates to social media
such as Facebook. Statistics can then be retrieved regarding the number of reservations that were
created through Facebook. The codes can be added as a parameter in the command line when
opening Fidelio Suite8 home page. This can be used for example when posting rates to social
media networks and using the redirection service from bit.ly. Using the redirection service in the
post message for rates for example allows opening the booking page on Fidelio Suite8 home page
directly with the given parameters.
Note: The redirection service bit.ly for URL shortening is only available to open Fidelio Suite8
home page with parameters, it does not work on a localhost connection. On a localhost connection
the address line to open Fidelio Suite8 home page with the parameters would look as follows:
http://localhost/v8Client/Inquiry.aspx?market=PRO&source=BUS&channel=WEB
In this example on a localhost connection, the market code 'Pro', source code 'Bus' and channel
code 'Web' is used.
For the redirection from social media networks the command line parameters have to be entered
on the report.
How To's
161
How to post a message from the rate query
1. Open the RATE QUERY
2. ENTER ARRIVAL AND DEPARTURE DATE FOR THE RATE OFFER
3. Click OK.
4. Select a rate.
5. Click POST NETWORKS
TO DISPLAY THE
POST TO SOCIAL NETWORKS
6. Select a Report and click CREATE MESSAGE
box.
BUTTON
DIALOG BOX.
to display the Message in the text
6. Change the message as required.
7. Click the Twitter button to send a tweet.
8. Click the Facebook button to post the message on Facebook
Note: If a rate is selected which is not configured as Open for Web
booking then a warning message is displayed.
162
How To's
How to post a message from the calendar events
1. Select Calendar Events from the Miscellaneous drop-down menu
2. Select a Calendar Event for Post to the Social Networks Platform
3. Click POST NETWORKS
TO DISPLAY THE
POST NETWORKS DIALOG BOX.
4. Select a Report and click CREATE MESSAGE
box.
BUTTON
to display the Message in the text
5. Change the message text if needed
6. Press Twitter button to send a tweet
7. Press facebook button to post the message on facebook
How to post and create facebook events
Facebook Events can be created from the Rate Query and from the Calendar Events dialog box
1. Click POST NETWORKS
TO DISPLAY THE
POST NETWORKS DIALOG BOX.
2. Select the Facebook Event tab, the Facebook events dialog box is displayed:
How To's
163
3. Enter or verify the EVENT DESCRIPTION.
4. Check the Start and End Dates.
5. Click the Facebook button to post the event on the Facebook wall and create an
event on Facebook events
Using bit.ly
When activating bit.ly, the URL shortcut redirecting service with real time link tracking to Fidelio
Suite8 home page bookings, the user and the provided API Key have to be entered under Global
Settings. Fidelio Suite8 home page can be opened with parameters; using the redirection service in
the post message for rates for example allows opening the booking page on Fidelio Suite8 home
page directly with the given parameters.
Example:
http://localhost/v8Client/inquiry.aspx?date=27.07.2010&nights=1&adults=1'
http://localhost/v8Client/Inquiry.aspx?market=PRO&source=BUS&channel=WEB
In this example on a localhost connection, the market code 'Pro', source code 'Bus' and channel
code 'Web' is used.
Validation occurs only when the reservation is submitted and if a market code is linked to the rate
code, the one from the rate code is used.
Note: The redirection service bit.ly for URL shortening is only
available for Fidelio Suite8 home page.
164
How To's
How to configure Social Media Network Interaction
Under Global Setting → Generic 4 Tab
Activate the account
Field
Definition
Legal Values
Facebook
Defines if a Facebook account is used.
Check: YES
Blank: NO
No Login
Credentials are
stored
For facebook and authentication is performed when
pressing facebook button from the Social Networks
dialog box
.
Reset Access
Token
This is used to log out the user from facebook.
Press this button to log the user for
Fidelio Suite8 out from the facebook
site
Twitter
Defines if a Facebook account is used.
Check: YES
Blank: NO
User
Enter the User Name for Twitter
Password
Enter the Password for Twitter
bit.ly
Activates bit.ly, the URL shortcut redirecting service Check: YES
with real time link tracking to Fidelio Suite8 home
Blank: NO
page bookings.
, the user and the provided API Key have to be
entered
User
The User for bit.ly
API Key
The API key provided by bit.ly
Check: YES
Blank: NO
Miscellaneous→Reports
Under reports, create two sections. For the Rate Query the section role is Social
Networks Rate Report. For Calendar Events the section role of the report is Social
Networks Events Report.
Multiple templates are allowed supporting various styles of message layout. The URL
address of the properties web site can be posted by using the function: ShortenURL.
How To's
165
How to post an advertisement
1. Click POST NETWORKS
TO DISPLAY THE
POST TO SOCIAL NETWORKS
DIALOG BOX.
2. Click ADVERTISEMENT to display the Advertisement Ticker Config dialog box.
3. Complete the advertisement details as per the Advertisement Ticker dialog box.
Note: When using TWEET and ADVERTISEMENT on the Post Networks'
dialog box, the ADVERTISEMENT configuration must be completed
before sending the TWEET as the dialog box closes after posting to
Social Networks and confirming the post successful message.
166
How To's
How to set up and use early arrival and late departure policies
Policies can be defined to post early arrival and late departure charges. A policy is defined to take
some sort of action when a certain set of circumstances is met, for example, if the guest checks out
at 15:00 and the check-out time of the property is 12:00 then a policy can be defined to charge the
guest a late check-out fee for the extra 3 hours. There are three possible actions for the application
of the policy:
Do nothing-- no early arrival fee or late departure fee is posted automatically, however, it is
still possible to post the fee manually via the billing check-out options.
Automatic - the early arrival fee or late departure fee is posted automatically with no message
prompt.
Ask - a question is displayed asking "Do you want to post the 10.00 EUR early arrival fee ?"
(Check- Out options)
Key Points
Policies can be defined for both early arrival and late departure
The option to post an early arrival charge is available for the entire day of arrival
An early arrival is calculated according to the actual time the guest checks in and the defined
default check-in time.
A late departure is calculated according to the actual time the guest checks out and the defined
default check-out time.
Early arrival and late departure buffer times can be defined, for example, with a buffer time of
15 minutes defined then if the guest is supposed to check out at 12:00 and the actual check-out
is performed at 12:10 the 15 minutes grace time is used in the calculation and no fee is charged.
A default policy can be defined for individuals, this is then applied to all individual
reservations
A default policy can be defined for groups, this is then applied to all group reservations
Policies can be linked to a specific rate via the rate code configuration or directly on the
reservation
A policy can be defined to be manually applied, automatically applied or via a question,
prompt the user to apply the policy
If the user is prompted with a question then the decision to override the charge or cancel it is
dependant upon user rights
Early arrival and late departure charges are visible on the billing screen of the guest, however,
the fee history can be displayed via the Early Arrival /Late Departure options on the C/O
Options menu
A description of the policy can be defined per language and used on the confirmation letter
templates
Earl arrival and late departure policy functionality requires the following
setup:
Definition of the early arrival and late departure POLICIES under Setup → Configuration →
Reservations.
Definition of policy rule settings and the definition of early arrival and late departure buffer
times under Setup → Configuration → Global Settings→ Reservation→ POLICIES 6 TAB
Definition of a DEFAULT CHECK IN TIME and DEFAULT CHECK OUT TIME under Setup →
Configuration → Global Settings → Reservation → Reservation 1 Tab. These times are
required in order to calculate the time to be charged.
Users who can override the calculated amount or cancel the charge need to be assigned the
rights ALLOW OVERWRITE CALCULATED AMOUNT andALLOW CANCEL POSTING under Setup →
Configuration → Users → User Definition → Rights → Early Arrival / Late Departure.
Policies can be added to the edit reservation screen using the screen painter functionality.
How To's
167
How to link a policy to a rate code
1. On the CONFIGURATION menu click RESERVATIONS.
2. Click RATE MANAGEMENT and then select RATES.
3. Select the required RATE CODE and click EDIT.
4. Select the MORE tab.
5. Select the required POLICY for this rate code.
6. Click OK to save the rate code.
If there are future reservations with this rate code then you are prompted to
update those reservations.
How to check in a guest and post an early arrival fee
1. From the Reservation Navigator select the reservation to be checked-in.
2. Click the CHECK IN button.
A message is displayed asking "Do you want to post 20.00 EUR early arrival fee ?"
3. Click YES to post the early arrival fee.
A confirmation dialog box is displayed.
168
How To's
4. The CALCULATED AMOUNT to be posted is displayed along with the calculated number
of hours BASED ON HOURS.
5. Click OK to confirm and post the charge as calculated by Suite8.
The Cashier Login screen is displayed.
6. Enter your CASHIER NUMBER and PASSWORD, click LOGIN.
Depending on the interfaces installed additional messages may be displayed.
Override calculated amount
With the appropriate user rights the amount to be posted may be changed.
The number of hours to be charged for early arrival may be selected in SELECT
OTHER HOURS; the amount to be charged is displayed in the NEW AMOUNT box.
The amount to be charged may be entered in the NEW AMOUNT box.
The number of hours to be charged may be selected and charged according to
the DEFAULT HOURLY FEE.
Early Arrival / Late Departure Calculation dialog box
Field
Definition
Calculated Amount
The charge calculated by the system as defined by the early
arrival/late departure policy.
Based on hours
The number of hours between the actual check-in time and the
defined default check-in time.
Override calculated amount
Select other hours
How To's
Select the number of hours to be charged if different from the
number calculated by Suite8.
169
New Amount
Displays the amount to be charged; with the appropriate user
rights this may be changed.
+ Available flat fees
Default hourly fee
Select the number of hours to be charged according the defined
hourly fee.
Fee history for this reservation
Displays already posted early arrival or late departure charges.
Post Time
The date and time the charge was posted.
For Hours
The number of hours being charged for.
Post Amount
The amount posted.
Type
The type of posting:
EA - Early Arrival
LD - Late Departure.
How to customize the reservation form
1. From the Setup main menu click MISCELLANEOUS and then FORM CUSTOMIZATION.
The form customization screen appears displaying a list of the screens that can or
have been customised.
2. Select the required FRESEDIT form to be customized and click the CUSTOMIZE button.
3. Four separate dialog boxes are displayed, they are:
The FORM to be customised (fResEdit)
The COMPONENT PALETTE - used to select the objects that should be placed on the
screen.
The OBJECT INSPECTOR - used to change the properties of the selected objects.
The SCRIPT dialog box - used to set controls for mandatory fields and prompt
users for action on click, exit or changing an event.
4. On the FRESEDIT form select the panel where the Policies selection box is to be
placed.
170
How To's
5. On the Component Palette, click the FIDRESSELECT tab.
6. Click the select box FIDRESPOLICYCOMBO and then place the selection box by clicking
the required location on the reservation form.
How To's
171
7. On the Component Palette, click the STANDARD tab.
8. Click LABEL and then place the it by clicking the required location on the
reservation form.
9. With the label still selected on the reservation form select the OBJECT INSPECTOR
dialog box in order to change the properties of the label.
10. Under APPEARANCE click CAPTION and enter the text to appear.
The policies select box is displayed on the form.
11. Close the form customization dialog boxes by clicking the
hand corner of the FRESEDIT screen.
in the top right
A message is displayed asking if you want to save the changes.
172
How To's
12. Select YES to save the changes and close all the dialog boxes.
13. Click CLOSE to close the Form customization screen.
Example setup for an Early Arrival Fee
Example setup for a Late Departure Fee
Note: An early arrival / late departure fee must be posted if the user
has no rights to either override the posting or cancel the posting.
The default check in time is defined via the option Default Check In Time under
Setup → Configuration → Global Settings → Reservation → Reservation 1 Tab.
The default check out time is defined via the option Default Check Out Time under
Setup → Configuration → Global Settings → Reservation → Reservation 1 Tab.
How To's
173
The number of minutes grace time included in the early arrival or later departure
calculations are defined via the options Early Arrival Buffer Time (mins) and Late
Departure Buffer Time (mins) under Setup → Configuration → Global Settings →
Reservation → Policies 6 tab.
The default action for the application of the early arrival or late departure
calculation is defined via the option Policy Rules for Early Arrival and Late
Departure under Setup → Configuration → Global Settings → Reservation → Policy
6 Tab.
The possibility to override the early arrival or late departure fee calculated by the
system is controlled by the user right Allow overwrite calculated amount under
Setup → Configuration → Users → User Definition → Rights → Early Arrival / Late
Departure.
The possibility to cancel the early arrival or late departure fee calculated by the
system is controlled by the user right Allow cancel posting under Setup →
Configuration → Users → User Definition → Rights → Early Arrival / Late
Departure.
How to setup voucher management
Voucher Management also referred to as Certificate Management may be used administer
vouchers and is accessible via the CASHIER menu. This option is controlled by the license VOUCHER
MANAGEMENT.
The integrated Voucher Management allows easy administration of Vouchers provided by the
property without using an external voucher management system. From the cashiering drop down
menu, all vouchers are displayed when pressing the Search button, additional filter criteria such as
the voucher number and description as well as display options such as displaying all, redeemed or
not redeemed vouchers can be set in the query fields.
When the voucher number is entered or read by a bar code reader, the invoice is checked for the
posted revenue department codes and if there are valid postings for the voucher, the voucher is
redeemed. Only value vouchers are redeemed without checking the department codes on the
invoice.
Voucher can also be sold using Fidelio Suite8 home page & Telecash.
The report FCR_PMS_4588_Voucher Mgmnt.rpt lists all vouchers with a summary of voucher
details and is part of the standard Fidelio Suite8 reports.
174
How To's
How to create a voucher
1. Click the CASHIER menu and select VOUCHER MANAGEMENT.
The Voucher Management Search screen is displayed.
2. Click the NEW button.
The Voucher Edit dialog box is displayed.
How To's
175
3. Select the ARTICLE from the list of defined voucher types.
4. Click the refresh icon
to assign a voucher NUMBER.
5. In the CONSUMING GUEST box select a guest profile if required.
6. In the ORDERING PROFILE box the default ordering profile is completed, but may be
changed as required.
7. Enter a DESCRIPTION and TEXT for the voucher.
The voucher text and description for the selected voucher type are completed, but
may be changed as required.
8. Enter a DEDICATION; the name of the person sending the voucher or a greeting
such as 'Happy Birthday'.
9. The VALID FROM and TO dates are automatically filled with the dates defined on the
selected Voucher Type.
10. Enter an ORDERING REASON if required.
11. Enter any INTERNAL INFORMATION if required.
12. Select ON HOLD if the voucher is to me marked as on hold.
13. Click OK to proceed to voucher payment.
14. Enter your CASHIER NUMBER and PASSWORD, click LOGIN.
176
How To's
The Payment Posting screen is displayed.
15. Complete the payment and click the POST button.
The invoice is generated and printed.
The Print Voucher dialog box is displayed.
16. Click E-MAIL or FAX to email or fax the voucher respectively.
17. Click PREVIEW to display a preview of the voucher, the voucher may be printed
directly from the preview screen.
How To's
177
18. Click the Printer icon to print the voucher or click the Close Door icon to close the
preview screen.
How to print the voucher
1. Click the CASHIER menu and select VOUCHER MANAGEMENT.
The Voucher Management screen is displayed.
2. Click the PRINT button.
The template defined under Global Setting->Generic3 tab is printed.
How to redeem a voucher
1. Click the CASHIER menu and select BILLING.
2. Enter a valid Cashier Number.
3. Open the invoice of the guest with the voucher to redeem.
4. Select MANUAL VOUCHER REDEMPTION from the OPTIONS menu.
178
How To's
5. Enter the Voucher number.
When the voucher number is entered or read by a bar code reader, the invoice is
checked for the posted revenue department codes and if there are valid postings
for the voucher, the voucher is redeemed. Only value vouchers are redeemed
without checking the department codes on the invoice. A message prompts
consumed items of the invoice and confirms the redemption.
6. If a bar code reader is linked; open the invoice and read the voucher with the bar
code reader.
Voucher Management Search dialog box
Field
Definition
Number
The voucher number.
Description
The voucher description.
Article
The Voucher Type.
Redeemed
All
Select this option to display all vouchers.
Redeemed
Select this option to display only redeemed vouchers.
Not redeemed
Select this option to display only not redeemed vouchers.
Finalized
All
Select this option to display all vouchers.
Finalized
Select this option to display only finalized vouchers.
Not Finalized
Select this option to display only not finalized vouchers.
On Hold
How To's
All
Select this option to display all vouchers.
On Hold
Select this option to display only vouchers on hold.
Not on Hold
Select this option to display only vouchers which are not on hold.
Include Voided
Select this option to include voided vouchers.
Not paid completely
Defines if partially paid vouchers are displayed.
Last Name
The last name of the person who ordered the voucher.
First Name
The first name of the person who ordered the voucher.
179
Order Reason
The reason for ordering the voucher.
Created By
The name of the user who created the voucher.
Created From To
Limits the search to specific creation dates.
Send By Mail
All
Select this option to display all vouchers.
To be sent
Select this option to display vouchers which are to be sent by mail.
Sent
Select this option to display vouchers which have been sent by mail.
Total Voucher
The total number of displayed vouchers.
Total Amount
The total amount of displayed vouchers.
Vouchers to be paid
The number of vouchers not paid yet.
Amount not paid
The amount of not paid vouchers in the displayed selection.
Redeemed amount
The redeemed amount of vouchers in the displayed selection.
Voucher Edit dialog box
Field
Definition
Article
The Voucher Type.
Voucher Type
Product, Value Arrangement
Number
The voucher number.
Amount
The value of the voucher.
Consuming Guest
Select the guest profile for whom the voucher is valid.
Ordering Profile
The default ordering profile is completed but may be changed as required.
Description
The voucher description.
Text
Default text is complete from the voucher setup but may be changed as required
Dedication
The name of the person sending the voucher or a greeting such as 'Happy
Birthday'.
Finalized
Only valid for Arrangement type vouchers
Valid from to
The dates are automatically filled with the default validity defined on the selected
Voucher Type.
Ordering Reason
Internal Info
Inactive
On Hold
A voucher may be marked as On Hold in the case where the voucher has been
purchased with City Ledger.
Then the voucher could be placed on hold until the hotel has received payment.
A voucher which is on hold cannot be redeemed.
Reason
180
Mandatory to enter a reason as to why the voucher has been placed on hold.
How To's
Voucher Payments via Interface
As of IFC8 Version 8.7.4.0 and Suite8 Version 8.9.0.5 voucher payment can be performed via the
interface; the payment is then linked to the voucher number in Suite8.
The following configuration is required:
A payment method for voucher redemption must be configured on the Micros
POS.
This payment method must be defined as a CASH & CREDIT CARD method with a
linked pay master in Suite8.
Auto balancing must be disabled for this payment method.
In Suite8 the VOUCHER TYPE must be a defined as a Value voucher and the
option PARTIAL REDEMPTION ALLOWED must be selected.
Voucher numbers are case sensitive and therefore it is strongly recommended
to define a number template on the voucher configuration.
When redeeming a voucher Suite8 automatically post the voucher credit to the target
account so that the balance is reduced.
Voucher management functionality is controlled by the license code Voucher
Management under Setup → Miscellaneous → Licence → V8 Sublicenses →
Property Management.
Voucher management functionality is controlled by the user rights View, Edit,
Insert, Print, Reprint and Billing under Setup → Configuration → Users → User
Definition → Rights → Voucher Management.
The default paying guest profile, voucher number cycle and other parameters are
configured in the section Voucher Management under Setup → Configuration →
Global Settings → Generic → Generic 3.
Details of voucher redemption including the voucher number, redemption amount
and reservation ID are displayed in the user log if the option Redeem is selected
under Setup → Configuration → Users → User Log → Voucher Management.
Voucher types are configured via the option Voucher Types under Setup →
Configuration → Voucher Management.
How to set up calendar events with rebates
A global rebate or a rebate valid for a specific time frame may be defined using calendar events. A
calendar event, such as, 'Happy Hour' in the bar can be setup for a specific time frame or a
calendar event can be setup with a rebate which is valid for the entire day.
The calendar event is set up for the time period required and the appropriate rebate code is linked.
Upon posting a charge, the rebate attached to the billing window is checked, then the rebate linked
to the reservation or financial account and finally the rebate code attached to the current active
calendar event. The appropriate rebate is then posted.
The type of rebate and the origin of the rebate are displayed on the posting details screen; the
origin displays if the rebate was attached to a specific billing window, to the reservation or if it was
a day rebate attached to a calendar event.
How To's
181
Setup required for day rebate functionality
Activate the parameterENABLE DAY REBATES under Setup → Configuration → Global Settings
→ Billing → Billing 3 tab to enable rebate linkage to calendar events.
Activate the parameterPOSTING FUNCTIONALITY FOR REBATE CARDS under Setup →
Configuration → Global Settings → Billing → Billing 2 tab. With this parameter activated, the
rebate will be deducted as soon as a discounted department code is posted.
Activate the parameterENABLE CARDLESSS REBATE HANDLING under Setup → Configuration →
Global Settings → Billing → Billing 2 tab.
Assign the user rights INSERT, EDIT and DELETE under Setup → Configuration → Users → User
Definition → Rights → Calendar→ Day Rebate Events.
Define a CALENDAR EVENT TYPE with the type DAY REBATES under Setup → Configuration →
CRM.
The relevant day rebate calendar event changes are displayed in the user log if the options
NEW DAY REBATE CALENDAR EVENT, UPDATE DAY REBATE CALENDAR EVENT, and DELETE DAY
REBATE CALENDAR EVENT are selected under Setup → Configuration → Users → User Log →
Calendar Events.
How to setup an alternative letter greeting
An alternative letter greeting free-formatted field can be added to the main profile edit tab or to
the second profile edit tab.
Alternative letter greeting functionality requires the following setup:
182
Activation of the parameter ALTERNATIVE LETTER GREETING under Setup → Configuration →
Global Settings → Profile → Profile 1 tab.
The addition of the free format text field FIDPROFILEEDITALTLETTERGREETING on the profile
edit main or second tab. The field is automatically added below the regular letter greeting
when a new form is created.
How To's
The field is contained in the following views and can be used in on profile letters and mailings.
V8_EDITOR_NAM - ALT_LETTGREET, ALT_LETTGREET_NAME,
ALT_LETTGREET_LASTNAME
V8_MAILING_CUSTOMERS - ALT_LETTERGREETING
The new field is stored in xcid_ALT_LETTGREET has been added to mailing.sql and can be used
in the standard mailing.
Alternative letter greeting functionality is controlled by the parameter Alternative
Letter Greeting under Setup → Configuration → Global Settings → Profile → Profile
1 tab.
The display of a second profile tab is controlled by the parameter Show Profile 2
Tab on Individual Profile Screen under Setup → Configuration → Global Settings →
Profile → Profile 1 tab.
How to setup trigger based scheduled tasks for automated email
sending
Scheduled functionality can be used to trigger automated email sending. With Serenata@mail, for
example, properties can instantly send confirmation or profile letters via email, such as sending an
email to arriving or departed guests.
Prerequisites
The Views:
V8_SYS_SCHEDULED_PROFILE
create or replace view V8_SYS_SCHEDULED_PROFILE as
select
xcms_id
as CONF_XCMS_ID,
xcms_id
as CONF_CONTACT_XCMS_ID,
xcms_wlan_id
as CONF_WLAN_ID,
xcid_addrgreet as CONF_ADDRGREET,
xcid_lettgreet as CONF_LETTGREET,
How To's
183
0 /*gtIndividual*/ as CONF_GREETINGTYPE,
(select xadr_id from xadr where xadr_xcms_id = xcms_id and XADR_PRIMARY
= 1 and rownum=1) as CONF_XADR_ID,
(select xcom_id from xcom where xcom_xcms_id = xcms_id and
xcom_PRIMARY = 1 and rownum=1) as CONF_XCOM_ID
from xcms, xcid
where
xcms_id=xcid_id(+);
/
Note: Internally the XCMS_ID of the guest is joined with the
V8_SYS_SCHEDULED_PROFILE.CONF_XCMS_ID
V8_SYS_SCHEDULED_CONFIRM
create or replace view V8_SYS_SCHEDULED_CONFIRM as
select
p.*,
r.yres_id
as CONF_YRES_ID,
r.yres_ygrp_id
as CONF_YGRP_ID
from
V8_SYS_SCHEDULED_PROFILE p, yres r
where
p.CONF_XCMS_ID = r.yres_xcms_id;
/
Note: Internally the YRES_ID of the reservation is joined with the
V8_SYS_SCHEDULED_CONFIRM.CONF_YRES_ID
The Views: V8_SYS_SCHEDULED_PROFILE and V8_SYS_SCHEDULED_CONFIRM have to be
created in order to deliver the default parameter values which are passed on to the confirmation or
profile letters.
Note: Both views can be customized by adding the prefix CUST_ in
front of the standard view name; the customized view will then be
executed instead of the standard one.
184
How To's
How to configure the scheduled task with triggers
1. On the MISCELLANEOUS menu select SCHEDULED TASKS.
2. Configure a scheduled task as detailed in the screen shot:
3. In the RHYTHM box select TRIGGER BASED.
4. Click EDIT TRIGGERS to display the Interface trigger setup.
How To's
185
All the available trigger types are available to be activated, however, only the
trigger types CUSTOM (XCMS) and RESERVATION (YRES) are able to pass the ID
(XCMS_ID/YRES_ID) of the trigger record to a report or for use in additional
validation. The parameter is called TRIGGER_PARAM.
5. Select the required trigger type and click Check to select.
6. Click OK to close.
7. A message is displayed that "The task will be saved.", click OK to close the
message.
Additional validation can be defined so that the task is only executed if the
condition is true.
8. In the RUN CONDITION box enter the validation; this example uses TRIGGER_PARAM
as additional validation:
select 1 from yres where yres_id=:TRIGGER_PARAM and nvl(YRES_CRSSYSTEM, '
') <> 'S8HP'
9. Click OK to save the scheduled task.
186
How To's
How to configure the scheduled task using a parameter in the recipient list
1. On the MISCELLANEOUS menu select SCHEDULED TASKS.
2. Configure the scheduled task as required.
3. In the RECIPIENT LIST box enter the validation; this example uses TRIGGER_PARAM
as a parameter:
Select recipient from v8_rep_yres_infos where yres_id=:TRIGGER_PARAM
4. Select the option RECIPIENT LIST
IS A
QUERY.
5. Click OK to save the scheduled task.
How to define the confirmation letter or correspondence
To automatically send a confirmation letter or correspondence, any report from the
report section for confirmation letters and correspondence can be selected.
Confirmation
If a report from the report section with the section role CONFIRMATION has been
selected the scheduled task can only be saved if:
The rhythm is TRIGGER BASED.
The trigger RESERVATION has been enabled.
Profile
If a report from the report section with the section role PROFILE LETTER has been
selected the scheduled task can only be saved if:
The rhythm is TRIGGER BASED.
The trigger CUSTOMER has been enabled.
Note: If the scheduled task is saved with any other trigger then the
warning 'This report can be used only with trigger type "Reservation".'
is displayed.
How to use the parameter in a report
The following example shows how to use the parameter in a report for the scheduled
task.
How To's
187
Fidelio Server
When the service SCHEDULED TASK RUNNER is running the Fidelio Server checks every
minute for scheduled tasks to be executed with existing triggers.
188
How To's
How to add calendar appointments to email
Calendar appointments (ICS files) can be attached to email's in the following modules:
Tasks and activities
Reservations
CCM Bookings
Setup
Adding calendar appointments to email's requires the following setup:
Creation of a report section with the SECTION ROLE 'Calendar ICS' and the SOURCE TYPE 'Text
Format template'.
Creation of three binary reports for reservations, tasks & activities and CCM. Each report must
be defined only with their respectiveICS_FILE_VALUE which can be found under the
corresponding DATA SOURCE when editing the binary report.
Example reports are included in the demo database as follows:
73920_Reservations_ICS
73921_TA_ICS
73922_CCM_ICS
The ICS reports must be linked to the relevant role via the option CALENDAR ICS SETUP under
Setup → Configuration → Email Settings
How To's
189
How does it work?
The ICS file can be attached to the e-mail via the ICS button on the email form of confirmation
letters, CCM booking letters and Task and activity letters.
The recipient of the email can then import this file into their calendar.
Note: If the data does not provide a start or end time, such as if the
check in time was not provided or no event was attached to a booking
or if it is a task, a default is entered: The description contains
summary information regarding the reservation, CCM booking or
notes of a task or activity.
The ICS file contains the following fields:
Subject
Location
Start date & time
End date & time
Description
Note: The start and end time of the ICS Calendar file on a Conference
Booking is taken from the start time of the first event of a booking and
the end time of the last event of this Booking.
How to configure multiple key cards
Fidelio Suite8 allows the configuration of multiple key card interfaces
Note: The interfaces have to be configured in IFC8 before they can be
configured in Suite8.
Once all key interfaces are running the configuration required in Suite8 is as follows:
Configure the key rights via the optionKEY RIGHTS under Setup → Configuration →
Miscellaneous → Interface Attributes.
Note: It is highly recommended to give a name to the key rights which have a link
to the DLS-interface, so that upon check in the rights can be easily assigned.
Assign the appropriate key card interface to each room type via the option ROOM TYPES under
Setup → Configuration → Reservations → Room Management.
In each room setup the DEFAULT KEY RIGHTS will automatically display the rights
from the interface which is linked to the related room type.
Note: It is not possible to configure a key card interface per room.
A key card interface can also be linked to a specific financial account group via the option
FINANCIAL ACCOUNT GROUPS under Setup → Configuration → Cashiering.
Activate the parameter SEND KEY-COMMANDS TO IFC FOR THIS GROUP AUTOMATICALLY and
then select the appropriate KEY INTERFACE.
190
How To's
Note: When making a key via INTERFACE FUNCTIONS on the
MISCELLANEOUS menu with multiple key card interfaces installed the
correct target interface is automatically selected and the KEY OPTIONS
from this interface are prompted.
Israel Trial Balance
The trial balance for Israel must only calculate and display the VAT for postings which have been
issued on an invoice on the day of closure.
This is regardless of the fact, that the invoice might get voided again and then these postings
remain not printed on the closing day. In this event, the VAT for these voided postings will be
shown on the trial balance report of the closing day.
How to implement the trial balance for Israel
1. The field
ZPOS_INVOICEDATE DATE
has to be added to the table ZPOS.
2. The following views need to exist in the Suite8 database.
V8_SYS_ZPOS_GROSS_NET_SEPVAT
V8_SYS_TRIAL_SEPVAT
V8_SYS_TRIAL_ZBALCALC_SEPVAT
v8_sys_zbalcalc_ct2_sepvat
3. The following Oracle procedures need to exist in the Suite8 database.
fillzbal2_sepvat
fillzbal2recalc_sepvat
4. Enter FILLZBAL2_SEPVAT in the field BALANCE CALCULATING PROCEDURE'S NAME under
Setup → Configuration → Global Settings → Night Audit → Night Audit 1 tab.
5. Add the procedure V8_SYS_FILLINVOICEDATE under Setup → Configuration →
Night Audit → Custom SQL Queries.
6. Use the trial balance report FCR_PMS_4501_TRIAL_BALANCE_SEPVAT.RPT instead
of the standard report.
How to setup function sheet with changes
Conference and catering reports such as function sheets can be formatted so that information
which has changed is displayed in a different color. When the report is previewed or printed a
comparison point can be selected and any changes since that point are displayed on the report in
the formatted color.
Key Points
Sections of a report can be formatted to display changes
Individual fields on a report can be formatted to display changes
The changes which can be displayed are based on the entries in the user log
The comparison points which can be selected are:
Creation date of the booking
Printing time of the report
Changed contract number
One report can be defined and changes will be displayed depending on whether the
optionSELECT START TIME OF CHANGES is selected. If the option is not selected then today's time
How To's
191
and date ares passed to the parameter which will produce the report without changes
indicated. It is not necessary to define two reports.
The report template 75004 FUNCTIONSHEET WITH CHANGES is part of the standard reports
supplied with Suite8
Functions sheet with changes requires the following setup:
Activation of the parameter DISPLAY CHANGES IN CCM REPORTS under Setup → Configuration
→ Global Settings → Reports → Reports 2 tab
Configuration of the required reports.
Configuration of the function sheet
The functionality is based on
The parameter CONF_CHANGESAFTER
The function FIDELIOGETCHANGETYPELOG() which can be used in the crystal reports.
The view V8_CCM_CHANGELOG which holds all changes from WLOG from CCM
The user log file (WLOG) where each number in the field WLOG_TYPE is related to a field.
See USER LOG NUMBER AND DESCRIPTIONS for a list of all the numbers and their description.
How to configure a function sheet with changes
1. Add the parameter CONF_CHANGESAFTER (DateTime) to the report.
2. Create the formula fields to represent the colors.
Using formula fields gives the possibility to change the colors in one place
according to wishes of the customer.
3. In the report template 75004 FUNCTIONSHEET WITH CHANGES the following fields and
colors were defined:
Field
Formula
NewField
rgb(191,215,233)
ChangedField
rgb(0,0,255)
DeletedField
rgb(255,0,0)
Colour
4. Apply the crystal function to the required fields in the report.
How to add a parameter
1. Open the report with Crystal Reports.
2. On the INSERT menu select FIELD OBJECT.
The Field Explorer dialog box is displayed
192
How To's
3. Select PARAMETER FIELDS and click NEW
The Create Parameter Field dialog box is displayed.
4. Enter CONF_CHANGESAFTER in both the NAME and PROMPTING TEXT boxes.
5. In the VALUE TYPE box select DateTime.
How To's
193
6. Click OK and then click CLOSE.
How to create formula fields
1. Open the report with Crystal Reports.
2. On the INSERT menu select FIELD OBJECT.
The Field Explorer dialog box is displayed
3. Select FORMULA FIELDS and click NEW
The Formula Name dialog box is displayed.
4. Enter the formula name and click OK.
The Formula Editor dialog box is displayed.
194
How To's
5. Enter the required color formula, for example:
rgb(191,215,233)
//Light blue
6. Click
to save and close the Formula Editor.
7. Repeat steps 3 to 6 for each color field required.
8. Click OK to close the Field Explorer.
How To's
195
Some examples when a field is changed in the main report
How to display the @Contact in different color when the contact is changed
1. Open the Crystal Report.
2. Select the field @CONTACT.
3. On the FORMAT menu select FORMAT FIELD.
The Format Editor dialog box is displayed.
4. Select the FONT tab.
5. Click the format formula button
for COLOR.
The Format Formula Editor: Font_Color dialog box is displayed.
196
How To's
6. Paste the following function in the field; in this example we have used 75;
'BOOKING CONTACT NAME'.
if FidelioGetChangeTypeLog({V8_CCM_CONTRACT.YBOM_ID}, 75,
totext({?CONF_CHANGESAFTER}, 'yyyy.MM.dd. HH:mm:ss') ) = 0 then crBlack
else
{@ChangedField};
Parameters accepted by the function FidelioGetChangeTypeLog()
The ID of the table; in our example YBOM_ID
The number of the WLOG_TYPE; in our example 75 which is the BOOKING
CONTACT NAME which means change of the contact.
The CONF_CHANGEAFTER parameter converted to text; this parameter is
passed when executing the report in order to hold the time for comparison.
Function calculation
The function compares the entries in the view V8_CCM_CHANGELOG:
If there is an entry for the number 75 then the function returns 1 - the field is
formatted in the color defined in the formula {@ChangedField}.
If there is no entry for the number 75 then the function returns 0 - the field is
formatted in the color black.
How To's
197
7. Click
to save and close the Formula Editor.
8. Click OK to close the Format Editor.
How to display the number of attendees in a different color when the number
of attendees changes
1. Open the Crystal Report.
2. Select the field V8_CCM_CONTRACT.YEVM_NOOFATENDEES.
3. On the FORMAT menu select FORMAT FIELD.
The Format Editor dialog box is displayed.
4. Select the FONT tab.
198
How To's
5. Click the format formula button
for COLOR.
The Format Formula Editor: Font_Color dialog box is displayed.
6. Paste the following function in the field; in this example we have used 116 which is
the number for EVENT NO. OF ATTENDEES.
How To's
199
if FidelioGetChangeTypeLog({V8_CCM_CONTRACT.YEVM_ID}, 116,
totext({?CONF_CHANGESAFTER}, 'yyyy.MM.dd. HH:mm:ss') ) = 0 then crBlack
else
{@ChangedField};
Parameters accepted by the function FidelioGetChangeTypeLog()
The ID of the table, in this example YEVM_ID
The number of the WLOG_TYPE, in this example 116 which is the EVENT NO. OF
ATTENDEES which means a change in the number of event attendees.
The CONF_CHANGEAFTER parameter converted to text; this parameter is
passed when executing the report in order to hold the time for comparison.
Function calculation
The function compares the entries in the view V8_CCM_CHANGELOG:
If there is an entry for the number 116 then the function returns 1 - the field is
formatted in the color defined in the formula {@ChangedField}.
If there is no entry for the number 116 then the function returns 0 - the field is
formatted in the color black.
7. Click
to save and close the Formula Editor.
8. Click OK to close the Format Editor.
How to display the background of a section in a different color when a new
event is created.
1. Open the Crystal Report.
2. On the FORMAT menu select SECTION.
The Section Expert dialog box is displayed.
200
How To's
3. Select GROUP HEADER #6 which contains the main event information.
4. Select the COLOR tab.
5. Click the format formula button
for BACKGROUND COLOR.
The Format Formula Editor: Section_Back_Color dialog box is displayed.
How To's
201
6. Paste the following function in the field; in this example we have used 113 which is
the number for EVENT NEW.
if FidelioGetChangeTypeLog({V8_CCM_CONTRACT.YEVM_ID}, 113,
totext({?CONF_CHANGESAFTER}, 'yyyy.MM.dd. HH:mm:ss') ) = 0 then
crWhite
else
{@NewField};
Parameters accepted by the function FidelioGetChangeTypeLog()
The ID of the table, in this example YEVM_ID
The number of the WLOG_TYPE, in this example 113 which is the EVENT NEW
which means a new event.
The CONF_CHANGEAFTER parameter converted to text; this parameter is
passed when executing the report in order to hold the time for comparison.
Function calculation
The function compares the entries in the view V8_CCM_CHANGELOG:
If there is an entry for the number 113 then the function returns 1 - the field is
formatted in the color defined in the formula {@ChangedField}.
If there is no entry for the number 113 then the function returns 0 - the field is
formatted in the color white.
7. Click
to save and close the Format Formula Editor.
8. Click OK to close the Format Editor.
How to display the booking note in a different color when it is changed.
When a booking note is changed it should be displayed in blue.
1. Pass the parameter CONF_CHANGESAFTER
In order to pass the parameter to the sub report we used a little trick. As we do
not have a DateTime field in the sub report we created a dummy formula field
DateTime in which we put the formula CurrentDateTime.
Now we can pass the parameter to the sub report. If in other sub reports there are
datetime fields you do not have to use this trick.
202
How To's
2. Pass the formula fields which contain the colors to the sub report.
Creating them again in the sub report would be a bad idea as you would have to
change them again in each sub report when the customer wants to use other
colours.
3. Remove the obsolete links in the select expert which were created due to the
above actions.
You should now have following result in the sub report.
4. Select the XCNO_NOTES field select the formatting tab/ color
5. Enter the crystal function like in the previous examples
if FidelioGetChangeTypeLog({?Pm-V8_CCM_FS_MAIN.YBOM_ID}, 298, totext({?Pm?CONF_CHANGESAFTER}, 'yyyy.MM.dd. HH:mm:ss') ) = 0 then
crBlack
else
{?Pm-@ChangedField}
The ID is here YBOM_ID and the number is 298 Booking Notes (see appendix B)
How To's
203
How to print a function sheet with changes
1. Select the appropriate booking in the grid; click the PRINT button to display the
Print Booking dialog box.
2. In the TEMPLATES box click the drop-down arrow and select the template 75004
FUNCTIONSHEET WITH CHANGES.
3. Select the SELECT START TIME OF
changes .
CHANGES
box in order to print the function sheet with
4. Complete the remaining options as required.
5. Click PREVIEW to preview the document or click PRINT to print the document.
A question is displayed asking if to "Increase Contract Number ?"
6. Click YES to increase the contract number, otherwise click NO.
If the option SELECT START TIME OF
dialog box is displayed.
CHANGES
was selected then the Change Time
'Change time' dialog, displaying the Time, Contract Number and Description of the
change from the User Log file.
204
How To's
7. Select the point from which you would like to see the changes and click OK.
The comparison points which can be selected are:
Creation date of the booking
Changed contract number
Printing time of the report (Confirmation)
8. If PRINT was selected then the printer setup dialog box is displayed.
9. Select the required printer and click OK.
The function sheet will be displayed or printed with all the changes and the change
log as configured in the template.
Example of function sheet with changes
How To's
205
Example of function sheet change log
User Log Numbers and Descriptions
Changes on Booking
First parameter of function should be YBOM_ID.
60: 'Booking New'
61; 'Booking Delete'
62; 'Booking Copy'
74; 'Booking Company Name'
75; 'Booking Contact Name'
63; 'Booking Contact on site'
64; 'Booking Booking Name';
65; 'Booking Early Arrival';
66; 'Booking Arrival Date';
67; 'Booking Departure Date';
206
How To's
68; 'Booking Late Departure';
69; 'Booking Category';
71; 'Booking Account Mgr.';
72; 'Booking Main Market';
73; 'Booking Market Segm.';
87; 'Booking Source';
76; 'Booking Conference Status';
77; 'Booking Conference Mgr.';
78; 'Booking Conference No. of Attendees';
79; 'Booking Conference Decision Date';
80; 'Booking Conference Follow up Date';
81; 'Booking Conference Cutoff Date';
82; 'Booking Conference Info board';
83; 'Booking Conference Currency';
84; 'Booking Conference Details Confirmed?';
85; 'Booking Conference FS Distributed?';
86; 'Booking Conference Function Type';
100;'Booking Rooms Status';
101;'Booking Rooms Mgr.';
97; 'Booking Rooms Decision Date';
98; 'Booking Rooms Follow up Date';
298; 'Booking Notes';
555; 'Booking Guest Comment';
227; 'Booking Linked Profiles';
299; 'Booking Deposit New';
301; 'Booking Deposit Delete';
337; 'Booking Deposit Conference Amount Due';
302; 'Booking Deposit Conference Due Date';
303; 'Booking Deposit Conference Percentage';
304; 'Booking Deposit Conference Paid?';
305; 'Booking Deposit Room Amount Due';
306; 'Booking Deposit Room Due Date';
307; 'Booking Deposit Room Percentage';
308; 'Booking Deposit Room Paid?';
309; 'Booking Cancel New';
310; 'Booking Cancel Delete';
How To's
207
336; 'Booking Cancel Conference Amount Due';
311; 'Booking Cancel Conference Cancelled By';
312; 'Booking Cancel Conference Percentage';
314; 'Booking Cancel Room Amount Due';
315; 'Booking Cancel Room Cancelled By';
316; 'Booking Cancel Room Percentage';
47; 'Billing Instruction New';
106; 'Billing Instruction Delete';
111; 'Billing Instruction From Date';
330; 'Billing Instruction To Date';
51; 'Billing Instruction Department Codes';
332; 'Billing Instruction Cash';
329; 'Billing Instruction Other Name';
105; 'Billing Instruction Type';
107; 'Billing Instruction Payment';
109; 'Billing Instruction Contact';
110; 'Billing Instruction Address';
334; 'Billing Instruction Notes';
Changes on Events
First parameter of function should be EVENT_ID.
113; 'Event New';
114; 'Event Delete';
115; 'Event Copy';
125; 'Event Status';
126; 'Event Type';
116; 'Event No. of Attendees';
117; 'Event Min. Guarantee';
118; 'Event Start Date';
119; 'Event End Date';
120; 'Event Start Time';
121; 'Event End Time';
122; 'Event Info Board';
123; 'Event Incl. in Package';
124; 'Event Noisy';
326; 'Event Notes';
161; name: 'Event Name';
Changes on Function Spaces
208
How To's
First parameter of function should be YEBS_ID.
128; 'Function Space New';
129; 'Function Space Delete';
130; 'Function Space Seating Arr.';
131; 'Function Space Rate';
132; 'Function Space Amount';
134; 'Function Space Don''t Move';
135; 'Function Space Incl. in Package';
250; 'Function Space Start Date';
251; 'Function Space Start Time';
252; 'Function Space End Date';
253; 'Function Space End Time';
254; 'Function Space Dept. Code';
255; 'Function Space Setup Time';
136; 'Function Space Setdown Time';
256; 'Function Space Name';
341; 'Function Space Notes';
340; 'Function Space Shareable';
Changes on Miscellaneous Items
First parameter of function should be YEBR_ID.
150; 'Misc. Item New';
151; 'Misc. Item Delete'
152; 'Misc. Item Copy';
154; 'Misc. Item Attribute';
155; 'Misc. Item Quantity';
156; 'Misc. Item External?';
157; 'Misc. Item Rate';
158; 'Misc. Item Setup Time';
159; 'Misc. Item Setdown Time';
160; 'Misc. Item Incl. in Package';
260; 'Misc. Item Start Date';
261; 'Misc. Item End Date';
262; 'Misc. Item Start Time';
263; 'Misc. Item End Time';
264; 'Misc. Item Dept. Code';
273; 'Misc. Item Resp. Dept.';
338; 'Misc. Item Name';
153; 'Misc. Item Price';
How To's
209
343; 'Misc. Item Notes';
Changes on Standard Menus
First parameter of function should be YEMN_ID.
230; 'Standard Menu New';
231; 'Standard Menu Delete';
232; 'Standard Menu Copy';
234; 'Standard Menu Name';
235; 'Standard Menu Cons. Base';
236; 'Standard Menu Incl. in Package';
237; 'Standard Menu Gratuity Incl.?';
238; 'Standard Menu Menu Price';
239; 'Standard Menu Quantity';
240; 'Standard Menu Compl. Menus';
241; 'Standard Menu Exp.';
242; 'Standard Menu Gtd.';
243; 'Standard Menu Set';
244; 'Standard Menu Serve Start';
245; 'Standard Menu Serve End';
233; 'Standard Menu Dept. Code';
248; 'Standard Menu Notes';
Changes on Menu Items
First parameter of function should be YEMI_ID.
274; 'Menu Item New' ;
275; 'Menu Item Delete';
276; 'Menu Item Price';
277; 'Menu Item Incl. in Menu?';
278; 'Menu Item Course';
279; 'Menu Item Course Order';
280; 'Menu Item Year';
283; 'Menu Item Portion';
284; 'Menu Item Forecast Category';
285; 'Menu Item Description';
286; 'Menu Item Name 1';
287; 'Menu Item Name 2';
288; 'Menu Item Name 3';
289; 'Menu Item Name 4';
290; 'Menu Item Origin 1';
291; 'Menu Item Origin 2';
210
How To's
292; 'Menu Item Origin 3';
293; 'Menu Item Price';
294; 'Menu Item Dept. Code';
295; 'Menu Item Category';
296; 'Menu Item Resp. Department';
297; 'Menu Item Quantity';
Changes on Packages
First parameter of function should be YPKD_ID.
317; 'Conference Package New';
318; 'Conference Package Delete';
319; 'Conference Package Copy';
324; 'Conference Package Name';
320; 'Conference Package Price';
321; 'Conference Package Pax';
322; 'Conference Package Start Date';
323; 'Conference Package End Date';
339; 'Conference Package Copied From';
The possibility to print function sheets with changes is controlled by the parameter
Display changes in CCM reports under Setup → Configuration → Global Settings →
Reports → Reports 2 tab. When activated the option Select start time of changes is
displayed on the Print Booking dialog box when selecting the option Print on a
conference booking.
The option Select start time of changes can be selected by default on the Print
Booking dialog by selecting the option Display changes in CCM reports under
Miscellaneous → User Settings → Search Screens.
How To's
211
How to set up the Kiosk Interface
The Kiosk Interface runs as a Socket Server in Fidelio Server. It uses a self- service technology and
is currently approved with the Ariane Kiosk System, a self-check in system.
General Logic
The first and utmost goal is to check out as many guests as possible and deny a transaction for as
little guests as possible. The Kiosk-Interface allows for example a check out where Window 2 has a
Debit as payment method, as this is considered a guaranteed payment method.
Remote Check-In is always enabled and Walk-In transactions can always be performed. There is
no restriction to days or times.
Key Points
IFC8 supports key creation for the different Vingcard systems (Vingcard Vision & VisiOnline).
The Suite8-Kiosk sends requests to IFC8 to encode RFID or magnetic keys on dedicated
encoders.
Kiosk interface functionality is controlled by the license Kiosk Interface under
Setup → Miscellaneous →License→V8 Sublicenses→Software Interfaces.
This option is license controlled.
Kiosk Interface functionality requires the following setup:
212
Activation of the license KIOSK INTERFACE under Setup → Miscellaneous →License→V8
Sublicenses→Software Interfaces.
Activation of the license SUITE8 HOMEPAGE under Setup → Miscellaneous →License→V8
Sublicenses→Software Interfaces.
How To's
14
Index
A
Automatic Night Audit ................................ 21
Configuration using scheduled tasks ...... 39
Configuration via the Fidelio Server ....... 39
D
Database Setup on the Fidelio Server ....... 22
E
E-Mail Sending Configuration .................... 35
E-Mail Server ............................................ 21
F
Fax Sending
Configuration ......................................... 43
Installing the Windows Fax Component . 43
Fidelio Server
Automatic Night Audit ............................ 21
Database Setup..................................... 22
E-Mail Server......................................... 21
Installing ................................................ 21
Socket Server........................................ 21
Uninstalling ............................................ 21
Fidelio XML Interface ................................ 17
H
HTML Expressions .................................... 45
I
Info Board ................................................. 31
InfoBoard .................................................. 31
M
Mail Server
Configuration ......................................... 35
Starting the mail server .......................... 35
O
Online Info Board Interface........................ 31
Online InfoBoard Interface......................... 31
S
Socket Server ........................................... 21
T
Trial Balance - Israel ............................... 191
X
XML Interface ........................................... 17
Index
213