1
Oracle® Hospitality Suite8
Table / Resource Reservation User Manual
Release 8.9
July 2015
Copyright © 1987, 2015, Oracle and/or its affiliates. All rights reserved.
This software and related documentation are provided under a license agreement containing
restrictions on use and disclosure and are protected by intellectual property laws. Except as
expressly permitted in your license agreement or allowed by law, you may not use, copy,
reproduce, translate, broadcast, modify, license, transmit, distribute, exhibit, perform, publish, or
display any part, in any form, or by any means. Reverse engineering, disassembly, or
decompilation of this software, unless required by law for interoperability, is prohibited.
The information contained herein is subject to change without notice and is not warranted to be
error-free. If you find any errors, please report them to us in writing.
If this software or related documentation is delivered to the U.S. Government or anyone licensing it
on behalf of the U.S. Government, then the following notice is applicable:
U.S. GOVERNMENT END USERS: Oracle programs, including any operating system, integrated
software, any programs installed on the hardware, and/or documentation, delivered to U.S.
Government end users are "commercial computer software" pursuant to the applicable Federal
Acquisition Regulation and agency-specific supplemental regulations. As such, use, duplication,
disclosure, modification, and adaptation of the programs, including any operating system,
integrated software, any programs installed on the hardware, and/or documentation, shall be
subject to license terms and license restrictions applicable to the programs. No other rights are
granted to the U.S. Government.
This software or hardware is developed for general use in a variety of information management
applications. It is not developed or intended for use in any inherently dangerous applications,
including applications that may create a risk of personal injury. If you use this software or
hardware in dangerous applications, then you shall be responsible to take all appropriate fail-safe,
backup, redundancy, and other measures to ensure its safe use. Oracle Corporation and its
affiliates disclaim any liability for any damages caused by use of this software or hardware in
dangerous applications.
Oracle and Java are registered trademarks of Oracle and/or its affiliates. Other names may be
trademarks of their respective owners.
Intel and Intel Xeon are trademarks or registered trademarks of Intel Corporation. All SPARC
trademarks are used under license and are trademarks or registered trademarks of SPARC
International, Inc. AMD, Opteron, the AMD logo, and the AMD Opteron logo are trademarks or
registered trademarks of Advanced Micro Devices. UNIX is a registered trademark of The Open
Group.
This software or hardware and documentation may provide access to or information on content,
products, and services from third parties. Oracle Corporation and its affiliates are not responsible
for and expressly disclaim all warranties of any kind with respect to third-party content, products,
and services. Oracle Corporation and its affiliates will not be responsible for any loss, costs, or
damages incurred due to your access to or use of third-party content, products, or services.
Contents
Preface ........................................................................................................................... 5
Audience ............................................................................................................................ 5
Customer Support ............................................................................................................. 5
Documentation .................................................................................................................. 5
Revision History ................................................................................................................ 5
1 Introduction ............................................................................................................. 7
Logging In .......................................................................................................................... 7
Navigation Keys ................................................................................................................ 8
Using the blue drill down arrow ...................................................................................... 8
HTML View ....................................................................................................................... 9
The Quick Keys ................................................................................................................ 13
The Date Box .................................................................................................................... 15
Changing the date............................................................................................................ 15
Customising Suite8 Grids................................................................................................ 16
Customising the HTML display ..................................................................................... 19
Favourites ......................................................................................................................... 21
Logging off, Exiting Suite8 and Locking the Station ..................................................... 22
2 Table Reservation................................................................................................... 23
About Table Reservations ............................................................................................... 23
Table Reservation Search ................................................................................................ 23
Table Search ..................................................................................................................... 27
New Table Reservation ................................................................................................... 29
New Table Reservation Series......................................................................................... 41
Table Reservation Availability........................................................................................ 46
Table Reservation Day Messages.................................................................................... 54
Restaurant Plan ................................................................................................................ 57
Restaurant Availability.................................................................................................... 66
3 Resource Reservation ............................................................................................. 71
About Resource Reservations ......................................................................................... 71
Reservation Search........................................................................................................... 71
New Reservation.............................................................................................................. 74
New Series........................................................................................................................ 81
Availability....................................................................................................................... 84
Day Messages................................................................................................................... 87
4 Index ...................................................................................................................... 91
3
4
Preface
Audience
This user manual is intended for system users and system administrators.
Customer Support
To contact Oracle Customer Support, access My Oracle Support at the following URL:
https://support.oracle.com
When contacting Customer Support, please provide the following:
Product version and program/module name
Functional and technical description of the problem (include business impact)
Detailed step-by-step instructions to re-create
Exact error message received
Screen shots of each step you take
Documentation
Oracle Hospitality product documentation is available on the Oracle Help Center at
http://docs.oracle.com
Revision History
Date
Preface
Description of Change
July, 2005
8.5.0.0 - First Issue Small Business
Edition
May, 2008
8.7 - Updated for Version 8.7
June, 2008
8.7.3.1 - Updated for Version 8.7.3.1
May, 2009
8.8 - Updates for Version 8.8
Sept, 2010
8.8 - Updates for Oracle 11gR1
Jan, 2012
8.9 - Updated for Version 8.9
Nov, 2012
8.9 - New cover page
July, 2015
8.9 – Oracle template applied
5
1
Introduction
Logging In
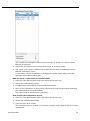
To use Suite8 you must first log into the system. You must have a valid user identification and
password.
Logging into Suite8
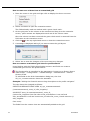
1. From the desktop, click the Fidelio Suite8 icon.
The Suite8 Splash screen is displayed for several seconds with the Payment
Application Data Security Standard (PA-DSS) disclaimer
The Fidelio V8 Login screen is then displayed.
2. Type your user identification (case sensitive) in the Login name box.
3. Tab to the Password box.
Introduction
7
4. Type your secret password (case sensitive) in the Password box.
5. Click LOGIN, the Suite8 main menu screen appears.
You are now logged into the system.
Note: If one of the following tables: WMLG, WLOG, ZPOS, WDAT,
SHIS, SRPD, WRPD has no indices or a missing index, an alert is
displayed when starting Suite8 with a message to contact support. It
could happen that a table has no indices in the event that a table was
renamed for support purpose. Renaming a table carries the indices to
the renamed table. If an index is missing of one of the above
mentioned tables, the alert is displayed when starting Suite8.
Navigation Keys
Accelerator keys
Suite8 has accelerator keys that allow you fast access to a box on a screen or dialog box. When a
letter is underlined you can press the Alt + letter keys and the cursor moves into the appropriate
box. For example, on the Profile Search screen the letter “A” is underlined in the Name box. By
pressing the Alt + A keys, the cursor moves into the Name box.
To use the accelerator keys:
From the screen or dialog box, press the Alt + letter to move the cursor into the appropriate box.
Shortcut keys
Suite8 has shortcut keys that allow you to perform actions directly from the keyboard without
having to use the mouse. Using these keys saves you time.
Suite8 Shortcut keys
Shortcut Key
Description
F1
Displays the help.
Alt + F4
Closes the active window.
F10
Closes all active windows.
F12
Moves the cursor from a data box to the first record on the grid
Alt + Down arrow
Displays a combo box.
Tab
Moves forward through the boxes/options.
Moves to the next box and confirms the entry.
Shift + Tab
Moves backward through the boxes/options.
Ctrl + Tab
Moves forward through tabs.
Ctrl + Shift + Tab
Moves backward through tabs.
Escape
Cancels the current action.
Removes a Combo box before a selection has been made.
Home
Moves the cursor to the beginning of a box.
End
Moves the cursor to the end of a box.
Using the blue drill down arrow
Many boxes have a blue drill down arrow
information that can be displayed.
8
next them indicating that there is additional
Introduction
For example, on the House Status screen clicking the blue drill down arrow on the Out of Order
line displays the Out of Order Rooms screen.
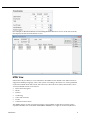
HTML View
Suite8 offers the possibility to view information in HTML format. HTML is the abbreviation for
"Hypertext Markup Language." This is the system of marking a document so it can be published
on the World Wide Web and viewed with a browser. The main areas where information can be
viewed in HTML format are as follows:
Reservation Navigator
Blocks
Profiles
Cashiering
Tasks and Activities
Events
Conference Reservation
The HTML display on the reservation navigator can be hidden so that the reservation grid is
expanded. Double-click in the blue reservation header bar or right-click and select/deselect
Introduction
9
LOWER PART OF THE SCREEN from the short-cut menu to view or hide the HTML display. This
setting is stored per user and remains until the next time it is changed.
Expand the HTML tree
Click the expand icon
to show all available folders.
Collapse the HTML tree
Click the collapse icon
to collapse all folders to the uppermost level.
Refresh the HTML View
Click the refresh icon
View information in HTML format
In this example we will display information in HTML format on the profile screen.
1. Click the CUSTOMER RELATION menu and select PROFILES to display the customer
profile screen.
This main customer profile screen is called the Navigator and is divided into 3
distinct areas:
10
Query - basic and advance profile search criteria
Introduction
Query Results - the results of the query shown in a grid format
Tree Listing and HTML Page
A tree listing of all the details associated with this profile including address,
communications, links, reservations or history
A freely definable HTML display which by default has a 'big' format where
the details are displayed in a non-grid style format or a list format. The
HTML display can be printed by using the right mouse click.
2. Enter the name to search for in the NAME box and click SEARCH.
4. The query results are shown in grid format in the middle section of the screen and
the tree and HTML formats are shown in the lower section of the screen.
5. In this instance the HTML view displays a summary of the profile details. The tree
listing is displayed by default expanded by one level. A plus sign next to a folder
indicates that it can be expanded to show more folders; a minus sign indicates
that it can be collapsed.
Change the display of the HTML
Two additional buttons on the html display allow you to change whether certain details
are displayed in a non-grid style or in a list format. By default the 'big' view is
displayed.
1. To view in list format click the
Introduction
button.
11
2. To view in a non-grid style, click the
12
button.
Introduction
Copy to clipboard
It is possible copying information from HTML files to clipboard by selecting items from
HTML, using right mouse short cut menu and selecting COPY TO CLIPBOARD or short cut
key CTRL + C. This information can then be pasted to any open file by using right
mouse menu option PASTE or short cut key CTRL + V.
The menu option COPY TO CLIPBOARD is controlled by the user right COPY TO CLIPBOARD
FROM HTML under Users → User Definition → Rights → Miscellaneous
The Quick Keys
Suite8 allows you to select the Quick Keys main menu from any screen. The quick keys are
shortcuts to screens, searches, and desktop tools. Using these keys allows rapid access to
information without having to leave the section that you are currently working on. For example, a
customer is making a new reservation while at the same time asking questions about restaurants in
the area. You can use the Telephone Book quick key for restaurant information instead of aborting
the new reservation screen, looking up the restaurant information, closing the Telephone Book,
and reopening the new reservation screen.
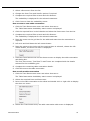
To access the Quick Keys main menu
Click the QUICK KEYS menu option.
The Quick Keys menu is displayed.
Introduction
13
14
Introduction
The Date Box
The format of the dates and the separators between the dates may vary from one hotel to another.
The date format is defined in the Control Panel Windows Regional Settings/Options.
Typical date formats include the following:
dd/yy
MM/dd/yyyy
yy/MM/dd
yyyy-MM-dd
dd-MMM-YY
You can type the date directly in the date box; however it must be typed exactly as per the predefined format.
There are many date boxes in the system, for example, Arrival Date or From Date. The date can be
either a specific date or an as of date.
A specific date is when you need to see what happened on that day. For example, you need to see
which guests have departed 01/01/03.
An 'as of date' is when you need to find out information starting from that date. For example, you
need to read the room rack starting from 09/09/03 through 12/09/03.
Changing the date
The date can be changed by typing a new date or with the use of the calendar.
To type a new date
1. Place the cursor in the Date box.
2. Type the new date in the Date box, in the defined format including separators.
3. Press the Tab key, the date is changed.
To change a date using the calendar
1. Click the drop down arrow
next to the Date box.
The calendar appears.
2. Change the month to a previous month or future month by clicking the horizontal
arrows located on the top of the calendar or by pressing the Ctrl + Page Up or
Ctrl + Page Down key.
3. Place the cursor on the date and click the left mouse button or move the keyboard
arrow keys to locate the date and press Enter, the date is changed.
Introduction
15
Customising Suite8 Grids
Many of the grids in Suite8 may be customised according to the needs of the property.
The customization options available are:
Customize
Restore Defaults
Show Defaults
How to display the customization options
Place the cursor on the grid and right-click to display the short-cut menu. The
following options are available:
CUSTOMIZE - opens the customize dialog box so that columns on the grid can be added,
changed or removed.
RESTORE DEFAULTS - applies the default settings for this grid.
SHOW DEFAULTS - applies the default settings to the current grid view, however, any
customised settings are used the next time the grid is displayed.
Select PRINT to print or export the existing grid layout, the possible export formats are
ASCII File, CSV Format, HTML Document or an Excel Document.
Note: The print or export function should be used before changes to
the grid will be saved.
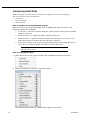
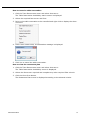
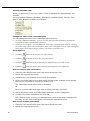
How to customize a grid
1. Place the cursor in the grid and right-click to display the short-cut menu.
2. Select CUSTOMIZE to open the customize screen.
The fields already used are marked with a green check mark.
16
Introduction
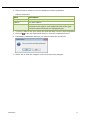
3. Click the PENCIL button to view or change the column properties.
Column Properties
Field
Description
Field name
The field name as it is defined in the database table.
Caption
The field caption.
Fixed
Defines if the column will be fixed to the left side, when
scrolling to the right to view additional fields of the grid.
Columns marked as fixed are highlighted grey.
4. To move a field to the grid, select the field and drag it to the required position.
5. Click the
in the top right-hand corner to close the customize screen.
6. A message is displayed asking if you want to store the grid layout.
7. Select YES to save the changes or NO not to save any changes.
Introduction
17
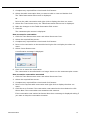
How to remove a column from a customized grid
1. Place the cursor in the grid and right-click to display the short-cut menu.
2. Select CUSTOMIZE to open the customize screen.
The fields already used are marked with a green check mark.
3. On the grid point to the column to be removed and drag it to the customize
screen; yellow arrows are displayed at each end of the column name.
Once the column has been removed the green check mark is removed from the
field name on the customize screen.
4. Click the
in the top right-hand corner to close the customize screen.
5. A message is displayed asking if you want to store the grid layout.
6. Select YES to save the changes or NO not to save any changes.
How to create a customised grid view for profile search
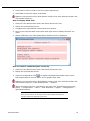
Users familiar with the Fidelio Suite8 table structure and fields can create a
customised grid view for the profile search.
This functionality is controlled by the parameter CUSTOM VIEW IN PROFILE SEARCH
under Setup → Configuration → Global Settings → Miscellaneous → Search
Screens 2 tab.
To add fields to the Grid Customization dialog box, the view
V8_SYS_CUSTOMXCMSSEARCH has to be amended.
Example: "Adding the financial account long description to the profile navigator"
The view has to be changed as follows:
CREATE OR REPLACE FORCE VIEW v8_sys_customxcmssearch
(customxcmssearch_xcms_id, zfac_longdesc)
AS SELECT xcms_id customxcmssearch_xcms_id,
(select zfac_longdesc from zfac where zfac_actvalidfrom is not null and
zfac_actvaliduntil is null and xcms.xcms_id=zfac.zfac_xcms_id and rownum=1)
zfac_longdesc
from xcms;
The fields from the custom view are automatically added to the grid.
18
Introduction
How to create a customised grid view for reservation search
Users familiar with the Fidelio Suite8 table structure and fields can create a
customised grid view for the reservation navigator.
This functionality is controlled by the parameter CUSTOM VIEW IN RES. NAVIGATOR
under Setup → Configuration → Global Settings → Miscellaneous → Search
Screens 2 tab.
To add fields to the Grid Customization dialog box, the view
V8_SYS_CUSTOMXCMSSEARCH has to be amended.
Example: "Adding the housekeeping status to the reservation navigator"
How to create a customised grid view for booking search
Users familiar with the Fidelio Suite8 table structure and fields can create a
customised grid view for the event booking search.
This functionality is controlled by the parameter CUSTOM VIEW IN BOOKING SEARCH
under Setup → Configuration → Global Settings → Miscellaneous → Search
Screens 2 tab.
To add fields to the Grid Customization dialog box, the view
V8_SYS_CUSTOMYBOMSEARCH has to be amended, however it must contain the field
customybomsearch_ybom_id.
Example: "How to display the function type description"
The view has to be changed as follows:
CREATE OR REPLACE FORCE VIEW V8_SYS_CUSTOMYBOMSEARCH
AS
SELECT
ybom_id customybomsearch_ybom_id,
yfty_longdesc
from
ybom, yfty
where
ybom_yfty_id=yfty_id(+);
Customization functionality is controlled by the user right EDIT under Setup →
Configuration → Users → User Definition → Rights → Miscellaneous → Grid layout
Customization.
Print functionality is controlled by the user right PRINT GRID under Setup →
Configuration → Users → User Definition → Rights → Miscellaneous.
Customising the HTML display
The HTML display may be customised according to the requirements of the property.
The customization options available are:
View Source
Edit template with notepad
Edit template with associated application
Introduction
19
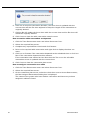
How to customize the HTML display
Place the cursor on the HTML display and right-click to display the short-cut menu.
The following options are available:
Select PRINT to print an exact copy of the HTML display. The print page margins and the
actions to take if the HTML printout is too large for the defined paper size can be defined
in the configuration.
Select PRINT WITH SETUP to display the printer options and then print the HTML display.
Select VIEW SOURCE to view the HTML code, no changes can be made.
Select EDIT TEMPLATE WITH NOTEPAD to open the relevant *.htm and *.qry in notepad.
Users with HTML programming knowledge can edit these files to meet the requirements
of the property.
Select EDIT TEMPLATE WITH ASSOCIATED APPLICATION to open the relevant *.htm and
*.qry with the program associated with these file types. Users with HTML programming
knowledge can edit these files to meet the requirements of the property.
How to use HTML Expressions to customize the HTML display
Properties can configure and store customised html files in the Version 8 directory for
htm files. The files are displayed in Suite8 either by logged in user, user language,
customised htm files for all users or language specific htm files for all users.
The priority Suite8 uses to determine which file to use is in the sequence as listed:
Customised htm file by user initials
To display a customised htm file by user initials, the htm file has to be called
USR_USERINTIALS_HTMFILENAME.HTM.
Example: For a user with the initials DS the file has to be called usr_ds_quickinfo.htm.
Customised htm file by user language
To display a customised htm file by user language, the htm file has to be called
CUST_LANG_LANGUAGE SHORT DESCRIPTION_QUICKINFO.HTM.
Example: If the language short description is F for French, the user has to select this
language under User Settings → Startup → Language and the file, such as quickinfo.htm
has to be called cust_lang_f_quickinfo.htm.
Customised version for all users
To display a customised version of htm files for all users, the html files have to be called
CUST_HTMLFILENAME.HTM.
Example: cust_quickinfo.htm.
Customised version by language
20
To display a customised version by language, the html files have to be called LANG_SHORT
DESCRIPTION OF THE LANGUAGE_HTMLFILE.HTM.
Introduction
Example: lang_f_quickinfo.htm, where f stands for the short description of the language.
If none of these files can be found then the standard htm file is displayed
How to hide or show expressions depending on activated features or license
The following expression can be used to hide for example, Conference Information on
the HTM file when working with the small business edition:
if ({const isBnB})=(1)}{/if}{else} {if {feature Meeting Planner}} Conference
{runquery 2}
Customization functionality is controlled by the user right HTML source view and
edit under Setup → Configuration → Users → User Definition → Rights →
Miscellaneous.
The print page margins and the actions to take if the HTML printout is too large for
the defined paper size are defined via the option HTML PRINTOUT under Setup →
Configuration → Global Settings → Miscellaneous → Visual Appearance 4.
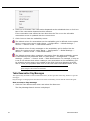
Favourites
The Favourites shortcut toolbar allows you to keep your most frequently used options right where
you can find them. Your most used options can be added to the Favourites shortcut toolbar where
they are more noticeable and more easily organized to suit your purposes.
To make the most of the Favourites shortcut toolbar, you need to organize the options in it; this can
be done using drag and drop.
In user settings the Favourites shortcut toolbar can be set to be listed first and will then be the
default shortcut toolbar opened when logging on to Fidelio.
Note: The Favourites shortcut toolbar cannot be removed from the
toolbar.
How to add an option to the Favourites shortcut bar
1. Click one of the coloured shortcut toolbars on the left to list the options on that
toolbar.
2. Right-click the option that you want to add, and then click ADD TO FAVOURITES on
the shortcut menu.
The option is now listed on the Favourites shortcut toolbar.
3. Repeat Steps 1 and 2 for each option that you want to add.
Note: Options from Web Services cannot be added to the Favourites
shortcut toolbar.
Introduction
21
How to delete an option from the Favourites shortcut bar
1. Click the FAVOURITES shortcut toolbar on the left to list the options.
2. Right-click the option that you want to remove, and then click DELETE BUTTON on
the shortcut menu.
The option is removed from the Favourites shortcut toolbar.
3. Repeat Steps 1 and 2 for each option that you want to remove.
How to reorganise the options on the Favourites shortcut bar
1. Click the FAVOURITES shortcut toolbar on the left to list the options.
2. Select the option to be moved and then left-click and hold the mouse button while
you drag the option to its new location on the toolbar.
3. Repeat Steps 1 and 2 for each option that you want to move.
On the toolbar the Favourites shortcut bar can be listed first by selecting the
option FAVOURITE BUTTONS ON TOP under Miscellaneous → User Settings →
Appearance Tab.
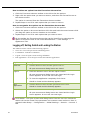
Logging off, Exiting Suite8 and Locking the Station
The windows menu consists of the following options:
Close All - closes all open screens and dialog boxes.
Lock Station - locks the workstation.
Logout - closes all open screens and logs off Suite8.
Exit Application - closes all open screens and exits the application.
Options
Description
Close All
Click the WINDOWS menu and the option CLOSE ALL.
All open screens and dialog boxes are closed.
Logout
1. Click the WINDOWS menu and the option LOGOUT
All open screens and dialog boxes are closed and the Login
screen appears. A new user can now login.
2. To close the application completely click CANCEL.
Suite8 is closed and the desktop appears.
Exit
Application
Lock Station
Click the WINDOWS menu and the option EXIT APPLICATION.
Suite8 is closed and the desktop appears.
Click the WINDOWS menu and the option LOCK STATION.
All open screens and dialog boxes are closed and the Login
screen appears. A new user can now login.
Lock Station - the open screens and dialog boxes from the user who locked the
station will not be closed if the parameter LEAVE OPENED SCREEN ON SWITCH USER is
selected under Setup → Configuration → Global Settings → Generic → Generic 3
tab.
22
Introduction
2
Table Reservation
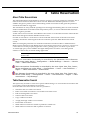
About Table Reservations
The Suite8 Table Reservation Module is used for viewing or reserving a table in a restaurant, bar or
other location which has tables that can be reserved. Restaurant and table preferences can be
added to the guest's profile so that when making a table reservation for that guest the preferred
restaurant and table are suggested.
The restaurants are setup with the opening hours and suggested booking times. In each restaurant
all the available tables are defined with setup and stay times, as well as minimum and maximum
number of guests per table.
A table can be reserved via the TABLE RESERVATION menu or via the OPTIONS menu of the both the
Reservation Navigator and the Edit Reservation screen.
If a table is reserved for a reservation it will be indicated at the bottom of the edit reservation
screen by an indicator. Selecting the TABLE RES. indicator opens the Table Reservation search
screen.
When activating the parameter USE AS RESOURCE RESERVATION the module is called RESOURCE
RESERVATIONS instead of TABLE RESERVATIONS and can be used to reserve a resource. A resource is
a reservable service the property might offer such as, parking spaces, sun beds or pool chairs.
A custom SQL query can be added to the night audit queries in order to save table growth
statistics on the last day of month during night audit.
Note: Table/Resource reservation functionality requires an additional
license code.
Resource reservation functionality is controlled by the parameter USE AS RESOURCE
RESERVATION under Setup → Configuration → Global Settings → Generic → Generic
4 tab → Table Reservations.
Table reservations functionality is controlled by the user rights VIEW, EDIT, INSERT,
DELETE and REINSTATE under Setup → Configuration → Users → User Definition →
Rights → Table reservations → Reservation.
Day Message functionality is controlled by the user rights VIEW, EDIT, INSERT and
DELETE under Setup → Configuration → Users → User Definition → Rights → Table
reservations → Day Message.
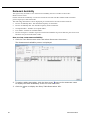
Table Reservation Search
This option may be used to search for a specific table booking or to view all table reservations and
is accessible via the TABLE RESERVATIONS menu.
From the table reservation search screen it is possible to:
Search for and view table reservations
Enter a new table reservation or a new table reservation series
Edit an existing table reservation
Cancel a table reservation
Copy a table reservation
Assign/Unassign a table to a reservation
Print a table reservation
Mark a table reservation as seated as planned or seated now
Mark a table reservation as left as planner or left now
Table Reservation
23
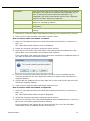
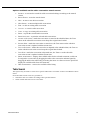
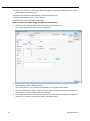
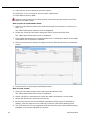
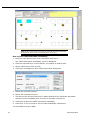
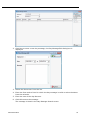
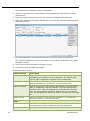
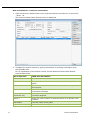
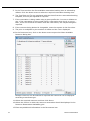
How to search for a table reservation
1. Click the TABLE RESERVATIONS menu and select RESERVATION SEARCH or press CTRL +
SHIFT + A.
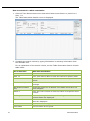
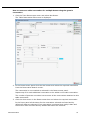
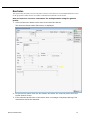
The Table Reservation Search screen is displayed.
2. Complete the search criteria by typing information or selecting information from
the available lists.
For an explanation of the search criteria, see the Table Reservation Search Criteria
table below:
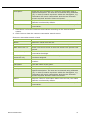
24
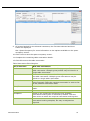
Fill in this field
With this information
Restaurant
Select a restaurant from the list.
Date to
Enter from and to dates to limit the search to specific dates.
Start time from to
Enter from and to times to limit the search to a specific time
period.
Include history
Select this check box to include historical table reservation
bookings.
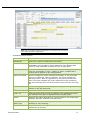
Not Assigned tables
only
Select this check box to display only tables which have not
been assigned.
Room #
Enter the room number to limit the search to a specific room
number.
Booking
Select a booking from the list; all bookings within the
selected dates are displayed.
Event
Select an event from the list; all events within the selected
dates are displayed.
Last Name
The last name of the guest.
First Name
The first name of the guest.
Table Reservation
Description
Enter the text to search for a table reservation with a specific
description. The text can be entered using wildcards (%) in
order to search anywhere within the description, e.g.
%highchair will return reservations with the text 'Highchair
required' and also 'Requires a highchair'.
Status
Select a table reservation status from the list, the status
DEFINITE is selected by default.
Reservation #
Enter the reservation number to limit the search to a specific
reservation.
Booking #
Enter the booking number to limit the search to a specific
booking.
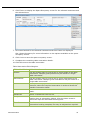
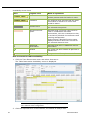
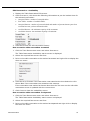
3. Click SEARCH to list the table reservations according to the entered search criteria.
4. Click CLOSE to close the table reservation search screen.
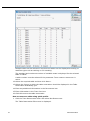
How to mark a table reservation as seated
1. Click the TABLE RESERVATIONS menu and select RESERVATION SEARCH or press CTRL +
SHIFT + A.
The Table Reservation Search screen is displayed.
2. Locate the required reservation using the search criteria.
3. Click SEATED AS PLANNED if the reservation was seated at the time booked or click
SEATED NOW if the reservation was seated at this moment.
If the reservation was marked as SEATED NOW then a message is displayed asking if
you want to keep the reservation duration.
4. Click YES to keep the reservation duration; the START time is updated with the
current time and the END time adjusted to keep the length of the reservation as
originally booked.
5. Clicking NO will update the START time with the current time and the END time will
remain as originally booked.
6. Click CLOSE to close the table reservation search screen.
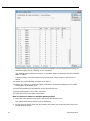
How to mark a table reservation as departed
1. Click the TABLE RESERVATIONS menu and select RESERVATION SEARCH or press CTRL +
SHIFT + A.
The Table Reservation Search screen is displayed.
2. Locate the required reservation using the search criteria.
3. Click LEFT AS PLANNED if the reservation departed at the scheduled time or click LEFT
NOW if the reservation departed at this moment.
If the reservation was marked as LEFT NOW then the TIME TO on the edit table
reservation screen is updated with the current time.
Table Reservation
25
4. Click CLOSE to close the table reservation search screen.
Table reservation search criteria
26
Fill in this field
With this information
Restaurant
Select a restaurant from the list.
Date to
Enter from and to dates to limit the search to specific dates.
Start time from to
Enter from and to times to limit the search to a specific time
period.
Include history
Select this check box to include historical table reservation
bookings.
Not Assigned tables
only
Select this check box to display only tables which have not
been assigned.
Room #
Enter the room number to limit the search to a specific room
number.
Booking
Select a booking from the list; all bookings within the
selected dates are displayed.
Event
Select an event from the list; all events within the selected
dates are displayed.
Last Name
The last name of the guest.
First Name
The first name of the guest.
Description
Enter the text to search for a table reservation with a specific
description. The text can be entered using wildcards (%) in
order to search anywhere within the description, e.g.
%highchair will return reservations with the text 'Highchair
required' and also 'Requires a highchair'.
Status
Select a table reservation status from the list, the status
DEFINITE is selected by default.
Reservation #
Enter the reservation number to limit the search to a specific
reservation.
Booking #
Enter the booking number to limit the search to a specific
booking.
Table Reservation
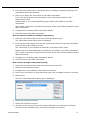
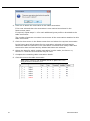
Options available on the table reservation search screen
SEARCH - to activate the search for table reservation bookings according to the entered
criteria
RESET FILTER - resets the search criteria
NEW - to enter a new table reservation
NEW SERIES - to enter multiple table reservations
EDIT - to edit an existing table reservation
CANCEL - to cancel a table reservation
COPY - to copy an existing table reservation
PRINT - to print the selected table reservation
PRINT SELECTED - to print the selected table reservations
SEATED AS PLANNED - marks the reservation as seated at the scheduled time;
FROM on the edit table reservation screen keeps the original time booked.
SEATED NOW - marks the reservation as seated now; the TIME FROM on the edit table
reservation screen is updated with the current time.
LEFT AS PLANNED - marks the reservation as departed at the scheduled time; the TIME TO
on the edit table reservation screen keeps the original time booked.
LEFT NOW - marks the reservation as departed now; the TIME TO on the edit table
reservation screen is updated with the current time.
SHOW ASSIGNMENT - displays the available tables for the selected restaurant; a table can
be assigned to a reservation by dragging the table to the reservation and unassigned by
dragging the table to the table listing. Selecting the SHOW ALL RESTAURANTS option will
display all available tables from all restaurants.
HIDE ASSIGNMENT - removes the available tables listing.
the TIME
Table Search
This option may be used to search for a specific table and is accessible via the TABLE RESERVATIONS
menu.
From the table search screen it is possible to:
Search for and view tables according to the specified criteria
Select a table and enter a new reservation
Table Reservation
27
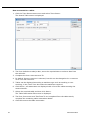
How to search for a table
1. Click the TABLE RESERVATIONS menu and select TABLE SEARCH.
The Search Table screen is displayed.
2. The DATE defaults to today's date; enter the required date or select a date from
the calendar.
3. Complete the START TIME FROM and TO.
4. By default IGNORE ATTRIBUTES is selected, but this can be changed to ALL ATTRIBUTES
or AT LEAST ONE ATTRIBUTE.
5. Tables can be displayed according to attribute type such as smoking or nonsmoking; in the TABLE TYPES box select the attributes required.
6. Click SEARCH; all restaurants are displayed with a list of the tables meeting the
entered search.
7. Select the required table and then click SELECT.
The Table Reservation Edit screen is displayed.
8. The DATE, RESTAURANT and TIME FROM TO are completed from the table search;
complete the remaining table reservation details.
9. Click OK to save the table reservation.
28
Table Reservation
Table Reservation Edit dialog box
Fill in this field
With this information
Profiles
The ADD button may be used to link a guest profile to the
table reservation. Multiple guest profiles may be linked to a
single table reservation.
Reservations
The ADD button may be used to link a guest reservation to
the table reservation. Multiple guest reservations may be
linked to a single table reservation.
Reservation
This option is displayed if a series of table reservations is
being reserved, select the required reservation in order to list
all the possible reservation dates.
Date/Dates
Select the date or dates for which a table reservation is to be
made.
Restaurant
Select a restaurant from the list.
Templates
Based on the restaurant selected the first available
reservation booking time is selected by default. Click the
down arrow to select the required reservation booking time.
Time from to
The from and to times are completed with the times from the
reservation booking template, but may be adjusted as
required.
# of adults
Baby
Child
Teenager
If the table reservation is being made using a guest profile
the # of adult's defaults to one. If the reservation is being
made using a reservation then the # of adults, Baby, Child
and Teenager entries are taken from the reservation, but
maybe changed if required.
Tables
Select the table to be reserved from the Select Available
Table dialog box. Multiple tables can be selected if required
and tables can be displayed according to attribute type such
as smoking or non-smoking.
A table number must be selected if the parameter TABLE
NUMBER IS MANDATORY is active.
Colour
Select the colour in which the table reservation is to be
displayed on the Table Reservation Availability grid.
Description
Enter any additional service information.
On the Availability and Restaurant Plan screens an icon
displayed if there is additional information.
Table Card
is
Enter the information to be printed on the table card.
New Table Reservation
This option may be used to reserve a table in one of the properties restaurants or bars and is
accessible via the TABLE RESERVATIONS menu. A table can be reserved for a guest using the guest's
profile or using the guest's reservation and multiple guest profiles and/or reservations may be
linked to the same table reservation. Multiple table reservations can be made for a single table by
marking the table reservation as shareable.
If a table is reserved for a reservation it will be indicated at the bottom of the edit reservation
screen by the indicator
search screen.
Table Reservation
. Selecting the TABLE RES. indicator opens the Table Reservation
29
How to reserve a table using the guest's profile
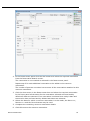
1. Click the TABLE RESERVATION menu and select NEW RESERVATION.
The Table Reservation Edit screen is displayed.
2. In the PROFILES panel click the ADD button and select the required profile from the
Profile Search screen.
3. If the selected profile has a reservation then a message is displayed asking if the
reservation should be attached.
4. Click YES to attach the reservation to the table reservation.
If YES was selected then the reservation is now marked as selected in the
RESERVATIONS panel.
5. The DATE defaults to today's date enter the date for which the table reservation is
to be made or select a date from the calendar.
6. Select the RESTAURANT required from the list.
30
Table Reservation
7. In the TEMPLATE box the first available reservation booking time is selected by
default. Click the down arrow to select the required reservation booking time.
8. The TIME FROM and TO are completed with the times from the reservation booking
template, but may be adjusted as required.
9. If the reservation is being made using a guest profile the # OF ADULTS defaults to
one, if the reservation is being made using a reservation then the # OF ADULTS,
BABY, CHILD and TEENAGER are taken from the reservation, but maybe changed if
required.
10. If more than one reservation can be made for this table, select the SHAREABLE
check box.
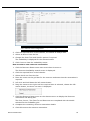
11. In the TABLES box, click on the down arrow to open the Select Available Table
dialog box.
Multiple tables can be selected if required and tables can be displayed according to
attribute type such as smoking or non-smoking.
The standard and maximum number of available seats is displayed for the selected
table or tables.
A table number must be selected if the parameter TABLE NUMBER IS MANDATORY is
active.
12. Select the required table and then click SELECT.
Table Reservation
31
13. Select the COLOUR in which the table reservation should be displayed in the Table
Reservation Availability grid.
14. Enter any additional information in the DESCRIPTION box.
15. Enter information in the TABLE CARD box.
16. Click OK to save the table reservation.
How to reserve a table using the guest's reservation
1. Click the TABLE RESERVATION menu and select NEW RESERVATION.
The Table Reservation Edit screen is displayed.
2. In the RESERVATIONS panel click the ADD button and select the required reservation
from the Reservation Search screen.
The reservation is now marked as selected in the RESERVATIONS panel.
3. The DATE defaults to today's date enter the date for which the table reservation is
to be made or select a date from the calendar.
4. If the date selected is out with the reservation dates then a message is displayed
asking if you want to change the table reservation date.
32
Table Reservation
5. Select YES to change the table reservation date to the actual arrival date of the
selected reservation, select NO to remove the selected reservation but leave the
profile attached.
6. Select the RESTAURANT required from the list.
7. In the TEMPLATE box the first available reservation booking time is selected by
default. Click the down arrow to select the required reservation booking time.
8. The TIME FROM and TO are completed with the times from the reservation booking
template, but may be adjusted as required.
9. The # OF ADULTS, BABY, CHILD and TEENAGER are taken from the reservation, but
maybe changed if required.
10. If more than one reservation can be made for this table, select the SHAREABLE
check box.
11. In the TABLES box, click on the down arrow to open the Select Available Table
dialog box.
Table Reservation
33
Multiple tables can be selected if required and tables can be displayed according to
attribute type such as smoking or non-smoking.
The standard and maximum number of available seats is displayed for the selected
table or tables.
A table number must be selected if the parameter TABLE NUMBER IS MANDATORY is
active.
12. Select the required table and then click SELECT.
13. Select the COLOUR in which the table reservation should be displayed in the Table
Reservation Availability grid.
14. Enter any additional information in the DESCRIPTION box.
15. Enter information in the TABLE CARD box.
16. Click OK to save the table reservation.
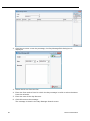
How to reserve a table using quick profile
1. Click the TABLE RESERVATION menu and select NEW RESERVATION.
The Table Reservation Edit screen is displayed.
34
Table Reservation
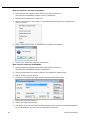
2. In the QUICK PROFILE panel enter the LAST NAME, FIRST NAME and PHONE number.
3. Click the ADD button, the name is displayed in the PROFILES panel; however, no
actual profile is created.
4. The DATE defaults to today's date enter the date for which the table reservation is
to be made or select a date from the calendar.
5. Select the RESTAURANT required from the list.
6. In the TEMPLATE box the first available reservation booking time is selected by
default. Click the down arrow to select the required reservation booking time.
7. The TIME FROM and TO are completed with the times from the reservation booking
template, but may be adjusted as required.
8. If the reservation is being made using a guest profile the # OF ADULTS defaults to
one, if the reservation is being made using a reservation then the # OF ADULTS,
BABY, CHILD and TEENAGER are taken from the reservation, but maybe changed if
required.
9. If more than one reservation can be made for this table, select the SHAREABLE
check box.
10. In the TABLES box, click on the down arrow to open the Select Available Table
dialog box.
Table Reservation
35
Multiple tables can be selected if required and tables can be displayed according to
attribute type such as smoking or non-smoking.
The standard and maximum number of available seats is displayed for the selected
table or tables.
A table number must be selected if the parameter TABLE NUMBER IS MANDATORY is
active.
11. Select the required table and then click SELECT.
12. Select the COLOUR in which the table reservation should be displayed in the Table
Reservation Availability grid.
13. Enter any additional information in the DESCRIPTION box.
14. Enter information in the TABLE CARD box.
15. Click OK to save the table reservation.
How to reserve a table for multiple guest profiles
1. Click the TABLE RESERVATION menu and select NEW RESERVATION.
The Table Reservation Edit screen is displayed.
2. In the PROFILES panel click the ADD button and select the required profile from the
Profile Search screen.
36
Table Reservation
3. If the selected profile has a reservation then a message is displayed asking if the
reservation should be attached.
4. Click YES to attach the reservation to the table reservation.
If YES was selected then the reservation is now marked as selected in the
RESERVATIONS panel.
Repeat steps 2 -4 for each additional guest profile to be added to the table
reservation.
The number of persons now takes into account all the reservations attached to this
table reservation.
5. Complete the remaining table reservation details.
6. Click OK to save the table reservation.
How to reserve a table for multiple reservations
1. Click the TABLE RESERVATION menu and select NEW RESERVATION.
The Table Reservation Edit screen is displayed.
2. In the RESERVATIONS panel click the ADD button and select the required reservation
from the Reservation Search screen.
The reservation is now marked as selected in the RESERVATIONS panel.
Repeat step 2 for each additional reservation to be added to the table reservation.
The number of persons now takes into account all the reservations attached to this
table reservation.
3. Complete the remaining table reservation details.
4. Click OK to save the table reservation.
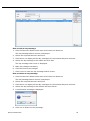
How to print a single restaurant booking
1. Click the TABLE RESERVATION menu and select RESTAURANT PLAN.
2. Select the required RESTAURANT.
3. Complete any required filter criteria and click REFRESH.
4. Point to the reservation to be printed and right-click to display the short-cut menu.
5. Select PRINT.
The Print Table Reservation dialog box is displayed.
6. Select the required TEMPLATES.
7. Select the required LANGUAGE.
8. The RESTAURANT and the FROM and TO dates default to the restaurant and dates
selected on the availability grid, but can be changed as required.
Table Reservation
37
9. Click PREVIEW to view and then print the report.
10. Click EMAIL or FAX to email or fax the report respectively.
11. Click SMS to send an SMS.
Reports to be printed via the PRINT button must exist with the section role TABLE
RESERVATION S INGLE PRINT.
How to print a confirmation letter
1. Click the TABLE RESERVATIONS menu and select RESERVATION SEARCH or press CTRL +
SHIFT + A.
The Table Reservation Search screen is displayed.
2. Locate the required reservation using the search criteria and click EDIT.
The Table Reservation Edit screen is displayed.
3. If the table reservation has a linked profile then a confirmation letter for the table
reservation can be printed or emailed.
4. Click the CONFIRMATION button to display the Print Table Reservation Confirmation
screen.
5. Proceed as for a reservation confirmation letter.
How to view events
1. Click the TABLE RESERVATION menu and select NEW RESERVATION.
The Table Reservation Edit screen is displayed.
2. Select a profile or reservation for which the table reservation is to be made.
3. Select the RESTAURANT required from the list.
4. In the TEMPLATE box the first available reservation booking time is selected by
default; click the down arrow to select the required reservation booking time.
5. The TIME FROM and TO are completed with the times from the reservation booking
template, but may be adjusted as required.
38
Table Reservation
6. Click EVENTS to display the Space Occupancy screen for the selected restaurant and
the selected time.
7. All events booked for the selected restaurant and time frame are displayed.
See: Space Occupancy for more information on the options available on the space
occupancy screen.
8. Click CLOSE to save the space occupancy screen.
9. Complete the remaining table reservation details.
10. Click OK to save the table reservation.
Table Reservation Edit dialog box
Fill in this field
With this information
Profiles
The ADD button may be used to link a guest profile to the table
reservation. Multiple guest profiles may be linked to a single
table reservation.
Reservations
The ADD button may be used to link a guest reservation to the
table reservation. Multiple guest reservations may be linked to a
single table reservation.
Reservation
This option is displayed if a series of table reservations is being
reserved, select the required reservation in order to list all the
possible reservation dates.
Date/Dates
Select the date or dates for which a table reservation is to be
made.
Restaurant
Select a restaurant from the list.
Templates
Based on the restaurant selected the first available reservation
booking time is selected by default. Click the down arrow to
select the required reservation booking time.
Time from to
The from and to times are completed with the times from the
reservation booking template, but may be adjusted as required.
Table Reservation
39
# of adults
Baby
Child
Teenager
If the table reservation is being made using a guest profile the #
of adult's defaults to one. If the reservation is being made using
a reservation then the # of adults, Baby, Child and Teenager
entries are taken from the reservation, but maybe changed if
required.
Shareable
Defines if the table reservation is shareable; if marked as
shareable then multiple table reservations can be made for the
same table. A warning message is displayed if the standard
number of persons is exceeded; if the maximum persons are
exceeded then the reservation cannot be completed.
Tables
Select the table to be reserved from the Select Available Table
dialog box. Multiple tables can be selected if required and tables
can be displayed according to attribute type such as smoking or
non-smoking.
A table number must be selected if the parameter TABLE NUMBER
IS MANDATORY is active.
Colour
Select the colour in which the table reservation is to be displayed
on the Table Reservation Availability grid.
Description
Enter any additional service information.
On the Availability and Restaurant Plan screens an icon
displayed if there is additional information.
Table Card
is
Enter the information to be printed on the table card.
SMS Sending functionality is controlled by the parameter ENABLE SMS SENDING
under Setup → Configuration → Global Settings → Interfaces → Misc. Interface 5
tab.
Restaurants are defined via the option RESTAURANTS under Setup →
Configuration → Table Reservations.
Tables are defined via the option TABLES under Setup → Configuration → Table
Reservations.
Restaurant booking time templates are defined via the option RESTAURANTS OPENING
TIMES under Setup → Configuration → Table Reservations.
The mandatory selection of a table number is controlled by the parameter TABLE
NUMBER IS MANDATORY under Setup → Configuration → Global Settings → Generic →
Generic 4 tab → Table Reservations.
Quick profile functionality is controlled by the parameter USE QUICK PROFILE under
Setup → Configuration → Global Settings → Generic → Generic 4 tab → Table
Reservations.
Marking table reservations as shareable by default is controlled by the parameter
RESERVATIONS ARE SHAREABLE BY DEFAULT under Setup → Configuration → Global
Settings → Generic → Generic 4 tab → Table Reservations.
40
Table Reservation
New Table Reservation Series
This option may be used to reserve the same table reservation for several different dates in one of
the properties restaurants or bars and is accessible via the TABLE RESERVATIONS menu.
How to reserve a table reservation for multiple dates using the guest's profile
1. Click the TABLE RESERVATION menu and select NEW SERIES.
The Table Reservation Edit screen is displayed.
2. In the PROFILES panel click the ADD button and select the required profile from the
Profile Search screen.
3. If the selected profile has a reservation then a message is displayed asking if the
reservation should be attached.
Table Reservation
41
4. Click YES to attach the reservation to the table reservation.
If YES was selected then the reservation is now marked as selected in the
RESERVATIONS panel.
If required, repeat steps 2 -4 for each additional guest profile to be added to the
table reservation.
The number of persons now takes into account all the reservations attached to this
table reservation.
5. Click the down arrow in the RESERVATIONS box and select the required reservation.
In the DATES panel all the dates for the reservation selected are listed and by
default all dates are selected. If no reservation is selected then today's date and
tomorrow's date are listed and by default both dates are selected.
6. Select the dates for which a table reservation is to be made; the SELECT ALL,
DESELECT ALL and SET DATES buttons may be used.
7. Complete the remaining table reservation details.
8. Click OK to save the table reservation.
Note: Tables which are not available for all or part of the series
being booked are marked in red.
42
Table Reservation
How to reserve a table reservation for multiple dates using the guest's
reservation
1. Click the TABLE RESERVATION menu and select NEW SERIES.
The Table Reservation Edit screen is displayed.
2. In the RESERVATIONS panel click the ADD button and select the required reservation
from the Reservation Search screen.
The reservation is now marked as selected in the RESERVATIONS panel.
Repeat step 2 for each additional reservation to be added to the table reservation.
The number of persons now takes into account all the reservations attached to this
table reservation.
3. Click the down arrow in the RESERVATIONS box and select the required reservation.
In the DATES panel all the dates for the reservation selected are listed and by
default all dates are selected. If no reservation is selected then today's date and
tomorrow's date are listed and by default both dates are selected.
Table Reservation
43
4. Select the dates for which a table reservation is to be made; the SELECT ALL,
DESELECT ALL and SET DATES buttons may be used.
5. Complete the remaining table reservation details.
6. Click OK to save the table reservation.
Note: Tables which are not available for all or part of the series
being booked are marked in red.
How to view events
1. Click the TABLE RESERVATION menu and select NEW SERIES.
The Table Reservation Edit screen is displayed.
2. Select a profile or reservation for which the table reservations are to be made.
3. In the DATES panel all the dates for the reservation selected are listed and by
default all dates are selected. If no reservation is selected then today's date and
tomorrow's date are listed and by default both dates are selected.
4. Select the dates for which a table reservation is to be made; the SELECT ALL,
DESELECT ALL and SET DATES buttons may be used.
5. Select the RESTAURANT required from the list.
6. In the TEMPLATE box the first available reservation booking time is selected by
default; click the down arrow to select the required reservation booking time.
7. The TIME FROM and TO are completed with the times from the reservation booking
template, but may be adjusted as required.
8. Click EVENTS to display the Space Occupancy screen for the selected restaurant and
the selected time.
44
Table Reservation
9. All events booked for the selected restaurant, the first date selected and time
frame are displayed.
See: Space Occupancy for more information on the options available on the space
occupancy screen.
10. Click CLOSE to save the space occupancy screen.
11. Complete the remaining table reservation details.
12. Click OK to save the table reservation.
Table Reservation Edit dialog box
Fill in this field
With this information
Profiles
The ADD button may be used to link a guest profile to the
table reservation. Multiple guest profiles may be linked to a
single table reservation.
Reservations
The ADD button may be used to link a guest reservation to
the table reservation. Multiple guest reservations may be
linked to a single table reservation.
Reservation
This option is displayed if a series of table reservations is
being reserved, select the required reservation in order to list
all the possible reservation dates.
Date/Dates
Select the date or dates for which a table reservation is to be
made.
Restaurant
Select a restaurant from the list.
Templates
Based on the restaurant selected the first available
reservation booking time is selected by default. Click the
down arrow to select the required reservation booking time.
Time from to
The from and to times are completed with the times from the
reservation booking template, but may be adjusted as
required.
Table Reservation
45
# of adults
Baby
Child
Teenager
If the table reservation is being made using a guest profile
the # of adult's defaults to one. If the reservation is being
made using a reservation then the # of adults, Baby, Child
and Teenager entries are taken from the reservation, but
maybe changed if required.
Tables
Select the table to be reserved from the Select Available
Table dialog box. Multiple tables can be selected if required
and tables can be displayed according to attribute type such
as smoking or non-smoking.
Colour
Select the colour in which the table reservation is to be
displayed on the Table Reservation Availability grid.
Description
Enter any additional information.
Table Card
Enter the information to be printed on the table card.
Table Reservation Availability
This option may be used to view restaurant table availability and is accessible via the TABLE
RESERVATIONS menu.
The TOTAL figure displayed at the bottom of the availability grid is the total number of persons
reserved for the selected restaurant; this figure also includes the number of persons that are part of
an event which has been booked in the selected restaurant. The UNALLOCATED CCM figure is the
number of persons that are part of an event but have not yet been allocated a table, they are
however already included in the total figure.
From the restaurant availability grid it is possible to:
View table availability and occupancy
Enter a new table reservation
Edit an existing table reservation
Cancel a table reservation
Display the restaurant plan
Print the table availability and occupancy grid
Mark a table reservation as seated as planned or seated now
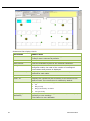
Understanding the Availability Screen
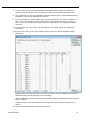
How to view restaurant availability
1. Click the TABLE RESERVATION menu and select AVAILABILITY.
The Table Reservation Availability screen is displayed.
46
Table Reservation
Note: The availability displayed initially is according to the restaurant
order defined in the configuration.
Availability search criteria
Search criteria
Description
Restaurant
Select the required restaurant from the list.
Start Time
The start time is used as the start time for showing the
availability and occupancy of the restaurant. The default start
time for each restaurant is defined in the configuration.
View By
Select the time interval to view the availability display; intervals
such as, 30 minutes, 1 hour, 4 hours, a week, 2 weeks and a
month can be defined in the configuration.
Zoom Horizontal
Used to change the zoom settings horizontally of the time/date
slots, to expand the view for example. The zoom settings are
stored per user. After an upgrade or if using them for the first
time, the zoom settings can be by default set to the minimum,
but once changed they will be the same every time the user logs
on.
Zoom Vertical
Used to change the zoom settings vertically, i.e. enlarge the table
names on the left hand side.
Filter
From...to
Select the from and to time to display on the availability screen;
the selected time span is displayed coloured pale green.
Tables
Displays the tables according to reserved status; All, Empty Only,
Empty & Partially Available, Occupied Only
Restaurant
Table Type
Displays the tables according to table feature, for example,
smoking or non-smoking.
Day Message
Displays any day messages which have been defined for this
restaurant on this day.
Table Reservation
47
Availability screen icons
Icon
Legend Term
What it represents
Table Reservation
A table reservation with the number of
booked persons and the booker’s name.
Tentative
The diagonal lines indicate that the table
reservation is linked to an event with
tentative status.
Closed Hours
Indicates that the restaurant is closed for
the selected time period.
Blocked function
space
Indicates that a function room which is
used in combination with table
reservations, such as a restaurant or bar,
is exclusively blocked via conference and
catering management.
Right-clicking a blocked function space
displays the SPACE OCCUPANCY screen for
the selected date and time.
Additional
Information
Indicates that there is additional service
information.
Seated
The guest has been seated as planned or
seated now.
Left
The guest has left as planned or left now.
How to search for table availability
1. Click the TABLE RESERVATION menu and select AVAILABILITY.
The Table Reservation Availability screen is displayed.
Note: The availability displayed initially is according to the restaurant
order defined in the configuration.
2. Click the required DATE in the Calendar, the default is today's date.
48
Table Reservation
3. Select a RESTAURANT from the list.
4. Change the START TIME and VIEW BY options if required.
5. Complete the required filter criteria and click REFRESH.
The availability is displayed for the selected restaurant.
6. Click CLOSE to close the availability screen.
How to enter a new table reservation
1. Click the TABLE RESERVATION menu and select AVAILABILITY.
The Table Reservation Availability search screen is displayed.
2. Click the required DATE in the Calendar and select the RESTAURANT from the list.
3. Complete the required filter criteria and click REFRESH.
The availability is displayed for the selected restaurant.
4. Place the cursor on the grid box for the table and start time the reservation is
required.
5. Left-click and hold down the left-mouse button.
6. Drag the mouse to the right until the required time is selected, release the leftmouse button, the short-cut menu is displayed.
7. Click NEW TABLE RESERVATION on the shortcut menu to display the table reservation
edit dialog box.
The DATE, RESTAURANT, TIME FROM TO and TABLES are completed with the details
selected on the availability grid.
8. Complete the remaining table reservation details.
9. Click OK to save the table reservation.
How to edit a table reservation
1. Click the TABLE RESERVATION menu and select AVAILABILITY.
The Table Reservation Availability search screen is displayed.
2. Select the required DATE and RESTAURANT.
3. Point to the table reservation to be edited and double-click or right-click to display
the short-cut menu.
4. Select EDIT TABLE RESERVATION, the table reservation edit screen is displayed.
Table Reservation
49
5. Make any changes necessary.
6. Click OK to save the changes.
50
Table Reservation
How to cancel a table reservation
1. Click the TABLE RESERVATION menu and select AVAILABILITY.
The Table Reservation Availability search screen is displayed.
2. Select the required RESTAURANT and DATE.
3. Point to the table reservation to be cancelled and right-click to display the shortcut menu.
4. Click CANCEL RESERVATION, a confirmation message is displayed.
5. Click YES to cancel the table reservation.
How to view the restaurant plan
1. Click the TABLE RESERVATION menu and select AVAILABILITY.
The Table Reservation Availability screen is displayed.
2. Select the RESTAURANT required and complete any other required filter criteria.
3. Click the SHOW PLAN button.
The Restaurant Plan screen is displayed according to the selected criteria.
Table Reservation
51
Note: If the restaurant is closed for the selected time period then the
background colour of the restaurant plan is dark grey.
How to print restaurant table availability
1. Click the TABLE RESERVATION menu and select AVAILABILITY.
The Table Reservation Availability screen is displayed.
2. Click the required DATE in the Calendar, the default is today's date.
3. Select a RESTAURANT from the list.
4. Click PRINT to display the Print Table Reservation dialog box.
5. Select the required TEMPLATE.
6. Select the required LANGUAGE.
7. The RESTAURANT and the FROM and TO dates default to the restaurant and dates
selected on the availability grid, but can be changed as required.
8. Click PRINT to print the table reservation availability.
9. Click EMAIL or FAX to email or fax the table availability respectively.
10. Click SMS to send an SMS.
52
Table Reservation
Edit Reservation - Availability
1. Display the Table Reservation Edit screen.
2. Click AVAILABILITY; this shows the following information as per the booked time for
the selected reservation:
Occupied Tables - number of occupied tables.
Free Tables - number of available tables.
Occupied Persons - number of persons booked and number of persons that are part of an
event but have not yet been allocated a table.
Avail Std Persons - the minimum capacity of the restaurant.
Avail Max Persons - the maximum capacity of restaurant.
3. Click OK to close the edit reservation screen.
How to mark a table reservation as seated
1. Click the TABLE RESERVATION menu and select AVAILABILITY.
The Table Reservation Availability search screen is displayed.
2. Select the required RESTAURANT and DATE.
3. Point to the table reservation to be marked as seated and right-click to display the
short-cut menu.
4. Click SEATED AS PLANNED if the reservation was seated at the time booked or click
SEATED NOW if the reservation was seated at this moment.
If the reservation was marked as SEATED NOW then the TIME FROM on the edit table
reservation screen is updated with the current time.
5. Click CLOSE to close the availability screen.
How to mark a table reservation as departed
1. Click the TABLE RESERVATION menu and select AVAILABILITY.
The Table Reservation Availability search screen is displayed.
2. Select the required RESTAURANT and DATE.
3. Point to the table reservation to be marked as departed and right-click to display
the short-cut menu.
Table Reservation
53
4. Click LEFT AS PLANNED if the reservation departed at the scheduled time or click LEFT
NOW if the reservation departed at this moment.
If the reservation was marked as LEFT NOW then the TIME TO on the edit table
reservation screen is updated with the current time.
5. Click CLOSE to close the availability screen.
The default colour for reservations on the availability grid is defined via the option
DEFAULT RESERVATION COLOUR under Setup → Configuration → Global Settings →
Generic → Generic 3 tab → Table Reservations.
The default colour for day messages on the availability grid is defined via the
option DAY MESSAGE COLOUR under Setup → Configuration → Global Settings →
Generic → Generic 3 tab → Table Reservations.
The default minutes when creating a reservation from the table availability screen
is controlled by the parameter SNAP TO under Setup → Configuration → Global
Settings → Generic → Generic 4 tab → Table Reservations. For example, if snap to
is set to 15 minutes then when creating a new reservation on the availability grid
by selecting a time range in the middle of the field 12.00 and dragging it to the
end of 13.00, the proposed start time for the new table reservation will be 12.15.
Note: The SHOW PLAN option is not available if there is no restaurant
plan setup for the selected restaurant.
Table Reservation Day Messages
This option may be used to enter restaurant notices, such as specials of the day, themes or special
messages.
Day messages are displayed on the table reservation availability screen and the restaurant plan.
How to enter a day message
1. Click the TABLE RESERVATION menu and select DAY MESSAGES.
The Day Message Search screen is displayed.
54
Table Reservation
2. Click NEW to enter a new day message, the Day Message Edit dialog box is
displayed.
3. Select the RESTAURANT from the list.
4. Enter the from and to DATE for which the day message is valid or select the dates
from the calendar.
5. Enter the text of the day MESSAGE.
6. Click OK to save the message.
The message is listed in the Day Message Search screen.
Table Reservation
55
How to edit a day message
1. Click the TABLE RESERVATION menu and select DAY MESSAGES.
The Day Message Search screen is displayed.
2. Select the required RESTAURANT and DATE.
3. Click SEARCH to display all the day messages for the selected day and restaurant.
4. Select the day message to be edited and click EDIT.
The day message edit screen is displayed.
5. Make any changes necessary.
6. Click OK to save the changes.
7. Click CLOSE to close the day message search screen.
How to delete a day message
1. Click the TABLE RESERVATION menu and select DAY MESSAGES.
The Day Message Search screen is displayed.
2. Select the required RESTAURANT and DATE.
3. Click SEARCH to display all the day messages for the selected day and restaurant.
4. Select the day message to be deleted and click DELETE .
5. A confirmation message is displayed.
6. Click YES to delete the day message.
56
Table Reservation
7. Click CLOSE to close the day message search screen.
The default colour for day messages on the availability grid is defined via the
option DAY MESSAGE COLOUR under Setup → Configuration → Global Settings →
Generic → Generic 3 tab → Table Reservations.
Day Message functionality is controlled by the user rights VIEW, EDIT, INSERT and
DELETE under Setup → Configuration → Users → User Definition → Rights → Table
reservations → Day Message.
Restaurant Plan
The restaurant plan displays the layout of each restaurant or bar in diagram format.
Different layouts can be defined for each restaurant, for example, if a restaurant is used for private
functions the layout may be different than from the normal daily setup.
On the restaurant plan you can:
View the assigned and available tables
Create a new table reservation
Add another table reservation to an existing reservation
Edit an existing table reservation
Cancel a table reservation
Mark a table reservation as seated or departed
Assign a table to a reservation
Print the restaurant layout
Print table reservation reports
Display the table reservation availability in grid format.
Understanding the Restaurant Plan
How to view the restaurant plan
1. Click the TABLE RESERVATION menu and select RESTAURANT PLAN.
The Restaurant Plan screen is displayed showing the first restaurant according to
the order defined in the configuration.
By default the restaurant plan displays all tables regardless of status or type for
today's date and time.
Table Reservation
57
Restaurant Plan display criteria
Field Name
What it does
Calendar
Displays the restaurant plan according to the selected date.
Today's date is selected by default.
Restaurant
Lists all the available restaurants.
Plan Preview
Lists the available layouts for the selected restaurant.
Assign Reservations
Displays a list of the reservations that have not yet been
assigned a table; the total of the number of unassigned
reservations and persons is displayed.
Show Availability
Displays the standard and maximum number of persons
defined for each table.
Filter
From...to
Displays the restaurant plan according to the selected from
and to times. The current time is selected by default.
Tables
Displays the tables according to reserved status:
All
Table Type (User
Definable)
58
Empty Only
Empty & Partially Available
Occupied Only
Displays the tables according to table feature, for example,
smoking or non-smoking.
This feature is user definable.
Table Reservation
Restaurant Plan screen buttons
Click this button
To do this:
Scale the restaurant plan to the size of the screen.
Resize the restaurant plan to its original size.
Increases the size of the restaurant plan.
Reduces the size of the restaurant plan.
Displays the restaurant plan configuration screen. This allows
restaurant plans to be created 'on the fly'.
Change the size of the screen display and the size of the
tables.
Refresh the restaurant plan screen.
Print the restaurant plan screen.
Print restaurant reports.
Display the table reservation availability screen.
Change the restaurant display time. If the slider is at 1:00PM
then the reservations booked for 1:00 PM are displayed,
move the pointer to 7:00PM and the reservations booked for
7:00 PM are displayed.
Note: The scale is displayed from when the restaurant is first
opened until it closes; hours closed in between times are not
indicated.
Close the restaurant plan screen.
Restaurant Plan screen icons
Icon
Table Reservation
Legend Term
What it represents
Additional Information
Indicates that there is additional service
information.
Seated
The guest has been seated as planned or
seated now.
Left
The guest has left as planned or left now.
Closed Hours
Indicates that the restaurant is closed for
the selected time period.
If the restaurant is closed for the selected
time period then the background colour of
the restaurant plan is dark grey.
Blocked function
space
If the restaurant is exclusively blocked for
the selected time period via conference and
catering management for a function room
which is used in combination with table
reservations, such as a restaurant or bar,
then the background colour of the
restaurant plan is coloured apricot.
59
Viewing the table hint
When you place the cursor over a table, a hint is displayed for approximately five
seconds.
The hint displays Capacity (Std/Max), Occupancy, Available Seats, Contact, Time,
Service Info, Number of Adults and children.
Change the view of the restaurant plan
You can change the view of the restaurant plan screen by:
Viewing a different restaurant - you can view the plan of each restaurant by selecting the
restaurant from the list of defined restaurants.
Selecting a zoom option - you can change the view of the restaurant plan screen by selecting
one of the zoom options. The zoom options allow you to change the view by either making the
tables on the screen appear larger, smaller, or fit to the size of the screen.
Zoom Options
Click this
button to increase the size of the display.
Click this
button to decrease the size of the display.
Click this
button to fit the restaurant plan diagram to the size of the screen.
Click this
button to display the restaurant plan diagram in its original size.
How to create a new reservation
1. Click the TABLE RESERVATION menu and select RESTAURANT PLAN.
2. Select the required RESTAURANT.
3. Complete any required filter criteria and click REFRESH.
4. Point to a vacant table or to a table which still has seats available if the existing
reservation is marked as shared and double-click.
The Table Reservation Edit screen is displayed.
or
Point to a vacant table and right-click to display the short-cut menu.
5. Select NEW RESERVATION, the Table Reservation Edit screen is displayed.
6. Complete the table reservation and click OK.
The restaurant plan screen is re-displayed with name of the guest is assigned to
the table and the table highlighted in the defined reservation colour.
How to edit a table reservation
1. Click the TABLE RESERVATION menu and select RESTAURANT PLAN.
2. Select the required RESTAURANT.
60
Table Reservation
3. Complete any required filter criteria and click REFRESH.
4. Select the table reservation that you want to edit or view and double click.
The Table Reservation Edit screen is displayed.
or
Point to the table reservation and right-click to display the short-cut menu.
5. Select EDIT TABLE RESERVATION, the Table Reservation Edit screen is displayed.
6. Make the changes on the Table Reservation Edit screen.
7. Click OK.
The restaurant plan screen is displayed.
How to cancel a reservation
1. Click the TABLE RESERVATION menu and select RESTAURANT PLAN.
2. Select the required RESTAURANT.
3. Complete any required filter criteria and click REFRESH.
4. Point to the reservation to be cancelled and right-click to display the short-cut
menu.
5. Select CANCEL RESERVATION.
A confirmation message is displayed.
6. Click YES to cancel the reservation.
The reservation is cancelled and is no longer shown on the restaurant plan screen.
How to mark a reservation as seated
1. Click the TABLE RESERVATION menu and select RESTAURANT PLAN.
2. Select the required RESTAURANT.
3. Complete any required filter criteria and click REFRESH.
4. Point to the required table reservation and right-click to display the short-cut
menu.
5. Click SEATED AS PLANNED if the reservation was seated at the time booked or click
SEATED NOW if the reservation was seated at this moment.
If the reservation was marked as SEATED NOW then a message is displayed asking if
you want to keep the reservation duration.
Table Reservation
61
6. Click YES to keep the reservation duration; the START time is updated with the
current time and the END time adjusted to keep the length of the reservation as
originally booked.
7. Clicking NO will update the START time with the current time and the END time will
remain as originally booked.
8. Click CLOSE to close the table reservation search screen.
How to mark a table reservation as departed
1. Click the TABLE RESERVATION menu and select RESTAURANT PLAN.
2. Select the required RESTAURANT.
3. Complete any required filter criteria and click REFRESH.
4. Point to the required table reservation and right-click to display the short-cut
menu.
5. Click LEFT AS PLANNED if the reservation departed at the scheduled time or click LEFT
NOW if the reservation departed at this moment.
If the reservation was marked as LEFT NOW then the TIME TO on the edit table
reservation screen is updated with the current time.
6. Click CLOSE to close the reservation plan screen.
How to assign a reservation to a table
1. Click the TABLE RESERVATION menu and select RESTAURANT PLAN.
2. Select the required RESTAURANT.
3. On the restaurant plan screen, select the check-box next to ASSIGN RESERVATIONS;
the Not Assigned Reservations dialog box is displayed.
The names of the guests who have made a reservation and have not yet been
assigned a table are listed.
62
Table Reservation
The number of reservations and the total number of persons are shown at the
bottom of the panel.
4. Select the guest name from the list and drag it to an empty table.
5. The name of the guest is added to the table and the table is highlighted in the
defined reservation colour.
A reservation can be unassigned by dragging the guest name back to the Not
Assigned Reservations dialog box.
How to move a reservation to another table
1. Click the TABLE RESERVATION menu and select RESTAURANT PLAN.
2. Select the required RESTAURANT.
3. Complete any required filter criteria and click REFRESH.
4. Point to the reservation to be moved, hold down the left-mouse button and drag
the reservation to the desired table.
The reservation is moved to the new table.
How to print the restaurant layout
1. Click the TABLE RESERVATION menu and select RESTAURANT PLAN.
2. Select the required RESTAURANT.
3. Click the PRINT PLAN button.
The restaurant plan is printed on the printer defined as the default printer on that
workstation.
Table Reservation
63
How to print a single restaurant booking
1. Click the TABLE RESERVATION menu and select RESTAURANT PLAN.
2. Select the required RESTAURANT.
3. Complete any required filter criteria and click REFRESH.
4. Point to the reservation to be printed and right-click to display the short-cut menu.
5. Select PRINT.
The Print Table Reservation dialog box is displayed.
6. Select the required TEMPLATES.
7. Select the required LANGUAGE.
8. Click PREVIEW to view and then print the report.
9. Click Email or Fax to email or fax the report respectively.
10. Click SMS to send the report as an SMS.
Reports to be printed via the PRINT button must exist with the section role TABLE
RESERVATION S INGLE PRINT under Miscellaneous → Reports.
How to print restaurant reports
1. Click the TABLE RESERVATION menu and select RESTAURANT PLAN.
2. Select the required RESTAURANT.
3. Click the PRINT REPORT button to display the Print Table Reservation dialog box.
4. Select the required TEMPLATES.
5. Select the required LANGUAGE.
6. The RESTAURANT and the FROM and TO dates default to the restaurant and dates
selected on the availability grid, but can be changed as required.
7. Click PREVIEW to view and then print the report.
64
Table Reservation
8. Click Email or Fax to email or fax the report respectively.
9. Click SMS to send the report as an SMS.
Reports to be printed via the PRINT REPORT button must exist with the section role
TABLE RESERVATION LIST.
How to display HTML Info
1. Click the TABLE RESERVATION menu and select RESTAURANT PLAN.
2. Select the required RESTAURANT.
3. Complete any required filter criteria and click REFRESH.
4. Point to the required table reservation and right-click to display the short-cut
menu.
5. Select HTML INFO, the Table Reservation Details screen is displayed.
How to create a restaurant plan 'on the fly'
1. Click the TABLE RESERVATION menu and select RESTAURANT PLAN.
2. Select the required RESTAURANT.
3. Click the configuration icon
to display the Restaurant Plans setup screen.
See Restaurants for how to define a new graphic floor plan.
Reports to be printed via the PRINT REPORT button must exist with the section role
TABLE RESERVATION LIST under Miscellaneous → Reports.
Table reservation setup is controlled by the user right TABLE RESERVATION under
Setup → Configuration → Users → User Definition → Rights → Configuration →
Table Reservations.
Note: On the restaurant plan the options ASSIGN RESERVATIONS and
SHOW AVAILABILITY are stored per user and remain selected/not
selected until next changed by the user.
Table Reservation
65
Restaurant Availability
This option may be used to view restaurant availability and is accessible via the TABLE
RESERVATIONS menu.
On the restaurant availability screen each restaurant is listed with the standard and maximum
person capacity for that restaurant.
The following information can be displayed per restaurant for the selected time interval:
Person Availability Max - the maximum capacity of restaurant.
Person Availability Std - the standard capacity of the restaurant.
Occupied Tables - number of occupied tables.
Free Tables - number of available tables.
Persons Occupied - number of persons booked and number of persons that are part of an event
but have not yet been allocated a table.
How to view restaurant availability
1. Click the TABLE RESERVATION menu and select RESTAURANT AVAILABILITY.
The Restaurants Availability screen is displayed.
2. To make a table reservation, click the blue arrow
next to the restaurant name
to display the Table Availability screen for that restaurant.
3. Click the
66
icon to display the Diary Table Reservation Info.
Table Reservation
4. Click CLOSE to close the Diary Table Reservation Info screen.
How to enter a new table reservation
1. Click the TABLE RESERVATION menu and select RESTAURANT AVAILABILITY.
The Restaurants Availability screen is displayed.
2. Click the required DATE in the Calendar and complete the required filter criteria;
click REFRESH.
3. Place the cursor on the grid box for the restaurant and start time the reservation is
required.
4. Left-click and hold down the left-mouse button.
5. Drag the mouse to the right until the required time is selected, release the leftmouse button, the short-cut menu is displayed.
6. Click NEW TABLE RESERVATION on the shortcut menu to display the table reservation
edit dialog box.
The DATE, RESTAURANT and TIME FROM TO are completed with the details selected on
the availability grid.
7. Complete the remaining table reservation details.
8. Click OK to save the table reservation.
How to view events
1. Click the TABLE RESERVATION menu and select RESTAURANT AVAILABILITY.
Table Reservation
67
The Restaurants Availability screen is displayed.
2. Click the required DATE in the Calendar and complete the required filter criteria;
click REFRESH.
3. Place the cursor on the grid box for the required restaurant and start time.
4. Right-click to display the Space Occupancy screen for the selected restaurant and
the selected time.
7. All events booked for the selected restaurant and time frame are displayed.
See: Space Occupancy for more information on the options available on the space
occupancy screen.
8. Click CLOSE to save the space occupancy screen.
9. Click OK to save the table reservation.
Availability search criteria
Search criteria
Description
Start Time
The start time is used as the start time for showing the
availability and occupancy of the restaurant. The default start
time for each restaurant is defined in the configuration.
View By
Select the time interval to view the availability display, the
options available are: 30 minutes, 1 hour and 4 hours.
Zoom Horizontal
Used to change the zoom settings horizontally of the time/date
slots, to expand the view for example. The zoom settings are
stored per user. After an upgrade or if using them for the first
time, the zoom settings can be by default set to the minimum,
but once changed they will be the same every time the user logs
on.
Zoom Vertical
Used to change the zoom settings vertically, i.e. enlarge the
restaurant names on the left hand side.
Filter
68
From....To
Select the from and to time to display on the availability screen;
the selected time span is displayed coloured pale green.
Options
Displays restaurant information as follows:
Table Reservation
Person Availability Max
Person Availability Std
Occupied Tables
Free Tables
Persons Occupied
Note: A time interval which is greyed out indicates that the restaurant
is closed for the selected time period.
Table Reservation
69
3
Resource Reservation
About Resource Reservations
The Suite 8 Resource Reservation Module is used for viewing or reserving a resource in an outlet
which has reservable resources. A resource is a reservable service the property might offer such as,
parking spaces, sun beds or pool chairs. Outlet and resource preferences can be added to the
guest's profile so that when making a resource reservation for that guest the preferred outlet and
resource are suggested.
The outlets are setup with the opening hours and suggested booking times. In each outlet all the
available resources are defined with setup and stay times, as well as minimum and maximum
number of guests per resource. When booking a resource a price can be entered on a per adult
basis.
A resource can be reserved via the RESOURCE RESERVATION menu or via the OPTIONS menu of the
both the Reservation Navigator and the Edit Reservation screen.
If a resource is reserved for a reservation it will be indicated at the bottom of the edit reservation
screen by an indicator. Selecting the RESRC. RES. indicator opens the Resource Reservation search
screen.
If the parameter USE AS RESOURCE RESERVATION is not selected then the module is called TABLE
RESERVATIONS instead of RESOURCE RESERVATIONS and can be used to view or reserve a table in a
restaurant, bar or other location which has tables that can be reserved.
Note: Table/Resource reservation functionality requires an additional
license code.
Resource reservation functionality is controlled by the parameter USE AS RESOURCE
RESERVATION under Setup → Configuration → Global Settings → Generic → Generic
4 tab → Table Reservations.
Table reservations functionality is controlled by the user rights VIEW, EDIT, INSERT,
DELETE and REINSTATE under Setup → Configuration → Users → User Definition →
Rights → Table reservations → Reservation.
Day Message functionality is controlled by the user rights VIEW, EDIT, INSERT and
DELETE under Setup → Configuration → Users → User Definition → Rights → Table
reservations → Day Message.
Reservation Search
This option may be used to search for a specific resource booking or to view all resource
reservations and is accessible via the RESOURCE RESERVATIONS menu.
From the resource reservation search screen it is possible to:
Search for and view resource reservations
Enter a new resource reservation
Edit an existing resource reservation
Cancel a resource reservation
Copy a resource reservation
Print a resource reservation
Resource Reservation
71
How to search for a resource reservation
1. Click the RESOURCE RESERVATIONS menu and select RESERVATION SEARCH or press CTRL
+ SHIFT + A.
The Resource Reservation Search screen is displayed.
2. Complete the search criteria by typing information or selecting information from
the available lists.
For an explanation of the search criteria, see the Resource Reservation Search
Criteria table below:
72
Fill in this field
With this information
Outlet
Select an outlet from the list.
Date to
Enter the from and to dates to limit the search to specific
dates.
Start time from to
Enter the from and to times to limit the search to a specific
time period.
Include history
Select this check box to include historical resource
reservation bookings.
Not Assigned
resources only
Select this check box to include only resources which have
not been assigned.
Room #
Enter the room number to limit the search to a specific room
number.
Last Name
The last name of the guest.
First Name
The first name of the guest.
Resource Reservation
Description
Enter the text to search for a resource reservation with a
specific description. The text can be entered using wildcards
(%) in order to search anywhere within the description, e.g.
%elevator will return reservations with the text 'Elevator
access required' and also 'Next to elevator'.
Status
Select a resource reservation status from the list, the status
Definite is selected by default.
Reservation #
Enter the reservation number to limit the search to a specific
reservation.
3. Click SEARCH to list the resources reservations according to the entered search
criteria.
4. Click CLOSE to close the resource reservation search screen.
Resource reservation search criteria
Fill in this field
With this information
Outlet
Select an outlet from the list.
Date to
Enter from and to dates to limit the search to specific dates.
Start time from to
Enter from and to times to limit the search to a specific time
period.
Include history
Select this check box to include historical resource
reservation bookings.
Not Assigned
resources only
Select this check box to include only resources which have
not been assigned.
Room #
Enter the room number to limit the search to a specific room
number.
Last Name
The last name of the guest.
First Name
The first name of the guest.
Description
Enter the text to search for a resource reservation with a
specific description. The text can be entered using wildcards
(%) in order to search anywhere within the description, e.g.
%elevator will return reservations with the text 'Elevator
access required' and also 'Next to elevator'.
Status
Select a resource reservation status from the list, the status
Definite is selected by default.
Reservation #
Enter the reservation number to limit the search to a specific
reservation.
Resource Reservation
73
Options available on the resource reservation search screen
SEARCH - to activate the search for resource reservation bookings according to the entered
criteria
RESET FILTER - resets the search criteria
NEW - to enter a new resource reservation
NEW SERIES - to enter multiple resource reservations
EDIT - to edit an existing resource reservation
CANCEL - to cancel a resource reservation
COPY - to copy an existing resource reservation
PRINT LIST - to print the selected resource reservations in a batch
PRINT SELECTED - to print the selected resource reservation
New Reservation
This option may be used to reserve a resource in one of the properties outlets and is accessible via
the RESOURCE RESERVATIONS menu. A resource can be reserved for a guest using the guest's profile
or using the guest's reservation and multiple guest profiles and/or reservations may be linked to
the same resource reservation.
If a resource is reserved for a reservation it will be indicated at the bottom of the edit reservation
screen by the indicator
Reservation search screen.
. Selecting the RESRC. RES. indicator opens the Resource
How to reserve a resource using the guest's profile
1. Click the RESOURCE RESERVATION menu and select NEW RESERVATION.
The Resource Reservation Edit screen is displayed.
74
Resource Reservation
2. In the PROFILES panel click the ADD button and select the required profile from the
Profile Search screen.
3. If the selected profile has a reservation then a message is displayed asking if the
reservation should be attached.
4. Click YES to attach the reservation to the resource reservation.
If YES was selected then the reservation is now marked as selected in the
RESERVATIONS panel.
Resource Reservation
75
5. The DATE defaults to today's date enter the date for which the resource reservation
is to be made or select a date from the calendar.
6. Select the OUTLET required from the list.
7. In the TEMPLATES box the first available reservation booking time is selected by
default. Click the down arrow to select the required reservation booking time.
8. The TIME FROM and TO are completed with the times from the reservation booking
template, but may be adjusted as required.
9. If the reservation is being made using a guest profile the # OF ADULTS defaults to
one, if the reservation is being made using a reservation then the # OF ADULTS,
Baby, CHILD and TEENAGER are taken from the reservation, but maybe changed if
required.
10. If the resource being booked is chargeable, enter the amount in the PRICE box.
11. The price is multiplied by the number of adults and the TOTAL displayed.
12. In the RESOURCES box, click on the down arrow to open the Select Available
Resource dialog box.
Multiple resources can be selected if required and resources can be displayed
according to attribute type.
13. Select the required resource and then click SELECT.
76
Resource Reservation
14. Select the COLOUR in which the resource reservation should be displayed in the
Resource Reservation Availability grid.
15. Enter any additional information in the DESCRIPTION box.
16. Enter information in the RESOURCE INFO box.
17. Click OK to save the resource reservation.
How to reserve a resource using the guest's reservation
1. Click the RESOURCE RESERVATION menu and select NEW RESERVATION.
The Resource Reservation Edit screen is displayed.
2. In the RESERVATIONS panel click the ADD button and select the required reservation
from the Reservation Search screen.
The reservation is now marked as selected in the RESERVATIONS panel.
3. The DATE defaults to today's date enter the date for which the resource reservation
is to be made or select a date from the calendar.
4. Select the OUTLET required from the list.
Resource Reservation
77
5. In the TEMPLATES box the first available reservation booking time is selected by
default. Click the down arrow to select the required reservation booking time.
6. The TIME FROM and TO are completed with the times from the reservation booking
template, but may be adjusted as required.
7. If the reservation is being made using a guest profile the # OF ADULTS defaults to
one, if the reservation is being made using a reservation then the # OF ADULTS,
BABY, CHILD and TEENAGER are taken from the reservation, but maybe changed if
required.
8. If the resource being booked is chargeable, enter the amount in the PRICE box.
9. The price is multiplied by the number of adults and the TOTAL displayed.
10. In the RESOURCES box, click on the down arrow to open the Select Available
Resource dialog box.
Multiple resources can be selected if required and resources can be displayed
according to attribute type.
11. Select the required resource and then click SELECT.
12. Select the COLOUR in which the resource reservation should be displayed in the
Resource Reservation Availability grid.
13. Enter any additional information in the DESCRIPTION box.
78
Resource Reservation
14. Enter information in the RESOURCE INFO box.
15. Click OK to save the resource reservation.
How to reserve a resource for multiple guest profiles
1. Click the RESOURCE RESERVATION menu and select NEW RESERVATION.
The Resource Reservation Edit screen is displayed.
2. In the PROFILES panel click the ADD button and select the required profile from the
Profile Search screen.
3. If the selected profile has a reservation then a message is displayed asking if the
reservation should be attached.
4. Click YES to attach the reservation to the resource reservation.
If YES was selected then the reservation is now marked as selected in the
RESERVATIONS panel.
Repeat steps 2 -4 for each additional guest profile to be added to the resource
reservation.
The number of persons now takes into account all the reservations attached to this
resource reservation.
5. Complete the remaining resource reservation details.
6. Click OK to save the resource reservation.
How to reserve a resource for multiple reservations
1. Click the RESOURCE RESERVATION menu and select NEW RESERVATION.
The Resource Reservation Edit screen is displayed.
2. In the RESERVATIONS panel click the ADD button and select the required reservation
from the Reservation Search screen.
The reservation is now marked as selected in the RESERVATIONS panel.
Repeat step 2 for each additional reservation to be added to the resource
reservation.
The number of persons now takes into account all the reservations attached to this
resource reservation.
3. Complete the remaining resource reservation details.
4. Click OK to save the resource reservation.
Resource Reservation
79
Resource Reservation Edit dialog box
Fill in this field
With this information
Profiles
The ADD button may be used to link a guest profile to the
resource reservation. Multiple guest profiles may be linked to
a single resource reservation.
Reservations
The ADD button may be used to link a guest reservation to
the resource reservation. Multiple guest reservations may be
linked to a single resource reservation.
Reservation
This option is displayed if a series of resource reservations is
being reserved, select the required reservation in order to list
all the possible reservation dates.
Date/Dates
Select the date or dates for which a resource reservation is
to be made.
Outlet
Select an outlet from the list.
Templates
Based on the outlet selected the first available reservation
booking time is selected by default. Click the down arrow to
select the required reservation booking time.
Time from to
The from and to times are completed with the times from the
reservation booking template, but may be adjusted as
required.
# of adults
Baby
Child
Teenager
If the resource reservation is being made using a guest
profile the # of adult's defaults to one. If the reservation is
being made using a reservation then the # of adults, Baby,
Child and Teenager entries are taken from the reservation,
but maybe changed if required.
Resources
Select the resource to be reserved from the Select Available
Table dialog box. Multiple resources can be selected if
required and resources can be displayed according to
attribute type.
Colour
Select the colour in which the resource reservation is to be
displayed on the Resource Reservation Availability grid.
Description
Enter any additional information.
Resource Info
Enter the information to be printed under resource info.
Outlets are defined via the option OUTLETS under Setup → Configuration →
Resource Reservations.
Resources are defined via the option RESOURCES under Setup → Configuration →
Resource Reservations.
Resource booking time templates are defined via the option OUTLET DEFAULT TIMES
under Setup → Configuration → Resource Reservations.
80
Resource Reservation
New Series
This option may be used to reserve the same resource reservation for several different dates in one
of the properties outlets and is accessible via the RESOURCE RESERVATIONS menu.
How to reserve a resource reservation for multiple dates using the guest's
profile
1. Click the RESOURCE RESERVATION menu and select NEW SERIES.
The Resource Reservation Edit screen is displayed.
2. In the PROFILES panel click the ADD button and select the required profile from the
Profile Search screen.
3. If the selected profile has a reservation then a message is displayed asking if the
reservation should be attached.
Resource Reservation
81
4. Click YES to attach the reservation to the resource reservation.
If YES was selected then the reservation is now marked as selected in the
RESERVATIONS panel.
If required, repeat steps 2 -4 for each additional guest profile to be added to the
resource reservation.
The number of persons now takes into account all the reservations attached to this
resource reservation.
5. Click the down arrow in the RESERVATIONS box and select the required reservation.
In the DATES panel all the dates for the reservation selected are listed and by
default all dates are selected. If no reservation is selected then today's date and
tomorrow's date are listed and by default both dates are selected.
6. Select the dates for which a resource reservation is to be made; the SELECT ALL,
DESELECT ALL and SET DATES buttons may be used.
7. Complete the remaining resource reservation details.
8. Click OK to save the resource reservation.
How to reserve a resource reservation for multiple dates using the guest's
reservation
1. Click the RESOURCE RESERVATION menu and select NEW SERIES.
The Resource Reservation Edit screen is displayed.
82
Resource Reservation
2. In the RESERVATIONS panel click the ADD button and select the required reservation
from the Reservation Search screen.
The reservation is now marked as selected in the RESERVATIONS panel.
Repeat step 2 for each additional reservation to be added to the resource
reservation.
The number of persons now takes into account all the reservations attached to this
resource reservation.
3. Click the down arrow in the RESERVATIONS box and select the required reservation.
In the DATES panel all the dates for the reservation selected are listed and by
default all dates are selected. If no reservation is selected then today's date and
tomorrow's date are listed and by default both dates are selected.
4. Select the dates for which a resource reservation is to be made; the SELECT ALL,
DESELECT ALL and SET DATES buttons may be used.
5. Complete the remaining resource reservation details.
6. Click OK to save the resource reservation.
Resource Reservation
83
Resource Reservation Edit dialog box
Fill in this field
With this information
Profiles
The ADD button may be used to link a guest profile to the
resource reservation. Multiple guest profiles may be linked to
a single resource reservation.
Reservations
The ADD button may be used to link a guest reservation to
the resource reservation. Multiple guest reservations may be
linked to a single resource reservation.
Reservation
This option is displayed if a series of resource reservations is
being reserved, select the required reservation in order to list
all the possible reservation dates.
Date/Dates
Select the date or dates for which a resource reservation is
to be made.
Outlet
Select an outlet from the list.
Templates
Based on the outlet selected the first available reservation
booking time is selected by default. Click the down arrow to
select the required reservation booking time.
Time from to
The from and to times are completed with the times from the
reservation booking template, but may be adjusted as
required.
# of adults
Baby
Child
Teenager
If the resource reservation is being made using a guest
profile the # of adult's defaults to one. If the reservation is
being made using a reservation then the # of adults, Baby,
Child and Teenager entries are taken from the reservation,
but maybe changed if required.
Resources
Select the resource to be reserved from the Select Available
Table dialog box. Multiple resources can be selected if
required and resources can be displayed according to
attribute type.
Colour
Select the colour in which the resource reservation is to be
displayed on the Resource Reservation Availability grid.
Description
Enter any additional information.
Resource Info
Enter the information to be printed under resource info.
Availability
This option may be used to view resource availability by outlet and is accessible via the RESOURCE
RESERVATIONS menu.
From the resource availability grid it is possible to:
View resource availability and occupancy
Enter a new resource reservation
Edit an existing resource reservation
Cancel a resource reservation
Print the resource availability and occupancy grid
How to search for resource availability
1. Click the RESOURCE RESERVATION menu and select AVAILABILITY.
The Resource Availability screen is displayed.
84
Resource Reservation
Note: The availability displayed initially is according to the outlet
order defined in the configuration.
2. Click the required DATE in the Calendar, the default is today's date.
3. Select an OUTLET from the list.
4. Change the START TIME and VIEW BY options if required.
The availability is displayed for the selected outlet.
5. Click CLOSE to close the availability screen.
How to enter a new resource reservation
1. Click the RESOURCE RESERVATION menu and select AVAILABILITY.
The Resource Availability search screen is displayed.
2. Click the required DATE in the Calendar.
3. Select the OUTLET from the list.
4. Place the cursor on the grid box for the resource and start time the reservation is
required.
5. Left-click and hold down the left-mouse button.
6. Drag the mouse to the right until the required time is selected, release the leftmouse button, the short-cut menu is displayed.
7. Click NEW RESOURCE RESERVATION on the shortcut menu to display the Resource
reservation edit dialog box.
The DATE, OUTLET, TIME FROM TO and RESOURCES are completed with the details
selected on the availability grid.
8. Complete the remaining resource reservation details.
9. Click OK to save the resource reservation.
Resource Reservation
85
How to cancel a resource reservation
1. Click the RESOURCE RESERVATION menu and select AVAILABILITY.
The Resource Availability search screen is displayed.
2. Select the required OUTLET and DATE.
3. Point to the resource reservation to be cancelled and right-click to display the
short-cut menu.
4. Click CANCEL RESERVATION, a confirmation message is displayed.
5. Click YES to cancel the resource reservation.
How to print resource availability
1. Click the RESOURCE RESERVATION menu and select AVAILABILITY.
The Resource Availability screen is displayed.
2. Click the required DATE in the Calendar, the default is today's date.
3. Select an OUTLET from the list.
4. Click PRINT to display the Print Resource Reservation dialog box.
5. Select the required TEMPLATE.
6. Select the required LANGUAGE.
7. The OUTLET and the FROM and TO dates default to the resource and dates selected
on the availability grid, but can be changed as required.
86
Resource Reservation
8. Click PREVIEW to view and then print the resource reservation availability.
9. Click EMAIL, FAX or SMS to email, fax or SMS the resource availability respectively.
Availability search criteria
Search criteria
Description
Start Time
The start time is used as the start time for showing the
availability and occupancy of the outlet. The default start time for
each outlet is defined in the configuration.
View By
Select the time interval to view the availability display, the
options available are: 30 minutes, 1 hour, 4 hours, a week, 2
weeks and a month.
Zoom
Horizontal
Used to change the zoom settings horizontally of the time/date
slots, to expand the view for example. The zoom settings are
stored per user. After an upgrade or if using them for the first
time, the zoom settings can be by default set to the minimum,
but once changed they will be the same every time the user logs
on.
Zoom Vertical
Used to change the zoom settings vertically, i.e. enlarge the
resource names on the left hand side.
Outlet
Select the required outlet from the list.
Day Message
Displays any day messages which have been defined for this
outlet on this day.
The default colour for reservations on the availability grid is defined via the option
DEFAULT RESERVATION COLOUR under Setup → Global Settings → Generic → Generic 3
tab → Table Reservations.
The default colour for day messages on the availability grid is defined via the
option DAY MESSAGE COLOUR under Setup → Configuration → Global Settings →
Generic → Generic 3 tab → Table Reservations.
The default minutes when creating a reservation from the resource availability
screen is controlled by the parameter SNAP TO Configuration → Global Settings →
Generic → Generic 3 tab → Table Reservations. For example, if snap to is set to 15
minutes then when creating a new reservation on the availability grid by selecting
a time range in the middle of the field 12.00 and dragging it to the end of 13.00,
the proposed start time for the new resource reservation will be 12.15.
Day Messages
This option may be used to enter resource notices, such as specials of the day, themes or special
messages.
Day messages are displayed on the resource availability screen.
How to enter a day message
1. Click the RESOURCE RESERVATION menu and select DAY MESSAGES.
The Day Message Search screen is displayed.
Resource Reservation
87
2. Click NEW to enter a new day message, the Day Message Edit dialog box is
displayed.
3. Select the OUTLET from the list.
4. Enter the from and to DATE for which the day message is valid or select the dates
from the calendar.
5. Enter the text of the day MESSAGE.
6. Click OK to save the message.
The message is listed in the Day Message Search screen.
88
Resource Reservation
How to edit a day message
1. Click the RESOURCE RESERVATION menu and select DAY MESSAGES.
The Day Message Search screen is displayed.
2. Select the required RESOURCE and DATE.
3. Click SEARCH to display all the day messages for the selected day and resource.
4. Select the day message to be edited and click EDIT.
The day message edit screen is displayed.
5. Make any changes necessary.
6. Click OK to save the changes.
7. Click CLOSE to close the day message search screen.
How to delete a day message
1. Click the RESOURCE RESERVATION menu and select DAY MESSAGES.
The Day Message Search screen is displayed.
2. Select the required RESOURCE and DATE.
3. Click SEARCH to display all the day messages for the selected day and resource.
4. Select the day message to be deleted and click DELETE .
5. A confirmation message is displayed.
6. Click YES to delete the day message.
Resource Reservation
89
7. Click CLOSE to close the day message search screen.
The default colour for day messages on the availability grid is defined via the
option DAY MESSAGE COLOUR under Setup → Configuration → Global Settings →
Generic → Generic 3 tab → Table Reservations.
Day Message functionality is controlled by the user rights VIEW, EDIT, INSERT and
DELETE under Setup → Configuration → Users → User Definition → Rights → Table
reservations → Day Message.
90
Resource Reservation
4
Index
A
Availability
Resource Reservation ........................... 84
Table Reservation ................................. 46
B
Blue Drill down arrow .................................. 8
D
Date Box
Changing the date ................................. 15
The date field......................................... 15
Day Messages .................................... 54, 87
H
HTML View ................................................. 9
L
Logging In ................................................... 7
N
Navigation Keys .......................................... 8
Q
Quick Keys ............................................... 13
R
Resource Reservation
About Resource Reservations ............... 71
Availability ............................................. 84
Day Messages....................................... 87
New Reservation ................................... 74
New Series ............................................ 81
Search................................................... 71
Restaurant Plan ........................................ 57
S
Series
Resource Reservation ........................... 81
Table Reservation ................................. 41
T
Table Reservation
About Table Reservations...................... 23
Availability ............................................. 46
Day Messages....................................... 54
New Series ............................................ 41
New Table Reservation ......................... 29
Search................................................... 23
Table Restaurant Plan............................... 57
Index
91
92
Index