1
LoRS Visual Tools v 0.82 User Guide:
An Introduction to the Logistical Runtime System
The Logistical Computing and Internetworking Laboratory
The University of Tennessee, Knoxville
loci.cs.utk.edu
www.utk.edu
LoRS Visual Tools v 0.82 User Guide
Chapter 1: Introduction................................................................................................... 3
Logistical Networking ................................................................................ 3
Component Technologies ........................................................................... 4
Chapter 2: Software Installation.................................................................................... 6
Windows ..................................................................................................... 6
Mac ............................................................................................................. 6
Unix............................................................................................................. 7
Chapter 3: Getting Started............................................................................................. 9
Display ...................................................................................................... 10
Upload....................................................................................................... 11
Download.................................................................................................. 14
Add a Copy ............................................................................................... 16
Refresh ...................................................................................................... 19
Quick Reference........................................................................................ 21
Chapter 4: Configuring Advanced Parameters ........................................................ 22
Upload....................................................................................................... 23
Download.................................................................................................. 25
Add a Copy ............................................................................................... 27
Refresh ...................................................................................................... 28
Delete ........................................................................................................ 29
Other → Preferences................................................................................. 30
Other → Display ....................................................................................... 31
Other → Depot List .................................................................................. 32
Appendix A: LoRS View display features...................................................................... 34
Appendix B: LoRS Command Line Tools ..................................................................... 38
Upload....................................................................................................... 38
Augment (Add Replicas) .......................................................................... 39
Trim (Remove Replicas)........................................................................... 40
Download.................................................................................................. 40
List ............................................................................................................ 41
Refresh ...................................................................................................... 42
Defaults ..................................................................................................... 43
The .xndrc Preferences File ...................................................................... 44
Acknowledgements
M. Jenée Mitchell, Author • Scott Atchley, Contributing Author • Jill Covington, Graphic Design •
Stephen Soltesz, Technical Consultant
2
Chapter 1: Introduction
The following documentation is a guide for the novice Logistical Runtime System Visual Tools
(LoRS VT) v 0.82 user. The information provided will aide you in installing and configuring the
LoRS software, learning basic command functions of the LoRS VT point and click interface
(such as Upload, Download, Add a Copy, and Refresh), as well as utilizing the LoRS View
display function. To put this information in context, we offer a brief introduction to the concept
of Logistical Networking and the underlying technologies that power the LoRS tools suite.
Logistical Networking
Logistical Networking is the coordinated scheduling of data transmission and storage within a
unified communications resource fabric. Like conventional logistics, which coordinates
transportation lines and warehouses for the distribution of physical goods, Logistical Networking
integrates networking and storage to form a coherent system for the distribution, staging, and
delivery of data.
Logistical Networking enhances communication and distributed collaboration by making storage
available as a shared network resource. The “working storage” offered by Logistical Networking
differs from other network storage schemes because it follows the same scalable design paradigm
as the Internet; meaning that it is based on a layered approach in which a highly generic, best
effort service provides the foundation on which all higher-level services are built. The
foundational service underpinning Logistical Networking is a best-effort service for managing
allocations on storage “depots.” In order to maximize scalability and sharability, storage
allocations are time-limited by default. All stronger services must be provided “end-to-end” at
higher layers of the network storage stack (see Figure 1). Extended storage duration, for instance,
is delivered by services that renew the “lease” on time-limited allocations; reliability and faulttolerance are provided by services that manage the fragmentation and replication of stored data.
Using this scalable approach, Logistical Networking has been able to create a testbed that offers
unbrokered access via the Internet to 22+ terabytes of storage space, on over 250 locally
maintained storage depots spread across the US and 20 other countries around the world.
The applications of Logistical Networking are myriad. You can store and transfer multi-terabyte
data sets, pre-position data for fast on-demand delivery, convey files many times too large to be
sent as standard email attachments, and share multi-TB data files on a one-time or regular basis
without the need to create and manage accounts. Logistical Networking provides an ideal
environment for working with distributed video and multimedia, making it easy to store large
amounts of digital content and then deliver it at high performance on flexible overlay content
distribution networks. Logistical Networking also offers Grid software developers the resources
necessary to manage the state of complex distributed applications, by moving and storing both
data sets and control state information.
3
Component Technologies
The LoRS tools suite incorporates the following Logistical Networking technologies:
•
IBP – Internet Backplane Protocol: a highly scalable, low-level mechanism for managing
network storage resources, through deployment and shared use of lightweight, time-limited
allocations on storage “depots.”
•
exNode – External Node: generalized data structure, analogous to the UNIX inode, which
holds the metadata necessary to manage distributed content stored on IBP depots and allow
file-like structuring of stored data. The exNode records storage metadata such as which IBP
depots house replicas of stored data.
•
L-Bone – Logistical Backbone: directory and resource discovery service cataloguing
registered IBP storage depots. The ever-growing L-Bone currently lists 250+ depots around
the world. IBP depots may register themselves with the L-Bone, providing information such
as the amount and type of storage offered, and geographical location of the depot. Clients
may query the L-Bone for depots that have specific characteristics, including minimum
storage capacity, duration policy, proximity, etc.
•
LoRS – Logistical Runtime System: software suite which uses the underlying capabilities
provided by IBP, the exNode, and the L-Bone to implement high-level data management
capabilities with strong properties, including high-performance access, reliability, and end-toend services such as data compression, checksums, and encryption.
•
LoRS VT – LoRS Visual Tools: graphical interface for the LoRS software suite, consisting of
the LoRS Command window and the LoRS View window. The Command window provides
point and click access to LoRS data management capabilities, while the View window is a
visualization tool displaying graphical representations of those capabilities, allowing the user
to view uploads, downloads, and inter-depot data transfers in real time.
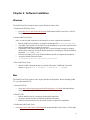
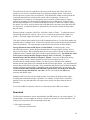
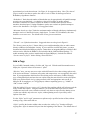
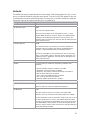
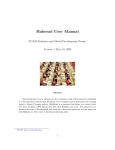
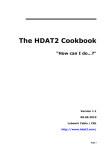
As noted above, these components have been designed and structured
according to the same layered, “end-to-end” design paradigm that the
Internet follows. IBP is at the bottom of the “network storage stack,”
(Fig. 1) and provides the generic, best-effort service that is the
foundation of Logistical Networking. IBP enables Logistical
Networking to build on a substrate of interchangeable and fully
interoperable storage depots that offer a uniform way to allocate and
manage storage with disparate underlying characteristics (disk, RAM,
tape, etc.).
Figure 1: The Network
Storage Stack
Applications
LoRS
exNode
L-Bone
IBP depots offer only a best effort service, so in order to accommodate
IBP
strong features like reliable data access, large file size, extended
duration, etc., support must be provided for fragmenting, replicating,
Local Access Layer
and distributing data among allocations on multiple IBP depots. The
exNode layer supports this key functionality by aggregating individual
Physical Layer
storage allocations to form a “network file.” An exNode holds
metadata about stored content, including a list of the IBP storage
allocations used to store fragments or replicas of file content, and the expiration date of each
storage allocation. The generalized nature of the exNode makes it an effective aggregation tool
for associating allocations on geographically distributed depots of different media types.
4
The Logistical Backbone, or L-Bone, records information about registered IBP depots, such as
location and available storage capacity. The L-Bone makes resource discovery simple, by
allowing clients to search for depots by geographical location (in a specific city, zip code,
country, etc.), as well as search according to storage capacity, time-limit policy, and other criteria.
The LoRS software integrates the underlying capabilities of IBP, the exNode, and the L-Bone
into a streamlined tool for storing, accessing, and managing data. LoRS Visual Tools provides
high-level data management capabilities in an easy to master environment.
For more information about the component technologies powering Logistical Networking, visit
the LoCI Lab website at http://loci.cs.utk.edu .
5
Chapter 2: Software Installation
Windows
The LoRS Visual Tools software suite requires Windows 2000 or later.
1. Download LoRS Visual Tools:
•
Go to http://loci.cs.utk.edu/lors/downloads and download LoRS Visual Tools v 0.82 for
Windows.
2. Install LoRS Visual Tools:
Note: you must remain connected to the internet in order to complete the installation.
•
•
•
•
•
Run the LoRS Tools installer by opening the downloaded file 'lors-win32-082.exe'
The LoRS Tools installer will check for current installations of ActiveTcl and ActivePerl,
and will download these programs if necessary.
If applicable, follow the prompts given by the Tcl and Perl install wizards to complete
setup of these programs. Accept the default parameters, including the default installation
directories c:/Tcl and c:/Perl/
Follow the prompts given by the LoRS installation wizard to complete the installation.
Accept the default destination folder
'c:\Program Files\LoCI Laboratory\LoRS Suite'
3. Run LoRS Visual Tools:
•
Start the LoRS Command interface by double clicking the "LoRSCmd" icon on the
desktop, or go to: Start -> Programs -> LoRS Suite -> LoRSCmd.
Mac
The LoRS Visual Tools software suite requires the Mac OSX platform. Before installing LoRS
VT, you must install Tcl/Tk.
1. Download Tcl/Tk:
•
Go to http://sourceforge.net/project/showfiles.php?group_id=10894 and download the
TclTkAquaBI package of Tcl/Tk for Aqua.
2. Install Tcl/Tk:
•
•
•
Run the install wizard by opening the downloaded application.
Accept the default directory and default installation parameters.
Follow the instructions given by the install wizard to complete the installation.
3. Download LoRS Visual Tools:
•
Go to http://loci.cs.utk.edu/lors/downloads and download LoRS Visual Tools v 0.82 for Mac.
6
4. Install LoRS Visual Tools:
•
Drag and drop the LoRS Command icon into your hard drive.
5. Run LoRS Visual Tools:
•
Start the LoRS Command interface by opening the LoRS Command application.
Unix
LoRS tools may be installed on any recent version of UNIX, Linux, or other Unix-like
environment. LoRS has been successfully deployed for production use and shown long term
stability on any Linux distributions with a 2.2 Kernel or later, SunOS 5.8, and AIX 5.2.
Preferred environments are those with the GNU compiler suite, irrespective of hardware.
Components not included with some systems (such as libxml2-2.4.25, popt-1.7, or zlib1.1.3) are included with the LoRS distribution for your convenience, but are built only if
they cannot be found on your system.
1. Configure using ./configure --prefix=$HOME/local
•
•
•
Depending on your platform, configure may take several minutes.
Optionally you may specify an installation prefix using the --prefix=<dir> switch to
configure, where <dir> is replaced with the full path to the destination directory. The
default value is /<LoRS source package root>/local/
If you do not wish to have the included packages built because they are already on your
system, you should be able to specify the current location of those packages. See
./configure --help for the available options.
2. Run make
3. Run make install
•
Add your install directory to your PATH and setup LD_LIBRARY_PATH if necessary.
4. Run lors_setup.sh
•
Run the lors_setup.sh script to setup the ~/.xndrc config file for the LoRS
Command Line Tools.
5. If the included libxml2 package was compiled and installed, you will need to set your
LD_LIBRARY_PATH environment variable in order for LoRS to find this library.
•
in CSH environment:
setenv LD_LIBRARY_PATH $LD_LIBRARY_PATH:<installpath>/lib
•
or in BASH/SH environment:
export LD_LIBRARY_PATH=$LD_LIBRARY_PATH:<installpath>/lib
where <installpath> is replaced with the value given to --prefix
7
•
In the event that this value is set improperly, when running the LoRS tools you will see
an error similar to this:
ld.so.1: /homes/user/local/bin/lors_ls: fatal: libxml2.so.2:
open failed: No such file or directory
Killed
6. Configure the LoRS Visual Tools graphical user interface: (Configuration of the LoRS VT
graphical user interface is optional; all data management capabilities offered by the GUI may
be accessed using the command line interface of the LoRS Command Line Tools.)
•
The Tcl/Tk and Perl scripts needed by the LoRS Visual Tools graphical interface are now
included with the developer source distribution. They will be installed to the specified or
default installation prefix, under the install directory in 'share/lors'
•
You my invoke the LoRS Command GUI with the command
wish ${installprefix}/share/lors/command.tcl
•
If Perl or Wish are unavailable on your system, you can install the
appropriate packages for your operating system or contact your system
administrator for instructions.
8
Chapter 3: Getting Started
This chapter will address the use of the basic commands available with the LoRS VT point and
click interface. For information on setting advanced parameters, please refer to Chapter 4.
* Please note: The figures used in this manual depict the LoRS Visual Tools v 0.81 interface for
Mac OS X. However, the LoRS Visual Tools v 0.82 interface is substantially identical on Mac,
Windows, and Unix operating systems to the version pictured.
To access LoRS VT for Windows:
•
Click on the LoRSCmd icon
OR Go to the Start menu, Programs, LoRS Suite, and click LoRSCmd.
•
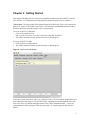
The LoRS Command window, pictured in Figure 2, should appear.
To access LoRS VT for Mac:
•
Click on the LorsCommand icon.
•
The LoRS Command window, pictured in Figure 2, should appear.
Figure 2: LoRS Command Window
Locate the Upload, Download, Add a copy, and Refresh tabs. We will examine each of these four
basic functions in this chapter, as well as the Display command (accessed through the Other tab).
Also notice the row of buttons along the bottom of the LoRS Command window. To stop any
command action while in progress, click the Stop button. To exit the program, click the Quit
button.
9
Display
The Display command invokes the LoRS View visualization tool, which may be used along with
the LoRS Command window to provide a graphical representation of data manipulations. The
current LoRS View display is an adaptation of a demonstration tool used to highlight the precise
control possible with Logistical Networking. As such, LoRS View shows data transfers and data
management in fine-grained detail.
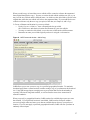
The LoRS View window will display one of five maps (USA, Europe, Asia, World, or USA &
Europe), with locations of IBP depots indicated on the map.
1. Choose a display map:
•
Click on the Other tab.
•
Click on the Display tab.
•
Your LoRS Command window should resemble Figure 2, above.
•
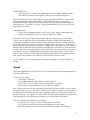
Under “Configuration Map,” select a map to view—USA, Europe, Asia, World, or USA +
Europe.
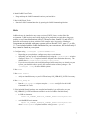
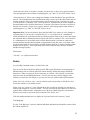
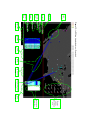
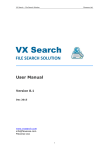
Figure 3: LoRS View window—USA map
10
2. Start LoRS View:
•
Click “Display Now” in the lower right-hand corner of the LoRS Command window.
•
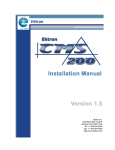
The LoRS View window should appear. (USA map view pictured in Figure 3)
Each disk-shaped icon shown on the LoRS View map represents an IBP depot. Stacked disks
indicate multiple depots in the same location. Color coding of the depots shows relative
geographical location. Depots listed on the right-hand side of the map are located outside the
current map view. For instance, in Figure 3, depots located outside of the US are listed on the
right hand side of the map.
3. Manipulate data:
•
Use the LoRS Command window to store, retrieve, copy, transfer, and manage data.
•
Watch the manipulations in real time with the LoRS View window.
As you use LoRS View to visualize data transfers and data management, you will see that
exNodes (xml encoded files that record metadata such as the location of individual blocks of
stored data) are graphically represented at the bottom left of the LoRS View display window by
one or more vertical bars, made up of stacked rectangular blocks (See Figure 5). Each stack of
blocks represents a replica of the stored data set. Within a stack, each block represents a block of
data housed in an individual storage allocation on an IBP depot. Each block is colored to match
the depot where the corresponding data is stored. Data transfers are represented by arrows drawn
from sender to receiver. Uploading and downloading are represented by blue arrows, drawn
between a block within the exNode diagram and the depot housing the corresponding block of
data. Depot to depot transfers are denoted by red arrows drawn between depots.
To exit LoRS View, click the Quit button in the bottom right-hand corner of the LoRS View
window.
Upload
The Upload command is used to upload a file from your local computer into storage allocated on
one or more IBP depots.
1. Select a file to upload:
•
Click on the Upload tab.
•
Your LoRS Command window should resemble Figure 4.
•
Under “Select a file to Upload,” enter a filepath in the box provided
OR Click Browse and choose the file you would like to upload.
Once you have selected a file to be uploaded, notice that the filepath box under “Save the exNode
as” has been filled in for you. By default, LoRS chooses to save the exNode in the same folder as
the uploaded file and with the same file name--appended with the .xnd extension to identify it as
an exNode file type. An exNode is an XML encoded file which holds metadata about your stored
data, including a list of the IBP storage allocations over which the data is distributed.
2. Choose a filename and location for your exNode:
•
Under “Save the exNode as,” enter a filepath in the box provided
OR Click Browse and choose a location and filename for your exNode.
•
Remember to name your exNode logically and save it using the .xnd extension.
11
Figure 4: LoRS Command window – Upload
The LoRS tools allow you to store data in a specified geographical location. To maximize upload
speed, consider uploading to a nearby IBP depot, perhaps within your own local domain. If the
data is to be downloaded from a remote location, consider storing the data near the download site.
For long-haul transfers or transfers across slow connections, consider uploading to a nearby IBP
depot, and then copying the data using “Add a Copy” (introduced later in this chapter) to a
location near the download site.
When you specify a geographical location, LoRS searches for available depot space at or near
that location. If your preferred location is unavailable, LoRS searches for depots within a
progressively larger radius and stores your data on available depots closest to your preferred
location. For instance, if requested storage in Pasadena is unavailable, LoRS will try to store
your data in Santa Barbara, then in San Diego, then in Stanford, etc.
While geographical proximity is a useful hint to data transfer performance, transfer speed is
governed by network proximity—which does not always mirror geographical proximity. If you
have knowledge of the network topology between source and destination sites, you may use it
when deciding which geographical locations are best suited for a particular application.
If you do not supply a preferred geographical location, LoRS will store your data on randomly
chosen depots.
3. Specify a geographical location:
•
Click on the first drop-down menu to the right of “Choose location” and select either zip,
state, country, or airport.
12
•
•
•
•
Use the second drop down menu to select the zip code (US only), state (US only),
country, or airport code of your preferred storage location.
If your preferred location is not one of the choices provided, choose from the left-hand
menu, then overwrite the right-hand menu box with an appropriate location code: five
digit zip code, two letter state abbreviation, three letter airport code, or two letter ISO
country code.
If you chose state or country from the left-hand menu, you may use the box labeled “city”
to enter the name of a city.
Choosing a preferred geographical location to store your data allows you to utilize
proximity to maximize upload or download performance.
4. Complete the upload:
•
Click “Upload Now” at the bottom of the LoRS Command window.
•
Watch the upload in the LoRS View window.
•
The upload is complete when LoRS View shows a status of “Done.”
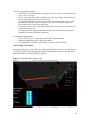
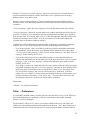
In Your LoRS View Window:
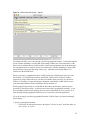
During the upload your LoRS View window should resemble Figure 5. In the bottom left-hand
portion of the LoRS View window, the name and size (in bytes) of your file will be listed. LoRS
View indicates the status of the upload by displaying the name of the function being executed
(“SetStore” in the case of Figure 5) and a description of the activity taking place—such as
searching, allocating, storing, etc.—along with the current data transfer rate for the upload.
Figure 5: LoRS View window – Upload
13
The exNode for the file to be uploaded is represented at the bottom left of the LoRS View
window by one or more vertical bars made up of stacked rectangular blocks. Each stack of
blocks represents a replica of the stored data set. Individual blocks within a stack represent the
constituent data blocks into which the file content will be fragmented. (For more on
fragmentation, see Chapter 4.) Each fragment may be stored on a different depot. Figure 5
pictures the uploading of a file that has been fragmented into 18 data blocks, with those data
blocks being distributed over two different IBP depots near the UT Knoxville campus. During
the upload, you will see an arrow drawn from each data block to the depot where that data block
is being stored. As individual blocks are uploaded, they are colored to match the depot where
they are stored.
When the upload is complete, LoRS View will show a status of “Done.” To redraw the arrows
representing data transfers, click the “Draw Arrows” button at the bottom of the LoRS View
window. The button toggles between the “Draw Arrows” and “Delete Arrows” functions.
Click the List button at the bottom of the LoRS Command window to view the block number and
expiration date of each data block. Each block is labeled with a unique identifying block number,
shown in parentheses. The expiration date of the block is listed next to the block number.
Storage allocations made on IBP depots are time-limited. Local depot policy, set by
individual depot owners, dictates the maximum duration of storage (length of storage “lease”)
allowed on each depot. When uploading data, the user may request a specific storage duration.
LoRS then locates available depot space with the required duration policy. By default, the LoRS
Tools request a storage duration (length of storage “lease”) of one day. To request a
duration longer than the default see Chapter 4, Upload. At the time of allocation (during
upload) you may request a storage duration up to the local maximum (see Ch. 4). To
accommodate an extended storage lifetime, you may also renew allocations for additional
duration periods using the Refresh command introduced later in this chapter. Any stored data will
become inaccessible after its expiration. Keep in mind that data blocks stored on different depots
may have different expirations dates, depending on the local duration policy of each depot. To
avoid inaccessible data resulting from individual expired blocks, use the Refresh command
to renew the storage allocations for your data. Be sure to refresh the data before any
necessary data blocks expire.
Although LoRS View lists only the month and day of expiration, the duration timer begins
counting at the moment the storage is allocated. For example, if a data block is stored for a
duration of one day, that data block will expire exactly twenty-four hours from the time of
allocation.
To reset the LoRS View display, click Clear at the bottom of the LoRS View window.
Download
The Download command is used to download data from IBP storage to your local computer. To
download data, you must supply the exNode (.xnd file) for the data you wish to download. The
exNode acts as a pointer to the corresponding stored data.
1. Select data to download:
•
Click on the Download tab.
14
•
•
Your LoRS Command window should resemble Figure 6.
Under “Select an exNode to Download,” enter an exNode (.xnd file) in the box provided
OR Click Browse and select the exNode for the data you wish to download.
Figure 6: LoRS Command window – Download
2. Choose a filename and location for your data:
•
Under “Download the file to,” enter a filepath in the box provided
OR Click Browse and choose a location and filename for your data.
•
Remember to select the proper extension for your file type.
3. Complete the download:
•
Click “Download Now” at the bottom of the LoRS Command window.
•
Watch the download in the LoRS View window.
•
The download is complete when LoRS View shows a status of “Done.”
In Your LoRS View Window:
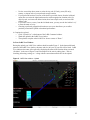
During the download, your LoRS View window should resemble Figure 7. The filename, file
size (in bytes), status of the download, and the current data transfer rate will be listed in the
bottom left-hand corner of the LoRS View window.
The exNode for the data set to be downloaded is represented by one or more vertical bars at the
bottom left of the LoRS View window. Each bar is composed of a stack of smaller blocks which
represent the constituent data blocks into which the data is fragmented. Each fragment may be
stored on a different depot. The blocks are colored to match the depots on which they are stored.
15
Figure 7: LoRS View window – Download
As the download progresses, two vertical bars will appear at the bottom right of the LoRS View
window. The first bar shows the constituent data blocks of the downloading file. Arrows are
drawn to each block from the depot supplying the corresponding data. When a block is finished
downloading, it is colored to match the depot which supplied the data. The second vertical bar is
a status bar, showing the progress of the download. The data blocks may arrive out of order, but
the status bar on the right advances only when the next block in the sequence has been
successfully downloaded, even if later blocks have already been acquired.
When the download is complete, LoRS View will show a status of “Done.” To reset the LoRS
View display, click Clear at the bottom of the LoRS View window.
Add a Copy
“Add a copy” (also called the Augment command) is used to add a replica of stored data to IBP
storage. You must supply the exNode (.xnd file) for the data you wish to augment. To create
multiple replicas with a single “Add a Copy” command, see Chapter 4, Add a Copy.
1. Select data to augment:
•
Click on the Add_Copy tab.
•
Your LoRS Command window should resemble Figure 8.
•
Under “Select an exNode to Augment,” enter an exNode in the box provided
OR Click Browse and select the exNode for the data you wish to augment.
16
When you add a copy of stored data, a new exNode will be created to reference the augmented
data (original data plus the copy). You may overwrite the old exNode with the new one, or you
may save the new exNode under a different name—in which case the old exNode will refer to the
original data, while the new exNode will refer to the augmented data. If you would like the new
exNode to reference only the new copy (or copies) of the data, see Chapter 4, Add a Copy.
2. Choose a filename and location for your new exNode:
•
Under “Save new exNode to,” enter a filepath in the box provided,
OR Click Browse and choose a location and filename for your new exNode.
•
You may overwrite the old exNode, or save the new exNode under a different name.
•
Remember to name your exNode logically and save it using the .xnd extension.
Figure 8: LoRS Command window – Add a Copy
LoRS allows you to store your new copy in a specified geographical location. To maximize
download speed from a remote location, consider storing a copy of your data near the download
site. Using IBP storage depots as staging areas to pre-position data for fast downloading is
especially efficient for long-haul transfers, as well as transfers across slow connections or
network boundaries.
When you specify a geographical location, LoRS searches for available depot space at or near
that location. If your preferred location is unavailable, LoRS searches for depots within a
successively larger radius and stores your data on available depots closest to your preferred
location. If you do not supply a preferred geographical location, LoRS will store your data on
randomly chosen depots.
17
3. Specify a geographical location:
•
Click on the first drop-down menu to the right of “Choose location” and select either zip,
state, country, or airport.
•
Use the second drop down menu to select the zip code, state, country, or airport code of
the preferred storage location for your new copy.
•
If your preferred location is not listed, choose from the left-hand menu, then overwrite
the right-hand menu box with a five digit zip code, two letter state abbreviation, two
letter country code, or three letter airport code.
•
If you chose state or country from the left-hand menu, you may use the box labeled “city”
to enter the name of a city.
•
Choosing a preferred geographical location for your new replica allows you to utilize
proximity to maximize download performance.
4. Complete the augmentation:
•
Click “Add_Copy Now” at the bottom of the LoRS Command window.
•
Watch the augmentation in the LoRS View window.
•
The augmentation is complete when LoRS View shows a status of “Done.”
In Your LoRS View Window:
During the augmentation, your LoRS View window should resemble Figure 9. The filename, file
size (in bytes), status of the augmentation, and the current data transfer rate will be listed in the
bottom left-hand corner of the LoRS View window.
Figure 9: LoRS View window – Add a Copy
18
The data to be augmented is represented by a vertical bar (or bars) at the bottom left of the LoRS
View window. The bar is composed of a stack of smaller blocks which represent the constituent
data blocks into which the data is fragmented. Each block is colored to match the depot on which
the corresponding block of data is stored.
A vertical bar representing the new copy will appear to the immediate right of the bar(s)
representing the previously stored data. Each block in the new bar will show two different colors
(see Figure 9). The triangle of color on the left side of the block is color coded to indicate the
depot supplying the given block of data (the sender in the data transfer). As a data block is
copied to a new storage allocation, the remainder of the block is colored to match the depot
storing the new copy of the data (the receiver in the data transfer). As the data is copied, interdepot data transfers are represented by red arrows drawn from sender to receiver.
When the augmentation is complete, LoRS View will show a status of “Done.” To see the new
block numbers and expiration dates for the augmented data, click List in the LoRS Command
window and view the exNode diagram in the LoRS View window. Notice that the block numbers
for all the data blocks have been reordered, ascending left to right and top to bottom, to
accommodate the new copy.
To reset the LoRS View display, click Clear at the bottom of the LoRS View window.
Refresh
The Refresh command renews the time-limited allocations (storage “leases”) used to store data on
IBP depots. Storage allocations made on IBP depots are time-limited and any stored data will
become inaccessible after its “lease” expires. Each constituent data block of a fragmented data
set may have a different expiration date, depending on the local duration policy of the depot on
which it is stored. To avoid inaccessible data resulting from expired blocks, use the Refresh
command to renew the storage allocations for your data. Be sure to refresh the data allocations
before any necessary data blocks expire. (To specify the amount of time by which the storage
allocations are extended with the Refresh command, see Chapter 4, Refresh. Otherwise,
allocations will be extended by the LoRS default of one day.)
1. Select data to refresh:
•
Click on the Refresh tab.
•
Your LoRS Command window should resemble Figure 10.
•
Under “Select an exNode to Refresh,” enter an exNode in the box provided
OR Click Browse and select the exNode for the data you wish to refresh.
2. Complete the refresh:
•
Click “Refresh Now” at the bottom of the LoRS Command window.
•
Watch the refresh in the LoRS View window.
•
The refresh is complete when LoRS View shows a status of “Done.”
19
Figure 10: LoRS Command window – Refresh
In Your LoRS View Window:
During the refresh, the filename and status of the refresh will be listed in the bottom left-hand
corner of the LoRS View window.
The data to be refreshed is represented by a vertical bar at the bottom left of the LoRS View
window. The bar is composed of a stack of smaller blocks which represent the constituent data
blocks into which the data is fragmented. Each block is colored to match the depot on which the
corresponding data is stored.
The new expiration date of each block is listed next to the block number. Each data block may
have a different expiration date, depending on the local duration policy of the depot on which it is
stored and the preferred duration requested during the refresh. To set a storage duration different
than the default, see Chapter 4.
Although LoRS View lists only the month and day of expiration, the duration timer begins
counting the moment the storage is allocated. For example, if a data block is stored for a duration
of one day, that data block will expire exactly twenty-four hours from the time of allocation.
20
Quick Reference
Display – Invokes the LoRS View visualization tool.
•
•
•
•
•
Click the Other tab.
Click the Display tab.
Under “Configuration Map,” select a map to view.
Click “Display Now” to start LoRS View.
Use the LoRS View window to visualize data manipulations in real time.
Upload – Transfers data from your local computer into storage on one or more IBP depots.
•
•
•
•
•
•
Click the Upload tab.
Under “Select a file to Upload,” enter the file you would like to upload.
Under “Save the exNode as,” choose a location and filename for your exNode.
Name your exNode using the .xnd extension.
Under “Choose Location,” use the left-hand menu to select zip, state, airport, or country, and
then enter an appropriate location code in the right-hand menu box: five digit zip code (US
only), two letter state abbreviation (US only), three letter airport code, or two letter ISO
country code.
Click “Upload Now.”
Download – Transfers data from IBP storage to your local computer.
•
•
•
•
Click the Download tab.
Under “Select an exNode to Download,” enter the exNode for the data you wish to download.
Under “Download the file to,” enter a filename and location for your file.
Click “Download Now.”
Add a copy – Creates and stores replicas of file content on one or more IBP depots.
•
•
•
•
•
•
•
Click the Add_Copy tab.
Under “Select an exNode to Augment,” enter the exNode for the data you wish to augment.
Under “Save new exNode to,” enter a filename and location for your new exNode.
You may overwrite the old exNode, or save the new exNode using a different name.
Name your exNode using the .xnd extension.
Under “Choose Location,” use the left-hand menu to select zip, state, airport, or country, and
then enter an appropriate location code in the right-hand menu box: five digit zip code (US
only), two letter state abbreviation (US only), three letter airport code, or two letter ISO
country code.
Click “Add_Copy Now.”
Refresh – Renews the time-limited IBP storage allocations used to store file content.
•
•
•
Click the Refresh tab.
Under “Select an exNode to Refresh,” enter the exNode for the data you wish to refresh.
Click “Refresh Now.”
21
Chapter 4: Configuring Advanced Parameters
This chapter will discuss the use of all advanced settings for the major LoRS Tools commands.
The advanced parameters described below will give the user detailed control over the functioning
of the LoRS Tools commands and allow fine tuning of LoRS Tools capabilities to fit the needs of
individual applications. This chapter will address the advanced parameters necessary to
implement user controlled fault-tolerance strategies, as well as end-to-end services such as
encryption, checksum, and compression. Before proceeding, we briefly discuss some key
concepts necessary to the understanding of the following material: soft vs. hard storage,
fragmentation, replication, and time-limited storage as they relate to Logistical Networking.
IBP depots may offer two types of storage allocations, soft or hard. Soft storage allocations are
made using free space in the local file system—space that may be reclaimed at any time
according to the needs of the local system. Hard storage allocations are made using dedicated
IBP storage space that will not be reclaimed by the local system. Hard storage is highly stable
and offers stronger guarantees that your stored data will remain intact and accessible for a
specified duration. Soft storage makes weaker guarantees, but is offered by IBP depots in great
abundance. The firm commitment of resources necessary for hard storage results in hard storage
being offered more scarcely than soft. And, accessibility of both soft and hard storage allocations
are vulnerable to machine and network outages. Hence, IBP is a best-effort service. Strong
properties such as reliability and extended storage duration must be layered over the foundational
capabilities of IBP.
The LoRS Tools software facilitates the combined use of replication and fragmentation to attain
strong assurance of sustained data accessibility. As on the hard drive of a computer, a file stored
with IBP may be fragmented into many blocks of data, with each data block stored in a separate
location. The fragments may be spread across several depots, or stored in separate allocations
within the same depot. A file may be left whole (one fragment) or split into many smaller data
blocks. With LoRS Tools, fragmentation is controlled by specifying the fragmentation block
size, referred to as “block size.” The number of fragments into which a file is divided will equal
the total file size divided by the specified block size. You may also specify the maximum number
of depots over which the fragments will be distributed.
LoRS allows you to specify the number of copies of your data to be stored. Storing replicas of
data sets on multiple depots guards against inaccessibility or data loss if one depot fails.
Replication may be used in conjunction with fragmentation to accomplish a high level of faulttolerance. Although LoRS does not provide explicit control over where individual data blocks
are stored, a desirable striping and redundancy pattern may be achieved by distributing multiple
copies of fragmented data across several depots.
As mentioned in Chapter 3, IBP storage allocations are time-limited. Each depot owner sets their
own local policy specifying the maximum allowed duration of storage allocations on their depot.
When storing data, you specify the duration of storage that you desire. LoRS attempts to store
your data on depots which offer time-limits greater than or equal to your specified duration. As
most depots offer only short-term storage, available storage capacity is inversely related to
requested duration. The shorter the requested duration, the more likely you will be to find
available depots that meet your specifications.
22
Upload
In your LoRS Command window, click the Upload tab. Click the small downward arrow to
display the “Optional/Advanced Parameters” panel.
exNode Structure:
“Copies” specifies the number of replicas of your data set that should be stored. More copies
mean a higher probability that you will avoid data loss or inaccessibility caused by depot failure.
However, the value of each additional replica will be balanced by the storage capacity needed to
house it. Depending on the importance of the stored data, three to five copies provides sufficient
backup in most instances.
“Blocksize” indicates the size of the data blocks into which your data will be fragmented. The
number of fragments into which a data set is divided will equal the total file size divided by the
specified block size. If you wish to divide a file into ten fragments, then choose a block size that
is roughly one-tenth of the total file size. The last data block may be smaller than the others,
since it holds what data is left over after filling the other blocks to capacity. If you choose a
block size larger than the file size, the file will not be fragmented. Choose a blocksize small
enough to cause sufficient fragmentation for fault tolerance considerations, but large enough to
allow good upload performance. Larger blocksize allows faster uploads by decreasing the
number of allocation operations necessary to store the file content, but the effect is asymptotic. A
blocksize between 512 KB and 2 MB is optimal for most applications. Enter your preferred block
size by typing a numeric value and appropriate units (use K for kilobytes, M for megabytes, or G
for gigabytes) without a separating space; e.g. “1600K” or “2M”, but not “1600 K”.
“End-to-End Blocksize” is the size of data chunks to which end-to-end checksum, encryption, and
compression services will be applied. The “end-to-end block size” must be smaller than the
fragmentation “block size.” If you enter a preferred end-to-end block size which is larger than the
selected fragmentation block size, LoRS will make the end-to-end block size equal to the
fragmentation block size. When using checksum, as each block of stored data is downloaded, the
value of checksum is reconciled for each end-to-end chunk within the downloading data block.
Setting a smaller end-to-end block size means checksum will be applied to a smaller chunk of
data and data integrity will be checked more often during download. If checksum indicates that
data has been corrupted, LoRS will stop downloading the corrupted data block and look for
another available copy of the block. Using a small end-to-end blocksize for checksum may save
time, since the more quickly a corrupted data block is identified, the more quickly that block may
be abandoned in favor of an intact copy. However, decreasing the end-to-end block size
increases the amount of metadata stored with each data block, thereby increasing the size of the
stored data set, as well as increasing the number of operations necessary to perform each
successful download. Enter your preferred end to end block size by typing a numeric value and
appropriate units (use K for kilobytes, M for megabytes, or G for gigabytes) without a separating
space; e.g. “1600K” or “2M”, but not “1600 K”.
Data Condition:
“Duration” refers to the duration of the time-limited storage allocations used to store data on IBP
depots. Duration dictates the length of time the data will be kept in storage before it expires.
When an IBP storage allocation expires, that depot space becomes available for other IBP users,
and any data stored in the expired allocation will no longer be accessible. When requesting a
23
duration, consider that most depots offer short term storage only. Each depot owner sets their
own local duration policy, limiting the maximum allowed storage duration for their depot. Most
depots offer a maximum duration of two days or less. The shorter the requested duration of your
allocation, the greater the amount of depot space that is available. After data has been stored, its
lifetime may be extended at anytime before it expires by using the Refresh command (discussed
in Chapter 3 and later in this chapter). Enter your preferred duration in units of seconds (s),
minutes (m), hours (h), or days (d), by typing a numeric value and appropriate units without a
separating space; e.g. “90m” or “364.25d”, but not “90 m”.
“Allocation Type” is the type of storage—soft or hard—used to store data. Soft allocations are
made using free space in the local file system that may be reclaimed if needed, while hard
allocations are made using dedicated IBP storage that will not be reclaimed by the local system.
Hard storage is stable, but available in limited quantities. Soft storage is abundantly available,
but less stable. Although individual storage allocations, hard or soft, offer no absolute guarantees
of reliability or future accessibility, fault-tolerance may be achieved by using replication and
fragmentation across several depots to produce a suitable striping pattern.
Features listed under “End-to-end Condition” will be applied to end-to-end data blocks before
uploading. To enable an end-to-end feature, check the box next to that feature.
“Compression” refers to storing data in a format that requires less space than usual. This feature
works well when applied to uncompressed files such as plain text files, but should not be used on
files which are already compressed. Applying the compression feature to files which are already
compressed will increase the size of the stored file. Note that some high level applications, such
as word processing or spreadsheet software, perform automatic file compression. Files created by
such programs are already compressed, so attempting end to end compression on these files will
result in enlarged file size.
“AES-Encrypt” uses the AES encryption algorithm to secure data before uploading to IBP
storage. Encryption protects your privacy by providing data security, even if the data is stored on
an untrusted server.
“MD5-Checksum” uses the MD5 one-way hash function to label each end-to-end data block with
an identifying numerical value. The same function is used at download time to calculate a
numerical value for each end-to-end data block as it is retrieved from storage. The calculated
value is compared with the stored value, and if the two values disagree, then the data has been
corrupted. If checksum indicates that a data block has been corrupted, LoRS will stop
downloading the corrupted data block and look for another available copy of the block.
Upload Performance:
“Threads” refers to the maximum number of data transfer operations to be performed
concurrently. Each thread is an individual transfer stream, storing or retrieving a separate block
of data. Maximizing upload and download performance is a matter of balancing the number of
threads with available bandwidth. Using more threads usually means faster performance,
provided that sufficient bandwidth is available. If a thread value of “all” is selected there is no
limit placed on the number of threads which may be used, and LoRS will use a separate thread for
each data block transfer. For transfers within a local area network, four to six threads are
recommended. For transfers over public wide area networks, use one to two threads for TCP
friendliness. For transfers over dedicated high-speed links, as between research facilities, try
using ten or more threads for maximum performance. See Figure 11 for further suggestions.
24
“Max Depots” indicates the maximum number of depots over which your data will be distributed.
In order to achieve a sufficient level of striping, choose a “Max Depots” value greater than or
equal to the number of copies to be stored. For reliable access and fault-tolerance, the “Max
Depots” value should be at least three to five.
“DepotList file”—see “Other → Depot List” section below.
Enter a filepath in the box provided or click Browse to choose a depot list file.
Download
In your LoRS Command window, click the Download tab. Click the small downward arrow to
display the “Optional/Advanced Parameters” panel.
Transaction Size:
“Blocksize” indicates a preferred size for the download increment, the amount of data to be
retrieved per transfer block during a download. If end to end conditions—checksum, encryption,
and compression—are not applied to the stored data, you may choose any value for preferred
download blocksize. The download blocksize value you specify will be the maximum transfer
block size. The size of actual transfer blocks may vary, but will be less than or equal to the
preferred download blocksize. When downloading data which has been stored using end to end
features, the transfer size must be a multiple of the end to end block size and less than or equal to
the fragmentation block size. If you choose a value for blocksize that is not a multiple of end to
end block size, the transfer block size is rounded up to the next closest end to end block size, to a
maximum of the fragmentation block size. A download blocksize between 512 KB and 2 MB is
usually optimal. Enter your preferred block size by typing a numeric value and appropriate units
(use K for kilobytes, M for megabytes, or G for gigabytes) without a separating space; e.g.
“1600K” or “2M”, but not “1600 K”.
“Cache” specifies the maximum number of data blocks to be held in temporary memory while
awaiting release to the output file. During the download process, data blocks are retrieved, and
then concatenated in the proper order to reassemble the fragmented file. Some data blocks may
download more quickly than others, causing blocks to arrive out of order. These non-sequential
data blocks are cached until they can be released in the correct order to the output file. The
download thread that retrieved the out of order block is then free to begin retrieving another
block. Without a cache, a thread that has retrieved a data block must wait until all preceding data
blocks in the file have downloaded, before releasing the data and moving on to retrieve another
data block. In general, a cache value of one to two times your thread count will enhance
download performance. Note that the amount of memory used during download is (t + c) b, the
sum of thread count plus cache, times block size. Choose threads, cache, and blocksize values so
that the amount of memory actually used will be less than one-half of your available physical
memory. If Progress Driven Redundancy is used, then the value of cache must be greater than
the value of progress in order for the optimization algorithm to function.
“Prebuffer” is used in conjunction with streaming content and refers to the number of data blocks
which, at the beginning of a download, should be initially queued before being released to the
output file. Prebuffer is used only at the beginning of a download to hold the first specified
number of data blocks before playback is initiated. This provides a preliminary cushion, so that
25
the content stream will not be interrupted if playback outpaces the progress of the download. Try
a prebuffer value of three and increase if necessary for slow connections.
Use the “Offset” and “Length” parameters to download only a specified section of data, without
retrieving the entire data set:
“Offset” specifies the location within a data set where the “Download” function will begin
downloading data. Offset is measured in bytes from the beginning of the data set. The default
value of zero indicates that “Download” should begin retrieving data at the beginning of the data
set. To specify an offset other than zero, enter a whole number of bytes (as measured from the
beginning of the data set) in the box provided.
“Length” specifies the total number of data bytes to be downloaded. “Download” will retrieve
data starting at the location specified by offset and ending at the location offset + length (or the
end of the data set, whichever comes first). Length has a default value equal to the size of the
data set minus the value of offset, indicating that “Download” should retrieve all bytes of data
located between offset and the end of the data set. To set a value of length other than the default,
enter a whole number (the total number of bytes to be downloaded) in the box provided.
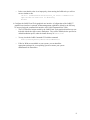
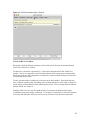
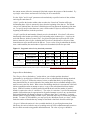
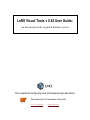
Figure 11: Suggested values for key download parameters
Network Connection
Internet, WAN,
Public network
LAN,
Private network
Threads
Blocksize
Cache
Dial-Up/ISDN
1
512KB – 2MB
1
1
1
Cable/DSL/T-1
2-3
512KB – 2MB
10
6
2
less than 100 Mbps
4-6
512KB – 2MB
20
9
3
20+
15+
3
100 Mbps and over 10 – 100 512KB – 2MB
Progress Redundance
Note: Mbps is megabits per second. To convert to MBps (megabytes per second), divide the Mbps by 8.
Recommendations similar to those given in Figure 11 may be found at http://promise.sinrg.cs.utk.edu/ibpvo/about.html
Progress Driven Redundancy:
The “Progress Driven Redundancy” section allows you to further optimize download
performance by specifying how LoRS will react to slow or stalled data blocks during download.
The value of “progress” defines the notion of a slow or stalled data block, by specifying how
many data blocks may be retrieved ahead of the pending block before redundant attempts will be
made to retrieve the slow block. When a slow-downloading data block is encountered, LoRS will
initiate a parallel thread in an attempt to retrieve a copy of the stalled data block from another
depot. LoRS will continue to initiate parallel download threads until the number of parallel
threads is equal to the value of “redundance”. The value of “redundance” specifies the maximum
number of threads that may be appropriated in all parallel attempts to retrieve any one data block.
Each parallel thread will attempt to connect to a different depot, but if “redundance” is greater
than the number of depots holding available copies, then each depot may be contacted by multiple
threads. To ensure TCP friendliness, you may specify the “Maximum threads per depot”, which
limits the number of threads that may attempt to download a data block from the same depot.
“Progress” defines the notion of a slow or stalled data block, by specifying how many data
blocks may be retrieved after the start of a pending retrieval, before redundant attempts to retrieve
the slow block are made using parallel download threads. The value of progress should be
26
approximately twice the thread count. See Figure 11 for suggested values. Note: The value of
progress must be less than or equal to the value of cache in order for the Progress Driven
Redundancy algorithm to function.
“Redundance” limits the total number of threads that may be appropriated in all parallel attempts
to retrieve any one data block. A redundance value of two to three is usually optimal.
Redundance should be less than or equal to the number of available data copies in order to
maximize download speed. Setting redundance equal to one results in no parallel attempts to
retrieve slow data blocks. See Figure 11 for suggested values.
“Maximum threads per depot” limits the maximum number of threads which may simultaneously
attempt to retrieve a data block from any single depot. To ensure TCP friendliness, this value
should be set to one or two. The default value of zero gives no restriction.
Performance:
“Threads”—see Upload section above. Suggested values are also given in Figure 11.
The “Stream content to player” feature allows you to send downloading video or audio content
directly to MPlayer for immediate viewing. If you would like to utilize this feature, you must
download and compile the MPlayer software. Instructions on integrating MPlayer with the LoRS
software can be found in the ERRATA file included with the LoRS download package. To
enable streaming (after you have installed and configured MPlayer), check the box labeled
“Stream content to player” before clicking “Download Now.”
Add a Copy
In your LoRS Command window, click the Add_Copy tab. Click the small downward arrow to
display the “Optional/Advanced Parameters” panel.
“Blocksize” note: you may store new copies with a different blocksize than existing replicas only
if the end to end features—checksum, encryption, and compression—are not applied to the stored
data. If you augment data which has been stored using end to end features, LoRS will simply
copy existing data blocks and store the new replicas using the same block size as the old replicas.
Enter your preferred block size by typing a numeric value and appropriate units (use K for
kilobytes, M for megabytes, or G for gigabytes) without a separating space; e.g. “1600K” or
“2M”, but not “1600 K”.
If the box labeled “Save new copies only” is checked, the resulting exNode will reference only the
newly created data replicas. Using this function, you could store data copies close to remote
collaborators and create a new exNode to reference only the new copies, thereby sharing access
(via the new exNode) only to the new copies, without granting access to previously stored
replicas of the data.
Use the “Offset” and “Length” parameters to replicate only a specified section of data, without
creating a copy of the entire data set:
“Offset” specifies the location within a data set where the “Add a Copy” function will begin
copying data. Offset is measured in bytes from the beginning of the data set. The default value of
27
zero indicates that “Add a Copy” should begin copying at the beginning of the data set. To
specify an offset other than zero, enter a whole number of bytes (as measured from the beginning
of the data set) in the box provided.
“Length” specifies the total number of data bytes to be copied by the “Add a Copy” function.
“Add a Copy” will replicate data starting at the location specified by offset and ending at the
location offset + length (or the end of the data set, whichever comes first). Length has a default
value equal to the size of the data set minus the value of offset, indicating that “Add a Copy”
should replicate all bytes of data located between offset and the end of the data set. To set a value
of length other than the default, enter a whole number (the total number of bytes to be replicated)
in the box provided.
If the box labeled “Balance” is checked, LoRS will balance the exNode, ensuring that there are at
least the specified number of accessible replicas (as given by the value of copies) for each stored
data block in the data set. If Balance is checked and the specified number of copies are not
currently accessible for a given data block, then the “Add a Copy” function will automatically
create the number of copies of that data block necessary to make the total number of accessible
replicas equal to the value of copies. A copy of a data block is considered inaccessible if it
cannot be accessed at the time of inquiry, even if the inaccessibility is temporary.
If the box labeled “Use TCP DataMovers (MCOPY)” is checked, LoRS will employ the MCOPY
DataMover command to perform point to multipoint data transfers. When using the MCOPY
DataMover, please indicate an appropriate depot list file in the box provided (see the “Other →
Depot List” section below). The MCOPY DataMover applies a form of overlay networking to
accomplish point to multipoint transfers, using protocols such as TCP unicast, simultaneous
threaded UDP, and native IP multicast. MCOPY provides enhanced performance when
distributing many replicas of file content over a large number of destination depots.
Details for other Add a Copy parameters may be found in the Upload section above.
Refresh
In your LoRS Command window, click the Refresh tab. Click the small downward arrow to
display the “Optional/Advanced Parameters” panel.
Duration:
Use the “Duration” section to choose how long you would like to extend the storage allocations
holding your data.
“Maximize duration of each allocation” extends every allocation to the maximum local time limit
allowed by each host depot. Each depot owner sets their own local policy governing the duration
time limit for their depot, so maximizing allocations on multiple depots may result in each
allocation being assigned a different expiration date.
“Extend duration by” allows you to extend your allocations by a specified time interval. The
expiration date of each individual allocation will be postponed by the specified time interval. If
you are extending allocations with unequal expiration dates, the differences between the
expiration dates will be preserved when using the “extend duration by” command. Enter the
28
refresh interval in units of seconds (s), minutes (m), hours (h), or days (d), by typing a numeric
value and appropriate units without a separating space; e.g. “90m” or “364.25d”, but not “90 m”.
“Extend duration to” allows you to change the duration of each allocation to the specified time
interval. The individual timer for each allocation will be zeroed, set for the chosen time interval,
and then restarted. Hence, the expiration dates of all allocations will be equal after use of the
“extend duration to” command. The “extend duration to” command may be used to lengthen or
shorten durations to the specified time interval. Enter the refresh interval in units of seconds (s),
minutes (m), hours (h), or days (d), by typing a numeric value and appropriate units without a
separating space; e.g. “90m” or “364.25d”, but not “90 m”.
Important Note: Use the list function, along with the LoRS View window to verify changes in
expiration dates. If you use the “extend duration by” or “extend duration to” commands to
refresh allocations for a time interval that exceeds the local time limit of one or more host depots,
the expiration dates of allocations on those depots will NOT be extended. The “extend duration
to” command may be used reliably with a refresh duration which is less than or equal to the
shortest duration requested during upload or augmentation of the data, since every depot which
accepted a data block for the previously specified duration should do so again (excepting sudden
changes in local policy). Also, depots may refuse refresh requests if they are near or at their
maximum storage capacity.
Performance:
“Threads”—see Upload section above.
Delete
In your LoRS Command window, click the Delete tab.
You can use the Delete function to delete specific IBP storage allocations, or trim mappings to
IBP allocations from an exNode replica list without actually deleting the storage allocations
themselves. When you apply the Delete function to an exNode, a new exNode is created that
references only the untrimmed allocations. You may save this new exNode using the same
filename (overwrite the old exNode) or you may save the new exNode under a different name.
Under “Select an exNode to clean,” enter an exNode in the box provided or click Browse and
choose the exNode you would like to trim.
Under “Save new exNode to,” enter a filepath in the box provided or click Browse and choose a
location and filename for your new exNode. You may overwrite the old exNode or save the new
exNode under a different name. Remember to save the new exNode using the .xnd extension.
When you are ready to execute the Delete function, click “Delete Now.”
Click the small downward arrow to display the “Optional/Advanced Parameters” panel.
Trim Mappings:
Use the “Trim Mappings” section to indicate individual data blocks that should be removed from
the exNode replica list.
29
When the “Trim only unreachable mappings” option is checked, the Delete function removes
only those data blocks which are currently inaccessible, due to expiration, network outage,
hardware failure, or any other reason.
When the “Destroy trimmed mappings” option is checked, memory space holding a deleted
allocation will be freed immediately (otherwise the allocation will remain on the depot until its
expiration).
“Trim all mappings” applies the selected options to all of the data blocks listed in the exNode.
“Trim these mappings” applies the selected options only to those data blocks specified in the box
provided. To specify a set of data blocks, enter the appropriate block numbers, space delimited,
in the box provided. For example, enter “18 43 2” to trim the eighteenth, forty-third, and second
data blocks listed in the given exNode. (Use the List button to view the block numbers and
expiration dates of allocations within an exNode.)
Combinations of the Trim Mappings parameters allow a high degree of capability in managing
exNodes. A few of the many ways the Delete function could be applied are as follows:
•
If you wish to quickly “clean” an exNode by removing all dead or unreachable data blocks,
and immediately release the memory space holding deleted allocations, then simply check
“Trim only unreachable mappings,” check “Destroy trimmed mappings,” and select “Trim all
mappings” before clicking “Delete Now.”
•
If you wish to delete a specific set of data blocks (perhaps to reduce the total number of
replicas) and immediately free the allocated space on the depot; then check “Destroy trimmed
mappings,” select “Trim these mappings,” and enter the appropriate block numbers before
clicking “Delete Now.”
•
If you wish to create a new exNode that references only specific data blocks while leaving the
old exNode unchanged, then select “Trim these mappings” and enter the block numbers of the
data blocks that you would like to remove from the new exNode. Leave the options “Trim
only unreachable mappings” and “Destroy trimmed mappings” unchecked. In the box
labeled “Save new exNode to” enter a location and filename for the new exNode (make sure it
is different from the old exNode). Click “Delete Now.” The new exNode will access only
the untrimmed allocations, while the old exNode will be unchanged.
Performance:
“Threads”—see Upload section above.
Other → Preferences
In your LoRS Command window, click the Other tab, then click the Preferences tab. When you
have finished adjusting your preferences, click Save at the bottom of the LoRS Command
window to record your changes.
The box labeled “L-Bone Server” allows you to choose which LDAP server will supply your
LoRS tools client with depot information from the L-Bone directory. The L-Bone keeps track of
information such as the amount and type (hard vs. soft) of storage available, maximum allowed
30
duration, and location of each depot. Choose an L-Bone server from the drop down menu or
enter the address of an appropriate L-Bone server.
Provide your location: Under “Choose Location,” use the left-hand menu to select zip, state,
airport, or country, and then enter an appropriate location code in the right-hand menu box: five
digit zip code (US only), two letter state abbreviation (US only), three letter airport code, or two
letter ISO country code. Providing your location allows LoRS to optimize your download
performance by automatically retrieving replicas of stored data nearest to your location.
Click the small downward arrow to display the “Optional/Advanced Parameters” panel.
Global Preferences:
The “Global Preferences” section allows you to change the default values of several advanced
parameters. Values set under “Global Preferences” become the default settings for all LoRS
commands.
“Display Host” allows you to specify the location of the computer running the LoRS View
program. If you would like to run LoRS Command and LoRS View on separate computers, then
enter the host name or IP address of the computer running LoRS View in the box provided. If
you will be running LoRS Command and LoRS View on the same computer, simply enter
“localhost”.
“Internal Memory” is the total amount of memory available to LoRS while the program is
running. Enter the memory capacity of your computer by typing a numeric value and appropriate
units without a separating space; e.g. “64M”, not “64 M”.
“Timeout” specifies the time, in seconds, to wait before ending a stalled process. The value of
timeout should usually be set between four to ten minutes (240 – 600 seconds), with the shorter
value used for faster connections. Increase the timeout as necessary for larger files or slower
connections. Enter a numeric value in seconds, without including units; e.g. “360”.
Other Preferences:
If the box labeled “List the physical size of mappings” is checked, LoRS will display physical file
or block sizes, rather than logical size. The logical size of a file or data block is the size of the
data itself, while the physical size is the size the data actually occupies in storage. The physical
size may be larger than the logical size because of attached metadata, such as checksums; or the
physical size could be smaller than the logical size, if the data is compressed before storage.
If “Show all Advanced settings” is checked, the Optional/Advanced Parameters panel for each
function will be opened by default when the LoRS Command window is displayed.
Details for other parameters can be found in the Upload section above.
Other → Display
In your LoRS Command window, click the Other tab, then click the Display tab. Click the small
downward arrow to display the “Optional/Advanced Parameters” panel.
31
If “Recreate configfile from LDAP source” is checked, then depot information presented on the
map display will be updated by querying the L-Bone server (running an LDAP based directory
service). Just as with using a cached copy of a web page, for most applications it is sufficient to
retrieve fresh information from the L-Bone only at convenient intervals, such as once daily.
If “Display depot names” is checked, then the name of each depot will be listed on the map
display next to each depot symbol.
Other → Depot List
In your LoRS Command window, click the Other tab, then click the DepotList tab.
The “Depot List” section allows you to create custom lists of depots for use with the Upload and
Add a Copy commands.
Under “Save DepotList file to,” enter a filepath in the box provided, or click Browse and choose a
location and filename for your depot list file. After entering a filepath, click “Load List” to
display the current contents of the depot list file in the right-hand window.
Query the L-Bone to locate registered depots to add to your depot list by specifying a location
preference under “Choose Location,” entering the maximum number of depots to be returned by
the query under “Max Depots,” and clicking “Update List.” The registered depots closest to your
preferred location will be listed in the left-hand window.
•
To add a depot to your list: Click to highlight the desired depot in the left-hand window. Use
the radio buttons to select either the Depot, Route, or Target label (see below). Click the
right arrow to copy the highlighted depot from left-hand window into the right-hand window.
You may add depots not registered with the L-Bone by manually updating your depot list file
with a text editor.
•
To remove a depot from your list: Click to highlight the desired depot in the right-hand
window. Click the left arrow to remove the highlighted depot from the right-hand window.
•
To change the order of depots in your list: Click to highlight a depot in the right-hand
window. Use the upward and downward arrows to change the position of the highlighted
depot.
•
To save the current changes to your list, click “Save DepotList”.
The Depot, Route, and Target labels are used to specify the task of a given depot during Upload
and Add a Copy functions. The Depot label identifies depots to which data may be stored with
the Upload command. The Route label identifies depots to which data may be copied using the
Add a Copy command, as well as identifying intermediate nodes used by the MCOPY
DataMover. MCOPY uses a broom-shaped distribution tree, transferring data to an intermediate
Route depot which then distributes data blocks among the Target depots. In order to utilize the
MCOPY DataMover, you must supply a depot list containing at least one Route depot and one or
more Target depots. (See the Add a Copy section above for further information on MCOPY.)
A single depot may be listed in the depot list file multiple times, with a different label each time.
Commands ignore depots with unfamiliar labels (e.g., a target or route depot will be overlooked
32
by the Upload command). Hence, a single depot list may be used to specify distinct sets of
depots to be used by Upload and Add a Copy.
To use your depot list with the Upload or Add a Copy commands, enter the filepath for the depot
list in the box provided at the bottom of the Upload or Add a Copy panel before executing the
command.
33
Appendix A: LoRS View display features
Features of the LoRS View display window for the Upload and Download functions are pointed
out in Figures 12 and 13, below and a brief description of each is given.
Figure 12: Upload
IBP Depots – Each disk-shaped icon represents an individual IBP storage depot. Stacked disks
represent multiple depots in the same location. Depots are color-coded according to relative east
to west location.
File Name – Name of the file being uploaded.
File Size – Physical or logical size (depending on user preferences, see Ch. 4) in bytes of file
being uploaded.
Function Call – IBP command being executed. When the upload is complete, this field will
show a status of “Done.”
Status – Description of the current activity (searching, allocating, storing, etc.).
Transfer Rate – During upload, the average transfer rate for the data fragment currently
uploading is displayed. After upload of the file is complete, the overall rate (averaged over the
entire upload) is shown.
Connection Status – Number of connection threads currently open.
ExNode Diagram – The exNode for the file to be uploaded is represented by one or more
vertical bars, made up of stacked rectangular blocks. Each stack of blocks represents a replica of
the stored data set. Individual blocks within a stack represent the constituent data blocks into
which the file content will be fragmented. Each fragment may be stored on a different depot. As
individual blocks are uploaded, they are colored to match the depot where they are stored. The
white triangles of color on the left side of each block indicate that the data blocks are being
transferred from the local system into depot storage. (Figure 12 pictures the uploading of a file
that has been fragmented into 18 data blocks, with those data blocks being distributed over two
different IBP depots near the UT Knoxville campus.)
Data Transfers – Data transfers are represented by arrows drawn from sender to receiver.
Uploading and downloading are represented by blue arrows, drawn between a block within the
exNode diagram and the depot housing the corresponding block of data. Depot to depot transfers
are denoted by red arrows drawn between depots. During the upload, you will see an arrow drawn
from each block in the exNode diagram to the depot where that data block is being stored.
Clear Button – To reset the LoRS View display, click Clear at the bottom of the LoRS View
window.
Draw Arrows Button – To redraw the arrows representing data transfers, click the “Draw
Arrows” button at the bottom of the LoRS View window. The button toggles between the “Draw
Arrows” and “Delete Arrows” functions.
Quit Button – Click the Quit button to close the LoRS View window.
Depots Outside Current Map View – Depots listed on the right-hand side of the map are
located outside the current map view. For instance, in Figure 12, depots located outside of the US
are listed on the right hand side of the map.
34
IBP
Depots
File Name
File Size
Function
Call
Status
Transfer
Rate
ExNode
Diagram
Data
Transfers
Figure 12: LoRS View display features – Upload
Connection
Status
Clear
Button
Draw Arrows
Button
Quit
Button
Depots
outside
current map
view
Figure 13: Download
IBP Depots – Each disk-shaped icon represents an individual IBP storage depot. Stacked disks
represent multiple depots in the same location. Depots are color-coded according to relative
location.
File Name – Name of the file being downloaded.
File Size – Physical or logical size (depending on user preferences, see Ch. 4) in bytes of file
being downloaded.
Function Call – IBP command being executed. When the download is complete, this field will
show a status of “Done.”
Status – Description of the current activity (connecting, downloading, etc.).
Transfer Rate – During download, the average transfer rate for the data fragment currently
downloading is displayed. After download of the file is complete, the overall rate (averaged over
the entire download) is shown.
Connection Status – Number of connection threads currently open.
ExNode Diagram – The exNode for the data set to be downloaded is represented at the bottom
left of the LoRS View window by one or more vertical bars, made up of stacked rectangular
blocks. Each stack of blocks represents a replica of the stored data set. Individual blocks within
a stack represent the constituent data blocks into which the data set has been fragmented. Each
fragment may be stored on a different depot. Blocks are colored to match the depots on which
they are stored. The expiration date and identifying block number are listed for each block.
(Figure 13 pictures the downloading of a file that has been fragmented into 25 data blocks, with
those data blocks being distributed over four different IBP depots in the US.)
Downloading File Content / Status Bar – As the download progresses, two vertical bars will
appear at the bottom right of the LoRS View window. The first bar shows the constituent data
blocks of the downloading file. Arrows are drawn to each block from the depot supplying the
corresponding data. When a block is finished downloading, it is colored to match the depot
which supplied the data. The second vertical bar is a status bar, showing the progress of the
download. The data blocks may arrive out of order, but the status bar on the right advances only
when the next block in the sequence has been successfully downloaded, even if later blocks have
already been acquired.
Data Transfers – Data transfers are represented by arrows drawn from sender to receiver.
Uploading and downloading are represented by blue arrows, drawn between a block within the
exNode diagram and the depot housing the corresponding block of data. Depot to depot transfers
are denoted by red arrows, drawn between depots. During the donwload, you will see an arrow
drawn to each block in the exNode diagram from the depot supplying the corresponding data.
Clear Button – Click Clear to reset the LoRS View display.
Draw Arrows Button – Click Draw Arrows to redraw the arrows representing data transfers.
This button toggles between the “Draw Arrows” and “Delete Arrows” functions.
Quit Button – Click Quit to close the LoRS View window.
Depots Outside Current Map View – Depots listed on the right-hand side of the map are
located outside the current map view. For instance, in Figures 13, depots located outside of the
US are listed on the right hand side of the map.
36
IBP
Depots
File Name
File Size
Function
Call
Status
Transfer
Rate
ExNode
Diagram
Clear
Button
Figure 13: LoRS View display features – Download
Connection
Status
Data
Transfers
Draw Arrows
Button
Downloading File
Content
Quit
Button
Depots
outside
current map
view
Download
Status Bar
Appendix B: LoRS Command Line Tools
The LoRS Command Line Tools offer the same data management capabilities provided by LoRS
Visual Tools, except by means of a command line interface instead of a graphical interface. This
appendix discusses the following major topics associated with using the LoRS Command Line
Tools interface:
•
•
•
•
•
•
•
Upload – store a file in the wide-area network.
Augment and Trim – add or remove replicas of a stored file.
Download – retrieve a file from storage.
List – identify where data blocks of a fragmented file are stored.
Refresh – extend the expiration times of storage allocations.
Defaults – default values for LoRS tools settings.
The .xndrc Preferences File – over-ride default values with custom preference settings.
Upload
To begin, let's upload a file into the network. The multi-threaded tool is lors_upload. The simple
usage is:
lors_upload <input_file> -f
This tells the tool to store the input file into the network using the preset defaults and then create
an exNode that uses the original file name with .xnd appended to it. So if we called:
lors_upload foo -f
It would create foo.xnd. The foo.xnd file is an XML file that contains information about the
stored file (name and size), information about where the data is stored (IBP allocations), and the
mapping between those allocations and the logical file (offset and length per allocation).
Let's do a little more sophisticated upload where you have more control. You want to call this
exNode bar.xnd and you want to store 2 copies of the file. You want each copy to be broken into
4 pieces. You would like the data to be available for at least 3 days without renewing your leases
and you would like the data near Los Angeles. Here is what you would do:
lors_upload foo -o bar.xnd -c 2 -F 4 -d 3d -l 'state= CA city= Los Angeles'
The arguments follow my description. The -o parameter sets the output file name. If you do not
specify -f or -o, the exNode will be printed on stdout. The duration parameter (-d) can be
specified in seconds (e.g. 600), in minutes (e.g. 30m), in hours (e.g. 12h) or in days (e.g. 2d). The
location hints are outlined on the L-Bone Client API page, available under “View Client API” at:
http://loci.cs.utk.edu/lbone
You have other choices in addition to the above:
•
•
You can override the default L-Bone server hostname and port number,
You can specify the type of IBP storage (HARD or SOFT),
38
•
•
•
•
Instead of number of fragments per copy, you can set a constant blocksize (before End-toEnd services are applied),
You can limit the number of threads the process uses,
You can limit the number of unique depots where the file is stored,
You can use a static list of depots instead of contacting the L-Bone.
The standard policy for the number of threads is Copies times Fragments (or Blocks). In the first
example, it would use 1 thread because we used the preset defaults of 1 copy and 1 fragment. In
the second example, it would use 8 threads (2 copies x 4 fragments). You can reduce this number
using the -t parameter, but you can't specify more than that.
Also, the LoRS tools support End-to-End (E2E) services including checksums, encryption and
compression. By default, DES encryption and checksums are used. If you are concerned with
maximizing performance, you can choose not to use E2E services with the -n parameter.
Encryption, in particular, slows performance by 50%.
Augment (Add Replicas)
Because the network is unreliable, you usually want more than one copy of the data in case you
can't reach a particular copy. You could specify at upload that you want 4 copies, but they will be
grouped together geographically. Also, with multi-copy uploads, all the copies originate from the
client which may not have as speedy a connection as most of the depots. In most cases, you will
want to add copies or replicas after the exNode is uploaded. Adding replicas is called an augment.
After you have created an exNode called foo.xnd, let's assume that you want to add a replica. You
could simply do this:
lors_augment foo.xnd -f
It would add a replica and store the expanded exNode in the original filename. You would get
another replica but it could be any where including on the same machine as the original.
Typically, you want to specify where a replica is. If you want to specify a replica near
Washington, DC, you would use:
lors_augment foo.xnd -f -l 'city= Washington state= DC'
You would use the Copies argument if you want more than one. Also, you can use different
fragments per copy or different blocksizes as well. The augment tool uses the same thread policy
as upload (copies times fragment/blocks).
I should also note that the keywords allowed in the -l argument have other options besides city
and state. You can specify by hostname, by airport, by zipcode (in the US) or by country. The full
syntax is available under “View Client API” at:
http://loci.cs.utk.edu/lbone
Using lors_augment with IBP_mcopy()
Experimental support for IBP_mcopy() was added in the 0.80 release of the LoRS tools.
IBP_mcopy() allows a client to transmit data to multiple targets with a single call. The transport
39
mechanism is chosen at compile time to be one of UDP, TCP or more recently MULTICAST
datamover. lors_augment supports only the TCP datamover at the moment.
The most usable inteface to lors_augment with IBP_mcopy is through the .xndrc file. Choose
both an mcopy route-depot and as many target-depots as desired. After adding these to your
.xndrc file using the appropriate ROUTE_DEPOT and TARGET_DEPOT keywords described in
the .xndrc tutorial, you may use a command like the following:
lors_augment --mcopy --depot-list foo.xnd -f -c <copies>
where copies is equal to the number of target depots you wish to use.
Trim (Remove Replicas)
If you are sending a large file to someone else, you want your upload time to be as short as
possible, but you also want your recipient's download time to be as fast as possible as well. To
satisfy both of you, you can upload to the closest depot, then augment the exNode to a depot near
the recipient. If you need the space back on your local depot, you can then remove that replica.
Removing a replica is called trim.
Let's use the above exNode foo.xnd which has 2 allocations (named 0 and 1). If we only want the
allocation represented by 1, we can trim allocation 0 by:
lors_trim foo.xnd -f -m 0
This will take exNode foo.xnd, remove mapping (or block or allocation and its metadata) 0 and
save the revised exNode as foo.xnd (because of the -f flag). You only removed the allocation
from the exNode. The default behavior is to leave the allocation on the IBP depot and let it
expire. You can explicitly free the IBP allocation by adding the -d flag (if you have the IBP
Manage capability). Also, the -m argument can take list of space-separated numbers such as:
lors_trim bar.xnd -f -m 2 4 6 8 10
Download
Let's get a file back from the network. The lors_download tool tries to download the file from
beginning to end in order (to a degree). The simplest usage is:
lors_download foo.xnd -f
The tells the tool to download the file stored in foo.xnd to its original name (foo) and use the
defaults for threads, blocksize, etc. This works but you want to alter the performance by adding a
few parameters:
lors_download foo.xnd -f -t 8 -b 512k -C 8
In this case, we specified 8 threads, a transfer blocksize of 512 K and a working cache of 8
blocks. As you can see, you can explicitly control the amount of threads used. You are also
controlling the amount of RAM used during the download. The amount used is equal to (the
number of threads + the number of cache blocks) times the blocksize or:
40
RAM = (t + C) x b
To optimize your downloads, keep the RAM level below your physical RAM to avoid constant
thrashing of your swap file. We have found that in WAN downloads, that a blocksize of 512 KB
or 1 MB is ideal. I try to keep the cache parameter equal to (or twice) the thread count. We found
that downloads do benefit from increasing threads, but most see little additional benefit over 24
threads. Note, the IETF views using more than 1 or 2 threads per depot as TCP unfriendly and
system administrators may perceive your download as a denial of service (DOS) attack.
The lors_download tool offers several other options. You can choose to only download a portion
of a file by specifying the beginning offset (-O) and its length (-L). If you are piping the output to
a media player (mplayer, mpg123, sox, etc), you would want to use the prebuffer flag (-q
number_of_blocks). This tells the download tool to wait until the first set of blocks are
downloaded before releasing any to the player. This reduces the chance that the player will start
and immediately stall because the first block was ready but the second (or third, etc) was not.
Typically when playing the multimedia, I prebuffer enough blocks to play a few seconds.
The download tool features an adaptive algorithm as outlined in “Algorithms for High
Performance, Wide-Area, Distributed File Downloads” (Plank, Atchley, Ding, Beck; UT Tech
Rep CS-02-485, Oct 2002). If the exNode has multiple copies of the data, the Progress-Driven
Redundancy algorithm tries downloading blocks from any depot that has the data. If the data
comes in at similar rates, then the algorithm simply works in a round-robin manner when
selecting from which depot to get the data. If some depots send their data much faster than others,
the threads calling on those depots will run ahead of the threads calling on the slower depots. If
the faster threads are working on blocks that are too far ahead of the lagging threads, the
algorithm will begin to duplicate effort and assign additional threads to download the lagging
blocks from different depots. To use this algorithm, you can specify the number of blocks that can
separate the lagging threads from the leading threads with -p (the progress number). You would
then need to set the amount of redundancy (number of duplicate downloads) with -r. Keep in
mind that if your exNode has two copies, then specifying a -r 3 will only be able to download
form the two copies and not three. You might use something like:
lors_download foo.xnd -t 10 -b 512k -C 20 -p 15 -r 3
Also, in this example, I did not specify -f or -o to set the output file name. In this case, the file
will be sent to stdout which is usually the terminal screen. This is helpful if you want to play the
music or movie without storing it on disk. To do so, you will need a multimedia player that can
read on stdin such as mpg123 and mplayer. Usage is something like:
lors_download foo.xnd -t 10 -b 512k -C 20 -p 15 -r 3 | mplayer See the mpg123 and mplayer man pages for usage. If you forgot to specify -f or -o and your
screen gets the data dump and whatever you tupe looks like garbage characters, type 'reset' and it
should clear it up.
List
Once you have stored an exNode, you may want to know where the pieces are or you
may want to know if they are accessible. You can list the exNode to see these things. For
41
example,
lors_ls foo.xnd -h
will provide output something like:
TOOL List
EXNODEFILE foo.xnd
TITLE Filename foo
MAXLENGTH 1000000
SIZE 1000000
0 Srwma 1 silo.surfnet.nl:6714
1 Srwma 1 silo.surfnet.nl:6714
0
500000
500000 Thu Jun 19 11:26:55 2003
500000 Thu Jun 19 11:26:55 2003
The tool repeats the exNode name (foo.xnd), the filename (foo) and the file's size in bytes
(1000000). It then prints one line per IBP allocation. The line starts with a number that is the
allocation's (fragment's, segment's, allocation's or mapping's) number. you may use this to specify
a specific mapping when using other tools.
Next, it shows Srwma which means that it uses SOFT IBP allocation (or H for a HARD
allocation). The rwm means that the exNode contains the Read, Write and Manage IBP
capabilities. If you want to give someone read access to your exNode but not the ability to delete
your IBP allocations, you would remove the Write and Manage capabilities from the exNode
(currently, you must do this manually by editing the .xnd XML file but we will provide a tool in
the next release). The a means the storage is an IBP byte array.
The next column has a number. It is typically 1 or -1. A positive 1 means that this allocation is
available. Conversely, a negative 1 means that it is not.
The fourth column has the name of the depot and the depot's port number.
The fifth column has the offset (starting byte) of the data stored in this allocation. The sixth
column has number of bytes stored in this allocation. The default is the logical number of bytes.
If you used checksums the physical number is slightly higher. If you used compression, the actual
number may be a lot less. You can add the -p parameter to see the actual number of stored bytes.
The last set of columns show the expiration date of the allocation. If the allocation was not
reachable, it will say DEAD.
Refresh
If you want to keep an exNode around for awhile, you can renew its lease. As long as the depot
has space available, it will grant the renewal. The simple usage is:
lors_refresh foo.xnd -m
This will extend each allocation to its maximum. Other choices are to add/subtract days (-d
n[m|h|d] where n is a number (whole or decimal) and m is minutes, h is hours and d is days), set
all expirations relative to now (-s n[m|h|d]) or have it expire at an exact time in seconds from the
Unix Epoch (-a seconds).
42
Defaults
The LoRS tools assume certain defaults for some settings. If the setting applies to a tool, you can
always override the default by using the proper option. You can see all of the options for any tool
by entering the tool's name and pressing return. You may also override the defaults by setting the
appropriate value in the .xndrc preference file in your home area.
Setting
Value
Duration
1 day
IBP Allocation Type
HARD
Keep until the expiration date.
This may be overridden on the command line with -s, which
specifies SOFT allocations. There is always more SOFT storage
available, but the IBP depot may delete it at any time if the
filesystem starts to become full. This may also be changed in the
.xndrc preferences file.
Internal Buffersize
48 MB
The maximum amount of memory to be used in Upload and
Download. This will constrain the amount of parallelization if
(Threads * Logical Data Blocksize) exceeds this amount.
This can be overridden on the command line with -M n[k|m|g]
where n is a number (whole or decimal) and k is kilobytes, m is
megabytes and g is gigabytes. This may also be changed in the
.xndrc preferences file.
Logical Data Blocksize
5 MB
Threads
-1 (Use as many as needed to completely parallelize each
operation)
In Upload, allocate and store all blocks in parallel.
In Download, retrieve all blocks in parallel.
In Augment, use (Copies * Number of Blocks) of threads to
create all copies and blocks in parallel.
In Trim, remove all selected pieces in parallel.
In List, check all allocations in parallel.
In Refresh, update all allocations in parallel.
Max Depots
4
Copies
3
Sets the number of copies for Upload and Augment.
E2E Blocksize
1 MB
This value must be less than or equal to the Logical Data
Blocksize. This unit must also be consistent within the exNode.
An entire E2E block must be retrieved in order to get any or all of
the data represented by it. This is the smallest amount of data
that may be Augmented or Downloaded. If the value is too large,
then downloading a small number of bytes has a higher latency.
However, using to small a value requires more CPU processing to
encode and decode the data.
43
The .xndrc Preferences File
You may use the .xndrc in your home area to store your preferred settings for almost all the
options available in the LoRS tools. These will override the default settings as described on the
defaults page.
You may also have .xndrc files in other directories in addition to your home area. The .xndrc in
the current working directory will override the .xndrc in your home area. For example, if you are
in ~/data and you have a .xndrc in your home area and another one in ~/data, the tools will read
~/.xndrc first and then the tools will read ~/data/.xndrc will override settings from ~/.xndrc.
You may temporarily override both the defaults and the .xndrc settings by using the command
line options.
Keyword
Value
Comment
LBONE_SERVER
LBONE_SERVER
...
hostname1 port
hostname2 port
...
e.g. vertex.cs.utk.edu 6767
LOCATION
zip= 37001
This can be in any form as
outlined on the L-Bone Client
API page. It may be only
listed once and all keywords
and values must be on the
same line.
DURATION_DAYS
2.4
This is the number of days
(whole or decimal) to request
allocations for.
STORAGE_TYPE
SOFT
The options are HARD (the
default) or SOFT.
There may be several L-Bone
servers listed in the .xndrc.
They must be on separate
lines. The hostname and port
must have a space between
them. The tools will start with
the first and continue down
the list until a server replies.
HARD allocations last until the
expiration time, but there is
less HARD space available.
There is more SOFT space
available, but the IBP depot
may delete it at any time if
the filesystem starts to
become full.
VERBOSE
0
This is not being used
currently.
DATA_BLOCKSIZE
512K
Sets the size of the Logical
Data Blocksize.
44
The format is n[k|K|m|M|g|G]
where n is a number (whole or
decimal). K and k are
kilobytes. M and m are
megabytes. G and g are
gigabytes.
When using this setting,
comment out
FRAGMENTS_PER_FILE option
by inserting a # in front of
FRAGMENTS_PER_FILE.
FRAGMENTS_PER_FILE
-1
Use as many as necessary.
Leave as -1 when specifying
DATA_BLOCKSIZE.
Set to a whole number if you
want the file stored in a
specific number of pieces. If
so, also comment out
DATA_BLOCKSIZE option by
inserting a # in front of
DATA_BLOCKSIZE.
COPIES
1
Sets the number of copies for
Upload and Augment.
THREADS
8
Set the maximum number of
threads to use.
MAX_INTERNAL_BUFFER
48M
Sets the maximum amount of
memory to use during Upload
adn Download.
Currently,when using the E2E
services, the tools can use
twice this amount.
TIMEOUT
600
Number of seconds before a
tool will give up.
#E2E_BLOCKSIZE
aaa
1 MB
This value must be less than
or equal to the Logical Data
Blocksize. This unit must also
be consistent within the
exNode.
An entire E2E block must be
retrieved in order to get any
or all of the data represented
by it. This is the smallest
amount of data that may be
Augmented or Downloaded. If
the value is too large, then
downloading a small number
of bytes has a higher latency.
45
However, using to small a
value requires more CPU
processing to encode and
decode the data.
#E@E_ORDER
DEPOT
DEPOT
...
hostname1 port
hostname2 port
...
If the user want to specify IBP
depots by name, use the -depot-list option instead of the
-l option on the command
line.
ROUTE_DEPOT
ROUTE_DEPOT
...
hostname1 port
hostname2 port
...
When using lors_augment
with the default IBP_copy(),
destination depots are
specified by the
ROUTE_DEPOT keyword
rather than DEPOT keyword.
We introduce a new keyword
to allow the same .xndrc file
to be used for a
lors_upload and
lors_augment to different
depots. As with DEPOT, the -depot-list parameter should
be specified on the command
line.
TARGET_DEPOT
TARGET_DEPOT
...
hostname1 port
hostname2 port
...
When using lors_augment
with IBP_mcopy(),
intermediate depots are
specified by ROUTE_DEPOT
and destination depots are
specified by TARGET_DEPOT.
In this way, a simple tree can
be created using
IBP_mcopy(). The --depot-list
parameter should be specified
on the command line, as well
as --mcopy.
46