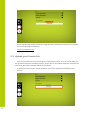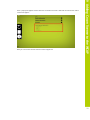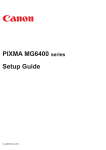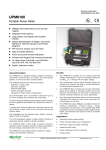
1
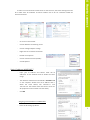
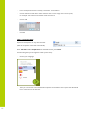
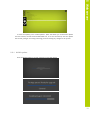
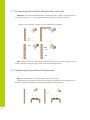
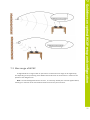
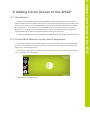
confidea
Installation & User manual
Attention:
This manual for Wireless Confidea System 3.0 is
valid only for all
WCAP+ firmware version
≥ 1.06
WCAP fpga version
≥ 1.06
WDU+ firmware version
≥ 1.06
WCAP+ 71.98.0033
Cocon
≥ 3.02
General information
1 Copyright Statement
4 2 Trademarks
5 1 Copyright Statement
No part of this publication or documentation accompanying this product may be
reproduced in any form or by any means or used to make any derivative such as
translation, transformation, or adaptation without the prior written permission of the
publisher, except in case of brief quotations embodied in critical articles or reviews.
Contents are subject to change without prior notice.
Copyright© 2008 by Televic Conference NV. All rights reserved.
The authors of this manual have made every effort in the preparation of this book to
ensure the accuracy of the information. However, the information in this manual is
supplied without warranty, either express or implied. Neither the authors, Televic
Conference NV, nor its dealers or distributors will be held liable for any damages caused or
alleged to be caused either directly or indirectly by this book.
4
All terms mentioned in this manual that are known to be trademarks or service marks
have been appropriately capitalized. Televic NV cannot attest to the accuracy of this
2 Trademarks
2 Trademarks
information. Use of a term in this book should not be regarded as affecting the validity of
any trademark or service mark.
5
6
3 System configuration
3 How to connect
8 3.1 Power up
8 3.2 Accessing the web-browser
8 3.3 Logging wizard
8 3.4 Introduction
8 First time access
8 4 Web server
12 4.1 Changing IP address
13 4.2 Initialization
14 4.2.1 4.3 Controlled Access
Unit Manager
14 15 4.3.1 Define groups
16 4.3.2 Define delegate names and assign to group
16 4.3.3 Remove delegate
17 4.4 Security
17 4.5 Update
18 4.5.1 WCAP update
19 4.5.2 Update delegate units
20 4 How to connect
4.1 Power up
After applying the 24V adapter to the power supply socket and switching the device on,
the first LED blinks white. This means the system is booting.
Note: If the LED does not switch to green after some minutes or it turns red, please
contact your support team.
4.2 Accessing the web-browser
To access the web-browser connect the LAN connector directly to your computer or to
the LAN network which includes your computer.
The default IP address is 192.168.1.110. Please make sure that your PC has an IP
address and subnet mask that can access that IP address.
4.3 Logging wizard
When you enter the web-browser for the first time you will be guided through a small
wizard for initial setup of the system.
4.4 Introduction
The WCAP has a built-in web server that allows you to set/monitor certain parameters
characterizing the wireless conference system.
The following is a step-by-step guide to give you a general idea of how to access your
WCAP.
First time access
STEP 1 – PC IP setup
Note: The WCAP has a default fixed IP address and subnet
mask:
IP:
192.168.1.110
Subnet mask: 255.255.255.0
8
instructions below.
-
Go to the ‘ Control Panel’
-
Click on Network and sharing center
-
Click on Change adapter settings
-
Right-click on Local Area Connection
-
Double on Properties
-
Click on Internet Protocol (TCP/IP)
-
Click Properties
4 How to connect
In order to access the built-in web server for the first time, the TCP IP settings from the
PC or MAC must be modified. A fixed IP address has to be set. Therefore follow the
Static IP address WINDOWS 7
-
Input your IP Address and subnet mask the IP
addresses on the network must be within the same
range.
-
The default IP address from the WCAP is 192.168.1.110
so the computer should have an IP Address that is
within
the
same
subnet,
like
192.168.1.11
and
192.168.1.20. The subnet mask must be the same for
all equipment on the network: 255.255.255.0)
-
Click OK
Assigning a fixed IP Address in WINDOWS 7
-
Enter the IP Settings op the PC
9
-
In this example the PC has normally “10.0.40.85” as IP address.
-
Click on Advanced and add a new IP address that is in the range of the access point,
for example 192.168.0.26 and subnet mask 255.255.0.0
-
Click to add
-
Click OK
STEP 2 - Accessing WCAP
Open Internet Explorer or any other browser
(with the computer connected to the WCAP)
Enter 192.168.1.110 or wcap3.local into the Address Bar, press Enter
A wizard will guide you through the initial system setup:
-
Choose your language
-
Then you can choose to be notified when updates are available. This requires that the WCAP
has a connection to the internet.
10
4 How to connect
-
In the next item you have to fill in a hostname. This is a name which can be associated with
the device for easy recognition in the system. Also when you have multiple WCAPs running
simultaneously, you will be able to identify which frequencies are used by which hosts
-
After you’ve completed the wizard you need to login. The default login and
password are
Login: admin
Password: admin
11
5 Web server
5 Web server
12 5.1 Changing IP address
13 5.2 Initialization
14 5.2.1 5.3 Controlled Access
Unit Manager
15 5.3.1 Define groups
16 5.3.2 Define delegate names and assign to group
16 5.3.3 Remove delegate
17 5.4 Security
17 5.5 Update
18 5.5.1 WCAP update
19 5.5.2 Update delegate units
20 5.6 Check firmware versions of delegate units
21 5.7 Check firmware versions of WCAP
22 6 Return to factory settings
12
14 22 First we will change the IP address of the system. To do this you have to go to the
settings. This can be done by clicking the settings icon.
Then scroll all the way down until you see the following icon
5 Web server
5.1 Changing IP address
which indicates the
network.
In this menu you define:
-
Hostname
-
Address mode (Static – DHCP)
-
IP address
-
Subnet mask
We advise to change the IP address. This will prevent conflicts when multiple access
points with the same IP address are in the network.
13
5.2 Initialization
In stand-alone mode, the WCAP supports two kinds of access: open access and
controlled access.
-
Open access: This is the default mode. Any unit can connect to the WCAP without
authorization procedure
-
Controlled access: a unit can only connect after going through an initialization and
authorization procedure.
5.2.1 Controlled Access
In this mode, a manual initialization is required.
The manual initialization procedure requires the use of the 3 buttons on the web server
displayed above: “Open init”, “Close init” and “Clear init”.
Take the following steps to initialize all units:
1)
Switch on all wireless units and wait a few seconds until the units have discovered
the WCAP.
14
2)
Select the “Clear Init”, to clear any previously created initialization list.
Start the new initialization by selecting the “Open Init” button.
After you started the new initialization, the red Microphone Status LED’s on all
wireless units will start to blink.
4)
To add a unit to the initialization list, press the microphone button of the unit to
add.
5)
5 Web server
3)
The LEDs will turn green indicating that the unit has been added to the initialization
list.
6)
Repeat step 4 for each unit that needs to be added.
7)
When finished, stop and save the initialization by pressing the “Close init” button,
Only the units that have been initialized will now be able to join the conference.
The init list is stored in the WCAP and stays in memory even after switching the WCAP
off.
Next time the WCAP and delegate units are switched on, only these units will be allowed
to connect to the WCAP.
5.3 Unit Manager
The unit manager allows to:
-
Define delegate names
-
Define groups
As you can see there are two main parts, the left column is the list of delegates; the right
column is the list of groups. Each delegate shows an array of information, from left to right:
-
Autonomy
-
Version
15
-
Serial number
-
Packet loss (if any)
In rare cases it may appear that the delegates background is red, this means the
delegate is running a golden version. Although this works, we strongly advice to reapply the
update so that these units can be used to their full potential.
5.3.1 Define groups
A group is defined by two parameters:
-
Group name
-
Group color
You can make a new group by clicking on the “Add new group” button.
Add a group name and select (optionally) a group color. Press enter to save the group.
Editing the group can be done by right-clicking (or swiping) on the group entry. A small
popup appears to edit or remove the group.
5.3.2 Define delegate names and assign to group
Right-click (or swipe) on the delegate you want to group. A small popup appears, click on
edit.
16
Note: clearing the initlist will also clear the delegate names, but not the groups
5 Web server
Change the name; assign delegate to group. Enter to save settings.
5.3.3 Remove delegate
Right – click (or swipe) on the delegate
Clicking or remove will delete the delegate unit from the initlist. This feature is only
useful when manual init is used.
5.4 Security
The security uses a AES 128 bit encryption.
The system has a built-in default factory encryption key. To increase the security even
further, another random encryption key can be generated. This key will be send to all
delegates connected to the system. Once other encryption option is selected only those
units having the encryption will be able to log onto the system.
If a unit needs to be added to the system, default encryption needs to be selected first.
17
5.5 Update
The update page can be found by going to the settings submenu and clicking on the
update button (displayed as two arrows in a circular formation).
When you get to the update page you can have one of these two situations:
-
No update available: either you have the latest software and an update is not
necessary or no update file has been uploaded.
-
There is an update available: this could either be because you’re connected to the
internet and there’s new version available or that you have manually uploaded a
file.
Note that through the internet update system you’ll only receive the latest updates.
Older updates will still need to be installed manually. To upload a file, click on the upload
button in the right upper corner
After you’ve selected a file, this will be uploaded automatically, however not installed
automatically
The file is a compressed folder which will be automatically extracted by the system
The file for the delegate units update has following name format “WDU.x.yz.tuf“
The file for the WCAP update has following name format “AP.x.yz.tuf“
Following screen appears and after a few seconds the system is ready to start the
installation of the updates and info is shown regarding the latest changes
18
5 Web server
To start the update, press “install updates”. (Note that when you received the update
over the internet, the file will be downloaded first, so do not disconnect). One the update
has started; you’ll get an overlay protecting you from making any changes to the system.
5.5.1 WCAP update
Once the WCAP update is started following screens will appear
19
During the update the WCAP led1 is green on and led2 is blinking white. When the update is
finished following screen will appear
An update may take a while; do not under any circumstances turn off the device. During
the system update, the device will reboot a few times, during which you cannot use the
device. If the update fails, the system will boot in golden mode from which you can retry
the update.
When updating delegate units, make sure they’re battery is charged >= 50% and that
you have the least amount of interference as interference will drastically increase the time
to update. After a delegate update, only the devices will be reboot.
5.5.2 Update delegate units
Once the WCAP update is started following screens will appear
20
5 Web server
During the update the mic leds on the delegate units will light up red – left , green - right , after 5
sec, red – right , green - left , ……
Remark : If a unit is accidentally switched off during the update (e;g; due to empty battery) , this
will temporarily stop the update , but after a few minutes the update for the other units will
continue
5.6
Check firmware versions of delegate units
If the firmware version does not correspond with the uploaded file , for some units , the update
needs to be redone to ensure all units have the same firmware version .
This can be checked via the unit monitoring list
21
5.7
Check firmware versions of WCAP
6 Return to factory settings
If the ip address is not known then a return to factory settings (default ip address) is possible by
pressing the reset button next to the middle antenna , during 10 sec , and release the button .
Following screens will appear while pushing reset button and wait until the circle is completed
when releasing reset button…
22
configuration
7 . Guidelines on optimal WCAP setup and configuration
23
7.1 Positioning the Confidea Wireless Access Point
24
7.2 Optimizing the position the antennas
24
7.3 Max range of WCAP
25
8 . Frequency Planning
26
8.1 Use with WiFi base stations nearby
26
8.2 Avoiding interference b.m.o. wifi collection points
26
9 . Adding Cocon license to the WCAP
27
9.1 Introduction
27
9.2 Get the MAC address of your central equipment
27
9.3 Upload your license file
28
7 Guidelines on optimal WCAP setup and configuration
7 Guidelines on optimal WCAP setup and
23
7.1 Positioning the Confidea Wireless Access Point
Attention: Do not place the WCAP behind obstacles like walls , cabinets, panels, projection
screen, glass screens etc… , as they significantly reduce RF signal strength and quality
Below you can find how to select a correct positioning of the WCAP.
Note : When the antennas of the WCAP are positioned very close to a wall or ceiling , this may
result in absorption of the RF signal , which can decrease RF signal quality.
7.2 Optimizing the position the antennas
Note :It is important not to point the antennas directly to the units
Choosing the correct angle of the antennas in relation to the position of the delegate units is
beneficial to a good overall RF link quality between WCAP and delegate units
24
7.3 Max range of WCAP
A single WCAP has a range of 30m in “open field” . However the max range can be significantly
less depending on the positioning of the WCAP itself and direction of the antennas in relation to the
position of the delegate units.
Note : Certain buildingmaterials like concrete , or metal may absorb part of the RF signalradiation,
resulting in a reduction of the max distance between the access point and units
7 Guidelines on optimal WCAP setup and configuration
25
8 Frequency Planning
8.1 Use with WiFi base stations nearby
If more than one WCAP or Wifi accesspoints are in the same room or within 30m. range , it is
strongly advised that not more than one of them uses automatic frequency selection , to avoid
that the frequencyscanning is disturbed by the other accesspoint(s) . If multiple accesspoints are
used within each other’s reach, manual frequency selection based on frequency planning is
strongly recommended to avoid that wifi access points and Confidea WCAP would use the same
frequencies
When the Confidea wireless system is set to manually selected the wireless carrier frequency,
then you must make sure the Confidea wireless carrier does not overlap the already occupied WiFi
wireless carrier channels.
When using manual frequency selection in 5gHz band , ideally the frequency selection is done in
such way that between 2 used frequencies , there is a 40Mhz “distance” to avoid interference by RF
sidebands.
8.2 Avoiding interference b.m.o. wifi collection points
The transmission mode between WDU’s and WCAP is specially designed to be used in very
challenging environments where a high density of wifi signals is present due to wifi access points as
well as so called smart devices , which may cause RF interferences
Wifi devices such as smartphones , I-Pads….. may send regular probing signals over the entire wifi
band to search for a wifi connection. This probing can cause temporary interference and will continue
until a wifi connection was established. When a large number of wifi devices is present in the room ,
these probing signals may cause WDU connection loss due to saturation of the used frequency .
Therefore it is strongly recommended that a wifi collection point is set up, so wifi devices can lock
on to them and this way reduce further the risk of interference.
Note : The wifi access points must have sufficient capacity to ensure wifi connection for all
present wifi devices .
If there is not a sufficient wifi connection capacity for the present mobile wifi devices ,
unstable functionality of the Confidea wireless system due to interference can not be
excluded !
26
9.1 Introduction
With the release of Confidea Gen 3 we’ve changed the CoCon license file location from the PC
where the Room Server is installed, to the device to which CoCon will be connecting. This means that
now you do not need to send us the MAC address of your PC but the MAC address of your Confidea
Gen 3 Access Point. This way the license is independent of the computer onto which the CoCon
Room Server is running, the license will allow only 1 concurrent connection and the software will
adapt automatically to the license modules which are active in the license file.
To obtain the MAC address of the Confidea Gen 3 WCAP please follow the procedure underneath.
9.2 Get the MAC address of your central equipment
The default IP address Confidea Gen 3 WCAP is 192.168.1.100. Please use a recent web browser
to browse to the addresses indicated. If it’s the first time you set up your device a small wizard will
appear to set your language and etc.
You can login using username “admin” and password “admin”. (Yes, we’ve been very creative this
time…). Then go to the settings page:
9 Adding Cocon license to the WCAP
9 Adding Cocon license to the WCAP
Then click on the license file icon:
27
Please copy this MAC address and send it along with your P-number (can be found on the CoCon
box) to the following email address:
[email protected]
9.3 Upload your license file
Then you will receive an email containing your requested license file. This is an xml file which you
can open with notepad or something similar to verify if the correct modules have been activated. The
name of the file contains the MAC address of your device.
To upload your file onto your central equipment, click on the upload button below the macaddress:
28
content will appear.
Now you can connect CoCon with the central equipment.
9 Adding Cocon license to the WCAP
Then a popup will appear. Please select the received license file. It will load onto the device and its
29