1
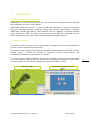
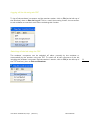
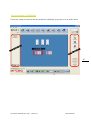
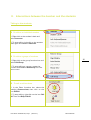
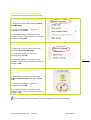
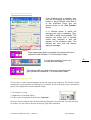
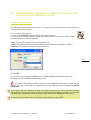
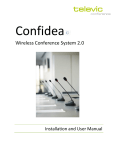
User Manual
AVIDAnet350/AVIDAnet Tenjin
0
Version 1.1
User Manual AVIDAnet 350/ Tenjin
(version1.2)
Televic Education
Please, feel free to contact our training department for any question:
Trainer : …………………………………….
E-Mail : …………………………………….
1
User Manual AVIDAnet 350/ Tenjin
(version1.2)
Televic Education
I.
Introduction ..................................................................................... 4
What is a multimedia laboratory .............................................................................................. 4
The teacher station ------------------------------------------------------------------------------------------------------------------ 4
The converter and the sources --------------------------------------------------------------------------------------------------- 5
Starting the lab......................................................................................................................... 6
Logging off the lab using the TCC ------------------------------------------------------------------------------------------------ 8
Switching off the lab using the TCC --------------------------------------------------------------------------------------------- 8
VACS virtual recorder ............................................................................................................... 9
Setting up a Group ................................................................................................................. 10
To set up a group: ------------------------------------------------------------------------------------------------------------------ 10
To remove a group: ---------------------------------------------------------------------------------------------------------------- 11
The philosophy of AVIDAnet ................................................................................................... 12
To interact or work with an individual student ----------------------------------------------------------------------------- 13
To interact with a specific group of students ------------------------------------------------------------------------------- 13
To interact with all students in the classroom regardless of groups -------------------------------------------------- 14
Administrative functions ........................................................................................................ 15
How to save the groups configuration ---------------------------------------------------------------------------------------- 15
How to save an attendance list ------------------------------------------------------------------------------------------------- 15
II. Interactions between the teacher and the students ................... 16
Talking to the students ........................................................................................................... 16
To talk to an individual student ------------------------------------------------------------------------------------------------- 16
To talk to a group of students --------------------------------------------------------------------------------------------------- 16
To talk to all students -------------------------------------------------------------------------------------------------------------- 16
Monitoring Students and discrete listening ............................................................................. 17
To view an individual student’s screen --------------------------------------------------------------------------------------- 17
To view a group of screens ------------------------------------------------------------------------------------------------------- 17
To view all screens ------------------------------------------------------------------------------------------------------------------ 18
Displaying a blank Screen on the Students’ screens ................................................................. 19
To send a blank screen to one student --------------------------------------------------------------------------------------- 19
To send a blank screen to a group --------------------------------------------------------------------------------------------- 19
To send a blank screen to all students ---------------------------------------------------------------------------------------- 19
Displaying the Teacher Screen on the students’ screens .......................................................... 20
To show your screen to one student ------------------------------------------------------------------------------------------ 20
To send your screen to a group ------------------------------------------------------------------------------------------------- 20
To send your screen to all students -------------------------------------------------------------------------------------------- 20
Sending students a Text Message ........................................................................................... 21
To send a message to one student --------------------------------------------------------------------------------------------- 21
To send a message to a group --------------------------------------------------------------------------------------------------- 21
To send a text message to all students --------------------------------------------------------------------------------------- 21
How to call the teacher........................................................................................................... 22
Answering a student call ---------------------------------------------------------------------------------------------------------- 22
Controlling a Student Keyboard and Mouse ............................................................................ 23
Locking a student’s keyboard and mouse ------------------------------------------------------------------------------------ 23
Taking over a student’s keyboard and mouse ------------------------------------------------------------------------------ 24
Sharing a student’s keyboard and mouse ------------------------------------------------------------------------------------ 25
User Manual AVIDAnet 350/ Tenjin
(version1.2)
Televic Education
2
III. Communication between the students: creating pairs,
conference and telephone groups ..................................................... 26
Creating pairing groups .......................................................................................................... 26
Creating conference groups .................................................................................................... 27
Creating telephone groups ..................................................................................................... 28
IV.
Playing a source (Tape/Video/DVD/Desktop) ........................... 29
Teacher preview..................................................................................................................... 29
Playing the source to the students .......................................................................................... 29
Streaming the teacher desktop ............................................................................................... 31
How to work with the VACS .................................................................................................... 34
How to save the students’ work.............................................................................................. 35
V.
Sending and collecting files ...................................................... 36
Sending a file to the students ................................................................................................. 36
To send a file to an individual --------------------------------------------------------------------------------------------------- 36
To send a file to a group ---------------------------------------------------------------------------------------------------------- 36
To send a file to the whole classroom: ---------------------------------------------------------------------------------------- 36
Sending an audio or a video file .............................................................................................. 38
Sending a Web Page ............................................................................................................... 39
Sending a text document ........................................................................................................ 40
Collecting files ........................................................................................................................ 41
Deleting files from the students’ computers ............................................................................ 43
User Manual AVIDAnet 350/ Tenjin
(version1.2)
Televic Education
3
I. Introduction
What is a multimedia laboratory
AVIDAnet® is a multimedia laboratory that can suit several teaching situations: Working
with individuals, groups or whole classes.
AVIDAnet® allows the teacher to easily create and distribute a range of multimedia
resources including listening, speaking, reading and writing comprehension activities.
AVIDAnet® provides the teacher with innovative tools for digitizing and saving cassette
tapes, video tapes, DVD’s and other multimedia resources. Digitizing multimedia sources
allows teachers to build up their own personal database of digital exercises.
The teacher station
The teacher station consists of a PC, two screens, a keyboard and a mouse (the keyboard
and the mouse are active on both screens).
One of the screens displays the AVIDAnet management interface (also called TCC: Teacher
Control Center). It allows the teacher to implement various communication and
broadcasting functions on the students’ computers.
The second screen displays Windows desktop: the teachers can work on their documents
or use the Internet. They will also use this screen to visualize the students’ screens while
monitoring them or to visualize the video while previewing a DVD or a VHS.
Windows desktop
User Manual AVIDAnet 350/ Tenjin
(version1.2)
AVIDAnet management interface
(TCC)
Televic Education
4
TCC Teacher Control Interface
5
Control Panel
The converter and the sources
Most AVIDAnet® laboratories are equipped with a PC called an ‘AD converter’ which is
usually installed within the teacher’s desk. The AD convertor allows the broadcasting and
the digitisation of audio and video sources which can include a DVD player, VHS player,
Audio cassette player and Satellite TV. The type of sources can vary from one laboratory to
another. The sources are normally situated above the AD converter within the teacher’s
desk.
Some labs are equipped with an Infra-red device for the sources. The Infra-red device is
used to activate the source from within the TCC software without having to use the remote
controls of the actual device (See ‘Control panel’ on the picture above).
User Manual AVIDAnet 350/ Tenjin
(version1.2)
Televic Education
Starting the lab
To work with the lab, the first thing the teacher and the students need to do is to log on to the PC and
school network.
To log on, press “Control, Alt, Delete” simultaneously to bring up the Login prompt. Then, log on using
your own user name and password.
When the teacher has logged on, a grey box called ‘AVIDAnet® client’ login window pops up and the
teacher must click OK. This will log them into the AVIDAnet® laboratory.
6
Student’s name
Station number
Folder where all the
documents sent by the
teacher are saved
Microphone Volume
Headphone volume
Phone Activity. Only
activated when the teacher
creates a phone group.
Call teacher button
User Manual AVIDAnet 350/ Tenjin
(version1.2)
Televic Education
The AVIDAnet® client allows communication between the teacher and the student, and it
cannot be closed by the student. The AVIDAnet® client login window also needs to be
started on all the students’ PC’s. Depending on how the laboratory is configured, the
AVIDAnet® client may login automatically.
When the students are logged into AVIDAnet® they appear
as little icons on the TCC screen (the student’s name can be
displayed below the icon):
7
User Manual AVIDAnet 350/ Tenjin
(version1.2)
Televic Education
Logging off the lab using the TCC
To log off the students’ computers and the teacher station, click on File (at the left top of
the interface), then on Exit and Log off. This is a useful time-saving funtion, but remember
to ask students to save their work before activating this function.
Switching off the lab using the TCC
The students’ computers can be switched off either manually by the students or
automatically by the teacher using the TCC. To switch off all the computers of the lab
including the students’ computers and the teacher’s station, click on File (at the left top of
the TCC interface), then on Exit and Shutdown.
User Manual AVIDAnet 350/ Tenjin
(version1.2)
Televic Education
8
VACS virtual recorder
VACS is an audio/video player and an audio recorder installed on the students’ and the
teacher’s stations. Students can use VACS independently to play or record listening and
speaking exercises. VACS also opens automatically when the teacher sends an audio or a
video file to the students.
Blanks creation (teacher function)
Subtitles creation
Open an audio or a video
file
Save an audio file
Create an audio file
File name
9
Add bookmarks
Remove bookmarks
Student volume
Document/ Source volume
Stop
Record
Play
When the record button is red, click on it to record your voice.
User Manual AVIDAnet 350/ Tenjin
(version1.2)
Televic Education
Setting up a Group
Setting up a group allows the teacher to assign different levels of work to different sets of
pupils in mixed ability classes. It will also allow the teacher to transfer a source to a group
of students. Therefore, it is highly recommended to create at least one group before
starting the lesson. *Most labs are configured for a group to automatically be created on
start-up.
x To set up a group:
1. Click on the Group icon in the top left of the TCC teacher screen
.
2. In the pop-up box that appears, create a name and choose a colour.
3. Click OK.
4. Next, click the students’ desks you want to include in the group.
5. Finally, click the OK button on the teacher screen.
10
If the version of your software is 1.17 or less, you have to click on the ‘Select’ button before
selecting the students’ desks. Once the students’ desks are selected click ‘OK’ as
mentioned in step 5.
The group will appear in the left-hand column and the desks included in the group will have
the same colour.
You can create as many groups as you wish, by repeating the process.
User Manual AVIDAnet 350/ Tenjin
(version1.2)
Televic Education
x To remove a group:
1. Click on the group you want to remove in the group function bar.
2. Right-click on the group.
3. In the menu, select Remove group.
11
User Manual AVIDAnet 350/ Tenjin
(version1.2)
Televic Education
The philosophy of AVIDAnet
There are 3 ways to interact with the students: individually, in groups or as an entire class.
12
User Manual AVIDAnet 350/ Tenjin
(version1.2)
Televic Education
xTo interact or work with an
individual student
1. Right-click on the relevant desk.
2. Choose the action you want to carry out
from the menu.
xTo interact with a specific group of
students
13
1. Click on and select the desired group
2. Right-click on the Group functions bar.
3. Choose the action you want to carry out
from the menu.
User Manual AVIDAnet 350/ Tenjin
(version1.2)
Televic Education
x To interact with all students in the
classroom regardless of groups
1. In the Class functions bar, click the
relevant heading (Monitor, for instance).
2. Click on the icon matching the action you
want to carry out (Mosaic All, for instance).
14
If you are assigning the same work to all students, it is not necessary to use groups. You
can work with the classroom functions only.
User Manual AVIDAnet 350/ Tenjin
(version1.2)
Televic Education
Administrative functions
How to save the groups configuration
Once the groups are created, it is possible to save this class configuration.
1. In the Class functions bar (on the right), click on the heading Set up, then on the icon
Store Set up.
2. In the box that opens, click ‘Store’ without changing the name of the configuration
(Default). This configuration will open automatically next time you switch the lab on.
How to save an attendance list
1. To save an attendance list, click on the heading Set up (in the Class functions bar) and
click on the icon Attendance list. A window opens, showing the list of students. To save this
list, click on File and ‘Save as’. The file created is an “xml” file that can be opened with Excel.
User Manual AVIDAnet 350/ Tenjin
(version1.2)
Televic Education
15
II. Interactions between the teacher and the students
Talking to the students
x To talk to an individual student
1. Right-click on the student’s desk and
select Intercom.
2. To stop talking, right-click on the student
desk again and deselect Intercom.
x To talk to a group of students
16
1. Right-click on the group functions bar and
select Call Group.
2. To stop talking to a group, repeat the
process and deselect Call Group from the
same menu.
x To talk to all students
1. In the Class functions bar, select the
heading Communicate, then click on the
icon Call All.
2. To stop talking, right-click on the icon Call
All. Then click Stop Call All.
User Manual AVIDAnet 350/ Tenjin
(version1.2)
Televic Education
In all cases described above the desk icons change to show when a student can hear you.
Monitoring Students and discrete listening
The monitoring function will allow you to view the students’ screens. While this function is
active, you will also be able to listen to the students’ production. The students do not know
that they are being monitored.
x To view an individual student’s
screen
1. Left-click once on the student’s desk. The
student’s screen opens as a window on the
teacher’s PC and a grey border is flashing
around the student’s desk icon to indicate
that it is being viewed.
2. To stop viewing, simply left-click once on
the desk again.
x To view a group of screens
17
1. Click on the group in the Group functions
bar.
2. Right-click on the group and choose
Mosaic View. This opens a window in which
all the screens in the group can be seen.
3. To stop viewing the screens right-click on
the group menu and deselect Mosaic View.
The desk icons are given a “mosaic”
background to indicate they are being
viewed.
User Manual AVIDAnet 350/ Tenjin
(version1.2)
Televic Education
xTo view all screens
1. In the Class functions bar, select the
heading Monitor, then click on Mosaic All.
2. To stop viewing, right-click on Mosaic All,
then click Release Mosaic All.
The desk icons are given a “mosaic”
background to indicate they are being
viewed.
18
User Manual AVIDAnet 350/ Tenjin
(version1.2)
Televic Education
Displaying a blank Screen on the Students’ screens
The blank screen function displays a blank screen on the students’ screens. When this
function is active, the students cannot use their computers. It is a very useful function if you
want to grab the students’ attention.
x To send a blank screen to one
student
1. Right-click on the student’s desk and
select Blank Screen.
2. To stop the function, deselect Blank
Screen from the same menu.
x To send a blank screen to a group
1. Right-click on the Group functions bar
and select Blank Screen.
19
2. To stop the function, deselect Blank
Screen from the same menu.
x To send a blank screen to all
students
1. Select the heading Communicate in the
Class functions bar, then click on Blank
screen.
2. To stop the function, right-click on Blank
Screen, then click Release Blank Screen.
The desk icons are given a blank screen background while receiving the function.
User Manual AVIDAnet 350/ Tenjin
(version1.2)
Televic Education
Displaying the Teacher Screen on the students’ screens
This function will allow you to display the teacher PC screen onto the students’ screens. It is
very useful if you want the students to work on an Internet page without having access to
the Internet for instance. During the broadcasting, the students’ mouse and keyboard are
blocked.
x To show your screen to one student
1. Right-click on the student desk and select
Show screen.
2. To stop showing your screen, deselect
Show Screen from the same menu.
x To send your screen to a group
1. Right-click on the Group functions bar
and select Screen To Group.
20
2. To stop the function, deselect Screen To
Group from the same menu.
x To send your screen to all students
1. Select the heading Communicate in the
Class functions bar, then click on Screen To
All.
2. To stop the function, right-click on Screen
To All, then click Release Screen To All.
In all cases described above the student desk icons change to indicate that they are
receiving the function.
User Manual AVIDAnet 350/ Tenjin
(version1.2)
Televic Education
Sending students a Text Message
x To send a message to one student
1. Right-click on the desk and select Send
Text Message.
2. A pop-up box appears. Type your
message and click OK.
The message opens in a window on the
student’s screen. The student can close this
window by clicking OK.
x To send a message to a group
1. Right-click on the Group functions bar
and select Send Text Message.
2. A pop-up box appears. Type your
message and click OK.
21
The message opens in a window on the
students’ screen. They close this window by
clicking on OK.
x To send a text message to all
students
1. In the Class functions bar select the
heading Communicate, then click on Text
to All .
2. A pop-up box appears. Type your
message and click OK.
The message opens in a window on the
students’ screen. They close this window by
clicking on OK.
For the student to call the teacher, see next page (How to call the teacher).
User Manual AVIDAnet 350/ Tenjin
(version1.2)
Televic Education
How to call the teacher
If the students have a problem, they
can call the teacher by clicking on a
button in the AVIDAnet client box.1.
In the AVIDAnet Client box, the
student clicks on the ‘Call Teacher’
button.
2. A window opens in which the
students can type a message. They
click OK to send the message. The
teacher will know that a student
needs help, because a ‘bell’ will
appear on the student’s desk. The
student can also click OK without
typing a message.
If the student has typed a message, the teacher will see a
yellow bell with the letter T on the student’s desk.
To read the message, hover over
the bell with the mouse..
If the student did not typed a message, the teacher will
get a yellow bell (without a T) on the student’s desk.
Answering a student call
The number of calls received appears at the top right of the interface. The teacher knows
exactly how many students are waiting for an answer. In the drop-down menu, the teacher
gets a chronological list of the students calling.
xTo answer to a call:
1. Right-click on the desk calling.
2. In the menu, choose the first function “Intercom”.
Once you have answered, the call automatically disappears from the list. If you do not want
to answer, you can click on the bin at the top right of the interface.
User Manual AVIDAnet 350/ Tenjin
(version1.2)
Televic Education
22
Controlling a Student Keyboard and Mouse
There are three ways of taking control of a student’s keyboard and mouse.
Locking a student’s keyboard and mouse
You can lock a student’s keyboard and mouse to call their attention to a specific part of the
screen for instance. In this situation neither the teacher nor the student have any control
over the student’s keyboard and mouse.
xTo lock a student’s keyboard and mouse:
1. First click on the desk to show the student’s screen.
2. Right-click on the desk, and select Lock keyboard/mouse.
3. To stop the function, deselect Lock keyboard/mouse from the same menu.
23
To be able to communicate with the student during the manipulation, it is highly
recommended to activate the Intercom function.
User Manual AVIDAnet 350/ Tenjin
(version1.2)
Televic Education
Taking over a student’s keyboard and mouse
The teacher can also take over a student’s keyboard and mouse to help the student open a
software program for instance.
xTo take over a student’s mouse and keyboard:
1. Click on the desk to show the student’s screen.
2. Right-click on the desk and select Take over keyboard/mouse.
3. To stop the function, deselect Take over keyboard/mouse from the same menu.
To be able to communicate with the student during the manipulation, it is highly
recommended to activate the Intercom function.
24
User Manual AVIDAnet 350/ Tenjin
(version1.2)
Televic Education
Sharing a student’s keyboard and mouse
The teacher can share a student’s mouse and keyboard to work together with the student.
For instance, if the student is working on a text, the teacher can show the mistakes by
underlining them, and the student can immediately correct the mistakes. Both the teacher
and the student have control over the student’s keyboard and mouse.
xTo share a student’s keyboard and mouse:
1. Click on the desk to to show the student’s screen.
2. Right-click on the desk and select Share Keyboard/mouse.
3. To stop the function, deselect Share keyboard/mouse from the same menu.
To be able to communicate with the student during the manipulation, it is highly
recommended to activate the Intercom function.
25
User Manual AVIDAnet 350/ Tenjin
(version1.2)
Televic Education
III. Communication between the students: creating pairs,
conference and telephone groups
Creating pairing groups
The pairing function allows the creation of a group in which the students will be put into
communication, two by two.
xTo create a pairing group:
1. Click on the Pairing button at the top left of the interface.
2. In the pop-up box that appears, set a name and a colour for the group. Then choose
between the three modes proposed:
- Free: The teacher decides who he wants to pair up.
- Fixed: The system pairs the students sitting next to each other (student 1 with 2...).
- Random: The system chooses the pairs randomly.
26
3. Click OK.
4. If you have choosen the Free Mode or the Random Mode, you have to select the
students and to click OK to activate the groups.
If you choose the random mode and you are not satisfied with the pairs created by the
system, you can modify them by right-clicking on the pairing group and selecting Shuffle
subgroups.
At any time, you can monitor a student computer to listen to the communication between
the students. You can also talk to the pair by activating the Intercom function on one of the
students talking (right-click on the student’s desk and choose Intercom in the menu).
At any time, the students can record the conversations by using VACS.
User Manual AVIDAnet 350/ Tenjin
(version1.2)
Televic Education
Creating conference groups
The conference function allows the creation of a group in which more than two students
will be put into communication. Up to 7 students can be in a single discussion group.
x To create a conference group:
1. Click on the conference button at the top left of the interface.
2. In the pop-up box that appears, set a name, a colour and define the size of the group.
Then choose between the two modes proposed:
- Free: The teacher chooses the students to be included in the conference group.
- Random: The system chooses the students to be included in the conference group.
27
3. Click OK.
4. Select the students.
5. Click OK to activate the conference group.
At any time, the teacher can monitor a student computer in order to listen to the
communication between the students. The teacher can also talk to the group by activating
the Intercom function on one of the students talking (right-click on the student’s desk and
choose Intercom in the menu).
User Manual AVIDAnet 350/ Tenjin
(version1.2)
Televic Education
Creating telephone groups
The telephone function allows the creation of a group in which the students can be put into
communication two by two. However, the students will be free to decide who they want to
talk to.
x To create a telephone group:
1. Click on the telephone button at the top left of the interface.
2. In the pop-up box that appears, set a name and a colour.
3. Click OK.
4. Choose the students you want to include in the activity.
5. Click OK to activate the telephone group.
6. The Phone button on the students’ AVIDAnet Client box will now be active.
If the students click on the phone button, the students who are part of the activity are
listed. They can now choose the student they want to talk to and press Call.
The student receiving the call
has to press Answer Phone.
28
If the student called is already in communication with another student, the student calling
will get an busy tone.
At any time, you can monitor a student computer to listen to the communication between
the students. You can also talk to the pair by activating the Intercom function on one of the
students talking (right-click on the student’s desk and choose Intercom in the menu).
User Manual AVIDAnet 350/ Tenjin
(version1.2)
Televic Education
IV. Playing a source (Tape/Video/DVD/Desktop)
The broadcasting of a source will allow you to use different multimedia resources (video
tapes, audio tapes, DVD’s…). The broadcasted source opens automatically on each
computer allowing each student to work at their own pace on the exercise.
Teacher preview
Before playing a source to the students, you need to preview it in order to cue it up.
1. At the top of the screen, click on the icon corresponding to the source you want to play
(DVD, VCR, or Tape).
The list of sources presented in this manual is not exhaustive and varies from one lab to
another.
2. At the bottom of the screen, click on the black arrow next to the control panel.
29
Sources control panel
If you have selected a video source (DVD or VCR), you will get a window with the video
playing. If you have selected an audio source, you will hear the source in your headphone.
You can now cue up the source with the commands of the control panel (only if your lab is
equipped with the Infra-Red controller device) or with the remote control. If you are playing
a DVD, you can select the language, the subtitles and the chapter.
3. Once the source is cued up, click again on the black arrow. You have just defined the
starting point of the source you are going to play to the students.
Playing the source to the students
To broadcast a source, you have to create a group first.
1. Now that your source is ready, click on the icon corresponding to your source at the top
of the screen (DVD, VCR...).
User Manual AVIDAnet 350/ Tenjin
(version1.2)
Televic Education
2. Drag it into the Group functions bar on the left. A pop-up window appears.
1: Streams.
You do not need to modify these
parameters. They are correctly set by
default. However, if you are playing a
video and you want to play only the video
stream, you can deselect ‘Audio’.
Similarly, if you want to play the audio
stream of a video source, deselect
‘video’.
2: Mode.
Active mode:
transmission without
recording.
Copy mode: both the source and the
student’s voice are recorded.
Copy Mute: the source only is recorded
without the student’s voice.
1
2
3
4
5
30
3: Teacher copy.
This has to be selected if you want to
save a copy of the file.
4: Options and Video Standard.
Parameters correctly set by default.
5: Stream.
It is recommended to create a session (a
folder) and to name the file(s). If you do
not create a session, the file(s) will be
saved in a folder called “no-session” and
will receive a default name (“stream” +
index).
User Manual AVIDAnet 350/ Tenjin
(version1.2)
Televic Education
The name of the session and the name of the file must be typed without any accents or
special characters .
3. Once the configuration is set, click OK.
4. Click on the black arrow below the group bar to broadcast the source
5. To stop broadcasting, click again on the black arrow below the group
bar:
6. To remove the source, click on the bin below the group bar.
If your lab is not equipped with the Infra-Red controller device, you will need to press the
Play button on the remote control or the device itself to start the source playing and the
Stop or Pause button to stop it playing.
31
Streaming the teacher desktop (from version 1.19 onwards only)
1. To stream the teacher screen to the students, click on the desktop streaming icon:
Desktop source added to source panel
2. Drag it into the Group functions bar on the left. A pop-up window appears
(See settings P.31)
User Manual AVIDAnet 350/ Tenjin
(version1.2)
Televic Education
Desktop config : region selection
Desktop config : window selection
When selecting “Region”, you can draw a rectangle on the primary screen to indicate the
region to be streamed. After drawing the initial rectangle, it is still possible to move or
resize it using the mouse. When clicking OK, the desktop streaming source is initialized, and
the selected region can be streamed to the students (in active or copy mode).
At any later moment, the region can still be modified by selecting “source properties”.
As with any analog source, during source client configuration you can specify the window
size of transmitted video. In case of desktop streaming, the client config actually specifies
the maximum window size. If the region selected by the teacher is smaller than what’s
mentioned in the client config, only the selected region is streamed. If the selected region
exceeds the predefined video window, it is scaled down to the client config window size
(while retaining the correct aspect ratio) before being streamed.
-
- When selecting “Window” in the Desktop selection drop down box, any single application
window on the primary screen can be selected for streaming. This is done by grabbing the
finder icon next to the drop down box, and dragging it onto the window to be streamed.
The advantage of using this type of selection, is that the selected window being streamed
can still be moved around on the teacher machine, without the clients noticing this. A
“region” selection at the other hand just streams a fixed region of the teacher screen, and
any change within that fixed region will be noticeable at the client side.
3. Once the configuration is set, click OK.
4. Click on the black arrow below the group bar to start broadcasting the source
User Manual AVIDAnet 350/ Tenjin
(version1.2)
Televic Education
32
5. To stop broadcasting, click again on the black arrow below the group
bar:
6. To remove the source, click on the bin below the group bar.
33
User Manual AVIDAnet 350/ Tenjin
(version1.2)
Televic Education
How to work with the VACS
If you have selected Copy or Copy Mute, the VACS opens automatically on the students’
computers. The students can now watch the video source or listen to the audio source at
their own pace. The file is saved in the session you have prepared. The students can easily
find it by clicking on Stream dir in their AVIDAnet client box (See picture below).
Similarly, if you have selected Teacher Copy, the VACS opens on your computer and the file
is saved in your Stream dir folder.
34
If you want to use this file for another lesson, it is recommended to save it in a personal
folder or on your USB stick. The stream Dir folder is a common folder, which means that
anyone can remove the files saved in that folder.
User Manual AVIDAnet 350/ Tenjin
(version1.2)
Televic Education
How to save the students’ work
When the students work on an audio source with the VACS, they can record their voice
with the VACS. It is very useful when you want them to work on an oral gap-fill exercise
(repetition or pronunciation exercise).
In order to record their voice, the students have to:
1. Click on the VACS record button:
2. Talk in the microphone.
3. Click on the Stop button at the end of their recording:
4. Save their work by clicking on the Save icon:
35
The students have to save their work (by clicking on the Save icon) to allow the teacher to
collect their work. (See Collecting files below).
The students can listen to their recording anytime during the exercise (by pressing the play
button) and correct themselves, if needed, by clicking again on the record button.
User Manual AVIDAnet 350/ Tenjin
(version1.2)
Televic Education
V. Sending and collecting files
Sending a file to the students
The function called ‘Launch application’ will allow you to send any type of file: audio file,
video file, text document, web page…
x To send a file to an individual
1. Right-click on the student’s desk and
select Launch Application. A dialogue box
appears.
End of the explanation below.
x To send a file to a group
1. Right-click on the Group functions bar
and select Launch Application. A dialogue
box appears.
36
End of the explanation below.
x To send a file to the whole
classroom:
1. In the Class functions bar, select the
heading Applications, or Remote Control,
depending on the version of the software.
2. Click on the icon Start Application. A
dialogue box appears.
End of the explanation below.
User Manual AVIDAnet 350/ Tenjin
(version1.2)
Televic Education
The following box appears:
List of applications
File path or URL
37
Session creation
User Manual AVIDAnet 350/ Tenjin
(version1.2)
Actions list
Televic Education
Sending an audio or a video file
x How to send a video or an audio file:
38
1. In the dialogue box that appears, select VACS.
2. Click Browse to select the file you want to send.
3. Create or select a session.
4. Click Launch.
It is recommended to specify or to create a session. This is a folder where the file will
be stored.
The list of actions on the right of the box is only available from version 1.18 onwards. This
list allows you to control the students’ VACS. For instance, you can click Record to put the
students’ VACS in the record Mode. Similarly, if the students are recording their voice, you
can easily save their work by clicking Save and Quit.
If your version of the software is inferior to 1.18, click OK instead of Launch.
User Manual AVIDAnet 350/ Tenjin
(version1.2)
Televic Education
Sending a Web Page
xTo send a web page to the students’ computers:
39
1. Select URL.
2. Type the web site address or copy and paste it in the field.
3. Click Launch.
If your version of the software is inferior to 1.18, click OK instead of Launch.
User Manual AVIDAnet 350/ Tenjin
(version1.2)
Televic Education
Sending a text document
x To send a text document (a text assignment for instance:
40
1. Select the option File.
2. Click Browse to select the file you want to send (it may be saved in your personal folder
or on your USB stick).
3. Create or select a session.
4. Click Launch.
If the version of your software is inferior to 1.18, instead of selecting File, select
Application with input file.
If your version of the software is inferior to 1.18, click OK instead of Launch.
It is highly recommended to specify or to create a session. This is a folder where the
file will be stored if you want to collect the students’ work.
User Manual AVIDAnet 350/ Tenjin
(version1.2)
Televic Education
Collecting files
You can collect the students’ work.
x To collect an assignment you have sent:
1. Select the heading File Transfer in the class functions bar. Then click on Collect Files.
41
2. In the window that opens, select the session you have created earlier.
3. Click on Collect Files.
User Manual AVIDAnet 350/ Tenjin
(version1.2)
Televic Education
The students’ work is saved in the folder called Collected files. You can easily find it by
clicking on Open Folder in the Collecting files window. The system creates a folder per
student.
You can now save the folder on your USB stick or on any personal folder if you want to
correct the students’ work later.
If you want to collect the files, the students must save their work. Therfore, they need to
click Save in the program they are using. If they change the destination of the document (by
clicking on Save as for instance) you will not be able to collect their work.
User Manual AVIDAnet 350/ Tenjin
(version1.2)
Televic Education
42
Deleting files from the students’ computers
Once you have collected the students’ work, you can delete the files saved on their
computers.
x To delete files on the students’ computers:
1. In the Class Functions Bar, click on the heading File transfer.
43
2. Click on the icon Delete Files.
3. In the box that opens, select the session you want to delete.
4. Click on the icon Delete session.
User Manual AVIDAnet 350/ Tenjin
(version1.2)
Televic Education