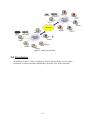
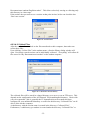
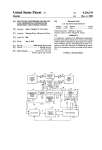
1
Artec Electronics N.V. Leo Bekaertlaan 1 8870 Izegem BELGIUM Tel.: +32 (51) 33 60 99 Fax: +32 (51) 33 60 98 http: www.artec-electronics.com www.televic.com AVIDAnet® Tenjin User Manual -1- Table Of Content 1 2 Disclaimer........................................................................................................................... 7 Introduction ........................................................................................................................ 8 2.1 AVIDAnet® TENJIN hardware ................................................................................. 8 2.2 Using analogue audio / video sources ........................................................................ 9 2.3 Groups, audio conversation quality.......................................................................... 10 2.4 Video-conferencing, multi-room operation.............................................................. 10 2.5 Conclusion................................................................................................................ 11 3 Starting up the multimedia lab ......................................................................................... 12 4 Using the Tenjin Control Centre (TCC)........................................................................... 14 4.1 Tenjin Control Centre graphical user interface ........................................................ 14 4.1.1 Teacher Control Panel Layout .......................................................................... 14 4.1.2 Menu items ....................................................................................................... 14 4.1.2.1 File ................................................................................................................ 14 4.1.2.1.1 Exit ......................................................................................................... 14 4.1.2.1.2 Exit and Shutdown ................................................................................. 15 4.1.2.1.3 Exit and Restart ...................................................................................... 16 4.1.2.1.4 Exit and Log off...................................................................................... 16 4.1.2.2 Edit ............................................................................................................... 17 4.1.2.2.1 Language ................................................................................................ 17 4.1.2.2.2 Config ..................................................................................................... 17 4.1.2.3 Help .............................................................................................................. 17 4.1.3 Student selection field (representation of the class) ......................................... 18 4.1.4 Group Configuration panel............................................................................... 18 4.1.5 Source selection panel...................................................................................... 19 4.1.6 Teacher preview and Source control panel ...................................................... 19 4.1.7 Classroom Control panel.................................................................................. 20 4.1.8 Teacher call panel............................................................................................. 20 4.2 Basic laboratory functions ........................................................................................ 20 4.2.1 Student presence and identification.................................................................. 21 4.2.2 Student monitoring ........................................................................................... 22 4.2.3 Student functions .............................................................................................. 24 4.2.3.1 Start student function.................................................................................... 24 4.2.3.2 Check active functions for a student ............................................................ 24 4.2.3.3 Terminate student function........................................................................... 25 4.2.3.4 Student menu overview ................................................................................ 25 4.2.3.4.1 Intercom.................................................................................................. 26 4.2.3.4.2 Student Call All ...................................................................................... 27 4.2.3.4.3 Lock Keyboard/Mouse ........................................................................... 27 4.2.3.4.4 Take over Keyboard/Mouse ................................................................... 28 4.2.3.4.5 Share Keyboard/Mouse .......................................................................... 28 4.2.3.4.6 Send Text Message ................................................................................. 29 4.2.3.4.7 Enable Chat ............................................................................................ 30 4.2.3.4.8 Show screen............................................................................................ 31 4.2.3.4.9 Show Student screen............................................................................... 32 4.2.3.4.10 Blank screen ......................................................................................... 32 4.2.3.4.11 Send ...................................................................................................... 33 4.2.3.4.12 Collect Files .......................................................................................... 35 4.2.3.4.13 Collect Log........................................................................................... 36 -2- 4.2.3.4.14 Erase student copies ............................................................................. 37 4.2.3.4.15 Close Client .......................................................................................... 37 4.2.3.4.16 Log off .................................................................................................. 38 4.2.3.4.17 Shutdown.............................................................................................. 38 4.2.3.4.18 Restart ................................................................................................... 39 4.2.3.4.19 Reset client ........................................................................................... 39 4.3 Working with groups ................................................................................................ 41 4.3.1 Group types ...................................................................................................... 41 4.3.1.1 Program groups ............................................................................................ 41 4.3.1.2 Pairing groups............................................................................................... 41 4.3.1.3 Conference groups ........................................................................................ 41 4.3.2 Creation of a group ........................................................................................... 41 4.3.2.1 Create a program group ................................................................................ 42 4.3.2.2 Create a Conference Group .......................................................................... 43 4.3.2.3 Create a Pairing group .................................................................................. 45 4.3.3 Selecting students for a group .......................................................................... 47 4.3.3.1 Program group .............................................................................................. 47 4.3.3.2 Conference Group ........................................................................................ 51 4.3.3.3 Pairing Group ............................................................................................... 56 4.3.3.4 Working with groups .................................................................................... 57 4.3.3.4.1 Program Groups...................................................................................... 57 4.3.3.4.2 Conference Groups ................................................................................. 57 4.3.3.4.3 Pairing Groups ........................................................................................ 58 4.3.3.5 Working with multiple groups...................................................................... 59 4.3.4 Group functions ................................................................................................ 60 4.3.4.1 Start group function...................................................................................... 60 4.3.4.2 Check active functions for a group ............................................................... 61 4.3.4.3 Terminate group function............................................................................. 62 4.3.4.4 Group menu overview .................................................................................. 63 4.3.4.4.1 Remove Group ........................................................................................ 64 4.3.4.4.2 Step Monitor ........................................................................................... 65 4.3.4.4.3 Auto Monitor .......................................................................................... 65 4.3.4.4.4 Stop Monitor........................................................................................... 65 4.3.4.4.5 Lock keyboard/mouse ............................................................................ 66 4.3.4.4.6 Call Group .............................................................................................. 66 4.3.4.4.7 Send text message ................................................................................... 66 4.3.4.4.8 Enable Chat ............................................................................................ 66 4.3.4.4.9 Blank Screen........................................................................................... 66 4.3.4.4.10 Screen To Group ................................................................................... 66 4.3.4.4.11 Mosaic View......................................................................................... 66 4.3.4.4.12 Send ...................................................................................................... 66 4.3.4.4.13 Collect file ............................................................................................ 66 4.3.4.4.14 Collect Log........................................................................................... 66 4.3.4.4.15 Erase student copies ............................................................................. 66 4.3.4.4.16 Start application.................................................................................... 66 4.3.4.4.17 Close clients.......................................................................................... 66 4.3.4.4.18 Log Off Clients ..................................................................................... 67 4.3.4.4.19 Shutdown Clients.................................................................................. 67 4.3.4.4.20 Restart Clients ...................................................................................... 67 4.3.4.4.21 Properties .............................................................................................. 67 -3- 4.3.5 Classroom functions ......................................................................................... 68 4.3.5.1 Monitor tab ................................................................................................... 68 4.3.5.1.1 Step Monitor ........................................................................................... 69 4.3.5.1.2 Auto Monitor .......................................................................................... 69 4.3.5.2 Communicate tab .......................................................................................... 70 4.3.5.2.1 Call All ................................................................................................... 70 4.3.5.3 File Transfer Tab .......................................................................................... 71 4.3.5.3.1 Send Files ............................................................................................... 71 4.3.5.3.2 Collect Files ............................................................................................ 71 4.3.5.3.3 Erase File ................................................................................................ 71 4.3.5.4 Setup tab ....................................................................................................... 71 4.3.5.4.1 Load Setup .............................................................................................. 72 4.3.5.4.2 Store Setup .............................................................................................. 73 4.3.5.4.3 Delete Setup ............................................................................................ 74 4.3.5.5 Log Off tab ................................................................................................... 74 4.3.5.5.1 Close Clients........................................................................................... 74 4.3.5.5.2 Log Off ................................................................................................... 75 4.3.5.5.3 Restart ..................................................................................................... 75 4.3.5.5.4 Shutdown................................................................................................ 75 4.4 Working with a source.............................................................................................. 76 4.4.1.1 Teacher preview ........................................................................................... 76 4.4.1.2 Allocation of a source to a group ................................................................. 77 4.4.1.3 Transmitting a source ................................................................................... 79 4.5 Teacher Call.............................................................................................................. 81 4.5.1.1 Detecting a Teacher Call .............................................................................. 81 4.5.1.2 Answering a teacher call .............................................................................. 83 4.5.1.3 Deleting teacher calls ................................................................................... 84 4.6 Working with multiple sources ................................................................................ 85 4.6.1.1 Working with multiple sources separately ................................................... 85 4.6.1.2 Working with mixed sources ........................................................................ 85 -4- Table of Figures Figure 1 - General concept of the AVIDAnet® Tenjin multimedia laboratory......................... 9 Figure 2 - Multi room operation............................................................................................... 11 Figure 3 - TCC and client icons ............................................................................................... 12 Figure 4 - Default configuration not found error message ....................................................... 13 Figure 5 – Teacher Control Panel layout.................................................................................. 14 Figure 6 - File menu ................................................................................................................. 14 Figure 7 - Confirm Exit ............................................................................................................ 15 Figure 8 - A/D converter .......................................................................................................... 15 Figure 9 - Confirm Exit and Shutdown .................................................................................... 16 Figure 10 - Confirm Exit and Restart....................................................................................... 16 Figure 11 - Confirm Exit and Log off ...................................................................................... 17 Figure 12 - Edit menu............................................................................................................... 17 Figure 13 - Help menu.............................................................................................................. 17 Figure 14 - About box .............................................................................................................. 18 Figure 15 - Classroom representation canvas.......................................................................... 18 Figure 16 - Group Configuration panel.................................................................................... 19 Figure 17 - Source Selection panel........................................................................................... 19 Figure 18 - Teacher preview - Source Control panel ............................................................... 19 Figure 19 - Classroom control panel ........................................................................................ 20 Figure 20 - Teacher call panel.................................................................................................. 20 Figure 21 - Student logon dialog.............................................................................................. 21 Figure 22 - Student logon status ............................................................................................... 21 Figure 23 - Student name tooltip .............................................................................................. 22 Figure 24 - Student discrete monitoring................................................................................... 23 Figure 25 - Activate student function....................................................................................... 24 Figure 26 - Functions active for a student ................................................................................ 25 Figure 27 - Student menu overview ......................................................................................... 26 Figure 28 - Intercom................................................................................................................. 27 Figure 29 - Student Call All ..................................................................................................... 27 Figure 30 - Lock Keyboard/Mouse .......................................................................................... 27 Figure 31 - Keyboard/Mouse control ....................................................................................... 28 Figure 32 - Keyboard/Mouse takeover ..................................................................................... 28 Figure 33 - Share Keyboard/Mouse ......................................................................................... 29 Figure 34 - Teacher Sent Text Message dialog........................................................................ 29 Figure 35 - Chat Client ............................................................................................................. 30 Figure 36 - Chat window.......................................................................................................... 31 Figure 37 - Show screen........................................................................................................... 32 Figure 38 - Show Student screen.............................................................................................. 32 Figure 39 - Show Student screen icon...................................................................................... 32 Figure 40 - Blank screen........................................................................................................... 33 Figure 41 - Send Files – Directory........................................................................................... 33 Figure 42 - Send Directory....................................................................................................... 34 Figure 43 - Send Files............................................................................................................... 34 Figure 44 - Send Session.......................................................................................................... 35 Figure 45 - Collect Files Session history.................................................................................. 35 Figure 46 - Collected Files directory structure......................................................................... 36 Figure 47 - Collect Log ............................................................................................................ 36 Figure 48 - Erase student copies............................................................................................... 37 -5- Figure 49 - Close Client confirmation window........................................................................ 38 Figure 50 - Log off confirmation window................................................................................ 38 Figure 51 - Shutdown confirmation window............................................................................ 39 Figure 52 - Restart confirmation window ................................................................................ 39 Figure 53 - Reset client confirmation window......................................................................... 40 Figure 54 - Create groups ......................................................................................................... 42 Figure 55 - Group Configuration window................................................................................ 42 Figure 56 - Create a workgroup ................................................................................................ 42 Figure 57 - Group panel ........................................................................................................... 43 Figure 58 - Conference group configuration............................................................................ 43 Figure 59 - Conference group selection modes ........................................................................ 44 Figure 60 - Conference group configuration............................................................................ 44 Figure 61 - Group panel conference group............................................................................... 45 Figure 62 - Pairing group configuration................................................................................... 45 Figure 63 - Pairing group selection modes ............................................................................... 46 Figure 64 - Pairing group configuration................................................................................... 46 Figure 65 - Group panel pairing group ..................................................................................... 47 Figure 66 - Selection of a group ............................................................................................... 48 Figure 67 - Enter student selection mode................................................................................. 48 Figure 69 - Student selection frames........................................................................................ 50 Figure 71 - Student selection confirmed .................................................................................. 51 Figure 72 - Group functions ..................................................................................................... 61 Figure 73 - Functions active for a group .................................................................................. 62 Figure 74 - Terminate group function...................................................................................... 63 Figure 75 - Group menu ........................................................................................................... 64 -6- 1 Disclaimer All information in this document is subject to change without notice. No part of this document may be reproduced or transmitted in any form or by any means, electronic or mechanical, for any purpose, without the express written permission of Televic. Due to the fact that Artec Electronics N.V. sticks closely to technological evolution, it is always possible that electronic devices and their technical and/or mechanical specifications are changed, without prior notice. The same applies to software development that will be modified to incorporate the latest technological, computer and programming evolution. 2004 Artec Electronics N.V. member of Televic. All rights reserved. -7- 2 Introduction The AVIDAnet® TENJIN laboratory integrates the latest technology used in comp uter multimedia. During the last few years Artec Electronics NV invested in a completely new digital system. The AVIDAnet® TENJIN multimedia laboratory is an electronic learning platform that can be used in a ‘multidisciplinary’ environment. Data-processing, office computing, sciences, mathematics, computer sciences, languages, accountancy, management, marketing, commercial training, exchange activities, finance, statistics, legal-economic activities, … are only a few examples of disciplines where the AVIDAnet® TENJIN multimedia laboratory can be used to increase the teaching efficiency. Regardless of the discipline taught, the system can be used for individual, traditional or conference work. The AVIDAnet® TENJIN laboratory consists of a computer classroom where each computer is equipped with a PCI board, the AVIDAnet® TENJIN master card. All transmissions of video and audio information, taking over control of the student computer and transmitting screen information is done over a standard IP network that connects all the computers. No extra analogue cabling is needed. This results in a very simple, flexible and evolutionary system. The intuitive graphical user interface of the Teacher Control Centre, hereafter commonly referred to as TCC, used to control the AVIDAnet® TENJIN laboratory has been developed in collaboration with teachers who provided us with the necessary feedback. The AVIDAnet® TENJIN laboratory, a fully Artec Electronics NV in- house development, uses the standardized MPEG4 video compression algorithm for all realtime video transmissions. TELEVIC N.V., of which Artec Electronics N.V. is a member, is also entitled with the quality certificate NBN EN ISO 9001: 2000. 2.1 AVIDAnet® TENJIN hardware We have reduced the cabling to a minimum in the AVIDAnet® TENJIN laboratory. This is a major advantage compared to the older analogue multimedia laboratories where the cabling was determining the possibilities of the system. In the AVIDAnet® TENJIN laboratory, a unique standard CAT5 FTP / UTP cable – 4 pairs – makes the link between the teacher and all the student computers. Our solution uses a dedicated pedagogical IP network in the laboratory, complementary and independent of the LAN. -8- Each multimedia laboratory will thus be equipped with two IP networks. The reason why we choose for this solution is twofold. On one hand, we want to have a guaranteed QoS for the real-time audio and video transmissions at all times. On the other hand, we do not want to add extra network load on the LAN so that the full LAN bandwidth remains available for all intra- and Internet traffic. The picture below shows the general structure of the AVIDAnet® TENJIN multimedia laboratory. Figure 1 - General concept of the AVIDAnet® Tenjin multimedia laboratory 2.2 Using analogue audio / video sources To make it possible to transmit a recorded videotape in real-time, we have developed a real-time software MPEG-4 encoder/decoder. This makes it possible for a teacher to record a video at home and use it in the AVIDAnet® TENJIN multimedia laboratory immediately and as is without digitisation step first. A teacher can use any analogue video course material as is for showing it in real-time to the students (VHS tapes, DVD, camera, audio cassettes). -9- If needed, a local digital copy can be saved on the student computer while sending the course to the students. After this initial transmission, a student can then review or relisten to the courses at his/her own pace. 2.3 Groups, audio conversation quality The AVIDAnet® TENJIN multimedia laboratory makes it possible to create different working groups, pairing groups or conference groups in an easy way. An unlimited number of groups can be created for each group type. Specia l care has been taken to have all conversations between students and teacher in realtime with a low delay. Delay is the time between the speaker pronouncing his/her utterance and the listener hearing the speaker’s utterance. If this delay is too important, the speech will not be lip-synchronous anymore. It will be comparable to a long-distance telephone call. A non-noticeable delay is very important for fluent and natural conversations and of crucial importance in language learning. In order to achieve this high level of audio quality, the AVIDAnet® TENJIN Master PCI card was developed based on the long experience of Artec Electronics N.V. and Televic in this field. 2.4 Video-conferencing, multi-room operation With the MPEG-4 video encoding and the increasing power of the computers, a videoconferencing application between students is now within reach. If all students and teacher computers are equipped with a web cam, one can imagine creating video conferencing groups where students can not only talk and listen to each other but can also receive each others image on their screen using a cheap web cam. Where all intercommunication between teacher and students is oral only today, a situation where the teacher can establish a videoconferencing intercommunication with one or more students becomes now possible. The fact that all communication and multimedia (audio/video) data transfer is done on a standard IP network combined with the use of the performant real-time MPEG-4 codec for video opens lots of possib ilities for distance learning. All of the above can be expanded to different classrooms and in the future even to different locations. As an example, a teacher present in classroom 1 will be able to control the computers in classroom 2 using his/her graphical user interface as if he/she was present in that classroom. All controls such as transmitting audio/video sources, audio communication, student screen transfer, … are possible beyond the physical boundaries of a classroom. The picture below explains this application. - 10 - Figure 2 - Multi room operation 2.5 Conclusion AVIDAnet® Tenjin is a truly evolutionary solution that can help you bring all the excitement of current and future multimedia experience alive in the classroom. - 11 - 3 Starting up the multimedia lab The AVIDAnet® Tenjin multimedia laboratory also can be used as a standard computer class. The students can come in and work on the computers without any teacher present. When the teacher wants to use the AVIDAnet® Tenjin system, he/she has to turn the key located under the teacher desk table. By doing so, the different AVIDAnet® Tenjin components will start automatically and the AVIDAnet® Tenjin system will initialise until ready to use. Then, there are two possibilities (depending on how the system is configured): 1) The Tenjin Control Centre (TCC) will start up automatically 2) The teacher has to start the Tenjin Control Centre by double-clicking the TCC icon on the desktop. The Tenjin Control Centre is the main control software of the AVIDAnet® Tenjin multimedia laboratory. It always has to be started up first. Once the Tenjin Control Centre application has fully started, the TCC screen will be displayed on the second teacher screen. This is the screen that will always be used for controlling the laboratory. The AVIDAnet® Tenjin multimedia laboratory is now ready for use. After starting the Tenjin Control Centre, the teacher has to log in his two clients: the “Teacher” client and the “PCTeacher” client. Two different situations are also possible here, again depending on the configuration of the system: 1) The “PCTeacher” client may start up and log in automatically and the “Teacher” client may start up automatically. The AVIDAnet® Tenjin dialog for the “PCTeacher” client and the logon screen for the “Teacher” client will be displayed. After that, the teacher still needs to log in to the Tenjin Control Centre by entering his/her name in the “Teacher” client login dialog and confirm by clicking the “OK” button. 2) If this is not the case, the teacher may start up both clients by double-clicking the client icons on the desktop. IMPORTANT NOTE: Always log in the “PCTeacher” client first. After this client has logged in successfully, log in the “Teacher” client. 1 2 3 Figure 3 - TCC and client icons The “PCTeacher” Client gives the possibility to use the sound of the teacher computer as source in the AVIDAnet® Tenjin multimedia laboratory. - 12 - The “Teacher” Client takes care of all teacher specific functionalities such as teacher preview, discrete monitoring, …. REMARK: When a teacher logs in on the teacher computer for the first time with his/her specific Windows user account, the following information message will pop up after starting the Tenjin Control Centre: Figure 4 - Default configuration not found error message Click “Yes” to continue. This message pops up because there is no default configuration saved for that user. If the user wants to avoid this pop-up message, he/she has to save a default configuration. This makes it possible for every teacher to have his/her own customized start- up configuration. For information on how to do this: see further in this manual. Students can now start login in to the AVIDAnet® Tenjin system. Once all students have logged in, the AVIDAnet® Tenjin multimedia laboratory is fully ready for use. - 13 - 4 Using the Tenjin Control Centre (TCC) 4.1 Tenjin Control Centre graphical user interface 4.1.1 Teacher Control Panel Layout Figure 5 – Teacher Control Panel layout 4.1.2 Menu items 4.1.2.1 File This menu allows to orderly close the AVIDAnet® Tenjin multimedia laboratory. Figure 6 - File menu 4.1.2.1.1 Exit Exit will close the Tenjin Control Centre and all student clients. To start reusing the AVIDAnet® Tenjin multimedia laboratory, the teacher needs to restart the Tenjin Control Centre and login the PCTeacher and teacher client to the TCC. See - 14 - section “3 Starting up the multimedia lab” for more details on how to start up those applications. Students needs to launch their AVIDAnet® Tenjin client software and logon to the TCC. Before executing the “Exit” command, the teacher will be prompted for a confirmation. Figure 7 - Confirm Exit 4.1.2.1.2 Exit and Shutdown Exit and Shutdown will close the Tenjin Control Centre, all student, teacher and source clients and shutdown all student computers, teacher computer and source A/D converters. If the AVIDAnet® Tenjin multimedia laboratory is equipped with an Artec/Televic automatic startup system, the easiest way to restart the laboratory is to turn the key in order to completely power off the laboratory and switch the laboratory back on with the same key. If the AVIDAnet® Tenjin multimedia laboratory does not have the Artec/Televic start-up system, all computers need to be manually restarted unless configured differently. Check with your site responsible (this is generally the IT department) how the computers have been configured in your AVIDAnet® Tenjin multimedia laboratory. Do not forget to start the source A/D converters installed in the AVIDAnet® Tenjin multimedia laboratory. (See the picture below. The A/D converter may also be painted in black with the Artec – Member of Televic logo) In order to power on the A/D converter, open the door on the front of the A/D converter as shown in the picture. Toggle the On/Off switch to start the A/D converter. Figure 8 - A/D converter - 15 - After restarting the teacher computer, the teacher needs to start the Tenjin Control Centre and login the PCTeacher and teacher client to the TCC. See section “3 Starting up the multimedia lab” for more details on how to start up those applications. Students need to restart the computers and log on to the Tenjin Control Centre. Before executing the “Exit and Shutdown” command, the teacher will be prompted for a confirmation. Figure 9 - Confirm Exit and Shutdown 4.1.2.1.3 Exit and Restart Exit and Restart will close the Tenjin Control Centre, all student, teacher and source clients and restart all student computers, teacher computer and source A/D converters. After the teacher computer has restarted completely, the teacher needs to start the Tenjin Control Centre and login the PCTeacher and teacher client to the TCC. See section “3 Starting up the multimedia lab” for more details on how to start up those applications. Students need to log on to the Tenjin Control Centre. Before executing the “Exit and Restart” command, the teacher will be prompted for a confirmation. Figure 10 - Confirm Exit and Restart 4.1.2.1.4 Exit and Log off Exit and Shutdown will close the Tenjin Control Centre, all student clients and log off the teacher and student from Windows. To start reusing the AVIDAnet® Tenjin multimedia laboratory, the teacher needs to relogon to Windows, start the Tenjin Control Centre and login the PCTeacher and teacher client to the TCC. See section “3 Starting up the multimedia lab” for more details on how to start up those applications. - 16 - Students needs to logon to Windows and launch their AVIDAnet® Tenjin client software and logon to the TCC. Before executing the “Exit and Log off” command, the teacher will be prompted for a confirmation. Figure 11 - Confirm Exit and Log off 4.1.2.2 Edit Figure 12 - Edit menu 4.1.2.2.1 Language The Tenjin Control Centre is available in 3 languages: English, Dutch and French. The language selection can be made in this menu item. The selected language is then written into a configuration file. In order for the language choice to become effective, the Tenjin Control Centre needs to be restarted. More languages may be added in the future 4.1.2.2.2 Config This menu item is for configuration purposes only and should not be launched by a teacher. It is mentioned here for completeness purposes only. In the future, this menu item will be password protected. 4.1.2.3 Help Figure 13 - Help menu Using this menu, the About box of the Tenjin Control Centre can be displayed. - 17 - Figure 14 - About box 4.1.3 Student selection field (representation of the class) Figure 15 - Classroom representation canvas This window always gives an overview of the status of all students in the multimedia lab. It will indicate whether a student has logged in to the Tenjin Control Centre, if a function is active for a student… Student selection for allocating students to a certain group is also performed on this panel. 4.1.4 Group Configuration panel - 18 - Figure 16 - Group Configuration panel This panel will allow a teacher to create or remove groups and to perform group actions such as “Call Group”, send a source to a group, etc. It also gives an overview of all sources allocated to the groups and the status of the source (streaming, streaming mode…) 4.1.5 Source selection panel Figure 17 - Source Selection panel This panel gives an overview of all sources a teacher can use in the AVIDAnet® Tenjin multimedia laboratory. The status (playing, stopped, paused…) of each IR controllable source is displayed (left next to the source icon). 4.1.6 Teacher preview and Source control panel Figure 18 - Teacher preview - Source Control panel If a source is equipped with the Artec IR remote control unit, the selected source can be controlled from this panel. Controlling the source by clicking on the buttons of the source control panel is equivalent to pressing buttons on the source device’s original remote control unit. - 19 - The IR remote control unit can always be used in parallel with the source control panel. However, in that case the status of the source cannot always be displayed correctly. There is also a visualization of the groups the source is currently allocated to and the status of the source in that group (streaming, streaming mode). 4.1.7 Classroom Control panel Figure 19 - Classroom control panel Functions activated using the classroom control panel will always operate on all students in the classroom. Furthermore, a number of service functions are accessible via the classroom control panel. 4.1.8 Teacher call panel Figure 20 - Teacher call panel This panel gives a drop-down list of the different students that have called for teacher help. It allows a teacher to answer or disregard a student teacher call. In both cases, the student is removed from the list. 4.2 Basic laboratory functions In this chapter, all basic AVIDAnet® Tenjin multimedia laboratory functions are described. Throughout this section, only one group is active to keep the explanation as simple as possible. Working with multiple groups is described further on in this manual. It’s obvious that all func tions explained for one group type apply for every type of group used. - 20 - 4.2.1 Student presence and identification When a student starts the AVIDAnet® Tenjin client, a logon dialog will open prompting to enter his/her name. Student enters his/her name Figure 21 - Student logon dialog When the student clicks OK, he/she logs on the Tenjin Control Centre. The teacher always has an overview of who is logged on to the system in the Tenjin Control Centre classroom canvas. One student has logged in to the Tenjin Control Centre Figure 22 - Student logon status - 21 - When a student has logged in to the Tenjin Control Centre, the student icon appears in the block that represents the physical location in the classroom layout. The login name is displayed under the student icon. In case the name is too long to be entirely displayed, hovering the mouse pointer over the student icon will display the full name in a tooltip. This allows a teacher to check how many students have logged in to the Tenjin system and at what place in the multimedia laboratory they have taken a seat. Figure 23 - Student name tooltip 4.2.2 Student monitoring This function gives the teacher the possibility to discretely monitor the screen and audio of a student. While the monitoring function is active, the teacher will receive the student’s audio on his/her headset and the student’s screen will be displayed on the teacher’s monitor. Left clicking on the icon of the student the teacher wants to monitor can activate the monitoring function. The monitoring status of a student is graphically represented on the Tenjin Control Centre by drawing a white border around the student position representation (the student block) creating the impression of a pressed button. - 22 - Left-click here to monitor this student Once monitor function is active there is a white line around the monitored student Figure 24 - Student discrete monitoring - 23 - 4.2.3 Student functions These functions only apply to the selected student. 4.2.3.1 Start student function To activate a student function, right-click on a student in the student selection field and choose a function from the menu. Right-click on a student and choose a function Figure 25 - Activate student function 4.2.3.2 Check active functions for a student Right-click again on a student to see which functions are active. Active functions will have a blue box with checkmark indicated on the right of the function name. - 24 - Intercom and Show screen are active for student “Dirk” Figure 26 - Functions active for a student 4.2.3.3 Terminate student function To stop the selected functions right-click on the student and left-click on the function to be stopped. 4.2.3.4 Student menu overview - 25 - Figure 27 - Student menu overview 4.2.3.4.1 Intercom Intercom is used to establish a conversation channel between teacher and student. During the intercom session, teacher and student can have a private conversation that cannot be heard by the other students unless: a. Student is member of a pairing or conference group. In that case, all other students in the pairing or conference group will also be able to hear the conversation between teacher and student. b. Teacher has activated a “Call All”. In that case, all students in the classroom that have logged on to the Tenjin Control Centre will be able to follow the conversation. c. Teacher has activated a “Call Group”. In that case, all students belonging to that group will hear the conversation. When intercom is active, the intercom icon appears in the student block on the Tenjin Control Centre graphical user interface. - 26 - Figure 28 - Intercom 4.2.3.4.2 Student Call All A student can talk to all students that have logged on to the TCC. The teacher authorizes this by selecting “Student Call All” in the student menu. From that moment on, the student can talk to all other students using his microphone. The other students cannot respond. It is a one-way communication channel. The function remains active until deactivated in the student menu. The “Student Call All” status is indicated with the following icon: Figure 29 - Student Call All 4.2.3.4.3 Lock Keyboard/Mouse This function becomes active in the student menu after the student has been put in monitoring mode. When active, the lock keyboard/mouse function will disable the keyboard and mouse of a student. This function is interesting when a teacher wants to stop a student from working on the PC in order to get his/her full attention while the information is still visible on the student screen. The keyboard/mouse locked status is indicated with the following icon: Figure 30 - Lock Keyboard/Mouse - 27 - Figure 31 - Keyboard/Mouse control 4.2.3.4.4 Take over Keyboard/Mouse This function becomes active in the student menu after the student has been put in monitoring mode. When active, the take over keyboard/mouse function will disable the keyboard and mouse for the student and the teacher will be able to control the student computer with his keyboard and mouse. All keyboard strokes and mouse movements will be visible for the student so he/she will be able to follow exactly what the teacher is doing. Because the student is also in monitoring mode, the teacher will receive the student screen on his/her monitor. The keyboard/mouse takeover status is indicated with the following icon: Figure 32 - Keyboard/Mouse takeover 4.2.3.4.5 Share Keyboard/Mouse This function becomes active in the student menu after the student has been put in monitoring mode. Share Keyboard/Mouse is a status where both student and teacher can control the student keyboard and mouse. This is interesting where a teacher wants to help a student but also - 28 - wants the student to take the initiative. This status avoids repetitive takeover keyboard/mouse – release keyboard/mouse sequences. Of course, this mode requires a certain discipline from the students. It is clear that both teacher and student mouse movements and keystrokes will interfere. The shared keyboard/mouse status is indicated with the following icon: Figure 33 - Share Keyboard/Mouse 4.2.3.4.6 Send Text Message The teacher can communicate with the student by sending him/her text messages. When selecting this function, a text message dialog window is opened on the teacher computer. The teacher can enter his/her text message by typing it in this window. Clicking the “OK” button will send the text message to the student. Contrary to chat mode, the student does not receive the text while the teacher is entering it. A teacher can abort the “Send Text Message” mode at any time by clicking the “Cancel” button. In that case, no text message is sent to the student computer and the student’s text message window will not be opened or updated. Figure 34 - Teacher Sent Text Message dialog Upon clicking “OK”, a text message window is opened on the student computer. Successive text messages will be displayed consecutively in the student text message window if left open on the student computer. The student cans either: • Close the text message window by clicking the “OK” or “CANCEL” button. • Clear all previous teacher text messages without closing the window by clicking the “Clear” button. - 29 - 4.2.3.4.7 Enable Chat Students have the possibility to form chat groups to practice written communication. By default, this functionality is disabled for all students until the teacher explicitly authorizes it. Selecting “Enable Chat” in the student menu will enable the chat button on this student’s AVIDAnet® Tenjin client program interface. Figure 35 - Chat Client - 30 - Figure 36 - Chat window A teacher can always participate or moderate the chat conversation. In order to do this, the teacher can click the “Chat” button on the teacher client program. A chat window will open on the teacher computer and all chat messages will appear in this window. The list of all students present in the chat room appears in the right panel. A student or teacher can choose one particular student to chat with by clicking on the student’s name. All messages sent to the selected student will only appear in that student’s chat window. This is referred to as a private chat. A private chat is indicated by displaying the name between ‘*’ characters. To chat with everyone in the chat room at once, click on the student’s own name. This is referred to as a public chat. Displaying the sender chat partner name between ‘(...)’ characters represents a public chat. 4.2.3.4.8 Show screen When active, the student will receive the teacher screen on his/her monitor. This is useful when a teacher wants to show a solution that he/she has prepared on his/her own screen or if he/she wants to show step by step to a student how a certain result can be achieved on the computer. The teacher can still continue using his/her computer while the screen is being shown to the student. The student will be able to see all modifications of the teacher screen on his own display. The show screen status is represented in the Tenjin Control Centre by displaying a teacher icon instead of a student icon. - 31 - Figure 37 - Show screen 4.2.3.4.9 Show Student screen Similar as “Show screen” where the teacher screen is shown to the students, can a particular student’s screen be shown to other students. This screen can be shown to another student, to a group or to the classroom. A drop-down selection box, displaying a list of all students logged in to the Tenjin Control Centre or the groups available at that moment, will automatically be opened. Figure 38 - Show Student screen A student whose screen is shown to other student(s) is represented in the Teacher Control Centre with the following icon: Figure 39 - Show Student screen icon 4.2.3.4.10 Blank screen When active, a blank screen is displayed on the student’s monitor. His/her keyboard and mouse are also locked during the full period of the blank screen. This function is interesting - 32 - when a teacher wants to stop a student from working on the PC in order to get his/her full attention. The blank screen status is represented in the Tenjin Control Centre by displaying a black student icon instead of the usual student icon. Figure 40 - Blank screen 4.2.3.4.11 Send Figure 41 - Send Files – Directory Upon selecting “Send Files” or “Send Directory”, an explorer window will open allowing the teacher to navigate to the correct directory and select the files or a directory for transfer. Click on the “OK” or “Open” button to initiate the transfer. By default, the files will be copied on the student computer in the directory: “My Documents\artec\student”. This path however is configurable. Check with your site responsible (this is generally the IT department) how file transfer has been configured in your AVIDAnet® Tenjin multimedia laboratory. - 33 - Figure 42 - Send Directory Figure 43 - Send Files A session can be used to better organize the files transferred on the student computer. This makes it easier to collect or erase a selected number of files after a lesson. If a session is specified, the files will be transferred to the student computer in the directory: “My Documents\artec\student \<session>”, in this case: “My - 34 - Documents\artec\student \English-weather”. This allows selectively erasing or collecting only this directory in a later stage. If the teacher does not want to use a session at that point in time, he/she can check the box “Don’t use session”. Figure 44 - Send Session 4.2.3.4.12 Collect Files After the students have worked on the files transferred to their computer, the teacher can collect those files. Upon clicking “Collect Files” in the student menu, a Session History dialog window will open. Previously created sessions can be individually collected. “Everything” will collect all files stored in “My Documents\artec\student” on the student computer. Figure 45 - Collect Files Session history The collected files will be stored in a shared directory on a server or on an FTP server. This depends on the configuration of the AVIDAnet® Tenjin multimedia laboratory. Check with your site responsible (this is generally the IT department) how file transfer has been configured in your multimedia laboratory or search for the directory “Collected Files” on all drives of the teacher computer. A subdirectory with the session name is created in the directory “Collected Files”. Furthermore, a subdirectory per student is created under the directory “Collected Files” or - 35 - under the session directory if applicable. The subdirectory is named after the student position number. Figure 46 - Collected Files directory structure 4.2.3.4.13 Collect Log This function is not part of the actual AVIDAnet® Tenjin multimedia laboratory functionality. It has been provided for diagnostic purposes only. It has been documented here for completeness purposes only. During each session, a number of diagnostic files are created. These files can provide us with information in case a problem might occur. In that case, we will get in touch with the site responsible and ask them to send us those diagnostic files. They can be copied off the student computer with the “Collect log” menu item. Figure 47 - Collect Log - 36 - 4.2.3.4.14 Erase student copies In section “4.2.3.4.11 Send ”, it is explained how files can be transferred to the student computer. In section “4.2.3.4.12 Collect Files”, it is explained how those files can be retrieved for review or correction once the student has finished working on those files. “Erase student copies” is complementary to the 2 functions mentioned above. If files have been transferred to the student computer, or sources streamed to the student computer in copy or copy- mute mode, and those local files or streams are not needed any longer, they can be erased with this command. Here too, the teacher has the option to selectively erase certain sessions or to erase “Everything”. If the files or some of the files are still needed for reviewing or correction, the teacher needs to collect them first before erasing the student copies. Figure 48 - Erase student copies 4.2.3.4.15 Close Client By selecting “Close Client” in the student menu, the teacher will remotely close the student’s AVIDAnet® Tenjin client. The student will be logged off the Tenjin Control Centre which terminates the teacher interaction from the Tenjin Control Centre with the student until the next student logs back in to the TCC. While the AVIDAnet® Tenjin client is closed, the student can still continue using his/her computer. This mode is sometimes also referred to as library or self-study mode. Before sending the “Close Client” command to the student, a confirmation dialog window will be opened on the teacher computer. The command will only be sent and executed on the student computer after the teacher confirms the action by clicking on the “Yes” button. This avoids accidentally closing the student client. The action can still be canc elled at this point by clicking on the “No” button. - 37 - Figure 49 - Close Client confirmation window 4.2.3.4.16 Log off By selecting “Log off” in the student menu, the teacher will remotely log off the student from Windows. This is the same action as if the student would have selected “Log Off” in Windows. This can be used to prepare the student computer for the next lesson. The next student will have to log on to Windows first and then log on to the Tenjin Control Centre. Before sending the “Log off” command to the student, a confirmation dialog window will be opened on the teacher computer. The command will only be sent and executed on the student computer after the teacher confirms the action by clicking on the “Yes” button. This avoids accidentally logging off the student. The action can still be cancelled at this point by clicking on the “No” button. Figure 50 - Log off confirmation window 4.2.3.4.17 Shutdown By selecting “Shutdown” in the student menu, the teacher will remotely shut down the student computer. This is the same action as if the student would have selected “Shutdown” in Windows. No prior warning will be sent to the student. This action should be performed only if the student has saved all his/her work. Before sending the “Shutdown” command to the student, a confirmation dialog window will be opened on the teacher computer. The command will only be sent and executed on the student computer after the teacher confirms the action by clicking on the “Yes” button. This avoids accidentally shutting down the student computer. The action can still be cancelled at this point by clicking on the “No” button. - 38 - Figure 51 - Shutdown confirmation window 4.2.3.4.18 Restart By selecting “Restart” in the student menu, the teacher will remotely shut down and restart the student computer. This is the same action as if the student would have selected “Restart” in Windows. No prior warning will be sent to the student. This action should be performed only if the student has saved all his/her work. Before sending the “Restart” command to the student, a confirmation dialog window will be opened on the teacher computer. The command will only be sent and executed on the student computer after the teacher confirms the action by clicking on the “Yes” button. This avoids accidentally restarting the student computer. The action can still be cancelled at this point by clicking on the “No” button. Figure 52 - Restart confirmation window 4.2.3.4.19 Reset client This function provides an emergency way out of problem situations such as no video streaming on this student, no audio streaming on this student… It should be used carefully and as few as possible. Activating this function will reset the AVIDAnet® Tenjin client running on the student computer. It allows a student client to restart from a clean situation. All functions that were active at a group level such as streaming of audio and video sources will be reactivated upon a restart of the student AVIDAnet® Tenjin client. Functions active on the individual student such as intercom, monitoring…will need to be reactivated. The status of the student as represented in the Tenjin Control Centre will always reflect the correct status of the student. Before sending the “Reset Client” command to the student, a confirmation dialog window will be opened on the teacher computer. The command will only be sent and executed on the student computer after the teacher confirms the action by clicking on the “Yes” button. This avoids accidentally resetting the AVIDAnet® Tenjin client running on the student computer. The action can still be cancelled at this point by clicking on the “No” button. - 39 - Figure 53 - Reset client confirmation window - 40 - 4.3 Working with groups In the AVIDAnet® Tenjin multimedia laboratory, the number of groups that can be created is limited only by the number of groups a person can work with simultaneously. There is no technical or software limitation on the number of groups that can be created during one session of the Tenjin Control Centre. 4.3.1 Group types There are three sorts of groups: • Program groups • Pairing groups • Conference groups 4.3.1.1 Program groups A program group will group a number of students that can be treated as one entity in the Tenjin Control Centre. Students will by default not be able to communicate with each other using their headset. It will be possible to: • Call the group • Auto monitor the group • Send a text message to the group • Transmit an audio or video source simultaneously to all students in the group • … See paragraph 4.3.4 “Group functions” for a complete list and a description on how to activate group functions. 4.3.1.2 Pairing groups Pairing groups will group 2 students in pairs. The 2 students in the same pairing group will be able to communicate with each other using their headset. Furthermore, all functions possible with program groups remain possible for pairing groups. When a teacher goes into intercom with one student of a pair, both students in the pair will be able to follow the conversation. When a teacher discretely monitors one student of a pair, he will receive the sound from both students in the pair. 4.3.1.3 Conference groups Conference groups are identical to pairing groups without the limitation of 2 students per group. Conference groups range from 3 students till 7 students. 4.3.2 Creation of a group A group can be created by clicking on the buttons in the group create panel: - 41 - 1 2 3 Figure 54 - Create groups With: (1) Program groups (2) Pairing groups (3) Conference groups 4.3.2.1 Create a program group Click on the Program Groups button to create a new program group. The Group Configuration window is opened. 1 2 Figure 55 - Group Configuration window (1) Enter a name for the new group in the “Name:” text box. Any character can be used except colon ‘:’. (2) Click on the drop-down arrow to choose a colour for the new group. Click on the OK button to confirm the formation of the new group. Give a name and choose a colour for the group. Click OK to confirm Figure 56 - Create a workgroup The new group is now added to the group panel. - 42 - Two groups created in the AVIDAnet® Tenjin lab This is the active group panel: all group functions activated or student selection will be performed on the group with name listed on top of the opened grouppanel: “Example for Manual” Figure 57 - Group panel No students are allocated to the group yet. See paragraph 4.3.3 Selecting students for a group in the manual on how to select students for a specific group. 4.3.2.2 Create a Conference Group Click on the Conference Group button to create a new conference group. The Group Configuration window is opened. 1 2 3 4 Figure 58 - Conference group configuration (1) Enter a name for the new conference group in the “Name:” text box. Any character can be used except colon ‘:’. (2) Click on the drop-down arrow to choose a colour for the new conference group. Click on the drop-down arrow to choose the selection mode. Two selection modes are possible: Free or Random. - 43 - Figure 59 - Conference group selection modes Selection modes: a. Free: In this mode, the teacher is free to select any student for the conference groups. There is no choice imposed by the AVIDAnet® Tenjin system. b. Random: In this mode, the Tenjin Control Centre will randomly select students for the different conference groups untill all students have been allocated to a conference group. (3) Select the size of a single conference group (number of students per conference group). Minimum size for a conference group is three students (2 students form a pairing group) and the maximum size is seven. Click on the OK button to confirm the creation of the new group. Enter all settings for the conference group and click OK to confirm Figure 60 - Conference group configuration The new group is now shown in the Group Panel. - 44 - (Conf.) is appended to the name of the group to indicate a Conference group. Figure 61 - Group panel conference group No students are allocated to the conference group yet. See paragraph 4.3.3 Selecting students for a group in the manual on how to select students for a specific group. See instructions described in “Working with multiple groups” on how to navigate through and use the different groups. Remark: You can create only one conference group. Within this conference group, an unlimited number of conference subgroups can be created. All subgroups will have the specified number of students. 4.3.2.3 Create a Pairing group A pairing group is in fact a special type of conference group. It is a conference group with a fixed size of two students. This allows to simulate telephone conversation. Click on the Pairing Group button to create a new pairing group. The Group Configuration window is opened. 1 2 3 Figure 62 - Pairing group configuration You can now: (1) Enter a name for the pairing group (2) Click on the drop-down arrow to choose a colour for the new pairing group (3) Click on the drop-down to choose the selection mode. For pairing groups, three selection modes are possible: Free, Fixed and Random. - 45 - Figure 63 - Pairing group selection modes Selection modes: a. Free: In this mode, the teacher is free to select any student for the pairing groups. There is no choice imposed by the AVIDAnet® Tenjin system b. Fixed: In this mode, the Tenjin Control Centre will automatically form pairing groups according to the scheme that has been entered in the configuration file. This configuration file is part of the installation. c. Random: In this mode, the Tenjin Control Centre will randomly select students for the different pairing groups untill all students have been allocated to a pairing group Click on the OK button to confirm the creation of the new pairing group. Give a name, pick a colour and selection mode and click OK to confirm Figure 64 - Pairing group configuration The pairing group is now shown in the Group Panel. - 46 - (Pair.) is appended to the name of the group to indicate a Pairing group. Figure 65 - Group panel pairing group No students are allocated to the pairing group yet. See paragraph 4.3.3 Selecting students for a group in the manual on how to select students for a specific group. See instructions described in “Working with multiple groups” on how to navigate through and use the different groups. Remarks: § You can create only one pairing group. Within this pairing group, an unlimited number of pairing subgroups can be created. § Contrary to conference groups, it is not possible to specify a size for the pairing group in the Group Configuration dialog. The size of a pairing group is fixed to 2 students. 4.3.3 Selecting students for a group 4.3.3.1 Program group a. Click on the group in the group panel for which you want to select students. The group panel band pertaining to this group will be opened and become the active group panel band. - 47 - Click on the group for which you want to select students This is the active group panel: student selection will be performed on the group with name listed on top of the opened grouppanel: “Example for Manual” Figure 66 - Selection of a group b. Click on the Select button to start selection of the students Click on the select button to start the selection of students for the Active Group Panel Figure 67 - Enter student selection mode The classroom representation is now switched to selection mode: - 48 - Student field in selection mode: a frame in the colour of the group to which the student belongs to is drawn around every student representation Students can no w be selected by either: § Clicking on the student § Dragging a window over all the students you want to add to the group. A coloured frame around the student field indicates to which group the student will belong when confirming the selection. Click OK to confirm the selection or click CANCEL to abort the selection A frame in the colour of the new group is drawn around the selected students - 49 - Figure 68 - Student selection frames The drawing above indicates all the possibilities. § In the screenshot above, the students are being selected for the red group “Group for Manual” since this is the active group at this moment. § When entering the selection mode, all students already allocated to a group are drawn with a frame in the same colour as the group they currently belong to. E.g. student01 belongs to “Group 1” (blue group). When entering the selection mode, a blue frame is drawn around the studen01 representation. § Dirk: belongs to “Group 1” (blue group). Is represented with a blue frame meaning that Dirk will remain in “Group 1”. Kim: currently belongs to “Group 1”. The student representation for Kim now has a red frame, meaning that she has been selected for “Group for Manual” (red group). When the student selection is confirmed, Kim will be allocated to “Group for Manual”. Elly: currently belongs to “Group for Manual”. However, there is no red frame around the student representation. This means Elly will be removed from “Group for Manual” when confirming the student selection. Mary : currently belongs to “Group for Manual”. Is represented with a red frame meaning that Mary will remain in “Group for Manual”. Tom: is currently not allocated to any group. Is represented with a red frame meaning that Tom has been selected for “Group for Manual” (red group). When the student selection is confirmed, Tom will be allocated to “Group for Manual”. § § § § Click “OK” to confirm the selection or “Cancel” to keep the old selection. The classroom representation switches back to normal mode and the student representations’ background is drawn in the colour of the group they belong to. - 50 - Figure 69 - Student selection confirmed 4.3.3.2 Conference Group Only one conference group can be created. This conference group is in fact a collection of different conference groups. The size of all conference groups is determined when the conference group is created. The selection routine is the same as the routine for Program Groups. a. Click on the conference group in the group panel. The conference group will now become the active group panel band. - 51 - Click on the conference group . This is the active group panel: student selection will be performed on the group with name listed on top of the opened grouppanel: “Example for Manual” Figure 70 - Selection of a group b. Click on the Select button to start selection of the students Click on the select button to start the selection of students for the Active Group Panel Figure 71 - Enter student selection mode The classroom representation is now switched to selection mode: - 52 - Student field in selection mode: a frame in the colour of the group to which the student belongs to is drawn around every student representation Students can now be selected by either: § Clicking on the student § Dragging a window over all the students you want to add to the group. A coloured frame around the student field indicates to which group the student will belong when confirming the selection. For a conference group, the system will automatically see to it that the size of each individual group equals the size specified when creating the conference group. Allocation starts at student 1 of the first conference group. Students selected will be added to the first conference group as long as the size is not exceeded. As soon as the specified size has been reached, selected will start for the second conference group. Click OK to confirm the selection or click CANCEL to abort the selection A frame in the colour of the new group is drawn around the selected students - 53 - Figure 72 - Student selection frames The drawing above indicates all the possibilities. § In the screenshot above, the students are being selected for the red group “Group for Manual” since this is the active group at this moment. § When entering the selection mode, all students already allocated to a group are drawn with a frame in the same colour as the group they currently belong to. E.g. student01 belongs to “Group 1” (blue group). When entering the selection mode, a blue frame is drawn around the studen01 representation. § Dirk: belongs to “Group 1” (blue group). Is represented with a blue frame meaning that Dirk will remain in “Group 1”. Kim: currently belongs to “Group 1”. The student representation for Kim now has a red frame, meaning that she has been selected for “Group for Manual” (red group). When the student selection is confirmed, Kim will be allocated to “Group for Manual”. § - 54 - § § § Elly: currently belongs to “Group for Manual”. However, there is no red frame around the student representation. This means Elly will be removed from “Group for Manual” when confirming the student selection. Mary : currently belongs to “Group for Manual”. Is represented with a red frame meaning that Mary will remain in “Group for Manual”. Tom: is currently not allocated to any group. Is represented with a red frame meaning that Tom has been selected for “Group for Manual” (red group). When the student selection is confirmed, Tom will be allocated to “Group for Manual”. Click “OK” to confirm the selection or “Cancel” to keep the old selection. The classroom representation switches back to normal mode and the student representations’ background is drawn in the colour of the group they belong to. Figure 73 - Student selection confirmed - 55 - Size of the conference groups is set to 5 After the selection of the first 5 students, the system auto starts with the formation of conference group 2 Click OK to confirm the Conference Groups 4.3.3.3 Pairing Group - 56 - The number of the conference group is indicated As already said there only can be just one Pairing Group. This group has to be divided in the actual pairs. The selection routine is the same as the routine for Program Groups. Click on the Pairing Group to make it ready for the selection of students. Click on the Select button to start the selection of the students. Click on the students that have to be allocated to Pair 1, the system will auto allocated two students to Pair 1 and then automatically start with the formation of Pair 2. The number of the conference group is indicated 4.3.3.4 Working with groups 4.3.3.4.1 Program Groups The number of Program Groups is virtually unlimited in the Tenjin system. All group functions described in chapter 3.2.4 are also valid for all program groups created. 4.3.3.4.2 Conference Groups All group functions described in chapter 3.2.4 are also valid for the conference group. If you select a function for the overall conference group it is valid for all the students in the conference group, so this means that the group functions don’t look at the subdivision of the overall group in smaller actual conference groups. Sources can be allocated and transmitted to the overall Conference group. There is a difference with a student in a Program Group if the student functions are used. If a student is monitored (click on the student) you will see the students screen but you will here the headsets of all the students in the conference group (the subdivision conference group, not the whole conference group). If the intercom function is used (right click on a student and chose the Intercom function), the teacher cannot only speak to that one student but to all the students that belong to the - 57 - conference group of that student (the subdivision conference group, not the whole conference group). Monitor one student of the C0 group to hear the headsets of all the students belonging to C0 Activate the Intercom function at one of the students of C0 to be able to speak to all the students belonging to C0 4.3.3.4.3 Pairing Groups All group functions described in chapter 3.2.4 are also valid for the pairing group. If you select a function for the overall pairing group it is valid for all the students in the pairing group, so this means that the group functions don’t look at the subdivision of the overall group in actual pairs. Sources can be allocated and transmitted to the overall Pairing Group. There is a difference with a student in a Program Group if the student functions are used. If a student is monitored (click on the student) you will see the students screen but you will here the headsets of all the two students in the pair. If the intercom function is used (right click on a student and chose the Intercom function), the teacher cannot only speak to that one student but to also to the other student that belongs to the pair. - 58 - Monitor one student of a pair to hear the headsets of the two students in the pair Activate the Intercom function at one of the students of the pair to be able to speak to the two students of the pair 4.3.3.5 Working with multiple groups The group functions of each group can be accessed by clicking right on the specific group name. To see the sources that are allocated to a specific group, just click on it. Click on Group1 to see the sources allocated to Group1 - 59 - Sources allocated to group 1 Click on Example for Manual to see the sources allocated to the Group Pioneer Source allocated to Group Example for Manual Right click on the group to access the Group functions 4.3.4 Group functions These functions apply to all students allocated to the selected group. All students in the group will receive the same command and they will all execute the selected function upon receipt of the command. A delay in execution start time between the different students is possible since the commands are sent over the network and will be received at different times thus being executed at different times on the different student computers. 4.3.4.1 Start group function To activate group functions, right click on a group in the group name label tag or in an empty area in the group band and select a function from the menu. - 60 - Right-click on a group and select a function Figure 74 - Group functions 4.3.4.2 Check active functions for a group Right-click again on a group to see which functions are active. Active functions will have a blue box with checkmark indicated on the right of the function name. - 61 - Keyboard/Mouse locked for this group Figure 75 - Functions active for a group 4.3.4.3 Terminate group function To stop the selected functions right-click on the group and left-click on the function to be stopped. “Step monitoring” and “Auto Monitor” have a specific menu item, “Stop Monitor”, to be terminated. - 62 - Click here to stop “Step Monitor” or “Auto Monitor” Click again on “Lock keyboard/mouse” to deactivate Figure 76 - Terminate group function 4.3.4.4 Group menu overview - 63 - Figure 77 - Group menu 4.3.4.4.1 Remove Group Stop using this group in the AVIDAnet® Tenjin multimedia laboratory. The group will be removed from the Tenjin Control Centre. Students that were in allocated to the group that has been removed are returned to the classroom without belonging to any group. The group color of the student icons in the Tenjin Control Centre will be replaced by the background color of the TCC. If sources were allocated to the group, streaming to the students in that group will be stopped. - 64 - There are no groups in the system. All students blocks have the background colour. 4.3.4.4.2 Step Monitor When active, students in the group are monitored one by one. Only students that have logged in to the Tenjin Control Centre will be monitored. Other positions in the group will be skipped. A student will remain in monitoring mode untill the teacher moves to the next student. To monitor the next student, right-click on the group and click again on “Step monitor” menu item. To stop the “Step Monitor” function, right- lick on the monitored group and choose the “Stop Monitor” menu item. See also section “4.3.4.4.4 Stop Monitor”. The “Step Monitor” function can also be stopped by clicking on the student that is currently being monitored. For more information about monitoring a student, refer to section “4.2.2 Student monitoring”. 4.3.4.4.3 Auto Monitor Students in the group are auto monitored: after a certain time the system automatically monitors the next student in the group. To stop the step monitor function click right on the monitored group and choose the stop monitor function (4). 4.3.4.4.4 Stop Monitor If one of the two monitoring ( (2) or (3) ) functions is active, these function stops the monitor function. - 65 - 4.3.4.4.5 Lock keyboard/mouse 4.3.4.4.6 Call Group Teacher can speak to all the students in the selected group When function is active the Teacher Call icon is shown in the visualisation blocks from the students in the selected group. 4.3.4.4.7 Send text message 4.3.4.4.8 Enable Chat 4.3.4.4.9 Blank Screen 4.3.4.4.10 Screen To Group 4.3.4.4.11 Mosaic View 4.3.4.4.12 Send One or more files are sent to the PC’s of the selected group. => See chapter 5.3 File Transfer Tab for full explanation 4.3.4.4.13 Collect file One or more files are collected from PC’s of the selected group and saved in a directory chosen by the teacher. => See chapter 5.3 File Transfer Tab for full explanation 4.3.4.4.14 Collect Log 4.3.4.4.15 Erase student copies 4.3.4.4.16 Start application 4.3.4.4.17 Close clients the Tenjin® client application of the students in the group is closed: the particular students are logged of from the Tenjin® system. The students can continue working with his PC, but stand alone, they aren’t influenced in any way by the Tenjin® system and the teacher can’t control them anymore. (10) Log off: The PC of the students in the group is logged of: this is a Windows logoff, can be used to prepare the PC’s for a new lesson: when the students enter all the PC’s show the Windows logon screen. - 66 - 4.3.4.4.18 Log Off Clients 4.3.4.4.19 Shutdown Clients The PC of the students in the group is shut down: this is without asking permission to the students: all their work can be lost! Mostly used to shut down PC’s at the end of the day. 4.3.4.4.20 Restart Clients The PC of the students in the group is restarted. 4.3.4.4.21 Properties the properties of the group can be changed: the colour of the group can be changed and a name can be given to the group. Group properties window: choose a name and a colour for the selected group Result of the changes: - 67 - 4.3.5 Classroom functions These functions apply to all the students connected to the system. It doesn’t matter in if the students are in a group or not, they will all get the same instructions and they will all execute the selected function at the same time. These functions can be found in the General Function panel. By clicking on one of the five options you can open a tab with sub options. General functions panel, the tab file transfer is selected and the sub options are shown 4.3.5.1 Monitor tab 1 2 - 68 - 4.3.5.1.1 Step Monitor All the students in the system are monitored one by one. To monitor the next student click again on the Step Monitor button. To stop the step monitor function click on the monitored student. 4.3.5.1.2 Auto Monitor All the students in the system are auto monitored: after a certain time the system automatically monitors the next student. To stop the auto monitor function right click on the Auto Monitor button and select the Stop Monitor function. The time interval also can be adapted, click right on the Auto Monitor button and select the Set Monitor Function. Right click on the Step Monitor button gives two options: Stop Monitor and Set Monitor Timer - 69 - Choose the interval needed 4.3.5.2 Communicate tab 1 4.3.5.2.1 Call All Teacher can speak to all the students connected to the system When function is active the Teacher Call symbol is shown. To stop the Call All function, right click on the Call All button and click on the Stop Call All option. - 70 - Right click on the Call All button and select the Stop Call All function 4.3.5.3 File Transfer Tab These options are used to send files to or collect files from the students PC’s. !!! To use this function a the lab must be connected to a server. 1 2 3 4.3.5.3.1 Send Files 4.3.5.3.2 Collect Files 4.3.5.3.3 Erase File erase all files in the File Transfer directory on the server. This option is to prevent that the File Transfer directory becomes larger and larger. 4.3.5.4 Setup tab 1 2 3 - 71 - These functions don’t apply to de students, it are configuration functions. The teacher can store TCC configurations and load them back any time. Following items are saved: -groups and the students in them -selected sources per group Every teacher can store his own preferred configuration and load it back when he uses the lab. The TCC always starts up with the “default” configuration: this configuration also can be changed. 4.3.5.4.1 Load Setup Click on this button to recall an already saved TCC configuration. The Setup Window appears. Click on the arrow to display all the saved TCC configurations. Click on the configuration to load. Click on the arrow to display all saved configurations. Click on the configuration to load. Click on the load button and the chosen configuration will be loaded. Click on the Load button to confirm the chosen configuration - 72 - 4.3.5.4.2 Store Setup Click on this button to save a TCC configuration. The Setup Window appears. Click on the arrow to display all already saved TCC configurations. Click on a name if a existing configuration has to be overwritten. Click on the configuration that has to be overwritten Choose the Default option if the TCC configuration to be saved has to be recalled every time the TCC is started. Type a name in the box if a new configuration has to be saved. Type a name for the configuration that has to be saved Click on the Store button and the configuration will be loaded Click on the Store button to save the configuration - 73 - 4.3.5.4.3 Delete Setup Click on this button to delete a saved configuration Click on the arrow to display all saved configurations. Click on the configuration to delete Click on the Remove Button to delete the chosen configuration Click here to delete the chosen configuration 4.3.5.5 Log Off tab 1 2 3 4 4.3.5.5.1 Close Clients All Students Clie nt Software application is closed: the students can’t be controlled anymore by the Tenjin System. The class now can be used as a standard PC-class: all students can word individually. - 74 - When teacher wants to control the lab with the Tenjin system again, he has to ask the students to launch the Client application again. 4.3.5.5.2 Log Off All the PC’s in the class are logged of: this is a Windows logoff, can be used to prepare the PC’s for a new lesson: when the students enter all the PC’s show the Windows logon screen. 4.3.5.5.3 Restart All the PC’s in the class are restarted. 4.3.5.5.4 Shutdown All the PC’s in the class are shut down. Mostly used to shut down PC’s at the end of the day. Remark: All these options do not ask permission to the students: all their work can be lost! - 75 - 4.4 Working with a source In this chapter the methods to work with one source are described, the Tenjin System also has the possibility to work with mixed sources. This is described in a following chapter. 4.4.1.1 Teacher preview The teacher preview gives the teacher the possibility to monitor every source and check the status of every source. The teacher can hear/see every source before he transmits it to the students. Simply click on one of the sources in the Source Selection Panel to put that source in preview. Source in preview In the Source Selection Panel the source in preview is highlighted in blue. Monitored Source Source control panel Source Control Panel is only active when the selected source is controllable. Appearance of the Source Control Panel depends on the selected source. - 76 - Source allocation tray with status for the particular group In this tray is visualised with colours to which groups the source is allocated. For each group the status of the source is visualised. * active or copy or copy mute * transmitting or not (see further on) Teacher pre listen/view section Click on this button to start the pre listen/view function. If it is a video source a preview window is opened on the Teacher PC screen. If the source is in pre listen/view mode the section changes as follows: Set source to copy mode: click this button to not only pre listen the source but also record the source to the teacher PC. This function can be used to digitalize analogue sources. Click here to stop the pre listen/view function 4.4.1.2 Allocation of a source to a group Select a source in the Source Selection Panel and drag it to the Group Panel to allocate the source to the group. - 77 - Click on the desired Source and drag it to the Group space The Source Configuration Window is opened. In this window the teacher can select how he wants to use the source. 1 2 (1) Streams: If needed the teacher can change the streams that will be transmitted to the students. For standard use these options don’t have to be changed. See further on in this manual for more explanation. (2) Modus * active: Aud io Active modus: the source is transmitted to the students, students can hear/see the source, but there is no recording. - 78 - * copy: The source is transmitted to the students, and the audio/video is recorded on the student PC’s. * copy mute: The source is transmitted to the students, and the audio/video is recorded on the student PC’s. The student mics are cut off. Select the needed mode, now the source is allocated to the group. - The pioneer cassette source is allocated to group one - The source is in Audio Active Mode - The source is stopped 4.4.1.3 Transmitting a source Right click on the source to open the source menu. 1 2 3 - 79 - (1) Remove Source: removes the source from the group (2) Transmit Source: Send the source to the students in the group. Depending on the sources properties the source is send in Audio active, copy, or copy mute mode. Visualisation of the transmission: The black arrow shows that this particular source is transmitted Right click on the source to stop the transmission. Right click on the source and select the Stop Transmission option to stop the transmission - 80 - (3) Properties: Choose this option to display the properties of the particular source (1) Streams: If needed the teacher can change the streams that will be transmitted to the students. For standard use these options don’t have to be changed. See further on in this manual for more explanation. (2) Modus * active: Audio Active modus: the source is transmitted to the students, student s can hear/see the source, but there is no recording. * copy: The source is transmitted to the students, and the audio/video is recorded on the student PC’s. * copy mute: The source is transmitted to the students, and the audio/video is recorded on the student PC’s. The student mics are cut off. 4.5 Teacher Call All students have a Call Teacher button on their Tenjin Client Application. With this function they can call for help from the teacher. Click on the Call Teacher button to ask for help from the teacher 4.5.1.1 Detecting a Teacher Call - 81 - When a student has clicked the Call Teacher button, the call is displayed in the student block and in the Call Teacher Panel in the TCC. The call teacher icon is displayed at the student who launched the call Total number of Teacher calls is displayed, and the names of all the students who called the teacher are displayed If more than one student called for help, the total number is displayed in the Teacher Call panel and all the names of the calling students are listed in a pull down list. The names are listed according to the order the students called for help. The student who called for help first is listed at the top of the list, the student who called for help as last one is listed on the last place. - 82 - Four students called for help from the teacher Click on the arrow to display the names of all the students that called for help Pull down list with all the students that called for help 4.5.1.2 Answering a teacher call To answer the teacher calls, just click on the Answer Call button . The teacher is automatically connected in intercom with the student who called for help first. - 83 - The student who called for help is automatically put in intercom mode with the teacher Click on the button to answer the oldest call The call is automatically deleted from the list To stop the help session right click on the student and click on the intercom function. Right click on the student and click on the intercom function to stop the help session 4.5.1.3 Deleting teacher calls Simply click on the Clear all Calls button to delete all teacher calls from the list. - 84 - 4.6 Working with multiple sources The Tenjin system has the possibility to allocated more then one sources to a group, even to work with mixed sources. 4.6.1.1 Working with multiple sources separately 4.6.1.2 Working with mixed sources - 85 - 4.7 Digitising a source The teacher has the possibility to digitize an audio or video source from the Tenjin Control Centre. A digitized audio file will be un uncompressed WAVE file with extension “.wav” with sampling rate of 22,050 kHz and 16-bit sample width. A digitized audio file will be an MPEG-4 compressed file with the extension “.avi”. Image size is CIF format (352x288 or 384x288 depending on the video acquisition card). Image rate is 25 frames per second. Before starting the digitization, a teacher will typically preview the source to digitize. This step allows positioning the source exactly at the point where the digitization should start. There is no need to stop the preview before digitizing. Starting the digitization will automa tically close the preview session and open a new preview window to allow the teacher to follow the progress of the digitization session. To digitize, the teacher should click on the “Digitize” button in the source control panel. Preview button Digitize button Digitize Figure 78 - Digitize button After clicking the “Digitize” button, a dialog window will be opened. In this dialog window, a number of options can be set or text entered to configure the digitization. Click on the “Start” button to start the digitization. Playback of the source will automatically start when equipped with the Artec IR remote control. - 86 - Figure 79 - Digitize dialog 1) Streams: If the source is an audio/video source, the teacher can choose to only digitize the audio (without video) or video (without the audio). This choice is not possible for audio-only or video-only sources. 2) Modus: The teacher can choose to record his/her own voice using the microphone of the headset along the source. In that case, the “copy” modus should be selected. The “copy mute” modus will mute the teacher microphone during the digitization. 3) Options: Use the “Stereo” option to make a true stereo recording. Use the “VACS Compatible” options if students should be able to do audiocomparative recordings with the VACS virtual recorder on the digitized material. 4) Stream: By default, the digitized file will be stored in the teacher’s stream directory. This directory usually is: “My Documents\artec\student” directory with the name “stream” followed by an index. Note that this directory may vary depending on your configuration. - 87 - Figure 80 - Default digitization file By filling in the different fields, a teacher can control the subdirectory and name of the digitized file. The “Session” field will create a subdirectory in the default stream directory of the teacher. The “name” field allows giving the digitized file a specific name instead of “stream” plus index. The “Duration” allows entering a duration for the digitization. It is specified in hours, minutes and seconds. The digitization will automatically stop when the specified duration has elapsed. Figure 81 - Naming digitized files - 88 - Upon starting the digitization, a preview window will open for the video and the audio will be audible through the teacher headphone for monitoring the digitization session. Figure 82 - Digitization preview window The following dialog box will be shown during the digitization: Figure 83 - On-going digitization dialog box The digitization can be stopped by clicking the “Stop” button or it will be stopped automatically when the specified duration has elapsed. - 89 - When stopped, the VACS virtual recorder will automatically open with the digitized file if installed. Click “Close” on the digitization dialog to terminate the digitization session. - 90 -