Download Capture One 4 Users Guide

Transcript
User Guide P 65+ Digital Full-Frame back
This Userguide is Version 0.9 shortly after the release of P65+ the new Userguide will be available on
http://www.phaseone.com/Content/p1digitalbacks/P65plus/Introduction.aspx
http://www.phaseone.com/Global/documentation/Documentation/Documentation_DB.aspx
On rights
©2008 Phase One A/S. All rights reserved. Made in Denmark.
Ver. 0.9
Colorspace images created in CROMiX ColorThink.
Photos by:
Kevin Raber
Text By:
The dedicated staff of Phase One
Learn more about Capture One 4 on www.phaseone.com/4
On liability
The information in this user guide is provided “as is”.
Under no circumstances, including negligence, shall Phase One be liable for any incidental, special, direct,
indirect or consequential damages arising out of or relating to use of the information provided in this guide with
or without the software and/or hardware described in the guide.
Trademarks & acknowledgements
Capture One and Phase One are either registered trademarks or trademarks of Phase One A/S in the European
Union and/or other countries.
All other trademarks are the property of their respective owners.
This product includes DNG technology under license by Adobe Systems Incorporated.
2
3
Contents
8.0 Play mode
1.0 Introduction
6
2.0 Unpacking the P65+
7
2.1 Charging the batteries
2.2 Classic vs. Value Added
2.2 Classic vs. Value Added warranty
3.0 Introduction to the P65+
3.1 Tethered or untethered operations
3.2 General Hardware Setup
4.0 Sensor+ in detail
5.0 Quick Start
5.1 Setting up time and date
6.0 CF Card Usage
8
9
10
11
12
13
16
17
18
19
6.1 Formatting your Memory card
6.2 Mounting/dismounting on Win XP and Win Vista
6.3 Formatting on a Mac OS X computer
6.4 Formatting on a Windows computer
6.5 Disabling iPhoto Autostart (Mac OS X)
21
23
24
24
24
7.0 Navigating the menu system
25
7.1 Menu buttons
7.2 Shortcuts
7.3 indicators
Power indicator
26
27
28
29
30
View modes
8.1 Zoom
8.2 Rating
8.3 Delete
8.4 Exit the Play mode
31
32
33
33
33
9. Menu mode
34
9.1 Capture Setup
9.2 PLAY SETUP
9.3 Configuration
34
40
43
10.0 P 65+ on Phase One 645AF & Mamiya 645 AFD50
10.1 Mounting P 65+ 10.2 About Viewfinder Masks
10.3 Phase One 645AF & Mamiya 645 series more details 51
52
53
11.0 P+ back for Mamiya RZ
55
11.1 About Viewfinder masking
11.2 Mamiya RZ other details
11.3 Mamiya RZ67 PRO IID
11.5 Studio flash sync on the RZ lens shutter
55
55
57
58
12.0 P 65+ back for Hasselblad V
59
12.1 Mounting the viewfinder mask on Hasselblad V
12.2 Mounting the P+ back on Hasselblad V
12.3 Camera body specifics
12.4 Hasselblad 555 ELD
12.5 Hasselblad 553 ELX
12.6 Hasselblad 501 CM and 503 CW without winder
12.7 Hasselblad 503 CW with Winder CW
12.8 Cables shipping with P+ back for Hasselblad V
59
60
61
62
63
64
65
66
4
13.0 P 65+ back for CONTAX 645
67
13.1 Mounting P 65+ back to the CONTAX 645
13.2 Flash photography on Contax 645
70
71
14. H 101 - P 65+ back for Hasselblad H1/H2
72
14.1 Camera LCD display
Viewfinder information
Auto exposure
Double exposure protection
14.2 Image orientation detection
IR filter on the CCD
About viewfinder mask on H1/H2
14.3 Mounting on the Hasselblad H 1
73
73
74
74
75
75
75
76
15.0 View camera and studio photography
77
15.1 1-shot release
78
16 Live Preview
80
16.1 General Live Preview information 16.2 Live Preview Camera support
81
82
17.0 Lens Cast calibration
85
17.1 What is Lens Cast?
17.2 How do I get rid of it?
17.3 4 Simple steps to calibrate (Mac)
18 Maintenance
87
19. Secure Storage System
88
19.1 Secure Storage system “3S” (How does it work?)
19.2 Disk Check summary
20.0 Service and Technical Specifications
20.1 Updating the P 65+
20.2 Support and recommendations
20.3 Recommendations
20.3 Technical specifications
88
88
89
89
90
91
92
85
85
86
5
1.0 Introduction
Thank you for choosing Phase One P65+ digital camera back solution.
The Phase One P+ Series, provides you with the advantage of having
the most powerful digital camera solution whether you are working
portable in the field or tethered in a studio.
When shooting portrait, landscape, fashion, wedding, product or
architectural photography you will always be able to find a Phase One
digital back that fits your needs.
The Phase One P+ Series system gives you the absolute best solution
when it comes to image quality and workflow.
Capture One is the P+ Series RAW file processing software, and is
available for either Mac OS X or Windows. The Capture One online user
guide is the general manual for this software.
The P 65 + is a genuine revolution, for the first time in history a medium
format full frame CCD has been released; proving Phase One to be the
leading developer of digital photographic equipment.
For the first time you actually get 2 backs in one – no cheap sales trick,
the P 65+ is a FULL-FRAME 60.5 megapixel AND a FULL-FRAME 15
megapixel digital back of world class quality.
This manual “P65 + Users guide” covers the specific P65+ features and
functionality.
The P+ Series is ready to be used right out of the box.
At Phase One we are always committed to provide you with the best
solution for the professional photographer.
We sincerely hope you will enjoy working with this new innovative product.
6
2.0 Unpacking the P65+
The suitcase contains all the necessary parts; Compact Flash card (CF
card), CCD Cleaning Kit, digital back, batteries and charger. Suitcase
and system contents may vary depending on purchase: Classic (basic
components) or Value added (everything needed).
The Software package, this manual and the LCC calibration kit are
included in the Phase One Leather binder and functions as a lid over
the utility compartment.
In the utility compartment you will find the CF card reader, cables and
international power adaptors. In daily usage the utility compartment can
be expanded by pulling out the inside square-to-circle foam, making
the space ideal for use as camera body compartment.
Configuring the system suitcase to fit your needs
With the “Value Added” suitcase it is possible to pull out the entire foam
insert and use the supplied dividers and double sided Velcro tape to
configure your own system suitcase.
The Velcro tape can be cut out and bent around the edges of the
dividers. This makes it easy to fixate these inside the suitcase.
4 dividers are supplied, use a large scissor or tool knife to cut out one
of them into three or four smaller pieces, and use these for splitting the
compartments into smaller sections.
7
2.1 Charging the batteries
When the system is unpacked the first thing to do, is to charge the
batteries fully.
The Value Added Suitcase is delivered with two 7.2 volt Lithium-Ion
batteries and a duo-charger.
Only one battery is used in the P+ back at a time, but it is recommended
to charge both batteries fully before you start. While charging the
batteries, you can still use the camera back if you connect it to the
IEEE1394/FireWire port on your computer.
The battery charger can adapt to voltages within a range of 110 to 250
volts.
It comes with an international set of power adaptors (placed in the
suitcase utility compartment), please select one that fits your outlet,
and mount it by sliding it in from the top.
Connect the unit to the outlet and charge the batteries (approximately
2.5 to 3 hours).
After the first initial charge, the batteries can be charged one at a time.
Purchasing extra batteries
The Phase One P+ back comes with two 2500mAh batteries. If you
need to purchase extra batteries
Warning!
• Only use the Charger to charge the specified batteries
• Do not allow charger to get wet or get exposed to moisture
• Keep the Charger out of reach of children
• Once charging is completed, unplug the charger from power source
• Only use the original mains adaptor 12V DC or car lead
• Never apply excessive force when connecting or disconnecting a battery or contact plate.
• Keep all contacts clean.
• Do not force down any of the contacts.
• Do not short-circuit the contacts.
• Never store the battery connected to the charger for an extensive period of time.
• Do not expose to excessive heat or naked flame.
• Do not dismantle or carry out any alteration to the product
• Do not attempt to eat or swallow the battery
Phase One recommends Canon BP 915 (1500 to 2500 mAh).
Due to difference in the tolerances of some third party batteries, these
may not fit into the digital back’s battery compartment. Do not try to
force a battery into the compartment. When pressing the battery release
button it should slide in without problems.
8
2.2 Classic vs. Value Added
All parts of the value added kit is available as spare parts; should you
need extra equipment, please consult your local dealer on different
Phase One or third party solutions.
Most important for the professional photographer are securing the
uptime of the camera and back, to be as safe as possible consult your
dealer to get information on the best solution; most uptime solutions
provided by Phase One can be purchased after acquiring the back or
camera.
Classic
P 65+ Full-Frame digital back
Kinetic Hard Case
1 year warranty
Value Added
P 65+ Full-Frame digital back
Amabilia Hard Case
3 year warranty
Dual Battery Charger
1 Battery
Viewfinder Masks?
4.5 m FireWire cable
Dual Battery Charger
2 Battery
Viewfinder Masks?
4.5 m FireWire cable
Multiconnector>minijack adapt. cable
Multiconnector sync cable
Sandisk USBII reader
Sandisk 1GB CFIII card
Capture One DB software CD
Capture One PRO software
PDF on SW CD
Leather binder protecting:
LCC Calibration kit
5 pcs QP grey card
Microfiber cloth
9
2.2 Classic vs. Value Added warranty
Before shipping, all Phase One digital backs undergo a thorough
manual inspection and control procedure, our skilled technicians are
checking:
• Sensor focus adjustment
• Luma/Chroma calibration & verification
• Illumination invariance verification
• Physical surface inspection
• Usability testing & capturing of images
• Visual inspection of images
• Final test cycle & more...
besides this thorough and spesialized test you have 2 different service
choices.
Service
Classic
Value Added
Warranty period
Free repair of manufacturing
defects
Shutter actuations covered
Product defect within first
month
Free loan unit during repair
Free camera platform exhange
24/7 online support forum and
access to knowledge base
articles
Guaranteed upgrade program
1 years
Yes
3 years
Yes
Unlimited
Repair
Unlimited
New Product
No
No
Yes
Yes
Yes
Yes
Yes
Yes
Ask your local dealer or consult www.phaseone.com on extra campaigns
and possibilities regarding securing your workflow and your daily
assignments now and in the future.
10
3.0 Introduction to the P65+
System overview
The Phase One P+ back is designed specifically to fit on one of several
brands or models of medium format cameras.
Play
Menu
ISO
WB
This overview section will deal with generic features, available in all
these different models: Tethered or untethered operation, preview
display functions, menu system controls (the P+ backs have four
buttons controlling the settings in the back), etc. Certain camera specific
explanations are placed in sections later in this manual. These can be
instructions on how to attach the P 65+ back on a camera, how to
install the focusing mask provided if needed, special cable connections
and other considerations.
You might want to look into the camera specific section before returning
to the overview to learn about your specific configuration needs.
Full-Frame
P 65+ is the first digital back created to provide the full 645 format. This
means that for the first time on medium format, your lens does have the
actual focal length that is intended. Using the P 65+ you do not need a
mask to show the crop of your view that actually is your capture area.
Sensor+
P 65+ offers the largest CCD and the largest RAW files; large RAW
files can take up to a second to empty the buffer – depending on your
camera model. When time is crucial, you might prefer smaller files and
short buffer time. Sensor+ will create files sized app. 25% of the normal
files, at the same time; the CCD will offer ISO from 200-3200.
Read more on Sensor+.
11
3.1 Tethered or untethered operations
Untethered: P65+ back can be operated as a fully portable unit powered by the embedded battery and shooting to a compact flash card
or microdrive which is inserted in the CF-card slot on the left side of
the camera back. The advantages of using it as a fully portable device
are obvious, but operating tethered has advantages too.
Tethered: When operating in a studio, connected to a computer via
FireWire you are not dependent on battery power or storage media.
The FireWire specification specifies 4.5 meter cable lengths as
maximum, longer cables might require a third party power solution or
FireWire hub. P 65+ matches FireWire 400 standard, if your cable or
computer should only accept FireWire 800 standard, use the adaptor
that are included in the kit.
When operating tethered you have the option of capturing the images
to the CF-card or transferring captures directly to the assigned capture
folder in the Capture One application on the computer hard disk.
The display on the P 65+ back can either be turned off while shooting
tethered or set to display the images while they are shot, just as if
shooting untethered.
When unplugging the P+ back from the FireWire, the P 65+ back will
default to untethered mode, capturing to CF-card or microdrive, and
using the battery for power.
Also when capturing tethered to laptop with 4 pin mini 1394/FireWire
without power it will require a battery in the P 65+ back. Using the four
menu buttons you can setup the preferences for all these operational
features.
I.e. the display time of the images, time before backlight is dimmed,
ISO, file format and white balance.
For more information on capturing tethered with the Phase One Capture
One application please consult the online user guide available in the
Capture One Help menu.
12
3.2 General Hardware Setup
The P 65+ back is designed to be used with medium format cameras
which are created with digital backs in mind. Using your P 65+ on these
cameras is possible without any cables attached between the P 65+
back and the camera body or lens. All timing and communication is
handled in the electrical interface between the P+ back and the camera
body.
Capturing images with the FlexAdaptor on large format camera or a
camera body without the digital interface is supported by connecting
the special lens sync cable that comes with all P+ backs.
For a guide to a specific camera body, please consult the corresponding
chapters later in this manual.
Powering up the P+ back
When the P 65+ is connected to the body, insert a battery or the
IEEE1394/FireWire cable and P 65+ will automatically turn on.
The back is switched on/off by shortly pressing the “Power” button just
below the P+ back display.
ISO Settings
Light sensitivity of the P 65+ back is per default set to ISO 50-800.
However, this setting can be changed using the menu system (when
untethered) or in the Capture panel of the Capture One application
(When tethered).
Depending on activating Sensor+ the ISO range is between 200 from
3200.
13
Power management and shutter latency
The CCD on the P65+ back constantly needs to be cleared from previous
data before an exposure. This requires some power consumption.
Deafult is Normal Latency, and this sshould be kept, under all “normal”
situations, only change the latency to “zero latency” if you work on
technical cameras, large format cameras or certain manual cameras in
special situations.(Please see the section specific for your camera body
for more information on what latency setting to select).
Double exposure protection
It is not possible to accidentally double expose the image by capturing
one image quickly after another when the P 65+ back is used on i.e.
Phase One 645AF, Mamiya 645 AFD/AFD II/AFDIII, Hasselblad 555 ELD
(DIG mode), Hasselblad H or Contax 645. The electronic communication
with the body ensures that the P 65+ back is ready before allowing
release of the next shot. On other camera bodies not using the electronic
interface from the P 65+, the user has to wait for the ready beep signal
before releasing the next shot.
14
Indicator lights
Upon powering up the P+ back the green and red LED’s on the right
will flash shortly and you will hear a beep, which indicates that the P+
back is ready to capture. In general, if the LEDs are not illuminated the
camera is ready.
Green LED
When capturing an image the green LED is flashing rapidly to indicate
that the P+ back is busy exposing the CCD or moving data from the
CCD.
A steady green light indicates that the backlight of the LCD display is
dimmed but that the camera is still ready to shoot. The timing before the
LCD backlight is dimmed can be set in the P+ back and is described
later under “Menu mode”
Red LED
The red LED indicates that the P+ back is writing to the storage media.
The same red LED indicator is located just beside the CF-cardslot under
the cover on the left hand side.
NB! When the red light is on please do not remove the card from the card
slot! This will damage the formatting of the card, resulting in corrupted
data or lost images.
IR filter on the CCD
The IR filter (Infrared reduction filter) is permanently mounted on top of
the CCD.
• The filter may not be removed for several reasons:
• The focusing of the P+ back camera back will be damaged.
• It is only possible to remount the filter without dust in between the
filter and the CCD if you have access to special clean room facilities.
• The Phase One Product Warranty is terminated.
15
4.0 Sensor+ in detail
Sensor+ is a new technology developed by Phase One, in practice the
easiest way to explain this, is that you should regard your back as 2
digital backs.
Default is 60.5 megapixels; each pixel is sized 6x6 Micron. - Select
Sensor+ and your P 65+ is 15 megapixels, each pixel sized 12x12
Micron.
Whereas 60.5 megapixel is capable of most assignments, you might want
a faster workflow in some situations, instead of bringing another digital
back, you can select Sensor+ via menu>Capture Setup>Sensor+
What is binning?
Binning is the technology behind Sensor+; this technology assembles
the pixels on the CCD and not as a part of the software or firmware. This
creates the unique behavior that provides you a full-frame 15 megapixel
back, with a significant increase in the sensitivity of the CCD.
Binning allows you to do capture in 25% of the default resolution, the
quality is still in top after processing in Capture One 4.X PRO as the
software is prepared to work on this specific type of file.
Why use Sensor+
Not only will Sensor+ files be smaller in size and the workflow faster,
but Sensor+ also provides a higher light sensitivity this changes the ISO
scale from default 50-800 to Sensor+ scale 200-3200 ISO.
The Noise you will find in any digital capture is also affected by Sensor+,
Noise origins in the single cell of the CCD, there will always be a small
uncertainty of the value in the single cell, after binning the noise ratio
will be significant lower, providing the possibility of higher ISO whilst
the noise is kept low.
16
5.0 Quick Start
This is what it takes to get started
1. Charge the batteries (Described earlier)
2. Install the focusing Screen if needed
3. Consult the Camera specific section for special cabling requirements
for your solution.
4. Insert Battery or connect IEEE1394/FireWire (for power) if capturing
tethered to e.g. a laptop, that can’t provide 10w, you must force
batterypower in the menu.
5. Insert CF-Card or connect IEEE1394/FireWire (To shoot tethered
directly to the computer)
6. If shooting tethered launch the Capture One Application
7. Otherwise Shoot the images to CF-card, import them using the
Capture One Application and a card-reader.
17
5.1 Setting up time and date
The camera back’s date and time is set to Central European Time
GMT+1 as Phase One’s production facility in located in Copenhagen,
Denmark.
If the digital back has been without power for a longer period of time,
it will automatically ask you to setup time and date when it is powered
up.
Menu>Configuration>Time and Date will allow you to set the time and
date using the four buttons on the P+ back.
Left side buttons will step through the hours, minutes and seconds
fields, while the right up and down buttons can be used to set the value
of the fields. The time and date is applied to all files captured with the
P+ back.
18
6.0 CF Card Usage
When working with CF-cards, card readers and digital cameras it is
very important to follow a few rules, to avoid loss of data.
Phase One recommends that you test-drive all new CF cards including
the one enclosed. By doing an initial test to verify that the capture files
are stored properly on the card and can be accessed on a computer
you will avoid unpleasant surprises on location or when you return from
a job. CF cards are manufactured by other suppliers, and Phase One
cannot guarantee that the cards are not defective.
Inserting and ejecting on the P+ back
The compact flash card or microdrive is inserted in the hidden slot
located under the cover on the left hand side of the P+ back.
Insert the CF card with the brand label facing the display end of the
digital back as shown in the image.
When the CF card is fully inserted no parts are sticking out and the
cover can be closed.
To eject the card push the small button just above the card once, and
an ejecting pin will come out.
Pushing this pin all the way back in will eject the card.
Microdrives are not recommended to be used with P 65+, as the speed
and size of most microdrives by far is exceeded by a standard CF card
today.
19
Secure Storage System (3S)
The Phase One Secure Storage system (3S) provides the industry’s
safest memory card handling ever.
When working with memory cards in a Phase One P+ back, you can
always be sure that your data is safe.
The 3S technology is automatically checking your cards file structure
every time it is inserted to the P+ back.
If the disk check function finds errors on the card, it will prevent usage
of the card until these are corrected or the card is formatted.
Read a more detailed description in the chapter dedicated to Secure Storage Sytem.
20
6.1 Formatting your Memory card
In General all CF-cards or microdrives are preformatted and ready for
use in the P+ backs.
However to ensure the best performance from these cards it is
considered best practice to always format them in the P+ back.
Please consult the “Format Disk” explanation in chapter 9.3 of this
users manual on how to format a memory card in the P+ back.
Formatting of the memory card is done in either FAT 16 or FAT 32
depending on card size, and if the formatting is done in the P+ back
cluster sizes on the disk is set for best performance.
It is also possible to format the cards on either Mac or Windows; this is
explained in the following sections of this chapter. FAT 16 only supports
up to 2 GB of storage.
Please note!
Ejecting the card while the P+ back is still writing to the card, when the
red LED is on, will cause images that are still not written to the card, to
be lost or damaged.
Also, ejecting the battery while the P+ back is still writing might result in
loss of the data that is not yet written to the memory card.
21
General handling guidelines
Especially when using microdrives you have to be careful not to drop
them on the ground or even on a table.
Compact flash cards are not as vulnerable as microdrives.
Please keep the card away from moisture and sand and don’t bend it.
Use the supplied jewel box as a storage container for the card.
Using cards or microdrives in the card reader
When inserting the card into the card reader on a Mac or PC, the card
will be mounted as a removable drive on the computer.
Windows XP and Mac OS X have the required drivers for the CF-card
reader.
For information on how to import the files to Phase One Capture One,
please consult the Capture One online user guide available under
“Capture One Help” in the Help Menu.
22
6.2 Mounting and dismounting on Windows XP and Windows Vista:
To avoid confusing the system or, worst case, end up with a CF-card
that was unintentionally erased, it is required to safely eject the card by
right clicking the icon in “My Computer” and select the “Eject” option.
On a Mac the card has to be un-mounted, by dragging it into the trash,
or selecting eject (command-e) in the “File” menu, or ejecting from the
Capture panel inside the Capture One software.
Just removing, and reinserting the CF card will confuse the system,
possibly resulting in uncontrolled read or write errors. If this happens,
restarting the computer can normally solve the problem.
Preparing the CF-cards or microdrives
Most CF cards or microdrives are pre-formatted and ready to be used
in the P 65+ back.
The P 65+ back supports CF cards formatted in either FAT 16 or FAT
32.
If your CF card is not recognized in the P 65+ back it is possibly due to
a wrong file system formatting on the card.
Mac HFS, UNIX or NTFS file systems are not supported by the P 65+
back, and cards with these file systems will not be recognized.
If the above written format systems have been used on the CF card will
have to be re-formatted in either FAT 16 or FAT 32 using a computer,
Mac OS X or Windows.
23
6.3 Formatting on a Mac OS X computer
On Mac OS X the formatting cannot be done directly in the finder but is
easily done inside the Disk Utility located in the Applications > Utilities
folder.
Open the Disk utility and select the Disk (not just the partition, but the
entire disk). Select the Erase panel as shown above, and select MSDOS File System. Give the disk a name and click on Erase to erase and
format the entire disk for use with the P+ back.
Choose “Options” in the formatting dialog to specify a complete and
thorough formatting of the media.
6.4 Formatting on a Windows computer
Insert the CF-card in the card reader, and select the drive when it mounts
in “My computer” or in the Explorer. Right click on the drive and select
“Format” from the pop-up menu.
Select FAT32 or FAT16 from the “File System” pop-up.
Provide the card a name and click Start to format the card.
To specify a complete and thorough formatting of the media resetting
all to zeros, do not enable the quick format option.
6.5 Disabling iPhoto Autostart (Mac OS X)
iPhoto Autostart can be disabled in the Mac system preference.
Select “CD’s & DVD’s” and change the setting for “Picture CD” to either
“Ignore” or point it to the Capture One application you are using.
24
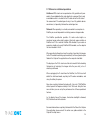
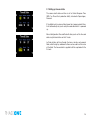
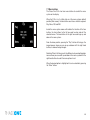
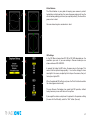
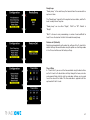
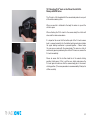
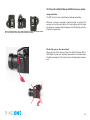
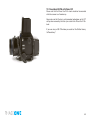
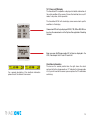
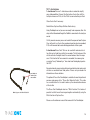
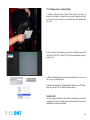
7.0 Navigating the menu system
When the P 65+ back is turned on, the screen will always be in its
default position or “Main screen”.
Pressing and holding down the upper left button on the back is always
your shortcut to the Main screen, regardless of where you are in the
menu system.
The Main screen has an indicator in the top showing remaining captures
on the CF card or selected hard drive, and a power indicator at the
bottom showing the remaining battery capacity or a FireWire icon if the
P 65+ is connected to FireWire.
When either indicator reaches zero, it will start blinking, to indicate that
either storage or battery needs replacement before capturing any more
images.
The main screen also shows the current ISO setting, white balance
setting and the selected IIQ Raw file format.
Right next to the fileformat indicator, you find the image technology
indicator, if you select Sensor+ technology, you will see the S+ icon
25
7.1 Menu buttons
The Phase One P 65+ has four menu buttons to control the menu
system on the display.
When the P 65+ is in its initial state or at the menu systems default
position (Main screen), the four buttons each has a shortcut assigned.
Play, Menu, ISO and WB.
Inside the menu system arrows will indicate the function of the four
buttons, the two buttons to the left are used to enter and exit the
selected menus. The two buttons to the right are used to go up and
down in the menu system.
From the home position, pressing the “Play” button will bring up the
image browser, where you can go up and down with the right hand
buttons, to browse through images.
Selecting “Menu” will bring you to the different setup and configuration
menus where you can scroll up and down in the menu system with the
right hand buttons to select the menu options to set.
When the desired option is highlighted it can be selected by pressing
the “Enter” button.
26
7.2 Shortcuts
Exit
Up
Home shortcut
Holding down the “Exit” button for a few seconds will always bring you
to the default position or main screen immediately.
When a FireWire cable is inserted the P 65+ Back draws the power from
FireWire this is shown with an icon in the bottom of the main menu.
Enter
Down
When Capture One is started on the computer, this is indicated with a
FireWire Icon in place of the cable icon.
P 65+ back can be forced to get power from the battery; this is indicated
with an additional battery icon.
Force battery power is invoked from the “Menu > Configuration > Power
Source” menu.
Button Lock shortcut
Holding down the “Play” button whilst in Home position colors the word
“Play” in yellow and at the same time reveals a shortcut with the word
“Lock” in the place where WB was.
Pressing the lock button twice when holding down the “Play” will lock
operation of the four menu buttons. This is useful to avoid unintended
button operation while carrying around the camera or shooting.
To unlock the buttons hold down the “Play” button again and press the
“Lock” button twice.
When the buttons are locked, the key icon is displayed just below
“WB”.
27
File format shortcut
Holding down the menu button, will change the ISO button to a shortcut
to the File selection menu, the file format is showed in the center of the
main screen, you can choose between IIQ S and IIQ L.
Sensor+ shortcut
Holding down the menu button, will change the WB button to a shortcut
to the Sensor+ menu, if Sensor+ is selected, you will se a S+ after the
file format e.g. [IIQ L, S+]
hold down button
7.3 indicators
Long exposure time indicator
If the camera is set to expose for more than 2 sec. the exposure time
indicator will show up in the top of the display.
While the shutter is open this indicator will keep counting the
seconds.
This indicator is very useful for timing long bulb exposures.
P 65+ provides a recommended maximum exposure time of 1 minute.
Long exposure black reference
In order to capture noise free long exposures Phase One digital backs
needs to capture a black reference after each capture. This black
reference requires the same amount of time as the exposure itself.
While the black reference is being captured this is indicated with a night
symbol and a counter counting down the time left for black reference
capture to complete.
This is done automatically.
28
Power indicator
In the bottom of the main menu you find the power indicator –
Battery: when using battery power you will see the battery icon,
indicating the approximate amount of power left on the battery.
FireWire: the FireWire icon will appear when a FireWire cable is
connected to the back; this means that P 65+ now is powered through
the cable even though the battery is still attached.
29
8.0 Play mode
“Play mode” can be used to review, zoom and delete images.
From the “Main screen”, press the top left button of the P 65+ back to
enter Play mode.
In Play mode the top of the screen will show a menu bar. In the right
side of the menu bar the current image number and the number of
images captured on the media is displayed.
In this example it shows number 12 out of 18 images.
Pressing the Up and Down buttons on the P 65+ back (right hand side)
it is possible to browse through the images.
Holding down the “Enter” button while pressing the up and down icon
will bring you to the first and last image accordingly.
Battery capacity and number of possible captures on the hard drive or
CF card are also shown in the menu bar.
Pressing the Play button on the P 65+ back (top left hand button) will
step through the options available in the menu bar.
From left to right these are: Review, Zoom, Rate and Delete.
Pressing the “Enter” button on the P 65+ back (bottom left hand button)
selects the option.
If the image was shot vertical the capture showed on the LCD display
will be automatically rotated.
To view such an image in full view rotate the digital back and the image
will be automatically rotated.
30
View modes
Play mode has four view modes, or review modes; Normal image display,
Exposure warning overlay, Histogram overlay or File Info overlay.
After entering the Play mode, press the “Enter” button to shift to the
view mode you want.
Exposure warning overlay will display the highlight areas as a flashing
color, to warn about over exposed areas in the image.
Histogram overlay will show a transparent Histogram over the image.
Use the various grids to
assist your evaluation
of the composition.
Especially photographers
working on large format,
technical cameras or
just photographing
architecture will find great
benefits in having the grid
to assist in adjusting the
lines of your capture.
File Info overlay will show detailed capture information like capture
number, capture time, date, ISO, WB, file format and shutter speed,
etc.
The view that Play mode is left in will be the setting used for review of
images while shooting.
This means, that if the Play mode is set to show images with a histogram,
and you then exit to the Main screen, all subsequent captures will be
shown on the display with a histogram over the image.
Read more about setting
Grids here…
31
8.1 Zoom
After entering Play mode, advance to the eyeglass icon by pressing the
button again and press the “Enter” button to select it.
It is now possible to zoom in the image with the “Enter” button.
The zoom has four steps, Normal, enlargement 1, enlargement 2 and
enlargement 3.
When zoomed into enlargement 1, 2 or 3 the insert view in the lower left
corner can be used to navigate around in the image.
A small rectangle will show the current position and the up and down
buttons can be used to scroll up and down.
An icon just beside the Play button (top left hand button) will show the
direction of scroll as either vertical or horizontal.
Pressing the “Play” button once will change this from horizontal to
vertical scroll when using the up and down buttons. (Left side)
To exit the zoom function use the enter key to navigate to the eyeglass
icon in the pan view and press the Play button to step to the next icon in
the menu bar. Or hold down the “Exit” button for more than 1 second.
Browsing inside Zoom
While in the Zoom tool (enlargement 1, 2 or 3) holding down the “Enter”
key, will hide the two up and down indicators. It is now possible to
browse through the images by pressing the Up and Down buttons
without leaving the Zoom functions.
This means that the exact same focus point can be evaluated on several
pictures in a row by pressing “Enter” - “Up” or “Enter” - “Down”.
32
8.2 Rating
If you want to rate while viewing, select the Rating feature, now the Exit
button will provide rating, 0-5, whilst the right buttons still allows you to
browse forward and backward in your captures.
When shooting to a CF card and rating the images, the ratings will be
recognized by in Capture One upon import of the rawfiles.
8.3 Delete
Navigate to the delete function by pressing the play button.
When in the delete view press the Up and Down buttons to browse
through images.
Pressing the Enter button brings up an
again will select and delete the image.
or a
. Pressing “Enter”
Pressing the exit button will select and cancel the deletion.
If “Confirm Delete” is set to “Off” in the “Play Setup”, the
and
confirmation will be skipped, and the image deleted immediately when
pressing “Enter” while on the delete menu.
8.4 Exit the Play mode
Exit the Play Setup at any time by holding down the Play button for two
seconds.
33
9. Menu mode
Pressing the lower left button sets the P+ back in “Menu mode”
Entering Menu mode by pressing the lower left button allows you to set
up the preferences of the P+ back.
Menus are navigated to by following the Enter, Exit, Up and Down
arrows and pressing the corresponding buttons on the P+ back.
Whenever you want to exit to the main screen hold down the exit button
(upper left button) for more than two seconds, and you will be back at
the main screen.
When entering the menu mode you have three options: Capture Setup,
Play Setup and configuration.
9.1 Capture Setup
Capture Setup is where you setup preferences for the capture.
Enter Capture Setup by pressing the enter button (lower left button)
In the Capture Setup you can select Shutter (latency), File Format,
Sensor+, Virtual Horizon, ISO or WB.
By scrolling down with the down button you can select the options.
34
Shutter
Shutter refers to the shutter of the camera the P+ back resides on.
Due to the sleeping architecture of the P 65+, where the CCD is put
to sleep to reduce power consumption, the P 65+ needs to wake up
before shooting. The timing of this wake up signal is referred to as the
latency.
In general, if the camera is used with 645 format cameras with digital
interface the recommended setting is “Normal latency”.
Zero latency has a shorter response time, but is power consuming,
so when preserving battery life is a priority you should select “Normal
latency”.
If the P 65+ back is used in “two shoot mode” on a large format camera
with i.e. a copal shutter or another mechanical shutter where the
shutter is released one time for waking up the back, and another time
for making an exposure, then the shutter setting in the P 65+ should be
set to “Normal latency”.
While Zero latency will respond immediately to triggering the camera,
Normal latency will not be that fast, but in return you gain much longer
battery life.
In general you should only use normal latency if you are using the
so-called two-shot release cable. If you are using Zero latency on
a two-shot release cable, you can very well end up having doubleexposures.
35
File Format
In “File Format” you can select two options “IIQ Raw L” and “IIQ Raw
S”.
“IIQ” is a short term for Intelligent Image Quality - Raw.
“IIQ L” is set as the default and is the lossless capture format of the P+
back.
“IIQ S” is a smaller file, and not totally lossless in the format. The “IIQ
L” is approximately half file size of the processed TIFF file. “IIQ S” is
approximately one third of the processed TIFF.
Most users will use the “IIQ S” as there is virtually no quality difference
between the two settings.
When the camera back is used tethered to a computer this setting is
set from within Capture One.
Sensor+
In the Sensor+ submenu you choose between on and off, when the
setting is “On” you will capture files in Sensor+ technology, this
provides full-frame, 15 megapixels back, creating files of app 15MB
if IIQ-L, each pixel will be 12x12 micron, in other words you get a file
of lower resolution, but you achieve a substantial increase of capture
rate.
If Sensor+ is set to “off” you will capture files as full-frame 60.5
megapixels, in an extremely high quality, each pixel will be 6x6 Micron
providing the finest resolution on the market.
Read more on Sensor+ technology
36
Virtual Horizon
The Virtual Horizon is your guide to keeping your camera in perfect
horizontal or vertical position, the menu disappear and you will see the
virtual horizon guiding you to level you capture perfectly, the line will be
green, when in level.
You can choose to get a sound when in level.
ISO settings
In the ISO Menu choose from ISO 50 to ISO 800 depending on the
conditions you want –if you are working in Sensor+ mode you can
choose between 200-3200 ISO.
In general the higher the ISO value, the more noise in the image. This
means that for optimal image quality, it is a better strategy to have
more light in the scene, or adjusting the f-stop on the camera, than just
turning to a higher ISO.
When the preferred ISO setting is set press the “Enter” button to confirm
the choice (green check-mark).
The new Sensor+ Technology has made high ISO possible, without
having too many issues with noise in the capture.
If you regret the choice and just want to go back to the previous setting
(the one with the little dot), select the “Exit” button (the red).
37
White Balance
Setting Auto WB will calculate a white balance based on the information
in the image. Auto WB is good for most applications.
If you are using a specific light source you can choose that option
here.
If the camera back is tethered to a computer, and white balance is set
from within Capture One it is indicated with the C1 icon in place of the
WB indicator on the main screen.
When the camera back is used tethered to a computer this setting is
set from within Capture One.
Custom White Balance on P 65+
P 65+ back allows you to create up to 3 custom white balances.
Custom WB is available when pressing the WB button at the main
menu.
When scrolling to the bottom of the WB options four options are
available:
“Custom1”, “Custom2”, “Custom3” and “Create WB…”
To make a new custom white balance select Create WB… and choose
which one from the following: “Custom1”, “Custom2” or “Custom3”
When one of the options is selected the “Make Custom WB” will be
blinking.
Now you are ready to capture the image that should be used for white
balancing. Place the viewfinder center circle on an area (gray card or
neutral white surface) and capture the image.
You have now made the custom white balance and it has been set as
the current capture white balance.
38
All subsequent captures will now have the new custom white balance
applied.
3 different custom white balances can be defined and used as shooting
white balances.
Custom white balance from Capture One
You can also choose to easily transfer a white balance from Capture
One to the P+ back:
1. Create a custom white balance inside Capture One.
2. While tethered to the computer select WB from the lower right button
on the P+ back.
3. Select “Custom1”, “Custom2” or “Custom3” on the P+ back
depending on where you want to store the new white balance.
4. Finally Click the “Set as capture white balance” button inside Capture
One.
P 65+ will beep, confirming that the custom white balance is now
uploaded, will be applied when the P+ back has been disconnected.
This technique is useful because you can bring up to three predefined
custom white balances taken in the studio to your location shoot.
Please be aware that when shooting tethered to the computer, the white
balance must still be set in the Capture One application. White balance
cannot be set on the P+ back while tethered.
39
9.2 PLAY SETUP
Play Setup
The second option in the menu mode is Play Setup.
Inside “Play Setup” you can adjust and select Brightness, Auto Preview,
Delete options, Display Style and Grid.
Brightness
In the Brightness setup, you can set the brightness of the preview LCD
screen.
Default setting is 80.
Only the Brightness of the display is affected. Exposure warning,
histogram and final capture are not affected by this setting.
Default Brightness is 80.
Especially when working outside or in bright surroundings, the brighter
settings might be useful.
In studio environments it might be useful to set the brightness at the
lower value.
20
40
60
80
100
40
Auto Preview
The second option in Play Setup is Auto Preview.
Auto Preview refers to the amount of time the image remains on the
screen after capture.
Default setting is 5 seconds allowing a quick look at the capture.
If Auto Preview is set to “Off” the preview will not be shown automatically
after capture.
Note - If a button is touched during the auto preview period, the preview
will remain on and the time-out will be disabled until next capture.
Delete options
There are three delete options: “Confirm On”, “Confirm Off” and
“Disable”.
In Delete options you can setup whether you want an extra confirmation
when you delete images (Confirm On - Default), delete images
immediately (Confirm Off ), or you can disable deleting of images on
the P+ back to avoid unintended loss of images.
41
Display Style
Display Style allows you to switch the captures showed on the display
to Black and White, instead of the color RGB signal.
It is important to emphasize that P 65+ while showing BW on the LCD
display, the captures are still RGB.
Grid
You can add grid to the viewed captures, especially architectural
photographers will find great benefit in this feature.
Choose between Off, Golden Ratio, Center Cross, Rectangle and
Square.
42
9.3 Configuration
Configuration is used to setup general settings and perform general
tasks on the P 65+ back.
Configuration contains more menu entries than can be displayed on
one screen. This is indicated by a double arrow pointing down on the
right side.
As shown here, scrolling past the last menu entry will reveal the next
entry. Now the arrow in the top right side will turn into a double arrow,
to indicate that there are hidden entries at the top.
Storage
Storage allows you to configure how P 65+ should store the captures
created.
Autodetect is the default setting of Storage.
If a card is inserted in the P 65+ back it will automatically capture to this
card. If not, it will try to capture via the IEEE 1394/FireWire port directly
to the computer.
If this option is set to Autodetect and both FireWire and CF-card are
available, FireWire will be chosen as default.
If the P 65+ back is not tethered to a computer you will get an error
message that the card slot in the P 65+ back is empty.
P 65+ can also be forced to shoot to either Compact Flash or IEEE
1394/FireWire by selecting the options inside Storage.
43
Power Source
Power source has two options, “Autodetect” or “Battery”.
Default is Autodetect, the P+ back will detect if an IEEE 1394/FireWire
connection is supplying power, and automatically shut off the battery
power.
If Power Source is set to “Battery” the power source is forced to come
from the battery, and the digital back will not consume power from the
FireWire connection.
It is recommendable when using technical or large format cameras,
that you force the power source to be battery power.
Do this to avoid draining the battery in a MacBook or PowerBook.
Format disk
Selecting “Format disk” will erase the CF-card in the P 65+ back. The
CF-card will be formatted as
FAT-32.
Please see CF-card section for troubleshooting if your card is not
recognized.
File Extension
Select the file extension; this does not change the format, only the
extension.
Default is .TIF
Choose between .TIF and .IIQ
Some operating systems and certain applications might not support
files holding the .IIQ extension; this is solved by changing the extension
from .IIQ to .TIF
44
Disk Checking
Disk Checking is done per default on every card inserted to the P 65+.
If for some reason this check is not wanted the feature can be turned
off in this menu.
Phase One recommends leaving Disk Checking turned on, to maximize
data security on the memory cards.
Read more about the Phase One Secure Storage System in Chapter 5
of this manual.
Camera Mode
Camera mode is used in special applications only. This could be in
combination with a specific electronic shutter or in an industrial
application, where the timing differs from a normal photographic
application.
Please consult the documentation included with these solutions, to find
out which mode to use.
If you are using the P 65+ back in a normal photographic application
using medium format camera or technical camera as described in this
manual, please leave this setting in “Normal” position.
Mode 1 =Schneider electronic shutter option
Mode 2 =Aereal application; used for linking to the Rollei AIC solution.
You will be asked to use it by Rollei if this mode is needed. It makes it
possible to disable black calibration with an electric signal on the multiconnector port, and also to disable auto rotation in the same way.
45
Power Save
Power Save has two options “Backlight” and “Auto Shutdown”.
Backlight is used to control the duration of backlight illumination.
If no action is detected the backlight will, by default, dim after 5
minutes.
This can be changed to 1 min, 20 sec. or 5 sec. using the backlight
menu.
Auto Shutdown determines the amount of time before the P+ back
shuts down, when there is no activity.
If the P 65+ back automatically shuts down it can only be woken up by
pressing the “Power” button.
46
Ready beep
“Ready beep” is the small beep that sounds from the camera after a
capture is taken.
The “Ready beep” signals that the capture has been taken, and the P+
back is ready for next capture.
“Ready beep” can be either “Single”, “Multi” or “Off”. Default is
“Single”
“Multi” is for use in noisy surroundings, i.e. where it can be difficult to
hear if it was the back or the flash that made the ready beep.
Restore def. (Defaults)
Selecting restore defaults will restore the settings of the P+ back to its
default settings. Be careful before using this option as all settings made
in the P+ back will be reset to factory settings.
Time & Date
In “Time & Date” you can set the time and date using the four buttons
on the P+ back. Left side buttons will step through the hours, minutes
and seconds field, while the right up and down buttons can be used
to set the value of the fields. The time and date is applied to all files
captured with the P+ back.
47
Language
The “Language” option in the “Configuration” Menu can be used to
select preferred language of the user interface.
Expressions in the main menu like: ISO, WB, Play and Menu are not
translated.
These are regarded as icons, and also understood widely as expressions
used to navigate even on the Japanese, or Chinese interface.
However switching to an unknown language unintentionally can be
frustrating and the user can have difficulty getting it back to the native
language back on the menu.
Phase One have made this easy by incorporating a large “L” in a
parenthesis after the Language menu.
Finding this “L” will help the user get the native language back.
At the time of writing the following languages are supported on the P+:
English (default)
Japanese
Chinese (Simplified)
French
Italian
German
Spanish.
48
About the P+ Back
The “About” option in the “Setup Menu” displays technical information
about the hardware and embedded software (“Firmware”) in the camera.
This is especially useful if support is needed or if you want to check if
Phase One is offering a newer firmware for your camera.
Firmware might be made available in the download section at www.
phaseone.com
Before contacting your dealer or Phase One Support please make sure
to have access to the “About “box or write down the entire contents of
the “About” box.
49
10.0 P 65+ back Phase One 645AF & Mamiya 645 AFD
The functionality of the P 65+ back is well integrated with the Phase One
645 AF and the Mamiya 645AFD series. The P 65+ back communicates
with the cameras through a fast internal electrical computer interface.
In addition adaptors are available for the Mamiya RZ PRO IID.
Shutter latency settings
Both the Phase One 645 series and the Mamiya 645 AFD series can be
used with both normal and zero latency.
The P 65+ back is set to Zero latency (default), which means that the
back will respond rapidly, however battery life will drain quicker than if
it is set to Normal Latency.
The battery performance is more than sufficient with the P+ backs. To
create longer lasting battery performance set the P+ back to Normal
latency. Remember though that this will slow down the response time
when shooting.
To learn how to setup latency please consult the Menu mode Section.
You should only use normal latency on Mamiya 645 series if you are
using the so-called two-shot release cable.
50
10.1 Mounting P 65+ back on the Phase One 645 AF &
Mamiya 645AFD Series
The P+ back is fully integrated with the camera body and acts as a part
of the whole camera system.
When no cassette is attached to the body the mirror is up and the
shutter is open.
When attaching the P 65+ back to the camera body the shutter will
close and the mirror comes down.
It is important to ensure that the bottom part of the P+ back camera
back is pressed correctly into the bottom locking mechanism before
the upper locking mechanism is pressed together. - Failure to do
this can cause an error with the camera body. The error is a state of
continuously opening and closing the shutter. If this occurs, remove the
P+ back immediately.
Please be aware that the shutter should be in the correct starting
position (shutter open), if this is not the case, attach and remove the
P+ back again to make sure that the camera body gets in the correct
starting position. (The same procedure is recommended by Mamiya for
all film cassettes)
51
10.2 About Viewfinder Masks
The image area of the Phase One & Mamiya 645 is approximately 56
mm x 42 mm.
The light sensitive CCD in the P 65+ measures 53.9x40.4 mm, this
means that viewer masking is not necessary, hence is the lens factor
now 1.0.
If a mask is already attached in the body, remove the mask according
to the relevant users guide.
52
10.3 Phase One 645AF & Mamiya 645AFD series more details
Image orientation
The CCD in the P+ back is positioned in landscape orientation.
Camera orientation: Images can be captured in all three positions – and will appear with
the correct orientation on the LCD or in the Capture One software.
Whenever an image is captured in portrait position, by rotating the
camera, an internal sensor detects this new position and the image
will appear as a correctly oriented image on the LCD display and in the
Capture One application.
Studio flash sync on the camera body
When using the P 65+ back on Phase One 645 AF, Mamiya AFD or
AFDII body, the flash sync should be connected to the camera body.
The flash connector on P 65+ back is for use with large format cameras
only.
53
T-mode on the Mamiya 645AFD
T-mode is not supported for digital backs on the Mamiya 645 AFD. This
is usually not a problem as the Mamiya can use exposure times as long
as 16 minutes.
P 65+ can create exposures of up to 1 minute of exposure time.
Mirror Up
When using mirror up the mode selector should be placed in M (Manual
mode) and the focus type selector should also be in the M position.
It is not possible for the camera to measure light or focus when the
mirror is up. Please consult the Mamiya 645 Instruction manual to learn
how to use Mirror Up.
54
11. P+ back for Mamiya RZ
11.1 About Viewfinder masking
The actual image area of Mamiya RZ67 is 56x69.5 mm as the size of
the CCD in P 65+ is 53.9x40.4 the CCD is smaller than the actual image
size.
Dismount the viewfinder, and let the mask lie on top of the focus screen,
then re-mount the viewfinder again, and you have placed the mask.
Please read the relevant manual on the Mamiya RZ67 regarding
dismounting the view finder.
11.2 Mamiya RZ other details
image orientation detection
The CCD in the P 65+ is positioned in landscape orientation. Whenever
an image is captured in portrait position, by rotating the camera, an
internal sensor detects the new positionand the image will appear as a
correctly orientated images on the LCD display and in the Capture One
application
IR filter on the CCD
The IR filter (Infrared reduction filter) is permanently mounted on top of
the CCD.
• The filter may not be removed for several reasons:
• The focusing of the P+ back camera back will be damaged.
• It is only possible to remount the filter without dust in between the
filter and the CCD if you have access to special clean room facilities.
• The Phase One Product Warranty is terminated.
55
Mirror Up
Mirror up operation is only recommended if using Mamiya’s own double
cable release.
The adaptor plate connects to the Mamiya body, and the switch
underneath is set to the L position (locked).
If you are using the Mamiya RZ Pro II adaptor you should set the Shutter
latency to ”Short latency”
It is possible to use Long latency on this camera, but only when shooting
tethered from the Capture One application using the capture button.
P+ back for Hasselblad V mounted on the Mamiya RZ67 PRO II with a
Phase One adaptor.
56
11.3 Mamiya RZ67 PRO IID
The P+ back for Mamiya 645 AFD series also supports the Mamiya
RZ67 PRO IID via the 645 AFD adaptor plate available from your Phase
One dealer (Part# 70994).
The mode selector on the trigger button should be turned to the white
dot when used with the P+ back.
When the P+ back is placed on the body and not in use, the selector
should be set to the orange dot, to avoid draining the small battery.
Even if the P+ back is turned off, the battery will drain slowly if the
orange dot is not selected
57
11.5 Studio flash sync on the RZ lens shutter
When using P 65+ on a Mamiya RZ67 PRO IID, the flash sync should
be connected on the Mamiya lens shutter.
The flash sync connector on the P+ back is for use with Large format
cameras where no digital interface is available.
Shutter latency settings
The Mamiya RZ PRO IID should be used with Zero latency.
Default your P+ back is set to Zero latency, which means that the P+
back will respond fast on triggering at the cost of battery life.
To learn how to setup latency please consult the Menu mode section.
Note: This adaptor does not support capturing from the computer this is only possible with the Phase One adaptor and a P+ back for
Hasselblad V
Cables shipping with P+ back for Mamiya 645 AFD (Value added
purchase only)
The P+ backs for Mamiya 645 AFD is shipping with the following cables:
(Value added purchase only)
Part# 50300143 Multi connector to Lens sync (for use with Large format
- in two shot mode)
Part# 50300144 From multi connector to mini jack female (for use with
Large format wakeup cable or Kapture Group one shot adaptor cable)
58
12.0 P 65+ back for Hasselblad V
The Phase One P 65+ back can be mounted on a wide range of
Hasselblad cameras including Hasselblad 555 ELD, 553 ELX, 501 CM,
503 CW as well as and 4” x 5” view cameras via optional Phase One
adaptors.
12.1 Mounting the viewfinder mask on Hasselblad V
The image area of the Hasselblad camera body is app. 6 cm x 6 cm,
whereas the image area of the P 65+ back is app. 53.9x40.4 mm.
Therefore, it is necessary to use the P 65+ back viewfinder mask.
Remove the protection tape from the mask and mount it beneath the
original focusing screen.
The viewfinder mask is positioned in the bracket that holds the focusing
screen. Please refer to the Hasselblad camera manual instructions
before the focus screen is removed.
After the Phase One viewfinder mask is positioned in the bracket,
place the Hasselblad focusing screen on top of the mask and slide the
viewfinder back into place.
59
12.2 Mounting the P+ back on Hasselblad V
The P+ back is fully integrated with the camera body and acts as a true
part of the whole camera system.
It is important to ensure that the bottom part of the P+ back camera
back is pressed well into the locking mechanism before the upper
locking mechanism is pressed together.
Place the Bottom of the P+ back in the locking mechanism.
Press the metal button in the top with your thumb and tip the upper end
in place.
Mounting the P 65+ back vertically
The P 65+ back can be rotated to the left and mounted vertically on the
Hasselblad body for use in portrait mode.
In this case the lock button on what is now the top should be slid to the
left before tipping the P 65+ back in place on the body.
Images will be rotated automatically on both the LCD screen and in the
Capture One application.
DO NOT MOUNT WHILE IN S OR RS MODE!
Please note that the Phase One P 65+ back should not be mounted
while the camera is set to mirror up (S or RS modes). The camera should
be set to AS, A or 0 mode. Also make sure that the lens is not jammed
when connecting the flash sync cable to the Phase One P 65+ back.
60
12.3 Camera body specifics
Regardless of which Hasselblad V type camera used, a sync cable is
always connected from the lens to the small connector in the front plate
on either the left or right side of the P+ back.
The flash cable is then connected to the F-connector on the camera
back.
Sync cable connects to one of the two small connectors in the front
plate.
For tethered capture to a computer - plug in a IEEE1394/FireWire cable
in the back.
Flash cable connects directly
to the P 65+ back
Mirror Up
if you need to do captures in Mirror Up function on Hasselblad V, 903
CW and 905 CW, set the Latency to Zero Latency. as these bodies are
very quickly ready for next exposure
61
12.4 Hasselblad 555 ELD
When using the Phase One P 65+ back with a Hasselblad 555 ELD,
the shutter release on the front of the Hasselblad must be in the “DIG”
position.
If, of any reason, you have to use the shutter release in “Film” position
(hardware defect on the DIG button, etc.) You must make sure that the
Shutter latency is set to ”ZERO latency” in the P 65+ back or in the
Capture One application.
Shutter latency settings
On the Hasselblad 555 ELD the P 65+ back can be used with both
Normal and Zero latency. All other Hasselblad cameras require you to
set the P 65+ back to Zero latency.
By default your P 65+ back is set to Zero latency, which means that
the P 65+ back will respond fast on capturing at the expense of battery
life.
To save battery life you can set the P 65+ back to Normal latency, and
thereby gain battery life at the expense of response time. but if using a
two-shot release cable, you might experience doubleexposures.
To learn how to setup latency please consult the Menu mode section.
No Motor cable on 555 ELD
A motor cable is not required when using P 65+ on a Hasselblad 555
ELD body.
62
12.5 Hasselblad 553 ELX
When using the P 65+ back on some Hasselblad motorized bodies (i.e.
Hasselblad ELX or Hasselblad ELM series), a motor cable is supplied to
enable capture from the computer.
The cable is connected between the multi-connector on the P 65+ back
and the DIN connector on the Hasselblad.
Avoid using A or AS mode.
Please also note that the Phase One P+ back should not be mounted
while the camera is set to mirror up (S or RS modes). Make sure that the
lens is not jammed or locked open on the “B” setting when connecting
the flash sync cable to the Phase One P+ back.
While using the Hasselblad 553 ELX you should set the Shutter latency
to”Zero latency”
It is possible to use “Normal latency” mode on this camera when using
a motor cable and only using the capture button inside the Capture One
Application.
63
12.6 Hasselblad 501 CM and 503 CW without winder
The Phase One P 65+ back also supports mechanical Hasselblad
cameras such as the 501 CM and 503 CW. These cameras are operated
in single shot mode via the shutter release button or a standard cable
release.
Please note that the Phase One P 65+ back should not be mounted
while the camera is set to mirror up.
Also make sure that the lens is not jammed or locked open on the “B”
setting when connecting the flash sync cable to the Phase One P 65+
back.
If you are using a mechanical Hasselblad you should set the Shutter
latency to”Zero latency”.
It is possible to use ”Normal latency” mode on Mechanical cameras,
but precautions must be taken not to trigger too fast.
To ensure capture reliability, it is recommended that you look at the
green LED on the back of the camera back while you slowly press the
mechanical trigger on the camera body.
You can safely press the button all the way in the moment the LED
flashes.
”Mirror Up” is not supported when using “Normal Latency”.
64
12.7 Hasselblad 503 CW with Winder CW
Please note that the Phase One P 65+ back should not be mounted
while the camera is set to mirror up.
Also make sure that the lens is not jammed or locked open on the “B”
setting when connecting the flash sync cable to the Phase One P 65+
back.
If you are using a 503 CW winder you could set the Shutter latency
to”Zero latency”.
65
12.8 Cables shipping with P+ back for Hasselblad V (Value
Added purchase only)
The P 65+ backs for Hasselblad V is shipping with the following cables
(Value Added purchase only):
Part# 50300145 Motor cable for Hasselblad ELX. (Used for host capture
when the P+ back is used on a Hasselblad ELX body).
Part# 50300148 Sync cable short (For use with all Hasselblad medium
format bodies)
Part# 50300143 Multi connector to Lens sync (for use with Large format
- in two shot mode)
Part# 50300144 From multi connector to mini jack female (for use
with Large format wakeup cable or Kapture Group one shot adaptor
cable).
66
13.0 P 65+ back for CONTAX 645
The CONTAX 645 utilizes TTL phase difference detection type auto
focus system. Furthermore the CONTAX 645 provides auto exposure
settings. The CONTAX 645 with a P+ back encourages all kinds of
photographic uses from portraiture and wide-angle photography to
high speed shooting to capture fast action with telephoto lenses.
The functionality of the P+ back is well integrated with the CONTAX 645
camera. The P+ back communicates with the CONTAX camera through
a fast internal electrical computer interface.
This exciting P+ back solution is a result of a development project fully
supported by Kyocera.
Auto exposure
The CONTAX 645 can work in different auto exposure modes.
This is fully supported by the P+ back, which communicates the
equivalent film speed of the digital back to the CONTAX 645 camera.
When capturing with auto exposure modes, exposure times between
1/4000 sec. and app. 1 sec. can be obtained in the highest possible
quality. Please note that images captured with exposure times longer
than 60 sec. is not possible on P 65+. The auto exposure of the CONTAX
645 camera uses the ISO value set in the P+ back, or when shooting
tethered, in the Capture One application. The ISO can be set to 50-800
or if using Sensor+ 200-3200.
67
Double exposure protection
With the P+ back for Contax it is not possible to accidently double
expose the image by capturing one image quickly after another e.g.
when using continuous capture mode. The P+ back communication
with the CONTAX 645 is disabling capture functionality in the camera
when necessary.
Image orientation detection
The CCD in P+ back is positioned in landscape orientation.
Whenever an image is captured in portrait position by rotating the
camera, an internal sensor detects this new position and the image will
appear with the correct orientation in the Capture One application.
Camera orientation: Images can be captured in all three positions – and
will appear with the correct orientation in the Capture One application.
IR filter on the CCD
The IR filter (Phase One TG1 Infrared cut-off filter) is placed on top of
the CCD.
The filter may not be removed for several reasons.
• The focusing of the P+ back will be damaged.
• It is only possible to remount the filter without dust in between the
filter and the CCD if you have access to special clean room facilities.
• The Phase One Product Warranty is terminated.
68
Mounting the focusing screen
The image area of the CONTAX 645 is 41.5mm x 56mm. The light
sensitive CCD in the P 65+ measures 40.4x53.9 mm, this means that
viewer masking is not necessary, hence is the lens factor now 1.0.
If a mask is already attached in the body, remove the mask according
to the relevant users guide.
This viewfinder mask has to be mounted underneath the CONTAX
focusing screen.
Refer to the CONTAX 645 Instruction Manual “Replacing Focusing
Screen” before the focusing screen is dis-mounted.
69
13.1 Mounting P 65+ back to the CONTAX 645
P 65+ back for Contax is fully integrated with the camera and acts as a
true part of the whole camera system.
When attaching P 65+ back to the camera it is important to ensure that
the bottom part of the back is pressed well into the locking mechanism
before the upper locking mechanism is pressed together.
To avoid that P 65+ is released by mistake from the camera house, the
lock button on the side of the P+ back can be used to lock the C645
locking mechanism.
Operating the camera from the host computer
The supplied release cable must be connected between the multiplepin connector on the P+ back and the mini-jack connector placed at
the bottom of the handgrip on the CONTAX camera house.
Bulb capture is not supported on Contax.
70
13.2 Flash photography on Contax 645
Use of flash sync cable
No cables are required between the P+ back and the CONTAX 645.
Flash sync cable must be connected to the CONTAX 645 camera.
The flash sync cable must NOT be connected to the P+ back. This
connector is only to be used when operated on a Large format camera
with the Phase One FlexAdaptor.
TTL flash
Because the CCD element reflects light different than film, and this cannot
be communicated to the Contax. Using TTL flash with the CONTAX 645
camera and P 65+ back, will result in a 2 f-stop overexposure. When
using TTL flash, the exposure compensation on the flash unit must
therefore be set to –2 f stops.
Cables shipping with P+ back for Contax 645 (Value added Purchase
only)
The P+ backs for Contax is shipping with the following cables (Value
added Purchase only):
Part# 50300143 Multi connector to Lens sync (for use with Large format
- in two shot mode)
Part# 50300144 From multi connector to mini jack female (for use with
Large format wakeup cable or Kapture Group one shot adaptor cable)
Part# 50300154 From multi connector to mini jack on the Contax
handgrip (used to enable Host Capture from Computer)
71
14. H 101 - P 65+ back for Hasselblad H1/H2
The Phase One H 101 – P 65+ back is a single shot digital camera
back designed specifically for the innovative Hasselblad H1 camera.
The Hasselblad H1 utilizes a hybrid TTL phase-difference- detection
type auto-focus system. Furthermore the Hasselblad H1 provides auto
exposure settings.
The Hasselblad H1/H2 with a Phase One H 101 – P 65+ back
encourages all kinds of photographic uses from portraiture and wideangle photography to high speed shooting to capturing fast action with
telephoto lenses. This combination is a result of a joint development
project between Phase One and Hasselblad.
The functionality of the Phase One H 101 – P 65+ back is well integrated
with the Hasselblad H1 camera. The H 101 – P 65+ back camera back
communicates with the H1/H2 camera through a fast internal electrical
computer interface.
72
14.1 Camera LCD display
The Hasselblad H1 incorporates a display which details information of
the actual condition of the camera. It shows flash method, lens use, AF
mode, f-stop value, shutter speed etc.
The Hasselblad H1/H2 will also display some camera back specific
conditions in this display.
Camera back ISO setting is displayed. ISO 50, 100, 200 or 400, 800 can
be set on the camera back or in the Capture One application if shooting
tethered.
Error messages like”Storage media full” will also be displayed in the
LCD, if for example the P+ back CF card is full.
Viewfinder information
For a general description of the viewfinder information
please consult the relevant User manual.
The icon on the second position from the right shows the actual
captures left on the storage media, an ”E” indicates that storage media
is full, you will need to free some space or replace the CF card before
continuing.
73
Auto exposure
The Hasselblad H1 can work in different auto exposure modes. This
is fully supported by the H 101 - P+ back, which communicates the
equivalent film speed of the digital back to the Hasselblad H1 camera.
The default film speed of the H 101 – P 65+ back is ISO 50. However,
this setting can be changed to 100, 200, 400 or 800 ISO, please consult
chapter 9 of this manual for details on setting the ISO in your camera
back.
Double exposure protection
When using the Hasselblad H1 with a H 101 – P 65+ back it is not possible
to accidently double expose the image by capturing one image quickly
after another. The H 101 - P+ back communication with the Hasselblad
disables the capture functionality in the camera if necessary.
At the end of an image exposure the image information in the CCD has
to be moved from the CCD to the processing system. During this short
period of time the CCD must be protected from light exposure. The
H 101 – P 65+ back ensures a safe emptying of the CCD by ignoring
the shutter release from the Hasselblad camera when this procedure is
running.
74
14.2 Image orientation detection
The H 101 – P 65+ back CCD is positioned in landscape orientation.
Whenever an image is captured in portrait position by rotating the
camera, an internal sensor detects this new position and the image
will appear correctly oriented on the LCD and in the Capture One
application.
Camera orientation:
Images can be captured in all three positions - and will appear with the
correct orientation on the LCD and in the Capture One software.
IR filter on the CCD
The IR filter is placed on top of the CCD.
The filter may not be removed for several reasons.
• The focusing of the H 101 - P 65+ back camera back will be
damaged
• It is only possible to remount the filter without dust in between the
filter and the CCD if you have access to special clean room facilities.
• The Phase One Product Warranty is terminated!
About viewfinder mask on H1/H2
The image area of the Hasselblad H1/H2 is app. 56 x 41.5 mm.
The image area of the H 101 – P 65+ is app 53.9x40.4 mm.
This is why H 101 – P 65+ back does not need a viewfinder mask. If the
H1 has already a mask mounted in the viewfinder, remove this, check
the relevant users guide for facts on this.
75
14.3 Mounting the H 101 - P+ back on the Hasselblad H 1
The H 101 – P 65+ back integrates fully with the H1 camera and acts as
a part of the whole camera system.
When no cassette is attached to the Hasselblad camera, the mirror is
up and the shutter is open. This is the correct position.
When attaching the H 101 - P+ back to the camera, the shutter will
close and the mirror comes down.
It is important to ensure that the bottom part of the H 101 - P+ back
camera back is pressed well into the locking mechanism before the
upper locking mechanism is pressed together.
Use of cables
No cables are required between the H 101 - P+ back and the Hasselblad H1.
Flash sync cable must be connected to the Hasselblad H1 camera house.
The flash sync cable must NOT be connected to the camera back when
used on a Hasselblad H 1.
The flash sync connector on the Camera back is only intended for use
with a Phase One FlexAdaptor, or other large format adaptors.
Cabling Cables shipping with H101 – P+ backs (Value Added purchase
only)
The P+ backs for Hasselblad H1/H2 are shipping with these cables
(Value Added purchase only):
Part# 50300143 Multi connector to Lens sync (for use with Large format
– in two shot mode)
Part# 50300144 From multi connector to mini jack female (for use with
Large format wakeup cable or Kapture Group one shot adaptor cable)
76
15.0 View camera and studio photography
The Phase One P 65+ back can be used with most wide angle cameras,
technical view cameras or large format cameras via camera interface
adaptors. The P 65+ back supports most mechanical shutters and some
electronic shutters from Horseman, Schneider and other vendors.
To enable noise free exposures without the use of active cooling of the
CCD, Phase One has developed the “Phase One Sleeping Architecture”.
The sleeping architecture ensures minimum heat build up inside the
back, by putting all the unused circuits to sleep, and only powering the
circuits that are actually needed at any given time.
77
15.1 1-shot release
1-shot release:The new 1-shot release cable is created to simplify
your studio workflow. Connect the flash exit on the shutter, with the
multipin entrance on P 65+; let the P 65+ be connected to your flash.
Close the shutter if necessary.
Select Menu>Capture Setup>Shutter>Zero Latency.
Using FlexAdaptor or not you are now ready to do exposure; often this
setup will be tethered and though the FireWire is connected in the back you
cannot
On fully manual cameras you can not control the exposure from Capture
One, neither will e.g. the shutter speed and aperture value be recorded,
P 65+ will however add a calculated approximate shutter speed.
2-shot release:Phase One P 65+ can be used with mechanical shutters that can be fired twice within four seconds. The first release of the
shutter activates the digital back; the second release takes the exposure. If the time limit of four seconds is exceeded, the camera gives
a warning “beep” followed by a “two shoot error” dialog displayed on
the LCD.
push button to
“wake up” the
camera back.
Wake Up sync cable Part # 50300131
Several automatic or semi-automatic two shoot solutions for mechanical
shutters are available from third parties. Please ask your dealer for
information on these solutions.
The optional Phase One FlexAdaptor is available for most large format
cameras and comes with a “Phase One Wake Up Cable”. This cable
has a small button that is used to wake up the camera before release
of the shutter.
The Phase One FlexAdaptor also has “Stitch functions” that makes it
possible to stitch two or three images together automatically using the
Stitch function in Capture One.
Please see the reference manual that comes with the FlexAdaptor.
78
Shutter latency settings when used with FlexAdaptor or other
technical camera adaptor
On a Phase One FlexAdaptor or other technical camera adaptor the P+
back can be used with both Long and short latency.
Default your P 65+ back is set to Short latency, which means that the
P 65+ back will respond fast on capture at the expense of battery life.
This setting can be used with the Kapture Group Two shoot adaptor.
If using the P 65+ back as a manual two shooter, where the first shot
will power up the P 65+ back, and the second will make the exposure,
you should use “Normal latency”.
Zero Shutter latency will increase your power consumpsion, as the
back will constantly be prepared for exposure.
To learn how to setup latency please consult the Menu mode section.
Phase One
FlexAdaptor
79
16 Live Preview
Phase One P 65+ Digital back has support for running Live preview
from within Capture One.
Live preview is a great help when working in the studio with composition
and setup of the scene. A live image can be captured directly to the
computer monitor for previewing the effect of different adjustments
done to the scene.
Live preview is available from the capture toolbox in Capture One DB
and Capture One PRO. please review the userguide included in the
software regarding the workflow of the software
80
16.1 General Live Preview information
A few recommended setup tips for optimal result when using Live
preview.
Recommended shutter speed for focus adjustment and image quality
is 4 = 1/4 second. (The shutter speed slider is controlling the readout
from the CCD - this is always a compromise between quality and quick
response to camera adjustments).
In the preferences the resolution of the composition view can be
changed. Lower resolution means higher frame rates (higher readout
frequency from the CCD).
If you change the back from landscape to portrait orientation or vice
versa the live image in the software will rotate automatically.
81
16.2 Live Preview Camera support
Phase One Live Preview is not only for technical cameras, it also
supports all medium format cameras with the following settings:
Phase One 645AF
1. Navigate to Custom Function 22 and set it to “1”. This will allow the
shutter release button to be used to start and stop the bulb exposure.
P
M.U
C
S
2. Rotate the shutter release dial to M.UP
L
3. Change the exposure mode from CF to anything else, like Shutter
Priority. Set shutter speed to bulb
4. Press the shutter release button, you will hear the mirror lock into the
up position.
5. Press the shutter release button again to turn the sensor on.
6. Click Live Preview in Capture One, press the play button and make
adjustments as desired.
82
Hasselblad H:
Before running Live Preview on a Hasselblad H-series camera we
recommend to redefine the user button on this camera to let it control
T-mode. Go into menu settings, choose custom options, user button
function and select T-mode.
H1 & H2
1. Launch Capture One Pro
2. Click on Capture Tab
3. Click on Live Preview button
4. The Live Preview-Composition View window will appear
5. Now configure the H1 or H2 so that the mirror is up and the shutter is open.
H bodies do not work with mechanical shutter release cables.
Press the Mirror-up button on the front of the camera body.
6. Press the shutter release button on H body.
7. Press play on the Live Preview window. Configure the subject, check focus, etc.
8. Press shutter release button on H body to close the shutter and leave T mode.
Hasselblad V:
B (Bulb)-mode.
83
Mamiya 645AFD/AFD II:
Mamiya shall be used in B-mode or at long exposures (available up
to 16 minutes, but be aware of the exposure cannot be interrupted).
T-mode is not supported for digital backs.
Mamiya RZ67 Pro II & Pro IID:
1. Thread the cable release.
2. Make a timed exposure by sliding the “T” lever covering the “ N”
the normal position.
3. Depress the shutter release.
4. Launch the Live Preview feature in Capture One.
5. Press Play.
6. Ready to create exposure close the Live Preview window and slide
the lever to the normal position.
Contax 645:
Establish LivePreview mode in Capture One BEFORE opening the
shutter.
Set camera to B-mode, although capturing in B-mode is not supported
on the Contax.
The Electronic Cable release is NOT supported in B mode and will not
work. Must use Manual Cable Release into B port on body.
84
17.0 Lens Cast calibration
17.1 What is Lens Cast?
Lens cast may occur if using the P 65+ with wide-angle lenses or on
Technical cameras with the possibility to tilt or shift the lens in front of
the CCD.
On a medium format camera lens cast is very rare if using fixed lenses
from 60 mm to 120 mm.
Why does it occur?
Lens cast occurs as a result of the angle at which the CCD is exposed to
light. If the CCD is exposed to light coming from a very sharp angle e.g.
wide-angle or extreme degrees of tilting or shifting you may experience
lens cast.
What does it look like?
Depending on the light conditions and photographic setup, lens cast will
typically appear as a green cast in one side of the image that changes
into a magenta cast in the opposite side of the image. This is mostly
visible on neutral grey backgrounds.
17.2 How do I get rid of it?
If working with Technical cameras with tilt and shift, you would have to
make a new calibration file if you change the tilt or shift position.
Phase One provides a solution in the Capture One 4 PRO that helps
you get rid of the lens cast. We call it: Lens Cast Calibration (LCC).
By holding an opal white plate in front of the lens and capturing a
calibration image that you then apply to all of your capture files you are
able to remove the lens cast.
On medium format cameras with fixed lenses the calibration is very
simple: You do one calibration for each lens and then save the calibration
files and apply them when needed by clicking “Set as default for new
Captures”.
85
17.3 4 Simple steps to calibrate (Mac)
1. Hold the calibration plate in front of the fixed lens (as close as
possible), and capture. In order to ensure correct exposure you may
have to open up a few f-stops or in a very dark setup, light directly onto
the plate.
2. In the Capture One software you select the ‘calibration’ image and
click on the “Save LCC” button (the LCC tool is located under the grey
balance tab).
3. Give the calibration file a name that corresponds to the lens in use or
the set-up (e.g. 45mmDaylight)
4. Select the calibration file: “45mmDaylight” from the “Lens CC” dropdown list and click “Set as default for new Captures”.
PLEASE NOTE:
As soon as grey calibration is done and the calibration files are saved
and appear in the Lens CC drop-down box the calibration files can be
deleted from the thumbnail window.
86
18 Maintenance
Cleaning the CCD
When the Phase One P 65+ is not attached to a camera, the camera
back must be protected with the protection plate.
Over time dust may accumulate on the IR filter. This will degrade the
image quality if not removed.
Please follow the directions included in the CCD cleaning kit in the P+
back suitcase.
IMPORTANT: DO NOT ATTEMPT TO REMOVE THE IR-FILTER IN
FRONT OF THE CCD
87
19. Secure Storage System
19.1 Secure Storage system “3S” (How does it work?)
When a card is inserted into the P–back, a complete disk check for a
valid file structure is performed.
High GB cards needs slightly longer to load
Large Microdrives is significantly slower than CF -cards, If the load time
exceeds 2 seconds the progress will be indicated with series of small
dots in the disk icon.
It is not recommended to turn off disk checking, but it is possible by
selecting the “Disk Checking” available in the “Menu” under “Storage”
Whenever Disk Checking is turned off the capture counter turns red to
indicate that the disk has not been checked.
19.2 Disk Check summary
With the 3S technology we have created a new and safe storage system
in the P – back that is much more rugged than anything else seen in
the industry.
Best performance is obtained by formatting the card in the P+ back
(Although other formatting is supported, formatting in the P+ back
ensures exact cluster size depending on card size)
Damaged or wrong formatted cards will be detected immediately
eliminating the risk of shooting to a damaged CFcard.
Ejecting a card while in a writing session will no longer damage the file
structure of the entire CF-card, only the affected buffer of images.
This level of file system security is unique to the Phase One digital
backs.
88
20.0 Service and Technical Specifications
All technical specifications and measurements are based on Phase One
R&D and Phase One Test Department.
20.1 Updating the P 65+
Phase One reserve the right to change or adjust any figure and
functionality in future updates, please read any eventual update
documentation before installing.
Firmware updates will be available on the download area on www.
phaseone.com
– Or check out the support forum.
89
20.2 Support and recommendations
Please check www.phaseone.com for updated support policy
By purchase of a Phase One product we guarantee you World Class
Support and Service!
A Phase One P 65+ is a simple product workflow wise, but the electronic
and interior of the back need specialized service, and we only have one
place to do interior repair of the back, Copenhagen, Denmark at Phase
One production facility.
If you should ever experience problems with your Phase One P 65+,
please consult the dealer from whom you have bought the digitalback.
Still some issues might occur as a result of unintended usage or usage
of equipment not recommended. Some of the issues are shown as
examples here, these issues can be solved by yourself, by following
the recommendations by Phase One.
90
20.3 Recommendations
to create the most smooth workflow in your day, it best to follow these
recommendations from Phase One support.
Standard Tethered Setup:
• max 15’ (4.5m) double shielded firewire cable.
• Capture folder on internal Hard Drive
• IIQ-L
• Back power forced from battery
• Nothing else on FW bus
Using CF-cards:
• Use ‘UDMA’ Ultra Direct Memory Access CF-card’s.
• Speed: 40 MB/s (266x), 45 MB/s (300x)
• Sandisk and Lexar cards avaliable with this performance
Optimal Systems for use with Phase One Backs:
Possible error if not using the recommended
standard tethered set-up.
Studio
• MacPro Tower
• 4 or 8 core Intel Processor
• 4GB Ram
• 2 Internal hard drives (one for backup)
Location
• MacBook Pro
• Core2Duo Processor
• 2-4GB RAM
91
20.3 Technical specifications
All Technical specifications are based on Phase One test standards,
and can be changed without notice.
Imaging technology
Storage security: Phase One Secure Storage System Operating conditions
CCD:
Lens Factor:
Resolution:
Active pixels:
CCD size effective:
Pixel size:
Image ratio:
Microlens on CCD:
Dynamic range:
technology
Battery type:
7.2 V Lithium Ion 2500mAh
Battery Lifetime:
2000 Captures
Exposure time:
1/10000 sec. - 1 minute
Live preview:
Yes
IR filter:
Mounted on CCD
Cooling system:
Passive cooling
Power up time:
Less than 2 sec. from OFF, sleeping
architecture for instant ON
Power:
8-33 V DC (from FireWire®)
Temperature:
Humidity:
Full frame CCD
Full frame / 1.0
60.5 mega pixels
8984 x 6732
53.9 mm x 40.4 mm
6 x 6 micron
4:3
No
12.5 f-stops
P 65+ full resolution capture mode:
Resolution:
60.5 mega pixels
Pixel size:
6 x 6 micron
Raw file compression IIQ Large: 60MB
IIQ Small: 40MB
ISO:
50, 100, 200, 400, 800
Sensor+ capture mode:
Resolution:
15 mega pixels
Pixel size:
12 x 12 micron
Raw file compression IIQ Large: 15MB
IIQ Small: 10MB
ISO:
200, 400, 800, 1600, 3200
Output files
Color depth:
Image file formats:
Color management:
16 bit per color
All output formats of Capture One are possible: TIFF-RGB, TIFF-
CMYK, JPEG.
RGB, Embedded ICC profile, CMYK
Size:
Resolution:
Viewing angle:
2.2”
230,400 pixels
160º
P 65+ mounts
Phase One/Mamiya:
Via adaptor: Phase One H101:
Phase One 645 AF
Mamiya 645AFD series, RZ67 Pro IID, Mamiya RB67es
Mamiya RZ67 Pro IID
Hasselblad V:
Contax 645:
Hasselblad 555ELD, 533ELX, 503CW and 501CM
Contaxt 645 AFD
Hasselblad H:
Hasselblad H1 and H2 / Fuji GX645
Contax:
Contax 645AF
Lighting
Supports all photographic lights: Flash, tungsten, daylight,
fluorescent, HMI
Computer minimum requirements
Mac:
Fast Core 2 Dual or later CPU.
4 GB RAM.
Fast HDD: RAID 0 configured
systems for max. performance.
Nvidia 8800 series graphics card or
newer.
PC/Mac:
Pentium III, 2 GB RAM,
IEEE 1394 interface,
Windows XP/2000
Software
Capture One 4.5 or later
Hasselblad H1 and H2
Certifications
CE
Certifications
Phase One IIQ file format speeds up the image capture and
file transfer. Increases the storage capacity by turning the
full 16 bit image data into a compact RAW file format. The
default IIQ RAW-large format is completely lossless.
Technical cameras and wide angle
Camera system
Capture time:
LCD screen
0º to 40ºC (32º to 122ºF)
15 to 80% RH (non-condensing)
1.0 sec./frame - 1.2sec/ frame depending on camera platform
4 x 5” via Flexadaptor: Arca Swiss, Cambo, Linhof, Toyo,
Sinar, Plaubel, Horseman
92