1
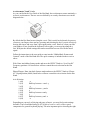
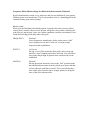
Using Hot Hand® with Keyboard
By Daniela Marquez, Product Specialist, Source Audio LLC
Overview
When using the Hot Hand with Keyboards & Synths there are some key tricks and tips
that can be used to get the optimal sound out of the pedal. The first thing to keep in mind
is that when opening the box for the first time, the Hot Hand comes configured with
factory settings that are designated for guitar. Thus some calibration and tweaking is
necessary in order to really get the most out of the effects pedal when using it with
keyboards. This application note will cover the following key aspects in order to gear the
settings more toward keyboard use:
• Accelerometer X and Y axis Interchange*
• Wearing the Ring
• Calibration of the ring – finding the right resting position
• Accelerometer Gain Trim*
• Frequency/Effect/Motion settings for different keyboard sounds (Wah unit)
• Depth/Effect/Motion settings for different keyboard sounds (Phaser/flanger unit)
The main driving force behind the Hot Hand motion controlled effects pedal is the
accelerometer in the ring. The power to craft the correct effect comes not only from how
you move your hand, but from how the settings are programmed in order to interpret your
hand motions while wearing the ring. Thus since the motion for playing keyboards is
vastly different from that of guitar, it is worth taking the time to adjust the settings in
order to get the most out of the Hot Hand effects.
(*) These topics require getting to the “Hidden/Back Features and Controls” for the Hot
Hand module. For instructions on how to enter into these hidden features check the
instruction manual that came with the pedal: page 20 (Wah-unit) or page 26
(Phaser/Flanger unit). The quick summary for how to enter this mode is described below
for each pedal:
Wah: Power up the unit while holding down the SELECT pedal and wait 2 seconds
Phaser/Flanger: Hold down SELECT pedal and then push and hold the SAVE button for
2 seconds
Accelerometer X and Y Axis
As you can find in the User Guide of the Hot Hand, the accelerometer senses motion by a
two-axis accelerometer. The two axes are defined by an x and y direction as seen in the
diagram below:
By default the Hot Hand senses along the x-axis. This is useful on keyboards, because as
you move your fingers down and up, (pressing and releasing the keys) you are effectively
moving the ring to and away from a pivot point on the x axis. However, when you slide
your hands to a new chord on the keyboard, left-to-right, you are moving along the y
axis. With just the default settings this motion would not have an effect on the music
signal.
Follow the instructions is the user guide to enter into the “Hidden/Back Features and
Controls” mode of the Hot Hand unit. The quick summary is included in the overview
above.
Wah: Enter into hidden features mode and move the EFFECT knob to “Low Pass Hi.”
Frequency positions 1-9 listed below will now control the axis selection for the Hot
Hand.
Phaser/Flanger: Enter into back features mode and move the EFFECT knob to “Phaser
05.” Depth position (00-08) listed below will now control the axis selection for the Hot
Hand.
Axis Selection
1. (00)
2. (01)
3. (02)
4. (03)
5. (04)
6. (05)
7. (06)
8. (07)
9. (08)
–x
Halfway between –x and –y
–y
Halfway between –y and x
x
Halfway between x and y
y
Halfway between y and –x
–x
Depending on your style of playing and genre of music, you may find certain settings
desirable. I have found that setting 6. (05) Halfway between x and y offers a good
compromise for general keyboard playing. The most important part to choosing the right
axis for the accelerometer is trying different settings and seeing how they work with your
style of playing.
Wearing the Ring
Though typical rings are generally worn on the aptly-named ring (4th) finger, for
keyboard applications, I find the ring is most effective on the index (2nd) or middle (3rd)
finger. The range of motion while playing passages is usually greater from the index and
middle finger than the ring finger. For certain passages it is even useful to wear the ring
higher up on the finger, past the knuckle in order to get a greater range of motion.
Also, depending on the style of music or style of playing sometimes only the dominant
hand is being used to play passages. In this case, I find it useful to wear the ring on the
non-dominant hand to do rhythmic motions, or large sweeps, while the dominant hand
plays the keyboard.
For two-handed passages, I find it most useful to wear the ring on the dominant hand.
The most motion will come from the dominant hand and will provide the greatest effect.
However, if more subtlety is desired, try the ring with the non-dominant hand. Again
experimentation is encouraged in order to have the effect suit the correct style of music.
Also, don’t be afraid to try non-traditional places to put the ring. Perhaps try tying the
ring to your shoe laces, attaching the ring to a headband or armband, or even try giving
the ring to someone else as you play. You truly have expressive freedom as you let
motion control the effect that you desire. A nice feature of attaching the ring to your head
is that it allows for independent control of the effect that is not necessarily tied to your
playing style.
Calibration of the Ring
As with guitar, calibration is recommend when using for the first time or when your
playing position changes (due to change in keyboard angle of stand etc). Following the
instructions on how to calibrate, turn the EFFECT knob to the CALIBRATE position,
find your resting position on the keyboard, tap the ON/OFF pedal once while holding the
hand steady for one second. More information can be found in the user manual page 11
(Wah-unit) or page 16 (Phaser/Flanger unit).
When calibrating, the default calibration mode affects all presets with the same “zero” or
center position. However, it is also possible to set different “zero” positions of calibration
for each preset. When the EFFECT knob is turned to calibrate all the preset LEDs will be
lit. Before depressing the ON/OFF pedal, hit the SELECT pedal; now the light from the
last preset will remain on, and the other preset LEDs will be off. If you calibrate with
only the one preset LED on, only that preset gets the new calibration data, and the
remaining presets are unaffected.
This ability to have varying calibration positions over the presets is very useful for using
with the keyboards. For certain sound patches (and effect combinations), a limited range
of motion will only affect certain frequencies thus changing the way the ring movement
affects the sound. I have found the following calibration positions useful and effective:
Preset 1: resting position, level with the keyboard, parallel to the ground
Preset 2: Angled up from resting position 45 Degrees
Preset 3: Angled down from resting position 45 Degrees
Preset 4: resting position, with Invert* on
*Turning invert on means that you are inverting the axis, or switching the meaning of
what the ring does when you move your hand up and down. Normal mode (invert off)
boosts higher frequencies when you move your hand up, whereas invert on means that
hand up boosts lower frequencies. You can change between invert on/off by turning the
MOTION knob all the way around past the six o’clock position.
In one song or passage, transitioning the current filter effect with Invert “on” to Invert
“off” can be very effective and produce cool effects. Also I have found that when
wearing the ring on the head with a headband, invert “on” is more intuitive because as
you nod your head with the beat downward, the higher frequencies are affected.
Accelerometer Gain Trim
Typically when playing keyboard versus playing guitar the hand motions associated with
playing the keys are in a smaller range of motion than strumming a guitar. Thus,
changing the gain multiplier applied to the Hot Hand signals relative to the zero point
from calibration is very useful to enhance the small range of motion used while playing
keyboards.
Follow the instructions is the user guide to enter into the “Hidden/Back Features and
Controls” mode of the Hot Hand unit. The quick summary is included in the overview
above.
Wah: Enter into hidden features mode and move the EFFECT knob to “Low Pass Lo.”
Frequency positions 1-9 listed below will now control the accelerometer gain trim.
Phaser/Flanger: Enter into back features mode and move the EFFECT knob to “Phaser
03.” Depth position (00-08) listed below will now control the accelerometer gain trim.
Accelerometer Gain
1. (00)
2. (01)
3. (02)
4. (03)
5. (04)
6. (05)
7. (06)
8. (07)
9. (08)
0.5
0.625
0.75
0.875
1.0
1.25
1.5
1.75
2.0
As you can see it is possible to change the gain to a higher (or lower) level in order to
suite your range of motion. I have found that changing the gain to a higher level, from the
default gain of 1.0 (center position) works quite well for use with the keyboard.
Frequency/Effect/Motion settings for different keyboard sounds (Wah unit)
Keep in mind that this section is very subjective and you may find that for your patches,
different presets work much better. This is only meant to serve as a launching pad for the
creation of many great custom settings!
Rhodes sound:
When I use the Hot Hand with a Rhodes patch, I typically like to have a more mellow
sound. I don’t want the effect to be too present, and prefer a more subtle variation in the
wah effect as I am playing. I strive for a darker sound that is mellow and rounded. I have
found the following presets help achieve this goal:
FREQUENCY:
Position 2
Lower frequencies sound deeper, darker, and are more “chill.”
Lower frequencies also don’t “stick-out” as much as highfrequencies and sound thicker.
EFFECT:
Lo Pass Lo
Having a Low Q filter means the filter peak is not as steep and
therefore a more rounded sound can be achieved. Low pass filters
also cut the sharper high frequencies thus a mellow tone can be
established.
MOTION:
Position 7
Having the motion sensitivity closer to the “flail” position means
that small hand movements won’t be picked up as much, and thus
will not affect the wah filters as much. This is good for having a
more subtle effect, but also allows stronger gestures to bring out
more of the effect when need be.
Clav Sound:
Contrary to the Rhodes, when using a Clav sound, I like to bring out the punchy and
sharp nature of instrument. I typically use Clav patches in funk music where the classic
sounding wah is very important to nail the exact feel: tight and rhythmic right on the
money with an upfront attitude. I have found the following presets help achieve this goal:
FREQUENCY:
Position 6
The nature of the Clav sound already has a lot of high frequencies.
Higher frequencies sound sharper, however sometimes at the cost
of being too thin. To allow the clav to sound sharp, while
maintaining the punch character, it is desirable to affect the HighMid frequency range.
EFFECT:
Classic Wah
This is the well-recognized modeling of the classic wah effect and
it achieves the funk flavor very well.
MOTION:
Position 2-3
Having the motion sensitivity closer to the “pick” position is good
for use with the clav. Typically very rhythmic patterns will be
played by your hand wearing the ring, and each hit will allow the
effect to respond right in time with the music.
Depth/Effect/Motion settings for different keyboard sound (Phaser/flanger unit)
Keep in mind that this section is very subjective and you may find that for your patches,
different presets work much better. This is only meant to serve as a launching pad for the
creation of many great custom settings!
Piano ->Honkey Tonk Piano
Does your keyboard not have a pre-set patch for a honkey-tonk piano that sounds slightly
out of tune and right out of a classic western flick? I discovered this by accident, but the
following presets allow you to achieve this sound using a flanger effect. Remember that
flanging is mixing a variable delayed signal with the original signal so pitch effects can
be introduced. I have found the following presets help achieve this goal:
DEPTH:
Position 05-06
Depth controls how much of the effect signal to mix back with the
original signal. Having the depth set at this position, allows the
effect to be heard with the interaction of pitch differences between
the original and affected signal.
EFFECT:
Flanger 03
“Multiple, individually varying, delay lines summed.”
In essence having many varying delay lines mixed together
produce many subtle pitch differences that tend to almost suggest a
chorus effect. These varying delay lines, however help achieve the
out of tune, “lopsided” feel of the honley-tonk piano feel.
MOTION/SPEED:
Position 04
Having the motion sensitivity at the “Strum” position provides a
good balance between picking the appropriate motions up to
introduce the effect, while not being too sensitive.
Pad/Synth Soundscape Effects
When you need to hold lush chords, but that modulation knob isn’t cutting it in order to
change your sound over a couple of bars, phasing from the Hot Hand can spice up your
sound right away. I have found that wearing the ring on the opposite hand that is holding
the chords is useful to be expressive in motion and feel while the other hand holds down
the melodic chord structure. Many different phasing and flanging presets can help attain
fun and different effects that add color and variety, but here is just one example of a
preset I found to be useful to use with a pad patch.
DEPTH:
Position 08
Having the Depth set at the maximum really allows the effect to
come singing through over the held chords or synth lead line that is
playing.
EFFECT:
Phaser 07
“2 notch but 6 peaks. Some resonance”
With the filter sweeping, there will be dips and peaks in the
response along with filter resonances that will flow in and out of
fat synth/pad chords and lead lines.
MOTION/SPEED:
Position 08
Having the motion sensitivity at the “Flail” position allows the free
hand with the ring, to really move with the music and be
expressive. Since you don’t need this hand as your playing hand,
you have full freedom to use large artistic gestures to change your
sound.
Give me some Vibrato!
Sometimes just riding that pitch knob doesn’t really cut it in order to get that rocking
vibrato sound that you really want. While you can’t do a sustained pitch bend with this
setting, you can change pitch as you change ring position. Imagine quick fluttery vibrato
just from the motion or your hand. Try the following settings to get some really kicking
vibrato with the Hot Hand.
DEPTH:
Position 08
Having the Depth set at the maximum really allows the vibrato
effect to be heard loud and clear.
EFFECT:
Flanger 07
“Delayed Signal only, no flanging effect. Meant for pitch
modulation, such as vibrato.
There are some small resonance peaks, so that vibrato doesn’t
sound too sterile and mechanical. Slow modulation will be nearly
inaudible. Shorter delay times will produce less of an effect than
long delay times.”
I can’t say much more than what is included above in the user
manual; just try this setting out with a long delay time. In order to
change the delay time, you have to go into the alternate settings.
This is how you do it:
Hold the SELECT pedal to enter alternate mode. Rotate the
DEPTH knob toward position 08 in order to change the delay time
to a longer delay time for flanger effects.
MOTION/SPEED:
Position 04
Depending on how you are using the ring, you can play with
different settings for this. I have found that I like to just use the
ring on one hand while playing the keyboard with the other. For
this case, the “strum” position works best. Experimentation is key
thought to get the best results.