1
User Manual version 1.2 Intentionally left blank for all the missing models xLights/Nutcracker page 1 Table of Contents
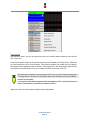
Chapter One: Introduction Acknowledgements Preface from Sean Meighan History xLights Nutcracker Chapter Two: Quick Start Guide Chapter Three: Installation Downloading xLights/Nutcracker Windows Macintosh Linux Installing Windows Macintosh Chapter Four: Tabs Setup Directories Show Directory Media Directory Lighting Networks Save Setup Add USB Add E1.31 Add NULL Change, Delete or Delete All Test Convert Layout Build Model from Preview Schedule Running the Schedule Papagayo Coro faces option Images option Sequencer Windows Timing Tracks Models New Model definition Appearance xLights/Nutcracker page 2 Names Strands and Nodes Custom Model definition Rename a Model Modify a Model Copy a Model Node layout Export csv Play Model Export Model Import Model Model groups Render All Timeline and Waveform Views Effect Presets Built In Effects Off Effect On Effect Bars Butterfly Circles ColorWash Curtain Faces Fan Fire Fireworks Galaxy Garlands Glediator Life Lightning Marquee Meteors Morph Piano Pictures Pixel Editor (Matrix Drawing Tool) Playing a video file as an effect Pinwheel Plasma Ripple Shimmer Shockwave Single Strand Snow Flakes xLights/Nutcracker page 3 Snow Storm Spirals Spirograph Strobe Text Tree Twinkle Wave Adding an Effect Changing an Effect Selecting Colors Single Channel Colors Moving and Stretching effects Copy, Paste, Delete Effects Undo Effect Selecting Multiple Effects Create Random Effects Layers Layer Blending Morph Layer Blending Mix Slider Singing Faces Model definition Coro Faces Matrix Timing Tracks Importing Phrases Breakdown Phrases Breakdown Words Shortcuts Chapter Five: Menus File New Sequence Musical Sequence Animation Sequence Open Sequence Save Sequence Save As Sequence Close Sequence Select Show Folder BackUp Quit Playlist Add Rename Delete Refresh Custom Script xLights/Nutcracker page 4 View Zoom in Zoom out Perspectives Windows Model Preview House Preview Effect Settings Colors Sparkles Brightness Contrast Layer Blending Effect Dropper Effect Assist Perspectives Audio Speeds Import Import Effects Settings Sequence settings Info/Media Metadata Timings New Import Data Layers Import Render On Save Tool Icon Size Grid Spacing Grid Icon Backgrounds Grid Node Values Render Mode Effect Assist Window Reset Toolbars Chapter Six: Advanced Features Configuring Matrix Panels as Models Coming over from LOR Running LOR Controller in DMX Mode LOR to DMX Channel conversion Running LOR in DMX mode Convert a LOR LMS file to play using non LOR hardware Converting a LOR sequence and importing into xLights/Nutcracker. Common Scenarios Online Support Groups xLights/Nutcracker page 5 Chapter One: Introduction
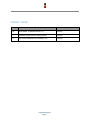
Acknowledgements The developers and authors of this manual are volunteers. A very special thanks goes out to our families for supporting us in this hobby. Without your support we could not do this. A very special thanks goes out to Matt Brown and Sean Meighan, the original authors of xLights and Nutcracker. Preface from Sean Meighan Welcome to the xLights/Nutcracker User Manual. We hope that you will find the information that you need to make your Halloween and Christmas shows shine! History xLights xLights was created by Matt Brown in 2010. Matt wanted a program that would reliably play his LOR show. The original xLights was “only” a scheduler/player. It had sophisticated playlists, ability to play videos, mp3 and wav files. Matt created a process to support Renard, Pixelnet, E1.31 (Sacn), LOR, DMX and Open DMX controllers. There was a built in CONVERT tab to change LOR lms files into xLight XSEQ files. Nutcracker 2.x. Version 1.0 of Nutcracker was released on Feb 2012 by Sean Meighan. Version 1.0 and 2.0 were a web based, php application. 3.x Matt Brown asked Sean if he could port the Nutcracker code into xLights in December 2012. The result was xLights/Nutcracker 3.0 4.x Sean had discussions with Dave Pitts about making a horizontal timeline, sound file waveform and drop effects. Dave coded up the first Alpha xLights/Nutcracker 4.0 in November 2014. In January 2015, Gil Jones and Dan Kulp came on to the team and took over the development from Dave. Dave went back to hardware design on his new Falcon 16 v2 boards. xLights/Nutcracker page 6 Document Version: Version Notes Date 1.00 Initial release. xLights/Nutcracker 4.2.1 082015 1.1 Additional content and new warning symbol 092015 1.2 New effects, additional LOR information, etc 102015 xLights/Nutcracker page 7 Chapter Two: Quick Start Guide
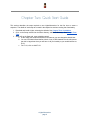
This section describes the steps required to use xLights/Nutcracker for the first time to create a sequence. The details of each step are covered in the respective sections covering that functionality. 1. Download and install xLights, selecting the defaults. See
Chapter Three: Installation
. 2. Click on the Setup tab and set the Show directory and Media directory. See
Chapter Four: Tabs
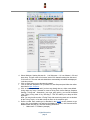
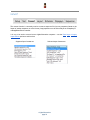
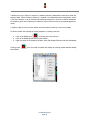
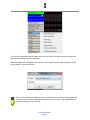
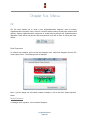
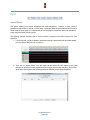
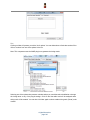
. 3. While still on the Setup tab, setup a default network. a. At this stage, the actual network does not matter as you can change the details later. b. You can click Add Null and define a block of say 10,000 channels to work with (ensure that this is larger than what you will have in all your models) or you can define them as E1.31. c. For E1.31, click on Add E1.31. xLights/Nutcracker page 8 d. Select Multicast, Starting Universe # = 1, #of Universes = 10, Last Channel = 512 and press okay. This will create 10 universes, each of 512 channels starting from Universe 1 to Universe 10. The start and end channels are automatically calculated and displayed in the last column. e. Click on Save Setup to save the network created. f. Click on the New Sequence Icon (or Select File, New Sequence) and follow the outline described in
New Sequence
. g. Click on the Sequencer tab and if you have not already done so, either create default timing marks say every 5 seconds or create a Timing Track via the Settings, Sequence Settings, Timings tab. Alternatively, just to get going quickly, you can set the default ‘New Timing’ timing mark off by unticking it. This will enable you to drop an effect anywhere. Note: You need to either select a Timing Track with some timing marks on it or deselect all the Timing Tracks, to be able to drop an effect on the sequencer grid. h. Define a model. Each model type is described in the
Models
section, however to get going, click on the Models icon and from the Models list window, click New and on the Model window that pops up, enter the following information: i.
Model name – P10 Matrix (example) xLights/Nutcracker page 9 ii.
iii.
iv.
v.
vi.
vii.
viii.
ix.
x.
xi.
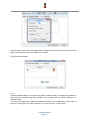
Display – Horiz Matrix Type of String – RGB Nodes Actual # of Strings – 50 # of RGB Nodes per String – 50 # of Strands per String – 1 Start Channel – 1 From Output – 1 Starting Corner – Top Left Part of my Display – Tick Model Brightness Adjustment – 0 Click OK to save the model i.
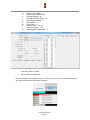
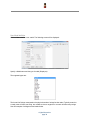
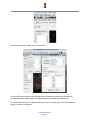
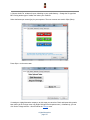
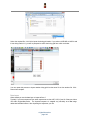
Add a model to the sequencer. From the sequencer tab, with the cursor on Timing Track section to the left of the sequencer grid, right click and select Edit Display Elements. xLights/Nutcracker page 10 From the Sequence Elements pop up window, select Master View and click on Add Models. Select the Matrix model created, Click on Add, then close the two windows. You should end up with a model added to the sequencer. j.
Select an Effect (as an example the Butterfly effect) from the Effects grid and drag it to the sequencer. Click on the Render all button. k. Click on Play to start playing the sequence. The effects should display in the Model Preview Window if it is open or in the House Preview Window if that is open. l. Click on the Save Icon to save the sequence and give it a name when prompted. Tip:
To Open and select Windows, click on View, Windows and select the Window(s) that you wish to have open. m. Next, click on the Layout tab. Click on the Save button below the Models button. n. Model Groups are described in the Model Groups section, however to get going, click on Select Model Groups, Edit Group, Add Group. Replace the ‘New Model group’ with a name such as ‘All Models’. Then select the model ‘P10 Matrix’ that you created above. Use the right arrow to move it to the ‘Models in Group’ section. Click on Update Group and then Close. xLights/Nutcracker page 11 o. Ensure that the ‘All Models’ Group is selected in the Model Groups window, then click OK to return to the Layout screen. Position the P10 Matrix model on the layout as required by dragging and adjusting it (described in the Layout section), and then click on the Save button (on the left side below the Models button) to save the Layout details. p. Return to the Sequencer tab and continue. Tip:
Any model created or changed must be saved first, before it becomes available to be seen on the Layout tab. To avoid confusion, before playing any sequence on the Layout tab, click on Render All and then Save the sequence first. This is not always necessary, but it depends on whether you change any of the default render or save settings. Caution
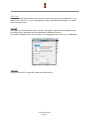
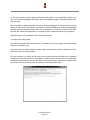
: Ensure that the MP3 file that you use for your sequences are set to a Constant Bit Rate. Use Audacity and export the audio as an MP3 file with Constant Bit Rate and preferably 128 or 192K. The sequence will play if it is not a constant bit rate, however the audio may not start exactly at the point the cursor is placed on the wave display on the sequencer tab. xLights/Nutcracker page 12 Chapter Three: Installation
Downloading xLights/Nutcracker Windows The latest release of xLights/Nutcracker for Windows can be found at the following link: http://nutcracker123.com/nutcracker/releases/
. This page also has links to other commonly used software. Macintosh The latest release of xLights/Nutcracker for Macintosh can be found at the following link: http://www.dankulp.com/xlights/?C=M;O=D Linux Most Linux users pull and compile the latest code checkin. The repository for the xLights/Nutcracker code is at
https://github.com/smeighan/xLights Installing If this is an upgrade to an existing xLights/Nutcracker setup, make sure that you backup your existing files before installing a new version. The install process does not delete any of the files required for your sequences or setup, as these files are kept in the show and media directories. To backup your existing files, follow the procedure described in
Chapter 5: Menus
or just press F10. Caution:
Before you install any new release of the software, it is very good practice to backup your key xLights/Nutcracker files using F10. Note that if you have any sequence currently open, then changes to the effects, views, models etc may not have been saved until you exit xLights. Windows 1. Download the required released executable file and save to any location on your Windows PC. 2. Double click on the downloaded executable. 3. The xLights/Nutcracker setup Window will be displayed. xLights/Nutcracker page 13 4. Click on Next 5. Select the destination location. Leave as is to upgrade to a new release. Follow the prompts and click on install when ready. 6. Click on Finish to complete the installation The xLights/Nutcracker software will be installed in the destination location. In addition to the software required to run the application, the installer also installs a few useful utilities, dictionaries and a songs subdirectory. The xLights/Nutcracker application software (32 bit) is installed by default in the xLights/Nutcracker subdirectory within your Windows Program Files directory ( C:\Program Files\xLights\). The location can be modified during the software install process by the user. If you do not have Audacity installed on your computer, then you should at least install the Queen Mary Vamp plugins for Audacity. For the QM vamp plugin packages that can be installed without Audacity installed, first download the plugin package (zip file fow WIndows) from the following address:
http://isophonics.net/QMVampPlugins and install on your computer. Macintosh 1. Double click on the compressed file that you downloaded. 2. Drag the newly created folder containing the xLights/Nutcracker application and associated files to the location of your choice. The xLights/Nutcracker application software folder is created in the same directory as the downloaded file. xLights/Nutcracker page 14 For the QM vamp plugin packages that can be installed without Audacity installed, first download the plugin package from the following address:
http://isophonics.net/QMVampPlugins To install, copy the files qmvampplugins.dylib qmvampplugins.cat qmvampplugins.n3 to either of the following locations on your computer /Library/Audio/PlugIns/Vamp/
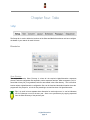
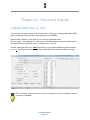
(for plugins to be available to all users) $HOME/Library/Audio/PlugIns/Vamp/ (for plugins to be available to you only) xLights/Nutcracker page 15 Chapter Four: Tabs
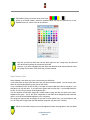
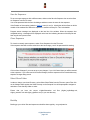
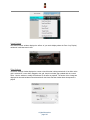
Setup The Setup tab is used to define the locations of the Show and Media directories as well as to configure the details of your network for each Universe. Directories Show Directory The xLights/Nutcracker Show Directory is where all the required xLights/Nutcracker sequences, pictures, and user configuration files required to run the sequences are kept. When a sequence (.xml) is saved and a binary file (.fseq) rendered, both files are created in the show directory. This is the same location where xLights/Nutcracker configuration files can be found and the default location where the program will first prompt for, or look for files pertaining to several functions of xLights/Nutcracker. Tip: It is useful to have separate show directories for each major event i.e. one for Halloween, one for Christmas or one for the next year. Start a new year directory by copying sequences from the Show Directory of the previous year. xLights/Nutcracker page 16 Media Directory The xLights/Nutcracker Media Directory is where the required audio (.mp3) and video (.mp4) media files are kept. The media directory can be different to the show directory or can be the same directory. This is the default location where xLights/Nutcracker will first prompt for, or look for media files. Tip: It is useful to have a common media directory for all shows. Alternatively, place all of the media for a particular show event in the respective show directory and set both of them to be the same. Specifying the names of these directories or changing them can be done by clicking on the Change button found on the Setup tab screen. If the two directories have been linked together (via the link icon), then the user can only change the location of the Show Directory and the same change will apply to the Media Directory. (unlinked icon) If separate locations are required, click on the icon to unlink the directories, at which point you can change the location of either directory. Caution
: Images used for pictures and faces use an absolute location reference i.e. you specify the exact location. Therefore the location won’t change if you change your show directory. You may wish to consider having all your images in a separate location outside your show directory. (linked icon)
Lighting Networks Each Universe (or section of Universe) should be defined, ensuring that the start and number of channels match your models. Tip: As described under
Chapter Two: Quick Start Guide
,
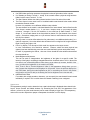
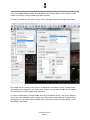
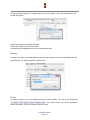
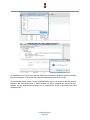
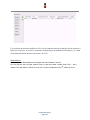
you can start with a default set of configuration values and then come back to change or update the details before testing your lights physical output. xLights/Nutcracker page 17 Save Setup One you have your lighting network setup, clicking on Save Setup will save your configuration. If you forget to save, don’t worry, you’ll be prompted upon exiting xLights/Nutcracker asking if you want to save your network setup. Add USB This option is to be used to define a DMX, Pixelnet, LOR dongle, DLight, Renard or OpenDMX setup. Each USB choice is described in the text found below the dropdown selection. As you select a different choice, the text assists you in identifying the best choice for your USB dongle. Add E1.31 Clicking on the Add E1.31 button will display the following screen: xLights/Nutcracker page 18 Select the Method (Multicast or Unicast) depending on which option you will use to drive your lighting networks. If unsure, leave as Multicast. If Unicast is selected, then the IP address of the controller that will support the universe(s) you are defining here must be entered. Enter the Starting Universe #, # of Universes and the Last channel for each universe. Leave the One Output unticked. Note: If the ‘One Output’ is ticked, then visually the universes and number of channels will be grouped as follows: The "Enable" value turns on/off that output when "Output to lights" is turned on. If it's not enabled, no output occurs. For example, if you have a controller not plugged in (testing a different controller) disabling that output would not attempt to send anything to that specific controller. Trying to send data to a controller that is not connected van in some cases cause delays and lags on the output. Highlight the row and Double Click on it to toggle the value . Tip:
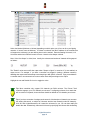
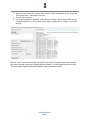
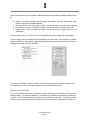
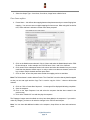
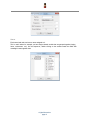
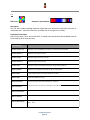
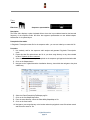
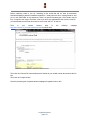
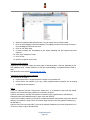
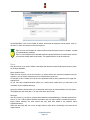
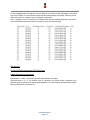
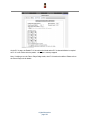
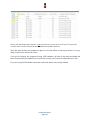
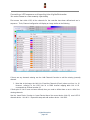
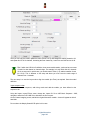
Most controllers only support 510 channels per DMX universe. The Falcon F16v2 controller supports up to 512 channels per universe. If configuring universes for a matrix that will be used on P10 panels, those universes should be defined as 512 channels per universe. Tip: If you have a number of contiguous universes of a fixed number of channels you can enter the starting Universe #, a multiple of Universes and the Last Channel (number of channels), click OK and xLights/Nutcracker will create the universes for you. You can then modify the details after that. Alternatively, define each Universe by specifying the Universe # in the Starting xLights/Nutcracker page 19 Universe # field, set the # of Universes to 1 and set the Last Channel to the number of channels in that section of the Universe. Press OK. The following picture shows a configuration where: ● Universe 1 has 94 channels from Channel number 1 to 94 ● Universe 2 then has 462 channels from Channel number 95 to 556 ● Universe 71 has 291 channels from Channel number 557 to 847 ● Universe 5 then has 453 channels from Channel number 848 to 1300 etc. Note:
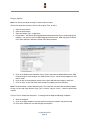
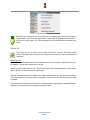
If there are gaps in between, it is not required to specify the missing channels. The following image describes a setup where a LOR network has been listed first. Even though only the first 32 channels of the LOR network are used, universe 1 has been defined as 510 channels in case more items are to be added to the LOR network without impacting the other channels above. If universe 1 is set to 32 channels, then Universe 2 will start from 33 onwards that is also a valid configuration. Add NULL This type of setup is used as an example, where the sequence output will not be used by xLights/Nutcracker as a show player, but output data to be used for playback on a Raspberry Pi or BeagleBone Black controller. xLights/Nutcracker page 20 There could be large matrices to be implemented via P10 or P5 panels running off a BeagleBone Black controller. A
null output can reserve a huge number of channels, but not actually output anything if the Output to Lights function is on. A model can still be sequenced as normal and viewed on all the windows just as any other output. Click on Add Null and specify the number of channels to be reserved. The corresponding number of channels will be created. Note:
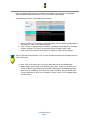
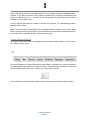
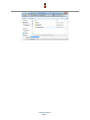
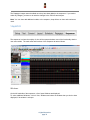
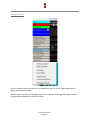
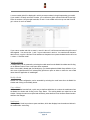
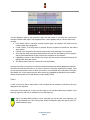
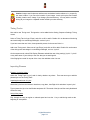
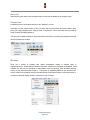
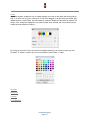
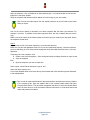
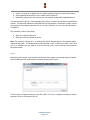
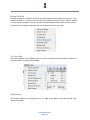
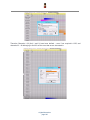
If the Falcon Player on the Raspberry Pi or BeagleBone Black controller is to be used in ‘Bridge Mode’ (for testing via the sequencer prior to your show) then the universes and corresponding channels must be defined i.e. a definition of NULL will not output any lights. Change, Delete or Delete All To change or delete an individual row, highlight the row and select Change or Delete. Click on Delete All to delete the entire set up. Test The test tab enables you to test anything from a single channel, all channels for a model or all channels by sending different test patterns to your physical lights. Ensure that output is enabled by selecting the Output To Lights button. At the end of testing, click on the Lights Off button. Select individual or multiple channels using the Control, Shift keys as described or select all lights. xLights/Nutcracker page 21 Once you have selected a set of channels, you can save this individual set up as a test configuration for future repeat testing by clicking on the Save button and specifying a name for that group of channels. You can load a previously saved test configuration by clicking on the Load button. Different test functions are available for RGB, non RGB lights as well as the option to execute different test cycles. You can also select and change background as well as highlight colors and control the speed of the function using the controls provided. Note: Output from the test tab is always in RGB sequence.
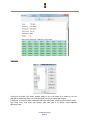
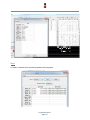
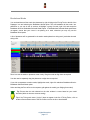
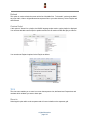
It actually turns on every 3rd channel, i.e. 1,4,7,10 etc for red and 2,5,6,11, etc for green, etc and then all channels for white. A quick way to test your lights to ensure the correct RGB, BRG, GRB etc. is set properly, is to turn on channel 1. That should turn on RED. Next would be to turn on channel 2, that should be Green and finally Channel 3 should turn on Blue. xLights/Nutcracker page 22 Convert The convert function is commonly used to convert a sequence file from one sequencer format to the format of another sequencer or to the format (.fseq) required to run via Falcon Player on a Raspberry Pi or BeagleBone Black controller. It is not to be used to convert into an xLights/Nutcracker sequence – use the
Data Layer or Import
, Import Effects
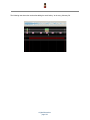
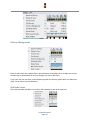
options to achieve that. Supported input formats are:
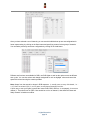
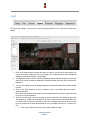
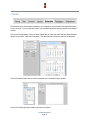
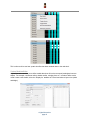
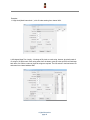
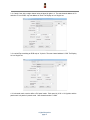
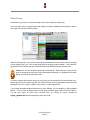
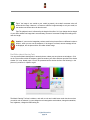
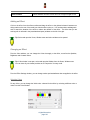
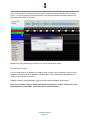
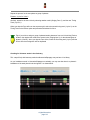
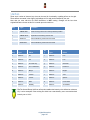
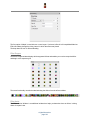
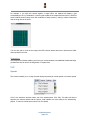
Selected output formats are: xLights/Nutcracker page 23 1. Click on Choose Files, and on the subsequent window, change the file type to the type of file that you wish to convert and navigate to where your input file (i.e. LSP MSQ file, LOR LMS file etc) is located. Double click to select the file. 2. Select the output Format to convert to. Supported formats are: 3. Specify whether all channels should be turned off at the end of the sequence. (Tick if unsure) 4. Select the Show Verbose Channel Map. This option will display messages pertaining to the input sequencer channel mapping for some inputs and is useful to identify missing or misaligned channel information . 5. Select the options specific to LOR conversion. xLights/Nutcracker page 24 6. Specify the time resolution i.e. (25ms, 50ms, 100ms). These correspond to (40 fps, 20 fps, and 10 fps respectively). Select 50ms if not sure. 7. Click on Start Conversion. 8. Conversion messages are displayed. If successfully converted, a file of the same name but with a different extension (i.e. as specified for the Output Format) will be created in your show directory. With the ‘Show Verbose Channel Map’ selected, the conversion messages display which channels have been converted to equivalent xLights/Nutcracker channels. This information can then be used to amend the channel mapping and/or define additional LOR controllers as required. xLights/Nutcracker page 25 Layout The layout tab displays a full preview of your show and provides a view of how all the models will appear. 1. Click on the image button to browse and select an image of your house (or other) setting. Use the set size button to adjust the size of your image to fit your display and use the fill background attribute to expand the image to fit your display. 2. The brightness slider is used to control the brightness that the sequence displays on this layout and can be used to increase the brightness if individual models have been set to less than full brightness. 3. You can also change the layout display brightness for individual models via the Modify Models function. 4. Click on the Open Sequence to open a sequence if one is not already open (or to open a different sequence) Note: While it is possible to have more than one xLights/Nutcracker sequence open at the same time, this is not recommended. 5. The first time the layout is set up, the position of each model has to be defined on the layout. The positions of models can be changed at any time, however they should reflect where your live models will be placed so that effects that work at a Model group level or whole of house level can present an accurate representation of how your display will look live. In order to do this. a. Click on the model from the list in the Preview Models window. xLights/Nutcracker page 26 b. In most cases the model image will display in the centre of the screen. Occasionally it may display at the bottom left corner of the screen. In which case: at the bottom left corner of the screen, a few lines will be highlighted in blue. Select and drag those lines to the center of the screen, resize and rotate as required and then place in the correct position. If you cannot ‘grab’ the model, try increasing the Model Size and Model Rotation values until you can grab and drag the model. c. Save the layout progressively and when done. 6. If your model does not display in the list, or you do not want it displayed in this layout, click on the Models button and change the ‘Part of my Display’ attribute accordingly. 7. The Preview Model list will list all the models which has the ‘Part of my Display’ attribute selected along with the Srat Channel and End Channel for each model. You can sort on any of the columns by clicking on the column heading. 8. If the ‘Overlay checks enabled’ attribute is selected, when you click on the model name in the list, it will turn yellow in the layout display to the right. If there is a channel overlap with any other model, then the other model will turn red. 9. You can also use Model Groups to group and display effects. To amend details, similarly click on the Select Model Groups button and then click on Edit Groups, highlight the group, add or remove models, make any other changes and then click Update Groups. 10. To play the sequence and watch the effects, click on the Play button to start the sequence. Note:
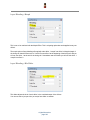
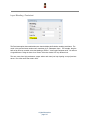
You must use the layout controls which are different to the same controls used for the sequencer. You can then pause and restart the sequence or stop the sequence. You can also start at any point by moving the slider. xLights/Nutcracker page 27 Tip: If you have a model groups displayed on the Layout screen, then it will only display models that are part of the model groups. Therefore it is useful to have a Model Group (say “All Models”) and include all the models for your show and include that model group on the layout tab. Moving Objects around For a single object, you can left click on the object, (it turns yellow) and with the mouse button still held down, drag it around. To move more than one object around together, Press the Control key first and then left click on each object that you want to move as a group (
holding down the control key all the time
). Then at the last object, drag to move all the selected objects around together. If you release the Control key at any time, the objects will not move as a group. Aligning objects Select a group of objects , right click and select Align (top , bottom etc) to align the selected objects. Which object should they all align to ? The object you selected first i.e. which will have the
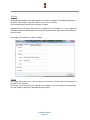
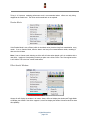
five blue dots is the key object that others will align to. When selecting a group , you can press shift, a box opens and you can drag the mouse around the objects to select the group to align. Note: There is no Undo for this actions for dragging and setting alignment. Build Model from Preview This option, which uses the whole house model, existed to support xLights/Nutcracker 3.x functionality. It has been removed. Use the Model Group functionality instead, which has the same features, but is much more flexible and gets updated as models are added or removed. xLights/Nutcracker page 28 Schedule The Schedule tab is used to define schedules if you are going to use a PC/MAC and xLights/Nutcracker to run your show. Prior to using this function, you must have defined at least one playlist via the Playlist function. Click on the Change button next to the Show Dates label to select the Show Start and Show End date ranges for your show. Select OK when done. The date selected will then be copied to the left panel. Click on Schedule Playlist and you will be presented with a ‘Schedule Playlist’ window. Click on the Playlist drop down window and select the Playlist. xLights/Nutcracker page 29 Select the start and end times, the date or dates this schedule is applicable to and other attributes such as ● Repeat – whether the playlist should loop back and restart if the length of the songs in the playlist is less than the schedule duration. ● Play first item only once. This option is useful if you have an Intro to your show at the beginning ● Play last item only once. This option is useful if you have a finale to your show at the end. ● Random order. Used if you want the events in the playlist to play in random fashion i.e. not sequentially. Click on OK when done. You must click on Save Schedule to save the schedule and any changes. You can specify different schedules for different dates in your date range. As an example, to create a different schedule for the weekend, repeat the steps above and select say a different end time for the Saturday and Sunday. Click OK when done. To change any schedule, select the schedule item from the list and click on Update Selected items. To delete any item, select the schedule item and click on Delete Selected items. Running the Schedule To run the schedule, ensure that the ‘Output to Lights’ button has been selected and click the ‘Run Schedule’ option. As each scheduled item is executed, the log details are displayed in the window on the right. You can clear the details by clicking on the Clear button on the right. You can save the log detail by clicking on the Save button on the right. You will be prompted for a file name for the log file. xLights/Nutcracker page 30 xLights/Nutcracker page 31 Papagayo The Papagayo tab enables you to import a Papagayo .PGO file (or files) and convert the mouth movement phonemes into effects in xLights/Nutcracker for Coro faces, mouth movements on a matrix or mega tree. Tip: Use the native functionality that has been added to xLights/Nutcracker to create mouth movements effects for Coro faces or a matrix. This functionality has been retained for historical reasons. Prior to this step, ensure that you have created and saved an xml sequence that at least has the channels to which you will map the mouth movements defined. For example, if mapping a single voice to a Coro ‘Singing Faces’ element, then create a xLights/Nutcracker sequence with that model defined and save the sequence. 1. Open xLights/Nutcracker and click on the Papagayo tab. Select the .PGO file by clicking on the ‘Select Papagayo Input File’ button and locating the required file. a. If you have split the/PGO voice file into more than one file (for example by splitting the song into two sections), then click on the ‘+’ icon on the same line, select the second .PGO file and then enter the ‘# of fames to offset by’ when prompted – this corresponds to the number of frames after which the second section of the song starts. 2. Select the xml sequence that contains the model to be imported against. Accept the warning message that the xml sequence will be overwritten. xLights/Nutcracker page 32 3. Select the Output Type – Auto faces, Coro faces, Image faces or Movie faces. Coro faces option 4. Preset Name – this defines the mapping between the phonemes and your custom Singing face mapping. You can save one or multiple mappings for future reuse. When using this for the first time, Select ‘add new’ and enter a Preset name when prompted. 5. Click on the Model name under each ‘Voice’ Column and select the Model Name that the .PGO file should map to. In this example, the .PGO file has a Voice 1 and Voice 2 defined. 6. Click on each of the subsequent entries in the column and select the channels from your custom model that the phoneme should map to. In order to select more than one channel, use the Ctrl key to select multiple channels and then press Enter. 7. Click on ‘Save’ to save the preset name so that the mapping can be reused later. Note: The Delete button is used to delete a Preset. The ‘Clear Grid’ is used to clear any details mapped so that you can start again and the ‘Copy First’ is used to copy the ‘Voice 1’ column to all the other columns. 8. Click on ‘Click to Create New Sequence’. A message will be displayed indicating completion. 9. Save the sequence. 10. Click on the Open Sequence icon and select the sequence that has been created in the previous step. 11. Click on the ‘Render All’ icon and then play the sequence. The Papagayo images cannot be edited once they have been added to the sequencer. If you need to make any changes, you have to do make the changes in the .PGO file and reimport. Note: You can then add additional models to the sequence, drop effects on them and continue as usual. xLights/Nutcracker page 33 Images option Note:
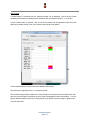
You need to precreate an image for each mouth movement. The first few steps are common to the Coro face option. Then, at step 3 1. Same as step 1 above. 2. Same as step 2 above. 3. Select the Output Type – Image faces 4. Preset Name – this defines the mapping between the phonemes and your custom Singing face mapping. You can save one or multiple mappings for future reuse. When using this for the first time, Select ‘add new’ and enter a Preset name when prompted. 5. Click on the Model name under each ‘Voice’ Column and select the Model Name that the .PGO file should map to. In this example, the .PGO file has a Voice 1, which is being mapped to a ‘P10 matrix’ model. 6. Click on each of the subsequent entries in the column and select the images of each face. 7. Click on ‘Save’ to save the preset name so that the mapping can be reused later. Note: The Delete button is used to delete a Preset. The ‘Clear Grid’ is used to clear any details mapped so that you can start again and the ‘Copy First’ is used to copy the ‘Voice 1’ column to all the other columns. Click on ‘Click to Create New Sequence’. A message will be displayed indicating completion. 8. Save the sequence 9. Click on the Open Sequence icon then select the sequence created in the previous step. 10. Click on the ‘Render All’ icon and then play the sequence. xLights/Nutcracker page 34 The Papagayo images cannot be edited once they have been added to the sequencer. If you need to make any changes, you have to do make the changes in the .PGO file and reimport. Note: You can then add additional models to the sequence, drop effects on them and continue as usual. Sequencer The sequencer is where the majority of time will be spent and where most of the functionality that the user sees resides. The main areas and functions of the Sequence tab are as follows: Windows On the left hand side of the sequencer, a list of open Windows are displayed. To select additional Windows, click on View, Windows and select the windows that you wish to have displayed, if the window is not open. xLights/Nutcracker page 35 You can close a Window or move them around or if you have an additional monitor configured, then one or move Windows can be moved to the alternate monitor. The Windows are described in the
View
, Windows section
. Tip:
You can save the windows that you normally have open as your default perspective. These windows will then be opened when you load xLights. Timing Tracks xLights/Nutcracker can support multiple timing tracks on the sequencer, each with different frequencies of timing marks. By default, a timing track ‘New Timing’ is created for each sequence if you have not created one when creating a new sequence. Timing Tracks can be added via the Settings, Sequence Settings, Timing Tracks menu. then select a new Timing Grid. When you create a timing track it gets added to all views that you have defined. Timing tracks are local to a sequence. Note: The timing marks create a grid but once the effects are dropped they have no relation to the original timing marks that were used to drop them. You can switch to any other timing track and have a completely different grid. If you have multiple timing tracks defined, ● Each timing track has a different color of timing marks. ● You can select the timing track radio button (to the left of the timing track name) to enable that track. You can also select more than one timing track to be displayed at the same time, however only one timing track will be active for effects to calculate the start and end position. xLights/Nutcracker page 36 You can set up timing marks on any timing track manually, by placing your cursor on the waveform (above the grid) and while playing the sequence, press the ‘t’ key where you wish the timing mark to appear. You can add new timing tracks or delete an existing timing track at any time. You can also import timing marks created externally (the most common being those created via Audacity). In order to do this, right click on a timing track, and select Add Timing Track or Delete Timing Track. To import one that has been created externally, select Import Timing Track, navigate to the .txt file containing the timing track and click OK to import it. Tip: Timings are created just like effects which means they have a duration. Every timing effect has a starting edge and an ending edge. So you can have a timing effect that goes from 1 to 2 seconds and then another from 3 to 4 seconds with nothing in between 2 and 3 seconds. If you want one in there just select a range and hit "t" then drag the edges over to connect to the existing timing effects. Models A model in xLights/Nutcracker defines the entire required characteristic about a single physical element of your display. Typically it will represent a common item such as an arch, a matrix, a straight line, flood light as well as more esoteric and custom made items such as singing trees, candy canes, a snowman etc. xLights/Nutcracker page 37 It defines the type of lights, the number of channels and other characteristics required to render the sequence data. When a model is defined, it is retained in an xLights/Nutcracker configuration .xml file in the show directory. It can be reused for all subsequent sequences – however it needs to be added to the sequence grid of each sequence as required in order for effects to then be sequenced against the model. A model is made up of one or more strands, and each strand is made up of one or more nodes. To define a model, after opening an existing sequence or creating a new one, ●
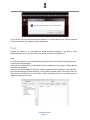
●
●
Click on the Models icon on the top row of the canvas or Click on the Models button on the Layout window Right click when in the sequencer window, select Edit Display Elements and then Add Models Clicking on the been defined. icon, the model list window will display any existing models that have already xLights/Nutcracker page 38 New Model definition Click on New to define a new model. The following screen will be displayed: Specify a Model name and the type of model (Display as). The supported types are: The Actual # of Strings corresponds to the physical number of strings for that model. Typically an arch or a candy cane will have one string, but models such as a mega tree or a matrix will have many strings. See the examples of a Mega tree and matrix below. xLights/Nutcracker page 39 ●
●
●
●
●
●
●
●
# of RGB Nodes per String represents the physical number of light nodes, bulbs or pixels. # of Strands per String is usually 1, except in the scenario where a physical string has been folded in which case it can be 2, 3, 4 etc. The Start Channel defines the starting channel number for the first node of the model. The From Output in most cases is set to 1 as default and the start channel is then used to define the absolute channel number. However it is possible to use a different definition setup wherein: The start channel for the model is calculated based on the “start channel” that is offset from this ‘From Output’ number (default is 1). If you have 4 outputs setup on your setup tab being universes 1 through 4, all with 510 channels, for the model set as Start Channel “1”, From Output “2”, its real start channel in the fseq would be channel 511 (first channel of the second output). Sometimes keeping track on a “per universe” basis is easier than the raw count from the very first channel. Starting corner is used to define where the first node starts in a multidimensional model (i.e. a matrix or mega tree). See to the default value of Bottom Left if running from left to right or Bottom Right if running from right to left. Part of my display. Tick this option if this model is to appear on the Layout screen. In most circumstances, this should be selected. However, where the same physical item (spinner) has been defined using more than one model definition (spinner and spinner matrix) for ease of programming the effects, then one of them should have the attribute selected and the other should not. Model Brightness Adjustment. This can be used to change/reduce the brightness of the lights for a specific model. The intensity of the lights is accordingly changed/reduced from its default value of 100 %. Most of the time
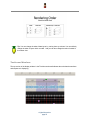
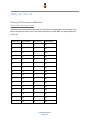
here is now a "Model Brightness" slider where you can reduce (or increase, but 99% of the time, you reduce) the brightness of the model in the FSEQ. Note: There is also a "Preview Brightness" slider (in the Appearance dialog) where you can then increase that brightness when displayed in the preview. Since the preview displays the raw FSEQ data, having the model brightness at 40% or something can result in the preview being hard to see (kind of dark) so increasing the Preview brightness can overcome that. Individual Start Chans For models with multiple strands or elements, you can specify the start channel for each strand individually if required. This is useful where the channel numbering is not contiguous. Appearance The Appearance setting is used to determine how a particular element is displayed when viewed in the Layout, House Preview and Model windows. By increasing the Pixel Size, the appearance of the element (a flood or any other small element) can be made to display a bigger size. The transparency values can be used to adjust how opaque or transparent the element is on the display. xLights/Nutcracker page 40 Names Each strand and node can have a name assigned to it. This is useful where for example you have single channel models that are grouped together (singing faces, tombstones etc). On the sequencer, double clicking on the strand reveals the nodes with meaningful names against them. xLights/Nutcracker page 41 Strands and Nodes From the sequencer grid view, right click on a model name, and click on the Toggle Nodes option, to display all strands for the model. With the strands view open (i.e. displayed), right click on a strand to either toggle the strands closed or to Toggle Nodes and display the nodes for a strand. xLights/Nutcracker page 42 This is often useful to see how a particular effect has been rendered down to the node level. Custom Model definition xLights/Nutcracker enables you to define models that do not fit into the concept of predesigned common shapes. For example, a snowman outline, reindeer outline, a singing face, etc. In order to define such a model: create a new model, select the ‘Display As’ attribute as Custom and select a layout size (width and height). xLights/Nutcracker page 43 A custom model grid will be displayed in which you enter numbers in the grid representing your model. If your model is a candy cane with 12 nodes, you could have a grid 4 columns wide and 10 rows high. Place the numbers 19 up the right hand side, 10 and 11 in the middle cells in the top row and 12 would go in column A row 2 as follows: If you enter a number and wish to erase it, enter 0 in the cell. It will be removed when the grid is saved and reopened. You can use the ‘+’ and ‘‘ keys to make zoom in and out. You can also enter the same data in Excel, copy the cells from Excel and then use the paste icon to paste the data into the cell in row 1 column 1. Save the model. Rename a Model A model (name) can be renamed by selecting the model name from the Model List window and clicking on the Rename button. Enter a new name when requested. Note: If the model is already part of a Model group, you should update the Model Group definition. If you don’t then xLights/Nutcracker will subsequently provide an option to delete or select the new model name when the application is loaded again. Modify a Model Details of a model configuration can be amended by selecting the model name from the Model List window and clicking on the Modify button. Copy a Model Once a model has been defined, a quick way to duplicate definitions is to select the model name from the Model List window and clicking on the Copy button. The existing details are copied into a new window. Change the name as required and amend any other details such as the Start channel number and Save the changes. Node layout Clicking on the Node Layout button opens a window, which then displays how the nodes are laid out in the model within each string. xLights/Nutcracker page 44 Export csv Clicking on the Export CSV button, enables details of one or all models to be output to a csv file (highlight the models required). You will be prompted to specify a location and filename. A single row is created for each model and includes the model name, ‘display as name’ attribute, string type, string count, node count, start channel, start node, ‘part of my display’, model brightness adjustment value. xLights/Nutcracker page 45 Examples 1. Single Arch (Model name Arch 1 ) with 25 nodes starting from channel 6001. A 360 degree Mega Tree visually 30 strings of 25 pixels on each string, however, physically made of 15 strings of 50 pixels each. Each string starts from the bottom, goes up to the top of the tree and loops back down. So half the number of physical strings are required. The first node is in the front bottom left and starts from channel address 9200. xLights/Nutcracker page 46 2. A Candy Cane with a single channel string of about 20 lights in it. The start channel address is 50 and since it is non RGB, only one address is used. The Display as is a Single Line. 3. A vertical Pipe containing an RGB strip of 10 pixels. The start channel address is 7250. The Display As is a Single Line. 4. A horizontal matrix used to define a P10 panel matrix. Each panel is (32 W x 16 H) pixels and the panel matrix is 8 panels in portrait mode. Start channel number is 11800. xLights/Nutcracker page 47 5.
A custom singing face (Coro face). Play Model If the Model Preview window is open, you can play the model effects in the window by right clicking to the left of the sequencer grid and selecting Play Model. The sequencer will start playing and the effects in this window will focus on the selected window You can also achieve the same result by clicking on an effect against the model in the grid and then selecting Play. xLights/Nutcracker page 48 Export Model This function is used if you wish to export effects from your model to another sequencer, such as LOR, LSP, Vixen, HLS. It can also be used to export an eseq (effect sequence) to the Raspberry Pi Falcon Player . Effect files are .fseq format files with an .eseq extension. These special sequence files contain only the channels for a specific effect and always start at channel 1 in the sequence file. The actual starting channel offset for the Effect is specified when you run it or configure the Effect in an Event on the FP. Tip
: Eseq (effect sequences) can be played on the FP any time while a main fseq sequence is running and you can have as many effect sequences running as you want on different elements of your display. If you create an fseq called ‘background.eseq’ and upload to the FP, it will execute as soon as the FP has started i.e no definition is required on the FP. Right click to the left of the sequencer grid and select Export Model. xLights/Nutcracker page 49 You will then be presented with a window where you can select the target sequencer type and the filename to be created. Press OK when done. Status messages will be displayed on the last line of your sequencer as the model is exported. The file will be created in your show directory. Tip:
You can use this functionality to export a models effects to the Falcon Player and then use the effect to run a continuous background sequence such as a “Tune to” sign, independently of sequences running in via the fseq file. xLights/Nutcracker page 50 Import Model There is no functionality to directly import an xLights/Nutcracker model that someone else has created. However, since models are defined using xml, you can copy them into your xlights_rgbeffects xml file in the models section. Then update the channel assignment to your setup. Tip
: Use an editor that works well with XML. Notepad++ is a free editor than can be used. Ensure that after you paste the xml, that the </models> end tag is returned to its original position on a new line. If you leave that end tag at the end of the last model line, it won't work. Model groups Model Groups can be used to group a number of similar elements (Arch1 … Arch6), so that by dropping an effect at the group level, the effect will be applied to all models that are part of the group. It can also be used to limit what you see on the display, by creating a group of selected models and then adding the group to the display on the Layout tab. Tip: Dropping an effect on a Model group will give different results to dropping the same model on all elements of the group (because in the former case the canvas is treated as a whole matrix and then the effect is applied to the models within it). Some effects work at the Group level better than others. To create a Model Group, from the layout tab click on Select Model Groups. xLights/Nutcracker page 51 From the Model Groups window, click on Edit Groups. Click on Add Group to create a new group and replace the name of the group in the Group Name. In xLights/Nutcracker, Model Groups are sequenced against an internal grid representation. The Layout Mode and Grid Size provides options on how the ‘internal grid’ is to be calculated when effects run across a model group. xLights/Nutcracker page 52 A list of all available defined models will be displayed in the left hand window. Use the arrows to add models to the Group). Click on Update Group when complete. To modify the models that form part of a group, click on the group name in the top right hand window. The models that are currently in the group will be displayed in the ‘Models in Group’ window and the other models will be displayed in the ‘Add to Group’ window. Use the arrows to add or remove models as required and click on the Update Group when done. To remove a Model Group, select the Model Group and click Remove Group. This will not change or remove any of the underlying models, however any effects that have been placed at the group level on the sequencer will be removed and the Model group will be removed from the Layout display if it has been added to that display. xLights/Nutcracker page 53 Tip: When on the sequencer tab, If you right click on a Model group, the window will display a ‘Toggle Models’ option which will display all the models under the Model group (or hide them if you select the option again). You can also double click on the Model Group to obtain the same results. Render All The ‘Render All’ icon is used to force a render of all effects that have either been created within xLights/Nutcracker, imported via the Import Effects function or has been imported as a Data layer. Rendering order The Data Layer order renders bottom to top. Therefore what is on the top layer will be done last – much like painting – the last brush strokes are on the top. Model layers also render bottom to top. Therefore the bottom layer will be rendered first, then the layer above it and do on until the top layer is rendered last. However, the Models themselves render top to bottom based on how they are laid out in the Master View of the sequence. So the top model is rendered first, then the next lower model until the last model is reached. This is important to keep in mind when you have multiple models or model groups mapped to the same channels such as whole house model group and regular models. xLights/Nutcracker page 54 Tip
: You can change the order of data layers by moving them up or down. You can similarly change the order of layers within a model . And you can also change the order of models in the master view. Timeline and Waveform The top section of the display window is the Timeline section and indicates the scale that the waveform and sequencer is displaying. xLights/Nutcracker page 55 You can select an area on the timeline – depicted by the arrows and you can then play
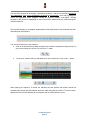
that section once independent of the section highlighted to be played on the waveform
. At the end of playing that section, the highlighted arrows disappear, leaving the waveform highlight to be played. Clicking anywhere in the timeline or highlighting an area in the timeline initiates auto play, without losing the waveform selection. The waveform displays a sonographic representation of the audio portion of the media that has been associated with the sequence. You can control the focus of the waveform. ● Zoom in on the waveform by double clicking on the waveform. Keep double clicking until you've got a zoom setting you can use. Or click on the ‘+’ button. ●
To zoom out, hold the shift key and double click on the waveform or click on the ‘‘ button. When playing the sequence, a vertical line indicates the start position and another vertical line extending right through the grid indicates where the audio being played current is. The time counter displays the time from the beginning of the sequence that the current position is up to. xLights/Nutcracker page 56 You can highlight a range on the waveform to play only that section. If you move your cursor on the waveform towards either edge of the highlighted area, a ‘hand’ appears and you can use that to move the edge. ● If the Pause button is selected, and then pressed again, the sequence will restart from the current position that it stopped at. ● If after a Pause, if the Play button is pressed, then the sequence will restart from the marked ‘start position’. ● Clicking on the Stop button will reset the start position to the beginning of the sequence. ● After Stop has been pressed the Rewind button will start from the beginning of the sequence and the fast forward button will play from the last component of the sequence. ● Highlighting a portion of the waveform will cause only that section to be played. Pressing the spacebar will replay that section.
● The ‘Replay’ button does not currently drive any functionality. Clicking on an effect in the grid will not alter the waveform area that has been highlighted to be played. The effect becomes the focus point, if you zoom in and out, but the play range does not change. If you do want the start position to move to where your effect is, or to be based on the edit position in the grid, then double click in the grid and that will then remove any highlighted position/area in the waveform and set the start position in line with where you have double clicked. Views A view is used to be able to easily select a list of models and the sequence in which they are to be displayed on the sequencer. Views work across sequences, so once you have setup a view with the models that you require, if you open any sequence, that view is available to use in that sequence. Tip: If you define Model Groups in a view, then when you use the view in the sequencer, you will be presented with a list of the groups. Double Clicking each group will open up the list of models within the group. xLights/Nutcracker page 57 Multiple views can be defined, with each view defining a list of models that are to be displayed and the sequence that they should be displayed in. For example: ● A ‘Static Model’ view may contain all elements that are non RGB. ● An ‘Import Model’ view may contain only elements that you wish to sequence after importing other data from other sequencers. ● A ‘Halloween Model’ view may contain only elements that you wish to sequence for Halloween. New models can be added to a view by selecting that view from the Views window within the Sequence Elements window (or from the View window to the left of the Waveform) and clicking on Add Models. Similarly models can be removed from a View by highlighting the model in the Model window within the Sequence Elements window and clicking on Delete Model. The position that the model appears within the view can be changed by highlighting the model and clicking on Move Up or Move Down. Within each view, the models that are part of the view can be marked as visible or non visible via the button to the left of the model. Note: The visibility is across all sequences and not specific to the sequence that is open. So if you make a model non visible, it will become non visible in all sequences. The
Master View
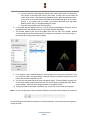
is a special (system created) view. It contains all the models that have been defined for the sequence that is open only i.e. it does not span sequences. It also determines the rendering order. Any model added to any other view when a sequence is open automatically gets reflected in the Master View of that sequence. Models can be deleted (i.e. removed) from any view at any time. Note: If you attempt to delete a model from the Master View, you will be prompted to confirm the deletion, as deleting the model from the Master View will remove all effects that you have created against that model for the sequence that you have open. If you add a Timing Track to a view, it will be added to all views that you have defined. xLights/Nutcracker page 58 Effect Presets Presets are a way to save an effect and easily recall it later to speed up sequencing. To save an effect (which can span layers and models) as a preset, highlight the effects that you want to save, right click and select Effect Presets. Under the Favorites tree, you can first create a group that describes the type of effect that you are going to save (Spirals, Bars, etc). Click on Add group and give the group a name (‘Spirals’). Then select the group and click New Preset and give the Preset name (‘Red and White Spirals’) and press OK. Caution: Do not use the default group that is already there. Ensure that you create you own group or groups before saving your effect preset against that group. It is good practice to create groups that reflect the type of the effect. To retrieve a preset that has been saved, go to a location on the grid where you wish the preset to be placed, right click on the sequencing grid, select Effects Preset, scroll to and locate the preset you want and double click on it to have it copied to your location, or select Apply Effect. If you change something within an effect that you have selected, you can update it by clicking Update Effects. You can move an effect preset from one group to another group, delete or rename a preset. You can also import an effect (from someone else), by clicking on Import, selecting an xlights_rgbeffects.xml
file and importing the effect from there. xLights/Nutcracker page 59 Built In Effects The following effects are ‘ready made’ effects that can be used to generate an effect straight away. Off Effect Effect Icon:
Sequencer representation: Description The off effect simply turns every pixel off on the model it is placed on. Prerequisite information Colors, Timing speed are ignored. Option/Settings Description None Tip:
You can use fade in/out with off. xLights/Nutcracker page 60 On Effect Effect Icon: Sequencer representation: Description The ON effect turns every pixel on for a given model. Prerequisite information Only one color may be used with the ON effect. If multiple colors are chosen, only the first color selected will be used. Option/Settings Description Start intensity Starting intensity value End Intensity Ending intensity value Tip: A start intensity of 0% and ending of 100% will result in a ramp up, opposed to an ON with hard edges. Tip:
Click on the "Shimmer" to get a shimmer effect. xLights/Nutcracker page 61 Bars Effect Icon: Sequencer representation: Description The Bars effect creates straight edged multiple color bars that move across a model. The edges may be hard, highlighted or 3D (soft). Prerequisite information Option/Settings Description Palette Rep Number of times the color palette repeats on a model. Direction UP/DOWN Bars move UP or DOWN a model. Direction Expand Bars start at the center and move outward towards the top and bottom. Direction Compress Bars start at the top and bottom edges of a model and move to the center. Direction Left/Right Bars start at the left/right edges of the model and move to the other side. Direction HExpand Bars start at the horizontal middle of the model and expand towards the left and
right edges. Direction HCompress Bars start at the left/right edges of the model and move in towards the horizontal
center of the model. Direction Alternate Bars are not animated like the other direction options. The colors for each bar
change to the next color selected in the palette. Highlight A single row of white is set at the leading edge of each color. 3D The trailing edge of each color fades to black. Tip: Layering a On effect with a start intensity of 0% and ending of 100% will result in a ramp up, as opposed to an On effect with hard edges. Be sure to set the blending option of the On effect to “layer 1 is mask”. Make sure the cycle count is set to 1, and you have a color selected (doesn't matter which color since it's a mask). xLights/Nutcracker page 62 Butterfly Effect Icon: Sequencer representation: Description The Butterfly effect creates seemingly random patterns of color swirling around, based on an initial set of parameters. Prerequisite information None Option/Settings Description Colors Rainbow or Palette can be selected. If Palette is selected, then the colors from the Color selection window are used. Style Up to 5 different styles can be selected for the effect. Bkgrd Chunks Controls whether and how sections of black color are to be used between the colors. Bkgrd Skip Used in conjunction with the background chunks to skip the black background. Speed Controls the speed with which the effects change.. Direction Controls whether the effect moves outwards or reverses direction. Tip: Butterfly style #2 generates radial patterns that look great on round models such as snowflakes, stars, globes, etc. In the context of
fast Fourier transform algorithms, a butterfly is a portion of the computation that combines the results of smaller discrete Fourier transforms (DFTs) into a larger DFT, or vice versa (breaking a larger DFT up into subtransforms). The name "butterfly" comes from the shape of the dataflow diagram in the radix2 case. The earliest occurrence in print of the term is thought to be in a 1969
MIT technical report. The same structure can also be found in the
Viterbi algorithm
, used for finding the most likely sequence of hidden states. xLights/Nutcracker page 63 Circles Effect Icon: Sequencer representation: Description The Circles effect creates solid sphere like objects that move seemingly in random fashion on a model. Used most effectively on models such as a mega tree or a matrix. Prerequisite information One or multiple colors can be used for the effect. If multiple colors are selected, than the spheres will be made up of the selected different colors. Option/Settings Description Number of Circles Number of circles that displays on a model. Size The size of each circle of the effect. Speed The speed at which the circles move on the effect. Bounce The effect creates a noticeable bounce up and down of the circles. Radial The circles stretch outwards and back radially. Plasma The circle edges blend into each other. Radial 3D The circles stretch outwards and back radially. Bubbles Each circle displays an outline rather than being solid in color. Linear Fade Causes each circle to blur and have its edges fade to black. Tip: Place the effect to initially span at least a few seconds. After placing the effect on the model, adjust the number of circles and the speed down until the circles can be seen moving around and then adjust upwards as required. Tip
: Place the Circles effect on a star and select the Radial option to obtain a nice looking effect. xLights/Nutcracker page 64 ColorWash Effect Icon: Sequencer representation: Description The ColorWash effect creates a wash effect of the selected color or colors across the model. Prerequisite information One or multiple colors can be used for the effect. If multiple colors are selected, than the ColorWash will use the selected colors repeating the colors depending on the ‘count’ setting. Option/Settings Description Count Number of times the colors selected will be repeated for the duration of the effect. Vertical Fade Controls whether the wash effect should fade vertically. Horizontal Fade Controls whether the wash effect should fade horizontally. Entire Model By default this effect will cover the entire model. When unchecked, you can then set
the X,Y coordinates for a partial color wash for an area of the model. Shimmer Applies a shimmer effect to the ColorWash effect if selected. Circular Palette When selected this smoothes the color transitions when the effect repeats per the
count setting. If not selected there will be a hard transition between the last color
selected and the first color selected. X, Y Coordinates Defines area of the model for the effect to be applied to when the Entire Model,
checkbox is deselected. xLights/Nutcracker page 65 Curtain Effect Icon: Sequencer representation: Description The Curtain effect creates a color transition of one or more colors across the face of a model depicting a curtain opening or closing based on the options selected. Used most effectively on models such as a mega tree, a matrix, whole house or grouped arches. Can also be used on singular items such as each arch. Option/Setting
s Description Curtain edge Denotes how the curtain edge will come together (i.e. close) or open – depending on the ‘Effect’
setting value. Examples: Center – Two curtains will move from the outside to the inside (center) of the model or from the
inside (center) to the outside of the model. Bottom – The curtain sweep will be from the top, closing or opening out towards the bottom. Effect Denotes whether the curtain should open, close, open then close or close then open. Used conjunction with the curtain edge direction. Swag Width Defines the curve of the curtain effect. A value of zero will depict a straight curtain edge. A value
of 10 will depict a curved curtain edge with a sweeping drop. Swag Speed Defines the speed at which the curtains will close or open. Tip:
You can use the curtain effect layered with any other effect as a mask to reveal the other effect. xLights/Nutcracker page 66 Faces Effect Icon: Sequencer representation: The Faces effect is used by xLights/Nutcracker to generate singing and talking face effects. It is used and placed on the sequencer as part of the Papagayo import functionality, if the target in xLights/Nutcracker is a Coro face. It is also used within xLights/Nutcracker functionality to generate Singing Faces. The use of this effect is described in the section describing
Singing Faces
. xLights/Nutcracker page 67 Fan Effect Icon: Sequencer representation: Description The Fan effect creates spiralling blade like objects that move around the model either clockwise or counterclockwise. Used most effectively on models such as a mega tree or a matrix. Prerequisite information One or many colors can be used for the effect. If multiple colors are selected, then the blades of the fan will be made up of the selected colors. Option/Settings Position: Center X,Y Defines the x and y coordinates of the center (i.e. focus) point of the fan effect. Position: Radius 1 Defines the lower radius of the fan. Position: Angle Defines the angle of each arm of the fan. Position: Radius 2 Defines the upper radius of the fan. Position: Revs Defines the number of 360 degree rotations per timing mark the effect is in. Blades: # Blades Defines how many blades the fan effect will use per color selected. Blades: Width % of area that the width of each blade will take on the effect. Blades: Angle Angle of each blade from center. Blades: # Elements How many segments each blade is divided into default is 1. Options:Duration Controls the swell i.e. the amount of time that the fan swells out. Options: Acceleration Controls how quickly the fan swells out and then back in. Options: Reverse Reverses the direction of the rotation of the fan effect. Options: Blend Edges Each edge blends to black. Turning it off converts the fan effect to a full circle at thee end of each. swell. xLights/Nutcracker page 68 Tip:
Playing with the radius values i.e. making radius 2 less than radius 1 can provide some interesting effects. Tip
: You can create four Fan effects that each take up about one quadrant of your model (matrix/house) and have them all doing different thing with their arms blending at the edges. The four positions would be x25:y25, x25:y75, x75:y75, x75:y25
. xLights/Nutcracker page 69 Fire Effect Icon: Sequencer representation: Description The Fire effect creates an effect that appears as licks of flames. Used most effectively on models such as a mega tree or a matrix. Prerequisite information None Option/Settings Description Height Defines the ‘length’ or height of the flames. Hue Shift Defines the color of the flame. Growth Cycles Defines the total length that the flames should grow to. Location Defines the initial location and therefore the direction of the flames. eg a setting
of ‘Bottom’ would drive the flames from the bottom to the top. xLights/Nutcracker page 70 Fireworks Effect Icon: Sequencer representation: Description The Fireworks effect creates a fireworks type of effect of exploding lights in a burst. Used most effectively on models such as a mega tree or a matrix. Prerequisite information One or multiple colors can be used for the effect. If multiple colors are selected, then the lights in the explosion will be made up of the selected colors. Option/Settings Description Number of Explosions Defines the number of explosions to be created. Particles in Explosion Controls the number of particles in the explosion. Velocity of Particles Controls the speed of the particles exploding. Particle Fade Defines the speed at which the particles should fade in the explosion after the initial
burst
. Tip:
Add multiple layers of fireworks with different colors on each layer to get more explosions with multiple colors at the same time. Set different velocities and number of explosions on each layer. xLights/Nutcracker page 71 Galaxy Effect Icon: Sequencer representation: Description The Galaxy effect creates a spiral like effect that expands around the model either clockwise or counterclockwise. Used most effectively on models such as a mega tree or a matrix. Prerequisite information One or multiple colors can be used for the effect. If multiple colors are selected, than the spiral will be made up of the selected colors. Options/Settings Description Start: Center X,Y Defines the x and y coordinates of the center (i.e. focus) point of the galaxy effect. Start: Radius Defines the lower radius of the galaxy. Start: Width Controls the width of the lower end of the spirals. Start: Angle Controls the angle of the spirals. End: Radius Defines the upper radius of the galaxy. End: Width Controls the upper width of the spirals. End: Rev’s Determines the number of full revolutions each arm makes in the given timeframe. Options: Head Duration Controls the swell i.e. the amount of time that the head of the spiral uses. Options: Acceleration Sets the speed of a nonlinear movement for the head color and body. Options: Reverse Reverses the direction of the rotation of the galaxy effect. Options: Blend Edges Each edge blends to black. Turning it off converts the galaxy effect to a full circle at the
end of the rotation. Options: Inward If the spirals overlap, it determines if the spirals will appear to be moving inward outward. If there is no overlap, this setting will have no effect. xLights/Nutcracker page 72 Garlands Effect Icon: Sequencer representation: Description The Garland effect creates an effect that simulates a circle of rings that drop on each other (depending on the direction of the effect). Prerequisite information One or multiple colors can be used for the effect. If multiple colors are selected, than the spheres will be made up of the selected different colors. Option/Settings Description Garland Type Controls 4 different type of garland effects. Spacing Controls the spacing of each cycle of the garland. Cycles Controls the number of complete cycles of the effect in the given timeframe. Stack Direction The direction in which the garland effects move or drop. Up to 8 variations are
possible i.e. Downwards, Upwards etc. xLights/Nutcracker page 73 Glediator Effect Icon: Sequencer representation: Description The Glediator effect enables the import and use of an effect that has been created using the Glediator software into xLights/Nutcracker Prerequisite information Glediator is a 3rd party application that can generate an unlimited number of effects. Once an effect has been created, it must be saved as a .GLED file. Procedure Place the Glediator effect in on timing cells that you wish to have the effect on a model. Click on the filename prompt and browse and select the gladiator file. Tip:
You must configure Glediator to the X,Y dimensions of your model you wish to add effects to. You may also use Jinx! to create effects. It will create a ‘.out’ file which can be used with this effect. There is no need to rename the saved output file to .gled to use with the Glediator effect. The Glediator effect now supports .GLED and .OUT files. xLights/Nutcracker page 74 Life Effect Icon: Sequencer representation: Description The Life effect simulates the Game of Life cellular automation model. From Wikipedia: “
The universe of the Game of Life is an infinite twodimensional orthogonal grid of square cells, each of which is in one of two possible states, alive or dead. Every cell interacts with its eight neighbours, which are the cells that are horizontally, vertically, or diagonally adjacent.” Prerequisite information One or multiple colors can be used for the effect. Option/Settings Description Cells to Start Controls the number of cells that the effects starts with. Type Selects the type of pattern. Four values can be selected. Speed Controls the speed at which the pattern and cells live and die. xLights/Nutcracker page 75 Lightning Effect Icon: Sequencer representation: Description The
Lightning effect generates a vertical lightning bolt type of effect. Prerequisite information One or multiple colors can be used for the effect. White is always selected for the outer edge of the lightning bolt. Option/Settings Description Number of Segments Defines the number of zig zag segments to be used in
the effect. Width of Bolt Controls the width of the zig zag. A value of 1 will form a
straight vertical line. Forked Lightning (Y,N) Controls whether the effect generates a forked efefct Top Location (x;y) Defines the coordinates of the top end of the lightning
bolt. X Movement Controls the movement of the lightning effect horizontally across the effect. Can be made to be
stationary or move in either direction. xLights/Nutcracker page 76 Marquee Effect Icon:
Sequencer representation: Description The Marquee effect displays scrolling lines or bands of pixels around the edge of an model or from one end of a line to the other. Prerequisite information One or multiple colors can be used for the effect. If multiple colors are selected, then the bands of the effect will be sequentially selected from the colors chosen. Option/Settings Description Band Size Controls the proportion ( % wise) of the circumference of the marquee effect that the pixels
will light up. Skip Size Controls the proportion (% wise) of the circumference of the marquee that will be skipped by
the pixel color ie will be dark. Thickness Controls the thickness of the marquee effect ie how many pixels wide. Stagger Defines the orientation of the pixel band thickness (visible if the thickness is > 1). Speed Controls the speed at which the marquee effect moves around. Reverse If selected, reverses the direction of the effect to counterclockwise. Scale (x:y) Used to control the scale (i.e. boundary) of the marquee effect. Defined as a % from 100% to + 100% if ‘Offset in Pixels is not ticked Defined as number of Pixels from 100 to + 100 if ‘Offset in Pixels is ticked Offset in Pixels Used to specify exact number of pixels rather than % for offset see Scale (x:y) Xaxis, Yaxis Center Used to control the center position of the marquee effect within the model Wrap X Used to warp the effect horizontally around the model. xLights/Nutcracker page 77 Meteors Effect Icon: Sequencer representation: Description The Meteor effect generates a number of meteor like streaks of color. Prerequisite information None. Option/Settings Description Colors Defines whether the Rainbow collection of colors is to be used for the effect or whether colors
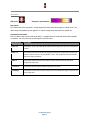
are to be selected from the Palette. If Palette is selected, then the colors used will be the ones
selected via the Color window for the effect. Effect Selects the direction of the meteors. Eight options are possible including Up, Down, Implode,
Explode etc. Count Controls the number of particles used for the effect. Trail Length Controls the length of the tail of the meteor. Swirl intensity Controls whether the meteor moves smoothly or swirls/oscillates. Speed Controls the speed of the meteor effect. Tip:
Hidden under the effect drop down box is a meteor type called Icicles. xLights/Nutcracker page 78 Morph Effect Icon: Sequencer representation: Description The morph effect creates a movement across a model of one or many strands of lights with a head, body and tail. Morph looks best on megatrees, arches and matrix models. Prerequisite information The first 2 colors chosen will be the head color, middle 2 colors chosen will be the body colors and the last 2 colors chosen will be the tail colors. A morph can start anywhere and end anywhere on a model. The starting and ending locations are specified by the X,Y coordinates on the Start/End tabs. Option/Settings Description Start : X1a Defines the first lateral position starting point (0 is bottom). Start : Y1a Defines the first vertical position starting point (0 is left). Start : X1b Defines the second lateral position starting point. Start : Y1b Defines the second vertical position starting point (100 is right). Start : Head Length Defines how long the head will be and is depicted by the head effect on the grid. Start : Link Points Enabling this option will cause the X,Y B points to be linked to the X,Y A points. Morph Quickset Options These options allow the user to quickly choose a commonly used morph type and direction. These are customizable after they are selected. End : X2a Ending position 1 on the horizontal axis (100 is top). End : Y2a Ending position 1 on the vertical axis. End : X2a Ending position 2 on the horizontal axis. End : Y2b Ending position 3 on the vertical axis. End : Head Length Defines the relative size of the head when the morph reaches the end points. End : Link Points Enabling this option will cause the X,Y b points to be linked to the X,Y a points. xLights/Nutcracker page 79 Head Duration Defines how long the head will show during the morph before it changes to the body colors. Acceleration Defines a nonlinear speed for the movement of the morph. Repeat Count This is used when selecting a single morph and you want it to repeat x number of times. Repeat Skip Sets the number of legs on the model that the morph will skip when the repeat option is enabled. Stagger This is used in conjunction with the single line morph and repeat. It can be set to positive or negative values for left or right sweeping type morphs. Small values look best (14). Show Head at Start When used with the stagger option, the head of each morph will show prior to the morph moving based on the stagger interval. Tip
: Open and use the Effect Assist window. The window will display a grid corresponding to the x,y start and end coordinates. If you then grab a slider for the morph effect and move it, the Effect Assist window shows exactly where the coordinate is being moved to, making it easier to determine what is being done to the effect. xLights/Nutcracker page 80 Piano Effect Icon:
Sequencer representation: Description The Piano effect displays a piano keyboard effects where the keys modulate based on the beat and frequency of the sequence audio. the effect also supports representation on user defined shapes besides that of a keyboard layout. Prerequisite information A Polyphonic Transcription notes file for the sequence audio you can use Audacity to create this file. Procedure 1. Use audacity and for the sequence audio analyse and generate Polyphonic Transcription notes. 2. Export this label file and and save the file in your show song directory or any other suitable location.
Rename the file to ‘notes.txt’ 3. Select the Piano effect and drop it as required on the sequencer grid against the desired model 4. Click on the Shapes button 5. Navigate to the xLights/Nutcracker Installation directory, then within that navigate to the piano subdirectory. 6. Select the PianoExampleKeyTopShapes.png file 7. Click on the CueShape Map button 8. From the same directory, select the Piano88KeyShapeMap.txt file 9. Click on the Cues button 10. Navigate to your songs directory or the location where the polyphonic notes file has been saved and select the ‘notes.txt’ file. xLights/Nutcracker page 81 11. Select a style for the keys, the # of keys, the # of rows and the placement of the keys Option/Settings Description Style Select the style of the effect. # of Keys Number of keys to be used for the effect. # Rows Number of rows to be used for the effect. Placement Describes how the keys are to be placed on the model i.e. Top left, Top center. Cues The name and location of the polyphonic transmission label file. CueShape Map The name and location of the Piano Effect Cue Shape Map file. Shapes The name and location of the key shapes file. Tip: Select a Style of Equalizer (bars), or Player Piano (scroll). Select a Placement of Bottom Middle. xLights/Nutcracker page 82 Pictures Effect Icon: Sequencer representation: Description The Pictures effect is used to import a supported image type (gif, bmp, jpg etc) and render that image as an effect while also allowing the image to be manipulated and edited within xLights/Nutcracker. Prerequisite information The image that is to be imported. Procedure Place the Picture effect in on timing cells that you wish to have the effect on a model. Click on the effect on the grid and amend the parameters as required. First click on the Browse button and navigate to the location of your image, select the image and click open or double click to select the image. Option/Settings Description Movement Controls how the image will move across the model layout. In addition to directional options
such as left, right etc, there are a number of special options, such as peekaboo, scaled, flag
wave, wiggle. Movement Speed Controls how fast the image moves across within the effect timeframe. Frame Rate Adj When using the pictures effect to play an AVI converted to images with ffmpeg, this setting is
used to set the playback speed if needed to speed up or slow down the playback. Start Position: (x,y) Sets the position of the image as it does not need to be centered on the model. Start Position: (wrap x) Used to bound the picture image within the model. Defines and controls the coordinates of
the ‘bottom left’ start corner. End Position: (x,y) Used to bound the picture image within the model. Defines and controls the coordinates of
the ‘top right’ end corner. xLights/Nutcracker page 83 Tip: If the image is not scaled to your model (eg matrix), the ‘scaled’ movement value will autoscale the image. However, it is better to scale the image externally to suit your model, so that another movement value can then be used. Tip:
The playback rate is influenced by the length of the effect. So if you change the time length of your effect and have an image that is non stationary, the rate of movement will adjust according to the new time length. Caution
: If you move the image that you have used for the picture effect to a different location or delete it, when you next run the sequencer, if the image is not found, an error message will not be displayed, but the picture effect will render a blank image. Pixel Editor (Matrix Drawing Tool) You can use the Matrix drawing tools to amend a picture or draw your own pictures or animations. Click on the Picture effect within the sequence grid that contains your effect and then open the Effect Assist window if it is not already open. You will be presented with a window similar to the following i.e. the picture of your effect is copied to a grid. The Matrix Drawing Tool has 8 windows, each with a color and a radio button under the color to show you which color is selected. You can change the color assigned to each window, change the saturation, hue, brightness, change the RGB setting etc. xLights/Nutcracker page 84 Select the pencil tool and after selecting a color, use the left mouse button to draw and fill in the selected color or use the right mouse button to erase what has been drawn. The eraser can be used to remove colors on the grid. New Image Click on New Image to create a new image. The first time you use this function, you will be prompted for a directory to store the image files in. As an example, create an ‘image’ subdirectory within your show directory. You will be presented with an empty grid and you can then draw/paint your effect within the grid. Click on Save image and name the image. The model window will display the model just drawn. (The model won’t be updated until the file is saved). Load Image Load Image is used to load a previously saved image or any other supported image. If the picture loaded is not as per the model scale, you won’t be able to edit it. Save As Save As can be used to save an effect to a new name. Playing a video file as an effect You can play an mp4,avi,mov or (any of over 100 formats) movie on a model such as a matrix or a whole house using the picture effect. To get a list of the formats supported type
ffmpeg formats at the command line for an output list. To play a video as an effect, create a temporary directory, and copy the video file there. Then use the ffmpeg utility to break it up into frames. ffmpeg is run from the DOS command line and is included with each release of xLights/Nutcracker. Example: ffmpeg i yourmovie.mp4 s 30x50 f%d.png Notes: The mp4 file name should be enclosed in quotes if it has a space in the name or an unusual character e.g. ffmpeg i “your movie.mp4” s 30x50 f%d.png This will create a number of files 'f1' onwards i.e. frames f1.png, f2.png .etc. The s 30x50 is the size output of the png files to be used for playback on your model where the format is s WxH pixels. xLights/Nutcracker page 85 ‘f’ refers to the output filename prefix. You could instead have specified outfile%d. Place the the picture effect on your model and browse and point to the first file i.e. "f1.png". The picture effect will then play the individual files quickly in succession giving the appearance of the video file playing on your model. Note: Only 'something1' will work i.e. the application looks for the '1' and then only picks the others. If you have an entire movie saved, you can export just portions of the video file as follows: ffmpeg i yourfile.avi s 30x50 ss 00:00:00 t 00:03:00 movie1%d.png This will make a 3 minute capture starting at the beginning. The time is noted in hours:min:sec. Tip: A quick way is to navigate to the directory with the video file using Windows Explorer. Then make sure no files are selected and hold down SHIFT and rightclick and you should get an option for "Open command window here". Now you have a DOS prompt already in the right directory without having to figure out how to type all the commands to get there. You won't get the right options if something is highlighted. xLights/Nutcracker page 86 Pinwheel Effect Icon: Sequencer representation: Description The Pinwheel effect generates a rotating pinwheel arrangement or radial rays type of effect. Prerequisite information None Option/Settings Description #Arms Defines the number of radial arms to be used for the pinwheel. Size Defines the outer circumference of the effect. Twist Controls whether the arms should be straight or twist clockwise or counterclockwise (within the rotation). Thick Controls the color thickness of each arm. Speed Controls the speed of the rotation. Rotation Defines the direction of rotation i.e. Clockwise or counterclockwise. 3D Defines whether the pinwheel should have a 3D or inverted 3D effect. Xaxis Center Controls the position of the fulcrum of the pinwheel along the horizontal axis. Yaxis Center Controls the position of the fulcrum of the pinwheel along the vertical axis. xLights/Nutcracker page 87 Plasma Effect Icon:
Sequencer representation: Description The Plasma effect generates cycles of changing color to give an illusion of a liquid organic movement effect. Prerequisite information None Option/Settings Description Color Choice Normal or 4 other preset values. if Normal is selected , then one or more colors from the palette can be used to define the colors of the effect. Add Twist to Effect Defines how much the components of the movement i.e the ripple, twists. Line Density Controls the thickness of each line of the ripples within the effect. Speed Controls the rate of change of the ripple movement within the effect. xLights/Nutcracker page 88 Ripple Effect Icon: Sequencer representation: Description The Ripple effect generates a ripple like spreading movement of color similar to when an object is dropped into water. Prerequisite information One or multiple colors can be used for the effect. Option/Settings Description Object to Draw Defines the shape of the object that will ripple. The Circle is the default and the most
commonly selected value. A Square and Triangle shape can also be selected. Movement Defines the direction of the ripple i.e. Explode (Outwards) and Implode (Inwards). Thickness Controls the thickness of each line of the ripple. Cycle Count Defines the number of cycles that the shape should explode/implode within the given time
frame of the effect. 3D Indicates whether the ripple effect should render as is a 3D or 2D effect. xLights/Nutcracker page 89 Shimmer Effect Icon: Sequencer representation: Description The Shimmer effect provides an effect whereby the lights rapidly turn on and off. Prerequisite information One or multiple colors can be used for the effect. Option/Settings Description Duty Factor Defines what percentage of the total cycle the lights will shimmer on. For the rest of the time
in the cycle, they will be off. Cycle Count Defines the number of cycles (shimmer on, followed by an off period) that will be repeated in
the timeframe of the effect. Use All colors If ticked, then the shimmer effect generates a pulse effect rather than a shimmer effect with
the selected colors pulsing off and on in sequence. xLights/Nutcracker page 90 Shockwave Effect Icon: Sequencer representation: Description The Shockwave effect describes a circular object that starts small and expands to a larger circle. The effect can be configured to do the opposite i.e. start as a large circle and shrink to a smaller one. Prerequisite information One or multiple colors can be used for the effect. If multiple colors are used, then as the effect expands or contracts, the circle color will cycle through the selected colors. Option/Settings Description Center X, Y Controls the center of the effect. Moving either value changes the horizontal or vertical axis position. Radius 1, 2 Controls the size of the circle effect by changing the starting or ending radius values. If the Radius 2 value is set to be > than the Radius 1 value, then the effect will contract inwards rather than expand outwards. Width 1,2 Controls the amount of the colored component of the effect and the rest of the black background component. Acceleration Controls the speed at which the effect expands and contracts. Blend Edges If selected, the circle colors will have a fuzzy look. If not selected the edges of the circle will have a sharp look. xLights/Nutcracker page 91 Single Strand Effect Icon: Sequencer representation: Description The single strand effect is an effect that is used to implement chases and other such staggered effects on models that are single dimensional in nature such as house outlines, arches as well as AC models Prerequisite information One or multiple colors can be used for the effect. Option/Settings Description Chase: colors Defines whether the Rainbow collection of colors is to be used for the effect or whether
colors are to be selected from the Palette. If Palette is selected, then the colors used will be the ones selected via the Color window for the effect. Chase: Chase Size Defines the size of the chase effect as a percentage of the total length of the model that will be on during the chase. Chase: Cycles Defines the number of cycles of the chase that will execute during the timeframe. Chase: Chase Types Defines the direction and type of the chase LeftRight, RightLeft, Bounce from Left etc. Chase: 3D Fade Indicates whether a 3D effect should be applied to the chase. Chase: Group All Arches When set, will synchronize the chase effect across multiple elements in an Arches model. Skips: Band Size Defines the relative size (from one to twenty) of the strand that will be on. Used in conjunction with the Skip Size. Skips: Skip Size Defines the relative size (from zero to twenty) of the strand that will be off. Used in conjunction with the Band Size. Examples: A Band Size of 1 and Skip Size of zero will have the entire effect on. A Band Size of 1 and Skip Size of 1 will have half the effect on and half off. A Band Size of 2 and Skip Size of 1 will have half the effect on for two units and off for one
unit. Skips: Starting Position Used to define the starting position of the first part of the strand that will be on. Advancing this value advances the component of the strand that will first turn on. Skips: Number of Advances This defines the relative value of the number of units that the effect will skip before turning on. A value of zero will force the effect to be stationary in one position. Skips: Direction Defines the direction of the skip i.e. Left, right, From Middle or To Middle. xLights/Nutcracker page 92 Snow Flakes Effect Icon: Sequencer representation: Description The Snowflake effect paints a picture of falling particles i.e. a similar to snowflakes falling on snow. Prerequisite information This effect works best with a single color selected. Multiple colors can be selected and depending on the type of the snowflake either one color or multiple colors will be used. Option/Settings Description Max Flakes Defines the relative % of flakes that should be used for the effect from a small number to a large number. Type Up To five different forms of flakes can be generated. Speed Controls the speed at which the flakes descend. Accumulate Defines whether the snowflakes accumulate at the bottom of the effect or disappear. It this option is selected, then they will accumulate. xLights/Nutcracker page 93 Snow Storm Effect Icon: Sequencer representation: Description The Snowstorm effect paints a picture of particles blowing i.e. a similar to an ice or dust storm.. Prerequisite information One or multiple colors can be used for the effect. Option/Settings Description Max Flakes Defines the relative % of particles that should be used for the effect from a
small number to a large number. Trail length Defines and controls the length of the trail that the particles leave before fading
out. Speed Controls the speed at which the flakes descend. xLights/Nutcracker page 94 Spirals Effect Icon: Sequencer representation: Description The Spiral effect provides different representations of two and three dimensional spirals and helix. Prerequisite information One or multiple colors can be used for the effect. However, this effect looks best with at least two colors selected. Option/Settings Description Palette Rep Defines the number of times (between one and five) that the selected colors are repeated during the duration of the effect. Spiral Wraps Controls the vertical orientation of the spiral. A value of zero is used for vertical lines and the spirals can be adjusted to lean towards either direction. Thickness Controls the thickness of the strands of the spiral. Movement Controls both the speed and direction that the spirals will move. Blend If set, then all the colors selected are blended together in each strand of the spiral. If not set, then each strand uses a different color. 3D If set, will provide a 3D type of effects. Grow The width of each spiral will grow slightly per cycle as it spins. Shrink The width of each spiral will shrink slightly per cycle as it spins. xLights/Nutcracker page 95 Spirograph Effect Icon: Sequencer representation: Description The Spirograph provides an effect described or formed by rolling a circle inside or outside of another circle. The point is placed at any point on the rolling circle. Prerequisite information Only one color can be used for the effect. Option/Settings Description Speed Defines the speed at which the spirograph will move. R Radius outer circle This defines the radius of the outer or fixed circle that is used to calculate the spirograph movement. r Radius of inner circle This defines the radius of the inner or moving circle that is used to calculate the spirograph movement. d Distance Defines the offset distance of the point of the spirograph that is used to calculate the spirograph movement. d Animation Defines the level of animation or movement of the spiral away from the axis. A higher value will cause the spiral to expand outwards. Length Defines the length of the expansion of the animation. Note: r should be <= R xLights/Nutcracker page 96 Strobe Effect Icon: Sequencer representation: Description The Strobe effect provides an effect where light particles turn off and on rapidly, but at fixed intervals. Prerequisite information One or multiple colors can be used for the effect. Option/Settings Description Number of Strobes Controls the number of particles that form part of the strobe effect. Strobe Duration Controls the duration of the particles being on; as a result affects how quickly or slowly the particles turn off and on. Strobe Type Unused at this stage. xLights/Nutcracker page 97 Text Effect Icon: Sequencer representation: Description The Text effect enables upto 4 lines of text, all individually controlled to be displayed. The content of the text can be static, but can also include countdown timers. Prerequisite information One color can be selected for each line of text. Each line can have a different color. Click on the tab (i.e. Line1.. Line4) to select the Line of text to be defined. For each line of text, the following settings can be defined: Option/Settings Description Text Contains the text that is to be displayed for the line. Font Defines the font that is to be used for the text. Click on the attribute to open up a window where the type of font, style, size, color and other related attributes can be defined. Movement C Defines the direction of the movement of the line of text. One of several options are possible such as Left, Right, Down, None, etc. If the box next to the Movement setting i.e. ‘C’ is ticked, then the text will reach the center and stop. Speed Controls the speed at which the line of text moves. Effect Controls the layout of the line of text. The default is ‘Normal’, however other options to rotate the text at different angles are possible. xLights/Nutcracker page 98 Count down Defines whether the line of text is to be used as a Countdown Timer. The default value is ‘None’ indicating that it is not a Countdown Timer effect. For a count down effect, the following options are possible and count down will be based from the time the effect is rendered or finally saved and not from when it is executed in the sequence. The concept of the count down timer stems from New Year’s eve count down displays. If one knows exactly when the countdown will start, then setting this to an appropriate date/time is a nonissue. The date/time must conform the the RFC822 standard format. Properly formatted examples are: Fri, 25 Dec 2015 00:00:00 +0100 Fri, 25 Dec 2015 00:00:00 EST Fri, 25 Dec 2015 00:00:00 MST Fri, 25 Dec 2015 00:00:00 0800 These must be specified in the Text field without any quotes. Option Format seconds 100 Will execute a 100 second countdown In the following examples ‘+0100’ refers to your time
+GMT hours. Change accordingly. Or you can use
GMT, EST etc. to date ‘d h m s’ Fri, 25 Dec 2015 00:00:00 +0100 Will display 33d 3h 38m 14 to date ‘h:m:s’ Fri, 25 Dec 2015 00:00:00 +0100 Will display 3h 38m 14 the time is calculated to the
next day in hours, mins, secs to date ‘m’ or ‘s’ Fri, 25 Dec 2015 00:00:00 +0100 Will display 217m the time is calculated to the next
day in minutes to date ‘s’ Fri, 25 Dec 2015 00:00:00 +0100 Will display 13011 the time is calculated to the next
day in seconds !to date !%tofmt /Fri, 25 Dec 2015 00:00:00 +0100/ %D Will display 133 Position This setting is used to adjust the initial position of the text. Either the vertical (Y) or the
horizontal (X) position of the text is adjusted, depending on the value of the ‘Movement’
setting. For a value of ‘None’ or a horizontal movement such as Left / Right, adjusting the
setting will move the initial position of the text vertically. xLights/Nutcracker page 99 Tree Effect Icon: Sequencer representation: Description The Tree effect creates a series of zigzag branches against a colored background. This effect is best used against a tree type of model such as a mega tree. Prerequisite information The first color selected will be used as the background color for the model (i.e. the mega tree). Subsequent color(s) will be used for each branch. Option/Settings Description Number Branches Defines how many individual branches are created for the effect. Speed Controls the speed at which the lights of the branch move across the effect. xLights/Nutcracker page 100 Twinkle Effect Icon: Sequencer representation: Description The Twinkle effect provides an effect of individual particles turning off and on slowly or rapidly, similar to the shimmer effect but with a different and more random implementation. Prerequisite information One or multiple colors can be used for the effect. Option/Settings Description Number Lights Defines and changes the number and pattern of the lights twinkling from a scattered pattern, to lights closely aligned, to an intense pattern. Twinkle Steps Controls the speed and accordingly the smoothness with which the colors of the lights change. Strobe If selected, will generate a strobe like effect to the twinkle. xLights/Nutcracker page 101 Wave Effect Icon: Sequencer representation: Description The Wave effect generates a waveform effect across the model. Different types of waveforms are possible as described below. Prerequisite information One or multiple colors can be used for the effect. Option/Settings Description Wave Type Defines the type of waveform to be generated by the effect: Sine Decaying Sine Square Triangle Fractal/Ivy Fill Colors Defines the color of color selection to be used for the waveform. If ‘None’ is selected, only the first color selected is used. If ‘Palette’ is selected, then the colors selected from the color palette are used. If ‘Rainbow’ is selected, then the colors selected from are from the rainbow palette. Mirror Wave If this setting is selected, a mirror image of the waveform is also generated. Number of Waves Controls the formation of the speed at which the waves are formed. Thickness of Wave Controls the thickness of the waveform. If multiple colors have been selected, as the thickness increases, then the different colors form part of the waveform. For a thin wave, the first color selected is used. Scale Height of Wave Defines the height of the waveform. Speed Controls the speed at which the wave moves across in the specified direction. xLights/Nutcracker page 102 Wave Direction Defines whether the wave moves from Left to Right or Right to Left. Adding an Effect Click on the effect from the effects toolbar and drag the effect to the grid and release it between two timing marks on the row of the model you wish the effect to play on. You can then select and drag each end to stretch the duration of the effect or reduce the duration of the effect. The effect that you are working with is reflected in the (associated and open) windows to the left of the grid. Tip:
Select and open the Views, Window menu and select windows to be opened. Changing an Effect From the Color window, you can change the Colors that apply to the effect, as well as the Sparkles, Brightness and Contrast values. Tip:
if this window is not open, select and open the Window from the Views, Window menu You can save all your window positions as a “Perspective” for easy recall. From the Effect Settings window, you can change various options/attributes that are applied to the effect. Selecting Colors For any effect, you can change the initial colors selected for the effect by selecting a different color or colors from the Color Window xLights/Nutcracker page 103 Tip:
Double Clicking on the any of the color icons opens up a Palette window, where the standard colors can then be replaced with a new standard color or a custom color can be selected. Tip: One you tailor an effect then use the effect again to a new timing mark, the effect will have all the same settings as the previous effect did. However, if you were to highlight any other effect with different colors selected then the colors will change to the colors of the effect that you have selected. Single Channel Colors Single Channel colors react only to the color that they are defined as. If you define them as single color blue then it will only react to the blue channel. You can set any color and it will route the blue portion of that color to that model. If you send White (R=255, G=255 B=255), to a single color blue model then it will turn fully blue. If you send blue it will turn fully blue. If you send red or green it won't turn on at all. If you send pink which is R=255, G=0, B=128 you will get a half brightness blue. You can therefore include those single color models inside a group and they will react to the colors dropped on the group. Any of the "blue" components of the RGB values assigned to that model will cause it to fire at the associated brightness of the component. The strings will light up with the intensity of the color for each channel. So if you send Purple R=128, G=0, B=128), that will light up all the Red and Blue strings but only about 50% intensity. Tip:
If you just want a string to turn on full brightness without worrying about it then use White. xLights/Nutcracker page 104 Moving and Stretching effects An effect or group of effects can be moved, by highlighting the effect, or range and moving it along the same model row/rows on the grid forwards or backwards. Hold the
Shift
key to move multiple effects. Tip: Effects can be stretched by using the
Alt key and dragging one edge of the effect highlighted (most commonly the bottom right corner) to provide a Chase effect.You may need to use Toggle Nodes to view the nodes so as to be able to strect an effect. Tip:
A simple way to do a chase effect is to select a block of cells and hit 'd' for a fade down or 'u' for a fade up. If you then need to adjust it, drag the end line. Copy, Paste, Delete Effects In order to copy and paste an effect, select the individual effect, right click and then select Copy. Move the cursor to where you want the effect to be copied to, right click and select Paste. You can also press Ctrl+C and Ctrl+V to copy and paste the effect. In order to copy and paste a range of effects, use the cursor to highlight and select a range of cells. Then copy, followed by paste. Tip: The copy works on copying effects and not copying grid locations. Therefore it will copy the first effect from with the range highlighted, and accordingly will paste that effect (and others after it that were selected) at the grid location when Paste is selected. You can delete an effect, by selecting the effect in the grid and pressing delete on your keyboard. Tip: In order to delete multiple effects, use the left mouse key to highlight a range of cells and then press delete. You can also right click on an effect and choose delete. Undo Effect xLights/Nutcracker page 105 Many, but not all effect actions can be ‘Undone’ by Right Clicking on the Grid and selecting the Undo action i.e. Undo effect move or Undo delete.. etc At this point, Ctrl+Z to Undo is not supported. The Undo actions can be daisy changed i.e. they can be repeated one after another. Selecting Multiple Effects In order to select a group of effects , use the left mouse key to select the range of effects. The colour of the cells change, but also, the links in the selected cells will turn to magenta. You can only select a group of cells, when the cursor looks like a pointing hand (i.e. glove). If two arrows are shown , then you can’t select the cells. You may need to zoom in to be able to see and select the required effects. Create Random Effects Select and highlight an area on the grid. Right click and select the option to Create Random effects. Effects will be randomly selected (along with different colors and options) and effects created in the area highlighted, each between consecutive timing marks. If there are no timing marks active, then a default time value will be used for each effect. Click on Play to play the effects. You can also use the shortcut key ‘R’ to achieve the same result by highlighting one or more cells and pressing R. xLights/Nutcracker page 106 Layers Layering effects gives you the ability to create unlimited stunning effects that could not be created without layers. First, let's go over the limits. Each model may have a up to 200 layers of effects. Each layer can be mixed 12 different ways with the layer below it for a combination of thousands possibilities within a single timing cell. Usually 46 layers is plenty enough though for the most discriminating user depending on the model shape and size. Why would you even want multiple layers on a model? Layers on a model is like layers on a cake. Each layer adds a bit to the effect produced at the end. Much like layering your popcorn with butter or salt. It's easy to think of each layer of being additive like a food recipe, but you can also use layers to be subtractive as well using layer masks to reveal only a portion of a layer. See the table below for the different layer blending options. Think of a color wash in red, with a layer of snowflakes. Normally you would picture a red model with the white snowflakes. You could change the layer masking so that the model was black and showed red on the snowflakes. Some effects like Morph can be applied to only a portion of a model, so using layers you can get multiple morphs on a Mega Tree that look like interleaving fingers for example. Combining two spirals in opposing directions on a mega tree also can create stunning effects. To add layers to a model right click the model in the sequencer tab and choose Add Layer above or below (the current layer). When setting the layer blending modes, the current layer is considered layer 1 and the layer below is considered layer 2. xLights/Nutcracker page 107 Layer Blending Modes Layer Blending mode results Normal Both layers will show, with layer 2 showing only where there is blank space from layer 1 as in thin spirals for example. Effect 1 Ignore effect 2 and only show effect 1. Good for being able to hide an effect if you’re not sure you want to use it. Effect 2 Ignore effect 1 and only show effect 2. 1 is Mask Effect 2 will show wherever effect one is not showing. If E1=Fire, E2=Spirals, then the spirals would show on top of the fire, but the fire would appear to be black. 2 is Mask Same as effect one, just reversed. Tip use Bars as the mask on layer 2 and you will have effect #1 reveal as if was coming from behind a curtain. 1 is Unmask Make Fire E1, Butterfly E2 and set both for 1 is Unmask. You’ll see the awesome power of this blending mode. 2 is Unmask Make Bars E1, Fire E2 and set both for 2 is Unmask. You’ll see the awesome power of this blending mode. 1 Reveals 2 Effect one will show on top of effect 2, except for areas in effect 1 that are black. Effect 2 will show on the black areas of Effect 1. 2 Reveals 1 See 1 reveals 2. Same result, just transposed. Shadow 1 on 2 The the layer 2 effect will show in the shape of layer 1. Try E1=Circles, E2=Butterfly to see what this does. Shadow 2 on 1 Effect 2 will overlay on effect #1, where there is no black in effect #2. Layered Try Effect #1 as circles, E2=Bars with one of the colors as black Average This what you would expect as layered. If E1 and E2 had yellow and blue circles, they would turn a dull green where the circles overlap. Bottom Top Left Right Effect 2 will appear on the top half of the model. Effect 1 will appear on the bottom half of the model. Effect 1 will appear on the left half of the model. Effect 2 will appear on the right half of the model. Tip: Put two effects on a model and step through each of the layering modes to see what they will look like. Experience is much better than reading about it. xLights/Nutcracker page 108 Layer Blending Morph This is not to be confused with the Morph Effect. This is a layering option that can be applied to any two effects. The morph option of layer blending will magically make effect 1 ‘morph’ into effect 2 during the length of the timing cell that the effects are in. You will not see effect 2 at the beginning of the timing cell, and you will not see effect 1 at the end of the timing cell. Somewhere near the middle you will see the effect 1 ‘morph’ into effect 2. Layer Blending Mix Slider This slider adjusts the level of each effect in the combined output of the effects. You can use this to just put a hint (or more)of one effect on another. xLights/Nutcracker page 109 Layer Blending Persistent The Persistent option when enabled does not clear the display buffer before rendering each frame. The result is the preview frame remains until overwritten by a subsequent frame. For example, drop the balls or fan effect on a model, select the blending to “Effect 1”, then toggle Persistent on/off. You will see a huge difference. Doing the same for a “Chase” effect also results in a very different look. The term came from high persistence scopes where each trace just kept layering on top of previous traces. Don Julien wrote that code in 2013. xLights/Nutcracker page 110 Singing Faces This section describes how Singing Face functionality i.e. the conversion of phrases from song lyrics or sentences spoken out aloud can be converted to work on Coro faces or Images on a matrix or Mega tree natively in xLights/Nutcracker i.e. without using the Papagayo application. Model definition Coro Faces In the model setup screen, for the singing face model, click on the Faces button. The first drop down box is used to select the type of face definition that is required. The default value is ‘None’. Select ‘Single Node’ or ‘Node Ranges’ for Coro faces or ‘Matrix’ if you are going to use images for each face position. Single Node (Coro faces) The following window is then displayed. For each phoneme, select the channels that will be turned on. Multiple selections can be selected, by holding down the CTRL key. xLights/Nutcracker page 111 Matrix If a matrix is selected, then the following window will be displayed. xLights/Nutcracker page 112 Node Ranges If ‘Node Ranges’ is selected, then the following window will be displayed. Type in the list of node numbers (pixel numbers) for what should be turned for each movement. Example: ("112,2430"). If Force custom colors is selected , then a color to be turned on can be specified for each line in the definition by double clicking in the Color column to bring up the Color palette. Click on Add and specify a name for the face definition (‘Snowman’) Then select the image placement i.e. Centered or Scaled. Then for each mouth position, double click in the eyes open column (you may need to double click more than once) and navigate to and select the face image corresponding to that mouth position. You can specify different images for the Eyes Closed position or by default, the same image is copied across. Click Ok when done. xLights/Nutcracker page 113 Caution:
Images used for pictures and faces use an absolute location reference i.e. you specify the exact location. If you move the location of your images, it won't pick up the new location. Similarly location won’t change if you change your show directory. You may wish to consider having all your images in a separate location outside your show directory. Timing Tracks Next add a new Timing track. Timing tracks can be added via the Setting, Sequence Settings, Timing menus. Select a Timing Track of type ‘Empty’ and click on OK to add it. Double click on the name of the timing track and change it to something meaningful, such as ‘Lyrics’ If you have more than one Voice, then repeat this process for the second Voice i.e. Add a new Timing track. Select one of type ‘Empty’ and click on OK to add it. Double click on the name of the timing track and change it to something meaningful, such as ‘Lyrics 2’ On the sequencer tab, select Edit Display Elements and add the new timing track(s) (‘Lyrics’ / ’Lyrics2’ or any other name of your choice) to the view that you are working with. If the Singing face model is not part of the view, then add that to the view too. Importing Phrases Phrases / Lyrics for Voice 1 Select the Timing Track (‘Lyrics’) and for clarity deselect any others. There are two ways to add the phrases/lyrics to the Timing Track. Importing the entire set of Lyrics Obtain the lyrics from the internet or elsewhere, copy them, then Right click and select ‘Import Lyrics’. Type or paste the lyrics into the Window and press OK. The words of the lyrics will be evenly distributed across the song. Using timing marks Play through the song at regular or reduced speed and use the ‘t’ key to add timing marks at the beginning of each phrase. xLights/Nutcracker page 114 Then, on the timing track, between two timing marks, double click and an ‘Edit label’ box will pop up. Type in, or copy and paste the words that pertain to the phrase (or phrases) that belong between the two timing marks. Press Ok to accept. Repeat for as many phrases as you require or you can do one phrase at a time. Breakdown Phrases You can break down all the phrases into words by right clicking on the timing track to the left of the Papagayo icon and selecting the Breakdown Phrases option. This will breakdown all the phrases into words or you can do this in sections i.e. Highlight a phrase or group of phrases, right click and accept the Breakdown Phrase option. Note: There could be a delay of several seconds the first time this is used in each session, while the first phrase is broken down, due to the loading of the dictionaries. xLights/Nutcracker page 115 A list of words will be generated for the phrase in a timing track, just below the phrase. xLights/Nutcracker page 116 Breakdown Words You can break down all the words into phonemes by right clicking on the Timing Track to the left of the Papagayo icon and selecting the Breakdown Words option. This will breakdown all the words into phonemes or you can do this in sections ie:Highlight a group of words, right click and accept the Breakdown Word or Breakdown Selected Words option. If the Breakdown Selected Words option does not appear, ensure that your cursor is not pointing on a word, otherwise you may only see the Breakdown Word option. A list of phonemes will be generated for the word or words phrase in a timing track, just below the word timing track. Zoom in to see the words or phonemes more clearly. Drag the words to align them as required. You also need to separately drag the phonemes to align them as required. If you wish to regenerate a word or words, highlight the words, right click and select Breakdown Word or Breakdown Selected Words option. Select and drag the Face effect to the sequence grid against the model (your Singing face model).
Tip: Ensure that the color selected on the color window is correct based on your model definition (White is the most common setting) Tip: If the Timing track name (‘Lyrics1’) does not appear in the list of Timing Tracks, click on another effect and then return to the Face effect to force the list to be refreshed. xLights/Nutcracker page 117 Using the Effects Setting window, under Mouth Movements, select the applicable Timing Track (‘Lyrics’). The face definition value will default to the one defined for the model. You can also select ‘Show Outline’ which will activate the outline when the face effect is present and ‘Turn On/Off Eyes’, if you wish. Setting the eyes to Auto will cause the eyes to blink every few seconds when the rest phenome is on. The timings should automatically appear against each mouth movement. xLights/Nutcracker page 118 Repeat the process for the next phrase or group of phrases. Phrases / Lyrics for Voice 2 Similarly, repeat for the next Voice by selecting another model (‘Singing Face 2’), and the next Timing Track (‘Lyrics 2’). When you drop the Face effect on the sequence grid, select the second timing track (‘Lyrics 2’) as the Timing Track on the Effects option and proceed as described for Voice. Tip
: If you wish to assign a group of phrases/words/ phonemes from one Voice/timing Track to another, then against the model of the second voice (‘Singing face 2’), for the selected group of phrases (‘Chorus’), when you drop the Face effect, select the first timing track (‘Lyrics’) and the effects from that timing track will be duplicated Checking for Unknown words in the dictionary This step will help eliminate any words that NutcrackerPapagayo may not have in its library. As you breakdown words in NutcrackerPapagayo occasionally you may see that there is no phonetic breakdown of the word placed in the timing track. As shown below. xLights/Nutcracker page 119 As you can see there is no pink phonemes below the work ‘honkey’. This means that the word is not in any of the NutcrackerPapagayo dictionaries which are standard_dictionary, extended_dictionary and user_dictionary. These dictionaries contain information that assist NutcrackerPapagayo in converting each word into phonemes. Each word in the dictionary is listed with its associated phonemes. As NutcrackerPapagayo proceeds with the breakdown process there may occasionally be a word that it cannot find in these dictionary files. When this happens there is a simple process to add that word to the user_dictionary. When Nutcracker is first installed this file is located in this folder. C:\Program Files (x86)\xLights This folder is the default folder that Nutcracker is installed into. This can change if you decide to install Nutcracker somewhere else. To keep this file from being overwritten in future installs you should move the user_dictionary file to the folder where you store your sequences. This user_dictionary is a simple text file which can be edited by using a text editor such as windows notepad or any other text editor such as Notepad++ to open this file. The only file that you should make any additions to because the other two files will be overwritten each time Nutcracker is installed. When you first open the user_dictionary file it will contain the information shown below. xLights/Nutcracker page 120 Before continuing create a text file containing all the words that did not have an associated NutcrackerPapagayo phoneme breakdown created for. I usually name this file is ‘missing words.txt’ and put it in the same folder as my sequences. There is no special formatting just a list of words, one per line, is required. One thing to note here is that if you have any hyphenated words such as ‘screaum’ you should break the word into two words such as ‘screa’ and ‘um’’ for this list. Then in your favorite browser open to the following webpage. http://www.speech.cs.cmu.edu/tools/lextool.html
as shown here: Then click the ‘'Choose File' button and browse to find the file you created or enter this name into the file box. Then click the 'Compile' button. Once the processing has completed another webpage will appear similar to this: xLights/Nutcracker page 121 Click the work 'link' Another webpage similar to this will appear. xLights/Nutcracker page 122 Here click the file with the .dict extension such as 0548.dict. then a web page will appear with the words and their phoneme breakdown as shown below. Before following the rest of this process, close the current sequence and exit Nutcracker. If your user_dictionary is not open, open it now. Highlight and copy this list and paste it into your open user_dictionary and save the newly modified file. There is a small bug in Nutcracker at the time this document was written which you need to compensate for. After pasting in the newly added words do a search and replace with a ‘ ‘ (space) for any ‘tab’ characters in the user_dictionary. This process will work for one to how ever many words that you have. But if you just want to quickly check one word past the following link into your browser. http://www.speech.cs.cmu.edu/cgibin/cmudict This is the
online CMU Pronouncing Dictionary
. Here you will look up each word that Papagayo did not find in its dictionaries. Let’s take the first word 'ooky'. There is a box below the title ‘Look up the pronunciation for a word or a sentence in CMUdict (v. 0.7a)’ where you will enter this word. Then click the 'Pronounce it!’ button. If a red dot appears with the phrase ‘not in dictionary; consider using the LOGIOS tool discussed above, which is able to generate missing pronunciations by rule.’ Then you need to click the ‘LOGIOS’ link which takes you to the previously discussed web page. Now that you have updated the user dictionary you should reopen Nutcracker and load the previously saved sequence and find the newly added dictionary words and do a right click ‘Breakdown Word’ for the missing phonemes. xLights/Nutcracker page 123 The following now shows the results after adding the word ‘honkey’ to the user_dictionary file. xLights/Nutcracker page 124 Shortcuts There are a number of shortcut keys that can be used for functionality or adding effects on the grid. These effects are stored in the xlights_keybindings.xml file and can be modified by the user. Note that you must edit this file while Nutcracker is
NOT running. Changes will be lost when xLights/Nutcracker closes as this file is saved upon exit each time. Key Type Function t TIMING ADD Adds a timing mark to the currently selected position s TIMING SPLIT Splits the current timing mark in half + ZOOM IN Also available by Control+mouse wheel ZOOM OUT Also available by Control+mouse wheel Ke
y Type Effect f EFFECT Fire Off F EFFECT Fan EFFECT On Fade Up g EFFECT Garlands d EFFECT On Fade Down p EFFECT Pinwheel m EFFECT Morph r EFFECT Ripple c EFFECT Curtain x EFFECT Text I EFFECT Circles s EFFECT Spirals b EFFECT Bars w EFFECT Color Wash y EFFECT Butterfly n EFFECT Snowflakes Key Type Effect o EFFECT On O EFFECT u Tip:
The On and Ramp Up/Down effects also enables the intensity to be defined as a shortcut key. Look at examples in the existing file which has a start intensity set to zero and and end intensity set to 100 %. xLights/Nutcracker page 125 Chapter Five: Menus
File The File menu enables you to create a new xLights/Nutcracker sequence, open an existing xLights/Nutcracker sequence, Save, Save As or Close a sequence that is currently open, select a show directory, backup xLights/Nutcracker sequences to another directory and quit the xLights/Nutcracker application. These actions can also be done using shortcut keys and via icons on the top bar of the canvas. New Sequence To create a new sequence, either use the New Sequence icon, select New Sequence from the File menu or press Ctrl N. The following screen is displayed: Note: if you do change your mind about creating a sequence, click on the Don’t Create Sequence button. Musical Sequence If creating a music sequence, click on Musical Sequence. xLights/Nutcracker page 126 A ‘Choose Audio File’ window will open, defaulting to your media directory. Change the file type from MP3 if using another type of media, then select your media file. Select the frames per second (fps) for your sequence. The most common one used is 20fps (50ms). Press Skip>> on the next screen. If creating an xLights/Nutcracker sequence, at this stage you can select ‘Done’ and import timing marks later (either via the Timings menu or by Right Clicking on the Sequencer menu ). Alternatively, you can click on the Timings tab now – this will lead to the
Timings
menu. xLights/Nutcracker page 127 On the Timing menu, you can select one or more of a number of timing bar options, which will generate timing marks automatically (similar to those that can be done via Audacity). If you click on the Edit Metadata tab, this will lead to the
Sequence Settings
dialog box. At this stage a new empty sequence has been created. You can... ● Select Save to save the sequence in your show directory – you will be prompted for a sequence name. ● Click on the
Sequencer
tab and continue with ○ Adding models for this sequence to the sequencer view, ○ Creating/adding timing marks ○ Dropping effects on the sequencer grid ○ Playing the sequence Tip: Ensure that you save the sequence prior to exiting to save the work that has been done so far. Animation Sequence If creating an animation sequence, click on Animation Sequence. No media/audio file is required or requested for. The subsequent process is the same as in the
Musical Sequence
. Open Sequence To open an existing sequence, either use the Open Sequence icon, select Open Sequence from the File menu or press Ctrl O. You will be presented with the ‘Choose Sequence file to open’ window, with the directory defaulting to your show directory. You can select an xLights/Nutcracker (xml) sequence or an xLights/Nutcracker fseq file to open. Save Sequence To save an open sequence, either use the Save Sequence icon, select Save Sequence from the File menu or press Ctrl S. If the sequence has not been saved previously, you will be presented with the Save As dialogue window to enter the name for the sequence. If the Render on Save setting (under the
Settings menu) is set (i.e. ticked) then all the effects on all the models will be rendered first before the sequence is saved in the fseq file. This is the default. Progress status messages are displayed on the last line of the window. When the sequence has completed saving, a message will be displayed on the last line indicating the name of the fseq file and how long the save process took. xLights/Nutcracker page 128 Save As Sequence To save an open sequence with a different name, either use the Save As Sequence icon or select Save As Sequence from the File menu. You will be presented with the Save As dialogue window to enter the name for the sequence. If the Render on Save setting (under the
Settings menu) is set (i.e. ticked) then all the effects on all the models will be rendered first before the sequence is saved in the fseq file. This is the default. Progress status messages are displayed on the last line of the window. When the sequence has completed saving, a message will be displayed on the last line indicating the name of the fseq file and how long the save process took. Close Sequence To close the currently open sequence, select Close Sequence from the File menu. If the sequence data has not been saved since the last change, you will be presented with warning. Click on Save Changes if you want to save your changes. If you click Cancel then you will be returned to the sequence. If you select and click Discard Changes, then the sequence will be closed without any sequence changes being saved. Select Show Folder In order to change your show Directory, select Select Show Folder from the File menu, press F9 or click on the Change button against the Show Directory on the Setup tab.You will be prompted to navigate to and select a new directory folder to select. Ensure that you have the correct xLights/Nutcracker xml files (xlights_keybindings.xml, xlights_networks.xml and xlights_rgbeffects.xml) in your new directory. BackUp Backing up your critical files and sequences should be done regularly – as good practice. xLights/Nutcracker page 129 What should be backuped? Anything you require to run your show, but in particular your xml sequences, your media files and your user specific xLights/Nutcracker configuration files. The xLights/Nutcracker configuration files are located in your show directory and are: xlights_keybindings.xml, xlights_networks.xml and xlights_rgbeffects.xml Tip: Pressing F10 anytime, anywhere will backup your XML files for your and store them in a zip file with the date and time the backup was created. You can press F10 as many times as you like and should do this at least once per sequencing session. Alternatively, from the File menu, select Backup. You will be presented will a message indicating where a backup will be created. Click Yes to proceed. Every time this step is executed, a copy will be created of all the
‘*xml’ files from your show directory into the Backup subdirectory of your show directory. A new subfolder is created each time a backup is executed. Tip:
It is a good practice to also separately backup any files that you may have used as inputs to your sequences such as LSP, LOR, Papagayo files that you imported, media files that may have amended with audacity, gif or jpegs etc. You may also wish to backup any fseq files, though this can be recreated by saving the sequence again. Backing up the show directory (and media directory if it is different) to an alternate location is the simplest way to ensure that you have the files required. Quit To quit xLights/Nutcracker, select Quit from the File menu or press ALT F4. If you have a sequence open and the sequence data has not been saved since the last change, you will be presented with warning. xLights/Nutcracker page 130 If you click No, then you will be returned to the sequence. If you select and click Yes, then the sequence will be closed without any sequence changes being saved. Playlist Playlists are created to be used within the xLights/Nutcracker scheduler if you plan on using xLights/Nutcracker to run your show rather than the Falcon Player on a Raspberry Pi. Add To create a new playlist, click on the Add button and provide name for the Playlist in the pop up window. A split screen will be displayed. On the left, the Available Files from the Show Directory are displayed. On the right, the Playlist and the items within are displayed. Filtering on the options against the Files line, enables xLights/Nutcracker sequences, video and audio files to be selected from the Show Directory. Use the arrows provided to add / remove files (one or all files) from the Available File list to the Playlist. Within the Playlist section, use the Green arrows to change the sequence of the item. xLights/Nutcracker page 131 In order to introduce a pause (i.e. delay) between items in the playlist, click on the item and then click the Set delay button. Specify the number of seconds for the delay. Click on Save Playlists to save the Playlist. The playlist will be displayed as a tab next to the Sequencer tab. Rename To rename a Playlist, click on the Playlist tab that you wish to change, then click on the Playlist tab, then select Rename. You will be prompted for a new name. Delete To delete a Playlist, click on the Playlist tab that you wish to delete, then click on the Playlist tab , then select Delete. You will be prompted to confirm the deletion. Click OK to delete or Cancel to return. xLights/Nutcracker page 132 Refresh This option is used to refresh the screen with a list of Available files. To be used if you have just added any new Audio, Video or xLights/Nutcracker sequence files to your show directory. Select Playlist and then Refresh. Custom Script If this option is elected for a playlist, the BASIC language scripts used to run the playlist is displayed. You can then edit/ add custom scripts to perform actions such as send out RDS data, play a video etc. You can also set Playback options for the Playlist as follows: View The view menu enables you to zoom in or out on the sequencer view, define and use Perspectives and nominate which windows you want to have open. Zoom in Selecting this option while on the sequencer tab will zoom in details on the sequencer grid. xLights/Nutcracker page 133 Zoom out Selecting this option while on the sequencer tab will zoom out the details on the sequencer grid Perspectives Perspectives saves the location and size of the "windows" you use. Particularly for dual monitor setups, it lets you move and size the Preview and Color windows away, giving you a bigger program area. Going to View / Perspectives / Save Current will store your settings to the currently selected perspective. You can have multiple perspective saved and easily recall them by selecting the perspective desired from the Perspectives window. Windows There are a number of windows that enable simultaneous display of different views in xLights/Nutcracker. When xLights/Nutcracker first loads, a default set of windows are displayed. Which windows are open can be controlled via the Windows menu by selecting View, Windows and then clicking on the required window to open it. The window is dropped by default on the left side of the screen, however each window can be moved and docked to alternate locations on the same screen or moved to an alternate display screen if connected to your PC/ MAC. xLights/Nutcracker page 134 Display Elements The Display Sequence Elements window enables views, Timings as well as models to be defined and updated. Functionality for these functions is described in the
Views
,
Timings and
Models section of this document. Model Preview The Model Preview window displays the effects on a model as the sequence is playing. With the window open, right click on the model name when on the sequencer tab and select Play model. xLights/Nutcracker page 135 House Preview The House Preview window displays the effects of your entire display where the ‘Part of my Display’ attribute of model has been ticked. Effect Settings The Effect Settings window displays the current or last effect that is being worked with. If an effect on the grid is selected or a new effect dragged to the grid, then this window gets updated with the ‘current’ effect. Use the window to modify the attributes of the effect as required. The results of the change are displayed in the model window when selected and in the House Preview window when the sequence is played. xLights/Nutcracker page 136 Colors The Colors window enables the user to change displays the current or last effect that is being worked with. If an effect on the grid is selected or a new effect dragged to the grid, then this window gets updated with the ‘current’ effect. Use the window to modify the attributes of the effect as required. The results of the change are displayed in the model window when selected and in the House Preview window when the sequence is played. By clicking on one of the colors, the color box will appear allowing you to choose or create any color you desire. To create a custom color, click on the Define Custom Colors >> button. Sparkles Brightness Contrast Layer Blending xLights/Nutcracker page 137 The first option of Morph is used with two or more layers. If selected, effect #1 will morph/blend/fade into Effect #2 midway through the timing interval in which the effects are placed. The drop down list has 12 different blending. Effect Dropper The Effect Dropper window displays all the supported effects and enables you to select a required effect and drag it to the sequence grid. The same functionality can also be obtained using the effects from the effects window: Effect Assist The Effect Assist Window is an additional window that helps you determine how an effects is being drawn via a panel view. xLights/Nutcracker page 138 For example, if you open this window against a morph effect, the windows will display a grid corresponding to the x,y coordinates. If you then grab a slider for the morph effect and move it, the Effect Assist window shows exactly where the coordinate is being moved to, making it easier to determine what is being done to the effect. You can also grab a corner of the image in the Effect Assist window and move it and have the slider values update in real time. Perspectives The Perspectives Window enables you to save your current windows is an additional window that helps you determine how an effects is being drawn via a panel view. Audio Speeds This function enables you to to play the audio during sequencing at normal speeds or at slower speeds. Click in the waveform and then select one of the speed options. Click Play. The audio will then be played at the selected speed and the vertical visual indicator will move along at the speed being played. To return to normal speed, select Play Full Speed. xLights/Nutcracker page 139 Import Import Effects This option enables you to import sequences from other sequencers. However, in many cases it generates a large number of effects. In most cases, importing of RGB effects as Data Layers will suffice. There could be some cases (A/C channel data or LOR singing face sequences) where it is desirable to import using the Import Effects function. The following example describes how to use this function to import an Arch effect from an LSP .msq sequence. 1. First ensure that you have created or opened an existing sequence that has the models added to the sequencer that you wish to import to. 2. Then click on ‘Import Effects’ from the Import tab and select the LSP sequence (the same process can be used for other supported sequence types from the drop down list). After a short while (while the sequence data is being parsed) the following screen will be displayed. xLights/Nutcracker page 140 3. Click on the drop down arrow and you will be presented with a list of models that you have defined on the sequencer. Select a model and Click on the ‘Add Model for Import’ and press Enter. The following screen will be displayed. Tip: Multiple models can be selected i.e. you can select another Model (‘Arch 2’) and Click on the ‘Add Model for Import’ again. 4. Tick the ‘Map by Strand/CCR’ option to select an entire strand (or multiple strands ) to import at a time. (Otherwise by not ticking the box, you can/must select individual nodes to import). The individual nodes will disappear and only the first two rows (i.e. model name and Strand name )will be displayed. 5. Double click in the Channel column against the row that says ‘ Arch 1 Strand 1’. You may need to double click more than once. A drop down list of LSP (or other sequencer) channels/controller /strands is display. Select the required channel/controller/strand. xLights/Nutcracker page 141 6. Select the required model and press enter. You can repeat this for multiple models 7. Click on ‘Save Mapping’ to Save the mapping. The mapping can then be reused by Clicking on the ‘Load Mapping’ button the next time. 8. Click on ‘OK’ when ready. 9. A status message will be displayed at the bottom indicating that the sequence has been imported. 10. Click on the ‘Render All’ button. 11. Click on Play. 12. Save the sequence as per usual. Importing a LOR Sequence Importing a LOR sequence follows the same steps as described above. However, depending on the LOR hardware setup, channel definitions in LOR and correspondingly in xLights/Nutcracker need to align. See discussion in the section
Coming Over from LOR
. Importing an xLights/Nutcracker Sequence This process can be used to ● Import effects from a xLights/Nutcracker sequence from another user ●
Import effects from another of your (e.g. older) xLights/Nutcracker sequence into an existing xLights/Nutcracker sequence Step 1 If the xml sequence has been received from another user , it is preferable to have both the shared sequence xml file and the xlights_rgbeffects.xml file from the donor. Create a new directory and copy the sequence file and the xlights_rgbeffects file to that directory. Change the show and media directories to point to the new directory. If you have the xlights_network.xml file (which contains the network setup details) copy that to the new directory too, otherwise setup a block of universes large enough to cover the sequence channels (e.g. 20,0000 NULL ). Copy the music file to the new folder. (If the music has been edited and you own the original music it is ok for you to have a copy of the edited file). xLights/Nutcracker page 142 Open the sequence, click on Render All or Save and then play it. You should be able to see how the lights flow in the layout window. Study the sequence and determine which models you wish to copy to your own models. Tip: Print out the model names from the shared sequence as you will need to know those when you import. Look for the correct quantity of elements in the donor sequence that will match your elements. For example If you have 4 windows but the donor sequence has 8, pick the 4 windows that you want to copy. Make a note of the names of each donor model you want to copy to a model of your own layout. Watch the sequence several times. Step 2 Copy just the xml file of the donor sequence to your own show directory. Make sure you have the appropriate music file in your own media show directory. Close the sequence you were watching, go to the setup tab and change the show and media directories back to your own directories. If importing into a new sequence, then ● Create a new musical sequence , select timings and add your display elements or select a view. ●
Save the sequence. Else ● Open the sequence you want to import into. Select Import, Import Effects and select a type of ‘xml’. Select the donor sequence xml. Click on the dropdown arrow in the box at the top of the window and follow the same process described in the example above. Tip: In order to Improve performance of the imported effects and reduce the memory footprint, in the sequencer tab, right click against each of the imported model names and select ‘Promote Node Effects’. This will search through the node level ‘On’ and ‘Color Wash’ effects and if the same effect is on all the nodes at the exact same times, it will be removed from the nodes and placed on the Model. xLights/Nutcracker page 143 Settings Sequence settings Info/Media The Info/Media tab displays information about the sequence including the xLights/Nutcracker release that was used to create the sequence, the number of models saved, the Sequence Type (i.e. Media or animated), if media has been specified then the name and location of the media file. The sequence duration, the sequence timing and whether the media tags should be overwritten. The sequence type, media file name or location, the sequence duration and whether media tags can be overwritten can be changed from this tab after the sequence has been created. xLights/Nutcracker page 144 Metadata The Metadata tab enables the media metadata to be entered or updated. The attributes supported are the author, email, website, song, artist, album, music url and a comment. This information does not drive any functionality in xLights. xLights/Nutcracker will parse and retrieve the information from the media file. It won't update any information entered on the media/info screen unless the Overwrite Media Tags setting on the Media/Info screen is ticked. After updating any data Click on Done to Update. Timings The Timings tab enables you to create or import one or more sets of timing marks on timing tracks for the audio of your sequence. This screen is part of the flow when creating a new sequence or can be accessed via this tab at any time after creating a sequence to add additional timing tracks. xLights/Nutcracker page 145 New Clicking on New will present you with a list of options. You can either select a fixed value such as 50 or 100 ms or select from one of the options in the list. Note: This component uses the VAMP plugins to generate the timing marks. Selecting one of the options then presents a window where you can either select the defaults or change the timing name or any of the plugin settings. Click Ok and the audio track will be analysed and a timing track will be created. You can then click New again to select another timing track (‘Beats’) to be created xLights/Nutcracker page 146 Click Ok and the audio track will be analysed and a timing track will be created. You can then click New again to select another timing track (‘Beats’) to be created. Click Done when complete. Import The Import button enables you to import timing marks created externally for example using Audacity or where you have created a timing track manually or wish to import one from another sequencer in a supported format. You will be presented with a window to navigate to and select a file containing the timing marks to import to the timing grid. This can be a text file (.txt), a LOR lms file or a LOR LAS file. xLights/Nutcracker page 147 Select the required file, click OK to import the timing grid marks. If you select a LOR LMS or LAS file and it has timing marks in it, you will be prompted to select the timing grid from within a window: You can repeat this process to import another timing grid from the same file or from another file. Click Done when complete. Data Layers When should you use the data layer to import effects ? Typically if you have sequences from other sequencers such as LSP, LOR, Vixen, HLS that you wish to use within xLights/Nutcracker. The imported sequence is mapped very efficiently as a data image rather than individual effects. After importing the sequencer you can: xLights/Nutcracker page 148 ●
●
●
Save it ( an .fseq file is created) and run it within xLights/Nutcracker or via the Falcon Player Add xLights/Nutcracker effects to new models via the sequencer Selectively override some of the effects from the imported models within xLights/Nutcracker. You cannot however ‘edit’ any of the imported effects directly. In order to do that see the Import Effects function. The data layer embeds the CONVERT tab into the sequence. The process is used to convert an incoming file from another sequencer into an *.iseq file. Therefore, Vix, Lms, Seq, and Hls data into an ISEQ file. This conversion is done in two places. ● When you a import a data layer ● When you press the ‘Render’ All button Note: The purpose of ‘Render All’ is to render all the effects and data layers to the sequence object without saving to disk. The already imported ISEQ file data is used. If the source (‘LMS’, ‘SEQ’, ‘HLS’ etc) file is changed, then you need to go to the Data Layer tab, click on that layer and select the ReImport function. Import Before using this function, a new sequence should have been created or an existing sequence opened. From the Main Menu tab, select Sequence Settings and then Data Layers. Click on Import, navigate to where your input file (‘LMS’, ‘LSP’ etc) is, change the file type as required and select the file to be imported. Click ok. xLights/Nutcracker page 149 On completion of the import, the Data layer details and the number of channels imported to the data later will be displayed. The file has been imported/converted and stored in an .iseq file. The normal (and default) option is for the xLights/Nutcracker ‘layer’ to be on the top and the imported sequence data represented below it. When rendered, the data is rendered from the lowest layer upwards, so the xLights/Nutcracker effects will be rendered last. (Refer to discussion under Move Up/Move Down). xLights/Nutcracker page 150 On the Main Menu, click on the ‘Render All’ button, after which the sequence can be played. Click on the ‘Save’ or ‘Save All’ buttons to save the sequence. Tip:
You must click Render All or Save the file as after the Import function is complete , the data is not automatically rendered. Tip: To view the details of the data that has been imported, doubleclick on the model's row title to reveal the strands and then the nodes. The imported effects are at the node level. Delete Use this function if you wish to delete a data layer that has been created via the import function. Select on the layer and delete. Move Up/Move Down While the most common use of this function is to import effects from a previous sequencer once per sequence, you can import multiple layers to be rendered at the same time. An example of this is where you may have two purchased LOR (or other) sequences for a mega tree singing faces. Or you may have xLights/Nutcracker effects on a whole house model which you then want to be ‘overridden’ by the imported data layer. Using the Up/Down buttons allow you to determine which layer will take precedence over the others. The highest layer will render last i.e. on top of the others and so forth. ReImport Use this function, if you wish to reimport and overwrite an imported data layer. Normally required if the source i.e. LSP, LOR sequence has been amended in any way and you wish to overwrite the previous import without affecting any other effects that may have been added to the sequence within xLights/Nutcracker. Select the data layer and click on the reimport function, after which, functionality is the same as the Import function. xLights/Nutcracker page 151 Render On Save The default setting is to render all the effects of all the models and groups when saving the xml. If this setting is unticked (i.e. to turn off), then it will only save the XML when you click Save / Save As, resulting in a very fast save operation. Then you can render using the Render All button when you really need to create an fseq file or need to make sure what you are previewing is fully up to date. Tool Icon Size This function enables you to change the size of the tool icons that are used to represent the effects on the effects ribbon. Four options are available: Grid Spacing This function enables you to change the size (i.e. width of each band) of the sequencer grid. Four options are available: xLights/Nutcracker page 152 Grid Icon Backgrounds When an effect such as the Morph effect is placed between timing marks (as an example over several seconds long), a representation of the color changes over time for that effect. If you select Off, then the effect on the sequencer grid will only show the generic effect icon and not the colors. Not all effects have this difference. Grid Node Values This function provides the ability to turn off the effect displaying colors at the node level. xLights/Nutcracker page 153 Turing it off improves rendering performance and is recommended where effects are only being dropped at the model level. The value can be turned back on as required. Render Mode If the Render Mode is set to Erase (which is the default value), then the fseq file is erased before every render. If set to Canvas Mode, then the data in the fseq is not cleared before a render, rendering is done over the old data. Note:
If set to Canvas mode, deleting an effect will still show when played until it is overridden with a new effect. Imagine a 6 foot painting in which you paint over a 4 foot section. The 2 foot original section is still visible. This is the how canvas mode works. Effect Assist Window Always On will display the window in all cases, Always Off won’t display the window and Toggle Mode will display the window if the effect supports it, else won't display the window if the effect does not have this capability. xLights/Nutcracker page 154 Reset Toolbars The Reset Toolbar option, when selected will reset the Toolbars to the default locations the next time xLights/Nutcracker is started. Help The help tab contains two options within it. Pressing F1 displays a Help or information window depending on tab the user currently is on. Selecting the About option display a window containing xLights/Nutcracker release information, websites, copyright and acknowledgements. xLights/Nutcracker page 155 Chapter Six: Advanced Features
Configuring Matrix Panels as Models In this example, the setup consists of 8 P10 panels (4H x 2 W) driven via a Beagle Black Bone (BBB) with an octoscroller running the Falcon Player (referred to as the FPBBB). Define a model ‘P10Matrix’ (or any name of your choice) as a horizontal matrix. Set # of strings = 64 (corresponds to number of rows), # of RGB nodes per string as 64 (corresponds to the columns) and # of strands per string = 1. Starting corner = Top Left. The start channel has been set to
11800 (this will vary for your channel configuration) and From Output is set to
1
. xLights/Nutcracker will automatically calculate all the start and end channels on the right. Tip:
The starting corner must be set to Top Left, irrespective of how you configure or connect your panels on the BBB. xLights/Nutcracker page 156 On the xLights/Nutcracker Setup tab, what you define is not relevant as that information is not carried over to the FPBBB. You must however ensure that the channel ranges are covered. Therefore you can define them as E1.31 or define a block of channels of type NULL. Note: If wishing to use the Falcon Player in Bridge mode, then the channels pertaining to your matrix must be defined (as below) and match your model i.e. they cannot be left blank. BBB definition On the LEDScape/Octoscroller LED Panel page, Enable LED panel must be ticked. Start channel is 11800 – (This must match the model definition in xLights) The panel layout is 2 x 4. The channel count is calculated. The vertical arrows correspond to the Up/Down physical setting of the arrows behind the panel. P1 for each output is the panel that the output from the Octoscroller is connected to. xLights/Nutcracker page 157 On the E1.31 page, the Enable E1.31 should
not be ticked and no E1.31 channel definition is required as E1.31 is not used to drive the panels – the output is memory mapped. Note: If wishing to use the Falcon Player Bridge mode, then E1.31 needs to be defined. Please refer to the Falcon Player site for details. xLights/Nutcracker page 158 Coming over from LOR Running LOR Controller in DMX Mode LOR to DMX Channel conversion The following table describes the conversion of a LOR Unit id to a DMX address. As an example, if you have a controller with a Unit id of 03, then when converted to run under DMX , the channel ranges will be 33 to 48. LOR Unit ID DMX Address LOR Unit ID DMX Address 01 1 11 257 02 17 12 273 03 33 13 289 04 49 14 305 05 65 15 321 06 81 16 337 07 97 17 353 08 113 18 369 09 129 19 385 0A 145 1A 401 0B 161 1B 417 0C 177 1C 433 0D 193 1D 449 0E 209 1E 465 0F 225 1F 481 10 241 20 497 xLights/Nutcracker page 159 Running LOR in DMX mode The following diagram shows an example of how LoR controllers can be connected in DMX mode. Refer to the table above of Unit ids to DMX channel conversions. Used with permission from FastEddy (ACL) xLights/Nutcracker page 160 Used with permission from FastEddy (ACL) You must use the LOR hardware utility to set the DMX start address on a LOR controller if the controller doesn’t have on board channel selection. The next diagram shows an example of how LOR controller addresses are set in a DMX universe. The controllers do not need to be physically connected in order of the controllers start address. The controllers can be put in any order. xLights/Nutcracker page 161 Used with permission from FastEddy (ACL) Convert a LOR LMS file to play using non LOR hardware This section is based on a video created by Steve Giron The item to be converted is a purchased 12 leg CCR tree sequence. The input file should be in LMS format. Within xLights/Nutcracker, go to the Convert tab and from there Select Convert, navigate to where the LMS file is and select it. Select the ‘Show Verbose Channel Map’ attribute. ‘Click on Start Conversion. Error messages are expected for the first run in the status window on the right side. Scroll to top of error messages and look at messages that says “LOR Network”. xLights/Nutcracker page 162 The messages tell us that two networks are required: One with zero channels – (this was a star where channels were deleted from) , one with 1800 channels. Go to the Setup tab and define these. Setup tab (Existing layout) Add two entries: Network type of LOR, any baud rate, however the last channel must map correctly. Then move them to the top using the green UP arrows. xLights/Nutcracker page 163 Ensure that ‘Map Empty LMS Channels’ is
not selected (else you may get errors as the CCR macros do not have effects in them).
Reconvert and it should convert with no errors. Open the xseq file that was created and play it to view the effects on the layout window. You may need to click on the ‘Render All’ button. If you are not playing the sequence though LOR hardware, go back to the setup and delete the two LOR entries that you added for the conversion, leaving your previous configuration as it was. If you are using LOR hardware, then these entries will need to be correctly defined. xLights/Nutcracker page 164 Converting a LOR sequence and importing into xLights/Nutcracker. This section is based on a video created by Clyde Lindsey First ensure that within LOR, all the channels for the controller have been defined and are in sequence . Tools, Channel configuration will display an image similar to the following. If there are any channels missing use the ‘Add Channels’ function to add the missing (unused) channel. 1. Note that in the image, the Unit id is 03 and the Channels (Circuit) values run from 1 to 16. However, referring to the LOR Unit Id to DMX channel
mapping
table Unit id 03 corresponds to Channel number 33. If Units prior to Unit 3 have not been defined, then you need to define them so as to ‘utilise’ the missing channels. Use the ‘Insert Device’ function to ‘Insert Device Above’ the current device (Unit 03) as a LOR 16 channel device – Unit id 01. Repeat this step and add another device Unit id 02. xLights/Nutcracker page 165 Therefore Channels 132 (Unit 1 and 2) have been defined – even if not required in LOR, and channels 33 – 48 belonging to Unit 03 are the ones that we are interested in. xLights/Nutcracker page 166 On the xLights/Nutcracker setup screen , the corresponding channels must be defined. You can define it as a USB , with a network type of LOR , and set up the COM port (obtained from the LOR device manager) and you will need to try different baud rates. However, there is sometimes a lag associated with the sequence when you use this option. It is preferable to use a DMX (to E131) bridge if possible and then define the channels as E131. xLights/Nutcracker page 167 For the three devices were defined in LOR, only 48 channels need to be defined, but to preserve a buffer for future use, an extra 16 channels corresponding to an additional LOR device, (i.e. a total of 64 channels) will be defined in Universe 1 as E1.31. Model definition Next create a new Model definition that matches the LOR Channels of Unit 03. Let’s say that this was 16 single channels Trees. In that case create a model ‘Small Tree 1’ , with 1 st
channel. The start channel must be set to 33 (not 1) as this corresponds to the 1 channel of Unit 3. xLights/Nutcracker page 168 Then you can copy the model, update the name (Small Tree 2) and change the starting channel to 34 and repeat this for all 16 channels, increasing the start channel by 1 each time until the last one is 48. Tip: If within the LOR Unit 03 definition, there are unused channels, you do not have to create a model for that channel or channel range. For example, let’s say within Unit 03, channels 1014 are not used. In which case, you would create 9 Trees (1 9), and then another 2 trees (for 1516). This is different to the setup tab where you must cover the entire range of channels from 1 onwards. The next step is to use the Layout tab to align the models (the Trees) as required. Save the model definition. Import sequence data Create a new music sequence, add timing tracks and add the models you have defined to the sequencer tab. Using the Import, Import Effects menu, change the ‘Import file’ file to LOR Music Sequence LMS, navigate to where the LOR LMS file is and select the file to Import. On the Channel mapping screen, add all the xLights/Nutcracker models – these will appear on the left hand side. Do not select the Map by Strand/CCR option in this case. xLights/Nutcracker page 169 Double Click in the Channel column – in line with the model name. You will be presented with a list of LOR models (as identified by the labels in LOR). Select the channel and repeat for all the models. Save the mapping first , so that you can reuse it later. Click Ok to start the process. After you which , click on the Render All icon and play the sequence. . Tip: If you were importing data from a Singing face where your model has multiple channels, then you need to double click in the Channel column, but against the node row instead. Tip:
The Convert tab has an option to ‘convert a LOR sequence file with a ‘Show verbose Channel map’ setting that will provide details of the LOR to xLights/Nutcracker channel mappings . You can simulate a conversion and review the mapping details first. Instead of using the Import tab to import the data as an editable effect, you can also import the data as a Data Layer. The process is much more efficient, however you cannot directly edit the data after your have imported it. That option has also been described in this chapter. xLights/Nutcracker page 170 Common Scenarios Scenario 1 A user is still using LOR for 8 controllers this year. How should he set them up ? Should he run it in DMX if the controller support DMX? The general rule is that you can do 96 channels of LOR with xLights if the LOR controllers are in LOR mode. In this case, put the LOR controllers in DMX mode and then xLights can do it all. The user can can import all the LOR sequences, schedule them play them, edit them, etc. Scenario 2 A user has an E682 and an E6804 running pixels and 2 CMB16 and 1 CMB24 controllers. How should they be configured and connected ? Is a cross over cable required? Plug in the USB, same com port that would be used, if running it from LOR. No crossover cable is required if running from a LOR network. On the setup screen, add LOR channels via USB device. Put in at least 48 channels. Set the com port as required. After the LOR USB row, add in universes of 510 for the E68x controllers. Scenario 3 A user is using comm4 and the USB to ethernet dongle. How should they be configured? Network Type – LOR, Port – COM4, Baud rate – 57600, Num channels (160 as example). Note: Baud Rate of 250000 is for DMX only. Scenario 4 A user is setup is a mixture of LOR and DMX Channels i.e. intermixed LOR DMXLORDMX. LOR Controller 1, LOR Controller 2, LOR Controller 3, DMX Universe 1 ch. 1126, LOR Controller 4, LOR Controller 5, DMX Universe 1 ch. 127183. How should this be configured? Option 1 Use Universe 1 for all the LOR and DMX channels. Since the DMX is already set (channels 1183), add an LOR entry with Universe 1 starting at 184 until the last channel for controller #5 (16 x 5 = 90), for a total of 274 total channels. You can 'reserve' additional channels should you need them later upto 510/512. xLights/Nutcracker page 171 Option 2 Keep it simple with DMX Universe 1, LOR Universe 2 and then start with Universe 3 with the RGB controllers. Tip
:
All the channels in LOR must be mapped exactly including blank ones in between . Setup your AC LOR channels first in XL4 and then start with your first prop in the same order as your LOR sequences. Otherwise the convert process will indicate that channels are unmapped. Tip
:
LMS to xLights/Nutcracker XML via Import Effects is done via model mapping so channel numbers don't matter. However , if using the LMS to xLights/Nutcracker via Data Layer import option, channel numbers need to match models between LMS and xLights/Nutcracker configurations. xLights/Nutcracker page 172 Online Support Groups
xLights/Nutcracker has an excellent online support community. The main dedicated forum is the Nutcracker forum located at
http://nutcracker123.com/forum Another support group is a Facebook group called Official xLights/Nutcracker Support Group https://www.facebook.com/groups/628061113896314/ Other online artefacts include ● The xLights/Nutcracker Wiki http://www.nutcracker123.com/wk/index.php?title=Main_Page ● xLights/Nutcracker Tutorials http://www.nutcracker123.com/wk/index.php?title=Tutorials ● xLights/Nutcracker FAQs http://www.nutcracker123.com/wk/index.php?title=FAQs xLights/Nutcracker page 173