1
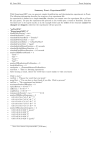
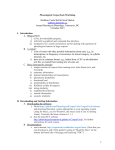
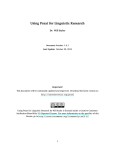
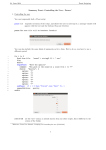
Summary Praat: ExperimentMFC1
With ExperimentMFC you can generate simple identificiation and discrimination experiments in Praat.
The following information describe the structure of an experiment file.
An experiment is defined as a simple text file, therefore you cannot use the New Praat script command.
To open the experiment file proceed as you would open a sound or TextGrid. The first two lines have to
be typed exactly as in the example below and the order of the elements cannot be changed or skipped,
otherwise the experiment will not proceed.
1
2
3
4
5
6
7
8
9
10
11
12
13
14
15
16
17
18
19
20
21
"ooTextFile"
"ExperimentMFC 6"
blankWhilePlaying? <no>
stimuliAreSounds? <yes>
stimulusFileNameHead = "Sounds/"
stimulusFileNameTail = ".wav"
stimulusCarrierBefore = "weSayTheWord"
stimulusCarrierAfter = "again"
stimulusInitialSilenceDuration = 0.5 seconds
stimulusMedialSilenceDuration = 0
stimulusFinalSilenceDuration = 0.5 seconds
numberOfDifferentStimuli = 4
"heed" ""
"hid" ""
"hood" ""
"hud" ""
numberOfReplicationsPerStimulus = 3
breakAfterEvery = 0
randomize = <PermuteBalancedNoDoublets>
startText = "This is a listening experiment.
After hearing a sound, choose the vowel that is most similar to what you heard.
22
23
24
25
26
27
28
29
30
31
32
33
34
35
36
37
38
39
40
41
42
43
Click to start."
runText = "Choose the vowel that you heard."
pauseText = "You can have a short break if you like. Click to proceed."
endText = "The experiment has finished."
maximumNumberOfReplays = 0
replayButton = 0 0 0 0 "" ""
okButton = 0 0 0 0 "" ""
oopsButton = 0 0 0 0 "" ""
responsesAreSounds? <no> "" "" "" "" 0 0 0
numberOfDifferentResponses = 5
0.2 0.3 0.7 0.8 "h I d" 40 "" "i"
0.3 0.4 0.5 0.6 "h E d" 40 "" "e"
0.4 0.5 0.3 0.4 "h A d" 40 "" "a"
0.5 0.6 0.5 0.6 "h O d" 40 "" "o"
0.6 0.7 0.7 0.8 "h U d" 40 "" "u"
numberOfGoodnessCategories = 5
0.25 0.35 0.10 0.20 "1 (poor)"
0.35 0.45 0.10 0.20 "2"
0.45 0.55 0.10 0.20 "3"
0.55 0.65 0.10 0.20 "4"
0.65 0.75 0.10 0.20 "5 (good)"
1 Praat
User Manual. ExperimentMFC. [31-05-2013]
1
Figure 1: Introductory screen
Figure 2: Experiment screen
1. How an experiment proceeds
After the experiment finishes, you can choose Extract results. The resulting ResultsMFC object
contains for each trial the stimulus name (e.g. "hood"), the response category (e.g. "u"), and the
goodness judgment (e.g. 4). You will want to save this ResultsMFC object to a text file with Save
as text file. . . . Once you have collected the results of all your subjects, you can read all the results
files into Praat, select all the ResultsMFC objects and choose Collect to table.
This will result in a table whose first column contains the names of the subjects, the second column
contains the stimulus names, the third column contains the responses, and the last column contains
the approximate reaction times. If there are goodness judgments, these will go into the fourth
column.
The table can be saved as a table file (with Save as tab-separated file. . . ), which can be read by
programs like Excel and SPSS.
2. Stimuli
In line 12 the user has to state how many stimuli will be used in the experiment and characterize
what the stimuli are (lines 13-16). In this example, wav files are used. Therefore, you have to
confirm the file ending in line 6 and stimuliAreSounds? in line 4 has to be stated as <yes>. The
name of the sound files and the must be identical with the names of the stimuli.
If the stimuli have a different directory than the experiment file, the path have to be indicated in
line 5 stimulusFileNameHead.
To present the listener with each stimulus more than once, line 17 gives you the opportunity to set
a replication value.
Lines 9 to 11 give you the possibility to define the duration of silence before, within and after a
stimulus.
Note, that all sound files must have the same number of channels and the same sampling frequency.
3. Carrier phrase
Lines 7 and 8 describe proceeding and following audio files that you might want to include in the
experiment. If only the stimulus itself should be played later on, use stimulusCarrierBefore = ""
and stimulusCarrierAfter = "".
4. Breaks
A new stimulus will be presented as soon as the listener has made her/his choice. You can insert a
break after every so many trials in line 18 using breakAfterEvery = x.
5. Randomization
There are different randomization strategies that you can use by randomizing your stimuli. The
following examples are applied for the experiment above.
a) ::::::::::
randomize ::
=::::::::::::::::::::::
<CyclicNonRandom>
The stimuli will be played in the order in which they were specified in the file:
heed hid hood hud heed hid hood hud heed hid hood hud
The most likely case in which you would want to use this randomization strategy, is if you
want to play them only once in a fixed order.
2
b) ::::::::::
randomize ::
=::::::::::::::::::::::
<WithReplacement>
The stimuli will be chosen at random without memory:
hid hood hood heed hid hood hud hud hid hood heed hid
Here, not all stimulus have the same number of occurence and some might also be presented
twice consecutively.
c) ::::::::::
randomize ::
=:::::::::::::::
<PermuteAll>
Using this strategy, you will get the same number of replications for each stimulus but they
might still be presented twice consecutively.
heed hood hud hud hid heed heed hud hood hid hid hood
d) ::::::::::
randomize ::
=:::::::::::::::::::::
<PermuteBalanced>
If you want a less random order, namely one in which the 12 trials are divided into 3 blocks
of 4 stimuli, use this method. All 4 different stimuli occur in a random order:
heed hood hud hid hood hud hid heed heed hud hood hid
But we still have the problem that a stimulus can occur twice in a row. To avoid that, use the
following strategy.
e) ::::::::::
randomize ::
=::::::::::::::::::::::::::::::::
<PermuteBalancedNoDoublets>
This strategy is used for most listening experiments in which you want to minimize effects of
stimulus order:
heed hood hud hid hood hud hid heed hud heed hood hid
The randomization procedure does not interfere with the breaks. The order is determined
before any breaks are inserted.
6. Instructions
Lines 20 to 26 give you the possibility to generate messages to the user. startText describes the
message before the experiment begins and it is centered on the screen (see also Figure 1). During
each trial, the participant will the the runText at the top of the screen (see Figure 2). The pauseText
will appear during breaks and endText after the experiment has been finished.
7. Special buttons
a) :::::::
Replay :::::::
button
Lines 27 and 28 give use the opportunity to determine whether a stimulus can be replayed or
not. For this experiment example no replays are allowed. To add a replay button you can
write something like
maximumNumberOfReplays = 1000
replayButton = 0.2 0.8 0.01 0.07 "Click here to play the last sound again" ""
The four values within the replayButton argument supply the area of the screan where a
button will be drawn. The whole screen measures from 0.0 (left) to 1.0 (right) and from 0.0
(button) to 1.0 (top).
To assign a keyboard shortcut to the replay button, do something like
maximumNumberOfReplays = 1000
replayButton = 0.2 0.8 0.01 0.07 "Click here to play the last sound again" " "
for using the space bar.
b) :::
OK::::::::
button
If you include an OK button, the behaviour of the experiment changes drastically. If you do
not include an OK button, Praat will present the next stimulus as soon as the participant has
clicked a response category.
If you do include an OK button, it will become visible as soon as the listener has chosen a
response category. The participant can then click the button, but can also choose to change
his/her answer.
3
c) :::::
Oops :::::::
button
If you include an oops button, it will become visible to the participant for every stimulus
except the first, and it will also be visible on the paus screens and on the final screen.
If the participant clicks the oops button, Praat will forget everything the participant did with
the current and the previous stimulus. The experiment will continue with playing the previous
stimulus again.
8. Responses
Every trial comes with the same set of response categories (see lines 32-37). For each response
category, you supply the area of the screen where a rectangle will be drawn. You also define the
text that will be drawn in this rectangle. After this you decide on the font size.
The second text defines the response key on the keyboard. And the third text is the response
category as it will be reported by Praat to you when the user clicks it. If you want Praat to ignore
mouse clicks on this rectangle, specify an empty response categorie, i.e. "".
e.g. 0.2 0.3 0.7 0.8 "h I d" 40 "" "i"
area, response category screen, font size, response key keyboard, response category results
You can use pictures instead of text on a response button, by using \FI, for example
0.2 0.3 0.7 0.8 "\FIpictures/hello.jpg" 40 "m" "i"
In this example, the picture hello.jpg from the subdirectory pictures will be drawn into the recangle.
9. Goodness judgments
If numberOfGoodnessCategories is not 0 (see lines 38-43), some more rectangles will be drawn.
Praat will record the number of the button when the listener clicks on it.
10. Stimuls-dependent texts
a) :::::::::::::::::::
Stimulus-dependent ::::
run ::::
text
For the given example, the same runText will be written at the top of the screen. But suppose
you want to make that text dependent on the stimulus. Therefore you would do some changes
for you stimuli (lines 13-16)
"heed" "Choose the vowel you heard."
"hid" "Click the vowel you heard."
"hood" "Select the vowel you heard."
"hud" "What’s the vowel you heard?"
runText = ""
In this case each stimulus comes with its own text.
b) :::::::::::::::::::
Stimulus-dependent :::::::::
response ::::::::
buttons
In the given example, for every stimulus the buttons contained the same visible texts. But
suppose you have an experiment about the perception of voicing in plosives. The first stimulus starts with an ambiguous /b/ or /p/, and you want the participant to choose between
"bath" and "path". The next stimulus starts with an ambiguous /d/ or /t/, and you want the
participant to chose between "dart" and "tart".
4
numberOfDifferentStimuli = 6
"bpath1" "|bath|path"
"bpath2" "|bath|path"
"bpath3" "|bath|path"
"dtart1" "|dart|tart"
"dtart2" "|dart|tart"
"dtart3" "|dart|tart"
...
numberOfDifferentResponses = 2
0.2 0.4 0.7 0.8 "" 40 "" "left"
0.6 0.8 0.7 0.8 "" 40 "" "right"
In this case, two response buttons show either "bath" and "path" or "dart" and "tart".
In the ResultsMFC, the stimuli will be recorded as "bpath1|bath|path" and not just as "bpath1".
Praat does this in order to be able to cope with balanced designs such as
"bath1" "|bath|path"
"bath1" "|path|bath"
In other words, the button ordering is considered part of the stimulus.
11. Blanking the screen
In the example above, the flag blankWhilePlaying was set to <no> (line 3). This means that in
all those cases the participant will immediately see the response categories when the sound starts
playing.
This can be changed by setting blankWhilePlaying to <yes>. When you do that, the participant
will see a blank screen while the stimulus is playing, and the response buttons will come up only
after the sound has finished. This is useful if you want to prevent the participant from clicking
before the sound has finished, or for priming experiments. Reaction times are measured from when
the response buttons appear.