1
ECO-WORTHY Solar Tracker System User Manual
1. INTRODUCTION
We are manufacturers and wholesalers of solar panels and renewable energy products. Our solar business
has been established since 2002. OEM and ODM services are both available. Our engineers are
experienced in solar and related accessories, we would like to be your best supplierIf you buy from us, you
deal with not just a seller, the whole technical team is behind you and your business.
Our mission is to accelerate the renewable energy products as well as energy-saving and environmentally
friendly products to come into vogue in the world.
2. WORKING PRINCIPLES
Due to the Earth's rotation, the illumination angle of the sun is changing all the time, if we set the solar
photovoltaic power at a fixed place then we haven’t use the sunlight fully. In order to keep the solar system
efficiency at its best, we need to guarantee the solar panels facing the sunlight all the time The solar tracker
is the power plant which can keep the solar panels facing the sun and can keep Vertical irradiation of the
sunlight to the solar panels at any time, and thus it can significantly improve the solar system efficiency of
solar photovoltaic modules. By using this solar tracking system, the generation efficiency of solar
photovoltaic modules can be 30% higher than normal fixed solar panels, this product has the advantages
of easy for installing, easy for using, durable and cheap.
3.
PRODUCT OVERVIEW
Building a complete solar tracking system has never been easier. The ECOWORTHY Solar Tracker Kit can be
used directly on 12volt system. The solar tracking system just functions like a MPPT controller. It can trace
the strongest sunlight and always keep the solar panel facing towards the strongest sunlight and thus can
significantly improve the efficiency of solar photovoltaic modules.
3.1 FEATURES
·
{C}{C}Standard 1 year warranty
·
{C}{C}Free-maintenance.
·
{C}{C}easy-installation.
·
{C}{C}Single axis tracker provides up to 35% more power production
·
{C}{C}Engineered to hold up to 1000 Watts of solar panels
·
{C}{C}Waterproof with IP 65.
·
{C}{C}The actuator is able to handle max 3A current.
·
{C}{C}The controller is able to hold max 8A current.
·
{C}{C}Small self –consumption.
3.2 SAFETY PRECAUTION
CAUTION: Never approach a solar tracker while the ECOWORTHY Solar Tracker electronics are “on”. The
solar tracker can move unexpectedly and the powerful linear actuator/motor can cause serious injury or
death. Always disconnect the ECOWORTHY Solar Tracker electronics from its power supply before
approaching the solar tracker.
4
PARTS LIST
The whole view of the solar tracker system
The 3 mail elements of the solar tracker system
solar tracking controller
East-West Linear Actuator
light- sensor
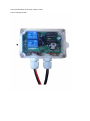
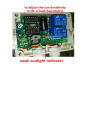
4.1 solar tracking controller
SPECIFICATION
Size: 115x80x35mm
Nominal output: 12/24v
Max load current: 8A
Waterproof: IP65
Operating temperature: -20 to +60℃
This control box is made of analog circuit control system. The main function of this controller is to control
the Linear Actuator’s positive inversion process (Rise & Fall). Inside the controller there is a voltage
comparison circuit to detect the sun’s orientation. This controller has accurate azimuth signal output. The
control precision is ±3 degrees.
Features
1. Weather detector
2. Day and night detector
3. The sensitivity of light can be adjustable
4. Red and green LED display
5. Weak light display
6. The control precision is ±3 degrees
7. Max current: 8A
8. Over current protection
9. EMF elimination
10. Wrong battery pole connection protection
4.2 Light –sensor
This device is a new umbrella detector,the metal parts are all made of 304 stainless steel,the detecting
element is made of two Epoxy silicon cells, and you can adjust the direction angle and then calibrate the
orientation.
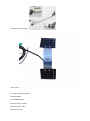
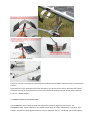
4.3 North-South Linear Actuator
The linear actuator is excellent for controlling the tracking in the East/West direction on Do-It-Yourself solar
trackers.
Limit switches are pre-installed on the linear actuator so you do not have to worry about the solar tracker
electronics forcing the linear actuator to over travel. The linear actuator will stop moving after it extends
17.72 in5.INSTALLATION
5.1 GENERAL INSTALLATION GUIDELINES
The ECOWORTHY Solar Tracker provides the electronics to build a single axis solar tracker. The
ECOWORTHY Solar Tracker Electronics are capable of operating at 3 amps continuously. In general, solar
trackers use linear actuators (geared motors) to move and follow the sun. The 8 amp operational capacity
of the ECOWORTHY Solar Tracker controller is powerful enough to power linear actuators for solar trackers
up to 1kw (1000 watts). ches even if the solar tracker electronics tell the linear actuator to keep moving.
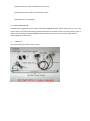
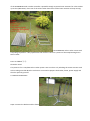
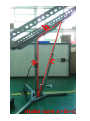
The ECOWORTHY Solar Tracker comes with
everything required for a fully operational solar tracker. The left is a picture of the Complete Single Axis
Solar Tracker.
Parts are labeled ①-⑥.
Please be noted:
This picture is for a complete Solar Tracker System. Here on sale is only including the Linear Actuator. And
solar tracking controller & Solar track sensor .You need to prepare the bracket, frame, power supply and
the solar panel by yourself.
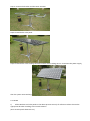
5.2 INSTALLATION STEPS
Step1: Connect the bracket and the frame.
Step 2: Connect the bracket and the Linear Actuator.
Step3: Assemble the solar panel.
Step4: Assemble the solar tracking controller and the Solar tracking sensor. Connection the power supply,
then the system starts working.
5.3. NOTES
1)
All the Brackets and solar panels in the above pictures are only for reference. Please choose the
appropriate bracket according to the actual situation.
(Such as Solar panel dimension etc.)
2)
Make sure that the installation orientation of the tracking sensor is consistent with the bracket’s
moving direction
3)
When assembling the actuator, make sure the actuator’s position matches well with the bracket’s
actual angle.
4)
If the actuator’s moving direction is opposite t the detected direction, please turn the actuator by
180 degrees or change the positive and the negative position to the power supply.
5)
The power supply of the controller can be directly connected to the battery of the system, but please
make sure the battery is 12V (the voltage of the battery and the controller must be consistent).
Attention
When assembling the system, please make sure that the length of the bracket is proper for the system in
case the brackets will be stuck during working process
Tell you how to DIY your solar cell !
Solar Charge Controller Basics
How to select an inverter for a solar system
MC means
Solar Power Basics
What the heck is an MPPT
GTI Series Inverters For GridUser Manual
Manual for 20A MPPT
every style meter instruction