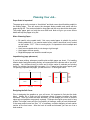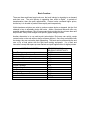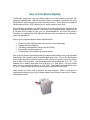
1
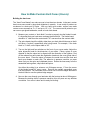
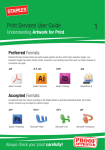
“Book Making 101” “We believe that the quality of books produced is dependent on the training of the book production operator. It’s vital that all of our customers have an understanding of paper properties and the book making processes.” Planning Your Job….................................................................................. 3 Book Creation… ...................................................................................... 5 How to Print Books Digitally........................................................................ 6 How to Laminate ....................................................................................... 7 How to Make Custom Hard Cases (Covers).................................................. 8 How to Bind.............................................................................................. 9 How to Trim Books .................................................................................. 10 Book Making Supplies ............................................................................. 11 Planning Your Job… Paper Grain is Important! The paper grain on the content or “book block” and book cover should both be parallel to the binding edge. This will ensure the strongest binds possible and assist with the pages laying flat. The content should be long-grain and the cover should be short-grain. The proper paper grain on both the cover and book block will give you more secure binds and help the pages to lay flat. When Choosing Paper... Be careful using coated stock! Not every coated paper is suitable for perfect binding adhesives. If you need a coated cover, select a stock that is only coated on the outside, “C1S”. Prior to running a job, it’s important to bind a sample and test the bind. Avoid cover material which is not strong or rigid enough Avoid paper with low opacity Bright white paper can strain the reader’s eyes Impositioning (page placement) If you’re laser printing, whenever possible print multiple pages per sheet. For handling heavier stocks and good quality printing, we recommend Xerox printers with a “per click” program. You will save money on toner and it will be easier to estimate your printing costs. For printing 4-up letter-half size pages, 11 x 17 paper has the correct paper grain. For printing 2-up letter-half pages, you will need 8.5 x 11 short-grain stock. 17” PAGE 1 11” PAGE 1 8 1/2 “ 11” PAGE 1 PAGE 1 PAGE 1 SHORT GRAIN PAGE 1 LONG GRAIN Designing the Soft Cover Prior to designing the graphics on your soft cover, it’s important to first print the book block. Adding ink or toner and air in-between sheets of paper increases the book thickness. Once you know the exact thickness, you can design your cover so that the spine text and graphics are properly centered. Purchase short-grain cover stock in long widths. The longer covers will give you flexibility in binding a variety of book thicknesses. If the wrap around cover has over 1.5” of overhang, consider designing a book marker section on the front cover. After the book is bound and trimmed, you can use it as a book marker. Designing Hard Covers Measure your book block in order to properly size the binder’s board. The hard case should overhang the book block. The formula for sizing the binder’s board is to add ¼” to the book block height and deduct 1/16” from the width. As an example, if you need to make a hard cover case for an 8” x 10” book block, your binder board should be 8 ¼” x 9 15/16”. To determine the proper spine width, determine your book block thickness and add 1/8” to the width of the spine. For example, if the book block is ¼” thick, cut the spine width to 3/8”. The spine height should be the same as the binder’s board. Book Creation… There are fewer and fewer large book runs, the book industry is migrating to on-demand and short runs. The print industry is upgrading from offset to digital. In periods of transformation, there are profit opportunities. Custom books command higher prices, but the key is to be able to produce them rapidly and inexpensively. Viable hardware solutions now exist to produce custom books on-demand, but the final obstacle is how to affordably design the books. Adobe, Quark and Microsoft offer very powerful graphics software. But we recommend that you take the time to learn them and be proficient. Many local colleges offer specific graphic design courses. Another alternative is to use web-to-print technologies. End users can quickly create custom books on the web with no design software required. Once they are satisfied with the design, they can review the book typesetting. The book can be produced by the end user or by a local printer with the right book making equipment. It’s a fresh and innovative concept that opens up new markets and profit opportunities for digital printers. POTENTIAL MARKETS Real Estate Publishing (Trade Books) on Demand Professional Speakers Professional Services/Corporations School Yearbooks Education Custom Catalogs Religious Organizations Scrapbooks Photography Enterprise Document Services Incremental Markets Total PROBABLE ANNUAL REVENUE OPPORTUNITY $1.0 B 7.0 B .7 B .4 B 2.5 B 5.0 B .3 B 5.0 B 1.0 B .3 B 2.0 B TBD $25.2B How to Print Books Digitally Traditionally, large book runs have been produced by offset printing processes with signatures, folded sheets. With the success of books on-demand, more books are being produced one sheet at a time on ink-jet and laser printers. These printers are ideal for variable data printing (“VDP”) allowing you to easily customize each book. Our customers print books on a wide spectrum of systems ranging from tabletop ink-jet printers to high speed laser printers. If you haven’t yet selected a printer, please give us a call and we’ll be happy to give you our recommendations. We don’t sell printers. Therefore, our opinions are more objective because they are based on our customer’s real-world experiences. Some of your important decision factors should include: • • • • • Printer cost (the initial purchase and long-term cost of ownership) Custom sheet size handling The ability to handle heavy stocks (225-400 GSM) Print quality, resolution and color Printer speed in both simplex and duplex modes One of the key factors to producing hard cover books with printed covers, such as coffee table books, is the printer’s ability to handle large sheet sizes. Due to the fact that the cover wraps around the binder’s board or book content, the printer should be able to print at least a 19” long sheet. Our standard printable cover sheets are 12.6” x 20”. This enables you to make a letter size cover with up to a 1” thick spine. For large format books, you may need sheet sizes up to 13.6” x 28”. This enables you make books up to 12” x 13”. Most of the ink-jet printers on the market can print this sheet size. Laser printers are often used to produce the book contents. Bear in mind that the recommended monthly duty cycle of these machines are limited to short runs of books, hundreds per month. How to Laminate To achieve good laminating results, you need to learn how to balance three important factors, heat, speed and temperature. 1. Heat. As the laminator runs, it is continually generating heat to compensate for dissipating surface heat. The temperature consistency is measured as ‘hysterisis’. As an example, the hysterisis of the Model 1200 laminator is +/- 3 degrees Fahrenheit. Depending on the thickness and type, laminating films require different temperature settings. 2. Speed. After heat, consistent speed or ‘dwell time’ is the next most important factor. The film needs to be exposed to the heat for sufficient time to enable the film to adhere sufficiently to the media. Some laser printed media with 100% toner concentration will need to be run at a slow speed and hotter setting. 3. Pressure. When heating up or cooling down a roll laminator, make sure that the silicone rollers are ‘gaped’ or apart. This will prevent flat spots being burned on the roller and extend the roller life. When the laminator reaches the correct operating temperature, un-gap the rollers and start production. For single-side laminating, make sure that you allow the laminator to pull the film from the mandrel core freely. If the laminator has to pull or stretch the film, you will get curl or bad lay-flat results. For double-side laminating, make sure that the film has the same pressure on both the top and bottom mandrel rolls. It’s important that you practice with your laminator on a variety of media types. How can you determine if you are being successful? Test the lamination. Try to peel the film away from the media at a corner. If the media or paper pulls away with the film, you have a good bond. If only the ink or toner pulls away on the film, the result is marginal. If the film pulls away cleanly, it’s a failure. How to Make Custom Hard Cases (Covers) Building the hard case The “Hard Cover Master” can make a cover in less than two minutes. In the past, custom hard covers were made by large book binderies in quantity. It was costly to produce an on-demand or short-runs of books. With our hard cover maker, anyone can make custom covers as small as 3” x 3” and up to 12” x 14”. The covers can be printed or you can use our pre-glued leatherette, suede or book cloth sheets. 1. Measure your content or “book block” in order to properly size the binder’s board. It’s important that your hard case overhang the book block. The binder board should be ¼” taller than the content and 1/16” narrower than the content width. 2. The spine board should be slightly wider than your book block thickness so that it will have a “keyhole” appearance after being bound. For example, if the book block is ¼” thick, cut the spine width to 3/8”. 3. Turn on the light and fan switches on the front of your cover maker. Adjust the spine alignment head for the dimension of your spine. Place a piece of cover material so that the spine text is aligned with the centerline of the lightbox. Peel off the release liner and rotate the registration head onto the cover glued side of the cover sheet. Place the spine in between the metal tines and the front and back cover boards on each side. The adhesive is pressure sensitive, so press down firmly on the spine and chipboard pieces. Rotate the tines away from the assembled tacking sheet, chip boards and spine. Use either the cutting jig or scissors, cut 45-degree corners, ¼” from the corner of the binder boards on every corner. Remove the partially assembled cover from the light box. You can either roll the cover over to turn the edges around the binder’s board or use the optional edge wrapper. 4. Now run the cover through your laminator with the heat set at about 180 degrees. Because the tacking sheet is pressure sensitive, this will press out any bubbles or wrinkles. Your cover is done and is ready for binding! How to Bind The term “perfect binding” is the process of gluing a wrap around book cover to the content or “book block”. If you are using plain paper for both the content and cover, achieving strong binds is easy. But if you have coated paper, you should roughen the spine to expose as much paper fiber or surface area to the glue as possible. The best way to roughen the spine is to mill or grind off a small amount of paper, then put perpendicular notches into the spine that will be filled with adhesive. A majority of perfect binders use EVA hot-melt adhesives applied at 250-360 degrees. It’s important to know the EVA cure time so that the books can achieve maximum strength before opening. Some large perfect binders use PUR adhesive. But PUR is a toxic adhesive that must be applied in a controlled environment. In order to achieve strong binds, use EVA ultra-high temperature adhesive in conjunction with a binder that presses the glue into the paper fiber. How to Trim Books When using a guillotine trimmer, think safety. The blades are very sharp and it’s important to read the user manual before attempting to operate the cutter or change the blades. Never attempt to hone or sharpen the blade yourself. Your choice for a paper cutter should be based on the volume of books that you intend to make. If you make on-demand to one-hundred books per year, a manual cutter is great for budget conscious applications. For short and medium book production, an electric guillotine is recommended, if only to save your arm muscles! For long runs or daily production, consider investing in a three-knife trimmer. There are two key points to remember about trimmers: 1. Always make sure that the blade is sharp! As a general rule, a blade will become dull after 25-30 hours of usage, or 3,000 to 5,000 cuts. How do you know when to change the blade? If the cutter hesitates or the paper doesn’t cut the paper evenly, it’s time for a blade change. It’s recommended that you invest in a backup blade, install the back-up when the other is out for sharpening. Depending on the cutter, make sure that your service sharpens the blade at the correct angle. 2. Use a “false clamp” to prevent the book spine from crushing. When trimming across the spine, the clamp pressure can crush the book spine even prior to trimming. The false clamp attaches magnetically to the bottom of the clamp. It has a hollow area located just above the book spine. The rest of false clamp makes contact with the book block without crushing the spine. Book Making Supplies If you want to make high-quality books, you need to use high-quality supplies that are designed specifically for your book making process. For printable covers, make sure that the paper is micron coated so that it can be printed on laser ink-jet or offset. End leaf should be at least 80 lb paper with good opacity and paper strength. Most importantly, make sure that the pressure sensitive adhesives are solvent-based and very aggressive to eliminate bubbles and wrinkles. ExactBind supplies are now proudly manufactured in the United States using the best possible paper with good opacity, tensile strength, and strong pressure sensitive adhesives. The printable cover sheets and end-papers are “FSC Certified” which represents the highest standard for archival book making. The papers are acid, carbon, lignon, and chlorine free. ExactBind makes it easy for you to invest in our system and understand our consumables. For making soft cover books, all you need is cover index, content paper and our adhesive. The adhesive costs only pennies per book. For making hard cover books, we offer the supplies in a kit. Each kit contains all of the supplies you need to make 100 hard covers. The kit includes: • • • • • Printable cover (ink-jet or laser tacking sheet) with adhesive backing and peel-off liner. As an option, you can get leatherette, suede or book cloth material. Front and back chipboard panels Book spine A pair of end-leafs (to cover the inside of the book covers) Optional lay-flat strips. Now for the best part, the average cost per hard cover set is about $3.50! Your total costs on hard cover books will vary depending on the number of book pages, color content, and optional lamination.