1
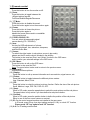
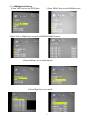
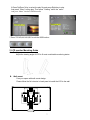
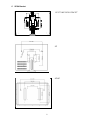
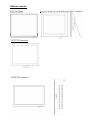
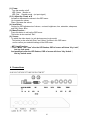
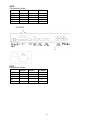
TFT LCD MONITOR
USER MANUAL
HMDE with SDI Series Models
L104SDI – 10.4”
L121SDI – 12.1”
L152SDI – 15.0”
L156SDI – 15.6”
L172SDI – 17.0”
L185SDI – 18.5”
L192SDI – 19.0”
L215SDI – 21.5”
L240SDI – 24.0”
L270SDI – 27.0”
L320SDI – 32.0”
L420SDI – 42.0”
L460SDI – 46.0”
Table Of Contents
Table of contents/ Warning…………………………………………………………...…..…2
Precautions …………………………………………………………………………...............3
About this user manual / Items included in the delivery ……………………….…..….….4
1. IR-remote control ………………………………………………………………..….……...5
2. LCD monitor mounting ………………………………………………………….…..…….7
3. Monitor controls …………………………………………………………………..…..……9
4. Connections .………………………………………………………………………..…....10
5. Monitor settings via OSD menu ……………………………………………………......12
5.1 Picture ………………………………………………………………………………..….12
5.2 Sound ……………………………………………………………………………….…...12
5.3 OSD Setup ……………………………………………………………………………....13
5.4 Advance ………………………………………………………………………………….13
5.5 PIP………………………………………………………………………………….….….13
5.6 PC ………………………………………………………………………………….……..14
6. Special features ……………………………………………………………………..……15
7. Technical specifications …………………………………………………………….…...16
Warning:
TO REDUCE THE RISK OF FIRE OR ELECTRIC SHOCK, DO NOT EXPOSE THIS PRODUCT
TO RAIN OR MOISTURE.
DO NOT INSERT ANY METALLIC OBJECT THROUGH VENTILATION GRILLS.
Caution:
Explanation of Graphical Symbols
Danger: This symbol is intended to alert the user to the
presence of un-insulated
"dangerous voltage" within the product’s enclosure that
may be of sufficient
magnitude to constitute a risk of electric shock to a person.
Warning: This symbol is intended to alert the user to the
presence of important
operating and maintenance (servicing) instructions in the
literature accompanying
the appliance.
2
Precautions
Safety---------------------------------------
Installation---------------------------------------
Should any liquid or solid object fall into the
cabinet, unplug the unit and have it checked
by the qualified personnel before operating it
any further.
Do not install the unit in an extremely hot or
humid place or in a place subject to excessive
dust or mechanical vibration.
Unplug the unit from the wall outlet if it is not
going to be used for several days or more.
To disconnect the cord, pull it out by the plug.
Never pull the cord itself.
Allow adequate air circulation to prevent
internal heat built-up. Do not place the unit on
surfaces(rugs, blankets, etc.) or near materials
(curtains, draperies) that may block the
ventilation holes.
The unit is not designed to be waterproof.
Exposure to rain or water may damage the unit.
Cleaning-----------------------------------Clean the unit with a slightly damp soft cloth.
Use a mild household detergent. Never use strong
solvents such as thinner or benzene as they might
damage the finish of the unit.
Retain the original carton and packing materials
for safe transport of this unit in the future.
Safety Precautions
Federal Communications Commission (FCC) Statement
This Equipment has been tested and found to comply with the limits for a
Class B digital device, pursuant to Part 15 of the FCC rules. These limits are
designed to provide reasonable protection against harmful interference in a
residential installation. This equipment generates, uses and can radiate
radio frequency energy and, if not installed and used in accordance with the
instructions, may cause harmful interference to radio communications.
However, there is no guarantee that interference will not occur in a particular
installation.
If this equipment does cause harmful interference to radio or television reception,
which can be determined by turning the equipment off and on, the user is
encouraged to try to correct the interference by one or more of the following
measures:
-
Reorient or relocate the receiving antenna.
-
Increase the separation between the equipment and receiver.
-
Connect the equipment into an outlet on a circuit different from that
to which the receiver is connected.
-
Consult the dealer or an experienced radio/TV technician for help.
● You are cautioned that changes or modifications not expressly approved
by that party responsible for compliance could void your authority to operate the equipment.
3
This device complies with Part 15 FCC Rules. Operation is subject to the
following two conditions:
(1) This device may not cause harmful interference.
(2) This device must accept any interference received including interference
that may cause undesired
About this user manual
This manual aims at assisting the user on how to operate the monitors described in this
manual.
This manual is subject to rigid quality control. However, no guarantee can be given that
mistakes are not present. We reserve the right to make changes to the manual without prior
notice.
Before operating the appliance, please read this manual carefully and retain it for further
reference. Verify that all appliance items are included in the delivery. Should items be
missing, do not operate the appliance and contact your local dealer.
Never attempt to repair the appliance yourself. This should only be done by qualified service
personnel.
Improper handling of the appliance will invalidate the warranty.
Items included in the delivery
1 x LCD monitor
1 x Power supply unit 12 V DC [Except for the 32”/42”/46”]
1 x Power cord
1 x VGA cable - Optional
1 x Audio cable - Optional
1 x IR remote control
1 x User manual
4
1. IR remote control
(1). Power:
Press this button to turn the monitor on/off.
(2). Zoom:
Press this button to toggle between the
different picture formats:
Full/Zoom/Subtitle/Regular/Panorama
(3).
Mute:
Press this button to disable the sound.
Press this button again to turn the sound on again.
(4). Freeze:
Press this button to freeze the picture .
Press this button again to
disable the freeze picture and to re-establish
the normal picture.
(5). PC/HD, AV1/AV2, SV:
You can select the appropriate signal
source directly (PC = VGA/DVI).
(6). Item:
Hot key for OSD adjustments of volume,
contrast, brightness, hue, saturation, sharpness,
and Red Green Blue .
(7). Source:
To switch the video inputs (or sub picture source in pip mode),
please use the IR remote control included in the delivery
This button is also used as „Enter“ and „Select“ function in the OSD menu.
and to confirm your selected settings in the OSD menu.
(8). OK / Menu:
Press this button to call-up the OSD menu.
This button is also used as “Exit“.
Note: The menu button is also used to return to the previous menu.
(9). Select ▲/▼:
Directional buttons up/down.
(10). Display:
Press this button to call-up screen information such as resolution, signal source, etc.
(11). Picture:
Press this button to toggle between the different picture modes:
User, Standard, Movie, Vivid.
(12). PIP:
Press this button to select the picture-in-picture function. Define the size of the sub picture:
Small, Medium, Large, POP Full, POP 4:3, OFF.
(13). Swap:
When in PIP mode, press the swap button to switch the main picture and the sub picture.
The swap button is only active if you have defined a sub-picture before .
(14). Position:
When in PIP mode, press the position button to define the position of the sub-picture:
Either in one of the four screen corners or centred.
(15).ID: Can be control several monitors are installed in the same area.
In ID mode, press ID key, then input setting number(01~99), to unlock “ID” function.
Please press “ID” key again to lock “ID” function.
(16).0~9: For ID setting number used.
5
(17). USB/Right/Left/Catalog:
1:Press ”USB” Key into the JPEG Menu.
2:Press ”MENU” Key into the USB Main menu
3:Press “Left” or “Right” key to select the JPEG/MP3/DRIVE function.
4:Press”Up/Down” Key to select play file.
5:Press”Right” Key to into the file
6
6:Press”Up/Down” Key to select the play file and press Right key to play.
And press ”Menu” to stop play. Then press” Catalog” return the menu.
And press “Menu” into the USB Main menu.
7:Press” PC/HD,AV1/AV2;SV to exit the USB function.
2 LCD monitor Mounting Guide
A.
Desktop
Adjust the viewing angle of LCD to fit most comfortable monitoring status.
B.
Wall mount
Free your space with wall mount design.
Please follow the fix-hole size in back panel to install the LCD to the wall.
7
C. VESA Bracket
15”/17”/18.5”/19”/21.5”/24”/27”
32”
42”/46”
8
3 Monitor controls
15’/17”/19” Plastic
10.4”/12.1”/15”/15.6”/17”/18.5”/19”/21.5”/22”/24”/27” Aluminium
15”/17”/19” Aluminium
32”/42”/46” Aluminium
9
(1). Power
Turn the monitor on/off.
LED: Green Monitor on
LED: Red Standby mode (no input signal)
(2./3). Adjust Up / Down ▲/▼
Increase or decrease the values in the OSD menu:
Up: Increase the values.
Down: Decrease the values.
(4). Item/Select:
Hot key for OSD adjustments of volume , contrast, brightness, hue, saturation, sharpness,
and Red, Green, Blue.
(5). Menu/Function :
Press this button to call-up the OSD menu.
This button is also used as “Exit“.
(6). Source:
To switch the video inputs, (or sub picture source in pip mode)
This button is also used as „Enter“ and „Select “function in the OSD menu.
and to confirm your selected settings in the OSD menu.
KEY Lock Function:
***Push “Menu” and “Item” after the LED flashes, OSD of screen will show “Key Lock”,
Into key lock mode.
And push again after the LED flashes, OSD of screen will show “Key Unlock “,
Into key unlock mode.
4. Connections
10.4”/12.1”/15”/15.6”/17”/18.5”/19”/21.5”/24”/27”
10
NOTE :
Connections of Audio
Audio 1
V
AV1
AV2
S-Video
PC
DVI
Audio 2
PC Audio
V
V
V
V
32”/42”/46”
NOTE :
Connections of Audio
Audio 1
V
AV1
AV2
S-Video
PC
DVI
Audio 2
PC Audio
V
V
V
V
11
5. Monitor settings via OSD menu
Various monitor settings can be made using the OSD menu (On Screen Display).
Press the Menu/OK button to call-up the OSD main menu. Here you can make adjustments
to the following items:
Picture
Sound
OSD Setup
Advance
PIP
PC (at PC input signal)
Use the ▲/▼ buttons to toggle between the different items.
Press the Source button to select the appropriate item.
5.1 Picture
Use the ▲▼ buttons to select adjusts item, and press source button to confirm.
Then use the ▲▼ buttons to increase/decrease the values,
or use “source” button to change the values.
Press the menu button to return to the previous menu item.
Item
Description
Contrast
Brightness
Hue
Saturation
Sharpness
Colour Temp.
Use the ▲▼ buttons to increase/decrease the screen contrast.
Use the ▲▼ buttons to increase/decrease the screen brightness.
Use the ▲▼ buttons to increase/decrease the hue.
Use the ▲▼ buttons to increase/decrease the saturation.
Use the ▲▼ buttons to increase/decrease the sharpness.
Use the source buttons to select the colour temperature:
Normal , Warm, , Cool, User.
Picture Mode
Use the source buttons to select the picture mode:
User, Standard, Movie, Vivid.
DNR
Use the source buttons to select the level of noise reduction:
(Noise Reduction)
Off, Low, Medium, High.
DLC
Use the source buttons to change the Black Level Extension on/off.
5.2 Sound
Use the ▲▼ buttons to select adjusts item, and press source button to confirm.
Then use the ▲▼ buttons to increase/decrease the values,
or use “source” button to change the values.
Press the menu button to return to the previous menu item.
Item
Volume
Mute
Sound Mode
Bass
Treble
Balance
Description
Use the ▲▼ buttons to adjust the volume.
Use the source buttons to change the Mute on/off.
Use the source buttons to adjust the effect:
User, Standard, Movie, Vivid.
Use the ▲▼ buttons to adjust the bass.(for R/L Audio in use)
Use the ▲▼ buttons to adjust the treble. (for R/L Audio in use)
Use the ▲▼ buttons to adjust the balance. (for R/L Audio in use)
12
5.3 OSD Setup
Use the ▲▼ buttons to select adjusts item, and press source button to confirm.
Then use the ▲▼ buttons to increase/decrease the values,
or use “source” button to change the values.
Press the menu button to return to the previous menu item.
Item
Language
Description
Use the source buttons to select the language.
Can be control several monitors are installed in the same area.
Set ID
Use the source buttons to enter into the function, then use up/down key to select
you setting the number (01~99), then press menu to exit OSD.
Press IR remote control “ID” key again to confirm the Set ID function.
Gamma
Use the source buttons to set the gamma values.(0,1,2)
Freeze
Use the source buttons to freeze the picture. Press this button again to
disable the freeze picture and to re-establish the normal picture.
OSD Time Use the ▲▼ buttons to setting the OSD menu display time.
OSD Halftone Use the ▲▼ buttons to setting the OSD menu display halftone.
Recall
Press the source button to restore the factory settings.
Screen
Use the source buttons to on/off the screen saver:[Screen protector-Anti blur]
saver
Version
Firmware Version
5.4 Advance
Use the ▲▼ buttons to select adjusts item, and press source button to confirm.
Then use the ▲▼ buttons to increase/decrease the values,
or use “source” button to change the values.
Press the menu button to return to the previous menu item.
Item
Scale
Scan Size
H Position
V Position
Description
Use the source buttons to select the picture size: Full/Zoom/Subtitle/Regular/
/Panorama.
Use the source buttons to select the real image size: Normal/Native
Use the ▲▼ buttons to position the picture horizontally.
Use the ▲▼ buttons to position the picture vertically.
5.5 PIP
Use the ▲▼ buttons to select adjusts item, and press source button to confirm.
Then use the ▲▼ buttons to increase/decrease the values,
or use “source” button to change the values.
Press the menu button to return to the previous menu item.
Item
Description
Multi Window Use source button to select the picture-in-picture function:
PIP, POP Full, POP 4:3 Off.
Sub Source Use source button to select the source of the PIP sub-picture.
Size
Use source button to set the size of the sub-picture: Small, Medium, Large.
Position
Use source button to define the position of the sub-picture.
Note: This function is only active if you have previously defined a sub picture.
Border Colour Use source button to select the sub-picture background colour: Black /Blue.
Sound Source Use source button to select the sound source: Main/Sub.
Swap
Use source button to swap the main picture and the sub picture.
Note: This function is only active if you have previously defined a sub picture.
13
5.6 PC
Use the ▲▼ buttons to select adjusts item, and press source button to confirm.
Then use the ▲▼ buttons to increase/decrease the values,
or use “source” button to change the values.
Press the menu button to return to the previous menu item.
Item
Description
Contrast
Use the ▲▼ buttons to increase/decrease the screen contrast.
Brightness Use the ▲▼ buttons to increase/decrease the screen brightness.
Colour Temp Use the source buttons to select the colour temperature:
Normal, Warm, Cool, RGB, User.
Scale
Use the source buttons to select the picture size: Normal/Centre
Auto Adjust Use the source buttons to Adjust the best image.
PC timing:
Mode
1
2
3
4
5
6
7
Resolution
800 x 600 @ 60
800 x 600 @ 72
800 x 600 @ 75
1024 x 768 @ 60
1280 x 1024 @ 60
1360 x 768 @ 60
1920 x 1080@ 60
6. Special features
●
●
●
●
●
●
●
●
●
●
●
●
●
●
Special Video Processor.
3G-SDI In/Out.
PIP Control Function (Only PC/Video).[Video/Video option]
Screen protector (Anti-blur /Image auto move).
NTSC/PAL Auto Switch.
3D De-interlace Technology.
3D Comb Filter Technology.
Automatic Colour Control and Colour Killer.
Luminance transient improvement(LTI),Chrominance transient improvement(CTI)
Directional zoom engine.
Video out support auto termination (75 Ohms).
Build-in 2W speaker.
Support IR remote controller.
VESA standard bracket 75/100mm for 10.4”/12.1”/15”/15.6”/17”/18.5”/19”/21.5”/24”/27”.
100/200mm for 32”, 200/300mm 42”, 46”.
14
7. Technical specifications
Monitor model
System
LCD panel
Visible area (mm)
Picture format
Max. resolution
Pixel dot pitch (mm)
Colours
Brightness
Contrast
Response time(Tr/Tf)
View angle (U/D/L/R)
Video input/output
S-Video input
Full HD input
Audio input/output
PC input
L104SDI
PAL / NTSC
10.4“
211.2 x 158.4
4: 3
1024 x 768
0.20625 x 0.20625
262K
300 cd/m² [CCFL]
400 cd/m² [LED]
500 :1
25ms
60/60/70/70
2 x / 2 x Composite (BNC) ; 1 x /1 x SDI
1 x 4 Pin Mini Din
1 x Full HD (A Type)
2 x / 2 x (RCA)
1 x VGA input (D-Sub 15 pin)
1 x Audio input
1 x DVI-D input
Speaker
1 x built-in speaker (2 watt)
3G-SDI[SMPTE 424M]
SDI standards
HD-SDI[SMPTM 292M]
SD-SDI[SMPTE 259M]
[3G] 1080P50/60(4:2:2)
SDI Video support
[HD]720P@50/60Hz,1080i@50/60Hz1080p25/30Hz
[SD]NTSC/60Hz, PAL/50Hz
SDI Video bandwidth
2.97Gpbs & 2.975/1.001Gpbs
SDI Cable Transmission
3G-SDI[100Meter], HD-SDI[200Meter], SD-SDI[300Meter]
_(5C2V orRG6Cable)
3D Comb Filter
Yes
3D De-Interlace function
Yes
Picture-in-Picture (PIP)
Yes (video/PC)
OSD setting
Yes
Power input
AC 100-240V 50/60Hz, Adapter DC 12V/2A
Power consumption
Approx. 14 watt
Approx. 12 watt
Dimensions (WxHxD) mm
266 x 214 x 60
Weight
2.4 kg
Operating temperature
0° to 40° C
Subject to technical changes without prior notice. Error excepted.
15
Monitor model
System
LCD panel
Visible area (mm)
Picture format
Max. resolution
Pixel dot pitch (mm)
Colours
Brightness
Contrast
Response time(Tr+Tf)
View angle (U/D/L/R)
Video input/output
S-Video input
Full HD input
Audio input/output
PC input
L121SDI
PAL / NTSC
12.1“
245.76 x 184.32
4: 3
1024 x 768
0.24 x 0.24
16.2M
500 cd/m² [LED]
700 :1
35 ms
80/80/80/80
2 x / 2 x Composite (BNC) ; 1 x /1 x SDI
1 x 4Pin Mini Din
1 x Full HD (A Type)
2 x / 2 x (RCA)
1 x VGA input (D-Sub 15 pin)
1 x Audio input
1 x DVI-D input
Speaker
1 x built-in speaker (2 watt)
3G-SDI[SMPTE 424M]
SDI standards
HD-SDI[SMPTM 292M]
SD-SDI[SMPTE 259M]
[3G] 1080P50/60(4:2:2)
SDI Video support
[HD]720P@50/60Hz, 1080i@50/60Hz1080p25/30Hz
[SD]NTSC/60Hz, PAL/50Hz
SDI Video bandwidth
2.97Gpbs & 2.975/1.001Gpbs
SDI Cable Transmission
3G-SDI[100Meter], HD-SDI[200Meter], SD-SDI[300Meter]
_(5C2V orRG6Cable)
3D Comb Filter
Yes
3D De-Interlace function
Yes
Picture-in-Picture (PIP)
Yes (video/PC)
OSD setting
Yes
Power input
AC 100-240V 50/60Hz, Adapter DC 12V/2A
Power consumption
Approx. 15 watt
Dimensions (WxHxD) mm
300 x 239 x 61
Weight
2.6 kg
Operating temperature
0° to 40° C
Subject to technical changes without prior notice. Error excepted.
16
Monitor model
System
LCD panel
Visible area (mm)
Picture format
Max. resolution
Pixel dot pitch (mm)
Colours
Brightness
Contrast
Response time(Tr/Tf)
View angle (U/D/L/R)
Video input/output
S-Video input
Full HD input
Audio input/output
PC input
L152SDI
L152SDI
PAL / NTSC
15“
304 x 228
4: 3
1024 x 768
0.297 x 0.297
16.7M
250 cd/m² [LED]
400 cd/m² [LED]
600 :1
6/2ms
80/80/80/80
2 x / 2 x Composite (BNC) ; 1 x /1 x SDI
1 x 4 Pin Mini Din
1 x Full HD (A Type)
2 x / 2 x (RCA)
1 x VGA input (D-Sub 15 pin)
1 x Audio input
1 x DVI-D input
Speaker
1 x built-in speaker (2 watt)
3G-SDI[SMPTE 424M]
SDI standards
HD-SDI[SMPTM 292M]
SD-SDI[SMPTE 259M]
[3G] 1080P50/60(4:2:2)
SDI Video support
[HD]720P@50/60Hz,1080i@50/60Hz1080p25/30Hz
[SD]NTSC/60Hz,PAL/50Hz
SDI Video bandwidth
2.97Gpbs & 2.975/1.001Gpbs
SDI Cable Transmission
3G-SDI[100Meter], HD-SDI[200Meter], SD-SDI[300Meter]
_(5C2V orRG6Cable)
3D Comb Filter
Yes
3D De-Interlace function
Yes
Picture-in-Picture (PIP)
Yes (video/PC)
OSD setting
Yes
Power input
AC 100-240V 50/60Hz, Adapter DC 12V/5A
Power consumption
Approx. 17 watt
Dimensions (WxHxD) mm
357 x 283 x 64
Weight
3.4 kg
Operating temperature
0° to 40° C
Subject to technical changes without prior notice. Error excepted.
17
Monitor model
System
LCD panel
Visible area (mm)
Picture format
Max. resolution
Pixel dot pitch (mm)
Colours
Brightness
Contrast
Response time(Tr+Tf)
View angle (U/D/L/R)
Video input/output
S-Video input
Full HD input
Audio input/output
PC input
L156SDI
PAL / NTSC
15.6“
344.2 x 193.5
16 : 9
1920 x 1080
0.252 x 0.252
262K
300 cd/m² [LED]
500:1
6/2 ms
60/60/70/70
2 x / 2 x Composite (BNC) ; 1 x /1 x SDI
1 x 4Pin Mini Din
1 x Full HD (A Type)
2 x / 2 x (RCA)
1 x VGA input (D-Sub 15 pin)
1 x Audio input
1 x DVI-D input
Speaker
1 x built-in speaker (2 watt)
3G-SDI[SMPTE 424M]
SDI standards
HD-SDI[SMPTM 292M]
SD-SDI[SMPTE 259M]
[3G] 1080P50/60(4:2:2)
SDI Video support
[HD]720P@50/60Hz,1080i@50/60Hz1080p25/30Hz
[SD]NTSC/60Hz,PAL/50Hz
SDI Video bandwidth
2.97Gpbs & 2.975/1.001Gpbs
SDI Cable Transmission
3G-SDI[100Meter], HD-SDI[200Meter], SD-SDI[300Meter]
_(5C2V orRG6Cable)
3D Comb Filter
Yes
3D De-Interlace function
Yes
Picture-in-Picture (PIP)
Yes (video/PC)
OSD setting
Yes
Power input
AC 100-240V 50/60Hz, Adapter DC 12V/2A
Power consumption
Approx. 15 watt
Dimensions (WxHxD) mm
382 x 230 x 47
Weight
2.7kg
Operating temperature
0° to 40° C
Subject to technical changes without prior notice. Error excepted.
18
Monitor model
System
LCD panel
Visible area (mm)
Picture format
Max. resolution
Pixel dot pitch (mm)
Colours
Brightness
Contrast
Response time(Tr/Tf)
View angle (U/D/L/R)
Video input/output
S-Video input
Full HD input
Audio input/output
PC input
L172SDI
L192SDI
PAL / NTSC
17“
19“
338 x 270
376 x 301
4:3
4:3
1280 x 1024
1280 x 1024
0.264 x 0.264
0.249 x 0.249
16.7M
16.7M
250 /400cd/m² [LED]
250 /400cd/m² [LED]
1000 :1
1000:1
1.2/3.8 ms
3.5/1.5 ms
80/80/85/85
80/80/85/85
2 x / 2 x Composite (BNC) ; 1 x /1 x SDI
1 x 4 Pin Mini Din
1 x Full HD (A Type)
2 x / 2 x (RCA)
1 x VGA input (D-Sub 15 pin)
1 x Audio input
1 x DVI-D input
Speaker
1 x built-in speaker (2 watt)
3G-SDI[SMPTE 424M]
SDI standards
HD-SDI[SMPTM 292M]
SD-SDI[SMPTE 259M]
[3G] 1080P50/60(4:2:2)
SDI Video support
[HD]720P@50/60Hz,1080i@50/60Hz 1080p25/30Hz
[SD]NTSC/60Hz,PAL/50Hz
SDI Video bandwidth
2.97Gpbs & 2.975/1.001Gpbs
SDI Cable Transmission
3G-SDI[100Meter], HD-SDI[200Meter], SD-SDI[300Meter]
_(5C2V orRG6Cable)
3D Comb Filter
Yes
3D De-Interlace function
Yes
Picture-in-Picture (PIP)
Yes (video/PC)
OSD setting
Yes
Power input
AC 100-240V 50/60Hz, Adapter DC 12V/5A
Power consumption
Approx.19 watt
Approx.22 watt
Dimensions (WxHxD) mm
391 x 352 x 65
430 x 356 x 66.7
Weight
4.1 kg
5.7kg
Operating temperature
0° to 40° C
Subject to technical changes without prior notice. Error excepted.
19
Monitor model
System
LCD panel
Visible area (mm)
Picture format
Max. resolution
Pixel dot pitch (mm)
Colours
Brightness
Contrast
Response time(Tr/Tf)
View angle (U/D/L/R)
Video input/output
S-Video input
Full HD input
Audio input/output
PC input
L185SDI
PAL / NTSC
18.5“
409.8 x 230.4
16 : 9
1366 x 768
0.300 x 0.300
16.7M
250 cd/m² [LED]
1000 :1
1.4/3.6 ms
80/80/85/85
2 x / 2 x Composite (BNC) ; 1 x /1 x SDI
1 x 4 Pin Mini Din
1 x Full HD (A Type)
2x / 2x (RCA)
1 x VGA input (D-Sub 15 pin)
1 x Audio input
1 x DVI-D input
Speaker
1 x built-in speaker (2 watt)
3G-SDI[SMPTE 424M]
SDI standards
HD-SDI[SMPTM 292M]
SD-SDI[SMPTE 259M]
[3G] 1080P50/60(4:2:2)
SDI Video support
[HD]720P@50/60Hz,1080i@50/60Hz
1080p25/30Hz
[SD]NTSC/60Hz,PAL/50Hz
SDI Video bandwidth
2.97Gpbs & 2.975/1.001Gpbs
SDI Cable Transmission
3G-SDI[100Meter], HD-SDI[200Meter], SD-SDI[300Meter]
_(5C2V orRG6Cable)
3D Comb Filter
Yes
3D De-Interlace function
Yes
Picture-in-Picture (PIP)
Yes (video/PC)
OSD setting
Yes
Power input
AC 100-240V 50/60Hz, Adapter DC 12V/5A
Power consumption
Approx. 22 watt
Dimensions (WxHxD) mm
464.4 x 285 x 69
Weight
5.7kg
Operating temperature
0° to 40° C
Subject to technical changes without prior notice. Error excepted.
20
Monitor model
System
LCD panel
Visible area (mm)
Picture format
Max. resolution
Pixel dot pitch (mm)
Colours
Brightness
Contrast
Response time(Tr/Tf)
View angle (U/D/L/R)
Video input/output
S-Video input
Full HD input
Audio input/output
PC input
L215SDI
L240SDI
PAL / NTSC
21.5“
24“
476.6 x 268.1
531.3 x 298.8
16:9
16:9
1920 x 1080
1920 x 1080
0.248 x 0.248
0.276.7 x 0.276 .7
16.7M
16.7M
250 cd/m² [LED]
250 cd/m² [LED]
3000 :1
1000:1
1.3/3.7 ms
3.5/1.5 ms
89/89/89/89
80/80/85/85
2 x / 2 x Composite (BNC) ; 1 x /1 x SDI
1 x 4 Pin Mini Din
1 x Full HD (A Type)
2 x / 2 x (RCA)
1 x VGA input (D-Sub 15 pin)
1 x Audio input
1 x DVI-D input
Speaker
1 x built-in speaker (2 watt)
3G-SDI[SMPTE 424M]
SDI standards
HD-SDI[SMPTM 292M]
SD-SDI[SMPTE 259M]
[3G] 1080P50/60(4:2:2)
SDI Video support
[HD]720P@50/60Hz,1080i@50/60Hz
1080p25/30Hz
[SD]NTSC/60Hz,PAL/50Hz
SDI Video bandwidth
2.97Gpbs & 2.975/1.001Gpbs
SDI Cable Transmission
3G-SDI[100Meter], HD-SDI[200Meter], SD-SDI[300Meter]
_(5C2V orRG6Cable)
3D Comb Filter
Yes
3D De-Interlace function
Yes
Picture-in-Picture (PIP)
Yes (video/PC)
OSD setting
Yes
Power input
AC 100-240V 50/60Hz, Adapter DC 12V/5A
Power consumption
Approx. 23 watt
Approx. 25watt
Dimensions (WxHxD) mm
532.3 x 323.3x 75.9
575.9 x 347.8 x 74.1
Weight
5.7kg
5.9kg
Operating temperature
0° to 40° C
Subject to technical changes without prior notice. Error excepted.
21
Monitor model
System
LCD panel
Visible area (mm)
Picture format
Max. resolution
Pixel dot pitch (mm)
Colours
Brightness
Contrast
Response time(Tr/Tf)
View angle (U/D/L/R)
Video input/output
S-Video input/ output
Full HD input
Audio input/output
PC input
L270SDI
L320SDI
PAL / NTSC
27“
31.5“
597.6 x 336.15
698.4 x 392.8
16:9
16:9
1920 x 1080
1920 x 1080
0.31125 x 0.31125
0.36375 x 0.37375
16.7M
16.7M
300 cd/m² [LED]
350 cd/m² [LED]
5000:1
3000 :1
7/5 ms
6.5ms
89/89/89/89
89/89/89/89
2 x / 2 x Composite (BNC); 1x /1x SDI
1 x 4 Pin Mini Din (input)
2 x 4 Pin Mini Din
1 x Full HD (A Type)
2 x / 2 x (RCA)
4 x / 4 x (RCA)
1 x VGA input (D-Sub 15 pin)
1 x Audio input
1 x DVI-D input
Speaker
1 x built-in speaker (2 watt)
2 x built-in speaker (2 watt)
3G-SDI[SMPTE 424M]
SDI standards
HD-SDI[SMPTM 292M]
SD-SDI[SMPTE 259M]
[3G] 1080P50/60(4:2:2)
SDI Video support
[HD]720P@50/60Hz,1080i@50/60Hz
1080p25/30Hz
[SD]NTSC/60Hz,PAL/50Hz
SDI Video bandwidth
2.97Gpbs & 2.975/1.001Gpbs
SDI Cable Transmission
3G-SDI[100Meter], HD-SDI[200Meter], SD-SDI[300Meter]
_(5C2V orRG6Cable)
3D Comb Filter
Yes
3D De-Interlace function
Yes
Picture-in-Picture (PIP)
Yes (video/PC)
OSD setting
Yes
Power input
AC 100-240V 50/60Hz, Adapter DC 12V/5A AC100-240V 50/60HZ
Power consumption
Approx. 30watt
Approx. 57 watt
Dimensions (WxHxD) mm
658 x 396.6 x 71.5
761.6 x 455.2 x 75
Weight
7.2kg
13.2kg
Operating temperature
0° to 40° C
Subject to technical changes without prior notice. Error excepted.
22
Monitor model
System
LCD panel
Visible area (mm)
Picture format
Max. resolution
Pixel dot pitch (mm)
Colours
Brightness
Contrast
Response time(G to G)
View angle (U/D/L/R)
Video input/output
S-Video input/ output
Full HD input
Audio input/output
PC input
Speaker
SDI standards
SDI Video support
SDI Video bandwidth
SDI Cable Transmission
3D Comb Filter
3D De-Interlace function
Picture-in-Picture (PIP)
OSD setting
Power input
Power consumption
Dimensions (WxHxD) mm
Weight
Operating temperature
L420SDI
L460SDI
PAL / NTSC
42“
46“
930.24 x 523.26
1018.08 x 572.76
16:9
16:9
1920 x 1080
1920 x 1080
0.4845 x 0.4845
0.53025 x 0.53025
16.7M
16.7M
400 cd/m² [LED]
500 cd/m² [LED]
4000:1
4000 :1
6.5ms
6.5ms
89/89/89/89
89/89/89/89
2 x / 2 x Composite (BNC); 1 x /1 x SDI
2 x 4 Pin Mini Din
1 x Full HD (A Type)
4 x / 4 x (RCA)
1 x VGA input (D-Sub 15 pin)
1 x Audio input
1 x DVI-D input
2 x built-in speaker (7 watt)
3G-SDI[SMPTE 424M]
HD-SDI[SMPTM 292M]
SD-SDI[SMPTE 259M]
[3G] 1080P50/60(4:2:2)
[HD]720P@50/60Hz,1080i@50/60Hz
1080p25/30Hz
[SD]NTSC/60Hz,PAL/50Hz
2.97Gpbs & 2.975/1.001Gpbs
3G-SDI[100Meter], HD-SDI[200Meter], SD-SDI[300Meter]
_(5C2V orRG6Cable)
Yes
Yes
Yes (video/PC)
Yes
AC 100-240V 50/60Hz
Approx. 78watt
Approx.107 watt
994.6 x 587.2 x 81
1081.5 x 635.45 x 80.5
23kg
25kg
0° to 40° C
23
Appendixes
Troubleshooting
The tables provided below include some problems that the user may encounter while using the
display and the corresponding solutions. Please refer to the contents of this section prior to contacting
service personnel.
Problem
Possible Causes
Solutions
1. Is the power cable connected to the 1. Make sure the power cable has been
properly connected to the unit.
unit?
2. Turn on the unit.
2. Is the unit turned on?
3. Is the signal cable connected to the 3. Make sure the signal cable has been
properly connected to the unit.
unit?
No picture
4. Press any key on computer keyboard.
4. Is the unit in power saving mode?
Strange color
1. Is the signal cable connected to the 1. Make sure the signal cable has been
unit?
properly connected to the unit.
Picture
distortion
1. Is the signal cable connected to the 1. Make sure the signal cable has been
unit?
properly connected to the unit.
2. Make sure the input signal is within
2. Is the video input signal within the
the unit's specified frequency range.
unit's specified frequency range?
Picture is too
dim
1. Have the unit's brightness and
contrast settings been set to the
lowest level?
1. Adjust brightness and contrast
1. Is the connection of the input
Only sound but signal correct?
no picture
Only picture
but no sound
1. Check connection of input signal.
2. Make sure the signal cable has been
properly connected.
1. Is the signal cable connected to the
unit?
2. Has the volume been set to the min
level?
3. Is the audio cable connected to the
unit?
1. Make sure the signal cable has been
properly connected to the unit.
2. Adjust the volume to an appropriate
setting.
3. Make sure the audio cable has been
properly connected to the unit.
Please contact the customer service centre of your local dealer if you have any questions
regarding the unit after reading the information provided above.
24