1
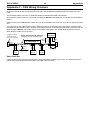
MDC2
Mitsubishi Diff Controller
User Manual
© Copyright – MoTeC Pty Ltd – 2001-2009
The information in this document is subject to change without notice.
While every effort is taken to ensure correctness, no responsibility will be taken for the consequences of any inaccuracies or omissions in this manual.
23 June, 2009
Contents
Introduction .........................................................................1 MDC2 Functionality ............................................................2 Mode selection ................................................................................................... 2 Lock Calculation ................................................................................................. 2 Slip Control ......................................................................................................... 3 Slip control example ................................................................................ 3 Speed Measurement .......................................................................................... 3 Speed Calculations ................................................................................. 4 Handbrake Override ........................................................................................... 4 Throttle Calibration ............................................................................................. 4 Steering Position Measurement.......................................................................... 4 Hydraulic Pressure Pump Control ...................................................................... 5 Hydraulic Pressure Pump Priming Mode ............................................................ 5 Communications ................................................................................................. 5 Main Vehicle CAN Bus ............................................................................ 5 Yaw/G Sensor CAN bus .......................................................................... 6 Data Logging ........................................................................................... 6 PC Connection ........................................................................................ 6 Miscellaneous functions ..................................................................................... 7 Fault indication ........................................................................................ 7 MDC2 Manager ....................................................................8 Computer requirements ...................................................................................... 8 Connecting to a MDC2 ....................................................................................... 8 Installing MDC2 Manager ................................................................................... 8 Managing Configurations .................................................................................... 8 Changing Configurations .................................................................................... 8 User Mode Tables ................................................................................... 8 File | Setup | Input Setup ......................................................................... 9 File | Setup | Input Tables...................................................................... 10 File | Setup | Output Setup .................................................................... 10 File | Setup | User Modes ...................................................................... 11 Monitoring MDC2 Data ..................................................................................... 11 Sending Firmware ............................................................................................ 11 MDC2 Installation..............................................................12 Appendices .......................................................................13 Appendix A – Fault Codes ................................................................................ 13 Appendix B – MDC2 Pinout and Links .............................................................. 14 MDC2 Connector Pinout ....................................................................... 14 Appendix C – CAN Wiring Practices ................................................................. 15 Appendix D – ECU Communications ................................................................ 16 Appendix E – CAN Messages .......................................................................... 17 50Hz Messages .................................................................................... 17 25Hz Messages .................................................................................... 18 MoTeC MDC2
1
Introduction
Introduction
The MoTeC Mitsubishi Diff Controller 2 (MDC2) is a direct replacement for the Active Centre Diff (ACD) controller
in the Mitsubishi EVO X.
The MDC2 also supports centre diff control on Active Yaw Control (AYC) equipped vehicles however the yaw
control hardware is not used.
This manual covers the installation, configuration and functionality of the MDC2.
MoTeC MDC2
2
Functionality
MDC2 Functionality
Mode selection
There are six user selectable control modes, four of which are user configurable. The control modes can be
selected using the ACD toggle switch on the steering wheel.
The current mode is indicated in the top line of the dash centre display. Optionally, three mode lights (SNOW,
TARMAC and GRAVEL) can be wired directly to the MDC2 if the dash display is removed.
Control Mode
0% Lock
Dash Display Top Line
Blank
Lights (optional)
None
1 (Snow)
SNOW
2 (Gravel)
GRAVEL
3 (Tar)
TARMAC
4 (Gravel/Tar)
/
Constant Lock
(alternating)
GRAVEL + TARMAC
SNOW + GRAVEL + TARMAC
(flashing)
Note: If the mode has not changed for one minute then the current mode is saved and will be used next time the
MDC2 is powered on.
Lock Calculation
Lock percentage applied to the centre diff is determined primarily by the vehicle speed, throttle position or engine
efficiency point (from a MoTeC ECU), and front to rear wheel slip.
Each of the four user modes are configured with an acceleration table, a braking table, a desired slip table and
slip control parameters. Slip control may be disabled if not required.
The lock percentage for a user mode is determined according to the following strategy:
Vehicle
Speed
Accel
table
(% lock)
Brake
OFF
ON
+
Brake
table
(% lock)
MIN
Handbrake
OFF
Throttle
Position or
Manifold
Pressure
Desired
Slip table
(kph)
Front & Rear
Speed
Slip
control
params
100%
Lock
Slip
Calculation
(% lock)
0%
Lock
ON
% lock
MoTeC MDC2
3
Functionality
The lock percentage for the constant lock mode is determined according to the following strategy:
Const ant
lock %
Handbrake
OFF
0%
Lock
ON
% lock
The constant lock % is equivalent to the maximum lock achieved by the Mitsubishi factory AYC / ACD controller.
The lock percentage is always 0% in the 0% lock mode.
Note: The handbrake status is ignored during a handbrake start from 0km/h – See Handbrake Override below.
For information on configuring the user modes see the MDC2 Manager section.
Slip Control
The slip control strategy detects slip (i.e.: rear speed ≠ front speed) and increases diff lock to maintain slip close
to the value specified in the Desired Slip table. The Desired Slip table specifies the value above which additional
diff lock will be applied, according to the slip control setup parameters.
The calculation of lock percentage for slip control is determined by the Slip Control Range and Max Slip Control
Lock parameters which apply to all user modes.
The following algorithm determines the %lock for slip control. The desired slip is the output from the Desired Slip
table.
IF Rear Speed > Front Speed
THEN Measured Slip = Rear Speed – Front Speed
ELSE Measured Slip = Front Speed – Rear Speed
Slip Control Factor = (Measured Slip – Desired Slip) / Slip Control Range
Constrain Slip Control Factor to the range 0 to 1
Slip Diff Lock = Slip Control Factor * Max Slip Control Lock
NOTE: Slip is specified as speed difference between front and rear wheels, not as a ratio of the speeds.
The addition of the calculated slip diff lock percentage is shown in the lock percentage strategy above.
Slip control example
Max slip control = 10% lock
Slip control range = 20 km/h
Desired slip (from Desired Slip table) = 10km/h
For a measured slip of 15km/h, slip diff lock = ((15 – 10) / 20) * 10 = 2.5%
For a measured slip of 30km/h or above, slip diff lock = 10%
For information on configuring the slip control parameters, see Setup | User Modes in the MDC2 Manager
section.
Speed Measurement
The four wheel speeds are received on the CAN bus from the ABS module, or the four wheel speed sensors can
optionally be wired directly to the MDC2. If the ABS module is removed, the sensors must be directly connected
to the MDC2.
MoTeC MDC2
4
Functionality
When wired directly to the MDC2, the wheel speed inputs can be configured as hall effect or magnetic sensors
with adjustable thresholds, and individual sensors can be enabled or disabled. Magnetic sensor input thresholds
are individually configurable for front and rear sensor pairs according to the current front and rear speeds.
The speed calibration can be adjusted for different wheel sizes and sensor teeth.
Front, rear and vehicle speeds are calculated from the wheel speeds, and all speeds are transmitted in CAN
messages. These speeds can be logged by the MoTeC ADL (Advanced Dash Logger), or used in logging or
engine control strategies by the MoTeC M800 ECU.
For information on configuring speed inputs, see Setup | Input Setup in the MDC2 Manager section.
Speed Calculations
The method of calculating front, rear and vehicle speeds is dependent on the status of the brake input.
When the foot brake is applied, speeds are calculated as follows:
• Front Speed is the faster of the two front wheel speeds.
• Rear speed is the faster of the two rear wheel speeds.
• Vehicle speed is the faster of the calculated front speed and rear speed.
When the foot brake is not applied, speeds are calculated as follows:
• The front speed is the average of the two front wheel speeds, weighted 80% towards the slowest front
wheel speed. If one front wheel speed is less than half of the other front wheel speed, then front speed is
simply the faster of the two front wheel speeds.
• The rear speed is the average of the two rear wheel speeds, weighted 80% towards the slowest rear
wheel speed. If one rear wheel speed is less than half of the other rear wheel speed, then rear speed is
simply the faster of the two rear wheel speeds.
• The vehicle speed is the average of the front and rear speeds, weighted 80% towards the slowest speed.
If either the front or rear speed is less than half of the other speed, then vehicle speed is simply the faster
out of the front speed and rear speed.
If any wheel speed exceeds 300km/h, the sensor reading is ignored until its speed returns to below 300km/h for 2
seconds. This is to prevent erratic behaviour from noisy wiring or faulty sensors.
Handbrake Override
If the front wheel speed is 0km/h and the handbrake is active, the handbrake will then be ignored in all lock
calculations until the handbrake is released. This functionality allows the diff to be locked in preparation for takeoff
during a handbrake start.
Throttle Calibration
The throttle position is received on the CAN bus from the ECU, or a throttle position sensor can be optionally
wired directly to the MDC2.
The optional throttle position sensor input can be calibrated using a table to convert voltage to throttle position.
This allows non-linear calibration of throttle position to more closely model the change in torque vs. throttle
butterfly angle.
The MDC2 Manager configuration program allows throttle input voltages to be read directly from the MDC2 in
order to perform 0% and 100% calibrations.
For information on calibrating the throttle input, see Setup | Input Setup in the MDC2 Manager section.
Steering Position Measurement
The steering position is received on the CAN bus from the steering position sensor.
MoTeC MDC2
5
Functionality
Hydraulic Pressure Pump Control
The MDC2 reads the hydraulic pressure sensor and controls the pump to maintain hydraulic pressure for the
ACD. The MDC2 implements the following strategies to protect the pump from being overrun and burnt out:
•
If the pressure sensor is faulty or missing then the pump is turned off and remains off until the pressure
sensor reads a valid reading.
•
If the pump has run for more than 20 seconds without achieving at least the low pressure threshold, the
pump is turned off for 20 seconds and a fault is indicated by a flashing mode indicator light.
•
The pump will never run when the 0% lock mode has been selected
Hydraulic Pressure Pump Priming Mode
The hydraulic pressure pump priming mode allows the pump to be run manually by a technician during priming of
the hydraulic system.
To enter the pump priming mode, the steering wheel ACD switch should be held in the up position while turning
on the ignition, and then remain held for five seconds. The top line of the dash display will cycle between
TARMAC, GRAVEL and SNOW when the priming mode is active.
When priming mode is active, the diff lock is set at 50% and the hydraulic pump is run while the throttle pedal is
pressed down.
To exit the pump priming mode, the ignition should be turned off.
NOTE: The pump prime mode should be used with care by experienced technicians only. The MDC2 does NOT
restrict pump run time or hydraulic pressure during pump prime mode.
Communications
Main Vehicle CAN Bus
The MDC2 communicates at 500kbit/sec on the main vehicle CAN bus. This CAN bus is used for communication
to other vehicle systems, for MDC2 status transmission and for communication with a PC for MDC2 configuration.
A summary of the CAN bus usage is shown below:
Received Data
Source
Usage
Throttle Position
Factory ECU or MoTeC
M800 ECU
MDC2 control strategies
Brake pedal
Factory Body Computer
MDC2 control strategies
Handbrake
Factory Body Computer
MDC2 control strategies
Wheel Speeds
ABS
MDC2 control strategies
ECU Efficiency
MoTeC M800 ECU
MDC2 control strategies (optional)
Engine Temperature
MoTeC M800 ECU
Dashboard temperature display
RPM
MoTeC M800 ECU
Dashboard tacho control
Thermo Fan Speed
MoTeC M800 ECU
Thermo fan control
ECU Temperature
MoTeC M800 ECU
Thermo fan control
MDC2 Configuration
PC (via MoTeC UTC)
Configuration from MDC2 Manager
MDC2 Firmware
PC (via MoTeC UTC)
Firmware upgrade from MDC2 Manager
MoTeC MDC2
6
Functionality
Transmitted Data
Target
Usage
Tacho position
Dashboard
Tacho based on M800 ECU RPM
Temperature Display
Dashboard
Temperature display based on M800 ECU engine
temperature
Thermo Fan Speed
Body Computer
Fan control (high or low speed) based on M800 ECU
requested thermo fan speed and M800 ECU internal
temperature
Diff Control Mode
Dashboard
MDC2 mode display (TARMAC etc.)
MDC2 readings &
status (50Hz)
MoTeC Dash Logger or
M800 ECU
MDC2 data for logging or use in engine control strategies
MDC2 readings &
status (25Hz)
MoTeC Dash Logger or
M800 ECU
MDC2 diagnostic data for logging
MDC2 readings &
status
PC (via MoTeC UTC)
Monitor channels function in MDC2 Manager
Yaw/G Sensor CAN bus
The MDC2 communicates at 500kbit/sec with a combined yaw/G sensor on a secondary vehicle CAN bus. The
MDC2 and yaw/G sensor are the only devices on this bus.
Received Data
Source
Usage
Lateral G
Yaw/G sensor
Retransmitted for logging or engine control strategies
Longitudinal G
Yaw/G sensor
Yaw Rate
Yaw/G sensor
Data Logging
The MDC2 transmits CAN messages at 50Hz containing information about all input and output functions, such as
speed readings, diff currents etc.
The MDC2 transmits CAN messages at 25Hz containing diagnostic information such as fault flags, firmware
versions etc.
The transmission of CAN messages from the MDC2 can be disabled. This feature may be used to prevent
reverse engineering of user control modes.
To configure a MoTeC logging device (ADL2, ADL3 etc) to receive MDC2 messages, use the ‘MDC2’ and ‘MDC2
Diagnostics’ communications templates included with the Dash Manager application.
PC Connection
The main CAN bus is used for communication with a PC for configuration and upgrading firmware using the
MoTeC UTC (USB To CAN) adaptor or the MoTeC CAN cable.
An adaptor cable is provided with the MDC2 to provide access to the CAN bus. This cable also provides the
power required if the MoTeC CAN cable is used to interface with a PC.
See Appendix C – CAN Wiring Practices for recommended CAN wiring practices
MoTeC MDC2
7
Functionality
Miscellaneous functions
Fault indication
Faults are indicated by flashing the following message on the dash centre display.
This display will continue to flash until there have been no faults present for 2 seconds.
Fault codes and diagnostic codes are included in the CAN diagnostic messages, as described in Appendix A –
Fault Codes.
MoTeC MDC2
8
Setup
MDC2 Manager
The MDC2 Manager software is necessary to configure an MDC2 unit from a PC. A new MDC2 unit must be
configured before its initial use.
Computer requirements
The MDC2 Manager software runs under Windows 95, 98, ME, NT4, 2000 or XP operating systems. The
minimum recommended PC specification is a Pentium 90 with 16MB RAM and a parallel port or USB port.
Connecting to a MDC2
The MDC2 connects to the PC using either the MoTeC UTC (USB To CAN) adaptor or the MoTeC CAN cable
connected to the CAN bus loom provided with the MDC2. The MDC2 unit must be powered to communicate with
the PC.
Installing MDC2 Manager
The MDC2 software can be installed either from the MoTeC Resource CD supplied with the MDC, or from the
MoTeC website (software.motec.com.au).
To start the program after installation, click on Start Æ Programs Æ MoTeC Æ MDC2 ManagerÆ MDC2 Manager
2.0
Managing Configurations
An MDC2 configuration file determines exactly how the MDC2 unit will operate. The MDC2 Manager software
allows configurations to be created, edited and sent to the MDC. To prevent unauthorized copying of
configuration data, configurations cannot be read out of the MDC2.
To create a new configuration, select File | New from the main menu, or use the default configuration created on
startup.
To open an existing configuration file, select File | Open from the main menu and select the desired file.
After a configuration has been created or modified it should be saved with a meaningful name by selecting File |
Save or File | Save As from the main menu.
To send the currently opened configuration to the MDC2, select Online | Send Config from the main menu, or
press F5. The configuration is automatically saved to disk when sent to the MDC2. A new configuration must be
saved with a new name before it can be sent.
TIP: To open an existing configuration file that exactly matches the configuration currently in the MDC2, select
Online | Open Matching Config while connected to the powered MDC2. If a matching configuration is found in the
default location on the PC then the configuration will be loaded.
Changing Configurations
User Mode Tables
Each of the four user modes has a set of three tables that determine the diff lock characteristics for the mode.
The speed and throttle position or ECU efficiency axis values used for all user mode tables are configurable
under the File | Setup option in the main menu, and can have between 2 and 11 values. Linear interpolation is
used between table points.
The Acceleration table is used to generate the %lock when the foot brake is not applied.
MoTeC MDC2
9
Setup
The Braking table is used to generate the %lock when the foot brake is applied, and is an override table for the
Acceleration table values.
If a cell in the braking table is left blank, the corresponding cell value from the Acceleration table is used. Cell
values should only be entered into the Braking table where a different value is required from the Acceleration
table.
The Desired Slip table specifies the value above which additional diff lock will be applied, according to the slip
control setup parameters.
The Acceleration and Braking tables specify %lock in 0.5% units.
The Desired Slip table specifies desired slip in 0.1 km/h units.
For more information on the diff control strategy, see the MDC2 Functionality section.
Editing Tables
Cell values in the tables may be incremented/decremented using the Page Up/Page Down keys, or entered
directly.
Table regions may be selected, cut, copied and pasted within the application, or to an Excel spreadsheet.
An entire table region can be filled with a value by selecting the region, entering the value, then pressing Enter.
Basic maths operations can be performed on a single cell or an entire table region. To perform an operation on all
cells within a region, select the region then enter the number followed by the operator (+,-,/,*).
Examples:
To add 15 to all values in a region, select the region then type 15+
To multiply all values in a region by 0.8, select the region then type 0.8*
Mode Notes
Comments about each user mode may be entered in the Notes field, and are stored with the configuration.
User Mode Table Font
The font type and size for the User Mode Tables may be changed using the File | Select Font option.
File | Setup | Input Setup
Speed
The speed detection method can be selected as ABS CAN (default) or Wheel Speed. The appropriate parameters
are shown when a speed detection method is selected. If the wheel speed method is selected then the wheel
speed sensors must be wired directly to the MDC2.
Speed Calibration
The speed calibration applies to all four wheel speed inputs.
Pulses/revolution:
Number of sensor pulses per wheel revolution
Circumference units:
Units (mm or inches) used to specify the rolling circumference
Rolling circumference:
Tyre rolling circumference, specified in mm or inches
Sensor Enable
The four speed sensors (Front Left, Front Right, Rear Left and Rear Right) can be individually enabled or
disabled. A disabled sensor has a speed of 0km/h. Factory default is all sensors enabled.
MoTeC MDC2
10
Setup
Speed Sensor
For Wheel Speed speed measurement method only.
Hall/Magnetic:
If the speed sensor type is hall effect (or equivalent), a hall switching threshold must be specified. If the
speed sensor type is magnetic, the Magnetic Levels table (on the Input Tables tab) must be configured.
Factory default is Hall.
Hall threshold:
The switching threshold for hall effect speed sensor inputs. Factory default is 2.2V.
Input Sources
Throttle Position:
The throttle position can be taken from CAN messages from the ECU (default) or by optionally wiring the
throttle position sensor directly to the MDC2 throttle position input pin. If the optional Input Pin source is
used, the throttle position sensor is calibrated using the table on the Input Tables tab.
Handbrake/Parkbrake:
The handbrake status can be taken from CAN messages from the body computer (default) or by optionally
wiring the handbrake switch directly to the MDC2 handbrake input pin.
Brake Pedal:
The brake pedal status can be taken from CAN messages from the body computer (default) or by optionally
wiring the brake pedal switch directly to the MDC2 brake input pin.
ECU Type
The ECU type option must match the installed ECU (MoTeC M800 or factory ECU).
File | Setup | Input Tables
Magnetic Levels
If magnetic wheel speed sensors are used, the sensor thresholds must be specified in the magnetic levels table.
Thresholds are configured separately for front and rear sensors.
Up to 11 ascending speeds can be specified in the table and linear interpolation is used between points.
Throttle Position
If the throttle position input source is the input pin then the throttle position sensor must be calibrated.
The Throttle Position table allows the throttle position sensor to be calibrated in up to 11 steps, with linear
interpolation between points. The table specifies the throttle position characteristic between the TP Low voltage
(0%in) and the TP High voltage (100%in).
The Read buttons for the throttle sensor high and low voltages can be used to calibrate the sensor if the MDC2 is
powered and connected to the PC. To calibrate, press the TP High Read button with the throttle pedal fully
depressed, then press the TP Low Read button with the throttle pedal fully released.
File | Setup | Output Setup
Hydraulic Pressure
The hydraulic pressure thresholds determine the accumulator pressures at which the pump is turned on and off.
The MDC2 can be configured to use the factory defaults or adjustable thresholds, specified in kPa.
Allow CAN diagnostics
The CAN data stream can be disabled or enabled. This feature may be used to prevent reverse engineering of
user control modes.
MoTeC MDC2
11
Setup
File | Setup | User Modes
Lock Table Axis
The Y-axis of the user mode lock tables is configurable as Throttle Position or ECU Efficiency.
The ECU Efficiency option should only be used when the vehicle is fitted with a correctly configured MoTeC M800
ECU. See Appendix D – ECU Communications for more details.
Slip Control
Enable Slip Control:
If slip control is enabled then the Desired Slip table and the slip control parameters are used to determine
how much extra diff lock is applied to control wheel slip.
If slip control is disabled then the Desired Slip table has no effect.
Max slip control:
This parameter specifies the maximum amount of diff lock (%lock) that can be added to attempt to control
slip.
Slip control range:
This parameter is the amount of measured slip (km/h) above the desired slip at which the Max slip control
lock will be applied. If the amount of measured slip is within the range (desired slip + slip control range),
then the amount of slip diff lock applied is proportional to how far the measured slip is away from the
desired slip.
For more detail on slip control parameters, and slip control examples, see Slip Control in the MDC2 Functionality
section.
Speed Axis
Up to 11 values can be specified for the speed axis that is used in all of the user mode Braking and Acceleration
tables. The axis values must be ascending and duplicate values are not allowed. Spacing between values is not
fixed, allowing non linear axes.
Throttle Axis or MAP Axis
Up to 11 values can be specified for the throttle or ECU Efficiency axis that is used in all of the user mode tables.
The table type (throttle or ECU Efficiency) is determined by the Lock Table Axis option. The axis values must be
ascending and duplicate values are not allowed. Spacing between values is not fixed, allowing non linear axes.
Monitoring MDC2 Data
Live data from a connected MDC2 may be monitored using the Online | Monitor Channels option (or the F3
hotkey) to open the Monitor Channels window.
Sending Firmware
The MDC2 firmware is user upgradeable from a PC connected to the MDC2 CAN bus with the MoTeC UTC (USB
To CAN) or the MoTeC CAN cable.
To upgrade the firmware the MDC2 must be powered and connected to a PC with the MDC2 Manager software
installed. Use Online | Send Firmware to send the current firmware to the MDC2.
MoTeC MDC2
12
Appendices
MDC2 Installation
The MDC2 is fitted in pace of the factory AYC / ACD ECU underneath the dashboard.
To install the MDC2, remove the entire factory AYC / ACD ECU bracket and unclip the plastic case from the
bracket. The MDC2 can be attached to the bracket with double sided tape or Velcro™ before the bracket is
reinstalled.
MoTeC MDC2
13
Appendices
Appendices
Appendix A – Fault Codes
The MDC2 fault flags included in the CAN diagnostics are sent as a bit field (16 bit) with the following faults:
Bit 0 (0x0001 = 1)
Bad Configuration (CRC failure)
Bit 1 (0x0002 = 2)
Short circuit pump output
Bit 2 (0x0004 = 4)
Hydraulic pressure sensor failure
Bit 3 (0x0008 = 8)
Pump run time fault (pump could not achieve min pressure threshold)
Bit 4 (0x0010 = 16)
Wheel speed CAN messages (from ABS) timed out
Bit 5 (0x0020 = 32)
Handbrake status CAN messages (from body computer) timed out
Bit 6 (0x0040 = 64)
Brake pedal status CAN messages (from body computer) timed out
Bit 7 (0x0080 = 128)
ECU CAN messages timed out
The MDC2 diagnostic flags included in the CAN diagnostics are sent as a bit field (16 bit) with the following faults:
Bit 1 (0x0002 = 2)
Steering position sensor not found on CAN
Bit 2 (0x0004 = 4)
Yaw/G sensor not found on CAN
MoTeC MDC2
14
Appendices
Appendix B – MDC2 Pinout and Links
MDC2 Connector Pinout
1
2
3
4
5
6
7
8
9
10 11 12 13
31 32 33 34 35 36 37 38 39 40 41
14 15 16 17 18 19 20 21 22 23 24 25 26
42 43 44 45 46 47 48 49 50 51 52
The 26 pin MDC2 connector connects to the factory wiring loom.
The 22 pin MDC2 connector offers inputs and outputs for custom wiring such as direct wheel speed inputs.
Pin
1
4
5
6
7
8
9
10
11
13
16
19
20
Function
ACD valve output
CAN-HI (main CAN bus)
CAN-LO (main CAN bus)
5V Aux
Hydraulic pressure sensor
0V
CAN-HI (secondary CAN bus)
CAN-LO (secondary CAN bus)
Steering wheel mode switch
Battery Battery +
0V
Pump relay output
31
32
33
34
35
36
37
38
39
40
41
42
43
44
45
46
47
48
49
50
51
52
0V
Front left speed sensor input
Front right speed sensor input
Rear left speed sensor input
Rear right speed sensor input
Brake pedal input
Handbrake input
Throttle position sensor input
5V Aux
0V
0V
Battery +
Battery +
0V
0V
CAN-HI (main CAN bus)
CAN-LO (main CAN bus)
SNOW light output
GRAVEL light output
TARMAC light output
0V
0V
Notes
Switched positive output
To Yaw/G sensor
To Yaw/G sensor
Switched positive output
Magnetic or Hall
Magnetic or Hall
Magnetic or Hall
Magnetic or Hall
12V when brakes applied
0V when handbrake ON
0-5V
Output for auxiliary equipment
Output for auxiliary equipment
Active low
Active low
Active low
MoTeC MDC2
15
Appendices
Appendix C – CAN Wiring Practices
A CAN bus should consist of a twisted pair trunk with 100R (0.25Watt) terminating resistors at each end of the
trunk.
The preferred cable for the trunk is 100R Data Cable but twisted 22# Tefzel is acceptable.
The maximum length of the bus is 16m (50ft) including the MoTeC CAN Cable (PC to CAN Bus Communications
Cable)
CAN Devices (such as MoTeC ADL, M800 etc) may be connected to the trunk with up to 500mm (20in) of twisted
wire.
The connector for the CAN Communications Cable may also be connected to the trunk with up to 500mm (20in)
of twisted wire and should be within 500mm of one end of the trunk. If desired two CAN Cable connectors may be
used so that the MoTeC CAN Cable may be connected to either side of the vehicle. Both connectors must be
within 500mm of each end of the trunk.
Minimum one twist per 50mm (2in)
CAN-HI
CAN-LO
0V
8V
CAN-HI
CAN-LO
CAN
Device
500mm
Max
CAN-HI
CAN-LO
CAN-HI
CAN-LO
100R
100R
<< CAN Bus >>
500mm
Max
CAN Cable
Connector
1
These wires must be Twisted
CAN-HI 5
CAN-LO 4
3
100R Terminating
Resistors at each
end of the CAN Bus
CAN
Device
CAN
Device
500mm Max
Short CAN Bus
If the CAN Bus is less than 2m (7ft) long then a single termination resistor may be used. The resistor should be
placed at the opposite end of the CAN Bus to the CAN Cable connector.
MoTeC MDC2
16
Appendices
Appendix D – ECU Communications
The MDC2 communicates with the factory ECU or a MoTeC M800 ECU using the main CAN bus.
When used in conjunction with an M800 ECU the MDC2 controls the thermo fan, the tacho and the dash
temperature gauge based on data received from the M800.
The M800 must be correctly configured to transmit all the required channels:
• Throttle position for diff control
• Engine efficiency for diff control (optional)
• Engine temperature for dashboard temperature gauge
• Fan duty for thermo fan control
• ECU temperature for thermo fan control (to cool the under bonnet ECU)
• RPM for dashboard tacho
The MoTeC supplied EVO-X M800 configuration has the appropriate channels and communications
preconfigured for the MDC2. This M800 configuration is also preconfigured to receive several channels from the
M800 for logging or control purposes.
MoTeC MDC2
17
Appendix E – CAN Messages
The MDC2 communicates on the main CAN bus running at 500kbit/s.
MDC2 operational data messages are each transmitted at 50Hz.
MDC2 diagnostic messages are each transmitted at 25Hz.
50Hz Messages
CAN ID 0x1F4
Byte
Data
0
Compound Id = 0
1
Diff Current Average (0.01A resolution)
2
Vehicle Speed (0.1 km/h resolution)
3
4
Front Wheels Speed (0.1 km/h resolution)
5
6
Rear Wheels Speed (0.1 km/h resolution)
7
CAN ID 0x1F4
Byte
Data
0
Compound Id = 1
1
Diff Current Minimum (0.01A resolution)
2
Yaw rate (0.1 deg/sec resolution)
3
4
Lateral G (0.001G resolution)
5
6
Longitudinal G (0.001G resolution)
7
CAN ID 0x1F4
Byte
Data
0
Compound Id = 2
1
Diff Current Maximum (0.01A resolution)
2
Hydraulic Pressure (1kPa resolution)
3
4
Percentage Diff Lock (0.1% resolution)
5
6
Steering Angle (1deg Resolution)
0deg = centre, +deg = clockwise, -deg = anticlockwise
7
CAN ID 0x1F4
Byte
Data
0
Compound Id = 3
1
Diff+ Voltage (0.1V resolution)
2
Fault Flags (See Appendix A – Fault Codes)
3
4
Diagnostic Flags (See Appendix A – Fault Codes)
5
Speed sensor noise fault flags:
Front Left
= 0x01 (bit 0)
Front Right
= 0x02 (bit 1)
Rear Left
= 0x04 (bit 2)
Rear Right
= 0x08 (bit 3)
BrakeStatus Flags:
Handbrake On
= 0x20 (bit 5)
Brake Pedal On = 0x80 (bit 7)
6
MDC2 Mode
0 = Diff open
7
1 to 4 = MDC2 user modes
5 = Constant diff lock
Appendices
MoTeC MDC2
18
CAN ID 0x1F4
Byte
Data
0
Compound Id = 4
1
2
Diff PWM duty (0.1% resolution)
3
4
Front Right Wheel Speed (0.1 km/h resolution)
5
6
Front Left Wheel Speed (0.1 km/h resolution)
7
CAN ID 0x1F4
Byte
Data
0
Compound Id = 5
1
2
Slip Control Percentage Diff Lock (0.1% resolution)
3
4
Rear Right Wheel Speed (0.1 km/h resolution)
5
6
Rear Left Wheel Speed (0.1 km/h resolution)
7
25Hz Messages
CAN ID 0x1F5
Byte
Bits
0
4..7
0..4
1
2
3
4
5
6
7
CAN ID 0x1F5
Byte
Bits
0
4..7
0..4
1
2
3
4
5
6
7
Data
Compound Id = 0
Reserved
Aux 5V Output Voltage (0.01V resolution)
Battery Voltage (0.01V resolution)
MDC2 Internal temperature (1°C resolution with +50°C offset)
Data
Compound Id = 1
Speed sensor noise fault flags
Front Left = 0x01
Front Right = 0x02
Rear Left
= 0x04
Rear Right = 0x08
Diagnostic Flags (See Appendix A – Fault Codes)
Fault Flags (See Appendix A – Fault Codes)
MDC2 Firmware version
eg. 123 = V1.23
Appendices