1
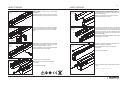
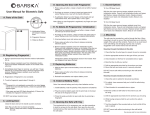
installation guide
user manual
1-2
user manual
IMPORTANT: Install using a fine-tipped
screwdriver.
01
02
user manual
Remove the aluminum front covers with a finetipped screwdriver, prying as shown in the figure.
A
After the covers have been removed, drill two
holes, one at each end, as shown in the figure.
Make the hole in the slot as shown in detail
(A).
CHANGING THE FLUORESCENT TUBE: Use
a fine-tipped screwdriver to pry off the cover as
shown in the figure.
05
When one end has been released, pull up to
completely remove the cover.
To remove the fluorescent tube, grasp at both
ends and turn until the connection pins at the
ends are aligned with the lamp socket slots. (A)
06
Once the connection pins are aligned, pull the
fluorescent tube upwards until it is free of the
lamp sockets. (B)
A
B
Replace with another fluorescent tube and repeat
the operation in reverse.
Detail A
03
Depending on the wall material, screw anchors
may need to be installed. In the case of wood,
only wood screws will be required.
Use a screwdriver to secure the light assembly
to the wall as shown in the figure.
07
Press the cover back into place and make sure
that it is completely snapped in.
Connect the power cable to the GST-18
connection.
The product is installed.
04
Press the front covers into place.
Connect the power cable to the GST-18
connection.
The product is installed
For any questions on the profile frame, contact
us at:
[email protected]