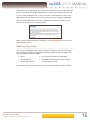
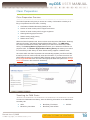
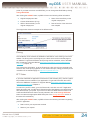
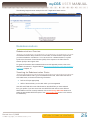
1
my
USER
MANUAL
Revised June 11, 2015
© 2015 Copyright, CGS Administrators, LLC.
myCGS USER MANUAL
Table of Contents
myCGS Overview
Claim Preparation
What is myCGS? 3
Claim Preparation Overview 18
Who Can Use myCGS? 3
Searching for CMN Status 18
Logging in to myCGS 4
CMN Status and History 19
myCGS Interface Overview 5
Ordering/Referring Physician 20
Change NPI/PTAN 6
Diabetic Supplies/Shoes History 21
Locked Tabs 7
Beneficiary Eligibility
Finance
Finance Overview 22
Beneficiary Eligibility Overview 7
Checks 23
Searching for Beneficiary Eligibility Information 8
Offsets 23
Medicare Advantage Plan (MAP) 9
Pricing 24
Medicare Secondary Payer (MSP) 10
EFT Status 24
Hospice 11
Home Health Episode (HHE) 11
SNF/Hospital 12
Claims
Claims Overview 13
Searching for Claims and Explanations 13
Claim Status Summary 14
Claim Explanations 14
Redeterminations
Redeterminations Overview 25
Searching for Redetermination Status 25
General Information
General Information Overview 26
User Account
Additional Claim Detail 15
User Account Overview 27
Pending Claims 16
Updating Your User Profile 27
Order RA 17
Updating NPI/PTAN Information on Your Account 28
User Approval & Permissions (AO/BAO Roles)
Admin Overview 30
Users with New Requests (Approval Queue) 31
Modify Users 33
Revised June 11, 2015
© 2015 Copyright, CGS Administrators, LLC.
2
myCGS USER MANUAL
myCGS Overview
What is myCGS?
The myCGS portal is a Web-based application developed by CGS that is available to
suppliers of durable medical equipment, prosthetics, orthotics, and supplies (DMEPOS)
who serve beneficiaries in Jurisdiction C. Using myCGS is a fast and
easy way to get the Medicare claim and billing information that you need.
In myCGS, you can:
●●
Find beneficiary eligibility information, including Part A and Part B effective dates,
deductible, DME MAC jurisdiction, Medicare Advantage Plan (MAP) information,
primary insurance information, hospice records, home health episodes,
and skilled nursing facility (SNF)/hospital stays.
●●
Check the status of claims that you have submitted to Jurisdiction C.
●●
Research denied claims with the help of detailed claim denial explanations.
●●
Determine the number of claims that are pending or on the payment floor.
●●
Order duplicate Remittance Advice (RA).
●●
Research historical beneficiary information, including CMNs, diabetic testing
supplies, and diabetic shoes.
●●
Find the status of an ordering/referring physician’s NPI.
●●
Receive status of recently issued and outstanding checks.
●●
Find information about offsets, including the name of the beneficiary for the
recouped claim.
●●
Get the status of your EFT application.
●●
Find the status of your redetermination requests.
This manual contains the information you need to navigate myCGS and take advantage
of its many helpful features. The instructions in this manual assume that you are familiar
with basic Medicare rules and regulations as they pertain to DMEPOS suppliers. For a
detailed overview of Medicare DMEPOS rules and regulations, refer to the DME MAC
Jurisdiction C Supplier Manual (http://www.cgsmedicare.com/jc/pubs/supman/index.
html). The Supplier Manual is the first resource that you should use for Medicare
billing questions.
For news and updates regarding myCGS, as well as other important DME MAC articles
and information, be sure to subscribe to our ListServ, the CGS electronic mailing list. To
join the ListServ, visit our website at http://www.cgsmedicare.com.
If you have any questions that cannot be answered in this manual or the DME MAC
Jurisdiction C Supplier Manual (http://www.cgsmedicare.com/jc/pubs/supman/index.
html), contact our Customer Service Department by calling 1.866.270.4909.
Who Can Use myCGS?
Any DMEPOS supplier or affiliate (i.e., third party clearinghouse or biller) who serves
beneficiaries in Jurisdiction C may register for myCGS. All myCGS users must be
approved through the CMS Enterprise Identity Management (EIDM) website, before
receiving the ability to use myCGS. For assistance with registering for myCGS, refer to
Revised June 11, 2015
© 2015 Copyright, CGS Administrators, LLC.
RETURN TO TABLE OF CONTENTS
3
myCGS USER MANUAL
the myCGS Registration Guide
(http://www.cgsmedicare.com/jc/mycgs/pdf/mycgs_RegistrationGuide.pdf).
When registering for myCGS, you may select one of three different types of user
roles—End User, Authorized Official (AO), or Backup Authorized Official (BAO). The
functions available in myCGS are different for each role. The majority of the functionality
within myCGS is aimed at the End User role. The AO role is primarily intended to be
an officer or manager at your company who approves End User and administers End
User permissions. The BAO role may be a combination of both End User and AO roles.
The majority of this manual is written with the End User role in mind. If you are an AO
(or BAO) and need assistance with user approval and maintenance, refer to the Admin
Overview section in this manual.
Logging in to myCGS
Before you can use myCGS, you must complete the registration process and receive
an EIDM user ID and password. Refer to the myCGS Registration Guide (http://www.
cgsmedicare.com/jc/mycgs/pdf/mycgs_RegistrationGuide.pdf), for instructions on how
to register.
Once you have successfully registered, follow these steps to log in to myCGS:
1. Open myCGS by going to the Jurisdiction C website at http://www.cgsmedicare.
com/jc and clicking on myCGS Login (under the myCGS menu).
2. Click on the Login to myCGS link.
3. Read and accept the EIDM Terms and Conditions.
4. Login to the EIDM Access Manager using your EIDM User ID and Password.
If you have an issue with your EIDM user ID and/or password and are unable to login,
follow the onscreen instructions for resetting your password. If you are still unable to
login, contact the myCGS Helpdesk at 1.866.270.4909.
5. Read the myCGS Terms and Conditions, and press the OK button.
6. Once you have successfully logged in, you will be taken to the myCGS
Home screen.
Revised June 11, 2015
© 2015 Copyright, CGS Administrators, LLC.
RETURN TO TABLE OF CONTENTS
4
myCGS USER MANUAL
Once logged in (as an End User), you will see seven tabs across the top of the
myCGS portal—Home, Beneficiary Eligibility, Claims, Claim Preparation, Finance,
Redeterminations, and General Information. To get started, click on the tab that contains
the information you need. In this manual, you will find a section devoted to each of these
main function tabs.
NOTE: If one or more of your tabs has a lock icon, then you do not have permission
to view/use that tab. Request access to any locked tabs from your AO. You will not be
able to access a locked tab until your AO updates your user permissions.
myCGS Interface Overview
myCGS contains seven function tabs, as well as user maintenance, help, and
feedback sections.
The following image shows the main areas of the myCGS window:
Revised June 11, 2015
© 2015 Copyright, CGS Administrators, LLC.
RETURN TO TABLE OF CONTENTS
5
myCGS USER MANUAL
Use the sections below to find detailed information about all of the myCGS functions
and capabilities.
Change NPI/PTAN
Most of the functional capabilities in myCGS depend on your supplier information—
your NPI and PTAN. If you represent a company that uses only one NPI/PTAN, then you
do not need to worry about changing NPI/PTANs—your correct NPI/PTAN information
will always populate automatically in any screen that requires supplier information in
myCGS. If you represent a company that uses multiple suppliers or supplier locations,
then you need to make sure you are using the appropriate NPI/PTAN for the information
you are requesting.
Before you can use additional NPI/PTANs, you must add them to your account profile.
Refer to Updating NPI/PTAN Information on Your Account in this manual for instructions.
Switching between NPI/PTANs in myCGS is easy. In the upper-right corner of myCGS,
you will always see the NPI/PTAN associated with your account that is currently selected.
This NPI/PTAN will auto-populate in any functional tab within myCGS that requires
supplier information.
To change to a different NPI/PTAN, simply click on the NPI or PTAN that is currently
showing. A pop-up window will appear containing a drop-down box which allows you
to switch to a different supplier number. Additionally, there is a Change NPI/PTAN
button on most screens within myCGS. The Change NPI/PTAN button is found on the
right side of the secondary tabs (underneath the main functional tabs), as illustrated in
the image on the top of the next page:
Revised June 11, 2015
© 2015 Copyright, CGS Administrators, LLC.
RETURN TO TABLE OF CONTENTS
6
myCGS USER MANUAL
The Change NPI/PTAN button functions identically to the NPI and PTAN links displayed
at the top of your screen—a pop-up window will appear with a drop-down box allowing
you to switch to a different supplier number.
Note that any time you change your NPI/PTAN, you will be automatically taken back to
the myCGS Home tab.
Locked Tabs
When you received approval to use myCGS, your approver gave you specific user
permissions. These permissions control which features you can and cannot use in
myCGS. If one of your function tabs shows a closed lock icon with grayed-out text, then
you do not have permission to use this function and will not be able to access the tab.
If you need access to a tab which is currently locked, contact your approver and request
access to the locked tab.
Beneficiary Eligibility
Beneficiary Eligibility Overview
The Beneficiary Eligibility tab gives you access to a variety of eligibility information about
Medicare beneficiaries, including:
●●
Medicare Part A and Part B effective and termination dates
Revised June 11, 2015
© 2015 Copyright, CGS Administrators, LLC.
RETURN TO TABLE OF CONTENTS
7
myCGS USER MANUAL
●●
Current year deductible to be met
●●
Previous year deductible to be met
●●
The DME MAC jurisdiction in which the beneficiary resides
●●
Medicare Advantage Plan (MAP) information
●●
Medicare Secondary Payer (MSP) records
●●
Hospice records
●●
Home health episodes
●●
Skilled nursing facility (SNF) and hospital stays
Searching for Beneficiary Eligibility Information
On the Beneficiary Eligibility tab, there are several secondary tabs: New Search,
Summary, MAP, MSP, Hospice, HHE, and SNF/Hospital. To search for eligibility records,
you must always begin on the New Search screen, which is the default secondary tab.
The screen will automatically populate your NPI and PTAN, therefore you do not need to
manually enter this information. If you have more than one NPI/PTAN and need to use
a different NPI/PTAN than what is currently selected, click on the Change NPI/PTAN
button and select the appropriate NPI/PTAN (refer to the Change NPI/PTAN section in
this manual for assistance).
To search for beneficiary eligibility, enter the following beneficiary information on the New
Search screen:
●●
HICN
●●
Beneficiary Last Name
●●
Beneficiary First Name
●●
Beneficiary Date of Birth
(be sure to use the MM/DD/YY format)
After clicking the SUBMIT button, myCGS will return basic eligibility information,
including Part A and B effective dates, deductible, and DME MAC jurisdiction of
residence. Additionally, myCGS will list indicators for other eligibility information that
may be on file, including Medicare Advantage Plan (MAP), Medicare Secondary
Payer (MSP), hospice records, and home health episodes. “Yes” and “No” radio buttons
are listed next to each of these indicators, letting you know if such a record does exist
on file. If the indicator shows “Yes” then you can click on the indicator hyperlink (or click
on the appropriate secondary tab) to see the details of the information.
Revised June 11, 2015
© 2015 Copyright, CGS Administrators, LLC.
RETURN TO TABLE OF CONTENTS
8
myCGS USER MANUAL
The image below shows eligibility results for a beneficiary who has a Medicare
Advantage Plan. Clicking on the Medicare Advantage Plan (MAP) hyperlink will take you
to a screen with more details about the plan.
In addition to the four subsets of eligibility shown above, you can also check to see if the
beneficiary was billed for a skilled nursing facility (SNF) or hospital stay on a specific
date of service. To do so, click on the SNF/Hospital secondary tab. Refer to the SNF/
Hospital section below for more information.
Medicare Advantage Plan (MAP)
A Medicare Advantage Plan (MAP) is an alternative to the traditional fee-for-service
Medicare plan. For information about MAP plans, refer to the DME MAC Jurisdiction C
Supplier Manual (http://www.cgsmedicare.com/jc/pubs/supman/index.html), Chapter 1.
The Beneficiary Eligibility tab in myCGS allows you to determine if a beneficiary
is enrolled in a MAP. To find MAP information, search for beneficiary eligibility as
described in the Searching for Beneficiary Eligibility Information section above. If MAP
information is found, the “Yes” radio button next to “Medicare Advantage Plan (MAP)?”
will be marked.
When myCGS finds MAP enrollment, the following information will be displayed in the
MAP secondary tab:
●●
Plan name
●●
Plan phone number
●●
Enrollment date
●●
Plan address
●●
Plan ID
●●
End date
●●
Plan type
The following screen image shows an example of a beneficiary currently enrolled in
a MAP:
Revised June 11, 2015
© 2015 Copyright, CGS Administrators, LLC.
RETURN TO TABLE OF CONTENTS
9
myCGS USER MANUAL
Medicare Secondary Payer (MSP)
The term Medicare Secondary Payer (MSP) refers to situations when a beneficiary has
another form of insurance which would pay a claim before Medicare. When a beneficiary
has an MSP plan, you may need to submit his/her claim to the primary insurance
before submitting a claim to CGS. For information about MSP, refer to the DME MAC
Jurisdiction C Supplier Manual (http://www.cgsmedicare.com/jc/pubs/supman/index.
html), Chapter 11.
The Beneficiary Eligibility tab in myCGS allows you to determine if a beneficiary has
an MSP plan. To find MSP information, search for beneficiary eligibility as described in
the Searching for Beneficiary Eligibility Information section above. If MSP information is
found, the “Yes” radio button next to “Medicare Secondary Payer (MSP)?” will be marked.
When myCGS finds an MSP result, the following information will be displayed in the MSP
secondary tab:
●●
Plan name
●●
Policy number
●●
Effective date
●●
Plan address
●●
MSP type
●●
Termination date
Note that it is possible for a beneficiary to have multiple MSP plans. Be sure to pay
attention to the effective and termination dates of any MSP plans listed.
Revised June 11, 2015
© 2015 Copyright, CGS Administrators, LLC.
RETURN TO TABLE OF CONTENTS
10
myCGS USER MANUAL
Hospice
When a beneficiary is enrolled in hospice coverage, all DMEPOS claims related to
the service must be billed through the hospice, not to the DME MAC. For information
about hospice and DME, refer to the DME MAC Jurisdiction C Supplier Manual
(http://www.cgsmedicare.com/jc/pubs/supman/index.html), Chapter 6.
The Beneficiary Eligibility tab in myCGS allows you to determine if a beneficiary is
enrolled in hospice. To find hospice information, search for beneficiary eligibility as
described in the Searching for Beneficiary Eligibility Information section above. If hospice
information is found, the “Yes” radio button next to “Hospice Record?” will be marked.
When myCGS finds hospice enrollment, the following information will be displayed in the
Hospice secondary tab:
●●
●●
Start date
●●
End date
Hospice NPI
You can use the NPI to find the name and contact information of the hospice by visiting
the NPI Registry (https://nppes.cms.hhs.gov/NPPES/NPIRegistryHome.do).
Home Health Episode (HHE)
When a beneficiary is under a home health plan of care, payment for certain items
must be made through the home health agency overseeing the home health plan. The
Beneficiary Eligibility tab in myCGS allows you to determine if a beneficiary is currently
being billed for a home health episode (HHE). For information about home health
episodes and consolidated billing, refer to the DME MAC Jurisdiction C Supplier Manual
(http://www.cgsmedicare.com/jc/pubs/supman/index.html), Chapter 6.
To find HHE information, search for beneficiary eligibility as described in the Searching
for Beneficiary Eligibility Information section above. If HHE information is found, the “Yes”
radio button next to “Home Health Episode (HHE)?” will be marked.
When myCGS finds a home health episode, the following information will be displayed in
the HHE secondary tab:
●●
Start date
●●
End date
●●
Home Health Agency NPI
You can use the NPI to find the name and contact information of the home health agency
by visiting the NPI Registry (https://nppes.cms.hhs.gov/NPPES/NPIRegistryHome.do).
Revised June 11, 2015
© 2015 Copyright, CGS Administrators, LLC.
RETURN TO TABLE OF CONTENTS
11
myCGS USER MANUAL
SNF/Hospital
When a beneficiary is enrolled in a Part A covered skilled nursing facility (SNF) or
hospital stay, most claims are not payable by the DME MAC. For information about SNF/
hospital stays and consolidated billing, refer to the DME MAC Jurisdiction C Supplier
Manual (http://www.cgsmedicare.com/jc/pubs/supman/index.html), Chapter 6.
The Beneficiary Eligibility tab in myCGS allows you to determine if a beneficiary is
enrolled in a SNF or hospital stay on a specific date of service. To find SNF/hospital
information, search for beneficiary eligibility as described in the Searching for Beneficiary
Eligibility Information section above. Once eligibility is returned, click on the SNF/Hospital
secondary tab.
Once you have navigated to the SNF/Hospital secondary tab, enter the date of service in
which you wish to check for Part A stay information, and then press the SUBMIT button.
HINT: If the only piece of eligibility information you need is SNF or hospital information,
you can go directly to the SNF/Hospital secondary tab without performing a “New Search”
for beneficiary eligibility. In this case, you must enter all of the appropriate beneficiary data
(HICN, last name, first name, and date of birth), along with the date of service you need to
check.
When myCGS finds a SNF or hospital stay, the following information will be displayed in
the SNF/Hospital secondary tab: ●●
Start date
●●
Facility Type
●●
Admitted Date
●●
End date
●●
Patient Status
●●
Discharge Date
●●
Facility NPI
You can use the NPI to find the name and contact information of the SNF/hospital by
visiting the NPI Registry (https://nppes.cms.hhs.gov/NPPES/NPIRegistryHome.do).
Revised June 11, 2015
© 2015 Copyright, CGS Administrators, LLC.
RETURN TO TABLE OF CONTENTS
12
myCGS USER MANUAL
Claims
Claims Overview
The Claims tab gives you access to a variety of information about the claims that you
have submitted to Jurisdiction C, including:
●●
Claim status
●●
Explanation of denied/reduced claims
●●
Denial explanation numbers (for claims reviewed by medical staff)
●●
Pending claims on the payment floor
●●
Pending claims in the Common Working File (CWF)
●●
Pending claims in process
●●
Ability to order a duplicate Remittance Advice (RA)
Within the Claims tab, there are four secondary tabs: New Search, Summary, Pending
Claims, and Order RA. Use the New Search screen, which is the default secondary tab,
to search for claim status and claim explanations. To find the total number of pending
claims for your NPI/PTAN, go to the Pending Claims secondary tab. If you need to order
a duplicate Remittance Advice (RA), go to the Order RA secondary tab (note that you
can also order a duplicate RA after performing a claim status search).
All screens within the Claims tab automatically populate your NPI and PTAN, therefore
you do not need to manually enter this information. If you have more than one NPI/
PTAN and need to use a different NPI/PTAN than what is currently selected, click on the
Change NPI/PTAN button and select the appropriate NPI/PTAN (refer to the Change
NPI/PTAN section in this manual for assistance).
Searching for Claims and Explanations
To search for status of a claim, enter the following information in the Claim
Status Request:
●●
HICN
●●
Beneficiary First Name
●●
Beneficiary Last Name
●●
Date of Service From
Revised June 11, 2015
© 2015 Copyright, CGS Administrators, LLC.
●●
Date of Service
To (optional)
RETURN TO TABLE OF CONTENTS
13
myCGS USER MANUAL
Your NPI and PTAN will be auto-filled based on the NPI/PTAN you have selected from
your profile. The search results will be limited to only display claim history for the
NPI/PTAN listed in the search criteria. You can change the NPI/PTAN by clicking on
the NPI or PTAN shown in the upper-right corner of your screen.
Note that the “Date of Service To” field is optional. If you are looking for only one specific
date of service, leave this field blank. If you would like to see all claims that you have
submitted for a beneficiary over a certain period of time, then use this field to span the
date range in your search.
After entering the claim data, press the SUBMIT button.
Claim Status Summary
After clicking the SUBMIT button, myCGS will return claim information found for the
search criteria. The following information will be displayed on screen:
●●
Claim Control Number (CCN)
●●
Place of Service
●●
Submitted Amount
●●
Remit Date
●●
HCPCS Code
●●
Allowed Amount
●●
Deductible Applied (DED)
●●
From Date
●●
●●
Paid Amount
●●
To Date
Claim explanation
(if applicable)
●●
Status
●●
Number of Services
The following image shows an example of the Claim Status Summary screen:
If you would like to order a duplicate copy of a Remittance Advice (RA), press the Order
RA button. A duplicate RA will then be printed and mailed to your address on file. You
can also order a duplicate RA from the Order RA secondary tab.
Claim Explanations
Although myCGS contains ANSI codes/explanations for denied claims, just like your
Remittance Advice (RA), these codes and explanations tend to be generic. For the
times when you need more information than what an RA can provide, myCGS contains
a custom denial explanation that is available anytime your claim was allowed at a lower
dollar amount than what you submitted. These claim explanations are as specific as
possible and include suggestions for what you can do to either correct or appeal the
Revised June 11, 2015
© 2015 Copyright, CGS Administrators, LLC.
RETURN TO TABLE OF CONTENTS
14
myCGS USER MANUAL
claim decision (when applicable). The explanations are based on the internal instructions
that our Customer Service Representatives use to answer your questions when you call.
To view a claim explanation, click on the View button in the Explanation column of the
appropriate claim line. Note that each line on a claim may have a different explanation.
Once you have pressed the View button, the Explanation window will appear on your
screen, such as the one in the following image:
When you have finished reading the explanation, press the EXIT button to return to the
Claim Summary screen.
Additional Claim Detail
You can select a displayed claim to get more detail by clicking on the CCN of the claim.
After clicking on the CCN, the Claim Status Detail Information window will appear. The
following additional detail is available:
●●
Status
●●
Denial Code Explanations (if applicable)
●●
Completed Date
●●
●●
Provider Paid Amount
GR/REAS Codes, Remarks Codes, and their
Corresponding Amounts
The following image shows an example of the Claim Status Detail Information window:
Revised June 11, 2015
© 2015 Copyright, CGS Administrators, LLC.
RETURN TO TABLE OF CONTENTS
15
myCGS USER MANUAL
To return to the Claim Summary screen, press the EXIT button.
Pending Claims
The Pending Claims secondary tab allows you to view information about the number of
claims you have pending on either the payment floor, the Common Working Files (CWF),
or in process. To access the pending claims, go to the Claims tab, and click on the
Pending Claims secondary tab.
Your NPI and PTAN will be auto-filled based on the NPI/PTAN you have selected from
your profile. You can change the NPI/PTAN by clicking on the NPI or PTAN shown in the
upper-right corner of your screen.
To search for your pending claim information, press the SUBMIT button. myCGS will then
display three types of pending claim information, as described below.
Pending Claims on Payment Floor
When a claim has been submitted to Medicare, it must wait a certain period of time
before payment can be released. When a claim has been approved but has not yet
reached the minimum waiting period, it is on the “payment floor.” When searching for
pending claim information, myCGS will display the number of your claims currently on
the payment floor, as well as the dollar amount submitted and the projected payment
Revised June 11, 2015
© 2015 Copyright, CGS Administrators, LLC.
RETURN TO TABLE OF CONTENTS
16
myCGS USER MANUAL
amount for the claims. Note that the projected payment amount may differ from the actual
Medicare payment/check that you will receive.
For additional information about the payment floor, refer to the DME MAC Jurisdiction C
Supplier Manual (http://www.cgsmedicare.com/jc/pubs/supman/index.html), Chapter 6.
Pending Claims at CWF
When a claim has been approved for payment by CGS, it then must go to the Common
Working Files (CWF) for final approval. Claims that are pending at CWF are one step
closer to completion, but have not yet actually been approved.
Pending claim information in myCGS provides you with the total number of claims and
dollar amount submitted that are currently pending at CWF.
Other Pending Claims in Process
Before CGS has made a claim decision, your claim is considered to be pending and
in process. Pending claim information in myCGS allows you to see the total number of
claims and dollar amount submitted that have been received by CGS, but in which a
payment determination has not yet been made.
Order RA
The Order RA secondary tab allows you to order a duplicate copy of a Remittance
Advice (RA). Note that you can also order a duplicate RA from the Claim Status
Summary Screen.
To order a duplicate RA, follow these steps:
●●
Go to the Claims tab, and click on the Order RA secondary tab.
●●
Your NPI and PTAN will be auto-filled based on the NPI/PTAN you have selected
from your profile. You can change the NPI/PTAN by clicking on the NPI or PTAN
shown in the upper-right corner of your screen.
●●
In the “Remittance Advice Date From” field, enter the date of the RA you wish to
order, and then press the SUBMIT button.
A duplicate RA will then be printed and mailed to your address on file.
Revised June 11, 2015
© 2015 Copyright, CGS Administrators, LLC.
RETURN TO TABLE OF CONTENTS
17
myCGS USER MANUAL
Claim Preparation
Claim Preparation Overview
The Claim Preparation tab gives you access to a variety of information to assist you in
filing a complete and accurate claim, including:
●●
Certificates of Medical Necessity (CMNs) on file
●●
Number of rental months paid for capped rental items
●●
Number of rental months paid for oxygen equipment
●●
Ordering/referring physician status
●●
Diabetic testing supply history
●●
Diabetic shoe history
Within the Claim Preparation tab, there are three secondary tabs: CMN Status, Ordering/
Referring Physician, and Diabetic Supplies/Shoes Billing History. The CMN Status
tab, which is the default secondary tab, allows you to search for a beneficiary’s CMN
history. The Ordering/Referring Physician tab allows you to determine the status of a
physician’s NPI. The Diabetic Supplies/Shoes Billing History tab allows you to search
for a beneficiary’s claim history for either diabetic testing supplies or diabetic shoes.
All screens within the Claim Preparation tab automatically populate your NPI and PTAN,
therefore you do not need to manually enter this information. If you have more than one
NPI/PTAN and need to use a different NPI/PTAN than what is currently selected, click on
the Change NPI/PTAN button and select the appropriate NPI/PTAN (refer to the Change
NPI/PTAN section in this manual for assistance).
Searching for CMN Status
To search for CMN status and history, enter the following information on the CMN Status
secondary tab:
●●
HICN
●●
Beneficiary First Name
●●
Beneficiary Last Name
●●
Beneficiary Date of Birth
Revised June 11, 2015
© 2015 Copyright, CGS Administrators, LLC.
●●
HCPCS
RETURN TO TABLE OF CONTENTS
18
myCGS USER MANUAL
HINT: You can search for more than one HCPCS code at a time by using an asterisk (*) as
a qualifier. For instance, if you enter E* in the HCPCS field, myCGS will return CMN results
for any HCPCS code that begins with an E.
Your NPI and PTAN will be auto-filled based on the NPI/PTAN you have selected from
your profile. You can change the NPI/PTAN by clicking on the NPI or PTAN shown in the
upper-right corner of your screen.
After entering the information, press the SUBMIT button.
CMN Status and History
After clicking the SUBMIT button, myCGS will return CMN history found for the search
criteria you entered. The following information will be displayed on screen:
●●
HCPCS
●●
Initial Date
●●
Type (initial, revised, or recertification)
●●
Revised/Recert Date (if applicable)
●●
Length
The image below shows an example of CMN Summary results. In this example, the user
searched for all HCPCS codes that begin with the letter E by entering E* in the HCPCS
search field:
To get additional information about a CMN, click on the HCPCS code of the appropriate
CMN. Upon clicking on the HCPCS hyperlink, the CMN Detail Information window will
appear with the following CMN details:
●●
Submitted HCPCS
●●
Initial Date
●●
Status
●●
Approved HCPCS
●●
●●
Rental Months Paid*
●●
Type (initial, revised,
or recertification)
Revised/Recert Date
(if applicable)
●●
Supplier Name
●●
Last Rental Date
●●
Length
●●
Supplier Phone Number
* The rental months paid displayed in myCGS account for payments made by
Jurisdiction C, but not for other DME MACs. If a beneficiary has resided in another
jurisdiction, it is possible that additional rental months have been paid.
The following image shows an example of the CMN Detail Information window:
Revised June 11, 2015
© 2015 Copyright, CGS Administrators, LLC.
RETURN TO TABLE OF CONTENTS
19
myCGS USER MANUAL
999-99-3333A
To return to the CMN Summary screen, press the EXIT button.
A Few Notes about CMNs
CMNs that appear in myCGS may be true CMNs or “dummy” CMNs. A true CMN is a
CMN or DIF that was completed by a physician/supplier and submitted to Jurisdiction C
with a claim. A dummy CMN is a CMN set up for the purposes of tracking payments on
capped rental items or inexpensive and routinely purchased (IRP) items.
When a capped rental item has been extended beyond the initial 13 month rental period
due to a break in billing, it will appear as a revised CMN in myCGS.
Accessories which are capped rental items or IRP items will be shown as their own CMN
within myCGS for the sake of tracking payments, even if the accessory was listed on the
same CMN as the base equipment.
For additional information about CMNs, refer to the DME MAC Jurisdiction C Supplier
Manual (http://www.cgsmedicare.com/jc/pubs/supman/index.html), Chapter 4.
Ordering/Referring Physician Status
Claims submitted to a DME MAC must include the ordering/referring physician’s NPI.
The physician’s NPI must be enrolled in the Medicare Provider Enrollment, Chain, and
Ownership System (PECOS) to be valid. You can use myCGS to check a physician’s NPI
for valid PECOS enrollment.
To search for ordering/referring physician status, go to the Claim Preparation tab, click on
the Ordering/Referring Physician secondary tab, and enter the following information:
●●
Ordering/Referring Physician NPI
●●
Physician Last Name (first six letters only)
After entering the information, press the SUBMIT button.
myCGS will return a statement regarding the ordering/referring physician status found for
the search criteria.
Revised June 11, 2015
© 2015 Copyright, CGS Administrators, LLC.
RETURN TO TABLE OF CONTENTS
20
myCGS USER MANUAL
The image below shows a response for a physician who is currently enrolled in PECOS:
If you need to perform another physician NPI search, press the CLEAR button, and then
enter the next physician’s information.
Diabetic Supplies/Shoes History
The Diabetic Supplies/Shoes History feature in myCGS allows you to check a
beneficiary’s history of diabetic supplies and shoes claims. You can use this information
on a pre-claim basis in order to determine if a beneficiary is eligible for additional
supplies or shoes. You can also use this feature if you have had a claim denied due to
overutilization and wish to find out if the beneficiary received supplies or shoes from
another DMEPOS supplier.
Diabetic Supplies
To search for diabetic supply history, go to the Claim Preparation tab, and then click on
the Diabetic Supplies/Shoes History secondary tab.
In the History Type dropdown menu, choose one of the following:
●●
Testing Supplies A4253 and A4259: This option will only search for HCPCS codes
A4253 and A4259.
●●
Testing Supplies Other: This option will search for all diabetic supply HCPCS
codes other than A4253 and A4259.
After choosing the appropriate History Type, enter the following information:
●●
HICN
●●
●●
Beneficiary Last Name
●●
Beneficiary First Name
●●
Date of Birth
Date of Service (myCGS will check for claims 90
days before and 90 days after the date that you
enter for A4253 and A4259, and six months before
and after for other testing supplies)
After pressing the SUBMIT button, myCGS will return the following testing supply claim
history found for the search criteria:
●●
From Date
●●
Units
●●
Provider Phone Number
●●
To Date
●●
Provider Name
●●
Status (Allowed or Denied)
●●
HCPCS
Revised June 11, 2015
© 2015 Copyright, CGS Administrators, LLC.
RETURN TO TABLE OF CONTENTS
21
myCGS USER MANUAL
The following image shows an example of claim history for a beneficiary who had
received a claim for HCPCS code A4259:
Diabetic Shoes
To search for diabetic shoe history, go to the Claim Preparation tab, and then click on the
Diabetic Supplies/Shoes History secondary tab.
In the History Type dropdown menu, choose one of the following:
●●
Shoes A5500 and A5501:
This option will only search for
HCPCS codes A5500 and A5501.
●●
Shoes Other: This option will search
for all diabetic shoe insert HCPCS
codes, but not A5500 and A5501.
After choosing the appropriate History Type, enter the following information:
●●
HICN
●●
Beneficiary First Name
●●
Beneficiary Last Name
●●
Date of Birth
●●
Calendar Year*
* myCGS will check for shoe claim history only in the calendar year you select.
After pressing the SUBMIT button, myCGS will return the following shoe claim history
found for the search criteria:
●●
From Date
●●
Units
●●
Provider Phone Number
●●
To Date
●●
Provider Name
●●
Status (Allowed or Denied)
●●
HCPCS
The following image shows an example of claim history for a beneficiary who had
received a claim for HCPCS code A5500 in 2011:
Finance
Finance Overview
The Finance tab in myCGS gives you access to a variety of financial
information, including:
●●
The last five checks issued
to your account
●●
Recent outstanding checks
●●
Offset information
●●
Pricing (fee schedules)
●●
EFT application
status
Within the Finance tab, there are four secondary tabs: Checks, Offsets, Pricing, and EFT
Application Status. The Checks tab, which is the default secondary tab, allows you to
see the checks that have been issued to you recently, as well as any outstanding (not
cashed) checks. The Offsets tab allows you to find information about overpayments
Revised June 11, 2015
© 2015 Copyright, CGS Administrators, LLC.
RETURN TO TABLE OF CONTENTS
22
myCGS USER MANUAL
that have resulted in an offset to your account, including the name and HICN of the
beneficiary on the original overpayment. The Pricing tab provides a link to the current
Jurisdiction C fee schedules. The EFT Application Status allows you to check the
status of any requests for Electronic Funds Transfer (EFT) update requests that you have
sent to CGS.
All screens within the Finance tab automatically populate your NPI and PTAN, therefore
you do not need to manually enter this information. If you have more than one NPI/
PTAN and need to use a different NPI/PTAN than what is currently selected, click on the
Change NPI/PTAN button and select the appropriate NPI/PTAN (refer to the Change
NPI/PTAN section in this manual for assistance).
Checks
The Checks tab allows you to see the last five checks issued to your account, as well as
outstanding checks that have been issued in the last 30 days. To search for your checks,
go to the Finance tab, and make sure you are on the Checks secondary tab (which is the
default). Your NPI and PTAN will be auto-filled based on the NPI/PTAN you have selected
from your profile. You can change the NPI/PTAN by clicking Change NPI/PTAN.
After confirming the NPI and PTAN are correct, press the SUBMIT button. myCGS will return the following check information:
●●
The date, amount, and status of the last five checks issued to your NPI/PTAN
●●
The date and amount of any outstanding checks issued to your NPI/PTAN within
the last 30 days
Note that if you have outstanding checks that are greater than 30 days old, they will not be
reflected in the check results.
The following image shows an example of check results in myCGS:
Offsets
The Offsets tab gives you access to information about overpayments that have resulted
in an offset. To use the Offsets tab, you will need the Financial Control Number (FCN) of
the overpayment. For general information about offsets and overpayments, refer to the
DME MAC Jurisdiction C Supplier Manual (http://www.cgsmedicare.com/jc/pubs/supman/
index.html), Chapter 12.
To search for an offset, go to the Finance tab, click on the Offsets secondary tab, and
then enter the FCN of your offset. You can find the FCN on your remittance advice. Your
NPI and PTAN will be auto-filled based on the NPI/PTAN you have selected from your
Revised June 11, 2015
© 2015 Copyright, CGS Administrators, LLC.
RETURN TO TABLE OF CONTENTS
23
myCGS USER MANUAL
profile. If you have more than one NPI/PTAN, you can change the NPI/PTAN by clicking
Change NPI/PTAN.
After clicking the SUBMIT button, myCGS will return the following offset information:
●●
Original overpayment date
●●
Current offset balance (if any)
●●
HICN of the beneficiary on the
original overpayment
●●
Name of the beneficiary on the
original overpayment
●●
Date of service of the claim that
was overpaid
The image below shows an example of the Offset screen:
Pricing
The Jurisdiction C fee schedule is available for download or online viewing on the CGS
website. The Pricing tab in myCGS gives you a direct link to the fee schedule page on
our website. For general information about pricing and fee schedules, refer to the DME
MAC Jurisdiction C Supplier Manual (http://www.cgsmedicare.com/jc/pubs/supman/
index.html), Chapter 10.
To access pricing information, go to the Finance tab, click on the Pricing secondary tab,
and then click on the pricing hyperlink. A new window will open, taking you directly to the
Jurisdiction C fee schedule page on http://www.cgsmedicare.com.
EFT Status
If you have submitted an application for Electronic Funds Transfer (EFT), the EFT Status
tab provides the current status of your application. For general information about EFT,
refer to the DME MAC Jurisdiction C Supplier Manual (http://www.cgsmedicare.com/jc/
pubs/supman/index.html), Chapter 6.
To search for your EFT status, go to the Finance tab, and click on the EFT Application
Status secondary tab. Your NPI and PTAN will be auto-filled based on the NPI/PTAN you
have selected from your profile. If you have more than one NPI/PTAN and need to use
a different NPI/PTAN than what is currently selected, click on the Change NPI/PTAN
button and select the appropriate NPI/PTAN (refer to the Change NPI/PTAN section in
this manual for assistance).
After clicking the SUBMIT button, myCGS will return the following information regarding
your EFT application: ●●
Date in which your request was received
●●
Status of your request
Revised June 11, 2015
© 2015 Copyright, CGS Administrators, LLC.
RETURN TO TABLE OF CONTENTS
24
myCGS USER MANUAL
The following image shows an example of the EFT Application Status screen:
Redeterminations
Redeterminations Overview
The Redeterminations tab provides the current status of redetermination requests that
you have submitted to Jurisdiction C. You can search for a redetermination in myCGS
by either the Document Control Number (DCN) of the request or the Claim Control
Number (CCN) of the original claim.
For general information about redeterminations and the appeals process, refer to the
DME MAC Jurisdiction C Supplier Manual (http://www.cgsmedicare.com/jc/pubs/supman/
index.html), Chapter 13.
Searching for Redetermination Status
To find redetermination status, go to the Redetermination tab, select either the DCN or
CCN radio button, and enter the following information:
●●
DCN or CCN (as appropriate)
●●
HICN of the beneficiary on the claim which you have appealed
Your NPI and PTAN will be auto-filled based on the NPI/PTAN you have selected
from your profile. If you have more than one NPI/PTAN and need to use a different
NPI/PTAN than what is currently selected, click on the Change NPI/PTAN button and
select the appropriate NPI/PTAN (refer to the Change NPI/PTAN section in this manual
for assistance).
Revised June 11, 2015
© 2015 Copyright, CGS Administrators, LLC.
RETURN TO TABLE OF CONTENTS
25
myCGS USER MANUAL
After clicking the SUBMIT button, myCGS will return following information about
your request: ●●
Date in which your request was received
●●
Status of your request
The following image shows an example of redetermination status:
To perform another redetermination search, click on the New Search button.
General Information
General Information Overview
The General Information tab contains a variety of useful information for Jurisdiction C
suppliers and myCGS users, including the following information:
●●
News about myCGS and other DME MAC happenings
●●
Hours of operation for CGS Customer Service Representatives
●●
Information about your appeal rights for Medicare claims
Revised June 11, 2015
© 2015 Copyright, CGS Administrators, LLC.
RETURN TO TABLE OF CONTENTS
26
myCGS USER MANUAL
User Account
User Account Overview
If you need to change or update information in your user profile, click on the User
Account link, which is located in the top-right section of any myCGS page. There are two
tabs within the User Account section of myCGS: User Profile and Update NPI/PTAN.
The User Profile tab contains your basic profile and contact information. You can use
this tab to update basic user information, such as your name and contact information.
The Update NPI/PTAN tab contains a list of all of your approved and pending NPI/PTAN
combinations. If you need to add additional NPI/PTAN combinations to your profile,
click on the ADD ROW button in the Update NPI/PTAN tab. You will then be prompted
to enter the NPI, PTAN, and organization name of the supplier you wish to add to your
profile. Once you have submitted the request, it will be forwarded to your Authorized
Official (AO) for approval. Once the appropriate AO approves your request, you will be
able to use the NPI/PTAN combination to search for claims, redeterminations, and other
information available in myCGS.
When you are finished viewing your User Account information, click on the Home tab
to return to the myCGS home page, where you can continue to use the functions and
features of the myCGS portal. Updating Your User Profile
To make changes to your basic user profile information (such as your address or
telephone number), click on the User Account link. The User Account section of myCGS
will default to the User Profile tab. Make the necessary updates to your profile, and then
press the SUBMIT button.
Revised June 11, 2015
© 2015 Copyright, CGS Administrators, LLC.
RETURN TO TABLE OF CONTENTS
27
myCGS USER MANUAL
Once you are finished editing your profile, press the Home tab to return to the main
functional areas of myCGS.
Updating NPI/PTAN Information on Your Account
When you first register for myCGS through EIDM, you must sign up with one (and only
one) NPI/PTAN. The NPI/PTAN you use to register is your primary NPI/PTAN in myCGS,
but many myCGS users represent more than one NPI/PTAN. Each NPI/PTAN linked
to your myCGS account must be approved by the appropriate Authorized Official (AO)
before you can use it to find claim, financial, and other information in myCGS.
You can view the NPI/PTANs that have been approved for use on your account, as well
as pending NPI/PTAN requests, by going to the User Account section of myCGS, and
then clicking on the Update NPI/PTAN tab. You can also add or delete NPI/PTANs from
this tab.
Revised June 11, 2015
© 2015 Copyright, CGS Administrators, LLC.
RETURN TO TABLE OF CONTENTS
28
myCGS USER MANUAL
Adding a New NPI/PTAN to Your Account
To add a new NPI/PTAN to your account from the Update NPI/PTAN page, follow
these steps:
NOTE: Before you can add an NPI/PTAN, the appropriate Authorized Official (AO) must
first register and receive approval for the NPI/PTAN in myCGS.
●●
Click on the ADD ROW button
●●
The “Add NPI/PTAN” window will appear on your screen
●●
Enter the appropriate supplier information (Supplier Name, NPI, PTAN, and
Tax ID/EIN)
●●
Under Web Portal Permissions, place checkmarks next to the myCGS features that
you wish to be able to access (Beneficiary Eligibility, Claims, Claim Preparation,
Finance, and Redeterminations)*
●●
Press the SUBMIT button
Your request will be sent to the AO of the NPI/PTAN for which you are requesting access.
Once the AO approves your request, the new NPI/PTAN will appear in your “Change NPI/
PTAN” drop-down menu, and you will be able to use the new NPI/PTAN in myCGS.
* Your AO may choose to only give you access to certain myCGS functions.
Revised June 11, 2015
© 2015 Copyright, CGS Administrators, LLC.
RETURN TO TABLE OF CONTENTS
29
myCGS USER MANUAL
Deleting an NPI/PTAN from Your Account
If you have an NPI/PTAN linked to your account that you no longer need, then press the
Delete link next to the appropriate supplier line. Once you delete an NPI/PTAN, you will
not be able to use it to find claim, financial, or other information in myCGS. If you have
deleted an NPI/PTAN by mistake, you can add it back just as you would if when adding a
new NPI/PTAN. Note that the request will need to be re-approved by your AO.
Once you are finished editing your profile, press the Home tab to return to the main
functional areas of myCGS.
User Approval & Permissions (AO/BAO Roles)
Admin Overview
The first person to register in myCGS for any supplier must be the appropriate Authorized
Official (AO), as listed in the Medicare Provider Enrollment, Chain, and Ownership
System (PECOS) (https://pecos.cms.hhs.gov/pecos/login.do) record for the NPI/PTAN.
No other users for your company can use myCGS until the AO has first been approved.
For information about the registration process, refer to the myCGS Registration Guide
(http://www.cgsmedicare.com/jc/mycgs/pdf/mycgs_RegistrationGuide.pdf).
The AO’s role in myCGS is to approve and administer End User permissions for other
myCGS users in his/her company. Typically an AO will not have the ability to use the
beneficiary eligibility, claims, finance, and/or other End User functions in myCGS. An AO
may also designate a Backup Authorized Official (BAO) within their company to act as an
AO for the purposes of approving new users and administering user permissions.
If you are registered for myCGS as an Authorized Official (AO) or Backup Authorized
Official (BAO), you have access to user maintenance screens in myCGS that other users
in your company cannot access. In fact, when you first log in to myCGS, you are taken
directly to the user approval queue, rather than to the normal home screen that End
Users see.
To login to the administration functions in myCGS, follow the normal myCGS login
procedures, as detailed in the Logging into myCGS section at the beginning of this
manual. Once logged in, you will be taken to the Admin Home section of myCGS, where
you will see four tabs across your screen:
Revised June 11, 2015
© 2015 Copyright, CGS Administrators, LLC.
RETURN TO TABLE OF CONTENTS
30
myCGS USER MANUAL
●●
Admin Home: Go to this tab to see news and updates about myCGS. Also use
this tab to return to the administrative features if you have navigated to the End
User sections of myCGS.
●●
Home: Press this tab to go to the End User sections of myCGS, such as
Beneficiary Eligibility, Claims, etc.
●●
Users w/new Requests: When you first login to myCGS, you will be taken to this
tab, where you can see any outstanding user requests waiting for
your approval.
●●
Modify Users: Use this tab to search for existing myCGS users and modify
their permissions.
The following image illustrates the Admin Home section of myCGS:
Users with New Requests (Approval Queue)
If you are an AO or a BAO, when you first login to myCGS you will be taken directly to the
Users w/new Requests tab, where you can see any outstanding user requests waiting for
your approval.
Any existing myCGS users who have requested to add your NPI/PTAN to their account
will be displayed in your approval queue until you activate them. If you are an AO, then
two user types may be displayed in your queue—End Users and BAOs. If you are a BAO,
only End User requests will be displayed in your queue. The following chart illustrates the
user types that can be approved for each role:
User Types Approved by an AO
Role Name
Role Code
Role Description
End User
cgs-user
A standard myCGS user. This type of user typically
accesses myCGS to find beneficiary eligibility,
claim information, financial information, etc.
cgs-approver2
A supplier employee who is given the ability to
approve/disapprove user requests and modify user
permissions, just as an AO would. A BAO may also
use the same functions and features that an End
User would use.
Backup Authorized
Official (BAO)
Revised June 11, 2015
© 2015 Copyright, CGS Administrators, LLC.
RETURN TO TABLE OF CONTENTS
31
myCGS USER MANUAL
User Types Approved by a BAO
Role Name
Role Code
Role Description
End User
cgs-user
A standard myCGS user. This type of user typically
accesses myCGS to find beneficiary eligibility,
claim information, financial information, etc.
When approving a user, it is important to verify that the user is indeed affiliated with your
company and has a right to act on behalf of your company within myCGS. When a user
sends a request for approval, he/she must include the supplier NPI, PTAN, and Tax ID/
EIN (BAOs must also include the check amount that the AO used when registering for
myCGS). The NPI, PTAN and Tax ID/EIN are verified automatically by myCGS to ensure
that they match your company’s information; however, it is up to you as an approver to
ensure that the individual is affiliated with your company. If you are a larger company, or
if you use a third party billing service who may wish to use myCGS on your behalf, we
recommend that you institute an internal process of some kind to verify myCGS users.
NOTE: Only existing myCGS users who have submitted new requests will appear in
your approval queue within myCGS. To approve a first-time myCGS user, you must
access EIDM. For additional information, refer to the myCGS Registration Guide
(http://www.cgsmedicare.com/jc/mycgs/pdf/mycgs_RegistrationGuide.pdf).
You may have certain in employees in your company who you wish to give access to
some, but not all, myCGS features. For instance, you may want an individual in your
billing department to have access to beneficiary information, but not to your company’s
financial information. With this in mind, myCGS was designed to give you the ability to
assign user permissions for each of the main functions within myCGS. There are five
main End User functions in myCGS:
●●
Beneficiary Eligibility: Allows users to find current eligibility information for
Medicare beneficiaries, including entitlement dates, deductibles, other insurance
information, and more.
●●
Claim Preparation: Allows users to find pre-claim information about existing
equipment/supplies on file for a beneficiary.
●●
Claims: Allows users to view claims submitted by your company, including
payment information and claim explanations.
●●
Finance: Allows users to view the dates and dollar amounts of your company’s
recently issued and outstanding checks, and other financial information.
●●
Redetermination Status: Allows users to view the status of redetermination
requests submitted by your company.
For more detailed descriptions of each of these five functions, refer to the appropriate
sections above in this manual.
Approving a User
To approve a user in your approval queue, follow these steps:
1. Determine whether or not the user is an employee/affiliate of your company. If the
user is not affiliated with your company, do not approve the request.
2. Determine if the user has selected the appropriate role. If the user has selected the
BAO role (cgs-approver2), be sure that you want to give the user access to your
administrative abilities.
Revised June 11, 2015
© 2015 Copyright, CGS Administrators, LLC.
RETURN TO TABLE OF CONTENTS
32
myCGS USER MANUAL
3. Review the End User permissions selected by the user. Check or uncheck each
permission as appropriate.
4. Once you are ready to approve the user, click on the Active checkbox and then
press the SUBMIT button. You will then receive a message stating that your
changes were successfully made.
The screen image below shows an example of the Users w/new Requests
approval queue: Modify Users
The Modify Users tab allows you to make changes to the user accounts of the individuals
who are registered in myCGS under your company’s NPI/PTAN. You may need to modify
a user’s permissions in myCGS for a number of reasons, such as:
●●
De-activating a user who is no longer affiliated with your company
●●
Adding new permissions to an existing user
●●
Removing permissions from an existing user
Searching for Users
To modify a user, first you need to search for the user. myCGS allows you to search for
users by entering any of the following four pieces of user information: user ID, user name,
NPI, or PTAN. You can use as many of the search criterion fields as you wish, entering as
much or as little information in each field as your wish. For instance, if you enter “smith”
in the User Name field (leaving the other fields blank), myCGS will return any user who
has “smith” in their name, be it Jill Smith, Stan Smith, Karen Smithson, or Smith Jones.
Revised June 11, 2015
© 2015 Copyright, CGS Administrators, LLC.
RETURN TO TABLE OF CONTENTS
33
myCGS USER MANUAL
Once you have entered the appropriate search criteria, press the SUBMIT button.
Modifying Users
After performing your search, myCGS will display the profile information for any users
who match your search criteria. Note that if you have more than one NPI/PTAN, multiple
rows may exist for a single user who shares the same multiple NPI/PTAN information.
You can make the following changes to a user’s account:
●●
Add or remove permissions to the Beneficiary Eligibility, Claim Preparation, Claims,
Finance, and Redetermination Status function tabs. To do so, check or uncheck the
appropriate checkbox (a check means the user has permission to the function tab).
Refer to the Users with New Requests (Approval Queue) section in this manual for
additional information.
●●
Deactivate an active user by unchecking the Active checkbox.
●●
Activate an inactive/deactivated user by checking the Active checkbox.
Once you have made the appropriate changes to the user’s profile, press the
SUBMIT button.
The following image shows an example of the Modify Users tab:
Revised June 11, 2015
© 2015 Copyright, CGS Administrators, LLC.
34