1
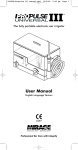
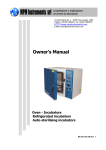
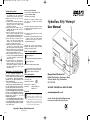
060808-Hydrofloss Kitty.qxd
20/9/06
11:33 am
Treatment Procedure
● Install your Hydrofloss Kitty Waterjet unit in
the bathroom using the wall bracket
provided. Connect to a 240V shaver socket.
● Attend your dentist for your first deep
scaling treatment.
● At home, fill the Hydrofloss Kitty Waterjet
water container with warm water and an
anti-plaque additive; for example Thymol
rinse tablets or Corsodyl.
● Always precede oral irrigation with your
Hydrofloss Kitty Waterjet with 2 minutes of
thorough brushing.
● Using the standard jet tip, adjust the jet
pressure to a level as high as you can while
remaining comfortable and apply the jet to the
gum/teeth boundaries of the affected areas.
● In the initial stages of treatment you can
expect a bad taste and possible some
discharge. This will diminish rapidly with
regular use on high pressure settings.
● Attend your dentist for an assessment. If the
gum disease is under control, continue
homecare treatment with the standard jet tip.
● If the gum disease is deeper, your dentist may
advise the use of a sulcus tip on an intermediary
pressure setting, twice daily for 3 weeks.
● Sulcus treatment will consist of 2 minutes
brushing, 2 minutes Hydrofloss Kitty Waterjet
use with the standard jet tip and 2 minutes
with the sulcus tip.
● If deeper infection (e.g. 5mm pockets) is
discovered at your next examination, your
dentist may advise the use of the pocket tip;
this treatment will consist of 2 minutes each
of brushing, standard jet tip, sulcus tip and
then pocket tip use.
Maintenance & Safety Inspections
ensure optimum performance the
Hydrofloss Kitty Waterjet should be serviced
every 12 months. Service or repairs conducted
by unauthorised agencies/organisations
invalidate any or implied warranties from
Mirage Dental Products.
Users of the Hydrofloss Kitty Waterjet
should carry out regular inspections to ensure
that the handle and hose, power cable,
reservoir and main body of the machine are
free from damage prior to use. If any damage
is evident the Hydrofloss Kitty Waterjet should
NOT be used until replacement parts have
been fitted. Only Hydrofloss Kitty Waterjet
branded items should be used with
Hydrofloss Kitty Waterjet.
The Hydrofloss Kitty Waterjet Oral Irrigator
is not user repairable and should be returned
to your Kitty Hydrofloss supplier or Mirage
Service Department (UK Customers Only) for
service and/or repair:
To
Page 1
Mirage Service Department
53 Purbeck Drive, Lostock, Bolton. BL6 4JF
Telephone: 0845 130 5445
Local Rate Applies (UK Only)
Additional user manuals, technical support
and advice are available from Mirage
Dental Products.
This product is fitted with a safety fuse to protect
the product from overheating and will cut out if
the following occurs:
User Manual
● The product is left switched on at the mains
when not in use.
● Continuous water flow of more than 10 mins
- NB. this should not prohibit normal
operation of the product, see “Using the
Hydrofloss Kitty Waterjet”.
Should the fuse cut out, please contact your
Hydrofloss Kitty Waterjet supplier or Mirage
(UK Only) at the above number.
Guide to safety symbols:
Class II Equipment
Attention - Consult Accompanying Documents
Type B.F. Equipment
IPX1 Protected Against Splashing Water
Must be disposed of in accordance with
European waste electrical and electronic
equipment directive 2002/96/EC
Safety Information
The Hydrofloss Kitty Waterjet is CE marked for
and complies with;
Medical Devices Directive
0499
Electrical Safety
EN60601-1
EMC Safety
EN55014; EN61000;
EN60601-1-2
Disposal
This symbol on the products and/or
accompanying documents means that used
electrical and electronic products should not
be mixed with general waste. Please return to
Mirage Health Group. Penalties may be
applicable for incorrect disposal of this waste,
in accordance with national legislation.
Copyright © Mirage Dental Products Ltd.
September 2006
WHL-060808
Hydrofloss Kitty Waterjet
Mirage Dental Products Ltd.
BioPark Hertfordshire, Broadwater Road,
Welwyn Garden City, Hertfordshire.
AL7 3AX UK
Tel: 0845 130 5440 Fax: 0845 130 6440
www.miragedental.co.uk
email: [email protected]
[email protected]
0499
060808-Hydrofloss Kitty.qxd
20/9/06
1. Water container / reservoir
2. Jet Tip Applicators
a. Standard Jet Tip
1.
b. Sulcus Tip
c. Pocket Tip
d. Adaptor
3. Jet Tip Holder
7.
4. Collar
5. Waterjet “Stop Button”
6. Pressure / Flow Control Knob
7. Operating Switch
8. Green “Power On Light”
11:33 am
Page 3
2a.
2b.
Technical Data
2c.
Voltage Rating:
220 to 240 V AC
Power Rating:
20 VA
Frequency:
50Hz
Static Pressure (with “stop button” closed)
Maximum Setting
8.16 bar (816kpa)
Waterjet pulses - (at 50Hz): 1200
Maximum operating time:
10 mins
(with a recommended rest time of 2 hrs.)
Storage temperature range: -5˚C ~ 65˚C
Storage relative humidity:
Up to 80%
4.
3.
5.
2d.
8.
6.
It is important that you read this user manual
before using the Hydrofloss Kitty Waterjet
The Hydrofloss Kitty Waterjet is a medical device
intended for the removal of plaque and debris
from the human mouth by irrigation.
caused, if the Hydrofloss Kitty Waterjet is
used for anything other than its intended
purpose, or used with non approved jet tip
applicators, components or accessories.
The Hydrofloss Kitty Waterjet consists of:
a) the power cord - terminating in a two pin
plug suitable for a shaver socket
b) User controls:
i). An operating switch (7) - this switch powers
the equipment On ( ) and Off ( )
ii). A pressure/flow control knob(6),
this determines the pressure and flow of
the water at the jet tip
iii). A waterjet stop button (5) (see tip holder
below)
c) the water container - the clear plastic
container and its detachable lid (1) is
removable for filling and cleaning
d) the waterjet tip holder - is attached to the
main body of the device by a coiled tube. This
tube is not detachable. The waterjet tip
holder (3) accommodates interchangeable
jet tip applicators such as the standard Jet
Tip, the Sulcus Tip and the Pocket Tip (2).
Only jet tip applicators designed for
the Hydrofloss Kitty Waterjet should be
used. The manufacturer cannot accept
responsibility for damage or injury, however
The tip holder incorporates a Waterjet stop button
(5). This button will stop the flow of the water
whilst it is fully depressed. The pressure/flow set
by the pressure/flow control knob will be resumed
upon release of the waterjet stop button.
Precautions
The Hydrofloss Kitty Waterjet should NOT be
used for ear syringing.
The Hydrofloss Kitty Waterjet is NOT intended
for continuous use and it should be
disconnected at the mains electrical supply
when not in use.
The Hydrofloss Kitty Waterjet should only be
connected to the electrical supply via a
double insulated socket designed specifically
for use with an electric razor.
The Hydrofloss Kitty Waterjet is supplied with a
bracket that allows wall mounting but should
NOT be positioned directly over a
washbasin or bath.
In the event of any change in performance of the
Hydrofloss Kitty Waterjet, stop using immediately.
Page 2
clean potable (drinking) water.
Clinical Criteria for Use
Intended use
Irrigating the mouth is carried out to:
a) facilitate the removal of plaque and debris
which are not hygroscopic, from the mouth.
b) facilitate recovery and provide oral hygiene
for gum disorders.
Limitations
Do not use the Hydrofloss Kitty Waterjet if:
a) pain or swelling develops
b) the gums develop abcesses.
Note: if the above or any other abnormal symptoms
develop, seek the advice of a dental practitioner.
Training
It is advised that users receive training in the
use of the Hydrofloss Kitty Waterjet from their
dentist, dental hygienist or other suitably
qualified person.
Setting up
Cleaning
The Hydrofloss Kitty Waterjet should be cleaned
and sterilised prior to each use.
The main unit must NOT be immersed in
water. Cleaning should be done by hand
wiping with a damp cloth only.
The water container, its detachable lid and
the jet tips should be removed from the device
and completely immersed in a cold solution
of a proprietary sterilising solution available
from a chemist.
The solution remaining in the water should be
passed through the device by locating the water
container in its operating position and switching
the operating switch (7) to the ON ( ) position
for approximately 10 seconds.
The water container should then be partially
filled with clean potable (drinking) water and the
operating switch turned to the On ( ) position for
approximately 10 seconds. The water container
should then be removed and thoroughly rinsed in
Connecting to the electricity supply
The Hydrofloss Kitty Waterjet must only be used
with a mains power supply that is the same as
that indicated on the data panel on the base of
the device.
The manufacturer cannot accept responsibility
for damage or injury, however sustained, from
connecting the device to a non-compatible
power supply.
The mains plug supplied with the Hydrofloss
Kitty Waterjet is for use with a double insulated
shaver socket designed for use with an electric
razor. Adapters should not be used when
connecting the device to the power supply.
The green “Power Supply On” light indicates
that the device is connected to the mains power
supply only (it does NOT indicate that the
operating switch is in the on ( ) position).
Caution: The product is not permanently
disconnected from the mains in the Off ( )
position. Please remove the plug from the
mains when not in use to prevent overheating.
Filling the water container
Although mains voltage is isolated from exposed
wiring in the device, it is recommended that:
● The water container is removed from the
device for filling and that the lid is always in
place when the water container is in-situ on
the device.
● The water container is not overfilled.
● The water used to fill or clean the water
container is potable and does not exceed
normal body temperature.
Fitting the Jet Tip Applicator
The Hydrofloss Kitty Waterjet is supplied with
interchangeable jet tip applicators.
To remove a jet tip applicator (2); pull the jet
tip applicator from the jet tip holder body.
To fit a jet tip applicator, reverse the
above procedure.
Using the Hydrofloss Kitty Waterjet
1. Follow the clinical criteria for use of the
Hydrofloss Kitty Waterjet for oral irrigation.
2. Set the Pressure/Flow control knob to its
slowest setting (fully anticlockwise).
3. Switch the Operating Switch to On ( ).
4. Turn the Pressure/Flow control knob slowly
clockwise until the pressure/flow of the
water is compatible with the treatment
requirements and the patients comfort.
5. Follow the treatment procedure.
Page 3