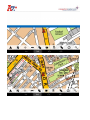
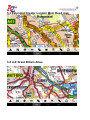
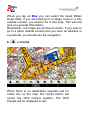
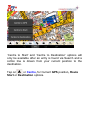
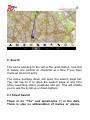
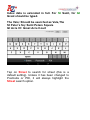
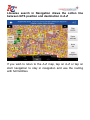
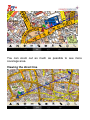
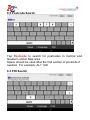
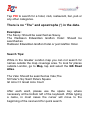
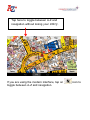
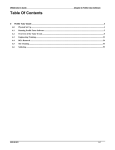
1
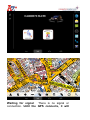
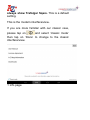
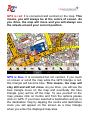
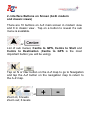
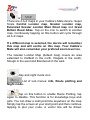
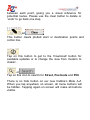
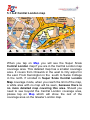
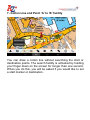
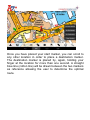
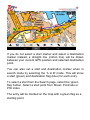
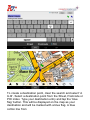
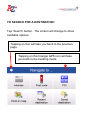
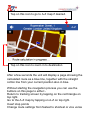
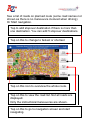
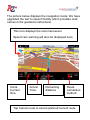
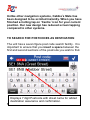
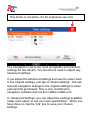
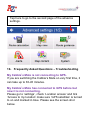
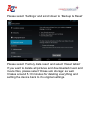
USER MANUALS © 2014 Knowledge Master UK Ltd.
Table of Contents
1- A-Z map instructions
2- Interface Buttons On Screen
3- Switching to navigation
4- Menu
4.1- info
4.2- Route plotting
4.3- Night Mode
5- Map
5.1- Central London Map
5.2- Greater London Map
5.3- Gtr.London Main Rd map
5.4- Great Britain Road Atlas
6- Centre
6.1- GPS
6.2- Route Start
6.3- Destination
7-
Cotton Line & A to B function
8-
Search
910-
8.1- Search Street
8.2- Search Postcode
8.3- Search POI
Simplified Navigation instructions
Frequently asked Questions
1- A-Z map instructions. Starting the A-Z
When you tap the A-Z icon on the Start Menu, you will see
the A-Z Greater London map displaying Trafalgar Sqare
(default) until it connects to GPS. The Cabbie’s Mate is
configured to connect to GPS automatically. When the
device is brand new, first connection can take up to
30-45 minutes. After the initial connection, it will connect
within 5 minutes. When the device is warm it will connect
within a couple of minutes if it is not instant.
Please also note, the A-Z map has no voice guidance
and does not turn in driving direction, it stays North
up. The voice guidance is in the Cabbie’s Mate
navigation application which can be started by tapping
the navigation icon or N/Nav button when you are in
the A-Z map mode.
Waiting for signal: There is no signal or
connection. Until the GPS connects, it will
always show Trafalgar Sqare. This is a default
setting.
This is the modern interface/view.
If you are more familiar with our classic view,
please tap on
and select ‘classic mode’
then tap on ‘Done’ to change to the classic
interface/view.
‘i’ info page
Classic View
Modern View
GPS is red: It is connected and centred on the map. This
means, you will always be at the centre of screen. As
you drive, the map will move and you will always see
the streets around your current position.
GPS is blue: It is connected but not centred. If you touch
on screen or scroll the map while the GPS triangle is red,
this triangle will become blue. This means, the map will
stay still and will not move. As you drive, you will see the
blue triangle move on the map and eventually the blue
triangle (you) will be off the map. To see yourself on the
map, please click on Centre and from the options please
click on GPS. If you have selected a destination and go to
the destination map by tapping the centre and destination
icons you will appear on the screen as a blue triangle
when you enter the displayed map area.
2- Interface Buttons on Screen (both modern
and classic views)
There are 10 buttons on A-Z main screen in modern view
and 8 in classic view . Tap on a button to reveal if a sub
menu is available.
or
List of sub menus; Centre to GPS, Centre to Start and
Centre to Destination (Centre to GPS is the most
important button you will be using).
or
Tap on N or Nav button on the A-Z map to go to Navigation
and tap the A-Z button on the navigation map to return to
the A-Z map.
or
Zoom in; 6 levels
Zoom out; 6 levels
or
There are 4 A-Z maps in your Cabbie’s Mate device. Super
Scale Central London map, Greater London map,
Extended Greater London Main Road map and Great
Britain Road Atlas. Tap on the icon to switch to another
map. Continuesly tapping on this button will cycle through
all A-Z maps.
If a different map is selected, the device will remember
this map and will centre on this map. Your Cabbie’s
Mate will also remember your prefered zoom level too.
The Greater London Map (default map) covers an area
extended to Hatfield in the north, Reigate in the south,
Slough in the west and Brentwood in the east.
Day and night mode icon.
List of sub menus; info, Route plotting and
Night mode.
Tap on this button to enable Route Plotting, tap
again to disable. This function is for knowledge boys and
girls. You can draw a multi point line anywhere on the map.
Simply tap the screen at your start point and then continue
tapping to plot your route. A vector line will be drawn
between each point, giving you a visual reference for
potential routes. Please use the clear button to delete or
‘undo’ to go back one step.
or
This button clears plotted start or destination points and
cotton line.
Tap on this button to get to the ‘Download’ button for
available updates or to change the view from modern to
classic.
or
Tap on this icon to search for Street, Postcode and POI.
There is no hide button on our new Cabbie’s Mate A-Z.
When you tap anywhere on screen, all menu buttons will
be hidden. Tapping again on screen will make all buttons
visible.
3- Navigation
or
Tap on this button to switch to navigation. Tap
on A-Z button to go back to A-Z map
4- Menu (classic mode only)
Tap Menu button for ‘info’, ‘Route plotting’ and ‘Night
mode’.
Congestion charging zone
Please note, the pink shaded area below Euston Road
indicates the Congestion Charge zone border.
5- Map
Tap Map for Super Scale Central London map, Greater
London map, Extended Greater London Main Road
map and Great Britain Road Atlas options.
The Cabbie’s Mate is configured to connect to GPS
automatically. You can only view maps within the map
coverage area. Central and Greater London Maps can not
be viewed if you are outside the coverage area unless you
scroll the map to the area covered by the Greater London
map. If you have selected the Central London map and are
driving towards outer London, as you exit the Central
London map coverage area, the map will automatically
change to Greater London map coverage area. When
exiting the Greater London coverage area, the map will
change automatically to the Extended Greater London
Main Road map and then to
the Great Britain Road Atlas.
When coming in from outside Greater London (Great
Britain Road Atlas coverage area) into Greater London
area, the map will not change automatically. When you
enter the Greater London Map area please Tap on Centre
to GPS to see your current position on the Greater London
map.
All four maps in the Cabbie’s Mate A-Z application enable
easy and fast scrolling. To scroll the map just touch the
screen and move your finger in the direction you wish the
map to move.
5.1 A-Z Central London map
When you tap on Map you will see the Super Scale
Central London map if you are in the Central London map
coverage area. This detailed map has a smaller coverage
area. It covers from Chiswick in the west to City airport in
the east. From Kennington in the south to Swiss Cottage
in the north. If scrolled in Super Scale Central London
Map coverage mode, when you reach the limit of the map,
a white area with no map will be seen, because there is
no more detailed map covering this area. Should you
need to see beyond the Central London coverage area,
please tap on Map which will show the rest of the
coverage area on the Greater London map.
If the Central London map is in use while driving, the
Central London map will change to the Greater London
map as you drive through the end of map coverage area.
Likewise if you drive beyond the Greater London map area
the map will change to Greater London Main Road map
and then to the Great Britain Road Atlas.
5.2 A-Z Greater London map
When tapping on Map you will see the Greater London
map, if you are in the Greater London map coverage area
and outside the Central London map area. This is the
default map setting. When Centre to GPS is used, it will
always centre you on the Greater London map if you are
within the coverage area if you have not tapped on the
Map button to select another map.
5.3 Extended Greater London Main Road map
5.4 A-Z Great Britain Atlas
When you tap on Map you can select the Great Britain
Road Atlas. If you are looking for a village, town or a City
outside London, you need to be in this map. This will only
give you general information.
Remember, A-Z maps are all about London. If you wish to
go to a place outside London and you have an address or
a postcode, you should use the navigation.
6-
or Centre
When there is no destination selected and no
cotton line on the map, the Centre button will
centre the GPS current position. The GPS
triangle will be displayed in red.
‘Centre to Start’ and ‘Centre to Destination’ options will
only be available after an entry is found via Search and a
cotton line is drawn from your current position to the
destination.
Tap on
or Centre, for Current GPS position, Route
Start or Destination options.
6.1 Centre to GPS
Tap on the GPS triangle
or Centre button and select
Centre to GPS button from the sub menu. This option will
show your current position and the triangle will be red.
After whatever you were doing, this button should be
tapped to show your current position. This is one of the
most important buttons on this device.
6.2 Centre to Route Start
Tap on GPS triangle
or Centre button and
select Centre to Start from the sub menu. This
option will show the starting point.
6.3 Centre to Destination
Tap on the GPS triangle
or Centre button and select
a Centre to Destination from the sub menu. This option
will show the destination point.
Show / Hide (there is no button or icon for
this)
Tap on screen to hide all buttons, re tap on
screen again to make them visible when
required
7- Cotton Line and Point ‘A’ to ‘B’ facility
You can draw a cotton line without searching the start or
destination points. The search facility is activated by holding
your finger down on the screen for longer than one second.
When you do this, you will be asked if you would like to set
a start marker or destination.
Once you have placed your start marker, you can scroll to
any other location in order to place a destination marker.
The destination marker is placed by, again, holding your
finger at the location for more than one second. A straight
blue line (cotton line) will be drawn between the two markers
as reference allowing the user to determine the optimal
route.
If you do not select a start marker and select a destination
marker instead, a straight line (cotton line) will be drawn
between your current GPS position and selected destination
point.
You can also set a start and desitnation marker when in
search mode by selecting the ‘A to B’ mode. This will show
a start (green) and destination flag (blue) for each entry.
To select a start from the Search page, select the ‘green
flag’ button. Select a start point from Street, Postcode or
POI index.
The entry will be marked on the map with a green flag as a
starting point.
To create a destination point, clear the search and select ‘A
to B’. Select a destination point from the Street, Postcode or
POI index. Type your destination entry and tap the ‘blue
flag’ button. This will be displayed on the map as your
destination and will be marked with a blue flag. A blue
cotton line from
selected point ‘A’ to selected point ‘B’ will also be drawn
automatically.
All scroll, map and zoom facilities can now be used to plan
or overview the route.
8- Search
The arrow pointing to the left is the undo button. Use this
to delete one section or character at a time if you have
made an incorrect entry.
The arrow pointing down will open the search page list.
You can tap on it to open the search page at any time
when searching street, postcode and poi. This will enable
you to use the scroll up or down buttons.
8.1 Street Search
There is no “The” and apostrophe (‘) in the data.
There is also no abbreviation of names or places.
Index data is extended in full. For St Saint, for Gt
Great should be typed.
The Vale: Should be searched as Vale,The
St Peter’s Sq: Saint Peters Square
Gt Acre Ct: Great Acre Court
Tap on Street to search for street (this is a
default setting). Unless it has been changed to
Postcode or POI, it will always highlight the
Street search option.
Start entering the street name required. Please enter as
many letters as you can to narrow the search down. In
some cases the cursor (blue highlight) will move forward to
the next word automatically, but sometimes you will need
to enter space when the space button is highlighted.
It is designed to predict what you are typing and it may
enter more letters than your input. Please always check
where the blue cursor is to avoid any mistakes. This may
confuse you at the beginning but will speed up your search
when you get used to it.
Please key in letters until the cursor moves to the postcode
section at the end, if there is more than one entry listed. In
most cases the cursor will predict and complete the name.
When the cursor is in the postcode section, you can type
the beginning of the postcode (N, S, E, W…) to narrow
your search. This will save you scrolling up and down. In
some cases the cursor will stop just before the postcode.
You will need to tap “(” on keyboard for the cursor to move
forward into the postcode section.
In some cases you may need to move back the cursor
while searching by using the arrow button pointing left.
This is situated on the top right hand side of the keyboard.
When the cursor is in the postcode section and W
(covering west London) is entered, all entries in West
London postal code area will be listed. If you tap on arrow
pointing down, the page will be opened and the page
below can be seen. If the required road name is Victoria
Road (W8), please enter this while searching to bring this
entry on top of the list. This will save you scrolling up and
down. Entering the first letter(s) of the other Greater
London map post codes will produce the same result.
When the required street name is on the list, please tap on it
and your entry will be shown on the map with a flag and
the direct line will be drawn automatically from your current
position to your selected destination.
You can zoom out or change maps to see more coverage
area. When you are satisfied you know where your
destination or found entry is, please tap on Centre to GPS
to go to your current position. Your search result will be
saved until it is deleted. The searched entry or address
can be viewed via Search page button.
Our new software provides an important, unique
additional advantage. Search in A-Z automatically
instigates the Navigation software to plan a route to the
selected destination. By tapping the ‘N’ or ‘NAV’ icon
and then ‘Start Navigation’, guidance will be provided
to the selected destination and voice instructions can
be heard both in Navigation and A-Z modes.
Likewise search in Navigation draws the cotton line
between GPS position and destination in A-Z
If you wish to retun to the A-Z map, tap on A-Z or tap on
start navigation to stay in navigation and use the routing
with full facilities.
You can zoom out as much as possible to see more
coverage area.
Viewing the direct line
If the destination is too far and the line can not be viewed
easily, please tap on map and view your line on either of
the Greater London maps or the Great Britain Road Atlas.
8.2 Postcode Search
Tap Postcode to search for postcodes in Central and
Greater London Map area.
Space should be used after the first section of postcode if
needed. For example: AL1 1AD
8.3 POI Search
Tap POI to search for a hotel, club, restaurant, bar, pub or
any other categories.
There is no “The” and apostrophe (‘) in the data.
Examples:
The Savoy: Should be searched as Savoy.
The Radisson Edwardian Grafton Hotel: Should be
searched as
Radisson Edwardian Grafton Hotel or just Grafton Hotel.
Search Tips:
While in the Greater London map you can not search for
names outside the map coverage area. To look for places
outside London, go to Map, tap and select the GB Road
Atlas.
The Vale: Should be searched as Vale,The
St Peter’s Sq: Saint Peters Square
Gt Acre Ct: Great Acre Court
After each word, please use the space key where
necessary at the bottom left of the keyboard. While typing
a name, in most cases the curser will move to the
beginning of the next word for quick search.
Please key in letters until the curser moves to the postcode
section at the end. In most cases curser will predict and
complete the name. This will save you scrolling up and
down.
When the curser is in the postcode section, you can type
the beginning of the postcode (N, S, E, W…) to narrow
your search. In some cases the curser will stop just before
the postcode. You will need to tap “(” on keyboard for the
curser to move forward into the postcode section.
In some cases you may need to move back the curser
while searching by using the arrow key to the left. This is
situated on the right hand side of the keyboard.
Due to having received the street index and building
names index in one database from Geographers’ A-Z, we
are unable to separate the building names. These building
names are marked/drawn on A-Z map and should be
searched in the street index. We are adding building
names on our POI database as we update.
Please search both Street and POI indexs if trying to
locate a building.
9- SIMPLIFIED NAVIGATION INSTRUCTIONS
To switch unit on:
Hold down button on top left corner of unit for three
seconds. Software will load and screen will default to
‘Cabbie’s Mate’ Main Menu screen.
If you wish to start working with ‘Navigation’ tap the
‘Navigation icon. Navigation will open and show the
‘tracking screen’
To change between ‘Navigation’ and ‘A-Z’ tap the A-Z or N
or Nav icon as appropriate.
Tap here to toggle between navigation and A-Z
without losing your entry.
Displays
the
speed
limit of
the road
and
current
speed.
Tapping on
Centre icon
will centre
GPS
triangle on
map and
adjust the
zoom level.
Tap to save
the current
position in
saved
destination.
Displays the current position.
Tap on
search
icon to
search for
street,
postcode
or POI.
GPS
connection
indicator
Tap here to toggle between A-Z and
navigation without losing your entry.
If you are using the modern interface, tap on
toggle between A-Z and navigation.
icon to
NAVIGATION
When a GPS signal has been found, the screen will show
geographical position of unit. Details will be displayed on
bottom line of page. The picture below displays the tracking
mode.
The navigation map can be scrolled like the A-Z.
TO SEARCH FOR A DESTINATION:
Tap ‘Search’ button. The screen will change to show
available options.
Tapping on this will take you back to the previous
page.
Tapping on this triangle GPS icon will take
you back to the tracking mode.
ADDRESS
Tap ‘Address’
Next page defaults to search for address in Greater
London.
If you wish to search for an address beyond Greater
London tap the icon to the left of the ‘tick’ box. This will
open the facility to enter the name of the city where you
wish to locate a street.
If the entry is correct, tap on this icon to go to the next
page. You can also tap on the list to select an entry.
Tap on this icon to select a different City
Backspace button. Tap on this to
delete one letter at a time.
Space button. Also tap on this once instead of
entering apostrophe or comma.
Tap on this icon to change country if your unit
contains a Western Europe map.
Tap on this icon to open a list of streets or tap
again to bring the keyboard on screen.
Please note. There is no comma button on the keyboard.
Where a comma is required insert a space in lieu.
Using the keyboard, tap the name of the street to be the
destination.
The navigation will then display the street name in red
letters at the top of the page. If the database contains more
than one street with the same name, tap the button
(keyboard icon) below the ‘tick’ box and you will see a drop
down menu showing the location of streets with the same
name. Tap the line which shows the desired destination.
The navigation will then display the keyboard and you can
then either:Insert the street number using the figures at top of keyboard
then again tap the ‘tick’ button. This will be the chosen
destination.
OR
Tap the button below the ‘tick’ box (keyboard icon) which
will then provide a drop down menu of the junctions on the
selected street. Tapping any named junction street will set
that as the chosen destination for navigation.
The unit will then display a page showing the location on
the map of the chosen destination.
Tap on this icon to go to A-Z map if desired.
Tap on this icon to zoom in to destination
After a few seconds the unit will display a page showing the
calculated route as a blue line, together with the straight
cotton line from your current position also in blue.
Without starting the navigation process you can use the
buttons on this page to either:Return to tracking screen by tapping on the red triangle on
top right.
Go to the A-Z map by tapping on A-Z on top right.
Insert stop points
Change route settings from fastest to shortest or vice versa
See a list of roads on planned route (some road names not
shown as there is no manoeuvre involved when driving)
Or Start navigation.
Tap to add stopover destination if there is more than
one destination. You can add 5 stopover destinations.
Tap on this to change to fastest or shortest
Tap on this icon to overview the whole route.
Tap on this to view the road list. Not all roads are
displayed.
Only the instructions/manoeuvres are shown.
Tap on this to go to navigation screen and start
navigating.
THE NAVIGATION AND A-Z APPLICATIONS IN THIS
UNIT WORK IN TANDEM. SELECTING A DESTINATION
IN NAVIGATION AUTOMATICALLY CREATES THE BLUE
COTTON LINE IN A-Z BETWEEN GPS POSITION AND
THE SELECTED DESTINATION. THIS OPENS THE
FACILITY IN A-Z TO SHOW GPS POSITION AND
DESTINATION ON THE A-Z MAP WITH FULL MAP
CHANGE, SCROLLING AND ZOOM OPTIONS.
If you have started navigation you will see the following
page on your unit.
The picture below displays the navigation mode. We have
upgraded the text to speech facility which provides road
names in the guidance instructions.
This icon displays the next manoeuvre
Speed cam warning will also be displayed here.
Clock.
Current
time.
Arrival
Time.
Remaining
distance
Route
calculation
method
Tap Cancel route to cancel planned current route
Unlike other navigation systems, Cabbie’s Mate has
been designed to be scrolled instantly. When you have
finished scrolling tap on ‘Centre’ icon for your current
position. Our new design has reduced screen tapping
compared to other systems.
TO SEARCH FOR POSTCODES AS DESTINATION
The unit has a seven figure post code search facility. It is
important to ensure that you insert a space between the
first and second sections of the postcode you wish to find.
Displays 7 digit Postcode with street name for added
destination assurance and confirmation.
TO SEARCH FOR A POINT OF INTEREST AS
DESTINATION
In Greater London points are listed numerically and
alphabetically and are not categorised.
‘In another city’ requires the City to be identified to the unit
before the name of the point is searched for.
‘In another city’ and ‘Close to me’ the points of interest are
categorised and the desired category from the list should be
selected before the nominal search is made.
TO SEARCH FOR A POINT ON MAP AS DESTINATION
Tap point on map icon.
Scroll map until desired destination is located. Tap screen
on that location. A blue indicator will appear to identify the
selected destination. Tap ‘start navigation’ and the device
will plan guidance to that point.
SETTINGS
In ‘Main Settings’ you can chose between Fastest/shortest
route, Day/night colour schemes, adjust/turn on or off sound
directions. Or go to ‘Advanced Settings’
This buton is not active, it’s for engineers use only.
The navigation is set to the most acceptable and practical
settings for taxi drivers. You should not need to adjust any
advanced settings.
If you adjust the advanced settings and want to return back
to the original settings, just tap on ‘Reset settings’. This will
reset all navigation settings to the original settings to when
unit was first purchased. This is only resetting the
navigation software and not the Cabbie’s Mate unit.
In ‘Advanced Settings’ you can adjust the settings available
under each option to suit your own specification. When you
have done so, tap the ‘tick’ box to save your chosen
settings.
Tap here to go to the second page of the advance
settings.
10- Frequently Asked Questions – Troubleshooting
My Cabbie’s Mate is not connecting to GPS.
If you are switching the Cabbie’s Mate on very first time, it
can take up to 30-45 minutes.
My Cabbie’s Mate has connected to GPS before but
now it is not connecting.
Please go to ‘settings’, check ‘Location access’ and tick
‘Access to my location’ make sure ‘GPS satellites’ is turned
to on and marked in blue. Please see the screen shot
below.
The GPS is not following me on the map.
You may be in poor reception area, occasionally this could
happen. It is very likely to happen when you are near tall
glass buildings because GPS signal bounces.
If this is happening more often, your Cabbie’s Mate may
need special insulation because on some units the 3G is
inteffering with the GPS signal. All units sold as of
01/07/2014 have this GPS shielding. If you are unsure
please e mail us your serial number and we can let you
know if it was done or not. We will be calling back all
previously sold Cabbie’s Mate for this free upgrade from
th
15 July 2014
How do I perform a factory reset?
Please tap on the ‘Menu’ icon (circle with the white dots)
and search for the ‘Settings’ option.
Please select ‘Settings’ and scroll down to ‘Backup & Reset’
Please select ‘Factory data reset’ and select ‘Reset tablet’
If you want to delete all pictures and downloaded music and
movie files, please select ‘Erase usb storage’ as well.
It takes around 5-10 minutes for deleting everything and
setting the device back to it’s original settings.
Please then scroll up to ‘Security’ and tick ‘Unknown
Sources’ to allow you to reinstall the software.
When you have done this you will need to go back and
reinstall our software.
To do this please go back to the ‘Menu’ and search for ‘File
Manager’
Please select ‘SD card’ and select the ‘A2Z.apk’ file and
install and tap on ‘Done’. Please then do the same with the
‘AnyMapMobile.apk’ file.
Why is the navigation coming on while I am using the
A-Z?
When you start in A-Z please tap on the N or Nav button to
switch to navigation and then switch back to A-Z by tapping
on the A-Z icon. Alternatively you could start in Navigation
and then switch to A-Z. Doing this will stop the navigation
screen from popping up by itself while you are using the AZ. An update to fix this will be released soon. You can close
the apps by dragging them down and then tapping on the AZ icon to initiate the A-Z.
My Cabbie’s Mate is not starting up.
Please charge the unit first. If it’s already charged and still
not starting up, please reset the device with a pin or paper
clip (reset button is located next to the on/off button) and
then press down the on/off switch for 3 second to switch the
unit on.
I cannot check for available downloads, A warning
message says ‘Could not load available downloads at
this time. Please check your connection’. What should I
do?
Either your Wi-Fi connection is not set to your available
network or our system is down.
First please check if you are connected to your Wi-Fi
network. Try to get online to make sure you have
connection. If you can get online it means our server is
down. Please try again later.
My sim card does not fit, its too small.
The Cabbie’s Mate requires a standard sim card with credit.
If your sim card is a micro sim card, please get an adapter
from any mobile shop.
I have downloaded apps but all app icons are placed on
my Main Menu where the Navigation and A-Z icons are
and the page is crowded. How can I move them.
You can move all but one downloaded app icons to another
page by holding your finger down on the app for 3-4
seconds and then dragging them to the the left. They will
move to the next page. There will be always one app icon
left which cannot be moved. If you wish to remove this as
well, you will need to come in for an Operating System
update.
I am having problem with my navigation or A-Z
software. I have to re start to fix the problem. What
should I do?
Please check for available updates first. Your Cabbie’s
Mate may need updating.
You should not need to re start your Cabbie’s Mate to fix a
software problem, instead, you can drag both navigation
and A-Z app pages down to close apps and tap on A-Z or
Navigation to re open; the problem will disappear. If the
problem persists, please contact us and we will give you a
download code to download a fix.
I broke my screen and/or USB socket, can it be fixed?
Yes, we can replace the screen and the USB socket. Any
physical damage does not come under warranty. Screen
replacement is £70 and the USB replacement is £50. If both
are damaged, we will only charge one fee, whichever is
greater. Repair takes 3 working days and providing we have
a loan unit in the office we will lend it to you. Please bring
your unit to our support office at Knowledge Master UK Ltd,
95 Aldwych, London, WC2B 4JF. Our working hours are
11am-1pm and 2-6 pm Monday to Friday.
How do I update my points or available downloads?
Sometimes updates will have be downloaded in two
sections (you need to perform the update twice). In the first
update, only the A-Z software will be available since this
has to be done first. This will require you to install the
Cabbie’s Mate software by following the simple on screen
instructions. This update is under 5MB, so it can be done on
the go as long as you have 3G or Wi-Fi connection. This
should take about 1 minute.
After this is installed, tap on A-Z, tap on info and tap on
downloads to download the rest of the available updates.
More detailed update instructions:
Please open your A-Z on the Cabbie’s Mate and tap on the
‘i’ info button. Then tap on ‘downloads’ to see available
updates (if you are using classic mode, tap on ‘Menu’ to get
to the ‘i’ button.)
An A-Z Software update will be available and will be
selected, tap on ‘download selected items’ and select ‘ok’.
Your Cabbie’s Mate will configure maps and will then notify
you of successful download. Please tap on ‘ok’ to proceed.
The Package Installer will then open the Cabbie’s Mate
update and ask if you want to install an update to the
existing application? Please select ‘Install’ and then ‘Done’
when it has finished installing. The page will then close and
display the main menu.
Tap on the A-Z, follow the same process and download the
rest of the available updates now.
*PLEASE NOTE: At this stage some users may receive a
‘PARSING ERROR’ message, please select ok and follow
the above steps again.
Note: Please make sure we always have your latest e
mail address. We will not always send you a text
message as well as e mail to remind you when there are
updates available.
DISCLAIMER
Knowledge Master UK Ltd reserves the rights of final
interpretation of the manual.
The manual content is subject to change without notice.
Please accept our apology for any inconvenience
If mistakes are found in the user manual, you are welcome
to contact Knowledge Master UK Ltd.
Please read the instructions in this manual and use only the
accessories of Cabbie’s Mate to avoid unpredicted damage.
Failure to follow the instructions will invalidate warranty and
might endanger personal safety, for which Knowledge
Master UK Ltd accepts no responsibility.
Data of navigation or A-Z electronic maps might be
inconsistent with actual traffic signals due to transportation
developments. Please follow traffic regulations and signs
and drive according to road restrictions. Operating the A-Z+
CABBIE’S MATE device while driving might cause serious
accidents. Knowledge Master UK Ltd accepts no
responsibility for accident’s and loss due to improper use.