1
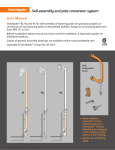
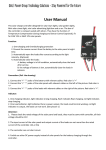
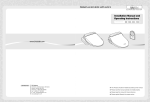
Document Number:10010101-UM Page 1 of 42 Enclosure Group 1 User Manual: This manual is for the following product assemblies: 81010 81011 81012 81013 81060 81061 81062 81063 Mini Office Enclosure Counter Top 45”W X 36”H Mini Office Enclosure Counter Top 72”W X 36”H Mini Office Enclosure Counter Top 45”W X 64”H Mini Office Enclosure Counter Top 72”W X 64”H POS Kiosk Enclosure Counter Top 45”W X 36”H POS Kiosk Enclosure Counter Top 72”W X 36”H POS Kiosk Enclosure Counter Top 45”W X 64”H POS Kiosk Enclosure Counter Top 72”W X 64”H PN 81010 PN 81011 PN 81012 PN 81013 PN 81060 PN 81061 PN 81062 PN 81063 Document Number:10010101-UM Page 2 of 42 Enclosure Group 1 User Manual:.......................................................................................................... 1 Introduction ....................................................................................................................................... 3 Safety Information ............................................................................................................................. 4 Tools Needed .................................................................................................................................... 5 How to use Self Tapping Screws....................................................................................................... 6 Basic Steps ....................................................................................................................................... 7 Unpacking the Enclosure............................................................................................................... 7 Inspecting the Enclosure, Accessories, and Hardware Kits........................................................... 7 If you have access to a forklift or equipment lift to position your Countertop Enclosure ................ 7 Attaching the Leveling Legs to the bottom of an Enclosure ........................................................... 9 Installing wheels directly to the bottom of an Enclosure .............................................................. 10 Installing an Enclosure on a Table, Counter Top, or Wire Rack Shelf ......................................... 11 Securing an Enclosure to the Wall and Floor............................................................................... 12 Relocating a bin box mounting bar inside of an Enclosure .......................................................... 14 Relocating a Multiple Outlet Strip................................................................................................. 15 Installing cabling through cable path openings ............................................................................ 16 Installing flexible grommet material around cable path openings................................................. 17 Operating the roll up door and lock.............................................................................................. 18 Connecting the Enclosure to 110VAC power............................................................................... 18 Optional Steps................................................................................................................................. 19 Modular Ventilation Systems for Enclosures overview ................................................................ 19 Testing and Regulating the Internal Temperature of Enclosures or Lower Cabinet..................... 21 Relocating a Modular Ventilation System from one side of an Enclosure to the other................. 21 Installing an Enclosure flush into a wall ....................................................................................... 24 Installing a VESA Monitor on a mount which is attached to an Enclosure interior pillar............... 27 Relocating a VESA Monitor mount which is attached to an Enclosure interior pillar.................... 29 Relocating Low Voltage Cable Management Rings..................................................................... 32 Relocating an 18”W interior Wire Rack Shelf............................................................................... 33 Relocating a Multiple Outlet Strip................................................................................................. 33 Adjusting the height of a full length interior Wire Rack Shelf ....................................................... 34 Product Short Descriptions.............................................................................................................. 35 Product Specifications: 45” W x 36”H x 30”D .................................................................................. 37 Product Specifications 45” W x 64”H x 30”D ................................................................................... 38 Product Specifications 72” W x 36”H x 30”D ................................................................................... 39 Product Specifications 72” W x 64”H x 30”D ................................................................................... 40 Engineering Drawing Reference Notes: .......................................................................................... 40 Warranty Information....................................................................................................................... 41 Service and Support........................................................................................................................ 42 Document Number:10010101-UM Page 3 of 42 Introduction This manual is designed to assist you in unpacking, assembling, installing, and using your PQS equipment safely and efficiently. Please refer to the cover of this manual for the applicable configurations. PQS products are modular and can be configured in numerous ways for a variety of applications. This manual contains information about the general setup of your PQS product, but cannot cover the multitude of configurations possible with this modular system. Please refer to the table of contents to reference the part or procedure that is most closely associated with your desired setup. If you are viewing this manual in electronic format: Using the ‘bookmarks’ tool in Adobe Acrobat is an efficient way to navigate this PDF document. Click the bookmarks tab to the left of the screen to view thumbnails of each page. The table of contents items are linked to their respective sections. Clicking on a TOC item will bring you to the appropriate section. You can also use ctrl+ f to bring up a search dialogue so you can search for key words or part numbers. The information in this manual is subject to change without notice. PQS is not liable for errors contained herein or for incidental or consequential damages in connection with the furnishing, performance, or use of this material. Because PQS products are always being improved, the illustrations and descriptions in this manual may differ from the products you receive. This document contains proprietary information that is protected by copyright. No part of this document may be photocopied, reproduced, or translated into another language without the prior written consent of PQS. ©2009 Practical Quality Systems. All rights reserved. PQS is a registered trademark. All other Trademarks belong to their respective companies. Common notifications in this manual: Messages like those below indicate special information: WARNING: Failure to follow instructions that appear in these cautionary boxes could result in the injury or death of personnel and/ or damage to equipment and loss of data. Tip: Instructions that appear next to a light bulb icon are designed to make the assembly of your unit go more easily and to help you avoid losing time due to mistakes. Document Number:10010101-UM Page 4 of 42 Safety Information This part of the manual provides an overview of safety guidelines to be observed when assembling, installing and using your PQS equipment. Keep a printed copy of this User’s Manual, especially the following safety information, in or near the Enclosure, Work Table, or Shelving System. WARNINGS • Improper use of this product may lead to serious injury or death. Read and understand all instructions prior to the assembly or use of this product. • Be advised that some parts of the product components may have sharp edges, please handle all pieces carefully. •Hire a professional electrician to connect permanent power circuits to equipment assemblies. It is advised against to route electricity to or within the unit without expert knowledge. • Have each unit individually grounded to the Telecommunication Ground Circuit (TGC) or signal reference grid to protect equipment and personnel from dangerous electrical charges. If you do not know how to do this, hire a professional electrician. • If you will be housing electronics in a PQS Enclosure or Cabinet, make sure that there is adequate ventilation to keep your electronics at a safe operating temperature. Refer to the section titled “Modular Ventilation Systems Overview” for further reference. • Be sure to use sufficient personnel to move the products safely. Most assembly and installation steps will require more than one person to comfortably and safely complete the task. Do not attempt to move large parts by yourself. Obtain adequate assistance to prior to moving heavy parts or hire professional equipment riggers if necessary. • Make sure loose items are removed from within the unit prior to moving it. Items shifting within assemblies can cause instability. • Move equipment on installed casters with extreme care. Sudden changes in direction, forces, or the surface over which the product is being moved can cause the unit to fall over. Never push on the sides. Casters are only for moving your unit to the desired location. Once in place, attach the leveling feet and secure the unit in place. • A standalone unit should be level, stable, and anchored to the floor. • Two or more units can be coupled together to enhance their stability. Even when coupled, anchor each individual unit to the floor and wall. • Consult you local building codes for seismic regulations regarding securing heavy equipment and ensure that your enclosure is secured according to your local laws. Document Number:10010101-UM Page 5 of 42 • Before loading equipment into or onto an Enclosure or Worktable, be sure that it is stable and level. Always anchor the leveling feet or the frame to the floor. • When servicing equipment in rack mount drawers: If you have multiple rack mount drawers, only unlock and extend the drawer you are servicing. Extending multiple racks at once may cause the entire unit to fall over. Extend only one rack mount drawer at a time. Extend rack mount drawers slowly. Sudden deployment of the rack could cause tipping. Always load heavy items at the bottom of the rack mount drawer first, and add lighter equipment on higher levels. Putting heavy items high up is dangerous. • There is a safety risk when equipment is mounted on a shelf installed more than 30 inches above the floor. Unsecured equipment may slide off of shelves and injure personnel. Be sure equipment on shelves over 30 inches from the ground is secured to the frame of your Enclosure, Work Table, or Shelving System. •PQS products can be configured in many ways. The amount of force required to make the units unstable is different in each configuration. Read and fully understand all safety considerations in this entire manual before you assemble your configuration. • There are task specific safety notes throughout this manual. Please read the entire manual and observe the warnings for each specific step. Tools Needed You may need some or all of these tools and possibly others depending on your particular assembly: Socket Wrench Power Drill Standard Drill Bits Screwdriver Bit Flat File Blue Painter’s Tape Scissors Marker Measuring Tape Round File Level 7/16”, 9/16”, ½” Heads For fastening self tapping screws and drilling holes For drilling holes when mounting accessories #2 Phillips Head For taking down any sharp edges on sheet metal For marking mounting positions on shelving standards For cutting flexible grommet stripping to length For marking any holes to be drilled when mounting accessories For verifying shelf heights For deburring any holes you’ve drilled For help adjusting leveling legs and shelves Document Number:10010101-UM Page 6 of 42 How to use Self Tapping Screws Many of the parts of the product assemblies are attached with Self Tapping Screws that must be installed into predrilled pilot holes. You’ll need an electric screw gun or drill and a #2 Phillips Screw Driver to install these screws. 1-Observe the construction of the screws. Note that the point of the screw is shaped and operates like its own drill bit. Also note the length of the threaded shaft portion of the screw and that the head of the screw is a Type #2 Phillips. 2- Install the correctly sized Phillips screw driver bit into the chuck of the electric screw gun or drill. These screw driver bits are often magnetized to hold the head of the metal screw in place while driving it into the metal. Set the clutch of the drill to about half of its total range. If the clutch begins to slip before the screw is fully installed; increase the clutch setting slightly and try it again. 3- Start by placing a screw in the bit and then carefully align the point of the screw directly against one of the pre drilled pilot holes. Be sure to hold the drill straight and apply only enough pressure to guide the screw and keep it centered in the pilot hole. 4-Press the trigger of the drill to slowly begin the rotation of the screw. As the tip of the screw begins to drill into the surface of the metal, you may slightly increase the pressure against the screw. Keep even pressure on the screw as the screw point penetrates the surface of the metal and the threaded shaft of the screw is drawn into the newly made hole. Stop the drill when the head of the screw contacts the surface of the metal. Document Number:10010101-UM Page 7 of 42 Basic Steps Unpacking the Enclosure The Enclosure will arrive on a pallet or skid. It is recommended that the unpacking of the pallet or skid be done in close proximity to where the final installation will be. The Enclosure itself will be bolted to the pallet or skid through the bottom near the four corners. As shipped from the factory, the door will be closed and locked with any accessories and hardware that were small enough to be fit inside the Enclosure attached to the interior surfaces. Around the outside of the Enclosure there may be additional pieces that were too big to fit inside the Enclosure. This instruction manual should be attached to the top of the shipment. 1. Read this manual in its entirety paying particular attention to safety warnings throughout. 2. Remove the components from around the outside of the shipment and lay them aside. 3. The keys that are packaged with these instructions are for unlocking the Enclosure. Insert the keys into the lock in the lower portion of the door and use the finger bar to slide the door open. 4. Remove any accessories and hardware that are packaged inside the Enclosure and put them aside. 5. Using a ½ “ socket wrench, unbolt the Enclosure from the pallet or skid. Inspecting the Enclosure, Accessories, and Hardware Kits With all of the components laid out, take some time to identify all of the pieces you ordered. It is recommended that you become familiar with all of the parts before you begin the installation. 1. Refer to the product descriptions near the end of this manual for a basic list of components that are included in your assembly. Verify that all the components are present. 2. Inspect all of the pieces to ensure there aren’t any defects or damage that occurred during shipping. 3. Identify the hardware kits. These bags contain the fasteners that you will need for the final assembly of your product. They will be marked with their hardware kit number and contents. If you have access to a forklift or equipment lift to position your Countertop Enclosure WARNING: Enclosures are heavy. If you are not experienced in setting up or handling heavy equipment, it is strongly recommended that you hire professional equipment riggers. The process of assembling an Enclosure can be made simpler by supporting it with a forklift or powered equipment lift. With this method, you can assemble the product in its upright position, and you will not have to lay the Enclosure on its back to attach bottom pieces. To do this: 1. Adjust the width of your forks to be as wide as possible without interfering with the mounting holes that are at each corner of the Enclosure. 2. Align the forks with the Enclosure so that they are centered on it and so that the longer side of the bottom will span the gap between the forks (see pictures below). Document Number:10010101-UM Page 8 of 42 3. Adjust the height of the forks so that they sit level with the pallet or skid. 4. Make sure the Enclosure is not still fastened to the pallet or skid. WARNING: Have as many assistants as necessary help you to comfortably and safely slide the Enclosure off of the pallet or skid and onto the forks of your lift. 5. Raise the forks so that the bottom of the Enclosure is suspended approximately 30” above the floor. 6. Assemble the lower parts of the assembly onto the suspended Enclosure as per the instructions in the rest of the manual. Document Number:10010101-UM Page 9 of 42 Attaching the Leveling Legs to the bottom of an Enclosure 1. Identify the leveling legs from your hardware kit 75700. 2. They each have a 1/2” threaded shaft that inserts into the holes near the corners of the Enclosure through which it was bolted to the pallet or skid. 3. Place the securing straps over the threaded shaft of the inserts. These straps will later be attached to the floor or countertop to secure the unit. Document Number:10010101-UM Page 10 of 42 4. Thread the leveling feet into the holes evenly on all four corners. Installing wheels directly to the bottom of an Enclosure WARNING Disconnect any low voltage wiring or power cables that are connected to the Enclosure. Remove any loose items from the interior of the Enclosure, close and lock the roll up door. Have as many assistants as necessary help you to comfortably and safely lift the Enclosure down on its back. Move equipment on installed casters with extreme care. Sudden changes in direction, forces, or the surface over which the product is being moved can cause the unit to fall over. Never push on the sides. Casters are only for moving your unit to the desired location. Once in place, attach the leveling feet and secure the unit in place. 1. Remove the four leveling legs from the Insert Plates on the bottom. 2. Remove the 4- 5/16” bolts and washers from each Insert Plate. 3. Actuate the brake mechanisms on each wheel to keep the wheels from turning. Document Number:10010101-UM Page 11 of 42 4. Align the mounting plates of the Caster Wheels with the holes in the Insert Plates in bottom of the Enclosure. Loosely reinstall the 5/16” bolts with washers through the mounting plates of each Caster Wheel Assembly and into the Insert Plate. 5. Verify that the mounting plates of the Caster wheels are properly aligned the Insert Plates, and then carefully tighten each bolt until it is snug. Installing an Enclosure on a Table, Counter Top, or Wire Rack Shelf WARNING: Before attempting to install the Enclosure, inspect the supporting structure of the counter top, table or other horizontal surface and verify that it is strong enough to support the Enclosure complete with all of the equipment that is planned to be installed inside it. Determine how low voltage cabling will be routed to the Enclosure, if the cabling must be installed inside of the adjacent wall, it may be advisable to install the cabling first before installing the Enclosure. Determine how the Enclosure will be connected to an 110VAC power receptacle. If it is necessary to have power wiring installed inside of the adjacent wall, it may be advisable to install the cabling first before installing the Enclosure. If you are installing on a wire rack shelf, secure the Enclosure by attaching ½” x 13 bolts with fender washers through the wire rack shelf and into the insert plates. WARNING: Only 36” H Enclosures can be installed on Wire Rack Shelves. The Wire Rack Shelf must at least 48” wide and 30” deep. Before attempting to install the Enclosure, inspect the wire rack shelve unit and verify that it is assembled correctly and is rated to be strong enough to support the Enclosure complete with all of the equipment that is planned to be installed inside it. Verify that the wire rack shelve has been properly leveled. The wire rack shelve must be securely attached to a wall and should have leveling feet installed, NOT wheels. Installing an Enclosure on a wire rack shelve with wheels is not advisable due to the possibility of the shelving unit becoming unstable. The height of the shelf on which the Enclosure is to be installed should be set at no more that 30” high above the floor Document Number:10010101-UM Page 12 of 42 Securing an Enclosure to the Wall and Floor WARNING: This is a critical safety step. Enclosures should always be fastened to a secure structure to prevent tipping. 1. Remove the screws that attach the inner rear panel and remove the inner rear panel. 2. Note that there are columns of predrilled pilot holes in the outer back panel that are located to align with wall studs which are spaced at 16” intervals. Drill out the pilot holes to accommodate the fasteners that you are using to attach the Enclosure to the wall. These fasteners are not included in your hardware kit. Determine the appropriate fastener for the surface into which you will be securing the Enclosure. *Side omitted for clarity Document Number:10010101-UM Page 13 of 42 *Side omitted for clarity If your Enclosure is a 64” high model, you will need to remove two rear inner panels instead of one in order to access all of the wall attachment holes on the outer rear panel. 3. Other holes can be drilled through the outer back panel as needed. 4. Once the Enclosure is secured to wall structure, reinstall the rear inner panel. 5. The securing straps should be fastened to the floor with a ½” diameter fastener appropriate for the surface you will be securing it to. Document Number:10010101-UM Page 14 of 42 Relocating a bin box mounting bar inside of an Enclosure There are Bin Box Bars that mount to the back panel, and there are bin box bars that mount to the internal shelf standards on the sides of Enclosures. To move the Bin Box Bars that are mounted to the back panel: 1. Use a drill with a #2 phillips head bit to remove the self tapping screws that secure the bar to the back panel. 2. Hold the bar up to its new desired position to determine which of the pilot holes in the back panel line up with the holes in the bar. 3. Secure the outermost coincident holes with the same self tapping screws were previously removed. 4. Secure the remaining coincident holes. To move the Bin Box Bars that are mounted to the internal shelf standards: 1. Mark the new desired location of Bin Box Bar with a piece of tape. 2. Use a 7/16” socket wrench to loosen the two ¼” bolts that secure the Bin Box Bar to the internal shelf standards. It is easier if you do not completely remove the bolts from the channel strut nuts. 3. Slide the whole assembly to your new desired height. 4. Retighten the bolts with the socket wrench. Document Number:10010101-UM Page 15 of 42 Relocating a Multiple Outlet Strip 1. Consider the best orientation of the corded end of the strip in respect to where you will be plugging the cord into a power outlet. 2. Use a drill with a #2 phillips head bit to remove the self tapping screws that secure the strip to the back panel. 3. Hold the outlet strip across the back of the enclosure where it will work best in your application. It is recommended that if you are installing the strip near the bottom that you provide at least three inches below the bottom of the strip to provide space for larger power transformers. Use a level to confirm that the strip is level and mark the centers of the mounting holes on the back panel of the enclosure. 4. Use a self tapping screw alone to first pre drill each hole, then align the mounting holes in the strip with the new holes and install the self tapping screws with the washers to secure the strip. Document Number:10010101-UM Page 16 of 42 Installing cabling through cable path openings There are six Cable Path Openings on the 45” wide Enclosures with one on each of the right and left sides of the top near the rear, one on the right and left sides of the bottom panel near the rear and one on each side of the Enclosure near the back. The 72” wide Enclosures have an additional cable path opening in the center of the bottom panel. 1. To open any of the cable passage slots; remove the single screw at the end of the cover. 2. Slightly loosen the two screws on the sides of the cover so that the cover can be slid open as needed. Tip After installing the associated cabling, slide the cable path cover down to reduce the open size of the cable passage slot to a minimum area. Be sure to leave enough room so that the flexible grommet stripping can be installed on the edges around the cables. See the next section for detailed instructions on flexible grommet stripping. 3. Once the opening is the desired size, retighten the two screws on the sides of the cover. If you have Side Supports on your Enclosure, note that there are also two Cable Path Openings on each of the side supports one at the top and one at the bottom. There are additional cable passage slots through the rear corners of the rear Half Depth Lower Shelf. If your Enclosure has a Full Depth Lower Shelf, there are also additional cable passage slots through sides of the middle of the Shelf as well. The cable passage slots in the shelves do not have covers. Document Number:10010101-UM Page 17 of 42 Installing flexible grommet material around cable path openings WARNING: The edges of the cable path opening may be sharp. Use caution when installing the flexible grommet material. The flexible grommet material is included to protect against possible wear on wiring resulting from contact with the cable path openings. It is necessary to install this edging on every sheet metal opening that wiring passes through to protect your equipment and to prevent wiring from becoming damaged. *Note: This procedure assumes that you have already adjusted your cable path opening to the desired width. If you have not done this, please refer to the section entitled "Installing low voltage cabling." 1. Find the flexible grommet edging material from your hardware kit #75702. 2. Holding one edge of the flexible grommet edging start pressing it onto one of the four corners of the cable path opening. 3. Continue pressing the flexible grommet onto the edge of the cable path opening until it has completely covered all four sides. 4. Use shears to snip off any excess edging. Document Number:10010101-UM Page 18 of 42 Operating the roll up door and lock The Roll Up Doors are made of flat sections of aluminum extrusion with inner and outer hinge features on each edge. The hinge features are fitted over one another so that each door section is connected along its entire length to the next. The ends of each door section include self lubricating plastic guides which travel in the tracks along each side of the door openings. A balancer mechanism is installed behind the header of the enclosure which offsets the weight of the door to greatly reduce the amount of force needed to raise and lower it. Raise and lower the door slowly using only your finger tips on the finger bar. Use extra care particularly when raising the door; even a properly adjusted door balancer might have a slight upward or downward pull to it at some positions. Before lowering the door; check that both tracks and the area where the door will rest against the bottom of the enclosure are free from obstructions. The locking mechanism features two flat latching bars with ends that travel into slots in each of the tracks to secure the door. Insert the key and turn it clock wise (to the right) to lock the door; to unlock the door; turn the key counter clockwise to the left. Note that when the door is new; it may be necessary to apply a slight downward pressure or slight shaking motion on the finger bar to ease the engagement and disengagement of the lock bars. Always remove the key from the lock after unlocking the door and before raising the door. Connecting the Enclosure to 110VAC power If your enclosure has a multiple outlet strip you can route the cord from it out through one of the Cable Path Openings and plug it into a power receptacle. For permanent installations, an electrician can install a power receptacle inside of the enclosure. Document Number:10010101-UM Page 19 of 42 Optional Steps Modular Ventilation Systems for Enclosures overview Modular Ventilation Systems can be installed on the right or left sides inside of any Enclosure. This allows Enclosures that use only one modular ventilation system to have one side placed against a wall or in a corner. Each system can support up to eight fans. 72” wide Enclosures can be equipped with two separate ventilation systems with one system installed on each side. There are sections of slots at the middle of the top and bottom of each side of the Enclosures. The ventilation systems are designed to pull cooler air in from the lower slotted inlet sections, then the air flows across the warm equipment and is drawn into the ventilation system near the top, rear, center of the Enclosure by the fans which then exhaust the warmer air out through the upper outlet sections. Document Number:10010101-UM Page 20 of 42 Document Number:10010101-UM Page 21 of 42 WARNING: If you will be housing electronics in a PQS Enclosure or Cabinet, make sure that there is adequate ventilation to keep your electronics at a safe operating temperature Testing and Regulating the Internal Temperature of Enclosures or Lower Cabinet Maintain at least 12" of clear space along the entire sides of Enclosures with active intake and exhaust sections and at least 12" of clear space in front of the intake and exhaust sections of cabinet doors. Factors such as the ambient temperature in which the Enclosure is installed and the amount of electronic equipment installed inside it will affect the internal temperature. To test whether you have adequate ventilation, install the electronics you wish the Enclosure or Cabinet to house along with an attached thermometer, bring them up to operating temperature, make sure the fans are activated, close the doors, and check the internal temperature every 2 hours over a 24 hour period. If the operating temperature exceeds the optimum operating temperature recommended by your electronic equipment's manufacturer, stop the test. You have three options that will potentially lower the internal temperature of your Enclosure or Cabinet. You can expand your modular ventilation system (PQS ventilation systems can be expanded up to 8 fans per vent box reference the section, “Adding fans to a modular ventilation system”), you can relocate the Enclosure or Cabinet to a cooler area, or you can lower the ambient temperature in which the Enclosure or Cabinet is installed with air conditioning. Be sure to test the temperature again once you have made the necessary changes to verify that your electronics are running at the optimum temperature recommended by the manufacturer. Relocating a Modular Ventilation System from one side of an Enclosure to the other As shipped from the factory, all Enclosures that are equipped with ventilation systems have them installed on the right side. WARNING To relocate a ventilation system, first unplug the power cord, verify that the fans are off and remove the power cord from the cable clamps which attach the power cord to the inside of the enclosure. WARNING Be advised that the sheet metal edges of the ventilation systems may be sharp. Please handle them carefully. Document Number:10010101-UM Page 22 of 42 1. Remove the screws that attach the fan cover to the ventilation system and remove the fan cover with the cord. 2. Remove the screws from inside the ventilation system that attach it to the top of the enclosure. Document Number:10010101-UM Page 23 of 42 3. Remove the screws and nuts which attach the Ventilation System Blank Covers from the “new ventilation system location” side of the enclosure and remove the covers from the sections of lower inlet and upper exhaust slots on the side of the enclosure. 4. Reinstall the Ventilation System Blank Covers over the sections of inlet and exhaust slots on the “old ventilation system location” side of the enclosure. 5. Align the mounting holes in the top of the ventilation system with the pilot holes in the middle C Beam in the top of the enclosure on the “new ventilation system location” side and install the screws to secure it. 6. Reinstall the fan cover in the ventilation system. Install the power cord with the cord grommet in the slot of the fan cover and reinstall the fan panel cover in the ventilation system. Document Number:10010101-UM Page 24 of 42 7. Install the fan power cord in the cable clamps and plug the power cord back into an outlet. Verify that the fans are working and that air is flowing into the inlet slots and out of the exhaust slots. Installing an Enclosure flush into a wall Preparing the Enclosure WARNING Disconnect any low voltage wiring or power cables that are connected to the Enclosure. Remove any equipment or other loose items from within or on top of the Enclosure. Close and lock the roll up door of the Enclosure. A qualified carpenter, iron worker, and ventilation specialist/ air conditioning specialist should be consulted for expert knowledge to perform this installation. If your Enclosure has Leveling legs installed in the Insert Plates, remove them at this time. Remove the 4- 5/16” bolts and washers from each of the six insert Plates. Document Number:10010101-UM Page 25 of 42 Preparing the wall The bottom of the Enclosure has six pre installed insert plates that serve as hard points for attaching to structural members. The wall must be prepared with a structurally framed opening that is equal to the outer dimensions of the Enclosure you are installing. Please refer to the specifications of the Enclosure that you are installing and make sure that the structure is strong enough to support the Enclosure you are using along with all of the equipment that you are planning to install inside. The first 6” of the entire front edge of the bottom structure of the Enclosure must rest directly on the top of the bottom edge of the framed opening. Tip To install the Enclosure so that it is at the height of a standard desk, the top edge of the bottom section of the framed opening must be 30” above the finished floor on the outside of the wall. Document Number:10010101-UM Page 26 of 42 If the framed opening is made of steel Leave at least one side of the wall uncovered until after the Enclosure is installed. Drill eight 3/8” holes on the bottom section of the opening in two patterns of four holes each that will align with the four threaded holes of the insert plates in the two front corners of the bottom structure of the Enclosure. Install eight 5/16” bolts up through the steel channel of the bottom section of the framed opening into the insert plates on the bottom of the Enclosure. If the framed opening is made of wood or masonry If the opening is constructed of wood, remove the insert plates from the bottom front corners of the Enclosure and install two ½” lag bolts down through the ½” holes in each of the front corners from the inside of the Enclosure and thread them into the top of the bottom sill section of the framed opening. If the opening is made of masonry, install appropriate anchors into the bottom section of the framed opening for the bolts to thread into. Preparing the area behind the wall The floor of the area behind the wall will need to be prepared to accept the anchoring of a steel frame work to support the middle and rear sections of the Enclosure Please refer to the specifications of the Enclosure that you are installing and make sure that the structure is strong enough to support the you are using along with all of the equipment that you are planning to install inside. The steel frame can be constructed of channel strut or another type of structurally rated steel material and but it must be attached to the insert plates in the middle section and rear corners of the bottom of the Enclosure and also to the floor. The height of the top of the steel frame work must be level with the height of the bottom section of the framed opening. Ventilation behind the wall Survey the area behind the wall. It should be of large enough volume to allow adequate cooling of the heated air which is vented from inside the Enclosure through the exhaust vents. The area behind the wall must be either actively vented with an air conditioning system or vented with a passive ventilation system that cannot be closed. Please refer to the section titled Modular Ventilation Systems for Enclosures Overview. Tip Please refer to the section titled Modular Ventilation Systems for Enclosures Overview for more information on how the ventilation system works. Document Number:10010101-UM Page 27 of 42 Installing a VESA Monitor on a mount which is attached to an Enclosure interior pillar The VESA monitor mount will support monitors up to 24” in size that are either 75mm or 100mm VESA compatible. If the monitor has a desk top mount attached to it; you will need to remove it before proceeding. 1. Find a smooth clean surface which will not scratch the monitors screen and carefully set the monitor down with the screen side facing down. 2. Examine the monitor mount inside of the enclosure and become familiar with the basic components; The Stand Off Bracket assembly with a large five point knob attaches the Mount Arm to the pillar. The Mount Arm connects between the Stand Off Bracket assembly and the Tilt Head assembly and the monitor attaches to the flat section of the Tilt Head assembly. Note that the large five point knob on the Stand off bracket assembly secures the side to side position of the Mount Arm at the mounting point. Note that the two four point knobs on the sides of the Tilt Head assembly are used to adjust and secure the up and down position of the screen on the end of the Mount Arm. Note that large five point knob below the Tilt Head assembly is used to adjust and secure the side to side position of the screen on the end of the Mount Arm. 3. You will need to remove the Tilt Head assembly from the end of the Mount Arm and attach it to the VESA mounting holes on the back of your monitor. Hold the Tilt Head assembly to keep it from turning and unscrew and remove the large five point knob from below the Tilt Head assembly. Note that there is a rubber washer installed between the Tilt Head assembly and the end of the mount arm. 4. Note the pattern of four threaded holes on the back of the monitor. Place the flat section of the Tilt Head assembly on the back of the monitor and align one set of the eight holes on the Tilt Head assembly with the pattern of four threaded holes on the back of the monitor. The smaller pattern of four Document Number:10010101-UM Page 28 of 42 threaded holes on the back of the monitor are spaced at 75mm and the larger pattern is spaced at 100mm. 5. Install the appropriate screws through the holes in the Tilt Head assembly and into the four threaded holes on the back of the monitor. M4 X 8MM screws are supplied with you hardware kit # 75701. WARNING If the screws are too long they may damage the monitor. Make sure that the screws do not penetrate deep enough into the monitor to damage it. 6. Verify that the rubber washer is correctly installed and is aligned over the hole on top of the end of the Mount Arm. Carefully lift the monitor with the Tilt Head assembly installed and align the threaded in the bottom of the Tilt Head assembly with the hole on the end of the Mount Arm. Install the threaded shaft of the large five point knob up through the hole in the bottom of the end of the Mount Arm, through the rubber washer and screw it into the threaded in the bottom of the Tilt Head. 7. Turn the monitor and attach the video and power connectors, adjust the screen to the desired position and then tighten all of the securing knobs. Document Number:10010101-UM Page 29 of 42 Relocating a VESA Monitor mount which is attached to an Enclosure interior pillar Document Number:10010101-UM Page 30 of 42 Examine the monitor mount inside of the enclosure and become familiar with the basic components; The Stand Off Bracket assembly with a large five point knob attaches the Mount Arm to the pillar. The Mount Arm connects between the Stand Off Bracket assembly and the Tilt Head assembly and the monitor attaches to the flat section of the Tilt Head assembly. If you are just moving the mount, you can skip steps 1 and 2 below. 1. If the monitor is already attached to Tilt Head on the Mount Arm, you will need to remove it before relocating the Mount Arm. Turn the monitor and disconnect the video and power cables. Support the full weight of the monitor and unscrew and remove the large five point knob from below the Tilt Head assembly. Note that there is a rubber washer installed between the Tilt Head assembly and the end of the mount arm. 2. Find a smooth clean surface which will not scratch the monitor’s screen and carefully set the monitor down with the screen side facing down. 3. Remove the rubber washer from the end of the Mount Arm and set it aside. 4. Support the Mount Arm and use a Phillips screw driver to remove the four ¼” -20 screws which attach the Stand Off Bracket assembly to the pillar. Carefully reach into the slot adjacent to where the Stand Off Bracket assembly was attached to the pillar and support the Mounting Plate; remove the two small 6-32 screws which secure the Mounting Plate to the pillar and carefully remove the Mounting Plate from the slot in the Pillar. 5. Slide the Mounting Plate into the slot on the Pillar that will be the new mounting location and loosely reinstall the two small 6-32 screws which secure the Mounting Plate to the Pillar. Verify that the four threaded holes in the Mounting Plate are correctly aligned with the four holes in the Pillar, adjust as needed and then gently tighten the two small 6-32 screws. Document Number:10010101-UM Page 31 of 42 6. Support the Mount Arm, align the four holes in the Stand Off Bracket assembly the four threaded holes in the Mounting Plate and then reinstall the four ¼” -20 screws to secure the Stand Off Bracket assembly to the Pillar. *Monitor not shown 7. Verify that the rubber washer is correctly installed and is aligned over the hole on top of the end of the Mount Arm. Carefully lift the monitor with the Tilt Head assembly installed and align the threaded in the bottom of the Tilt Head assembly with the hole on the end of the Mount Arm. Install the threaded shaft of the large five point knob up through the hole in the bottom of the end of the Mount Arm, through the rubber washer and screw it into the threaded in the bottom of the Tilt Head. 8. Turn the monitor and attach the video and power connectors, adjust the screen to the desired position and then tighten all of the securing knobs. Document Number:10010101-UM Page 32 of 42 Relocating Low Voltage Cable Management Rings There are locations around the perimeter of every Enclosure’s inner panel and along the entire length of every C-beam on the top of all Lower Cabinets. Locate the patterns of pilot holes that are located diagonally from each other. 1. Decide the orientation in which you wish to mount your cable management ring. Remember to use an orientation in respect to the opening on the cable ring that will allow you to easily add or remove cabling in your desired equipment configuration. 2. Remove the two self tapping screws which secure the cable management ring to the rear panel. 3. Reorient the ring in its new desired configuration. 4. Use two self-tapping screws to secure two of the four slots on the cable management ring into the inner rear panel. Document Number:10010101-UM Page 33 of 42 Relocating an 18”W interior Wire Rack Shelf The 18” wide Wire Rack Shelf is preinstalled at the factory but can be removed and relocated as needed. 1. Note the two aluminum mounting clips that are secure with Self tapping screws that attach the 18” Wire rack shelf to the Inner Rear Panel of the Enclosure. 2. Using a drill with a #2 phillips head bit, remove the two 10-16 self tapping screws that pass through the mounting clips from the back panel 3. Hold the Wire Rack shelf up to its new desired location, and find the pilot holes in the Back Panel that best coincide with the new mounting location. 4. If none of the existing pilot holes are suitable, you can drill new pilot holes in the Back Panel. 5. Reinstall the two 10-16 self tapping screws through the clips and into the new pilot holes. Relocating a Multiple Outlet Strip 5. Consider the best orientation of the corded end of the strip in respect to where you will be plugging the cord into a power outlet. 6. Use a drill with a #2 phillips head bit to remove the self tapping screws that secure the strip to the back panel. 7. Hold the outlet strip across the back of the enclosure where it will work best in your application. It is recommended that if you are installing the strip near the bottom that you provide at least three inches below the bottom of the strip to provide space for larger power transformers. Use a level to confirm that the strip is level and mark the centers of the mounting holes on the back panel of the enclosure. 8. Use a self tapping screw alone to first pre drill each hole, then align the mounting holes in the strip with the new holes and install the self tapping screws with the washers to secure the strip which side will be optimal. Document Number:10010101-UM Page 34 of 42 Adjusting the height of a full length interior Wire Rack Shelf The full length Wire rack shelves have support brackets at either end which are secure to channels by means of bolts and Channel Strut nuts. WARNING Remove any equipment and items from the shelves. 1. Mark the new desired shelf height on the channels with a piece of tape. 2. Place a level on top of the shelf lengthwise. 3. Have someone assist you by holding the shelf up as you loosen the bolts with a socket wrench on the inside of the brackets. Do not loosen the bolts all the way. The Channel Strut nuts can slide inside the channels without removing the bolts completely. 4. Once the bolts are loose enough the shelf should be able to slide up and down with the nuts still inside the channels. 5. Lift the shelf to its new desired location. 6. Begin to tighten down the bolts once again making sure that channel strut nuts are still spanning the opening of the channel. 7. Verify that the shelf is level. 8. Tighten all of the bolts until the shelf is once again secure. Document Number:10010101-UM Page 35 of 42 Product Short Descriptions For complete descriptions of all items included in your assembly; please refer to the sections entitled Standard Features” and “Included Options” on the individual product information sheets. All product information sheets are available in PDF format on our website from the tool bar on the individual product pages or from our Product Resources page Mini Office Enclosure for Counter Tops 45W X 36H PN 81010 Installs directly on any counter top, table or inside of any commercial 48"W X 24"D wire rack shelving unit. Includes a locking Roll Up Door, a light, an 18"W Wire Rack Shelf, a 34"H Side Shelf System with a 18"W Side Shelf, a Modular Ventilation System with 2- Fans, an outlet strip, cable management rings, a VESA monitor mount, 4- Leveling Legs, 4-Bin Boxes 5 3/8"L x 4 1/8"W x 3"H and a 19"W Mounting Bar. Mini Office Enclosure for Counter Tops 72W X 36H PN 81011 Installs directly on any counter top or table. Includes a locking Roll Up Door, a light, an 18"W Wire Rack Shelf, a 34"H Side Shelf System with a 18"W Side Shelf, a Modular Ventilation System with 4- fans, an outlet strip, cable management rings, a VESA monitor mount, 4- Leveling Legs, 4-Bin Boxes 5 3/8"Lx4 1/8"Wx3"H, 4-Bin Boxes 7 3/8"Lx4 1/8"Wx3"H and 2-19"W Bin Box Mounting Bars. Mini Office Enclosure for Counter Tops 45W X 64H PN 81012 Installs directly on any counter top or table. Includes a locking Roll Up Door, a light, an 18"W Wire Rack Shelf, a 62"H interior Shelving System with 2- 36"W X 18"D Wire Rack Shelves and 1- 18"W Side Shelf, a Modular Ventilation System with 6 Fans, an outlet strip, cable management rings, a VESA monitor mount, 4Leveling Legs, 4-Bin Boxes 5 3/8"L x 4 1/8"W x 3"H and a 19"W Bin Box Mounting Bar Mini Office Enclosure for Counter Tops 72W X 64H PN 81013 Installs directly on any counter top or table. Includes a locking Roll Up Door, a light, an 18"W Wire Rack Shelf, a 62"H interior Shelving System with 2- 60"W X 18"D Wire Rack Shelves and 1- 18"W Side Shelf, a Modular Ventilation System with 8 Fans, an outlet strip, cable management rings, a VESA monitor mount, 4Leveling Legs, 9-Bin Boxes 5 3/8"Lx4 1/8"Wx3"H, 9-Bin Boxes 7 3/8"Lx4 1/8"Wx3"H and 2- 38"W Bin Box Mounting Bars. POS Kiosk Enclosure for Counter Tops 45W X 36H PN 81060 Kiosk installs directly on any counter top, table, or inside of any commercial 48"W X 24"D wire rack shelving unit. Includes a locking Roll Up Door, a light, an 18"W Wire Rack Shelf, an interior 34"H Side Shelf System with a 18"W Side Shelf, 1Modular Ventilation System with 2- Fans, an outlet strip, cable management rings, 2 front mounted POS terminal mounts that swing out, 4- Leveling Legs, 4-Bin Boxes 5 3/8"Lx4 1/8"W x 3"H and a 19"W Mounting Bar For complete descriptions of all items included in your assembly; please refer to the sections entitled Standard Features” and “Included Options” on the individual product information sheets. Document Number:10010101-UM Page 36 of 42 For complete descriptions of all items included in your assembly; please refer to the sections entitled Standard Features” and “Included Options” on the individual product information sheets. All product information sheets are available in PDF format on our website from the tool bar on the individual product pages or from our Product Resources page POS Kiosk Enclosure for Counter Tops 72W X 36H PN 81061 Kiosk installs directly on any counter top or table. Includes a locking Roll Up Door, a light, an 18"W Wire Rack Shelf, an interior 34"H Side Shelf System with a 18"W Side Shelf, 1- Modular Ventilation System with 4- fans, an outlet strip, cable management rings, 2 front mounted POS terminal mounts that swing out, 4Leveling Legs, 4-Bin Boxes 5 3/8"Lx4 1/8"Wx3"H, 4-Bin Boxes 7 3/8"Lx4 1/8"Wx3"H and 2-19"W Mounting Bars. POS Kiosk Enclosure for Counter Tops 45W X 64H PN 81062 Kiosk installs directly on any counter top or table. Includes a locking Roll Up Door, a light, an 18"W Wire Rack Shelf, a 62"H interior Shelving System with 2- 36"W X 18"D Wire Rack Shelves, one 18"W X 19"D Gal shelf, 1- Modular Ventilation System equipped with 6 Fans, an outlet strip, cable management rings, 2 front mounted POS terminal mounts that swing out, 4- Leveling Legs, 4-Bin Boxes 5 3/8"Lx4 1/8"W x 3"H and a 19"W Mounting Bar. POS Kiosk Enclosure for Counter Tops 72W X 64H PN 81063 Kiosk installs directly on any counter top or table. Includes a locking Roll Up Door, a light, an 18"W Wire Rack Shelf, a 62"H interior Shelving System with 2- 60"W X 18"D Wire Rack Shelves, one 18"W X19"D Gal shelf, 1- Modular Ventilation System equipped with 8 Fans, an outlet strip, cable management rings, 2 front mounted POS terminal mounts that swing out, 4- Leveling Legs, 9-Bin Boxes 5 3/8"Lx4 1/8"Wx3"H, 9-Bin Boxes 7 3/8"Lx4 1/8"Wx3"H and 2- 38"W Mounting Bars. Document Number:10010101-UM Page 37 of 42 Product Specifications: 45” W x 36”H x 30”D General Measurements: 45” W x 36”H x 30”D Interior Space: 43.42”L x 26.87”D x 28.06”H (to bottom of door housing) & 28.87”H (to bottom of vent box) or about 18.95 cubic feet Weight: 45 x 36 Countertop Bare = approx 220 lbs. Note: This weight does not include any options or accessories. Each Enclosure will probably contain at least 50 lbs. of accessories. Document Number:10010101-UM Page 38 of 42 Product Specifications 45” W x 64”H x 30”D General Measurements: 45” W x 64”H x 30”D Interior Space: 43.42”L x 26.87”D x 55.06”H (to bottom of door housing) & 56.87”H (to bottom of vent box) or about 37.17 cubic feet Weight: 45 x 64 Countertop Bare = approx 325 lbs. Note: This weight does not include any options or accessories. Each Enclosure will probably contain at least 50 lbs. of accessories. Document Number:10010101-UM Page 39 of 42 Product Specifications 72” W x 36”H x 30”D General Measurements: 72” W x 36”H x 30”D Interior Space: 70.39”L x 26.87”D x 28.06”H (to bottom of door housing) & 28.87”H (to bottom of vent box) or about 30.71 cubic feet Weight: 72 x 36 Countertop Bare = approx 365 lbs. Note: This weight does not include any options or accessories. Each Enclosure will probably contain at least 50 lbs. of accessories. Document Number:10010101-UM Page 40 of 42 Product Specifications 72” W x 64”H x 30”D General Measurements: 72” W x 64”H x 30”D Interior Space: 70.39”L x 26.87”D x 55.06”H (to bottom of door housing) & 56.87”H (to bottom of vent box) or about 60.26 cubic feet Weight: 72 x 64 Countertop Bare = approx 445 lbs. Note: This weight does not include any options or accessories. Each Enclosure will probably contain at least 50 lbs. of accessories. Engineering Drawing Reference Notes: To view and manipulate 3D models of any assembly; visit www.edrawingsviewer.com and download the free eDrawings viewer software, then open the eDrawings format files (.EASM) found in our Engineering Drawings folders. For more product dimensional specifications; download the Engineering Drawings folder for files in DWG, PDF and .EASM formats from on our website from the tool bar on the individual product pages or from our Product Resources page. Document Number:10010101-UM Page 41 of 42 Warranty Information LIMITED WARRANTY WHAT IS COVERED Practical Quality Systems, Inc. (PQS) guarantees manufactured products and each part or component thereof against all defects in material and/or workmanship. HOW LONG COVERAGE LASTS The warranty extends for a period of one year from the date of installation or initial use, provided that this period shall not exceed 18 months from the original date of shipment from PQS. WHAT IS NOT COVERED This warranty does not extend to products that have been subjected to neglect, accident or improper use, nor to units that have been altered by non-PQS technicians. WHAT PQS WILL DO PQS agrees to remedy any manufacturing defect either through replacement or repair at no charge, provided that the defective unit is returned, transportation prepaid, to PQS. HOW TO GET SERVICE In order to be eligible for service under this warranty you must return the warranty registration card within 30 days of purchase. • Authorization to return any product purchased from PQS for inspection must be obtained from an authorized Practical Quality Systems representative. All returns must be accompanied by a completed PQS return material authorization (RMA). An RMA will be generated by customer service department and must be pre-approved. We will inspect your product and contact you within 72 hours with the results. • Any product that has been repaired or replaced shall be similarly warranted on its repair or replacement for the remaining product warranty period or 90 days from the date of repair or replacement, whichever expires last. WARRANTY SCOPE No warranties other than those set forth in this section are given or implied with respect to the products furnished. PQS shall, in no event, be liable for consequential damages, for loss, damage or expense directly or indirectly arising from the use of the products, for any inability to use materials or from any other cause. YOUR RIGHTS UNDER STATE LAW This warranty gives you specific legal rights, you may have other rights which vary state to state. DAMAGE OR LOSS IN TRANSIT Title to goods sold passes upon delivery to the carrier. Practical Quality Systems accepts no responsibility for damage or loss in transit. Practical Quality Systems will use commercially reasonable efforts to assist the Buyer in initiating action against the carrier for such losses. The Buyer must notify Practical Quality Systems in writing and the carrier as soon as the loss or damage is known and in any event, no later than 4 days after delivery. • Practical Quality Systems shall not be responsible or liable for any delays, losses or damages caused by strikes, lockouts, labor trouble, acts of war, acts of God, public calamity, or other causes beyond its control, or acts not directly caused by Practical Quality Systems. Document Number:10010101-UM Page 42 of 42 Service and Support For answers to your questions, please email our technicians at [email protected], or call our office at (818) 993-1022 Monday to Friday, 9 a.m. to 5 p.m., Pacific Standard Daylight Savings Time. Mailing Address: Practical Quality Systems PO BOX 4624 Chatsworth, CA 91313 www.practicalqualitysystems.com