1
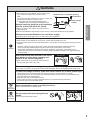
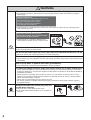
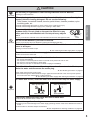
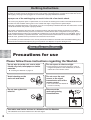
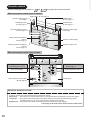
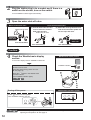
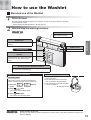
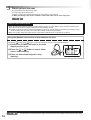
Instruction Manual
Washlet GL
Cautions and warnings . . . . . . . . . . 2
Precautions for use . . . . . . . . . . . . . 6
Efficient use . . . . . . . . . . . . . . . . . . . 7
Overview of features . . . . . . . . . . . . 8
Names of parts . . . . . . . . . . . . . . . . . 9
Before use . . . . . . . . . . . . . . . . . . . . 11
Introduction
How to use the Washlet . . . . . . . . . 13
Convenient functions . . . . . . . . . . . 15
● Adjusting the temperature . . . . . . 15
● Using the deodorizer . . . . . . . . . . 16
Energy Saver function . . . . . . . . . . 17
● Using the Energy Saver timer . . . 17
Operation
TCF891G/GE/SW
• Cleaning the main Washlet unit, seat and lid . .20
• Cleaning between the main Washlet unit
and the toilet . . . . . . . . . . . . . . . . . . . . . . . . . .22
● Periodic cleaning . . . . . . . . . . . . . 23
Cleaning
Cleaning the Washlet . . . . . . . . . . . 19
● Before cleaning . . . . . . . . . . . . . . 19
● Daily cleaning . . . . . . . . . . . . . . . 19
● Thorough cleaning . . . . . . . . . . . . 20
• Cleaning the mains plug . . . . . . . . . . . . . . . .23
• Cleaning the deodorizer filter . . . . . . . . . . . . .23
• Cleaning the wand . . . . . . . . . . . . . . . . . . . . .24
• Cleaning the water supply filter . . . . . . . . . . .25
Settings
Preventing damage from freezing and
measures for long-term disuse . . . . . 29
Troubleshooting . . . . . . . . . . . . . . . . . . . 34
Specifications . . . . . . . . . . . . . . . . . 39
Troubleshooting
¢ Thank you very much for purchasing this Washlet. Please read
this manual carefully and use the Washlet correctly.
Keep this instruction manual for future reference.
¢ "Washlet" is a registered trademark of TOTO.
Changing settings . . . . . . . . . . . . . 27
● Setting whether or not the remote
control makes sound . . . . . . . . . . 27
● Setting automatic operation of the
standard deodorizer . . . . . . . . . . . 27
● Making the Power Deodorizer work
automatically . . . . . . . . . . . . . . . . . 28
Warranty . . . . . . . . . . . . . . . . . . . . . . 40
Important User Guidance Information . . 41
Cautions and warnings
Always observe these warnings.
Please read these cautions and warnings carefully and use the equipment correctly.
Follow all safety precautions and warnings.
● The meanings of these indications are as follows.
WARNING
When this appears next to a topic, this indicates that misoperation
could result in death or serious injury.
CAUTION
When this appears next to a topic, this indicates that misoperation
may result in injury or physical damage.
● The following symbols are used to classify and explain instructions that must be followed.
Symbol example
Meaning of symbol
The
symbol indicates something that is prohibited.
The
symbol indicates something that must be done.
● This equipment is Class 1, so it is necessary to attach it to an earthed connection.
● Install this equipment close to a mains socket.
● This equipment is not to be used by any person who has reduced physical, sensory or mental abilities (including
children), nor is it to be used by any person who lacks sufficient experience or knowledge. However, such persons may
use the equipment when a person who takes responsibility for their safety provides supervision and direction.
Children must be supervised to make certain that they do not play with the equipment.
● Use the new hose set included with this equipment. Do not reuse an old hose set.
WARNING
Do not wet the main Washlet unit or mains plug with water or cleaning fluid.
Do not wet
● Doing so could cause fire or electric shock.
Since this is electronic equipment, do not locate it in a place where it might be
splashed or otherwise become wet. Likewise, do not locate it in a humid place
where water could drip onto the surface of the Washlet. When using it in a
bathroom, install a ventilation fan or ventilation opening, so that the bathroom
has sufficient airflow.
Install the Washlet at least 0.6 m away from any bathtub.
● Failure to observe this caution may result in fire or electrical shock.
Required
2
Prepare the socket for the electrical wiring as follows.
● Failure to observe this caution may result in fire or electrical shock.
a. Provide electric current to the socket (device) using a differential residual electric current device
(DDR) with a released current that does not exceed 30 mA.
b. Locate the socket (device) and its wiring plug at least 0.6 m from the outside edge of a shower
chamber or bathtub.
› Confirm that the wiring for items a and b above has been completed. If the wiring has not been
completed, request completion from the business that installed the unit.
WARNING
Confirm that the earth wire has been installed properly.
● If the earth wire is not installed, electric shocks could
occur if there is a malfunction or a short circuit.
Note:
Use copper wire with a diameter of 1.6 mm or more and
with an earth resistance of 100 Ω or less.
› If the earth wire has not been installed, request
installation from the business that installed the unit.
Ventilation fan or ventilation opening
Circuit board
Earth leakage
breaker
0.60 m
● Failure to observe this caution may result in fire or
electrical shock.
›Follow the installation requirements for the country in which the Washlet is being installed.
Always connect the Washlet to the cold water supply.
● Failure to do so could cause burns or malfunction of the equipment.
Introduction
Always insert the electrical cord completely
into the socket (220-240 V AC, 50 Hz).
Be careful to prevent low-temperature burns.
● When seated on the Washlet for a long time, set the seat temperature to "off".
● Another person should turn the seat temperature to "off" before the following types of people use the
Washlet.
Required
• Children, elderly and other people who cannot adjust the temperature suitably themselves.
• Sick or physically disabled people and others who might not be able to move freely.
• People who have taken medication that causes drowsiness (sleep aids, cold medicine, etc.),
people who have drunk much alcohol, extremely fatigued people and others who might fall asleep
unintentionally.
Remove dust that has adhered to the mains
plug blades or other parts regularly and
insert it in the socket completely.
For the U.K.
● Dust could cause fire or electrical shock. Remove
the plug and wipe it with a dry cloth.
When removing the mains plug, always hold and pull the plug itself.
● If you pull on the cord, the plug and cord could be damaged, and fire or electrical shock could result.
To reduce the danger of burns, death from electric shock, fire or other human injury:
- Close supervision is necessary when this product is used by or near children or invalids.
- Use this product only for its intended use as described in this manual. Do not use accessories not
recommended by the manufacturer.
- Keep the cord away from heated surfaces.
- Connect this product to a properly earthed socket only. See the Earthing Instructions.
- The tank should only be filled with water.
Never disassemble, repair or modify the device.
Do not
disassemble
● This could cause fire or electric shock.
For the U.K.
Do not
touch with
wet hands
Do not remove the mains plug with wet
hands.
● This could cause electric shock.
3
WARNING
Do not continue to use Washlet that is broken or malfunctioning.
● In the following situations, disconnect the mains plug and close the water shut-off valve to stop the
water supply.
Possible malfunctions
● Water is leaking from plumbing or the main unit.
● The Washlet has a crack or a break.
● There is a strange sound or smell.
● Smoke is coming from the Washlet.
● The Washlet is unusually hot.
● Continued use of a malfunctioning or broken unit could cause fire, electric shock, or flooding of the
room containing the unit.
Do not do anything that could damage the power cord or seat cord.
Do not pull, twist, excessively bend,
intentionally damage, alter or heat the cords.
Do not put heavy items on them.
For the U.K.
● Continued use of a unit with a damaged cord
could cause fire, electric shock, or a short circuit.
Prohibited
Do not use a loose mains socket.
● This could cause fire or electric shock.
Do not use this product with any power supply other than specified (220-240 V AC, 50 Hz).
● Failure to observe this caution may result in fire or electrical shock.
Do not use sockets or wiring equipment exceeding the rated values.
● Use of multi-prong mains adapters and other actions that exceed the rated values could cause fire from
excess heat.
Use only tap water or potable well water (groundwater).
● Use of other water could cause skin inflammation or other problems.
To reduce the danger of burns, death from electric shock, fire or other human injury:
- Never operate this product if it has a damaged cord or plug, if it is not working properly, if it has been
dropped or damaged, or if it has been dropped in water. Return the product to TOTO Europe GmbH for
examination and repair.
- Never block the air openings of the product or place it on a soft surface, such as a bed or a couch,
where the air openings could be blocked. Keep the air openings free of lint, hair or a similar material.
- Never use it while sleepy or drowsy.
- Never drop or insert anything into any opening or hose.
- Do not use outdoors or operate where aerosol (spray) products are being used or where oxygen is
being administered.
Always disconnect the mains plug from the
socket when cleaning.
Unplug first
4
● Failure to do so could cause electric shock.
› Use of the "Wand Cleaning button" is an exception to
this rule.
For the U.K.
CAUTION
Do not bring lit cigarettes or other burning materials near the Washlet.
Flammable
● Doing so could cause fire.
When cleaning plastic parts, including the main Washlet unit, use diluted (pHneutral) kitchen cleaning detergent. Do not use the following:
Toilet cleaner, household cleaner, benzine, paint thinner, cleanser powders, nylon
scrubbing pads, etc.
Do not subject the main Washlet unit to strong force or a
sudden shock. Do not climb on the seat, the toilet lid or any
other part of the main Washlet unit. Do not put heavy objects
on it.
● Injury could result if it breaks or the main Washlet unit becomes dislodged and falls.
Introduction
● These could damage the plastic or cause cracks, which could lead to injury.
● These could damage the water supply hose, resulting in water leaks.
Do not lift the Washlet by the seat or toilet lid.
Prohibited
● Injury could result if the main Washlet unit becomes dislodged and falls.
Do not detach the drain valve with built-in water filter while the water shut-off
valve is still open.
● Doing so will cause water to spill.
► See "Cleaning the water supply filter" on page 25
Do not bend or crush the water supply hose.
● This could cause a water leak.
To reduce the danger of death from electric shock:
-
Do not use while bathing.
Do not place or store the product where it could fall or be pulled into a tub or sink.
Do not put in or drop into water or other liquid.
Do not try to recover it if it has fallen into water. Unplug it immediately.
If the Washlet will not be used for a long time, close the water shut-off valve,
drain the water and disconnect the mains plug.
► See "Draining the water" on page 31
● For safety, disconnect the mains plug.
● Run water through the Washlet before using it again because water left in the unit may have spoiled
and could cause skin inflammation or other problems.
► See "Restoring the water supply after draining the Washlet" on page 33
If a water leak occurs, close the water shut-off valve and stop the water supply.
Wall-mounted toilet valve
Floor-mounted toilettvalve
Water shut-off valve
Water shut-off valve
Required
Turn clockwise
Turn clockwise
Thoroughly tighten the drain valve with built-in water filter.
● Failure to do so could cause a water leak.
Prevent damage from freezing.
● Freezing could cause damage to the water supply plumbing and the inside of the Washlet and result in
a leak.
● Use a heater or otherwise keep the toilet warm.
► See "Preparation for freezing conditions" on page 29
5
Earthing Instructions
This product must be earthed. If an electrical short circuit occurs, earthing reduces the risk of electric shock by
providing an escape wire for the electrical current. This product is equipped with a cord that has an earth wire and an
earthing plug. The plug must be plugged into a socket that is properly installed and earthed.
Improper use of the earthing plug can result in the risk of an electric shock.
If the cord or plug requires repair or replacement, do not connect the earthing wire to either of the flat blade terminals.
The earth wire has insulation that is green on the outside and might or might not have yellow stripes.
Check with a qualified electrician or serviceman if you do not completely understand the earth wire instructions or have
a doubt about whether the product is properly earthed.
This product is equipped at the factory with a specific electrical cord and plug that allow connection to a suitable
electrical circuit. Confirm that the product is connected to a socket with the same configuration as the plug. Do not
use an adapter with this product. Do not modify the included plug. If the plug and socket are not compatible, have a
suitable socket installed by a qualified electrician. If the product must be reconnected for use with a different type of
electrical circuit, qualified service personnel must conduct the reconnection.
If it is necessary to use an extension cord, use only a three-wire extension cord that has a three-blade earthing plug
and a three-slot socket that accepts the plug on the product cord. Replace or repair a damaged cord.
Save these instructions.
Precautions for use
Please follow these instructions regarding the Washlet.
Do not wipe the main unit, seat or toilet
lid with dry cloth, toilet paper or similar
materials.
► "Cleaning the Washlet" on page 19
Avoid urinating on the
main unit and wand.
Do not expose to direct sunlight.
● Direct exposure could cause changes in colour or
irregular temperature in the heated seat, as well as
malfunction of the remote control.
Do not cover the seat
sensor or the signal
transmission area of the
remote control.
● This could cause the Washlet to
function incorrectly.
Do not lean against the
toilet lid.
Disconnect the
mains plug during
thunderstorms.
For the U.K.
Use radios and similar devices at a distance from the Washlet.
● The Washlet could cause interference to the radio signal.
6
Efficient use
Skilfully save energy to protect the global environment.
Using the timer-based Energy Saver
Close the toilet lid
3-hour Energy Saver
in use
By closing the toilet lid, less
warmth escapes from the seat
surface, conserving energy.
Set the temperature lower
Set the Operation on/off button to "off"
when the Washlet will not be used for a
long time
To conserve energy set the
temperature just high enough so
that the seat does not feel cold.
► See page 15
When going out, for example,
Introduction
Once the Energy Saver is
set, the warm water and seat
heaters will turn off at the same
time every day to save energy.
The duration of the Energy
Saver can be set to 3, 6 or 9
hours.
► See page 17
Timer-based Energy Saver in use
button to "off" to
set the
conserve energy.
► See page 12
7
Overview of features
Washlet functions
Page
Rear wash
● Wash the rear.
13
Front wash
● Use as a bidet for women.
13
Washing position adjustment
● Adjust the wand position forward and backward.
13
Water pressure adjustment
● Adjust the water pressure.
13
Oscillating wash
● Moves the wand forward and backward for thorough
cleaning over a wide area.
13
Amenities
Page
Heated seat
● Warms the toilet seat.
Temperature adjustment
● Adjust the temperature of the water and the seat.
15
Deodorizer
● Eliminates odours inside the toilet.
16
Power Deodorizer
● Eliminates odours inside the toilet with even greater
suction power.
16
Automatic Power Deodorizer
● Automatically operates the Power Deodorizer when a
person leaves the seat.
16
Remote control
● Control the Washlet from a comfortable position.
10
Seat sensor
● Makes various functions operate when a person sits on
the seat.
13
Soft closing
● Closes the seat and toilet lid slowly.
Energy Saver functions
-
Page
Timer-based Energy Saver
● Once set, the warm water and seat heaters will turn
off at the same time every day to save energy. (The
duration of Energy Saver can be set to 3, 6 or 9 hours.)
17, 18
Operation on/off button
● By turning this button "off", the operation of the heated
seat and other functions can be stopped for thorough
energy conservation.
12
Cleaning features
8
-
Page
Seat and toilet lid attachment and
removal
● The seat and toilet lid can be removed easily to make
cleaning simple.
20, 21
One-touch attachment and removal of the
main unit
● The main Washlet unit can be removed with a simple
operation allowing easy access to the back of the toilet
for cleaning.
22
Self-cleaning
● The wand tip is automatically cleaned thoroughly before
and after washing.
-
Wand Cleaning on/off button
● The wand can be extended without emitting water for
easy cleaning.
24
Names of parts
Product stock number and type
printed here.
Water drainage plug
► See pages 31 and 32
Cap
Washlet release button
► See page 22
Washlet main display section
Washlet main operation section
REAR button ► See page 14
"POWER" indicator
Operation on/off button
► See page 12
"ENERGY SAVER" indicator
Introduction
Remote control signal
receiver
FRONT button ► See page 14
Mains plug
Toilet lid
› Use when the remote control battery is dead,
for example.
For the U.K.
Remote control
► See page 10
Toilet lid
bumper
Remote control
holder
Drain valve with built-in
water filter
► See page 25
Seat sensor
► See page 13
Wand (wand head)
► See page 24
Water shut-off valve
Floor-mounted toilet
valve
Water supply hose
Deodorizer cartridge
Main Washlet unit
Heated seat
(The illustration shows a wall-mounted toilet.)
Seat cushion
Deodorizer filter
► See page 23
9
Remote control
● Raised markings are included on
and
for people who cannot see well.
When the remote control cover is closed
STOP button ► See page 13
Remote control signal
transmitter
REAR button
► See page 13
Oscillating button
► See page 13
FRONT button
► See page 13
Power Deodorizer button
► See page 16
Water pressure adjustment
buttons
► See page 13
Washing position adjustment
buttons
► See page 13
Remote control signal
transmitter
Remote control display
Remote control cover
When the remote control cover is open
Energy Saver setting
► See pages 17 and 18
Temperature settings
► See page 15
Timer on/off button
Water Temperature buttons
Seat Temperature buttons
Wand Cleaning on/off button
► See page 24
Inside panel
About the electronic sounds
● When a remote control button is pressed and the main Washlet unit receives a signal, the unit produces an
electronic sound. This unit uses three types of electronic sounds.
Short beep .......Sounds when a remote control button is pressed and the main Washlet unit receives a signal.
Long beep ........Sounds when the STOP button is pressed, when any function (timer-based Energy Saver,
oscillating wash, etc.) is turned off or when the setting mode is exited.
Double beep .....Sounds when the Water or Seat Temperature is set to their "high" settings.
► See page 27 for how to turn off the remote control sound.
10
Before use
For the U.K.
Floor-mounted toilet valve
Introduction
Preparation
1
Put batteries in the remote control.
(1)
(1) Remove the remote control from the remote
control holder.
• Grasp the sides of the remote control with both hands
and lift straight up.
Remote control
holder
(2) Open the battery cover on the back of the remote (2)(3)(4)
control.
Back
(3) Insert two AA batteries.
(4) Close the battery cover.
Tip
Close
1
Open
Battery cover
● When the batteries are correctly installed, the remote
control display should appear as in the illustration.
Two AA batteries
Remote control display
About the batteries
● Please use alkaline batteries.
Observe the following precautions to keep batteries from splitting or leaking.
● When replacing them, use two new batteries of the same brand.
● Remove the batteries when not using the remote control for a long time.
● Do not use rechargeable batteries.
Tip
1
● When changing the batteries or cleaning the remote control, turn the
button in the Washlet
main operation section off.
● When changing the batteries, the temperature settings, timer-based Energy Saver and other
settings might be lost. If this should occur, please reset the settings. (For example, even though the
timer-based Energy Saver was on before, it could be off after replacing the batteries.)
11
2
Plug the mains plug in to a socket and if there is a
switch on the socket, turn on the switch.
For the U.K.
● The "POWER" indicator lights automatically.
3
Open the water shut-off valve.
Wall-mounted toilet valve
Water shut-off valve
Floor-mounted toilet valve
(1) Turn the water shut-off valve
cover to remove it from the
water shut-off valve.
Water shut-off valve
(2) Mount the cover by the hole in its
side on the end of the spindle and
use it to open the valve.
Check for
water leak
Check for
water leak
Turn anticlockwise
Turn anticlockwise
Turn anticlockwise
Confirm
4
Check the Washlet main display
section.
Washlet main display section
● Is the main display section "POWER" indicator lit?
If the "POWER" indicator is not lit, none of the
functions can be used.
(Excluding when Energy Saver is in use.
► See page 18)
"POWER" indicator
Press the
button in the Washlet main
operation section.
(The "POWER" indicator lights.)
Tip
1
Turning off the power
Press
Washlet main operation section
to turn off the power.
● The "POWER" indicator goes off.
Tip
12
1
Please see "Adjusting the temperature" for instructions about turning the seat on and off and
adjusting the temperature. ► See page 15
How to use the Washlet
1
Standard use of the Washlet
2
Sit on the seat.
The seat sensor detects the presence of a person and all the functions become operative.
● The deodorizer starts.
Please test the Power Deodorizer. ► See page 16
Use and stop the washing functions.
Tip
2
REAR button
Use to wash the rear.
STOP button
FRONT button
Oscillating wash
Use as a bidet.
Operation
This button stops rear and front
washing.
Water pressure adjustment
buttons
Use these buttons to adjust the water
pressure as you like (there are five
levels).
Washing position adjustment buttons
Use these buttons to adjust the washing position as you
like (there are five positions).
About the seat sensor
Other convenient functions
Oscillating wash
This function moves the wand backward and
forward to wash thoroughly over a larger area.
(1) Press the
select.
or
button to
● The seat sensor detects when a
person sits down.
● The seat sensor puts out Infrared
rays, as shown in the illustration.
● The seat sensor might not work well
in some conditions.
► See page 34-38
(2) Press
once.
● This starts the oscillating wash.
(3) Press
again.
● This stops the oscillating wash.
Tip
2
Please sit fully on the seat.
By doing so, the washing position will be more accurate and it is less likely that water will spray out
from the Washlet.
13
3
Stand up from the seat.
The Automatic Power Deodorizer starts.
● It stops after about two minutes.
● Water is emitted from around the wand into the toilet for a few seconds.
› Water remaining in the wand is emitted so that fresh water can be used every time.
Tip
1
Please be aware of these points
● When the Washlet is washing (when the Wand Cleaning button is used), water comes out of the left side of the
wand. This is necessary for proper functioning and is perfectly normal.
› If water continues to come out when the Washlet is not being used for washing, something is probably wrong.
Close the water shut-off valve, and contact the installer or seller of this Washlet.
● Water in the warm water tank expands and is sometimes emitted from the right side of the wand.
Using the Washlet if the remote control batteries are dead
● Press the
button or the
button in the main operation section to use the wash function.
(1) Confirm the POWER indicator in the main
display section is on.
(2) Press the
or
button to select either
rear or front washing.
(3) Press the same button again to stop
washing.
Tip
14
1
The Automatic Power Deodorizer might not function if the time seated is brief (40 seconds or less).
Convenient functions
Adjusting the temperature
● The temperature of the warm water and the seat can be adjusted with the remote control. Please
set them to the temperatures you prefer.
1
Open the remote control cover.
Remote control cover
2
Adjust the temperature.
Tip
Operation
and
● Use the
buttons to adjust the temperature
of the warm water and the seat. Each setting has five
levels.
button until all the bars in the appropriate
Press the
level display disappear to turn off either the warm water
heater or the seat heater.
2
Level display
Water Temperature buttons
Use these to adjust the warm water
temperature (five levels).
Seat Temperature buttons
Use these to adjust the seat
temperature (five levels).
Tip
2
The warm water and seat temperature settings might be lost when the remote control
batteries are changed. Please reset the settings if necessary.
15
Using the deodorizer
● The three deodorizer functions include the standard deodorizer, the Power Deodorizer and the
Automatic Power Deodorizer.
Using the standard deodorizer and the Automatic Power Deodorizer
The standard deodorizer works when someone sits on the seat.
● When someone gets up off the seat, the Automatic Power Deodorizer works, removing odour from
inside the toilet.
1
Sit on the seat.
The standard deodorizer starts.
2
Tip
1
Get up off the seat.
The Automatic Power Deodorizer starts.
It stops automatically after about two minutes.
Tip
2
► See pages 27 and 28 for how to turn off the standard deodorizer or Automatic Power Deodorizer.
Using the Power Deodorizer
Use this function when seated to increase the suction power and remove unwanted odours
from the toilet.
Tip
1
3
Press
control.
on the remote
The Power Deodorizer starts.
1
To stop the Power Deodorizer
Press
again.
Standard deodorizer power resumes.
16
Tip
4
Tip
1
The standard deodorizer is set "on" by default.
Tip
2
Tip
3
● The Automatic Power Deodorizer is set "on" by default.
● The Automatic Power Deodorizer might not function if the time seated is brief (40 seconds or
less).
The Power Deodorizer will not work if no one is sitting on the toilet. However, the Power Deodorizer
button will function for about two minutes after a person gets up off the seat.
Tip
4
If a person stands up without pressing the
about two minutes.
button, it will stop automatically after
Energy Saver function
Overview of the Energy Saver timer
● Once the Energy Saver is set, the warm water and seat heaters will turn off at the same time
every day to save energy. The duration of the Energy Saver can be set to 3, 6 or 9 hours.
n For example, follow these steps to set Energy Saver to turn off the heaters from 1 a.m.
to 7 a.m. (six hours)
(1) Press
While Energy Saver is
working
at 1 a.m.
The warm water and seat heaters
turn off.
(2) Select "6" for the Energy
Saver duration.
Washlet main display section
0:00 1:00
Setting completes.
6:00
18:00
Operates at the set temperatures.
7:00
Lights (Green)
Washlet main display section
Operation
While operating the
Washlet
12:00
Lights (Blue)
Using the Energy Saver timer
Timer on/off button
Remote control display
Remote control cover
17
Conserving energy using the Energy Saver timer
Example: Setting the Energy Saver to turn off from 1 a.m. to 7 a.m. (6 hours)
1
At the time that you want the Energy
Saver to start every day (1 a.m.), press
button on the remote control.
the
Display
The Energy Saver starts.
● "Timer" and "Saving Time" appear on the remote control display.
Tip
2
1
Press the
hours.
button to set it to 6
Washlet main display section
The setting is complete.
● "6 hrs." appears on the screen.
● When the Energy Saver timer is working, the "ENERGY
SAVER" indicator in the main display section lights
green.
Lights
(Green)
Changing the Energy Saver duration
● This can be set to 3, 6 or 9.
1
Press the
button.
● Each press of the button cycles through the settings 3,
6, 9 and off (nothing appears on the display when off).
Select the setting for the duration you want.
OFF
(Blank)
The setting change is complete.
› When you want to change the duration setting (3, 6 or 9 hours),
reset the Energy Saver at the starting time you desire.
Stopping the Energy Saver timer
1
The Energy Saver function is turned off.
● The green "ENERGY SAVER" indicator is extinguished,
and the blue "POWER" indicator lights in the main
display section.
Tip
18
Blank
Press the
button until "Timer"
and "Saving Time" disappear from
the display.
1
Washlet main display section
Lights
(Blue)
The heaters can still be used when the Energy Saver timer is working.
● Even when the Energy Saver timer is operative, the warm water and seat heaters will work
temporarily when someone sits on the seat.
● It takes about 15 minutes for the seat to warm up.
● It takes about 10 minutes for the water to become warm.
To change the starting time for the Energy Saver, turn off the Energy Saver timer once, and
the press the
button again at the time that you want it to start every day.
Cleaning the Washlet
Before cleaning
Each part can be detached, allowing thorough cleaning.
Attention!
● Always disconnect the mains plug from the socket when cleaning.
› Use of the "Wand Cleaning button" is an exception to this rule.
Mains plug
Seat and toilet lid
(removable)
► See pages 20 and 21
For the U.K.
Main unit
(removable)
► See page 22
Floor-mounted
toilet valve
Water shut-off
valve
Wand
(Can be extended without emitting water)
► See page 24
Drain valve with built-in water filter
(removable)
► See page 25
Deodorizer filter
► See page 23
Daily cleaning
Wipe with a soft wet cloth.
For the U.K.
Cleaning
1
Cleaning the main unit, seat and lid
● After wetting a soft cloth with water, wring it out
thoroughly and then use it to wipe the Washlet.
Tip
2
Cleaning when the Washlet is very dirty
(1) Wipe with a soft cloth dampened with diluted kitchen cleanser (pH neutral).
(2) After cleaning with the cleanser, wipe again with clean water.
Wipe away any toilet cleanser that spills on the Washlet
● After wiping with a soft cloth dampened with water, wipe away any remaining droplets.
Attention!
When cleaning inside the toilet with cleanser
● When cleaning inside the toilet with toilet cleanser, disinfectant or similar substances, flush away the cleaning
substances as quickly as possible (within three minutes), and then leave the seat and lid open. In addition, be sure
to completely remove any cleanser remaining on the toilet.
(If vapours from toilet cleansers or similar substances enter the main Washlet unit, this could lead to malfunction.)
Tip
2
● Since the Washlet is made of plastic, do not wipe it with a dry cloth, toilet paper or any similar
material. Doing so could cause scratches.
● The Washlet is an electric appliance, so be very careful to avoid letting water get inside it.
Thoroughly wipe away any cleanser left in gaps between the main unit and the toilet.
Do not forget to clean the seat sensor and remote control transmission section!
If these parts become dirty various Washlet functions might stop working.
► See pages 9, 10, 13 and 34-38
19
Thorough cleaning
Cleaning the main Washlet unit , seat and lid
● The seat and lid can be detached, allowing thorough cleaning.
Detaching the seat and lid
1
2
Lever
Disconnect the mains plug.
(2)
› For safety, disconnect the mains plug before
removing the seat and lid. In addition, be careful to
avoid splashing water on the disconnected mains
plug.
Open the lid as shown in the
illustration, pull the lever at the
bottom left outwards and then
remove the lid.
Lift with the lever
pulled outwards
(1)
› Do not use the seat when the lid is removed.
Tip
3
1
(1)
Raise and detach the seat as shown
in the illustration.
(2)
› Detach the seat by grasping it with both hands and
lifting.
› The length of the seat cord is about 8 cm.
› Do not forcibly pull on the seat. (Doing so could
break the cord.)
Tip
1
4
Place the detached seat on top of
the toilet as shown in the illustration.
5
Clean the main Washlet unit , seat
and lid.
Seat cord
› The length of the seat cord is about 8 cm.
› Do not forcibly pull on the seat. (Doing so could
break the cord.)
About 8 cm
► To clean these parts, follow the instructions in "Daily
cleaning" on page 19.
Tip
20
1
● To avoid damage to the detached seat and lit, set them aside carefully after detaching them.
● When the seat and lid are detached for cleaning, do not detach the main Washlet unit . (Dropping
any of them on the floor or in the toilet could cause malfunction.)
Reattaching the seat and lid
1
Align the seat with the seat pin on
the right side and attach it as shown
in the illustration.
Push the seat on the seat pin while aligning it by
shifting it backwards and forwards.
› Hold the seat with both hands when attaching it.
› Do not push the seat in diagonally or with
excessive force.
› Make sure the seat cord is not twisted when you
reattach the seat and lid.
Notch
(1)
Seat pin
Seat pin
(2)
2
With the lever at the bottom left in
the outwards position, reattach the
lid as shown in the illustration.
Close the seat
› Hold the lid with both hands when attaching it.
› Do not push the seat in diagonally or with
excessive force.
Seat pin
4
Confirm that the lever has returned
to its inwards position.
Cleaning
3
Push onto the seat pins
● If it is not in the inwards position, grasp the lid and push
it until you hear a click.
Connect the mains plug.
Seat pin
Close the lid
Replacing the seat pins
(1) Identify the left and right seat
pins by the labels on their ends.
(2) Push both seat pins into the unit until you
hear a click.
If the seat pins are
not pushed all the
way in, the seat
and lid cannot be
attached.
L
R
21
Cleaning between the main Washlet unit and the toilet
● About once a month, remove the main Washlet unit to clean the top of the toilet and the bottom of
the main unit.
1
Disconnect the mains plug.
2
Remove the main Washlet unit.
For the U.K.
› For your safety, disconnect the mains plug before
removing the main unit. In addition, avoid splashing
water on the disconnected mains plug.
● While pressing the Washlet release button on the right
side, pull the main Washlet unit forward.
› When the main Washlet unit is detached, do not
turn it over or tip it at a great angle.
› Do not pull the unit with a lot of force because the
water supply hose and power cord are attached to
it.
Washlet release button
3
4
● While pressing the release button, pull the
main unit forward.
Clean the unit.
► To clean these parts, follow the instructions in "Daily cleaning" on page 19.
Reattach the main Washlet unit.
(1) Align the centre of the main Washlet unit and the
centre of the base plate.
(2) Slide the main Washlet unit over the top of the
toilet to cover the base plate completely, until you
hear a click.
› If the main Washlet unit is not pushed completely
onto the base plate, the Washlet will not function.
5
22
Reconnect the mains plug.
Base plate
Periodic cleaning
Cleaning the mains plug
● Clean the mains plug about once per month.
1
2
3
Disconnect the mains plug.
For the U.K.
Dry cloth
Clean the plug.
● Remove dust from the blades and other parts of the
mains plug with a dry cloth.
Reinsert the mains plug.
For the U.K.
● Insert the plug completely.
Cleaning the deodorizer filter
● If the deodorizer does not seem to be clearing unpleasant smells, clean the deodorizer filter.
Disconnect the mains plug.
Grasp the deodorizer filter handle
and pull it forward.
● The deodorizer filter cannot be disconnected. Do not pull
it with excessive force.
(Doing so could cause damage or malfunction.)
3
Clean the filter.
4
Push the deodorizer filter back in.
5
Reconnect the mains plug.
Filter
Handle
Cleaning
1
2
● Remove the debris on the filter with a toothbrush or
similar tool.
● Push the filter in completely until you hear a click.
23
Cleaning the wand
● The wand can be extended without emitting water, making it easy to clean.
1
Press the
button on the
remote control.
The wand extends.
● The wand automatically returns to its inactive position
after about 5 minutes.
Wand
2
Clean the wand.
3
Press the
● Wipe the wand with a soft damp cloth.
› Do not push or pull the wand with excessive force.
(This could cause damage or malfunction.)
button again.
The wand retracts and automatically to
clean itself.
Wand chamber
24
Cleaning the water supply filter
● Clean the water supply filter if the water pressure during rear or front washing seems to have
weakened.
1
Close the water shut-off valve and stop the water supply.
Wall-mounted toilet
valve
CAUTION
Prohibited
Do not detach the drain valve with
built-in water filter while the water
shut-off valve is still open.
● Doing so will cause water to spill.
Water shut-off valve
Turn clockwise
2
Floor-mounted toilet
valve
Water shut-off valve
Turn clockwise
Drain the water from the Washlet pipes.
(1) Press the
button on the remote control.
(This drains any remaining water from the Washlet.)
(2) Press the
button again.
(The wand returns to its inactive position.)
3
Open the cap.
Cap
Cleaning
Open
4
Detach the drain valve with built-in water filter.
● Use a flat-blade screwdriver to loosen the drain valve
with built-in water filter and pull it out.
Attachment Hole for the drain valve with builtin water filter
Drain valve with built-in water filter
Turn anticlockwise
Water receptacle
25
5
Clean the filter.
Filter
● Wash off and remove debris caught in the water filter mesh.
Tip
1
› Thoroughly remove the debris on the filter with a toothbrush or similar tool.
› Use a cotton swab or similar to remove debris from inside the attachment hole for
the drain valve with built-in water filter.
6
Reattach the drain valve with built-in
water filter.
● Insert the drain valve with built-in water filter and use a
flat-blade screwdriver to tighten it thoroughly.
Drain valve with built-in
water filter
CAUTION
7
Required
Thoroughly tighten the drain valve with
built-in water filter.
● Failure to do so could cause a water
leak.
Open the water shut-off valve.
● Open the water shut-off valve.
› Confirm that no water is leaking from the plumbing,
the main Washlet unit or the drain valve with builtin water filter.
Turn clockwise
Wall-mounted
toilet valve
Water shut-off valve
Floor-mounted
toilet valve
Water shut-off valve
Check for
water leak
Check for
water leak
Turn anticlockwise
Turn anticlockwise
Cap
Open
8
Tip
26
Check for
water leak
Close the cap.
1
Cleaning the water supply filter
● Do not use cleanser. Wash with plain water.
● Do not break the water supply filter or detach it from the drain valve.
Changing settings
Before changing other settings, follow the instructions in the next section, "Setting whether or not
the remote control makes sound" to turn the sound on if it is currently off. You will use this sound to
confirm changes to other settings.
Setting whether or not the remote control makes sound
● By default, when you press a remote control button, you will hear a sound when the main Washlet unit receives the
signal.
● You can choose to turn this confirmation sound off.
1
2
Default setting: Sound on
Press
for at least 10 seconds.
● Hold the button down until the whole remote control
display blinks.
Press
Tip
for at least 5 seconds.
2
● The setting changes every time the button is pressed for
at least 5 seconds.
To turn the sound ON
Press the button until you hear a short beep.
Display area
To turn the sound OFF
3
Press the button until you hear a long beep.
Press the
button again.
This completes the change to the settings.
Setting automatic operation of the standard deodorizer
● You can set whether or not the standard deodorizer works automatically.
Settings
Default setting: ON
1
2
Press
for at least 10 seconds.
● Hold the button down until the whole remote control
display blinks.
Press the
Tip
button.
2
● Each time you press this, the setting changes between
ON and OFF.
Display area
Tip
2
If no button is pressed for more than a minute, the remote control automatically leaves setting
mode. If you want to continue changing a setting, start again from the first step.
27
To turn automatic operation of the standard deodorizer ON
Press the button until you hear a short beep.
To turn automatic operation of the standard deodorizer OFF
3
Press the button until you hear a long beep.
Press the
button again.
This completes the change to the settings.
Making the Power Deodorizer work automatically
Automatic Power Deodorizer
1
2
Default setting: ON
Press
for at least 10 seconds.
● Hold the button down until the whole remote control
display blinks.
Open the remote control cover and
button.
press the
Tip
1
● Each time you press this, the setting changes between
ON and OFF.
Display area
To turn automatic operation of the Power Deodorizer ON
Press the button until you hear a short beep.
To turn automatic operation of the Power Deodorizer OFF
3
Press the button until you hear a long beep.
Press the
button again.
This completes the change to the settings.
Tip
28
1
If no button is pressed for more than a minute, the remote control automatically leaves setting
mode. If you want to continue changing a setting, start again from the first step.
Preventing damage from freezing and
measures for long-term disuse
Preparation for freezing conditions
Tip
2
Keep the toilet warm, so that the temperature stays above freezing. If this is not possible, drain the water.
If you worry that the water might freeze, follow these procedures to prevent damage to the Washlet.
If the Washlet freezes, it might suffer damage and water leaks could occur.
Attention!
● Before conducting these procedures to prevent freezing, lower the toilet seat and close the lid.
1
Draining the water
Close the water shut-off valve and
stop the water supply.
Wall-mounted
toilet valve
Floor-mounted
toilet valve
Water shut-off valve
Water shut-off valve
Turn clockwise
Turn clockwise
Troubleshooting
Tip
2
If you expect freezing temperatures
Do not use the Energy Saver, because the Washlet could be damaged if the water freezes when
the heaters are turned off.
► See page 18 for how to turn off the Energy Saver
29
2
Drain the water from the Washlet
pipes.
(1) Press the
button on the remote control.
(This drains any remaining water from the Washlet.)
button again.
(2) Press the
(The wand returns to its inactive position.)
(3) Use a flat-blade screwdriver to loosen the drain
valve with built-in water filter and then pull it out.
Attachment hole for drain valve
with built-in water filter
Drain valve with built-in
water filter
CAUTION
Prohibited
Do not detach the drain valve with builtin water filter while the water shut-off
valve is still open.
● Doing so will cause water to spill.
Turn anticlockwise
Water receptacle
(4) Lift the water supply hose to drain the water out of it.
Water supply hose
3
Water receptacle
Reattach the drain valve with built-in
water filter.
● Insert the drain valve with built-in water filter and use a
flat-blade screwdriver to tighten it thoroughly.
Drain valve with built-in
water filter
CAUTION
4
Required
Thoroughly tighten the drain valve with
built-in water filter.
● Failure to do so could cause a water
leak.
Keep the inside of the main Washlet unit warm.
(1) Confirm that the
button in the main operation section is "on" and use the remote control to set
high warm water and seat temperature levels.
Washlet main display section
"POWER" indicator
(2) Close the lid.
30
Turn clockwise
Remote control operation section
What to do if you will not use the Washlet for a long time
● If the Washlet is not used for a long time, water left in it could become contaminated and cause
skin inflammation or other problems. You should also drain the water to prevent the Washlet from
freezing.
Tip
1
1
Draining the water
2
3
4
5
Close the water shut-off valve and
stop the water supply.
Wall-mounted
toilet valve
Floor-mounted
toilet valve
Water shut-off valve
Water shut-off valve
Turn clockwise
Turn clockwise
Drain the water from the Washlet pipes.
► See step 2 of "Draining the water" on page 30.
Disconnect the mains plug.
For the U.K.
› For your safety, disconnect the mains plug before
removing the main unit. In addition, avoid splashing
water on the disconnected mains plug.
Remove the main Washlet unit.
● While pressing the Washlet release button on the
right side, pull the main Washlet unit forward.
● Rest the detached Washlet on the front half of
the top of the toilet.
› When the main Washlet unit is detached, do
not turn it over or tip it at a great angle.
› Do not pull the unit with a lot of force
because the water supply hose and power
cord are attached to it.
Use a flat-blade screwdriver to open
the cap.
Washlet
release
button
● While pressing the
release button, pull the
main unit forward.
Cap
Tip
1
Do not forget to drain the water!
Always drain the water to prevent freezing:
● When leaving home for a long time in the winter.
● When the Washlet is installed in a vacation home or other location that is not always occupied.
Empty homes can be very cold in winter.
Troubleshooting
Flat-blade screwdriver
31
6
Remove the water drainage plug
and drain the water from the main
Washlet unit.
● Use a flat-blade screwdriver to loosen the water
drainage plug and then pull it forward.
● About 700 ml of water will pour out of the drainage
opening.
7
8
9
10
Tip
32
Water drainage plug
Turn anticlockwise
Reinsert the water drainage plug.
Reattach the cap.
Reattach main Washlet unit.
(1) Align the centre of the main Washlet unit and the
centre of the base plate.
Base plate
(2) Slide the main Washlet unit over the top of the
toilet to cover the base plate completely, until you
hear a click.
› If the main Washlet unit is not pushed completely
onto the base plate, the Washlet will not function.
Put antifreeze in the toilet.
Tip
1
1
Put antifreeze in the water remaining in the toilet to reduce the chance of freezing.
Restoring the water supply after draining the Washlet
1
Open the water shut-off valve.
● Check that there are no leaks in the plumbing or the main Washlet unit.
Wall-mounted toilet valve
Floor-mounted toilet valve
Water shut-off valve
Turn anticlockwise
2
3
Water shut-off valve
Turn anticlockwise
Insert the mains plug in the socket.
Run water through the wand.
Tip
2
● Cover the seat sensor with white paper and press the
or
button to make water flow
through the wand for about 2 minutes.
(It takes about one minute to discharge the water from
the wand. Catch the water in a cup.)
White paper
Troubleshooting
Tip
2
What to do if the remaining water has frozen and no water comes out
Water left in the water supply hose and water shut-off valve might freeze. If this has happened,
warm the inside of the toilet and use a cloth soaked in warm water to warm the water supply hose
and water shut-off valve.
33
Troubleshooting
Please read this section to troubleshoot any problem before requesting repairs. If you still cannot
solve the problem after reviewing this section, please contact TOTO Europe GmbH (see the back
cover for contact information).
CAUTION
If a water leak occurs, close the water shut-off valve to stop the water supply.
Wall-mounted toilet valve
Water shut-off valve
Floor-mounted toilet valve
Water shut-off valve
Required
Turn clockwise
Turn clockwise
Please confirm the following three points before requesting
repair.
(1) Is the main Washlet unit attached correctly to the base plate?
● Are the Washlet and base plate out of alignment?
→ Remove the main Washlet unit and reattach it to the base plate once. ►See page 22
(2) Is the Washlet "POWER" indicator in the main display section lit?
● Is the "POWER" indicator lit? ►See page 12
→ If the "POWER" indicator is lit, go to step (3).
→ If the "POWER" indicator is not lit
• Is the "ENERGY SAVER" indicator lit?
→ The Energy Saver timer might be on. ►See page 17
• Are all indicators unlit?
→ Follow these steps to see if the indicators light.
≥ Check here
Washlet main display section
Lights (Blue)
1. Press the
button in the main operation section.
2. Has there been a power cut or are any of the central power breakers
switched off? If there is a power cut wait until the power comes back
on. If the breaker controlling the power to the Washlet is off, turn it
back on.
(3) Is the remote control working?
● Have all the indicators on the remote control LCD disappeared?
→ Check whether working batteries are properly installed.
● When you press the remote control button, does the remote control LCD go blank momentarily?
→ If so, the batteries are running out of power. Install new batteries. ►See page 11
● Is the remote control signal transmission area covered or dirtied by debris or water droplets, for example?
→ Remove or clean whatever is blocking the transmission area. ►See pages 9 and 10
If the problem is not resolved after confirming (1), (2) and (3), continue with "Identifying the
problem" on the next page.
34
Identifying the problem
Do rear and front washing work?
Trouble
Washing functions do not work when the REAR and FRONT buttons on the remote control
are pressed.
Tests and results
Does the function work when
the
or
button in the
Washlet main operation section
is pressed?
› If the seat sensor does not
detect a person, these functions
will not work. Please sit on the
seat when confirming these
operations.
Does the wand extend when
you press the
or
button on the remote control?
If it works
● The remote control signal might not
be being received.
If it does not work
● Is the seat sensor covered or dirtied
by debris or water droplets, for
example?
If it does not work
● The seat sensor might not work
depending on how a person sits
or the colour and fabric of their
clothing.
If the wand extends but washing
water does not come out or is very
weak
● Water might not be supplied to the
Washlet, or debris could be blocking
the wand.
If the wand does not extend
● Have you been sitting on the seat
for about 2 hours or longer?
If the wand does not extend
● Is the seat sensor constantly
sensing something?
If the wand does not extend
● Have you been using it
continuously?
Rear and front washing stop
automatically about 5 minutes after
pressing the button. The indicator
in the Washlet main display section
blinks for about a minute while
water is being warmed.
Solutions
● Follow the instructions in "(3) Is the
remote control working?" to check
whether it is working. ►See page 34
● Remove or clean whatever is blocking it.
►See pages 9 and 13
● Sit on the seat fully and raise clothing so
that the sensor can detect skin.
● Is the water cut off? Press
and wait
for the water to turn on again.
● Is the water shut-off valve closed? Turn
the water shut-off valve anticlockwise.
►See page 12
● Clean the drain valve with built-in water
filter. ►See page 25
● If someone has been sitting on the seat
continuously for about 2 hours or longer,
rear and front washing functions will stop
working. Get up off the seat and then sit
down again.
● If the seat sensor is covered or dirtied
by debris or water droplets, for example,
the sensor might constantly sense
something. Remove or clean whatever is
blocking it. ►See pages 9 and 13
● If a seat or lid cover is left on the
Washlet, the seat sensor might
constantly sense something, so remove
any such cover.
● Wait until the indicator in the Washlet
main display section lights and press the
button again.
Do the deodorizer and Energy Saver work?
The deodorizer does not function.
Tests and results
Can you hear the sound of the
deodorizer when you sit on the
seat?
Solutions
If there is no deodorizer sound
● Remove or clean whatever is blocking it.
►See pages 9 and 13
● Is the seat sensor covered or dirtied
by debris or water droplets, for
example?
Troubleshooting
Trouble
35
Do the deodorizer and Energy Saver work?
Trouble
The deodorizer does not function.
Tests and results
Can you hear the sound of the
deodorizer when you sit on the
seat?
Trouble
If there is no deodorizer sound
● The seat sensor might not work
depending on how a person sits
or the colour and fabric of their
clothing.
If there is no deodorizer sound
● Is the deodorizer set to "off"?
If there is deodorizer sound
● Is the deodorizer filter blocked?
● Sit on the seat fully and raise clothing so
that the sensor can detect skin.
● Set the deodorizer to "on".
►See page 27
● Clean the deodorizer filter.
►See page 23
The Automatic Power Deodorizer does not work.
Tests and results
Is the Automatic Power Deodorizer set to "off" on the remote control?
Trouble
Solutions
Solutions
● Set the Automatic Power Deodorizer to
"on".
►See page 28
The Energy Saver timer is not working.
Tests and results
Have you changed the batteries
in the remote control?
If you changed the batteries in the
remote control, or the batteries have
gone dead, these settings might be
lost.
Solutions
● Set the Energy Saver timer settings
again.
►See pages 17 and 18
The seat or washing temperature is cold
Trouble
The seat does not warm up (it is cold).
Tests and results
Check the indications on the
remote control LCD.
Is the seat temperature setting low or
off?
Is the main Washlet unit
"ENERGY SAVER" indicator lit?
If the green "ENERGY SAVER"
indicator is lit
● The Energy Saver timer, which
automatically turns the seat heater
off, is active.
Have you been sitting on the seat for an hour or more?
Is the seat sensor covered or dirtied by debris or water droplets, for
example?
36
Solutions
on the remote control to
● Use
adjust the temperature.
►See page 15
● Sitting on the seat temporarily starts the
heater. It will become warm in about 15
minutes.
►See page 18
● If someone sits on the seat continuously
for an hour or more, the seat heater will
turn off. Get up off the seat to restart the
seat heater automatically.
● Remove or clean whatever is blocking it.
►See pages 9 and 13
The seat or washing temperature is cold
Trouble
The rear or front washing water is cold.
Tests and results
Check the indications on the
remote control LCD.
Is the water temperature setting low
or off?
Is the Energy Saver timer on?
Solutions
on the remote control to
● Use
adjust the temperature.
►See page 15
● Sit on the seat and wait for about 10
minutes.
The rear and front washing water pressure is weak
Trouble
The washing water pressure is weak.
Tests and results
Check the indications on the
remote control LCD.
Is the water pressure set to a low
level?
Is the water filter in the drain valve blocked?
Is the water shut-off valve closed?
Solutions
water pressure
● Press the
adjustment button on the remote control.
►See page 13
● Clean the built-in water filter.
►See page 25
● Turn the water shut-off valve
anticlockwise to open it.
►See page 12
Rear or front washing starts and stops on its own
Trouble
Rear or front washing suddenly stops during use.
Tests and results
Solutions
Have you been using it for a long Rear and front washing stop
time?
automatically about 5 minutes after
pressing the button. The indicator
in the Washlet main display section
blinks for about a minute while water
is being warmed.
Are you sitting in a way that
If you get up slightly from the seat,
prevents the seat sensor from
or sit forward on the seat, the seat
working?
sensor might temporarily stop
working.
● Wait until the indicator in the Washlet
main display section lights and press the
button again.
Trouble
● Sit fully on the seat.
Water comes out of the wand when it should not.
Tests and results
Solutions
Does water come out of the left
side of the wand even when no
one is on the seat?
Troubleshooting
The seat sensor could be falsely
detecting a person in the following
circumstances, for example:
—
● When using a washbasin near the
toilet
● When cleaning the unit
● When the toilet tank lever is used
After getting up off the seat, water is emitted from around the wand into the
—
toilet for a few seconds.
● If water is coming out continuously when
Is water coming out of the base Sometime water comes out of the
base of the wand during washing.
not washing, this could be a malfunction.
of the wand?
This is a necessary function.
Close the water shut-off valve and
contact the installing or selling business.
37
Rear or front washing starts and stops on its own
Trouble
Water comes out of the wand when it should not.
Tests and results
Is water coming from the right
side of the wand?
Solutions
The water inside the warm water
tank expands and comes out. This is
normal.
—
The deodorizer functions when it should not
Trouble
The deodorizer functions when it should not.
Tests and results
Solutions
The seat sensor could be falsely detecting a person and causing the
deodorizer to function in the following circumstances, for example:
● When using a washbasin near the toilet
● When cleaning the unit
● When the toilet tank lever is used
● When opening/closing the seat or toilet lid manually
Trouble
—
The deodorizer sound becomes louder when you get up from the seat.
Tests and results
Is the Automatic Power
Deodorizer on?
Solutions
This louder sound is from the
Automatic Power Deodorizer.
—
Other situations
Trouble
Water is leaking from the plumbing connections.
Tests and results
Is a plumbing connection nut loose?
Trouble
Are the bolts in the base plate that fixes the main Washlet unit to the toilet
loose?
The weight of a cover will make it close more quickly.
● Thoroughly tighten these base plate
bolts.
Solutions
—
The speed that the toilet seat and lid close changes between summer and winter.
Tests and results
The speed might be changed some due to the room temperature or
frequency of use.
38
Solutions
The toilet seat and lid close more quickly when covers are attached.
Tests and results
Trouble
● Use a monkey wrench or similar tool to
tighten the loose part more.
› If the water leak does not stop, close the
water shut-off valve and request repair
work.
►See page 34
The main Washlet unit feels loose.
Tests and results
Trouble
Solutions
Solutions
—
Specifications
Rated power
220–240 V AC, 50 Hz
Rated power consumption
270–320 W
Standard power consumption per year *
190 (261) kWh/year
Power cord length
1.0 m
Protection degree
IP x4
Spray volume
Washlet
equipment
Deodorizer
equipment
Heated seat
Rear wash
About 0.29–0.55 L/min (at 0.2 MPa water pressure)
Front wash
About 0.27–0.55 L/min (at 0.2 MPa water pressure)
Spray temperature
About 30–40ºC
Heater capacity
190–230 W
Safety equipment
Temperature fuse, excessive heating prevention device,
float switch to prevent heating when empty
Backflow prevention equipment
Vacuum breaker, reverse flow stopping valve, air gap
Type
O² deodorizer
Standard mode: about 0.09 m³/min
Power mode: about 0.16 m³/min
Airflow
Surface temperature
Temperature adjustment range : about 28–35ºC
Heater capacity
47–56 W
Safety equipment
Temperature fuse
Water pressure
0.1–1.0 MPa
Water temperature
0–35ºC
Operating ambient temperature
0–40ºC
Dimensions
400 mm (width), 535 mm (depth), 185 mm (height)
Weight
About 8.0 kg
* Standard power consumption per year without the energy saver functions is shown in the brackets.
Troubleshooting
39
Warranty
LIMITED TWO YEARS WARRANTY
1. TOTO warrants its products to be free from manufacturing defects under normal use and service for a period of two
(2) years from the date of purchase. This warranty is extended only to the ORIGINAL PURCHASER.
2. TOTO's obligations under this warranty are limited to repair or replacement, at TOTO's option, of products or parts
found to be defective, provided that such products were properly installed and used in accordance with this OWNER'S
MANUAL. TOTO reserves the right to make such inspections as may be necessary to determine the cause of the
defect. TOTO will not charge for labor or parts in connection with warranty repairs or replacements.
TOTO is not responsible for the cost of removal, return and/or reinstallation of products.
3. This warranty does not apply to the following items:
a) Damage or loss sustained in a natural calamity such as fire, earthquake, flood, thunder, electrical storm, etc.
b) Damage or loss resulting from any unreasonable use, misuse, abuse, negligence, or improper maintenance of the
product.
c) Damage or loss resulting from removal, improper repair, or modification of the product.
d) Damage or loss resulting from sediments or foreign matter contained in a water system.
e) Damage or loss resulting from the quality of water in the region where the product is used.
f ) Damage or loss resulting from improper installation or from installation of a unit in a harsh and/or hazardous
environment.
4. This warranty gives you specific legal rights. You may have other rights which vary from country to country.
5. To obtain warranty repair service under this warranty, you must take the product or deliver it prepaid to a TOTO
service facility, together with a letter stating the problem, or contact a TOTO distributor or product service contractor,
or directly to TOTO sales office. If, because of the size of the product or nature of the defect, the product can not be
returned to TOTO, receipt by TOTO of written notice of the defect shall constitute delivery. In such case, TOTO may
choose to repair the product at the purchaser's location or pay to transport the product to a service facility.
THIS WRITTEN WARRANTY IS THE ONLY WARRANTY MADE BY TOTO. REPAIR OR
REPLACEMENT AS PROVIDED UNDER THIS WARRANTY SHALL BE THE EXCLUSIVE
REMEDY AVAILABLE TO THE PURCHASER. TOTO SHALL NOT BE RESPONSIBLE FOR LOSS
OF USE OF THE PRODUCT OR FOR OTHER INCIDENTAL, SPECIAL, OR CONSEQUENTIAL
DAMAGE OR EXPENSES INCURRED BY PURCHASER, OR FOR LABOR OR OTHER COSTS
DUE TO INSTALLATION OR REMOVAL, OR COSTS OF REPAIRS BY OTHERS, OR FOR
ANY OTHER EXPENSE NOT SPECIFICALLY STATED ABOVE. EXCEPT TO THE EXTENT
PROHIBITED BY APPLICABLE LAW, ANY IMPLIED WARRANTIES, INCLUDING THAT OF
MERCHANTABILITY OR FITNESS FOR USE, ARE EXPRESSLY LIMITED TO THE DURATION
OF THIS WARRANTY. SOME STATES DO NOT ALLOW LIMITATIONS ON HOW LONG AN
IMPLIED WARRANTY LASTS, OR THE EXCLUSION OR LIMITATION OF INCIDENTAL OR
CONSEQUENTIAL DAMAGE, SO THE ABOVE LIMITATION AND EXCLUSION MAY NOT APPLY
TO YOU.
40
Important User Guidance
Information
If you want to dispose this product, do not mix it with general household waste. There is a separate
collection system for used electronic products in accordance with legislation that requires proper
treatment, recovery and recycling.
Private households in the 25 member states of the EU, in Switzerland and Norway may return their used electronic
products free of charge to designated collection facilities or to a retailer (if you purchase a similar new one).
For countries not mentioned above, please contact your local authorities for the correct method of disposal.
By doing so you will ensure that your disposed product undergoes the necessary treatment, recovery and recycling,
which prevent potential negative effects on the environment and human health.
Only discard discharged batteries. They should not be disposed of with household waste, but rather at appropriate
collection sites or at the product retailer.
41
Head Office
TOTO Europe GmbH
Armeler str. 20-22 D-46242 Bottrop Germany
Tel: +49 (0)700 8686 0700
● You are advised to record the following information to allow quick service.
Date of purchase :
Name of shop :
Date : year month day
Tel :
©TOTO Ltd. All rights reserved.
2011. 12. 9
D08673
Printed in Japan.