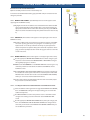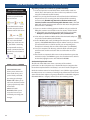
1
ccx
Clinical Competency Examination
MANUAL
Copyright Information
© 2002 DxR Development Group, Inc.,
150 East Pleasant Hill Road, Carbondale, Illinois 62903-6158
for software template and icons.
All rights reserved.
No part of this software program, including artwork and text, may be
utilized, reproduced, stored, or transmitted in any form by any
means, electronic or mechanical, or by any information storage or
retrieval system, without permission in writing from the copyright
holder.
Address inquiries to DxR Development Group, Inc.,
150 East Pleasant Hill Road, Carbondale, Illinois 62903-6158
Licensee of the software does have permission to duplicate the
printed manuals, and to print and duplicate manuals from the
readme text files contained on the CD-ROM.
Macintosh is a registered mark of Apple Computer, Inc.
Windows is a registered mark of Microsoft Corporation.
Pentium is a registered mark of Intel Corporation.
Director is a trademark of Macromedia, Inc.
Clinical Competency Examination was made with Director©, a product of Macromedia, Inc.
Brands and product references noted are the trademarks of their
respective companies.
Table of Contents
Introduction
Mv1.3CCXS062602
Technical Requirements......................................................................................................4-5
Specifications for Graphics....................................................................................................5
Software Installation................................................................................................................6
Chapter 1 - Using the Criteria and Performance Utility
Getting Started in the C & P Utility....................................................................................7
Setting Case Preferences in the C & P Utility..............................................................8-9
Creating the Grading Key (Case Content)...............................................................10-20
-Presenting Information......................................................................................10
-Findings.............................................................................................................10-11
-Problem List...........................................................................................................12
-Diagnostic Hypothesis(es)................................................................................12
-Labs.....................................................................................................................12-15
-Diagnosis.................................................................................................................15
-Management Items......................................................................................16-18
-Content Questions...............................................................................................18
-Checklists................................................................................................................19
Setting Performance Values in the C & P Utility....................................................19-21
-Requiring Items....................................................................................................20
-Category Weighting............................................................................................21
Editing Existing Cases in the C & P Utility......................................................................22
Chapter 2 - Using the Clinical Competency Exam
Setting preferences for the CCX Exam - Instructor help....................................23-26
Accessing the CCX Case Preferences screen...............................................24
Instructions for Using the CCX exam........................................................................29-38
-Getting started......................................................................................................29
-Case screens
Content Questions..............................................................................30
Statement of patient problem - findings list.............................30
Problem List...........................................................................................30
Diagnostic Hypothesis(es)................................................................30
Laboratory Section........................................................................31-34
Diagnosis.................................................................................................35
Management...................................................................................35-37
Delayed Labs..........................................................................................37
Other Issues............................................................................................38
Chapter 3 - Using the Standardized Patient Utility
Instructor set-up......................................................................................................................39
Standardized Patient Instructions..............................................................................39-40
Collecting SP Utility Data.....................................................................................................40
2
[email protected]
Table of Contents
Chapter 4- Using the Student Activity Record Utility
Importing Student Records ...............................................................................................42
Viewing and Evaluating Student Records.....................................................................43
-Student Activity Records Screen..............................................................43-44
-Matching Screens..........................................................................................45-47
-Record Statistics Screen.....................................................................................47
-Adjust Evaluation Criteria Screen...................................................................48
Chapter 5 - Using the Multi-case Performance Utility
Getting Started in the MCP Utility....................................................................................49
Setting Performance Values in the MCP Utility.....................................................50-51
-“Clustered” cases..................................................................................................50
-“Essential” items....................................................................................................51
Viewing and Evaluating Performance Scores in the MCP Utility....................52-54
-The Student’s Overall case performance....................................................52
-Overriding performance marks......................................................................53
-Synopsis of group performance.....................................................................53
Exporting Data from the MCP Utility...............................................................................54
Appendix - Common Buttons
Common Buttons in the C & P Utility..............................................................................55
Common Buttons in the CCX Exam.................................................................................56
Common Buttons in the SAR Utility................................................................................57
Common Buttons in the MCP Utility...............................................................................58
Appendix - Quick Help Guides
Quick Help Guide for the C & P Utility......................................................................59-60
Quick Help Guide for the CCX Exam.........................................................................61-62
Quick Help Guide for the SP Utility..................................................................................63
Quick Help Guide for the SAR Utility.........................................................................64-65
Quick Help Guide for the MCP Utility.......................................................................66-67
Appendix - Frequently Asked Questions
FAQ's for the C & P Utility.....................................................................................................68
FAQ's for the CCX Exam........................................................................................................69
FAQ's for the SAR Utility.................................................................................................70-71
FAQ's for the MCP Utility................................................................................................72-73
Formatting Instructions........................................................................................................74
File Structure.............................................................................................................................75
License Agreement........................................................................................................76-77
Index......................................................................................................................................78-79
Tech support: 1-800-453-8040
3
Introduction
The CCX Software package is made up of five main components (utilities)
that work together to provide a mechanism for testing and evaluating your
students' clinical competency. The Utilities are listed below in the order in
which they will be used.
The Five Components of
the CCX Software Package
The Criteria and Performance
Utility (C & P Utility) - Instructors
enter patient case information
and set performance standards
that will shape the Clinical
Competency Exam that students
take.
The Clinical Competency Exam
(CCX) Software - Students document the patient case data that
they gather in each step of their
clinical investigation.
The Standardized Patient (SP)
Utility - Standardized patients
record their feedback on the
encounter with the student for
use by the instructor in evaluating
student performance.
The Student Activity Record
(SAR) Utility - Instructors import
student responses from an individual CCX exam and standardized patient feedback for evaluation of individual and group performance.
The Multi-Case Performance
(MCP) Utility - Instructors and
committees review and set standards for evaluating individual
and group performance on multiple patient cases.
4
The Criteria and Performance Utility (C&P Utility) is the tool used to build the
framework for the Clinical Competency Exam that students will take. In this
utility, instructors will create or edit the patient case information and
establish grading criteria for the CCX Exam. Instructors begin by determining
the types of information students will be asked to supply in each category of
the clinical investigation simulated in the CCX exam. Instructors will then
enter acceptable responses for those categories. The instructor's entries
create a template for the CCX exam and for the performance criteria that will
be used to evaluate student performance.
The CCX Exam Software (CCX) provides a template for students to document
their findings from an encounter with a simulated or standardized patient
case. The CCX Exam Software takes students through an ordered process of
gathering and entering data in each step of a clinical investigation. Students
may be asked to enter a patient findings and problem list, order labs, make a
diagnosis, create a management plan, and perhaps answer questions on case
content. Each student's responses will then be recorded for grading using the
Student Activity Record Utility (SAR).
The Standardized Patient (SP) Utility is used only if the student saw a
standardized patient as part of completing the Clinical Competency Exam.
The standardized patient will answer a list of instructor questions about items
the student did or did not cover in gathering the patient’s medical history
and conducting an initial physical exam. The Patient Satisfaction checklist will
pose questions that relate to the standardized patient’s satisfaction level with
the student. Results can be exported to the SAR Utility as part of the
evaluation of student performance.
The Student Activity Record (SAR) Utility reports and evaluates student
performance on the CCX Exam. Results from an individual CCX Exam are
imported into the SAR Utility, which can display overall results and results for
each category on a single screen. The software is designed to allow faculty to
review and manually match specific student “free text” responses with the
instructor's evaluation standards. The SAR Utility can also provide insight into
areas of strength or weakness in student knowledge by displaying the
number of students in a group who responded appropriately or
inappropriately to a particular item. Information from the Student Activity
Record can be printed or exported to a spreadsheet application for further
analysis. The data from the SAR can also be exported to the Multi-Case
Performance Utility.
[email protected]
Introduction
The Multi-Case Performance (MCP) Utility is designed to allow instructors or
committees to examine student performance over a number of cases. The
MCP Utility is capable of displaying a student's or a group's performance for
multiple completed patient cases. The MCP Utility displays both overall
performance scores and scores in individual case categories. The instructor
sets standards for evaluating student performance on the group of cases.
Data may also be exported to a spreadsheet application for further analysis.
Technical information
To run the CCX Software package, your computer must meet the following
minimum technical specifications:
Windows®
Macintosh®
System: Windows 95, 98, NT4,
2000, XP
System 8.1 to 9.2 and OS X
(10.1 or above) in Classic mode
Processor: A Pentium® or
better- 233 MHz or greater (for
utilities that faculty will use); 166
MHz or greater (for case template
that students will use) .
Processor: 200 MHz Power PC
or greater (for utilities that faculty
will use); 133 MHz or greater
Hard Drive: 30-60 MB of
available hard drive space; total
space depends on the number of
cases and student records in each
Case.
Hard Drive: 30-60 MB of
available hard drive space; total
space depends on the number of
cases and student records in each
case.
RAM: at least 64 MB available
RAM
RAM: at least 64 MB available
RAM
Monitor: Capable of
supporting thousands of colors
(16-bit color depth) at a resolution
of 640x480 for the case template
and SP Utility; 800x600 for
instructor utilities
Monitor: Capable of
supporting thousands of colors
(16 bit color depth) at a resolution
of 640x480 for the case template
and SP Utility; 800x600 for
instructor utilities
(for case template that students
will use)
Tech support: 1-800-453-8040
SPECIFIC ATIONS
FOR GR APHICS
You have the option of
attaching graphics to
accompany patient cases.
Those graphics must meet
the following format
specifications:
File format: PICT, TIFF,
BMP, OR JPEG
Dimensions: Height no
greater than 345 pixels
Width no greater than
600 pixels
Resolution: 72 dpi
5
Introduction
Installation:
ALERT
Disable anti-virus software
when installing software, creating
cases with the C & P Utility, or taking the Clinical Competency Exam
test.
For Windows®:
1. Start your computer and insert the CD into the computer’s CD drive.
2. Find the CD Icon and double-click.
3. When the CD opens, you will see some items including; a folder labeled
CCX Readme & Sample Case and a Set-up Icon. Double-click the set-up
icon.
4. The welcome screen warns you that set-up doesn’t update files that are
currently in use. Click CANCEL to exit or click NEXT to continue.
5. The License Agreement screen includes the terms and conditions of the
use agreement. Read the agreement. If you agree and accept the terms,
check the box indicating your acceptance. You must click the box to
complete the software set-up.
6. The Installation Directory requires you to specify where you would like
to install the program. You may install the program on any hard drive.
During installation you may....
a.) type in a new path, for example c:/ccxNew/ or
b.) click the BROWSE button to view the directories available.
c.) click NEXT when you’ve chosen a directory.
7. On the Ready to Install screen, click FINISH to install the software. Click
CANCEL to abort.
8. A box will appear informing you that the computer is installing the files.
The “Finished” screen will then appear. Click FINISH to complete the
installation process.
9. You may check your installation by locating the folder in the directory
you chose. Inside this folder should be two folders; one will be called
the C & P Utility, while the second will be named Record Utility.
You have now installed the Clinical Competency Exam Software package.
For Macintosh®:
1. Start your computer and insert the CD into the computer’s CD drive.
2. Find the CD Icon and double-click to open.
3. Copy the folder called “CCX” from the CD to your computer hard drive.
4. Open the folder. It should contain all the necessary files to run the
Clinical Competency Exam Software Package.
6
[email protected]
Chapter 1. Using the Criteria and Performance Utility
Instructors will start working with the CCX Software package by using the
Criteria & Performance Utility since this is where most of the instructional and
evaluation information is recorded. Here’s a list of what this chapter covers.
Getting Started in the C & P Utility 7
Creating a New Case 7
Setting Case Preferences in the C & P Utility 8-9
Creating the Grading Key (Case Content) 10-20
Presenting Information 10
Findings 10-11
Problem List 12
Diagnostic Hypothesis(es) 12
Labs 12-15
Diagnosis
15
Management Items
16-18
Content Questions
18
Checklists
19
Setting Performance Values in the C & P Utility
Requiring Items
20
Category Weighting 21
Editing Existing Cases in the C & P Utility
22
Getting Started: Instructor help
TIME CUE
Allow 3-4 hours your
first time in working
through the C & P Utility.
19-21
Figure 1. The Criteria and Performance Utility title screen.
Before you start
It’s important that you first collect and organize all case-specific information,
graphics (See Specifications for Graphics), and scoring criteria before you start
work in the C & P Utility. If you want to see an example of a case with grading
criteria, you’ll find an example included on the CD. Open the file named
“Warren Kirk” to see the case information in text form, then follow the
instructions for using the C & P Utility. (See also ALERT on pg. 6)
Step 1. Open the CCX folder
that you just installed on your computer.
Within that folder, highlight the C&P Utility folder
and doubleclick.
Double-click the “C & P Utility” icon
or go to Start, open the
Programs menu, choose the Clinical Competency Exam and open the
C&P Utility.
Step 2. The Clinical Competency Examination Criteria and Performance
Utility title screen will give you a choice between creating a new case or
editing an existing one. What you see on the screen and the steps you
take after this point will differ depending on your choice. We’ll outline
each scenario in the pages that follow.
Creating a new case
Click “Create New Case.” [see Figure 1] and follow the on-screen
prompts (see also Case Folder Note).
The next screen you see will ask for the patient’s name. Enter it into
the space provided.
Select one of three template choices: adult male, adult female, or
pediatric. (This action will select the appropriate lab values for your
patient case.) You are now ready to set the case preferences for the
new case. The Case Preferences screen will take a moment to load.
Tech support: 1-800-453-8040
C ASE FOLDER
NOTE
You must select a folder into
which the new CCX case will
be saved.
Example: Desktop folder
After you have highlighted
the folder, Windows users
click OK.
Macintosh users click the
“Select...” bar.
Remember where you save
this new case. You will need
to access it later.
Note for Windows users: If
you save your case on your
desktop, you will have to
navigate to the desktop
folder to access your case.
7
C & P Utility
Setting Case Preferences In the C & P Utility
Setting Case Preferences allows the instructor to determine how students will
document pertinent patient information and what screens students will see
when they take the Clinical Competency Examination. Those choices are
made in the CASE PREFERENCES screen of the C & P Utility. You must set case
preferences for each case that you create. The “Case Preferences” screen will
list questions for the instructor to answer, as described below. [See also Figure
2.]
1. Which type of findings should
be collected? Choose “Pertinent
Findings” or “Positive/Negative
Findings.
Choose “pertinent findings” to
require the student to list all
his/her findings related to the
case into a single list. Choose
“Positive/Negative Findings” to
require students to enter two
separate findings lists.
2. Should a “problem list” be
collected for this case?
If you answer “yes,” students
would list current or previous
conditions noted that may or
may not be related to the chief
complaint and may affect your
management plan.
Answer Yes or No.
3. Would you like to enter content
questions for this case?
If you choose to add questions,
you may:
choose any combination of
three question formats including
true/false, multiple choice, and
short answer,
add questions to appear after
any major case category, or
decide not to choose a location
for your questions, which will
automatically place the questions
at the end of the case.
Figure 2. C & P Utility Case Preferences screen
4. Should this patient be treated
in a hospital or as an out-patient?
8
[email protected]
Selecting “In-Hospital” or
“Outpatient” establishes one part
of the management criteria for
the patient case for which
students will be evaluated.
C & P Utility
5. How should the student
indicate management items for
this patient? Select management
items from a menu or specify from
“free entry” text. [See Figures 3
and 4.]
Figure 3. C & P Utility Management Screen – Free Entry Option
6. Will you collect checklists (i.e.
history and physical exam, patient
satisfaction) from the
standardized patient?
Answer Yes or No.
Choose the “list”option to allow
students to select management
items from a list of subcategories.
Choose “free entry” text to require
students to type in the specific
management items for each
category they choose.
Figure 4. C & P Utility Management Screen – Select from list option
If you answer Yes, the
standardized patient will answer a
list of yes-no questions pertaining
to his/her encounter with the
student. If you choose this option
you may collect responses for one
or both checklists. If you choose
to collect checklists on these
items, a list will appear where you
must supply total items possible
for the History and Physical Exam
checklist and/or the Patient
Satisfaction checklist as well as
the minimum satisfactory level
(MSL) for each checklist. If you
want to collect data for only one
checklist, enter zeros for the other
checklist MSL and total possible.
Once you have fully answered all questions on the Case Preferences screen,
click OK at the bottom of the screen to begin entering or editing content for
your patient case.
Tech support: 1-800-453-8040
9
C & P Utility
Creating the Grading Key (Case Content)
For Navigation Help,
refer to the Common Buttons section of this
Your next step in using the CCX Criteria and Performance Utility is to enter
the data for the patient case you are creating. You will move through a series
of screens where you can enter data for the categories you just selected as
appropriate to the patient case.
manual (pages 55-58).
A. Presenting Information
On the “Presenting Information” screen, enter the patient information the
student(s) will see when they open the case. Verify the patient name in the
upper field (first name, then last). In the lower field, enter a statement of the
presenting situation.
Click “OK” when you have entered all the “Presenting Information.”
B. Findings
The findings screen is where you enter either the “pertinent” findings or the
“positive and negative” findings that you expect your students to list in taking
the CCX exam. You will see one of two views, depending on whether you
chose to require a single list of “Pertinent Findings” or separate lists for
“positive findings” and “negative findings.” [See Figures 5 and 6.]
Figure 5. C & P Utility Findings Screen – Pertinent Findings option
Figure 6. C & P Utility Findings Screen – Positive & Negative Findings Option
10
[email protected]
C & P Utility
Note: It’s important to consider adding all appropriate synonyms for
your chosen responses now. This will reduce the time you will spend
matching answers when you evaluate student records in the SAR Utility.
The software will recognize and accept only answers worded and spelled
identically to yours. See SYNONYMS NOTE for instructions.
If you require students to list Pertinent findings only:
Type each finding separately in the text box marked ENTER PERTINENT FINDING. Click ENTER (Return) or the ADD/EDIT button. Enter
all appropriate synonyms for your listed items. (See SYNONYMS
NOTE.)
Click the box to the left of the line that reads “Limit maximum # of
findings to “ if you want to limit the number of findings a student
may enter. Enter the maximum number of findings the student may
list in the box to the right. (See FINDINGS note.)
Click COMPLETE in the upper right corner of the screen and use the
arrow keys to advance to the next screen when you are satisfied with
your list.
If you require students to make separate lists for Positive & Negative findings:
Type each finding separately in the space marked ENTER
POSITIVE/NEGATIVE FINDING. If the item should be listed as a positive
finding, click ADD/EDIT above the window on the left of the screen
marked POSITIVE FINDINGS. If the item should be listed as a negative
finding, click ADD /EDIT above the window on the right side of the
screen marked NEGATIVE FINDINGS. Add all appropriate synonyms
for your listed items. (See SYNONYMS NOTE.)
Note: On the Positive/Negative Findings screen, you must click
ADD/EDIT to add an item to either list. You may NOT use the
ENTER (Return) key on your keyboard.
Click the box to the left of the line that reads “Limit maximum # of
findings to“ if you want to limit the number of findings a student may
enter. Enter the maximum number of findings the student may list in
the box to the right. (See FINDINGS note.)
Click COMPLETE in the upper right corner and use the arrow keys to
advance to the next screen when you are satisfied with your list.
Tech support: 1-800-453-8040
SYNONYMS NOTE
To add new items as
Synonyms: Enter the first
item and add it to the list,
then immediately enter the
item to be listed as a
synonym, and click the
synonym button. The new
item will appear alongside
the original item with a
vertical hash mark
separating the items. The
computer will accept either
answer.
Example: fever|febrile
To add a synonym to an
item already on the list:
Highlight the original item
so it appears in the ENTER
text field. Begin typing the
synonym in the text field
(original item disappears
from the ENTER field) and
click the SYNONYM button.
FINDINGS NOTE
The “findings” limit will be
displayed to the student on
the CCX findings screen in
the patient case and
students will be prohibited
from entering findings that
exceed the limit.
11
C & P Utility
C. Problem list
On the Problem List screen enter a list of the patient’s previous or current
medical problems other than the chief complaint described under
“presenting situation.” Items listed may affect your management plan.
Enter each problem separately in the space provided below ENTER PROBLEM.
Click ADD/EDIT or ENTER (Return) to add the item to the list.
Click the COMPLETE box in the upper right corner of your screen and use the
arrow keys to advance to the next screen when your list is complete.
D. Diagnostic hypotheses
NOTE
Prioritizing items in the
Hypothesis list doesn’t assign
a weight to items. It simply
allows the instructor to compare his/her chosen order
with the student’s list. Those
comparisons can be made in
the Record Utility.
Type each hypothesis in the text box marked ENTER DIAGNOSTIC
HYPOTHESIS. Click ADD/EDIT or ENTER (Return) to add each item to your
Diagnostic Hypothesis list.
Check the RECOMMEND UP TO box if you want to set a recommended limit
on the number of diagnostic hypotheses. Enter the maximum number of
hypotheses you recommend that students enter in the text box. This number
will be displayed to the student on the hypothesis screen, stating the
maximum number of hypotheses recommended for this case. Once the
student enters the recommended maximum number of hypotheses, a
message will appear telling the student that he/she has exceeded the
recommended limit. Since the maximum is a recommendation only, the
student may continue to enter additional hypotheses.
Highlight an item in the list and then click the appropriate “Priority” arrow to
arrange items in the list. (See Note.)
E. Labs
On the LABS screen you can:
determine the labs you expect your student to order from a large
database of labs, listed by category;
view and edit the “normal” and “patient” lab results to be displayed to
the student;
attach graphics of your choosing to illustrate a particular lab result;
require students to review, justify and/or interpret lab results;
delay the display of a lab’s results until after the student makes a
diagnosis and treatment plan;
determine if there are equivalent labs to those you’ve selected; and
see and revise the cost of each lab ordered and the total cost of all
labs for a given case.
Complete the following steps for each of the labs you include in your list.
12
[email protected]
C & P Utility
1. Click the menu labeled SELECT LAB CATEGORY. Highlight the category of
the lab that you want to select. [See Figure 7.]
EQUIVALENTS
NOTE
If you select a lab test that
has an equivalent, a button
marked EQUIVALENT LABS
will appear. Click to view all
equivalent lab tests. These
tests will have the same
“normal” and “patient”
results as the lab selected,
and the information for
these labs will change
when information is altered
for any of the equivalents.
Figure 7. C & P Utility Labs screen with Categories
2. Click the menu labeled SELECT LAB TEST. You will see an alphabetical list
of all available labs in the category you selected. Find the test you wish
to select and highlight it. [See Figure 8.] Note: You may also move
through the lab test list using the arrow keys to the right of the menu.
IMPORTING
GR APHICS
Click ATTACH GRAPHIC. A
dialog screen will appear
reminding you to make sure
your graphic meets the
specifications listed on page 5
of this manual. (If your graphic
doesn’t meet the specifications,
click CANCEL. Make the needed
changes to the graphic file and
return to the ATTACH GRAPHIC
function to import the graphic.)
If your graphic meets the
specifications, click CONTINUE.
In the window that appears,
Figure 8. C & P Utility, Labs Screen with a list of Labs
select the appropriate graphic
and click OPEN. The graphic will
3. Each time you select a lab, normal results and patient results will appear
in the text boxes immediately below the menus. To modify these results
highlight the material you wish to change and type in the new value(s).
See Equivalents Note. [See also Figure 9.]
appear in the window. Click
4. Check the box next to ATTACH GRAPHIC if you want to attach one or
more graphics to a lab. (See IMPORTING GRAPHICS).
remove the graphic that’s in the
ADD to attach multiple
graphics to a lab test or
question. Click DELETE to
viewing window. Click SHUFFLE
BACK or SHUFFLE FORWARD to
change the order in which
multiple graphics appear. Click
RETURN to go back to the C & P
Utility’s Labs screen.
Tech support: 1-800-453-8040
13
C & P Utility
INTERPRET
The “interpret” function is a
way to learn about a
student's content knowledge
of interpreting lab results
without directing them to
order certain labs.
CONSULTANT
If you require students to
interpret a lab for which
you’ve entered consultant
information, the student will
be required to enter his/her
interpretation BEFORE the
consultant report will be
displayed. The student won’t
be allowed to go back and
change the interpretation
after reviewing the
consultant information.
14
Figure 9. C & P Utility, Labs Screen – Editing patient and normal results
5. Select REQUIRE STUDENT TO INTERPRET, to require students who order
this lab to interpret its results before leaving the case. You must check
INTERPRET on the CCX Case Preferences screen to activate this function
in the CCX Exam [See pg. 25.]. (Optional) You may enter a consultant
report that the student may or may not wish to see. Type your
consultant information it in the text box marked CONSULTANT REPORT.
[See CONSULTANT NOTE.] If you require an interpretation, the
consultant text appears after the student enters his/her interpretation.
If not, students can access it on the Labs screen.
6. Check REQUIRE STUDENT TO JUSTIFY if you want to require students to
explain their reason(s) for ordering a particular lab test. You must also
check JUSTIFY LABS in the CCX Case preferences screen to activate this
function in the student exam. [See page 25.]
7. Check MUST SEE THIS LAB to force a student to look at a particular test
result, if he/she did NOT order it. The student won’t be allowed to leave
the case without viewing the test results designated as “MUST SEE.”You
must also check MUST SEE THIS LAB in the CCX Case Preferences screen
to activate this function in the student exam. [See pages 25-26.]
8. If you want students to interpret results for a lab that they did NOT
order, you must mark MUST SEE THIS LAB and REQUIRE STUDENT TO
INTERPRET. You must also check both MUST SEE THIS LAB and
INTERPRET on the CCX Case Preferences screen to activate this function
in the student exam. Results will appear on the ADDITIONAL LABS
screen in the CCX exam.
9. Check DELAY THIS LAB to delay a student’s review of lab results. Delayed
lab results will be available to the student after final diagnosis and
management decisions are entered. Some labs have preset time delay(s)
that are simulations of the delays that might occur in real life. Simulated
delays will appear in the box next to DELAY THIS LAB. You may alter the
length of these delays, choose to remove a delay from a test (by “unchecking” the box), or add a delay to a test if you wish. If results are
delayed, a student may change the diagnosis and management after
seeing the results. However, a record of their entries both before and
after seeing the test results will be available for comparison by the
instructor in the SAR Utility.
[email protected]
C & P Utility
10. Click ADD TO LIST once all lab values and requirement instructions are
complete for a particular lab. The lab will appear in the bottom text box
on the LABS screen. Repeat this process for each of the labs to be
entered. You may delete labs using the DELETE button. If you want to
edit a lab that you’ve already added to your list, highlight the lab, and
type in your changes.
NOTE: To make lab tests with differing results equally acceptable for
your evaluation purposes, highlight the original item, select the
new lab, and then click OR [See COMMON BUTTONS]. The new lab
will appear alongside the original choice, separated by a vertical
hash mark.
11. Check “COMPLETE” when you have made all the lab test selections you
wish to include. Use the arrow keys to advance to the next screen.
F. Diagnosis
Choose the diagnosis(es) you expect students to enter, either from the list of
hypotheses you entered earlier or by typing a diagnosis into the text box.
1. To choose a diagnosis from the diagnostic hypothesis list, click the menu
and highlight the item you wish to select. Click ADD/EDIT.
2. To enter a diagnosis not on the diagnostic hypothesis list, type the
diagnosis in the text box labeled ENTER DIAGNOSIS. Click ADD/EDIT.
You may also delete items or add synonyms.
3. Check the box marked COMPLETE in the upper right corner and use the
arrows to advance to the next screen when you are satisfied with your
Diagnosis list.
Tech support: 1-800-453-8040
15
C & P Utility
G. Management Items
You will enter the patient case Management Items you expect students to
enter in completing the CCX case. Your selection of either in-hospital or outpatient care from the CASE PREFERENCES screen will automatically appear in
the MANAGEMENT LIST box in the lower half of your screen. Management
Items are divided into ten categories; (see button labeled SELECT
MANAGEMENT CATEGORY) nursing care, activity, diet, procedures, specialist,
medications, education, counseling, community resources, and follow-up. You
may also designate an INTERIM TREATMENT if appropriate.
The MANAGEMENT ITEMS screen that you see will differ slightly, depending
on your selection in Question 5 on the CASE PREFERENCES screen. See the
steps listed below for each choice. [See also Figures 10 and 11.]
Figure 10. C & P Utility Management Screen – Free Entry Option
Figure 11. C & P Utility Management Screen-Select from list option.
FREE ENTRY
If you chose “free entry,” you will find a text box directly below the menu
marked SELECT MANAGEMENT CATEGORY.
1. Select a Management Category, type in the management items for each
category you select and click ADD. The item will appear in the text box
labeled MANAGEMENT LIST. Repeat this process for each management
item you want to list.
2. To designate an item as an INTERIM TREATMENT, follow the steps listed
in #4 under Select From List . To order medications as a management
category, follow the steps in #2b on page 17.
16
[email protected]
C & P Utility
SELECT FROM LIST
1. Choose from the SELECT MANAGEMENT CATEGORY list, and then from
the SELECT MANAGEMENT ITEM list. Highlight the item and click ADD.
2a. Some management items have open-ended instructions.
Example: Select the NURSING CARE management category. If you
select the MANAGEMENT ITEM labeled “Notify if....” a text box
appears where you may type in the notification orders for nursing
care. Once you are satisfied with the completed instructions for the
management item, click OK. Your completed instructions will
appear in the MANAGEMENT ITEM menu.
2b. If you select MEDICATIONS as a patient management option, a box will
appear. Enter detailed information regarding the drug you would
specify [See Medications note and Figure 12].
Select a DRUG TYPE and a DRUG CLASS. Highlight the DRUG TYPE
you wish to order. A list will appear in the DRUG CLASS box.
Highlight one of the drug classes listed, or choose “other.”
MEDIC ATIONS
NOTE
If you wish to specify a drug
type, class, route of delivery
dosage, or interval not
listed, choose OTHER and
type your selection into the
box provided.
You must select a DRUG
TYPE and a DRUG CLASS
before you can add a drug
to your management list.
(Optional) Select the ROUTE OF DELIVERY from the list provided.
Choices include; by mouth, intravenous, intramuscular, topical, subcutaneous, and other.
(Optional) Type the DOSAGE into the box provided and highlight the
UNITS from the list provided.
(Optional) Select the INTERVAL by highlighting your choice from the
menu provided.
Click ORDER when you’re satisfied with your choices. This will return
you to the MANAGEMENT ITEMS screen. Click ADD.
Figure 12. C & P Utility Management Screen - Medications window
3. You MUST CLICK ADD to place an item on your Management list.
4. The INTERIM TREATMENT box designates a management item as an
INTERIM TREATMENT. Highlight the item in the management list, then
check the INTERIM TREATMENT box. The item will now have “Interim_Rx”
added to it. If a student orders this item it will appear on the
management list, but the student will receive credit only if he/she
selects the item as interim management in the case.
5. Delete items from the management list or add synonyms as described
under COMMON BUTTONS. [page 55].
Tech support: 1-800-453-8040
17
C & P Utility
6. Check COMPLETE and use the arrow keys to advance to the next screen
when you are satisfied with your MANAGEMENT LIST.
Note: If you choose to enter content questions, that will be the next screen
you see. If not, you will advance to the PERFORMANCE VALUES section
of the C & P Utility. You will find instructions for SETTING PERFORMANCE
VALUES under that heading on page 20. If you choose to collect
checklist data from a standardized patient, you will need to enter those
questions into text files. Instructions for entering checklist data appears
on pages 19 and 20.
ABBREVIATIONS
TYPE:MC denotes multiple
choice, with up to five
possible answers from
which students choose.
H. Content question
On the Content Questions screens, enter all content knowledge questions
you want students to answer while taking the CCX test. Questions may be
formatted in three ways: multiple choice, true false, or short answer. The
software is designed to allow you to place your questions after any of the
major sections of the Clinical Competency Exam. You may import graphics to
accompany the question(s). You also have the option of allowing the student
to re-answer the question. (To activate this options, you must check ALLOW
RETURN TO QUESTIONS on the CCX Exam Case Preferences screen.)
TYPE:TF denotes true/false.
TYPE:SA denotes a question
with a short answer.
1. Click the TYPE button until you arrive at the type of question you would
like to pose. (See ABBREVIATIONS.)
2. Determine the QUESTION LOCATION within the case from the pull-down
menu. Choices include; at the end of the case, after the Findings screen,
after the Problem List screen, after the Diagnostic Hypotheses screen,
after the Lab screen, after the Diagnosis screen, or after the Interim
Treatment screen (the student will see questions placed after INTERIM
TREATMENT only if he/she chooses an Interim Treatment or if you
determine that students may reanswer this question). You may choose a
separate location for each content question you enter. If you don’t select
a location for a content question, it will automatically appear at the end
of the case.
3. Type in the QUESTION(s).
ALERT
!
To avoid unforeseen formatting problems, we recommend
that you type your checklist questions and responses into a plain
text editor, rather than into a
word processing application. The
qhp.txt, qsat.txt, hp.txt and sat.txt
files in the program’s Readme
section are created in a plain text
editor and are properly formatted
4. TYPE IN ANSWER CHOICES for Multiple Choice questions, labeled “A”
through “E.”You may choose to list fewer than five possible answers.
5. PROVIDE CORRECT ANSWER(s) for the True-False and Multiple Choice
questions. Click the button to the left of the correct answer and then
click ADD NEW QUESTION if you wish.
Note: No answer will be added for short answer questions at this time.
6. Check ALLOW RE-ANSWER to let the students answer the question(s)
again after the initial answer.
7. Decide whether to IMPORT GRAPHICS to accompany a question or
questions (see IMPORTING GRAPHICS, pg.13 and SPECIFICATIONS, pg. 5).
8. Click DELETE QUESTION to remove a question from your list. You may
use the arrow keys at the bottom of the screen to navigate through
your list of content questions.
9. Check COMPLETE when you are satisfied with your list of questions and
answers. Use the arrow keys in the upper right of the screen to advance
to the next screen.
to avoid formatting conflicts with
the program.
18
[email protected]
C & P Utility
I. Checklists
Instructors can enter Checklist questions for the standardized patient to
answer following his/her encounter with the student. Questions may be
imported to the SP Utility for use in gathering patient input. You can enter
checklist questions covering two general topics: a) the History and Physical
exam portion of the patient-student encounter and b) the Patient
Satisfaction with the student. All questions must have YES-NO answers. If you
plan to use the SP Utility, questions are typed into a new file called input.txt.
Entering questions for use in the SP Utility
Copy the file called input.txt and type your questions for the standardized
patient into the copied file, using the format shown in the original document.
[See also pages 74 for input.txt formatting instructions.] Save this file as
input.txt in a location where you can retrieve it for use in the SP Utility.
Setting Performance Values in the C & P Utility
Assigning Point Values
In this section of the C & P Utility, you assign point values to the items you’ve
added for each section of the patient case. You will see a Performance Values
screen corresponding to each section of case information you’ve just entered.
The values you set on each screen will be reflected in the Student Activity
Record Utility for your evaluation purposes. You may also designate certain
items as “required” for the student to receive a satisfactory score for that
portion of the exam. On the Performance Values screens, you will also set
Minimum Satisfactory Levels (MSL) for each section of the exam. The
Category Weighting screen is your opportunity to emphasize certain case
categories by assigning them a greater weight for evaluation purposes.
Complete each screen independently as directed on pages 20 and 21.
Tech support: 1-800-453-8040
19
C & P Utility
A. Requiring items
Each item you entered earlier in the C & P Utility will appear on a
corresponding “Performance Values” screen. For example, all Findings you
entered will appear on the Performance Values screen for Findings. (If you
entered many items, your list may be continued on a second screen. Use the
arrow buttons immediately above the list to navigate among multiple
screens. ) Determine which, if any, of the items listed should be required for
students to satisfactorily complete that portion of the exam.
Figure 13. C & P Utility Performance Values Screen
1. Check the box marked REQUIRED next to each item you want to require
for satisfactory performance. Each time you designate an item as
REQUIRED, the Minimum Satisfactory Level (MSL) will change to reflect
the fact that the selected item must be included for the student to
successfully complete that category in the exam. [See Figure 13.]
NOTE
The performance values
you set in the C & P Utility
can be changed later when
students’ records are
imported into the Record
Utility.
20
2. Enter a POINTS value for each item. If you do not enter a point value, a
value of one will be assigned to that item.
3. Set a MINIMUM SATISFACTORY LEVEL (MSL) of performance for each
section of the exam. This number can’t exceed the TOTAL POINTS
available in that section of the exam, and can’t be less than the total
point value assigned to items designated as REQUIRED.
4. Check the COMPLETE box and use the arrow keys in the upper right of
the screen to navigate to the next screen when you are satisfied with
your entries. Repeat this process for the Performance Values screen
corresponding to each section of the Clinical Competency Exam.
[email protected]
C&P Utility
B. Category Weighting
On the Category Weighting screen, you will specify weights to be applied to
each content category in the Clinical Competency Exam case. You will also
determine the content categories a student must successfully complete to
receive a satisfactory overall score on this case.
Figure 14. C & P Utility Performance Values Screen
1. Check REQUIRED TO PASS CASE next to all case categories a student
must successfully complete to receive a satisfactory rating on the case
as a whole. If a student fails a required category, he/she will receive an
unsatisfactory score for overall case performance. (The REQUIRED
buttons are on the left side of each category.)
2. Specify the weight to be given to each of the categories within the CCX
exam. This weight will be expressed as a percentage (up to two digits to
the right of the decimal) and can be typed in the boxes to the right of
each category.
3. The category weights you assign must total 100% for the entire list. The
software is designed to keep a running total of the category weights as
you set them. The total weight for all categories is at the bottom of the
screen. If the weights you assign do not total 100%, you will not be able
to complete the Category Weighting process until you adjust your
figures.
4. Check the COMPLETE box in the upper right of the screen when you are
satisfied with your entries. Click the arrow keys to advance to the next
screen.
You have now finished using the C & P Utility to set up a new patient case. All
information entered for each section has been saved in the folder you
selected when you began the case creation process. This case will be labeled
by the first initial and the last name of the patient (e.g. W_Kirk). See Note.
Tech support: 1-800-453-8040
NOTE
It is important to remember
the name of the folder in
containing your patient
case. You will eventually
copy this folder to the
computers where students
will take the exam. Students
will open this folder to take
the CCX exam. Click the
MENU button to return to
the C & P Utility menu if you
want to change any of your
entries. Click the red STOP
button to exit the program.
21
C&P Utility
Editing an existing case in the C & P Utility
Open the C&P Utility
Click “Edit Existing Case” on the Clinical Competency Examination
Criteria and Performance Utility title screen.
HELPFUL HINT
Starting in the CASE
PREFERENCES screen of the
C &P Utility before you edit
case content may save time.
Click OK on the CASE
PREFERENCES screen to move
automatically to the
FINDINGS screen. Click MENU
and choose the category you
wish to edit next.
22
Windows Users: Find your case by navigating to it. Select the case
folder you would like to edit. Click OK.
Macintosh Users: Find your case folder and highlight it, then click
the “Select” button to begin loading files.
After you have selected the case you wish to edit, you will arrive at the
“Criteria and Performance Utility Menu” screen. Click the button corresponding to the case section you wish to edit to go directly to that
section of the case. Any changes you make will automatically be
saved. (See Helpful Hint.) Screens marked as “Complete” are designated with a green light on the C & P Utility menu screen.
Click the red STOP button in the upper right of the Case Content and
Performance Values screens to end your editing session. Click the
STOP button again on the C & P Utility title screen to exit the program.
[email protected]
Chapter 2. Using the Clinical Competency Exam
In the CCX Exam, instructors can determine what information students will be
asked to provide in the CCX case. Students can use the software template to
document their findings, list hypotheses, order lab tests and review the
results, order treatment, and answer questions about case content. Here’s
what is covered in this chapter.
Setting preferences for the CCX Exam - Instructor help 23-36
Accessing the CCX Case Preferences screen
24
TIME CUE
Instructors, allow 1-2 hours
your first time in Setting
Preferences and working
through a CCX case with
this manual.
Instructions for Using the CCX exam 29-38
Getting started 29
Content Questions 30
Case screens
Statement of patient problem - findings list 30
Problem List 30
Diagnostic Hypothesis(es) 30
Laboratory Section 31-34
Diagnosis 35
Management 35-37
Delayed Labs 37
Other Issues 38
Setting Preferences in the CCX Case - For
Instructors Only
Figure 15. The CCX Patient Case title screen.
Setting preferences in the CCX Template provides the instructor with another
opportunity to make choices about what the student sees in taking the
Clinical Competency Exam. Some choices on the Case Preferences screen are
necessary to activate preferences set in the C & P Utility. The process of
setting case preferences for the student test also allows the instructor to link
the student case with such tools as computer based dictionaries for student
use while taking the test.
Figure 16 on page 24 shows the default preferences that are already selected
in the software. Adjust the preferences as needed.
Tech support: 1-800-453-8040
23
CCX Exam
HELPFUL HINT
Accessing the Case Preferences Screen - For Instructors Only
1. Find the individual case folder that you created in the C & P Utility.
It may save time if you set
the case preferences before
you copy the case(s) onto
the computers that the
students will use in taking
the test. However, the
program will also allow you
to set case preferences after
the cases are copied onto
the individual test
computers. If you choose
this method, you must set
case preferences
individually on each
computer that students will
use to take the exam.
Its name will be the first initial and the last name of the patient.
Example:
2. Open the case by clicking the “CCX” icon
within the case folder.
3. The CCX Case title screen will appear [see Figure 15 on page 23].
Information on accessing Case Preferences has been removed from this
electronic document. Please consult your printed manual.
4 . Please consult your printed manual.
5. Make all your preference choices for this case. If you do not change
preferences that have default settings, the default settings will be
applied.
You will have seen some of the preference choices in the C & P Utility. Make
adjustments as needed. Click DONE on the Case Preferences screen when you
are satisfied with your entries. Following is a description of the choices you
may make in each section of the CCX Case Preferences screen. [See also
Figure 16.]
DETAIL NOTE
The format required by the
default setting will be an
eleven character ID number,
including dashes, one
space, then student name
all on one line (see
example).
Example of student
names and numbers:
111-11-1111 John Doe
If you check ENTER ID
NUMBER, the file name for
the student record will be
their ID number of up to
eight digits without dashes.
If ENTER ID NUMBER isn’t
checked, the file name for
the student record will be
the first eight characters of
the student name. Save
your student roster. You
may need this list again
later if you evaluate student
records from multiple cases.
24
Figure 16. CCX Case Preferences Screen with default settings
Case Functions
Keep Records: Check this box to store student records in the location
you designate. You must select a location in the box to the right of
the STUDENT RECORD LOCATION button at the bottom of the
screen. [See Pg. 28]
If you do not check the KEEP RECORDS box and set a RECORD
LOCATION, no record of the student’s test performance is saved. The
student will be warned of this after entering his/her name or ID
number as they enter the case.
Enter ID Number: Check ENTER ID NUMBER to require students to enter
an ID number to enter the CCX case. If this box is checked, students
won’t be allowed to access the case unless they enter an ID that
matches one of those you list in the “names” field on the Case
[email protected]
CCX Exam
Preferences screen. The ID must also be formatted identically to those
on your list, so if you check ENTER ID NUMBER, you must advise
students of your chosen format. [See DETAIL NOTE, page 24.] If this
box isn’t checked, students can gain access to the CCX case when
they type in any name, regardless of whether it’s listed in the Names
field on the Case Preferences screen.
ID Length: To modify the length and form of the ID number, first change
the number in the box next to ID LENGTH. (The default setting is for
eleven characters, including dashes.) Change the FORM to
correspond with your preferred way of listing the student ID's. Click
ID# to revert to the default length of an eleven character ID number.
You may enter student names and/or ID numbers to the list either by typing
them in the text box on the right side of the screen or by importing a list of
ID numbers and names from a plain text file. (We strongly recommend
using a plain text editor, rather than a word processing application to
create your list.) To import names, follow the instructions below.
Click IMPORT NAMES, then navigate to the text file containing your list of
names and/or ID numbers. Open the file. You can format your list to conform
to those required by the Default settings [see Detail Note], or you can change
the ID length and form as directed above. The format in your text file must be
identical to the length and form you chose above. Regardless of the length of
the ID number, your list must contain only one ID number and name per line,
spacing once between the ID number and the name. So, if you choose to
import a student roster that includes 4-digit ID numbers, you must still space
once between the ID number and the student name.
NOTE
Designate Hypothesis: Check DESIGNATE HYPOTHESIS to require
students to link each lab they order with a hypothesis on their list.
Students may link multiple labs to the same hypothesis (instructions
on the LAB screen). If this box isn’t checked, a student may order labs
without linking them to a hypothesis.
All lab preferences on the
CCX Preferences screen
serve to activate or
deactivate choices you
previously made in the
C & P Utility. For example:
Justify Labs: Check this box to require students to justify the labs you
designated for justification in the C & P Utility. If this box isn’t
checked, students may order labs without justifying their choices. If
you require a student to justify a lab with delayed results, the
justification will be made when the student looks at the results on
the delayed labs screen. If you require a student to justify a lab that
isn’t delayed, the student must justify the lab when it’s ordered.
If you marked any labs for
both INTERPRET and MUST
SEE in the C & P Utility,
check both corresponding
boxes on the CCX Case
Preferences screen to force
students to both view and
interpret those labs.
Labs
Delay Labs: Check this box to delay the lab results for labs you
designated as “delayed” in the C & P Utility. The software is shipped
with this function turned ON. If the box isn’t checked, no lab results
will be delayed. [See Justify Labs.]
Interpret: Check this box to activate the INTERPRET function for the labs
you designated for interpretation in the C & P Utility. If the student
chooses a lab marked as “interpret,” he/she will be asked to interpret
lab results before viewing consultant information if you entered such
information in the C & P Utility. The software is shipped with the
“Interpret” function turned ON. The “interpret” function is a way to
learn about a student’s knowledge of interpreting lab results without
directing him/her to order certain labs [See Note].
Must See: Check this box to activate the MUST SEE function for labs
designated as “Must See” in the C & P Utility. This function requires
students to view results for labs that they didn’t order. Results of lab
Tech support: 1-800-453-8040
If the MUST SEE box isn’t
checked here, students
won’t be forced to see any
lab results, even those
designated as “Must See” in
the C & P Utility. If the
INTERPRET box isn’t
checked, students won’t be
required to interpret any lab
results.
25
CCX Exam
tests designated as “Must See” will appear on the “Additional Labs”
screen just before the “Other Issues” screen. The students must view
the lab results before they can continue with the case. However,
students won’t have an opportunity to change the diagnosis or
management plan at that point.
Management
Select from List: Check this box to have students choose management
items from the lists provided. If this box isn’t checked, students will
type in (free enter) any management items they want to request.
Must fill in all Drug Fields: Check this box to require students to
complete all text fields related to a medication, before they can
proceed with their order and management. If the box isn’t checked,
students may order a drug without completing all fields provided for
medication information.
Allow Delete: Check this box to allow students to delete management
items from their lists as needed. If the box isn’t checked, students
won’t be allowed to delete management items once they’ve been
ordered.
ACCESS NOTE
Area Access
If the Area Access box for
Hypothesis isn’t checked,
the student can still use the
DDx button on the Lab
screen to go to a
hypothesis screen and type
in a hypothesis. But if the
instructor determines a
Hypothesis isn’t relevant to
the case, the student
wouldn’t have a reason to
go to the Hypothesis
screen.
Check the box for each area of the CCX exam that you want your students to
be able to access. This function is designed to save time for students by
requiring them to visit only the screens that the instructor deems relevant to
the case. The feature takes the student only to the screens selected. For
example, if you check only the following items
Findings
Labs
Diagnosis
the student will never see Problem List, Hypothesis, or Management. [See
Access Note.] The software is shipped with access designated for the
Findings, Hypotheses, Lab, Diagnosis, Diagnosis Justification and
Management sections.
Dx Justification: Check this box to require students to enter a
justification for their diagnosis on the diagnosis screen before they
can continue in the case. If the box isn’t checked, instructions
appearing in the “Diagnosis Justification” area will tell the student(s)
to skip diagnosis justification and select a confidence level before
continuing.
Learning Resource
Dictionary: Check this box if you want to link a computer based
dictionary for student use on various screens in the CCX exam,
provided your institution owns a copy and a site license for the
resource. Students will access the dictionary by clicking the
DICTIONARY button on screen. The dictionary button will appear on
the findings, problem list, hypothesis, and diagnosis screens. If the
box isn’t checked students won’t see the DICTIONARY button on any
of the screens within the case, even if a dictionary has been linked to
the case.
Note: If you check DICTIONARY or DRUG INFO, see also instructions for
LOCATION BUTTONS.
26
Drug Info: Check this box to allow students access to a resource for
drug information while ordering a medication, provided your
institution owns a copy and a site license for the resource. If the
[email protected]
CCX Exam
student selects the Medication category, a dialog box appears in
which they can select medications. A DRUG INFORMATION button
will appear in the medications dialog box. Students can click the
DRUG INFORMATION button to open the resource that has been
linked to the case..
If the Drug Info box isn’t checked, the DRUG INFORMATION button won’t
appear on the medications dialog box even if a resource has been
linked to the case.
In Case of Crash restart from last visited section
Check this box to allow a user to return to the program at the point at
which a crash or power outage occurs or at which the user must quit
out of the program. If this box is checked, all information entered up
to the point of the interruption will be saved, unless the student was
in the process of answering a set of content questions. In that event,
the answers to some questions may not be saved. The student must
use the same ID number and/or name they used initially to log on
again.
Justify Managements
Check the management categories where you want the student to
provide justification for the management items he/she specifies.
Example: If you check the “nursing” category under “Justify
Managements,” a student would be required to justify all
management items he /she orders in the “nursing” category. You
may choose to have a student justify his/her choices for one or
more categories.
NOTE
If the IN CASE OF CRASH
box is NOT checked, a
student trying to re-enter
the program after a crash
or other shut-down will see
a message that the
program crashed the last
time it was used, and the
student won’t be able to
enter the program using
the ID number used
previously. The message
will advise contacting
technical support.
If you don’t check any boxes under Justify Managements, students won’t
be asked to provide justification for their choices in any management
category.
Content Questions
ALLOW RETURN TO QUESTIONS: Check this box to allow students to
reanswer content questions that appeared throughout the case. If
this box is checked, students may return to the content questions
again at the end of the case and change their answers as many times
as they wish. If students don’t change their answer(s), the original
answer will remain. (See also Reanswer Hint.) If ALLOW RETURN TO
QUESTIONS isn’t checked, content questions will appear only once,
even if they are marked for reanswer in the C & P Utility. Any content
questions that you place immediately after the “Interim
Management” screen won’t appear to students who don’t select
“Interim Management” if ALLOW RETURN TO QUESTIONS isn’t
checked.
Set Time Limit
Time Limit: Choose a maximum time allowable for students to take the
test. Enter that time, expressed in minutes, in the box provided in the
lower center of the screen. The program is shipped with a default
time limit of 1000 minutes If you don’t want to limit students’ time,
keep or increase that amount.
Display Warning: How many minutes before the time limit expires
should students receive a warning? Type in your choice. Timing can
be expressed to the students in one of two ways. Choose either; a
clock showing the time remaining, or a clock showing time elapsed.
Tech support: 1-800-453-8040
RE-ANSWER HINT
You may also use ALLOW
RETURN TO QUESTIONS to
ensure that students who
don’t select an “Interim
Management” still get to
answer any content
questions that you
designated to follow the
“Interim Management”
screen. These questions
would appear to students
who don’t select “Interim
Management” for the first
time at the end of the case.
27
CCX Exam
Location Buttons
STUDENT RECORD LOCATION- Click this button to direct where student
entries for the CCX exam are saved. It’s recommended that you create
a new folder to hold student records for a particular case. For
example, the records for a case in which the patient’s name is Warren
Kirk could be saved in a folder called “Kirk Records.” Do not save
student records in the “Prefs” folder.
Student Records Location
Student records will be stored in the
Case Records folder by the first eight characters of either their name or their ID
number (see example below). Make sure
you remember the location of this folder.
You will need it later in using the Student
DICTIONARY LOCATION - Click this button to direct the program to a
previously purchased and installed dictionary that the student can
use in taking the CCX exam. Navigate to the executable file or
dictionary application you will allow students to use.
RESOURCES LOCATION - Click this button to direct the program to the
previously purchased and installed drug reference that students can
use in taking the exam. Navigate to the executable file or drug
information resource you will allow students to use.
Activity Record Utility.
Delete Backups
The CCX software makes a back-up copy of each student record from the CCX
exam. (Backups are saved in the ccx_file folder of the case.) Click this button
to delete the backup copies. A dialog box will appear asking again if you
want to delete the back-ups. Click YES to delete.
Click DONE when you’ve selected all the necessary preferences. The CCX
exam cannot be taken over a network, so you must copy the case folder
onto the computers where the students will take the test [See ALERT].
ALER
T!
Disable anti-virus software on
all computers the students will
use to take the Clinical
Competency Exam.
28
[email protected]
CCX Exam
Section B. Instructions for using the CCX exam
Getting Started
1. Find the case you’ve been assigned to work on. It will be saved by
patient name.
NOTE
For example, the case for a patient named Warren Kirk would be saved as
W_Kirk.
Open the case folder. Double click the “CCX” icon.
The title screen
will re-state the patient’s name. Click BEGIN. A box will appear asking
you to identify yourself, either by name or ID number. Type the
information in the box provided and click DONE. The program will
confirm your name. If the name is correct, click YES. If the name is
incorrect, click NO to return to the CCX Case title screen and begin
again.
2. The Clinical Competency Exam title screen will again provide you with
the patient’s presenting situation. Read the information and click YES to
continue.
3. On the screens that follow, you will see several buttons (listed on pg. 56).
Once you enter the CCX Case,
you may not quit until you
have completed the entire
case.
If the program crashes or if
there’s a power outage while
you are taking the CCX
exam, re-enter the CCX
program using the same
username and ID. The
program will resume on the
last screen you completed
before you left the case.
Graphics Note
Instructors have the option of attaching
graphics to accompany content questions. If a graphic is available, a button
labeled SEE GRAPHIC will appear. Click it
to access the graphic.
Figure 17. CCX Case Screen – Diagnostic Hypothesis
Case Screens
From this point on, you will see either some or all of the case screens
described in the following pages. Don’t be alarmed if you do not see all
screens. That simply means your instructor has determined that certain
screens aren’t appropriate for this case. When you are finished with each
screen click either the button marked DONE or WHEN FINISHED, CLICK HERE
TO CONTINUE.
Tech support: 1-800-453-8040
29
CCX Exam
Content Questions
Your instructor may or may not have added content questions in the Clinical
Competency Exam. Questions may take three forms: True/False, Multiple
Choice, or Short answer.
Click the button next to the answer you wish to select if the question
is either True/False or Multiple Choice.
Type your answer in the text box provided for Short Answer
questions. Questions may appear throughout the Clinical
Competency Exam or they may be listed at the end of the case.
Your instructor may or may not allow you to reanswer content
questions when you reach the end of the case. See instructions for
the “Other Issues” screen to access this option if it’s available to you.
Statement of Patient’s Problem/Findings
FINDINGS LIMIT
Your instructor may have
applied a limit to the
number of Findings you
may list. The limit will be
displayed on the Findings
screen. Once the limit is
reached, you won’t be
allowed to add new items
without deleting others.
The initial statement of the patient’s chief complaint will appear in the text
box at the top of the Patient’s Problem/Findings screen. The Patient’s
Problem/Findings screen will appear to you in one of two formats, depending
on whether your instructor requires you to list all findings as “pertinent”
finding, or divide items into a “positive findings” list and a “negative findings”
list.
Type the initial statement of the patient’s problem in the text box
provided at the top of the screen.
Type each “Finding” in the appropriate text box provided. Click Enter
(Return) if your instructor requires a single list of “Pertinent” findings.
Type your entry in the field above the appropriate list box if your
instructor requires separate lists for “Positive” findings and “Negative”
findings. Press Enter (Return) to add the item to your list.
Problem list
The initial statement of the patient’s chief complaint will appear in the text
box at the top of the screen.
Type in each item you want to include in the Problem List. The
Problem List may contain such items as previous patient conditions
or concerns that may or may not be related to the chief complaint.
HYPOTHESIS
MAXIMUM
Your instructor may have
recommended a maximum
number of Diagnostic
Hypotheses. If so, the
maximum is simply a
recommendation rather
than an actual limit and
you will be allowed to
continue to add more
items.
30
Click ENTER (Return).
Diagnostic Hypothesis
Your initial statement of the patient’s problem will appear at the top of the
screen.
Type in and enter one or more of the diagnostic hypotheses you
would like to investigate.
Use the UP and DOWN buttons to prioritize your list of hypotheses.
Click RETURN TO... to return to the previous screen.
[email protected]
CCX Exam
Laboratory section
You may order laboratory tests and procedures to help you diagnose and/or
treat the patient. Order tests as you would in real life, but keep in mind the
risk and the cost effectiveness of your choices will be considered in
evaluating your performance.
The LAB REQUEST FORM screen contains buttons that allow you to make
certain decisions regarding laboratory work and interim treatments.
Interim Management
Any management entered prior to
entering a final diagnosis and final
treatment is considered Interim
Management.
Figure 18. CCX Lab Request form screen when designating a hypothesis
You may be asked to designate a hypothesis for each lab selected. A
list of the hypotheses you entered can be found in the pull-down
window at the top of your screen under “Hypothesis being investigated.“If you aren’t investigating a particular hypothesis, select SCANNING. If you are ordering a treatment-related test, associate it with
the TREATMENT in the hypothesis list. [See Figure 18.]
Figure 19. CCX Lab Request form showing lab categories & list
You may select labs in one of three ways.
-Use the “Search” button to find the desired test.
-Select a Lab category and then select a lab from the list of tests that
appears as shown in Figure 19.
-Click the appropriate button from the COMMON LABS buttons in the
lower half of your screen [See Figure 20 and ALERT, pg 32.]
Tech support: 1-800-453-8040
31
CCX Exam
The name of each navigation button on the left side of the screen
appears when you roll your cursor over that button. Review the list
on page 34 for a brief description of each button.
The results of some labs may be delayed.
Instructors have two options for crediting you with ordering a
lab.
a) You may be charged and receive credit for the labs as soon as you
add lab tests to your list.
b) You may be charged for labs when you click SUBMIT REQUEST and
given credit for the labs when you look at the results.
ALE
Click the RX button and select Interim Treatment to order a form of
treatment before your final diagnosis and treatment decisions are
made. (This option is also available on the Lab Results screen.)
RT
You may be asked to Interpret some labs or to Justify certain lab
choices you make.
No lab is actually ordered until
you add it to your list and click
the SUBMIT REQUEST button.
Order all items on your list by
clicking SUBMIT REQUEST, or
select items from your list (they
will appear in bold) and click
SUBMIT REQUEST to order only
the selected items. See a) and b)
above for an explanation of how
students are credited and
charged for labs ordered.
Figure 20. CCX Lab Request form - using COMMON LABS button
32
[email protected]
CCX Exam
Lab section Step-by-Step
1. Designate a diagnostic hypothesis for each lab selection, if that’s
required. Add all the labs you want to order that are associated with
that hypothesis. To select more than one lab associated with the same
hypothesis, hold down the CONTROL (CTRL) key while selecting the
hypothesis and desired lab tests.
2. You can find the lab test you would like to order by one of the three
methods listed on pg. 31 and described on your screen.
Graphics Note
Instructors have the option of attaching
graphics to accompany lab tests. If a
graphic is available, it will appear after you
click the name of the lab on the LAB
RESULTS screen.
3. Click SUBMIT REQUEST when you are satisfied with your list. If you
ordered any labs that aren’t delayed, this will take you to the LAB
RESULTS screen where all non-delayed labs are listed. [See instructions
below for ACCESSING LAB RESULTS.]
4. Click REQUEST MORE LABS if you want to order more tests.
5. Use the buttons listed below to move to the screen of your choice.
Note: If you have ordered any DELAYED LABS, results will be available after
you’ve made your final diagnosis and management decisions. [See
instructions on Page 37.]
ARE YOU DONE REQUESTING LABS?
If so, use the buttons on the upper left of
your screen to access another screen in the
case.
Accessing Lab Results
After you’ve submitted your lab request(s) each lab with available results will
be listed in the text box at the top of the Lab Results screen [see Figure 21].
Click the name of each test to see the Patient Results (on the left side
of the screen) and normal results for that test (on the right side of the
screen).
Click REQUEST MORE LABS to return to the Lab Request Form to order
more tests.
Figure 21. CCX Lab Results Screen
Tech support: 1-800-453-8040
33
CCX Exam
CCX Control Buttons- Lab Section
Go to the Lab Request Form.
Go to the Diagnostic Hypotheses screen.
Go to the Diagnosis screen. You won’t be able to return to
the main lab screen after you commit to going to the
Diagnosis screen.
Go to the Management screen to order an interim
treatment or a final treatment. For a final treatment, you will
need to choose either IN HOSPITAL or OUT PATIENT. If you
select Final Treatment, you will be prompted to enter a
Diagnosis before going to Final Management.
Make Notes on patient responses and results. Hold down
the control key while clicking the results or responses to
add the text to your notes. Click the Notes button without
selecting text to view or add Notes of your own.
Interpret the patient’s lab results.
Review consultant information if available for the lab that
you selected. You may be required to interpret the lab
before you can see the consultant text.
On-line help
34
[email protected]
CCX Exam
Diagnosis
On the Diagnosis screen you will make a final diagnosis.
Click ADD NEW HYPOTHESIS and type any additions into the box
provided. Click DONE to enter.
Highlight the hypothesis or hypotheses you want to select as your
final diagnosis and click ENTER SELECTED ITEM AS YOUR Dx. Your
selection will appear in the text field in the middle of your screen. You
may edit the selected item(s) and add detail as needed.
A screen labeled ADDITIONAL LABS may
Type a justification of your diagnosis in the text box provided, if it’s
required.
see, even if you didn’t order them on your
Select a description of your confidence level in your diagnosis and
clinical reasoning.
type in your interpretation, if that’s required.
appear after the DELAYED LABS screen. This
screen appears only if there are lab tests that
your instructor deemed important for you to
own Click the lab name to see the results and
You will not be allowed to make changes in
your diagnosis and management plan after
the ADDITIONAL LABS screen.
Management
You must select either In Hospital or Out Patient case management.
Management items can be selected in two ways: free entry or selected from
lists. The screens for entering your management items will differ slightly,
depending on your instructor’s preference.
FREE ENTRY
Choose a management category from the buttons on the left side of the
screen. Type in the specific management or treatment you would
prescribe for this case. Be as specific as possible.
SELECT FROM LIST
Choose the management category from the buttons at the left side of the
screen. Select from the management choices listed for that category, or
select “Other.”Type in specifics for “other” or for open-ended
management items [see Management category examples on page 36].
You may also be asked to justify your management choices in certain
categories.
Tech support: 1-800-453-8040
NOTE
You may use the lab button
to order lab tests to aid in
your management
decisions. Results for lab
tests ordered as part of the
management section are
available immediately, and
the lab will appear on your
management list.
35
CCX Exam
Management Categories:
Management:
Example:
Nursing Care
Vital Signs every 3 hours
Activity
Bed Rest
Diet
Tube Feeding
Procedure
IV Fluids... for 48 hours
Specialist
Neurosurgeon
Medications
Antimicrobial - Antibacterial
Education
Weight Control
Counseling
Psychotherapy
Community Resources
Prescription Assistance
Follow-up
Return Visit..... in 4 weeks
Note: When you click MEDICATIONS, you will be asked for more information
as described on pg. 37. Certain other management items also require
specifics. Type them in the dialog boxes that will appear.
36
[email protected]
CCX Exam
To Order Medications:
Click MEDICATIONS. Select a DRUG TYPE from a list provided in the dialog
box. [See Figure 22 below.] Select a drug class in a second dialog box. Also
provide a description of the recommended drug, the route of delivery, the
dosage and the interval at which the drug should be administered. Click
DRUG INFORMATION to access a drug information resource made available
by the instructor. If the DRUG INFORMATION button doesn’t appear, no drug
information resource is available to you. Click ORDER to submit your
management plan.
MEDIC ATIONS
Fill in the Medications
Information as completely
as possible. The instructor
may require you to
complete all drug fields
before you can continue in
the patient case.
Figure 22. Ordering Medications in the CCX Management section.
Delayed Labs
Labs that were delayed are available after you have made your final diagnosis
and management decisions. A dialog box will appear prompting you to
review the results.
Click the name of the specific test under Delayed Labs to view the
results. Normal results and patient results will appear in the adjacent
text box. You must click on each test separately to view its results.
Click CHANGE Dx to change the diagnosis you already entered.
Click CHANGE Rx to change the management items already ordered.
Select additional treatments or select DISCONTINUE from the
appropriate category to stop a treatment previously selected.
Note: If you select DISCONTINUE, a dialog box will appear asking you to
specify what item you want to discontinue.
Click the Go back button when you are finished making changes to
the MANAGEMENT screen.
Grading Note: If you make changes to your diagnosis and management
items after seeing delayed labs, instructor grading will be based on
the revised entries. However, instructors can see all prior entries when
evaluating student records in the Record Utility.
Tech support: 1-800-453-8040
37
CCX Exam
Other Issues
Type in any issues related to the patient you want to discuss or issues
that occurred to you since you made your diagnosis. Answer the
questions at the bottom of the screen.
Click ANSWER CONTENT QUESTIONS to respond to content questions
that are meant to appear for the first time at the end of the case.
Click RETURN TO CONTENT QUESTIONS to reanswer content
questions that appeared earlier in the case. If you do not see this
button, either your instructor didn’t enter content questions or
he/she won’t allow you to reanswer questions.
Click DONE when you’ve completed this screen.
Congratulations! You have completed the Clinical Competency Exam.
An Important Note to Instructors
After students have completed the CCX Case, you or your technical support
personnel must collect the student records located on the computers the
students used to take the CCX Exam. Once collected, place these records into
the records folder you created when setting CCX Case Preferences, usually
named by the patient’s last name, followed by a space, then the word
Records. This folder should also contain a copy of the eval.cst file from within
the case folder. This information, plus any data collected in the Standardized
Patient Utility will be imported into the Record Utility for evaluation. To see a
visual depiction of what must be in your records folder, see page 41 of this
manual.
38
[email protected]
Chapter 3. Using the Standardized Patient Utility
The Standardized Patient Utility may be used only if the student saw a
standardized patient in completing the CCX Exam. The SP Utility allows the
instructor to pose questions to the standardized patient covering student
performance in gathering History and Physical Exam information, and in
overall Patient Satisfaction. The standardized patient will complete the
questions entered by the instructor after the student has completed his/her
patient interview and/or physical examination. Here’s what’s covered in this
chapter.
Instructor set-up 39
Standardized Patient Instructions 39-40
Collecting SP Utility Data 40
TIME CUE
The Standardized Patient
using the SP Utility for the
first time may take 10-15
minutes to complete the
checklists for each student.
For the Instructor: Getting started
1. Copy the file called input.txt and type your questions for the
standardized patient in the copied file, using the format shown in the
original input.txt document. [See also formatting instructions, pg. 74.]
2.. Open the SP Utility folder
Utility Icon.
and click the CCX Standardized Patient
3. Navigate to the input.txt file which contains the checklist questions for
the case you are using. (The response files created by the SP Utility will
be saved in this location.)
4. Click CONTINUE on the SP Utility Title Screen.
5. See the bottom of pg. 40 for instructions on gathering SP Utility data
after the Standardized Patient has completed his/her responses.
Note for Instructors
To exit the SP Utility, administrators
using Windows should hold down
the Ctrl and Alt keys while clicking
Continue on the Identify the
Student screen. If you are using
Mac, hold down the Ctrl and Option
keys while clicking the Continue
button.
For the Standardized Patient: Gaining SP Utility access
1. If the instructor requires a password to gain access to the SP Utility, enter
it in the space provided.
2. Enter your real name, initials,or ID number, then follow the steps below
through the SP Utility.
STEP 1. IDENTIFY THE STUDENT (Case name appears at the top of the screen.)
Highlight the name of the student to be evaluated from the complete list
of student names OR type in the first few letters of the student’s first
or last name then select the appropriate student from the names that
matched your entry. Click CONTINUE. (If a record for the student you
selected already exists, follow the instructions in Step 4. )
Standardized Patient Note
If you acted as the Standardized Patient for
multiple students, you may be asked to complete checklist questions for all or certain students in the group. Consult your faculty
member for instructions.
Figure 23. SP Utility checklist screen
STEP 2. CHECKLISTS [See Figure 23. Student name appears at screen’s top.]
Tech support: 1-800-453-8040
39
CCX Exam
Click YES or NO to mark your answer for each question listed on each
CHECKLIST screen. You can mark your answers using your mouse or
the "Y" and "N" keys on your keyboard. You can use the up and down
arrow keys on your keyboard to move from question to question.
After you have answered all the questions on a page, if there are
additional pages of questions for that checklist, you will be prompted
to either review the page or advance to the next page in the series.
STEP 3. REVIEW AND EXIT. [See Figure 24. Student name appears at the top.]
Click the appropriate REVIEW AND CHANGE button to make changes to
your responses on the checklist. Click PREVIOUS PAGE or NEXT PAGE
to navigate among multiple pages in a checklist.
OPTIONAL: Click ADD COMMENTS on the REVIEW AND EXIT screen to
type in any comments you'd like to make about the student. Click
DONE to exit the Comments screen.
Click SAVE RESULTS AND SELECT NEW STUDENT to record your responses
for this student. No record of your entries will be saved until you click
the SAVE RESULTS AND SELECT NEW STUDENT button. You will return
to the screen titled IDENTIFY THE STUDENT, where you can choose
another student from the list.
Figure 24. SP Utility Review and Edit screen
STEP 4. Editing Entries.
To edit your entries for a student after the records have been saved,
select the student’s name again from the page titled IDENTIFY THE
STUDENT and click CONTINUE. A dialog box will appear telling you a
record already exists for this student. Click New Student to return to
the previous screen or click Edit to make changes to the existing
record. You will return to the REVIEW AND EXIT screen. Click the
appropriate REVIEW AND CHANGE button or the ADD COMMENTS
button, make your changes, and then click SAVE RECORDS AND
SELECT NEW STUDENT. Your changes will be saved. You will return to
the screen titled IDENTIFY THE STUDENT, where you can choose
another student from the list.
For the Instructor: Collecting SP Utility Data
After the work of the Standardized Patient(s) is complete, create a folder and
name it sp_data. Copy your input.txt plus the text and (optional) comments
files for each student that the Standardized Patient(s) reviewed and place
them into the sp_data folder. Move or copy this folder to the records folder
for evaluation by the Record Utility.
40
[email protected]
Chapter 4. Using the Student Activity Record Utility
The Student Activity Record Utility allows you to import student records from
the CCX exam for evaluation. A single screen displays both overall results and
category results for individual students and for a group. The SAR Utility also
allows you to adjust evaluation standards, match student answers with your
own entries, and adjust the credit a student receives based on your
evaluation of his/her answers. Here’s what’s covered in this chapter.
TIME CUE
Allow 2 hours for your first
use of the Student Activity
Record Utility.
Moving files into the proper folders 41
Importing Student Records 42-43
Viewing and Evaluating Student Records 43
Student Activity Records Screen 43-44
Matching Screens 47
Record Statistics Screen 47
Adjust Evaluation Criteria Screen 48
Moving files into the proper folder
A few steps are required to ensure that student records are
properly displayed for your evaluation.
1. Locate and open the folder where student exam results
are stored. This is the location you chose on the case
preferences screen using the “Set Record Location” button. (Do not
save Records in the Prefs folder.)
2. Make sure you copy the file named eval.cst (found in the CCX folder in
the patient case you are using) into the common folder containing
student records. Do NOT copy the Eval.cst file from another case,
since eval.cst files are not interchangeable between cases. The
Student Activity Record Utility will evaluate student records based on
the criteria designated for that case in the C & P Utility.
3. If your case involves collecting Patient Satisfaction/History and Physical
Exam checklists and you used the SP Utility, the common records folder
must contain a folder labeled sp_data which must contain the
following files: input.txt J_Doe.txt (there should be a text file for each
student) and (optional) J_Doe_comments.txt.
4. Select and open the Record Utility Folder.
You will see this icon.
Click the Record Utility icon to open the Record Utility.
Figure 25 The Student Activity Record Utility title screen.
What your Records folder
should contain to run the
Record Utility
1. Eval.cst copied from the
proper CCX case.
2. Student Records copied
from the computers where
students took the CCX exam.
3. (optional - needed only if
you used a Standardized
Patient) You must have the
sp_data folder containing
the input.txt file and, may
include a comments.txt and
text files for each student in
the group.
Tech support: 1-800-453-8040
41
SAR Utility
Importing Student Activity Records
1. On the Student Activity Record Utility title screen [Figure 25, pg. 41] click
Begin. The IMPORT STUDENT ACTIVITY RECORDS screen will appear.
2. Choose how to IMPORT STUDENT LAB LISTS.
(Choose VIEWED LABS ONLY to “charge” students for all lab requests
submitted, but to credit them only after they view the results. Select
ALL LABS SELECTED to charge and credit students for all labs listed,
whether or not the student viewed the results.)
3. Choose from the import options listed below [See Figure 26].
If you choose IMPORT NEW SARs and then
choose records for a case you’ve already evaluated, any changes you made during the initial review will be lost. To add additional student records to those already evaluated without erasing your changes, choose MERGE
SARs.
Choose the IMPORT NEW SARs option to conduct an initial evaluation
of student scores for a given case.
Choose OPEN REVIEWED SARs to access student records that you
previously imported, preserving your previous changes and
evaluations.
Choose MERGE SARs to add more student records to a list that you’ve
already started evaluating [see MERGE NOTE].
Choose OPEN LAST CASE REVIEWED to access records for the last case
you reviewed without erasing any of your previous changes.
MERGE NOTE
4 . After you have selected an import option, use the directory to select the
folder containing the student records and the eval.cst for the case you
want to evaluate. Depending on the number of records, the import
process may take some time.
5. Choose whether you want records listed alphabetically or by ID number.
Follow these steps to merge unreviewed
records with records already reviewed in
the Student Activity Record Utility.
1. (opt.) Update your hp and sat files to
include names, ID’s and responses for the
new students.
2. Create a new records folder to hold the
records for this patient case which
haven’t been reviewed (e.g. Kirk Merged).
3. Move the unreviewed records and
copy the eval.cst from the original
records folder to the “merged” folder.
4. Select OPEN REVIEWED RECORDS and
open the original records folder.
5. Click MERGE SARs and select the folder containing your unreviewed records.
Figure 26 - Import screen in the Student Activity Record Utility
6. To review your newly-merged records,
select OPEN REVIEWED RECORDS and
open your original records folder.
Click EXPORT DATA to create a text file containing Student Activity Record data that
6. Once the Student Activity Records have been imported, you should see
the patient case name in the text box in the upper right corner of the
screen. A list of student names and/or ID numbers will appear on the
left side of the screen.
7. On the IMPORT STUDENT ACTIVITY RECORDS screen, you will decide
some or all of the following:
can be imported into a spreadsheet program
whether student names should be displayed in the records.
for making charts, graphs, or other types of
reports on student performance. Data are
whether a student whose entry matches a criteria item will be
credited automatically with “matching” the instructor’s criterion.
exported as a text file that can be imported
whether to export student data in a comma-delimited format.
into your chosen spreadsheet program.
42
[email protected]
SAR Utility
8. (After records have been imported) Click INDEX to go to a list of student
names and/or ID's. Select a name from the list and click GO TO RECORD
[See Printing note.]
9. Make all necessary selections and use the Common Buttons or the tabs
to navigate through the rest of the Student Activity Record [see next
section].
PRINTING
To access printing options, click
INDEX.
To print records for one student, highlight the name of the
Viewing and Evaluating Student Records
student records you want to
print. Then click PRINT and
Student Activity Record Screen
choose whether you want to
The Student Activity Record (SAR) screen exhibits data on an individual
student’s overall performance and performance in individual categories of
the Clinical Competency Exam. It also compares the student with the average
group performance. The student’s name and/or ID and the case name will
appear at the top left of the screen. [See Figure 27.] Refer to the information
on the following pages to learn about the parts and features of the Student
Record screen.
print the student’s test record,
scores, or the list of labs
ordered.
To print records for multiple
students, click on the students’
records in the list. The selected
names will appear in bold.
Then click PRINT SELECTED
RECORDS. Choose whether you
want to print the student(s)
test records, scores, or list of
labs ordered.
You may also print from the
Student Record Screen.
REMINDER
Because some student
responses are “free text”
entries, the student scores you
Figure 27. SAR Utility Student Record Screen
see initially may be low. Scores
will rise as you move through
The left side of the SAR screen exhibits a summary of the student’s
performance on the Clinical Competency Exam patient case. The SAR
screen exhibits an overall performance score and category performance score for each section of the Clinical Competency Exam. The
minimum satisfactory level set by the instructor and the student’s
category score are also listed, along with the “weight” assigned to
each category. A check-mark will appear next to the categories that
the student completed with a “satisfactory” score. An “X” will appear
next to categories for which the student received an “unsatisfactory”
score. [See Reminder and Scoring Note,pg. 44.]
the SAR Utility and match
answers with your entries.
Click the right side of the SAR screen. In the upper section you will see
a summary of overall group performance for the entire exam. Click
the lower right to see group performance in individual categories.
Average Group scores and the Minimum Satisfactory Levels in the
various categories are expressed in percentages. The range of student
scores within a group is represented by a green bar on the screen.
The Average Group score is designated by a red triangle on the
graphic. The score of the student whose record is under review is
Tech support: 1-800-453-8040
43
SAR Utility
SCORING NOTE
To calculate the Overall
Student Score, multiply each
category score by that
category’s weight, and then
total those figures. To calculate
the category score, divide the
student’s score by the total
possible. The Overall Case score
is the sum of all category
results. In order to satisfactorily
complete a category with a
required item, the student
must enter and receive credit
for the required item AND must
obtain the Minimum
Satisfactory Level in that
category. If either of these
criteria isn’t met, the student
will receive an “unsatisfactory”
rating for that category. If the
category contains no required
items, the student must simply
receive the MSL to receive a
satisfactory category mark. If a
student receives an
unsatisfactory mark in a
required category, he/she will
receive an unsatisfactory rating
for the entire case. (It won’t
affect the numerical score.)
marked with a blue triangle. A bar | represents the Minimum
Satisfactory Level for category and overall performance.
Click ‘ADDITIONAL DATA” to view
a) a“Matching Record” of all matches between the student’s responses
and those supplied by the instructor displayed by category
b) “Combined Records” with a complete listing of the student’s
responses, in the order they were entered,with the time of entry
recorded
c) History and Physical Exam Checklist questions and standardized
patient responses, if applicable, or
d) the Patient Satisfaction questions and standardized patient responses,
if applicable.
Click STUDENT COMMENTS to review any observations entered by the
student on the Other Issues screen at the end of the patient case or
in the NOTES function on the Lab screen or the Management screen.
Click NOTES TO STUDENT to type in any notes you wish to make to
the student. This function allows you to print the notes or save the
notes as an electronic file that you can e-mail to the student.
Click PRINT SCREEN to print the information exhibited on the Student
Activity Record screen.
Click LEGEND and then click any of the highlighted items on the
screen to view explanations of the key components of the Student
Activity Record screen. Click LEGEND again to exit the legend screen.
Click a specific CATEGORY on the SAR screen or go to the MATCHING
screen for that category to see a summary of student entries and performance. For example, to view student entries in the “Positive
Findings” category, click “Positive Findings” from the category list. This
will take you to the POSITIVE FINDINGS MATCHING screen (matching
screens described below), detailing the student’s responses. Click
MATCHING to go to the matching section.On the Instructions screen
of the matching section, select the category you wish to view from
the tabs at the bottom of the screen. (To see the patient’s responses
about student performance, click Patient Satisfaction or H & P
Checklist on the Student Record screen. The patient’s responses will
be listed in the window.)
See instructions for the MATCHING, RECORD STATISTICS, and ADJUST
CRITERIA screens on pages 45-48.
At the bottom of the SAR screen, you will see any Self-Assessment data
entered by the student. You will also see the student’s report of Prior
Experience with such cases and the completion times for the individual
student, the group average, and the expected completion time. You will also
see an accounting for the lab costs incurred by the student compared to the
group average and the instructor’s cost estimate.
44
[email protected]
SAR Utility
MATCHING SCREENS
Most categories for which there is data have a corresponding MATCHING
screen. The exception is History and Physical Exam and Patient Satisfaction,
which can be seen on the ADJUST CRITERIA screen. [See Figure 28 for an
example of how a matching screen looks.]
Click the MATCHING button, then click the appropriate category tab to:
review student responses in that category of the CCX exam;
rate students’ justifications for diagnosis(es) entered on the diagnosis
matching screen,
match or remove matches from students’ entries/selections for findings, working hypothesis, management lists, lab tests, interpretations
and justifications, and question responses. You may choose to
“match” student responses that the computer couldn’t recognize as
correct due to alternate wording.
Figure 28. SAR Utility Matching Screen for Positive Findings.
On most MATCHING screens, the student’s responses are listed in the box on
the left, while instructor responses are listed on the right. Matched items will
appear in bold type, while the “weight” of items designated as “required” will
be marked with an asterisk.
TO MATCH OR REMOVE MATCHES FROM ITEMS ON THE MATCHING SCREENS:
Click the items from the two lists that you want to match. Items will appear
in bold when they are matched. As items are matched, the number in the
Student Matched section will rise, as will the student score listed at the
bottom of the screen. Items listed as synonyms will be saved as a text file. To
remove a match, click on the item in the student list with its match in the
instructor list. The bold text will revert to plain text and the score in the
Student Matched section will decrease.
REVIEW MATCHED ITEMS
MATCHING NOTE
An item in the student's list can be matched
with multiple items in the instructor’s list.
However, a single item in the instructor’s list
cannot be matched with multiple items in
the student’s list.
Click REVIEW MATCHED ITEMS, then click a matched item in either the
student or instructor list to see the item with which it’s been matched.
A “Category Performance” rating will designate either “SATISFACTORY” or
“UNSATISFACTORY” performance and appears on each matching screen.
Tech support: 1-800-453-8040
45
SAR Utility
SETTING VALUES FOR QUALITATIVE LIST DESCRIPTIONS
On most Matching screens, the instructor may choose a description for the
student’s responses in that category. On most screens,choices include:
Thorough, Appropriate, Constrained and Vague. Choices within the labs
matching section include Appropriate, Incomplete, Excessive, and
Unnecessary Risk. Each of the descriptions is assigned a pre-set positive or
negative value (which represents a percentage). The values can be changed
and can be set individually for each category.
Review the values assigned to each description, displayed in the small box to
the left . If you want to change the value, place your cursor in the box and
type in a new value. When you click the description on the matching screen,
the student score will be adjusted by the value assigned to that description.
Note: To apply one of the values to another student, you must select one of the four
descriptions listed on the student’s matching screen for that category.
PROFICIENCY
EX AMPLE
If you adjust the student’s
proficiency score to reflect
a new score of 51 percent,
and if you selected a
description that has a
VALUE of -2, then two
percent would be deducted
from the student’s score.
The score exhibited under
“Student Proficiency” would
be 49-percent.
The STUDENT information under the Proficiency heading notes the number
and percentage of the student’s responses that matched instructor’s
responses.
The Instructor REQUIRED and MSL shows the student’s score on items
“required” by the instructor.
Note: The score you see in the proficiency area also takes into account any point values
assigned to the Qualitative Description you selected for the student’s entries for this category (see EXAMPLE). It will also account for any matches you made on the Matching
screen.
Click ADJUST STUDENT SCORE to edit the student’s score in an individual
category. You may choose to enter notes to the student about this
adjustment. Click Done to apply your adjustments.
Click ADJUST CRITERIA to go to the ADJUST EVALUATION CRITERIA screen.
(See instructions on pg 48. )
You can also PRINT each matching screen individually.
A note about Diagnosis Matching - In addition to the student and instructor
lists, this screen also contains a window to display the student’s justification
for their Diagnosis. The instructor may describe the diagnostic justifications
using the choices Satisfactory, Unsatisfactory, or Not Assessed.
A note about Questions Matching - A QUESTIONS MATCHING screen will
appear for each content question entered. The text of the question will
appear in the box near the top of the screen. The student’s answer will
appear in a box just below the middle of the screen. Multiple choice and
True/False questions will be graded by the computer. Click the
CORRECT/INCORRECT button to change the scoring for Multiple Choice and
True/False questions. For short answer questions, click the
CORRECT/INCORRECT button at the bottom center of the screen to either
accept or reject the student’s answer. Use the PREVIOUS QUESTION and NEXT
QUESTION buttons to move through the content questions.
Click STUDENT’s RECORD when you are finished matching items in this
student’s record. Use the arrow buttons on the STUDENT’S RECORD screen to
move to another student record for this case.
46
[email protected]
SAR Utility
Record Statistics Screen
The Record Statistics screen lists all categories within the Clinical
Competency Exam and allows you to view the number of students who
matched items within a chosen category, as well as the number and
percentage of students who completed that section of the exam with a
satisfactory score. [See Figure 29.]
Figure 29. SAR Utility Record Statistics Screen
Click the exam category for which you wish to see data. Detail of the
item(s) and number of students who matched the item(s) will appear
in the box on the right side of the screen.
Click the item to view the lists of students who matched the item and
who failed to match the item.
In the detail window, click ASSOCIATE and then select another item
from any category to see a list of students who included both items.
It’s best to use this function after matching items on the Matching
screens.
Click CLEAR to remove the associate information once you are done
looking at it.
Click PRINT STATISTICS to print the information currently displayed on
the Record statistics screen, or to print statistics for all categories in
the case.
Tech support: 1-800-453-8040
47
SAR Utility
Adjust Evaluation Criteria Screen
The Adjust Evaluation Criteria screen [shown in Figure 30] allows you to:
see and adjust the point values assigned to appropriate responses for
each category of the exam;
add synonyms to the items you have already listed;
add new criteria items to your existing lists;
mark item(s) as “required” or remove the “required” designation from
items as needed;
adjust the category weights.
Figure 30. SAR Utility Adjust Evaluation Criteria screen
To Edit an existing criteria item, click the criteria item in the Evaluation
Criteria field. In the window that appears, you may:
Add synonyms to existing items already listed by using a vertical hash
mark (shift+\) and typing the synonym next to the equivalent phrase.
Change the point value assigned to a criteria item by highlighting the
existing value in the window and typing in the new value.
(Optional) Change whether the item should be marked as Required
by clicking inside the Required box.
Click Save Changes in the window when your edits are complete.
To add a new criteria item, click ADD CRITERIA ITEM. In the window that
appears, you may:
EXPORT NOTE
After your evaluation of student records is complete,
you can return to the
Import SARs screen to
export the data to an application that accepts files
saved in a comma-delimited format.
48
Add new criteria items by typing the item in the window.
Assign a point value to the new criteria item by typing the value in
the Point Value field.
(Optional) Mark the item as Required by clicking inside the Required
box. A checkmark will appear.
Click Save Changes in the window when your additions are complete.
To revise the weights you previously assigned to each category, click
CATEGORY WEIGHTS. Highlight the category weight and type in a new value.
Weights are expressed as percentages. The weight total for all categories
must equal 100-percent.
To apply your criteria edits and additions to all student records in the
group, click APPLY CRITERIA CHANGES.
[email protected]
Chapter 5. Using the Multi-Case Performance Utility
Student results for multiple cases can be entered into the Multi-Case
Performance Utility for your evaluation. You must have completed your
evaluation of student records in the Student Activity Record Utility
before you can start working in the MCP Utility. The Multi-Case
Performance Utility allows you to see and evaluate student performance over
a range of cases and over specific categories in clusters of cases. You can also
evaluate group performance over several cases. This chapter covers the topics
listed below.
Getting Started in the MCP Utility 49
Setting Performance Values in the MCP Utility 50-51
“Clustered” cases 50
“Essential” items 51
TIME CUE
Allow 30 minutes for your
first review of records after
cases are imported into the
Multi-Case Performance
Utility. Depending on the
speed of your computer,
the import process could
also take 30 minutes.
Viewing & Evaluating Performance Scores in the MCP Utility 52-54
The Student’s Overall Multi-case performance 52
Overriding performance marks 53
Synopsis of group performance 53
Exporting Data from the MCP Utility 54
Getting Started in the MCP Utility
1. Make sure the “Records” folders for the patient cases that
you’ve already evaluated in the Student Activity Record
are within the Record Utility folder. If the records folders
and their entire contents (eval.cst, stdinfo.cst and
stdmod.cst) aren’t in the Record Utility folder, copy them
to that location. Each records folder must be named by
the last name of the patient in that case, followed by a
space, and then the word Records.
Figure 31. Multi-Case Performance Utility title screen.
Example: Kirk Records
2. Create a master text file containing a combination of the Student Rosters
from all the cases being imported. Name the file MCP Roster and place it
into the Record Utility Folder.
3. Locate the MCP Utility folder
To avoid problems with formatting
within the Record Utility folder.
4. Open the MCP folder and double-click the MCP Utility Icon
open the program.
to
5. Click BEGIN on the Multi-Case Performance Utility title screen. A window
will appear listing the case folders within the Record Utility.
Select the cases you would like to evaluate in the MCP Utility. The
name of that case will appear in bold print after you have selected it.
Click ADD ALL if you want to evaluate all the cases on the list. [See
Figure 32, page 50.]
Click LOAD PREVIOUS CASE LIST if you have already loaded cases into
the MCP Utility. A window will appear asking you to select which case
files you wish to evaluate.
for your student roster, we suggest
copying the plain text file(s) you used to
create the student rosters for each case.
We recommend that you use a plain text
editor (rather than a word processing
application) to combine those rosters into
the master roster file and name it MCP
Roster. Place that file in the Record Utility
Folder.
Enter how many of the cases you’ve chosen to evaluate must be
completed with a satisfactory score in order to receive an overall
rating of “satisfactory.”
6. Click OK when you have entered all the information requested.
Tech support: 1-800-453-8040
49
MCP Utility
Setting Performance Standards
In the MCP Utility, you can set overall performance standards for a number of
cases and “clusters” of cases that you wish to evaluate as a group. You can also
set standards for evaluating performance in specific categories across a range
of cases. These standards are in addition to the individual case scoring criteria
that you set previously using the C & P Utility or edited in the Record Utility.
Cluster Requirements
When you require students to
show satisfactory performance in
a certain number of cases within a
cluster, this requirement is in
addition to standards you will set
for the entire list of cases being
evaluated. So, in order to receive a
satisfactory Overall Multi-Case
Performance rating, the student
must meet all cluster
requirements and must meet all
other Performance Standards for
the entire list of cases selected for
evaluation.
Figure 32 MCP Utility Case Preferences screen
Clustered Cases
Instructors may “cluster” or group together cases within the larger case list for
purposes of setting specific standards that apply to items within that cluster
of cases. Select the cases you would like to group together. Enter the number
of cases that must be completed satisfactorily to result in an overall multicase performance rating of satisfactory. Click CREATE CASE CLUSTER. Repeat
for each cluster. When you are finished, click DONE CREATING CLUSTERS. [See
Figure 33.] If you have difficulty, click RESTART to return to the MCP Utility
Title screen.
NOTE
Students must meet all
Case Cluster and Category
Performance standards to
earn a “Satisfactory” rating
in Multi-Case Performance.
See page 51 for more
information on
performance standards.
Figure 33 MCP Utility Cluster option
50
[email protected]
MCP Utility
“Essential” Items
On the SETTING PERFORMANCE STANDARDS screen, you will set standards
that apply to all the cases you selected for evaluation, as described in steps 1
through 6 and Figure 34 below.
Figure 34. MCP Utility Performance Standards screen.
1. Click each category that you want to designate as ESSENTIAL, meaning
the student must show satisfactory performance in all such categories
to receive a “satisfactory” rating. When you select a category, it will be
displayed in gold.
2. Type in a “# required” next to each category you marked as ESSENTIAL.
This denotes the minimum number of cases in which the student must
show satisfactory performance for that category.
3. Enter a “# required” for each NON-ESSENTIAL category, designating a
minimum number of cases in which the student must have shown
satisfactory performance for that category [see Reminder].
4. In the red box provided, enter the number of non-essential categories
that the student must complete satisfactorily [see Reminder].
5. Click APPLY PERFORMANCE STANDARDS AND DISPLAY RESULTS when
you are satisfied with the standards you just entered.
6. Name the file in which your Performance Standards will be saved. The
computer will then load the cases and scores you selected.
REMINDER
To receive an overall rating
of satisfactory, students
must meet two standards
for non-essential categories.
1)The student must have
satisfactorily completed
that category in a sufficient
number of cases
( # required).
2) The student must also
satisfactorily complete the
designated number of nonessential categories (red
box).
Tech support: 1-800-453-8040
51
MCP Utility
Viewing and Evaluating Performance Scores
Instructors may use the data gathered and evaluated in the Multi-Case
Performance Utility to evaluate student data in several ways using two
screens within the MCP Utility.
Figure 35. MCP Utility Student’s Overall Multi-Case Performance Screen
Figure 36. MCP Utility Synopsis of Group Performance Screen
The STUDENT’S OVERALL MULTI-CASE PERFORMANCE screen allows you to
see data for individual student performance over a range of cases and over
specific categories in multiple cases. [See Figure 35 above.]
The SYNOPSIS OF GROUP PERFORMANCE screen displays student group(s)
performance over a range of cases and group performance in particular
categories. [See Figure 36 above.]
Student’s Overall Multi-Case Performance
On this screen, you will see displayed:
an overall multi-case performance rating for the student,
a student score, expressed as a percentage,
How do I tell how cases are numbered?
Roll your cursor over the case number. The
name of the case (patient name) and the student’s score for that individual case appears
in the window in the upper right of the
Overall Multi-Case Performance screen.
results of the student’s satisfactory performance in essential and nonessential categories, cases and case “clusters,”
a chart showing the categories the student completed with a
satisfactory score (blue dot) and the categories the student
completed with an unsatisfactory score (red x), and
the number of cases listed as “required” in each category.
How do I tell which cases are clustered?
On the Overall Multi-Case Performance
screen and the Synopsis of Group
Performance screen, the Case # for clustered
cases will be displayed in the same color. For
example, if cases 2, 4, and 6 are clustered, the
Case # at the top of those columns will all be
shown in blue.
52
[email protected]
MCP Utility
Overriding Performance Marks
When evaluating student performance in a given case, either a blue dot or a
red X will appear at the top of the Overall Multi-Case Performance screen and
in the row corresponding to each category for which data was entered.
Click the dot or the X next to the Overall Case Performance rating to
override the rating assigned by the computer. This will not change
the student score.
Click the dot or the X corresponding to each category to see detail of
the student’s response list as compared to the instructor’s
expectations for that category. Click OVERRIDE to change the
individual student’s Performance mark for that category. [See Figure
37.]
Click NOTES to enter notes to the student that you can print for their
review.
Click DONE when you are finished viewing the list for that category.
Figure 37. MCP UTILITY Overall Case Performance Screen with override option.
Synopsis of Group Performance
On this screen, you will see the following information: [See Figure 38.]
the number of students in a group(s) who met all performance
standards,
the number of students who didn’t meet all performance standards
a graphic showing the range of scores in the group
the average score in the group
how the group performed in each of the case categories.
Figure 38. MCP Utility Synopsis of Group Performance Screen
Tech support: 1-800-453-8040
53
MCP Utility
Viewing Detail of Group Performance on the Synopsis Screen
In each category containing data, a blue upward-pointing triangle will
designate a category in which all performance standards were met by over
half of the group. A downward pointing red triangle will appear next to
categories in which over half of the group failed to meet performance
standards. When you move your cursor over the various case categories,
numbers will appear next to the red and blue triangles in the upper right
corner of the screen. Those numbers represent how many students
satisfactorily completed that category (blue upward triangle) and how many
students failed to meet standards in that category (red downward triangle).
Figure 39. MCP UTILITY Detail of Group Performance
Click the triangle corresponding to the case category to see total
numbers and names of students in the group who performed
“satisfactorily” in that category for a specific case as well as total
numbers and names of students who performed with an
“unsatisfactory” score in that category. [See example in Fig. 39.]
Click DONE when you have finished reviewing the list.
Quartiles
NOTE
To use the QUARTILES
function on the Synopsis
screen, you must have at
least four students in the
group you are evaluating.
Click QUARTILES on the Synopsis of Group Performance screen to see
an evaluation of group performance by “quartiles.”That is, the list of
average student scores is divided into four groups or “quartiles” based
on where the score falls in the range of all students’ average scores.
For example, all students whose scores fall within the lowest 25percent of all student scores on the list will be appear in the same
quartile. The list will display all students within each quartile and their
average score.
Above each quartile you will see the SCORE RANGE for that quartile.
Exporting Data from the MCP Utility
Data from the Multi-Case Performance Utility can be exported to other
spreadsheet applications for further analysis.
1. Go to the SYNOPSIS OF GROUP PERFORMANCE screen.
2. Click EXPORT.
3. Designate the spreadsheet application you would like to use. Make sure
your application will receive data that has a “COMMA DELIMITED”
format. You may have to select a “comma delimited” format the first time
you open the spreadsheets.
54
4. See the application’s instructions for importing data to that program.
[email protected]
Appendix
Common Buttons in the C & P Utility
ADD/EDIT: Use this button to add an item to a list or to edit an item that has
already been added. To add an item, type the item into the text box, then
click the ADD/EDIT button that corresponds to that list. To edit an item
already in a list, highlight the item, edit the item in the text box, and then
click ADD/EDIT.
ARROWS: The two arrow buttons at the top right of your screen take you
either forward to the next screen or back to the previous screen.
COMPLETE: Check this box in the upper right of the screen when you have
finished entering data on that screen. If you advance to the next screen
without checking the COMPLETE box, a dialog box will appear reminding you
to do so. A green light will appear on the main menu screen next to each
category you mark as “COMPLETE.”
DELETE: To remove an item from a list, highlight it and click the delete
button.
MENU: This button at the top left of the screen takes you back to the “C & P
Utility” Menu screen. From the menu screen, you can navigate directly to a
particular section of the C & P Utility.
OR: This button appears only on the Labs screen. To make multiple lab tests
with differing results equally acceptable for your evaluation purposes,
highlight the original item, select the new lab, and then click OR.
PRIORITY ARROWS: Prioritize items in the list found on the diagnostic
hypothesis screen. Highlight the item you wish to move, then click either up
or down. The item will move accordingly.
STOP: The circular red button in the top right of the screen takes you back to
the CCX Criteria and Performance Utility Title Screen. Click the red button
again on C & P Title Screen to exit the program.
SYNONYM: Use this button to list two items as synonymous. Enter the first
item and add it to the list, then immediately enter the item to be listed as a
synonym, and click SYNONYM. The new item will appear alongside the
original item with a vertical hash mark separating the items. The computer
will accept either answer.
Example: fever|febrile
To add a synonym to an item already on the list, highlight the original item so
it appears in the ENTER text field. Begin typing the synonym in the text field
(original item disappears from the ENTER field) and click SYNONYM.
Tech support: 1-800-453-8040
55
Appendix
Common Buttons in the Clinical Competency Exam
CLOCK: Click the clock icon to see either how much time you have taken on
the exam up to that point OR how much time you have remaining to
complete the case. The clock will appear only if your instructor has activated
this option.
DELETE: Highlight the item you want to remove or delete and click the
button.
DICTIONARY: Click this button to access the on-line dictionary your instructor
has designated for your use in completing the patient case. This button
appears only on screens where you must type in information and only if your
instructor has designated a dictionary.
DONE or CLICK HERE TO CONTINUE: When you are finished with each screen
click one of these two buttons found at the bottom of the screen.
DRUG INFORMATION: The DRUG INFORMATION button will appear only in
the medications dialog box that you access through the Management screen.
Click the DRUG INFORMATION button to open the resource if one has been
linked to the case. (If you do not see this button, the resource isn’t linked to
this case.)
EDIT: Highlight the item you wish to change, click the EDIT button, edit the
item in the text box, and then click DONE.
ENTER (Return): Type the item into the text box, then click ENTER (Return) on
your keyboard to add the item to your list.
RETURN TO : This button allows you to return to a particular screen.
UP and DOWN: Prioritize items in lists found on the diagnostic hypothesis
screen by highlighting the item you wish to move, then clicking either up or
down. The item will move accordingly.
56
[email protected]
Appendix
Common Buttons in the SAR Utility
ADJUST CRITERIA - Click ADJUST CRITERIA to view and adjust the evaluation
criteria previously set in the C & P Utility and the point values required for
each entry in individual exam categories.
ADJUST STUDENT SCORE - Click ADJUST STUDENT SCORE to type in a new
category score for the student. This button is found on the MATCHING
screens for each category.
FIRST SAR - Click FIRST SAR to go to the first Student Activity Record in the
list.
INDEX - Click INDEX to go to a list of students whose records are available.
Highlight the name of the student whose record you wish to see, and click
GO TO RECORD. You may also print any or all student test records, student
scores, or a list of labs ordered by the student.
MATCHING - Click MATCHING to go the section of the SAR Utility that allows
you to review and match student answers with answers on the instructor’s
list. This function is valuable in crediting students for answers that use
wording that differs from the instructor’s wording. When you click MATCHING,
you will see an instruction screen with a series of individual sections within
the exam, listed as tabs. Click the tab to go to the matching screen for that
section.
RECORD STATISTICS - Click RECORD STATISTICS to review which entries within
each category were matched by student responses, as well as how many
students matched those entries. The Record Statistics screen also displays the
number and percentage of students who received SATISFACTORY mark for
each category.
Go directly to the first student record (Category, in SET VALUES) in the
list.
Move backward one student record (Category in SET VALUES) at a time.
Move forward one student record (Category in SET VALUES).
Go directly to the last student record (Category in SET VALUES) in the
list.
Quit the program .
Tech support: 1-800-453-8040
57
Appendix
Common Buttons in the MCP Utility
EXPORT - Click to export the spreadsheet data into a file so that it can be
opened in another program or application to produce graphs or reports
exhibiting performance data.
INDEX - Click to see a list of students whose records are included. Click the
individual student’s name to view scores for that student on several cases.
You may view this list only after you have set performance standards and
after the program has retrieved the scores at the end of the process for
SETTING PERFORMANCE STANDARDS.
PERFORMANCE STANDARDS - Click to go to the SETTING PERFORMANCE
STANDARDS screen.
SYNOPSIS/MCP- Click this button to navigate between a display of a student’s
overall Multi-case Performance data (MCP) and a screen showing a SYNOPSIS
OF GROUP PERFORMANCE.
Figure 40. MCP Utility Synopsis of Group Performance Screen
58
Figure 41 . MCP Utility Overall Multi-Case Performance screen
[email protected]
Quick Help Guides - Criteria and Performance Utility
Getting Started
Collect and organize all case-specific information, graphics and scoring
criteria before you start work in the C & P Utility. Follow the file path
diagrammed in the margin to access the Criteria and Performance Utility. The
Clinical Competency Examination Criteria and Performance Utility title screen
gives you a choice between creating a new case or editing an existing one.
Click CREATE NEW CASE and enter the patient’s name and select one
of three template choices; adult male, adult female, or pediatric. The
next screen you will see will be the C & P Case Preferences screen.
Click EDIT EXISTING CASE and choose the case you would like to edit.
You must know the location of the selected case folder. Open the
folder. The next screen you see will be the C & P Menu screen. Click
the button corresponding to the section of the case you would like
to edit.
Case Preferences
Setting Case Preferences allows the instructor to determine what students
will see when they access the Clinical Competency Exam. Use the radio
buttons and the boxes to designate your answers for the questions listed.
1. Which type of findings should be collected for this case? This response
determines whether students will collect and enter all findings in a
single list or divide their findings into positive and negative lists.
2. Should a problem list be collected for this case? This choice determines
if your students will be required to collect and enter a list of patient
problems.
3. Would you like to enter content questions for this case? Answering yes
means a screen will appear later in the C & P Utility where you can enter
multiple choice, true-false, or short answer questions for students to
answer as they work through the case. “No” means no content
questions will appear.
4. Should the patient be treated in the hospital or as an outpatient? This
answer will be used as part of the criteria to evaluate the student’s
management plan.
5. How should the student indicate management items for this patient?
This response determines whether students will select management
items in various categories from a menu of management choices within
each category or select a management category and then use “free
text” entry to specify management activities for the chosen categories.
6. Will you collect checklists from the standardized patient? Answer Yes if
you want a standardized patient to answer a list of yes-no questions
about his/her encounter with the student. If you answer yes, you will be
asked to specify on this screen the total points possible and the
minimum satisfactory level for each checklist. If you enter only one
checklist, enter zeros for the other list.
Entering Grading Criteria
How do I navigate in the Case
content screens?
Click to exit the program.
Click to see a menu of screens.
On the screens that follow, enter the criteria items that will form the basis for
grading the CCX exam that students will take. Check “Complete” at the top of
each screen when you are satisfied with your entries.
Presenting Information: Type the patient’s first and last name and a
description of the presenting situation. Students will see the name and
presenting situation when they enter the case.
Findings: Type in and add the findings that you would expect students to
enter in completing the CCX exam. You may set a limit if you choose. If
Tech support: 1-800-453-8040
Click to advance or go back.
59
C & P Utility Quick Help
you are asking students to enter positive and negative findings, add
each finding to the appropriate list.
Problem list: Enter a list of the patient’s previous or current medical
problems other than the chief complaint described under “presenting
situation.”
Diagnostic Hypothesis: Enter and add a list of diagnostic hypotheses. You
may enter a recommended maximum and/or prioritize your list with the
arrow buttons.
Important Labs note:
To activate the options of requiring students to Interpret, Justify and/or see lab
tests, you must also select these functions
on the CCX Case Preferences screen.
Labs: Select a lab category from the pull-down menu (left pull-down).
Select the specific lab test (right pull down). Patient and normal results
will appear in the text fields below. Edit patient results as needed to
change what the student will see when he/she orders this lab test. For
each lab you list, you should determine whether you want to do any or
all of the following (use the check-boxes): Attach graphics, require
students to interpret a lab and make available a consultant report,
require students to justify this selection, mark a lab test as a “must see”
even for students who don’t order it on their own, or delay a lab until
after the student has entered his/her final diagnosis and management
plan. After you’ve made all the changes for a particular lab, click ADD TO
LIST.
Diagnosis: Choose the diagnosis(es) you expect students to enter and add
all appropriate synonyms.
QUESTIONS
REMINDER
If you enter content
questions, remember to
designate where they
appear in the case. The
default location allows
students to access them on
the Other Issues screen.
Also remember to check
“Allow Reanswer” if you
want students to be able to
review and change their
answers at the end of the
case. You must also select
this option on the CCX Case
Preferences screen.
You have now completed your
work in the C & P Utility.
Management: Select the management category(ies) that you expect
students to order. For each category you select, either type in your
specific management items (free text entry) or choose them from a pulldown menu (select from list option). If you order medications, a
window will appear where you will select the drug type and class. You
may also select a route of delivery, dosage, and interval.
Content Questions: Choose the question type (True-False, Short Answer,
Multiple Choice) and type the question in the text field. Type in answer
choices for multiple choice questions. Choose the correct answer for
multiple choice and true false questions. Repeat if you have additional
questions.
Checklists: To enter History and Physical Exam and/or Patient Satisfaction
questions for a standardized patient, you must type them into a plain
text file and save it as input.txt. This file must be formatted as shown on
page 74.
Setting Performance Values
Requiring Items: On the Performance Values screens corresponding to
sections of the case, check REQUIRED for each item that the student
must list to receive a satisfactory rating for that exam category. Each
time you require an item the Minimum Satisfactory Level will increase.
Assigning Point Values: On the Performance Values screens, enter a point
value for each item. The default value is one. Total possible points for
that section are shown at the bottom of the screen.
Category Weighting: Check Required To Pass Case for each exam category
the student must satisfactorily complete to pass the case as a whole.
Assign a category weight to each exam category in the case. Entries
must total 100%.
Congratulations!
60
[email protected]
Quick Help Guides - CCX Case
Opening the case
1. Find and open the case you’ve been assigned to work on. It will be saved in a
folder by the patient name. (See the example at the right.)
2. Double click on the “CCX” icon. When the title screen appears, click BEGIN.
3. Type in either your name or ID number (ask your instructor). Click DONE. The program will confirm your name. If the name is incorrect, click NO to return to the
CCX Case title screen and begin again.
4. Read the presenting situation of the patient case and click YES to enter the case.
Case screens
Below is a brief description of the information you’ll be asked to enter on the case
screens. Don’t be alarmed if you don’t see all screens listed. That simply means your
instructor didn’t select certain screens as applicable to that case.
Questions Note: If your instructor entered content questions, they will be true-false,
multiple choice, or short answer. You may also have the opportunity to see graphics
associated with a question and/or reanswer questions at the end of the exam.
Click your answer choice for True/False and Multiple Choice questions.
Type in your answer for short answer questions.
Pertinent Findings or Positive & Negative Findings/Problem List
Case name
__________________
Case location
____________________
Identification format required:
______________________
For Pertinent Findings, type in and press Enter (Return) to add Findings you
think are pertinent to this patient. For Positive/Negative Findings, type each
finding in the space provided above the appropriate list. Press Enter (Return)
to place that finding in the list box below.
Type your problem list in the space provided. Press Enter (Return) to add the
item to the list.
Hypothesis
Enter an initial list of diagnostic hypotheses you would like to investigate in this case.
You will have the opportunity to edit or add to this list later.
Lab Section (see Figure 1c )
To order labs, you will follow some or all of the steps listed below.
Highlight the hypothesis you are investigating before selecting each lab you
order (if required --see your instructor).
Select and order lab tests to help in making diagnosis and treatment decisions. You may also order interim treatment (Rx) and then return to the
Labs screen to order more labs.
Choose labs by using the search function, by clicking the appropriate button
from the “Common Labs” buttons at the bottom of the screen, or by selecting
a lab category and then choosing the test from within that category.
(See Note)
Figure 1c. CCX Lab Screen
Tech support: 1-800-453-8040
NOTE
To choose a lab, you MUST
click ADD TO LIST on the Labs
list. Then to order a lab in your
list, you must click SUBMIT
REQUEST on the Lab Request
Form.
61
CCX Case Quick Help
How do I navigate beyond the
lab screen?
Click the name of a lab on the LAB RESULTS screen to access patient results as
compared to “normal” results. Graphics or consultant text may be available in
reviewing labs. Interpret results if required. Some lab results may be delayed
until after you’ve entered your diagnosis and management choices.
Order additional labs as needed (with the Request More Labs button).
Go to Lab request form
Go to Diagnostic
Hypotheses
Go to final Diagnosis
Go to Management
Figure 2c. CCX Lab Results Screen
Diagnosis
Edit the Diagnostic Hypotheses you entered earlier as needed, then enter a final diagnosis here. You may be required to justify your diagnosis.
Management
After you enter your final DIAGNOSIS and
MANAGEMENT plan, results of any DELAYED
LABS will be available to you. View and/or
interpret them as needed. You may make
changes to your Diagnosis and Management
plan. An ADDITIONAL LABS screen may also
appear, containing lab results your instructor
deemed important for you to view and interpret. Follow your on-screen instructions.
Select the case management category for each management you would like
to order. Categories are medications, procedures, education, nursing care,
changes or restrictions on diet or activity, education, community resources or
counseling.
Type in or select a particular management activity within each category you
choose. Be as specific as possible.
If you select MEDICATIONS, you should provide the following information
drug type, class, name, route of delivery, dosage, and interval. You may be
required to complete all text fields before you can advance in the case.
Use the Lab button to order a lab during management, or use the backward
arrow to leave the management screen. Use the forward arrow to advance.
Figure 3c. CCX Management Screen - Select from List Option
Other Issues
Type in other issues which occurred to you while completing the case. Your instructor
will be able to see your entries when reviewing your exam results. Click ANSWER CONTENT QUESTIONS or RETURN TO CONTENT QUESTIONS to answer or reanswer questions on case content.
62
[email protected]
Quick Help Guides - Standardized Patient Utility
Instructions for the Standardized Patient
Open the SP Utility Folder and click on the SP Utility icon.
To enter the Standardized Patient Utility, type your REAL name, ID or Password in the
dialog box provided.
STEP 1. IDENTIFY THE STUDENT -(Standardized patient case name appears at the
upper right of the IDENTIFY screen)
Highlight the name of the student to be evaluated from the Student List OR
type in the first few letters of the student’s first or last name and select the
appropriate student from the names that matched your entry. Click CONTINUE. (If a record for the student already exists, follow instructions listed in Step
4.)
STEP 2. CHECKLISTS (The student’s name appears in the upper right corner of each
CHECKLIST screen.)
Click YES or NO to mark your answer for each question listed on each CHECKLIST screen by using your mouse, or by using the “Y” and “N” keys on your
keyboard. You can use the up and down arrow keys on your keyboard to
move from question to question. After you’ve answered all questions on the
page, you will be prompted to either review the page or advance to the next
screen in the series.
STEP 3. REVIEW AND EXIT. (Student name appears in the upper right of the screen.)
Click the appropriate REVIEW AND CHANGE button to make changes to your
responses on the checklist. Click PREVIOUS PAGE or NEXT PAGE to navigate
among multiple pages in a checklist.
OPTIONAL: Click ADD COMMENTS on the REVIEW AND EXIT screen to type in any
comments you’d like to make about the student. Click DONE to exit the
Comments screen.
Click SAVE RESULTS AND SELECT NEW STUDENT to record your responses for
this student. No record of your entries will be saved until you click the SAVE
RESULTS button. You will return to the screen titled IDENTIFY THE STUDENT,
where you can choose another student from the list.
If you’ve been asked to provide feedback for more than one student, repeat
this process for each of those students.
STEP 4. To edit your entries for a student after the records have been saved:
select the student’s name again from the page titled IDENTIFY THE STUDENT,
then click CONTINUE. A dialog box will appear telling you a record for this
student already exists.
Click NEW STUDENT to return to the previous screen or click EDIT to make
changes to the existing record. You will return to the REVIEW AND EXIT
screen.
Click the appropriate REVIEW AND CHANGE button, make your changes, and
then click SAVE RESULTS AND SELECT NEW STUDENT. Your changes will be
saved and you will return to the IDENTIFY THE STUDENT SCREEN when you
are satisfied with your entries.
Tech support: 1-800-453-8040
63
Quick Help Guides - Student Activity Record Utility
Organizing Test Results and Accessing the Record Utility
Files needed to run the
Student Activity Record Utility
1. Eval.cst copied from the
proper CCX case.
2. Student Records copied
from the computers where
students took the CCX exam.
3. (optional - needed only if
you used a Standardized
Patient) You must have the
sp_data folder containing
the input.txt file and, may
include a comments.txt and
text files for each student in
the group.
1. Locate and open the records folder where student exam results are
stored. (This is the location you chose on the case preferences screen
using the “Set Record Location” button.)
2. Make sure you copy the file named eval.cst (found in the CCX folder in
the patient case you are using) into the common folder containing
student records. Do NOT copy the Eval.cst file from another case,
since Eval.cst files are not interchangeable between cases. (The SAR
Utility will evaluate student records based on the criteria designated for
that case in the C & P Utility.)
3. If your case involves collecting Patient checklists and you used the SP
Utility, the common records folder must also contain a folder labeled
sp_data, which must contain the input.txt and files for each student.
Example: J_Doe.txt and (optional) J_Doe_comments.txt.
4. Select and open the Record Utility Folder. Click the Record Utility icon
to open the Student Activity Record Utility.
5. On the SAR Utility title screen, click Begin. On the Import screen that
appears, click IMPORT NEW SARs to import student records you haven’t
yet evaluated. If some or all of the records you are importing have
already been reviewed, click one of the other buttons [see OPTIONS].
6. From your computer’s file directory, select the folder containing your
student records and the eval.cst for this case. Follow the on-screen
prompts.
7. After records are imported click a name in the student list to go to that
student’s record, or click INDEX to go to a list of student names and ID's.
In the Index, highlight a name and click GO TO RECORD.
Student Activity Record Screen
OPTIONS
OPEN REVIEWED SARSallows you to retrieve student records for any case
you’ve already evaluated,
preserving your changes.
MERGE SARs-allows you to
add a new student record to
a group of previously evaluated records
OPEN LAST CASE
REVIEWED-allows you to
access the last case you
evaluated, preserving your
changes.
The left side of the SAR screen shows a summary of the student’s
performance on the CCX patient case. Checkmarks denote categories that
the student completed with a “satisfactory” score. An “X” marks categories in
which the student received an “unsatisfactory” score. Click the upper right of
the SAR screen to see a summary of overall group performance for the entire
exam. Click the lower right to see group performance in individual categories.
Click MATCHING or a category name to access the matching section.
Figure 1s . SAR Utility Student Activity Records Screen
64
[email protected]
SAR Utility Quick Help
Matching Screens
There is a matching screen that corresponds to each category of the case
data, with the exception of History and Physical Exam and Patient
Satisfaction. On most matching screens, the student’s responses are listed in
the box on the left, and instructor grading criteria are listed on the right.
Matched items will appear in bold type.
To see detail of Checklist results,
click Additional Data. Detail of History and
Physical Exam and Patient Satisfaction performance is available.
TO MATCH OR REMOVE MATCHES FROM ITEMS ON THE MATCHING SCREENS:
Click the items from the two lists that you want to match. Items will appear in
bold when they are matched. To remove a match, click the matched item in
the student list and its match in the instructor list. The bold text will revert to
plain text and the score in the Student Matched box will decrease. Use the
arrow keys to navigate to another student’s matching screen for that
category. Any changes you make will be saved, either when you change
screens or when you click APPLY NEW MATCHES.
Click ADJUST STUDENT SCORE to edit the individual student’s score
for that category.
Click ADJUST CRITERIA to change the criteria affecting all students’
scores (see below).
Click STUDENT’S RECORD to return to the Student Activity Record
Screen or click another category tab to view detail for that category.
Record Statistics screen
Before changing the evaluation criteria, you may want to see how the group
of students performed in various categories and in selecting specific items.
Click Record Statistics, then click a category to view detail of how many
students included each criteria item in that category. Your criteria will be
listed in the text field, as well as the number of students who received credit
for including that item. Click a specific item to see the names of students who
did and did not match your expectations. After reviewing this information
you may decide to change evaluation criteria. See the instructions below.
Adjust Evaluation Criteria Screen
Click Adjust Criteria and then click the button corresponding to a case
category. Evaluation Criteria and their assigned point values will appear.
Click an item in the Evaluation Criteria field to edit that item. In the
window that appears, use a vertical hash mark (shift+\) and type a
synonym next to existing criteria items to add
a synonym. You may delete criteria items or
highlight and edit the point values you previously entered. Click the REQUIRED box to either
require an item or remove the requirement.
Click ADD CRITERIA ITEM to include a new criteria item for the case. In the window that
appears, type in the item, the point value, and
determine if the item is Required.
Click CATEGORY WEIGHTS to enter new category weights for the sections of the case.
Click APPLY CRITERIA CHANGES when you are
satisfied with your changes. They will be
reflected on the Matching screens and in the
scores on the SAR screen.
Tech support: 1-800-453-8040
Figure 2s. SAR Utility Adjust Evaluation Criteria screen
65
Quick Help Guides - Multi-Case Performance Utility
Getting Started
1. Make sure the “Records” folders for the patient cases that you’ve already
evaluated in the Student Activity Record are within the Record Utility
folder. If the records folders and their entire contents (eval.cst, stdinfo.cst
and stdmod.cst) aren’t in the Record Utility folder, copy them to that
location. The records folder must be named by the patient’s last name,
followed by a space, and then the word Records.
Example: Kirk Records
2. In a plain text editor, create a roster, listing all students in the rosters for
the cases being imported. Name this file MCP Roster. Place it in the
Record Utility Folder.
3. Open the MCP folder (inside the Record Utility Folder) and double-click
the MCP Utility Icon
to launch the program.
4. Click BEGIN on the Multi-Case Performance Utility title screen.
5. Select the cases you would like to evaluate in the MCP Utility. Click LOAD
PREVIOUS CASE LIST if you have already loaded cases into the MCP
Utility. Enter how many of the cases you’ve chosen to evaluate must be
completed with a satisfactory score in order to receive an overall rating
of “satisfactory.”
Setting Performance Standards
1. Select the cases you would like to group together. For each cluster, enter
the number of cases that must be completed satisfactorily to result in
an overall multi-case performance rating of satisfactory. Click CREATE
CASE CLUSTER. Repeat for each cluster.
2. Click DONE CREATING CLUSTERS to continue. Click RESTART to start
again.
3. On the SETTING PERFORMANCE STANDARDS screen, click the categories
that you want to designate as ESSENTIAL. The student must show
satisfactory performance in all ESSENTIAL categories to receive a
“satisfactory” overall multi-case performance rating.
5. Type in a “# required” next to each category you marked as ESSENTIAL
denoting the minimum number of cases in which the student must
show satisfactory performance for that category.
6. Enter a “# required” for each NON-ESSENTIAL category, designating a
minimum number of cases in which the student must have shown
satisfactory performance for that category.
7. In the red box provided, enter the number of non-essential categories
that the student must satisfactorily complete to receive a satisfactory
overall rating.
8. Click APPLY PERFORMANCE STANDARDS AND DISPLAY RESULTS when
you have completed all fields. Type in a file name for the case list.
Student Overall Multi-Case Performance Screen
What do the red X’s and blue dots mean?
The Red X denotes an unsatisfactory rating for a category or for Overall MultiCase Performance.
The Blue Dot denotes a satisfactory rating for a category or for Overall Multicase Performance.
66
Review the individual student’s overall and category performance ratings.
To Override the Student’s Overall Multi-Case Performance rating, click
on the Red X (unsatisfactory) or the Blue dot (satisfactory) to change
the computer’s evaluation. The student’s numerical score won’t
change.
To Override the Student’s Category Performance rating, click the Red
X or the Blue dot corresponding to the case and category. On the
window that appears click Override. Click DONE when you are satisfied with your changes.
[email protected]
MCP Utility Quick Help
Synopsis of Group Performance
Click SYNOPSIS to go to the Synopsis of Group Performance screen.In
each category containing data, a blue upward-pointing triangle
marks a categories in which all performance standards were met by
over half of the group. A downward pointing red triangle appears
next to categories in which over half of the group failed to meet performance standards.
Click the triangle next to the case category to see total numbers and
names of students in the group who performed “satisfactorily” in that
category as well as total numbers and names of students who performed with an “unsatisfactory” score in that category.
Click DONE when you have finished reviewing the list.
Quartiles
Click QUARTILES on the Synopsis of Group Performance screen to see an
evaluation of group performance over all cases by “quartiles.”To use this
function, you must have imported at least four student records. When using
quartiles, the list of average student scores is divided into four groups or
“quartiles” based on where the score falls in the range of all students’ average
scores. For example, all students whose scores fall within the lowest 25percent of all student scores on the list will be appear in the same quartile.
The list will display all students within each quartile and their average score.
Above each quartile you will see the SCORE RANGE for that quartile.
Exporting Data from the MCP Utility
Data from the Multi-Case Performance Utility can be exported to spreadsheet
applications for further analysis.
1. Go to the SYNOPSIS OF GROUP PERFORMANCE screen.
2. Click EXPORT.
3. Determine the application you would like to use. Make sure your
application will receive data that has a “COMMA DELIMITED” format.
4. See the application’s instructions for importing data to that program.
Navigation Help
Click
to see a list of student records imported into the MCP
Utility.
Click
to return to the SETTING
PERFORMANCE STANDARDS screen where you cluster cases. You can also
access the screen to designate “essential” categories and the number of cases
students must pass in each essential and non-essential category.
Click
screen.
Click
to go to the SYNOPSIS OF GROUP PERFORMANCE
to exit the MCP Utility.
Tech support: 1-800-453-8040
67
Appendix - Frequently Asked Questions
Below are listed questions which may arise during the use of the Clinical Competency
Exam Software package. The questions are organized according to where in the CCX
software package they are likely to arise.
Set-up questions
Q. What should be contained in the CCX “set-up” file?
A. C & P folder (which contains the CCX case template files) and the Record Utility
folder (containing the MCP).
Criteria and Performance Utility Questions
Q. How do I save the information I entered in the C & P Utility?
A. The C & P Utility saves your data as you edit or add information on the screens.
Clicking ADD places the item(s) on your criteria list.
Q. What are “delayed labs”?
A. You may choose to delay when a student sees the results of a lab, simulating the
delay a student might experience in the clinical setting.
If you choose to delay a lab, the time delay you type in is not real time. For example,
if you choose a 24 hour delay that doesn’t mean the student must return the
following day.
Instead, the student won’t be able to view the results of that lab until they have
entered their final diagnosis and management plan. After reviewing the delayed
lab results, the student may modify his/her diagnosis and management from
the delayed labs screen only.
Q. What happens if I ask students to justify labs in a case that has delayed labs?
A. If you require a student to justify a delayed lab, the justification will be made
when the student looks at the results on the delayed labs screen. If you require a
student to justify a lab that isn’t delayed, justification must be provided at the
time the lab is ordered.
Q. What is the result of marking a lab as “must see?”
A. “MUST SEE” is a way of requiring students to see certain lab results, even if the
student didn’t order the lab. If you designate both “must see” and “interpret” for
a lab and activate both functions in the CCX Case Preferences, a student must
see the lab results AND provide an interpretation before he/she can continue in
the case.
Q. What should I do if I’m experiencing frequent crashes while running the program?
A. If you are running the CCX program on a Macintosh computer, try increasing
your settings for the memory allotted to the projector. Click the C&P Utility Icon
and then press Apple+i on your keyboard. In the pull-down menu, select
Memory and set your minimum at 16,000 or more and your maximum at 20,000
or more.
68
[email protected]
Appendix - FAQ's CCX Case
CCX Case Frequently Asked Questions - For Instructors - Setting Preferences
Q. If I choose the feature “in case of crash come to last screen,“what data is saved in
the event of equipment or power failure?
A. Data entered on the screen which was displayed at the time of the crash may
not be saved. Data entered on prior screens will be saved.
Q. What if I don’t check the “Keep records” preference in a case?
A. If you don’t choose the “keep records” preference, no records of the student’s
activity will be saved while he/she is using the case. The software is shipped
with KEEP RECORDS already activated. You still must designate where student
records will be saved.
Q. How does the interim management/management function work?
A. This option allows students to attend to immediate patient concerns without
having to order labs or wait for lab results. Interim treatments may be discontinued later. Students must enter their Final Diagnosis before they enter final
Management items.
Q. How do I give students access to Dictionary and Drug Info resources?
A. Install the dictionary and/or reference software at a location accessible from the
student computers. Next, click the Dictionary Location or Drug Info Location
button on the CCX Case Preferences screen and then select the executable file
for the resource you wish to access. Then click the box next to DICTIONARY or
DRUG INFORMATION. Now the dictionary and/or drug resource will be accessible to students while taking the exam.
FAQ’s For Students - Taking the Clinical Competency Exam
Q. How do I use the Dictionary and the Drug Info resources?
A. Click the appropriate button on the screens that have these resources linked to
them. This should link you to the available resource. If the “Dictionary” or “Drug
Info” button does not appear, resources aren’t activated for this case.
Q. What kind of things should I enter under “other issues”?
A. Comments and or concerns that came to mind that you didn’t enter elsewhere in
the CCX program are appropriate for the “Other Issues” screen. You may also add
additional follow-up suggestions. The instructor will be able to see this information during his/her review.
Q. How am I credited for ordering a lab?
A. Your instructor has two options for crediting you for labs: A) Upon adding a lab
to your list, or; B) upon ordering a lab and then viewing its results.
Q. When am I charged for a lab?
A. Your instructor has two options for charging you for labs: A) Upon adding a lab
to your list or B) upon clicking the button to submit your list.
Q. How do I find out my score on the exam?
A. The CCX program keeps a record of each student entry on each screen in the
patient case (assuming your instructor activated this feature). The student
record can be imported into the Student Activity Record Utility for evaluation.
The Student Activity Record Utility calculates scores based on the Instructor’s
standards. See the instructor about how those scores will be reported to you.
Tech support: 1-800-453-8040
69
Appendix - FAQ's SAR Utility
Student Activity Record Utility FAQ's
Q. How do I get started using the Record Utility?
A. Locate and open the records folder where you stored student exam results.
Example: Kirk Records.
In addition to student records for this case, the Records folder should contain
the eval.cst from the patient case you want to review, plus the sp_data folder,
containing the input.txt file listing your questions, plus a comments.txt and
another text file for the students in your group. Click the Record Utility icon and
navigate to the records folder for the desired case.
Q. I see several documents labeled as eval.cst. Which one should be used in the
Record Utility? Where is it located?
A. In the C & P Utility, you created a folder labeled with the patient’s name. The
eval.cst file (which stores the criteria used to evaluate student records for that
case) is in the CCX_File of the case folder. Copy this eval.cst into the folder containing the student records BEFORE importing them into the Record Utility. Do
NOT copy an eval.cst from another case folder, since these files are NOT interchangeable between cases.
Q. What do I do if I get a “Combined record error“ warning?
A. Try deleting the Prefs Folder inside the Record Utility folder and then restart the
Record Utility.
Q. When should I use the “Import new SARs” option for student activity records?
A. Select “Import new SARs” the FIRST time you import records for a particular case
into the Record Utility. If you use “Import new SARs” after partially reviewing
records and making other grading adjustments for that case, the changes you
made will be overridden.
Q. What if I’ve already reviewed some student records for a particular case in the
Student Activity Record Utility, but now I want to add more records from that same
case?
A. Open the Student Activity Record Utility and choose Open Reviewed SARs on
the Import Student Activity Records screen. Navigate to the folder containing
your previously-reviewed records. Once those records are imported, select
“Merge SARs” and navigate to a separate folder that contains the new records
you want to import. This folder should also contain the eval.cst file for that case.
Q. When should I choose the “Open Reviewed SARs” option?
A. If you have imported and made adjustments to student records in the SAR
Utility, this option allows you to view those records without erasing any of those
adjustments.
Q. Do I have to do anything to save the changes I make in the Record Utility?
A. Maybe. Hand-matches and adjustments to the student’s score are saved automatically as you make the changes. If you hand-match an entry in a student list,
the same item that occurs in other students’ lists will also be matched, either
when you leave that screen, or when you click APPLY NEW MATCHES in the
Automatching Preferences window. Scores will be re-evaluated at that time to
reflect the change. If you Adjust Evaluation Criteria, you should click APPLY CRITERIA CHANGES to apply your changes to all students in the group.
Q. How do I import History and Physical Exam and Patient Satisfaction questions?
A. Type a list of all the students in your group and their ID's into a plain text file, followed by all the questions for the Standardized Patient. Format the file as shown
on page 74 and save it using the file name input.txt. Make a new folder called
sp_data and put the input.txt file inside it. The sp_data folder should be placed
70
[email protected]
Appendix - FAQ's SAR Utility
inside the Records folder for the case you want to work with.
Q. How do I adjust student scores?
A. The matching screen for each case category has a separate box where you can
adjust scores. To open this box, click ADJUST STUDENT SCORE . You can increase
or decrease the student scores individually. The adjustments you make to one
student’s score doesn’t affect the scores of others.
Q. How can I print student records?
A. You can print an individual’s Student’s Record directly from the Student Record
screen. You can also click PRINT on the INDEX screen for other print options.
To print records for one student from the INDEX screen, highlight the name of the
student records you want to print. Click PRINT and select the information you
want to print: the student’s test record, scores, or the list of labs ordered.
To print records for multiple students from the INDEX screen, click the students’
records in the list. The selected names will appear in bold. Click PRINT SELECTED
RECORDS. Select the information you want to print: the students’ test records,
scores, or list of labs ordered.
To print individual matching screens, navigate to the screen you want to print and
click PRINT MATCHING SCREEN. To print statistical information, navigate to the
Record Statistics screen and click PRINT STATISTICS. Choose either to print only
the statistics currently displayed on the screen or to print statistics for all categories in the case.
Q. How do I export data from the Record Utility into a spreadsheet?
A. Go to the “IMPORT SARS” screen. Click the EXPORT button. Select the application
that you want to use to view the data. Open the spreadsheet application, and
import the data.
Q. What does it mean when no data appears in a category?
A. No data indicates that the instructor chose not to include information for that
category of the CCX Exam.
Q. What does it mean when “not assessed” appears in a category?
A. “Not assessed” indicates a part of the exam that the instructor needs to evaluate
manually. It most commonly appears in the Dx Justification category.
Tech support: 1-800-453-8040
71
Appendix - FAQ's MCP Utility
Multi-Case Performance Utility FAQ's
Q. What is the MCP Utility? Is the MCP the same as the Record Utility?
A. The MCP Utility provides instructors with the option of looking at how the students performed over a range of cases and how they performed in each category.
Q. All of my records have been run through the SAR Utility and are in the Record
Utility folder, but the MCP Utility still shows “no data” for all categories. What’s wrong?
A. You must also include in the Record Utility folder a text file containing the student roster list. See the question above or page 49 for instructions.
Q. How do I import records from several patient cases into the MCP Utility?
A. Follow the steps below.
1. Make sure all records for all cases have already been evaluated in the Record
Utility.
2. Move or copy your “Records” folders into the Record Utility. The “Records” folder
should be named with the last name of the patient. Example: Kirk Records
You also need a plain text file called MCP Roster, listing all student names and
ID numbers for all the cases you are importing, formatted exactly as you imported them into the Student Activity Record Utility. The MCP Roster should be in
the Record Utility folder.
3. Click the MCP Icon.
Q. All of my categories display “No Data” in the MCP Utility. Where should I look to
correct the problem?
A. First, make sure you have a plain text file listing all students for all cases you are
importing. Name the file MCP Roster and place it in the Record Utility folder.
Second, check the formatting of the MCP Roster file. Third, make sure your format for listing student names and ID numbers matches EXACTLY with the format you entered into the Student Activity Record Utility.
Q. Can I hand-match items in the MCP Utility?
A. No. The MCP utility is for reporting data that has already been evaluated by the
Record Utility. If you want to match additional items, you’ll have to re-enter the
Student Activity Record Utility. You can, however, override the Overall Case
Performance ratings and the category performance ratings assigned by the
computer.
Q. What is a case cluster?
A. A case cluster is a collection of cases that the instructor chooses to evaluate as a
group. An instructor may choose to “cluster” similar cases together and apply
special grading standards for those cases. For example, an instructor may have a
list of 15 cases imported into the MCP Utility, five of which are pediatric cases. If
he/she wants to evaluate student performance in the pediatric cases, the
instructor may set additional standards in the MCP Utility that apply only to that
group of cases .
Q. How can I tell which cases are clustered?
A. Case clusters are color-coded at the top of the screen.
Q. Can I override a student’s performance in the MCP Utility?
A. Yes. On the MCP’s Student Record screen, double-click the case category in which
you would like to override a student score. A window will appear showing the
current student performance rating on the left. To make changes, click the
OVERRIDE button. Performance ratings that have been changed are marked
with an asterisk.
72
[email protected]
Appendix - FAQ's MCP Utility & Formatting Instructions
Q. What does the quartile button do?
A. This function divides the entire group of students into four groups, each consisting of 25% of the total number of students in the class. Students are assigned to
one of the four Quartiles based on their scores on the group of cases.
Example: In a class with a total of 16 students, each of the four quartiles
would contain four student scores. The top quartile would include all students who scored in the top 25% of their class. The next quartile would contain the four student scores that fall next in the scoring hierarchy, and so on.
When an instructor uses the Quartile function, the student may also receive a
Quartile ranking, informing him/her of how their score ranked in relation to
the other students in the group.
Tech support: 1-800-453-8040
73
Formatting Instructions
Formatting Examples
Below are listed formatting examples that may help you in creating text files to hold
student rosters, patient checklist questions, and response data.
Student Records created from using
an 11-digit ID number, including dashes, will
be saved by the first eight digits of the ID
number. Example:
Student Records created from using
an ID number other than an 11 digit number
will be saved by the digits of the ID number
Format for Student Roster CCX Exam
Create this file in a plain text editor and copy it into the Roster list box on the CCX
Preferences screen. The default format is an 11 digit ID number, including dashes, followed by one space, the student’s name, all on one line. Do NOT use middle initials.
111-11-1111 Generic User1
222-22-2222 Generic User2
You may change the length of this ID number to any length you choose, but you must
space once between the ID number and the name and you must be consistent within
a case. You must also change the number in the ID LENGTH box on the CCX Case
Preferences screen.
1111 Generic User1
2222 Generic User2
that were used, up to a total of eight digits.
Example:
Formatting for Input.txt file (for use in the SP Utility)
If you use the Standardized Patient Utility, you will create an input.txt file that will
include your entire list of questions for the standardized patient. Create this file in
your plain text editor. Information shown in italics is simply instructions and
shouldn’t remain in your text file.
Formatting for input.txt files
When you type in the kind of questions,
the words Patient Satisfaction must be
capitalized and separated by a space.
“History” and “Physical” must be capitalized and should be separated by a space,
an ampersand (&) and another space.
If you use a password type it on first line. If not leave the first line blank.
Press return (enter) and type a pipe symbol on the next line.
|
(the pipe symbols are required formatting)
111-11-1111,Jane Doe (commas are necessary between the ID # and
name)
222-22-2222,John Doe (one name/ID number per line)
|
Warren Kirk (case name)
|
History & Physical (list of history and physical questions)
I've been sick for two weeks.
I don't have a fever.
The student listened to my lungs.
|
Patient Satisfaction (list of PATIENT SATISFACTION questions)
The student looked and acted professional.
The student was respectful.
After you have typed in all your questions for each checklist, save the file as
input.txt and create a new folder called sp_data to hold the input.txt file. This folder
will be used in the Record Utility.
Formatting for your MCP Roster file
The Multi-Case Performance Utility allows you to evaluate results from multiple cases.
To accomplish this, you must use a plain text editor to create a master roster that
includes the username/ID for each student who completed any of the cases being
imported. You can do this by copying the student roster(s) you created in setting CCX
Case Preferences into a new plain text file, making sure to list each username/ID only
once. Name your master roster list MCP ROSTER and move or copy it into the Record
Utility. Follow the format described below for entering ID’s and names in your MCP
Roster. Student ID’s will be the full ID number used in the CCX exam, (including any
dashes you used) followed by a single space, then the student’s name. You must list
only one student ID number and name per line as shown below. Names and numbers
must be unique.
111-11-1111 Generic User1
222-22-2222 Generic User2
3333 Generic User3
74
[email protected]
File Structure
Files containing Standardized
Patient information
1. Gather the files containing
Standardized Patient
Questions, responses, and
Comments.
Files needed to run the Student
Activity Record Utility
1. Eval.cst copied from the
proper CCX case.
Files needed to run the Multi-Case
Performance Utility
1. The Records folder for each
case being evaluated,
including the following files.
2. Student Records copied
from the computers where
students took the CCX exam.
2. Place those files in a folder
called sp_data.
3. Place the sp_data folder and
all its contents into the
Records folder for the case
you want to evaluate.
3. (optional - needed only if
you used a Standardized
Patient) You must have the
sp_data folder containing
the input.txt file and, may
include a comments.txt and
text files for each student in
the group.
Tech support: 1-800-453-8040
2. Create a master roster for all
cases being imported into the
MCP Utility and place it in the
Record Utility folder.
3. Place the MCP folder inside
the Record Utility folder
75
License Agreement
LICENSE AGREEMENT FOR CLINICAL COMPETENCY EXAMINATION
Please read this license carefully before using the software. By using this software, the
licensee agrees to be bound by the terms of this license. If the licensee does not agree
to the terms of this license, licensee should return the unused software promptly to
DxR Development Group, Inc., 150 E. Pleasant Hill Road, Carbondale, IL 62903-6158
(800-453-8040).
1.LICENSE. Clinical Competency Examination (hereafter "CCX") software program and
related documentation accompanying this License, whether on disk, in read-only
memory, or on any other media, are licensed to you (hereafter "Licensee") by DxR
Development Group, Inc. (hereafter "DxR"). The Licensee may use the Software, but
DxR retains title to the Software and related documentation, which are protected by
United States and international copyright laws and international trade provisions. The
Licensee must treat this Software like any other copyrighted material. DxR grants the
Licensee a nonexclusive license to copy the Software to multiple computers that are
used for educational/testing purposes, and permits any person within the educational
program who wishes to use the computer for educational/testing purposes to use the
installed software.
2. RESTRICTIONS. The Software contains copyrighted material, trade secrets, and other
proprietary information, and, in order to protect them, the Licensee agrees not to disassemble or otherwise reduce the Software to a human-perceivable form. The
Licensee agrees not to modify, rent, lease, loan, distribute, or create derivative works
based upon the Software in whole or in part. The Licensee shall take reasonable precautions to prevent any unauthorized use or dissemination of the Software. Rights
assigned the Licensee in this agreement are not transferable. Licensee may not use
the Software in whole or in part for any commercial applications.
3. TERMINATION. This License is effective until terminated. The Licensee may terminate
this License at any time by returning the original Software and related documentation. Copies of the Software shall either be returned to DxR, or destroyed by Licensee.
If destroyed, the Licensee shall supply written verification of such destruction to DxR
Development Group, Inc., 150 E. Pleasant Hill Road, Carbondale, IL 62903-6158 (800453-8040). This License will terminate immediately without notice from DxR if the
Licensee fails to comply with any provision of this License.
4. DISCLAIMER OF WARRANTY ON SOFTWARE. The Licensee expressly acknowledges
and agrees that use of the Software is at its sole risk. The Software and related documentation are provided "AS IS" and without warranty of any kind, and DxR expressly
disclaims all warranties, expressed or implied, including, but not limited to, the implied
warranties of fitness for a particular purpose. DxR does not warrant that the functions
contained in the Software will meet the Licensee's requirements, or that the operation
of the Software will be uninterrupted or error free, or that defects in the Software will
be corrected. Furthermore, DxR does not warrant or make any representations regarding the use or the results of the use of the Software or related documentation in terms
of their correctness, accuracy, reliability, or otherwise. No oral or written information or
advice given by DxR or its authorized representative shall create a warranty or in any
way increase the scope of this warranty.
76
[email protected]
License Agreement
5. LIMITATION OF LIABILITY. Under no circumstances, including negligence, shall DxR
be liable for any incidental, special, or consequential damages that result from the use
or inability to use the Software or related documentation, even if DxR or its authorized
representative has been advised of the possibility of such damages.
6. SEVERABILITY. If for any reason a court of competent jurisdiction finds any provision
of this License, or portion thereof, to be unenforceable, that provision of the License
shall be enforced to the maximum extent permissible so as to effect the intent of the
parties, and the remainder of this License shall continue in full force and effect.
7. COMPLETE AGREEMENT. This License constitutes the entire agreement between the
parties with respect to the use of the Software and related documentation, and supersedes all prior or contemporaneous understandings or agreements, written or oral,
regarding such subject matter. No amendment to or modification of this License will
be binding unless in writing and signed by a duly authorized representative DxR.
Tech support: 1-800-453-8040
77
Index
A
F
Additional Data 44
Adjust Criteria 46, 57, 65
Adjust Evaluation Criteria screen 48
Allow Delete, Management. See Management, Allow Delete
Associate 47
Findings 8, 10, 11, 59
Pertinent 8, 11, 61
Positive/Negative 8, 11, 61
Problem/Findings List 30
Free Entry, Management Items 16, 35
C
G
Case Folder 7
Case Preferences, Accessing 24
Case Preferences, Setting 8, 59
In the C & P Utility 8
In the CCX Case 23
Password, Set Preferences 24
Category Weighting 21, 60
In the C & P Utility 20
Checklists 19, 39, 41, 59, 60, 63, 64
Formatting for Questions 74
history and physical exam 71
Input.txt file 74
patient satisfaction 71
Clinical Competency Exam 4, 23
Getting Started 29
Opening the case 61
Quick Help Guide 61
Clustered Cases 50, 52, 66, 72
Consultant
Consultant Report 14
Content Questions 18, 30, 46, 59, 60, 61
Return to Questions 27, 38, 62
Creating a New Case 7, 59
Criteria and Performance Utility 4, 7
Before you start 7
Creating a new case 7
Creating the Grading Key (Case Content) 10
Getting Started 7, 59
Quick Help Guide 59
D
Delay Labs. See Labs, Delay
Delete Backups 28
Designate Hypothesis 25
Diagnosis 15, 35, 60, 62
Diagnostic Hypothesis 12, 30, 60
Dictionary 56, 69
Dictionary Location 28
Drug Information 26, 37, 56, 69
Dx Justification. See Diagnosis, Justification
E
Editing an existing case 22, 59
Equivalents 13
Essential 51, 66
categories 51
Eval.cst file 41, 49, 70
Exporting Data 54
From the MCP Utility 54, 58, 67
From the SAR Utility 44, 48, 71
78
Group Performance 44, 52, 67
H
Hypothesis 61
Designate 25, 31
I
ID 25
Import SAR 42, 70
In Case of Crash 27, 69
Index Button 43, 57, 58, 71
Installation 6
Interim Management/Treatment 16, 17, 69
Interpret 14, 25. See also Labs, Interpret
J
Justify Diagnosis. See also Dx Justification
Justify Labs. See also Labs, Justify
Justify Managements. See Managements, Justify
K
Keep Records 24, 69
L
Labs 12, 25, 31, 60, 61
Accessing Lab Results 62
Common Labs 31
Control Buttons 34
Delay 14, 25, 33, 37, 68
Interpret 25
Justify 25, 68
Must See 14, 68
Ordering, Step-by-Step Instructions 33
Learning Resource 26
Legend 44
M
Management 16, 35, 60, 62
Allow delete 26
Categories, types of 36
Free Entry 9, 16, 35
In hospital 59
Interim Treatment 16, 17, 69
Management Buttons 36
Medications, Ordering 37
Must fill in all Drug Fields 26
Outpatient 59
Select from List 9, 17, 26, 35
Matching 45, 57, 64, 65
Diagnosis Matching 46
Questions Matching 46
Medications 17, 36, 62
Merge 42, 64, 70
Minimum Satisfactory Level 20, 46
[email protected]
Index
Multi-Case Performance Utility 5, 49, 66, 72
FAQ's 72
Getting Started 49
MCP Utility folder 49, 66
Overall Multi-case Performance Screen 52
Performance Standards 50
Quick Help Guides 66
Synopsis of Group Performance 53, 54, 58
Must fill in all Drug Fields 26
Must See 25
Student Activity Record Utility 4, 41, 64
Adjust Evaluation Criteria Screen 48
Adjust Student Score 71
Importing Student Activity Records 42
Matching Screens 45
Record Statistics Screen 47
Set Values 46
Student Activity Record Screen 43
Student Record Location 28
Synonyms 11, 55
O
T
P
W
On-line help 34
Other Issues 38, 62, 69
Override 53, 66, 72
Technical information 5
Time Limit 27
Treatment. See Management
Performance Standards 51, 58, 66, 67
Performance Values 60
Point Values 60
Presenting Information 10, 59
Printing 71
Problem List 12, 30, 59, 60, 61
Weights 41, 43, 48, 64
Q
Quartiles 54, 67, 73
Questions. See Content Questions
R
Record Statistics 57, 65
Records folder 49, 66, 70, 72
Requiring items 20, 21, 60, 65
Resource Location 28
Review Matched Items 45
Roster 70, 74
S
Scoring
Group Performance 54
Overall Multi-Case Performance 52
Overriding Performance Marks, MCPU 53
Proficiency 46
Viewing and Evaluating Performance Scores,
MCPU 52
Search 31
Select from List, Management Items 17, 26, 35
Set Values 46, 57
Set-up questions 68
Specifications for graphics 5
Standardized Patient Utility 4, 39, 63
For the Instructor: Collecting SP Utility Data 40
For the Instructor: Getting started 39
For the Standardized Patient: Gaining access to
the SP Utility 39
Quick Help Guides 63
Tech support: 1-800-453-8040
79