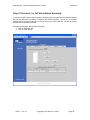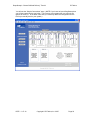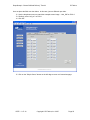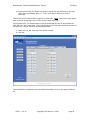
1
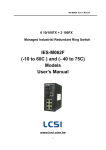
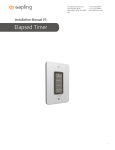
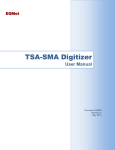
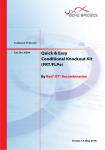
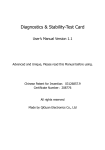
DeepSweep™ Tutorial
CBIS SM and BIF Example
December 2007
Copyright © IP Fabrics, Inc. 2007
IP Fabrics, Inc.
14964 NW Greenbrier Parkway
Beaverton, OR 97006
503-444-2400
503-444-2401 FAX
www.ipfabrics.com
DeepSweep™ “Secure Buffered Delivery” Tutorial
IP Fabrics
Table of Contents
Introduction......................................................................................................................... 3
DeepSweep BIF and MF (CBIS Surveillance Module)................................................. 4
Phases of the tutorial....................................................................................................... 5
Phase I – LEA provided information .................................................................................. 6
Phase II – Configure the BIF .............................................................................................. 7
Step 1: Point browser to configuration screens............................................................... 7
Step 2: Login................................................................................................................... 7
Step 3: Define ‘cbis-case-example’ case parameters...................................................... 9
Phase III – Configure the DeepSweep AF/MF ................................................................. 11
Step 1: Point browser to configuration screens............................................................. 12
Step 2: Login................................................................................................................. 12
Step 3: Define ‘cbis_sm’ Surveillance Module (SM)................................................... 13
Step 5: Construct ‘uc_SA’ Surveillance Assembly ...................................................... 20
Phase IV – Run the intercept ............................................................................................ 27
Step 7: Run the ‘uc_SA’ Surveillance Assembly ......................................................... 27
Step 9: Stop the ‘cbis_SA’ Surveillance Assembly...................................................... 30
Step 10: (optional) Accessing log files ......................................................................... 30
Phase V – Observe BIF progress ...................................................................................... 31
Step 4: Statistics – Observing the running system........................................................ 31
Phase VI – LEA file access............................................................................................... 32
Step 5: Accessing data files .......................................................................................... 32
Table of Figures
Figure 1. Overview setup for "cbis_case_example" .......................................................... 3
Figure 2. Simplified network example for CBIS scenario.................................................. 4
DSTC – 1.47-16
Copyright © IP Fabrics, Inc. 2007
Page 2
DeepSweep™ “Secure Buffered Delivery” Tutorial
IP Fabrics
Introduction
This document is a simple step by step tutorial that guides you through the stages involved to
construct all aspects of a sample CBIS intercept. Both the Access Function (AF) and the
Mediation Function (MF) are provided by the DeepSweep™ using the CBIS Surveillance Module
(SM). The Broadband Intercept Function (BIF) employs a DeepSweep “Secure Buffered
Delivery” stand-alone appliance.
The diagram (Figure 1) depicts the overall set of system components that might be involved. This
tutorial discusses three areas of a CBIS intercept – the Collection Function (CF) which is resident
at a Law Enforcement Agency (LEA), the BIF and the AF/MF. Looking at these further:
1. DeepSweep is the example AF/MF. It intercepts the packets from the identified subject
and it pushes a set of files to the BIF at IP address 192.168.43.81 using SFTP.
2. The DeepSweep Secure Buffered System is the center. It is set up to receive CBIS files
for the case named ‘cbis-case-example’.
3. The Law Enforcement Agency (LEA) is the box on the lower right. This is where the LEA
would pull the buffered files using its own software. Trivially, a Windows-based utility
such as ‘WinSCP’ can be used. In actual practice, this may be a much more
sophisticated software package, of course.
Access Function and
Mediation Function
DeepSweep
IP addr: 192.168.43.50
Example DeepSweep setup:
BIF IP address:
192.168.43.81
BIF account:
CBIS_incoming
BIF password:
ipfabrics
Case:
cbis-case-example
Subject ID:
MAC 11:22:33:44:55:66
MF Interface
(SFTP push)
Broadband Intercept Function
DeepSweep “Secure Buffered Delivery”
IP addr: 192.168.43.81
Example BIF setup:
‘To-buffer’ password: ipfabrics
Type of Buffering:
CBIS
Case:
cbis-case-example
Password for LEA
lea-xyz
Others …
<defaults>
CF Interface
(SFTP pull)
Law-enforcement
collection system
Figure 1. Overview setup for "cbis_case_example"
DSTC – 1.47-16
Copyright © IP Fabrics, Inc. 2007
Page 3
DeepSweep™ “Secure Buffered Delivery” Tutorial
IP Fabrics
DeepSweep BIF and MF (CBIS Surveillance Module)
The MF uses a DeepSweep system with two Packet Inspection Accelerators (PIXL) that are
embodied on one Double Espresso (DE) board. This provides dual Gbit Ethernet ports on each
PIXL for a total of four interfaces. This example only uses surveillance ports E0 and E1.
Let’s set up the sample scenario. We want to watch DHCP packet traffic and associated packet
traffic for a particular user ID. We know the MAC address and some other identifying information.
In this sample system, IP addresses are assigned by DHCP for the other. In this example, we
also will assume that the user is currently connected as the time the intercept starts up and that
we know the currently assigned IP address. You will see this as 192.168.43.58 later in the
tutorial.
Figure 2 depicts a greatly simplified network topology for this example. The purpose of this
tutorial is to go though the DeepSweep CBIS concepts rather than how to set up an network. It
shows the use of an in-line tap to provide two simplex Ethernet streams for each tap point but in
actual practice this would likely be done with combinations of mirror ports, span ports, multiple
taps and aggregation equipment. This is highly installation dependent.
“CBIS SM” Tutorial Example
Subject computer
MAC
11-22-33-44-55-66
BIF - DeepSweep “Secure Buffered Delivery”
GB2
DHCP
server
“CMTS-42”
GB1
Browser
I/F
TAP
content
Router
Internet
“outside”
E1
E0
E3
E4..7
E2
MF – DeepSweep
GB2
GB1
cbis_sm
Browser
I/F
LEA
null_sm
Figure 2. Simplified network example for CBIS scenario
DSTC – 1.47-16
Copyright © IP Fabrics, Inc. 2007
Page 4
DeepSweep™ “Secure Buffered Delivery” Tutorial
IP Fabrics
We will use two DeepSweep ports to watch DHCP assignments. For both MF and BIF, one
system port (GB2 in this example) is connected to the network so that a browser has access to
the DeepSweep and the other system port (GB1) is not used. In this example, we assume that
these connections and associated configuration have already been done.
Phases of the tutorial
The tutorial is organized into six major phases across the three areas of function:
DeepSweep
CBIS Surveillance Module
(AF and MF)
DeepSweep
“Secured Buffered Delivery”
Standalone appliance
(BIF)
Law Enforcement Agency
(CF at LEA)
I. Discussion of initial
LEA-provided
information.
II. Configuration of the BIF
on the DeepSweep
“Secure Buffered
Delivery” stand-alone
appliance.
III. Configuration of the MF
on a DeepSweep using
the CBIS Surveillance
Module (named
“cbis_SM”) and running
in a Surveillance
Assembly (named
“cbis_SA”).
IV. Starting the CBIS
intercept and observing
(e.g. Run/Statistics
screen) it on the MF.
V. Observing on the BIF
(e.g. Buffering/Statistics
screen).
VI. Discussion of secure
LEA access to their own
case files.
NOTE: If you are only interested in one DeepSweep product (only CBIS SM or BIF) then simply
skip over the unneeded phases. You will still be able to use the tutorial to learn about the basic
use of the appropriate DeepSweep product.
DSTC – 1.47-16
Copyright © IP Fabrics, Inc. 2007
Page 5
DeepSweep™ “Secure Buffered Delivery” Tutorial
IP Fabrics
Phase I – LEA provided information
In any intercept the process must begin with the LEA providing necessary technical and legal
information. We deal with only the technical aspects here. The minimal information required to
set up the intercept for this example are:
1. Case ID. Use the string ‘cbis-case-example’ for this tutorial.
2. Access password. Use the string ‘lea-xyz’ for this tutorial.
3. The LEA must be told the BIF’s IP address as viewed from the LEA’s computer that runs
the Collection Function (CF).. In this example we will let this just be the internal IP
address 192.168.43.81 but in actual practice the IP address will likely be an external
(public) IP address and may be configured on the second system Ethernet port on the
BIF.
DSTC – 1.47-16
Copyright © IP Fabrics, Inc. 2007
Page 6
DeepSweep™ “Secure Buffered Delivery” Tutorial
IP Fabrics
Phase II – Configure the BIF
Step 1: Point browser to configuration screens
Point your browser to the DeepSweep Secure Buffered Delivery system (“SBD”) login screen.
Use the IP address of the SBD. Systems have been tested with Microsoft IE and Mozilla Firefox
browsers. While the URL is dependent on the specifics of your installation setup, the URL you
should use the secure “https” and will be similar to the following:
https://192.168.43.81
If you are running the DeepSweep SBD with a locally attached display, keyboard and mouse then
use:
http://127.0.0.1
Step 2: Login
If you have set up a user account already then use it to log in. If you have not yet set up an
account then use ‘admin’ account with the default (as shipped) password ‘ipfabrics’. These are
all lower case. You can set up your own account later by following the instructions in the user
manual. The first pages you see should look like the following before and after login:
DSTC – 1.47-16
Copyright © IP Fabrics, Inc. 2007
Page 7
DeepSweep™ “Secure Buffered Delivery” Tutorial
IP Fabrics
NOTE: This tutorial assumes that the BIF will be used with the default password (“ipfabrics”) for
incoming files from the MF to the BIF. If so, then there is no need to change this up now. If the
default is not in use then use the Security configuration page to change the “To-buffer” password.
DSTC – 1.47-16
Copyright © IP Fabrics, Inc. 2007
Page 8
DeepSweep™ “Secure Buffered Delivery” Tutorial
IP Fabrics
Step 3: Define ‘cbis-case-example’ case parameters
This step tells the SBD about a new case for which CBIS intercept files are to be received and
sets a few other defining parameters.
1. Click ‘Buffering’ tab.
2. Click ‘New’ button.
3. Click in blank box labeled ’Case ID’.
4. Enter the string ’cbis-case-example’.
DSTC – 1.47-16
Copyright © IP Fabrics, Inc. 2007
Page 9
DeepSweep™ “Secure Buffered Delivery” Tutorial
IP Fabrics
5. Click OK button. This takes you to the main Buffered Case Definition page.
Now we can define the specific criteria for the case named ‘cbis-case-example’.
6. Click “CBIS BIF” radio button to indicate the type of intercept data to be received.
7. A default password is pre-set to be ‘ipfabrics’ upon initial case creation so this must be
set to the appropriate new password. Delete the current text (asterisks) and replace it
with new text in both Password text boxes. Enter the seven characters ‘lea-xyz’. This is
the LEA’s access password for this case.
8. Click OK.
That’s it! The DeepSweep Secure Buffered Delivery appliance is now set up for the new case
name ‘cbis-case-example’ and can accept CBIS Media Function Interface files via Secure FTP
protocol.
DSTC – 1.47-16
Copyright © IP Fabrics, Inc. 2007
Page 10
DeepSweep™ “Secure Buffered Delivery” Tutorial
IP Fabrics
Phase III – Configure the DeepSweep AF/MF
We will use one DeepSweep port to watch DHCP assignments and another port to watch other
user IPv4t traffic. One system port (GB1 in this example) is connected to the network so that a
browser has access to the DeepSweep and the other system port (GB2) is not used. In this
example, we assume that these connections and associated configuration have already been
done.
A step-by-step tutorial follows. At a high level, the process is:
1. Phase III
a. Open a browser to DeepSweep
b. Log in
c. Define a Surveillance Module (SM) to watch control information and other IPv4
traffic. At times, we may refer to the latter IPv4 traffic as “content.”
d. Define a Surveillance Assembly (SA).
2. Phase IV
a. Start the SA.
b. Re-examine the User Connection SM once the system is running
c. Stop the running SA.
DSTC – 1.47-16
Copyright © IP Fabrics, Inc. 2007
Page 11
DeepSweep™ “Secure Buffered Delivery” Tutorial
IP Fabrics
Step 1: Point browser to configuration screens
Point your browser to the DeepSweep login screen. Use HTTPS with the IP address of the
DeepSweep. Systems have been tested with Microsoft IE and Mozilla Firefox browsers. If the
DeepSweep IP address has been set to 192.168.43.50 then one would enter the URL as:
https://192.168.43.50
If you are running the DeepSweep with a locally attached display, keyboard and mouse then use:
http://127.0.0.1
Step 2: Login
If you have set up a user account already then do use it to log in. If you have not yet set up a
user account then use ‘admin’ account with the default (as shipped) password ‘ipfabrics’. These
are all lower case. You can set up your own account later by following the instructions in the user
manual. Note that some screens may be different for “admin” vs. a non-admin user name.
DSTC – 1.47-16
Copyright © IP Fabrics, Inc. 2007
Page 12
DeepSweep™ “Secure Buffered Delivery” Tutorial
IP Fabrics
Step 3: Define ‘cbis_sm’ Surveillance Module (SM)
This is the only Surveillance Module (SM) you will need to define for the tutorial. This SM will be
of type ’Cable Broadband (CBIS)’ and will be watching all packet traffic (i.e. DHCP to identify user
connections along with associated packets for the user’s subject IDs selected).
9.
10.
11.
12.
13.
14.
Click ‘Make SM’ tab.
Click ‘New’ button.
Select ‘Cable Broadband (CBIS)’ from the ‘SM type’ menu.
Click in blank box labeled ’SM name’.
Enter the string ’cbis_sm’
Click OK button.
This takes you to the configuration page for this SM type.
DSTC – 1.47-16
Copyright © IP Fabrics, Inc. 2007
Page 13
DeepSweep™ “Secure Buffered Delivery” Tutorial
IP Fabrics
There is a single setup screen for this SM definition. Initially, this screen will be as below.
DSTC – 1.47-16
Copyright © IP Fabrics, Inc. 2007
Page 14
DeepSweep™ “Secure Buffered Delivery” Tutorial
First, we will set a few ‘SM Attributes” identification and access parameters.
information on the right side of the page.
IP Fabrics
This is the
1. Enter any string (e.g. ‘ens5’) as the IAP System ID name.
2. Enter any string (e.g. ‘CMTS-42’) as the CMTS ID.
3. Note that the hostname appears as the MFID for your information. This is set on the
system interface page as Hostname and is used as identifying information in the CBIS
files. You need not change anything for this tutorial.
4. Click OK.
DSTC – 1.47-16
Copyright © IP Fabrics, Inc. 2007
Page 15
DeepSweep™ “Secure Buffered Delivery” Tutorial
IP Fabrics
Next we will define a new case.
5. Click “New” button that is near the case section of the page. This takes you to a simple
screen with a single text-entry box..
6. Enter “cbis-case-example” in the text box.
7. Click OK.
You will be returned to the IAS Controller definition page.
DSTC – 1.47-16
Copyright © IP Fabrics, Inc. 2007
Page 16
DeepSweep™ “Secure Buffered Delivery” Tutorial
IP Fabrics
Now we will define the parameters for this sample case.
8. Make sure the newly added case name is highlighted. If it is not then click on the name.
9. Check the intercept information boxes for To, From and Content.
Note that the start date should be today’s date and the end date will be blank.
Just leave them that way. If the start date is not correct then confirm that your
system’s time zone is set correctly and (possibly) that you have a valid path to an
NTP time server. See the DeepSweep User’s Manual for more information if this
is not set up properly.
10. Enter the IP address of the BIF. The example uses 192.168.43.81 but you may have
your BIF set up differently (or not have a BIF at all).
11. Enter the string ‘ipfabrics’ as the password for the BIF’s incoming account. This is the
default for IP Fabrics BIF product so, assuming you really want to run a trial intercept,
you should confirm that it has not been changed.
12. Check the “To” and “From” boxes. Leave “Content” unchecked.
13. Click OK.
DSTC – 1.47-16
Copyright © IP Fabrics, Inc. 2007
Page 17
DeepSweep™ “Secure Buffered Delivery” Tutorial
IP Fabrics
Next we will add the subject ID entries for this case. In this example case, we will watch for
DHCP assigning an IP address to a known MAC address. We will further assume that the
subject’s computer is known to already be connected and have an active IP address of
192.168.43.58. This latter entry is optional and is used to start intercepting packets immediately
rather than waiting for the subject to cause DHCP to issue a new (or renew current) IP address.
Once this DHCP transaction occurs the system will automatically track the new IP address in
place of the one entered in the Dynamic IP box.
14. Click on the “New” button in the middle of the IAS Controller page near the text “Selected
Case, Case Information”. This takes you to a screen for entry of Subject Identifiers.
15. Select MAC as Identifier Type and enter a MAC address. We use “11-22-33-44-55-66” in
the example.
16. Enter 192.168.43.58 in the Dynamic IP Address field.
17. Click OK.
This returns you to the CBIS SM configuration page.
DSTC – 1.47-16
Copyright © IP Fabrics, Inc. 2007
Page 18
DeepSweep™ “Secure Buffered Delivery” Tutorial
IP Fabrics
This is how the page should now appear.
We are done defining the information for the CBIS SM for a single User ID.
DSTC – 1.47-16
Copyright © IP Fabrics, Inc. 2007
Page 19
DeepSweep™ “Secure Buffered Delivery” Tutorial
IP Fabrics
Step 5: Construct ‘uc_SA’ Surveillance Assembly
In this step we will construct the Surveillance Assembly (SA) that places the Surveillance Module
that we just defined into a system of instances and interconnections. For this SA, we will take
packets arriving at ports E0 and E1 on PIXL-0 to be input to the CBIS SM. We will do nothing
with packets on the other interfaces.
We begin by defining a new SA named cbis_SA’.
1. Click on ‘Make SA’ tab.
2. Click on ‘New’ button.
DSTC – 1.47-16
Copyright © IP Fabrics, Inc. 2007
Page 20
DeepSweep™ “Secure Buffered Delivery” Tutorial
IP Fabrics
This takes you to the configuration page for entering the name of a new SA.
3. Enter text string ‘cbis_SA’ into the text box.
4. Click ‘OK’ button.
This takes you to the first configuration page for this SA.
DSTC – 1.47-16
Copyright © IP Fabrics, Inc. 2007
Page 21
DeepSweep™ “Secure Buffered Delivery” Tutorial
IP Fabrics
You will see the “Simple Connections” page. (NOTE: If you have an 8-port DeepSweep then
you will see a page like the one below. If you have a 4-port system then you will only see
options for PIXL 0,1. In the latter case, then you need only define the configuration for the
PIXLs you actually have in your system.)
DSTC – 1.47-16
Copyright © IP Fabrics, Inc. 2007
Page 22
DeepSweep™ “Secure Buffered Delivery” Tutorial
IP Fabrics
Select the topology for the first PIXL pair (0,1).
5. Click button labeled “PIXL 0,1.
6. Click on the icon that is second from the right of the set across the top. It has the
descriptive text “1-2 inputs spread over 2 PIXLs, possible reflect output” below it.
7. Click OK. The selected icon will appear in the definition area in the lower part of the
screen.
DSTC – 1.47-16
Copyright © IP Fabrics, Inc. 2007
Page 23
DeepSweep™ “Secure Buffered Delivery” Tutorial
IP Fabrics
[8-port system only] Repeat this process for the second PIXL pair (2,3).
8. Click the button “PIXL 2,3”.
9. Click the second-from-left icon on top half of page.
10. Click OK button. This completes the definition for the second PIXL pair.
Next we will place the SMs on the proper chains.
11. Click on the PIXL 0,1 chains-icon box at the lower left of the page. This will take you to
the SM Chains definition page.
DSTC – 1.47-16
Copyright © IP Fabrics, Inc. 2007
Page 24
DeepSweep™ “Secure Buffered Delivery” Tutorial
IP Fabrics
Here we place the SMs onto the chains. In this case, just one SM each per chain.
12. Use the drop-down menus to match the example screen image – “cbis_SM” on PIXL 0.
13. Similarly, select “null_sm” on PIXL1.
14. Click OK.
15. Click on the “Simple Conns” button on the left edge to return to Connections page.
DSTC – 1.47-16
Copyright © IP Fabrics, Inc. 2007
Page 25
DeepSweep™ “Secure Buffered Delivery” Tutorial
IP Fabrics
16. [8-port system only] On “Simple Connections” then click on the chains-icon in the lower
part of the screen labeled “PIXL 2,3”. This is to the right of the one you clicked
previously.
This will take you to Chains definition page for the other PIXL. (Note, if you have a 4-port system
then you do not do this step since you will only see a single PIXL pair.)
[8-port system only] The example does not use the second pair of PIXLs so we just place the
“null_SM” at the top of each chain. This is required since each PIXL chain must have at least one
SM at the top. ‘null_sm’ acts as a do-nothing placeholder.
17. Match the “null_SM” entries as in the screen example.
18. Click OK.
This completes the configuration of the Surveillance Assembly. Now you are ready to RUN the
SA.
DSTC – 1.47-16
Copyright © IP Fabrics, Inc. 2007
Page 26
DeepSweep™ “Secure Buffered Delivery” Tutorial
IP Fabrics
Phase IV – Run the intercept
Step 7: Run the ‘uc_SA’ Surveillance Assembly
Let’s run the SA.
1. Select the ‘Run’ tab at the top of the page.
2. Select cbis_SA’ from the drop-down menu on the left side of the gray area.
3. Click ‘Start’ button. You should see several changes in the Messages and Status boxes.
Finally the system will display “RUNNING’ and the Messages display should show “OK”.
DSTC – 1.47-16
Copyright © IP Fabrics, Inc. 2007
Page 27
DeepSweep™ “Secure Buffered Delivery” Tutorial
IP Fabrics
Click on “Statistics” button to see intercept activity. Minimally, you should see a non-zero value
appear in the first set of four boxes under “Chain X. If there is other traffic on the surveillance
ports then these will also be observed in the counters.
DSTC – 1.47-16
Copyright © IP Fabrics, Inc. 2007
Page 28
DeepSweep™ “Secure Buffered Delivery” Tutorial
IP Fabrics
Step 8: Return to “cbis_SM” SM
We now have a running Surveillance Assembly. If we return to the configuration page for the
user connection we will see some indication of this.
1. Click “Make SM” tab.
2. Select the “cbis_SM” SM from the list.
3. Click “Edit” button.
This takes you to the User Connection configuration page. The SA is running so you will get an
indication that this SM is alive and actually running via the green ‘lights’. From here, you can add
new user IDs and they will immediately be made active. In fact, we could have created and
started the SA and then added the example user IDs afterward.
DSTC – 1.47-16
Copyright © IP Fabrics, Inc. 2007
Page 29
DeepSweep™ “Secure Buffered Delivery” Tutorial
IP Fabrics
Step 9: Stop the ‘cbis_SA’ Surveillance Assembly
To shutdown the SA click on the ‘Control’ button. This takes you back to the ‘Run’ page. Click on
the ‘Stop’ button.
You should see the system Status go to “STOPPING’ and then to ‘IDLE’ with the Status of ‘OK’.
Step 10: (optional) Accessing log files
To access files (e.g. ‘systemlog’) in the user area you can use SFTP or SCP or a product such as
“WinSCP” to get files after a run.
The account is ‘ens_administrator’ and is shipped with the default password ‘ipfabrics’. See the
DeepSweep User’s Manual for additional details.
DSTC – 1.47-16
Copyright © IP Fabrics, Inc. 2007
Page 30
DeepSweep™ “Secure Buffered Delivery” Tutorial
IP Fabrics
Phase V – Observe BIF progress
Step 4: Statistics – Observing the running system
To see what is happening you can use the Statistics page. This will show you packet counts for
the physical ports and also some information about the files being created. Remember that files
may contain many packets and other records and will not be transferred until required – e.g. a
time or file size limit is crossed.
DSTC – 1.47-16
Copyright © IP Fabrics, Inc. 2007
Page 31
DeepSweep™ “Secure Buffered Delivery” Tutorial
IP Fabrics
Phase VI – LEA file access
Step 5: Accessing data files
To access data files from a remote system you can use SFTP or SCP or WinSCP. The account
is ‘cbis-case-example’ and the password ‘lea-xyz’. You will see some indication of the connection
on the Statistics page as shown below by looking at the boxes at the bottom of the page for
Ethernet port frames. There should be some general packet traffic. If you actually run an
intercept then after some time you should the file counters increase as is shown below. This is
just a sample, of course. Your own data, of course, would vary.
DSTC – 1.47-16
Copyright © IP Fabrics, Inc. 2007
Page 32
DeepSweep™ “Secure Buffered Delivery” Tutorial
IP Fabrics
From the remote system (i.e. the simulated LEA system) should see files in the buffered case
directory similar to the following.
DSTC – 1.47-16
Copyright © IP Fabrics, Inc. 2007
Page 33