1
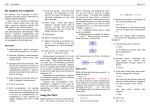
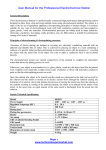
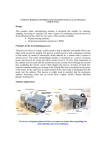
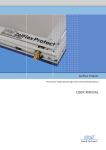
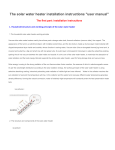
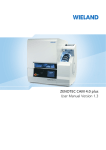
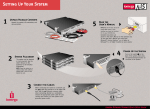
4
1
Installation and operation of this unit does not require in-depth professional knowledge or
specific training. Just fill the “Keep Solution Hot” system with 250 ml of hot-tap or boiled water,
connect this unit to a the power supply, fill all tanks with required solutions (50 ml each tank)
and place them in three holes on the front of the unit. Now place the correct anodes, connect
the plating objects to the cathode rod using copper or aluminium wire (hooks), connect both, 4
mm anode and cathode rods to the power supply using red and black crocodile clamps, switch
the unit “On” (turn a potentiometer with a knob clockwise) and start your works. That’s it.
To start electroplating / electroforming you will probably also need the following:
- Some additional anodes such as a rhodium plating anode for rhodium plating process
(supplied separately on request due to prices changing every day). Copper and nickel anodes for
copper or nickel plating processes.
- Sufficient amount of distilled or deionised water (water for car acid batteries is suitable) to
stir chemicals with.
- Cleaning/Plating/Forming chemicals depending on process you require.
- Copper or aluminium wires (hooks) to connect the objects to the cathode rod.
- Rinsing water in glass or plastic container or, alternatively, easy access to tap water.
STARTING YOUR WORK:
When your unit is fully prepared to work (when all solutions, plating objects and anodes are already in
tanks; both 4 mm anode and cathode rods are connected to the powers supply using the red and black
crocodile clamps (connect them to “crocodile clips points” on Picture No:3) and the “Keep Solution Hot” system is filled up with hot-tap or boiled water just switch the unit “On” by turning the
potentiometer (Metallic knob with 0-9 digits) clock-wise and move it to the correct position (1
digit = 1.5V) for your work to supply a voltage to the cathode/anode rods.
Please note: the current will be shown on a gauge (in the middle of top panel) only when
the electroplating process has started -“Plating-Stripping” switch is on “Plating” position and
both ANODE and CATHODE (object to be plated) are in the solution. Please also note that most processes require just 1-2 A per 1 sq. If your gauge stays on “0” position its mean that in your tanks is less
then 1 A. If you see that the gauge starts to show more than 1 A then increase distance between
the anodes and the objects to be plated in all tanks or reduce the voltage using potentiometer
(turn it anti-clockwise).
WWW.TECHNICALSUPERMARKET.COM
Compact Electro Plating Machine - CEPM-4
INSTALLATION AND OPERATION:
USER MANUAL
PRODUCT INTRODUCTION:
This compact electroplating machine is a high
performance plating/forming unit that is designed
to plate Rhodium and all other precious metals; to form; strip and clean objects (with
dimensions approximately one cubic inch) using
an electrochemical method. This appliance
incorporates principles of modern design..
Electrochemical processes are widely used in
many industries such as electronic, machinery,
decorating, crafts, jewellery, arts, etc. Most
popular plating processes are: rhodium; gold;
silver; nickel; copper; yellow passivate; brass;
DELIVERY SPECIFICATIONS:
This unit with black and red leads (crocodile clamps); 3x50 ml plastic tanks with lids; anode and
cathode, 4 mm metal rods x 2; drain rubber plug x 1; stainless steel, copper and nickel anodes with
protective plastic mesh for cleaning, copper, nickel, gold, silver, chrome and rhodium plating processes.
Model
CRPM-4
Input (V)
110V – 240V ac
Output (ADC)
0-12 V dc / 0 - 4 A continuously
Keep Solution Hot option (water)
Yes
Plating-Stripping option
Yes
Overload power cut-off system
Yes
Power / Voltage indicator
Yes
Ampere gauge
Yes (0 – 4 ADC)
Plating line parameters (Output)
0-12Vdc/0A-4A continuously
HEALTH AND SAFETY:
Anode’s rod
Yes, 4 mm
All Electrochemical processes are subject to two main hazardous effects: electrical injuries and poisoning by solutions and their gases. To avoid electrical injuries the user must not
touch any exposed leads of the station with unprotected hands.
Always use rubber gloves. This will also protect your hands from the harmful effects of the solutions. It will also be necessary to provide a rubber mat to stand on in the operation area. The
chemicals which you will work with are hazardous; many of them are deadly poisons and
their combinations often produce corrosive and poisonous gases.
Therefore, all general safety precautions should be undertaken when working with them
including keeping all chemicals inaccessible to children, wearing eye protection, avoiding skin
contact, wearing latex gloves and avoiding inhalation.
Proper ventilation of the work area is essential. Appropriate rules of working with chemicals
are provided by the suppliers of every chemical. Please follow all instructions carefully.
Cathode’s rod
Yes, 4 mm
Plating line x
1
Tank’s lid
Yes x 3
Solution tank
3
Volume of each tank
50 ml
Dimensions of each tank (mm)
50 (D) x 60 (H)
Tank’s material
Polypropylene
Dimensions of station (mm)
235(W) x 165(D) x 170(H)
Weight
0.9 Kg
If you find cleaning, electroplating, electroforming or stripping processes challenging please feel free
to contact us regarding a downloadable electroplating courses for beginners!
[email protected]
Customer Support Worldwide: +44 (0)800 059 9607
www.technicalsupermarket.com
BRUSHES AND PENS:
The unit has an electrical line (outputs) enabling Brush or Pen
plating as well. In
order to do this, connect the pen (brush) to
the positive “+” (red
crocodile clamp) lead.
Connect the negative
power source “-” (black
crocodile clamp) lead to
an object to be plated.
For a brush (Pen) stripping process please use
IMPORTANT!
If the received unit
looks a little different
from the model that
you expected, please do
not worry: changes
that have been made
are solely made with
the purpose of improving the quality, appearance and specifications
2
3
ASSEMBLY:
THE “Keep Solution Hot” SYSTEM:
Both, anode and cathode 4 mm rods (Picture No:1) are fully movable and can be taken out at any time
when required to clean tanks after the plating process is completed, to fill tanks with fresh solutions or
you want to fill up the “Keep Solution Hot” system by hot tap or boiled water. If these rods already
are on their position please connect a positive power (using a crocodile clamp/clip on the red lead) to 4
mm ANODE rod (please see picture bellow) and a negative power (using the crocodile clamp/clip on
the black lead) to a 4 mm CATHODE rod. Now connect the correct anodes (to the ANODE rod) as
shown on a picture on next page.
It is a very simple safe and useful heating option
that allows you to save money on electricity.
When you require increasing temperature of solution inside tanks just add about 250 ml of hot
enough or boiled water inside the unit (Picture C).
IMPORTANT! Please make sure that all anodes are in the protective plastic mesh in order to avoid any
contact with the objects to be plated/cleaned (short-cut).
Now dissolve the chemicals in the correct amount (50 ml) of warm (50C-60C) distilled water, mix
them very well and pour the solutions into the tanks. For example, fill the left tank with cleaning solution and the second tank with tap (rinsing) water and the right tank with a rhodium plating solution. (All
tanks can be also used in different ways, for example, for cleaning or plating/forming solution in all
three tanks). Now attach a correct type of anode for each tank to the anode’ rod as shown on top
picture on next page. Your machine is ready to work.
A
When you want to use this system or already to
change this cooled water on the system just unplug a drain rubber plug on the bottom of a side
wall on the unit (please see Pictures A) and pour
all cooled water out from the unit in a suitable
container (Please see picture B). Then place this
rubber plug back on its place, take out ANY one
NOTE:
It is very important to
B
C
keep temperature of
your solutions under
The rule of thumb is that the anode should be about twice bigger in size then area of plating object and
depending on the plating process (rhodium, gold, copper, chrome etc) the anode material will vary. If
the object you wish to be plated is bigger than the anode them a Cathode Rotating Stand or 2 - 4 anodes
around the plating object should be used in same time to get an acceptable plating result.
control
this
because
if
tem perature
reaches more than
ITEMS PREPARATION: CLEANING PROCESS
75 C (167 F) it will
To prepare the items for quality electroplating or electroforming process it is important to ensure
that all oil, grease, paint, old layers or other materials are removed prior to processing. The most
common cause of poor quality plating or forming is insufficient preparation. The usage of an electromagnetic or ultrasonic cleaners is excellent for the purpose of removal of some grease or polishing
compounds. However, vigorous brushing with soapy water is sufficient. You can also electro-clean
these objects in the tank. This electro-cleaning process takes just a few minutes and this is a very
short period of time compared to the time you may waste trying to plate an object which was not
sufficiently cleaned. In order to perform the cleaning process the object to be plated should be hung
on the cathode rod (please see picture bellow) using a hook made from copper or aluminium wire.
destroy
Please make sure that the cleaning item is
fully immersed in the cleaning solution
and have a good contact with the cathode
rod. Connect this rod (see a picture on
next page) to a negative power supply
using the black crocodile clamp. Now
connect the stainless steel anode on the
anode rod and connect this rod using the
red crocodile clamp of positive power
supply. Then make sure that the “Plating
– Stripping” switch is on the “Plating”
position. Now switch this unit “On” and
turn the potentiometer (left knob with 0-9
digits) to the required voltage (usually
about 9-12 Volts) and commence the
process. You can repeat this procedure as
many times as you want.
your
solu-
STRIPPING OPTION:
This process is widely used for removal of all residues or unwanted layer fro m a previously plated object.
For this process the object go i n g to be stripped needs to be hung on hooks made of copper or aluminiu m wire
to the ANODE rod (positive power supply) and connect an anode to the CATHODE rod (negative power
supply). O n t his mac hine it can be done automatically without changing the object’ and anode’s position by
sw itc hi n g “Plating-Stripping” switch on top front panel of the machine to the “Stripping” position. Once again
there is no need to reverse the polarity of the cables manually as the unit does this automatically for you - just make
sure that the s t r i p p i n g item and an anode are fully immersed in the solution and have a good contact with its 4
TERMINOLOGY FOR BEGINNERS:
Anode and Cathode: Throughout the User Manual we refer to the terms anode and cathode a lot. Please do not be
put off by this. AN ANODE is the piece of metal in the tank which should be connected to the plus (+) or positive
power and A CATHODE is the object that needs to be plated and that should be connected to the minus (-) or the
negative power.
The “Keep Solution Hot” heating system is a system that allows you to keep your rhodium and other precious metal
solutions in a tank hot enough to get a high quality plating surface within the best possible time. Usually this temperature
is between 50 C and 70 C. This electroplating unit is supplied with an integral PP-welded water-proof non-movable
container (under three plating tanks) which allows pouring and holding of about 250 ml (when tanks are placed on their
holes!) of hot tap or boiled water and sufficient for keeping your solution in three tanks hot enough (up to 70 C) for
about 45-60 minutes which is fully sufficient for any type of electroplating process. DO NOT overfill! Hot tap or boiled
water can be poured in any tank’s hole – please see Picture 2 and make sure later that all three tanks are properly placed
back in their holes. To do these just move those tanks around in their holes manually. Do not press them down.
DC power cut-out system - this model has an overload DC power cut-out system that allows the unit to remain
in full working order if an accidental shortcut occurs. (The anode and cathode connected together in a solution
for a period of up to 10 seconds).