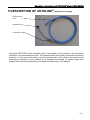
1
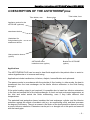
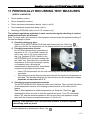
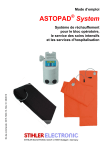
Operating Instructions ASTOTHERM®plus Warmer for blood, infusion and irrigation solutions Part-No.0450.7200.12, Rev. 1 – 06/2006 Models STIHLER ELECTRONIC GmbH • 70597 Stuttgart • Germany AP220 AP220S AP260 AP260S To be filled in by the user: Serial number ______________________________________________ Stock number ______________________________________________ Appliance location ______________________________________________ Date of commissioning ______________________________________________ Manufacturer: STIHLER ELECTRONIC GmbH Julius-Hölder-Str. 36 70597 Stuttgart Germany Telephone: Telefax: Nat.: 0711/72067-0 Nat.: 0711/72067-57 Int.: +49-711-72067-0 Int.: +49-711-72067-57 E-Mail: [email protected] STIHLER ELECTRONIC GmbH, Stuttgart takes sole responsibility for declaring that this product (only 230-240 VAC models) complies with EC Council Directive 93/42/EEC pertaining to medical products, dated 14th June 1993. Appointed agency: DEKRA Certification GmbH, permit number 0124. Year of approval for application of CE symbol: 2004 Operating Instructions ASTOTHERM®plus 220(S)/260(S) CONTENTS Section............................................................................................................ Page 1 WARNINGS AND SAFETY INFORMATION ............................................................................ 4 2 EXPLANATIONS OF SYMBOLS ............................................................................................. 6 3 GENERAL TECHNICAL DATA ................................................................................................ 7 4 DESCRIPTION OF THE ASTOTHERM®plus ........................................................................... 9 5 DESCRIPTION OF ASTOLINE® (optional accessory) ........................................................... 13 6 CONTROL PANEL ................................................................................................................. 14 7 INSTALLATION...................................................................................................................... 16 8 COMMISSIONING ................................................................................................................. 17 9 SWITCHING OFF THE APPLIANCE ..................................................................................... 19 10 CLEANING AND DISINFECTION........................................................................................... 20 11 PERIODICALLY RECURRING TEST MEASURES ................................................................ 21 12 REPAIRS AND CUSTOMER SERVICE ................................................................................. 23 13 WARRANTY TERMS.............................................................................................................. 24 14 RETURN AND DISPOSAL OF APPLIANCES ........................................................................ 24 15 EMC GUIDANCE AND MANUFACTURER’S DECLARATION .............................................. 25 -3- Operating Instructions ASTOTHERM®plus 220(S)/260(S) 1 WARNINGS AND SAFETY INFORMATION Follow the operating instructions! Any handling of the appliance assumes the accurate knowledge of and compliance with these instructions. WARNINGS • If the ASTOTHERM PLUS excessive temperature alarm is triggered, stop supply of fluid to the patient immediately. • When the ASTOTHERM PLUS is combined with other electrical medical devices, the relevant standards must be observed (see EN 60601-1-1 Safety requirements for medical systems). • When the ASTOTHERM PLUS is used as a component in a haemofiltration, haemodialysis or haemodiafiltration device, it must be ensured that the entire system meets EN 60601-2-16. The temperature of the fluid may not exceed 41 °C. The haemodialysis, haemofiltration or haemodiafiltration device must have an independent overtemperature cut-out (41 °C) which at the very least must be checked before every treatment. • To ensure reliable disconnection from the mains, pull out the mains plug if required. • Do not use the ASTOTHERM PLUS in areas at risk of explosion. • In order to minimise the risk of electrical shock, do not remove the rear of the housing. Do not use mains adapters or extensions which interrupt the earth wire. • In order to ensure the safety of user/patient, the application and servicing measures specified by the manufacturer must be carried out. • The manufacturer will not be liable for user/patient safety if measures other than those specified by the manufacturer are applied in use, servicing and safety checks. • Persons performing such measures must be appropriately qualified and trained. • Any servicing measures and modifications to the appliance may be carried out only by qualified persons authorised by the manufacturer. • Any electrical installations must comply with the national standards and regulations applicable in each case (e.g. DIN VDE 0107). • In the case of several appliances being combined and connected (e.g. at multiple sockets), the sum of the leak currents must not exceed the permissible limit value. • Only use sterile infusions extensions marked expressly as accessories for the ASTOTHERM PLUS. • All disposable sterile infusion systems are intended to be used only once. • Use only CE-marked accessories marked expressly as accessories for the ASTOTHERM PLUS (e.g. ASTOTUBE, see also Section 7). • Only the ASTOLINE active insulation cover may be connected to the appliance socket of the ASTOTHERM PLUS 220S or AP260S. -4- Operating Instructions ASTOTHERM®plus 220(S)/260(S) • WARNINGS (observe when using the ASTOLINE) • ASTOLINE may only be connected to the appliance socket provided for it on the ASTOTHERM PLUS. • The ASTOLINE may not be covered during use (cloths, emergency films etc.). • Do not bend the ASTOLINE. SAFETY INFORMATION • All applications involving the use of an ASTOTHERM PLUS warmer must performed under supervision of medically trained staff. • When fluids are warmed up, it is possible that gas may evolve (bubbles form). • Be aware of the potential for air emboli when using a blood and fluid warmer. • Fully prime all filters, lines and disposable sets before starting an infusion. • Make sure all connections of the complete fluid stream are fixed tightly to prevent inadvertent infusion of air into the fluidstream. • Do not warm infusions containing soluted gas (e.g. bicarbonate). • Extreme care should always be taken to ensure that a bolus of air does not pass to the patient. • In order to minimise the risk of injury to patients or users, or the risk of damage to property, please notify your regional sales agent immediately of any of the following events. In such cases, do not use the ASTOTHERM PLUS until the appropriate corrective measures have been taken. Damaged or worn mains connecting cables or mains plug Damaged housing, damaged front panel, front panel with poor adhesion A system which has suffered a severe shaking, blow or fall An appliance whose electronic components have been exposed to the effects of fluids A system which has already given one person an electrical shock A system which seems to overheat • When fitting the warmer to an infusion stand, follow the instructions of the infusion stand manufacturer with regard to maximum load and the avoidance of tilting. • ASTOTHERM PLUS is a medical electrical equipment. According to Medical Safety EMC standard EN60601-1-2-2001 medical electrical equipment needs special precautions regarding Electromagnetic Compatibility. Please follow the related notes in chapter 15. • Portable and RF communication equipment (especially mobile phones) may interfere medical electrical equipment (see chapter 15). • High frequency surgical appliances may interfere medical electrical equipment (see chapter 15). CONTRAINDICATIONS No contraindications are currently known apart from those which may generally occur when infusions, transfusions or dialysis processes are used. -5- Operating Instructions ASTOTHERM®plus 220(S)/260(S) 2 EXPLANATIONS OF SYMBOLS Insofar as these symbols are applicable, they appear in the relevant place on the appliance, in the packaging, on the rating plate or in the accompanying paperwork. Symbol: this shows that the appliance is a Type B defibrillation-protected part as per standards IEC 601-1 and VDE 0750 Part 1. Symbol: protected from water splashes Symbol: appears before the 4-figure year of manufacture of the appliance Symbol: Indicates the manufacturer. Symbol: indicates that an absolute prerequisite for operating the appliance safely is accurate knowledge of the accompanying documents before using the appliance Symbol: certifies compliance with the requirements of Medical Products Directive 93/42/EEC Control lamp: excessive or inadequate temperature alarm (look at temperature display) Control lamp: stand-by mode Key: "Appliance On/Off" (keep depressed for at least 1 second to switch off) Key: "ASTOLINE On/Off"; models AP220S, AP260S only Key: "Start", confirms temperature selected and starts the warmer heating process (keep depressed for approx. 1 second) Key: "Increase" selected temperature Key: "Decrease" selected temperature Symbol: energy output values for ASTOLINE appliance socket Symbol: equipotential bonding (optional) -6- Operating Instructions ASTOTHERM®plus 220(S)/260(S) 3 GENERAL TECHNICAL DATA ASTOTHERM PLUS 220 and 220S (with ASTOLINE) ASTOTHERM PLUS 260 and 260S (with ASTOLINE) Power supply cord AP220 EU AP220S EU AP260 EU AP260S EU AP220 UK AP220S UK AP260 UK AP260S UK AP220 CH AP220S CH AP260 CH AP260S CH AP220 DK AP220S DK AP260 DK AP260S DK Earthing-contact type plug H 05 VVF 3 x 0,75 BS-plug incl. 13 A Fuse H 05 VVF 3x1 Swiss plug H 05 VVF 3 x 0,75 DK plug DK2-Ia, DK2-5a 3 x 0,75 Electrical connection 230-240 VAC ±10% 50-60 Hz Impedance of protective earthing ≤ 0.2 Ω Insulation resistance > 2 MΩ Leakage current ≤ 0.2 mA Primary fuses 2x4A Secondary fuses 2 x 0.63 A Power consumption 450 W Self-start after mains power failure 5 to 30 sec. Protection class I Protection level to IEC 601-1 Type B defibrillation-proof applied part Signal output part ("S“ Models only) DC 8 W, can only be used for ASTOLINE Humidity protection IP X4 Classification as per Appendix IX IIb (Rule 9) UMDNS Code 10-447 Dimensions (excl. ASTOLINE) height x width x depth 145 mm x 135 mm x 295 mm Weight (excl. ASTOLINE) 2.9 kg Heating-up time Approx. 1 min (20°C to 35°C) Operating mode Continuous operation Permissible environmental conditions: operation: storage: Humidity: Temperature: Pressure: 10% to 90% 10% to 100% 0°C to 32°C -20°C to 60°C 700 hPa to 1060 hPa 500 hPa to 1060 hPa 3 selectable control temperatures Standard: 39°C / 41°C / 43°C (± 0.5°C) Optional: from 36°C to 43°C 1st Safety temperature cut-off 2nd Safety temperature cut-off 45.5°C (± 1°C) 46.0°C (± 1°C) Heating element bimetal switch 65.0°C (± 5°C) Inadequate temperature alarm 4°C (± 1°C) below control temperature -7- Operating Instructions ASTOTHERM®plus 220(S)/260(S) Permissible cleaning agents and disinfectants • Bacillol plus (Bode Chemie, Hamburg) • Meliseptol (B. Braun, Melsungen) • Mikrozid Liquid (Schülke und Mayr, Hamburg) • Mikrozid Pumpspray (Schülke und Mayr, Hamburg) • or ¼%-strength sodium hypochlorite solution Compliance with international standards: EN 60601-1: 1990 + A1: 1993 + A2: 1995 Electrical medical equipment: Part 1: General requirements for safety EN 60601-1-2: 2001 Electrical medical equipment: Part 1: Addition standard: Electromagnetic compatibility, requirements and tests ASTM F 2172-02: Standard Specification for Blood, Fluid Warmers Environmental information By dispensing with the mains switch, it has been possible to considerably improve the ecobalance of the ASTOTHERM PLUS. The raw materials and energy which would be incurred in manufacturing the mains switch and cables are saved. Even 10 years' permanent stand-by mode uses less energy (< 1 W) than that which would be used to manufacture the switch and cables. To save still more energy, we recommend disconnecting the mains plug when the appliance is not in use. We reserve the right to make modifications to the design and technical data without prior notice. -8- Operating Instructions ASTOTHERM®plus 220(S)/260(S) 4 DESCRIPTION OF THE ASTOTHERM®plus Tube holder, rear Sleeve grips Tube holder, front Appliance socket for the ASTOLINE (optional) Attachment device Handwheel for fixing/releasing the attachment device Heat protection sleeve (option) ASTOLINE active insulation cover (option) Bracket for ASTOLINE (option) Applications The ASTOTHERM PLUS can be used to heat fluids supplied to the patient either to avoid or reduce hypothermia or to increase well-being. Applications include transfusions, infusions, dialysis, haemofiltration and apheresis. The warmer works in accordance with the principle of flow heating, in other words, the heat is transferred from the heat exchanger via the sterile infusion extension to the fluid flowing through it. If the entire heating output is not required, it is possible also to insert two infusion extensions in the first and second half of the heat exchanger. A check on heat exchanger temperature at the inlet and outlet avoids the fluids overheating, even if they have different inlet temperatures. The patented heat protection sleeve insulates the heat exchanger cylinder and the infusion extension against the effects of ambient cold (e.g. air-conditioning units) and thus increases the degree of efficiency. There is a recess in the centre of the heat protection sleeve for using a second infusion extension. Extensions can be put in or brought out at this point and secured with the hand-grips. -9- Operating Instructions ASTOTHERM®plus 220(S)/260(S) Overheating is prevented by the following measures: • two separate temperature sensors for temperature control, temperature display and excessive temperature safety cut-off, • an additional independent temperature sensor for excessive temperature safety cut-off, • visual and acoustic alarm display. The temperature of the ASTOTHERM PLUS can be selected to be 39°C, 41°C or 43°C. The temperature-display always shows the current mean temperature of the heat exchanger. Heating of the medium is based on flow rate and inlet temperature (see diagrams of outlet temperatures). If the displayed temperature of the heat exchanger drops more than 4°C below the selected temperature, the inadequate temperature alarm will be activated (see Section 6). ASTOTHERM PLUS is available in two variants: AP220: heat exchanger groove for 4 mm dia. infusion instruments By standard three temperatures can be selected: 39°C, 41°C, 43°C, Optional temperatures: from 36°C to 43°C, power consumption 450 W AP260: heat exchanger groove for 6.8 mm dia. infusion instruments By standard three temperatures can be selected: 39°C, 41°C, 43°C, Optional temperatures: from 36°C to 43°C, power consumption 450 W The appliances with the "S" supplement to the order number are ready for connection to the ASTOLINE. It is possible to have appliances retrofitted by the manufacturer. - 10 - Operating Instructions ASTOTHERM®plus 220(S)/260(S) Temperatures on the ASTOTHERM PLUS 220(S) Temperature [°C] AP 220S, Settings 43/41/39/37°C, appliance outlet temperature, initial temperature 10°C 45 44 43 42 41 40 39 38 37 36 35 43°C 41°C 39°C 37°C 0 10 20 30 40 50 60 70 Flow [ml/min] Temperature [°C] AP 220S, Settings 43/41/39°C, appliance outlet temperature at the end of ASTOLINE, initial temperature 20°C 43 42 41 40 39 38 37 36 35 34 33 43°C 39°C 0 10 20 30 41°C 40 50 60 70 80 90 100 Flow [ml/min] 10 ml/min = 0.6 l/h 20 ml/min = 1.2 l/h 30 ml/min = 1.8 l/h 40 ml/min = 2.4 l/h 50 ml/min = 3.0 l/h 60ml/min = 3.6 l/h 70ml/min = 4.2 l/h 80ml/min = 4.8 l/h 90ml/min = 5.4 l/h 100ml/min = 6.0 l/h - 11 - Operating Instructions ASTOTHERM®plus 220(S)/260(S) Temperatures on the ASTOTHERM PLUS 260(S) AP 260S, Settings 43/41/39/37 °C, appliance outlet temperature, initial temperature 20°C 45 Temperature [°C] 44 43°C 43 42 41°C 41 40 39°C 39 38 37°C 37 36 35 0 10 20 30 40 50 60 70 Flow [ml/min] Temperatur [°C] AP 260S, Settings 43/41/39°C,appliance outlet temperature at the end of ASTOLINE, initial temperature 20°C 43 42 41 40 39 38 37 36 35 34 33 43°C 39°C 0 10 20 30 41°C 40 50 60 70 Flow [ml/min] 10 ml/min = 0.6 l/h 20 ml/min = 1.2 l/h 30 ml/min = 1.8 l/h 40 ml/min = 2.4 l/h 50 ml/min = 3.0 l/h - 12 - 60ml/min = 3.6 l/h 70ml/min = 4.2 l/h 80ml/min = 4.8 l/h 90ml/min = 5.4 l/h 100ml/min = 6.0 l/h 80 90 100 Operating Instructions ASTOTHERM®plus 220(S)/260(S) 5 DESCRIPTION OF ASTOLINE® (optional accessory) Flexible silicon cover Appliance plug Connection housing Using the ASTOLINE active insulation cover it is possible to limit cooling of the fluid being returned on the warmer/patient route. The heated flexible silicon body surrounds the infusion extension on the way to the patient, ensuring that the part of the infusion line which would otherwise be exposed to cool ambient air is insulated and heated. Its special shape also enables infusions and transfusions to be observed all the way to the patient. - 13 - Operating Instructions ASTOTHERM®plus 220(S)/260(S) 6 CONTROL PANEL Illuminated LC-Display Actual temperature of the heat exchanger cylinder Frame marked Selected temperature = specified temperature Display of possible selected ttemperatures "Increase" key for selected temperature set (test function 2) "Decrease" key for selected temperature set (test function 3) Stand-by status orange LED "Start" key to confirm selected temperature and start heating (test function 1) green LED Alarm status red LED "ASTOLINE On/Off" key green LED ASTOLINE Symbol "Appliance On/Off" key green LED (Models 220S und 260S only) Operating and alarm conditions A – Warmer conditions Condition Appliance display Appliance activity Stand-by orange Stand-by LED on no activity Appliance On green Appliance-LED on Temperature Display on Alarm LED flashing red Alarm sound on Start LED flashing green no activity appliance “waiting” confirm with “Start” key Start heating Appliance LED on Alarm LED off or flashing when appliance cold Alarm sound off green Start LED on heating on temperature control on temperature monitoring on - 14 - Operating Instructions ASTOTHERM®plus 220(S)/260(S) B – ASTOLINE® conditions (Models AP220S, AP260S only) Condition Appliance display Appliance activity ASTOLINE connected, On and Start green ASTOLINE LED on ASTOLINE heating on output monitoring on C – Alarm reactions Type of Alarm Appliance display Excessive temperature Alarm heating goes off green Start LED flashing red Alarm LED flashing Alarm sound on Look at temperature display! Inadequate temperature alarm heating stays on green Start LED on red Alarm LED flashing Alarm sound on for 15 seconds after 2 minutes Look at temperature display! Possible reasons Recommended measures Note: after Steps 1 or 2 below have been carried out and the blood warmer has cooled down, press the "Start" key. 1. Allow medium to cool down. 1. Inlet temperature of the medium to be heated is too high. 2. Influence of an external 2. Stop influence of external heat source (e.g. radiator, heat source or change location. sunlight, increasing ambient temperature). 3. Blood warmer is defective. 3. Warmer needs repairing -> return to manufacturer. Note: alarm stops automatically if the reason for the alarm is eliminated. 1. Throttle flow somewhat. 1. Inlet temperature of the medium to be heated is too low or flow is too high. 2. Blood warmer is defective. 2. Warmer needs repairing -> return to manufacturer. ASTOLINE Alarm ("S“-Models only) Heating off and ASTOLINE heating off green Start LED flashing red Alarm LED flashing Alarm sound on ASTOLINE LED on 1. ASTOLINE is not plugged 1. Plug ASTOLINE into the in. socket on the ASTOTHERM PLUS and switch on again at the key. 2. ASTOLINE is defective. 2. ASTOLINE needs repairing -> return to manufacturer. Software fault red Alarm LED flashing Alarm sound on 1. temporary program fault 2. permanent program fault 1. Unplug appliance, wait 1 minute, switch on again, or hold the buttons "increase temp." and "decrease temp." simultaneously for approx. 3 seconds. 2. Return appliance to manufacturer. - 15 - Operating Instructions ASTOTHERM®plus 220(S)/260(S) 7 INSTALLATION The ASTOTHERM PLUS is not approved for use in areas at risk of explosion! • The ASTOTHERM PLUS can be attached to infusion bars/stands (dia. 12 mm to dia. 35 mm) using the integrated attachment device or attached to appliance rails. When it is used as a free-standing appliance or attachment to other appliances, the user should ensure that it is properly secured against tilting. • The ASTOTHERM PLUS is design for the mains voltage range given on the rating plate. • According to our current state of knowledge, when the ASTOTHERM PLUS is combined with other medical equipment, the following effects may occur as a result: - loss of pressure of up to 50 mm Hg caused by the infusion extension required and dependent on the flow rate, - bubble formation due to evolution of gas in the heated fluid, - increase in total leak current. • When combined with other electrical equipment, ensure that the earth wire potential is identical. • ASTOTUBE infusion extensions are CE-marked original accessories for the ASTOTHERM PLUS. Select suitable sterile infusion extensions in accordance with the table below: ASTOTUBE infusion extension required (CE, sterile, use once only) Design: ASTOTHERM® plus 220(S) ASTOTHERM® plus 260(S) Number of windings max. 11 max. 9 External diameter 4 mm 6.8 mm Order no. PVC Filling volume IFT 30460 37.5 ml IFT 30410 89 ml - 16 - Operating Instructions ASTOTHERM®plus 220(S)/260(S) 8 COMMISSIONING 1. Check whether mains voltage matches the details on the rating plate. 2. Check whether the housing is damaged or the front panel is adhering poorly. 3. Connect the mains plug to the mains. Stand-by mode 4. Switch on appliance at the "Appliance ON/OFF" activated. 5. Select temperature using the or is indicated. key. Check whether the alarm is keys. 6. To start heating, keep the "Start“ key depressed for approximately one second. The brief clicking when the "Start" key is pressed is a component of the safety device test which is performed automatically when the appliance is started. 7. The alarm testing devices are reset and the heating starts to work until 35 °C is reached after approx. one minute. The appliance then regulates itself to the temperature set. As long as the actual temperature of the appliance is approx. 4 °C below the selected temperature during heating-up, the red alarm indicator flashes to signal inadequate temperature. 8. Pull the heat protection sleeve (option) apart by the two grips and remove it. 9. Clip the start of the infusion extension (female Luer lock) into the bracket. 10. Starting from the back, insert the infusion extension into the circumferential groove in an anticlockwise direction. Gently pulling makes it easier to insert and improves the seating of the infusions extension. - 17 - Operating Instructions ASTOTHERM®plus 220(S)/260(S) 11. Clip the infusion extension into the front bracket. Supplementary information for appliances with heat protection sleeve 12.Pull the heat protection sleeve apart and wrap it around the appliance. Have the opening facing upwards and clip it shut by pressing the sides together. Supplementary information for appliances with the ASTOLINE active insulation cover 13.Plug the ASTOLINE into the appliance socket on the rear of the housing (the correct alignment is marked with arrows) and fix the plug turning the milled nut. Switch on using the "ASTOLINE On/Off“ key . 14.Starting from the patient side, feed the end of the infusion extension into the ASTOLINE. The ASTOLINE should come as close as possible to the patient to prevent the medium cooling down even at the slowest flow rates. Note: to facilitate insertion of the infusion extension, the blue silicone profile can be dusted with commercial talcum powder (from the pharmacy, for example). 15.Engage the ASTOLINE in the bracket on the front part of the appliance. If the whole of the active insulation cover is not required, the infusion extension can be brought out of the ASTOLINE at any point. Supplementary information for appliances with a connection to equipotential bonding (optional) 16.Plug in the equipotential bonding line at the back of the bottom of the appliance. The plug is marked . - 18 - Operating Instructions ASTOTHERM®plus 220(S)/260(S) 9 SWITCHING OFF THE APPLIANCE • The appliance goes into stand-by mode if the "Appliance On/Off“ key approx. 1 second. • To disconnect the appliance from the mains completely, pull out the plug if necessary. is pressed for Supplementary information for appliances with the ASTOLINE active insulation cover • The ASTOLINE active insulation cover does not have to be disconnected from its socket after use. The ASTOLINE can be hung around the back off the appliance. • If the ASTOLINE is disconnected from the ASTOTHERM PLUS, the protective cap must be put on the appliance socket to prevent the contacts becoming contaminated. - 19 - Operating Instructions ASTOTHERM®plus 220(S)/260(S) 10 CLEANING AND DISINFECTION Always disconnect the plug from the mains before cleaning and disinfecting! Clean your ASTOTHERM PLUS regularly. Regular cleaning and care by the user increases service life and ensure that the specified performance characteristics are always achieved. If the ASTOLINE active insulation cover is removed and unplugged for cleaning or disinfecting, the appliance socket must be covered with the protective cap. Cleaning To remove splashes of physiological saline or blood from the surface of the housing, use a soft cloth with a mild soap solution or a special cleaning agent for plastic. Commercially available cotton wool buds are suitable for cleaning the circumferential heat exchanger groove. Never immerse appliance completely in fluid or bring into contact with steam! Disinfection For disinfection, use alcohol-based disinfectants of the "ready-to-use spray disinfectant" type containing low quantities (<0.2%) of aldehydes. For disinfection the ASTOTHERM PLUS and the ASTOLINE, we recommend Bacillol plus from Bode Chemie in Hamburg, Meliseptol from B. Braun in Melsungen and Mikrozid Liquid oder Mikrozid Pumpspray from Schülke & Mayr in Hamburg. The operator should not use any cleaning or decontamination methods other than those recommended. If using other methods, check with the manufacturer that these will not damage the appliance. Under no circumstances sterilise with steam, hot air or thermochemicals Servicing The ASTOTHERM PLUS is maintenance-free. There are no parts subject to wear. - 20 - Operating Instructions ASTOTHERM®plus 220(S)/260(S) 11 PERIODICALLY RECURRING TEST MEASURES (EVERY 24 MONTHS) • Check heating-up time • Check temperature control • Check excessive temperature alarms (tests 1 and 2) • Test inadequate temperature alarm (test 3) • Checking ASTOLINE safety cut-off ("S“ models only) The national regulations applicable in each case for the regular checking of medical products should also be followed! Note: To check earth wire resistance, the test point must penetrate the anodised coating of the heat exchanger cylinder. Checking heating-up time Switch on the ASTOTHERM PLUS and start heating with the "Start" key . After one minute, the temperature on the display should have exceeded 35 °C. Checking temperature control An LCD thermometer which guarantees a tolerance of ± 0.1 °C and has a sensor tip with a max. dia. of 3.5 mm is required for this (e.g. Geratherm GT2038). Switch on the ASTOTHERM PLUS and start heating with the "Start" key. After about five minutes the temperature of the heat exchanger cylinder is completely even, allowing the measurement to be performed. Avoid direct sunlight and draughts during this test. o o Insert LCD thermometer into the rear measuring bore on the side of the heat exchanger. Start measuring at the thermometer and wait until the maximum temperature is indicated. The deviation between the thermometer and the temperature display should be no more than ± 0.5 °C. Checking excessive temperature alarms The ASTOTHERM PLUS is fitted with alarm test functions. They simulate the failure of the temperature sensors, thus leading to the activation of the safety cut-off feature. Test 1: Start appliance at middle temperature set. Keep the "Start" key depressed for three seconds to start the internal test cycle. The LCD alternately shows "t1" and the actual temperature. After a short time, the appliance should react with the excessive temperature alarm (cf. Section 6). Warning: If the appliance does not react with an alarm, it must be repaired before being used any more! Re-start appliance by pressing the "Start " key . - 21 - Operating Instructions ASTOTHERM®plus 220(S)/260(S) Test 2: Start appliance at the highest temperature set. Keep the "Increase" key depressed for three seconds to start the internal test cycle. The LCD alternately shows "t2" and the actual temperature. After a short time, the appliance should react with the excessive temperature alarm (cf. Section 6). Warning: If the appliance does not react with an alarm, it must be repaired before being used any more! Re-start appliance by pressing the "Start " key . Checking inadequate temperature alarm Test 3: Start appliance at lowest temperature set (no heat protection sleeve). Keep the "Decrease" key depressed for three seconds to start the internal test cycle (the heating stays off). The LCD alternately shows "t3" and the actual temperature. Once the appliance has cooled down to 4 °C (± 1 °C) below the lowest select temperature, it should react with the inadequate temperature alarm (cf. Section 6). Warning: If the appliance does not react with an alarm, it must be repaired before being used any more! Switch off appliance using the "Appliance On/Off" key . After this test, the appliance cannot be re-started by pressing the "Start“ key . Checking ASTOLINE safety cut-off ("S" models only) Plug the ASTOLINE into the appliance socket on the rear side. Switch on ASTOTHERM PLUS using the "Appliance On/Off" key and start heating by pressing the "Start" key . To activate the heating function of ASTOLINE press the "ASTOLINE On/Off" key Then disconnect ASTOLINE by pulling the plug out of the socket. ASTOTHERM PLUS should react with ASTOLINE Alarm (cf. Section 6). Warning: If the appliance does not react with an alarm, it must be repaired before being used any more! - 22 - Operating Instructions ASTOTHERM®plus 220(S)/260(S) 12 REPAIRS AND CUSTOMER SERVICE Note If repairs to the ASTOTHERM PLUS are necessary because one of the tests described in Section 10 was failed or for some other reason, please contact your regional sales or service agent. Do not try to repair the ASTOTHERM PLUS by yourself. Only a qualified and trained engineer is allowed to carry out repairs to the ASTOTHERM PLUS. Please note: The ASTOTHERM PLUS goes into alarm mode in the event of • the temperature limit being exceeded (excessive temperature alarm), also as result of external influences such as sunlight, • the temperature limit not being reached (inadequate temperature alarm) – e.g. if the inlet fluid is too cold and the flow rate is too high, • a fault with the ASTOLINE. In the event of an alarm, take account of the above-mentioned causes first. Responsibility of the manufacturer The manufacturer considers himself responsible for the safety, reliability and performance of the appliance only if • all those instructions described by the manufacturer for the use, servicing and setting of the appliance have been followed. • people performing these activities are adequately trained and qualified. • spare parts and components are replaced with original parts. • assembly, modifications or repairs are performed by persons and service agencies expressly authorised to do so by the manufacturer. • electrical fittings conform to all the national standards applicable in each case. • the ASTOTHERM PLUS is used in conformity with the operating instructions. The manufacturer can provide a service manual on request to make it possible for appropriately trained and qualified staff to repair those parts of the appliance which the manufacturer deems it possible to repair. The providing of technical documents or spare parts means no authorisation by the manufacturer to open or repair the appliance. - 23 - Operating Instructions ASTOTHERM®plus 220(S)/260(S) 13 WARRANTY TERMS Unless the extended warranty is taken out, the warranty period for the ASTOTHERM PLUS is 12 months from the day of delivery to the purchaser. If you wish to take advantage of the extended 2-year warranty, please fill in and return the reply card to STIHLER ELECTRONIC within 30 days of buying the appliance. Within the warranty period we will make good any defect attributable to poor materials or workmanship by repairing or replacing the appliance at our discretion. Indirect damage is not subject to warranty. There is no claim under warranty for damage caused by mishandling or incorrect handling, use of force or normal wear and tear, nor in the case of unauthorised intervention or modifications to the original state. In the case of a claim under warranty or damage, return the defective appliance to STIHLER ELECTRONIC for repair. The cleaned appliance must be suitably packet for transport so that no further damage is sustained and the repair becomes unnecessarily expensive. In any event, the customer must bear the expenses of transport and packaging. 14 RETURN AND DISPOSAL OF APPLIANCES If the appliance has been in contact with blood or bodily fluids, it needs to be carefully cleaned and disinfected. In view of the risk of contamination with viruses and other pathogens, adequate precautions should always be taken to prevent contact with such pathogens. We recommend placing the appliance in a plastic bag and sealing this tightly before returning it. The appliance should be packed in either the original packaging or equivalent to avoid transport damage. The customer is responsible for packaging and marking the product for return correctly. The meaning of the symbol on the product, packaging or operator’s manual: Electrical appliances are valuable products and should not be thrown in the dustbin when they reach the end of their serviceable life! Please follow regional regulations on the disposal of old appliances or send the old cleaned and disinfected appliance to STIHLER ELECTRONIC or to your local distributor with an explanatory note. So it is ensure your old appliance will be disposed cheaply and properly. - 24 - Operating Instructions ASTOTHERM®plus 220(S)/260(S) 15 EMC GUIDANCE AND MANUFACTURER’S DECLARATION According EN 60601-1-2-2001 manufacturers of medical devices should declare following electromagnetic emission guidance and manufacturer´s declaration Guidance and manufacturer´s declaration - electromagnetic emission ASTOTHERM PLUS is intended to be used in the electromagnetic environment specified below. The customer or the user of ASTOTHERM PLUS should assure that it is used in such an environment. Emissions test Compliance Electromagnetic environment - guidance RF-Emission CISPR11 Group 1 ASTOTHERM PLUS uses RF energy only for its internal function. Therefore, its RFemissions are very low and are not likely to cause any interference in nearby electronic. RF-Emission CISPR11 Class B Harmonic emissions IEC 61000-32 Class A ASTOTHERM PLUS is suitable for use in all establishments, including domestic establishments and those directly connected to the public low-voltage powers supply network that supplies buildings used for domestic purposes. Voltage fluctuation/ flicker emissions IEC61000-3-3 Complies Guidance and manufacturer´s declaration - electromagnetic immunity ASTOTHERM PLUS is intended to be used in the electromagnetic environment specified below. The customer or the user of ASTOTHERM PLUS should assure that it is used in such an environment. Immunity test IEC 60601-test level Compliance level Electromagnetic environment - guidance Electrostatic discharge (ESD) ± 6 kV contact ± 6 kV contact Floors should be wood, concrete or ceramic tile. If floors are covererd with synthetic material, the relative humidity should be at least 30%. IEC 61000-4-2 ± 8 kV air ± 8 kV air Electrical fast transient/burst ± 2 kV for power supply lines ± 2 kV for power supply lines IEC 61000-4-4 ± 1 kV for input/output lines ± 1 kV for input/output lines Surges ± 1 kV differential mode ± 1 kV differential mode IEC 61000-4-5 ± 2 kV common mode ± 2 kV common mode Voltage dips, short interruptions and voltage variations on power supply input lines < 5% UT (>95 % dip in UT)for 0,5 cycle < 5% UT (>95 % dip in UT)for 0,5 cycle 40% UT (60 % dip in UT) for 5 cycles 40% UT (60 % dip in UT) for 5 cycles 70% UT (30 % dip in UT) for 25 cycles 70% UT (30 % dip in UT) for 25 cycles < 5% UT (>95 % dip in UT) for 5 sec < 5% UT (>95 % dip in UT) for 5 sec 3 A/m 3 A/m IEC 61000-4-11 Power frequency (50/60Hz) magnetic field Mains power quality should be that of a typical commercial or hospital environment. Mains power quality should be that of a typical commercial or hospital environment. Mains power quality should be that of a typical commercial or hospital environment. If the user of ASTOTHERM PLUS requires continued operation during power mains interruptions, it is recommended that ASTOTHERM PLUS is powered from an uninterruptible power supply or a battery. Power frequency magnetic fields schould be at levels characteristic of a typical location in a typical commercial or hospital environment. IEC 61000-4-8 Note: UT is the a.c. mains voltage prior to application of the test level. - 25 - Operating Instructions ASTOTHERM®plus 220(S)/260(S) Guidance and manufacturer´s declaration - electromagnetic immunity ASTOTHERM PLUS is intended to be used in the electromagnetic environment specified below. The customer or the user of ASTOTHERM PLUS should assure that it is used in such an environment. Immunity test IEC 60601-test level Compliance level Electromagnetic environment - guidance Portable and mobile RF communications equipment should be used no closer to any part of ASTOTHERM PLUS, including cables, than the recommended separation distance calculated from the equation applicable to the frequency of the transmitter Recommended separation distance: Conducted RF 3 Vrms 150 kHz to 80MHz 3 Veff d = 1,2 P 3 V/m 800 MHz to 2,5 GHz 3 V/m d = 1,2 P IEC 61000-4-6 Radiated RF 80 MHz bis 800MHz ICE 61000-4-3 d = 2,3 P 800 MHz bis 2,5 GHz Where P is the maximum output power rating of the transmitter in watts (W) according to the transmitter manufacturer and d is the recommended separation distance in meters (m). Field strength from fixed RF transmitters, as determined by an electromagnetic site survey, a should be less than the compliance level in each frequency range. b Interference may occur in the vicinity of equipment marked with the following symbol: NOTE 1: At 80 MHz an 800 MHz, the higher frequency range applies. NOTE 2: These guidelines may not apply in all situations. Electromagnetic propagation is affected by absorption and reflection from structures, objects and people. a Field strength from fixed transmitters, such as base stations for radio (cellular/cordless) telephones and land mobile radios, amateur radio, AM and FM radio broadcast and TV broadcast cannot be predicted theoretically with accuracy. To assess the electromagnetic environment due to fixed radio transmitters, an electromagnetic site survey should be considered. If the measured field strength in the location in which ASTOTHERM PLUS is used exceeds the applicable RF compliance level above, ASTOTHERM PLUS should be observed to verify normal operation. If abnormal performance is observed, additional measures may be necessary, such as reorienting or relocating ASTOTHERM PLUS. b Over the frequency range 150 kHz to 80 MHz, filed strength should be less than 3 V/m. - 26 - Operating Instructions ASTOTHERM®plus 220(S)/260(S) Recommended separation distances between portable and mobile RF communication equipment and ASTOTHERM PLUS ASTOTHERM PLUS is intended to be used in the electromagnetic environment, in which radiated RF disturbances are controlled. The customer or the user of ASTOTHERM PLUS can help to prevent electromagnetic interference by maintaining a minimum distance between mobile and portable RF communication equipment (transmitters) and ASTOTHERM PLUS as recommended below, according to the maximum rated output power of the communications equipment. Ratet maximum output power of the transmitter (W) Recommended separation distance according to the frequency of the transmitter (m) 15 kHz to 80MHz 80 MHz to 800 MHz 800 MHz to 2,5 GHz d = 1,2 P d = 1,2 P d = 2,3 P 0,01 0,12 0,12 0,23 0,1 0,38 0,38 0,73 1 1,2 1,2 2,3 10 3,8 3,8 7,3 100 12 12 23 For transmitters rated at maximum output power not listed above, the recommended separation distance d in meters (m) can be estimated using the equation applicable to the frequency of the transmitter, where P is the maximum output power rating of the transmitter in watts (W) according to the transmitter manufacturer. NOTE 1: The compliance level between 80 MHz and 2,5 GHz is intended to decrease the likelihood that mobile/portable communication equipment could cause interference if it is inadvertently brought into patient areas. For this reason, an additional factor of 10/3 is used in calculating the recommended separation distance for transmitters in this frequency range. NOTE 2: These guidelines may not apply in all situations. Electromagnetic propagation is affected by absorption and reflection from structures, objects and people. - 27 - Operating Instructions ASTOTHERM®plus 220(S)/260(S) (Notes) - 28 - Operating Instructions ASTOTHERM®plus 220(S)/260(S) (Notes) - 29 -