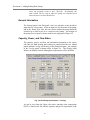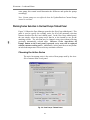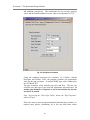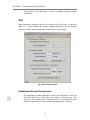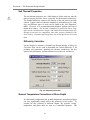
1
Ground Loop Design
Geothermal Design Studio
User’s Guide
(English)
Ground Loop Design™ Version 2.6 for Windows®
www.gaiageo.com
Copyright Notice
Ground Loop DesignTM Version 2.6 User’s Guide
© 2002 Celsia, LLC. All Rights Reserved.
This guide, as well as the software described in it, is furnished for information
purposes only to licensed users of the Ground Loop Design software product and
is furnished on an “AS IS” basis without any warranties, whatsoever, express or
implied. This may be used or copied only in accordance with the terms of the
included End-User License Agreement. The information in this manual is subject
to change without notice, and should not be construed as a commitment by Gaia
Geothermal. Gaia Geothermal assumes no responsibility or liability for errors or
inaccuracies that may occur in this book.
Except as permitted by such license, no part of this publication may be
reproduced, stored in a retrieval system, or transmitted in any means, electronic,
mechanical, recording, or otherwise, without the prior written consent of Gaia
Geothermal.
Other brand and product names are trademarks or registered trademarks of the
respective holders. Microsoft Excel, Windows, Windows 95, Windows 98,
Windows NT, Windows Explorer, Windows ME, Windows XP, and Windows 2000
are registered trademarks of Microsoft Corporation. Netscape Navigator is a
registered trademark of Netscape Corporation.
The Ground Loop Design Version 2.6 User’s Manual
Originally printed in October 2001
Revised in April 2002
Printed in USA
Part No. GGENG-1004
Visit our Web site at http://www.gaiageo.com.
Software Versions Available
Three versions of Ground Loop Design are available. The program always is available for
download on the web at www.gaiageo.com or www.geoclip.com. For sales and program
upgrade information, contact [email protected].
The three versions have the following features:
Ground Loop Design LE
• Design StudioTM
• Studio LinkTM System
• Vertical Borehole Design Module
• Zone Manager Loads Module
• Hundreds of Preloaded Heat Pumps
• Reports
• English or Metric Units
• Data Reference Files
• Interactive Help System
• Customization
• Automatic Loads Import Feature
Ground Loop Design LE PLUS
• All of the Above Features
• Average Block Loads Module
• Heat Pump Add/Edit Module
Ground Loop Design PROFESSIONAL
• All of the Above Features
• Additional Design Modules (Horizontal and Surface Water)
• Metric/English Units Conversion
• Advanced Reports
In addition, foreign language versions are available. If you would like to request a
specific language version, please contact us at [email protected].
END USER SOFTWARE LICENSE AGREEMENT
PLEASE READ THIS END USER SOFTWARE LICENSE AGREEMENT (“End User Agreement”)
CAREFULLY BEFORE USING THE SOFTWARE.
BY USING THIS SOFTWARE, YOU ARE AGREEING TO USE THE SOFTWARE SOLELY IN
ACCORDANCE WITH ITS INTENDED USE AND YOU ARE CONSENTING TO BE BOUND BY THIS END
USER AGREEMENT. IF YOU DO NOT AGREE TO ALL OF THE TERMS OF THIS END USER
AGREEMENT, PROMPTLY RETURN AND DO NOT USE THE SOFTWARE.
Single User License. Subject to the terms and conditions of this End User Agreement, Celsia, LLC, doing business as
Gaia Geothermal (“Gaia”) and its suppliers grant to you (“Customer”) a non-exclusive, non-transferable license to use
the Ground Loop Design ™ software program in object code form and all related materials included herewith,
including written materials, binders and other containers (hereinafter the "Software") on supported operating systems.
Use.
(i)
If this Software has been provided to Customer free of charge for evaluation purposes, Customer will be able
to use this Software five (5) times with limited functionality. Upon completion of this trial period, Customer
will be instructed that full use of the Software is possible with the use of a key code (“Key Code”).
Instructions for payment of the license fees and requesting a Key Code will be provided. If Customer
chooses not to request a Key Code, the license granted to Customer herein automatically terminates.
(ii)
If this Software has been provided to Customer after full payment of the license fees, Customer will be able
to use this Software five (5) times with limited functionality. Upon completion of this trial period, Customer
will be instructed that full use of the Software is possible with the use of a key code (“Key Code”).
Instructions for requesting a Key Code will be provided.
Limitations. Customer’s full use of this Software is limited to the number of authorized licenses Customer has
purchased. Customer agrees to use reasonable efforts to protect the Software from any unauthorized use, modification,
reproduction, distribution and publication. Customer may not transfer any of the rights granted to Customer hereunder,
unless Customer receives prior written authorization from Gaia and only if Customer transfers all of Customer’s rights
granted hereunder, without retaining any of the Software, or any copies thereof or any rights thereto. Except as
otherwise expressly provided under this End User Agreement, Customer shall have no right, and Customer specifically
agrees not to:
(i)
make error corrections to or otherwise modify or adapt the Software nor create derivative works based upon
the Software, or to permit third parties to do the same; or
(ii)
copy, in whole or in part, decompile, translate, reverse engineer, disassemble or otherwise reduce the
Software to human-readable form.
Upgrades and Additional Copies. For purposes of this End User Agreement, “Software” shall also include (and the
terms and conditions of this End User Agreement shall apply to) any upgrades, updates, bug fixes or modified versions
(collectively, “Upgrades”) or backup copies of the Software licensed or provided to Customer by Gaia or an authorized
distributor for which Customer has paid the applicable license fees and holds the corresponding software keys.
Notwithstanding the foregoing, Customer acknowledges and agrees that Gaia shall have no obligation to provide any
Upgrades under this End User Agreement. If Upgrades are provided, Customer acknowledges and agrees that:
(i) Customer has no license or right to use any such additional copies or Upgrades unless Customer, at the time of
acquiring such copy or Upgrade, already holds a valid license to the original Software.
Notices of Proprietary Rights. Customer agrees to maintain and reproduce all trademark, copyright, patent, and
notices of other proprietary rights on all copies, in any form, of the Software in the same form and manner that such
trademark, copyright, patent, and notices of other rights are included on the Software. Except as expressly authorized
in this End User Agreement, Customer shall not make any copies or duplicates of any Software without the prior
written permission of Gaia. Customer may make such backup copies of the Software as may be necessary for
Customer’s lawful use, provided Customer affixes to such copies all trademark, copyright, patent, and notices of other
proprietary rights that appear on the original.
Proprietary Rights. Customer shall own the physical media on which the Software is recorded, but the Software is and
will remain the sole and exclusive property of Gaia. Gaia’s rights under this Section will include, but not be limited to:
(i) all copies of the Software, in whole and in part; and (ii) all Intellectual Property Rights in the Software. For
purposes herein, “Intellectual Property Rights” means patent rights (including patent applications and disclosures),
copyrights (including, but not limited to, rights in audiovisual works and moral rights), trade secret rights, rights of
priority and any other intellectual property right recognized in any country or jurisdiction in the world. “Moral Rights”
means any right to claim authorship to or to object to any distortion, mutilation, or other modification or other
derogatory action in relation to a work, whether or not such would be prejudicial to the author’s reputation, and any
similar right, existing under common or statutory law or any country in the world or under any treaty, regardless of
whether or not such right is denominated or generally referred to as a “moral right”.
Confidential Information. Customer agrees that Customer will not disclose or, except as expressly permitted in this
End User Agreement, use any Software or other technical information disclosed to Customer by Gaia (“Confidential
Information”), and that Customer will take all reasonable measures to maintain the confidentiality of all Confidential
Information in Customer’s possession or control, which will in no event be less than the measures Customer uses to
maintain the confidentiality of Customer’s own information of equal importance. Confidential Information will not
include information that: (i) is in or enters the public domain without breach of this End User Agreement; (ii)
Customer receives from a third party without restriction on disclosure and without breach of a nondisclosure obligation;
or (iii) Customer develops independently, which Customer can prove with written evidence. Customer acknowledges
that the Software is a trade secret of Gaia, the disclosure of which would cause substantial harm to Gaia that could not
be remedied by the payment of damages alone. Accordingly, Gaia will be entitled to preliminary and permanent
injunctive relief and other equitable relief for any breach of this Section.
Limited Warranty. Gaia warrants that the Software will substantially conform to its published specifications for a
period of thirty (30) days from the later of receipt of the Software or receipt of access to the Software. Gaia further
warrants that the media on which the Software is contained will be free from defects for a period of thirty (30) days
from the later of receipt of the Software or receipt of access to the Software. This limited warranty extends only to
Customer as the original licensee. Provided that (a) Customer has notified Gaia of such substantial non-conformance
or defect during the applicable warranty period, and (b) Gaia has confirmed such Software or media to be substantially
non-conforming or defective, as Customer’s sole and exclusive remedy and Gaia’s and its suppliers’ entire liability
under this limited warranty, Gaia will, at its option, repair, replace, or refund the Software free of charge. Except as
expressly provided in this End User Agreement, the Software is provided “AS IS” without warranty of any kind. Gaia
does not warrant that the Software is error free or that Customer will be able to operate the Software without problems
or interruptions. Gaia reserves the right to charge additional fees for repairs or replacements performed outside of the
limited warranty period.
This warranty does not apply if the Software (i) is licensed for beta, evaluation, testing or demonstration purposes for
which Gaia does not receive a license fee, (ii) has been altered, except by Gaia, (iii) has not been installed, operated,
repaired, or maintained in accordance with instructions supplied by Gaia, (iv) has been subjected to abnormal physical
or electrical stress, misuse, negligence, or accident, or (v) is used in ultrahazardous activities.
The authorized distributors of the Software, who are appointed by Gaia, are not permitted to alter the terms of this End
User Agreement in any manner.
Disclaimer. EXCEPT AS SPECIFIED IN THIS WARRANTY, ALL EXPRESS OR IMPLIED CONDITIONS,
REPRESENTATIONS, AND WARRANTIES INCLUDING, WITHOUT LIMITATION, ANY IMPLIED
WARRANTY OR CONDITION OF MERCHANTABILITY, FITNESS FOR A PARTICULAR PURPOSE,
NONINFRINGEMENT, SATISFACTORY QUALITY OR ARISING FROM A COURSE OF DEALING, USAGE,
OR TRADE PRACTICE, ARE HEREBY EXCLUDED TO THE EXTENT ALLOWED BY APPLICABLE LAW.
IN NO EVENT WILL GAIA OR ITS SUPPLIERS BE LIABLE FOR ANY LOST REVENUE, PROFIT, OR DATA,
OR FOR SPECIAL, INDIRECT, CONSEQUENTIAL, INCIDENTAL, OR PUNITIVE DAMAGES HOWEVER
CAUSED AND REGARDLESS OF THE THEORY OF LIABILITY ARISING OUT OF THE USE OF OR
INABILITY TO USE THE SOFTWARE EVEN IF GAIA OR ITS SUPPLIERS HAVE BEEN ADVISED OF THE
POSSIBILITY OF SUCH DAMAGES. IN NO EVENT SHALL GAIA’S OR ITS SUPPLIERS’ TOTAL LIABILITY
TO CUSTOMER, WHETHER IN CONTRACT, TORT (INCLUDING NEGLIGENCE), OR OTHERWISE, EXCEED
THE PRICE PAID BY CUSTOMER. THE FOREGOING LIMITATIONS SHALL APPLY EVEN IF THE ABOVESTATED WARRANTY FAILS OF ITS ESSENTIAL PURPOSE. BECAUSE SOME STATES OR JURISDICTIONS
DO NOT ALLOW LIMITATION OR EXCLUSION OF CONSEQUENTIAL OR INCIDENTAL DAMAGES, THE
ABOVE LIMITATION MAY NOT APPLY TO CUSTOMER.
Term and Termination. This End User Agreement is effective until terminated. Customer’s license rights under this
End User Agreement will terminate immediately without notice from Gaia if Customer fails to comply with any
provision of this End User Agreement. Upon termination, Customer must destroy all copies of Software and the
corresponding keys in its possession or control.
Compliance With Law. Each party agrees to comply with all applicable laws, rules and regulations in connection with
its activities under this End User Agreement. Without limiting the foregoing, Customer acknowledges and agrees that
the Software, including technical data, is subject to United States export control laws, including the United States
Export Administration Act and its associated regulations, and may be subject to export or import regulations in other
countries. Customer agrees to comply strictly with all such regulations and acknowledges that Customer has the
responsibility to obtain licenses to export, re-export, or import the Software.
Restricted Rights. The Software shall be classified as “commercial computer software” as defined in the applicable
provisions of the Federal Acquisition Regulation (the “FAR”) and supplements thereto, including the Department of
Defense (DoD) FAR Supplement (the “DFARS”). The parties acknowledge that the Software was developed entirely
at private expense and that no part of the Software was first produced in the performance of a Government contract. If
the Software is supplied for use by DoD, the Software is delivered subject to the terms of this End User Agreement and
either (i) in accordance with DFARS 227.702-1(a) and 227.7202-3(a), or (ii) with restricted rights in accordance with
DFARS 252.227-7013(c)(1)(ii) (OCT 1988), as applicable. If the Software is supplied for use by a Federal agency
other than DoD, the Software is restricted computer software delivered subject to the terms of this End User Agreement
and (i) FAR 12.212(a); (ii) FAR 52.227-19; or (iii) FAR 52.227-14 (ALT III), as applicable.
General. This End User Agreement will bind and inure to the benefit of each party’s successors and assigns, provided
that Customer may not assign or transfer this End User Agreement, in whole or in part, without Gaia’s written consent.
This End User Agreement shall be governed by and construed in accordance with the laws of the State of California,
United States of America, as if performed wholly within the state and without giving effect to the principles of conflict
of law. No failure of either party to exercise or enforce any of its rights under this End User Agreement will act as a
waiver of such rights. If any portion hereof is found to be void or unenforceable, the remaining provisions of this End
User Agreement shall remain in full force and effect. This End User Agreement is the complete and exclusive
agreement between the parties with respect to the subject matter hereof, superseding and replacing any and all prior
agreements, communications, and understandings (both written and oral) regarding such subject matter.
Conventions Used in This Document
The following symbols are used in this document to highlight certain information and
features included in the User’s Guide and Ground Loop Design software program.
This caution symbol notifies the user that care must be
taken at the specified location.
This star-shaped symbol highlights new features in
Version 2.x.
The round symbol highlights suggestions for using the
program more effectively or for improving designs.
CONTENTS
Contents
Preface: Before You Begin...............................................................….1
System Requirements for Installing Ground Loop Design.................…..........................…. 1
Hardware requirements........................................................................................... 1
Software requirements............................................................................................ 2
Operating system requirements………...………………………………. 2
Internet browser requirements…..……………….……………………... 2
Installation procedure…………………………………………………………….. 2
Initial installation……………...……………………………………….. 2
Installation of updated versions or re-installation…...……..…………… 3
Program Licensing and Registration…………………………………………….. 4
How to Register the Program…………………………………………… 4
How to Transfer the Program Between Computers…………………….. 5
Intended Users and Scope ………….............................................................……………… 6
Chapter 1: Ground Loop Design Overview....................................…..7
General Program Features…………………………………………………………………..7
The Design Studio ………………………..…………………………………….... 7
Customization…..………………….…...............................................................… 8
Metric/English Units…………………………………………………………….. 8
Internationalization………………………………………………………………. 9
Heat Pump and Zone/Loads Models Introduction..……………………..………………... 9
Heat Pump Module…..…...………….................................................................… 10
Zones/Loads Modules…..…...……..................................................................… 10
Zone Manager Loads Module…...……………………………………… 10
Average Block Loads Module..….………..……………………………. 11
Design Modules…..…..… ……………...........................................................................…. 11
Borehole Design Module…...……..................................................................…… 12
Description……………………….…………………………………….. 12
Theoretical Basis…………………………..……………………………. 12
Horizontal Design Module……………………………………………………….. 13
Description……………………………………………………………… 13
Theoretical Basis……………………………………………………….. 14
Surface Water Design Module...........................................................................…. 15
Description…………………….……………………………………….. 15
Theoretical Basis……………………………………………………….. 16
Additional Modules…………………….............................................................… 16
Reports………...…………………………………………………………………………… 16
Project Reports……………...……......................................................................... 17
Zone/Loads Reports………….................................................................................17
Data Reference Files………………... …………….........................................................…. 17
Program Help and Support………………………………………………………………….18
References………………………………………………………………………………….. 18
Chapter 2: Adding/Editing Heat Pumps…...............................………. 20
Heat Pump Model………………………………………………………………………….. 20
i
CONTENTS
Description……….………………………………………………………………. 20
Theoretical Basis..………………….................................................................….. 21
Capacity and Power…….………………………………………………. 21
Flow Rate…………………………………………………………….…. 22
Load Side Corrections..……..…………………………………………... 22
Entering Data into the Add/Edit Heat Pumps Module..………………………………….…23
Creating a New Series and/or Manufacturer.................................................…..… 23
Editing Pump Data……………………………………………………………….. 24
Pump Series Controls…………………………….…………………….. 24
Pump Edit Controls……………………………………….……25
Save Control……...……….………………………………….. 25
Edit Pump Information Control……………………….………. 25
Delete Series Control………………………………………….. 25
General Information………………………………………………….…. 26
Capacity, Power, and Flow Rates………………………………………. 26
Load Side Corrections………………………………………………….. 27
Load Temperatures Panel………………………………….….. 27
Load Flows Panel…….……………………………………….. 28
Testing Input Data….………….……………………………………….. 29
Exiting the Add/Edit Heat Pumps Module………………………………………………… 30
Heat Pump File Descriptions……………………………………..……..…………………. 30
Adding Pump Sets Obtained from External Sources……………..……..…………………. 30
Chapter 3: Loads and Zones ………………............….....................….. 33
The Ground Loop Design Loads Model…………..……………………………..………… 33
Zone Files………………......……………………………………………………………… 34
The Zone Manager Loads Module………………………………………………………… 34
Managing Zones in the Loads Tabbed Panel…………………………………….. 36
New and Copy…………………………..………………………………. 36
Remove and Clear..…...……………………………………………….. 36
Renumber…….……………………..………………………………….. 36
Summary View Toggle Button……..………………………………….. 36
Entering Loads…………………………………………...………………………. 37
Design Day Loads….…………………..……………………………….. 37
Annual Equivalent Full-Load Hours.…………………………………… 38
Equivalent Hours Calculator……………………………………………. 39
Days per Week……………………..…………………………………… 40
Pump Matching and Selection ………………………..…………………………. 40
Auto-Select………………………………..……………………………..41
Manual Select…………...…...…………………………………………..41
Details..……………………………..………………………………….. 45
Clear….………...…...………………………………………………….. 45
Custom Pump (Customization)……..………………………………….. 46
Automatic Heat Pump Selection Options for the Entire Zone Set.……………… 46
Auto-Select All Pumps…………………..…………………………….. 46
Update/Reselect Current Pumps…………..………………………….. 43
Working Series Selection in the Heat Pumps Tabbed Panel…………………… 44
Choosing the Active Series……………..…………………………….. 44
Inlet Load Temperatures…………………..………………………….. 45
The Average Block Loads Module….……………………………………………………. 45
Managing the Average Block Loads…………………..…………………………. 46
New……………………………………..………………………………. 46
Clear…………….…...………………………………………………….. 46
Entering Loads…………………….…………………..…………………………. 46
ii
CONTENTS
Pump Selection……………….………………………..…………………………. 47
Details and Clear…………………..………………………………….. 48
Custom Pump (Customization)……..………………………………….. 48
Pump Continuous Update Feature…………………………………………………………. 48
The Studio Link System…………………………………………………………………. 48
Making a Link.…………………….…………………..…………………………. 49
Unlinking…….……………….………………………..…………………………. 49
Studio Link Status Lights..……….…………………..…………………………. 50
Importing Loads Data From External Programs………………………………………….. 50
Using the Import Button for Commercial Loads Program Files………………… 51
Using the Import Loads Command for Excel Data……………………………… 52
When Imported Data is Not Detailed Enough …………………………………… 52
Review of Loads Entry……………………………………………………………………. 54
Design Day Loads………………………………………………………………... 55
Annual Equivalent Full-Loads Hours……………………………………………. 55
Surface Water Loads……………………………………………………………... 56
Chapter 4: The Borehole Design Module..................………..........….. 57
Overview…………………………..……………………………………………………….. 57
General Features…..……………………………………………..……………….. 57
Opening Projects………….….………………………………………………….. 58
New Projects…....………………………………………………………. 58
Existing Projects…..……………………………………………………. 58
Saving Projects…………...….…………………………………………………… 58
Typical Operation…..……………………………………………………………. 59
Entering Data into the Tabbed Panels …...…………….………………....………………... 59
Information……...………….……………………………………………..……… 59
Extra kW …….………….……………………………………………………….. 60
Pump Power Calculator………………………………………………… 62
Pattern……....………..……………………………………………………..……. 62
Vertical Grid Arrangement..……………………………………………. 62
Separation between Vertical Bores..………………… ………………… 62
Bores per Parallel Loop…………..…………………………………….. 63
Modeling Time Period………………………………………………….. 63
U-Tube……..….………..………………………………………………………… 64
Pipe Parameters..…………………………………………….………….. 65
Borehole Diameter and Backfill (Grout) Information..………………… 66
Soil……....………….…………………………………………………..………… 66
Diffusivity Calculator………………………………………………… 67
Fluid.………..….……….……………………..…………………………………. 67
Design Heat Pump Inlet Fluid Temperatures…………………………… 68
Design System Flow Rate ……………………………………………… 66
Solution Properties……………………………………………………… 69
Calculate…………………………………………………………………………..69
Reporting Section………………………………………………………. 70
Optional Cooling Tower……………………………………………… 71
Printing Reports……….…………..……………………………………………………….. 73
Chapter 5: The Horizontal Design Module.........………..........………. 74
Overview…………………………..………………………………………………………. 74
General Features…..……………………………………………..………………. 74
iii
CONTENTS
Opening Projects………….….………………………………………………….. 78
New Projects…....………………………………………………………. 78
Existing Projects…..……………………………………………………. 78
Saving Projects…………...….…………………………………………………… 78
Typical Operation…..…………………………………………………………….. 76
Entering Data into the Tabbed Panels …...…………….………………....……………….. 76
Configuration.……….….……………………………………………..…………. 76
Trench Layout…………... …………………………………………….. 76
Pipe Configuration in Trench………………………………………….. 77
Straight Pipe Configurations…………………………………………… 77
Single Pipe Vertical Alignment……………………………… 78
Two-Pipe Vertical Alignment………………………………… 78
Three-Pipe Vertical Alignment…………………….…………. 78
Slinky Pipe Configurations…………………………………………….. 78
Vertical Slinky……………………………………………….. 79
Horizontal Slinky…………………………………………….. 79
Modeling Time Period…………………………………………………. 79
Piping……………………………………………………………………………. 79
Piping Parameters……………………………………………………… 79
Soil……………………………………………………………………………….. 81
Undisturbed Ground Temperature…………………………………….. 81
Soil Thermal Properties………………………………………………… 82
Diffusivity Calculator………………………………………… 82
Ground Temperature Corrections at Given Depth……………………… 82
Regional Air Temperature Swing…………………………….. 83
Coldest/Warmest Day in Year………………………………… 83
Fluid……………………………………………………………………………… 83
Design Heat Pump Inlet Fluid Temperatures…………………………… 83
Design System Flow Rate……………………………………………… 83
Solution Properties…………………………………………………….. 84
Calculate……………………………………………………………………….… 85
Reporting Section………………………………………………………. 86
Optional Cooling Tower……………………………………………… 86
Printing Reports………………………………………………………………… 88
Chapter 6: The Surface Water Design Module.........………..........….. 90
Overview…………………………..………………………………………………………. 90
General Features…..……………………………………………..………………. 90
Opening Projects………….….………………………………………………….. 91
New Projects…....………………………………………………………. 91
Existing Projects…..……………………………………………………. 91
Saving Projects…………...….…………………………………………………… 91
Typical Operation…..…………………………………………………………….. 92
Before You Begin………………………………………………………………… 92
Entering Data into the Tabbed Panels …...…………….………………....………………. 93
Surface Water.……….….……………………………………………..………… 93
Surface Water Temperatures at Average Circuit Pipe Depth…………... 94
Surface Water Temperatures at Average Header Pipe Depth………….. 94
Primary Header……………………………………………….. 94
Branches………………………………………………………. 94
Details (Reference only)……………………………………………….. 94
Piping..……..….………..……………………………………………………….. 94
Circuit Parameters………………………………………………………. 95
Circuit Pipe Size………………………………………………. 95
Number of Parallel Circuits…………………………………… 95
iv
CONTENTS
Circuit Style…………………………………………………... 96
Circuit Head Loss per 100 feet……………………………….. 96
Extra Equivalent Length per Circuit…………………………... 96
Header Parameters……………………………………………………… 97
Number of Lines………………………………………………. 97
Pipe Size………………………………………………………. 98
Header Length / Average Branch Length…...………………… 98
Head Loss per 100 feet………………….…………………….. 98
Soil……....………………………………………………………………..………. 98
Ground Temperature Corrections at Given Depth……………………… 99
Depth of Header in Soil….……………………………………. 99
Soil Type………………………………………………………. 99
Regional Air Temperature Swing…………………………….. 99
Coldest/Warmest Day in Year….…………………………….. 100
Corrected Temperature……..….……………………………… 100
Fluid.………..….……….……………………..…………………………………. 10
Calculate…………………………………………………………………………..101
Reporting Section………………………………………………………. 102
Printing Reports……….…………..……………………………………………………….. 103
Chapter 7: Reports………………………….......................................….. 104
Overview……………………..........................................................................................……… 104
The Report Preview Window………………....................................................................… 104
Project Reports………….……………….......................................................................... 105
Information…………….......................................................................................... 105
Calculation Results………….................................................................................. 105
Input Parameters……….......................................................................................... 105
Comments………..…..........................................................................................… 106
Zone Reports……………………………..........................................................................… 106
Detailed Form……….............................................................................................. 106
Concise Form……................................................................................................. 107
Equipment List………............................................................................................ 107
Loads List……………............................................................................................ 107
Names List…………............................................................................................... 107
Concluding Remarks……………………………………………………………………….. 107
Chapter 7: Tables and Data Reference Files….....................…………108
Overview…….………………............................................................................…………... 108
Tables Included with Ground Loop Design……………………………………………….. 109
Fluid Properties………………………………………………………………….. 109
Soil Properties………………………………………………………………….… 110
Pipe Properties………………………………………………………………….… 110
Conversions…………………………………………………………………..….. 110
Adding Customized Reference Files………………………………………………………. 111
Original Model……….………………………………………………………… 111
HTML Files…………………………………………………………………..….. 112
Editing Existing Files…………………………………………………… 112
Making a Table…………………………………………………………. 113
Adding a Picture, Graph, or Figure…..………………………………… 113
Taking Care with Updates…………………….………………………………….………... 114
Concluding Remarks………………………………………………………………………. 114
v
PREFACE
PREFACE
Before You Begin
This chapter describes the installation procedure as well as hardware and
software requirements for the Ground Loop DesignTM program.
Additionally, the chapter introduces licensing system as well as the typical
uses and users of the software.
System Requirements for Running Ground Loop Design
This section lists the hardware and software requirements for running Ground
Loop Design.
Hardware Requirements
A full installation has the following minimum hardware requirements:
•
•
32 MB Ram
50 MB hard disk space (100 MB recommended)
1
PREFACE
Software Requirements
Ground Loop Design has the following software requirements:
•
•
System running under Windows®
®
®
Netscape Navigator or Internet Explorer
Operating System Requirements
Ground Loop Design will operate under Windows 9X/ME/NT/2000/XP.
Internet Browser Requirements
An Internet browser is required only for viewing the data reference files,
and not for general program operation. To access the data reference files,
at least one of the following browsers is necessary:
•
•
Netscape Communicator Version 4.0 or later.
Internet Explorer Version 4.0 or later.
Installation Procedure
This section describes the CD-based installation procedure for Ground Loop
Design. If you have problems installing Ground Loop Design, please visit the
FAQ page at http://www.geoclip.com/faq.html. Note that you can also download
Ground Loop Design from the internet at http://www.geoclip.com/demo. The
downloadable version always will be the most recent release.
Initial Installation
The installation should start automatically. If not, the software may be installed
by clicking on the Setup.exe file included on the disk.
The program is set to install in the folder:
(Main Drive):\Program Files\Gaia Geothermal\Ground Loop Design
If desired, the user can specify a different location during the installation
sequence.
2
PREFACE
Installation of Updated Versions or Re-Installation
If the user re-installs or replaces the software with a more recent version, the user
either can uninstall the program (see Note below) or can just update a current
version (versions subsequent to Version 2.0). To completely remove a version,
go to the Windows Start Menu Æ Settings Æ Control Panel Æ Add/Remove
Programs and choose to remove “Ground Loop Design”. After removing the
program, please conduct the new installation as described above. As long as the
user does not manually delete folders, existing work files, pumps, and zone files
will not be affected.
Note:
The file “Pumplist.gld” in the \Ground Loop Design\pumps folder will
be overwritten upon re-installation. If the user has added pumps other
than those originally included with the program, this file should be copied
or moved to a backup directory prior to removal and re-installation. After
re-installation, the Pumplist.gld file can be returned to the \Ground
Loop Design\Pumps folder or the desired contents can be added to the
contents of the new Pumplist.gld file using a simple text editor like
Notepad.exe. The format of the file is provided below.
Pumplist.gld
Pump List File
Number of Manufacturers (Integer)
First Manufacturer Name (Text)
Street Address (Text)
City, State, Zip (Text)
Country (Text)
Telephone Number (Text)
Number of Different Series for this Manufacturer (Integer; Example: 2)
Series #1 Name (Text)
Series #1 filename without .hpd extension (Text)
#Date Entered# (Text; Example: #2001-10-05#)
Series #2 Name (Text)
Series #2 filename without .hpd extension (Text)
#Date Entered# (Text; Example: #2001-10-06#)
Second Manufacturer Name (Text)
Street Address (Text)
…
Alternatively, any pump files not included with the setup package may be
added from within the program itself using the method described in
Chapter 2, under Adding Pump Sets Obtained from External Sources.
3
PREFACE
The actual original heat pump data files (*.hpd), will not be deleted unless
their names are identical to those being installed. Thus, all data can be
recovered even if the previous version of the Pumplist.gld file is
overwritten. However, this will either involve editing the Pumplist.gld
file manually to include the customized data, or identifying those files
within the program itself. In general, if there are only a few pump sets to
add, working within the program may be best. If there are many, cutting
and pasting from the old file using a text editor may prove to be more
efficient (Remember to modify the number of manufacturers if necessary!).
If the user has created customized heat pump sets, it may be wise to make
a backup of all data files prior to removal and re-installation.
Additionally, customized data reference files should be backed up before
any user-modified Ground Loop Design menu HTML documents are
replaced.
The linked HTML documents themselves will not be
overwritten.
Program Licensing and Registration
This section describes the program registration and license transfer options
available in Ground Loop Design.
How to Register the Program
Ground Loop Design utilizes a software licensing system that offers great
flexibility to the user. The program allows five “trial version” executions before
requiring the input of a software license.
If you decide to register the program during the trial period:
1. Confirm that all program modules (borehole, horizontal, surface water,
average block, zone manger, heat pump) open properly. If they do not, contact
your vendor before purchasing.
2. From the License dropdown menu in the Design Studio, choose Modify
License as shown below:
4
PREFACE
3. A screen similar to the one below will then appear:
4. Contact your vendor by phone, fax or email. Give them the red, 10-16 digit
Customer Code that appears in the dialog box.
5. Upon receipt of payment, your vendor will issue you an Unlock Code. Input
this Unlock Code in the dialog box as shown above and click 'Register'.
How To Transfer the Program Between Computers
The licensing system allows the user to transfer the license from one computer to
another. If a user decides to transfer Ground Loop Design from one computer to
another, all he or she has to do is the following:
•
Insert a blank, formatted floppy disk into the licensed computer.
•
Go to the License dropdown menu, and choose to Transfer License. The
license is now transferred to the floppy disk and Ground Loop Design will no
longer run on the original computer.
•
Load Ground Loop Design from the original CD onto the target computer or
download the program from www.gaiageo.com or www.geoclip.com.
•
After the “demo version” of the program is running on the new computer, go
to the License dropdown menu and choose to Import License.
•
Insert the disk that contains the license into the new computer.
•
Click on 'OK' to import license.
The procedure can be repeated as many times as necessary. Remember to use a
blank, formatted disk to ensure success.
5
PREFACE
Intended Users and Scope
Ground Loop Design is intended as a Design Studio for professional HVAC
designers and engineers working in the area of geothermal applications. It is
primarily designed for use with light-commercial or commercial installations,
since the calculations take into account long-term thermal effects that often
determine the necessary design requirements.
Additionally, the loads
representation employed in Ground Loop Design’s Zone Management system
allows for detailed equipment selection and specific load distribution data to
maximize calculation accuracy.
The professional version of Ground Loop Design includes three design modules,
one for vertical borehole, one for horizontal and one for surface water (pond, lake,
etc.) installations. It also includes two loads modules, one for average block loads
and one for the more detailed zone model. The loads data can be shared between
modules using Ground Loop Design’s unique linking system. In addition, loads
data from external loads programs as well as from Excel files conveniently can be
imported into the loads modules
Because of the extensive customization and override features included in the
software, Ground Loop Design is suited ideally for both standard and nonstandard applications, which can involve significant variations in equipment,
loads, and operational parameters for each zone in the design. The user, who may
prefer to add his or her specific images or data sheets, has the freedom to
customize the data reference files.
With instant, direct metric/English unit conversions and foreign language
capabilities, Ground Loop Design is a truly international program. With Ground
Loop Design, communicating project parameters, equipment requirements and
loads data with coworkers, partners, and vendors anywhere in the world is
efficient and easy. The program provides a framework for international
standardization.
6
CHAPTER 1: Ground Loop Design Overview
CHAPTER 1
Ground Loop Design Overview
This chapter is an introduction to the Ground Loop Design software
package. It introduces the Design Studio and its components, including
the Heat Pump and Loads Modules, the Borehole, Horizontal and Surface
Water Design Modules, the reporting functions, and the data reference
files. There is also an explanation of the theoretical and experimental basis
for the program’s calculations.
General Program Features
Ground Loop Design is a “Geothermal Design Studio” that provides the user with
a freedom that single-purpose software cannot offer. The program is modular and
permits flexibility in the designing process and customization based on designer
preferences. Additionally, it has an English/metric unit conversion option,
providing applicability to the widest range of equipment and customers. Because
the software is available in different languages, it is truly international in its
ability to traverse national borders as well as language and cultural barriers.
The Design Studio
The studio is the desktop work area in which the designer conducts his or her
project analyses and establishes the basis for designs. When additional projects
are desired, new windows may be opened or existing projects may be loaded.
The Loads modules hold and display the information for the particular
installation. Other windows may be opened concurrently. For example, one
window may be used to edit or to modify heat pump data, another to calculate
equivalent full load hours, and still others to provide easily accessible graphs or
charts that may be required repeatedly through the course of a design. Similar
7
CHAPTER 1: Ground Loop Design Overview
design plans can be compared directly, or entirely different designs can be created
and varied. All of the information a designer needs exists in one convenient
location within Ground Loop Design.
Besides opening and closing windows and taking care of file management, the
studio desktop menu and toolbar include control features which can be applied to
more than one different type of project. For example, the English/metric unit
conversion tool can convert a single window without affecting the rest of the open
windows. Project reports can also be printed from the studio desktop.
Customization
Ground Loop Design offers the user a great deal of freedom in how he or she
enters and uses information. Rather than conforming designs to the software, this
software package allows some modification and variation in its included features.
Some of the most common areas of customization in Ground Loop Design include
the entry of loads and the selection of equipment. Although fully automatic
modes are available, the user also has the ability to customize or override the
automatic features. For example, detailed load information may be included for
precision designs, while extremely limited data is enough for rough calculations.
Additionally, if the data are available, the designing engineer can enter his or her
own pump sets to take full advantage of the automatic selection procedures. Also,
different families of pumps can be used within a single project, and even
individual pumps not included in the pre-defined pump sets can be employed as
required.
Another area where customization is possible is in the data reference files, which
are based on HTML. With a simple HTML editor the user can include any tables,
data, pictures, graphs, charts, or any other useful information that meets the user’s
needs. User-added files can supplement or replace the data reference files already
provided with Ground Loop Design.
Metric/English Units
One of the intrinsic features in Ground Loop Design is the English/metric unit
conversion capability. The English/metric option can be used not only to
compare values, but it also can be used to quickly make use of specific equipment
or loads data supplied in only one format.
Because the reports and data reference files automatically recognize the selected
units, users can obtain different reports and data lists depending on the state of the
Design Studio. Presentation and comparison of project information between
different engineers and designers is now a straightforward process.
8
CHAPTER 1: Ground Loop Design Overview
Internationalization
The final major feature of Ground Loop Design is the international component.
Because the program is multi-language capable, users easily can communicate
accurate results and design parameters across borders, even when the designers
are not proficient in the technical language of their foreign counterparts.
Currently, English, Chinese, Korean and Japanese versions are available. Figure
1.1 is a screenshot from the Korean version (metric).
Figure 1.1 Korean Version of Ground Loop Design
Heat Pump and Zone/Loads Modules Introduction
The underlying framework of Ground Loop Design is based on three modules that
permit flexibility in the addition and modification of components related to
geothermal designs. The first is the heat pump module, which takes a
representative amount of data from the heat pump specifications and then uses it
for the automatic pump selection features. The second and third are the average
block and zone loads modules, which provide organized methods for entering the
heat gains or losses for an installation. Because the heat pump and loads modules
9
CHAPTER 1: Ground Loop Design Overview
are closely related, users can match heat pumps to the loads automatically or
manually.
An advantage of this design is that the heat pump selection and the loads modules
can be connected directly with the various design modules available in the studio.
Therefore, one type of loads and heat pump data can be used for all designs.
Heat Pump Module
In Ground Loop Design, heat pump data can be entered into a separate module
that keeps track of all of the pumps stored in the Ground Loop Design’s Heat
Pump Database. Families of heat pumps from various manufacturers can be
added to the existing pump set maintained by the user. In this way, heat pump
data obtained from any source easily can be included within the software to take
advantage of the automatic equipment sizing features of Ground Loop Design.
Recent data from popular heat pump manufacturers is included with Ground Loop
Design. However, any pump set can be added to the list. The heat pump model
only requires that certain data from heat pump specification sheets, or from
software provided by the manufacturer, be entered into the Edit/Add Heat Pumps
module. The model in Ground Loop Design requires the input of a minimum of
six data points for both heating and cooling modes. These data points relate
capacity and power to the inlet source temperature and are fit using a polynomial
line to provide an accurate model for the equipment for any given design
parameters. By including additional data from different source flow rates and/or
different inlet load temperatures and flow rates, higher levels of accuracy are
possible.
The Edit/Add Heat Pumps module is covered in detail in Chapter 2.
Zones/Loads Modules
Ground Loop Design employs two different types of load input schemes. With the
Zone Manager Loads module, users can perform a detailed analysis. With the
Average Block Loads module, users can make quick estimates without
performing detailed component design work. These stand-alone modules are
linked to design modules using the Studio Link system (Chapter 3). Both modules
can import loads data from commercial loads programs and Excel files.
Zone Manager Loads Module
Component-style designs often are more appropriate for geothermal
installations, particularly when equipment is available in various sizes.
The units can be placed near or within the locations to be conditioned.
With regard to water source heat pumps, it is often much easier to bring
10
CHAPTER 1: Ground Loop Design Overview
water lines to the equipment instead of providing ductwork or long load
lines from a centralized source.
When considering geothermal applications, the precision of the zone/loads
model is crucial because it relates directly to the extent of external heat
exchanger installation. Heat exchanger costs impact the overall costs of a
project. Additionally, a unit that is called only when necessary or is well
matched to a zone will be more efficient than a larger unit that may cycle
more often.
Inputs for Ground Loop Design’s Zone Manager Loads module include
peak load information for each of the zones in an installation at different
periods during the day. These loads data can be matched automatically to
heat pumps stored within Ground Loop Design’s Heat Pump Database.
Therefore, ideal and rapid sizing is possible. As with the Average Block
Loads module, the annual running time also may be included for a buried
heat exchanger. This loading information can be simple or complex,
depending on the level of detail the designer desires. To facilitate this
model, the zones can be viewed either independently or together on the
summary panel.
Average Block Loads Module
For quick estimates and general calculations, there is no need to do a full
zone analysis for a project. In these cases, designers can quickly enter
data and consider approximate designs using the Average Block Loads
module.
The average block model takes peak data from up to four time periods
during the peak day, and then uses a generalized form of the automatic
pump selection sequence to match a particular type of pump to an entire
installation. For buried heat exchangers, the model also uses weekly and
annual operational time as parameters. The hours can be computed from
monthly loads data using the Equivalent Hours Calculator (Chapter 3).
Loads modules are covered in detail in Chapter 3.
Design Modules
The Ground Loop Design Geothermal Design Studio consists of the following
three design modules:
•
The Borehole Design Module - This module models the lengths of
bore required for a vertical borehole exchanger system.
11
CHAPTER 1: Ground Loop Design Overview
•
The Horizontal Design Module – This module determines the
length of piping required for a horizontal/slinky exchanger system.
•
The Surface Water Design Module - This module determines the
length of piping required when a closed loop of pipe inserted into a
body of water acts as the heat exchange medium.
All three modules utilize the same loads module formalism, and are linked to
loads modules using the Studio Link system.
Borehole Design Module
Description
The Borehole Design module allows the user to enter various parameters
with respect to the desired vertical borehole system. Input is arranged in
panels corresponding to the type of input. After the user enters all
parameters, the software calculates results such as the required bore
length, the inlet and outlet temperatures and the coefficient of performance
(COP), etc., based on the input data. Within this framework, it is
straightforward and easy to make changes and conduct new calculations.
The input information is organized into seven panels, shown in figure 1.2.
Fig. 1.2 Borehole Design Panel List
Using these seven panels (Calculate, Fluid, Soil, U-Tube, Pattern, Extra
kW, and Information), the user enters the project-specific information.
A more complete description about how to enter data and perform
calculations in the Borehole Design module is provided in Chapter 4.
Theoretical Basis
The vertical bore length equations used in the Borehole Design module are
based upon the solution for heat transfer from a cylinder buried in the
earth. The method was developed and tested by Carslaw and Jaeger
(Carslaw and Jaeger, 1947). The solution yields a temperature difference
between the outer cylindrical surface and the undisturbed far field soil
temperature. Ingersoll suggested using the equation and its solution for
the sizing of ground heat exchangers in cases where the extraction or
12
CHAPTER 1: Ground Loop Design Overview
rejection occurs in periods of less than six hours (where the simple line
source model fails) (Ingersoll, 1954). The borehole module’s equations
include the suggestions of Kavanaugh and Deerman, who adjusted the
methods of Ingersoll to account for U-tube arrangement and hourly heat
variations (Kavanaugh and Deerman, 1991). It also employs the borehole
resistance calculation techniques suggested by Remund and Paul to
account for pipe placement, grout conductivity, and borehole size (Paul,
1997).
Additionally, the software calculates the amount of energy absorbed by or
withdrawn from the ground using the load information collected from the
individual zones and their relationship to the equipment selected.
The calculations find the conditions for long-term, steady state operation
of borehole fields based on the desired heat pump inlet temperatures. In
order to provide an optimum design and prevent system failure, the
combination of parameters must allow for proper extraction or dissipation
of energy from or to the earth at the location of interest.
The most complete description of the calculations and input data can be
found in Chapter 3 of the book, Ground Source Heat Pumps - Design of
Geothermal Systems for Commercial and Institutional Buildings, by S.P.
Kavanaugh and K. Rafferty, 1997. In extensive tests, this model
consistently proved to be the most accurate when compared with
calibrated data from actual installations (Hughes and Shonder, 1998).
Horizontal Design Module
Description
The Horizontal Design module, similar to the Borehole Design module,
allows the user to enter parameters necessary to describe a horizontal
buried pipe and trench configuration. Again, the interface is arranged in
panels corresponding to the type of input. After the user enters all
parameters, the software calculates results such as the required trench and
pipe lengths, the inlet and outlet temperatures, the coefficient of
performance (COP), etc., based on the input data.
The input information is organized into seven panels, as shown in figure
1.3.
Fig. 1.3 Horizontal Design Panel List
13
CHAPTER 1: Ground Loop Design Overview
Using these seven panels (Calculate, Fluid, Soil, Piping, Configuration,
Extra kW, and Information), the user enters the project-specific
information.
A more complete description about how to enter data and perform
calculations in the Horizontal Design module is provided in Chapter 5.
Theoretical Basis
The horizontal trench length equations used in the Horizontal Design
module once again are based upon the Carslaw and Jaeger solution for
heat transfer from cylinders buried in the earth, as described in the single
vertical case above. Again, this method properly models shorter time
periods of heat extraction or rejection, where the simple line source model
fails. Since a number of pipes may be buried in close proximity, this
model must be modified to account for all mutual pipe interactions. A
major benefit derived from using this model, besides its ability to
accurately assess heat-transfer, is that both the horizontal and the vertical
design modules can operate under the same loads formalism.
In 1948, Ingersoll and Plass demonstrated that the Kelvin line source
theory could be used to estimate the change in temperature of a buried
pipe in which heat is being absorbed or rejected (Ingersoll and Plass,
1948). In a ground coupling system, an apparent thermal resistance
between the circulating fluid and the undisturbed ground dominates the
overall resistance. In 1985, in the ASHRAE Design/Data Manual for
Ground-Coupled Heat Pumps, Parker et. al. outlined a method by which
this “field resistance” or “soil resistance” could be estimated and applied
to determine piping and trench length requirements for a buried pipe
system. In the case of horizontal pipe systems located near the ground
surface, the mathematics necessitate the inclusion of “mirror image” pipes
into the calculations. These “mirror image” pipes are located the same
distance above the surface as the buried pipes are below it. In a multiple
pipe system, the soil temperature in the vicinity of any single pipe is
determined by both the undisturbed earth temperature and by the thermal
interference from other pipes in the same and in adjacent trenches. (Parker,
Bose, and McQuiston, 1985).
The current Horizontal Module effectively employs a combination of the
cylindrical model of Carslaw and Jaeger and the multiple pipe
methodology of Parker et. al. Additionally, as in the Borehole Module,
the equations also include modifications suggested by Kavanaugh and
Deerman that adjust the methods of Ingersoll to account for physical
arrangement and hourly heat variations (Kavanaugh and Deerman, 1991).
However, time-step-based rates of rejection and extraction also previously
were discussed in some depth by Parker et. al.
14
CHAPTER 1: Ground Loop Design Overview
The two “Slinky” options available on the Configuration panel partially
are based on the above formalism. Because of the complexity of the
solution to the heat transfer equation for coiled loops of pipe, the design
procedure used for the “Slinky” options is actually only a theoretical
approximation. This approximation is recommended in Closed-loop
Geothermal Systems: Slinky Installation Guide and is based on a specific
set of tests conducted on 36” diameter Slinky coils (Jones, 1995). In the
approximation, the program first calculates the total trench length required
for a single U-Tube buried at the specified trench depth. It then divides
the calculated length by 250 ft and multiplies the result by a factor
determined from both the run fraction and the Slinky pitch (distance
between adjoining loops). The horizontal Slinky configuration employs
the same calculation procedure as that of the vertical. However, in the case
of the horizontal Slinky, the U-tube depth is lowered such that the average
depth of the vertical Slinky would be equal to that of a flat horizontal
Slinky. The pitch and run fraction function is obtained from a twodimensional interpolation over the surface determined from the
experimentally determined data points provided in the Slinky manual.
Surface Water Design Module
Description
The Surface Water Design module allows the user to enter various
parameters concerning the body of water (lake, pond, river, etc.) system.
As in the Borehole Module, inputs are arranged in panels that relate to the
type of input. After the user enters all parameters, the software calculates
the required pipe length, the circuit number, the inlet and outlet
temperatures and the COP, etc., based on the design specifications. Again,
within this framework, it is straightforward to make changes and
recalculate results.
The input information is organized into seven panels, shown in figure 1.4.
Fig. 1.4 Surface Water Design Panel List
These seven panels include Calculate, Fluid, Soil, Piping, Surface Water,
Extra kW and Information. The panel names and many of the panel input
parameters differ from those of the Borehole Design module.
15
CHAPTER 1: Ground Loop Design Overview
A more complete description about how to enter data and perform
calculations in the Surface Water Design module is provided in Chapter 6.
Theoretical Basis
To determine the length of pipe necessary for different surface water
systems, experiments were conducted for different size pipes in coiled and
“slinky” configurations for both heating and cooling modes (Kavanaugh,
1997). Ground Loop Design uses a polynomial fit of this experimental
data to determine the amount of pipe necessary for different loading
conditions.
Additionally, coefficients are used to take into account the effect of the
heat transfer in the lengths of the header and the branch piping that are in
both the water and the soil between the installation and the submerged
circuits. The program combines all factors so that the loop system
provides the source inlet temperature at the heat pump requested by the
designer.
Because the circuit layout is of primary importance to the designer
concerned with pumping losses, the head loss estimation feature for
different piping configurations is included in the Surface Water Design
module. Users can quickly explore different layouts to determine the
optimum design in terms of both heat transfer and circulation pump
energy losses.
A description of some of the calculations and the input data can be found
in Chapter 7 of the book, Ground Source Heat Pumps - Design of
Geothermal Systems for Commercial and Institutional Buildings, by S.P.
Kavanaugh and K. Rafferty, 1997.
Additional Modules
Ground Loop Design’s Design Studio has the potential for additional
modules that may be included in later versions. These modules would also
be able to take advantage of the Design Studio’s heat pump and loads
models.
Reports
Ground Loop Design’s reporting features allow the designer to make hardcopies
of both the data entered and the resulting calculations. These reports are design
records, and are valuable when communicating the design to others involved in
the projects.
16
CHAPTER 1: Ground Loop Design Overview
Project Reports
Every design module has associated project reports, which can be printed
at any time from the Design Studio desktop. The project report contains
all the project information, and includes the parameters chosen, the
calculation results, and the name of the zone file used. Both concise and
detailed versions of the report are available.
Zone Reports
A ‘print’ button in the loads modules allows the designer to print the
loads-related information in various formats. Because the zones contain
information about the zones, the loads, and the equipment, it is often
necessary to obtain reports of the information in separate as well as
combined documents.
For example, at one time, a designer may want to quickly see all of the
zones with their loads and corresponding equipment. At other times, the
designer may only need to see a list of the equipment for each zone.
Ground Loop Design offers five different zone report options including:
•
•
•
•
•
A concise zone report
A detailed zone report
An equipment list report
A loads report
A zone names report
Reports are described in detail in Chapter 7.
Data Reference Files
To access the data reference files the user must have an internet browser present
in the Ground Loop Design-enabled computer. The program will work without
the browser, but the data reference files may not be accessible.
Metric and English reference files are included with Ground Loop Design. These
files aid in the correct verification and entry of the various parameters. The three
main topics/design aids currently included under the Tables menu in the Design
Studio are Fluid Properties, Soil Properties, and Pipe Properties. A convenient
Conversions table with metric/English conversions in two different formats is
included for reference as well. Reference files can be opened and left as open
windows on the desktop, and the user can refer to them as necessary during the
design process.
17
CHAPTER 1: Ground Loop Design Overview
Realizing that designers and engineers have their own preferred resources,
Ground Loop Design employs the HTML browser model so that the user has
ultimate control over the reference files. The designer simply creates a basic
HTML file containing customized data, pictures, graphs, charts, etc. and then
modifies the included top level HTML files to link to their pages. The system
requires a very basic knowledge of HTML, but it offers an extremely flexible
system for user customization.
Detailed information on reference files and sample HTML can be found in
Chapter 8.
Program Help and Support
Ground Loop Design contains a comprehensive, searchable database of help
topics. Access this feature from the Design Studio Help menu. In addition, an upto-date frequently asked questions (FAQ) sheet is available on the web at
http://www.geoclip.com/faq.html. If these resources do not answer your question,
please contact your vendor for support.
References
Carslaw, H.S. and Jaeger, J.C. Conduction of Heat in Solids. Oxford: Claremore Press,
1947.
Hughes, P.J. and Shonder, J.A. The Evaluation of a 4000-Home Geothermal Heat Pump
Retrofit at Fort Polk, Louisiana: Final Report. Oak Ridge National Laboratory, TN.
ORNL/CON-460. 1998
Ingersoll, L.R. and Plass, H.J. “Theory of the ground pipe heat source for the heat pump.”
Heating, Piping, and Air Conditioning. 20:7 (July). 1948.
Ingersoll, L.R., Zobel, O.J., and Ingersoll, A.C. Heat conduction with engineering,
geological, and other applications. New York: McGraw-Hill. 1954.
Jones, F.R. Closed-Loop Geothermal Systems: Slinky Installation Guide. Rural Electric
Research, National Rural Electric Cooperative Association, Oklahoma State University,
International Ground Source Heat Pump Association, and Electric Power Research
Institute, 1995.
Kavanaugh S.P. and J.D. Deerman. Simulation of vertical U tube ground coupled heat
pump system, ASHRAE Transactions, Volume 97, pages 287 - 295, 1991.
18
CHAPTER 1: Ground Loop Design Overview
Kavanaugh S.P. and Rafferty, K. Ground Source Heat Pumps - Design of Geothermal
Systems for Commercial and Institutional Buildings, ASHRAE, 1997.
Parker, J.D., Bose, J.E., and McQuiston, F.C. ASHRAE Design/Data Manual for
Ground-Coupled Heat Pumps. ASHRAE Research Project RP-366, 1985.
Paul, N. The Effect of Grout Thermal Conductivity on Vertical Geothermal Heat
Exchanger Design and Performance. M.S. Thesis, South Dakota State University. 1996.
19
CHAPTER 2: Adding/Editing Heat Pumps
CHAPTER 2
Adding/Editing Heat Pumps
To effectively use any of the design modules included with Ground Loop
Design, it is important to understand how the system models heat pump
data. For the purpose of adding new or editing existing heat pumps to
Ground Loop Design’s Heat Pump Database, the Add/Edit Heat Pumps
Module is included as a separate module in the Design Studio. This
chapter describes the theory of the module and gives an example of how to
enter heat pump data.
Heat Pump Model
Description
For convenience, the Loads modules in Ground Loop Design predict how
heat pump characteristics will vary with changes in the input design
parameters. If the designer changes the inlet source or load temperatures,
or the system flow rate, the capacity and power data of the units may also
change. The easiest and most accurate way of realizing these changes is to
employ an internal model, which the software uses to update the pump
data automatically. Using Ground Loop Design, the designer can
concentrate on the effects of variations without worrying about how the
individual pumps in various zones will react to such changes.
20
CHAPTER 2: Adding/Editing Heat Pumps
The heat pump model employed in Ground Loop Design reproduces the
complete operational data of any particular unit when supplied with a few
representative data points selected from across the range of interest. Data
for each pump can be entered into the model and grouped together under
manufacturer and series headings. The data need only be input once, and
then can be used repeatedly for subsequent modeling sessions. Pump data
is stored permanently in the ‘pumps’ directory. Many popular pumps
from major manufacturers already are included with the program.
In both heating and cooling modes, the minimum data required is the
capacity and power variations with source inlet temperature. To increase
the modeling accuracy, these same variations have to be included at a
second flow rate. Even more accurate results can be obtained if correction
factors are provided for variations in the load inlet temperature and flow
rate. The level of accuracy depends both on the amount of data available
and the time the designer wants to invest.
Note that Ground Loop Design’s heat pump module allows for both waterto-air and water-to-water pumps.
Theoretical Basis
Capacity and Power
Heat pump capacities and power requirements vary smoothly but
significantly for differing source inlet temperatures. Three points taken
along both the capacity vs. temperature and power vs. temperature curves
are fit to a polynomial equation to model these variations. The resulting
calculated coefficients are then used to generate capacity or power values
for any given source inlet temperature.
The basic polynomial equation used for fitting has the form:
y = a + bx + cx2,
where a, b, and c are the three coefficients calculated from the fitting
routine. For the capacity case, ‘y’ represents the capacity and ‘x’ is the
desired temperature. For the power-input determination, ‘y’ is the power
and ‘x’ again is the temperature. Be aware that these coefficients do
change for metric and English units.
The software stores coefficients for each pump, and then uses the
coefficients with the source inlet temperatures chosen by the designer to
determine the unit capacity and power.
21
CHAPTER 2: Adding/Editing Heat Pumps
Flow Rate
To model the effect of the source flow rate on the calculated capacity and
power, data from a second flow rate are used. Generally speaking, with
different flow rates the shape of the capacity and power curves does not
change significantly, but is shifted up or down by a constant factor. This
factor is determined for each of the three temperature data points and
averaged over those input to obtain the linear flow factor, which is shown
on the input screen.
Once the flow factor is determined, the linear capacity or power change
per flow unit may be calculated. The program then calculates a new
capacity or power at any specified flow rate using the initial values already
known from the stored data.
If no data points are entered for a second flow rate, the flow factor is
assumed to be the constant value of 1.0. This means that the capacity
and power will not vary with changes in flow rate.
Considering the size of the variations (generally only a few percent), this
simple model is accurate enough for most pumps. A completely accurate
model of the flow rate variations for all possible pumps would require
significantly more data entry.
Load Side Corrections
The Ground Loop Design Edit/Add Heat Pumps module also can include
corrections to the capacity or power that result from variations in the load
side inlet temperature or flow rate. They are entered as correction factors
across the desired temperature or flow range. The software again uses the
polynomial fitting to model these correction factors. In these cases, a fourcoefficient model is used to better model the types of variations that may
occur. Three to five points are allowed as data input.
Again, if load side correction data are not included, there will be no
capacity or power variations with load temperature or flow, and all
correction factors will be 1.0, the standard value.
The load side temperature range will generally be considerably different
for water-to-air and water-to-water pumps. Ground Loop Design suggests
different initial temperature ranges when the user chooses the water-to-air
or the water-to-water pump type option.
22
CHAPTER 2: Adding/Editing Heat Pumps
Entering Data into the Add/Edit Heat Pumps Module
The user opens the Edit/Add Heat Pumps module from the Design Studio Heat
Pumps menu. Note that one module can be open at a time.
When the module opens, there are two selection boxes present in the upper pane,
while no pump data is displayed in the lower pane. In the left box, the user can
choose to select either one of the manufacturers from the list of existing
manufacturers or ‘New Series’. If a manufacturer is selected, the associated list
of pump series available for that particular manufacturer appears in the box on the
right. When a series is chosen, the data for that series appears in the lower panel.
Creating a New Series and/or Manufacturer
If the user chooses ‘New Series’ from the manufacturer list on the left, the
lower pane becomes active with another selection box that requests
direction as to whether to use an existing manufacturer or to create a ‘New
Manufacturer’. After the user makes a selection, the panel changes to
show information about the manufacturer and series. The manufacturer
information will be editable if the series belongs to a new manufacturer.
The Edit/Add Heat Pumps module with an open ‘Pump Information’ panel
is shown in figure 2.1.
Fig. 2.1 Pump Information Panel
23
CHAPTER 2: Adding/Editing Heat Pumps
After the user enters all the data and clicks the ‘Proceed’ button, all of the
information for the series being added will be stored in the Pumplist.gld
file. Note that the information marked with an asterisk must be
included before the user is allowed to proceed.
Editing Pump Data
Once the new pump series information is entered, or an existing pump
series is selected from the upper pane, the Pump Edit pane will appear in
the lower pane of the Edit/Add Pumps module, as shown in figure 2.2.
There are two sub-panes. The left sub-pane is a list of the pumps already
included in the series. The right sub-pane is a series of tabbed panels that
contain the data for each pump on the list. In the case of a new series,
both the list and the panel section will be empty until a new pump is
created. The name of the current manufacturer and series are shown in the
selection boxes in the upper pane.
Fig. 2.2 Pump Edit Pane
Pump Series Controls
The Pump Series control buttons, shown in figure 2.3, are found above the
list and the pump data panels. They include the Pump Edit controls (New,
24
CHAPTER 2: Adding/Editing Heat Pumps
Copy, Remove, Reorder, and Clear,) the pump Save control, the Edit
Pump Information control, and the Delete Series control.
Fig. 2.3 Pump Series Controls
Pump Edit Controls
The Pump Edit Control buttons are designed to work directly with
the pump list. New pumps are added by pressing the New button.
Copies of existing pumps are added with the Copy button. Remove
is used to remove a pump from the list. Reorder is pressed to
reorganize the list, both alphabetically and numerically. Clear is
used to delete all pumps from the current list. Be careful not to
accidentally delete pumps.
Save Control
The Save control button can be used at any time to save the current
pump information.
Edit Pump Information Control
The Edit Pump Information control button allows the user to edit
both the series and the manufacturer information for a given pump.
Note, however, that if the manufacturer information is
changed, it will change for every series connected to that
manufacturer. ‘Proceed’ or ‘Cancel’ will return the user to the
Pump Edit Pane.
Delete Series Control
The Delete Series control button deletes the current series. If the
series is the only series of a manufacturer, the manufacturer also
will be deleted automatically.
Note: The actual heat pump file (*.hpd) will not be deleted from
the pumps directory. If necessary, the series can be restored by
creating a ‘New Series’. The user need only provide the
appropriate manufacturer and series name, and use the deleted
‘.hpd’ filename for the pump set ‘Filename’. Incomplete fields will
be recreated from the *.hpd file. If the original file no longer
25
CHAPTER 2: Adding/Editing Heat Pumps
exists, the program creates a new *.hpd file. Incidentally, the
same system can be used to add new pump sets obtained from
external sources as described below.
General Information
The General panel is the first panel a user sees when he or she decides to
input data for a new pump. It has an input box for the name of the pump,
and in the ‘Pump Type’ area, the user selects whether the pump should be
classified as a water-to-air or or a water-to-water pump. An example of
the pump General panel is shown in the lower right pane of figure 2.2.
Capacity, Power, and Flow Rates
The capacity, power, and flow rate information pertaining to the source
side flow for both heating and cooling are entered into the two tabbed
panels labeled Cooling and Heating in the Pump Edit pane. An example
of the Cooling panel is shown below in figure 2.4. The Heating panel
follows an identical format, although the temperatures will be different.
Fig. 2.4 Heat Pump Specifications – Cooling
As can be seen from the figure, the source entering water temperature
(EWT) is listed to the left, and the capacity and power requirement of the
26
CHAPTER 2: Adding/Editing Heat Pumps
unit at different flow rates are listed to the right. Once the values are
input, the coefficients and flow factor can be calculated from the entered
data. The Calculate Coefficients button turns red when values are
changed, indicating that new coefficients must be calculated before
proceeding.
Note: If data for only one flow rate are available, only the first capacity
and power requirement data must be included, under the section entitled
‘FLOW RATE 1’. The data under ‘FLOW RATE 2’ can be left as
zeroes, and the program will ignore them, leaving the flow factor as 1.0.
Load Side Corrections
Corrections resulting from variations in inlet temperatures and flow rates
on the load side can be entered in the Load Temperatures and Load Flows
tabbed panels of the Pump Edit pane. If these corrections are not added,
the factors remain at 1.0 and input variations in load temperature or flow
rate will have no effect on calculated capacities and/or input power. Time
permitting, however, it is best to include as much information as possible
from what the manufacturer provides.
Load Temperatures Panel
The Loads Temperatures panel is where corrections for variations
in the load inlet temperature are input. Both the cooling and
heating information (taken at the average or standard source
temperature and flow rate, and the average load flow rate) are
entered on the same panel, an example of which is shown in figure
2.5.
The factors shown in figure 2.5 were calculated from a
manufacturer’s list of capacities provided for the different
temperatures, using the capacity at the selected temperature as the
numerator and the capacity at 67°F for cooling (70°F for heating)
as the denominator. The 67°F (70°F) capacity values were those
used for the inlet source data on the Cooling and Heating tabbed
panels described previously. Occasionally, manufacturers will
provide capacity values at the standard temperature with a table of
correction factors that can be entered into the Ground Loop Design
Load Temperatures panel directly.
Notice how in figure 2.5 five points of data are included for
cooling but only three are included for heating. The software
requires a minimum of three data points for its coefficient
calculation. More data may be input if desired. However, no boxes
may be left blank! Other temperature and coefficient values must
27
CHAPTER 2: Adding/Editing Heat Pumps
be set to zero in this case. As a convenience, ‘0’ buttons are
included to quickly set rows to zero.
Fig. 2.5 Heat Pump Load Temperatures Panel
Note: If correction factors are unknown or unnecessary, they can
all be left at the constant value of 1.0, which is the initial condition
that exists when a new pump is first added.
Load Flows Panel
Similar to the Load Temperatures panel, the Load Flows panel
allows the user to enter corrections for variation in load side flow
rates. The system used here is different, however. Every pump
is assigned a nominal flow rate, and the data is input as
percentages of the nominal flow rate. A sample Load Flows panel
is shown in figure 2.6.
To get a capacity factor at a flow rate of 80 percent of nominal, for
example, the capacity of the unit at 80 percent of nominal would
be divided by the capacity at the nominal flow rate. The procedure
is identical for the power factors. Data is usually taken at standard
source temperatures and flows, and at the standard load
28
CHAPTER 2: Adding/Editing Heat Pumps
temperature. Quite often, the manufacturer provides lists of these
variations that can be input directly.
Once again, a minimum of three points is necessary for the
coefficient calculations, and ‘0’ buttons are provided for quickly
setting the unused rows to zero. Remember - boxes must be set to
0 if they are not used!
Fig. 2.6 Heat Pump Load Flows Panel
Testing Input Data
The Test panel is provided as a final check after a pump’s data has been
input into the Heat Pump module. Without testing the data directly, there
is no way to know if mistakes were made during the input process.
A sample Test panel is shown in figure 2.7. As can be seen from the
figure, both source and load entering water and air temperatures, as well as
flow rates, can be edited directly. Clicking the “Test” button performs the
calculation to see what capacity, power, and EER/COP result from the
chosen input parameters. Average values are used initially, but by varying
the parameters the designer can see how well the newly created model
matches the data set used for data entry.
29
CHAPTER 2: Adding/Editing Heat Pumps
Fig. 2.7 Heat Pump Test Panel
Often, any input errors will be evident immediately from the test (by
comparing the test results with the input sheet). Additionally, the user can
use this test to make certain that the pump data are accurate over the
particular range of temperatures, flows, etc. that he or she typically uses,
and then modify the data if necessary.
Exiting the Edit/Add Heat Pumps Module
After editing or adding heat pumps, and calculating all necessary coefficients, the
user should make sure that the pumps are saved by clicking the Save button on the
Pump Series control bar. When the pumps are securely saved, the Save button
will become disabled.
Clicking the close button in the upper right hand corner of the lower pane closes
the Pumps Edit Pane, and clicking the close button in the upper right hand corner
of the Edit/Add Heat Pumps window closes the Edit/Add Heat Pumps module.
Closing without saving edited data will initiate a dialog box that reminds the user
to save the data before closing.
30
CHAPTER 2: Adding/Editing Heat Pumps
Heat Pump File Descriptions
There are two types of files created by the Edit/Add Heat Pumps module. The
first is the Pumplist.gld file, which maintains the current master list of
manufacturers and the series associated with those manufacturers.
The
Pumplist.gld file also includes the filenames (without the ‘.hpd’ extension) of the
heat pump data files associated with the individual series.
The second type of file is the ‘.hpd’, heat pump data file, for each individual
series of pumps. This file type keeps track of all the data input by the user as well
as the pump names and the coefficients calculated within the module. Since
‘.hpd’ files cannot be deleted by the program (unless they are accidentally
overwritten), many difficulties usually can be overcome by just adding new pump
sets or, if necessary, editing the Pumplist.gld file directly. The format of the
Pumplist.gld file is given in the Preface, page 3.
Adding Pump Sets Obtained From External Sources
To provide the greatest amount of flexibility to the user, Ground Loop Design
allows the user to obtain heat pump data files (*.hpd files) from external sources.
For example, a heat pump set may be copied from a fellow designer, or even
downloaded from a participating heat pump manufacturer’s website.
Since the original Pumplist.gld file does not contain a reference to the externally
obtained data set, it must be added manually. The procedure for this is as follows:
1. Place the ‘*.hpd’ file into the \Ground Loop Design\pumps folder.
2. Add a ‘New Series’.
a. If the series belongs to an existing manufacturer, choose the
appropriate manufacturer.
b. If the series belongs to an unlisted manufacturer, choose ‘New
Manufacturer’ from the list.
3. Provide the ‘Series Name’ and ‘Manufacturer Name’, as required.
4. Under ‘Filename’, type the existing filename of the series to be added. Notethe existing filename is the *.hpd file the user just put into the pumps folder in
step 1 above.
5. Click “Proceed”.
Ground Loop Design will open the heat pump file for editing and will include it in
its Heat Pump Database. Additionally, if this is a new manufacturer, any included
31
CHAPTER 2: Adding/Editing Heat Pumps
manufacturer information will become visible for this pump set. Since the
Pumplist.gld file has been modified, it will register the new pumps for use in all
modules opened afterwards.
32
CHAPTER 3: Loads and Zones
CHAPTER 3
Loads and Zones
All of the calculations performed in Ground Loop Design fundamentally
are based on loads provided by the designer. This chapter describes the
unique Ground Loop Design loads system, and how to enter the loads in
both the Zone Manager and the Average Block loads modules.
Additionally, it explains the pump matching capabilities and operation
both in automatic and in manual modes. At the end of the chapter there is
an explanation of how to import external loads files as well as a brief
review of the program’s loads input methodology.
The Ground Loop Design Loads Model
The intrinsic flexible nature of the Ground Loop Design Geothermal Design
Studio appears again in the loads models the software employs: the user is not
limited to a single style of loads input. Similar to the design modules, a designer
can choose between different types of loads input schemes based on the level of
complexity he or she desires and the time he or she wishes to invest. These loads
modules are then ‘linked’ to one or more design modules using the Ground Loop
Design Studio link system. Currently, two loads modules are available, the Zone
Manager Loads module and the Average Block Loads module
The Zone Manager Loads module is provided for designers who desire a full
analysis capability. Loads are input as separate zones, and each zone is matched
33
CHAPTER 3: Loads and Zones
with a particular pump. This mode is more valuable when users require thorough
designs.
The Average Block Loads module offers a rapid system of entering whole
systems information for users who do not require or desire to input the data for a
fully zone-divided installation. Rather than matching specific pumps to each zone,
the Average Block Loads module uses a particular, user-defined style of pump (or
COP) and matches it in an average way to the entire installation. Although the
input scheme is simpler, the design calculations are identical to those of the more
complex Zone Manager Loads module. In fact, on average, if identical values
could be placed in both the Zone Manager and Average Block loads modules,
identical calculated bore lengths would result.
Zone Files
Zone (loads) files are stored as *.zon files in the Ground Loop Design ‘zones’
directory. They have a general format that can be read into any loads module, and
they can be used simultaneously in different design modules. However, if this is
done, it may be wise to save any changes under different filenames.
Both loads modules are stand-alone entities. The files are entirely independent
of project design files. This means that an entire installation loading design can
be entered, matched with pumps, optimized, and saved without ever opening a
design module. This is valuable for users who wish to keep the loads entry and
pump selection completely separate from the studio’s geothermal design modules.
Now users can work on designs and load inputs at different times, and can use the
same loads files for various projects/styles of project.
New zone files can be created by clicking the ‘New’ button in any loads module,
or by clearing all of the current loads information with the Clear button, followed
by the ‘New’ button. The designer provides a filename when the zone file is
saved.
Zone files can be opened and saved using the Open and Save buttons on the Loads
panel.
The Zone Manager Loads Module
For commercial, non-centralized installations, it is often necessary to divide loads
into separate zones that individually are served by specific heat pumps. This type
of system has many advantages including lower installation and service costs as
well as a highly accurate method of matching the loads to the heat exchanger.
From the time-specific loads data that the user provides, Ground Loop Design
34
CHAPTER 3: Loads and Zones
determines the maximum heating and cooling loads of the entire system, and then
uses these values to calculate the length of heat exchanger required.
Fig. 3.1 Zone Manager Loads Module, Main View
The Zone Manager loads module can be opened either from the Loads Menu or
by clicking the Zone Manager toolbar button. An example of the module opened
to the Loads tabbed panel is shown in figure 3.1. The Heat Pumps tabbed panel
will be discussed shortly.
In the Main View, Zones in Ground Loop Design are organized in a list on the left
side of the Loads tabbed panel. Each zone panel contains information relating to
the working zone, including a zone name, the loading information, and the
information about any heat pumps selected for that zone. Selecting a different
zone name in the zone list changes the working zone.
Using the list, the designer can bring up and modify any particular zone by
clicking on its name. An essentially equivalent but more compact summary of the
input data can be obtained in the Summary View, obtained by clicking on the
Summary View toggle button. Different representations of zone data can also be
printed as reports.
35
CHAPTER 3: Loads and Zones
Managing Zones in the Loads Tabbed Panel
The buttons along the top of the Zone Manager are used to work with the zones.
A closer view is shown in figure 3.2.
Fig. 3.2 Zone Manager Control Buttons
The five buttons on the left side are zone-editing controls, and they include New,
Copy, Remove, Renumber, and Clear. A Summary view of all the zones can be
obtained by hitting the sixth, or Summary View, toggle button. The next three
buttons are the Open and Save buttons, for opening and saving the zone files, and
the Print button, for printing various zone reports. The next button is the Import
Loads button, a description of which can be found towards the end of this chapter
under “Importing Loads Data from External Programs.” The final two buttons on
the far right are for pump selection across the entire set of zones, and include
Auto-Select All and Update/Reselect, which are discussed in more detail below.
New and
Copy
A new zone may be created at any time from the Loads panel by clicking the New
button. Identical zones may be created from any existing zone by bringing up that
zone’s data window and clicking the Copy button.
Remove and
Clear
Zones also can be deleted from the list. Any zone can be removed from the list by
bringing up the zone’s data window and pressing the Remove button. To delete
all of the zones in the list, press the Clear button.
Renumber
If several zones are added or removed from the list, click the Renumber button to
reorganize the zones. This button renumbers the existing zones from one, starting
with the first zone in the current list.
Summary View Toggle Button
With the Summary View toggle button, the user can at any time simultaneously
look at the group of zones. This view provides lists of the heat pump data in both
cooling and heating modes as well as collective information about the set of
36
CHAPTER 3: Loads and Zones
chosen pumps. This information includes the peak loads and when they occur, and
the total combined capacity, the peak demand, and the average efficiency of the
selected equipment. Although individual pumps cannot be added or removed in
the Summary View, changes made across the entire pump selection are directly
observable. A sample Summary panel is shown in figure 3.3. Note that more than
one type of pump series is listed.
Fig. 3.3 Zone Manager Summary View
Entering Loads
Loads can be entered directly in the individual zone data windows back in the
Main View of the Loads tabbed panel. A sample entry is shown in figure 3.4. The
Ground Loop Design loads input methodology may be new for some designers.
Consequently, an additional and alternative description of the methodology can be
found at the end of this chapter.
Design Day Loads
According to the model that Ground Loop Design uses, average peak load data for
every hour of a twenty-four hour day can be included if desired. However, for
simplification, average peak loads for the design day, or the day of heaviest usage
37
CHAPTER 3: Loads and Zones
in the year for both cooling (heat gains) and heating (heat losses) modes of
operation, can be input for up to four separate times of the day. These include
morning (8 a.m. to 12 noon), afternoon (12 noon to 4 p.m.), evening (4 p.m. to 8
p.m.) and night (8 p.m. to 8 a.m.). This method of input not only provides the
total load, but also identifies when the equipment will be in use for the heat
exchanger calculations.
Fig. 3.4 Sample Loads Input Data
If only one peak value during the day is provided to the designer, it can be entered
into one or several of the time slots, depending on how the loads will be expected
to change during the course of a day. Slightly reduced values can be added for
off-peak hours if the building still will be in operation but not at full load.
Insignificant time slots can be left at zero.
Note: If only one peak load value is provided per zone, the designer will need to
be consistent in placing it in the same time slot for every zone. This is because the
software loops through all of the zones to determine which time of day has the
highest loading requirements prior to performing its calculations.
If only cooling or only heating loads data are to be used, all of the non-used slots
should remain as zeroes. Only the side with the loads provided will be
calculated.
Annual Equivalent Full-Load Hours
The hours entered into the lower section of figure 3.4 are determined from
detailed annual loads data for the system being designed. They represent the
annual number of hours the system will be running if operating at full load, and
are a measure of the system running time.
This system is used both to limit the amount of data the user must enter and to
simplify the calculations. It is identical to methods that require input of all the
monthly data but more concise, since it represents the total energy input to the
38
CHAPTER 3: Loads and Zones
ground in terms of the peak load. Month-to-month variations are not necessary in
the annual/monthly/daily pulse model used in Ground Loop Design.
For example, if a loading report provides the number of Btus required by this
zone each month, the hours per month will be obtained by dividing the monthly
Btu requirement by the peak Btu/h value. The resulting number will be the
monthly equivalent full-load hours. To get the annual full-load hours, the value
will need to be obtained for every month that required heating or cooling, and
then combined to finally get the annual equivalent heating or cooling hours.
If exact values are not available, an estimate should be made with regard to the
expected running time of the unit in each particular zone. Estimates of time must
be reduced, of course, from actual running time since the ‘annual equivalent fullload hours’ represents the running time if the system were operating continuously
at full load, which is not generally the case.
Equivalent Hours Calculator
To aid in this calculation, Ground Loop Design includes the Equivalent Hours
Calculator, found in the Tools menu, or obtainable directly by clicking the
‘Calculate Hours’ button. Figure 3.5 shows a view of the Equivalent Hours
Calculator.
Fig. 3.5 Equivalent Hours Calculator
39
CHAPTER 3: Loads and Zones
Remember that although the vertical bore length calculation results are not
extremely dependent on the running hours within one zone for multi-zone
designs, the total number of running hours across the zones can certainly affect
the required bore length. The user should attempt to enter the running hours as
accurately as possible.
Equivalent hours are unnecessary for a surface water design, since long-term
buildup effects are unimportant. If a loads module is linked to a Surface Water
Design module, the hours will not be visible.
Days per Week
This value represents the occupation of the installation, in days per week. The
building in the example is only occupied during weekdays, so the value 5.0 was
entered. Decimal values can be used for partial occupations, and the amount can
vary between zones.
Again, the occupation is unnecessary for a surface water design, since long-term
buildup effects are unimportant. If a loads module is linked to a Surface Water
Design module, the days per week will not be visible.
Pump Matching and Selection
Every zone has heat pump equipment associated with it. Equipment matching
and selection is done within the zone data window, in the lower section entitled,
“Heat Pump Specifications at Design Temperature and Flow Rate”. In this
section, the designer has three choices when matching a pump to a zone:
•
•
•
Automatic selection based on the active heat pump series
Manual selection from a list of all available pumps
Custom input of pump data
Once selected, the zone retains all of the information associated with the pump
chosen. This information includes the pump name, the number of pumps, and the
capacity, power consumption, EER/COP, flow rate, and partial load factor in both
cooling and heating modes. If obtained from the list of available pumps, detailed
information is also available, including the manufacturer and series name, the
pump type, and the inlet load temperatures.
Figure 3.6 shows the pump selection section of the zone data window with sample
data matched to the loads data of figure 3.4.
Several buttons can be found in the pump selection section. These include AutoSelect, Select, Details, and Clear. A checkbox is also included to indicate when
40
CHAPTER 3: Loads and Zones
the pump is a ‘custom pump’, or a pump not included in Ground Loop Design’s
internal list of pumps.
Fig. 3.6 Sample Pump Selection Section with Data
Auto-Select
This option is by far the easiest method of matching a pump to the loads in a
particular zone. By clicking the Auto-Select button, Ground Loop Design utilizes
the information stored for the active pump series and determines which pump
within the list is best suited to the zone in question. If the listed pumps are too
small for the zone loads, the software increases the number of pumps of each size
until an acceptable match is achieved.
The pump selection process uses information from the Zone Manager loads
module. This includes the chosen inlet source temperature, the flow rate, the heat
pump series, and the initial inlet load temperatures. The flows and load
temperatures can be entered at the bottom of the module, and the active heat
pump series and load temperatures may be changed on the Heat Pumps tabbed
panel.
Manual Select
If an automatically selected heat pump is for any reason undesirable, or a different
pump series from the same manufacturer, or even from a different manufacturer is
required, the Select button may be used. This button allows the designer to
choose any of the stored pumps. As with the Auto-Select button, all of the
associated fields are calculated automatically once the pump is selected.
When the Select button is pressed, the selection panel appears, as shown in figure
3.7. After a pump is chosen, pressing Select Pump will place the pump in the
zone and automatically calculate all of the associated parameters. Cancel will
return the user to the main display without changing any pumps.
41
CHAPTER 3: Loads and Zones
Note: Unlike with Auto-Select, a pump that is manually selected may or may not
match the loads in the zone. It is the responsibility of the designer to make sure
the pumps match the zones.
Fig. 3.7 Pump Selection Panel
Details
Specific details about a given pump may be obtained by clicking the Details
button. Additionally, the details panel is where the designer may vary the loads
input temperatures or flows for that particular pump. After the user presses the
return button, variations in the input load temperature will affect the pump
parameters listed on the main pump selection area. A sample details panel is
shown in figure 3.8.
Fig. 3.8 Pump Details Panel
Clear
Pressing the Clear button clears the current pump in a zone. All values are reset
to the initial state, allowing the user to reselect or enter a pump for the zone.
42
CHAPTER 3: Loads and Zones
Custom Pump (Customization)
If the designer must include a heat pump unit that is not stored in Ground Loop
Design’s Heat Pump Database, he or she may add customized pumps simply by
entering values directly into the boxes on the pump selection section of the zone
data window. When the user does this and overrides the automatic selection
features, a check appears next to the “Custom Pump” label, indicating that the
pump information is from an external source. The details section will no longer
contain information about the pump manufacturer, series, or type.
The calculation portion of Ground Loop Design will require at least the capacity
and power data to utilize the pump properly. The actual COP used in the
calculations is determined from the capacity and the power, not the input text box.
Other information may be added for the designer’s reference.
Note: When a custom pump is included, its values will remain unchanged during
the designing process. Variations in inlet source or load temperatures, or
system flow rate, will not affect a customized pump’s data.
Automatic Heat Pump Selection Options for the Entire Zone Set
Two controls are included with Ground Loop Design that allow for an automatic
selection of pumps throughout the entire set of zones. This feature is useful when
the pump set needs to be compared or changed, or when modifications are
required throughout the existing set. These controls are necessary so that large
sets of pumps can be changed or updated without having to step through each
individual zone.
Auto-Select All Pumps
The Auto-Select All Pumps control performs the same function as the Auto-Select
button in the pump selection section of the zone data window, except it performs
the selection sequentially through all of the zones. It uses the active heat pump
series selected on the Heat Pumps tabbed panel.
Note: Auto-Select All Pumps will overwrite all currently selected pumps,
including custom pumps.
Update/Reselect Current Pumps
The Update/Reselect Current Pumps control reselects the pumps in all zones after
determining the current series used in each particular zone. For example, if most
of the pumps belonged to the same water-to-air series, but one was a water-to43
CHAPTER 3: Loads and Zones
water pump, this control would determine the difference and update the pumps
accordingly.
Note: Custom pumps are not affected when the Update/Reselect Current Pumps
control is activated.
Working Series Selection in the Heat Pumps Tabbed Panel
Figure 3.9 Shows the Zone Manager opened to the Heat Pump tabbed panel. This
panel is used to specify the working series for all of the automatic selection
features described for the Loads tabbed panel. In the Heat Pump tabbed panel,
the user simply selects the pump series that he or she intends to use for the
matching session. The selection may be changed at any time without affecting
previously automatically selected units. However, if the ‘Auto-Select All
Pumps’ button on the Loads panel is pressed, every zone will be replaced
with the current working series. Additionally, in this panel the user may define
an inlet load temperature to be used in any automatic selection.
Choosing the Active Series
The active heat pump series is the series of heat pumps used by the AutoSelect features in the Loads panel.
Fig. 3.9 Heat Pumps Tabbed Panel
44
CHAPTER 3: Loads and Zones
It represents the primary heat pump family utilized by the designer for a
particular project. Although this is the primary series, other pumps may
still be selected for certain zones using either the Select button or by
defining a custom pump. To choose a pump series, select a manufacturer,
followed by the desired series of that manufacturer. A list of available
pumps appears in the list box.
Inlet Load Temperatures
Values for the initial inlet load temperatures for both water-to-air and water-towater pumps may be entered in the appropriate boxes. If necessary, these values
may be changed for individual pumps in the Loads panel. For water-to-air
pumps, ‘WB’ refers to “Wet Bulb” and ‘DB’ refers to “Dry Bulb” temperatures.
The Average Block Loads Module
If detailed zone-style modeling is unnecessary for an initial calculation, or if information
is incomplete for a component-based design, the Average Block loads module is a better
option than the Zone Manager. The required input consists of only a single set of loads,
which represents the entire installation.
Fig. 3.10 Average Block Loads Module
45
CHAPTER 3: Loads and Zones
In this case, the pump matching model is slightly different from the model for the
individual zones. A single pump type is selected from the Ground Loop Design Heat
Pump Database to approximate the average pump characteristics of the installation. For
example, if the designer is planning to use the highest efficiency pumps, a pump in a
series with a higher coefficient of performance (COP) might be chosen over a lower
efficiency pump. If specific pump characteristics are required, they can be input directly,
overriding the automatic functions.
A view of the Average Block Loads Module is shown in figure 3.10. Although it
resembles a single zone in the Loads tabbed panel of the Zone Manager loads module, it
has some slight differences: there is no list of zones, and the pump matching section has a
different format.
Managing the Average Block Loads
The buttons along the top of the Average Block Loads module are used to work
with the single panel of loads information. A closer view is shown in figure 3.11.
Fig. 3.11 Average Block Loads Module Controls
The buttons on the left are zone-editing controls, and include only New and Clear.
To the right are the Open and Save buttons, for opening and saving the zone files,
along with the Print button, for printing various zone reports. The last button on
the right is the Import Loads button which is explained towards the end of this
chapter. Unlike the Zone Manager, there are no Auto-Select buttons.
New
A new set of loads data may be created initially by clicking the New button.
Since only one panel is allowed, this button becomes disabled after a new set
appears. It is re-enabled when the set is cleared.
Clear
To delete all of the current information, press the Clear button.
Entering Loads
The method for entering loads in the Average Block Loads module is identical to
the method used in the Zone Manager. The only difference is that the summed
loads values may be larger than the smaller values used in individual zones.
46
CHAPTER 3: Loads and Zones
Refer to the Zone Manager Entering Zones section or the end of this chapter for
specific details about the Design Day Loads, Annual Equivalent Full-Load Hours,
and Days Occupied per Week sections. Note that the Annual Equivalent FullLoad Hours can be calculated for the entire installation using the Equivalent
Hours Calculator.
Pump Selection
Although the selection process is identical to selection in the Zone Manager loads
module, the results are slightly different. Figure 3.12 shows the result after
selecting a pump, and then modifying the partial load factor to 0.9 on the
dominant load (Heat Gains) side.
Fig. 3.12 Average Block Loads Pump Selection
In this case, an average pump was selected for the zone, and that pump was given
a partial load factor of 1.00 for the dominant cooling side. Since the partial load
factor, the ratio between the peak loads and the total equipment capacity, varies
depending on designer preference, it can have any value of 1.0 or less.
Additionally, the partial load factor will remain constant as the continuous update
feature modifies the pump values due to changes in the temperature or the flow
rate. The partial load factor plays a small role in the heat exchanger length
determination calculations.
47
CHAPTER 3: Loads and Zones
Details and Clear
The Details and Clear buttons and the Details panel operate in the same way as
they do in the Zone Manager Loads module. However, one difference is that no
variation of the load flow rates is permitted in the Details panel.
Custom Pump (Customization)
Checking the Custom Pump check box allows an override of all automatic pump
selection features. The user can input any data desired, although once again the
COP used in the calculations is calculated from the capacity and the power, not
taken from the text box list.
Pump Continuous Update Feature
The Update/Reselect Current Pumps control is called automatically when changes
are made to either the inlet source temperature or the system flow rate from within
the Zone Manager, the Average Block Loads module, or the design modules. In
this way, the designer does not have to worry about updating the pumps already
matched to zones in Ground Loop Design.
However, the designer must be aware that sometimes this may result in a new
pump size assignment due to capacity changes related to variations in temperature
or flow. If this is problematic, custom pumps may be used to lock pump values
into a zone. However, for proper modeling, any customized pumps must be
edited separately by the designer after the design parameters have been
established.
The Studio Link System
The Studio Link system is a powerful feature in Ground Loop Design that gives
users the ability to link or to unlink the loads modules to or from the design
modules. When a loads module is linked to a Borehole, Horizontal or Surface
Water Design module, all of the data in that loads module is transferred to the
design module. Once the connection is established, the pertinent information is
stored within the design module, which makes transfers in from or out to the loads
module as necessary. Since the information is now held in the design module, it
is possible to add multiple design modules with only a single loads module open.
When studio links are established, the information shown in the loads module will
correspond to the active design project.
As long as a link is active, design modules retain information about the type of
link and the filename of the associated zone ‘.zon’ file. This information is stored
48
CHAPTER 3: Loads and Zones
in saved project ‘.gld’ files, so that the appropriate loads module can be opened
and loaded when a project file is opened.
Making a Link
The most direct method of making a link between a loads and a design module is
to open both modules to be linked, activate (click on) the design module, and then
press the ‘Link’ button on the toolbar. Another option is to choose “Link” from
the Ground Loop Design Loads menu. If there is only one type of loads module
open, a link will be established with that module. If more than one type of loads
module is open, Ground Loop Design will query the user for his or her linking
preference.
Alternative systems for linking exist, but they are more indirect. For example, if
only one unlinked design module is present, a link may be established from any
open loads module, since Ground Loop Design automatically recognizes the
user’s intention. If more than one unlinked design module exists, however,
pressing the link button from an active loads module will have no effect.
The link status lights in the corners of the modules indicate when a link has been
formed. Colors indicate the type of link. Link status lights are described in more
detail below.
Unlinking
To break a link between modules, simply activate (click on) the design module to
be disconnected and click the ‘Unlink’ button on the toolbar. Equivalently, the
user can choose “Unlink” from the Ground Loop Design Loads menu. The link
will be broken, and all related loads information for the design module will be
cleared. However, the information still exists in the loads module, and can be
recovered by linking again if necessary.
If only one design module is linked to a particular loads module, unlinking from
the loads module is also possible. If more than one linked design window is open,
however, clicking the unlink button from a loads module will have no effect,
since Ground Loop Design cannot determine which project should be
disconnected.
The link status lights in the corners of the modules indicate when links are
broken. Link status lights are described in more detail below.
49
CHAPTER 3: Loads and Zones
Studio Link Status Lights
Studio Link status lights are used to indicate when links are made, when data
transfer occurs, and when links are broken. They are located in the lower left
hand corner of the design modules, and the lower right hand corner of the loads
modules.
Connection Established - First Light from Left
The light furthest to the left indicates both whether or not a connection is
established and the type of connection. If the light is off, no connection is
established. Magenta indicates a link to an Average Block Loads module, while
light blue indicates a link to a Zone Manager loads module.
Receiving Data - Second Light from Left
The second light from the left indicates when the module is receiving data from
the other module. It is green in color.
Sending Data - Third Light from Left
The third light from the left indicates when the module is sending data to the other
module. It is yellow in color.
Broken Connection – Rightmost Light
The light on the right turns red whenever a connection is broken. It turns off
again when connections are reestablished.
Importing Loads Data From External Programs
With Ground Loop Design, users easily can import loads data from both
commercial loads programs and Excel files directly into the loads modules.
Import commercial loads programs data by clicking on the Import button found in
both the Average Block and the Zone Manager loads modules and import Excel
files data by using the ‘Import Loads’ command from the Design Studio Loads
menu.
Since calculation programs express results in a number of different ways, Ground
Loop Design edits the input data so that it matches the Design Day formalism
used in the Loads Modules. Occasionally, however, the data from external loads
programs do not have the hour-by-hour level of detail that Ground Loop Design
can accept. In these cases, the designer or Ground Loop Design must make
modifications to the imported data to assure that the proper level of detail is
50
CHAPTER 3: Loads and Zones
retained. In this way the program can be certain to calculate the appropriate heat
exchanger size. These modifications are explained later.
Using the Import Button for Commercial Loads Programs Files
To import a file from a commercial loads program, the user can click on the
Import button from any loads module. This automatically opens the file dialog
box in the “zones” folder, and displays all files that can be imported. When the
user selects a valid import file, the program automatically transfers the data into
the current open zone of the active loads module. Note that any previously
existing loads will be overwritten. At the same time the data is transferred into
the loads module, an Import Loads window is opened, showing the imported data
in detail. This window is shown in figure 3.13, and its corresponding loads entry
is shown in figure 3.14.
Fig. 3.13 Import Loads Window
Fig. 3.14 Results of Importing
51
CHAPTER 3: Loads and Zones
The Import Loads window displays the imported data, the filename, and the name
of the program that generated the file. Total loads and peak demand data are
presented on separate screens for cooling and heating. Use the buttons on the
bottom of the window to toggle between the two. On the right is the monthly
partial load factor, calculated by Ground Loop Design. Although the data cannot
be modified directly in the Import Loads window, hitting the “Modify” button
will open the file in the Equivalent Hours Calculator, where it can be edited. The
user can transfer the modified data into the loads module by pressing the
“Transfer” button. Since both the Calculator and the Import Loads windows will
be open, the program first will ask the user from which window, the Calculator or
the Import Loads window, he or she wishes to transfer data. The program then
prompts the user to decide to which loads, heating or cooling, the data should be
transferred.
Using the Import Loads Command for Excel Data
The easiest way to import data from an Excel file is by using the ‘Import Loads’
command found in the Design Studio Loads menu. Select ‘Import Loads’ and an
Import Loads window similar to that in Fig 3.13 will appear. Ground Loop
Design expects the Excel data to be in the following column order and units (note
that Ground Loop Design can accept a maximum of 12 data rows per column):
Month
Total Heating Total Cooling Peak Heating Peak Cooling
1000 BTU
1000 BTU
1000 BTU/hr 1000 BTU/hr
January
…
December
To import the Excel data, simply highlight the four columns in the Excel
spreadsheet and copy them onto the clipboard (Ctrl-C). Note: highlight only the
numeric data. DO NOT highlight the column and row descriptions. Then in
the Import Loads window click on the Excel icon. The data will be imported. Data
can be modified (if necessary) and transferred into the loads modules following
the method described above in “Using the Import Button for Commercial Loads
Programs Files.”
Note that it is possible to import a single column of data. Following the column
order listed above, put the single column of data in the correct position. Fill the
remaining columns with zeros and then copy all four columns to the clipboard.
When Imported Data is Not Detailed Enough: How the
Program Modifies External Loads Files
In the case of a loads program that generates only total monthly loads and peak
monthly demand, nothing is known about the daily hour-by-hour transfer of heat
to or from the installation. This information is important in the Borehole and
52
CHAPTER 3: Loads and Zones
Horizontal Design modules because the hourly data ultimately determines the
contributions to the daily and monthly pulses of heat to the ground (Ground Loop
Design performs calculations based on daily, monthly and annual heat pulses). In
this type of situation, Ground Loop Design will use the peak demand and total
monthly loads to determine a monthly partial load factor (PLFm) for the peak
design month, where
PLFm = (actual run time per month) / (run time if at full load per month).
Once the program calculates the PLFm, it automatically determines the
relationship between off-peak period loads and peak period loads to assure that
the monthly partial load factor matches that of the imported data. The program
assumes that the peak demand occurs during the top four-hour period, multiplied
by the number of days in the month. If the total heat gains or losses provided for
the peak month still exceed this value, the remainder of the total monthly loads
are evenly split between the other time periods in the day, making up the
remaining 20 hours. If not, the demands of all other periods are set to 0. The
peak and its time block will be used for the daily pulse. The monthly pulse utilizes
the data in the off-peak periods to recalculate the PLFm. A sample PLFm
calculation is presented below.
Assume the monthly calculation gives a total monthly load in January of 10000
MBtu (kWh), and the corresponding peak demand from noon to four p.m. is 30
MBtu/hr (kW). In this case, the monthly partial load factor is:
PLFm = 10000 MBtu / (30 MBtu/hr * 24hr * 31 days) = 0.448
If this value is to be transferred correctly into the Design Day Loads boxes in the
loads modules, the 0.448 must remain the same. Noon to four p.m. represents
four hours out of twenty-four in a day. Loads not included in that four-hour
period must be included in the other twenty hours of the day. The following
equation is used to determine the relationship between off-peak loads and peak
loads so that the PLFm is maintained (Note that this automatic calculation also
assumes that the installation is running 7 days per week, and changes the 'Days
per Week' value to reflect this. If other occupation times are desired, the values
will need to be changed manually to reflect proper distribution over the course of
a month):
53
CHAPTER 3: Loads and Zones
PLFm =
( Days per Week / 7 days ) x
((4 hr x [Peak Demand 8-12am]
+ 4 hr x [Peak Demand 12-4]
+ 4 hr x [Peak Demand 4-8]
+ 12 hr x [Peak Demand 8pm-8am] ) / (24 hr x [Top Peak Demand]))
0.448 =
(7 days per Week/ 7days) x
((4 hr x 30 MBtu/hr)
+ (4 hr x Y)
+(4 hr x Y)
+(12 hr x Y) / (24 hr x 30 MBtu/hr))
or, solving for Y:
Y = (((30 MBtu/hr x 24 hr) x 0.448 ) – (30 MBtu/hr x 4hr)) / 20 hr
Y = (322.56 MBtu – 120 MBtu) / 20 hr
Y = 10.128 MBtu/hr
To preserve the partial load factor when transferring into the Design Day Loads,
30 MBtu/hr has to be transferred to the noon to four p.m. block as expected. The
10.128 MBtu/hr needs to be transferred into each of the other three blocks, which
represent the other 20 hours of the day.
Ground Loop Design performs the monthly partial load and the full-load hours
calculations automatically when it imports a file containing only monthly and
peak loads data. However, if the designer knows more specific details about the
installation in question, he or she may want to place those loads more precisely in
the actual in-use periods of the day, and consider also the daily occupation of the
installation (i.e. not in use on weekends, etc.). However, as long as the peak
demand and partial monthly load factor remain the same, the calculated length
will also remain the same, no matter what the representation, since the daily and
monthly pulses remain unchanged.
Review of Loads Entry in Ground Loop Design
The loads input methodology in Ground Loop Design is not as complicated as it
first may appear to be. This system has been chosen for two main reasons: First,
the advanced mathematical model the program employs allows the loads to be
broken into hourly pulses throughout the day of peak demand (the 'Design Day'),
54
CHAPTER 3: Loads and Zones
which should provide a better overall accuracy in the calculations. Second,
Ground Loop Design uses full-load equivalent hours to reduce the total amount of
data entry.
Design Day Loads
The 'Design Day' heat gains and losses are simply the average hourly peak
demands of the installation over the different periods of the day. Although the
program could include all 24 hours of the day separately, it instead uses three 4hour periods and one 12-hour period to simplify input. These average hourly
loads can be entered directly into the corresponding entry box. The soil resistance
models employed by the program actually use this data to determine the daily and
monthly transfer of energy into the soil. This is because the model assumes that
there are different resistances associated with the annual, monthly, and daily
pulses of heat being transferred.
If an installation is not being used at night, for example, the demand for the 12
hour period might be set to 0.
Annual Equivalent Full-Load Hours
Because complete loads entry could be extensive, especially in applications with
more than a few zones, Ground Loop Design limits the necessary data by
compacting all of the monthly loads into a single number, the "Annual Equivalent
Full-Load Hours". This number effectively represents all of the monthly total
loads data (MBtu or kWh), in terms of the peak demand value (MBtu/hr or kW).
The advantage is that a single value is used instead of twelve (one for each month
of the year).
The full-load hours calculation procedure is straightforward. Simply sum the
monthly total loads for all of the months (Mbtu or kWh), and divide by the peak
demand (MBtu/hr or kW). The resulting number, the annual equivalent full-load
hours, then has the units of hours. To put it another way, think of the annual
equivalent full-load hours as the total number of hours the system would be
running in a year if it ran at full capacity the whole time.
To help with this calculation, the program offers the "Equivalent Hours
Calculator" as one of the standard tools included in the Geothermal Design
Studio. If the designer knows the monthly total loads and peak demand, he or she
can simply input them into the boxes provided in the calculator. Pressing
'Calculate' then determines the hours, according to the summation and division
described above. When the user presses the 'Transfer' button in any loads module
when the calculator is showing, the values will be transferred directly into the
loads module, as previously described.
55
CHAPTER 3: Loads and Zones
Surface Water Design Loads
The Surface Water Design Module does not require the loads input detail of the
other design modules. Since there is no long-term build-up of heat in the water,
the only values that are actually required are the peak demand of the installation.
All other values may be set to zero, or included simply for reference.
56
CHAPTER 4: The Borehole Design Module
CHAPTER 4
The Borehole Design Module
This chapter describes the features and operation of the Borehole Design
module. This module is used in the design of vertical borehole systems. It
is one of the three design modules included with Ground Loop Design.
Overview
A design is only as good as the quality of the data that goes into it. This is
certainly the case with the Ground Loop Design Borehole Design module.
Although Ground Loop Design utilizes the best theoretical models available
today, the most accurate results will naturally result from the most accurate input
parameters. Because the calculations conducted here involve the combination of
a large number of input parameters, care must be taken to assure that proper
values are verified before use. Assuming that reasonable values are provided to
the software, the software will provide reasonable results.
General Features
To aid in the data entry process, the Borehole Design module in Ground Loop
Design consists of a set of panels, grouped by subject, through which the designer
can enter and edit the input variables efficiently. For example, parameters related
to the soil are listed on the Soil panel, while piping choices are listed on the Utube panel. The idea is that everything related to a project is presented
simultaneously and is easily accessible at any time during the design process.
57
CHAPTER 4: The Borehole Design Module
The Borehole Design module includes several additional features:
•
•
•
•
Metric and English unit conversion
Printed reports of all input and calculated data
Convenient buttons to bring up tables and calculators
A ‘Calculate’ button used to refresh the calculations
Opening Projects
There are two ways to open Borehole Design projects. One is by using the ‘New
Borehole’ command from the Design Studio File menu or toolbar, and the other is
by opening an existing Borehole Design project (*.gld) file. Files cannot be
opened if other modules with the same name are already open. As many files can
be opened as the system’s memory permits.
New Projects
New projects may be opened at any time from the Design Studio by
choosing ‘New Borehole’ from either the Design Studio File menu or the
toolbar. New projects open with standard parameter values that must be
edited for new projects. The module opens directly into the Information
panel, through which the designer enters information about the new
project.
In new projects, no loads files (*.zon) are loaded. The user must create a
new loads file or open an existing loads file into one of the loads modules.
Links may be established using the Studio Link system described in
Chapter 3.
Existing Projects
Existing projects may be opened at any time from the Design Studio by
choosing ‘Open’ from the Design Studio File menu or toolbar. The file
automatically opens into a new Borehole Design Project module.
If a loads file (*.zon) is associated with the loaded project, the loads file
automatically will be loaded into the appropriate loads module and opened
along with the project file. However, if the associated loads file cannot be
found, the user will be notified and the automatic file loading will not
occur.
Saving Projects
Projects may be saved at any time using ‘Save’ or ‘Save As’ from the Design
Studio File menu or by clicking the save button on the toolbar. When the user
58
CHAPTER 4: The Borehole Design Module
closes the program or module, the program automatically asks the user if he or
she wants to save the project and associated loads files.
Typical Operation
Although each user will have his or her own unique style, the typical operation of
the Borehole Design module would include the following steps:
1. Enter Loads and select pump in either the Average Block Loads
module or the Zone Manager module
2. Form a link between the loads module and the design module
3. Modify step-by-step the input parameters listed in each panel
4. Perform initial calculation
5. Modify various parameters and recalculate to determine the effects
of the modifications
6. Establish an optimal system
7. Save and/or print the project and associated zone file
Entering Data into the Tabbed Panels
Ground Loop Design’s innovative tabbed panel system provides for easy
organization of and direct access to the relatively large number of design
parameters associated with a particular project. This section describes the
Information, Extra kW, Pattern, U-Tube, Soil, Fluid, and Calculate panels (See
Chapter 3 for a discussion of Loads entry).
Information
The contents of the Information panel are shown in figure 4.1. All of the
descriptive information related to the project is stored in this panel. This
primarily includes the names of the project and designer and the dates. Reference
data concerning the client also can be included on this page, so that all relevant
project information is in one convenient location.
In addition to generalized project information, specialized comments can be
included in the ‘Comments’ section of the Information panel. This area allows
the designer to make any notes particular to the specific project that may not
necessarily fit under any of the other topics provided.
All of the data in the information panel is optional, but completing the page is
recommended for the sake of organization. Reports utilize the project information
as a way of distinguishing one project from another.
59
CHAPTER 4: The Borehole Design Module
Except for the dates, the information panel input boxes contain only text, and any
desired format may be used when filling out the form.
Fig. 4.1 Information Panel Contents
Extra kW
Additional energy that is utilized by the system can be entered in the Extra kW
panel. The entry boxes are shown in figure 4.2.
This panel is included for entire system average efficiency calculations. The top
entry box, “Circulation Pumps”, is for the energy required by the system
circulation pumps. The middle entry box, “Optional Cooling Tower”, is for the
energy required by a cooling tower (if used). The lower entry box, “Additional
Power Requirements”, is for all other elements (besides the heat pump units) in
the system that may require energy input. For example, heat recovery units
require additional energy that can be recorded in this box so that it can be used in
the overall calculation of the System EER/COP.
60
CHAPTER 4: The Borehole Design Module
In the ‘Circulation Pumps’ section, the ‘Required Input Power’ is calculated from
the ‘Pump Power’ required by the pump(s) for the system in question and the
average ‘Pump Motor Efficiency’. It is not possible to edit the ‘Required Input
Power’ values directly. However, if the pump motor efficiency is set to 100%, the
‘Pump Power’ and ‘Required Input Power’ will be the same.
Fig. 4.2 Extra kW Panel Contents
If an optional cooling tower is used for hybrid applications, the demands of the
pump and fan may be included on this panel. The tower pump is selected based on
the water flow and the total head (these also determine the horsepower). The
required fan horsepower and motor efficiency may also be entered to include the
demand of the fan. Generally, cooling tower inputs are left at zero initially, and
then modified once the program suggests the cooling tower size and flow rate.
The ‘Additional Power’ may be included as necessary.
Note: To make a kilowatt entry in the ‘Pump Power’ box, switch to metric units,
enter the kilowatt value, and then return to English units.
61
CHAPTER 4: The Borehole Design Module
Pump Power Calculator
If the pump efficiency, system flow rate and head loss are known, the
Pump Power Calculator can be used to determine the pump power. An
image of the pump power calculator is shown in figure 4.3.
Fig. 4.3 Pump Power Calculator
Pattern
Information pertaining to the ground field arrangement is in the Pattern panel.
This includes the vertical boreholes pattern, the borehole separation, the number
of boreholes per parallel loop, and the modeling time. The input screen is shown
in figure 4.4.
Vertical Grid Arrangement
Currently, the Borehole Design module is configured only to accept
equally spaced rectangular patterns based on an x, y coordinate system.
The theoretical model employed allows flexibility in the ground field
arrangement, but requires an extremely complicated and cumbersome
input screen. To simplify, the more common rectangular system is used.
Separation between Vertical Bores
This value is the center-to-center distance between adjacent bores. For
optimal use of space, the current calculations allow only one spacing
distance between vertical bores in either direction.
62
CHAPTER 4: The Borehole Design Module
Boreholes per Parallel Loop
The ‘number of boreholes per parallel loop’ refers to the piping
arrangement within the borehole pattern. The calculation will give
slightly different bore lengths depending on whether one, two, or more
boreholes are included in one parallel circuit. Remember that pumping
costs will increase as the pipe lengths per parallel circuit become longer.
Modeling time Period
In Ground Loop Design, ten years is used as a standard length of time for
the ground temperature to stabilize, although longer time periods may be
entered if desired. When excessive ground water movement is known to
occur, one year is sometimes used as the modeling time period. In this
case, it is assumed that the ground temperature stabilizes in a single year
due to the neutralizing effects of the ground water movement.
Fig. 4.4 Pattern Panel Contents
63
CHAPTER 4: The Borehole Design Module
U-Tube
The U-Tube panel contains information related to the pipe and bore. The main
purpose of the panel is to obtain a value for the borehole thermal resistance.
Calculated according to the method of Paul and Remund (Paul, 1996), the thermal
resistance calculation takes into account the pipe parameters and positioning, the
borehole diameter, and the grout thermal conductivity. If desired, an
experimentally determined value of the borehole resistance also may be entered
into the textbox, which then overrides all calculations. The panel contents are
shown in figure 4.5.
Fig. 4.5 U-Tube Panel Contents
64
CHAPTER 4: The Borehole Design Module
Pipe Parameters
The pipe parameters are entered in the ‘Pipe Parameters’ section. They
include the pipe resistance and pipe outside diameter, followed by the
configuration and placement of the pipe in the bore.
Ground Loop Design calculates the convective resistance using the DittusBoelter correlation for turbulent flow in a circular tube (Incropera and
DeWitt, 1990). The calculations use average values of the Reynolds
number to represent the different types of flow, with values of Re = 1600,
3150, or 10000 for laminar, transition, and turbulent, respectively. The
calculations also use average values of viscosity and the Prandtl number
for water, taken at a temperature of 70oF.
Using the standard expression for resistance of a hollow cylinder
(Incropera and DeWitt, 1990), the program can calculate an approximate
value for the pipe resistance. It assumes HDPE pipe with a conductivity
of 0.225 Btu/h”ft*F.
The pipe resistance varies with the pipe style and flow. The user can
select the size and type of pipe from the appropriate selection boxes. If
another pipe diameter is required, it can be entered directly into the text
boxes as needed.
Note: By pressing the ‘Check Pipe Tables’ button, the ‘Pipe Properties’
tables will open.
If the user wants to enter an experimentally determined pipe resistance, or
requires more precise calculations, he or she can enter these values
directly into the ‘Pipe Resistance’ text box, overriding all pipe resistance
calculations.
The user also selects the U-tube configuration and radial pipe placement
for the designed installation. A single U-tube refers to two pipes placed in
the bore, while a double U-tube refers to four pipes placed in the bore.
The radial pipe placement can be one of the following:
•
•
•
Close together - 1/8” average distance between the pipes
Average - pipes are centered at a point halfway between
the wall and the center of the bore
Along outer wall - pipes are against the outer wall
Illustrations are included to clarify the choices.
Note: The ‘Double’ U-tube configuration at this stage is added more for
reference than for practical use. Currently, the values Ground Loop
65
CHAPTER 4: The Borehole Design Module
Design uses are based on experimental data and a new theoretical model
accounting for a lower pipe and convective resistance, and a larger
displacement of the grout. Designers should be aware of this fact, and
remember that a ‘single’ U-tube is the standard option.
Borehole Diameter and Backfill (Grout) Information
The user can enter the borehole diameter and the grout thermal
conductivity directly into their respective text boxes. If cuttings are used
for the backfill, the average soil conductivity should be entered here.
Soil
Input parameters relating to the soil are located in the Soil panel, as shown in
figure 4.6. These include the average ground temperature and the soil thermal
properties.
Fig. 4.6 Soil Panel Contents
66
CHAPTER 4: The Borehole Design Module
The undisturbed ground temperature refers to the temperature of the soil below
the surface layer, where there is no longer a seasonal swing. This value may be
determined from regional data or by recording the actual stabilized temperature of
water circulated through pipe in a test bore.
The soil thermal properties are a little harder to define, and care must be taken to
provide accurate values, especially for the thermal conductivity. The thermal
diffusivity relates to the density of the soil and its moisture content. Typical
values of thermal conductivity and diffusivity for sand, clay, and different types
of rocks can be found in the ‘Soil Properties’ tables. However, it is recommended
that soil tests are performed to obtain these values. The thermal conductivity in
particular has a large effect on the calculated bore length, and should be
determined with care through in-situ tests or comparison with other projects
installed in the local vicinity. Ground Loop Design does not encourage the use of
ex-situ data.
Diffusivity Calculator
For the designer’s assistance, Ground Loop Design includes a Diffusivity
Calculator that can be used to determine the actual diffusivity if all the
soil parameters are known. It requires knowledge of the thermal
conductivity, the dry specific heat and density, and the moisture level in
the soil. An image of the diffusivity calculator is shown in figure 4.7.
Fig. 4.7 Diffusivity Calculator
Fluid
The circulating fluid parameters may be entered in the Fluid panel. A sample
67
CHAPTER 4: The Borehole Design Module
input screen is shown in figure 4.8.
Design Heat Pump Inlet Fluid Temperatures
The heat pump inlet fluid temperatures are included in the Fluid panel.
The designer can input the desired inlet source temperatures for both
heating and cooling here. When changes are made to these values, the
heat pumps in all zones are updated automatically. Since the new
calculated equipment capacities can lead to changes in selected
equipment, the designer must be aware of the changes. Customized
pump values must be manually adjusted.
Design System Flow Rate
The system flow rate per installed ton is included on the Fluid panel. This
is the system flow rate per ton of peak load, not installed capacity (This is
because it is assumed that all units will not be running at full load
simultaneously, even in the peak load condition).
Fig. 4.8 Fluid Panel Contents
68
CHAPTER 4: The Borehole Design Module
Optimized systems generally operate in the range from 2.5 to 4.0 gpm/ton,
while the ideal system flow rate is somewhere around 3.0 gpm/ton.
Again, if the flow rate is changed, the selected heat pumps are updated in
the loads modules.
Solution Properties
Solution properties are also included in the Fluid panel. These include the
specific heat and density of the circulating fluid. Also, a reference label is
included so that the designer knows the percentage of antifreeze and
antifreeze type; however, this reference label is not currently linked to
the other input parameters.
The specific heat and density values of the antifreeze are used for the
calculation of the heat pump outlet temperature, which in turn is used for
the bore length calculation.
Additionally, the viscosity of the solution may affect the flow type in the
pipe, which was selected on the U-Tube panel. The designer must be
aware of any changes made.
Note: Since solution properties vary considerably and non-linearly with
type and percentage of additive, Ground Loop Design does not include
detailed automatic antifreeze information. Generalized tables of data may
be found in the ‘Fluid Properties’ tables. The designer must manually
enter the desired values in the input text boxes.
Calculate
All results for both the heating and the cooling calculations can be viewed at any
time on the Calculate panel. After all data has been entered or any changes have
been made, the user can calculate interim or final results using the ‘Calculate’
button. A sample screen for this panel can be seen in figure 4.9.
The two lists on the Calculate panel are for heating and cooling. Although all of
the numbers shown are valid and respond to changes, the side with the longer
required length is printed in bold type so that it stands out. The longer length
determines the installation size and for this reason the shorter-length system
results loses relevance.
The Calculate panel is divided into two sections. On the top is the reporting
section, which presents the calculation results. The lower “Optional Cooling
Tower” section is included to assist in the sizing of a cooling tower. This is a
convenient tool for hybrid-type designs, which may be desirable when the cooling
69
CHAPTER 4: The Borehole Design Module
length exceeds that of heating. The cooling tower option is discussed in more
detail below.
Reporting Section
The reporting section is further separated into five subsections. The first deals
with the bores, including the total length, the borehole number, and the borehole
length for one bore. A common way to adjust the borehole length to a desired
value is to change the borehole number or pattern on the Pattern panel.
The second subsection presents the long-term ground temperature change with
respect to the average ground temperature of the installation. Remember that only
the temperature change listed in bold has any relevance. However both
temperature changes will be equal if the cooling and loads to the ground are equal.
Fig. 4.9 Calculate Panel Contents
The third subsection of the report lists the heat pump inlet and outlet temperatures
of the circulating fluid.
70
CHAPTER 4: The Borehole Design Module
The fourth subsection lists the total unit capacity, the peak loads and demand of
all the equipment, and the calculated heat pump and system efficiencies. The
peak load is the maximum and is determined from whichever time period across
all the zones has the highest load. The peak demand includes all pumps and
external energy requirements, including those listed in the Extra kW panel.
Finally, the system flow rate is listed in its own subsection. The system flow rate
is calculated from the peak load divided by 12,000 Btu/ton, and then multiplied
by the flow rate (in gpm/ton) chosen on the Fluid panel. It represents the flow
rate from the installation out to the buried pipe system.
Optional Cooling Tower Section
Although typically not recommended because of increased running and
maintenance costs, the user may elect to add a cooling tower to a coolingdominated geothermal system to reduce the total boring lengths, and
therefore the total initial installation costs. To facilitate this design choice,
Ground Loop Design offers the cooling tower, or “hybrid”, option.
In any case where the calculated boring lengths for cooling are longer than
those for heating, the difference in the lengths can be eliminated through
the use of a cooling tower tied in parallel to the geothermal ground loop.
This requires that either the cooling tower capacity is chosen such that
both the peak load and the annual load to the ground are balanced or if a
full balance is unnecessary, a capacity is chosen that allows for
downsizing the loop to an acceptable length.
To aid in the sizing process, a Load Balance control is provided in the
Optional Cooling Tower section of the Calculate panel. Although clicking
the slider control can initiate a valid calculation or recalculation, the slider
control generally is employed after initial calculations have been
conducted. The Load Balance is a slider-based control that represents a
percentage of the total cooling load, both instantaneous (peak) and annual.
For example, a 100% Load Balance would be equivalent to saying that the
entire cooling load of the system would be handled by the cooling tower.
Conversely, a 0% Load Balance would mean that no cooling tower is
employed.
In a typical design it is difficult to predict exactly how much load balance
or what size of cooling tower is necessary to match the cooling and
heating lengths. However, using the Load Balance slider control, the
designer can optimize the system to the lengths desired by directly
controlling the amount of cooling load to be handled by the cooling tower.
71
CHAPTER 4: The Borehole Design Module
In the case where the designer desires the shortest length possible, the
design requires a perfect balance of the heating and cooling loads to the
ground. The length from this perfect balance would be the minimum
length required to adequately cover the heating load requirement. To
accomplish this, the Load Balance slider needs to be adjusted to the
percentage value where the calculated cooling and heating bore
lengths are approximately equivalent.
Note: As expected, the Long Term Ground Temperature Change for both
heating and cooling should be identical in a perfectly balanced system.
In other cases, the designer just may seek a reduction in the total required
system length rather than a perfect balance. Using the slider control, the
designer can select the desired length and then note the required cooling
tower condenser capacity (as calculated by the program).
Once the required cooling tower capacity is determined, the designer can
further modify the various cooling tower parameters to match them to his
or her own system. The standard equation used in the program (Francis,
1997) is:
Condenser Capacity (Btu/hr)
= Flow Rate (gpm) x 500 x Temperature Difference (°F),
where the 500 is used for pure water, and represents a factor derived from:
Specific Heat of Water (1.0) x 60 min/hr x Density (8.33 lb/gal) = 500
(Note that Ground Loop Design actually calculates this factor from the
input fluid properties on the Fluids panel, although pure water is a logical
choice for most cooling-dominated applications.)
For example, if the cooling range is increased above the initial minimum
value, the capacity of the condenser also is increased, reducing the total
number of operating hours. However, in the same case, decreasing the
required flow rate is another option which would keep the condenser
capacity and operating hours unchanged. The only limitations are the
required temperature difference and the minimum condenser capacity
needed to meet the chosen design length. With Ground Loop Design,
users have the flexibility to choose the parameters that fit best in their
designs.
72
CHAPTER 4: The Borehole Design Module
Printing Reports
Reports of the active project can be printed at any time from the Design Studio
using the toolbar print button or from the File menu Æ Print.
The information printed includes all of the input parameters from the design
module, along with the associated results. The zone and loads information is not
included with the report, and must be printed separately from the Loads panel.
The filename of the *.zon file associated with the project report is also listed on
the report.
Two different project reports are available: concise and detailed. The concise
form includes all of the design parameters, but omits some of the project
information and comments. The detailed version includes the project information
and comments.
More information on reports can be found in Chapter 7.
References
Francis, E., Editor. Refrigeration and Air Conditioning, 3rd Edition. Air-Conditioning
and Refrigeration Institute. p.186. Prentice Hall, New Jersey, 1997.
Incropera, F. and Dewitt, D. Introduction to Heat Transfer, 2nd Edition. p. 456, p. 98.
John Wiley and Sons, New York. 1990.
Paul, N. The Effect of Grout Thermal Conductivity on Vertical Geothermal Heat
Exchanger Design and Performance. M.S. Thesis, South Dakota State University. 1996.
73
CHAPTER 5: The Horizontal Design Module
CHAPTER 5
The Horizontal Design Module
This chapter describes the features and operation of the Horizontal Design
module. This module is used in the design of near-surface horizontal
systems. It is one of the three design modules included with Ground Loop
Design.
Overview
As with the Borehole and Surface Water Design modules, the calculations made
in the Horizontal Design module involve the combination of a large number of
input parameters. Care must be taken to assure that proper values are verified
before use. Assuming that reasonable values are provided to the software, the
software will provide a reasonable result.
General Features
The Horizontal Design module in Ground Loop Design also includes a set of
panels, grouped by subject, through which the designer can enter and edit the
input variables in a straightforward and efficient manner. For example, parameters
related to trench configuration are listed on the Configuration panel, while piping
choices are listed on the Piping panel. Everything related to a project is presented
simultaneously and easily is accessible throughout the design process.
The Horizontal Design module includes several additional features:
74
CHAPTER 5: The Horizontal Design Module
•
•
•
•
Metric and English unit conversion
Printed reports of all input data and calculated results
Convenient buttons to bring up tables and calculators
A ‘Calculate’ button used to refresh the calculations
Opening Projects
There are two ways to open Horizontal Design projects. One is by using the
‘New Horizontal’ command from the Design Studio File menu or toolbar, and the
other is by opening an existing Horizontal Design project (*.gld) file. Files cannot
be opened if other modules with the same name are already open. As many files
can be opened as the system’s memory permits.
New Projects
New projects may be opened at any time from the Design Studio by
choosing ‘New Horizontal’ from either the Design Studio File menu or the
toolbar. New projects open with standard parameter values that must be
edited for new projects.
In new projects, no loads files (*.zon) are loaded. The user must create a
new loads file or open an existing loads file into one of the loads modules.
Links may be established using the Studio Link system described in
Chapter 3.
Existing Projects
Existing projects may be opened at any time from the Design Studio by
choosing ‘Open’ from the Design Studio File menu or toolbar. The file
automatically opens into a new Horizontal Design Project module.
If a loads file (*.zon) is associated with the loaded project, the loads file
automatically will be loaded into the appropriate loads module and opened
along with the project file. However, if the associated loads file cannot be
found, the user will be notified and the automatic file loading will not
occur.
Saving Projects
Projects may be saved at any time using ‘Save’ or ‘Save As’ from the Design
Studio File menu or by clicking the save button on the toolbar. When the user
closes the program or module, the program automatically asks the user if he or
she wants to save the project and associated loads files.
75
CHAPTER 5: The Horizontal Design Module
Typical Operation
Although each user will have his or her own unique style, the typical operation of
the Horizontal Design module would include the following steps:
1. Enter Loads and select pumps in either the Average Block Loads
module or the Zone Manager module
2. Form a link between the loads module and the design module
3. Modify step-by-step the input parameters listed in each panel
4. Perform initial calculation
5. Modify various parameters and recalculate to determine the effects
of the modifications
6. Establish an optimal system
7. Save and/or print the project and associated zone file
Entering Data into the Tabbed Panels
Ground Loop Design’s innovative tabbed panel system provides for easy
organization of and direct access to the relatively large number of design
parameters associated with a particular project. This section describes the
Information, Extra kW, Configuration, Piping, Soil, Fluid, and Calculate panels.
The Information and Extra kW panels are identical to those included in the
Borehole Design module described in Chapter 4, so the reader is referred there for
detailed information. See Chapter 3 for a discussion of Loads entry.
Configuration
Information pertaining to the trench configuration is in the Configuration panel.
This includes the trench layout, the pipe configuration in the trenches, and the
modeling time. The input screen is shown in figure 5.1.
Trench Layout
This is the section where the user enters all parameters regarding the
physical size and placement of the trenches. The number of trenches may
be modified at any time using the up-down arrows, and “Separation”
refers to the center-to-center distance between adjacent trenches. The
program assumes all trenches will be equal in separation, length, depth
and width. Note that if the selected piping configuration does not fit into
the selected trench size, the program will automatically adjust the size of
the trench to accommodate the selection.
76
CHAPTER 5: The Horizontal Design Module
Fig. 5.1 Configuration Panel Contents
Pipe Configuration in Trench
The designer defines the physical arrangement of pipe in the trenches in
this section.
STRAIGHT PIPE CONFIGURATIONS
In the case of the three straight-pipe configurations, the user also provides
the total number of pipes and the horizontal [X] and vertical [Y]
separation of the pipes in the trench. An additional offset, meaning a
horizontal shift between adjacent vertical layers, can be included if desired.
77
CHAPTER 5: The Horizontal Design Module
Single-Pipe Vertical Alignment
In this arrangement, the user creates a single column of pipes.
The number of pipes chosen defines how many layers will be
included. Each pipe is separated from its neighbor by the
given vertical separation [Y], starting from the bottom of the
trench. If the ‘Offset’ box is checked, each pipe layer will be
shifted from the pipe layer below by the given horizontal
separation [X].
Two-Pipe Vertical Alignment
In this arrangement, the user creates two-pipe layers. The
number of pipes chosen defines how many layers will be
included (2, 4, 6, etc.). Each vertical layer is separated from
the one above or below by the given vertical separation [Y].
If the ‘Offset’ box is checked, each pipe layer will be shifted
from the pipe layer below by one-half the given horizontal
separation [X/2].
Three-Pipe Vertical Alignment
In this arrangement, the user defines three pipe layers. The
number of pipes chosen defines how many layers will be
included (3, 6, 9, etc.). Each vertical layer is separated from
the one above or below by the given vertical separation [Y].
If the ‘Offset’ box is checked, every layer will be shifted
from the layer below by one-half the given horizontal
separation [X/2].
SLINKY PIPE CONFIGURATIONS
In the case of the horizontal and vertical slinky configurations, the user
Fig. 5.2 Slinky Variables
78
CHAPTER 5: The Horizontal Design Module
may define the pitch and diameter of the Slinky. Because of the limited
model employed, the pitch must be between 10 and 56 inches, and the
diameter must be 36 inches. See figure 5.2.
Vertical Slinky
In this arrangement, the slinky is placed vertically within a
trench and is resting at the bottom. The trench may be as
narrow as the pipe and soil allow.
Horizontal Slinky
In this arrangement, the slinky is placed horizontally at the
bottom of the trench. The minimum trench width depends on
the slinky diameter.
Modeling time Period
In Ground Loop Design, ten years is used as a standard length of time for
ground temperature stabilization, although longer or shorter time periods
may be entered if desired. In the case of horizontal systems, a single year
or less is often chosen since the interaction with the atmosphere or
sunlight generally reduces the long-term buildup or reduction of soil
temperatures. Long-term thermal effects are more commonly associated
with vertical bores.
Piping
The Piping panel contains all the information related to the particular pipe chosen
for the buried heat exchanger. The program uses information about the pipe size
and flow type to determine the associated pipe resistance, which ultimately is
used in the length calculations. The input screen for the piping panel is shown in
figure 5.3.
Pipe Parameters
The pipe characteristics are entered in the ‘Pipe Parameters’ section. They
include the pipe resistance, the inside and outside pipe diameter, and the
pipe and flow type.
As in the Borehole Design module, Ground Loop Design calculates the
convective resistance using the Dittus-Boelter correlation for turbulent
flow in a circular tube (Incropera and DeWitt, 1990). The calculations use
average values of the Reynolds number to represent the different types of
flow, with values of Re = 1600, 3150, and 10000 for laminar, transition,
79
CHAPTER 5: The Horizontal Design Module
and turbulent, respectively. The calculations also use average viscosity
values and the Prandtl number for water, taken at a temperature of 70oF.
Fig. 5.3 Piping Panel Contents
Using the standard expression for resistance of a hollow cylinder
(Incropera and DeWitt, 1990), the program calculates an approximate
value for the pipe resistance. It assumes HDPE pipe with a conductivity
of 0.225 Btu/h”ft*F.
The pipe resistance varies with the pipe style and flow. The user can
select the size and type of pipe from the appropriate selection boxes. If
another pipe diameter is required, it can be entered directly into the
text boxes as needed.
Note: By pressing the ‘Check Pipe Tables’ button, the ‘Pipe Properties’
tables will open.
If the user wants to enter an experimentally determined pipe resistance, or
requires more precise calculations, he or she can enter these values
80
CHAPTER 5: The Horizontal Design Module
directly into the ‘Pipe Resistance’ text box, overriding all pipe resistance
calculations.
Soil
Input parameters relating to the soil are located in the Soil panel, as shown in
figure 5.4. These include the average ground temperature, the soil thermal
properties, and the ground temperature corrections at a given depth.
Fig. 5.4 Soil Panel Contents
Undisturbed Ground Temperature
The undisturbed ground temperature refers to the temperature of the soil
below the surface layer, where there is no longer a seasonal swing. This
value may be determined from regional data or by recording the actual
stabilized temperature of water circulated through pipe in a test bore.
81
CHAPTER 5: The Horizontal Design Module
Soil Thermal Properties
The soil thermal properties are a little harder to define, and care must be
taken to provide accurate values, especially for the thermal conductivity.
The thermal diffusivity relates to the density of the soil and its moisture
content. Typical values of thermal conductivity and diffusivity for sand,
clay, and different types of rocks can be found in the ‘Soil Properties’
tables. However, it is recommended that designers perform soil tests to
obtain these values. The thermal conductivity in particular has a large
effect on the calculated bore length, and should be determined with care
through in-situ tests or comparison with other projects installed in the
local vicinity. Ground Loop Design does not encourage the use of ex-situ
data.
Diffusivity Calculator
For the designer’s assistance, Ground Loop Design includes a Diffusivity
Calculator that can be used to determine the actual diffusivity if all
pertinent soil parameters, including the thermal conductivity, the dry
specific heat and density, and the moisture level in the soil, are known.
Fig. 5.5 Diffusivity Calculator
Ground Temperature Corrections at Given Depth
In a horizontal configuration, the ground temperature around buried pipes
can vary significantly simply due to the proximity to the surface. To
account for this variation at different depths, the regional ‘Swing’
temperature and phase shift are used in a sinusoidal equation. The
82
CHAPTER 5: The Horizontal Design Module
program determines the depth of each pipe in the chosen configuration,
and then calculates the expected temperature at that depth.
Regional Air Temperature Swing
This is the temperature swing for the location of interest. It is a measure
of the average temperature variation of the region during the warmest and
coolest months as compared to the yearly average temperature. Regions
with temperate climates have a lower temperature swing than regions that
have large differences between summer and winter temperatures.
Coldest/Warmest Day in Year
These are the actual days of the year, on a 365-day scale, when the
temperature is usually coldest or warmest. For example, if February 3 is
approximately the coldest day of the year, the value entered will be ‘34’
(31 days in January, plus 3 days of February).
Fluid
The circulating fluid parameters may be entered in the Fluid panel. A sample
input screen is shown in figure 5.6.
Design Heat Pump Inlet Fluid Temperatures
The heat pump inlet fluid temperatures are included in the Fluid panel.
The designer can input the desired inlet source temperatures for both
heating and cooling here. When changes are made to these values, the
heat pumps in all zones are updated automatically. Since the new
calculated equipment capacities can lead to changes in selected
equipment, the designer must be aware of the changes. Customized
pump values must be adjusted manually.
Design System Flow Rate
The system flow rate per installed ton is included on the Fluid panel. This
is the system flow rate per ton of peak load, not installed capacity (This is
because it is assumed that all units will not be running at full load
simultaneously, even in the peak load condition).
Optimized systems generally operate in the range from 2.5 to 4.0 gpm/ton,
while the ideal system flow rate is somewhere around 3.0 gpm/ton.
Again, if the flow rate is changed, the selected heat pumps are updated in
the loads modules.
83
CHAPTER 5: The Horizontal Design Module
Fig. 5.6 Fluid Panel Contents
Solution Properties
Solution properties are also included in the Fluid panel. These include the
specific heat and density of the circulating fluid. Also, a reference label is
included so that the designer knows the percentage of antifreeze and
antifreeze type; however, this reference label is not currently linked to
the other input parameters.
The specific heat and density values of the antifreeze are used for the
calculation of the heat pump outlet temperature, which in turn is used for
the trench length calculation.
Additionally, the viscosity of the solution may affect the flow type in the
pipe, which was selected on the Piping panel. The designer must be aware
of any changes made.
Note: Since solution properties vary considerably and non-linearly with
type and percentage of additive, Ground Loop Design does not include
detailed automatic antifreeze information. Generalized tables of data may
84
CHAPTER 5: The Horizontal Design Module
be found in the ‘Fluid Properties’ tables. The designer must manually
enter the desired values in the input text boxes.
Calculate
All results for both the heating and the cooling calculations can be viewed at any
time on the Calculate panel. After all data has been entered or any changes have
been made, the user can calculate interim or final results using the ‘Calculate’
button. A sample screen for this panel can be seen in figure 5.7.
Fig. 5.7 Calculate Panel Contents
The two lists on the Calculate panel are for heating and cooling. Although all of
the numbers shown are valid and respond to changes, the side with the longer
required length is printed in bold type so that it stands out. The longer length
determines the installation size and for this reason the shorter-length system
results lose relevance.
85
CHAPTER 5: The Horizontal Design Module
The Calculate panel is divided into two sections. On the top is the reporting
section, which presents the calculation results. The lower “Optional Cooling
Tower” section is included to assist in the sizing of a cooling tower. This is a
convenient tool for hybrid-type designs, which may be desirable when the cooling
length exceeds that of heating. The cooling tower option is discussed in more
detail below.
Reporting Section
The reporting section is further separated into several subsections. The first deals
with the trenches, including the total length, the number of trenches, and the
length for one trench. A common way to adjust the trench length to a desired
value is to change the trench number on the Configuration panel.
The associated pipe length, both total and for a single trench, directly follow the
reported trench lengths. The pipe lengths are a function of the selected
configuration of pipe in the trench, so the length of trench is always less than the
length of pipe when anything other than a single pipe configuration is chosen.
The following subsection of the report lists the heat pump inlet and outlet
temperatures of the circulating fluid.
The next subsection lists the total unit capacity, the peak loads and demand of all
the equipment, and the calculated heat pump and system efficiencies. The peak
load is the maximum and is determined from whichever time period across all the
zones has the highest load. The peak demand includes all pumps and external
energy requirements, including those listed in the Extra kW panel.
Finally, the system flow rate is listed in its own subsection. The system flow rate
is calculated from the peak load divided by 12,000 Btu/ton, and then multiplied
by the flow rate (in gpm/ton) chosen on the Fluid panel. It represents the flow
rate from the installation out to the buried pipe system.
Optional Cooling Tower Section
Although typically not recommended because of increased running and
maintenance costs, the user may elect to add a cooling tower to a coolingdominated geothermal system to reduce the total boring lengths, and
therefore the total initial installation costs. To facilitate this design choice,
Ground Loop Design offers the cooling tower, or “hybrid”, option.
In any case where the calculated trench lengths for cooling are longer than
those for heating, the difference in the lengths can be eliminated through
the use of a cooling tower tied in parallel to the geothermal ground loop.
This requires that either the cooling tower capacity is chosen such that
86
CHAPTER 5: The Horizontal Design Module
both the peak load and the annual load to the ground are balanced or if a
full balance is unnecessary, a capacity is chosen that allows for
downsizing the loop to an acceptable length.
To aid in the sizing process, a Load Balance control is provided in the
Optional Cooling Tower section of the Calculate panel. Although clicking
the slider control can initiate a valid calculation or recalculation, the slider
control generally is employed after initial calculations have been
conducted. The Load Balance is a slider-based control that represents a
percentage of the total cooling load, both instantaneous (peak) and annual.
For example, a 100% Load Balance would be equivalent to saying that the
entire cooling load of the system would be handled by the cooling tower.
Conversely, a 0% Load Balance would mean that a cooling tower is not
employed.
In a typical design it is difficult to predict exactly how much load balance
or what size of cooling tower is necessary to match the cooling and
heating lengths. However, using the Load Balance slider control, the
designer can optimize the system to the lengths desired by directly
controlling the amount of cooling load to be handled by the cooling tower.
In the case where the designer desires the shortest length possible, the
design requires a perfect balance of the heating and cooling loads to the
ground. The length from this perfect balance would be the minimum
length required to adequately cover the heating load requirement. To
accomplish this, the Load Balance slider needs to be adjusted to the
percentage value where the calculated cooling and heating bore
lengths are approximately equivalent.
Note: As expected, the Long Term Ground Temperature Change for both
heating and cooling should be identical in a perfectly balanced system.
In other cases, the designer just may seek a reduction in the total required
system length rather than a perfect balance. Using the slider control, the
designer can select the desired length and then note the required cooling
tower condenser capacity (as calculated by the program).
Once the required cooling tower capacity is determined, the designer can
further modify the various cooling tower parameters to match them to his
or her own system. The standard equation used in the program (Francis,
1997) is:
Condenser Capacity (Btu/hr)
= Flow Rate (gpm) x 500 x Temperature Difference (°F),
where the 500 is used for pure water, and represents a factor derived from:
87
CHAPTER 5: The Horizontal Design Module
Specific Heat of Water (1.0) x 60 min/hr x Density (8.33 lb/gal) = 500
(Note that Ground Loop Design actually calculates this factor from the
input fluid properties on the Fluids panel, although pure water is a logical
choice for most cooling-dominated applications.)
For example, if the cooling range is increased above the initial minimum
value, the capacity of the condenser also is increased, reducing the total
number of operating hours. However, in the same case, decreasing the
required flow rate is another option that would keep the condenser
capacity and operating hours unchanged. The only limitations are the
required temperature difference and the minimum condenser capacity
needed to meet the chosen design length. With Ground Loop Design,
users have the flexibility to choose the parameters that fit best in their
designs.
Printing Reports
Reports of the active project can be printed at any time from the Design Studio
using the toolbar print button or from the File menu Æ Print.
The information printed includes all of the input parameters from the design
module, along with the associated results. The zone and loads information is not
included with the report, and must be printed separately from the Loads panel.
The filename of the *.zon file associated with the project report is also listed on
the report.
Two different project reports are available: concise and detailed. The concise
form includes all of the design parameters, but omits some of the project
information and comments. The detailed version includes the project information
and comments.
More information on reports can be found in Chapter 7.
References
Francis, E., Editor. Refrigeration and Air Conditioning, 3rd Edition. Air-Conditioning
and Refrigeration Institute. p.186. Prentice Hall, New Jersey, 1997.
Incropera, F. and Dewitt, D. Introduction to Heat Transfer, 2nd Edition. p. 456, p. 98.
John Wiley and Sons, New York. 1990.
88
CHAPTER 5: The Horizontal Design Module
Paul, N. The Effect of Grout Thermal Conductivity on Vertical Geothermal Heat
Exchanger Design and Performance.
89
CHAPTER 6: The Surface Water Design Module
CHAPTER 6
The Surface Water Design Module
This chapter describes the features and operation of the Surface Water
Design module. This module is for the design of systems that use bodies
of water, including ponds, rivers, lakes, oceans, etc. It is one of the three
design modules included with Ground Loop Design.
Overview
As with the Borehole and Horizontal Design modules, the calculations made in
the Surface Water Design module involve the combination of a large number of
input parameters. Care must be taken to assure that proper values are verified
before use. Assuming that reasonable values are provided to the software, the
software will provide a reasonable result.
General Features
The Surface Water Design module in Ground Loop Design also includes a set of
panels, grouped by subject, through which the designer can enter and edit the
input variables in a straightforward and efficient manner. For example,
parameters related to the body of water are listed on the Surface Water panel,
while piping choices are listed on the Piping panel. Everything related to a
project is presented simultaneously and easily is accessible throughout the design
process.
The Surface Water Design module includes several additional features:
90
CHAPTER 6: The Surface Water Design Module
•
•
•
•
•
Metric and English unit conversion
Printed reports of all input and calculated data
Convenient buttons to bring up tables and calculators
A ‘Calculate’ button used to refresh the calculations
A system to monitor header and branch piping head losses
Opening Projects
There are two ways to open Surface Water Design projects. One is by using the
‘New Surface Water’ command from the Design Studio File menu and the other
is by opening an existing Surface Water Design project (*.gld) file. Files cannot
be opened if other modules with the same name are already open. As many files
can be opened as the system’s memory permits.
New Projects
New projects may be opened at any time from the Design Studio by
choosing ‘New Surface Water’ from the Design Studio File menu or the
toolbar. New projects open with standard parameter values that must be
edited for new projects.
In new projects, no loads files (*.zon) are loaded. The user must create a
new loads file or open an existing loads file into one of the loads modules.
Links may be established using the Studio Link system described in
Chapter 3.
Existing Projects
Existing projects may be opened at any time from the Design Studio by
choosing ‘Open’ from the Design Studio File menu or toolbar. The file
automatically opens into a new Surface Water Design Project module.
If a loads file (*.zon) is associated with the loaded project, the loads file
will be loaded automatically into the appropriate loads module and opened
along with the project file. However, if the associated loads file cannot be
found, the user will be notified and the automatic file loading will not
occur.
Saving Projects
Projects may be saved at any time using ‘Save’ or ‘Save As’ from the Design
Studio File menu or by clicking the save button on the toolbar. When the user
closes the program or module, the program automatically asks the user if he or
she would like to save the project file.
91
CHAPTER 6: The Surface Water Design Module
Typical Operation
Although each user has his or her own style, the typical operation of the Surface
Water Design module would include the following steps:
1. Enter Loads and select pump in either the Average Block Loads
module or the Zone Manager module
2. Form a link between the loads module and the design module
3. Modify step-by-step the input parameters listed in each panel
4. Perform initial calculation
5. Modify various parameters and recalculate to determine the effects
of the modifications
6. Establish an optimal system
7. Save and/or print the project and associated zone file
Before You Begin
The theoretical model, which is based on experimental data and non-laminar flow,
requires a minimum system flow rate of 3.0 gpm/ton in the pipes to achieve
proper heat transfer. Minimum flow rates through the circuit piping also are
required to maintain the non-laminar flow with different antifreeze solutions.
Thus, there is a limit on the maximum recommended number of parallel circuits
required in the system, which in turn determines the length of an individual
circuit.
Changing the pipe size requires a change in the minimum required flow rates,
which can either increase or decrease the maximum recommended number of
parallel circuits and their lengths. However, this also can have substantial effects
on the piping head losses, which must also be considered in order to reduce the
pumping costs.
To fully optimize a system in the Surface Water Design module, the designer
thoroughly must understand the relationship between the system flow rate,
the minimum required flow rates, the pipe size, the head loss per length of
pipe, and the preferred number of parallel circuits. Ground Loop Design can
conveniently make all the appropriate calculations, but the designer must first
have a grasp of all of the individual inputs required and the relationships among
them.
Finally, the surface water designing process actually involves an additional stage
of optimization that is not included with the Borehole Design module. The
Surface Water module includes a piping calculation component to assist the
designer in selecting the best pipe sizes and circuit lengths.
92
CHAPTER 6: The Surface Water Design Module
Entering Data into the Tabbed Panels
Ground Loop Design’s innovative tabbed panel system provides for easy
organization of and direct access to the relatively large number of design
parameters associated with a particular project. This section describes the Surface
Water, Piping, Soil, Fluid, and Calculate panels. The Information and Extra kW
panels are identical to those included in the Borehole Design module described in
Chapter 4, so the reader is referred there for detailed information. See Chapter 3
for a discussion of Loads entry.
Surface Water
Use the Surface Water panel to enter data related to the body of water being used
as the heat transfer medium. Figure 6.1 shows the associated input screen.
Fig. 6.1 Surface Water Panel Contents
93
CHAPTER 6: The Surface Water Design Module
Surface Water Temperatures at Average Circuit Pipe Depth
These are the temperatures in the body of water at the depth where the
majority of the pipe will reside. The “Circuit Pipe” refers to the main heat
exchanger portion of the pipe, and does not include the header pipe
leading from the surface.
Temperatures in bodies of water naturally change from summer to winter.
Both temperatures, at the circuit pipe depth, should be included in this
section.
Surface Water Temperatures at Average Header Pipe Depth
These are the summer and winter temperatures at the average depth in the
body of water where the submerged portion of the header pipes reside.
“Header Pipe” refers to the section of pipe leading from the surface to the
main heat exchanger (circuit) portion of the loop. Further distinctions are
described below.
Primary Header
This is the standard “header”, which will most likely come either directly
from the installation or from a manifold that comes from the installation
main supply and return lines.
Branches
These will be any branches that split from the primary headers. Generally
they will be smaller in size than the primary header.
Details (Reference Only)
The surface water details are not used in any calculations. They are
included for the designer’s reference. Several different types of water
bodies are included, but the designer can type anything in the selection
box.
Piping
The Piping panel contains all the information related to the circuit piping and the
piping selected for the primary header(s) and up to one level of branching off the
primary header(s). The heat exchanger circuits actually dominate the heat transfer,
but if the supply and return lines are long or exposed to different design
conditions, care must be taken with the header heat transfer. The input screen for
the piping panel is shown in figures 6.2 and 6.3.
94
CHAPTER 6: The Surface Water Design Module
Fig. 6.2 Piping Circuit Panel Contents
Circuit Parameters
Circuit Pipe Size
This is the size of the pipe used in the primary heat transfer circuits.
Although larger pipes offer better heat transfer, designers generally prefer
smaller sizes (3/4”, 1”) because of ease of handling and lower pipe costs.
Number of Parallel Circuits
This is the number of parallel circuits required to maintain the required
minimum flow rates defined by the designer. If the number of circuits
entered here is greater than the allowed number of circuits, this value will
be overwritten automatically with the limiting value when the
calculations are performed.
Even if the circuits are split into equivalent groups (for example, three
groups with ten circuits each), the total number of parallel circuits (the
smallest unit) will not change.
95
CHAPTER 6: The Surface Water Design Module
Circuit Style
Both loose bundled coils and “slinky” (spread out) styles are available. If
extensive spacers are used in a coil style arrangement, the slinky model
may provide more accurate results, but the loose coil option will provide
the more conservative results.
Circuit Head Loss per 100 feet
This is the head loss for the particular style of pipe. These values are not
entered automatically. Instead, they come from designer’s charts. A chart
in English units is included with Ground Loop Design in the “Pipe Tables”
section. The designer must be aware that this value changes with pipe
size, temperature, and flow rate.
Extra Equivalent Length per Circuit
This is an average pipe length value included per circuit to take into
account all fittings (elbows, tees, etc.). It is only necessary for the head
loss calculations.
Fig. 6.3 Piping Header Panel Contents
96
CHAPTER 6: The Surface Water Design Module
Header Parameters
The Ground Loop Design Surface Water module assumes that a standard
supply and return line design will consist of mains, followed by a
manifold that splits the mains into the headers. Headers are generally the
first pipes to enter the ground or water. They can then branch off once
more if necessary (branch lines). For small systems, the mains may be the
headers, and there may not be branches. For larger systems, there may be
many headers and multiple levels of branches.
In the Piping panel, the model employed allows for multiple headers and
multiple first-level branches off of those headers. If further branching is
required, the head loss calculations will need to be calculated and added
separately. Their effect on the calculated piping length, which cannot be
included, will depend on their length. All headers are assumed to have
an identical pipe size, and an approximately equivalent flow. The
same is true for the branch lines.
If there are no branches, the number of branches should be set to
zero. The Surface Water Design module starts with only a single primary
header.
Ground Loop Design uses the header information so that the heat transfer
losses or gains are taken into account. The software then uses this
corrected value iteratively to modify the length of the circuit loop piping,
so that the desired entering water temperature for the heat pumps is
provided. These calculations depend directly on the header-depth surface
water and soil temperatures obtained from the Surface Water and Soil
panels.
Additionally, the program calculates the average head losses of the system
when provided with the head losses per 100 ft. for each type of pipe in the
system. These values vary with pipe size, antifreeze, and flow rate.
Several graphs are provided with the program to help determine these
values for pure water and standard solutions, but the designer is
ultimately responsible for making sure the appropriate values are
entered. These head loss calculations also require the one-way length of
the header, which is doubled within the program to account for both the
supply and return lines.
Because the inputs to headers and branches are similar, they are described
together below.
Number of Lines
This is the number of header or branch lines in the system.
97
CHAPTER 6: The Surface Water Design Module
Pipe Size
This is the size of the pipe used in the primary header or branches. For
pumping reasons, the size of the primary header is generally larger than
the branch and circuit pipe sizes, and branches are generally larger than
the circuit pipe size.
Header Length / Average Branch Length
This is the designer-defined one-way length of the pipe from the
installation to the water line, and then from the water to the circuit pipes.
Different heat transfer calculations are used for the header pipe buried in
the soil and the header pipe submerged in the water.
If a primary header enters the water, it is automatically assumed that the
branches have no soil component. Likewise, if branches enter the soil, it
is assumed that the primary header has no water component.
Head Loss per 100 feet
This is the head loss for the particular style of pipe. These values are not
entered automatically. Instead, they come from designer’s charts. A chart
in English units is included with Ground Loop Design in the “Pipe Tables”
section. As mentioned above, the designer must be aware that this
value changes with pipe size, temperature, and flow rate.
Soil
The Soil panel is included only for the heat transfer calculations associated with
the portion of the header pipe in the soil. The model uses the undisturbed ground
temperature of the soil as well as several other parameters associated with the
installation location to determine the temperature at pipe depth on the coolest and
warmest days of the year. This temperature then is used to determine how much
heat is transferred from the header pipe to the soil or vice versa.
Once the amount of heat transfer from or to the soil is known, the circuit pipe
length (calculated from the surface water data) can be modified to provide fluid
with the desired inlet source temperature to the heat pumps.
The Soil panel input screen is shown in figure 6.4.
98
CHAPTER 6: The Surface Water Design Module
Fig. 6.4 Soil Panel Contents
Ground Temperature Corrections at Given Depth
Depth of Header in Soil
This is simply the average depth in the soil between the water’s edge and
the installation at which the primary header or branches will be buried.
Soil Type
The soil type can have one of three values: wet, dry, or average. Ground
Loop Design uses this to assign an approximate diffusivity value to the
soil used in the temperature model.
Regional Air Temperature Swing
This is the temperature swing for the location of interest. It is a measure
of the average temperature variation of the region during the warmest and
coolest months as compared to the yearly average temperature. Regions
99
CHAPTER 6: The Surface Water Design Module
with temperate climates have a lower temperature swing than regions that
have large differences between summer and winter temperatures.
Coldest/Warmest Day in Year
These are the actual days of the year, on a 365-day scale, when the
temperature is usually coldest or warmest. For example, if February 3 is
approximately the coldest day of the year, the value entered will be ‘34’
(31 days in January, plus 3 days of February).
The program uses these days to determine the soil temperature at the given
depth at these times of the year.
Corrected Temperature
These are the corrected temperatures at the depth specified, calculated
automatically from the undisturbed temperature and the other input values
provided. These values are used in the heat transfer calculation between
the header or branch pipes and the soil.
Fluid
The fluid panel is identical to the one described for the Borehole Design module
in Chapter 4 except for one addition. That addition is the minimum required
circuit flow rate in the lower ‘Minimum Circuit Flow Rate and Solution
Properties’ section. The added section is shown in figure 6.5.
Fig. 6.5 Minimum Circuit Flow Rate Section of the Fluid Panel
Ground Loop Design uses this information in conjunction with the system flow
rate to establish the maximum number of parallel circuits. The flow rates required
for non-laminar flow for several antifreeze solutions are included as a table in the
‘Fluid Properties’ set. Exact values for a particular mixture may need to be
determined independently by the designer.
Note once again that changes in the inlet source temperature or the system flow
rate will cause an automatic update of the selected pumps.
100
CHAPTER 6: The Surface Water Design Module
Calculate
There are several significant differences between the Surface Water Design
module’s Calculate panel and the Borehole Design module’s Calculate panel.
These differences relate to the nature of the calculations, as well as to the
inclusion of the head loss calculation results. Figure 6.6 shows a typical view of
the Calculate panel.
Again, there are two lists shown on the Calculate panel, one for heating and one
for cooling. Although all of the numbers resulting from both sets of calculations
are valid, the side with the longer length is printed in bold type, so that it stands
out. The longer length usually determines the installation size, and for this reason
the shorter-length system results lose relevance. However, in cases where the
cooling and heating lengths are similar, care must be taken to assure the safest
design.
Fig. 6.6 Calculate Panel Contents
101
CHAPTER 6: The Surface Water Design Module
Reporting Section
The surface water report has five sections. The first deals with the circuit pipe,
and includes the total length, the length for one circuit, the number of circuits, and
the maximum allowable number of parallel circuits (shown in red). If the
maximum allowable number of parallel circuits exceeds the actual number of
circuits, the actual number of circuits may be increased in the Piping panel to
reduce the individual circuit lengths and thus reduce head losses. However, this
type of reduction is not always necessary or desirable. Other ways of increasing
the maximum allowable number of parallel circuits include changing the system
flow rate or the minimum circuit flow rate for non-laminar flow.
The second section lists different temperature variables. The first of these is the
approach temperature, which is the difference between the pond temperature and
the desired inlet source temperature. Source inlet and outlet temperatures are the
final items in this section.
Note: In surface water heating applications, although the solution within the pipe
may not freeze, the freezing temperature of the body of water is generally 32°F.
If the heat pump outlet temperature is too far below this value, the water may
freeze on the pipe, greatly reducing its heat transfer characteristics and
potentially leading to system failure. The designer must always pay attention to
the outlet temperature value for this reason.
As with the Borehole Design module, the third section lists the total unit capacity,
the peak loads and the demand of all the equipment, followed by the calculated
heat pump and system efficiencies. The peak load is the maximum, determined
from whichever time period across all the zones has the highest load. The peak
demand includes all pumps and external energy requirements, including those
listed in the Extra kW panel. Care must be exercised when equipment energy
requirements listed in the Extra kW panel refer to only heating or only cooling
types of equipment. In these cases, the pump efficiency could be fine, but the
system efficiency might be incorrect.
The fourth section lists the total head loss calculation results, as well as the
individual losses for the header and circuit pipe. It does not include any losses for
the heat pump equipment, which must be considered separately. This section is
convenient for determining the optimum pumping arrangement for the system.
Finally, the system flow rate is listed along with the flow rates in the primary and
branch headers, as well as the flow in the individual circuits. The system flow
rate is calculated from the peak load divided by 12,000 Btu/ton, and then
multiplied by the system flow rate in gpm/ton (as given on the Fluid panel). The
primary header flow rate is calculated from the system flow rate divided by the
number of primary headers, and the branch flow rate is obtained from the primary
header flow rate divided by the number of branches (as given on the Piping
102
CHAPTER 6: The Surface Water Design Module
panel). The circuit flow rate is obtained by dividing the system flow rate by the
total number of circuits (also provided on the Piping panel).
Printing Reports
Reports of the active project can be printed at any time from the Design Studio
using the toolbar print button or from the File menu Æ Print.
The information printed includes all of the input parameters from the design
module, along with the associated results. The zone and loads information is not
included with the report, and must be printed separately from the Loads panel.
The filename of the *.zon file associated with the project report is also listed on
the report.
Two different project reports are available: concise and detailed. The concise
form includes all of the design parameters, but leaves out some of the project
information and comments. The detailed form includes the information and
comments.
More information on reports can be found in Chapter 7.
103
CHAPTER 7: Reports
CHAPTER 7
Reports
This chapter covers the report creation and printing features of Ground
Loop Design. It includes both project and zone reports.
Overview
Ground Loop Design includes reporting features. These features have been added
for professionals who need to keep records of their designs and communicate
them to others. There are nine different report styles included within the package,
and this chapter provides an explanation of as well as suggested uses for each type
of report.
The Report Preview Window
When a particular report is selected, a report preview window opens to show a
preview of the report. Report preview windows have a zoom feature that allows
adjustment of the magnification. Additionally, reports may be sent to a printer or
exported as various file types, including text and html. Multiple reports may be
opened simultaneously, even if they originate from the same project.
Report preview windows do not react directly to metric/English unit conversion.
Instead, a report opens with the same units used by its parent design module. If
another system of units is required, the user must first change the unit system of
104
CHAPTER 7: Reports
the design module (using the Design Studio ‘Units’ menu), and then open a new
report.
Project Reports
Project reports may be opened at any time from the Design Studio File menu by
selecting Print. An option dialog box appears displaying the two types of reports
that are available, concise and detailed. Detailed reports contain full project
information, while concise reports limit the project information and exclude any
comments. Detailed reports generally require multiple pages while concise reports
are designed for single-page printouts. The user selects a preference and then
clicks ‘OK’.
The report does not print automatically, but instead creates the report preview
window, in which the report can be reviewed prior to printing. Printing can be
done by clicking on the printer icon in the upper left hand corner of the report
preview window.
In general, project reports contain four main sections:
•
•
•
•
Information
Calculation Results
Input Parameters
Comments (Detailed reports only)
Information
This section contains the information from the design module’s Information
panel. The project and designer’s names, dates, client’s name and address, etc.
appear here. This section is included at the top of every report. Concise reports
only include the project name and start date.
Calculation Results
This section lists the results of the calculations and essentially is the same
information shown on the Calculate panel of the design module. The most
important results, such as the total length of pipe required, are highlighted and
boxed in order to stand out from the background. The report presents results of
both the heating and the cooling calculations.
Input Parameters
This section contains all of the parameters entered by the designer during the
design process. Parameters are placed into sections with names taken directly
105
CHAPTER 7: Reports
from the panels in the design modules. The filename of the zone file associated
with the project is listed under the Loads heading.
Comments
This section, at the end of the report, is reserved for any additional information
that the designer would like to include with the project.
Zone Reports
Zone (or loads) reports are printed directly from the Loads modules. They
include only the project information and data from the zones, presented in
different formats. Five different zone reports exist, containing complete or
specific information about the zones.
Zone reports work in conjunction with project reports, but are actually a separate
entity. They are representative of the actual installation rather than the heat
exchanger portion of the system. Zone delineation, loads, and equipment are
separate from the heat exchanger system. It is for this reason that the designer
would necessarily want to view and consider this information apart from the
specific heat exchanger details. For example, if the design is a building, the zone
reports will cover everything within the building, while the project report
essentially will contain information about everything outside, or external to the
building.
A zone report is printed from the Loads panel of the Zone Manager or directly
from an Average Block Loads module by clicking the printer button in the
controls. A dialog window appears, giving the designer the list of available report
styles. After the making a choice, click ‘OK’ to bring up the report window.
There are five different zone reports included with Ground Loop Design:
•
•
•
•
•
Detailed Form
Concise Form
Equipment List
Loads List
Names List
Detailed Form
The Detailed Form zone report is the most detailed zone report. It lists all of the
information included in every zone, along with full explanations of the listed
parameters. The format is open and easy to read. However, as with the project
106
CHAPTER 7: Reports
reports, the detailed form produces a much longer printed report than any of the
more compact versions.
Concise Form
The Concise Form zone report contains most of the detail of the long report, but it
is packed into a smaller space. It does not include zone names, occupation days,
detailed pump information (manufacturer, series, and type), or full descriptions of
the items listed. It does, however, contain important information about the loads
and the operational parameters of the equipment matched to those loads.
Equipment List
The Equipment List lists only the equipment associated with each zone. It
provides detailed pump information, including name, number, manufacturer,
series, and type, plus all of the operational data associated with that pump. It is an
ideal report for engineers or contractors who require equipment lists but do not
necessarily need to know further details about the design.
Loads List
The Loads List lists only the loads associated with each zone. It provides the
design day loads at the different periods during the day in both heating and
cooling modes. For the Borehole Design module, the Loads report includes the
annual hours and weekly occupation information.
Names List
The Names List is just a list of the full reference names of the different zones,
combined with the zone number, pump name, and number of pumps required for
the zone. It makes a convenient, compact link between zone name and number,
and is especially useful when the project consists of many separate zones.
Concluding Remarks
There is no data in Ground Loop Design that is not expressible in a printed form.
The designer can organize and share information both during the developmental
stages of a project and after the design is complete.
107
CHAPTER 8: Tables and Reference Files
CHAPTER 8
Tables and Reference Files
This chapter covers the tables and reference files of Ground Loop Design.
It starts with a description of the included files, and then explains how the
user may add customized files to the existing set.
Overview
Favorite references are like a comfortable pair of worn-in sneakers. Although this
software package provides some useful information in the included tables, it may
never replace the old standards. Rather than trying to impose a particular system
onto the users of the software, Ground Loop Design employs a technologically
sophisticated system that allows the user to customize the reference files as much
as he or she desires. With this system a new pair of shoes feels comfortable
immediately.
The reference files included with Ground Loop Design are minimal, consisting of
a few tables and graphs that should aid in the selection of requested parameters.
All files are written in open HTML (Hypertext Mark-up Language) files. The
designer can edit and add to them as he or she desires to create a customized
reference library within the Design Studio environment.
As with the heat pump and loads models, the reference files model is another
customizable element of the geothermal Design Studio that the user has the option
to control.
108
CHAPTER 8: Tables and Reference Files
Tables Included with Ground Loop Design
Several tables are included with Ground Loop Design. They are separated into
several broad categories from which most questions will arise. These include:
•
•
•
•
Fluid Properties
Soil Properties
Pipe Properties
Conversions
The first three sections present a menu screen with hyper-links to various tables
that have been included in the package. The fourth section consists of a pair of
metric-to-English units conversion tables that answer most common engineering
conversion problems. Below is a description of the included files.
Fluid Properties
Fluid properties refer to any data related to the circulation fluid. The five Fluid
Properties tables in Ground Loop Design are the following:
Table 1: Densities and Specific Heats of Various Solutions
Table 2: Minimum Required Flow Rate for Non-laminar Flow
(Tables 3-5 included only in English Units)
Table 3: Head Loss in SDR 11 HDPE Pipe - 20% Propylene Glycol
Table 4: Head Loss in SDR 11 HDPE Pipe - 20% Methanol
Table 5: Head Loss in SDR 11 and 17 HDPE Pipe - Pure Water
Some of these charts could have also been placed with the Pipe Properties tables,
but because they vary primarily with solution type, they were placed here.
In an ideal world, the Fluid Properties tables would include all of the graphs,
charts, and tables for all of the parameters of all possible antifreeze combinations.
However, because these variations are difficult to predict for specific projects,
only partial information has been included. For the most accurate designs,
designers are encouraged to seek out their own favorite antifreeze combinations,
and determine the specific heat, density, and minimum required flow rate for nonlaminar flow.
109
CHAPTER 8: Tables and Reference Files
Soil Properties
Soil properties refer to any data related to the soil. The three reference files are
listed below.
Table 1: Thermal Conductivity and Diffusivity of Sand and Clay Soils
Table 2: Thermal Properties of Rocks at 770 F
Table 3: Earth Temperatures, Soil Swing and Phase Constants for U.S. Cities
The first two Soil Properties tables included with Ground Loop Design provide
various soil parameters, including ranges for thermal conductivity (k) and thermal
diffusivity (α) for various types of soils.
These tables should not be considered accurate for a given location; however,
they should provide the designer with a realistic range within which their own
measurement results should fall.
The third table contains mean earth temperatures and other parameters for U.S.
cities. This table particularly may be useful for horizontal designs.
Pipe Properties
Pipe properties refer to any data related to the piping. The Pipe Properties tables
included with Ground Loop Design are related to either the borehole thermal
resistance or the pipe physical data. They are listed below.
Table 1: Thermal Conductivities of Typical Grouts and Backfills
Table 2: Pipe and Tube Dimensions
Table 3: Required Flow Rates to Achieve 2 ft/s – SDR11 Pipe
The first table provides thermal conductivities for some typical grouts. The
second lists the physical dimensions (inner and outer diameter) for common pipe
sizes in various types of pipe. The third, although unnecessary for the associated
calculations, provides some convenient flow rates required for proper purging of a
piping system.
Conversions
The Conversions table has two separate lists of metric to English conversions,
placed together in one file. As already mentioned, the user can obtain multipliers
110
CHAPTER 8: Tables and Reference Files
for most common metric/English unit changes by going through the listed
conversions.
Adding Customized Reference Files
The user can create customized reference files by editing the existing HTML files
with the table lists, and making new links. The process is simple and requires
only a very basic knowledge of HTML
Original Model
The original model included with Ground Loop Design consists of these files:
English
Metric
FluidTables.html
FluidTable1.html
FluidTable2.html
FluidTable3.html
FluidTable4.html
FluidTable5.html
FluidTablesMetric.html
FluidTable1Metric.html
FluidTable2Metric.html
SoilTables.html
SoilTable1.html
SoilTable2.html
SoilTable3.html
SoilTablesMetric.html
SoilTable1Metric.html
SoilTable2Metric.html
SoilTable3Metric.html
PipeTables.html
PipeTable1.html
PipeTable2.html
PipeTable3.html
PipeTablesMetric.html
PipeTable1Metric.html
PipeTable2Metric.html
PipeTable3Metric.html
To add a new file, the FluidTables.html, the SoilTables.html, or the
PipeTables.html must be edited. The user must create a link in one of the three
aforementioned *.html files to the new file (which contains the table, graph or
image that the user would like to have available in Ground Loop Design).
Note: Ground Loop Design requires the FluidTables.html, SoilTables.html, and
PipeTables.html files (and their metric counterparts, FluidTablesMetric.html,
SoilTablesMetric.html, and PipeTablesMetric.html) as the initial files when opening
the associated tables. They can be edited, but if they are deleted the associated
tables cannot be opened at all.
111
CHAPTER 8: Tables and Reference Files
HTML Files
HTML refers to Hypertext Mark-up Language. It is the language used on web
pages, and commonly used in software to quickly provide linked information to
users. HTML files can be created with an HTML editor (like those distributed
with common browsers) or with a simple text editor. They must, however, follow
a certain format and have a ‘.htm’ or ‘.html’ extension.
Editing Existing Files
Existing files may be edited by simply opening up the original file into a
text editor or HTML editor, making changes, and then saving the file
again. For example, if a user wishes to add a new pipe table to the list, he
or she first will create the table (i.e. PipeTable4.html) and then will add a
link to it on the PipeTables.html file.
Additionally, if the user wishes to add additional information to an
existing table or figure, he or she only has to open the appropriate HTML
file in a text editor or HTML editor and make and save the desired
changes. For example, if adding a new link, PipeTables4.html, to the
PipeTables.html file, one might add this new link with the name “Table 4:
New Pipe Table” by typing the new link at the end of the PipeTables.html
file into a text editor as follows (the added section is in bold type):
.
.
.
<li>
<a href="PipeTable3.html">Table 3: Required Flow Rates to Achieve
2ft/s – SDR 11 Pipe</a></li>
</ul>
<li>
<a href="PipeTable4.html">Table 4: New Pipe Table</a></li>
</ul>
</body>
</html>
PipeTables.html (edited version)
112
CHAPTER 8: Tables and Reference Files
Making a Table
A new table can be made at any time by creating one as an HTML file.
The easiest way to do this is to use an HTML editor. It is much more
difficult to make a table using plain HTML in a text editor.
Although any name is valid for a table, tables can be added to the
appropriate group by just extending the naming sequence already being
used. For example, the name PipeTable4.html could be used as the name
for a new file.
Adding a Picture, Graph, or Figure
If an image is stored as either *.jpg or *.gif, it can be imported into an
HTML page. The HTML page can be linked directly to the Ground Loop
Design reference files.
As an example, let’s assume that an engineer scans an image of his
favorite density vs. percent solute graph for Calcium Chloride and saves it
in the Help Files directory as a jpeg image, called CaCl2Density.jpg. A
very simple HTML file can be created with a text editor, and called
FluidTable6.html. The entire FluidTable6.html file would be as follows:
<html>
<head></head>
<body>
<img SRC="CaCl2Density.jpg" >
</body>
</html>
FluidTable6.html
Remember, the FluidTables.html file would have to be edited to include
the new link to the FluidTable6.html file, similar to the example given in
Editing Existing Files, above.
If everything is done properly, when ‘Fluid Properties’ is selected from the
Tables menu in the Design Studio, ‘Table 6’ will appear as a link in the
list of available tables. By clicking on the link, the CaCl2 density image,
CaCl2Density.jpg, will appear, and can be used as a convenient internal
reference.
113
CHAPTER 8: Tables and Reference Files
Taking Care with Updates
Updated versions of Ground Loop Design may have new reference files and new
versions of FluidTables.html, SoilTables.html, or PipeTables.html. If this is the
case, then any custom changes to these files made by the user may be overwritten
during a new installation. Although the linked files will remain, the user is
advised to make backup files of all customized reference files before new
Ground Loop Design installations or updates.
Concluding Remarks
The reference files in Ground Loop Design are added entirely for the user’s
convenience. Designers should find the customizable geothermal Design Studio
an ideal and familiar environment in which they can conduct their work with the
highest levels of efficiency and confidence.
114