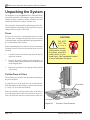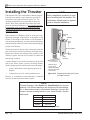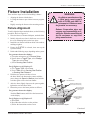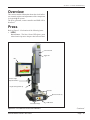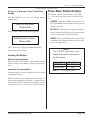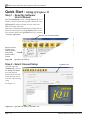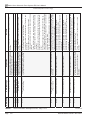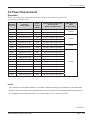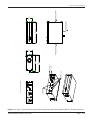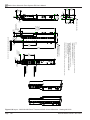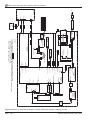
1
Intelligent Assembly Solutions Series SERVO ULTRASONIC PRESS SYSTEMS ES AUTOMATED HAND PROBE PRESS User's Manual Press/Thruster Models: • 43S215 • 43S220 • 43S245-AX • 43S340 Dukane Part No. 403-578-01 Dukane Intelligent Assembly Solutions • 2900 Dukane Drive • St. Charles, Illinois 60174 USA • TEL (630) 797-4900 • FAX (630) 797-4949 products are manufactured ISO 9001:2008 Dukane in ISO registered facilities. www.dukane.com/us Series Servo Ultrasonic Press Systems ES User’s Manual Copyright © 2014 Dukane Intelligent Assembly Solutions 2900 Dukane Drive St. Charles, IL 60174 USA Notice of Rights: All rights reserved. No part of this manual including the interior design, cover design and icons may be reproduced, transmitted or utilized in any form or by any means, electronic, mechanical, photocopying, recording, or by any information storage and retrieval system, without written permission from Dukane Corporation. Notice of Liability: The information contained in this manual is distributed on an “As is” basis, without warranty. While every precaution has been taken in the preparation of this manual, Dukane Corporation shall not have any liability to any person or entity with respect to any liability, loss, or damage caused or alleged to be caused directly or indirectly by the instructions contained in this manual, or by the hardware products described herein. Specifications subject to change without notice. This user’s manual documents product features, hardware, and controls software available at the time this user's manual was published. Printed in the United States of America. Dukane Part Number: 403-578-01 Dukane ultrasonic equipment is manufactured under one or more of the following U.S. Patents: (* = Inactive) 3,780,926 * 4,131,505* 4,277,710* 5,798,599 5,880,580 6,984,921 7,225,965 7,475,801 7,819,158 and 8,052,816 Page ii Dukane Manual Part No. 403-578-01 Revision History Revision Number - 00. Revision Summary Date Original release. 11/01/2012 - 01. Table 11-I, Page 127: 08/25/2014 . Corrected Linear Encoder Resolution to microns (µm). . Tables 3-III and 3-IV, Pages 28 and 29: . Corrected Cable # 200-1556-XXM to J5. Dukane Manual Part No. 403-578-01 Page iii Series Servo Ultrasonic Press Systems ES User’s Manual This page intentionally left blank Page iv Dukane Manual Part No. 403-578-01 Contents Section 1- Introduction . . . . . . . . . . . . . . . . . . . . . . . . 1 General User Information . . . . . . . . . . . . . . . . . . . . . . 2 Press System Overview . . . . . . . . . . . . . . . . . . . . . . . 3 Section 2 - Health and Safety . . . . . . . . . . . . . . . . . . . 5 Section 3 - Installation . . . . . . . . . . . . . . . . . . . . . . . 13 Before Installation . . . . . . . . . . . . . . . . . . . . . . . . . . 15 Unpacking the System . . . . . . . . . . . . . . . . . . . . . . . 20 Securing the Machine Base . . . . . . . . . . . . . . . . . . . 21 Installing the Press without Machine Base . . . . . . . 22 Press Height Adjustment . . . . . . . . . . . . . . . . . . . . . 23 Installing the Thruster . . . . . . . . . . . . . . . . . . . . . . . . 24 Cable Connections . . . . . . . . . . . . . . . . . . . . . . . . . . 26 Connector Descriptions . . . . . . . . . . . . . . . . . . . . . . 33 Flange Template . . . . . . . . . . . . . . . . . . . . . . . . . . . . 39 Section 4 - Acoustic Stack/Fixture Setup . . . . . . . . 41 Overview . . . . . . . . . . . . . . . . . . . . . . . . . . . . . . . . . 43 Stack Description . . . . . . . . . . . . . . . . . . . . . . . . . . . 44 Changing Stack Components . . . . . . . . . . . . . . . . . . 45 Fixture Installation . . . . . . . . . . . . . . . . . . . . . . . . . . 49 Section 5 - Controls and Indicators . . . . . . . . . . . . . 53 Overview . . . . . . . . . . . . . . . . . . . . . . . . . . . . . . . . . 55 Press . . . . . . . . . . . . . . . . . . . . . . . . . . . . . . . . . . . . 55 Ergonomic Base . . . . . . . . . . . . . . . . . . . . . . . . . . . . . . . . . 56 Emergency Stop Switch . . . . . . . . . . . . . . . . . . . . . . . . . . . 58 Press Base Status Display . . . . . . . . . . . . . . . . . . . . . . . . . 59 Generator . . . . . . . . . . . . . . . . . . . . . . . . . . . . . . . . . 60 Remote Controller . . . . . . . . . . . . . . . . . . . . . . . . . . 60 HMI . . . . . . . . . . . . . . . . . . . . . . . . . . . . . . . . . . . . . . 60 Section 6 - Operation . . . . . . . . . . . . . . . . . . . . . . . 61 Overview . . . . . . . . . . . . . . . . . . . . . . . . . . . . . . . . . Start-up . . . . . . . . . . . . . . . . . . . . . . . . . . . . . . . . . . . Control Functions . . . . . . . . . . . . . . . . . . . . . . . . . . . Stopping the Weld Cycle . . . . . . . . . . . . . . . . . . . . . 63 64 66 67 Continued Dukane Manual Part No. 403-578-01 Page v Series Servo Ultrasonic Press Systems ES User’s Manual Contents Section 6 - Operation . . . . . . . . . . . . . . . . . . . Continued Software Support Features . . . . . . . . . . . . . . . . . . . 68 Quick Start Using iQ Explorer II . . . . . . . . . . . . . . . . 70 Unique Features . . . . . . . . . . . . . . . . . . . . . . . . . . . . 82 Section 7 - System Operational Test . . . . . . . . . . . . 83 Overview . . . . . . . . . . . . . . . . . . . . . . . . . . . . . . . . . 85 Operational Test of the Acoustic Stack . . . . . . . . . . . 86 Procedure for Cycling the System . . . . . . . . . . . . . . 89 Restoring Factory Defaults . . . . . . . . . . . . . . . . . . . 89 Section 8 - Maintenance . . . . . . . . . . . . . . . . . . . . . . 91 Stack Maintenance . . . . . . . . . . . . . . . . . . . . . . . . . 93 System Maintenance . . . . . . . . . . . . . . . . . . . . . . . . 96 Six-Month Periodic Maintenance . . . . . . . . . . . . . . . 97 Press Calibration . . . . . . . . . . . . . . . . . . . . . . . . . . . 98 Section 9 - Troubleshooting . . . . . . . . . . . . . . . . . . 99 Overview . . . . . . . . . . . . . . . . . . . . . . . . . . . . . . . . 101 Welding . . . . . . . . . . . . . . . . . . . . . . . . . . . . . . . . . 102 Insertion . . . . . . . . . . . . . . . . . . . . . . . . . . . . . . . . . 109 Stacking . . . . . . . . . . . . . . . . . . . . . . . . . . . . . . . . . 112 Servo Press Alarm Messages . . . . . . . . . . . . . . . . 115 Section 10 - Contacting Dukane . . . . . . . . . . . . . . . 121 Section 11 - Specifications . . . . . . . . . . . . . . . . . . . 125 Press Specifications,Weights, Dimensions, Operating Environment . . . . . . . . . . . . . . . . . . . . . . . . . . . . . . 127 AC Power Requirements . . . . . . . . . . . . . . . . . . . . 129 Compressed Air Requirements . . . . . . . . . . . . . . . 130 Drawings . . . . . . . . . . . . . . . . . . . . . . . . . . . . 131-145 Replacement Parts List . . . . . . . . . . . . . . . . . . . . . 146 Regulatory Agency Compliance . . . . . . . . . . . . . . . 147 Section 12- Appendices . . . . . . . . . . . . . . . . . . . . . 149 Appendix A - List of Figures . . . . . . . . . . . . . . . . . . 151 Appendix B - List of Tables . . . . . . . . . . . . . . . . . . . 154 Index . . . . . . . . . . . . . . . . . . . . . . . . . . . . . . . . . . . 155 Page vi Dukane Manual Part No. 403-578-01 Section 1 - Introduction SECTION 1 Introduction General User Information . . . . . . . . . . . . . . 2 Press System Overview. . . . . . . . . . . . . . . 3 Dukane Manual Part No. 403-578-01 Page 1 Series Servo Ultrasonic Press Systems ES User’s Manual General User Information Read This Manual First Before operating your ultrasonic system, read this User’s Manual to become familiar with the equipment. This will ensure correct and safe operation. The manual is organized to allow you to learn how to safely operate this equipment. The examples given are chosen for their simplicity to illustrate basic operation concepts. This manual provides information to set up, operate, and interface Dukane’s iQ Series Servo ES presses. Particular models are listed on the manual cover and in Section 11, Specifications. The manual consists of sections that describe in detail press specifications and functions, installation and testing procedures, and maintenance and troubleshooting steps. Each section describes press functions that are applicable to a standard press/thruster. Notes, Cautions and Warnings Throughout this manual we use NOTES to provide information that is important for the successful application and understanding of the product. A NOTE block is shown to the right. NOTE Note statements provide additional information or highlight procedures. CAUTION Caution statements identify conditions or practices that could result in damage to the equipment or other property. In addition, we use special notices to make you aware of safety considerations. These are the CAUTION and WARNING blocks as shown here. They have important information that, if ignored, could have increasingly severe outcomes. These statements help you to identify and avoid hazards and recognize the consequences. One of three different symbols also accompany the CAUTION and WARNING blocks to indicate whether the notice pertains to a condition or practice, an electrical safety issue or an operator protection issue. Drawings and Tables The figures and tables are identified by the section number followed by a sequence number. The sequence number begins with one in each section. The figures and tables are numbered separately. The figures use Arabic sequence numbers (e.g. –1, –2, –3) while the tables use Roman sequence numerals (e.g. –I, –II, –III). As an example, Figure 3–2 would be the second illustration in section three while Table 3–II would be the second table in section three. Page 2 WARNING Warning statements point out conditions or practices that could result in personal injury or loss of life. Condition or Practice Electrical Hazard Hearing Protection Dukane Manual Part No. 403-578-01 Section 1 - Introduction Press System Overview An iQ Series Servo Ultrasonic Press System ES designates a variety of component combinations. These are generally grouped into two versions of the system based on how the servo electrical components are housed. System Defined A typical system consists of a press, generator, HMI (optional on some systems), an acoustic stack (transducer, booster, horn), fixturing, and cables. Control and data acquisition software is considered part of the system as well. Systems with A-Series generators (without a display) require the use of iQ Explorer software for operation. Systems with Q-Series generators (with a display) use iQ Explorer II software, which is not required for operation, but useful in process setup and data collection. Versions Offered Two press system configurations exist: remote and integrated. Remote - This version consists of a press, generator, remote controller, and an HMI (optional on some systems). Most of the servo electronics are housed in the remote controller, with cable connections to the press and generator. Press models with this configuration are: 43S215 (15/20 kHz) and 43S245-AX (30/40 kHz). Integrated - This version consists of a press, generator, and an HMI (optional on some systems). The servo electronics are integrated within the press. Press models with this configuration are: 43S220 (20 kHz) and 43S340 (30/40 kHz). Other Resources While this user's manual deals with the iQ Servo Press, other system components are covered in these publications: iQ A-Series ES Generator (without display): 403-575 iQ Q-Series ES Generator (with display): 403-584 iQ Explorer software (for A-Series): 403-579 iQ Explorer II software (for Q-Series): 403-585 These user manuals can be downloaded from the Dukane website. Navigate to the manual you want using this path: www.dukane.com/us > Downloads > Manuals. Dukane Manual Part No. 403-578-01 Page 3 Series Servo Ultrasonic Press Systems ES User’s Manual This page intentionally left blank Page 4 Dukane Manual Part No. 403-578-01 Section 2 - Health and Safety SECTION 2 Health and Safety General Considerations . . . . . . . . . . . . . . . . 7 Plastics Health Notice. . . . . . . . . . . . . . . . . 9 Electrical Safety . . . . . . . . . . . . . . . . . . . . . . . . . . . . . 10 Domestic Power Grounding . . . . . . . . . . . . . . . . . . . . . . 10 International Power Grounding . . . . . . . . . . . . . . . . . . . 11 Lifting the Equipment . . . . . . . . . . . . . . . . . . . . . . . . . 12 Dukane Manual Part No. 403-578-01 Page 5 Series Servo Ultrasonic Press Systems ES User’s Manual This page intentionally left blank Page 6 Dukane Manual Part No. 403-578-01 Section 2 - Health and Safety General Considerations Safe Operation Please observe these health and safety recommendations for safe, efficient, and injury-free operation of your equipment. Proper Installation - Operate system components only after they are properly installed. NOTE These recommendations apply to the welding system. System in this manual refers to a complete group of components associated with the welding of parts, also known as an ultrasonic assembly system. A typical iQ Series System consists of the iQ generator, a press with thruster, switches, controls, cables, transducer, booster, horn, and fixture, and iQ Explorer II software. WARNING No Unauthorized Modifications - Do not modify your system in any way unless authorized to do so by Dukane Corporation. Unauthorized modifications could cause equipment damage and/or injury to the operator. In addition, unauthorized modifications will void equipment warranty. Keep the Covers On - Do not remove any equipment cover unless directed to do so by Dukane Corporation. Grounded Electrical Power - Operate this equipment only with a grounded electrical connection. (See Electrical Safety Grounding Instructions, Page 10.) Comply with Regulations - You may be required to add accessories to bring the system into compliance with applicable regulations (OSHA in the USA) for machine guarding and noise exposure. Use Eye Protection - Wear ANSI approved safety impact goggles. Any fixture manufactured by a third party must comply with all OSHA and ANSI requirements. All fixtures must be guarded as necessary. Dukane Corporation does not assume any responsibility or liability for fixtures manufactured by the customer or any third party manufacturer. WARNING Never operate the generator with the cover off. This is an unsafe practice and may cause injury. CAUTION At some time you may be asked to remove equipment covers by the Dukane Service Dept. personnel. Before doing so, disconnect the system electrically from the incoming line AC power, including the generator, press, and remote controller (if present). Continued Dukane Manual Part No. 403-578-01 Page 7 Series Servo Ultrasonic Press Systems ES User’s Manual Continued from Previous Page Safe Operation Acoustic Stack Hazard - When an acoustic stack (transducer, booster, horn and tip) is energized by the ultrasound signal, it presents a potential hazard. Stay clear of an energized stack. System Abort Switch - Install a system abort switch at each operator station when ultrasonic plastic assembly equipment is used with automatic material handling equipment in an automated system. CAUTION Parts being joined ultrasonically will at times vibrate at audible frequencies. Wear ear protectors to reduce annoying or uncomfortable sounds. In addition, ultrasound baffles, sound enclosures, or materials that absorb sound may be located to surround the system. Foot Switch - Using a foot switch in place of the optical touch finger switches (operate switches) violates OSHA regulations. Pre-trigger Absolute Distance Position - This positioning feature causes the horn to vibrate before contacting the part to be welded. To ensure safe operation, adjust this position so the ultrasound signal will not activate if the horn is more than ¼ in (7 mm) from the part to be welded. WARNING Keep head, hands, limbs and body at least six inches (152 mm) away from an operating press/ thruster. A vibrating, descending horn can cause burns and/ or crushing injuries. System Electrical Cabling - Electrical power must be off when connecting or disconnecting electrical cables. Continued Page 8 Dukane Manual Part No. 403-578-01 Section 2 - Health and Safety Continued from Previous Page Safe Operation Do Not Wear Loose Clothing or Jewelry - Clothing or jewelry can become caught in moving parts. Stay Alert - Watch what you are doing at all times. Use common sense. Do not operate the press when you are tired or distracted from the job at hand, or if bystanders are within reach of the press. Effects of Medication - Your judgement or reflexes could be impaired while taking prescription medications. If so, do not operate the press. Be familiar with warning labels and recommended activity restrictions that accompany your prescription medications. If you have any doubt, do not operate the equipment. CAUTION When making cable connections to system equipment or disconnecting cables from system equipment, make sure electrical power to the system is turned off, and AC power cords for each system component are removed from their receptacles. After the cables have been securely connected and the connections and cable routing checked a final time, the power may be restored. Special Health Notice – Plastics Certain plastic materials, when being processed, may emit fumes and/or gases that may be hazardous to the operator’s health. Proper ventilation of the work station should be provided where such materials are processed. Inquiries should be made to the U.S. Department of Labor concerning OSHA regulations for a particular plastic prior to processing with Dukane ultrasonic equipment. Dukane Manual Part No. 403-578-01 Page 9 Series Servo Ultrasonic Press Systems ES User’s Manual Electrical Safety The iQ Series Servo Ultrasonic Press Systems ES have several electrically powered components including: • iQ Generator, • iQ Servo Press, and, • Remote Controller (for applicable models). Each of these components must be grounded, including power grounding and RFI suppression grounding. CAUTION If you have a two-prong electrical receptacle, we strongly recommend that you replace it with a properly grounded three-prong type. Have a qualified electrician replace it following the National Electric Code and any local codes and ordinances that apply. See Figures 2 - 1 and 2 - 2. Domestic Power Grounding For safety, the power cords used with your system have three-wire, grounding-type power cords. Figure 2-1 illustrates the appropriate electrical outlet to use with the power cords that are included with systems shipped within North America. Approved 2 pole, 3 wire grounding receptacle HUBBELL No. 5652 or equivalent to NEMA 6–15R or 6–20R CAUTION If there is any question about the grounding of your receptacle, have it checked by a qualified electrician. Do not cut off the power cord grounding prong, or alter the plug in any way. If an extension cord is needed, use a threewire cord that is in good condition. The cord should have an adequate power rating to do the job safely. It must be plugged into a grounded receptacle. Do not use a two-wire extension cord with this product. Figure 2 - 1 Example of 220/240 Volt, Grounded, 3-Prong Receptacle Continued Page 10 Dukane Manual Part No. 403-578-01 Section 2 - Health and Safety Continued from Previous Page International Power Grounding Power cables normally provided for international use are compatible with the power outlet used in many Continental European countries (Refer to Figure 2- 2.) However, if your application requires another type of power cord, check with your equipment supplier, and follow local regulations concerning proper wiring and grounding. Grounding Contacts Typical Outlet CAUTION To ensure safe and trouble–free operation, ground the generator, press, base, and remote controller. Use a STAR configuration (illustrated below). Do not DAISY CHAIN the grounds. Generator Grounding Stud Provided Cable Press Grounding Stud Figure 2 - 2 International 220/240V Grounding Grounding for RFI Suppression In addition to the safety considerations, proper grounding is essential for the effective suppression of RFI (Radio Frequency Interference). For instance, every generator contains an RFI filter which blocks noise on the AC power line from entering the generator control circuitry. This filter also prevents ultrasonic RFI from being fed back into the AC power line. Base Grounding Stud Earth Ground Remote Controller Grounding Stud Grounding wires are shipped with each system component (green/yellow; 5 meters long; Dukane part number 200-1557). It is important to connect each of these wires to the nearest grounded metal pipe or equivalent earth ground by means of a ground clamp as shown in Figure 3-12. Note that the wires are connected using a 'star' configuration - do not 'daisy chain' the wires. Operate Switches The optical operate switches on the press base comply with OSHA safety regulations. Using a foot switch in place of these switches violates OSHA regulations. Dukane Manual Part No. 403-578-01 Page 11 Series Servo Ultrasonic Press Systems ES User’s Manual Lifting the Equipment How to Lift Safely • Before lifting, take a moment to think about what you’re about to do. • Examine the object for sharp corners, slippery spots or other potential hazards. Know your limit and don’t try to exceed it. • Ask for help if needed, or if possible, divide the load to make it lighter. • Know where you are going to set the item down, and make sure it and your path are free of obstructions. Then follow these steps: CAUTION Use a mechanical lift device to assist in safely lifting system components. NOTE Equipment weights are shown in Section 11 - Specifications, Table 11-II. 1. Stand close to the load with your feet spread apart about shoulder width, with one foot slightly in front of the other for balance. 2. Squat down bending at the knees (not your waist). Tuck your chin while keeping your back as vertical as possible. 3. Get a firm grasp of the object before beginning the lift. Begin slowly lifting with your LEGS by straightening them. Never twist your body during this step. 4. Once the lift is complete, keep the object as close to the body as possible. As the load’s center of gravity moves away from the body, there is a dramatic increase in stress to the lumbar region of the back. 5. If you must turn while carrying the load, turn using your feet-not your torso. To place the object below the level of your waist, follow the same procedures in reverse order. Remember, keep your back as vertical as possible and bend at the knees. NOTE Several press models have a lifting eye bolt (at the top of the rigid column) for use with a mechanical hoist and lift hook. See the figure below. Lifting Eye Bolt Figure 2-3 Lifting Eye Bolt on Some Press Models Page 12 Dukane Manual Part No. 403-578-01 Section 3 - Installation SECTION 3 Installation Before Installation. . . . . . . . . . . . . . . . . . 15 Lockout/Tagout Devices . . . . . . . . . . . . . . . . 15 Utilities. . . . . . . . . . . . . . . . . . . . . . 17 Placement . . . . . . . . . . . . . . . . . . . . . . . 17 Unpacking the System . . . . . . . . . . . . . . . 20 Securing the Machine Base . . . . . . . . . . . . 21 Installing the Press without Machine Base . . . . . 22 Press Height Adjustment . . . . . . . . . . . . . . 23 Installing the Thruster . . . . . . . . . . . . . . . . 24 Cable Connections . . . . . . . . . . . . . . . . . 26 Connectors Descriptions . . . . . . . . . . . . . . 33 Flange Template. . . . . . . . . . . . . . . . . . . 39 Dukane Manual Part No. 403-578-01 Page 13 Series Servo Ultrasonic Press Systems ES User’s Manual This page intentionally left blank Page 14 Dukane Manual Part No. 403-578-01 Section 3 - Installation Before Installation As you plan for the installation of your system, including generator and press, please consider these important subjects as listed below: • When to use lockout / tagout devices • Lifting the equipment safely - See Section 2 Health and Safety, Page 12 • Utilities • Placement When to Use Lockout / Tagout Devices WARNING Electrical safety hazards exist inside the generator, press, and remote controller units. Before making any internal adjustments to these components, apply a lockout/tagout (LOTO) device to each component. Figure 3-1 Lockout Device In Open Position, Unlocked The typical kind of lockout/tagout (LOTO) device is a clam shell type device (with lockout capability). The LOTO device is placed over the plug end of the generator, press, and remote controller electrical cords. This effectively prevents access to the energy isolation points. See the example of one such device in the figure above. The figure to the right shows the lockout device in the closed, locked position. Figure 3-2 Bottom Lockout Device In Closed Position, Locked Continued Dukane Manual Part No. 403-578-01 Page 15 Series Servo Ultrasonic Press Systems ES User’s Manual Continued from Previous Page Lockout/Tagout Procedure to use BEFORE making any internal adjustments to the generator, press or remote controller units: 1. Push the unit's AC power switch/breaker to the OFF position. 2. Unplug the unit's electrical cord from its source. 3. Authorized personnel apply a lockout/tagout (LOTO) device to the plug end of the unit's electrical cord. Using a typical clam shell type LOTO device: 1) Open the clam shell. 2) Place the electrical cord plug end inside the shell. 3) Close the shell. 4) Secure the shell with its lock, and lock it. 4. Wait a minimum of five minutes for the unit to discharge its electrical energy. 5. After taking these steps, make the necessary adjustments to the unit. Assuming the unit is being put back into service. . . Procedure to use AFTER making any internal adjustments to the generator, press or remote controller units: 1. Authorized personnel remove the lockout/tagout device from the plug end of the unit's electrical cord. Using a typical clam shell type LOTO device: 1) Unlock the protective shell. 2) Open the shell, exposing the electrical cord end. 3) Remove the LOTO device, and set it aside. 2. Plug the unit's electrical cord into its AC power source. 3. Push the unit's AC power switch/breaker to the ON position. Page 16 Dukane Manual Part No. 403-578-01 Section 3 - Installation Utilities Provide for electricity to meet the equipment specifications as shown in Section 11, Specifications. Transducer Cooling Air Some welding applications may require compressed air to be used to cool the transducer, depending on the ultrasound power draw and ambient air temperature. The presses are equipped with tube fittings for connecting compressed air, which is routed to the transducer area inside the press. The air supply must be clean and dry. The pressure required is dependent on the application, with a maximum of 100 psi. (0.7 MPa). Fitting sizes are listed below for each press model: CAUTION If transducer cooling air is used, this compressed air must be clean, dry and oil free. Any particulate, oil contamination or moisture can coat or clog the transducer. This can result in premature failure of the transducer. 43S215: 5/16" or 8 mm 43S220 and 43S340: 6 mm 43S245-AX: 1/4" Placement Check that enough space has been set aside for the installation. Equipment dimensions are shown in Section 11, Specifications. In addition, take extra precautions when the installation is made in an active seismic region. See the recommendations for generator installation on the following two pages. Dukane Manual Part No. 403-578-01 Page 17 Series Servo Ultrasonic Press Systems ES User’s Manual Placing the Generator when Used in an Active Seismic Region If the iQ generator is to be used in an active seismic region, secure the unit by rack-mounting it or by securing the unit to a benchtop. Rack- Mounting Install the four brackets from Dukane's rack-mount kit to the generator. See Table 3-I, and Figure 3-3 (showing a low profile unit) below. Mount the generator to a 19-inch equipment rack. System Type Dukane Part Number High Profile 147-4721 Low Profile 147-4720 Table 3- I Rack Mount Bracket Part Numbers ALLOW 3" IN BACK FOR CABLES NOTE ALLOW 5" BOTH SIDES FOR COOLING ALLOW 5" BOTH SIDES FOR COOLING The figure shows how a typical iQ generator is rack mounted. Your generator’s appearance may be different from what is shown here. 0.12 [3.0] IN [mm] 0.25 X 0.50 SLOT (2 PLCS) OPTIONAL RACK MOUNT BRACKETS 147-4720 Figure 3-3 Rack Mounting iQ Generator - Representative Low-Profile Model Shown Continued Page 18 Dukane Manual Part No. 403-578-01 Section 3 - Installation Continued from Previous Page Benchtop Mounting If you choose to mount the generator on a benchtop follow these instructions: 1. Install the four (4) optional hold down brackets (Dukane part number 147-1398). See Figure 3-4 below. 2. Secure one side of each L bracket to the generator's sheet metal cover. 3. Secure the other side of each L bracket to the bench itself. ALLOW 3" IN BACK FOR CABLING. ALLOW 5" BOTH SIDES FOR COOLING. 0.280 HOLE 7.11 ALLOW 5" BOTH SIDES FOR COOLING. NOTE The figure shows how a representative iQ generator is benchtop mounted. Your generator’s appearance may be different from what is shown here. OPTIONAL HOLD DOWN BRACKETS 147-1398 IN [mm] OPTIONAL HOLD DOWN BRACKETS Figure 3-4 Securing iQ Generator to Benchtop - Representative High-Profile Model Shown Dukane Manual Part No. 403-578-01 Page 19 Series Servo Ultrasonic Press Systems ES User’s Manual Unpacking the System As mentioned, a typical iQ Series Servo Ultrasonic Press System ES consists of a press (thruster, ergonomic base and support package), generator, remote controller (on some models) and accessories (cables, software, etc.) The system has been assembled and packaged at the factory for shipment. Depending on the system, there may be multiple crates or boxes to deal with. Press The press is secured to a wooden pallet and covered with a wooden crate. Components inside the crate are secured with metal bands, and with additional packing materials to give reinforcement when needed. Before unpacking the press, take care and use mechanical assistance to move it close to the location where it will be installed. 1. Carefully remove the wooden crate from the base to expose the contents. 2. Remove the packing material, and temporarily set aside any other system components, leaving the press on the shipping base. 3. CAUTION CAUTION DO NOT LIFT the p r e s s manually. Lifting and/or moving the press manually could result in perManuallymeans lifting the sonal injury. Use mechanical press system could to move and place theresult press. in injury Inspect the assembly for any damage before placing it in position. Put the Press in Place Do not lift the press by hand. Use mechanical means to put the press into place. To place the press on the work area, use a pallet lift platform. When the press has a lifting eye bolt (as seen in Figure 2-3, Page 12), use a hoist and lift hook. Press Table Raise the assembly until the bottom edge of the base is even with the top of the work area as shown in Figure 3-5. Then, carefully slide the press system on to the work area. Lift Device Figure 3-5 Page 20 Example of Press Placement Dukane Manual Part No. 403-578-01 Section 3 - Installation Securing the Machine Base In some cases there may be a need to secure the machine base to a work surface. The base has two 1/2" diameter holes provided to accept either 12mm or 7/16” diameter bolts for this purpose. See the figure below showing base dimensions detail. 2.63 [66.7] 2.25 [57.2] 2.25 [57.2] 2.63 [66.7] 18.6 [472] 15.40 [391.1] 14.38 [365.1] COLUMN MOUNTING HOLES 6X M10x1.5x .8 [25] 12.38 [314.3] 10.88 [276.2] 9.35 [237.5] 8.2 [208] ULTRASOUND STACK CENTER 4.92 [125.0] 3.50 [88.9] FIXTURE PLATE MOUNTING HOLES 8X M10x1.5x .5 [13] 0 ø12.00 [ø304.8] B.C. (REF.) ø9.84 [ø249.9] B.C. (REF.) ø7.00 [ø177.8] B.C. (REF.) 3.50 [88.9] 4.92 [125.0] 5.4 [138] 2X ø.50 [ø12.7] 6.00 [152.4] 6.61 [167.9] 8.1 [206] 3.50 [88.9] 0 3.50 [88.9] 8.1 [206] 6.61 [167.9] 6.00 [152.4] (BASE MOUNTING HOLES) 8.4 [212] INCHES [MILLIMETERS] 8.0 [204] 24.8 [631] BASE DETAIL Figure 3-6 Base Dimensions Detail - For Reference Only Dukane Manual Part No. 403-578-01 Page 21 Series Servo Ultrasonic Press Systems ES User’s Manual Installing the Press without Machine Base In this configuration, secure the flange to a rigid, level, and stationary structure. We recommend socket-head cap screws M12 -1.75 with a minimum length of 50 mm for securing the flange to the supporting structure to achieve a minimum of 20mm thread engagement (the flange is 1 inch [25 mm] thick). Depending upon the thickness and material of the supporting structure, longer screws and/or additional hardware may be required. A full scale template is provided for locating and drilling holes in the supporting structure. The template is Figure 3-16 on Page 39. Page 22 Dukane Manual Part No. 403-578-01 Section 3 - Installation Press Height Adjustment The height of the thruster on the column is adjustable. Adjustment is made by first finding the two height locking handles on the press. Figure 3-9 shows typical locations for these handles. • To loosen the grip on the column, turn the handles counterclockwise, as shown in Figure 3-7a. The gas spring on the column supports the weight of the thruster while the handles are loose. If a thruster is not installed, the unloaded column may move upward unexpectedly, so be careful to avoid injury. • Adjust the column to the desired height using the height adjustment wheel. See Figure 3-9. • Turn the handles clockwise, as shown in Figure 3-7b, until tight. • To rotate the handles out of the way without loosening or tightening, pull the handles outward, rotate and release, as shown in Figure 3-8. CAUTION Exercise caution if a thruster is not installed on the support housing. The gas spring on the unloaded housing may cause the assembly to move upward unexpectedly when the height locking handles are loosened. – Loosen (b) – Tighten Figure 3-7 To Make Adjustments (a) Figure 3-8 To Relocate Handles Height Adjustment Wheels Models 43S245 -AX Models 43S215 ,43S220, and 43S340 Height Locking Handles (typical) Figure 3-9 Height Adjustment Wheels and Locking Handles Dukane Manual Part No. 403-578-01 Page 23 Series Servo Ultrasonic Press Systems ES User’s Manual Installing the Thruster NOTE If the thruster unit is provided without a Dukane support, it should be mounted to a rigid, stationary structure as illustrated in the example shown in Figure 3-10. The mounting arrangement varies depending on the press model. Refer to the applicable layout drawings listed below for mounting information. It is critical to observe the maximum screw penetration specifications where indicated on the drawings; failure to do so may result in equipment damage. Each installation presents its own set of conditions for the installer. The information offered here is a general guide to thruster installation. Mounting Holes Washers When mounted to a Dukane column as in the press configuration, the height of the thruster is adjustable on the column. If the height of the thruster is not adjustable in your mounting arrangement, you must consider the distance from the horn tip to the work surface when determining the position of the thruster. Mounting Bolts The distance between the tip of the retracted horn and the parts in the fixture must be less than the maximum travelling distance (stroke) of the thruster slide assembly. If the distance is greater, the horn will be unable to contact the parts during operation. Rigid Mounting A shorter distance between the retracted horn tip and the parts in the fixture means a shorter travelling distance (stroke) during operation, which results in two advantages: • A more stable thruster when applying pressure to the parts • A shorter duty cycle for a faster production rate Distance from horn to work surface should be less than the maximum stroke. Figure 3-10 Example of Mounting the Thruster to a Rigid Structure However, it is important to ensure that there is sufficient room for the placement and removal of parts. NOTE Thruster Drawings: See Section 11, Specifications for thruster drawings. The Dukane website is also a resource for the drawings. Go to www.dukane.com/us>Downloads>Drawings / Layouts and choose a thruster drawing based on your model number. See the table below. Model Thruster Dwg.No. 43S215 400-2321 43S220 400-2294 43S245-AX 400-2316 43S340 400-1978 Table 3-II Page 24 Thruster Drawing Numbers Dukane Manual Part No. 403-578-01 Section 3 - Installation Connections for Thruster Only Cable connections for systems without an ergonomic base are the same as for systems with a base shown in previous sections, with one exception. The cable normally connected to the base is replaced with an automation interface cable (Dukane part number 2001546-XXM, where M is length in meters), which is connected between the generator J6 Base/Abort connector and the user-supplied automation equipment. Dukane Manual Part No. 403-578-01 Page 25 Series Servo Ultrasonic Press Systems ES User’s Manual Cable Connections The iQ Servo Presses are configured in one of two ways, depending on the model. Each has unique cabling requirements. Version 1- Remote Controller Configuration (Press Models: 43S215, 43S245-AX) Typical Components: • iQ Generator • iQ Servo Press • Remote Controller (contains servo electronics) • HMI Interface (optional on some systems) • Customer Automation Equipment Connect the Cables Use the following references as guides to making the connections: For press model 43S215, use Figure 3-11 and Table 3-III. For press models 43S245-AX, use Figure 3-11 and Table 3-IV. 1. Make the basic cable connections 1 through 9, and 13-16. 2. Make any optional connections. 3. Connect any customer-supplied equipment such as automation. Use cables 17 and 18 for automation. 4. Connect customer-supplied electricity using cables 10, 11, and 12. Connect the power cords last, but do not turn on the power yet. CAUTION Before connecting or disconnecting cables: Put power switches for the iQ generator, press, remote controller, and any usersupplied automation equipment in the OFF position. Turn off electrical power. Remove AC power cords from their receptacles. NOTE Some connectors have a pair of threaded jack screws to secure the connector. Make sure the screws are snug, but do not overtighten them. CAUTION DO NOT operate the generator unless the ultrasound coaxial cable is connected and the transducer is installed in the thruster. Otherwise, an overload condition could occur, with possible damage to the generator. 5. Recheck all connections. When they are secure, you are ready to connect electrical power. 6. Finally, connect electrical power. See Section 11, Specifications for AC power requirements. Continued Page 26 Dukane Manual Part No. 403-578-01 Dukane Manual Part No. 403-578-01 LINE VOLTAGE: 90-240 Vac 50/60 Hz, 10A W ARNING: POW ER LINE OUTLET M UST BE G ROUNDED. DISCONNECT LINE POW ER BEFORE REM OVING COVER. 11 9 PE J100 SERVO POW ER 1 ST. CHARLES, IL M ADE IN U.S.A. WWW.DUKANE.COM DUKANE CORPORATION 15 J206 J202 6 GENERATOR I/O THRUSTER I/O 2 J204 ENCODER IN 3 J205 10 J201 ENCODER OUT SERVO FEEDBACK 4 PE LINE VOLTAGE: 200-240 Vac 50/60Hz, 15A -WARNING- U.S. PATENT 5,880,580 OTHER PATENTS PENDING ST. CHARLES IL 60174 MADE IN U.S.A. DUKANE CORP POWER LINE OUTLET MUST BE GROUNDED. DISCONNECT LINE POWER BEFORE REMOVING COVER. 16 Earth Ground 8 J6 BASE/ABORT 13 J9 ETHERNET J10 RS-232 J5 THRUSTER 12 7 J11 ENCODER 14 J4 CONFIGURATION J3 ULTRASOUND J1 SYSTEM OUTPUTS J2 SYSTEM INPUTS 17 18 Automation Equipment 5 Thruster Detail: See Figure 3-14 (43S245-AX) Section 3 - Installation Continued from Previous Page Servo Press/Thruster (Version 1) Figure 3-11 iQ Generator, Remote Controller, and Servo Press/Thruster - Connections Diagram Continued Page 27 Table 3-III Page 28 200-1289-XXM 200-1556-XXM 200-1613-XXM 200-1545-XXM 200-1553-XXM 5 6 7 8 9 13 14 15 16 17 18 12 11 10 200-1649-XXM 4 (Power cord is integral to generator,) 200-1557 200-1557 200-1557 200-1557 200-1380-XXM 200-1381-XXM 200-1541 (240 VAC, 10A, US) 200-1542 (240 VAC, 10A, Europe) 200-1624 (240 VAC, 10A, India) 200-1576 (120 VAC) One of the following: One of the following: 200-1110 (240 VAC, 15A, US) 200-1111 (240 VAC, 16A, Europe) 200-1612 (240 VAC, 15A, India) 200-1655-XXM 200-1647-XXM 200-1648-XXM Part Number 1 2 3 Cable No. 5 5 5 5 XX XX 2.4 2.4 2.4 XX XX XX XX XX XX (meters) XX XX XX Length PE J2 J3 AC INPUT - - J1 J5 J11 J6 J9 - - Generator GRND - - - - J35 - - - Base PE - - - - PE - - - AC INPUT Connections Remote Thruster Controller SERVO POWER J100 THRUSTER I/O J206 ENCODER J204 SERVO J205 FEEDBACK ULTRASOUND J202 J201 - - - AC INPUT - ETHERNET - - HMI Series Servo Ultrasonic Press Systems ES User’s Manual Continued from Previous Page Servo Press/Thruster (Version 1) iQ Generator, Remote Controller, and Servo Press/Thruster Cables for Press Model 43S215 Continued Dukane Manual Part No. 403-578-01 Table 3-IV Dukane Manual Part No. 403-578-01 200-479-XXM 200-1556-XXM 200-1613-XXM 200-1545-XXM 200-1553-XXM One of the following: 5 6 7 8 9 13 14 15 16 17 18 12 11 (for 120 VAC models, power cord is integral to generator) 200-1557 200-1557 200-1557 200-1557 200-1380-XXM 200-1381-XXM 200-1624 (240 VAC, 10A, India) 200-1542 (240 VAC, 10A, Europe) 200-1541 (240 VAC, 10A, US) 200-1612 (240 VAC, 15A, India) 200-1111 (240 VAC, 16A, Europe) 200-1110 (240 VAC, 15A, US) 200-1576 (120 VAC) One of the following: 200-1624 (240 VAC, 10A, India) 200-1542 (240 VAC, 10A, Europe) 200-1541 (240 VAC, 10A, US) 200-1576 (120 VAC) One of the following: 200-1624 (240 VAC, 10A, India) 200-1542 (240 VAC, 10A, Europe) 200-1541 (240 VAC, 10A, US) 200-1649-XXM 4 10 200-1646-XXM 200-1647-XXM 200-1648-XXM Part Number 1 2 3 Cable No. 5 5 5 5 XX XX 2.4 2.4 2.4 XX XX XX XX XX XX (meters) XX XX XX Length PE J2 J3 AC INPUT - - J1 J5 J11 J6 J9 - - Generator GRND - - - - J35 - - - Base PE - - - - PE - - - AC INPUT Connections Remote Thruster Controller SERVO POWER J100 THRUSTER I/O J206 ENCODER J204 SERVO J205 FEEDBACK ULTRASOUND J202 J201 - - - AC INPUT - ETHERNET - - HMI Section 3 - Installation Continued from Previous Page Servo Press/Thruster (Version 1) iQ Generator, Remote Controller, and Servo Press/Thruster Cables for Press Models 43S245-AX Page 29 Series Servo Ultrasonic Press Systems ES User’s Manual Cable Connections Continued Version 2 - Integrated Configuration (Press Models: 43S220, 43S340) Typical Components: • iQ Generator • iQ Servo Press with Integrated Servo Electronics • HMI Interface (optional on some models) • Customer Automation Equipment Connect the Cables Use Figure 3-12 and Table 3-V as guides to making the connections. 1. Make the basic cable connections CAUTION Before connecting or disconnecting cables: Put power switches for the iQ generator, press and any user-supplied automation equipment in the OFF position. Turn off electrical power. Remove AC power cords from their receptacles. 2 through 6, and 9-11. 2. Make any optional connections. 3. Connect any customer-supplied equipment such as automation. Use cables 12 and 13 for automation. 4. Connect customer-supplied electricity using cables 1, 7, and 8. Read and follow the NOTE about cable layout to the right. Connect the power cords last, but do not turn on the power yet. NOTE Arrange the cable layout so that cable 1 is physically separated from other cables connected to the thruster (see Figure 3-12). Do not bundle cables 1, 7, or 8 with any other cables. 5. Recheck all connections. When they are secure, you are ready to connect electrical power. 6. Finally, connect electrical power. See Section 11, Specifications for AC power requirements. CAUTION DO NOT operate the generator unless the ultrasound coaxial cable is connected and the transducer is installed in the thruster. Otherwise, an overload condition could occur, with possible damage to the generator. Continued Page 30 Dukane Manual Part No. 403-578-01 NOTE: Separate cables 1, 7 and 8 from other cables. DO NOT bundle these with other cables. 7 1 8 6 Figure 3-12 Dukane Manual Part No. 403-578-01 PE LINE VOLTAGE: 200-240 Vac 50/60Hz, 15A U.S. PATENT 5,880,580 OTHER PATENTS PENDING ST. CHARLES IL 60174 MADE IN U.S.A. DUKANE CORP -WARNING- POWER LINE OUTLET MUST BE GROUNDED. DISCONNECT LINE POWER BEFORE REMOVING COVER. J6 BASE/ABORT J9 ETHERNET J10 RS-232 J5 THRUSTER 2 J11 ENCODER 3 11 J4 CONFIGURATION J3 ULTRASOUND J1 SYSTEM OUTPUTS J2 SYSTEM INPUTS 5 4 13 9 iQ Generator and Servo Press/Thruster - Connections Diagram Earth Ground Automation Equipment 12 10 Thruster Detail: See Figure 3-15 Section 3 - Installation Servo Press/Thruster (Version 2) Continued from Previous Page Continued Page 31 Table 3-V Page 32 9 10 11 12 13 8 7 2 3 4 5 6 1 Cable No. One of the following: 200-1541 (240 VAC, 10A, US) 200-1542 (240 VAC, 10A, Europe) 200-1624 (240 VAC, 10A, India) 200-1576 (120 VAC) 200-1556-XXM 200-1613-XXM 200-479-XXM 200-1545-XXM 200-1553-XXM One of the following: 200-1541 (240 VAC, 10A, US) 200-1542 (240 VAC, 10A, Europe) 200-1624 (240 VAC, 10A, India) 200-1576 (120 VAC) One of the following: 200-1110 (240 VAC, 15A, US) 200-1111 (240 VAC, 16A, Europe) 200-1612 (240 VAC, 15A, India) 200-1541 (240 VAC, 10A, US) 200-1542 (240 VAC, 10A, Europe) 200-1624 (240 VAC, 10A, India) (for 120 VAC, 3600 W, or 4800 W models, power cord is integral to generator) 200-1557 200-1557 200-1557 200-1380-XXM 200-1381-XXM Part Number 5 5 5 XX XX 2.4 2.4 XX XX XX XX XX 2.4 Length (meters) PE J2 J3 AC INPUT - J5 J11 J1 J6 J9 - Generator PE - - - THRUSTER I/O ENCODER ULTRASOUND - AC INPUT Connections Thruster GRND - - - J35 - - Base - - AC INPUT ETHERNET - HMI Series Servo Ultrasonic Press Systems ES User’s Manual Continued from Previous Page Servo Press/Thruster (Version 2) iQ Generator and Servo Press/Thruster Cables Dukane Manual Part No. 403-578-01 Section 3 - Installation Connector Descriptions Brief descriptions are given grouped by the press component that has the connector being discussed. iQ Generator Connectors J1 - Ultrasound Output Connector The ultrasound output connector used with all standard generators is a high voltage (5000V) coaxial style SHV-BNC connector. This connector provides superior shielding of electrical noise, compared to other types of connectors. The ultrasound output connector mates with fully shielded coaxial ultrasound cables that are secured with a simple and reliable quarter-turn bayonet style attachment mechanism. J2 - System Inputs Connector The SYSTEM INPUTS connector includes connections for all of the basic system control input signals that will typically come from an automated control system. The cable attached to this connector includes all of the available system control signals, which will be controlled by an output card or output port on the automation controller. The user can determine which signals to use for each particular welding application, but there must be at least one connection to this connector in order to activate the ultrasound output. NOTE For details on integrating the welder with automation, refer to Application Note AN507 (Automation Interface Guidelines) at www.dukane.com/us > Downloads > Application Notes. J3 - System Outputs Connector The SYSTEM OUTPUTS connector includes connections for all of the basic system status and monitor output signals, which will typically connect to an automated control system. The cable attached to this connector includes all of the available system output signals, which will be read or monitored by a digital input card or analog inputs on the user-supplied automation controller. The user can determine which signals are appropriate for each welding application. Continued Dukane Manual Part No. 403-578-01 Page 33 Series Servo Ultrasonic Press Systems ES User’s Manual Continued from Previous Page J4 - Configuration Port Connector The configuration port connector is a DB-9M (standard D-subminiature 9 circuit male) typically used for RS-232 serial communications. This serial port (DTE) connects to a serial port (DCE) on a computer via a standard 9- pin serial cable. If the computer does not have a serial port, you may use a USB-to-serial conversion cable. This port is used for field updates to the generator firmware, without removing the enclosure cover. This port can also be used with a software application running on a Windows PC to modify the factory default system settings and hardware configurations. Contact your local sales representative for software availability information and access to documentation that will allow you to make use of the configuration port features. J6 - Base/Abort The Base/Abort connector accepts the operate and emergency stop signals from the optical operate switches and abort switch on the base. If you are using custom automation, you may have separate operate and abort switches, but these still connect to this connector on the generator. J9 - Ethernet This port is used for Ethernet communication between the generator and HMI running iQ Explorer or iQ Explorer II software. J10 - RS-232 This port is primarily used for welder diagnostic functions accessible via serial communication to a PC. Guidance will be provided by Dukane if the need to use the capability arises. J11 - Encoder This connector accepts signals from the distance encoder on the press. J5 – Thruster This connector is used to interface various control signals between the press and generator. Page 34 Dukane Manual Part No. 403-578-01 Section 3 - Installation Thruster Connectors Thruster I/O Encoder This connector is used to interface various control signals between the generator and press. This connector contains signals from the distance encoder that are routed to the generator. Ultrasound NOTE The Top of Stroke connector on the press is limited to 24 VDC @ 2 Amps. This connector receives the ultrasound cable from the generator's J1 port. Top of Stroke (Optional) Some press models are equipped with this connector, which provides a signal indicating when the press is in the Top of Stroke (fully retracted) position. This signal is typically used in automated systems to indicate to the controlling mechanism (supplied by the end user) when the slide assembly is fully retracted. Although the Top of Stroke signal is provided on some presses, it is available as a digital output on the generator (connector J3) for all press models. The use of this generator output rather than press signal is recommended for greater long-term reliability. J35 - Ergonomic Base Connector This connector is used to interface the base controls and display to the Base/Abort connector (J6) on the generator. See Figure 3-13 for the location of the base connector. Dukane Manual Part No. 403-578-01 Page 35 Series Servo Ultrasonic Press Systems ES User’s Manual Remote Controller Connectors The remote controller works with the iQ generator to: • provide power for the servo actuator, J35 – Base Interface Grounding Lug • send control outputs to and receive inputs from the servo actuator, and • receive inputs from and send outputs to the iQ generator. J100 - Servo Power Power for the servo actuator is fed through the cable that connects to SERVO POWER on the thruster. J202 - Servo I/O Figure 3-13 Rear of Press Base Showing J35 and Grounding Lug This connector mates with an Inputs/Outputs cable that carries signals between the remote controller and the iQ generator. J204 - Encoder In Signals from the thruster's distance encoder are fed to this connector on the remote controller. J205 - Servo Feedback J206 - Thruster I/O Feedback from the servo actuator is transmitted to the remote controller through this connector. Inputs and outputs between the thruster and the remote controller are transmitted through this connector. Continued Page 36 Dukane Manual Part No. 403-578-01 Section 3 - Installation Continued from Previous Page NOTE Circled numbers correspond to cables shown in: Table 3-III for Model 43S215, and in Table 3-IV for Models 43S245-AX. # Servo Feedback (to J205) 4 Thruster I/O (to J206) 2 Encoder (to J204) Grounding Stud 1 Servo Power (to J100) Optional: Transducer Cooling Air 3 5 13 Ultrasound (to J1) CAUTION If transducer cooling air is used, this compressed air must be clean, dry and oil free. Any particulate, oil contamination or moisture can coat or clog the transducer. This can result in premature failure of the transducer. Air pressure is determined by the application, transducer power draw and ambient air temperature. Figure 3-14 iQ Servo Press/Thruster Rear Cable Connectors - Version 1, Models 43S245-AX (NOTE: Version 1, Model 43S215 has a similar rear panel.) Continued Dukane Manual Part No. 403-578-01 Page 37 Series Servo Ultrasonic Press Systems ES User’s Manual Continued from Previous Page NOTE Circled numbers correspond to cables shown in Table 3-V. # 1 Press Electrical Power Press Power Switch 9 Ground Detect Connector Grounding Stud Top of Stroke Connector Encoder (to J11) 3 Servo I/O (to J5) 2 4 Ultrasound (to J1) Connector not shown but it is like 5 in Figure 3-14. Figure 3-15 iQ Servo Press/Thruster Rear Cable Connectors - Version 2, Model 43S220 and 43S340 Page 38 Dukane Manual Part No. 403-578-01 Section 3 - Installation FRONT (fixture side) 7.75 inches (196.85 mm) 3.023 inches (76.783 mm) 3.875 inches (98.425 mm) 2.625 inches (66.675 mm) 2.00 inches (50.80 mm) 1.50 inches (38.10 mm) 2.625 inches (66.675 mm) 2.25 inches (57.15 mm) 2.25 inches (57.15 mm) Figure 3-16 Flange Template REAR No Scaling - Actual Size Flange Template Dukane Manual Part No. 403-578-01 Page 39 Series Servo Ultrasonic Press Systems ES User’s Manual This page intentionally left blank Page 40 Dukane Manual Part No. 403-578-01 Section 4 - Acoustic Stack/Fixture Setup SECTION 4 Acoustic Stack/Fixture Setup Overview . . . . . . . . . . . . . . . . . . . . . . 43 Stack Description. . . . . . . . . . . . . . . . . . 44 Changing Stack Components. . . . . . . . . . . . 45 Stack Removal . . . . . . . . . . . . . . . . . . . . 45 Stack Disassembly . . . . . . . . . . . . . . . . . . 46 Removing a Detachable Tip. . . . . . . . . . . . . . 46 Stack Assembly and Torque Values. . . . . . . . . . 47 Installing a Detachable Tip . . . . . . . . . . . . . . 48 Fixture Installation. . . . . . . . . . . . . . . . . . 49 Fixture Alignment . . . . . . . . . . . . . . . . . . . 49 Adjusting the Travel Limit (Electronic Bottom Stop). . . . 50 Fixture Leveling. . . . . . . . . . . . . . . . . . . . 51 Dukane Manual Part No. 403-578-01 Page 41 Series Servo Ultrasonic Press Systems ES User’s Manual This page intentionally left blank Page 42 Dukane Manual Part No. 403-578-01 Section 4 - Acoustic Stack/Fixture Setup Overview A Dukane press/thruster and an iQ Series generator can be used to assemble an unlimited variety of parts for every conceivable market segment, including automotive, medical, appliance, consumer, packaging and toy industries. Various techniques and processes, such as welding, staking, swaging, inserting, and spot welding can be used for the different applications. This variety is made possible through the interchange of some system components. Of these components, the horn and fixture are usually custom-made for each application, and the booster that is selected for a job depends on the required horn output amplitude. Also, the press/thruster controls are specifically adjusted for each application. This section provides instructions for setting up these components of the system in a new installation or when changing applications. Dukane Manual Part No. 403-578-01 Page 43 Series Servo Ultrasonic Press Systems ES User’s Manual Stack Description The acoustic stack shown in Figure 4-1 consists of three parts: • • • Transducer Booster Horn The transducer and the booster are normally shipped assembled and installed in the press. The horn and/or the fixture may be shipped separately. The stack is easily removed from or installed in the press/thruster. This makes it possible to change the horn or booster. It also makes it easier to perform regular inspections and/or maintenance of the stack components. TRANSDUCER Contact Button BOOSTER Transducer Housing Anti–Rotation Pins Mounting Stud Mounting Ring HORN Spanner Wrench Hole (Typical) Figure 4-1 Acoustic Stack Components Page 44 Dukane Manual Part No. 403-578-01 Section 4 - Acoustic Stack/Fixture Setup Changing Stack Components Stack Removal Before removing the stack, perform the following steps: 1. Activate the E-STOP (Abort) switch on the front of the press base. 2. Power down the generator. These two steps are necessary to ensure that no power will be accidently applied while removing the stack. CAUTION The stack access door on the press/ thruster holds the stack components in the stack housing. Hold the stack by the HORN or the exposed part of the BOOSTER when removing or installing the access door. This will prevent the stack from falling out and being damaged. 3. While supporting the stack with one hand, loosen the two or four socket-head screws that secure the stack access door. 4. If the door has two screws, swing it open. If it has four screws, remove it completely. 5. Pull the stack forward and down until the transducer clears the electrical contact. Refer to Figure 4-2. 6. Lift the stack out of the housing. NOTE When changing or inspecting any of the stack components, ALWAYS remove the stack from the thruster. CAUTION There may be an electrical charge stored in the transducer. To avoid any electrical shock, do not touch the contact button when removing the stack. Figure 4-2 Stack Removal Dukane Manual Part No. 403-578-01 Page 45 Series Servo Ultrasonic Press Systems ES User’s Manual Stack Disassembly To separate the stack components carefully follow the instructions below: 1. Use the two spanner wrenches (wrench A and B) provided with the press. Place wrench A on the component to be removed (Figure 4-3) and wrench B on the adjoining component. Turn wrench A in the direction indicated. Once the component is loose, it can be removed by hand. 2. To maintain structural integrity, NEVER hold a transducer by the housing or the booster by the mounting rings while separating components. Doing so will result in damage to the unit. 3. Use only the tools recommended by Dukane. NEVER clamp a horn, booster, or transducer in a vise or use tools such as pliers, visegrips, etc. Doing so will result in scratches and/or gouges, resulting in stress areas on the surface. This condition will affect the stack operation and could lead to failure of each stack component. A B Figure 4-3 Disassembling Components CAUTION To avoid possible injury, press down on the spanner wrench with the palm of the hand. Removing a Detachable Tip If the horn has a detachable tip, do the following: 1. Use a spanner wrench to hold the horn, as shown in Figure 4-4. 2. Turn a properly sized open end wrench to loosen the tip. Figure 4-4 Tip Removal NEVER clamp the horn or use a vise to hold it. Page 46 Dukane Manual Part No. 403-578-01 Section 4 - Acoustic Stack/Fixture Setup Stack Assembly Before assembling a stack, inspect all of the components for possible damage — especially the surfaces that are to be joined. Look for non-flat surfaces (concave, convex), stress cracks, chips, or gouges. Any of these irregularities will affect the operation of the stack and could cause further damage. Contact the Dukane Ultrasonics Tooling Department concerning a damaged component. When the components have been inspected and are found to be free of any damage, continue with the following steps: 1. Inspect the contact surfaces for smoothness and cleanliness. Pitting or a buildup of old grease and dirt on the surface will interfere with the transfer of energy from one component to another. 2. Remove any foreign matter from the threaded stud and the mating hole. Tighten the stud in the stack component that is most distant from the transducer according to the following stud torque values: Stud Thread Size Torque inch-lbs foot-lbs Nt-meters 1/2 in. x 20 12-18 1 - 1.5 1.4 - 2 3/8 in. x 24 12-18 1 - 1.5 1.4 - 2 M8 x 1.25 12-18 1 - 1.5 1.4 - 2 Table 4-I Stud Torque Values 3. Coat one of the contact surfaces with a thin coat of high-pressure grease. A small packet is supplied with the system. We recommend Dow– Corning #4 (or #111 as an alternate). NOTE Do not apply any grease or lubricant to the stud. 4. Thread the components together and tighten (Refer to Table 4-II) by applying torque as follows: Stack kHz Torque inch-lbs foot-lbs Nt-meters 15 540 45 61 ** 20 420 35 47.5 20 300 25 34 30 216 18 24.4 40 216 18 24.4 Table 4-II Horn/Booster Torque Values ** 20 kHz 43S245, 43Q245 models. These models have Figure 4-5 Assembling Components 3/8 inch x 24 tpi studs. Often a step stud may be required to assemble the 20 kHz horn to its booster. Dukane Manual Part No. 403-578-01 Page 47 Series Servo Ultrasonic Press Systems ES User’s Manual Installing a Detachable Tip If the horn has a detachable tip, do the following: NOTE Do not apply any lubricant to the tip threads. 1. Inspect the surfaces of the tip and the horn for any stress cracks, chips or gouges. 2. Coat one of the contact surfaces with a thin coat of high-pressure grease or lubricant. We recommend Dow– Corning #4 (or #111 as an alternate). 3. Thread the tip into the horn. To tighten the tip, use the open-end wrench for the tip and a spanner wrench to hold the horn, as shown in Figure 4-6. Tighten the tip to the following specifications: Figure 4-6 Tip Assembly Tip Stud Thread Size Torque inch-lbs foot-lbs Nt-meters 1/2 in. x 20 360 30 40.7 3/8 in. x 24 336 28 37.9 5/16 in. x 24 300 25 33.9 1/4 in. x 28 240 20 27.1 Table 4-III Replaceable Tip Torque Values Installing the Stack 1. Ensure that the generator power is off. 2. With the stack at the angle shown in Figure 4-7, rest the booster mounting ring on the block or pin of the stack housing. 3. Brace the stack at point A in Figure 4-7, and swing the stack to a vertical position. The ultrasound contact button on the transducer should snap under the electrical contact leaf of the housing. 4. While still supporting the stack in this vertical position, install or swing closed the stack access door, and thread the two or four socket-head screws (that hold the door closed) into their holes. 5. If the horn is not properly aligned with the fixture, rotate the stack to align the horn with the fixture. 6. Finish tightening the socket head screws until snug. DO NOT OVER-TIGHTEN! Page 48 A Figure 4-7 Stack Installation NOTE When all door screws are tightened, a small gap between the door and stack housing is normally present. Dukane Manual Part No. 403-578-01 Section 4 - Acoustic Stack/Fixture Setup Fixture Installation WARNING There are three steps involved in installing a fixture. • Aligning the fixture with the horn, • Leveling the fixture to provide the necessary support, and • Rigidly securing the fixture to the mounting surface. Any fixture manufactured by a third party must comply with all OSHA and ANSI requirements. All fixtures must be guarded as necessary. Fixture Alignment Dukane Corporation does not assume any responsibility or liability for fixtures manufactured by the customer or any third party manufacturer. To safely align the fixture under the horn, use the following procedure. Refer to Figure 4-8. 1. Place the fixture, with unwelded parts, under the horn. 2. Initially align the two slots in the fixture over two of the seven mounting holes on the base plate. 3. Install the two fixture hold-down bolts with washers, and finger tighten. 4. Ensure the E-STOP is released, then start up the system normally. 5. Perform the following steps, depending on the system: For generator front color display: a) From the main menu, go to Process Setup. b) Scroll down to Trigger Type, select Change Type, then select Force. c) Select Sensing Start Position. For iQ Explorer or iQ Explorer II: a) For Trigger Type, select Force. b) Press Teach next to Sensing Start Position or Sensing Start Distance. 6. Hold the two operate switches to lower the horn. Before the horn makes contact with the parts, change the Speed to Medium, then hold the switches again to lower the horn further. 7. After the horn slightly depresses the parts together, tighten the two hold-down bolts. 8. Return the press to the home position as follows: Fixture Hold Down Bolts Fixture Leveling Screws (Hex socket set screws) Fixture For generator front color display: Push the Back button, and follow the instructions on the display. Holes for 4–Hole Mounting Fixture (9" x 9") For iQ Explorer or iQ Explorer II: a)Select Exit. b)Press No when asked to set the position. c)Follow the instructions on the screen. Holes for 3–Hole Mounting Fixture (12" x 14") Figure 4-8 Fixture/Base Layout Continued Dukane Manual Part No. 403-578-01 Page 49 Series Servo Ultrasonic Press Systems ES User’s Manual Continued from Previous Page Adjusting the Travel Limit NOTE Electronic Bottom Stop Adjust the press travel limit (Electronic Bottom Stop) so that the horn stops above the fixture. This prevents pinch points and avoids horn damage if the acoustic stack assembly descends when a part is not in the fixture. The fixture should be flat on the base. If the fixture is equipped with leveling jack screws, adjust the screws so that they do not interfere with seating of the fixture on the base plate. 1. The acoustic stack should be in the press, and the fixture/nest should be positioned. 2. Perform the following steps, depending on the system: For generator front color display: a) From the main menu, go to Process Setup. b) Select the Travel Limit button. For iQ Explorer or iQ Explorer II: Press Teach next to Travel Limit. 3. Hold the two operate switches to lower the horn. Allow the horn to reach a position just above the fixture/ nest so that there is a gap of approximately .050" [1.3 mm]. If the gap must be smaller to allow the weld to complete properly, adjust it accordingly. 4. Set the travel limit and return the press to the home position as follows: For generator front color display: a) Press the Use Position button. b) Press the Back button, and follow the instructions on the display. For iQ Explorer or iQ Explorer II: a) Select Exit. b) Press Yes when asked to set the position. c) Follow the instructions on the screen. NOTE Do not overtighten the cap screws. This may flex the fixture plate. Figure 4-9 Loosening the Hold–Down Figure 4-10 Tightening the Hold–Down Cap Screws and Jack Screws Cap Screws and Jack Screws Continued Page 50 Dukane Manual Part No. 403-578-01 Section 4 - Acoustic Stack/Fixture Setup Continued from Previous Page Fixture Leveling For most applications, the fixture must be mounted so that the contacting surfaces on the horn are parallel to the contacted surfaces on the plastic part. This ensures that a consistent, even weld will result. To level the fixture, do the following: 1. Place a part in the fixture. 2. Loosen (turn counterclockwise) the hold-down bolts or cap screws and the four leveling jack screws on the fixture plate. Refer to Figure 4-9. 3. Perform the following steps, depending on the system: For generator front color display: a) From the main menu, go to Process Setup. b) Scroll down to Trigger Type, then press the Sensing Start Position button. For iQ Explorer or iQ Explorer II: Press Teach next to Sensing Start Position or Sensing Start Distance. 4. Hold the two operate switches to lower the horn. Just before the horn makes contact with an unwelded part, change the Speed to Medium or Slow. Lower the horn to apply some light pressure (approximately 10 - 20 lb.) 4. Press the OFFLINE button on the generator if one is present. If not, select the Utilities tab in iQ Explorer and check the Off-line box. 5. Cycle the equipment by activating both cycle activation switches on the base or by triggering the automation switch. (See the NOTE below.) When one cycle is completed, the pressure developed between the horn and the sample part will have left marks from the carbon paper on the white paper. If the fixture is not level, the carbon markings will be darker in some areas than in others. All carbon markings will be uniform when all adjustments have been made properly. 6. Adjust the leveling of the fixture and repeat this procedure as necessary until you are confident that the fixture is level. 7. To re-enable ultrasound for welding, press the ONLINE button on the generator if one is present. If not, uncheck the Off-line box in the Utilities tab in iQ Explorer. On some applications, leveling may be difficult to achieve as described above. In these instances, sample parts would need to be welded, measured for parallelism, and the leveling adjusted correspondingly. 5. Turn the four jack screws clockwise until a slight resistance is felt. Refer to Figure 4-10. 6. Tighten the hold-down cap screws by turning them clockwise until a firm resistance is felt. 7. Return the press to the home position as follows: For generator front color display: Push the Back button, and follow the instructions on the display. For iQ Explorer or iQ Explorer II: a) Select Exit. b) Press No when asked to set the position. c) Follow the instructions on the screen. The following procedure may be helpful in leveling the fixture in some applications. To perform this procedure, use a piece of carbon paper and a piece of white paper. 1. Place a sample part in the fixture. 2. Place a piece of white paper on top of the sample part. 3. Place a piece of carbon paper, carbon side down, on top of the white paper. Dukane Manual Part No. 403-578-01 NOTE Since no melting will occur during this process, the intended "weld collapse distance" should be much smaller than on a typical weld to avoid generating excessive forces. Page 51 Series Servo Ultrasonic Press Systems ES User’s Manual This page intentionally left blank Page 52 Dukane Manual Part No. 403-578-01 Section 5 - Controls and Indicators SECTION 5 Controls and Indicators Overview . . . . . . . . . . . . . . . . . . . . . . 55 Press . . . . . . . . . . . . . . . . . . . . . . . . 55 Ergonomic Base . . . . . . . . . . . . . . . . . . . . 56 Emergency Stop Switch . . . . . . . . . . . . . . . . 58 Press Base Status Display . . . . . . . . . . . . . . . 59 Generator . . . . . . . . . . . . . . . . . . . . . . 60 Remote Controller. . . . . . . . . . . . . . . . . . 60 HMI. . . . . . . . . . . . . . . . . . . . . . . . . 60 Dukane Manual Part No. 403-578-01 Page 53 Series Servo Ultrasonic Press Systems ES User’s Manual This page intentionally left blank Page 54 Dukane Manual Part No. 403-578-01 Section 5 - Controls and Indicators Overview This section contains information about the visual indicators, manual switches and adjustments of the components in a typical iQ ES system. The press, generator, remote controller and HMI will be discussed. Press Refer to Figure 5-1 for location of the following items: • LED's Servo Power - The Servo Power LED glows green when electrical power to the press has been activated. Servo Power LED Trigger LED HMI Thruster Height Adjustment Wheel Height Locking Handles (2) Base Plate Operate Switches (2) Press Status Display Figure 5-1 Press Manual Controls and Indicators Dukane Manual Part No. 403-578-01 E-STOP Switch Continued Page 55 Series Servo Ultrasonic Press Systems ES User’s Manual Continued from Previous Page Trigger - The Trigger LED glows whenever the trigger point is reached. • Operate Switches See the next page in this section for more information. • E-STOP Switch See Page 58 in this section for more information. • Press Status Display See Page 59 in this section for more information. • Thruster Height Adjustment Wheel The adjustment wheel is used with the height locking handles. After the handles have been loosened to unlock the thruster from the column, the wheel can be turned to move the thruster into the desired position. The adjustment wheel is found on the side of the press on models 43S215, 43S220, and 43S340. See Figure 5-1. The wheel is found at the back of the press on models 43S245-AX. See Figure 5-2. Thruster Height Adjustment Wheel Figure 5-2 Height Adjustment Wheel, Models 43S245-AX • Thruster Height Locking Handles See Press Height Adjustment on Page 23. Ergonomic Base The ergonomic base, shown in Figure 5-3, consists of a cast base, base plate, left and right operate or cycle activation switches (black finger switches), abort switch (red palm switch), and a status display screen. At the back of the base is a cable connector for an interface between the iQ Series generator and the base front panel. Right Operate Switch Left Operate Switch Lower Fixture Base Plate The machined base plate is bolted to the top of the ergonomic base. It has a series of tapped holes for mounting fixtures. For details on the alignment and leveling of the fixtures, see Section 4: Stack/Fixture Setup. E–Stop Switch Figure 5-3 Ergonomic Base Controls Continued Page 56 Dukane Manual Part No. 403-578-01 Section 5 - Controls and Indicators Continued from Previous Page Cycle Activation (Operate) Switches Located on either side of the base are two optical operate switches. These are shown in Figures 5-3 and 5-4. These switches use Infrared (IR) sensors. They comply with OSHA and CE safety standards. Both switches are identical. Each switch has a small red LED that is dimly illuminated whenever the power is on, as shown in Figure 5-4. When the operator places their finger in the tray, the LED brightens and a second LED in the opposite corner of the tray illuminates to indicate the switch has been activated as shown in Figure 5-5. Both switches must be activated simultaneously (within approximately 0.35 seconds) to initiate a weld cycle or jog the press while in "Teach" mode. Dimly Lit Red LED Figure 5-4 Right Operate Switch in Standby Mode, One LED Dimly Lit Emergency Stop (Abort) Switch A red Emergency–Stop (E-STOP) switch is located in the center of the base as shown in Figure 5-3. The emergency stop switch must be in its reset position before the operate switches will function. Brigtly Lit Red LEDs Figure 5-5 Right Switch in Operate Mode, Both LEDs Brightly Lit WARNING Any modifications to the Activation Switch (also known as the Operate Switch) circuit must comply with all OSHA and ANSI requirements. Compliance with all local building and electrical codes is also required. Dukane Corporation does not assume any responsibility or liability for circuitry modifications made by the customer or by any third party manufacturer. Continued Dukane Manual Part No. 403-578-01 Page 57 Series Servo Ultrasonic Press Systems ES User’s Manual Continued from Previous Page Using the E-STOP Switch To Stop the System with E-STOP Push the red, Emergency Stop (E-STOP) switch to the OFF position. This is also known as setting the E-STOP. See Figure 5-6. Pressing the E-STOP switch causes the generator to: • • • eset Twist to R POWER E IN CYCL ABORT Immediately turn off the ultrasound, Remove electrical power from the press, and Initiate a software abort sequence. The following indicators are displayed when the E-STOP is set, depending on system configuration. Using an HMI Display The HMI display shows this window: E-Stop has been pressed by an operator! OK Choose to acknowledge the message, or not. The OK on the screen may be tapped to acknowledge the message, but in any case the message disappears when the E-STOP switch has been reset. Using an iQ Generator Color Front Panel Display The Main Menu background color turns to red. Resetting the E-STOP The E-STOP switch must be in its reset position before the power is restored, and before the operate switches will function. Figure 5-6 Setting and Resetting the E–STOP Switch WARNING Any modifications to the Emergency Stop Switch (also known as the E-STOP or Abort Switch) circuit must comply with all OSHA and ANSI requirements. Compliance with all local building and electrical codes is also required. Dukane Corporation does not assume any responsibility or liability for circuitry modifications made by the customer or by any third party manufacturer. Using an HMI Display Once the E-STOP has been reset, the HMI displays messages that show what is happening while the system restarts. As the software initializes, a message appears: Initializing Servo Press... Please Wait. To reset the E-STOP, twist the large red button about 45 degrees clockwise, which will cause the button to spring out. This is shown in Figure 5-6. Next, there will be a message prompting the operator to Home the welder. The following indicators are displayed once the E-STOP is reset, depending on system configuration. Follow the instructions on the HMI to Home the welder. Continued Page 58 Dukane Manual Part No. 403-578-01 Section 5 - Controls and Indicators Continued from Previous Page Using an iQ Generator Color Front Panel Display After the E-STOP switch is reset, this message appears on the display: Press Base Status Display The function of the Press Status Display - See Figure 5-1 - is to indicate one of three status conditions of the press: • POWER - When the E-STOP switch is pulled out, • IN CYCLE - When both cycle operate switches are • ABORT - When the E-STOP switch is pushed in, the Servo in Test Mode. Please Wait. As the software initializes, the message appears: Initializing Servo Press... Please Wait. the green POWER status light indicates that power is applied to the press. pressed, the IN CYCLE display of the status indicator is ON for the duration of switch activation. red ABORT status indicator illuminates. Press operation is no longer possible. This is followed by a prompt to Home the machine. Follow the procedure below. Homing the Welder Manual Operating Mode Activate both operate switches, and hold them until the homing message on the HMI or generator display disappears. Automatic Operating Mode NOTE The E-STOP status bar is displayed at the bottom menu bar of the HMI screen. E-Stop Status Status Color E-STOP is Reset E-STOP is Set Gray Red Table 5-I E–STOP Status Color An external input is required to home the welder. This signal is supplied by the user. Detailed information on configuring external signals to perform homing and other functions is contained in application note AN507 available from the Dukane website (www.dukane.com/us > Downloads > Application Notes). Dukane Manual Part No. 403-578-01 Page 59 Series Servo Ultrasonic Press Systems ES User’s Manual Generator The rear panel has an AC breaker/switch that turns power to the generator on or off. See Figure 5-7. On most units the front panel has a power button that is lighted (green) when power has been activated. On some units, the front panel has a power light (green) only (i.e. no power button). It is beyond the scope of this manual to describe and discuss the other manual controls featured on generators with color displays. Refer to the iQ Generator ES manual, 403-584, for detailed information about all the front panel controls. (ON) (OFF) Remote Controller The rear panel has an AC breaker/switch that turns power to the controller on or off. See Figure 5-7. The front panel has an LED that lights when power to the unit has been activated. HMI On the rear panel, the HMI has a power switch with integrated LED. The LED lights when power to the unit has been turned on. Figure 5-7 Typical AC Breaker/Switch NOTE See the Section 6, Operation for more information about using the switches in start-up and shutdown. Below the HMI display on the front of the unit a set of LED's light to reflect the unit's activity. Page 60 Dukane Manual Part No. 403-578-01 Section 6 - Operation SECTION 6 Operation Overview . . . . . . . . . . . . . . . . . . . . . . . . . . . . . . . . . . . . . . . . . 63 Start-up . . . . . . . . . . . . . . . . . . . . . . . . . . . . . . . . . . . . . . . . . . 64 Control Functions . . . . . . . . . . . . . . . . . . . . . . . . . . . . . . . . . . 66 Starting and Stopping the Weld Cycle . . . . . . . . . . . . . . . . . . . 67 Software Support Features . . . . . . . . . . . . . . . . . . . . . . . . . . . 68 Numeric Pad and Keypad . . . . . . . . . . . . . . . . . . . . . . . . . . . . . . . . . 68 Help System . . . . . . . . . . . . . . . . . . . . . . . . . . . . . . . . . . . . . . . . . . . 69 Quick Start using iQ Explorer II . . . . . . . . . . . . . . . . . . . . . . . 70 Unique Features . . . . . . . . . . . . . . . . . . . . . . . . . . . . . . . . . . . 82 Dukane Manual Part No. 403-578-01 Page 61 Series Servo Ultrasonic Press Systems ES User’s Manual This page intentionally left blank Page 62 Dukane Manual Part No. 403-578-01 Section 6 - Operation Overview After setup is complete, operation can begin. This section on system operation will cover basic, general guidelines for operation. By way of review, a typical system has: • an iQ generator, • an iQ press (including thruster, switches, controls, and cables), • a stack (transducer, booster, horn), and fixturing. • a user interface (HMI) or computer (optional on some systems) • control and data acquisition software (optional on some systems) As described previously there are Remote and Integrated versions of the system to consider. (See Section 1, Page 3.) System Makeup - System operating requirements depend on what type of system there is, what its options are, what user-supplied equipment is interfaced with the system, and on what the application is. Control - Control of the welding process depends on the system configuration. For generators with a color front panel display (Q-Series), the user may control the welding system with either the iQ generator's color front display, or through the iQ Explorer II software. For generators without a display (A-Series), the system is controlled exclusively via the iQ Explorer software running on an HMI or computer. Other Considerations - Operating the system includes making whatever adjustments there may be to the press, acoustic stack and tooling. For additional information about the other key Dukane components of the system, see these User Manuals: Generators with color display (Q-Series): • iQ Ultrasonic Generator/Power Supply ES (Part No. 403-584), and • iQ Explorer II (Part No. 403-585), and Generators without display (A-Series): • iQ Ultrasonic Generator/Power Supply ES (Part No. 403-575), and • iQ Explorer (Part No. 403-579) Dukane Manual Part No. 403-578-01 Page 63 Series Servo Ultrasonic Press Systems ES User’s Manual Start-up Generator iQ Generator with AC Breaker and Power Button The steps below describe the preferred start-up sequence of the servo ultrasonic press system. Details on powering up individual components are provided in the subsequent paragraphs. 1. Set the AC breaker on the press or remote controller on. (ON) (OFF) Figure 6–1 Typical AC Breaker/Switch Lighted Power Button 2. Ensure the E-Stop is not active (i.e. system is not aborted). 3. Power up the generator. 4. If using an HMI, power it up, and start the iQ Explorer or iQ Explorer II software. Figure 6–2 iQ Generator with Color Display and Power Button 5. Power up any other equipment interfaced with the welder. 6. Press the rear panel AC breaker/switch to ON. (Figure 6-1) Power Light 7. The front panel lighted power button (Figure 6-2) will glow RED when in the extended position. This means the generator is in standby. 8. To activate the generator, press the RED power button lightly. It will flash a few times, then will glow a steady GREEN. The generator then begins its start-up sequence. The LCD display, if present, identifies the Dukane iQ Series type first. The sequence ends when the Main Menu is displayed. Page 64 Figure 6–3 iQ Generator with Power Light Dukane Manual Part No. 403-578-01 Section 6 - Operation iQ Generator with AC Breaker Only 1. Press the rear panel AC breaker/switch (Figure 6-1) to ON. 2.The front panel power light (Figure 6-3) will glow GREEN after some time (up to 40 seconds on some systems). This means the generator's power has been turned on. AC Breaker/Switch Remote Controller For systems equipped with a remote controller, press the rear panel AC breaker/switch (Figure 6-1) to the ON position. Press Base When powered, the press base display (Figure 5-1) shows the word POWER. Press Press the AC breaker/switch, located on the rear panel, to ON. See Figure 6-4 for switch location. The SERVO POWER LED will be lit GREEN. See Figure 6-2. iQ HMI Press the power button to the on position. The button is under the power icon located on the left side of the rear panel. When power is on, an LED on the power button is lit. Figure 6–4 Servo Press AC Breaker/Switch Location Other Equipment Power up any other system components - automation equipment, etc. Dukane Manual Part No. 403-578-01 Page 65 Series Servo Ultrasonic Press Systems ES User’s Manual Control Functions Various functions, such as controlling the system and monitoring the welding process are accomplished by one of several possible means, depending on the system configuration. For systems equipped with generators containing a color front panel display (Q-Series), the user has the option of controlling the welding system with either the generator's color front display, or through the iQ Explorer II software. For systems equipped with generators not containing a display (A-Series), the system is controlled exclusively via the iQ Explorer software running on an HMI or computer. Page 66 NOTE Most of the examples in this manual illustrate concepts using the iQ Explorer II software. Although there are differences between iQ Explorer and iQ Explorer II , the functionality of iQ Explorer may be inferred from these examples. Dukane Manual Part No. 403-578-01 Section 6 - Operation Starting and Stopping the Weld Cycle Starting a Weld Cycle Before starting a weld cycle, ensure the process settings are correctly programmed and that the parts to be welded are loaded in the fixture. Check that the Sensing Start Position is set properly (if used) so that the horn does not come in contact with the part at this position see the Quick Start guide that follows in this section for details. For press systems equipped with a standard Dukane base, the cycle is started by activating both opti-touch operating switches at the same time (i.e. within 0.35 seconds of each other). Maintain switch activation until the ultrasound starts, which is indicated by the TRIGGER LED becoming lit on the front of the press. De-activating the switches prior to the start of ultrasound aborts the cycle and causes the press to retract to the Top-of-Stroke position. For press systems integrated with external automation, starting the weld cycle is typically accomplished through the Cycle Start Input. See the generator manual for details. Stopping the Weld Cycle Normal Conditions The cycle stops when the programmed welding cycle ends or when the generator's Cycle Stop input is activated. Stopping the Weld Cycle Emergency Conditions For press systems equipped with a Dukane base, push in the E-STOP button to abort the weld cycle (see Section 5, Controls and Indicators and Figure 5-6). NOTE: Once the E-STOP button is pressed in, power to the servo is turned off, and the horn will not move up. To allow the servo to move again, the E-stop must be reset and the press controller must complete its start-up process, which takes some time. If there is a need to move the horn up quickly, such as in case of accidental entrapment, the horn can be pushed up manually on some models (43S245-AX and 43S340). On other models, the entire thruster can be moved up on the support column by unlocking the height locking handles (see Section 3, Installation and Figure 3-9). Turning the generator off as described below will also stop a weld cycle. iQ Generator with AC Breaker and Power Button Applies to Models with 2400 Watts or less. 1. Press the generator's front panel power button. The button color changes from GREEN to RED. 2. In addition, you may push the power switch on the generator's rear panel to the OFF position. The front panel lighted power button goes out indicating that power has been turned off. iQ Generator with AC Breaker Only Applies to Models with 3600 Watts or greater. 1. Press the rear panel AC breaker/switch (Figure 6-1) to OFF. 2. The front panel power light (Figure 6-3) will go out. This means the generator's power has been turned off. Dukane Manual Part No. 403-578-01 Page 67 Series Servo Ultrasonic Press Systems ES User’s Manual Software Support Features Two support features incorporated into the iQ Explorer and iQ Explorer II software are its virtual numeric pad/keyboard and its help system. Numeric Pad and Keyboard Select for the keyboard. Select for the numeric pad. See Figure 6-5 to the right. Figure 6-5 Page 68 iQ Explorer II, Keyboard and Numeric Pad Dukane Manual Part No. 403-578-01 Section 6 - Operation Help System The help system is a reference tool to assist in understanding key terms of the ultrasonic welding process. The iQ Explorer/iQ ExplorerII help function can be accessed using the top menu bar, or by pressing the F1 key as explained below. Help Icon Top Menu Bar Help is one of the top menu bar items as shown in Figure 6-6. Figure 6-6 Help from Top Menu Bar Clicking on Help and then selecting Help from the pull-down menu will open the Help window. A Contents tab and an Index tab are two entry points to the help file information. Using Contents in Help Contents groups the help file information into these eight categories: - Hardware - Process Control - Process Limits - Notes - Graph - Utilities - System - Options The Index is an alphabetical list of words and phrases. Using the Index in Help Figure 6-7 Contents and Index in Help Figure 6-7 illustrates that the term, Trigger was found through both Contents and the Index. Using the F1 Key The F1 key can be pressed to activate Help when: 1. The cursor is positioned in an item that can be edited, such as a text box, drop down list, or check box and, 2. That item is linked to Help. Dukane Manual Part No. 403-578-01 NOTE If no keyboard is available, use the iQ HMI Windows keyboard, or press Help in the top menu bar, and navigate to the desired topic. Page 69 Series Servo Ultrasonic Press Systems ES User’s Manual Quick Start - Using iQ Explorer II Step 1 - Read the Software User's Manual Read the Installation section of the iQ Explorer II User's Manual, 403-585. Ensure that a proper connection of the iQ Explorer II software and the servo press has been made. See Figure 6-8 below. Important: Understand and familiarize yourself with the operation and navigation of the iQ Explorer II user interface software. Refer to the iQ Explorer II User's Manual - Section 4, Operation. Name of the connected welder. Names of active welders in the network appear when Show Welders tab is clicked. Figure 6-8 Shop A Servo Welder 3 Welder DR Insert Line 14 iQ Explorer II, Start-up Step 2 - Select Unused Setup After moving to the Hardware tab, click on the Setup File Name box, and select an unused setup. This will ensure that you do not overwrite a pre-existing setup. Hardware Tab See Figure 6-9. Figure 6-9 iQ Explorer II, Start-up, Hardware Tab Page 70 Dukane Manual Part No. 403-578-01 Section 6 - Operation Step 3 - Navigate to the Process Settings Tab See Figure 6-10. Process Settings Tab Figure 6-10 iQ Explorer II, Process Settings Tab Step 4 - Set Cycle Initiation Mode See Figure 6-11. NOTE This Initiate Mode selection assumes there is a stand-alone, benchtop system with manual operate switches. Select Manual in Initiate Mode. Figure 6-11 iQ Explorer II, Process Settings > Initiate Mode Dukane Manual Part No. 403-578-01 Page 71 Series Servo Ultrasonic Press Systems ES User’s Manual Step 5 - Specify Trigger Settings Select Force as the type of trigger. NOTE Then program the desired amount of force the press is to apply before ultrasound is initiated. The example shown in Figure 6-12 assumes trigger force for a part with four linear inches of weld would need between 32 - 42 lbs. of trigger force. A 20 inch linear weld may require between 52 - 70 lbs. of trigger force. See Figure 6-13, Initial Trigger Force Settings. Next, program Max Trigger Time. This provides a measure of safety insuring the welder will fault if for some reason the welder never achieves the programmed trigger force. See Figure 6-12. 40 Figure 6-12 6.000 iQ Explorer II, Process Settings > Trigger > Type, Force, Max Trigger Time 110 105 100 95 Force (pounds) 90 85 80 75 70 65 60 55 50 45 40 35 30 25 20 15 10 5 0 Figure 6-13 Page 72 2 4 6 8 10 12 14 16 18 20 22 24 Linear Weld Joint (inches) 26 28 30 32 34 36 Suggested Initial Trigger/Force Setting Dukane Manual Part No. 403-578-01 Section 6 - Operation Step 6 - Program Sensing Speed On the Process Settings tab, find Sensing Speed. This is the speed (inches/millimeters per second) at which the horn will move during the approach just before reaching the trigger position. A typical starting value for Sensing Speed is 0.040 in/s (1.0 mm/s). Sensing Speed can be set higher for shorter cycle times, or lower for greater trigger force detection accuracy. This feature is exclusive to the servo-controlled systems and allows for precise, accurate trigger forces. Figure 6-14 iQ Explorer II, Process Settings > Sensing Speed Step 7 - Program Sensing Start Position See Figure 6-15. Sensing Start Position is the actual position in the machine travel where the system begins to sense for the trigger force to be achieved. By the time the horn reaches the Sensing Start Position, it is already moving at the programmed Sensing Speed. It is critical to program the Sensing Start Position so that the horn is never in contact with the part at this position, taking into account the height variability of unwelded parts. Failure to do so may result in equipment damage. If you do not know the position where this contact is made, select the Teach button. See Figure 6-16. Figure 6-15 iQ Explorer II, Process Settings > Sensing Start Position Dukane Manual Part No. 403-578-01 Page 73 Series Servo Ultrasonic Press Systems ES User’s Manual Step 8 - Teach Sensing Start Position After pressing Teach, you will see a window similar to the one shown in Figure 6-16. Place an unwelded part into the fixture. Press both operate switches to jog the horn down to within 0.010 0.030 inches above the part. The stroke position of the thruster will be shown in the Current Position box. Once you are at the desired position, press Set to program that distance. Select Exit, and follow instructions to home the machine. Figure 6-16 iQ Explorer II, Teach Sensing Start Position Page 74 Dukane Manual Part No. 403-578-01 Section 6 - Operation Step 9 - Program Weld Characteristics Primary Method On the Process Settings tab, find Weld > Primary Method, and select Collapse Distance. Collapse Distance - This is the distance the welder advances once the programmed trigger force is reached. Usually this distance is the height of the energy director, or shear joint of the part being welded. NOTE Programming these weld parameters is similar to programming the Dukane DPC IV Plus or other pneumatic systems. Weld methods are: Collapse Distance, Absolute Distance, Energy and Peak Power. Max Time is a component of the weld method intended to offer a measure of safety. If the programmed parameter is not achieved within this time window (2 seconds as shown in the example of Figure 6-17), the system will fault. Figure 6-17 iQ Explorer II, Process Settings > Weld > Primary Method Advanced Users - NOTE Advanced users may refine weld control after programming a primary method by choosing a secondary weld method. This selection is shown below. Secondary Method Continue programming weld characteristics by selecting one of the Secondary Methods available: Position, Energy, or Peak Power. The purpose of the secondary method is to end the weld phase if the selected method parameter value is reached. If Disabled is chosen, there would be no secondary weld method. Figure 6-18 iQ Explorer II, Process Settings > Weld > Secondary Weld Method Dukane Manual Part No. 403-578-01 Page 75 Series Servo Ultrasonic Press Systems ES User’s Manual Step 10 - Enable Melt Detect See Figure 6-19. This patented feature is found only on Dukane's servo press systems. If the feature is selected, the system will stop motion once the desired Trigger Force is achieved. The ultrasound will be initiated at this moment. Once the programmed force drop is detected, which indicates material softening or melting has begun, the motion will continue. This is the basis for Dukane's exclusive MeltMatch™ technology. 5 Figure 6-19 iQ Explorer II, Process Settings > Weld > Enable Melt Detect The value of the After Force Drops By parameter is used to designate how much the force is to decrease relative to the Trigger Force before the horn will resume the programmed weld motion. For example, for a Trigger Force of 40 lb. and a value of 5% for After Force Drops By, the press would stop once the Trigger Force is achieved, and resume motion after the force drops by 2 lb. (5% of 40 lb.) below the Trigger Force, or 38 lb. A starting value of After Force Drops By is typically in the 5-10% range. The benefit of this option is significantly less stress on the parts and stronger weld bonds. Step 11 - Specify Weld Motion Immediately after Trigger (or Melt Detect) occurs, the press changes the speed of motion to the Weld Speed. Enter the selections described below and shown in Figure 6-20. Weld Motion Control - Select Speed. Weld Profile - Select Constant. Speed - Enter desired weld speed. Typical weld speeds are in the range 0.010-0.060 in/s (0.25-1.5 mm/s). For users experienced with pneumatic welders, one method to estimate the weld speed is to divide the desired weld collapse distance by the weld time that would be expected on a pneumatic welder - the result is the average speed. Figure 6-20 Page 76 iQ Explorer II, Process Settings > Weld > Weld Motion Control, Weld Profile, Speed Dukane Manual Part No. 403-578-01 Section 6 - Operation Advanced Users - NOTE Advanced users can optimize the weld speed using a Profile to produce superior weld strength and excellent cosmetic appearance. See Figure 6-21, where Segmented was selected as the Profile Type. This feature allows creating a speed motion profile during the weld cycle. The profile can be used to match the actual melt collapse of the weld joint. Figure 6-21 View Speed Profile Selecting View Speed Profile brings up a screen like one shown below. iQ Explorer II, Process Settings > Weld > Weld Profile > Segmented Optimizing the Feature The easiest way to make best use of this feature is to optimize the power draw throughout the weld cycle. This can be done by manipulating the Speed Profile until the Power Graph shows a smooth, constant result. See Figure 6-22 at right for a view of a Segmented Speed Profile.To program the desired speeds, first select the segment by clicking on the square block under the down arrow, then type in the speed value in the numerical entry box. Repeat this process for the remaining segments. Figure 6-22 iQ Explorer II, View Speed Profile Step 12 - Set Ultrasound Amplitude A typical initial ultrasound weld amplitude setting is 100%. The range for this feature is between 20% and 100%. See Figure 6-23 below. Figure 6-23 iQ Explorer II, Process Settings > Amplitude Dukane Manual Part No. 403-578-01 Page 77 Series Servo Ultrasonic Press Systems ES User’s Manual Step 13 - Post Weld Settings The post weld phase of the process is sometimes overlooked; however, it is important in achieving desired weld results. The iQ Servo Welder has several exclusive post weld control parameters that can improve weld bond strength and process repeatability. Hold There are two types of hold - Dynamic Hold and Static Hold. These types can be used together or separately. Dynamic Hold Method During Dynamic Hold, which occurs immediately after the weld phase, the press will continue to travel at the programmed hold speed with the ultrasound turned off. This feature provides the ability to collapse the molten plastic after the ultrasonic signal is turned off, before material solidification. This feature can be beneficial in producing superior weld strength and appearance. To program Dynamic Hold, find Post Weld > Dynamic Hold Method, and select Distance. Then enter the desired Hold Distance, Speed, and Max Time. The Max Time parameter is used to terminate the machine cycle if the dynamic hold distance is not reached within the allowable time window. See Figure 6-24. Figure 6-24 iQ Explorer II, Process Settings> Post Weld > Dynamic Hold Method Continued Page 78 Dukane Manual Part No. 403-578-01 Section 6 - Operation Continued from Previous Page Hold Static Hold Method After the completion of dynamic hold, if enabled, the press motion stops for a specified amount of time to allow for molten plastic to solidify. This phase is called static hold. To program static hold, set the Static Hold Method to Time, and enter the desired Hold Time. Once the static hold phase is complete, the press retracts back to the Top-of-Stroke position. This unique feature allows for superior consistency on overall part height. This is unlike a pneumatic press that continues to compress the part during the hold phase. In addition, Static Hold can contribute to stronger weld bonds. See Figure 6-25 below. Figure 6-25 iQ Explorer II, Process Settings> Post Weld > Static Hold Method Step 14 - Test the Acoustic Stack Run a test of the acoustic stack to confirm proper operation before welding parts. Please go to Section 7 of this User's Manual, System Operational Test, where the system test procedures are outlined. Dukane Manual Part No. 403-578-01 Page 79 Series Servo Ultrasonic Press Systems ES User’s Manual Step 15 - Specify Process Limits Behavior See Figure 6-26. For each limit that is important to your application, use the drop down menu, and select Display. These parameters will be displayed on the Cycle Data screen, and may be important for subsequent analysis of the weld process. Once the process settings are fully developed for the application, the Process Limits can be set to Suspect and/or Bad to identify part assemblies of inferior weld quality. Process Limits Tab Figure 6-26 iQ Explorer II, Process Limits Tab Page 80 Dukane Manual Part No. 403-578-01 Section 6 - Operation Step 16 - Run Weld Cycle After all the parameters have been programmed, initiate the weld cycle. Step 17 - View Weld Results View the results at the Cycle Data tab to insure all parameters have been achieved. See the example shown below in Figure 6-27. Detailed performance graphs for select parameters may also be reviewed by selecting the Graph tab. Figure 6-27 iQ Explorer II, Cycle Data Tab Dukane Manual Part No. 403-578-01 Page 81 Series Servo Ultrasonic Press Systems ES User’s Manual Unique Features The following paragraphs describe certain features of the iQ Servo system that may be useful for some applications. Teachable Top-of-Stroke Position The position from which the press initiates a weld cycle and to which it returns afterward is called Topof-Stroke. With the iQ Servo Press, that position can be defined anywhere within the available stroke using direct numeric entry or position teaching. The benefits of this feature are: • • • Enhanced ability to optimize the required down stroke, which can be done without repositioning the thruster on the support column. Setup simplification. In situations where there are similar applications, the operator may want to keep the thruster position on the column the same. This can be done by creating various setups each with differing Top-of-Stroke positions, minimizing cycle times without having to change the position of the thruster on the column. Application switching repeatability. By avoiding changes in the thruster position on the column for different applications, changeovers between applications are highly repeatable due to digital Top-of-Stroke position control. Setup Switching A setup contains all the programmed parameters for one particular process. On an iQ Servo Press, the setup can be saved digitally in memory. All settings, including the home position, speed control, Top-of-Stroke and others are saved as part of a particular setup. NOTE: The only mechanical adjustment that might be needed is the repositioning of the thruster on the column. If the thruster is moved up or down when going to a new program, Sensing Start Distance (or Trigger Position) and Travel Limit have to be adjusted accordingly. with the Part #1 setup, a switch to running parts for the Part #2 setup can be made quickly. Just load the saved file for Part #2, and the iQ Servo Press is ready for a different operation. The benefits of this feature are: • • Time savings due to quick program switching. Enhanced setup repeatability due to digital parameter control. Duplicating Process on Multiple Machines If welding a high volume of parts, one of the main goals is to achieve repeatable results. It is likely that more than one machine will be welding parts simultaneously. With the iQ Servo, multiple machines (welders) can easily be programmed to duplicate a known process. With pneumatic systems, this presents a dilemma because of all of the minor mechanical differences that exist from welder to welder. Another consideration that can be problematic is government and agency approval that may need to be completed. ISO acceptance and FDA audits can be treated with greater confidence in the process and in the results for the iQ Servo Press. For a process that is audited on a regular basis or has a part that FDA needs to inspect, the iQ Servo Press has advantages of repeatability that can’t be matched by a pneumatic press. The benefits of this functionality are: • • Reduced welder-to-welder variability. Time savings due to elimination of pneumatic component adjustments. One instance of the use of this feature is as follows. A file is created for the setup of Part #1 and another file for the setup of Part #2. After running a batch of parts Page 82 Dukane Manual Part No. 403-578-01 Section 7 - System Operational Test SECTION 7 System Operational Test Overview . . . . . . . . . . . . . . . . . . . . . . . . . . . . . . . . . . 85 Operational Test of the Acoustic Stack . . . . . . . . . . . 86 Cycling the System . . . . . . . . . . . . . . . . . . . . . . . . . . 89 Restoring Factory Defaults . . . . . . . . . . . . . . . . . . . . 89 Dukane Manual Part No. 403-578-01 Page 83 Series Servo Ultrasonic Press Systems ES User’s Manual This page intentionally left blank Page 84 Dukane Manual Part No. 403-578-01 Section 7 - System Operational Test Overview An iQ Series generator must be operating and connected to the press/thruster in order to test the system. For efficient operation of a Dukane ultrasonic assembly system, the ultrasound signal from the generator must match the frequency and phase angle (vibrational characteristics) of the acoustic stack that is being driven. Each acoustic stack has unique vibrational characteristics dependent on the combination of stack components. In addition, the characteristics of a particular stack may vary slightly during operation because of temperature and loading factors. To match the generator output signal with the characteristics of a particular acoustic stack, the generator output frequency is adjusted by Dukane’s patented phase-lockedloop Digi-Trac pulse-width modulation circuitry. The Digi-Trac feature automatically adjusts the ultrasound signal to match the vibrational characteristics of the stack being driven. When the ultrasound turns on during each operating sequence, the Digi-Trac circuit monitors the motion of the acoustic stack on a frequency cycle-by-cycle basis and adjusts the ultrasound signal for the optimum setting. Because the Digi-Trac continuously monitors each operating sequence, it compensates for vibrational changes that occur during repeated operations due to heating of the acoustic stack components. It also compensates for changes that occur over longer time periods due to aging of the piezo electric crystals in the transducer, or possible wear of the ultrasonic horn. The Digi-Trac feature excels in environments hostile to reliable operation, such as high duty cycles or high stress, and continuous-duty applications. In such situations, the Digi-Trac circuit compensates for the unique vibrational characteristics of each stack due to differences caused by aging, loading, temperature changes, and differences in horn configurations. Dukane Manual Part No. 403-578-01 Page 85 Series Servo Ultrasonic Press Systems ES User’s Manual Operational Test of the Acoustic Stack The following test procedure is suggested before starting the generator, to verify that the vibrational characteristics of the stack fall within the range of the Digi-Trac. All Dukane stack components are manufactured to tolerance specifications within this range. A non-Dukane horn, an improperly assembled stack, or a stack component that is worn or damaged, can result in vibrational characteristics outside these specifications, and will require some adjustment. This test reveals the existence of any problems and directs you to corrective action. 1. Check the following: a) Make sure that the correct booster and horn for the application are installed in the thruster. b)Check the iQ Series system components for proper grounding. c) Check the ultrasound cable connections on the generator and thruster for proper seating and security. d)Verify that the horn is not under load (not in contact with a fixture or part). 2. Turn the iQ Series generator AC breaker/switch to ON. For generators equipped with a lighted power button on the front, push the button to the ON position. The power button will start to flash RED on and off for some time, then turn a steady GREEN to indicate the generator is operating properly. If the light becomes RED and stops flashing, an internal generator failure has been detected - do not go any further with the test. 3.Using iQ Explorer II go to the Utilities tab. Press the TEST button, and hold it for the duration of the test period. See Figure 7-1. a) System Power Output: • If the power output display remains between 10 and 20 percent and the horn frequency is within the following ranges (depending on the frequency), proceed to the next step: • Page 86 15 kHz: 14.6 - 15.4 kHz 20 kHz: 19.5 - 20.5 kHz 30 kHz: 29.5 - 30.5 kHz 40 kHz: 39.5 - 40.5 kHz If the power output exceeds the 20% indication, there may be a problem with the acoustic stack. TEST Button Figure 7-1 iQ Explorer II Utilities TEST Button Continued Dukane Manual Part No. 403-578-01 Section 7 - System Operational Test Continued from Previous Page Figure 7-2 iQ Explorer II TEST, Screen Display Acoustic Stack Test b)If an overload fault is displayed, a mismatch has occurred between the generator’s ultrasonic output signal and the stack. Refer to Section 10, Troubleshooting, and see the Press Alarm Message tables. Also see Figure 7-3 that shows an example of an ultrasound-related error that caused cycling to stop. 4. If all the indicators pass their tests, the stack is within the Digi-Trac range. NOTE Note the Frequency and Power values in the graph above. You have the option of saving the test data for future reference. The generator is operating at the optimum setting for this stack when the Watts displayed on the graph (after the test) is between 10 and 20 percent. The vibration amplitude of the horn and booster and the mass of the horn determine the amount of energy needed to vibrate the stack. • If the system passes the tests of these four steps, proceed to the section called Cycling the System, Page 89. • If one or more of these tests have failed, go to the next step. Figure 7-3 iQ Explorer II Error Detected - Cycle Stop Continued Dukane Manual Part No. 403-578-01 Page 87 Series Servo Ultrasonic Press Systems ES User’s Manual Continued from Previous Page Acoustic Stack Test 5. Turn the generator off. Check the stack for proper assembly, damaged components, or dirty mating surfaces. Recheck the ultrasound cable for proper connections. Repeat Steps 1 through 4. If the test still fails, go to the next step. 6. Turn the generator off, remove the stack from the thruster, and remove the horn from the stack. Reinstall the transducer-booster assembly in the thruster and turn the generator on. Repeat Steps 2 through 4. If the assembly passes with the horn removed, the horn is outside the specifications required for operation with the Digi-Trac preset range. Reassemble the horn to the stack. In iQ Explorer II, checking the Enable Advanced Settings box and then clicking the Advanced button within the Process Settings tab provides access to features designed for unique horns and applications. See Figure 7-4. Figure 7-4 Page 88 Consult Dukane Corporation before making adjustments to these settings. If any failure indications are present with the horn removed, check the booster and the transducer for the following • Any visible damage • Loose or cracked stud • Pitted or dirty mating surfaces Make any necessary repairs or adjustments. Go to Step 7. 7. Repeat Steps 1 through 6. • If the failure indications disappear, reassemble the horn to the acoustic stack and repeat Steps 2 through 4. • If any failure indications are still present, do not run this stack. Return the transducer and booster to Dukane for analysis. iQ Explorer II, Process Settings . Enable Advanced Settings Dukane Manual Part No. 403-578-01 Section 7 - System Operational Test Cycling the System 1. Check that you have correctly performed the following: a) Installed the acoustic stack in the thruster and bolted the stack access cover closed. b) Secured the fixture in place. c) Performed the Operational Test of the Acoustic Stack as detailed on Page 86 of this section. 2. Verify that all controls on the press/thruster and the generator are set as required for this operation. 3. Place a part in the fixture. 4. Cycle the system. Activate both operate switches at the same time to start the system, and hold fingers in place until the ultrasound starts. Releasing the fingers before ultrasound starts will abort the cycle. Restoring Factory Defaults The servo press systems has a means of restoring all programmable parameters to factory defaults, which is intended to assist in troubleshooting or correcting unintended parameter changes. Once the restore process is completed and a weld cycle is run with the default parameters, the press should perform a very short-stroke weld motion. To restore factory defaults in iQ Explorer or iQ Explorer II, perform these steps: 1. Select the System tab. 2. Press OK on the WARNING message that appears. 3. Press the Restore Factory Defaults button. 4. Press YES to confirm the action. To restore factory defaults on a generator with a color front panel display, perform these steps: 1. Navigate to the Main Menu. 2. Select Utilities/Hardware. 3. Select Hardware Setup. 4. Scroll to Restore Factory Defaults. 5. Select Restore Defaults. 6. Select YES to confirm the action. Dukane Manual Part No. 403-578-01 Page 89 Series Servo Ultrasonic Press Systems ES User’s Manual This page intentionally left blank Page 90 Dukane Manual Part No. 403-578-01 Section 8 - Maintenance SECTION 8 Maintenance Stack Maintenance . . . . . . . . . . . . . . . . . . . . . . . . . . 93 Inspection of the Acoustic Stack Components . . . . . . . . . . . . . . . 93 Reconditioning Stack Components . . . . . . . . . . . . . . . . . . . . . . . .94 System Maintenance . . . . . . . . . . . . . . . . . . . . . . . . . 96 Six-Month Periodic Maintenance . . . . . . . . . . . . . . . . 97 Press Calibration . . . . . . . . . . . . . . . . . . . . . . . . . . . . 98 Dukane Manual Part No. 403-578-01 Page 91 Series Servo Ultrasonic Press Systems ES User’s Manual This page intentionally left blank Page 92 Dukane Manual Part No. 403-578-01 Section 8 - Maintenance Stack Maintenance Inspection of the Acoustic Stack Components It is essential that the mating faces between an ultrasonic transducer/booster and a booster/horn be absolutely flat and parallel. If there is any air gap, there will be a loss in power output and efficiency. Coupling may be so poor as to prevent the startup of vibration from the stack due to the excessive power draw at the mating surfaces. The condition of excessive crowning, or uneven contact surfaces, is normally made evident by a burnished appearance around the bolt hole areas of the contact surfaces. This condition indicates that contact between the parts occurs only at the burnished areas and not across the full faces of the mating surfaces. (See Figure 8-1.) The following flatness tolerances are specified for Dukane transducers, boosters, and horns used in 20 kHz applications: Transducer .0005 inch Booster .0005 inch Horn .0005 inch To check if there may be a flatness problem, first disassemble the stack and look at the mating surfaces. If there are burnished areas at the periphery of a contact surface, that surface may be crowned in the center. Place a straight edge along the face. Refer to Figure 8-2. If light can be seen along the edges, it is crowned. Burnished Area Figure 8-1 Example of Burnished Area Crown Straight Edge Gap Figure 8-2 The surface may also be depressed in the bolt area. Refer to Figure 8-3. In this case, there will be contact only at the peripheral edges and light will be visible beneath the straight edge in the center region. Example of Crowning Gap Straight Edge Figure 8-3 Dukane Manual Part No. 403-578-01 Example of Center Depression Page 93 Series Servo Ultrasonic Press Systems ES User’s Manual Reconditioning Stack Components To restore the interface to the proper condition, do the following: 1. Disassemble the transducer/booster/horn stack and wipe interfaces with a clean cloth or paper towel. 2. Examine all interfaces. If any interface is corroded or shows a dark, hard deposit, it should be reconditioned. 3. If the interfaces appear to be in good condition, go to Step 11. NOTE The operating efficiency of the equipment will be greatly affected if the mating interfaces of the transducer/booster/horn stack are not flat, make poor contact with each other, or become corroded. A poor contact condition wastes power output, makes tuning difficult, can affect the noise level, and can cause possible heat damage to the transducer. 4. If necessary, remove the mounting studs. CAUTION 5. Tape a clean sheet of #400 grit (or finer) silicon carbide wet-or-dry paper to a clean, smooth, flat surface. A piece of plate glass is usually suitable. Use extreme care to avoid tilting the part. Loss of flatness of interface surfaces may render the welding system inoperative. 6. Hold the part to be conditioned at its lower end with your thumb over a spanner wrench hole. Carefully stroke the part once in one direction (toward you) across the abrasive paper, as shown in Figure 8- 4. Do not apply downward pressure. The component’s weight alone provides sufficient pressure. Perform a second stroke. 7. Rotate the part 120° (1/3 rotation) to the next spanner wrench hole. Repeat the procedure outlined in Step 6. 8. Rotate the part the remaining 120° and repeat. Be certain to perform the same number of strokes at each orientation: Two strokes per rotation. 9. Before reinserting a stud in any horn, perform the following for proper engagement of the threads: a) Visually inspect and clean the stud. b) Clean the threaded hole using a clean cloth or towel. c) Tighten the stud to the torque specifications listed in Table 4-I. Figure 8-4 Method of Component Resurfacing CAUTION Use extreme care to avoid multiple strokes at each 1/3 rotation of the part. Loss of flatness and perpendicularity of the interface surface to the centering axis of the part may render the welding system inoperative. Continued Page 94 Dukane Manual Part No. 403-578-01 Section 8 - Maintenance Continued from Previous Page Reconditioning Stack Components 10.Reexamine the interface surface and repeat Steps 6 through 9 until most of the contaminate has been removed. This should not take more than 2 or 3 complete rotations of the part being reconditioned. 11. Reassemble and install the stack, using the procedure in Section 7 of this manual. Recheck the power supply tuning. See Section 7, System Operational Test. Torque Values See Section 4, Stack/Fixture Setup for torque values: Table 4-I - Stud Torque Values Table 4-II - Horn/Booster Torque Values Table 4-III - Replaceable Tip Torque Values NOTE Thread deformation may occur if the studs are overtightened. Removal of the stud could damage the threads in the horn. If this occurs, re-tap the horn threads and replace the stud with a new one. Use studs recommended by Dukane. NOTE Overtightening stack components may result in horn/booster studs loosening and cause ultrasound overloads. Dukane Manual Part No. 403-578-01 Page 95 Series Servo Ultrasonic Press Systems ES User’s Manual System Maintenance Sheet Metal Covers The covers on the generator, press, and remote controller (if present) are formed to prevent access to internal components. Keep the covers on at all times due to the presence of high voltages and moving components, which could cause injury. The internal generator case also contains capacitors, which continue to hold a high electric charge even after the power is shut off. Air Ventilation Slots Ventilation intake and exhaust slots exist on the generator, press, and remote controller (if present). Keep all ventilation slots free from obstructions. If excessive dust or dirt collects on the slots, wipe or vacuum them clean. Do not use compressed air to clean them as this may force the dirt inside the chassis. Allow 5 inches (127 mm) of clearance outside each ventilation slot. WARNING Never operate the generator, press or remote controller with any covers off. This is an unsafe practice and the high voltage and moving elements present may cause injury. AC Power Cord The AC power cords should be kept in good condition and free from any cuts. The AC plugs should be straight with no bent prongs. Dovetail Slide on Thruster Support Dovetail Slide on Thruster Support On stand-alone systems with press models, 43S245-A2 and 43S245-A4, the press support column components have an anodized coating. Lubrication on these columns is not necessary. On systems with press models 43S215, 43S220, and 43S340, the dovetail slide on the column is lubricated. Clean and lubricate the dovetail slide regularly. See Figure 8-5. Use the two slide grease fittings to supply lubricant. For medical applications, the option of using food-grade lubricant may be required. Figure 8-5 Dovetail Slide Continued Page 96 Dukane Manual Part No. 403-578-01 Section 8 - Maintenance Six-Month Periodic Maintenance 1. Disconnect the generator AC power cord from the AC line receptacle and the AC power cord from the thruster (thruster models 43S220 and 43S340) or remote controller (thruster models 43S215 and 43S245-AX). Then, remove the thruster left and right side covers. 2. Check if any fasteners are visibly loose. If so, contact Dukane for the proper tightening torque. 3. Wipe or blow away all dirt and grease in the thruster. 4. No air is required for the normal operation of a servo press. However, there may be a time when optional cooling accessories were added. This optional cooling could produce excess oil and dirt accumulation. Wipe away all excess oil and any dirt accumulation, especially at the exhaust openings in the transducer housing. There should be very little, if any, oil accumulation at the air exhaust opening. If oil accumulation is excessive, route the air for the press/thruster through an “oil mist reclassifier”. 5. Ensure that all wire and cable connections are secure in the thruster and are not rubbing or showing wear. If they do show wear or rubbing then reroute to eliminate the problem. 6. Remount and secure the thruster covers and reconnect the generator, press, and remote controller AC power cords to the AC line receptacles. Continued Dukane Manual Part No. 403-578-01 Page 97 Series Servo Ultrasonic Press Systems ES User’s Manual Press Calibration All models of the iQ Servo Press are equipped with a force sensor and a linear distance encoder. When a new press is built at the Dukane factory, the following parameters are either calibrated or verified to perform within a set of accuracy limits: • • • Force Distance Average Speed (without thrust load) It is recommended that the performance of the above parameters be checked and adjusted (if necessary) on a periodic basis. Dukane offers calibration services either on-site or at the Dukane factory, as well as packages that allow end-users to perform the calibration themselves. Please contact Dukane for more details on these offerings. Page 98 Dukane Manual Part No. 403-578-01 Section 9 - Troubleshooting SECTION 9 Troubleshooting Overview . . . . . . . . . . . . . . . . . . . . . . . . . . . . . . . . . 101 Welding . . . . . . . . . . . . . . . . . . . . . . . . . . . . . . . . . . 102 Insertion . . . . . . . . . . . . . . . . . . . . . . . . . . . . . . . . . . 109 Staking . . . . . . . . . . . . . . . . . . . . . . . . . . . . . . . . . . . 112 Servo Press Alarm Messages . . . . . . . . . . . . . . . . . . 115 Dukane Manual Part No. 403-578-01 Page 99 Series Servo Ultrasonic Press Systems ES User’s Manual This page intentionally left blank Page 100 Dukane Manual Part No. 403-578-01 Section 9 - Troubleshooting Overview The Troubleshooting section of this manual contains a listing of problems that may occur when using this equipment along with probable causes and recommended solutions for the problems. Primary Weld Characteristics Primary weld characteristics refers to methods used to control the welding process. The characteristics include Time, Distance, Absolute Distance, Energy, and Peak Power. Dukane Manual Part No. 403-578-01 Page 101 Series Servo Ultrasonic Press Systems ES User’s Manual Welding __________________________________________________________________________________ Problem Flash (See also Non-uniform welding) Probable Cause Solution Energy director is too large. Reduce the size of the energy director. Reduce the weld distance/primary weld characteristic. Use an interrupted energy director. Shear interference is too great. Reduce the amount of interference. Weld time is too long. Reduce the weld distance/primary weld characteristic. Increase weld speed. Non-uniform joint dimensions. Re-dimension the joint. Redesign the joint to be a shear joint or a tongue-in-groove joint. Contact Dukane's Applications Lab. Check the molding conditions. Part fit or tolerances. Loosen the part fit. Tighten the part tolerances. __________________________________________________________________________________ Problem Misalignment of the welded assembly Probable Cause Solution Parts are not self-aligning. Design a means of alignment into the tooling (fixturing). Add a means of alignment (e.g., pins and sockets) to the mating part halves. Improper support in the fixture. Redesign the fixture for proper support. Wall flexure. Add ribs or gussets to the part. With a resilient fixture, if large sections of urethane are deflecting, add a rigid backup. Joint design is not properly dimensioned. Re-dimension the parts. Incorrect part tolerance/poor molding. Tighten the part tolerance. Check the molding conditions. __________________________________________________________________________________ Continued Page 102 Dukane Manual Part No. 403-578-01 Section 9 - Troubleshooting Continued from Previous Page Welding _______________________________________________________________________________ Problem Internal components are welding together. Probable Cause Solution The internal components are made of the same material. Make the internal components out of different materials. Carefully lubricate the internal parts. Use less horn amplitude by changing to a lower gain booster. Part fit or tolerances. Increase part clearances. Tighten the part tolerances. _______________________________________________________________________________ Problem Diaphragm Damage Probable Cause Solution Excessive horn amplitude. Reduce the horn amplitude. Dampen the welding area to absorb the excessive vibrations. Excessive exposure to ultrasound. Reduce the weld duration and increase the horn amplitude and/or weld speed. Improper gate location/design/thin- wall sections. Check gate placement. Change the shape of the gate. Add stiffening ribs to the part. Increase the thickness of the material on the underside of the gate area. If using a 20 kHz system, consider using a 30 kHz or 40 kHz system. If using a 15 kHz system, consider using a 20 kHz system. The type of horn and/or its placement. Check for the proper horn/part fit. Change the horn. _______________________________________________________________________________ Problem Overwelding Probable Cause Solution Too much energy is being transmitted to the part. Reduce the trigger force. Reduce the weld duration/primary weld characteristic. Reduce amplitude setting. Change to a lower gain booster to reduce the horn amplitude. Continued Dukane Manual Part No. 403-578-01 Page 103 Series Servo Ultrasonic Press Systems ES User’s Manual Continued from Previous Page Welding __________________________________________________________________________________ Problem Internal components of work piece damaged during welding. Probable Cause Solution Excessive horn amplitude. Reduce the horn amplitude by decreasing the amplitude setting or changing to a lower gain booster. Dampen the excess horn amplitude. Excessive exposure to ultrasound. Reduce the primary weld duration and increase the horn amplitude and/or weld speed . Too much energy transmitted into the part. Reduce the horn amplitude. Reduce the weld duration/primary weld characteristic. Increase weld speed. The components are improperly mounted (e.g., parts are mounted too close to the joint area). Ensure that internal components are mounted properly. Isolate internal components from the part. Move the internal components away from areas of high energy. Use an external device to dampen energy locally. __________________________________________________________________________________ Problem Melting or fracturing of the part (outside of the joint area). Probable Cause Solution Sharp internal corners/thin sections. Radius all sharp corners. Dampen motion for any damaged area, if possible. Excessive horn amplitude. Reduce the horn amplitude by decreasing the amplitude setting or changing to a lower gain booster. Long weld duration. Decrease the weld duration, increase the horn amplitude and/or the weld speed. Inherent part stress. Check the molding conditions. Check the part design. Reduce the horn amplitude. __________________________________________________________________________________ Continued Page 104 Dukane Manual Part No. 403-578-01 Section 9 - Troubleshooting Continued from Previous Page Welding _______________________________________________________________________________ Problem Underwelding. Probable Cause Solution Insufficient energy is being transmitted to the part. Increase the trigger force. Reduce weld speed. Increase the weld duration/primary weld characteristic. Increase the horn amplitude by increasing the amplitude setting or changing to a higher gain booster. Use a higher power capacity assembly system. Energy is being absorbed into the fixture. Change the type of fixture being used. _______________________________________________________________________________ Problem Uneven welding. Probable Cause Solution Warped part(s). Check part dimensions. Check the molding conditions. Use a higher trigger force. Increase dynamic hold distance. Increase static hold time. The energy director varies in height. Redesign the energy director to ensure uniform height. Use an interrupted energy director. Lack of parallelism between the horn, the fixture, and the part. Make sure the fixture and part are perpendicular to the horn. Check the part dimensions. Wall flexure is occurring. Add ribs to the part. Modify the fixture to prevent outward flexure. The knockout pin location is in the joint area. Redesign the part so the knockout pin is not in the joint area (make sure knockout pins are flush with the surface). There is insufficient support in the fixture. Redesign the fixture to improve the support in critical areas. Change to a rigid fixture. If large sections of urethane are deflecting with a resilient fixture, add a rigid backup. _______________________________________________________________________________ Continued Dukane Manual Part No. 403-578-01 Page 105 Series Servo Ultrasonic Press Systems ES User’s Manual Continued from Previous Page Welding _________________________________________________________________________________ Problem Uneven welding. Probable Cause Solution Part dimensions are incorrect. Check the part dimensions. Re-dimension the part, if necessary. Check the molding conditions. The parts are improperly aligned. Check for part shifting during welding. Check the alignment of mating parts. Check for parallelism of the horn, the part, and/or the fixture. There is a lack of intimate contact around the joint area. Check the part dimensions. Check the part tolerances. Check for knockout pin marks in the joint area. Check for misalignment of the mating part halves. Check for sinks. Non-uniform horn contact is occurring. Check the fit of the part to the horn. Check for proper support in the fixture. Mold release is on the joint surface(s). Clean the mating surfaces. There is a non-uniform distribution of filler in the plastic material. Check the molding conditions. Check the mold design. The joint design is incorrect. Redesign the joint. There is a material or resin grade incompatibility problem. Consult with the resin supplier(s). There is a regrind problem. Check with the molder. Check the molding conditions. There is moisture in the molded parts. Specify the parts to be “dry as molded”. Dry the parts by heating them prior to welding. _________________________________________________________________________________ Continued Page 106 Dukane Manual Part No. 403-578-01 Section 9 - Troubleshooting Continued from Previous Page Welding ________________________________________________________________________________ Problem The parts are marking. Probable Cause Solution Insufficient force during welding. Increase trigger force. Increase weld speed. If using Match Detect, decrease the value of the parameter After Force Decreases By. Check for a loose stud, tighten if loose. Loosen and then retighten the horn tip. (Refer to Section 8). Ensure that the horn and booster are coupling well (Refer to Section 8). Visually check the horn for cracks. Reduce the weld duration. The horn heats up. There are high spots in the part. Check the part dimensions. Check the fit of the horn to the part. Use of raised lettering. Use recessed lettering or relieve the horn around the lettering. The part does not fit the fixture properly. Check the fixture for proper support. Check for cavity-to-cavity variations. Redesign the fixture. Oxide from the horn is being transferred to the part. Place polyethylene film between the horn and the part. Use a chrome-plated horn and/or fixture. The parts contain fillers. Check the processing conditions. Reduce the amount of filler in the plastic. ________________________________________________________________________________ Problem Welding process not in control (inconsistent weld results on a part-to-part basis). Probable CauseSolution A mold release agent is used. Clean the mating surfaces. If a mold release agent is necessary, use a paintable/printable grade. Incorrect part tolerances. Tighten the part tolerances. Check the part dimensions. Check the molding dimensions. There are cavity-to-cavity variations. Check the part dimensions and tolerances. Check for cavity wear. Check the molding conditions. ________________________________________________________________________________ Continued Dukane Manual Part No. 403-578-01 Page 107 Series Servo Ultrasonic Press Systems ES User’s Manual Continued from Previous Page Welding __________________________________________________________________________________ Problem Welding process not in control (inconsistent weld results on a part-to-part basis). Probable Cause Solution Part dimensions vary due to mold cavity variations. Perform a statistical study to see if a pattern develops with certain cavity combinations. The resin contains regrind or degraded plastic. Consult with the molder. Check the molding conditions. Reduce the percentage of regrind. Improve the quality of the regrind. The plastic’s filler content is too high. Reduce the percentage of filler in the plastic. Check the processing conditions. Change the type of filler (e.g., from short to long glass fibers). The horn doesn’t fit the part correctly. Check the part dimensions. Check for cavity-to-cavity variations. Obtain a new horn. There is a lack of parallelism between the horn, part, and/or fixture. Check for parallelism between the horn, part, and fixture. Check the horn/part fit. Check the part/fixture fit. Level the fixture, where necessary. Rigid fixture reflects vibratory energy. Dampen the energy by using teflon, neoprene, cork, or urethane in the nest of the fixture. Fluctuations in the AC line voltage supplied to the generator. Upgrade to a generator with line regulation. Problem The weld cycle is too long. Probable Cause Solution Excessive distance between the Sensing Start Position and point of contact between horn and part. Increase Sensing Speed. Reduce distance between the sensing and actual trigger points. Page 108 Dukane Manual Part No. 403-578-01 Section 9 - Troubleshooting Insertion _______________________________________________________________________________ Problem The insert pulls out easily in use. Probable Cause Solution There is insufficient interference between the hole and the insert. Reduce the size of the molded hole in the plastic. The screw bottoms out in the hole. Use a shorter screw. (Applies to internallythreaded insert). Deepen the hole. The insert gets pushed into the plastic before the plastic melts. Increase the horn amplitude or decrease weld speed. Use pre-triggering. The ultrasound remains on after insertion is complete. Decrease the primary weld characteristic. The horn retracts before the plastic around the insert is solidified. Increase the hold time. _______________________________________________________________________________ Problem Inconsistent insertion of multiple inserts on the same part. Probable Cause Solution The plastic is not melting consistently around all inserts. Increase the horn amplitude. Inserts are pushed into the plastic before the plastic has melted. Check Sensing Start Position and Sensing Speed. Use pre-triggering. Inserts are seated at different heights within the same part. Evaluate the support provided by the fixture. If required, re-level or shim the fixture. Measure the horn tip length to check for dimensional consistency. If a varying length is found, send the horn to Dukane for modification. _______________________________________________________________________________ Continued Dukane Manual Part No. 403-578-01 Page 109 Series Servo Ultrasonic Press Systems ES User’s Manual Continued from Previous Page Insertion ________________________________________________________________________________ Problem The boss or the plastic around the boss cracks after insertion. Probable Cause Solution The insert is pushed in before the plastic has melted. Reduce the weld speed, or increase horn amplitude. Use pre-triggering. The boss wall is too thin. Increase the thickness of the boss wall. There is too much interference between the insert and the hole. Increase the hole diameter. Use a smaller insert. ________________________________________________________________________________ Problem The insert is not driven to the desired depth. Probable Cause Solution The ultrasound is not on long enough. Increase the primary weld characteristic. Check the cycle data to see if the desired weld parameters were reached (e.g. Collapse Distance). Increase the depth of the hole. Flash fills the hole. (Applies to an internally-threaded insert.) There is insufficient ultrasonic power. Increase the horn amplitude or use a more powerful generator. ________________________________________________________________________________ Problem The cycle time is too long. Probable Cause Solution There is insufficient ultrasonic power or the generator overloads. Use a more powerful generator. There is too much interference between the hole and the insert. Increase the hole diameter, if possible. Use a smaller insert. The area of the part being inserted is not being rigidly supported. Support the part directly under the boss. Install a metal post directly under the part being inserted. Continued Page 110 Dukane Manual Part No. 403-578-01 Section 9 - Troubleshooting Continued from Previous Page Insertion _________________________________________________________________________________ Problem Plastic flows over the top of the insert. Probable Cause Solution The weld duration is too long. Decrease the primary weld characteristic. The insert is being driven too deep. Decrease the primary weld characteristic. There is too much interference between the hole and the insert. Increase the hole diameter, if possible. Use a smaller insert. _________________________________________________________________________________ Problem Melted plastic fills the hole (Applies to internally-threaded inserts). Probable Cause Solution The insert is too long or the hole is too shallow. Use a shorter insert or make the hole deeper. There is too much interference between the hole and the insert. Increase the hole diameter. Use a smaller insert. The insert is being driven too deep. Decrease the primary weld characteristic. _________________________________________________________________________________ Dukane Manual Part No. 403-578-01 Page 111 Series Servo Ultrasonic Press Systems ES User’s Manual Staking ________________________________________________________________________________ Problem A ragged or irregularly shaped stake head is formed. Probable Cause Solution The staking cavity is too large. Change to a smaller cavity in the horn. The volume of plastic in the stud is insufficient. Increase the stud height/diameter. The stud is melting at the base. See the problem section that follows entitled “The base is melting before the head forms”. ________________________________________________________________________________ Problem There is excessive flash around the stake head. Probable Cause Solution The staking cavity is too small. Use a larger cavity in the horn. The volume of plastic in the stud is excessive. Decrease the stud height and/or diameter. The stud is not centered in the horn cavity. Center the stud under the horn cavity. ________________________________________________________________________________ Problem The surface below the stake head is distorted. Probable Cause Solution The part is not supported directly beneath the stud being staked. Support the fixture with a metal post beneath the stud being staked. The trigger force is too high. Reduce the trigger force. Use pre-triggering. ________________________________________________________________________________ Problem There is a loose fit between the staked head and the part being attached. Probable Cause Solution The hole diameter relative to the stud diameter is too large. Reduce the hole diameter. Increase the stud diameter. Continued Page 112 Dukane Manual Part No. 403-578-01 Section 9 - Troubleshooting Continued from Previous Page Staking _________________________________________________________________________________ Problem There is a loose fit between the staked head and the part being attached. Probable Cause Solution The holding force was removed before the stud head could solidify. Increase the dynamic hold distance. Increase Static Hold time. Increase the stud diameter. Reduce the size of the staking cavity. _________________________________________________________________________________ Problem The stud is collapsing at its base. Probable Cause Solution There is a sharp corner near the base of the stud. Radius the stud at the base. The stud is not centered in the horn cavity. Center the stud under the horn cavity. Use a knurled tip. The base is melting before the head forms. See the problem section below entitled “The base is melting before the head forms”. Too much force is applied before the ultrasound is activated. Use pre-triggering. _________________________________________________________________________________ Problem The base is melting before the head forms. Probable Cause Solution The trigger force is too high. Reduce the trigger force. Use pre-triggering. The horn amplitude is insufficient. Increase the amplitude. _________________________________________________________________________________ Continued Dukane Manual Part No. 403-578-01 Page 113 Series Servo Ultrasonic Press Systems ES User’s Manual Continued from Previous Page Staking _________________________________________________________________________________ Problem The formed stud head stays in the staking cavity as the horn retracts. Probable Cause The stud head has not solidified before the horn retracts. The horn tip is hot and not allowing the stud to solidify. Solution Increase the hold time. Cool the horn tip. Use afterburst. _________________________________________________________________________________ NOTE The use of a knurled horn tip and a pointed stud can help solve many of the above problems. Page 114 Dukane Manual Part No. 403-578-01 Section 9 - Troubleshooting Servo Press Alarm Messages The following table lists alarms that may appear on the servo press systems containing a generator with a color front panel display (Q-Series) or iQ Explorer II software. For systems containing a generator without a display (A-Series), many of these alarms are indicated as fault or error messages in iQ Explorer. Information on particular alarms may also be obtained on the Dukane '"Easy Alarm" web page: http://www. dukane.com/us/DL_EasyAlarm.asp Continued Dukane Manual Part No. 403-578-01 Page 115 Alarm Message Configuration Fault Bad Parameter Alarm Watchdog Reset Alarm Hardware Fault Frequency Overload Fault 1 (PLL Lock Fail) Frequency Overload Fault 2 (PLL Lock Lost) POS Peak Overload Fault NEG Peak Overload Fault Average Overload Fault Bad Current Loop Fault Alarm Code U100 U101 U102 U103 U104 U105 U106 U107 U108 U109 Explanation Table 9- I Page 116 Solution Contact Dukane. Contact Dukane. This is a disabling condition for the generator; contact Dukane. Servo Press Alarm Message Screens - Page 1 of 4 4-20 mA current loop is not connected to the remote amplitude card, or 4-20 mA current loop is defective (poor electrical). Generator ultrasound overload. Generator ultrasound overload. Generator ultrasound overload. The stack may be coupling the part to the fixture. The generator did not obtain a frequency lock by the end of ramp up period. Check for proper connection to remote amplitude card. Check for damage to wiring. This is a disabling condition for the generator; contact Dukane. Reduce the force being applied to the part (on a pneumatic press) or reduce the weld speed (on a servo press). Check if one of the stack components is defective. Check if one of the stack components is loose. Check if the iQ generator's system frequency settings are set correctly. Check if one of the stack components is defective. Check if one of the stack components is loose. Check if the iQ generator's system frequency settings are set correctly. Attempt to decouple vibrations from fixture by using a compliant medium, such as a sheet of silicone or cork, between the part and fixture, or fixture and base. Press Test button on the power supply. Verify that the ultrasonic stack will operate in a test condition. Verify that the stack is operating at proper Frequency and Power draw. Reduce trigger pressure, force, and/or down speed. If stack will not operate in test perform stack care and maintenance. Follow this link to stack care and maintenance procedure. If Stack will not operate in test condition, remove horn and re-inspect. Enable “Advanced Process Settings” to adjust free run frequency to the “in air” operating frequency that results from a test. Enabling a pre-trigger source that allows for full ramp-up time to elapse still “in air” before contacting the part should eliminate all “Frequency Overload Fault 1” occurrences for a properly maintained stack. If the above steps do not resolve problem, contact Dukane. Hardware configuration or options were This is a disabling condition for the generator; contact changed since last generator power up. Dukane. Internal generator fault. Internal generator fault. Default Setup corrupted, Model Number incorrect, Serial Number incorrect, Feedback Scaling incorrect, etc. Series Servo Ultrasonic Press Systems ES User’s Manual Continued from Previous Page Continued Dukane Manual Part No. 403-578-01 Alarm Message Power not OK Fault Overtemperature Fault Frequency Overload Fault 3 (PLL Limit Exceeded) Servo Controller Fault Force Duration Exceeded Position Error Limit Exceeded Amplifier Error Command Error Checksum Error Lower Limit Switch Activated Alarm Code U110 U111 Table 9- I U112 U200 Servo Press Alarm Message Screens - Page 2 of 4 Dukane Manual Part No. 403-578-01 U201 U202 U203 U204 U205 U208 Lower travel limit switch was activated on press. Internal servo controller error. Servo controller program error. Indicates a problem with the servo amplifier. Servo press was not able to complete the programmed motion due to reaching its maximum force capability. Large amount of force was applied for an excessive amount of time while jogging. One of several possible problems detected on servo controller. The operating frequency was artificially bounded by the system frequency limits for 25 consecutive milliseconds. This is usually due to excessive operating frequency drift (operating frequency is “far” from free run frequency) due to heating of the stack. Generator has exceeded its temperature limit. Problem with incoming AC line voltage. Explanation Jog the press up to avoid contact with the limit switch. Cycle power on the generator. If alarm persists, contact Dukane. Cycle power on the generator. If alarm persists, contact Dukane. Cycle power on the generator. If alarm persists, contact Dukane. Decrease trigger force, weld and/or hold speed(s). Use alternate press model with larger force capacity. Cycle power on the generator. Do not apply large force for long periods of time while in jog mode. Cycle power on the generator. If alarm persists, contact Dukane. Adjusting the Free Run Frequency may also be advisable. A sudden shift in frequency (as observed on the graph) immediately before a Frequency Overload Fault 3, as opposed to a general frequency drift, indicates stack/horn coupling to the part during the weld or an another abrupt change in stack resonance. This does not imply an operating frequency drift issue, but a weld application setup issue. Often as a horn/stack heats up, it may begin to have trouble starting (Frequency Overload Fault 1) because the operating frequency is drifting away from the generator’s Free Run Frequency setting. Execute the following steps to alleviate the problem: Observe the last operating frequency from a test graph. Enable “Advanced Process Settings”. Change “System Frequency Limits” to “Manual” and adjust the offending upper/lower frequency limit to an acceptably safe value for your horn/stack/application. Check for blockage of air vents on the sides of the generator, restricting air flow to the inside of the generator. Check if the internal fan is defective. Verify that the incoming AC Line voltage supplied to the generator is within the range specified for the generator. Consult the manual for your generator Solution Section 9 - Troubleshooting Continued from Previous Page Continued Page 117 Alarm Message Upper Limit Switch Activated Servo HW Test Failed Servo Overtemperature Fault Servo Travel Limit Exceeded Servo Communication Error Obstruction at Top of Stroke Excessive Force at Idle Excessive Deviation from TOS Servo Encoder Failure Operate Switch 1 Pressed before Cycle Start Operate Switch 2 Pressed before Cycle Start Auto In Switch closed at End of Cycle Alarm Code U209 U210 U211 Table 9- I Page 118 U212 U213 U214 U216 U217 Servo Press Alarm Message Screens - Page 3 of 4 U218 U300 U301 U302 The press system detected a problem with the linear position encoder. The press position deviated excessively from the defined Top-ofStroke position when idle. The press system senses an excessive amount of force when idle. The press is unable to reach the Topof-Stroke position. Communication between the servo controller and the motherboard has been compromised. Servo press has reached the defined maximum travel limit. The servo actuator temperature has exceeded 100° C. A failure has been detected during the servo hardware test, which is performed at system startup or reset. Upper travel limit switch was activated on press. Explanation Remove active Auto-In signal. Verify wiring to Auto-In signal. Release Switch 2 before pressing both activation switches to start a cycle. Verify wiring of both operating switches. Release Switch 1 before pressing both activation switches to start a cycle. Verify wiring of both switches. Contact Dukane. Contact Dukane. This alarm can occur when an ultrasonic stack is removed from the press when power is on. Be sure to turn system power off when disassembling and reassembling the stack. If alarm appears when not changing stacks, contact Dukane. Remove obstruction detected at Top of Stroke. Adjust Top of Stroke position to be defined higher than obstruction. Contact Dukane. Increase the maximum travel limit position. Adjust weld parameters to reduce the distance traveled during the weld and hold. Turn servo press off, wait for actuator to cool down, then resume operation. Increase time between cycles to prevent excessive heating. Press any key on generator color display for additional failure details. Check that servo AC breaker is on and the servo power LED on the press is lit. Check that all cables are connected securely. Check for any damage to connector pins. If alarm persists, contact Dukane. Jog the press down to avoid contact with the limit switch. Solution Series Servo Ultrasonic Press Systems ES User’s Manual Continued from Previous Page Continued Dukane Manual Part No. 403-578-01 Table 9- I Weld Position set to Zero Max Trigger Time set to Zero Forced Shutdown Alarm Pre-trigger Overtravel Alarm Part Detected Too Early Max Trigger Time Exceeded Max Trigger Delay Time Exceeded Servo Must Be Homed End of Weld Signal Detected End of Cycle Signal Detected U406 U407 U410 U411 U413 U414 U500 U501 U502 Weld Distance set to Zero U404 U405 Weld Power set to Zero Weld Time set to Zero U401 Weld Energy set to Zero Weld Limits enabled for continuous operation U400 U403 Generator or Press Not Ready U308 U402 Alarm Message Alarm Code Solution Dukane Manual Part No. 403-578-01 For servo press the distance from pre-trigger to position of trigger is required to be less than 0.25 inches or 6.35 millimeters. For pneumatic press the distance from pre-trigger to position of trigger is required to be less than 0.75 inches or 19.05 millimeters. This alarm is for information only. Increase maximum trigger time. Start the weld process sooner. When Auto-stop is enabled and set for End of Cycle, this alarm indicates that the signal has been detected. When Auto-stop is enabled and set for End of Weld, this alarm indicates that the signal has been detected. The servo press must complete the homing process before operation is allowed. This alarm is for information only. This alarm is for information only. Home the servo press by activating both operating switches. Trigger delay distance was not reached Increase maximum trigger delay time. within the specified time limit. Start the weld process sooner. Trigger did not occur within the specified time limit. Contact between the horn and part was Adjust Sensing Start Position to be above contact with part. detected before reaching the Sensing Account for variation of heights of unassembled parts. Start Position. NOTE: Repeated occurrences of this alarm may result in costly damage to servo actuator. Press travel exceeded fixed distance limit while ultrasound was active. External command was received by generator to end weld cycle. Adjust maximum trigger time to be greater than zero. Adjust weld position to be greater than zero. Adjust weld distance to be greater than zero. Adjust weld energy to be greater than zero. Adjust weld peak power to be greater than zero. Adjust weld time to be greater than zero. Change Weld Mode from Automation. Disable Weld Method. iQ generator initialization process is not Wait for initialization process to complete. complete. Cycle power on iQ generator. If alarm persists, contact Dukane. Explanation Section 9 - Troubleshooting Continued from Previous Page Servo Press Alarm Message Screens - Page 4 of 4 Page 119 Series Servo Ultrasonic Press Systems ES User’s Manual This page intentionally left blank Page 120 Dukane Manual Part No. 403-578-01 Section 10 - Contacting Dukane SECTION 10 Contacting Dukane Dukane Manual Part No. 403-578-01 Page 121 Series Servo Ultrasonic Press Systems ES User’s Manual This page intentionally left blank Page 122 Dukane Manual Part No. 403-578-01 Section 10 - Contacting Dukane Contacting Dukane Identify Equipment When contacting Dukane about a service–related problem, be prepared to give the following information: • Model and serial numbers of the press and generator. • Fault/error/alarm indicators from the generator display or iQ Explorer/ iQ Explorer II software. • Software versions. (On generators with a display, go to Main Menu and press Help. On generators without a display, go to Hardware tab in iQ Explorer/iQ Explorer II). • Problem description and steps taken to resolve it. • Line voltage(s) for press and generator. Many problems can be solved over the telephone, so it is best to call from a telephone located near the equipment. Intelligent Assembly Solutions Mailing Address: Dukane Ultrasonics 2900 Dukane Drive St. Charles, IL 60174 US Phone: (630) 797–4900 E-mail: [email protected] Fax: Main (630) 797–4949 Service & Parts (630) 584–0796 Website The website has information about our products, processes, solutions, and technical data. Downloads are available for many kinds of literature. Here is the address for the main website: www.dukane.com/us/ You can locate your local representative at: www.dukane.com/us/sales/intsales.htm Dukane Manual Part No. 403-578-01 Page 123 Series Servo Ultrasonic Press Systems ES User’s Manual This page intentionally left blank Page 124 Dukane Manual Part No. 403-578-01 Section 11 - Specifications SECTION 11 Specifications Press Specifications, Weights, Dimensions, and Operating Environment . . . . . . . . . . . . . . . . . . . . . . . . . . . . . . . . . . . . 127-128 AC Power Requirements . . . . . . . . . . . . . . . . . . . . . . . . . . . . . . . 129 Compressed Air Requirements . . . . . . . . . . . . . . . . . . . . . . . . . . 130 Drawings . . . . . . . . . . . . . . . . . . . . . . . . . . . . . . . . . . . . . . . 131-145 Replacement Parts . . . . . . . . . . . . . . . . . . . . . . . . . . . . . . . . . . . 146 Regulatory Agency Compliance . . . . . . . . . . . . . . . . . . . . . . . . . 147 Dukane Manual Part No. 403-578-01 Page 125 Series Servo Ultrasonic Press Systems ES User’s Manual This page intentionally left blank Page 126 Dukane Manual Part No. 403-578-01 Section 11 - Specifications Press Specifications Model Number Stroke Maximum Weld Force Maximum Rapid Speed Linear Encoder Resolution Maximum Horn Weight in mm lb kg in/s mm/s in µm lb kg 43S215 5.0 127 1000 455 7.0 178 0.00004 1.0 60 27 43S220 5.0 127 550 250 3.0 76 0.00004 1.0 15 7 43S245-A2 3.5 89 150 68 4.9 124 0.00004 1.0 4.0 1.8 43S245-A4 3.5 89 90 41 7.9 200 0.00004 1.0 2.0 0.9 43S340 5.0 127 150 68 5.5 140 0.00004 1.0 6.0 2.7 Table 11- I Press Specifications Dukane Manual Part No. 403-578-01 Page 127 Series Servo Ultrasonic Press Systems ES User’s Manual Weights Press (includes thruster, base and column) Model Number Thruster Only Remote Controller lb kg 25 11 20 9 lb kg lb kg 43S215 * 325 148 115 52 43S220 * 283 129 73 33 43R215 43S340 * 43S245-A2 * 43S245-A4 * 276 125 66 30 230 105 32 15 43R245 Table 11- II Weights * Shipping:Add 145 pounds (66 kg) to unit weight for packing materials Dimensions 43S220 43S340 43S245 NOTE Press (includes base and column) Model Number 43S215 Dimensions - in (mm) Height Width Depth 19.9 (507) 24.8 (630) 61 (1550) highest 46.5 (1180) lowest 70.1 (1780) highest 49.1 (1250) lowest 44.5 (1130) highest 36.0 (915) lowest Table 11- III Dimensions Operating Environment Operate the equipment within these guidelines: Temperature: 40°F to 100°F (+5°C to +38°C) Air Particulates: Keep the equipment dry. Minimize exposure to moisture, dust, dirt, smoke and mold. Humidity: 5% to 95% Non–condensing @ +5°C to +30°C Add 6" (150 mm) behind the press/thruster for connection of cables and optional cooling air tube. NOTE Press height for a particular application is typically driven by the horn length and the required clearance between the horn and the fixture for part loading and unloading. Nonoperating storage guidelines: Temperature: -4°F to 158°F (-20°C to +70°C) Air Particulates: Keep the equipment dry. Minimize exposure to moisture, dust, dirt, smoke and mold. Humidity: 5% to 95% Non–condensing @ 0°C to +30°C Page 128 Dukane Manual Part No. 403-578-01 Section 11 - Specifications AC Power Requirements Generator The AC line voltage and current needed depend on whichever generator has been chosen for your system. See the table below. Operating Frequency Generator Model Number Overload Power Ratings (Watts) Input AC Power Requirements Nominal AC Volt @ Maximum RMS Current 15kHz 15HS360-2♦-XX-XX 3600 200-240V 50/60 Hz @ 25 Amps 15kHz 15HS480-2♦-XX-XX 4800 200-240V 50/60 Hz @ 30 Amps 20kHz 20HS120-1♦-XX-XX 1200 100-120V 50/60 Hz @ 15 Amps 20kHz 20HS120-2♦-XX-XX 1200 200-240V 50/60 Hz @ 8 Amps 20kHz 20HS180-2♦-XX-XX 1800 200-240V 50/60 Hz @ 12 Amps 20kHz 20HS240-2♦-XX-XX 2400 200-240V 50/60 Hz @ 15 Amps 20kHz 20HS360-2♦-XX-XX 3600 200-240V 50/60 Hz @ 25 Amps 20kHz 20HS480-2♦-XX-XX 4800 200-240V 50/60 Hz @ 30 Amps 30kHz 30HS090-1♦-XX-XX 900 100-120V 50/60 Hz @ 8 Amps 30kHz 30HS090-2♦-XX-XX 900 200-240V 50/60 Hz @ 8 Amps 30kHz 30HS120-1♦-XX-XX 1200 100-120V 50/60 Hz @ 15 Amps 30kHz 30HS120-2♦-XX-XX 1200 200-240V 50/60 Hz @ 8 Amps 30kHz 30HS180-2♦-XX-XX 1800 200-240V 50/60 Hz @ 12 Amps 40kHz 40HS060-1♦-XX-XX 600 100-120V 50/60 Hz @ 8 Amps 40kHz 40HS060-2♦-XX-XX 600 200-240V 50/60 Hz @ 5 Amps 40kHz 40HS090-1♦-XX-XX 900 100-120V 50/60 Hz @ 15 Amps 40kHz 40HS090-2♦-XX-XX 900 200-240V 50/60 Hz @ 8 Amps 40kHz 40HS120-1♦-XX-XX 1200 100-120V 50/60 Hz @ 15 Amps 40kHz 40HS120-2♦-XX-XX 1200 200-240V 50/60 Hz @ 8 Amps Table 11- IV North America/ Japan AC Outlet Rating 30 Amps 15 Amps 30 Amps 15 Amps Generator AC Power Requirements NOTES: An X used above in the Model Numbers is a “wildcard” character meaning any valid character code combination. Maximum line current requirement is specified at the minimum nominal AC line voltage and the rated power level. ♦ = designation for the front panel series - "A" = a blank panel, or "Q" = a color front panel. Continued Dukane Manual Part No. 403-578-01 Page 129 Series Servo Ultrasonic Press Systems ES User’s Manual Continued from Previous Page Remote Controller The AC line voltage and current needed depend on whichever remote controller has been chosen for your system. See the table below. Model Number Input AC Power Requirements Nominal AC Voltage @ Maximum RMS Current North America/ Japan AC Outlet Rating 43R215 200-240V 50/60 Hz @ 10 Amps 15 Amps 43R245-AX 90-240V 50/60 Hz @ < 5 Amps 15 Amps Table 11- V Remote Controller AC Power Requirements Press ** The AC line voltage and current needed for your system is shown in the table below. Model Number 43S220, 43S340 Table 11- VI Input AC Power Requirements Nominal AC Voltage @ Maximum RMS Current North America/ Japan AC Outlet Rating **Power to the press for models 90-240V 50/60 Hz @ < 5 Amps 15 Amps 43S215 and 43R245-AX is supplied by the remote controller. Press AC Power Requirements Compressed Air Requirements Ultrasonic stacks will create heat in high duty cycle applications and will require external air cooling. Air requirements will depend upon the duty cycle of the application. Dukane recommends that you use regulated clean, dry air necessary to maintain the ultrasonic stack at a proper operating temperature below 110o F. Air fittings are provided on the back of most thruster units. Compressed air supplied to these fittings is directed at the transducer housing inside the thruster. Page 130 Dukane Manual Part No. 403-578-01 Section 11 - Specifications M10x1.5 HOLE FOR LIFTING 5.9 [150] (REF.) 6.2 [157] 37.1 [941] 22.0 [560] 2.8 [70] (TYPICAL BOOSTER; HORN NOT SHOWN) 4X M10x1.5 MAX. SCREW DEPTH 1.0 [25] 18.75 [476.3] ø.473 [ø12.01] 3.39 [86.0] 1.75 [44.5] 3.50 [88.9] SERVO FEEDBACK (TO J205) THRUSTER I/O (TO J206) (TO J204) ENCODER (TO J100) SERVO POWER (TO J1) (MAX: 100 psi. / 0.7 MPa) PE ULTRASOUND TRANSDUCER COOLING AIR ST. CHARLES, IL MADE IN U.S.A. U.S. PATENT 7819158 OTHER PATENTS PENDING WWW.DUKANE.COM/US DUKANE CORPORATION C L .473 [12.01] 14.57 [370.0] (TO SLOT CENTER) 2.423 [61.54] METRIC MOUNTING 3X 3/8-16 UNC MAX. SCREW DEPTH 1.0 [25] .501 [12.73] ø.501 [ø12.73] SERVO FEEDBACK (TO J205) THRUSTER I/O (TO J206) (TO J204) ENCODER (TO J100) SERVO POWER PE (TO J1) ULTRASOUND (MAX: 100 psi. / 0.7 MPa) TRANSDUCER COOLING AIR ST. CHARLES, IL MADE IN U.S.A. U.S. PATENT 7819158 OTHER PATENTS PENDING WWW.DUKANE.COM/US DUKANE CORPORATION C L 14.00 [355.6] 12.00 [304.8] (TO SLOT CENTER) 2.75 [69.9] 2.75 [69.9] 4.47 [113.5] IMPERIAL MOUNTING UNIT WEIGHT: 115 lb. [52 kg] Page 131 Dukane Manual Part No. 403-578-01 1.3 [33] MOUNTING SURFACE NOTES: 2. BOOSTER LENGTH VARIES DEPENDING UPON GAIN RATIO. (DIMENSIONS ARE FOR REFERENCE ONLY). 1. ALLOW MINIMUM OF 10" [250 mm] CLEARANCE BEHIND WELDER FOR CONNECTORS. 3. HORN (NOT SHOWN) DIMENSIONS VARY DEPENDING UPON DESIGN, MATERIAL, AND TUNING FREQUENCY. TYPICAL LENGTHS RANGE FROM 6" [152 mm] FOR 20kHz TO 7.5" [191 mm] FOR 15kHz. CONTACT DUKANE ULTRASONICS HORN DEPARTMENT FOR DIMENSIONS FOR SPECIFIC APPLICATIONS. 4. MAXIMUM STROKE LENGTH 5.0" [127 mm]. 5. THRUSTER MUST BE USED WITH REMOTE CONTROLLER - REFER TO DRAWING 400-2323. Figure 11-1 Layout - 15/20 kHz High Power iQ Servo Thruster 43S215 - Drawing: 400-2321 Series Servo Ultrasonic Press Systems ES User’s Manual COLUMN MOUNTING HOLES 6X M10x1.5x .8 [25] ULTRASOUND STACK CENTER FIXTURE PLATE MOUNTING HOLES 8X M10x1.5x .5 [13] REMOTE CONTROLLER (SEE NOTE 5) 2.25 [57.2] 2.63 [66.7] 18.6 [472] 0 3.50 [88.9] BASE DETAIL 2.63 [66.7] 2.25 [57.2] 3.50 [88.9] 6.00 [152.4] 6.61 [167.9] 8.1 [206] 12.38 [314.3] 15.40 [391.1] 14.38 [365.1] 10.88 [276.2] 9.35 [237.5] 8.2 [208] 4.92 [125.0] 3.50 [88.9] 0 4.92 [125.0] 5.4 [138] 3.50 [88.9] 5.89 [150] 18.6 [472] 19.9 [507] 24.84 [631] 65.7 [1669] MAX. 51.1 [1298] MIN. NOTES: 2. BOOSTER LENGTH VARIES DEPENDING UPON GAIN RATIO. (DIMENSIONS ARE FOR REFERENCE ONLY). 1. ALLOW MINIMUM OF 8" [200 mm] CLEARANCE BEHIND WELDER FOR CONNECTORS. 3. HORN DIMENSIONS VARY DEPENDING UPON DESIGN, MATERIAL, AND TUNING FREQUENCY. TYPICAL LENGTHS RANGE FROM 6" [152 mm] FOR 20kHz TO 7.5" [191 mm] FOR 15kHz. CONTACT DUKANE ULTRASONICS HORN DEPARTMENT FOR DIMENSIONS FOR SPECIFIC APPLICATIONS. 4. MAXIMUM STROKE LENGTH 5" [127 mm]. 12.25 [311] 6. FOR THRUSTER DIMENSIONS, REFER TO DRAWING 400-2316. 39.8 [1012] (SHOWN IN RETRACTED POSITION) 8.36 [212] SEE NOTE 1 5. THRUSTER MUST BE USED WITH REMOTE CONTROLLER - REFER TO DRAWING 400-2317. TYPICAL BOOSTER; HORN NOT SHOWN (SEE NOTE 2) 21.2 [538] MAX. 6.7 [170] MIN. 4.63 [117] 3.56 [90] 8.05 [204] WEIGHT: 325 lb. [148 kg](EXLUDING REMOTE CONTROLLER & TOOLING) Dukane Manual Part No. 403-578-01 Page 132 ∅12.00 [∅304.8] B.C. (REF.) ∅9.84 [∅249.9]B.C. (REF.) ∅7.00 [∅177.8]B.C. (REF.) 2X ∅.50 [∅12.7] 8.1 [206] 6.61 [167.9] 6.00 [152.4] Figure 11-2 Layout - 15/20 kHz High Power iQ Servo Press System - Drawing: 400-2324 Section 11 - Specifications ALLOW MIN. 8" [200 mm] CLEARANCE FOR CABLES 17.4 [442] ALLOW MIN. 5" [130 mm] CLEARANCE FOR COOLING 5.5 [140] 14.1 [357] 12.6 [320] CONNECTIONS TO PRESS POWER SWITCH AC POWER ENTRY LINE VOLTAGE: 200-240 Vac 50/60 Hz, 15A PE THRUSTER I/O J202 SERVO I/O J206 CONNECTIONS TO GENERATOR J100 SERVO POWER WARNING: POWER LINE OUTLET MUST BE GROUNDED. U.S. PATENT 7819158 DISCONNECT LINE POWER BEFORE REMOVING COVER. OTHER PATENTS PENDING ENCODER IN J204 J205 SERVO FEEDBACK J201 ENCODER OUT ST. CHARLES, IL MADE IN U.S.A. WWW.DUKANE.COM/US DUKANE CORPORATION Page 133 Dukane Manual Part No. 403-578-01 ALLOW MIN. 5" [130 mm] CLEARANCE FOR COOLING 5.2 [132] UNIT WEIGHT: 25 lb. [11.4 kg] Figure 11-3 Layout - Remote Controller iQ 15/20 kHz High Power Servo Press (Model 43R215) - Drawing: 400-2323 Series Servo Ultrasonic Press Systems ES User’s Manual 38.1 [968] C L 5.2 [132] 2.59 [65.7] "A" 5.0 [127] STROKE 2.05 [52.1] 2.90 [73.7] 13.2 [336] 1.2 [31] 31.8 [809] 15.7 [399] 2.4 [61] 12.8 [326] 19.6 [499] 10.5 [267] 7.1 [181] 14.17 [360.0] 1.26 [32.0] 7.48 [190.0] 4X M10x1.5 MAX. SCREW PENETRATION .8 [20] NOTES: C L AC POWER IN POWER SWITCH TOP-OF-STROKE GROUND STUD GROUND DETECT ENCODER OUT SERVO I/O MAX. DOWEL PIN PENETRATION .5 [13] 1.18 [30.0] ∅.395 [10.0] ULTRASOUND BNC 1.0 [25] 1. ALLOW 6" [150] CLEARANCE ON REAR PANEL FOR CONNECTORS. DIMENSION "A" TABLE BOOSTER GAIN "A" +/- .06 [1.5] 1.51 [38.4] 0.4:1 1.28 [32.5] 0.3:1 1.24 [31.5] 0.6:1 1.67 [42.4] 1:1 1.39 [35.3] 1.25:1 1.47 [37.3] 1.5:1 1.53 [38.9] 1.75:1 1.49 [37.8] 2:1 1.44 [36.6] 2.5:1 1.41 [35.8] 3:1 11.811 [300.0] 2. BOOSTER LENGTH "A" VARIES DEPENDING UPON GAIN RATIO AS SHOWN IN THE TABLE (DIMENSIONS ARE FOR REFERENCE ONLY). 3.94 3. HORN DIMENSIONS VARY DEPENDING UPON DESIGN, MATERIAL, [100.0] AND TUNING FREQUENCY. TYPICAL LENGTHS RANGE FROM 4.5" [114] TO 6" [152]. (TO MOUTING SURFACE) CONTACT DUKANE ULTRASONICS HORN DEPARTMENT FOR DIMENSIONS FOR SPECIFIC APPLICATIONS. Dukane Manual Part No. 403-578-01 Page 134 C L UNIT WEIGHT (EXCLUDES HORN): 73 LB. (33 KG) Figure 11-4 Layout - 20 kHz iQ Servo Thruster 43S220 - Drawing: 400-2294 Section 11 - Specifications TOP GAS SPRING MOUNT BLOCK POSITION 18.6 [472] 2.25 [57.2] 2.63 [66.7] 3.50 [88.9] 12.38 [314.3] 15.40 [391.1] 14.38 [365.1] 10.88 [276.2] 9.35 [237.5] 8.2 [208] 4.92 [125.0] 3.50 [88.9] 0 3.50 [88.9] 4.92 [125.0] 5.4 [138] 70.1 [1780] MAX. 44.6 [1132] NOTES: 1. CLEARANCE AMOUNT DEPENDS ON GAS SPRING MOUNT BLOCK POSITION (SEE ISOMETRIC VIEW): TOP POSITION: 5.0 [127] - 16.1 [409] BOTTOM POSITION: 14.9 [378] - 26.0 [660] 8.0 [204] SEE NOTE 2 2. FOR THRUSTER DIMENSIONS, REFER TO DRAWING 400-2294. 8.4 [212] 24.8 [631] 38.1 [968] 1.4 [35] (TYPICAL BOOSTER; HORN NOT SHOWN) 5.0 [127] TO 26.0 [660] (SEE NOTE 1) 4.7 [120] 19.9 [507] 5.2 [132] Page 135 Dukane Manual Part No. 403-578-01 ISOMETRIC VIEW 0 BASE DETAIL 2.63 [66.7] 2.25 [57.2] 3.50 [88.9] BOTTOM GAS SPRING MOUNT BLOCK POSITION COLUMN MOUNTING HOLES 6X M10x1.5x .8 [25] ULTRASOUND STACK CENTER FIXTURE PLATE MOUNTING HOLES 8X M10x1.5x .5 [13] ∅12.00 [∅304.8] B.C. (REF.) ∅9.84 [∅249.9] B.C. (REF.) ∅7.00 [∅177.8] B.C. (REF.) 2X ∅.50 [∅12.7] 8.1 [206] 6.61 [167.9] 6.00 [152.4] 6.00 [152.4] 6.61 [167.9] 8.1 [206] Figure 11-5 Layout - 20 kHz iQ Servo Press System - Drawing 400-2295 Series Servo Ultrasonic Press Systems ES User’s Manual 38.1 [968] C L 5.2 [132] 2.59 [65.7] "A" 5.0 [127] STROKE .6 [14] 1.25 [31.7] 2.60 [66.0] 13.2 [336] 1.2 [31] 31.8 [809] 15.7 [399] 2.4 [61] 3.94 [100.0] (TO MOUTING SURFACE) 12.8 [326] 19.6 [499] 10.5 [267] 14.17 [360.0] 7.1 [181] 1.26 [32.0] 7.48 [190.0] 4X M10x1.5 MAX. SCREW PENETRATION .8 [20] NOTES: C L AC POWER IN POWER SWITCH GROUND STUD TOP-OF-STROKE GROUND DETECT ENCODER OUT SERVO I/O MAX. DOWEL PIN PENETRATION .5 [13] 1.18 [30.0] ∅.395 [10.0] ULTRASOUND BNC 1.0 [25] 11.811 [300.0] DIMENSION "A" TABLE BOOSTER GAIN "A" +/- .06 [1.5] 1.72 [43.7] 1.49 [37.8] 1.45 [36.8] 1.88 [47.8] 1.60 [42.2] 1.68 [42.7] 1.74 [44.2] 1.70 [43.2] 1.65 [41.9] 1.62 [41.1] 0.4:1 0.5:1 0.6:1 1:1 1.25:1 1.5:1 1.75:1 2:1 2.5:1 3:1 1. ALLOW 6" [150] CLEARANCE ON REAR PANEL FOR CONNECTORS. 2. BOOSTER LENGTH "A" VARIES DEPENDING UPON GAIN RATIO AS SHOWN IN THE TABLE (DIMENSIONS ARE FOR REFERENCE ONLY). 3. HORN DIMENSIONS VARY DEPENDING UPON DESIGN, MATERIAL, AND TUNING FREQUENCY. CONTACT DUKANE ULTRASONICS HORN DEPARTMENT FOR DIMENSIONS FOR SPECIFIC APPLICATIONS. Dukane Manual Part No. 403-578-01 Page 136 C L UNIT WEIGHT (EXCLUDES HORN): 66 LB. (30 KG) Figure 11-6 Layout - 30/40 kHz iQ Servo Thruster 43S340 - Drawing 400-1978 Section 11 - Specifications 3.50 [88.9] TOP GAS SPRING MOUNT BLOCK POSITION ISOMETRIC VIEW 2.25 [57.2] 2.63 [66.7] 18.6 [472] 0 BASE DETAIL 2.63 [66.7] 2.25 [57.1] 3.50 [88.9] 12.38 [314.3] 15.40 [391.1] 14.38 [365.1] 10.88 [276.2] 9.35 [237.5] 8.2 [208] 4.92 [125.0] 3.50 [88.9] 0 4.92 [125.0] 5.4 [138] 3.50 [88.9] 70.1 [1780] MAX. NOTES: 1. CLEARANCE AMOUNT DEPENDS ON GAS SPRING MOUNT BLOCK POSITION (SEE ISOMETRIC VIEW): TOP POSITION: 4.0 [102] - 15.1 [383] BOTTOM POSITION: 13.9 [353] - 25.0 [635] 8.0 [204] SEE NOTE 2 2. FOR THRUSTER DIMENSIONS, REFER TO DRAWING 400-1978. 44.6 [1132] 8.4 [212] 24.8 [631] 38.7 [982] 1.9 [48] (TYPICAL BOOSTER; HORN NOT SHOWN) 4.0 [102] TO 25.0 [635] (SEE NOTE 1) 4.7 [120] 19.9 [507] UNIT WEIGHT (EXCLUDES HORN): 276 LB. [125 KG] 5.2 [132] Page 137 Dukane Manual Part No. 403-578-01 BOTTOM GAS SPRING MOUNT BLOCK POSITION COLUMN MOUNTING HOLES 6X M10x1.5x .8 [25] ULTRASOUND STACK CENTER FIXTURE PLATE MOUNTING HOLES 8X M10x1.5 x .5 [13] ∅12.00 [∅304.8] B.C. (REF.) ∅9.84 [∅249.9] B.C. (REF.) ∅7.00 [∅177.8] B.C. (REF.) 2X ∅.50 [∅12.7] 8.1 [206] 6.61 [167.9] 6.00 [152.4] 6.00 [152.4] 6.61 [167.9] 8.1 [206] Figure 11-7 Layout - 30/40 kHz iQ Servo Press System - Drawing 400-2090 Series Servo Ultrasonic Press Systems ES User’s Manual 4.44 [113] 2.68 [68] 3.45 [88] 3.99 [101] 27.40±.5 [696±13] (RETRACTED POSITION; SEE NOTE 2) TRANSDUCER LOCATION 2.69 [68] 3.32 [84] 2.75 [70] HORN NOT SHOWN) 1.09 [28] (TYPICAL BOOSTER; 2.68 [68] 7.12 [181] C L 1.25 [32] 3.38 [86] NOTES: 1. ALLOW MINIMUM OF 6" [150mm] CLEARANCE BEHIND WELDER FOR CONNECTORS. 2. BOOSTER LENGTH VARIES DEPENDING UPON GAIN RATIO. (DIMENSIONS ARE FOR REFERENCE ONLY). 3. HORN DIMENSIONS VARY DEPENDING UPON DESIGN, MATERIAL, AND TUNING FREQUENCY. TYPICAL LENGTHS RANGE FROM 2.5" [64] FOR 40kHz TO 6" [152] FOR 20kHz. CONTACT DUKANE ULTRASONICS HORN DEPARTMENT FOR DIMENSIONS FOR SPECIFIC APPLICATIONS. 4. MAXIMUM STROKE LENGTH 3.5" [89 mm]. .75 [19.1] (TO J100) SERVO POWER (TO J205) SERVO FEEDBACK (TO J1) ULTRASOUND (MAX: 100 psi./ 0.7 MPa) TRANSDUCER COOLING AIR THRUSTER I/O (TO J206) (TO J204) ENCODER PE ST. CHARLES, IL MADE IN U.S.A. WWW.DUKANE.COM DUKANE CORPORATION C L 1.50 [38.1] (3X) ∅.316 [8.0] MAX. DOWEL PIN PENETRATION .35 [9.0] (4X) M8x1.25 MAX. SCREW PENETRATION .50 [12] 5. THRUSTER MUST BE USED WITH REMOTE CONTROLLER - REFER TO DRAWING 400-2317. 25.75 [654] 2.75±.5 [70±13] (SEE NOTE 2) 8.500 [215.9] ALLOW MIN. 6" [150 mm] BEHIND WELDER FOR CABLE CLEARANCE 10.66 [271] 1.07 [27] Dukane Manual Part No. 403-578-01 Page 138 1.73 [44] 3.50 [89] STROKE C L MOUNTING SURFACE UNIT WEIGHT (EXCLUDES HORN): 32 LB. (14.5 KG) Figure 11-8 Layout - 30/40 kHz Mini Servo Thrusters 43S245-A2 and 43S245-A4 - Drawing 400-2316 Section 11 - Specifications ALLOW MIN. 5" [130] CLEARANCE FOR COOLING 3.44 [87] 17.39 [442] ALLOW MIN. 6" [150 mm] FOR CABLE CLEARANCE ALLOW MIN. 5" [130] CLEARANCE FOR COOLING 3.82 [97] 12.57 [319] CONNECTIONS TO PRESS AC POWER ENTRY PE THRUSTER I/O J202 SERVO I/O J206 CONNECTIONS TO GENERATOR SERVO POWER J100 ENCODER IN J204 SERVO FEEDBACK J205 J201 ENCODER OUT Page 139 Dukane Manual Part No. 403-578-01 POWER SWITCH LINE VOLTAGE: 90-240 Vac 50/60 Hz, 10A WARNING: POWER LINE OUTLET MUST BE GROUNDED. DISCONNECT LINE POWER BEFORE REMOVING COVER. ST. CHARLES, IL MADE IN U.S.A. WWW.DUKANE.COM DUKANE CORPORATION UNIT WEIGHT: 20 lb. [9 kg] Figure 11-9 Layout - 30/40 kHz Mini Servo Remote Controller 43R245 - Drawing 400-2317 Series Servo Ultrasonic Press Systems ES User’s Manual COLUMN MOUNTING HOLES 6X M10x1.5x .8 [25] ULTRASOUND STACK CENTER FIXTURE PLATE MOUNTING HOLES 8X M10x1.5x .5 [13] REMOTE CONTROLLER (SEE NOTE 5) 2.25 [57.2] 2.63 [66.7] 18.6 [472] 0 3.50 [88.9] BASE DETAIL 2.63 [66.7] 2.25 [57.2] 3.50 [88.9] 6.00 [152.4] 6.61 [167.9] 8.1 [206] 12.38 [314.3] 15.40 [391.1] 14.38 [365.1] 10.88 [276.2] 9.35 [237.5] 8.2 [208] 4.92 [125.0] 3.50 [88.9] 0 3.50 [88.9] 4.92 [125.0] 5.4 [138] 18.6 [472] 19.9 [507] 4.08 [104] 24.84 [631] 44.5 [1130] MAX. 36.0 [915] MIN. NOTES: 2. BOOSTER LENGTH VARIES DEPENDING UPON GAIN RATIO. (DIMENSIONS ARE FOR REFERENCE ONLY). 1. ALLOW MINIMUM OF 6" [150mm] CLEARANCE BEHIND WELDER FOR CONNECTORS. 3. HORN DIMENSIONS VARY DEPENDING UPON DESIGN, MATERIAL, AND TUNING FREQUENCY. TYPICAL LENGTHS RANGE FROM 2.5" [64] FOR 40kHz TO 6" [152] FOR 20kHz. CONTACT DUKANE ULTRASONICS HORN DEPARTMENT FOR DIMENSIONS FOR SPECIFIC APPLICATIONS. 4. MAXIMUM STROKE LENGTH 3.5" [89 mm]. SEE NOTE 1 6. FOR THRUSTER DIMENSIONS, REFER TO DRAWING 400-2316. 7.70 [196] 2.68 [68] 6.50 [165] 31.27 [794] 5. THRUSTER MUST BE USED WITH REMOTE CONTROLLER - REFER TO DRAWING 400-2317. 27.42±.5 [696±13] (RETRACTED POSITION) 4.0 [102] MIN. 12.5 [317] MAX. TYPICAL BOOSTER; HORN NOT SHOWN (SEE NOTE 2) 4.63 [117] 8.05 [204] WEIGHT: 230 lb. [105 kg](EXLUDING REMOTE CONTROLLER) Dukane Manual Part No. 403-578-01 Page 140 ∅12.00 [∅304.8] B.C. (REF.) ∅9.84 [∅249.9] B.C. (REF.) ∅7.00 [∅177.8] B.C. (REF.) 2X ∅.50 [∅12.7] 8.1 [206] 6.61 [167.9] 6.00 [152.4] Figure 11-10 Layout - 30/40 kHz Mini Servo Press System - Drawing 400-2318 Section 11 - Specifications Figure 11-11 Press Wiring Diagram - Model 43S215 Dukane Manual Part No. 403-578-01 Page 141 Series Servo Ultrasonic Press Systems ES User’s Manual AC IN GENERATOR 200-1541 (240Vac) OR 200-1576 (120 Vac) 438-880 438-985 LOAD CELL KIT LOAD CELL KIT NUMBERS THRUSTER MODEL 43S220 43S340 1 0 BLU BLU N L BRN BLU BRN AC BREAKER (680-891-010) BRN DOWN LIMIT SWITCH (680-862) UP LIMIT SWITCH (680-403) FAN (286-60) GROUND STUD NEAR TOP OF STROKE CONNECTOR GROUND STUD BELOW AC BREAKER GRN / YEL BLK WHT GRN / YEL ULTRASOUND CONTACT LEAF EXTENSION PCB (110-4471) CABLE 1 C. (1) NO. (3) TO LOAD CELL (P2) (PART OF LOAD CELL KIT) LOAD CELL PCB TO THRUSTER PCB (P1) 430-04-0040 NOTES: N.O. COM WHT BLK RFI / 24 VDC POWER SUPPLY PCB (110-4473) CABLE 6 CABLE 11 GROUND DETECT (E201) TOP OF STROKE OUTPUT (P206) FAN & TEMPERATURE SENSOR (P205) 200-1862 OR CABLE 3 GRN/YEL BLU BRN SERVO POWER LED (430-03-0044) (SEE NOTE 2) POWER LED (P208) TRIGGER LED (430-03-0043) ENCODER (J2) I/O (J3) POWER (J5) SERVO CONTROLLER / DRIVE (110-4406) RS-232 (J4) MOTOR (J1) TRIGGER LED (P207) SERVO ACTUATOR ENCODER INPUT (J204) LINEAR ENCODER INPUT (J202) THRUSTER PCB (110-4461) AC OUTPUT TO DC POWER SUPPLY (P202) CABLE 7 UP LIMIT SWITCH (P211) CABLE 2 AC POWER INPUT (P201) DC OUTPUT TO SERVO THRUSTER (P203) CABLE 4 CABLE 8 DOWN LIMIT SWITCH (P212) DC INPUT FROM POWER SUPPLY (P201) CABLE 10 CABLE CARRIER SERVO RS-232 (J203) SERVO I/O (P202) SERVO CONTROLLER ENCODER (P210) EXTENSION PCB 45-PIN CONNECTION (J201) LOAD CELL (P204) 45-PIN CONNECTION (P201) EXTENSION PCB 9-PIN CONNECTION (J205) MECHANICAL STOP MOTOR (P203) CABLE 9 9-PIN CONNECTION (P202) SERVO ACTUATOR (104-10) POWER ENCODER - + DC OUT 60 VDC POWER SUPPLY (110-4936 OR L N AC IN 110-4407) 1. CABLES LABELED AS CABLE X ARE PART OF WIRING HARNESS 430-05-0041 2. CABLES CONNECTED TO 60VDC POWER SUPPLY DEPEND ON POWER SUPPLY MANUFACTURER: FOR TDK/LAMBDA: 200-1862 AND 200-1863 FOR XP POWER: CABLE 3 AND CABLE 5 LINEAR ENCODER (625-19) THRUSTER LINE LOAD IEC RECEPTACLE GND (597-513) PE TOP OF STROKE GROUND DETECT (PART OF LOAD CELL KIT) LOAD CELL ULTRASOUND THRUSTER I/O 200-479-X 200-1556-X ENCODER J1 ULTRASOUND J5 THRUSTER 200-1613-X GRN / YEL J11 ENCODER J6 BASE/ABORT 200-1545-X J35 BASE BLK VIO 200-1863 OR CABLE 5 (SEE NOTE 2) Dukane Manual Part No. 403-578-01 Page 142 GRN / YEL GRN / YEL Figure 11-12 Layout - Press Wiring Diagram - Models 43S220 and 43S340 - Drawing 190-3867 Section 11 - Specifications Figure 11-13 Press Wiring Diagram - Models 43S245A and 43S245-A4 Dukane Manual Part No. 403-578-01 Page 143 Series Servo Ultrasonic Press Systems ES User’s Manual Figure 11-14 Remote Controller Wiring Diagram - Model 43R215 Page 144 Dukane Manual Part No. 403-578-01 Section 11 - Specifications Figure 11-15 Remote Controller Wiring Diagram - Model 43R245 Dukane Manual Part No. 403-578-01 Page 145 Series Servo Ultrasonic Press Systems ES User’s Manual Replacement Parts - iQ Series Servo Presses ES Below is a list of select replacement parts. Contact Dukane for any parts not listed here. Press Model Part Number Part Description 43S215 with 43R215 43S220 43S245-A2 with 43R245 43S245-A4 with 43R245 43S340 110-4675 Servo actuator with mount plate X ― ― ― ― 110-4551 Servo actuator with mount plate ― X ― ― ― 110-4820 Servo actuator with mount plate ― ― X ― ― 110-4824 Servo actuator with mount plate ― ― ― X ― 110-4612 Servo actuator with mount plate ― ― ― ― X 110-4679 Servo motor controller (1) X ― ― ― ― 110-4406 Servo motor controller (1)(2) ― X X X X Servo amplifier (1) X ― ― ― ― 110-4407 Power supply for servo controller ― X ― ― X 110-4827 Power supply for servo controller ― ― X X ― 110-4678 105-10 Power supply for servo drive X ― ― ― ― 625-19 Optical distance encoder X X ― ― X 625-23 Optical distance encoder ― ― X X ― 438-984 Load cell kit (3) X ― ― ― ― 438-880 Load cell kit (3) ― X ― ― ― 438-985 Load cell kit (3) ― ― X X X Table 11- VII Select Replacement Parts X = available — = unavailable NOTES: (1) Component requires programming at the factory. (2) Please specify Press Model number at time of order. (3) Load cell requires calibration after installation into press. Page 146 Dukane Manual Part No. 403-578-01 Section 11 - Specifications Regulatory Agency Compliance FCC The generator complies with the following Federal Communications Commission regulations. • The limits for FCC measurement procedure MP-5, “Methods of Measurement of Radio Noise Emissions from ISM Equipment”, pursuant to FCC Title 47 Part 18 for Ultrasonic Equipment. CE Marking This mark on your equipment certifies that it meets the requirements of the EU (European Union) concerning interference causing equipment regulations. CE stands for Conformité Europeéne (European Conformity). The equipment complies with the following CE requirements. • T h e E M C D i r e c t i v e 2 0 0 4 / 1 0 8 / EC for Heavy Industrial — EN 61000-6-4: 2001 EN 55011: 2003 EN 61000-6-2: 2005 EN61000–4–2 EN61000–4–3 EN61000–4–4 EN61000–4–5 EN61000–4–6 EN61000–4–8 EN61000–4–11 • The Low Voltage Directive 2006/95/EC. • The Machinery Directive 2006/42/EC. EN 60204: 2006 Safety of Machinery - Electrical Equipment of Machines Part 1: General Requirements. CAUTION DO NOT make any modifications to the generator, press, remote controller or associated cables as the changes may result in violating one or more regulations under which this equipment is manufactured. IP (International Protection) Rating The iQ generator as well as all models of the servo press and remote controller have an IP rating from the IEC (International Electrotechnical Commission). The rating is IP2X, in compliance with finger-safe industry standards. Dukane Manual Part No. 403-578-01 Page 147 Series Servo Ultrasonic Press Systems ES User’s Manual This page intentionally left blank Page 148 Dukane Manual Part No. 403-578-01 Section 12 - Appendices SECTION 12 Appendices Appendix A, List of Figures . . . . . . . . . . . . . . . . . . . 151 Appendix B, List of Tables . . . . . . . . . . . . . . . . . . . . 154 Dukane Manual Part No. 403-578-01 Page 149 Series Servo Ultrasonic Press Systems ES User’s Manual This page intentionally left blank Page 150 Dukane Manual Part No. 403-578-01 Section 12 - Appendices List of Figures Appendix A No.Description Page 2-1 Example of 220/240 Volt, Grounded, 3-Prong Receptacle.............................................10 2-2 International 220/240V Grounding ..............................................................................11 2-3 Lifting Eye Bolt on Some Press Models.........................................................................12 3-1 Lockout Device In Open Position, Unlocked..................................................................15 3-2 Bottom Lockout Device In Closed Position, Locked .....................................................15 3-3 Rack Mounting iQ Generator - Representative Low-Profile Model Shown ................18 3-4 Securing iQ Generator to Benchtop - Representative High-Profile Model Shown ......19 3-5 Example of Press Placement.........................................................................................20 3-6 Base Dimensions Detail - For Reference Only .............................................................21 3-7 To Make Adjustments ..................................................................................................23 3-8 To Relocate Handles ...................................................................................................23 3-9 Height Adjustment Handle and Wheels 3-10 Example of Mounting the Thruster to a Rigid Structure 3-11 iQ Generator, Remote Controller, & Servo Press/Thruster - Connections Diagram ....27 3-12 iQ Generator and Servo Press/Thruster - Connections Diagram 3-13 Rear of Press Base Showing J35 and Grounding Lug 3-14 iQ Servo Press/Thruster Rear Cable Connectors - Version 1, Models 43S245-AX.......37 3-15 iQ Servo Press/Thruster Rear Cable Connectors - Version 2, Model 43S220 and 43S340...38 3-16 Flange Template. . . . . . . . . . . . . . . . . . . . . . . . . . . . . . . . . . . . . . . . . . . . . . . . . . . . . . 39 4-1 Acoustic Stack Components..........................................................................................44 4-2 Stack Removal...............................................................................................................45 4-3 Disassembling Components...........................................................................................46 4-4 Tip Removal...................................................................................................................46 4-5 Assembling Components...............................................................................................47 4-6 Tip Assembly..................................................................................................................48 4-7 Stack Installation............................................................................................................48 4-8 Fixture/Base Layout.......................................................................................................49 4-9 Loosening the Hold Down Cap Screws and Jack Screws..............................................50 4-10 Tightening the Hold Down Cap Screws and Jack Screws..............................................50 .....................................................................23 ..........................................24 .............................31 ............................................36 Continued Dukane Manual Part No. 403-578-01 Page 151 Series Servo Ultrasonic Press Systems ES User’s Manual Appendix A No.Description Continued from Previous Page List of Figures Page 5-1 Press Manual Controls and Indicators ..........................................................................55 5-2 Height Adjustment Wheel, Models 43S245-AX .............................................................56 5-3 Ergonomic Base Controls...............................................................................................56 5-4 Right Operate Switch in Standby Mode.........................................................................57 5-5 Right Operate Switch in Operate Mode..........................................................................57 5-6 Setting and Resetting the E-Stop Switch.......................................................................58 5-7Typical AC Breaker/Switch.............................................................................................60 6-1 Typical AC Breaker/Switch ..........................................................................................64 6-2 iQ Generator with Color Display and Power Button ....................................................64 6-3 iQ Generator with Power Light ....................................................................................64 6-4 Servo Actuator AC Breaker/Switch Location ...............................................................65 6-5 iQ Explorer II, Keyboard and Numeric Pad .................................................................68 6-6 Help from Top Menu Bar ..............................................................................................69 6-7 Contents and Index in Help .........................................................................................69 6-8 iQ Explorer II, Start-up ..................................................................................................70 6-9 iQ Explorer II, Start-up, Hardware Tab ........................................................................70 6-10 iQ Explorer II, Process Settings Tab ............................................................................71 6-11 iQ Explorer III, Process Settings > Initiate Mode ..........................................................71 6-12 iQ Explorer II, Process Settings > Trigger > Type, Force, Max Trigger Time ..............72 6-13 Suggested Initial Trigger/Force Setting .......................................................................72 6-14 iQ Explorer II, Process Settings > Sensing Speed ......................................................73 6-15 iQ Explorer II, Process Settings > Sensing Start Position ...........................................73 6-16 iQ Explorer II, Teach Sensing Start Position ...............................................................74 6-17 iQ Explorer II, Process Settings > Weld > Primary Method .........................................75 6-18 iQ Explorer II, Process Settings > Weld > Secondary Weld Method ..........................75 6-19 iQ Explorer II, Process Settings > Weld > Enable Melt Detect ....................................76 6-20 iQ Explorer II, Process Settings > Weld > Weld Motion Control Mode, Weld Profile, Speed .....76 6-21 iQ Explorer II, Process Settings > Weld > Weld Profile > Segmented...........................77 6-22 iQ Explorer II, View Speed Profile ...............................................................................77 6-23 iQ Explorer II, Process Settings > Amplitude.................................................................77 6-24 iQ Explorer II, Process Settings > Post Weld > Dynamic Hold Method ......................78 6-25 iQ Explorer II, Process Settings > Post Weld > Static Hold Method ...........................79 6-26 iQ Explorer II, Process Limits Tab ................................................................................80 6-27 iQ Explorer II, Cycle Data Tab ......................................................................................81 Continued Page 152 Dukane Manual Part No. 403-578-01 Section 12 - Appendices Appendix A No.Description Continued from Previous Page List of Figures Page 7-1 iQ Explorer II Utilities TEST Button ...............................................................................86 7-2 iQ Explorer II TEST, Screen Display..............................................................................87 7-3 iQ Explorer II Error Detected - Cycle Stop.....................................................................87 7-4 iQ Explorer II Process Settings, Enable Advanced Settings..........................................88 8-1 Example of Burnished Area............................................................................................93 8-2 Example of Crowning.....................................................................................................93 8-3 Example of Center Depression......................................................................................93 8-4 Method of Component Resurfacing............................................................................... 94 8-5 Dovetail Slide.................................................................................................................96 11-1 Layout - 15/20 kHz High Power iQ Servo Thruster 43S215 - Drawing: 400-2321.......131 11-2 Layout - 15/20 kHz High Power iQ Servo Press System - Drawing: 400-2324............132 11-3 Layout - Remote Controller iQ 15/20 kHz High Power Servo Press (Model 43R215) - Drawing: 400-2323....................................................................................................133 11-4 Layout - 20 kHz iQ Servo Thruster 43S220 - Drawing: 400-2294................................134 11-5 Layout - 20 kHz iQ Servo Press System - Drawing 400-2295......................................135 11-6 Layout - 30/40 kHz iQ Servo Thruster 43S340 - Drawing 400-1978............................136 11-7 Layout - 30/40 kHz iQ Servo Press System - Drawing 400-2090.................................137 11-8 Layout - 30/40 kHz Mini Servo Thrusters 43S245-A2 and 43S245-A4 - Drawing 400-2316...138 11-9 Layout - 30/40 kHz Mini Servo Remote Controller 43R245 - Drawing 400-2317.........139 11-10 Layout - 30/40 kHz Mini Servo Press System - Drawing 400-2318.............................140 11-11 Press Wiring Diagram - Model 43S215 .......................................................................141 11-12 Layout - Press Wiring Diagram - Models 43S220 and 43S340 - Drawing 190-3867...142 11-13 Press Wiring Diagram - Models 43S245A and 43S245-A4..........................................143 11-14 Remote Controller Wiring Diagram - Model 43R215....................................................144 11-15 Remote Controller Wiring Diagram - Model 43R245....................................................145 Dukane Manual Part No. 403-578-01 Page 153 Series Servo Ultrasonic Press Systems ES User’s Manual Appendix B No.Description List of Tables Page 3-I Rack Mount Bracket Part Numbers................................................................................. 18 3-II Thruster Drawing Numbers ........................................................................................... 24 3-III iQ Generator, Remote Controller, and Servo Press/Thruster Cables, 43S215 ............. 28 3-IV iQ Generator, Remote Controller, and Servo Press/Thruster Cables, 43S245-AX.......... 29 3-V iQ Generator and Servo Press/Thruster Cables ............................................................ 32 4-I Stud Torque Values ......................................................................................................... 47 4-II Horn/Booster Torque Values............................................................................................ 47 4-III Replaceable Tip Torque Values........................................................................................ 48 5-I E-STOP Status Color....................................................................................................... 59 9-I Servo Press Alarm Message Screens.................................................................... 116-119 11-I Press Specifications....................................................................................................... 127 11-IIWeights.......................................................................................................................... 128 11-IIIDimensions.................................................................................................................... 128 11-IV Generator AC Power Requirements.............................................................................. 129 11-V Remote Controller AC Power Requirements................................................................. 130 11-VI Press/Thruster AC Power Requirements....................................................................... 130 11-VII Select Replacement Parts.............................................................................................146 Page 154 Dukane Manual Part No. 403-578-01 Index Index Dukane Manual Part No. 403-578-01 Page 155 Series Servo Ultrasonic Press Systems ES User’s Manual This page intentionally left blank Page 156 Dukane Manual Part No. 403-578-01 Index Index A Acoustic Stack 41 Description 44 Horn/Booster Torque Values 47 Installing the Stack 48 Generator 60 HMI 60 Press 55 Ergonomic Base 56 Remote Controller 60 Cycle Activation (Operate) Switches 57 D Overview 43 Drawings and Tables 2 Removing a Detachable Tip 46 Dukane 121 Replaceable Tip Torque Values 48 Address 123 Stack Assembly 47 Contacting 123 Stack Disassembly 46 E-mail 123 Stack Removal 45 Fax 123 Stud Torque Values 47 Intelligent Assembly Solutions 123 Alarm Messages 115 Address 123 Appendices 149 E-mail 123 Appendix A, List of Figures 151 Fax 123 Appendix B, List of Tables 154 Phone 123 Website 123 C Cable Connections Thruster Only 25 www.dukane.com/us/sales/intsales.htm 123 E Version 1 - Remote Controller Configuration 26 E-mail 123 Version 2 - Integrated Configuration 30 Emergency Stop (Abort) Switch 57 Connector Descriptions 33 Ergonomic Base Connector 35 iQ Generator Connectors 33 Remote Controller 36 Thruster 35 Top of Stroke (Optional) 35 Control Functions 66 Controls and Indicators 53 Dukane Manual Part No. 403-578-01 Page 157 Series Servo Ultrasonic Press Systems ES User’s Manual F Homing the Welder 59 Features 82 I Duplicating Process on Multiple Machines 82 Setup Switching 82 Teachable Top-of-Stroke Position 82 Installation Before Installation 15 When to Use Lockout /Tagout Devices 15 Figures 151 Benchtop Mounting 19 Fixture Installation 49 Configuration Alignment 49 Electronic Bottom Stop 50 Leveling 51 Flange Template 39 H Servo Press/Thruster (Version 1) 27 Servo Press/Thruster (Version 2) 31 Machine Base Without 22 Placement 17 Seismic Region 18 Health and Safety 5, 8 Electrical Safety 10 Domestic Power Grounding 10 Grounding for RFI Suppression 11 International Power Grounding 11 Operate Switches 11 Rack-Mounting 18 Thruster 24 Unpacking the System 20 Utilities 17 iQ Generator Color Front Panel 59 How to Lift Safely 12 Lifting Eye Bolt 12 Safe Operation 7 Special Health Notice – Plastics 9 Help System 69 F1 Key 69 Page 158 Dukane Manual Part No. 403-578-01 Index L Layout Drawings 131 20 kHz iQ Servo Press System - Drawing 400-2295 135 20 kHz iQ Servo Thruster 43S220 - Drawing: 400-2294 134 30/40 kHz iQ Servo Press System - Drawing 400-2090 137 30/40 kHz iQ Servo Thruster 43S340 - Drawing 400-1978 136 30/40 kHz Mini Servo Press System - Drawing 400-2318 140 30/40 kHz Mini Servo Remote Controller 43R245 - Drawing 400-2317 139 30/40 kHz Mini Servo Thrusters 43S245-A2 and 43S245-A4 - Drawing 400-2316 138 iQ Servo Press System - Drawing: 400-2324 132 iQ Servo Thruster 43S215 - Drawing: 400-2321 131 Remote Controller iQ 15/20 kHz High Power Servo Press (Model 43R215) - Drawing: 400-2323 133 M Machine Base Securing 21 Maintenance 91 Press Calibration 98 Reconditioning Stack Components 94 Six-Month Periodic 97 Stack 93 System 96 Torque Values 95 N Notes, Cautions and Warnings 2 O Operating Mode Automatic 59 Operation 61 Generator AC Breaker and Power Button 64 Overview 63 Dukane Manual Part No. 403-578-01 Page 159 Series Servo Ultrasonic Press Systems ES User’s Manual O - Continued Operation Start-up Generator 64 AC Breaker and Power Button 64 AC Breaker Only 65 iQ HMI 65 Other Equipment 65 Press 65 Press Base 65 Remote Controller 65 P Press Calibration 98 Press Height Adjustment 23 Press System Overview 3 Resources 3 System Defined 3 Versions Offered 3 Q Quick Start 70 Step 1 - Read the Software User's Manual 70 Step 2 - Select Unused Setup 70 Step 3 - Navigate to the Process Settings Tab 71 Step 4 - Set Cycle Initiation Mode 71 Step 5 - Specify Trigger Settings 72 Step 6 - Program Sensing Speed 73 Step 7 - Program Sensing Start Position 73 Step 8 - Teach Sensing Start Position 74 Step 9 - Program Weld Characteristics 75 Step 10 - Enable Melt Detect 76 Step 14 - Test the Acoustic Stack 79 Step 15 - Specify Process Limits Behavior 80 Step 16 - Run Weld Cycle 81 Step 17 - View Weld Results 81 R Regulatory Agency Compliance 147 Replacement Parts 146 S Software Support Features 68 Help System 69 Numeric Pad Keyboard 68 Quick Start 70 Specifications 125 Compressed Air Requirements 130 Dimensions 128 Operating Environment 128 Power Requirements 129 Generator 129 Press 130 Remote Controller 130 Press 127 Weights 128 Status Display Press Base 59 System Operational Test 83 Cycling the System 89 Restoring Factory Defaults 89 Test of the Acoustic Stack 86 Step 11 - Specify Weld Motion 76 Step 12 - Set Ultrasound Amplitude 77 Step 13 - Post Weld Settings 78 Page 160 Dukane Manual Part No. 403-578-01 Index T Tables 154 Torque Values 95 Troubleshooting 99 Alarm Messages 115 Insertion 109 Staking 112 Welding 102 U Unpacking the System 20 User Information 2 Drawings and Tables 2 Notes, Cautions and Warnings 2 Using the E-STOP Switch 58 Resetting the E-STOP 58 Stop the System 58 W Weld Cycle Starting 67 Stopping 67 Wiring Diagrams Press Wiring Diagram - Model 43S215 141 Press Wiring Diagram - Models 43S220 and 43S340 - Drawing 190-3867 142 Press Wiring Diagram - Models 43S245A and 43S245-A4 143 Remote Controller Wiring Diagram - Model 43R215 144 Remote Controller Wiring Diagram - Model 43R245 145 Dukane Manual Part No. 403-578-01 Page 161 Series Servo Ultrasonic Press Systems ES User’s Manual This page intentionally left blank Page 162 Dukane Manual Part No. 403-578-01 Dukane ISO ISO CERTIFICATION Dukane chose to become ISO 9001:2008 certified in order to demonstrate to our customers our continuing commitment to being a quality vendor. By passing its audit, Dukane can assure you that we have in place a well–defined and systematic approach to quality design, manufacturing, delivery and service. This certificate reinforces Dukane's status as a quality vendor of technology and products. To achieve ISO 9001:2008 certification, you must prove to one of the quality system registrar groups that you meet three requirements: 1.Leadership 2.Involvement 3. Quality in Line Organizations and Quality System Infrastructure. The ISO 9001:2008 standard establishes a minimum requirement for these requirements and starts transitioning the company from a traditional inspection–oriented quality system to one based on partnership for continuous improvement. This concept is key in that Dukane no longer focuses on inspection, but on individual processes. Dukane's quality management system is based on the following three objectives: 1. Customer oriented quality. The aim is to improve customer satisfaction. 2. Quality is determined by people. The aim is to improve the internal organization and cooperation between staff members. 3. Quality is a continuous improvement. The aim is to continuously improve the internal organization and the competitive position. ISO 9001:2008 CERTIFIED Dukane products are manufactured in ISO registered facilities. Please refer to our website at: www.dukane.com/us/sales/intsales.htm to locate your local representative. Series Servo Ultrasonic Press Systems ES User's Manual Part No. 403 - 578- 01 www.dukane.com/us Printed in the United States of America Dukane Intelligent Assembly Solutions • 2900 Dukane Drive • St. Charles, Illinois 60174 USA • TEL (630) 797- 4900 • FAX (630) 797- 4949