1
Kaosweaver
Version 2.0.0
Released March 1st 2005
Expert Images v2
A Dreamweaver Extension
•
Sitewide dynamic image control
•
Centralized JavaScript files
•
Image sets and actions named for easy editing
•
9 built in actions, 3 controls for slideshows and manual instructions for further control over the output
For Dreamweaver MX and higher, Windows 2000 & XP or higher and OS 9.x and higher
Table of Contents
Start here
Overview
4
Setup and Installation
6
License
15
Quick Guide
1, 2, 3 – you’re done!
16
Expert Images Guide
Overview
21
Set Management
22
Image List Management
23
Subdomain
25
Image Property Management
27
Working with Templates
28
Expert Images Action Guide
Overview
29
Expert Images Caption Guide
Overview
31
Slideshow Control Guide
Overview
31
Setup click show
34
Setup Stop/Start controls
34
Advanced Options
Database Image lists
35
Wrap Up
Troubleshooting
41
Overview
Expert Images is the ‘great-grandchild’ of Random Images which was
Kaosweaver’s first publicly released Dreamweaver extension back in 2001. Daily
Images was another extension Kaosweaver wrote. They combined into
Advanced Random Images and the first version included slideshow capabilities
as well. Eventually, Professional Random Images came about because of some
features unavailable in Advanced Random Images and then Expert Images came
about to advance on Professional Random Images’ feature set. Expert Images
v2 is another leap forward in image display and control.
Expert Images uses a completely new code base designed apart from any
Advanced or Professional Random Images code. This extension will allow you to
setup named image sets for use site wide, setup specific actions on pages and
delete actions or images. Expert Images will also have slideshow controls for the
slideshow actions and the ability to setup actions on the other non-slideshow
images. Expert Images combines commands and behaviors to control the
dynamic images on your site
Expert Images will work with Dreamweaver MX and MX2004. It will work in a
template or a page that has a template applied to it. It will work with subdomain
(subfolder) site. Given the modular capabilities of the extension, preview on the
local machine will not work. The pages will need to be pushed to the server (as
well as the images and supporting JavaScript) in order for the images to be
displayed properly.
Feature List:
•
8 Actions for the image sets:
o Random Image – one image randomly from the set.
o Daily Image – one image all day for all visitors from the set.
o Weekly Image – one image per weekday from the set.
o Date Image – one image per calendar date from the set.
o Month Image – one image per month from the set.
o Cycle Image – sequentially displays the list of images from the set
per user, uses cookies.
o Sequential Slideshow – displays a slideshow, in sequence, from a
set, can be set for images to link to a popup or in the same page.
o Random Slideshow – displays a slideshow, randomly, from a set,
can be set for images to link to a popup or in the same page.
•
Slideshows can be set to fade from one image to the next.
•
Text captions can be placed on the page which will change and display with
the displayed image.
•
Clickshow controls for the non-slideshow actions.
•
Stop, start, forward and backward slideshow controls.
•
Multiple actions per page.
•
Multiple sets of images per site.
•
Image sets can be used across the site.
•
Centralized JavaScript control file, one control file per site.
•
Works on a templated page.
•
Works in a template page.
•
Validates to the w3c standards.
•
Advanced manual editing of the actions, image sets and even extra
functionality for the popup slideshow functionality and slideshow speed
controls.
Setup and Installation
Loading the extension into Dreamweaver
All extensions for Dreamweaver are loaded the same way, regardless of platform
(PC or Mac) that the extension is on. One package (kw_Extensions.mxp) is used
for both Windows and Macintosh distribution. Some requirements exist for our
extensions as detailed below (please note, this extension may not work with all of
the versions of Dreamweaver listed below):
Dreamweaver 4 or UltraDev 4
o Extension Manager v1.5
o Dreamweaver/UltraDev update v4.01 or later
Dreamweaver MX
o Extension Manager v1.6
o Dreamweaver MX v6.01 update or later
Dreamweaver MX 2004
o Extension Manager v1.6
o Dreamweaver MX v7.01 or later
All of these are available as updates for free from the Macromedia website in
their download section. This location has changed in the past or we’d provide a
URL for you to reference. Please note, the majority of our products do not work
in Dreamweaver v3 or UltraDev v1 or earlier. Our policy is to support the current
release of Dreamweaver and the prior version. All versions behind the current
version by two releases may be supported; however, we are unable to
troubleshoot issues un-reproducible on the supported versions of Dreamweaver.
To load the extension, save it from the email you received with it attached or
locate it where you downloaded it to on your system. If you’ve requested the
delivery email and it has not come yet, please check your email filtering software
and check your junk bin. We do know most of the free email services will have
email delivery delays of one to four hours. If time is absolutely critical, please
send our support staff an email and we may be able to assist in a quicker
delivery. Another alternative is to change the email on your account at the
Kaosweaver site and resend the product to yourself. The delivery system is
subject to the limitations of email delivery and may sometimes experience delays
because of the latest virus, worm or spam on the internet.
Once the extension is saved from the email, find it on your drive. Once found,
double clicking on the extension will load Extension Manager which will automate
the process of installation. Some possible messages will include a request to
overwrite existing files. You can answer Yes or No to any of these and the install
should not be impacted. This is usually due to shared images or resource files
that Kaosweaver uses to prevent installing unique files for each extension which,
in reality, are identical. Certain extensions will have resource files that you can
edit through the extension and these extensions will require a little caution when
re-installing to prevent your past modifications from being removed. All resource
files from Kaosweaver will be saved with .xml extensions. Always answer no to
overwriting these files when asked by the Extension Manager unless you’re
willing to lose the modifications (sometimes needed if the modifications crash the
system). This process of installation is also the method we recommend when the
extension (and most likely your system) becomes unstable and possibly corrupt.
Dreamweaver is a great program, however, occasionally, it fails to run properly
and has been known to corrupt third party (Kaosweaver for instance) extensions.
Troubleshooting
If the installation encounters some problems, these solutions tend to work. Try
them prior to emailing Kaosweaver for support (because this is what we’ll tell you
to try anyway):
1. Load Dreamweaver while attempting to install the extension.
2. Check your Extension Manager version with Macromedia to
ensure you’ve got the latest version.
3. Load Extension Manager, select Dreamweaver (your version)
from the dropdown, select Install Extension from the File menu
and navigate to the extension package and select it.
4. Check you file associations (this is system dependant, check
your user manual or local techie on how to do this) and see if
.mxp as a file extension is associated to Extension Manager.
Restarting Dreamweaver
Once the extension is installed (or re-installed), restart Dreamweaver. This is
critical for the extension to show up in the menus and be available.
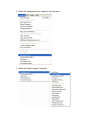
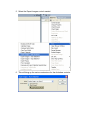
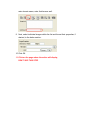
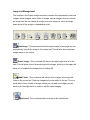
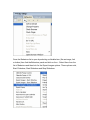
Finding Expert Images
Expert Images is found under the command menu under the main menu bar of
Dreamweaver, here is how to access this:
1. Click on the Command menu from the main menu:
2. Select the Kaosweaver.com subpanel from the menu:
3. Select the Expert Images Command:
4. Expert Images will load:
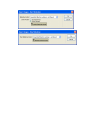
Finding Expert Images Action Command:
1. Expert Images Action command is found in the same spot as Expert
Images is found, one command below the Expert Images Command in the
Kaosweaver.com subpanel under the command menu:
2. Expert Images Action will load:
Finding Caption Command:
1. Expert Images Caption command is found in the same spot as Expert
Images is found, one command below the Expert Images Action
Command in the Kaosweaver.com subpanel under the command menu:
2. Expert Images Caption will load:
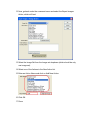
Finding Clickshow controls:
1. Select a link or image.
2. Click on the Behavior Panel
3. Click on the + in the behavior panel
4. Select the Kaos subpanel
5. Select the Expert Images control needed:
6. This will bring up the various extensions for the clickshow controls:
License
1.
This is an agreement by and between Kaosweaver, Inc. ("Licensor") and the End User
("Licensee"), who is being licensed to use the Expert Calendar extension.
2.
Licensee acknowledges that this is only a limited nonexclusive license. Licensor is and
remains the owner of all titles, rights, and interests in the Software.
3.
This License permits Licensee to install the Software on more than one computer system,
as long as the Software will not be used on more than one computer system
simultaneously. Licensee will not make copies of the Software or allow copies of the
Software to be made by others, unless authorized by this License Agreement. Licensee may
make copies of the Software for backup purposes only.
4.
This Software is subject to a limited warranty. Licensor warrants to Licensee that the
physical medium on which this Software is distributed is free from defects in materials and
workmanship under normal use, the Software will perform according to its printed
documentation, and to the best of Licensor's knowledge Licensee's use of this Software
according to the printed documentation is not an infringement of any third party's
intellectual property rights. To the extent permitted by law, THE ABOVE-STATED LIMITED
WARRANTY REPLACES ALL OTHER WARRANTIES, EXPRESS OR IMPLIED, AND LICENSOR
DISCLAIMS ALL IMPLIED WARRANTIES INCLUDING ANY IMPLIED WARRANTY OF TITLE,
MERCHANTABILITY, NONINFRINGEMENT, OR OF FITNESS FOR A PARTICULAR PURPOSE. No
agent of Licensor is authorized to make any other warranties or to modify this limited
warranty. Licensee has specific legal rights pursuant to this warranty and, depending on
Licensee's jurisdiction, may have additional rights.
5.
Notwithstanding the foregoing, LICENSOR IS NOT LIABLE TO LICENSEE FOR ANY
DAMAGES, INCLUDING COMPENSATORY, SPECIAL, INCIDENTAL, EXEMPLARY, PUNITIVE,
OR CONSEQUENTIAL DAMAGES, CONNECTED WITH OR RESULTING FROM THIS LICENSE
AGREEMENT OR LICENSEE'S USE OF THIS SOFTWARE, whether based on lost revenue or
otherwise, regardless of whether LICENSEE was advised of the possibility of such losses in
advance. In no event shall LICENSOR's liability hereunder exceed the amount of license
fees paid by Licensee, regardless of whether Licensee's claim is based on contract, tort,
strict liability, product liability or otherwise. Licensee's jurisdiction may not allow such a
limitation of damages, so this limitation may not apply.
6.
Licensee agrees to defend and indemnify Licensor and hold Licensor harmless from all
claims, losses, damages, complaints, or expenses connected with or resulting from
Licensee's business operations.
7.
Licensor has the right to terminate this License Agreement and Licensee's right to use this
Software upon any material breach by Licensee.
8.
Licensee agrees to return to Licensor or to destroy all copies of the Software upon
termination of the License.
9.
This License Agreement is the entire and exclusive agreement between Licensor and
Licensee regarding this Software. This License Agreement replaces and supersedes all prior
negotiations, dealings, and agreements between Licensor and Licensee regarding this
Software.
10. This License Agreement is valid without Licensor's signature. It becomes effective upon the
earlier of Licensee's signature or Licensee's use of the Software.
11. Kaosweaver extensions are trademarks of Kaosweaver Inc. Macromedia, Dreamweaver,
and/or Fireworks, are registered trademarks, trademarks, or copyrights of Macromedia, Inc.
in the United States of America and/or other countries.
1, 2, 3 – you’re done!
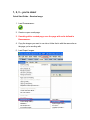
Quick Start Guide – Random Image
1. Load Dreamweaver :
2. Create or open a web page.
3. If working with a created page, save the page with a site defined in
Dreamweaver.
4. Copy the images you want to use into a folder that is with the same site as
the page you’re working with.
5. Load Expert Images.
6. Which brings up the interface for Expert Images:
7. Give the image set a name and enter in a slideshow timer (even if it isn’t
going to be a slideshow):
8. Next, use the folder selector to get all of the images that were copied to
the folder within the site in step 4, also, if the site is in a subfolder off of a
main domain name, enter that here as well:
9. Next, select individual images within the list and the set their properties, if
desired, in the below section:
10. Click OK.
11. Click on the page where the action will display,
DON’T SKIP THIS STEP
12. Now, go back under the command menu and select the Expert Images
Action, which will load:
13. Select the Image Set from the Image set dropdown (which should be only
one image set).
14. Select one of the Actions in the New Action list.
15. Enter an Action Name and click on Add New Action:
16. Click OK.
17. Done.
In order to view the page, it, the contents of the kaosjs folder within the site and
the images folder (from step #4) will have to be uploaded to the server, it will not
work in preview mode, it must be uploaded to the server.
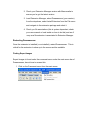
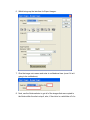
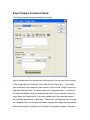
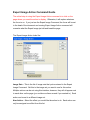
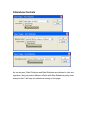
Expert Images Command Guide
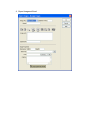
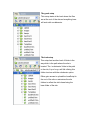
The Expert Images Command interface looks like:
And is broken down into several parts, the top part is the set control and consists
of the Image Sets list, Slideshow Timer field and the Name field.
The middle
part is devoted to the image lists and consists of the icon bar, Image List list box
and the Subdomain field. The bottom part is for image data entry. It consists of
the width and height, which are automatically filled in by the extension when the
script writes the JavaScript file, only enter values here if you want the image to
be a different size then its original size. Please note, changing this won’t change
the image file itself, just the way the browser displays the image, we recommend
altering the image in a software tool designed to manipulate images. We prefer
Fireworks for our image handling. Next are the title and alt property fields for the
image tag. A Link field is provided for entering in a related page to go to when
clicked. If an image has no link, on slideshows, a link will still be present,
however, the link won’t go anywhere. On non-slideshow actions, the link will be
used only when it has somewhere to link to. Finally, the Caption field is for
entering text that will be utilized in the Expert Images Caption command for
display on the page. You can enter full HTML code here. We recommend this
be used as for the purpose it was designed, as a small text field for captions.
Using it for entering complex HTML may cause problems with the code (we’ve
not tested every possible entry or combination of forms, fields and such).
Set Management
Image Sets – This field contains the list of existing image sets and an entry for
creating a new image set. In order to create a new image set, first set this drop
down to “New Set”.
Name – This field is for entering or editing the name of a set. Once the Image
Sets dropdown list is set to an existing image set or to a New Set, entering a
name here will change the Image Set name. Doing this may cause the interface
to flicker and possibly pause for a second, this is normal and is just the interface
being updated with the new information.
Slideshow Timer – This field is for the timer on the slideshow from image
change to image change. On fading slideshows, this is the timer which initiates
the change, however, the slideshow effect is separate from this timer and the first
image’s time on the page will be longer then the rest. This is an entry for the
number of second the image will be displayed. For larger images, use more
seconds or the slideshow will swap the image prior to the prior image loading.
Image List Management
The icon bar in the Expert Images extension contains the commands to add new
images, delete images, add a folder of images, add an image to the set, remove
an image from the set, delete all images, move an image up, move an image
down and sort the images in alphabetical order.
Add Image—This command will add a single image to the image set and
automatically include the image in the current set. This will also allow duplicate
image entries in the set list.
Delete Image—This command will remove a single image from all of the
sets. This will place a set of brackets around the image, clicking on this again will
allow you to undelete the image prior to clicking OK.
Add Folder—This command will add all of the images in the selected
folder to the current set. Duplicate images will not be added to the set. This is a
quick way to have a folder of images where you can add new images and not
have to pick through the list in order to add the newer images.
Add to set–This command adds an image to the selected set.
Remove from set—This command will remove the selected image from
the set.
Delete All Images—This command will delete all images from all sets.
Move Image Up—This command will move an image up on the list of
images. This is useful when setting up the actions which include the date as a
marker for displaying certain images.
Move Image Down—This command will move an image down on the list
of images. This is useful when setting up the actions which include the date as a
marker for displaying certain images.
Alphabetical Sort—This command will sort all of the images in the
Image List in alphabetical order. This is useful when setting up the actions which
include the date as a marker for displaying certain images.
Image List
The image list box contains all of the images for all of the sets. The images
associated with the currently loaded set will be designated with an asterisk after
the image name (*). Selecting an image from the list will populate the Image
Properties section of the interface with the data related to the selected image.
Working with Subdomains
The subdomain feature in Expert Images allows for the code to accommodate the
subdomain or sub folder site which either has no access to the main domain or
root folder of the site. This is critical for sites which operate at hosting companies
which do not require a registered domain name and provide a virtual domain
name off of a subfolder of the site. Typically this is achieved by a URL which
looks similar to:
http://www.yourSite.com/~subdomain/
Another aspect of the subdomain feature is the ability to set the site up at a level
above the main domain of the web site. This is useful for large sites or
departmental sites which all share a common domain but only have control over
a smaller portion of the domain. A lot of educational locations, large corporations
and other similar sites fall in this area. In order to make this work for your site,
you’ll need to enter the part about the base URL and your home page’s URL, for
instance:
URL Example: http://www.yourSite.com/~subdomain/
Base URL: http://www.yourSite.com/
Subdomain entry: ~subdomain
If you do not have a subdomain to contend with, leave the field empty (don’t even
put a space in it as that will be seen as the subdomain that your site operates
under). When using the subdomain option, make sure that your Dreamweaver
site definition doesn’t start on the site root (base) folder and starts on the
subdomain folder.
The good setup
This setup starts at the level where the files
are at the root of the site and everything here
will work with a subdomain.
The bad setup
This setup had another level of folder in the
way which is the path where the site is
located. The ‘~subdomain’ folder is the path
to the site, Expert Images will fail utilizing this
folder structure with the subdomain option.
Either gain access to upload the JavaScript to
the root of the site or restructure the site
folders to reflect the site’s base being the
base folder of the site.
Image Properties Management
Width – This is the width, in pixels, for the selected image in the Image List box.
This can be altered to change the displayed size of the image, however this won’t
alter the image itself, just how the browser displays the image. This field is
automatically populated within the extension.
Height - This is the height, in pixels, for the selected image in the Image List box.
This can be altered to change the displayed size of the image, however this won’t
alter the image itself, just how the browser displays the image. This field is
automatically populated within the extension.
Title & Alt - This is the entry for the title and alt properties for the image. This
work identical to the title and alt properties for an img tag. When an image is
hovered over the title will be displayed and when the image hasn’t been
displayed yet, the alt text will be displayed. This is also dependant upon the
browser’s compliance to the standard display (some won’t show anything when
hovered over and some won’t display the alt text prior to the image showing or if
the image path is incorrect). The All button will set all of the images in the Image
List to the value in this field. This is not reversible, so be cautious using this.
You will get an alert to confirm you really want to do this, click OK on the alert to
confirm the entry or cancel to stop the assignment from happening.
Link – This entry is for making the image link to another location (even a larger
image of itself, if desired). The link should be inside the site to use the browser
button. If you want to enter a link to another site, you must use the full URL,
including the http// or https:// prefix. Like with Title & Alt, clicking on the All button
will assign all of the images in the image list the link in this field. The extension
will popup an alert in order to prevent accidental overwriting of the links in the list.
Caption – This field is for entering a text caption for the image. The entry will
support full HTML (so use <br> to do a new line and not just hit the enter key),
however complex HTML is not recommended. This field is intended for a simple
caption display.
Working with Templates
Expert Images is designed to work with templates, either in the template itself or in
a page where a template has been applied to. Since all of the sets are available
on any page, setting the template up with Expert Images and possibly an action or
two will allow all pages to share the Expert Images Action without increasing the
page weights by a significant amount. The JavaScript file will be preloaded
decreasing the time to load even more.
The best practice for using templates and Expert Images is to setup the Expert
Images in the template only if all pages that are using the template will incorporate
an action (or multiple actions) or to setup Expert Images individually in the pages
which require the Actions to be on them. Expert Images will also work in dual
mode, with some actions on all pages and certain pages having more actions
than the rest. After the JavaScript is cached, the page weight for the JavaScript
file to be included is minimal on pages that do not incorporate any actions but
have the link for the JavaScript. The JavaScript is absolutely referenced as are
the image paths in the JavaScript file. This is why the preview mode won’t work
because the local preview’s absolute path starts at the base folder of the main
hard drive from the machine it is run from while the actual base of the site is a
little deeper. Running a server with local preview setup is the only way to get
around this problem.
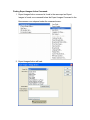
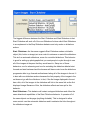
Expert Image Action Command Guide
The critical step in using the Expert Image Action command is to click on the
page where you want the action to display. Otherwise, it will replace whatever
the focus is on. If you just ran the Expert Image Command, the focus will be set
in the head of the document and running Expert Image Action command will
overwrite what the Expert Image just did and break the page.
The Expert Image Action looks like:
Image Sets – This is the list of image sets that you’ve entered in the Expert
Image Command. Set this to the image set you want to use for this action.
Multiple actions can be set using this interface, however, they will all appear next
to each other on the page (you could move them around if you wanted to). Each
action can be set to a different image set.
New Action – Select the effect you would like the action to do. Each action can
only be assigned one effect from this list.
Action Name – Set this to a name symbolic of the action so you will recall later
on what the action was to be used for. The name must be a single word (no
spaces) and can have letters and numbers in it, however, it must start with a
letter. Once you’ve selected the effect from the New Action list, selected fading
for slideshows that you’d like to have it on and entered a name here, click on the
Add New Action button to add the action to the Existing Actions list. Once the
Add New Action button is hit, the action can’t be edited (although you could
delete it and enter a new one pretty easily).
Fade Slideshow – This checkbox is used to make the slideshow fade on
browsers that support the fading functionality. As of production, this included IE
v5.x and v6 on Windows, Firefox & Mozilla on Windows and OS X and Safari on
OS X. It does not work in V5.2 of IE for OS X or prior nor on Netscape Navigator
v4. IT will degrade gracefully and still function (slideshow wise) just not fade.
When new versions of the browsers emerge, we will update the product to reflect
these new browsers provided they are capable of handling fading. The effect is
different on IE then the other platforms. In IE the images fade into each other
and on the rest, the image fades to blank and the new image loads and fades
back in.
Existing Actions – This is a list of actions on the page. It contains information
on the type of action, name of action, name of set and for slideshows, the image
name of existing actions prior to the extension loading and for faders a F follows
the list.
Delete Existing Action – Clicking on an action in the Existing Actions list and
then clicking on this button will mark the action for deletion. The action will be
removed from the page once the extension finishes. If the deletion was in error,
clicking this button again will provide a popup which will give the option to
undelete the action. Once OK is clicked for completing the extension, the actions
will be deleted and unrecoverable.
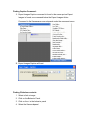
Expert Images Caption Command Guide
The Expert Images Caption Command looks like:
It has one option, set the action to display a caption for. Like Expert Images
Action Command – The critical step in using the Expert Image Caption command
is to click on the page where you want the caption to display.
Actions set to display caption for – select the action on the page to display the
caption related to the image displayed. On slideshows this selection will change
in modern browsers (those that support the innerHTML and getElementbyId
functionality). For non-slideshow actions, the caption will simply be written on the
page.
Styling the caption - You have two options to style the output. You can use
HTML in the caption entry in the Expert Images Command or you can setup a
style for the display, the text is written into a span with an ID set to
kwei_actionName where the actionName matches the name of the action the
caption is being used for. In the dropdown list, this would be the name after the
dash ( - ) and before the set name which is in the brackets [ and ].
Working with Slideshow Controls
To find the Slideshow controls and be able to access them setup the Expert
Images and have at least one action on the page. Once these items are on a page
(save the page for good measure) then the Slideshow controls will be available.
They are found under the Behaviors panel:
Once the Behaviors list is open by selecting a clickable item (like an image, link
or button) then find the Behaviors panel and click on the +. Select Kaos from the
list of Behaviors and then look for the Expert Images options. Three options exist,
Start Clickshow, Start Slideshow and Stop Slideshow.
Slideshow Controls
As can be seen, Start Clickshow and Start Slideshow are identical in look and
operation, they just product different effects while Stop Slideshow pretty much
does just that. It will stop any slideshow running on the page.
The biggest difference between the Start Clickshow and Start Slideshow is that
Start Clickshow will work off of the non-Slideshow Actions which Start Slideshow
is a complement to the Stop Slideshow behavior and only works on slideshow
actions.
Start Clickshow—As the name suggests Start Clickshow makes a clickable
object (link, button or image) act as a control to advance or rewind the slideshow.
This isn’t an automatic slideshow, more of a controlled slideshow. This behavior
is great for setting up photographs that you want people to cycle through to see
all of the images at the pace that they would want to. Setup two of these
behaviors, one for advancing and one for rewinding the slideshow labeled start
forward and start backward and the browser will have control over the slideshow
progression able to go forward and backward along all of the images in the set. It
is best with non-slideshow actions because the link property of the images in the
set does not go with the clickshow. In fact, if the first image displayed in the set
has a link, all of the images in the clickshow will link to the same link as the first
displayed image. Because of this, the slideshow effects are less apt for this
behavior.
Start Slideshow—This behavior will restart a stopped slideshow and offers the
same directional capabilities of the Start Clickshow behavior. It operates off of
the same objects on the page (anything clickable). This is designed to allow
some control over the automatic slideshow and it maintains the links throughout
the slideshow image set.
Stop Slideshow—This behavior stops a selected automatic slideshow. Using
this in combination with the Start Slideshow behavior to provide a set of controls
for the slideshow.
Advanced Options
Database options – making the extension work with your database.
Expert Images doesn’t directly support working with a database, however, it can
be accomplished with a little work on your part. We have to contend with working
around the purpose of the extension (to create an error free JavaScript solution)
and then work to get it to work with a database. For the first step we’ll need to
create an image set as if we were going to use it as a JavaScript solution.
1. Setup a temporary folder in the site.
2. Copy a few images into the folder (3 is fine)
3. Run the Expert Images Command as normal, setting up a set and
selecting the three images for that set.
4. Run Expert Images Actions as normal, setting up the action on the page
where you want it.
5. Load up the kw_expertImages.js file which is found in the kaosjs folder.
6. Cut all of the lines below this line:
kwimg=new Array();
7. Save the JavaScript file.
8. Open a new page.
9. Create a recordset with the image data, image URL, width, height, alt &
title, link, and caption.
10. In the head of the document, make a script section
11. Paste the lines from step 6. The page should look like:
12. Now we need to replace the data section with the recordsets from the
database. We will be dealing with this line:
13. Delete the other two lines.
14. On your recordset we need to insert the data markers so go to the
Bindings tab on the Application panel:
15. Click on the + for the recordset you’re using:
16. Now go to the JavaScript line and highlight the URL:
17. Go back to the recorset Bindings tab and click on the Image URL field (in
this example, ours is at_imgURL) and then click on the Insert button:
18. Your code should look like (PHP):
Cold Fusion, ASP, .NET and JSPs will have different output.
19. Repeat the process for each of the other fields. In order they are width,
height, alt and title, link and caption, here is a visual help on this:
Do not overwrite the double quotes or single quotes the surround the
entry. These are needed for JavaScript to work properly. Also, the URL
for the image, the alt and title, the link and caption all have to be formed
as expected by the script. The URL should not contain double quotes (or
spaces or other special characters). The alt and title should be just text
and spaces, nothing else. The link should match the URL except no
single quotes either and the caption should be like the alt and title with the
addition of HTML tags. Do not put in hard returns, use <br> instead in the
caption in the database.
If you get a javascript error when running the page with “Indeterminate
String Error” that means you broke on of the rules above.
20. Now we need to apply a repeat region to the section, however,
Dreamweaver won’t do this for you in the HEAD of a document in a
<script> tag so what I usually do when I don’t want to type from memory is
I insert a field in the page and then apply the repeat region to that field.
21. Copy everything from the repeat region code above the repeated region
(what we inserted from step 20) and paste it above the kwimg JavaScript
line.
22. Copy everything from the repeat region code below the reported region
(from step 20) and paste it below the kwimg JavaScript line. It should look
similar to this (PHP example):
Copy the server scripting in the top of the document for ASP.
23. We need to test what we’ve done so far, so upload this to the server and
view source. Your image list should be present in the source code
looking, style wise, just like the JavaScript code we cut from the
kw_expertImages.js file). If not (or you get an error) go back over the
steps and if your confident you’ve done them right, drop us an email and
we’ll walk through it with you.
24. Now we need to replace the other set of code which requires a little hand
coding. We need to add a function to rewind the recordset so we can
accurately count the number of images as the next section is what adds
them to the set (tip for really advanced DB coders, you could do loops
with multiple recordsets to make this work for multiple instances on the
page – but that is beyond the scope of this project – if you’re on PHP,
email us for the code to do this as we’ve managed to get this
accomplished).
For PHP, use:
<?php mysql_data_seek($rcAds,0);
$row_rcAds = mysql_fetch_assoc($rcAds); ?>
For ASP, use:
<% Recordset1.MoveFirst() %>
For CF use:
Nothing, it resets the pointer itself (so we’re told).
Add this code before this line:
25. On the line that looks like this:
We’re going to replace the second 0 with cnt++ line so:
26. Now we need to add the recordset repeating code around the above line
and delete the other two lines. The end code will look like (PHP):
27. One last thing, prior to the above code, add this line:
28. Upload the page and you’ve got a working Expert Images action from a
database pull.
Troubleshooting
Thank you for purchasing the Kaosweaver Expert Images. We hope you’ve
found this documentation helpful and we hope the extension is profitable for your
business or personal web design endeavors. We hope we’ve covered all of the
possible options, questions or usage issues with this manual. We have support
available, either via email, the Kaosweaver forum or our ticket system, in the
event we’ve not explained something sufficiently for you.
We want to stress, please send us an email message before investing hours
working on this extension if you encounter a problem not covered in this
document. It has been our experience that we’re able to resolve almost all
issues within minutes of receiving the email (which could take some time to
receive, depending on when it gets sent). We are active and aggressive in
releasing fixes, updates and product enhancements. In order to provide the best
support possible for you please provide us with as much detail as possible if you
should encounter an issue or problem using our extension. It would be
especially useful to receive a copy of your file; preferable zipped, with a brief note
outlining your errors.
The bullet points below are from an article on Effective Bug Reporting by Simon
Tatham published under his OpenContent Licence. The copy has been modified
to suit our applications.
How to Report Bugs Effectively
By Simon Tatham, professional and free-software programmer
Introduction
Anybody who has written software for public use will probably have
received at least one bad bug report. Reports that say nothing ("It doesn't
work!"); reports that make no sense; reports that don't give enough
information; reports that give wrong information. Reports of problems that
turn out to be user error; reports of problems that turn out to be the fault of
somebody else's program; reports of problems that turn out to be network
failures.
There's a reason why technical support is seen as a horrible job to be in,
and that reason is bad bug reports. However, not all bug reports are
unpleasant: I maintain free software, when I'm not earning my living, and
sometimes I receive wonderfully clear, helpful, informative bug reports.
In a nutshell, the aim of a bug report is to enable the programmer to see the
program failing in front of them. You can give them careful and detailed
instructions on how to make it fail. If they can make it fail, they will try to
gather extra information until they know the cause. If they can't make it fail,
they will have to ask you to gather that information for them.
In bug reports, try to make very clear what are actual facts ("I was at the
computer and this happened") and what are speculations ("I think the
problem might be this"). Leave out speculations if you want to, but don't
leave out facts.
When you report a bug, you are doing so because you want the bug fixed.
There is no point in swearing at the programmer or being deliberately
unhelpful: it may be their fault and your problem, and you might be right to
be angry with them, but the bug will get fixed faster if you help them by
supplying all the information they need.
"It doesn't work."
Give the programmer some credit for basic intelligence: if the program
really didn't work at all, they would probably have noticed. Since they
haven't noticed, it must be working for them. Therefore, either you are doing
something differently from them, or your environment is different from
theirs. They need information; providing this information is the purpose of a
bug report. More information is almost always better than less.
If you are not reporting a bug but just asking for help using the program,
you should state where you have already looked for the answer to your
question. ("I looked in chapter 4 and section 5.2 but couldn't find anything
that told me if this is possible.") This will let the programmer know where
people will expect to find the answer, so they can make the documentation
easier to use.
"Show me how to show myself."
If you have to report a bug to a programmer who can't be present in person,
the aim of the exercise is to enable them to reproduce the problem. You
want the programmer to run their own copy of the program, do the same
things to it, and make it fail in the same way. When they can see the
problem happening in front of their eyes, then they can deal with it.
So tell them exactly what you did. If it's a graphical program, tell them which
buttons you pressed and what order you pressed them in. If it's a program
you run by typing a command, show them precisely what command you
typed. Wherever possible, you should provide a verbatim transcript of the
session, showing what commands you typed and what the computer output
in response.
Give the programmer all the input you can think of. If the program reads
from a file, you will probably need to send a copy of the file. If the program
talks to another computer over a network, you probably can't send a copy of
that computer, but you can at least say what kind of computer it is, and (if
you can) what software is running on it.
[ Kaosweaver: send all files to us by zipping them into one file, with
subfolders as necessary – unzipped files are deleted by virus and spam
filters]
[Kaosweaver – If possible, upload the page if the error isn’t in the extension
and provide the URL to the page. This is very, very helpful.]
"Works for me. So what goes wrong?"
If you give the programmer a long list of inputs and actions, and they fire up
their own copy of the program and nothing goes wrong, then you haven't
given them enough information. Possibly the fault doesn't show up on every
computer; your system and theirs may differ in some way. Possibly you
have misunderstood what the program is supposed to do, and you are both
looking at exactly the same display but you think it's wrong and they know
its right.
So also describe what happened. Tell them exactly what you saw. Tell them
why you think what you saw is wrong; better still, tell them exactly what you
expected to see. If you say "and then it went wrong", you have left out some
very important information.
If you saw error messages then tell the programmer, carefully and
precisely, what they were. They are important! At this stage, the
programmer is not trying to fix the problem: they're just trying to find it. They
need to know what has gone wrong, and those error messages are the
computer's best effort to tell you that. Write the errors down if you have no
other easy way to remember them, but it's not worth reporting that the
program generated an error unless you can also report what the error
message was.
In particular, if the error message has numbers in it, do let the programmer
have those numbers. Just because you can't see any meaning in them
doesn't mean there isn't any. Numbers contain all kinds of information that
can be read by programmers, and they are likely to contain vital clues.
Numbers in error messages are there because the computer is too
confused to report the error in words, but is doing the best it can to get the
important information to you somehow.
At this stage, the programmer is effectively doing detective work. They don't
know what's happened, and they can't get close enough to watch it
happening for themselves, so they are searching for clues that might give it
away. Error messages, incomprehensible strings of numbers, and even
unexplained delays are all just as important as fingerprints at the scene of a
crime. Keep them!
[ Kaosweaver: Screen shots of error messages are perfect! If just sending
one or two images of errors, you don’t have to zip them, please use jpeg or
gif formats for size considerations.]
"So then I tried . . ."
There are a lot of things you might do when an error or bug comes up.
Many of them make the problem worse. A friend of mine at school deleted
all her Word documents by mistake, and before calling in any expert help,
she tried reinstalling Word, and then she tried running Defrag. Neither of
these helped recover her files, and between them they scrambled her disk
to the extent that no Undelete program in the world would have been able
to recover anything. If she'd only left it alone, she might have had a chance.
Users like this are like a mongoose backed into a corner: with its back to
the wall and seeing certain death staring it in the face, it attacks frantically,
because doing something has to be better than doing nothing. This is not
well adapted to the type of problems computers produce.
Instead of being a mongoose, be an antelope. When an antelope is
confronted with something unexpected or frightening, it freezes. It stays
absolutely still and tries not to attract any attention, while it stops and thinks
and works out the best thing to do. (If antelopes had a technical support
line, it would be telephoning it at this point.) Then, once it has decided what
the safest thing to do is, it does it.
When something goes wrong, immediately stop doing anything. Don't touch
any buttons at all. Look at the screen and notice everything out of the
ordinary, and remember it or write it down. Then perhaps start cautiously
pressing "OK" or "Cancel", whichever seems safest. Try to develop a reflex
reaction - if a computer does anything unexpected, freeze.
If you manage to get out of the problem, whether by closing down the
affected program or by rebooting the computer, a good thing to do is to try
to make it happen again. Programmers like problems that they can
reproduce more than once. Happy programmers fix bugs faster and more
efficiently.
"I think the tachyon modulation must be wrongly polarised."
It isn't only non-programmers who produce bad bug reports. Some of the
worst bug reports I've ever seen come from programmers, and even from
good programmers.
I worked with another programmer once, who kept finding bugs in his own
code and trying to fix them. Every so often he'd hit a bug he couldn't solve,
and he'd call me over to help. "What's gone wrong?" I'd ask. He would reply
by telling me his current opinion of what needed to be fixed.
This worked fine when his current opinion was right. It meant he'd already
done half the work and we were able to finish the job together. It was
efficient and useful.
But quite often he was wrong. We would work for some time trying to figure
out why some particular part of the program was producing incorrect data,
and eventually we would discover that it wasn't, that we'd been investigating
a perfectly good piece of code for half an hour, and that the actual problem
was somewhere else.
I'm sure he wouldn't do that to a doctor. "Doctor, I need a prescription for
Hydroyoyodyne." People know not to say that to a doctor: you describe the
symptoms, the actual discomforts and aches and pains and rashes and
fevers, and you let the doctor do the diagnosis of what the problem is and
what to do about it. Otherwise the doctor dismisses you as a hypochondriac
or crackpot, and quite rightly so.
It's the same with programmers. Providing your own diagnosis might be
helpful sometimes, but always state the symptoms. The diagnosis is an
optional extra, and not an alternative to giving the symptoms. Equally,
sending a modification to the code to fix the problem is a useful addition to
a bug report but not an adequate substitute for one.
If a programmer asks you for extra information, don't make it up! Somebody
reported a bug to me once, and I asked him to try a command that I knew
wouldn't work. The reason I asked him to try it was that I wanted to know
which of two different error messages it would give. Knowing which error
message came back would give a vital clue. But he didn't actually try it - he
just mailed me back and said "No, that won't work". It took me some time to
persuade him to try it for real.
Using your intelligence to help the programmer is fine. Even if your
deductions are wrong, the programmer should be grateful that you at least
tried to make their life easier. But report the symptoms as well, or you may
well make their life much more difficult instead.
"That's funny, it did it a moment ago."
Say "intermittent fault" to any programmer and watch their face fall. The
easy problems are the ones where performing a simple sequence of actions
will cause the failure to occur. The programmer can then repeat those
actions under closely observed test conditions and watch what happens in
great detail. Too many problems simply don't work that way: there will be
programs that fail once a week, or fail once in a blue moon, or never fail
when you try them in front of the programmer but always fail when you have
a deadline coming up.
Most intermittent faults are not truly intermittent. Most of them have some
logic somewhere. Some might occur when the machine is running out of
memory, some might occur when another program tries to modify a critical
file at the wrong moment, and some might occur only in the first half of
every hour! (I've actually seen one of these.)
Also, if you can reproduce the bug but the programmer can't, it could very
well be that their computer and your computer are different in some way
and this difference is causing the problem. I had a program once whose
window curled up into a little ball in the top left corner of the screen, and sat
there and sulked. But it only did it on 800x600 screens; it was fine on my
1024x768 monitor.
The programmer will want to know anything you can find out about the
problem. Try it on another machine, perhaps. Try it twice or three times and
see how often it fails. If it goes wrong when you're doing serious work but
not when you're trying to demonstrate it, it might be long running times or
large files that make it fall over. Try to remember as much detail as you can
about what you were doing to it when it did fall over, and if you see any
patterns, mention them. Anything you can provide has to be some help.
Even if it's only probabilistic (such as "it tends to crash more often when
Emacs is running"), it might not provide direct clues to the cause of the
problem, but it might help the programmer reproduce it.
Most importantly, the programmer will want to be sure of whether they're
dealing with a true intermittent fault or a machine-specific fault. They will
want to know lots of details about your computer, so they can work out how
it differs from theirs. A lot of these details will depend on the particular
program, but one thing you should definitely be ready to provide is version
numbers. The version number of the program itself, and the version number
of the operating system, and probably the version numbers of any other
programs that are involved in the problem.
"So I loaded the disk on to my Windows . . ."
Writing clearly is essential in a bug report. If the programmer can't tell what
you meant, you might as well not have said anything.
I get bug reports from all around the world. Many of them are from nonnative English speakers, and a lot of those apologise for their poor English.
In general, the bug reports with apologies for their poor English are actually
very clear and useful. All the most unclear reports come from native English
speakers who assume that I will understand them even if they don't make
any effort to be clear or precise.
•
•
•
•
Be specific. If you can do the same thing two different ways, state which
one you used. "I selected Load" might mean "I clicked on Load" or "I
pressed Alt-L". Say which you did. Sometimes it matters.
Be verbose. Give more information rather than less. If you say too much,
the programmer can ignore some of it. If you say too little, they have to
come back and ask more questions. One bug report I received was a
single sentence; every time I asked for more information, the reporter
would reply with another single sentence. It took me several weeks to get
a useful amount of information, because it turned up one short sentence at
a time.
Be careful of pronouns. Don't use words like "it", or references like "the
window", when it's unclear what they mean. Consider this: "I started
FooApp. It put up a warning window. I tried to close it and it crashed." It
isn't clear what the user tried to close. Did they try to close the warning
window, or the whole of FooApp? It makes a difference. Instead, you
could say "I started FooApp, which put up a warning window. I tried to
close the warning window, and FooApp crashed." This is longer and more
repetitive, but also clearer and less easy to misunderstand.
Read what you wrote. Read the report back to yourself, and see if you
think it's clear. If you have listed a sequence of actions which should
produce the failure, try following them yourself, to see if you missed a
step.
Summary
•
•
•
•
•
•
•
The first aim of a bug report is to let the programmer see the failure with
their own eyes. If you can't be with them to make it fail in front of them,
give them detailed instructions so that they can make it fail for themselves.
In case the first aim doesn't succeed, and the programmer can't see it
failing themselves, the second aim of a bug report is to describe what
went wrong. Describe everything in detail. State what you saw, and also
state what you expected to see. Write down the error messages,
especially if they have numbers in.
When your computer does something unexpected, freeze. Do nothing until
you're calm, and don't do anything that you think might be dangerous.
By all means try to diagnose the fault yourself if you think you can, but if
you do, you should still report the symptoms as well.
Be ready to provide extra information if the programmer needs it. If they
didn't need it, they wouldn't be asking for it. They aren't being deliberately
awkward. Have version numbers at your fingertips, because they will
probably be needed.
Write clearly. Say what you mean, and make sure it can't be
misinterpreted.
Above all, be precise. Programmers like precision.
Disclaimer: I've never actually seen a mongoose or an antelope. My zoology may be
inaccurate.
$Id: bugs.html,v 1.24 2004/06/01 14:06:37 simon Exp $
Copyright © 1999 Simon Tatham.
This document is OpenContent.
You may copy and use the text under the terms of the OpenContent Licence.
Please send comments and criticism on this article to [email protected].
We would like to add a list of items that we think will help us more efficiently
assist you:
1. Always restart Dreamweaver after installing an extension.
2. Always work from a saved page that is part of a site. An Unconnected
page won’t work well with paths to files it can’t find. Dreamweaver has no
clue where you want to save the file and it will insert machine paths
instead of relative paths which enable the web server to find the file.
3. If you get an error working on a complex page, try the same process on a
blank page with the minimum elements required to accomplish the same
task
4. Put it on a test page and on a web server.
5. Try it on another machine.
6. Try it on a machine not using Windows 98 or Windows ME or Mac OS 8.x
or Mac OS 9.x.
7. Always state which version of Dreamweaver you have (including if you’ve
upgraded to the latest bug fix from Macromedia), the Extension Manager if
you’re having install problems, and the operating system with version. If
these are not stated, we will need to contact you for the information before
even looking into the problem.
Following these suggestions will assist us in providing you with the quickest
solution to the problem. We want to solve whatever problem you’ve encountered
with our software. If we have the opportunity to fix the problem, we both win. We
get the chance to fix a bug we don’t know about and you get what you paid for.