1
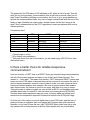
Upgrading to Amateur Radio from
Other Radio Services
What is the “Family Radio Service?”
It is becoming common for volunteer citizen emergency response groups such as CERT
and REACT to use FRS (Family Radio Service) “walkie-talkie” radios to communicate
between participants at events such as parades, community functions and for local
disaster assistance. Wikipedia defines FRS as “an improved walkie talkie radio system
authorized in the United States since 1996. This personal radio service uses
channelized frequencies in the ultra-high frequency (UHF) band. It is quiet and clear
because it uses frequency modulation (FM) like the ham and public service radios
instead of amplitude modulation (AM), which was used by CB radio, so it does not suffer
the interference effects found on citizens' band (CB) at 27 MHz, or the 49 MHz band
also used by cordless phones, toys, and baby monitors. Since the UHF band has
different radio propagation characteristics, short-range use of FRS may be more
predictable than license-free radios operating in the HF CB band.”
The benefits of FRS
What this means to those of you that don’t speak the language of radio technology is
that the Family Radio Service (FRS) uses a radio technology similar to the radios used
in public service, such as police and fire agencies, and also by ham radio operators.
The UHF and VFH technology, as mentioned in the definition above, has been proven
to provide very good quality communications over a relatively short range. FRS radios
typically have a “line-of-sight” range of 10-25 miles (under ideal conditions – actual
range will be less). The radios used by ham operators and public service agencies use
a system of retransmitting the signal, called “repeaters,” in order to extend the range to
50 to 100 miles or more. The public service radios are only for use by employees, and
the use of this type of ham radio requires an amateur radio license from the FCC. FRS
radios are inexpensive to purchase and do not require a license, therefore they are
popular for groups that need to have a lot of radios available for communications for
their function or event.
Some of the more expensive FRS radios have a second radio service built into the radio
called GMRS (General Mobile Radio Service). GMRS is very much like FRS, but it
allows for higher power limits, up to 50 watts for mobile or base units (5 watts for the
handheld walkie-talkie radios), and also allows the user to use repeaters to get the
signal out even further, however, repeaters in the GMRS service are usually privately
owned and require you to either belong to a club or group, or to subscribe in order to
have access to use the repeater. In the amateur radio service, for comparison,
repeaters are generally made publically available for any licensed ham to use. GMRS
radios can be used for both business and personal communications, but the license fee
is $85 and must be renewed every five years, not an excessively high figure, but more
than you would want to require of your volunteers who offer their time and efforts for
free to provide a necessary and useful public service. FRS radios, on the other hand,
require no license, so there is no initial fee or renewal fee. FRS radios are also simple to
use because they are “channelized” and do not require you to program in the
frequencies you want to use. You simply find a channel that is not being used, set all
radios in the group to that channel, add a privacy tone (discussed later in this article),
and you are ready to communicate. The “hybrid” radios we are referring to allow the
user to communicate on some of the GMRS channels without a license because they
are limited to the same 500 mW (1/2 watt) restriction of the FRS channels. This
essentially gives the user move available channels to use and also allows users to
monitor some of the GMRS frequencies used by licensed users using full power. To
obtain the full benefit of the General Mobile Radio Service, you would not use your FRS
radio, but rather, you would purchase a more powerful GMRS handi-talkie or mobile
radio which will give you more power and improved communication, but you would be
required to purchase a license in order to use it.
Some of you may remember Citizens Band (CB) radio, especially during the 1970’s
when it was popular enough to be labeled a “craze,” appearing in movies such as
“Smokey and the Bandit” and on television shows such as “Dukes of Hazzard.” CB
radios operated on a shortwave frequency known as HF (high frequency) similar to
today’s HF ham radios. The main problem with using CB radio for personal, club and
disaster communications is that the band has been taken over by a community of users
who apparently have no regard for other users or for any FCC regulations. It is nearly
impossible to carry on an emergency community with all of the frequency jamming,
interference and rudeness that you encounter on the citizens band. FRS radio, on the
other hand, continues to be respectable, and most of the FRS users exhibit behavior
similar to the polite and respectable community of ham radio operators. Since FRS
radios are a recent development and use a newer technology, the radios are smaller in
size, have crystal clear sound without the type of interference experienced on the HF
bands, and are generally easy to use. The radio allows the user to select any one of up
to 14 channels to communicate with the other party who will be tuned into the same
channel. Most FRS radios also allow you to use “privacy codes” to block out
interference from other users on the same channel. These privacy codes are called
“CTCSS” (Continuous Tone-Coded Squelch System) which when employed, forces a
radio in receive mode to squelch the audio output when the selected tone is not present
on a received signal. This allows an FRS radio user to set up any number of radios on
the same channel with the same privacy tone such that the radios will only un-squelch if
and only if the received signal has the tone present. All of the features I have described
so far can also describe amateur, or “ham” radio, which has been popular for the past
hundred years.
The limitations of FRS
The power limit for FRS radios is 500 milliwatts (mW), which is half of a watt. This will
work fine for close proximity communications from a half mile to several miles “line-ofsight” (less if blocked by buildings or mountains), but if one of your group wanders too
far from the communications base, they can no longer communicate with the rest of the
family or team. Besides low output power, another reason for the short range is the
small “fixed” antenna which by law (FCC regulations) cannot be replaced with a more
efficient antenna.
Comparison chart:
Range*
Cost (Approximate)
Power
License
Test required?
Antenna
Uses
FRS
½ mile
$15-$85
Batteries
None
No
Fixed
Personal
GMRS
1-2 miles
$30-$200
Batteries
Yes, $85 for 5 years
No
Replaceable or external
Personal or Business
Amateur Radio
5 miles**
$100-$400
Batteries
Yes – No charge***
Yes
Replaceable or external
Personal only
* (Typical range in a city)
** (A lot farther using repeaters)
*** (Although there is no fee for the license, you will need to pay a $5-$15 fee to take
the license exam)
Is there a better choice for reliable inexpensive
communications?
How can a family, a CERT team or a REACT team get extended range communications
with all of the modern features and ease of use of the Family Radio Service? The
answer is – “ham radio!” The reason that families, CERT teams and REACT teams (and
more) are using FRS radios is because they are low cost and do not require the user to
study a license preparation manual or take a class in order to be able to pass a test to
become a licensed amateur radio operator. But once a person passes their amateur
radio license exam, the license is good for ten years, and there is no cost to renew.
Taking the exam to obtain a license can cost as little as $5.00, and handheld radios are
available brand new for under $75, with the better ones costing around $130-$400.
Premium brand name equipment may cost more, but many hams are getting good
results from the inexpensive imported Chinese built radios in the $130 price range.
So if the cost of the radio is not much higher than a good FRS radio, and the cost of
getting a license is negligible, then most people don’t become ham radio operators
because it is too hard to pass the test, right? WRONG!! Many clubs have set up one
day classes with a testing session at the end. Many people such as yourself have
walked into one of these sessions knowing nothing at all about ham radio and walked
out with a CSCE in hand. A CSCE (Certificate of Successful Completion of Exam) is
your proof that you passed your exam. The people that administered the exam will
report your success to the FCC (Federal Communications Commission) and the FCC
will post your new ham radio “call sign” online is as little as two days or up to a few
weeks. Once you see your call sign has been posted in the FCC database, you can
begin making contacts as an officially licensed ham radio operator!
Sounds good – what do I need to do to get started?
You can decide on your own to become a licensed ham radio operator, and be able to
take advantage of all of the benefits and privileges afforded to hams, but if your main
concern is how you can best serve your team, club or organization, you should first talk
to your coordinator or the person responsible for managing radio communications within
your group. Tell them that you were considering becoming a licensed ham radio
operator, and they will most likely support your decision and offer assistance. If for
some reason they feel that it is not necessary to become a ham and that you can be an
effective team member using only FRS radio, you still should investigate ham radio on
your own and then decide whether or not this is right for you.
Ham radio has an interesting history of apprenticeship. Many ham operators have
entered the hobby under the tutelage of an “elmer,” which is a mentor that will work with
you each step of the process, helping you to get your license, set up your equipment
and get on the air, sort of what I am hoping to accomplish with this document. If you
know someone who is a licensed ham radio operator, ask them if they would help you
get started. If you don’t know any hams, consider joining a ham radio club in your area.
You usually don’t have to be a ham to join the club, and once you have attended a few
club meetings and events, you will meet hams willing to help you learn about ham radio.
Another way to look for an elmer is by attending classes that ham operators go to, such
as CERT or Skywarn training. CERT and Skywarn are two good examples of volunteer
organizations that have a need for both licensed hams as well as people who do not
use radios. Many of the people who belong to these sort of organizations see the ham
radio in use and develop an interest, and the hams who are members are usually more
than willing to talk about their hobby with anyone that asks.
But before you go looking for an elmer, I suggest that you should read a little about ham
radio. Start with small, simple books that mainly serve to point out the uses of ham
radio. Organizations such as the ARRL (Amateur Radio Relay League) as well as
manufacturers often supply radio clubs and organizations with free materials to pass out
at community events. Also look in your library for a short, simple book to serve as an
introduction to ham radio. Don’t read the more complicated license preparation manuals
yet – they are more complicated, and in the beginning, you want to keep it as simple as
possible until you are sure that you want to pursue this hobby.
Once you have looked at some introductory material and have decided that you want to
study to become a ham, it is time to begin learning the information you will need to know
in order to pass your first license exam for “Technician Class,” also known as “Element
2.” Element 1 was reserved for learning Morse code, which is no longer required in
order to obtain a license. There are no longer any element 1 examinations offered.
There are three levels of ham radio licenses currently offered – technician, general and
amateur extra. In addition, there are two other levels that were discontinued – novice
and advanced, but hams currently holding either of these licenses may continue to
renew their licenses indefinitely. However, increased operating privileges of the current
license classes make it a good idea for anyone holding a discontinued class of license
to “upgrade” to the next higher level from the current group of licenses.
There are many books available to help you study for your technician and other exams.
Two of the most popular are the series of books from Gordon West, available as a book
only or with a CD containing practice exam software, and also the ARRL Technician
Class License Manual. Both of these books are widely available in bookstores, ham
radio and electronics stores, and on the Internet.
Fortunately, most of the information that you will be studying in your exam prep book is
related to answering your basic questions rather that covering all of the technical things
that more advance hams seem to know about. As you read and study, you will learn
more about what you can do with ham radio, what is possible for you in the future with
additional study and experience, what kind of equipment is necessary, and about how
ham radio is used. The first level of licensing, the technician class, is more of a “get
acquainted” type of license with limited operating privileges. The more advanced and
technical information comes with the general class license and amateur extra license.
As you study for each of the three levels of amateur radio licenses, you will learn what
operating privileges are available within each class of license. One of the reasons most
hams upgrade to a higher class of license is to have access to additional bands and
frequencies. For example, technician class hams have almost no operating privileges
on the very popular “HF” bands. The HF radio is the one that you hear about when
hams discuss their contacts with foreign countries or people in other states. Other than
a few frequencies in the 10 meter band, Technician class hams are limited to CW only,
which means Morse code, no voice contact. A general class license will open up almost
all of the HF bands for voice contact (also called “phone”), and an extra class license
offers practically unlimited use of all of the HF bands.
Step two is to take “practice tests.” If you have the Gordon West software mentioned
above, you already have some of the best practice tests because you get immediate
feedback on the questions you miss and it states the correct answer right out of the
book. If you don’t have this resource, there are many good practice tests available
online. Two of the best that I have found are the AA9FP FCC Exam Practice site
(http://aa9pw.com/radio/java) and the eHam.net ham exams at
http://www.eham.net/exams. I believe that the best way to get the most from these
practice exams is to take two or three or more exams every day. Review the results and
make note of the questions that you missed so that you don’t miss them again on
another exam. Keep taking the tests every day until you are almost always getting
100% every time. Now you are ready to take the FCC exam “for real!”
Either ask the ham radio club that you joined about any exam sessions that they have
scheduled, or use the ARRL web site at http://www.arrl.org/exam_sessions/search to
search for testing sessions in your area. Check the information provided to see if you
can sign up online or if you need to phone the contact person to make an appointment.
The website information or the contact person will tell you what to bring to the exam
session. You will need to have an FCC registration number in advance of your exam.
You can register for this number at https://fjallfoss.fcc.gov/coresWeb/publicHome.do
and you will get your “FRN” immediately. Print this screen so that you have a record of
your number and bring the printout to your exam session to verify your FRN. Also write
down the number. You will need it for your general class and extra class exams, and
also to log on to the FCC web site to check to see what your call sign is going to be or
to make any changes to your profile information. You will also need a current legal
accepted photo ID such as a driver’s license, and the fee for the exam, usually $5 to
$14. If you don’t have a driver’s license, the ARRL website has information on other
accepted identification documents at http://www.arrl.org/what-to-bring-to-an-examsession.
Bring two sharp pencils, an eraser and a pen. If you already have a ham radio license
and you are upgrading, or if you have a CSCE (Certificate of Successful Completion of
Examination) from your last exam but haven’t received your license in the mail yet, then
bring either of these documents with you. Finally, a calculator may be necessary to help
you with any questions involving math. There are more of these on the general class
exam, and quite a few on the extra class exam. If applicable, erase the memory of your
calculator in advance. A scientific calculator will be necessary for the general and extra
class exams. Make sure that the batteries are charged or replaced!
The exception to scheduling and attending an exam session would be if you enrolled in
a one or two day class where the exam is given to all the students at the end of the
class. In this case, your class and your exam are like a “package deal!” Most people
that take one of these classes pass their exam based only on what they learned that
day in the class. Talk about cramming! If you don’t pass, then you can revert to the plan
that I have described above. Being able to pass a ham radio exam with only 6 hours of
classroom instruction is a difficult task, but it is possible, and many clubs do it that way.
You may have both options available to you and can decide for yourself which will work
best for you.
On exam day, arrive 15 minutes early to make sure you can find the location. The
testing staff usually does a good job of making you comfortable and welcome. After all,
they were once in the same place you are, and they can remember how nervous they
were! There will usually be several other people testing with you the same day. The
volunteer staff will tell you everything else you need to know – all you have to do is
study, and then get there! By the way, remember that these people are volunteering
their time to help you get your ham license, so be sure to thank them, and be nice to
them. You might even want to bring some donuts or cookies with you to share!
After you pass your exam, you may be given the opportunity to try for the general class
exam at the same time for no extra charge. If you feel like this is something you could
do, there is no harm in trying. Do not be discouraged if you don’t pass, because after all,
you came to get your technician license, not the general class license! If for some
reason you do not pass your exam on this attempt, study some more and you may take
the exam again on a different day or week, whenever you feel prepared.
When you successfully pass your exam, you will receive a document called the CSCE
(Certificate of Successful Completion of Examination). This is your proof that you have
passed the exam. If you are ready to take your next exam, such as general class,
before your license arrives from the FCC, you can use this document instead of your
technician license as proof that you have passed the technician exam. The CSCE does
not allow you to operate your ham radio. You must wait until your call sign appears in
the FCC database. After a few days have passed, you can use the FCC web site
license query to see if your call sign is listed in the FCC database. To do this, go to
http://fcc.gov and select the Tools & Data menu. Then click on Data and then Search
FCC Databases, and finally, select General Menu License Search – By Licensee. That
will bring you to this "License Query" page:
http://fjallfoss.fcc.gov/General_Menu_Reports/license_search.cfm?accessible=NO&wild
_select=on. If you see your call sign, write it down, and you are now ready to begin
using your ham radio!
Selecting your equipment
You can purchase your ham radio before or after you pass the license exam. If you
purchase it before, you have even more incentive for passing the exam! My suggestion
is to wait until you have at least studied the license preparation manual. It contains a lot
of useful information that will help you select a radio. It is very difficult to purchase
something that you know very little about. In fact, it would be helpful if you allowed a
ham radio operator that you trust to help you pick out what you need to get started with
your new hobby.
The way I see it, there are three categories of equipment. First is your radio; second is
station accessories; and finally, equipment to upgrade your ham station. I will explain
this concept more as we investigate each category.
First of all, your main piece of operating equipment, the “transceiver.” Your ham radio is
called a transceiver because it is both a transmitter and a receiver. In earlier days, the
receiver and transmitter were two separate pieces of equipment.
As I said earlier, as a new technician class operator, most of your band privileges are in
the VHF and UHF spectrum. The most popular bands are the 2 meter band (144 to 148
MHz), the 1.25 meter band (222 to 225 MHz), the 70 centimeter band (420 to 450 MHz)
and the 6 meter band (50.1-54.0 MHz). There are also voice privileges on the 10 meter
band from 28.300 to 28.500 MHz. Both the 6 meter and the 10 meter band would
require a “HF” (high frequency) radio, but the three most popular bands 2 meter, 1.25
meter and 70 centimeter can be accessed with a common FM transceiver, either base,
mobile or handheld.
There are various “modes” of operation – AM (amplitude modulation), FM (frequency
modulation), SSB (single side-band), CW (continuous wave, better known as “Morse
code”) and some data modes. New hams with a technician class license are limited to
FM and CW as well as some data modes, which we will discuss later. Here is a link to a
“band plan” chart that will show you what frequencies are available to you as a
technician as well as the band allocations for other ham radio license classes. You
should post this near your operating position and refer to it to make sure that you don’t
accidentally transmit on a frequency that you are not permitted to use. The chart is
available at: http://www.dixieham.org/images/bandchart.pdf. For a new technician class
operator, in addition to the voice (also known as “phone”) privileges mentioned here,
there are also frequencies where you can use CW mode (Morse code). On the HF
frequencies, you have CW privileges on 80 meters, 40 meters, 15 meters, 10 meters,
and on VHF/UHF frequencies on 6 meters, 33 centimeters, 23 centimeters and higher.
There are three main configurations your transceiver will come in. A “base station” is a
self-contained, larger unit with a built in power supply that is made to sit on a desk or
table top. A mobile unit connects to a 12-13.8 volt car battery and is intended to be used
in a car, but it can also be used at home by getting its power from a separate regulated
power supply. The handheld is perhaps the most popular type of radio because it can
be used at home, in the car, or walking around, which makes it ideal for hiking,
camping, traveling or emergency communication volunteer work, such as at parades or
disaster assistance.
Handheld transceivers, commonly known as “handi-talkies” or “HT’s” are available as a
single band design, dual-band, tri-band, or even quad-band. The least expensive would
be the single band. If you want to get one of these, you need to decide what band you
will use the most. This is usually determined by either what repeaters are near your
house, what frequencies your ham radio club uses, or what frequencies are used by any
organization you belong to, such as RACES, ARES, American Red Cross or Skywarn.
RACES and ARES are emergency communications volunteer organizations that use
ham radio to assist in times of disaster. Skywarn is a branch of the National Weather
Service that uses ham radio to report dangerous weather conditions, and the Red Cross
is of course, the Red Cross! We will talk about these sorts of organizations later in a
different article. For now, I will tell you that the most popular band for beginners is
probably the 2 meter band. Dual band HT’s are usually not much more money than a
single band, and the popular configuration is the 2 meter and 70 cm combination,
although 2 m and 1.25 m is available. My personal radio is a tri-bander – 2 m, 1.25 m
and 70cm, and I would highly recommend this configuration because it gives the user
more band choice options. A four band radio is available and offers even more options,
but is higher in cost.
With your “handi-talkie,” you should buy a few accessory items. I would recommend that
you buy a speaker-mic, an alkaline battery pack or extra battery, a data cable to
connect your radio to your computer, a DC power cable to use your radio in your car,
and a cable to connect your radio to a DC power supply. Sometimes the charger that
comes with the radio can also be used to power the radio, but be sure to check your
manual because there are some radios that cannot be used while they are charging.
Let’s talk more about each of these recommended items. The speaker-mic allows you to
clip your radio to your belt or to your car’s dashboard and then listen and talk through
the speaker-mic. Most hams clip this to their collar to get it close to their ear. You can
also hold the radio high in the air and talk into your speaker-mic when you are having
reception problems. An alkaline battery pack allows you to use common AA flashlight
batteries to power your radio. These do not provide as much power or last as long as
the rechargeable battery that is included with your radio, but it makes a good backup
battery. You could also purchase a second battery pack as a backup option, but these
are often costly.
The data cable is necessary if you want to program your radio using software that is
usually available for free from the Internet. This makes it easier, especially if your radio
has 400 memories and you want to fill them all! The DC car cord allows you to plug your
radio into the lighter socket in your car to save the battery in the radio. There is
sometimes a cable available that allows you to connect your radio to a regulated DC
power supply. This could be useful if the included charger is for charging only and
cannot be used while operating the radio. In addition, the DC cables usually include
fuses to protect the radio.
Other options to consider are a protective case, a more efficient antenna, a mobile
antenna such as a trunk mount or magnet mount base to use your radio in your car, and
a base antenna to give your radio more “gain” when operating at home. The subject of
gain antennas are beyond the purpose of this document, so we will discuss them in
another article. For now, just get the recommended accessories.
You have two other purchase options rather than buying a handi-talkie portable radio –
mobile and base. A mobile FM transceiver is available in the same band configurations
– single band through quad-band. The mobile rig could be mounted in your car or used
in the house while connected to a regulated 12-14 volt power supply and an external
antenna, such as a base antenna. If you install your radio n your car, you will need to
also install a mobile antenna. These come in a variety of mounting options – magnet
mount, trunk lip mount, bumper or mirror mount, rain gutter mount, through glass or
clipped over the car window, and permanently mounted by drilling a hole in the roof.
You can look through ham radio catalogs or discuss your options with a ham radio store
to decide which is best for your needs.
Another choice of transceivers available to you is the base station. Usually the base
station is for the HF frequencies, but there are some that include at least 2 meter and 70
centimeter frequencies. This would be nice if you want a radio to use right now with your
technician class license and then it would also offer the HF frequencies that you could
use when you upgrade to general license class.
A base station will need a base antenna to go with it. If you have enough room in your
yard, a dipole antenna works well and is inexpensive. A dipole is a long string of two
wires connected at the center to a feed line that runs into your house and connects to
your transceiver. These usually range from 16.5 feet to 260 feet. The longer the dipole
antenna, the lower the frequency you can use it to transmit and receive on. If you install
a short 16.5 dipole for the 10 meter band, it will be difficult to tune in any of the other
bands, such as 40 meters or 80 meters, but if you install the longest antenna (260 feet)
for the 160 meter band, then it can also be used on the other bands if used with a
manual antenna tuner.
However, these frequencies are all for HF SSB or CW use, and do not apply to you as a
newly licensed technician. When you upgrade to general class, you can buy your dipole
antenna and get on the air with HF. Fortunately, most transceivers have a second
antenna connection for the FM bands such as 2 meter through 70 centimeter, and there
are vertical antennas available that you can mount on a mast in your back yard. These
vertical antennas don’t require you to have a lot of property to run a 260 foot antenna!
The base station should come with a microphone and a built in power supply, so all that
you need to get going is your antenna and an antenna tuner. Check the specifications
on the radio you are interested in because some base stations require a separate
regulated power supply, and this can increase the price at least $100 for a basic power
supply or over $200 for a good one.
An antenna tuner electronically adjusts the simulated length of the antenna to match it
to the impedance of the transmitter. Each band requires and antenna of a specific
length, determined by a formula. Rather than having to purchase a separate antenna for
each band, the antenna tuner adjusts the match between the antenna and the
transceiver to allow the antenna to work on more bands that the one it was intended for.
As I mentioned earlier, longer antennas can be electronically adjusted to work on
frequencies requiring shorter antennas, but it is very difficult to adjust short antennas to
work on frequencies requiring longer antennas.
As I mentioned earlier, most base stations are for HF use only, so another purchase
option would be to get a handi-talkie or FM mobile radio (or both!) for now, and then add
the base station later when you get your general class license. In fact, I believe that this
is what most of the hams do. If you do decide to get a base station that included the
technician class bands as well as HF, just remember not to transmit on the HF bands
that are not allowed by your license class.
In order to keep this article simple for beginners, I recommend that for now, you
purchase only the equipment that I have referred to so far, but as I said earlier, there
are also station accessories and equipment to upgrade your ham station that you might
consider. Some of the popular station accessories are a SWR/Power meter, an antenna
switch, a duplexer or triplexer to allow you to use multiple antennas with a single feed
line, an external speaker, and a boom headset-mic or a better base or mobile
microphone. Upgrade equipment would include interfaces for digital modes such as
packet radio or Winlink. There are also new radios available with two interesting
options, but these new options are too new for me to positively recommend at this time.
The first option is a digital radio format called “D-Star.” D-Star is a trademark of Icom
America, Inc.. Digital radios offer improved voice and data quality as well as provide
additional ways to use ham radios. The other new technology is APRS (automatic
packet reporting system), which is related to GPS, which you are perhaps familiar with.
An APRS equipped radio will allow others to view your physical location on a map over
the Internet. This feature could be handy for tracking delivery drivers or helping to find
you in a disaster situation. As a beginner, it is hard to know if you would want or need
either of these new options, so I advise you to do some more research and study your
choices before making a purchase decision. I can safely say, however, that most of the
radios available at this time do not include either of these features, so if you feel that
you don’t need D-Star or APRS, you have many more choices.
The last two things to consider when purchasing your equipment is “what brand” and
“new or used.” Used equipment is less expensive than new equipment, and usually with
all electronic equipment, if it is working when you buy it, it should continue to work. If
you are considering used equipment, you should take your time and check out the
equipment thoroughly before buying it. If you can, have an experienced ham help you
evaluate it. It is better to buy used equipment from an established store who might
possibly offer a guarantee, or from someone that you know personally. If neither of
these choices are available to you, there are two web sites that are popular places for
hams to buy and sell equipment. One is the eHam classifieds at http://eham.com which
requires you to sign up for a free account before you can access the classified ads. Go
ahead and sign up because this site also has some of the best product reviews and
evaluations that I have seen, and will no doubt be a valuable resource in helping you
make your purchase decision. The other popular source of used equipment is QRZ
(http://qrz.com). Click on “Swapmeet” form the main menu, and then “Ham Radio Gear
For Sale.”
Then there are the obvious choices for used merchandise such as eBay and Craig’s
List. These could possibly lead to a good deal on a nice rig, but these sites are also
popular for selling used equipment with “problems” or also for outright fraud such as
collecting money and not delivering the product. Of course, both sites work hard to
protect you from abuse such as this, so just be careful no matter where you shop. If
possible, always try to get a guarantee and a return policy, but these are not usually
available on used equipment.
As far as which brand to buy, the old saying, “you get what you pay for,” is probably true
in this case. There are some good choices among the little known brands, but you will
have to ask a lot of questions and do some research to be able to separate the good
choices from the bad. This is where online forums such as those on eHam.com,
QRZ.com and Yahoo are good for reading other people’s opinions about the many ham
radios available. You can usually search by make and model and then get a list of
comments and reviews to read. There are some Chinese brands, such as Wouxun, that
are becoming popular because they offer a fairly good radio for a good price. A dualband Wouxun HT will usually cost less than $130, where a well-known established
brand such as Icom, Kenwood or Yaesu will cost more money. Many of the hams I
associate with purchase “brand-name´ equipment, and perhaps buy a Chinese radio as
a second-radio or a backup radio. Some of the popular brands for FM handi-talkies and
mobile radios are Icom, Yaesu, Kenwood, Alnico and Jetstream. For base transceivers,
Ten-Tec and Elecraft and others are also good choices, but are in a higher price range.
To sum up and simplify this section, as a new technician class operator, you can begin
to enjoy the hobby by purchasing a new or used handi-talkie (HT), either dual-band or
tri-band, and enjoy the convenience of being able to carry this radio anywhere that you
go and also be able to use it to participate in volunteer activities such as REACT,
ARES, RACES or CERT. If you will be operating only from home, a base station is a
good choice, but a mobile dual-band (2 meter and 70 centimeter) radio connected to a
regulated 12-14 volt power supply and a base antenna will allow you to operate at
home, and then move your radio into your car and hook it up to a mobile antenna when
you want to use it “on the road.” If you are really into ham radio, and you can afford it,
then consider getting all three radios – a base station that covers 160 MHz through 450
MHz or higher, a mobile transceiver that covers 160 MHz through 450 MHz or higher,
and a dual-band to four-band handi-talkie with D-Star and APRS!
How to use your radio
For sake of simplicity, since this is a document for newly licensed technician class
operators, I will limit this discussion to the modes that are most popular and available to
technician class hams.
The first step is to refer to your owners and operating manuals to make sure that you
have hooked up all of your equipment correctly. As I have said before, it might be a
good idea to enlist the help of an experienced ham at this point. If you are using a
handi-talkie, all you have to do is charge the battery and screw on the “rubber duck”
antenna, and perhaps plug in the speaker-mic. Fortunately, most mobile and base
antennas come “pre-tuned” and can usually be used as soon as they are connected.
The hardest step comes next – programming your radio or selecting a frequency to use.
Most radios now come with many memory storage positions that allow you to program
all of the popular frequencies and repeaters that you might want to use, and then select
them easily with a switch or set of up-down buttons. Programming your radio is not
something we can cover in this document because each radio has its individual
methods and requirements. We can, however, make some general comments on the
topic.
First of all, let’s limit this discussion to an FM transceiver, either HT or mobile, covering
either a single band of two or more bands. You could enter a frequency following the
instructions in your manual and start talking, but most hams find it more convenient to
take the time to “pre-load” the frequencies that they intend to use. These frequencies
could be in the form of either “simplex” or “repeaters.” A simplex frequency is when you
talk directly to another ham radio user, point-to-point. A repeater is a piece of equipment
usually installed in a location that can easily be reached by weaker signals, such as
those on handi-talkies, located usually on a mountain top or in a central location. The
user connects to repeater on one frequency, and then the repeater amplifies the
frequency and rebroadcasts it on a different frequency. This is what is called an “offset.”
Fortunately, most of the offsets are standardized, and some radios can even
automatically select the offset “input” frequency when you program in the “output”
frequency. Other radios require you to enter both frequencies. When using a repeater
(and sometimes even when talking simplex), you may need to program a code for the
“PL tone” (also known by other names such as “tone squelch” or “CTCSS”). What the
tone does is to allow the signal to be heard only to others who are “listening” for signals
on this tone. This allows a sort of “privacy,” in fact, that is what the “P” in “PL” stands for
- “privacy tone.” Here is a link to another article I wrote that will explain this more
complicated process better: http://tomsmerk.com/radio/repeaters.pdf. In order to keep
this document simple, I will refer you to this other article and to your user manual for
help in programming your radio. I will mention, however, that most of the hams that I
know find it easier to download the programming software (usually free) and use it to
store the repeater and simplex frequencies into your radio. The file also serves as a
backup of the frequencies programmed into your radio.
The next step at this point is to “listen.” Turn on your radio, select a popular local
repeater (your club or a fellow ham can help you here), and adjust the squelch. The
squelch control on your radio is used to block out the background noise and keep the
radio quiet until a transmission is received. Start with the squelch fully off
(counterclockwise if this is on a knob) and then turn it up until the background noise
goes away and the receiver is quiet. Then when a transmission is received, it will break
through the squelch and you will hear the caller’s voice.
Now listen for a day or a few days to others using the frequencies. If you don’t hear
much, you can try different frequencies. If your radio has a scan feature, you can let the
radio continuously scan all of the frequencies until it stops on an active frequency.
By listening, you will learn a little bit about “etiquette” and the proper way to make a
contact and conduct yourself on the amateur radio bands. Once you stop listening and
start talking, it is OK if you make mistakes. The ham community is usually very
forgiving. After all, we were all once in your position – scared and nervous, but anxious
to get going!
One of the ways to get some more time on the air, learn new information, and make
new friends and acquaintances is to join a “net.” A net is an on-the-air roll call and
round-table discussion that pertains to a particular topic or organization. Radio clubs
have nets, as do organizations such as ARES, RACES, Skywarn, SATERN, and the
American Red Cross. Nets are also used to pass traffic, another way of saying
“exchange messages.” Some nets are held for the purposes of either testing your
equipment or making DX contacts. Other nets are used to practice your emergency
communications skills. Nets are also popular with special interest groups, hobbyists,
and for buying and selling ham radio equipment. Some of the “special interest” nets
might pertain to off-road vehicles, antique ham radios, sailing, flying, surfing, and just
about any interest or activity that comes to mind.
Begin by finding out what nets are available. If you belong to any organizations or clubs,
ask them if they have weekly nets. If you belong to a Yahoo group or a similar online
discussion group, read the messages or the FAQ to learn about any nets that might be
available, or else ask the moderator for the group. You can also search online for
available nets, either by topic, or by area, or else you can get complete lists of ALL nets,
but these can be quite lengthy and confusing to read through!
It is usually best to start with one net on a topic that you are very familiar with or a group
or club that you actively participate in. What you need to know is the frequency, the day,
the time the check-in begins, or the time the net begins. Some nets go “on-the-air” early,
such as a half-hour before the net begins, to allow people to check in early rather than
having to wait until their name is called. It is not necessary to check in to a net early, but
you do sometimes have that option. For HF nets, you need to know the band and the
frequency, and for VHF and UHF nets, you need to know the repeater that will be used
(the frequency, offset and PL tone).
You might want to spend your first week on a new net just listening. If you understand
the procedure before you actively join in, you are less likely to make any embarrassing
mistakes. Before we go on, I should clarify that in the field of ham radio fellowship, there
really is no such a thing as an embarrassing mistake – most hams are forgiving if you
do something incorrect, and they will be happy to explain net etiquette to you so that
you are better prepared next time. But there are a few individuals out there that tend to
take things more seriously, and could possibly say something to embarrass you if you
do not follow proper net procedure.
Every net has its own unique protocol, and net procedures differ depending on the
nature of the net, but there are certain similarities that we can discuss. Most nets begin
with a call to club officers or net officials for news bulletins or information. This is usually
followed by a roll call of general net members. How you respond to the roll call depends
on how many “go-arounds” the net will have. For example, if the net only has one “goaround,” you will respond to your call sign when it is announced by “net control” and
state your traffic. By “state your traffic,” I mean that you will either announce what is new
concerning you, mention what you want to buy or sell, give a synopsis of local weather
or driving conditions, make comments based on the “theme” of the net, pass along any
messages that you are holding for other areas, or simply say “no traffic.” Many nets
operate in this “round table” fashion and are focused on discussion and hearing the
viewpoint and comments from all of the net members. Others may be brief and consist
only of a quick check-in process. Do you see now why it is a good idea to “listen only”
the first week?
On a net with two or more “go-arounds,” the first time you name or call sign is
announced, you just indicate your presence. For example, I will listen for net control to
call out my call sign, and then I will say “This is Tom, AA6TS, from Dulzura, California.”
The net control marks you “present” and you are invited to participate in the second
“round.” After the first round where all the net members present are “checked in,” call
signs are announced sequentially a second time. This time when you hear your call, you
might be expected to contribute some information for the net. This is where each net
differs from the others. You might be expected to comment on the topic of discussion for
this evening that was announced, either in advance or at the beginning of the net, you
might give of receive a signal report, you might have the opportunity to make a DX
contact (usually just on a HF net) with another net member, you might pass on message
you are holding for another area, you might list an item that you have for sale or list an
item you are looking for, or make some other contribution to the net based on the
guidelines for this particular net. Make sure that you understand this part of net protocol
before you decide to speak up and participate. It is OK to make mistakes the first time,
but your goal will be to try to make no mistakes and to “fit in” the best you can. Once
you speak up that first time, you now become familiar to everyone else on the net, and
you are one step closer to being a “regular” net member. The next week, it will be much
easier to check in, and by the third week, you will be having a lot of fun and all of the
nervousness will have completely disappeared!
Some nets go around several more “go-arounds” until net members run out of things to
talk about, Some of these nets can last hours while others are over in ten minutes.
Whenever you decide that you want to end your participation in the net, when your
name is called, you give your salutations to the group, such as “73’s everyone” (best
wishes) and announce somehow that you are signing off from the net, such as “we’ll be
signing off,” or “I’ll be QRT,” (stop transmitting) or “I’m going to sign out and listen on the
side,” or whatever you deem appropriate after listening to how the other more
experienced net members handle it. Most nets have a policy that if you don’t check in
on a regular basis, your name may be dropped from the roll call. You can always rejoin
the net later if this ever happens and you still want to participate. Now that you know
how the net operates, you will want to listen for the net control operator to announce
“are there any new net members?” This is where you say your call sign, and then wait to
be acknowledged. Once acknowledged, the net control operator will usually want to
know your first name and possibly your location (QTH). Your net control operator will let
you know what they need. The net control operator might even ask “do you want to be
added to the net?”
Sometimes people make mistakes, so next week, if you do not hear you name or call
sign called, wait for the net control operator to ask “are there any late or missed net
members?” Once you understand how the net operates and decide to join, you should
try to check in each week, or daily, if the net occurs every day. Don’t feel bad about
missing the net if you have something important to do, but try to check in as often as
you can. Now that you are a member of the net, you can look forward to hours of
enjoyment using your ham radio. You will keep in touch, make new friends, and learn
new things. It is not unusual for ham radio nets to often get together in person for
picnics, dinners and barbeques, or to host an annual Christmas party. Also, once you
meet people through the nets, you may want to contact them individually at other times
for a QSO (chat) or to ask a question or exchange information. You have made a new
friend and contact! Another benefit of participating in weekly (or daily) nets is that
sometimes, after the net has concluded, net members hang around and talk back and
forth among themselves for a while longer. If you like to talk on your ham radio, this is a
good way to pick up some more opportunities to do so!
Other than nets, another way to begin talking on your new ham radio is to listen to an
invitation for a QSO (contact, or radio conversation). Some hams do this by making an
announcement such as “this is AA6TS monitoring.” There might be other reasons for
letting us know they are monitoring the frequency, such as telling a person that has
been trying to contact them that they are now available, but most of the time, this means
that they are available for a chat. You can come back by stating your call sign and a
greeting, such as “AA6TS, this is KJ6NTB. I’m a new ham, and wanted to take the
opportunity to say hello.” Do you see how this could lead to an interesting
conversation? Just remember to announce your call sign every ten minutes according to
FCC regulations, and to give your call sign when ending the conversation. An easy way
to give your call sign every ten minutes is by saying “this is AA6TS, for ID” (but of
course, use you own call sign, not mine!)
The third way to make a contact is to try the same thing yourself. Key the mike, say your
call sign, and then say “monitoring.” Perhaps someone will come back to you. It might
even be another new ham, and then you both will have a lot to talk about! Just be
respectful of others who might want to use the frequency, and pause or break
occasionally to see if there is anyone else waiting to make a contact. One way of doing
this is to say “is there anyone else that would like to use the frequency?” If there is, and
you are not finished with your conversation, you could either finish quickly, or you could
agree to contact each other on a different frequency or repeater. Don’t forget to sign off
with your call sign.
One more way to make a ham radio contact is to call for another ham that you know.
The format for this is “KJ6NTB, this is AA6TS,” or you could say the call sign twice, as in
“KJ6NTB, KJ6NTB – this is AA6TS calling.” If the party you are attempting to contact
comes back to you, you are on your way. If not, say “No contact, AA6TS clear and
listening (or monitoring),” but of course, once again, use your own call sign, not mine! If
you wish, you could try contacting a different person.
Now that you are on the air there are two more things to do. First of all, learn to observe
proper and courteous operating procedures. Secondly, continue to learn and study both
basic operating procedures, as well as begin to study the license preparation guide for
the next license class you want to obtain. The ARRL (American Radio Relay League)
has two books available for new hams, one cheap and one expensive. You can get
“The ARRL Operating Manual” for $29.95 or the more extensive “ARRL Handbook” for
$49.95 ($59.95 for hardcover). Both of these are available at your local ham radio store,
some electronics and book stores, and from the ARRL online store at
http://www.arrl.org/shop. The Operating Manual is sometimes offered as a bonus gift
when you become an ARRL member. I highly recommend ARRL membership for all
new hams because not only can you take advantage of all of the other benefits offered
to ARRL members, you also get a great ham radio magazine, “QST,” in your mailbox
each month. Note: The “ARRL Handbook” contains more advanced information than it
does information for beginners, so although this will become a valuable resource as you
continue to learn more about ham radio, it might be too complicated and confusing for
brand new hams.
Once you gain experience and become comfortable operating ham radio, be sure to
upgrade to general class, and also look into other opportunities such as volunteering for
emergency communications or public service work, or getting into new ways of using
ham radio, such as packet radio of some of the other digital modes.
The AA6TS web site “Tom’s Radio Shack,” has links to a lot more educational
resources for ham radio operators of all levels. As you discover other interesting
resources on your own, be sure to let me know so that I can add these links to my web
site. Email your useful discoveries to [email protected].
In an effort to get this useful information in the hands of all new hams, I will post this in
its current form on my web site and on any other sites that want to use it, and I will
continue to make revisions because there is still more that I want to add. I welcome your
comments. Let me know if you found this to be useful or if you have any questions. You
can contact me at [email protected]. As they say in ham radio “73” (best wishes)!
What to do next?
See my article “Ham Radio Training for Responders and Groups” (currently under
development) for valuable information on how to use your radio as part of an organized
communications unit of a citizen’s response group. This training document will cover
and correct common mistakes made by less experienced users in an attempt to elevate
the level of training and preparation of volunteer radio communications responders.
As they say in the language of ham radio – “73!” (Best wishes!)