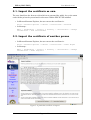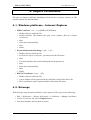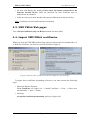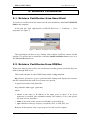
1
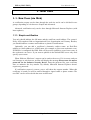
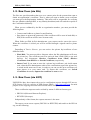
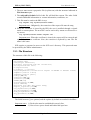
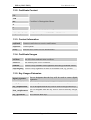
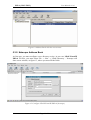
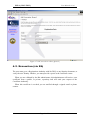
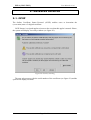
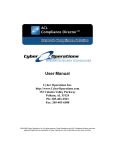
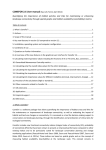
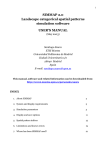
PKIv6 (UMU–DIIC)
User Manual v1.0.1
Gregorio Martínez Pérez
Gabriel López Millán
Manuel Gil Pérez
[email protected]
November 2003
PKIv6 (UMU-DIIC)
User Manual v1.0.0
TABLE OF CONTENTS
1. New User....................................................................................5
1.1. New User (via Web) ............................................................................................................5
1.1.1. Simple certification .................................................................................................................... 5
1.1.2. Advanced certification............................................................................................................... 6
1.2. New User (via RA)...............................................................................................................8
1.3. New User (via SCP) .............................................................................................................8
1.3.1. File Structure............................................................................................................................... 9
1.3.2. Certificate Content...................................................................................................................10
1.3.3. Contact Information................................................................................................................10
1.3.4. Certificate Usages.....................................................................................................................10
1.3.5. Key Usages Extension.............................................................................................................10
2. External Request (only via RA) .................................................11
3. Search Certificates (only via Web) ............................................12
3.1. Import the certificate as own............................................................................................14
3.2. Import the certificate of another person ........................................................................14
4. Import Certificates ..................................................................15
4.1. Windows platforms – Internet Explorer ........................................................................15
4.2. Netscape ..............................................................................................................................15
4.3. UMU PKIv6 Web pages ...................................................................................................16
4.4. Import UMU PKIv6 certificates......................................................................................16
5. Retrieve Certificates ................................................................17
5.1. Retrieve Certificates from SmartCard .............................................................................17
5.2. Retrieve Certificates from DNSSec.................................................................................17
5.3. Retrieve Certificates from LDAP ....................................................................................18
5.3.1. Windows Address Book .........................................................................................................18
5.3.2. Netscape Address Book..........................................................................................................22
5.3.3. URL............................................................................................................................................23
5.3.4. Commands Line .......................................................................................................................24
6. Revocation ..............................................................................25
6.1. Revocation (via Web) ........................................................................................................25
6.1.1. Revocation Request .................................................................................................................26
6.1.2. AutoRevocation........................................................................................................................26
6.2. Revocation (via RA)...........................................................................................................28
7. Renewal Request......................................................................29
7.1. Renewal Request (via Web) ..............................................................................................29
7.2. Renewal Request (via RA).................................................................................................30
Page 2 of 36
PKIv6 (UMU-DIIC)
User Manual v1.0.0
8. Certification Authority & CRL..................................................31
9. Advanced Services ...................................................................32
9.1. OCSP ...................................................................................................................................32
9.2. TSP .......................................................................................................................................33
9.3. SCEP....................................................................................................................................34
9.4. 6WIND VPN routers........................................................................................................35
Page 3 of 36
PKIv6 (UMU-DIIC)
User Manual v1.0.0
TABLE OF FIGURES
Figure 1. Simple certification example through Netscape ......................................... 6
Figure 2. Advanced certification options through Microsoft Internet Explorer ........ 7
Figure 3. Search Certificates page..............................................................................12
Figure 4. Found certificates in the previous search...................................................13
Figure 5. A particular certificate to import ................................................................14
Figure 6. Security alert: (a) Microsoft Internet Explorer, (b) Netscape....................16
Figure 7. Retrieve certificate from smart card ...........................................................17
Figure 8. Configure LDAP Euro6IX PKIv6 (Windows) ............................................18
Figure 9. LDAP properties .........................................................................................19
Figure 10. Find people from LDAP Euro6IX PKIv6................................................. 20
Figure 11. Particular contact details ...........................................................................21
Figure 12. Address Book with the new contact......................................................... 22
Figure 13. Configure LDAP Euro6IX PKIv6 (Netscape) ......................................... 22
Figure 14. Find people from LDAP Euro6IX PKIv6................................................. 23
Figure 15. Client authentication................................................................................ 25
Figure 16. Autorevocation’s Phase 1 where the user must register........................... 27
Figure 17. Self revocation online (phase 2) ............................................................... 28
Figure 18. Renewal Request of a client certificate .................................................... 29
Figure 19. Certification Authority & CRL web page .................................................31
Figure 20. Security warning....................................................................................... 32
Figure 21. OCSP Requestor....................................................................................... 33
Figure 22. Time Stamping Requestor ....................................................................... 34
Page 4 of 36
PKIv6 (UMU-DIIC)
User Manual v1.0.0
1. New User
1.1. New User (via Web)
A certification request can be done through the web site and it can be divided in two
groups, depending of web browser: Simple and Advanced.
Advanced certification only can be done through Microsoft Internet Explorer (with
laster updates).
1.1.1. Simple certification
You only should indicate the full name and the certificate email address. The system’s
Policy will complete fields as Organizational Unit, Organization and Country. Besides,
you should indicate a contact email address or phone for notifications.
Optionally, you can add a certificate’s alternative subject name: an IPv4/IPv6
address (to router address) or a DNS name (for example, myusername.mydomain.com).
If DNSSec is configured the DNS field will be used to publish a myusername entry in
the mydomain.com server. If you want to publish in the default DNS server only need
specify myusername.
When fields are filled user’s request can be send to the server. If it is correct, and you
use Netscape as web browser, an alert will display the message Please enter the master
password for the Software Security Device. Enter the password for your certificate
store to authorize the key transfer. By default, Microsoft Internet Explorer doesn’t
require any password.
If certification request is correct, server will show the request number. When this
certificate is issued you will be notified through a signed email or phone contact. The
new PKC can be retrieved with the same web browser.
Page 5 of 36
PKIv6 (UMU-DIIC)
User Manual v1.0.0
Figure 1. Simple certification example through Netscape
1.1.2. Advanced certification
This certification allows to the user to specify the certificate content in detail, as well as
the use of smart cards to store public and private keys. Advanced certification is only
available on Microsoft Internet Explorer since for cryptographic operations it has been
used the PISCIS Cryptographic Service Provider (CSP).
Page 6 of 36
PKIv6 (UMU-DIIC)
User Manual v1.0.0
Figure 2. Advanced certification options through Microsoft Internet Explorer
Advanced certification requires the same information that simple mode. Besides, it
allows changing selected CSP to make cryptographic operations. For each provider you
can choose a key size and a hash algorithm.
If you want to use PISCIS CSP, you can define if the private key will be or not
exportable and whether the old private key stored in smart card will be removed.
Optionally, you can add a certificate’s alternative subject name: an IP address (to
router address) or a DNS name (for example, myusername.mydomain.com). If DNSSec
is configured the DNS field will be used to publish a myusername entry in the
mydomain.com server. If you want to publish in the default DNS server only need
specify myusername.
If certification request is correct, you should wait until the notification arrive
containing the certificate serial number and how to retrieve it.
In order to you can use this new certificate, you must import it to your web browser.
To import a certificate, see Import Certificates document.
Page 7 of 36
PKIv6 (UMU-DIIC)
User Manual v1.0.0
1.2. New User (via RA)
The RAs are special members that serve as a contact point for the persons that want to
obtain an organization’s certificate. That is, when you want to obtain a new certificate
you must go to the Registration Authority. This entity will be responsible for verifying
the user identities (through DNI, or any identity document) and will send the requests to
the Certification Authority.
When you are validated by the RA as organization member, you must provide the
following data:
o Contact email address or phone for notifications.
o Pass phrase to protect the password (if the certificate will be store in hard disk) or
PIN (if the certificate will be store in smart card).
When fields are filled by RA administrator, your request can be sent to the server.
When this certificate is issued you will be notified through a signed email or phone
contact.
Depending of Device Selector, you can retrieve the private key/certificate of two
different forms:
o Hard Disk: You must provide a disquette where the RA administrator will store
the private key. The certificate can to be retrieved from LDAP, DNS or any web
browser. See documents: Retrieve Certificates from LDAP, Retrieve
Certificates from DNSSec or Search Certificates, respectively.
o Smart Card: If you want to store the <private key/certificate> pair inside smart
card, when the RA administrator achieves the certification request the private key
is stored inside smart card. Later, in order to you can use this new certificate you
must import it to your smart card. To import this certificate, see Search
Certificates document, Import the certificate as own section.
1.3. New User (via SCP)
UMU-PKIv6 have been improved to receive certification requests through SCP access.
SCP (Secure CoPy) is a service of SSH (Secure SHell) – http://www.ssh.com. Its main
purpose is safe copying files between local and remote computer.
These certification requests can be realized by means 2 different format types:
o PKCS#10 (Microsoft Internet Explorer).
o KEYGEN (Netscape).
Independently of the format, the request structure is the same.
The steps to create a new request (PKCS#10 or KEYGEN) and send it to the PKI via
scp, are the following:
Page 8 of 36
PKIv6 (UMU-DIIC)
User Manual v1.0.0
1. The user must create a properties file (in plain text) with the structure indicated in
File Structure apart.
2. The subjectKeyGenInfo field of this file will hold the request. The other fields
contain additional information as: contact information, extensions, etc.
3. This file must be send to the PKI via scp:
scp request.req scpuser@<server-name>:
Important note: Obligatorily, the extension of the request file must be .req.
4. When the certificate is issued by the PKI, the user is notified through a signed
email or contact phone. The new PKC can be retrieved by means a web browser o
scp access:
scp scpuser@<server-name>:request.cer .
Important note: When the certificate is issued, the request will be removed and
replaced by the new certificate. Now, the extension is replaced by .cer. The file
name is the same.
SCP requires a password to access to the SCP user’s directory. This password must
be provided by the PKIv6 administrator.
1.3.1. File Structure
The structure of this file is the following:
CN=(common name)
UID=[unique identifier]
E=(e-mail associated with the certificate)
OU=(organizational unit)
O=(organization)
C=(country – 2 letters)
subjectKeyGenInfo=(certification request in KEYGEN or PKCS#10 format)
reqEmail=[contact e-mail]
reqPhone=[contact phone]
notify=[on|off]
sslClient=[on|off]
sslServer=[on|off]
SMIME=[on|off]
objectSigning=[on|off]
ip=[IP address]
dns=[name into DNS[.DNS server name]]
digital_signature=[on|off]
non_repudiation=[on|off]
key_encipherment=[on|off]
data_encipherment=[on|off]
key_agreement=[on|off]
The fields between [] are optional, and the options by default are marked in boldface.
Important notes: 1.) Each value must be established in an only line.
2.) Not to leave spaces ahead and behind the equal one.
Page 9 of 36
PKIv6 (UMU-DIIC)
User Manual v1.0.0
1.3.2. Certificate Content
CN
UID
Certificate’s Distinguished Name.
OU
O
C
E
E-mail associated with the certificate.
subjectKeyGenInfo
certification request in KEYGEN or PKCS#10 format.
1.3.3. Contact Information
reqEmail
Contact e-mail where to receive notifications.
reqPhone
Contact phone.
notify
Does the user wish to receive notifications?
1.3.4. Certificate Usages
sslClient
An SSL client authentication certificate.
sslServer
An ordinary SSL server certificate.
SMIME
Used to verify S/MIME email signatures and encrypt S/MIME emails.
objectSigning Used to verify signatures on files of executable code, e.g. jar files.
1.3.5. Key Usages Extension
digital_signature
Use to designate that the key will be used to create digital
signatures.
non_repudiation
Use to designate that the key will be used for non-repudiation.
key_encipherment
Use to designate that the key will be used to encrypt other keys.
data_encipherment
Use to designate that the key will be used to directly encrypt
data.
key_agreement
Not valid for RSA keys.
Page 10 of 36
PKIv6 (UMU-DIIC)
User Manual v1.0.0
2. External Request (only via RA)
The user must go to a Registration Authority with the following:
o DNI, or any identity document, to verify the user identity.
o A file with the request. This file has to be a PKCS#10.
o The private key associated (optional). This private key has to be stored in a file.
o The user must provide also a contact email address or phone for notifications.
Note: If the user presents his smart card, the RA administrator can store the private
key inside the card.
When the user is validated by the RA as organization member (through DNI, or any
identity document), the user request can be sent to the server.
When this certificate is issued the user is notified through a signed email or phone
contact.
Later, the new certificate can to be retrieved from LDAP, DNS or any web browser.
See documents: Retrieve Certificates from LDAP, Retrieve Certificates from
DNSSec or Search Certificates, respectively.
Page 11 of 36
PKIv6 (UMU-DIIC)
User Manual v1.0.0
3. Search Certificates (only via Web)
When users want to search their own certificates or another person certificates they
should click on Search Certificates option. From this page (see figure 3), they can
achieve searches to:
o Requests Server Database. Searches by means of the certificate’s serial number,
email address or unique identifier (if required).
o DNS. Searches by means of the user name into DNS server. The name of this
server can be configured manually or achieve searches inside DNS server by
default.
o LDAP. Searches by means of the email address into LDAP directory. The name
of this server can be configured manually or achieve searches inside LDAP server
by default.. The Search Suffix field is filled by the system’s Policy, but the user
can change it and to realize searches inside other compatible directories.
Figure 3. Search Certificates page
When user requests the query, server shows a new page with all found certificates
(see figure 4).
Page 12 of 36
PKIv6 (UMU-DIIC)
User Manual v1.0.0
Figure 4. Found certificates in the previous search
In this page, the user can view a brief description of each found certificate: version,
serial number, issuer, subject, validity period and fingerprint. Each certificate can be
stored locally click on Save to file. Besides, the user can notice warning and error
messages; for example, in the previous search the second certificate is revoked.
The user can view more details of a certificate click on corresponding View
Certificate button.
In the new page (see figure 5), the showed information is:
o Basic certificate fields: version, serial number, issuer, subject, validity period,
status, etc.
o Fingerprint.
o Cryptographic Service Provider.
o PEM format certificate which can be exported to a file.
With above information there are two options:
o Import the certificate as own.
o Import the certificate of another person.
Page 13 of 36
PKIv6 (UMU-DIIC)
User Manual v1.0.0
3.1. Import the certificate as own
The user should use the browser with which was generated the public key or the smart
card with the private key associated in a browser with the PISCIS CSP installed.
o In Microsoft Internet Explorer, the user can see the certificate in:
Tools → Internet Options → Content → Certificates → Personal
o In Netscape:
Edit → Preferences → Privacy & Security → Certificates → Manage
Certificates → Your Certificates
3.2. Import the certificate of another person
o In Microsoft Internet Explorer, the user can see the certificate in:
Tools → Internet Options → Content → Certificates → Other People
o In Netscape:
Edit → Preferences → Privacy & Security → Certificates → Manage
Certificates → Other People's
Figure 5. A particular certificate to import
Page 14 of 36
PKIv6 (UMU-DIIC)
User Manual v1.0.0
4. Import Certificates
The user can import certificates depending of web browser, operative system, etc. The
possible options are described later.
4.1. Windows platforms – Internet Explorer
o X509 Certificate: *.cer – *.crt (DER or PEM format)
o Double-click on certificate file.
o Install certificate. This button will open a new window (Wizard to import
certificates).
o Next.
o Select store automatically.
o Next.
o Finish.
o Personal Information Exchange: *.pfx – *.p12
o
o
o
o
o
o
o
o
Double-click on certificate file.
In Wizard to import certificates, you must select the file name.
Next.
You must introduce the password that protects the private key.
Next.
Select store automatically.
Next.
Finish.
o PKCS#7 Certificates: *.spc – *.p7b
o Double-click on certificate file.
o A new window will be opened with all certificates stored in the above file.
o These certificates can be imported double-click on the file name.
4.2. Netscape
With Netscape only personal certificates can be imported. The steps are the following:
o Edit → Preferences → Privacy & Security → Certificates → Manage Certificates.
o In Your Certificates tab, click on Import button.
o You must introduce the file name to restore.
Page 15 of 36
PKIv6 (UMU-DIIC)
User Manual v1.0.0
o An alert will display the message Please enter the master password for the
Software Security Device. Enter the password for your certificate store to
authorize the key transfer.
o In the new alert, you must introduce the password that protects the private key.
Note: Certificates on smart cards cannot be backed up.
4.3. UMU PKIv6 Web pages
View Search Certificates (only via Web) document for more detail.
4.4. Import UMU PKIv6 certificates
When you open the UMU PKIv6 Home Page and your browser haven’t installed the CA
or Web site certificate, you will view an alert window as figure 6.
Figure 6. Security alert: (a) Microsoft Internet Explorer, (b) Netscape.
To import these certificates, depending of browser, you must execute the following
steps:
o Microsoft Internet Explorer:
View Certificate (see figure 6.a) → Install Certificate → Next → Select store
automatically → Next → Finish.
o Netscape:
Accept this certificate permanently option (see figure 6.b)
Page 16 of 36
PKIv6 (UMU-DIIC)
User Manual v1.0.0
5. Retrieve Certificates
5.1. Retrieve Certificates from SmartCard
To retrieve a certificate from the smart card, the user should have installed CSP PISCIS
Shell in his computer.
In the task bar, click right button on PISCIS Shell icon → Certificate → View
properties (see figure 7).
Figure 7. Retrieve certificate from smart card
This application will show a new window with complete certificate content. In this
window, you will be able to install the certificate (Install certificate button), save it to
file (Save to file button), etc.
5.2. Retrieve Certificates from DNSSec
When users want to retrieve their own certificates or another person certificates they can
make it through DNS server.
This search can make it with a DNS lookup utility, as dig command.
dig (domain information groper) performs DNS lookups and displays the answers
that are returned from the name server/s that were queried.
A typical invocation of dig looks like:
dig @server name type [options]
where:
o server: Is the name or IP address of the name server to query. If no server
argument is provided, this command consults DNS address servers and queries
the name servers listed here.
o name: Is the name of the resource record that is to be looked up.
o type: Indicates what type of query is required (ANY, A, MX, SIG, etc.).
Between all the options, only we go away to fix in the [no]short option:
Page 17 of 36
PKIv6 (UMU-DIIC)
User Manual v1.0.0
+[no]short: Provide a terse answer. The default is to print the answer in a verbose
form.
In our case, dig command will be used as follow:
dig @shire.umu.euro6ix.org CERT <Subject Alt. Name-DNS>.sigz.umu.euro6ix.org +noshort
5.3. Retrieve Certificates from LDAP
When users want to retrieve their own certificates or another person certificates they can
make it through LDAP server. We can achieve these searchs with:
o Windows Address Book.
o Netscape Address Book.
o URL (only Windows platforms).
o Commands line.
Note: With new Netscape versions, LDAP searchs doesn’t work fine.
5.3.1. Windows Address Book
As first step, you must configure a new directory service; in our case, LDAP Euro6IX
PKIv6. For this, you must select Tools → Accounts... → Add… (see figure 8).
Figure 8. Configure LDAP Euro6IX PKIv6 (Windows)
Page 18 of 36
PKIv6 (UMU-DIIC)
User Manual v1.0.0
In the next window:
o Internet Directory Server (LDAP): pippin.umu.euro6ix.org
As result, you will have a new entry into Directory Service panel:
pippin.umu.euro6ix.org.
Figure 9. LDAP properties
With this new entry selected, you must click on Properties button to change the
LDAP options (see figure 9). In General tab, you must establish the following data:
o Directory Service Account: LDAP Euro6IX PKIv6
o Server Name: pippin.umu.euro6ix.org
In Advanced Options tab:
o Server Port: 389 (port by default to LDAP).
o Search Base: ou=OU plugtest I, o=O plugtest I, c=ES
To achieve a search in our LDAP server, you must complete the following steps:
1. In Address Book window, you must select Find People button (see Figure 10 –
step 1).
2. At the Look in: field select the dropdown arrow to display directories.
3. Select LDAP Euro6IX PKIv6 from the Look in: dropdown list on the Find People
window.
4. You are now ready to locate the contact using this directory search.
Page 19 of 36
PKIv6 (UMU-DIIC)
User Manual v1.0.0
5. The type of information you have about the contact will determine the type of
search to perform.
6. Type [email protected] in the e-mail edit box (see Figure 10 – step 2) and left
click the Find Now button (see Figure 10 – step 3). When the search completes
the results will be displayed in the list box.
7. In the results displayed highlight User PKIv6 and left click the Add to Address
Book button (see Figure 10 – step 4). The contact will then open allowing you to
edit the contact details.
Figure 10. Find people from LDAP Euro6IX PKIv6
8. In Cert IDs option (see Figure 11), you can view the client certificate click the
Properties button.
9. Once you are satisfied with the contact details select the OK button. The contact
details are the added to the Address Book.
10.
From the Find People window select Close to return to the Address Book.
Page 20 of 36
PKIv6 (UMU-DIIC)
User Manual v1.0.0
Figure 11. Particular contact details
You just added a new contact to Windows Address Book using LDAP Euro6IX
PKIv6 directory search (see figure 12).
Note: If you want to view only the client certificate, without add the contact to
Address Book, you must click the Properties button (see figure 10) and you will edit
the contact details (see figure 11).
Page 21 of 36
PKIv6 (UMU-DIIC)
User Manual v1.0.0
Figure 12. Address Book with the new contact
5.3.2. Netscape Address Book
As first step, you must configure a new directory service: in our case, LDAP Euro6IX
PKIv6. For this, you must select File → New → LDAP Directory… Netscape will
show a new window, as figure 13, where you must fill the fields.
Figure 13. Configure LDAP Euro6IX PKIv6 (Netscape)
Page 22 of 36
PKIv6 (UMU-DIIC)
User Manual v1.0.0
As result, we will have a new entry into Address Books panel: LDAP Euro6IX
PKIv6.
To achieve a search in our LDAP server, you must complete the following steps:
1. Select LDAP Euro6IX PKIv6 as LDAP server into Address Books.
2. Select Advanced button (see Figure 14).
Figure 14. Find people from LDAP Euro6IX PKIv6
3. At the Search in: field select the dropdown arrow to display directories.
4. Select LDAP Euro6IX PKIv6 from the Search in: dropdown list.
5. You are now ready to locate the contact using this directory search.
6. The type of information you have about the contact will determine the type of
search to perform.
7. Type [email protected] in the right edit box and left click the Search button.
When the search is completed the results will be displayed in the list box.
8. In the results displayed highlight User PKIv6 and you can see left click the
Properties button. The contact will then open allowing you to edit the contact
details. If you would like to send a mail to this user, click on Compose button.
5.3.3. URL
A user can achieve these searchs from the URL of any web browser. Note that these
searchs only can be done on Windows platforms.
Page 23 of 36
PKIv6 (UMU-DIIC)
User Manual v1.0.0
The URL pattern is the following:
ldap://<ldap-server>/CN=<user-cn>,<search-base>
where search-base is the starting point for the search instead of the default.
For example:
ldap://pippin.umu.euro6ix.org/CN=User PKIv6,ou=OU plugtest I,o=O plugtest I,c=ES
If the search returns a LDAP entry, you will show a window as figure 11.
5.3.4. Commands Line
A user can achieve these searchs from the commands line. Note that these searchs only
can be done on Unix platforms.
The command is the following:
ldapsearch
–h
<ldap-server>
userCertificate -x
-b
“<search-base>”
“<user-cn>”
where search-base is the starting point for the search instead of the default.
For example:
ldapsearch –h pippin.umu.euro6ix.org –b “ou=OU plugtest I,o=O plugtest I,c=ES” “CN=User PKIv6”
userCertificate -x
Page 24 of 36
PKIv6 (UMU-DIIC)
User Manual v1.0.0
6. Revocation
6.1. Revocation (via Web)
Requisite: The client certificate to revoke must be imported inside web browser as
personal certificate or must be stored inside smart card. To import a certificate, see
Import Certificates document.
The revocation can be done of two forms: Revocation Request and AutoRevocation.
With Revocation Request, the user is forced to achieve it with the same browser with
which was generated the public key or the smart card with the private key associated in
a browser with the PISCIS CSP installed. On the other hand, the AutoRevocation
consists in two phases:
o Phase 1: You must register with a login name (certificate’s serial number) and
password with the browser that contains your imported certificate as own. This
certificate must be valid (not revoked and private key not compromised).
o Phase 2: You will be able to revoke your certificate by using the login name and
password from phase 1. This step can be achieved on whichever browser.
Figure 15. Client authentication
Page 25 of 36
PKIv6 (UMU-DIIC)
User Manual v1.0.0
6.1.1. Revocation Request
The possible revocation’s reasons are:
o Unspecified.
o Key compromise.
o CA key compromise.
o Affiliation Change.
o Impersonated.
o Ceased.
o Lost Certificate.
o Revoked and Published in the CRL.
When the user specifies his revocation reason, user can send the request to the server.
In this point, the browser displays a window (see figure 15) where the user must select
the certificate to revoke.
When the request has been sent, the server responds with a serial number or an error
message if there was any problem. When the certificate is revoked the user is notified
either by a signed email or phone contact. To check if the certificate has been really
revoked, the user has several ways:
o Search in the server database with the option Search Certificates. The certificate
will be showed as revoked.
o Download laster CRL. It should contain the revoked certificates.
6.1.2. AutoRevocation
This process consists in two phases, explained earlier:
o Phase 1: The user must register with a login name (certificate’s serial number)
and password with the browser that contains your imported certificate as own (see
figure 16). In this point, the browser displays a window (alike figure 15) where
the user must select the certificate to revoke. This certificate must be valid (not
revoked and private key not compromised).
o Phase 2: The user will be able to revoke your certificate by using the login name
and password from phase 1. This step can be achieved on whichever browser (see
figure 17).
In this step, the user will establish the revocation’s reason. The possible
reasons are (the same way as above):
o Unspecified.
o Key compromise.
o CA key compromise.
o Affiliation Change.
Page 26 of 36
PKIv6 (UMU-DIIC)
User Manual v1.0.0
o Impersonated.
o Ceased.
o Lost Certificate.
o Revoked and Published in the CRL.
Warning: Proceed with caution because in this phase your certificate will be
revoked and you will not be able to use it again.
Figure 16. Autorevocation’s Phase 1 where the user must register
Page 27 of 36
PKIv6 (UMU-DIIC)
User Manual v1.0.0
Figure 17. Self revocation online (phase 2)
6.2. Revocation (via RA)
The user must go to a Registration Authority with his DNI, or any identity document, to
verify the user identity. Besides, you must provide a proof as the certificate owner.
When you are validated by the RA administrator, this administrator will retrieve your
certificate from a public, or private, repository and will send your request to the
Certificate Authority.
When this certificate is revoked you are notified through a signed email or phone
contact.
Page 28 of 36
PKIv6 (UMU-DIIC)
User Manual v1.0.0
7. Renewal Request
7.1. Renewal Request (via Web)
Requisite: The client certificate to revoke must be imported inside web browser as
personal certificate or must be stored inside smart card. To import a certificate, see
Import Certificates document.
In this option, the browser displays a window (see figure 18) where you must select
the certificate to renew. This certificate must be valid (not revoked and private key not
compromised).
The request will be sent to the server, and will be processed by the CA. Once you are
notified (through a signed email or phone contact), you will be able to recover the
renewal certificate. The new validity period is automatically set by the system’s Policy.
Figure 18. Renewal Request of a client certificate
The new certificate can to be retrieved from LDAP, DNS or any web browser. See
documents: Retrieve Certificates from LDAP, Retrieve Certificates from DNSSec or
Search Certificates, respectively.
Page 29 of 36
PKIv6 (UMU-DIIC)
User Manual v1.0.0
7.2. Renewal Request (via RA)
The user must go to a Registration Authority with his DNI, or any identity document, to
verify the user identity. Besides, you must provide a test as certificate owner.
When you are validated by the RA administrator, this administrator will retrieve your
certificate from a public, or private, repository. This certificate must be valid (not
revoked and private key not compromised).
The request will be sent to the server, and will be processed by the CA. Once you are
notified (through a signed email or phone contact), you will be able to recover the
renewal certificate. The new validity period is automatically set by the system’s Policy.
The new certificate can to be retrieved from LDAP, DNS or any web browser. See
documents: Retrieve Certificates from LDAP, Retrieve Certificates from DNSSec or
Search Certificates, respectively.
Page 30 of 36
PKIv6 (UMU-DIIC)
User Manual v1.0.0
8. Certification Authority & CRL
The CA’s certificate and the Certificate Revocation List (CRL) should be retrieved from
the web site at the beginning (see figure 19). Both can be store in a file, with the option
Save to file, or can be imported automatically to the system.
o To see the certificate with Microsoft Internet Explorer:
Tools → Internet Options → Content → Certificates → Authorities
o With Netscape:
Edit → Preferences → Privacy & Security → Certificates → Manage
Certificates → Authorities
A CRL is a time stamped list identifying revoked certificates that is signed by a CA
and made freely available in a public repository, such a LDAP directory or DNS server.
In Microsoft Internet Explorer, CRL can not be imported in the system, and in Netscape
is imported into the browser and it will be automatically checked every time the
browser uses a certificate issuer by the same CA.
Figure 19. Certification Authority & CRL web page
Page 31 of 36
PKIv6 (UMU-DIIC)
User Manual v1.0.0
9. Advanced Services
9.1. OCSP
The Online Certificate Status Protocol (OCSP) enables users to determine the
(revocation) state of a digital certificate.
OCSP feature is a signed applet to insure to the user that this applet is trusted. Hence,
the system will display a security window (see figure 20).
Figure 20. Security warning
The user only must provide the serial number of the certificate (see figure 21) and the
system will display its status.
Page 32 of 36
PKIv6 (UMU-DIIC)
User Manual v1.0.0
Figure 21. OCSP Requestor
9.2. TSP
A Time Stamping service allows to prove that a datum existed before a particular time
and can be used as a trusted third party as one component in building reliable nonrepudiation services.
TSP feature is a signed applet to insure to the user that this applet is trusted. Hence,
the system will display a security window (see figure 20).
The user only must provide a file to time stamping and a final file (file sign). See
figure 22.
Page 33 of 36
PKIv6 (UMU-DIIC)
User Manual v1.0.0
Figure 22. Time Stamping Requestor
9.3. SCEP
SCEP is a CISCO designed protocol to provide secure issuance of PKCs to network
devices using standard protocols as PKCS#7 and PKCS#10. The protocol supports
operations of CA and RA public key distribution, certificate enrollment, revocation and
query, and CRL query. Such devices as routers, servers, etc. can use SCEP to obtain
public and private keys to establish Virtual Private Networks (VPN) in a secure way.
The main steps to access a PKI from a VPN device are:
1. Generate Keys.
The public and private keys will be used to create a new PKCS#10 request.
cisco> enable
cisco# configure terminal
cisco(config)# crypto key generate rsa
2. Configure CA identity.
cisco(config)# crypto ca identity PKIv6-name
cisco(ca-identity)# enrollment mode ra
cisco(ca-identity)# enrollment url
Page 34 of 36
PKIv6 (UMU-DIIC)
User Manual v1.0.0
http://rq-server/piscis/servlet/piscis.pki.ca.servlets.SCEP
cisco(ca-identity)# query url ldap://ldap-server
cisco(ca-identity)# crl optional
cisco(ca-identity)# exit
3. To obtain CA and RA certificates.
cisco(config)# crypto ca authenticate PKIv6-name
This command shows the CA’s certificate Fingerprint.
4. To make a certification request.
cisco(config)# crypto ca enroll PKIv6-name
cisco(config)# exit
cisco# show crypto ca certificate
The first command sends a new request to the server, after the RA
administrator validate this request the new certificate is stored automatically
inside the device. The last command shows the system certificates.
9.4. 6WIND VPN routers
To configure new certificates in a 6WIND router, seven steps are needed:
1. Define a new CA.
doom{} ca PKIv6-name scp://scpuser@<pkiv6-server>
Example: doom{} ca UMU scp://[email protected]
2. Install the CA certificate.
doom{} import ca_cert PKIv6-name [CA cert remote name]
Example: doom{} import ca_cert UMU ca.cer
3. Define a new IKE identity.
doom{} id idname
This command enters an interactive mode in which the identity parameters are
proposed one after each other. These parameters are:
o fqdn: Fully Qualified Domain Name.
o user_fqdn: User Fully Qualified Domain Name.
o country: Country name.
o state: STate name.
o locality: Locality name.
o organization: Organization name.
Page 35 of 36
PKIv6 (UMU-DIIC)
User Manual v1.0.0
o unit: Organizational Unit name.
o commonname: Common Name.
o email.
Example: doom{} id doom, with the following options: doom
doom.umu.euro6ix.org [email protected] ES Murcia Murcia euro6ix
euro6ix doom [email protected]
4. To get a new certificate.
doom{} cert_req idname PKIv6-name
This command generates a new request stored in the file idname.req that
should be exported to the PKI using the following command:
doom{} export cert_req idname PKIv6-name
Example: doom{} cert_req doom UMU
doom{} export cert_req doom UMU
5. The PKIv6 should issue the new certificate.
6. The certificate should be imported into the router.
doom{} import cert idname PKIv6-name [cert remote name]
Example: doom{} import cert doom UMU
7. To make the certificate usable in VPN you should select an identity and a trusted
CA as follow:
doom{} edit myconfig
doom{myconfig} sec
doom{myconfig-sec} ike_id idname
doom{myconfig-sec} trust PKIv6-name
doom{myconfig-sec} exit
doom{myconfig} save
doom{myconfig} exit
doom{} ...
Example: doom{myconfig-sec} ike_id doom
doom{myconfig-sec} trust UMU
Page 36 of 36