1
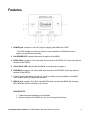
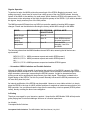
MIDI Module 3000
User's Manual
Copyright 2007-2010, Ian Loiselle - Conceptual Audio Solutions.
www.conceptualaudiosolutions.ca
This publication is protected under copyright and all rights are reserved.
Disclaimer: Conceptual Audio Solutions and its product, the MIDI Module 3000, are in no way
affiliated with Korg nor any of its products. The MIDI Module 3000 serves as an independent,
third-party product, designed to enhance the functionality of the Korg SDD-3000.
Conceptual Audio Solutions: The MIDI Module 3000 User Manual, July 2010
1
Warranty
The MIDI Module 3000 is warranted against part failure and/or faulty workmanship for a period of one
year after delivery to the original owner. During this period Conceptual Audio Solutions will conduct
any work deemed necessary, free of charge, provided that:
•
•
•
There are no signs of tampering, modification, or opening the unit.
The warranty label(s) are fully intact.
Advised precaution and operation (as outlined in this manual) have been followed.
Conceptual Audio Solutions may, at its own discretion, service units whose warranties have expired,
free of charge, provided that the preceding criteria has been met and that the precautions outlined in
in the following page have been observed.
Conceptual Audio Solutions reserves the right to make modifications to, or improvements upon the
product without any obligation to include those changes in previously purchased units.
Please note that in all situations, the customer must pay for shipping in both directions, to and from
Conceptual Audio Solutions.
To contact Conceptual Audio Solutions concerning a warranty and/or servicing, please send an email
to Ian Loiselle at: [email protected]
Conceptual Audio Solutions: The MIDI Module 3000 User Manual, July 2010
2
Precautions
For safe and proper functioning of the MIDI Module 3000, the following precautions must always be
followed.
DO NOT expose this device to water or any other liquid.
DO NOT expose this device to temperatures less than 0 °C or in excess of 45 ° C.
DO NOT tamper with, modify or open this device at any time.
DO NOT use any solvents to clean this device. Simply use a clean cloth to wipe the unit.
DO NOT service this device, nor have anyone else, other than Conceptual Audio Solutions service this
device. (Please see previous section for servicing information).
DO NOT connect this device to any power source that is not expressly stated in this manual.
DO NOT connect this device to any equipment that is not expressly stated in this manual.
Failure to follow any of the above precautions automatically voids the warranty.
Conceptual Audio Solutions is in no way responsible for any harm or damages caused by misuse of
the MIDI Module 3000.
Conceptual Audio Solutions: The MIDI Module 3000 User Manual, July 2010
3
Introduction
Thank you for purchasing the MIDI Module 3000 (MM3k), the first MIDI converter designed specifically
for the Korg SDD-3000 (SDD3k).
For over two decades, musicians have admired the sonic character of the SDD3k. However, with the
absence of MIDI capabilities, users of the SDD3k are at a loss when attempting to control the device
in live situations. For this reason, Conceptual Audio Solutions, has designed a solution that bridges
yesterday's technology with today's audio standards – the result is the MM3k.
No longer are musicians limited to manual incrementing of the SDD3k presets. Users now have the
ability to choose on demand, and in any order, which preset they wish to recall through the use of the
MIDI protocol. Recall of presets is fast and is completed within tens of milliseconds.
The MM3k is designed to accept MIDI messages from any MIDI controller that sends MIDI Program
Changes. The MM3k then processes the Program Changes and converts them into logically assigned
contact closures. All nine savable presets and the bypass function of the SDD3k are switchable
through use of the MM3k.
The MM3k switcher is currently available in three different versions. The first version, the MM3k
Single, controls one SDD3k. The second version, the MM3k Dual Tandem, controls two SDD3k's using
the same MIDI data and provides identical preset switching to each SDD3k. The third version, the
MM3k Dual Independent, controls two SDD3k's completely independent from each other.
Musicians can now focus their attention back to the fretboard and leave fast switching to the MM3k.
Please continue reading this manual to learn more about the features and proper operation of the
MM3k.
Ian Loiselle,
Conceptual Audio Solutions
Conceptual Audio Solutions: The MIDI Module 3000 User Manual, July 2010
4
Features
1. POWER jack: accepts a 2.1mm DC plug for supplying the MM3k with *9VDC.
* The 9VDC adapter must have a minimum current capability of 500mA and have a
negative tip, positive barrel polarity.
2. Red POWER LED: indicates that power is supplied to the MM3k.
3. PROG UP(A): accepts a 1/4” mono cable and connects to the 'PROG UP' control input jack on
the back of the SDD3k.
4. Yellow SYNC LED: indicates that the MM3k is internally set to program 1.
5. BYPASS(A): accepts a 1/4” mono cable and connects to the 'BYPASS' control input jack on
the back of the SDD3k.
6. These Functions are identical to items 3, 4 and 5 and they are only available on the MM3k
Dual Tandem and Dual independent switchers.
7. MIDI IN jack: accepts a 5-pin DIN, standard MIDI cable, providing the MM3k with incoming
MIDI data from the foot controller of your choice.
PLEASE NOTE:
1. Cables and power adapter are not included.
2. Disconnect power if the MM3k is not in use for long periods of time.
Conceptual Audio Solutions: The MIDI Module 3000 User Manual, July 2010
5
Operation
Installation
Installation of the MM3k in your rig will be dependent upon your existent system design. However, the
MM3k interface has been specifically made to provide an un-cluttered installation directly in behind the
input side of the SDD3k. If this location is available, we recommend fastening it to the inner wall of the
rack case containing your gear.
Easy access to the MM3k power source is also a requirement (see synchronization section below).
For this reason, it is recommended that the MM3k source its voltage from a power conditioner with a
master switch. This setup, allows easy access to your rig power from the front of your rack case.
Caution: Do not connect any cables/instruments/devices to or from the MM3k other than what is
described below.
Setup and Initialization
1. Connect a standard 1/4” mono cable from the 'PROG UP(A)' jack of the MM3k to the 'PROG
UP' control input jack on the back of the SDD3k. If you are using one of the MM3k Dual units,
repeat the same procedure with the 'PROG UP(B)' jack.
2. Connect a standard 1/4” mono cable from the 'BYPASS' jack of the MM3k to the 'BYPASS'
control input jack on the back of the SDD3k. If you are using one of the MM3k Dual units
repeat the same procedure with the 'BYPASS(B)' jack.
3. Connect a 5-pin DIN, standard MIDI cable from your choice of MIDI foot controller to the 'MIDI
IN' jack of the MM3K.
4. Connect the 'POWER' jack of the MM3k to the 9VDC jack specified on the previous page.
5. Ensure that both the red POWER LED and yellow SYNC LED light up.
6. Turn on your SDD3k.
7. Your MM3k is now setup and synchronized for use.
Synchronization
The MM3k can be considered a set-and-forget unit. However, one key requirement maintains that both
the MM3k and the SDD3k be in 'sync' with each other for the correct recall of presets.
Synchronizing the MM3k and SDD3k can be achieved by applying power to each unit (the order is not
important). If the SDD3k is already powered up, ensure that it is on preset 1, and then re-apply power
to the MM3k. The yellow sync light signifies when the MM3k is internally set to preset 1. This light will
disappear if another preset has been recalled.
Maintaining synchronization requires the user to refrain from manually incrementing the SDD3k
presets via the front panel 'PROG' button. The MM3k eliminates the need for manual incrementation.
However, if it is desired, simply follow the instructions above to regain synchronization.
Conceptual Audio Solutions: The MIDI Module 3000 User Manual, July 2010
6
Regular Operation
To perform its tasks, the MM3k mimics the preset logic of the SDD3k. Beginning at preset 1 and
ending at preset 9, users have full control over calling up any of the nine SDD3k presets. An extra
feature of the MM3k is the addition of a tenth preset, which sends the SDD3k into bypass mode. This
allows users to take advantage of the highly sought after preamp of the SDD3k. If you wish to deselect
the bypass, simply recall any one of the nine presets.
The MM3k accepts MIDI data from any MIDI foot controller capable of sending MIDI program
changes. Please see the table below showing the factory default MIDI settings for the MM3k.
MODEL
MIDI CHANNEL MIDI PROGRAM SPECIAL NOTE
CHANGE RANGE
MM3K Single
1
1 thru 10
MM3K Dual
Tandem
1
1 thru 10
Each SDD3k receives
the same instructions.
MM3K Dual
Independent
1&2
1 thru 10
Dedicate MIDI
channels 1 and 2 for
the MM3K
The following shows how the MM3k handles relevant MIDI data, assuming that all devices are
synchronized.
MIDI CH1, PC1 = MM3k processes request and recalls SDD3k preset 1
MIDI CH1, PC2 = MM3k processes request and recalls SDD3k preset 2
etc ...
MIDI CH1, PC10 = MM3k processes request and enables SDD3k bypass
… Yet another SDD3k Limitation and Possible Solutions
Although the MM3k is fully capable of performing fast switching of the SDD3k's presets, the SDD3k
can present another limitation to its users. With or without use of the MM3k, musicians might notice a
slight momentary noise when incrementing the SDD3k's presets. It might be characterized as a
pulsing sound and is amplified with the presence of an audio signal. The problem is related to the
original design of the SDD3k. Test this for yourself. Manually increment the SDD3k presets and you
will most likely hear the 'pulse'.
An internal modification of the SDD3k may be possible. However, a more viable solution is to simply
place the SDD3k in the loop of a MIDI switcher and have it assigned an instant access switch on your
MIDI controller. You can then activate the loop after the momentary noise has passed (SDD3k preset
called), thereby avoiding the above issue altogether.
In Closing
Thank you once again for your interest my product. I hope that the MIDI Module 3000 will help make
guitar playing less of technical challenge and more of a musical experience.
Ian Loiselle,
Conceptual Audio Solutions.
Conceptual Audio Solutions: The MIDI Module 3000 User Manual, July 2010
7