1
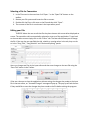
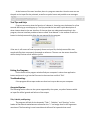
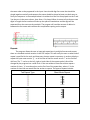
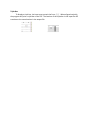
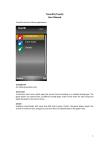
EECS 2311 Group 1 TAB2PDF - USER MANUAL Table of Contents: 1. Installing and Opening the Program 2. The Graphical User Interface(GUI) 3. Selecting a file for conversion 4. Editing your file 5. Previewing your File 6. Customizing the Output 7. Saving changes to your Input file 8. Program Status Bar 9. Tool Tips and Help 10. Exiting the program 11. Troubleshooting 12. Accepted Syntax a. Title, Subtitle and Spacing b. Horizontal Line c. Vertical Line d. Fret Numbers e. Repeats f. Slides g. Hammer-on, Pull-off h. Harmonics i. Muted String j. Triple Bar Installing and Opening the Program: Once you have downloaded and saved the TAB2PDF.jar file to a directory on your computer, you can open it up by double clicking on the file. This will launch the program. This will work for Windows, Linux and OSX computers. The Graphical User Interface(GUI): The interface is divided up into a menu bar, toolbar, tabs, customization panel, status panel, editor and preview panels. The menu bar contains a file menu and a help menu. On the left side there is a panel containing a song title editor, song subtitle editor, horizontal spacing and vertical scaling sliders. The toolbar contains four buttons called Open Tab, Save Tab, Export to Pdf, and User Manual. Under the toolbar is two tabs, one for the editor panel and the other for the preview panel. While in the editor tab, the screen contains an input editor panel where the user can display and edit their tab files. When in the preview tab, the user can preview how the PDF will look after any changes made in the editor tab. Selecting a File for Conversion: 1. In the File menu in the menu bar click “Open..” or the “Open Tab” button on the toolbar. 2. Browse your file system and locate the file to convert. 3. Double click the file or click once on the file and then click “Open”. 4. The content of the file is now shown in the input editor panel. Editing your File: TAB2PDF allows the user to edit the file they have chosen with a text editor displayed on screen. The text editor tab is automatically selected on start up of the application. To get back to the text editor screen simply click on the “Editor” tab. The text editor allows you to change the file. If the user has not specified the title, subtitle or spacing values in the tab, they can do so in the “Song Title”, “Song Subtitle” and “Horizontal Spacing” panels. Users can change text files in the input editor and then save changes to the text file using the “Save Tab” button in the Toolbar. If the user chooses to close the application without saving the changes they made to the input file in the text editor, an “Unsaved Changes” message will pop up. This pop up will ask the user if they would like to save the changes they have made to the file before exiting the program. Viewing your Output: In the Tabs, click the “Preview” tab to view a preview of the PDF. When the user clicks on the “Preview” tab, the program will render any changes saved or made to the input file and create a new preview reflecting these changes. Within the preview panel, the user has all the typical options available in a PDF viewer app. Here the user can print, zoom in, scroll, etc. The user has the option of either saving the PDF file using the button in the preview panel or to click on the “Export to PDF” button found in the toolbar. This button will launch the default PDF reader on the user’s computer. The user can then save the PDF in any location they wish by using their default PDF reader’s “Save As” button. Customizing the Output: On the left side of the user interface there are four panels below the toolbar. The “Song Title” and “Song Subtitle” let you change the song title and subtitle to be displayed at the top of the PDF. The “Vertical Scaling” Panel allows the user to change the overall vertical scaling of the PDF output. This will allow the user to make the bars, notes and tabs larger or smaller. The “Horizontal Spacing” Panel allows the user to choose how much horizontal space will exist between the fret notes in the PDf through the GUI slider. Horizontal Spacing : Fitting a certain amount of tabs in one width of a page. Scaling : The space inbetween the vertical lines. Saving Changes to your Input File: 1. Make changes to the tab file in the input editor or customization panels. 2. Click the “Save” button in the toolbar or in the File menu. Program Status Bar: At the bottom of the user interface, there is a program status bar. Here the user can see the path to the input file they selected, as well as a symbol count and possible error messages. Tool Tips and Help: If you are unsure on what the function of a button is, hovering over the button for a few seconds will bring up a tooltip pop up. Tool tips provide the user with a quick description of what a button does in the user interface. If the user does not understand something in the program, the user interface provides a button called “User Manual” in the toolbar as well as a button in the help menu which links the user manual for the program. If the user is still unsure of how to properly format an input file, the help menu offers two sample tab files that are properly formatted as reference. The user can also access these files within the zip file that comes with the jar file. Exiting the Program: On the frame of the program window find your computer’s native close application button and press it or go into the file menu in the menu bar and click “Exit”. Troubleshooting: If the program did not open make sure that Java is up to date on your computer. Accepted Syntax: The following section refers to the syntax supported by the system, any other features within an input file will be ignored and left out of the output. Title, Subtitle, and Spacing: The program will look for the keywords “Title=”, “Subtitle=” and “Spacing=” at the header of the tab and read whatever comes after the “=” and assign those to the arguments mentioned. The formatting is case insensitive and will work for keywords that are all capitalized, all lower case or a combination of upper and lower case. If the user chooses not to include anything for the title or subtitle, these will be assumed to be blank for the output. The user can add titles, subtitles and spacing values with the customization options in the user interface. If the spacing is not specified, it will be assigned a base value, that can later be changed within the GUI. String Lines: By placing six rows of dashes, the user can represent the string lines of a guitar fretboard. Then in order to add fret numbers, the user should erase the dash in the correct row and relative location within the row, then type the desired fret number. The user is responsible for aligning fret numbers, that should be played together but in different rows, vertically in columns. By aligning the fret numbers along the dash entries, the program will translate this order onto a PDF. Dashes should be in between bar lines and aligned such that there is the same amount of dashes/notes on each row. An example of this can be seen below: Vertical Bar Lines: The program will replace the ‘|’ characters found in the input files with vertical bar lines in the same location. The input should contain six ‘|’ aligned vertically. The program will ignore any other '|’ symbols in the guitar tab that are not a part of a vertical sequence. Fret Numbers: The program will read all single or double-digit numbers from the input file within range of 0 - 24, these digits represent the fret numbers of a guitar tab. All numbers are outputted in the same order as they appeared in the input. Users should align fret notes that should be played together vertically and separate fret notes should be placed at least one dash away to clarify the sequence. In the example below it is evident that the first frets played are the 2 and 3 as they are in the same column, then after a 2 is played. When it comes to frets that are two digits in length the fret number will take up the space of two dashes and the digit will be separated from the next note by one dash. The program will read the amount of dashes in between the fret notes and translate this to equivalent spacing on the output. Repeats: The program allows the user to input tab repeat bars in multiple formats and convert them to a standard musical notation in the PDF output. This will notify the user on what kind of repeat is specified in the music and how many times a repeat is necessary. In order to display a repeat the input must contain ‘||’ on all six lines of the bar as well as two ‘*’ on the 3rd and 4th lines. The ‘*’ can be on the left, right or both sides of the repeat symbol, this will be changed by the program into a solid circle. If the user wishes to have the section repeat a number of times, ‘|x’ must be written on the first line of the repeat bars, where ‘x’ is the number of times the user would like the section to repeat. The types of repeats include: Tab Repeat Type Sheet Music Repeat Slides: To display a slide from one note to another, the input must contain this form: ‘XsX’, where X is any valid fret number. The ‘s’ will then be converted to a ‘/’ in the PDF. The same output will occur even if there exists any amount of ‘-’ in ‘XsX’. Hammer-on, Pull-off: To display hammer-ons (pull-offs) the input must contain this form: ‘XhX’ (‘XpX’), where ‘X’ is any valid fret number.The same output will occur even if there exists any amount of ‘-’ in ‘XhX’ or ‘XpX’. The program will take the input and produce a small arc over the two frets specified as well as a small ‘h’ or ‘p’ over the arc. Harmonics: To display a harmonic the input must contain this form: <X>, where X is any valid fret. The output will be converted to the fret number with a diamond symbol on the right side of the fret. Muted String: To display a muted string the input must contain a ‘x’ on the fretboard for where the muted string is meant to be played. The output will also print a ‘x’ character in the same location. Triple Bar: To display a triple bar, the input must contain the form: ‘|||’ . When aligned vertically, the program will print a triple bar to the PDF. The location of the triple bar in the input file will translate to the same location in the output file.