1
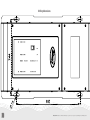
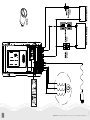
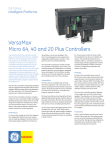
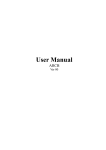
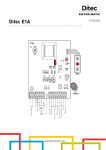
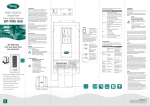
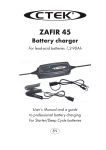
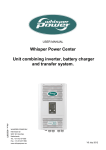
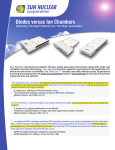
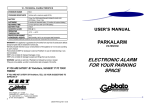
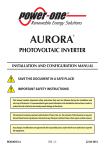
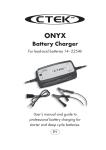
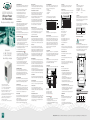
1. GENERAL INSTRUCTION
Thanks for choosing our product. This manual contains important
safety and operation instructions. Read this manual before use.
USER MANUAL
Whisper Power
DC-PowerCube
Diesel powered battery charger
High power:
4.5 kW / 150A (24V)
4.5 kW / 80A (48V)
diesel battery charging
The DC PowerCube needs to be installed by a professional
installer. Check the next points prior to installation:
- The voltage of the battery system is equal to the
nominal input voltage range of the DC PowerCube.
- Use short connection cables to connect the
DC PowerCube to the battery and ensure a secure connection.
- The DC PowerCube WAS NOT designed to use in any
life retaining equipment.
2. SAFETY INSTRUCTION
As dangerous voltages and high temperature exists within the
DC PowerCube, only qualified and authorized maintenance
personnel are permitted to open and repair it.
This manual contains information concerning the installation and
operation of the DC PowerCube. All relevant parts of the manual
should be read prior to commencing the installation. Please follow
the local stipulation meantime.
Any operation against safety requirement or against design, manufacture, safety standard are out of the manufacturer warranty.
3. GENERAL PRECAUTIONS
- Do not expose the DC PowerCube to dust, rain, snow or liquids
of any type, it is designed for indoor use only. DO NOT block
ventilation, otherwise the DC PowerCube will overheat.
- To avoid fire and electric shock, make sure all cables have
correct thickness and being connected well.
- Please do not put any inflammable goods near to DC PowerCube.
- Never place unit directly above batteries, gases from a battery
will corrode and damage the DC PowerCube.
- Do not place batteries above the DC PowerCube.
Precaution regarding battery operation
- Use plenty of fresh water to clean in case battery acid contacts
skin, clothing, or eyes and consult with doctor as soon as possible.
- The battery may generate flammable gas during charging.
NEVER smoke or allow a spark or flame in vicinity of a battery.
- Do not put the metal tool on the battery, sparks and
short circuit might lead to explosion.
- Remove all personal metal items such as rings, bracelets,
necklaces, and watches while working with batteries.
Batteries can cause short-circuit current high enough to make
metal melt, and could cause severe burns.
4. GENERAL DESCRIPTION
The DC PowerCube is a battery charger with dual input:
1-phase AC-input from the Grid/shore and a 3-phase AC input
suitable for a variable speed permanent magnet generator.
With AC input available from the grid or generator, or combined,
the batteries are charged in a fast and efficient way.
5. BATTERY CHARGER
The DC PowerCube is a high performance, high quality battery
charger. The battery charger is equipped with the latest charging
algorithm to ensure the optimal charging of your batteries.
- High Power battery charging
when connected to grid AC input
- 2nd DC output to charge auxiliary battery
(20 A, 3+ step charge algorithm)
- Wide input voltage range (when connected
to grid power 90-264VAC, 45-65Hz)
- 3-step charge characteristic with temperature sensor
- Fully automatic, in diesel mode: variable
speed regulation with automatic switch-off
- Suitable to charge open lead acid, GEL,
AGM and Li-Ion batteries
- For commercial and recreational applications
3-step
Fully automatic mode
The DC PowerCube can be programmed to be fully automatic
with a diesel generator. In case the grid AC input connection fails
to keep the batteries fully charged, the diesel generator can be
started to charge the batteries fast and efficient. When the batteries are full, the diesel can be automatically switched off.
Wide range inputs
The DC PowerCube has two wide range inputs, ready to charge the
batteries any place all over the world, and suitable to work from
a variable speed generator.
Regardless of the input voltage of either source, the DC PowerCube is given a maximal input current, and will charge the
batteries as fast as possible without overloading the inputs.
Multi stage charger
Fitted with the 3+ step charging algorithm, the charger of the
DC PowerCube is designed to charge batteries fast. This charge
algorithm guarantees the optimal charging for batteries.
Battery temperature compensation
Battery temperature compensation is very important for correct
charging, the charge voltage must be adjusted according to
the actual battery temperature to ensure that batteries are
fully charged. All charging voltages recommended by battery
manufacturers are in fact ONLY applied at 25ºC.
The WP-BTS (battery temperature sensor) supplied with the
DC PowerCube measures the temperature of the battery and
automatically adjusts the charge voltage at a compensation
rate of -5mV/ºC/cell. In case the WP-BTS is not present,
the DC PowerCube will use 25ºC as a default setting.
Maximal charger current
On the front panel of the DC PowerCube the maximal charging
current can be adjusted on the fly. With this function the charging
current can be adjusted from 5%, 25%, 50%, 75% or 100%.
Where 100% is the maximal allowed charging current.
(see programmable parameters)
Multi battery chemicals available
Commonly encountered battery chemicals include Lithium-ION,
AGM, GEL, Open lead acid and traction. The voltage required for a
proper charging of different battery varies. The battery type can be
selected in the connection compartment by a dip switch setting.
Slave charger
The DC PowerCube features a 12V slave charger to charge a
small battery. The output is a 20A slave charge output and is also
equipped with the 3+ step charging algorithm. The slave charger is
standard configured to stop charging when no AC inputs are available. With a dip switch the ‘cont. slave’ function can be selected.
Then the slave charger will use the service battery to charge the
slave battery (this function switches automatically off when the
service battery is drained to 26.5V (24/150) or 53V (48/80)).
Manual Equalization
Over a period of time, the cells in a flooded battery can develop
uneven chemical states. This will result in a weak cell which in
turn can reduce the overall capacity of battery. To improve the life
and performance of non sealed flooded battery, the DC PowerCube includes a manual equalization program that can be used,
if recommended by battery manufacturer, to equalize this battery.
For details, please refer to chapter 10.
This charging program can ONLY being applied to flooded battery.
As a protection, the equalization mode will automatically be disabled if you select either GEL, AGM or Lithium-ION as battery type.
7. BEFORE INSTALLATION
Before the installation, you need to set total 4 parameters. Loose
the screws to the connection box and you will see the central
panel where you set the following parameters:
- Battery type
- Slave charger behavior
- Charger behavior
-Equalization
Location
Please install the DC PowerCube in a dry,
clean and good ventilated location.
Working temperature -10-55ºC
Storage temperature -40-70ºC
Relative Humidity 0-95%, non-condensing
Cooling
Forced air
General advice
Ensure that the DC PowerCube has the correct DC voltage for
your battery system. Install the DC PowerCube as close to the
batteries as possible reducing the voltage drop on cable for the
better performance of the equipment.
We recommend connecting a DC fuse corresponding to the
conductor between battery and DC PowerCube, which will offer
protection to the battery cable.
A B C
Battery Type
The battery type can be selected with the dipswitch 1-5.
Slave charger behavior
When the DC PowerCube has no input from the mains or the PM
generator, the charging current to the main battery connection
will be zero. The slave charger also will stop charging. By switching DIP switch number 6 ON, the slave charger is continuously
switched on, powering the slave charger output from either the
AC inputs or from the service battery. The slave charger is automatically switched off when the service battery reaches 26.5V.
(switch on at 27V, values can be changed by USB and
WhisperPower software)
Charge algorithm
Standard the DC PowerCube uses the 3+ step charging algorithm.
If in some application the charging algorithm should be changed to
continuously float, this can be switched on by DIP switch number
7. The charging algorithm is explained in chapter 11.
Equalization
By toggling dipswitch 8 to OFF-ON-OFF, the equalization program
is set for your flooded battery. Please refer to chapter 10 for
details of performing equalization charging.
8. CONNECTIONS
In the next figures the connections of the DC PowerCube are given.
D E
F
G H I J
A Voltage sense
B Battery temperature sensor
C Remote control panel
D Whisper Connect (CAN)
E USB connection
F DIP switch 1-8
G Free programmable output nr 1 (30V - 1A)
H Free programmable output nr 2 (30V - 1A)
I Free programmable input nr 1
J Free programmable input nr 2
Voltage sense
The voltage sense can be used to compensate cable losses
or the voltage loss which is introduced when battery isolators
(e.g. diode blocks) are used.
DC PowerCube
Recommended fuse
24/150
200A
48/80
125A
INSTALLATION AND CONNECTION
For the safety of the installer, cut off
the power before installation
Mount the DC PowerCube
The DC PowerCube has to be installed vertically on the wall.
Choose a flat surface and with 4 x M8 bolts to fix the unit securely.
In mobile applications, keep the vibration as small as possible.
Keep proper ventilation space around the DC PowerCube:
200mm to the wall, floor and other equipment.
Battery temperature sensor
The WP-BTS should be placed on the service batteries.
Remote control panel
The WP-RCP is standard delivered with the DC PowerCube.
USB connection
The USB connection can be used to update the software of the
DC PowerCube or to change parameters. (e.g. charging voltages,
PM generator parameters, and so on)
DIP switches
These are already explained in chapter 7
Free programmable outputs nr 1 and 2
- These two outputs are two potential free relay outputs.
The maximal voltage and current allowed is (30V, 1A).
- Output number 1 is standard configured as “ON” in
case AC input is present.
- Output number 2 is standard configured as “ON” when
a failure condition is true. (e.g. overtemperature, OVP,
missing fase PM generator input, and so on)
- Changing the behavior of these outputs can be done by USB.
Short circuit protection
Both charger outputs (main + slave) are protected against short
circuit. In case of a short circuit, the output will be current limited.
Battery temperature protection
During charging, the DC PowerCube keeps monitoring the battery
temperature and will stop charging at -20º degrees Celsius or
+55º Celsius. At too high or too low temperature, the output will
be set to a safe level of 23.0 or 46.0 Volt (Respectively for the
24V or 48V DC PowerCube).
Battery connection
The battery connection has two M10 bolts to connect the plus and
minus of the battery. The slave charger has a S+ connection, the
minus is common with the service battery.
If all DIP switches are set to OFF, these parameters
can be programmed by the USB computer interface.
6. PROTECTIONS
The equipment is being protected against many failures through
hardware and software making it a robust and reliable equipment.
Overheat protection
In case a too high internal temperature is detected, the
DC PowerCube will derate the output current, up to a complete
switch off. After cooling down, the DC PowerCube automatically
resumes charging.
Grid AC input
The grid input also has a 3 wire connection (L, N, and PE).
The input voltage range for the AC input is 90-264VAC.
A
B
C
D
E
A PM generator input
B Grid AC input
C Main charger output (minus)
D Main charger output (plus)
E Slave charger output 12V (plus)
PM generator input
- The PM generator input is a 3 phase connection with 3 wires.
- The neutral cannot be connected.
- The input voltage range for the AC input is 90-300VAC.
Exceeding this voltage range will damage the DC PowerCube
and warranty will be void.
Free programmable inputs nr 1 and 2
- The two inputs have to be connected to a potential free contact.
Standard behavior of input number 1, contact “closed” is DC
PowerCube disabled. Standard behavior of input number 2,
contact “closed” is PM input disabled.
- Changing the behavior of these inputs can be done by USB.
9. INSTALLATION
Material list
The unit is packed with following materials. Please confirm
the series number on the DC PowerCube is the same
to that on the carton box.
- DC PowerCube
- WP-BTS - WhisperPower battery temperature sensor
- WP-RCP - WhisperPower remote control panel with 5m cable
- User manual
DC Power- AC wiring
Generator DC wiring
Cube
230V
24/150
2.5mm2
2.5mm2 50-90mm2
48/80
2.5mm2
2.5mm2 35-50mm2
WhisperPower BV Kelvinlaan 82, 9207 JB Drachten, The Netherlands, Tel: +31 (0) 512 571 550, Fax: +31 (0) 512 571 599, [email protected], www.whisperpower.com
Check battery voltage matches the model you are
going to install, the wrong battery could destroy
equipment and is out of warranty.
Check the polarity of DC input. Reverse polarity
causes permanent damage on equipment and warranty will be void.
CONNECTING THE AC CABLE
AC input cable mains:
pull through the AC input cable through the gland and connect
it to the AC input connector. Connectors are marked as “L”-line,
“N”-neutral and “PE”-earth. Make sure it is tightly screwed.
AC input cable generator:
pull through the AC output cable through the cable gland and connect it to the AC output connector. Connector are marked as “L”line, “N”-neutral and “PE”-earth. Make sure it is tightly screwed.
Check if the voltage on the AC inputs is the correct
voltage window before connecting, too high input
voltage will damage the DC PowerCube permanently.
Check the AC inputs after connection. Wrong connection will damage the DC PowerCube permanently.
OPERATION
With the switch the unit can be switched
to “on” or to “grid only”. When the unit
is switched “on”, the DC PowerCube
will start charging in case AC-input is
present. With the “grid only” the
DC PowerCube will only charge from the
grid, but will not use the PM generator
input to charge the batteries.
Charging status
The charging state can be checked with
the charging status bar.
The lights indicate in which charging
state the charger is operating.
Switch on charger
Switch on the AC input power. The DC PowerCube automatically
starts charging. The “AC grid present” and the “Bulk” LED will
illuminate.
Connecting the accessories cable
Connect the battery temperature sensor and the remote control
panel through the corresponding cable gland.
Install the temperature sensor
Please glue the temperature sensor, which was plugged into
WP-BTS socket at central panel, on the side of battery or in the
same room and secure the attachment.
Battery Charging
When the AC-input is present, the charger will start working. The
DC-load bar indicates the charging current, from 5 to 100%. In
the right bar the charging status can be seen.
Input current limit
By pressing the AC current limit button for 3 seconds:
the AC input current can be limited.
The selectable values are 4A, 8A, 10A,
12A and 16A.
Generator input current limit
By pressing the GEN current limit button for 3 seconds:
the current drawn from the PM generator
can be controlled from 20%, 40%, 60%,
80% and 100%. 100% is the maximal
current that the PM generator can deliver, or the maximum current that the DC
PowerCube can draw. The PM generator
parameters can be set using the USB
connection.
Charging current
By pressing the DC charge limit button for 3 seconds
the maximal charging current can be set
from 5%, 20%, 50%, 75% to 100%
When the remote control is mounted on the dashboard, the back
cover can be used as drill guide.
3-step
Over a period of time, the cells in a flooded battery can develop
uneven chemical states. This will result in a weak cell which in
turn can reduce the overall capacity of battery. To improve the life
and performance of non sealed flooded battery, DC PowerCube
features a manual equalization program that can be used. Through
the dipswitch at central panel, you can initiate the desulphation
program manually.
After you choose this program, the charger will start an ordinary
charging cycle, afterwards of which it will raise the voltage to
15.5V/31V/62V on purpose. All leds from Bulk to Float will start
flashing indicating the equalization is in progress.
After 30 minutes, the DC PowerCube
will switch from the equalization mode to
charging mode.
Check electrolyte level and refill battery
with distilled water if necessary.
During equalization, the battery generates potentially
flammable gases. Follow the battery safety precautions listed in this guide. Ventilate the area around
the battery thoroughly and ensure that there are no
sources of flame or sparks in the vicinity.
Turn off or disconnect all loads on the battery during
equalization. The voltage applied to the battery may
be above the safe levels for some loads.
Connecting the slave charger S+
Connect the S+ output of the slave charger output to the positive
(+) terminal of the starter battery. The minus (-) terminal of the
starter battery should be connected to the minus (-) terminal of the
main battery connection.
Install the WP-RCP
The remote control panel could be mounted either on, or in the
dashboard. The cutout for mounting in the dashboard is:
10. EQUALIZATION
It is strongly recommended to read this section carefully before you set the de-sulphation charging and
DO NOT leave battery unattended while performing
de-sulphation. Always check if your battery supplier
recommended desulphation charging. Only start
when it is suitable.
At a maximum of once a month, for heavily used flooded batteries,
you may wish to equalize your battery. Flooded battery with light
service only need to be equalized every 2-3 months.
Equalization can damage your batteries if it is not performed
properly. Always check battery fluid before and after equalization.
Fill batteries only with distilled water.
Battery manufacturers recommendations on equalization vary.
Always follow the battery manufacturer instructions so batteries
are properly equalized.
12. TROUBLE SHOOTING
Problem
13. SPECIFICATION
Model name
WP-DC PowerCube WP-DC PowerCube
24/150
48/80
Model number
60202002
Possible cause
Solution
The ambient
temperature is
too high
Place the DC PowerCube
in a colder environment,
or reduce the load
The ventilation is
blocked
Place the DC PowerCube on
a better position or remove
the blocking structure
Nominal battery voltage
24 VDC
48 VDC
Output current
The DC PowerCube does not
charge from
the grid
0-150A (short
circuit protected)
0-80A (short circuit
protected)
AC-input is out of
input range
Check AC input voltage
and frequency
Output voltage
26.5/28.5 VDC
53.0/57.0 VDC
Recommended battery capacity:
300 to 1500 Ah
200 to 800 Ah
The DC PowerCube does not
charge from the
PM generator
Charge characteristic
3+ step charge characteristic
AC-input is out of
input range
Check AC input voltage
and frequency
Slave charger
12V-20A (3+ step charge characteristic)
short circuit protected
Use the USB connection to
set the correct PM generator parameters
Grid input voltage range
90-264VAC (45-65Hz)
(3 wire connection)
Grid input current
Adjustable, from 2A to 16A
Power factor (cos phi)
> 0.9
PM generator input range
80-300VAC (30-500Hz)
(3 wire connection)
PM input current
Adjustable, from 2A to 14.5A
Power factor (cos phi)
> 0.85
The overtemp
light burns
RPM of the engine
The PM generator
does not corparameters are
respond with RPM
incorrect
on DC PowerCube
60202003
Battery charger General specifications
Input specifications
Power Factor Correction (PFC) EN 61000-3-2
Product:
60202002
60202003
WP-DC-PowerCube 24/150
WP-DC-PowerCube 48/80
Is in conformity with the following provisions of the EC
2004/108/EC (EMC directive). The following harmonized standards have been applied:
Generic emission standard: EN61000-6-3: 2007
Generic immunity standard: EN61000-6-1: 2007
2006/95/EC (Safety directive), with the following standard:
Low voltage standard: EN60950: 2000
Drachten,
R. ter Heide, C.E.O. Whisper Power B.V.
Technical specifications
Temperature compensation
-30 mV/°C
Supported battery types
Open and sealed lead acid: GEL / Traction
/ AGM / Spiral and Lithium-ion
-60 mV/°C
Battery leakage current
<5mA per battery
Charge voltages
Bulk, Absorption, Float
Charge voltage AGM / GEL
at 25°C
28.80 VDC, 28.50
VDC, 27.20 VDC
57.60 VDC, 57.00
VDC, 54.40 VDC
Charge voltage Traction
at 25°C
29.20 VDC, 28.90
VDC, 26.50 VDC
58.40 VDC, 57.80
VDC, 53.00 VDC
Charge voltage
Open lead acid at 25°C
28.50 VDC, 28.50
VDC, 26.50 VDC
57.00 VDC, 57.00
VDC, 53.00 VDC
Charge voltage
Lithium ION at 25°C
28.80 VDC, 28.60
VDC, 28.00 VDC
57.60 VDC, 57.20
VDC, 56.00 VDC
Return current from
absorption to float
6% of Imax
6% of Imax
Power Cube
charging status on/off
Digital output (relay, two-way contact)
Failure condition present
Digital output (relay, two-way contact)
DC PowerCube disabled
Digital input (potential free input,
closed is disabled)
PM input disabled
Digital input (potential free input,
closed is disabled)
Conformity
Directive EMC 2004/108/EC : EN
61000-6-1, EN 61000-6-3, EN 55014,
EN 55022, EN 61000-3-2, 62040-2 Low
voltage directive 2006/95/EC: EN 620401-1, EN 50091-2, EN 60950-1
ONLY PERFORM EQUALIZATION TO FLOODED LEAD-ACID
BATTERIES. DO NOT EQUALIZE GEL, AGM OR LI-ION BATTERIES.
Protections
11. 3+STEP CHARGING ALGORITHM
Over temperature protection
Yes, derating above 40°C, shutdown at
high temperatures. (with automatic restart
after cooling down)
Overvoltage protection
(manual restart needed)
36 VDC
+/- 0.5 VDC
Ingress Protection index
IP21
The DC PowerCube is fitted with the multi stage charging
algorithm (IUoUo), with this algorithm the batteries are charged in
a fast and safe way, resulting in a longer lifetime of the batteries.
The charging states are represented by the different indication
lights in the charging status bar on the DC PowerCube. When the
DC PowerCube is charging, the bulk light will always illuminate.
The 20-40% indicator will illuminate when the charging voltage
is higher than 13.25V. When the charger reaches the bulk voltage
14.25V (depending on the battery type), the charger will go into
the absorption mode. When the charging current drops below
the return amps (6% of the Ah setting), the 60-80%
indicator will illuminate. After 15 minutes,
the charger will go into the float mode.
When the battery drops below
12.8V, the charger will
switch from float to
bulk mode again.
14. EC DECLARATION OF CONFORMITY
We Whisper Power BV, Kelvinlaan 82, 9207 JB Drachten, The
Netherlands, hereby declare that:
68 VDC
+/- 0.5 VDC
Mechanical specifications
Main battery connection
2 x M10 studs
Slave battery connection
1 x M5 stud
Earth grounding lug
1 x M6 stud
AC grid input
3 x M3 screw terminal block
PM grid input
3 x M3 screw terminal block
Remote control panel
RJ12
Battery temperature sensor
RJ12
Whisper Connect CANbus
RJ45
Voltage sense
Phoenix MSTB 2.5/2-ST-5.08
Digital outputs
6 x fastons (6.3x0.8)
Digital inputs
4 x fastons (6.3x0.8)
Dimension hxwxl [mm]
575x221x316
Operating temperature range
-20 - 55°C (derating above 40°C)
Relative humidity in operation
up to 95% without condensation
Ventilation
Combined cooling
(convection and forced (variable speed))
Weight
26 kg
Acoustic level
<52dB
Warranty
2 years
Accessories
Battery temperature sensor
and remote control panel
26 kg
WhisperPower BV Kelvinlaan 82, 9207 JB Drachten, The Netherlands, Tel: +31 (0) 512 571 550, Fax: +31 (0) 512 571 599, [email protected], www.whisperpower.com
05022013ManualPowerCube
Connecting DC cable
Pull through the DC cables through the cable gland, clamping the
cable terminal on cable. Secure the battery cable on DC+ and
DC- terminals respectively making sure it is tightly screwed.
Drilling dimensions
WhisperPower BV Kelvinlaan 82, 9207 JB Drachten, The Netherlands, Tel: +31 (0) 512 571 550, Fax: +31 (0) 512 571 599, [email protected], www.whisperpower.com
05022013ManualPowerCube
WhisperPower BV Kelvinlaan 82, 9207 JB Drachten, The Netherlands, Tel: +31 (0) 512 571 550, Fax: +31 (0) 512 571 599, [email protected], www.whisperpower.com