1
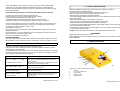
10 - TECHNICAL CHARACTERISTICS
IR SENSOR RANGE
50cm
CRUSHING RESISTANCE
Vehicles with a maximum weight of 20q
BATTERY
AUTONOMY
RECHARGE TIME
BATTERY FUSE
ACOUSTIC ALARM
OPERATING
TEMPERATURE
PROTECTION AGAINST
ATMOSHERIC AGENTS
12Vdc 7Ah FREE MAINTENANCE SEALED LEAD ACID
(OPTIONAL: 12Vdc 17Ah)
4 months with standard battery (8 months with optional battery) *
12 hours (24 hours with 12V/17Ah battery)
315mA
85db @ 1m
-10°C ÷ +50°C
USER’S MANUAL
IP 16
Rain,Humidity, Hail. It can not support total immersion.
* Autonomy is calculated considering No.5 complete pre.-alarm cyle a day and No.1 complete alarm cycle of 3 minutes a week
WARRANTY: this appliance is guarantee for 24 months from any kind of construction defects
(except all parts that are weared for normal use).
Warranty decade whenever occour a manumission of the appliance or it is not use according
to user’s manual
Free domicile to KERT is necessary to send us ParkAlarm in case of malfunctioning or any
kind of problem.
KERT srl is not liable for transport damages or loss.
KERT srl is not liable for damage to people and things that use its products.
WARNING: warranty is valid only if ParkAlarm is followed by invoice or receipt.
If they are not available, we refer to construction date increased of 6 months.
IF YOU ARE SATISFY BY ParkAlarm, SUGGEST IT TO YOUR
FRIEND!
IF YOU ARE NOT SATISFY BY ParkAlarm, TELL US YOUR SUGGESTIONS TO
IMPROVES IT
8
Via P.Viganò, 21 – 31031
CAERANO DI S. MARCO (TV) – ITALY
Tel. 0423 650707 r.a. – Telefax 0423 650385
E-mail: [email protected]
www.kert.it
ZZMAN PARK-eng REV.1 03.05
PARKALARM
PATENTED
ELECTRONIC ALARM
FOR YOUR PARKING
SPACE
INDEX
7 - BATTERY RECHARGE
Warnings
…2
1
Introduction
…2
2
Safety Instructions
…3
3
Case description
…3
4
How Parkalarm works
…4
5
Installation and first functional test
…4
6
Signalling and acoustic alarms
…6
7
Battery recharge
…7
Open yellow cover of ParkAlarm and disconnect the battery from the cable (taking care to disconnect the
fastons not by wire!!!). Now extract the battery, and replace the cover on its original position.
To recharge this battery, use the battery charger mod. VIK50 gives in dotation.
Connect red faston on battery charger to the + pole of battery (signed in red) and black faston to the
- pole of the battery (signed in black). DO NOT ABSOLUTELY REVERSE THE POLARITY: BATTERY
CHARGER CAN BE DAMAGED. Now connect VIK50 to a 230Vac input socket.
Yellow charge led will be ON until the battery is not completely recharged (about 12 hours). When yellow
led is OFF, means that the battery is recharged: it can be connected to the battery charger for long times
without any kind of problems, because VIK50 is expressly design for plug charge.
8
Optional battery
…7
8 - OPTIONAL BATTERY
9
Important note
…7
10
Technical characteristics
…8
Its available in optional 12V/17Ah battery to increase the autonomy from original 4 months to 8 months
Install the battery as you can see on figure below: battery’s poles must be held on the top.
WARNINGS
BATTERY
12Vdc 17Ah
Thanks for your choice of this new kind of alarm for your car parking space.
Before to install PARKALARM read carefully this manual
The user’s manual gives instructions about safety, installation and operation.
Preserve this manual
It contains instructions regards the functioning of ParkAlarm and regards the user’s
safety.
Preserve or recycle packing materials
The packaging is designed to protect the emergency power supply from transport
damages.Warranty does not cover transport damages
1 - INTRODUCTION
PARKALARM™ is an electronic alarm, that assure to you to always find your car parking area free.
ParkAlarm can be installed in every kind of place and position, because it is very easy to install by only
the four screws in dotation. In add, thanks it’s internal battery, is not necessary to connect this device to
the main AC line.
Through an infrared ray sensor, it finds all vehicles that occupies your parking area without any permission.
A sonorous alarm from the elevated intensity, will act as instead from deterrent, forcing who occupies
your parking area to move the car. The signalling will be also of luminous type. Moreover, thanks to the
elevated capacity of the sensor, it is possible to intercept also average with one height from elevated
earth, which cross-country vehicle, etc... with the maximum height 50cm.
.
2
SEL
CODE
FUSE
SENSORE IR
Fig.6
9 - IMPORTANT NOTE
- All vehicles with integrated radio transmitter on the dashboard, can control Parkalarm and all Gobbato’s
automation products.
- Periodically verify that IR sensor is free of dust,leafs, oil etc… that can compromise its functionality.
Clean IR sensor and metallic box only with a humid of water cloth. Do not use any kind of solvent or
abrasive detergent.
- As soon as connected the battery you heard “deactivation sound” of ParkAlarm, its necessary to
proceed with system RESET as decribe on page 5.
- Before to call our technical assistance for a presumed damage, check if battery is discharged or if protection fuse is broken. To change it unscrew black cap signed FUSE (see figure 4 on page 5) and substitute it (nominal capacity 315mA).
- We absolutely suggest to do not install ParkAlarm where could be water stagnation and in all kind of
floor where water level can be higher than 3 cm.
We thoughtless the installation of ParkAlarm in snowy places.
7
ZZMAN PARK-eng REV.1 03.05
ZZMAN PARK-eng REV.1 03.05
If after system RESET, the allarm continuos to ringing, it is necessary to repeate radio transmitter
memorization (radio transmitter available is P/N TRA2S with two channels or TRA3S with three
Channels). Radio transmitter memorization is describe on a white label fixed on the internal side of the
yellow cover of ParkAlarm.
FOR TRANSMITTERS MEMORIZATION FOLLOW INSTRUCTIONS BELOW AND SEE FIG.4 ON PAGE 5
Cover IR sensor: the alarm starts to ringing and CODE led is ON.
Push SEL button (see Fig.4) for one second: CODE led starts to blinking.
Push a button of radio transmitter from a distance of 50cm.
If CODE led is always ON, means that memorization had been made successfully.
Repeat these operations for all transmitters that you want to memorize up to 120 pieces
In the end of these operations, fix yellow cover of ParkAlarm: take carefully to insert correctly the cover
(you have to center the grid for the antenna) to avoid any kind of damage on the receiver’s antenna.
Use only the key in dotation to lock No.2 TORX ® screws.
Now ParkAlarm is ready to use.
Now park your car in your parking area and wait that ParkAlarm starts to ringing (all alarms cycles are
describe on table below).
Now push button No.1 of your radio transmitter: alarm shut-off and after this you heard a confirmation
signal that advise you that the alarm system is OFF.
You can shut-off ParkAlarm in every moment.
RECEIVER ERASING
If you want to erase all codes stored into receiver, push SEL button (see Fig.4 on page 5) for 5 seconds:
led CODE blinks for 3 times and then shut off. Now , all transmitters’ code previously stored are erased
2 - SAFETY INSTRUCTIONS
All devices described on the present manual will cover the use for which they are created.
Every other use will be considered improperly.
The manufacturer is not responsible for damages caused by an improperly use.
When you use an electric device, it is important to respect some rules:
- Read carefully this manual before to start with the installation.
- Preserve all packaging materials (carboard box, plastic etc.) must not be leave into evironment : it could
be dangerous for children
- Before to start with the installation, verify the integrity of the product.
- Disconnect the cable from the battery to the circuit by faston and not by cables .
- Disconnect battery’s cable before all cleaning and maintenance operations.
- Do not leave disconnected battery inside ParkAlarm: uncovered poles of battery could be short-circuited
by an accidental contact with metallic case.
- If ParkAlarm does not work correctly, disconnect the battery and do not try to repair it by yourself: call as
soon as possibile a qualified technician.
WARNING: all informations write in these manual, can be changed without any notice to users.
STANDARDS
PARKALARM comply to alarm standard CEI 79.
PARKALARM respect these EMC standards: EN 301 489-1/3, EN 300 220-1/3, EN 60335-1 respecting
directive 1999/05/EC
3 - CASE DESCRIPTION
6 - SIGNALLING AND ACOUSTIC ALLARMS
Table below , describe alarms type and duration that ParkAlarm generate.
Alarm sequence is made of: Pre-Alarm, Slow Alarm, Fast Alarm, ParkAlarm deactivation signal with
charged battery and discharged battery .
When ParkAlarm generate for the first time deactivation signal with discharged battery (No.5 sequentially
long beeps), we guaratee a residual autonomy of 20-25 days with standard 12V/7Ah battery. After these
time, functionality of Park Alarm is strongly compromise.
RING TONE
BEEP ————- BEEP ————- BEEP
BEEP - BEEP (ParkAlarm deactivation)
1
ALARM TYPE
4
Pre-alarm and deactivation: Repeat No.6 beeps spaced by a long
pause each one. This kind of alarm advise you that you have to
shut-off ParkAlarm.
When you will deactive alarm system, No.2 short beeps advise you
that ParkAalrm is off and the battery is charged.
BEEP — BEEP — BEEP — BEEP …...
Slow alarm: Repeat a sequence of long beeps for a total time of 90
seconds. This is the first alarm level.
BEEP - BEEP - BEEP - BEEP …...
Fast alarm: Repeat a sequence of fast beeps for a total time of 90s.
This is the second alarm level.
BEEEEP — BEEEEP — BEEEEP
(ParkAlarm deactivation)
Discharged battery: When battery starts to discharge, ParkAlarm
advise you with No.5 long beeps when you shut-off it with
radio-transmitter.
6
2
3
5
Fig.1
On Figure No.1 you can see external cover of ParkAlarm
1IR sensor.
2No.2 Locking TORX© screws.
3Allarm’s grating.
4Receiver’s antenna.
5Red lighting spot.
3
ZZMAN PARK-eng REV.1 03.05
ZZMAN PARK-eng REV.1 03.05
4 - HOW PARKALARM WORKS
Parkalarm constantly controls your parking area.
Whenever a car tries to parking in this reserved area, there can be two situations ...
… PARKING SPACE ’S OWNER PARKS IN HIS RESERVED AREA
ParkAlarm detect a vehicles and start to ringing: this is a pre-allarm condition, that advise park’s owner
that it has to shut-off alarm system through radio transmitter gives in dotation.
Pre-allarm condition goes on for 10 seconds
Only just car leaves parking area, ParkAlarm will be activated automatically by itself.
If an unauthorised vehicle parks in your reserved parking area, ParkAlarm starts to ringing: it starts
with the pre-allarm for 10 seconds and then the alarm will be hardly and strongly to passing of time.
In add alarm condition is followed by a blinking high brightness red led positioned on left side of cover.
Total duration of alarm is 3 minutes: if this vehicle remain in its position, ParkAlarm stops to ringing
Only just car leaves parking area, ParkAlarm will be activated automatically by itself.
5 - INSTALLATION AND FIRST FUNCTIONAL TEST
Fig. 2
Fixing surface must be plain and quite flat.
On Figure No.2 you can see the ideal zone to install ParkAlarm: 150 cm from the advanced extremity of
your parking area. This position assure you to detect all kind of vehicles.
For installation is enough to do No.4 for holes with a diameter of 8 mm: on Figure No.3, you can see the
position of these four fixing holes.
Use screws and dowels gives in dotation.
4
ZZMAN PARK-eng REV.1 03.05