1
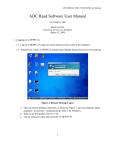
UNIVERSAL TWO WAY AUTOMATION (UTA ) INSTALLATION INSTRUCTIONS AND USER’S MANUAL “LEADERS IN TWO WAY AUDIO TECHNOLOGY” MANUAL P/N 119516 REV. 2.6 11/95 TABLE OF CONTENTS 1.0 GENERAL. .................................................................................................................... 3 1.1 FEATURES............................................................................................................................................ 3 1.2 GENERAL DESCRIPTION. ................................................................................................................... 3 1.3 GENERAL SPECIFICATIONS. .............................................................................................................. 4 2.0 REQUIREMENTS. ......................................................................................................... 4 2.1 POWER. ................................................................................................................................................ 4 2.2 CENTRAL STATION. ............................................................................................................................ 4 3.0 INSTALLATION. ........................................................................................................... 4 3.1 INSTALLATION SUMMARY.................................................................................................................. 4 3.2 WIRING AND PLACEMENT. ................................................................................................................. 5 4.0 OPERATION. ................................................................................................................ 7 4.1 GENERAL OPERATION........................................................................................................................ 7 4.2 AC/BATTERY SUPERVISION. .............................................................................................................. 7 4.3 SYSTEM TROUBLE INDICATORS. ...................................................................................................... 8 4.4 LINE FAULT LED. ................................................................................................................................. 8 4.5 LINE IN USE LED.................................................................................................................................. 8 4.6 OTHER TROUBLE CONDITIONS. ........................................................................................................ 8 5.0 PROGRAMMING........................................................................................................... 9 5.1 CHANGING DEFAULT SETTINGS. ...................................................................................................... 9 5.2 RING PATTERNS................................................................................................................................ 10 5.3 SYSTEM OPTIONS. ............................................................................................................................ 12 6.0 OPTIONAL CONNECTIONS....................................................................................... 13 6.1 EXTERNAL RELAY OUTPUT. ............................................................................................................ 13 6.2 BACK-UP BATTERY. .......................................................................................................................... 14 7.0 NOTES. ....................................................................................................................... 14 8.0 FCC REQUIREMENTS................................................................................................ 15 TABLE OF TABLES AND DIAGRAMS TABLE 1: GENERAL SPECIFICATIONS. .................................................................................................. 4 TABLE 2: WIRING CONNECTIONS........................................................................................................... 5 DIAGRAM 1: WIRING SCHEMATIC. .......................................................................................................... 6 TABLE 3: SUMMARY OF PROGRAMMING OPTIONS............................................................................ 10 TABLE 4: SYSTEM OPTIONS. ................................................................................................................ 12 2 1.0 GENERAL. 1.1 FEATURES. The Universal Two Way Automation Interface offers: ♦ Compatibility with all digital receivers ♦ Compatibility with all two way module and hybrid control panels ♦ Compatible with phone systems and stand-alone phones ♦ Compatible with all data transmission formats ♦ Four telephone line inputs per UTA ♦ External relay output for system trouble notification ♦ Piezo alert for system trouble notification ♦ AC Power, Low Battery, Line in use and Line Fault indicators ♦ Many programmable features 1.2 GENERAL DESCRIPTION. The Eagle Universal Two Way Automation Interface can be used with any manufacturers alarm receiving equipment for the purpose of improving and simplifying the operation of two way audio via semi-automation of the process. The UTA interfaces to the incoming telephone lines, the receiving equipment and the local two way phone (system). It automates the switching of the telephone line to the local two way phone after the receiver has completed communication with the account. Operation is simplified by providing the operator with a uniform method of handling two way accounts utilizing a variety of different types of two way devices. 1.2.1 UTA TWO WAY ENHANCEMENTS The UTA provides several enhancements for Two Way Voice in the central station. Some of the enhancements are listed here. Eliminates preliminary disconnects. Because the receiver is no longer utilized in holding the line open after kiss-off, the UTA can hold the line until the operator picks up on the line or until the two way module disconnects. This eliminates dropped two way calls due to extended operator response times during peak traffic hours. Prevents receiver lines from being tied up unnecessarily too long. Because receivers stay on line for a preprogrammed period of time, they can tie the receiver line up longer than the two way session elapses. The UTA eliminates this unwanted condition. Allows the receiver to be located away from operators. Many receivers offer a two way voice line output. Operation of with this feature requires the receiver to be located immediately in front of an operator as operator interaction with the receiver is required. The UTA eliminates this condition as the receiver is no longer in the two way process. Eliminates line fault condition. The UTA replaces the phone line into the receiver with a “dummy” load providing 48 VDC, eliminating the line fault condition which occurs after the receiver drops off from the call. Eliminates off-hook conditions. An inadvertent off hook condition can occur if an operator “knocks” a phone off hook. The UTA eliminates this condition by removing the phone (or phone system) from the telco line during non-active conditions. Eliminates “queuing” condition. Some receivers “queue” two way calls allowing only one call to be processed at a time. The UTA eliminates this condition because all lines are independent. Eliminates compatibility issues. The UTA allows all receivers to receive two way calls from all two way audio modules and systems. This eliminates the condition where many receivers are not capable of holding the line open after kiss-off and any other compatibility issues. 3 Eliminates “forgotten hang-ups”. Central station operators are human. They can, and have, forgotten to send a disconnect command to the two way system. The UTA eliminates this condition from occurring by automatically generating a disconnect command if not issued by the central station operator. Eliminates confusing disconnect commands. The UTA allows a generic disconnect command to be programmed into its memory. This command, up to ten characters long, can disconnect all two way voice systems in use today. 1.3 GENERAL SPECIFICATIONS. TABLE 1: GENERAL SPECIFICATIONS. Size (H x W x L): Approx.: Power Requirements: Number of Lines Ring Voltage Receiver line monitor voltage Indicators 5” x 14” x 12”, PVC Enclosure 16.5 VAC 40 VA; 12 VDC Standby Four (4) using RJ-11 modular connectors 80 Vrms 50 VDC Line in use LED and line fault LED for each line; Low Battery, Low AC, Trouble buzzer, Trouble Relay 8 VDC @ 5 mA Local Phone Power 2.0 REQUIREMENTS. 2.1 POWER. Operating voltage: 16 VAC 40 VA; 12 VDC Standby Current draw (standby): 60 mA max. 2.2 CENTRAL STATION. The Eagle Universal Two Way Automation Interface requires the following hardware: 1. A digital receiver (any make or model). 2. A telephone system or stand alone phones (access to all four lines). 3.0 INSTALLATION. 3.1 INSTALLATION SUMMARY. 1. 2. 3. 4. Connect the telco lines to LINE 1 TELCO, LINE 2 TELCO, etc.. Connect the receiver telco connections to LINE 1 RECV’R, LINE 2 RECV’R, etc.. Connect stand alone phone or phone system to LINE 1 PHONE, LINE 2 PHONE, etc. Turn power switch on rear panel OFF. Then connect included transformer to the AC connector on the back panel. Do not plug transformer into power. 5. Connect user supplied battery to BATTERY connector on the back panel using supplied two conductor cable/plug. 6. Place the phone connected to LINE 1 off hook. 7. Turn power switch on back panel ON. The UTA will power-up in program mode. 8. Follow programming instructions in section 5.0. 9. Hang up phone. 10. Disable receiver’s listen-in function (usually a software feature). 4 5 3.2 WIRING AND PLACEMENT. TABLE 2: WIRING CONNECTIONS. CONNECTOR BATTERY BATTERY AC AC AC TROUBLE RELAY TROUBLE RELAY TROUBLE RELAY TROUBLE RELAY WIRE BLACK RED GREEN WHITE WHITE BLACK RED WHITE WHITE FUNCTION NEGATIVE POSITIVE EARTH GROUND AC AC System GROUND (NEGATIVE) +12 VDC, (500 mA max.) NORMALLY OPEN NORMALLY OPEN Descriptions: BATTERY, BLACK: NEGATIVE POWER connection from back up battery. BATTERY, RED: +12 VDC connection from back up battery. AC, GREEN: EARTH GROUND connection from grounded transformer. AC, WHITE: AC connection from grounded transformer. AC, WHITE: AC connection from grounded transformer. TROUBLE RELAY, BLACK: GROUND connection. TROUBLE RELAY, RED: +12 VDC output connection, 500 mA maximum output. TROUBLE RELAY, WHITE: NORMALLY OPEN connection. TROUBLE RELAY, WHITE: NORMALLY OPEN connection. 6 CS UTA WIRING SCHEMATIC 7 LINE IN TELCO LINE RECV’R RECEIVER (BACK OF UTA) PHONE LINE X INPUT TELCO LINE X INPUT SYSTEM LINE X TO PHONE - OR - TO PHONE DIAGRAM 1: WIRING SCHEMATIC. 4.0 OPERATION. 4.1 GENERAL OPERATION. After the UTA detects that the telephone line has been off-hook for longer than five (5) seconds it will wait for the receiver to disconnect. It will then pickup on the incoming telephone line and switch the receiver to a voltage source to prevent it (the receiver) from reporting a line trouble condition. The UTA monitors the telco line for the disconnect signal from the calling device. Ten seconds after kiss off it starts to ring the local two way phone (system) providing the two way device is still on line. The programmed extend sequence is then automatically sent upon operator pickup. Upon completion of the extend sequence it will disconnect its hold on the line (the phone is now connected to the line). It will then continue to monitor the line looking for the operator to press the programmed extend or hang-up digit, place the local phone back on-hook or for the two way device to disconnect. When the operator places the local phone on-hook the unit will automatically send the hang-up digit(s) if the disconnect signal from the operator was not detected. At any time during the call the operator may initiate the extend or hang-up sequence by pressing the digit programmed for that purpose. If no activity is detected on the line for more than the programmed time (No Activity Time) during a two way call, the UTA will sound three short warning tones fifteen (15) seconds before starting the disconnect sequence. The operator can at any time press a digit to extend the call. The disconnect sequence sends the programmed hang-up digit(s), then waits for four (4) seconds for the two way device to disconnect. After four (4) seconds the telco line is reconnected to the receiver and the local phone is connected to the ring circuit. If the local phone remains off-hook, a local off-hook trouble will occur and the UTA will light its LINE FAULT LED, cause the buzzer to be continuously active and close the TROUBLE RELAY. All or any combination of lines may be active simultaneously with independent two way voice calls. Because all lines are independent, they are not required to be connected to the same receiver. 4.2 AC/BATTERY SUPERVISION. 4.2.1 AC POWER SUPERVISION. The AC Power is sampled over a thirty second period, providing detection of low AC or AC restoral within 30 seconds. 4.2.2 BATTERY SUPERVISION. The battery is tested using two sample rates. A slow rate is used when AC is on and a faster rate when AC is off. When the AC is on, the active battery test samples the battery over a five (5) minute period, providing for a low battery detection within five (5) minutes. When the AC is off, the battery is sampled over a thirty (30) second period, allowing a battery trouble to be detected within 30 seconds. The low battery condition will restore after the battery has been sampled as good five (5) times. This causes the battery to restore within two and a half (2.5) minutes after AC is OK. 4.2.3 POWER UP BATTERY SUPERVISION. At power up, a missing battery will be detected within 30 seconds. If the system was powered up without a battery, and the battery is then connected, the low battery condition will be restored within 60 seconds. 8 4.3 SYSTEM TROUBLE INDICATORS. 4.3.1 AC LED. The AC LED is on whenever AC POWER is detected as OK. The AC LED is off whenever AC POWER is detected as low. 4.3.2 LOW BATTERY LED. The LOW BATTERY LED is off when the battery is OK and will flash when a low battery condition exists. 4.3.3 TROUBLE RELAY. The TROUBLE RELAY will be active whenever a trouble condition exists. When a second trouble condition is detected, and the relay is already active, the relay will open for five (5) seconds, then reactivate. The relay is intended to be connected to the alarm panel at the central station to provide remote annunciation of a trouble condition. 4.3.4 TROUBLE BUZZER. The TROUBLE BUZZER (PIEZO) will sound when any local phone is left off hook for more than five (5) minutes when a two way is active. When two way is not active, the trouble will occur when the local phone is off hook for more than the time programmed into the Local Phone Off Hook Time. This trouble condition will generate a buzzer sound of one second on then four seconds off. Returning the phone to on hook will restore the line fault within two (2) seconds and silences the buzzer. 4.3.5 OTHER TROUBLE. For other troubles, the TROUBLE BUZZER (PIEZO) will beep for two and one half (2.5) seconds then pause for fifteen (15) seconds the first five (5) minutes, then beep for two (2) seconds every four (4) minutes until the trouble restores. Any new trouble condition will restart the TROUBLE BUZZER at the fast beep rate. 4.4 LINE FAULT LED. The LINE FAULT LED is used to indicate when the local phone is ringing and when it has been left off-hook too long. When the line is ringing the LED flashes as the same rate as the ring signal. When indicating a local phone fault the LED will flash at a faster rate (four flashes per second). 4.5 LINE IN USE LED. The LINE IN USE LED is on whenever a two way call is in progress. 4.6 OTHER TROUBLE CONDITIONS. If a line should be left off hook the UTA will generate a pulsing (one second on, one second off) tone on the phone speaker. Returning the phone on hook will restore the trouble condition. 9 5.0 PROGRAMMING. 5.1 CHANGING DEFAULT SETTINGS. 5.1.1 ENTERING PROGRAMMING MODE. Programming is accomplished by using a touch tone phone to select options. The program mode is entered by powering down the UTA (turn power switch on rear panel OFF). Next, place the local phone connected to LINE 1 off-hook, then power up the UTA (turn power switch ON). After a power up sequence which sequentially lights all LED’s and beeps as each LED is illuminated, the BATTERY LED will flash to indicate that the unit is in the programming mode. 5.1.2 HOW TO PROGRAM. Each (receiver) line has six programming steps. Programming is accomplished by entering the line number, the step number and then the option data. The steps which allow/require more than one data digit require a line flash as an “enter” command at the end. This line flash can be accomplished either by pressing a “flash” button on the phone or by momentarily hanging up the phone. Steps which allow only on data digit are automatically entered at the completion of entering the data. The first digit entered selects the line, the second digit selects the step number. After the line number has been entered the LINE IN USE LED will light for the line that was selected. The option data is now entered for the step that was selected. When the option data is accepted, the UTA will acknowledge by producing a two tone sequence after the programmer releases the digit. The UTA then returns to the start of the programming sequence, except when programming extend or hang-up digits. The on-hook condition is used as the “ENTER” key when programming extend and hang-up digits. After all digits have been entered, (up to 10 digits can be programmed for each extend or hang-up), the digit programming is ended by placing the phone on hook for more than 100 milli-seconds. The unit will then return to the start of the programming sequence. The acceptance of the data is indicated to the user by a 1KHz tone for 60 milli-seconds followed by a 500 Hz tone for 60 milli-seconds (sounds like short “beep-bop”). Any programming error is indicated by a single 500 Hz tone for a duration of one (1) second (sounds like a long “bop”). Any programming mode is ended when the local phone is placed on-hook for more than five (5) seconds. The programming mode will also end if no digits are detected for a period of 5 minutes (auto program time out). 5.1.3 PROGRAMMING OPTIONS. Reference Table 3. The ‘n’ in the step refers to the line number desired to be programmed. The digit next to the ‘n’ is the step number. Hence, if line 2, step 3 is the desired programming feature to be changed, enter a 2 then a 3. Step ‘n1’: Selects the ringing pattern for each line, individually. The ringing patterns are described in section 5.2. If custom ring patterns are programmed (section 5.2.3), then entering a “0” (zero) for Step ‘n1’ will select the custom ring pattern. NOTE: IF CUSTOM RING PATTERNS ARE DESIRED, SECTION 5.2 MUST BE PROGRAMMED BEFORE STEP ‘N1”. Step ‘n2’: Selects, if any, the “No Activity Time”. The “No Activity Time” disconnects the two way device and the local phone line when the timer expires. This feature is optional and can be disabled with a programmed value of zero (0). The time is entered in minutes. Step ‘n3’: Identifies which button (number) on the two way phone will initiate the extend command sequence. This button does not have to be the same as the DTMF command sent as the extend sequence. The sequence of numbers can be one to ten digits long. 10 Step ‘n4’: Programs the DTMF digits that will be sent for the extend sequence. Up to ten (10) digits can be programmed. Extend digits are sent when the local phone first goes off-hook or when the operator presses the digit programmed in step 2 (extend digit). TABLE 3: SUMMARY OF PROGRAMMING OPTIONS. The following table lists the programming steps, where ‘n’ indicates the line number. STEP OPTION DESCRIPTION n1 Ringing pattern for line ‘n’. n2 “No Activity Time”. Zero to disable. Time in minutes. 0 n3 Enter the DTMF digit that will be used to trigger the extend sequence. 7 n4 Enter the DTMF digits that will be sent for the extend sequence. 7 n5 n6 DEFAUL T Note 1 Enter the DTMF digit that will be used to trigger sending of the auto hang-up digit(s). Enter the DTMF digits that will be sent for the hang-up sequence. 9 99 Note 1: The default is ring PATTERN ONE. See Section 5.2.1 for details. Step ‘n5’: Identifies which button (number) on the two way phone will initiate the hang-up command sequence. This button does not have to be the same as the DTMF command sent as the hang-up sequence. The sequence of numbers can be one to ten digits long. Step ‘n6’: Programs the DTMF digits that will be sent for the hang-up sequence. Up to ten (10) digits can be programmed. Hang-up digits are sent to the two way device when the local phone is placed back on-hook or when the operator presses the digit programmed in Step 5 (Hang-up digit). 5.1.4 ENTERING AN “ENTER” COMMAND. Line steps four (4) and six (6) and line ring pattern programming require an “enter” command when programming less than the maximum number of allowable digits. The “enter” command is accomplished by “flashing” the line. A line flash can be generated by momentarily hanging up the line or by pressing a “flash” button on the programming phone. 5.1.5 EXITING PROGRAMMING MODE. To exit programming mode hang up the phone which has been used in programming the system. 5.2 RING PATTERNS. You may program any or all lines with a custom ring pattern. Lines not custom programmed will use the default as described below for PATTERN ONE. When programming custom patterns the custom patterns must be programmed before programming the other options (section 5.1.3). If your phone has a “FLASH” button, pressing it or momentarily depressing the hook switch on the telephone exits the custom programming for that line and returns you to the start of programming. 11 There are two pre-defined ring patterns from which to program each of the four phone lines. PATTERN ONE can be custom defined if desired. If not custom defined, the factory default will be used. PATTERN TWO is factory programmed and described below. If custom ring patterns are programmed (section 5.2.3), then entering a 0 for Step ‘n1’ will select the custom ring pattern. If custom ring patterns are not programmed, then entering a 0 for Step ‘n1’ will select the factory default PATTERN ONE as described below. 5.2.1 RING PATTERN ONE Ring PATTERN ONE is selected by entering a 0 for Step ‘n1’. (Remember, ‘n’ is the line number.) Example: If programming Line 2, enter 2 1 0. The 2 selects line 2. The 1 selects step 1. The 0 selects PATTERN ONE. Repeat this procedure for the remaining lines. Ring PATTERN ONE utilizes a long “OFF” time. In all cases (lines 1 through 4), the “OFF” time is 30 seconds. Line ring patterns are as follows: Line 1: 1/2 second ON (ring); 30 seconds OFF (no ring). Line 2: 1/2 second ON; 1/4 second OFF, 1/2 second ON, 30 seconds OFF. Line 3: 1/2 second ON; 1/4 second OFF, 1/2 second ON, 1/4 second OFF, 1/2 second ON, 30 seconds OFF Line 4: 1/2 second ON; 1/4 second OFF, 1/2 second ON, 1/4 second OFF, 1/2 second ON, 1/4 second OFF, 1/2 second ON, 30 seconds OFF 5.2.2 RING PATTERN TWO Ring PATTERN TWO is selected by entering a 1 for Step ‘n1’. PATTERN TWO will always program the factory default pattern described below and will replace PATTERN ONE for ALL LINES. Example: If programming Line 2, enter 2 1 1. The 2 selects line 2. The first 1 selects step 1. The second 1 selects PATTERN TWO. Repeat this procedure for the remaining lines. Ring PATTERN TWO utilizes a short “OFF” time. In all cases (lines 1 through 4), the “OFF” time is 2-1/2 seconds. Line ring patterns are as follows: Line 1: 1/2 second ON (ring); 2-1/2 seconds OFF (no ring). Line 2: 1/2 second ON; 1/4 second OFF, 1/2 second ON, 2-1/2 seconds OFF. Line 3: 1/2 second ON; 1/4 second OFF, 1/2 second ON, 1/4 second OFF, 1/2 second ON, 2-1/2 seconds OFF Line 4: 1/2 second ON; 1/4 second OFF, 1/2 second ON, 1/4 second OFF, 1/2 second ON, 1/4 second OFF, 1/2 second ON, 2-1/2 seconds OFF 5.2.3 USER DEFINED RING PATTERN. User defined ring patterns are defined by programming up to 16 time segments. Each time segment programs an ON (ring) or an OFF (no ring) time. The ON and OFF times are entered as a series of digits. Each digit represents a period time equal to the value of the digit times 1/4 second. All un-programmed times, indicated by ---, are skipped. (Example; programing a 3= 3 x 0.25 = 0.75 seconds) An “enter” command must be issued for the UTA to accept the line of data. THE “ENTER” COMMAND IS ISSUED BY “FLASHING” THE LINE. This is accomplished by either momentarily hanging the phone up (pressing the “hook”) or by pressing the “flash” button on the phone (if the phone has this option). 12 Entering a 0 in place of any number will program a 1/4 second of silence (only). Entering an * in place of a number will program 5 seconds of silence or ring. Entering a # in place of a number will program 10 seconds of silence or ring. Examples: For Line One, to program a sequence of: 1/2 second ring, followed by 1/4 second silence, followed by 1/2 second ring, followed by 5 seconds of silence; Enter: 0(ring programming) 1 (for line one) Enter: 2(ON) 1(OFF) 2(ON) *(OFF) Note: ALL UNUSED LOCATIONS ARE IGNORED [flash hook] For Line Two, to program a sequence of: 1/2 second ring, followed by 1/4 second silence, followed by 1/2 second ring, followed by 1/2 second silence, followed by 3/4 second ring, followed by 15.25 seconds of silence; Enter: 0 2 (for line two) Enter: 2(ON) 1(OFF) 2(ON) 2(OFF) #(OFF) [flash hook] Note: ALL UNUSED LOCATIONS ARE IGNORED 3(ON) *(OFF) 0(OFF)* * Note: a 0 in an ON time slot programs a 1/4 second silence (OFF). 5.3 SYSTEM OPTIONS. Some system options and operations are accessed when in the programming mode. The system option menu is accessed by selecting 0 for the line number. TABLE 4: SYSTEM OPTIONS. STEP SYSTEM OPTION DESCRIPTION DEFAULT 00 Program the EEPROM with the DEFAULT values. N/A 01 Program ring pattern for line 1. PATTERN ONE LINE 1 02 Program ring pattern for line 2. PATTERN ONE LINE 2 03 Program ring pattern for line 3. PATTERN ONE LINE 3 04 05 Program ring pattern for line 4. Local phone off-hook time. See Paragraph 5.3.6. PATTERN ONE LINE 4 1 (5 Sec.) 5.3.1 SYSTEM OPTION 00. This command loads the default values into the EEPROM. To execute, while in programming mode, press 0 0 on the tough tone phone. This will automatically execute the command. 13 5.3.2 SYSTEM OPTION 01. This is the programming step to program the ring pattern for Line 1. See Section 5.2 for options. 5.3.3 SYSTEM OPTION 02. This is the programming step to program the ring pattern for Line 2. See Section 5.2 for options. 5.3.4 SYSTEM OPTION 03. This is the programming step to program the ring pattern for Line 3. See Section 5.2 for options. 5.3.5 SYSTEM OPTION 04. This is the programming step to program the ring pattern for Line 4. See Section 5.2 for options. 5.3.6 SYSTEM OPTION 05. This command allows the user to program the period of time before the UTA will go into a fault condition after a local phone is left off hook. It is recommended that a period of no less than 10 seconds (a value of 2) is used. When programming, each digit count is equal to five seconds. For example, entering a ‘2’ is 2 times 5 or 10 seconds; entering a ‘6’ is 6 times 5 or 30 seconds. 6.0 OPTIONAL CONNECTIONS. 6.1 EXTERNAL RELAY OUTPUT. The TROUBLE RELAY will be active whenever a trouble condition exists. When a second trouble condition is detected, and the relay is already active, the relay will open for five (5) seconds, then reactivate. The relay is intended to be connected to the alarm panel at the central station to provide remote annunciation of a trouble condition. The TROUBLE RELAY connector on the back panel of the UTA provides the following connections: WIRE BLACK RED WHITE WHITE FUNCTION System GROUND connection. 12 VDC output, 500 mA max. output. NORMALLY OPEN. NORMALLY OPEN. 14 6.2 BACK-UP BATTERY. 6.2.1 PURPOSE. The UTA has requires a BACK-UP BATTERY. This will provide continued operation in the event of a power failure. A BACK-UP BATTERY prevents any interruption in service even when a AC GENERATOR is utilized. Failure to connect a battery will cause the UTA to remain in a TROUBLE condition. 6.2.2 REQUIREMENTS. The UTA requires a 12 VDC, 1.2 amp-hour battery. It is connected to the BATTERY connector on the back of the UTA . The red wire connects to BATTERY POSITIVE and the black wire to BATTERY NEGATIVE. 7.0 NOTES. TECHNICAL SUPPORT HOTLINE: 800-447-E3 A2 G4 L5 E As with all electronic devices, electrostatic discharges can damage the components. Handle the circuit board with care! Features and specifications subject to change without notification. Use of this equipment may be in violation of local laws. Please verify and obey all local laws. Eagle Security Products, Inc. does not assume any liability for the illegal use of this equipment. Trademarks and Registered Trademarks are the property of their respective owners/companies. 15 8.0 FCC REQUIREMENTS. 1. The Federal Communications Commission (FCC) has established Rules which permit this device to be directly connected to the telephone network. Standardized jacks are used for these connections. This equipment should not be used on party lines or coin lines. 2. If this device is malfunctioning, it may also be causing harm to the telephone network; this device should be disconnected until the source of the problem can be determined and until repair has been made. If this is not done, the telephone company may temporarily disconnect service. 3. The telephone company may make changes in its technical operations and procedures; if such changes affect the compatibility or use of this device, the telephone company is required to give adequate notice of the changes. You will be advised of your right to file a complaint with the FCC. 4. If the telephone company requests information on what equipment is connected to their lines, inform them of: a. The telephone number this unit is connected to b. The ringer equivalence number c. The USOC jack required d. The FCC Registration number Items 'b' and 'd' are indicated on the label. The ringer equivalence (REN) is used to determine how many devices can be connected to your telephone line. In most areas, the sum of the RENs of all devices on any one line should not exceed five (5.0). If too many devices are attached, they may not ring properly. 5. In the event of equipment malfunction, all repairs should be performed by our Company or an authorized agent. It is the responsibility of users requiring service to report the need for service to our Company or to one of our authorized agents. Service can be obtained at: Eagle Security Products, Inc. 11650 Genesee Street, Suite #2 Alden, NY 14004-9630 SALES: 800.447.E3A2G4L5E or 716.937.0095 FAX: 716.937.3127 TECHNICAL SUPPORT HOTLINE: 800.447.E3A2G4L5E or at your local installation company. EAGLE SECURITY PRODUCTS CENTRAL STATION UNIVERSAL TWO WAY AUTOMATION INTERFACE Complies with Part 68, FCC Rules FCC Registration #: 1SYUSA-18688-KX-N Ringer Equivalence : 0.0B LIMITED WARRANTY Eagle Security Products, Inc. Warrants that the products of its manufacture shall be free from defects in materials or workmanship to one year from the date of invoice if such goods have been properly installed, are subject to normal proper use, and have not been modified in any manner whatsoever. Upon return of the defective product to the nearest Eagle Security Products dealer, Eagle Security Products will, at its sole discretion, either repair or replace, at no cost to the customer, such goods as may be of defective material or workmanship. Customers outside the United States are to return products to their distributor for repair. In addition, any out of the box failure will be replaced at no charge providing the unit has not been altered physically. Alterations include, but not limited to, soldering, the addition of tape / foam tape or any form of physical damage. EAGLE SECURITY PRODUCTS, INC. SHALL NOT UNDER ANY CIRCUMSTANCES BE LIABLE FOR ANY INCIDENTAL OR CONSEQUENTIAL DAMAGES ARISING FROM LOSS OF PROPERTY OR OTHER DAMAGE OR LOSSES OWING TO THE FAILURE OF EAGLE SECURITY PRODUCTS’ PRODUCTS BEYOND THE COST OF REPAIR OR REPLACEMENT OF ANY DEFECTIVE PRODUCTS. EAGLE SECURITY PRODUCTS, INC. MAKES NO WARRANTY OF FITNESS OR MERCHANTABILITY AND NO OTHER WARRANTY, ORAL OR WRITTEN, EXPRESS OR IMPLIED, BEYOND THE ONE YEAR WARRANTY EXPRESSLY SPECIFIED HEREIN. 16 USER NOTES 1995 EAGLE SECURITY PRODUCTS, INC. UTA PROGRAMMING WORKSHEET SYSTEM OPTIONS STEP # OPTION DESCRIPTION 00 Program EEPROM with default values. STEP # RING PATTERN ON 01 Line 1 02 Line 2 03 Line 3 04 Line 4 STEP # 05 OFF ON OFF ON OPTION SELECTION NOT APPLICABLE OFF ON OFF ON OFF ON OFF ON OFF ON OFF FLASH* FLASH* FLASH* FLASH* OPTION DESCRIPTION Off hook time. OPTION SELECTION (Enter # of 5 second increments, 0-9.) LINE 1 OPTIONS STEP # 11 12 13 14 15 16 OPTION DESCRIPTION Ring pattern. No Activity time (minutes) Extend sequence trigger Extend digit sequence Hang-up sequence trigger Hang-up digit sequence OPTION SELECTION FLASH* FLASH* LINE 2 OPTIONS STEP # 21 22 23 24 25 26 OPTION DESCRIPTION Ring pattern. No Activity time (minutes) Extend sequence trigger Extend digit sequence Hang-up sequence trigger Hang-up digit sequence OPTION SELECTION FLASH* FLASH* LINE 3 OPTIONS STEP # 31 32 33 34 35 36 OPTION DESCRIPTION Ring pattern. No Activity time (minutes) Extend sequence trigger Extend digit sequence Hang-up sequence trigger Hang-up digit sequence OPTION SELECTION FLASH* FLASH* LINE 4 OPTIONS STEP # 41 42 43 44 45 46 OPTION DESCRIPTION Ring pattern. No Activity time (minutes) Extend sequence trigger Extend digit sequence Hang-up sequence trigger Hang-up digit sequence OPTION SELECTION FLASH* FLASH* * Note: A line flash is required after entering data for this line. UTA PROGRAMMING WORKSHEET REV 1;11/95 UTA PROGRAMMING WORKSHEET REV 1;11/95