1
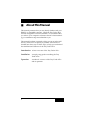
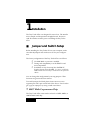
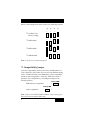
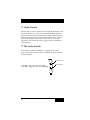
Tiny Turbo XTra User's Manual TM ORCHID 1990, Orchid Technology. No part of this manual may be reprinted without written permission from Orchid Technology. Tiny Turbo and Orchid are trademarks of Orchid Technology. All other products mentioned in this manual are trademarks of their respective manufacturers. Table of Contents Introduction 1 About This Manual 2 About The Tiny Turbo XTra 3 System Requirements 4 Chapter 1: Installation 5 Jumper and Switch Setup 80287 Math Co-processor Chip Compatibility Jumper Installing the 80287 Installing the Tiny Turbo XTra Verification Testing Reinstallation Chapter 2: Operation CPU Control Cache Control The Cache Switch 5 5 6 7 8 9 10 10 11 12 12 Appendix A: Technical Specifications 13 Appendix B: Troubleshooting 14 Appendix C: Returning a Product 16 Appendix D: FCC Compliance 19 ■ Introduction Orchid Technology has been a leading manufacturer of peripherals for personal computers since its incorporation in 1982, and is noted for introducing a series of personal computer industry firsts: 1982 PCnet: the first personal computer Local Area Network. 1984 PCTurbo: the first Accelerator card for PC compatible computers. 1985 ECCELL: the first PC Multifunction card with error correction. 1987 RamQuest 50/60: the first EMS (Expanded Memory Specification) product for the IBM PS/2 computers. 1990 ProDesigner II: the first super VGA graphics adapter to support 1024 x 768 graphics in 256 colors. 1990 RamQuest 8/16: the first Industry Standard Architecture (ISA) card that is expandable to 32 megabytes. Thank you for buying the Tiny Turbo XTra. Care has been taken to ensure that it will provide you with years of trouble free operation. We are sure you will be pleased with your purchase. 1 ■ About This Manual This manual presumes that you are already familiar with your IBM PC or compatible computer. While the Tiny Turbo XTra has been designed for ease of installation, we recommend that you refer to your computer’s reference manual when terminology or installation steps are unfamiliar to you. This manual has been organized to help you set up and install the Tiny Turbo XTra as quickly as possible. Each section is divided into short, easy to follow steps, to help you understand the installation and function of the Tiny Turbo XTra Introduction: A basic overview of the Tiny Turbo XTra . Installation: A step-by-step guide to installing the Tiny Turbo XTra. Operation: A technical overview of the Tiny Turbo XTra and its operation. 2 ■ About The Tiny Turbo XTra The Tiny Turbo XTra Accelerator provides a way to upgrade IBM PCs, XTs, and compatibles computing power to higher speed levels of an IBM AT without compromising the either the reliability of the original computer or the compatibility with software and hardware. The key to compatibility is the CPU switch between the 12MHz 80286 and the original processor used in your computer. The Tiny Turbo XTra replaces the 8088, 8088-2, or V-20 processor in your PC, but leaves the processor in the system for 100% compatibility. You can switch between your system processor and the 80286 with Tiny Turbo XTra’s lower rear-panel switch. The Tiny Turbo XTra comes equipped with 8K bytes of highspeed cache memory. For the few applications that will not load in a caching environment, the 80287 and the cache memory can be switched off from the rear panel toggle switches. The Tiny Turbo XTra lets you use a math chip for fast mathematical calculations. A 5, 8 or 10MHz 80287 can be installed on the Tiny Turbo XTra in the socket provided. 80287 Socket 8088 Socket Cache Switch CPU Switch 80286 Processor Figure 1: Tiny Turbo XTra 3 ■ System Requirements Host: IBM PC, XT, or compatibles based on the 8088, 8088-2 or V-20 processors. Connection: Fits into any slot, except J8 on the IBM XT. Memory: Will work in the PC with any amount of memory. Power and Cooling: Power consumption and cooling should not be a concern in a standard IBM XT. IBM PCs, Compaq portables, and other systems with small power supplies may have to be upgraded to 135 Watt, XT type power supplies. Expansion Chassis: Try to avoid using an expansion chassis in a system that contains a Tiny Turbo XTra. Although you may be able to get the system to work, it is not recommended. You may experience unrecoverable data losses. Note: Do not install the Tiny Turbo XTra in a computer that contains a microprocessor other than an 8088, 8088-2 or V-20. It will not work and damage may occur. IMPORTANT Static Electricity is a deadly enemy of your computer peripheral. Since you will be handling the Tiny Turbo XTra during this installation process, be sure to guard against electrostatic discharge. Do not wear clothing that causes static (such as wool sweaters) during installation. In most cases touching the power supply housing will discharge static electricity. If you believe there may be a static problem, you may want to buy a ground strap from your local radio parts store. 4 1 Installation The Tiny Turbo XTra was designed for ease of use. The installation is simple, and the operation straightforward. Be sure to read all notations in italics prior to installing the Tiny Turbo XTra. ■ Jumper and Switch Setup Before installing the Tiny Turbo XTra in your computer, make sure that the jumpers and switches are set for your configuration. The factory configuration of the Tiny Turbo XTra is as follows: ❐ ❐ ❐ No 80287 Math co-processor installed. Timing and compatibility is set for IBM PCs and most compatibles. Installation in any slot except J8 in the IBM XT, J8 is the closest slot to the 8088. It is not a normal slot, IBM intended it to be used for connection to an expansion chassis. You can change the configuration by moving jumpers. Their functions are given in the next sections. To install a jumper, the black plastic sleeve must cover two opposite pins with a pin in each hole of the sleeve. If it is hard to get a grip on a jumper, try using a small screwdriver. ❐ 80827 Math Co-processor Chip The Tiny Turbo XTra comes with a socket for a 5MHz, 8MHz, or 10MHz 80287 math chip. 5 Below is the configuration matrix for the four math chip options: J2 J3 J4 J5 • • • • • • • • ❐ 5MHz 80287 • • • • • • • • ❐ 8MHz 80287 • • • • • • • • • • • • • • • • ❐ No Math Chip (factory setting) ❐ 10MHz 80287 Note: J6 and J7 are to remain unjumpered. ❐ Compatibility Jumper To ensure compatibility with a wide variety of 8088, 8088-2, or V-20 systems, the Tiny Turbo XTra can run with different timing clocks. The board comes set for IBM timing. Most compatibles operate in this configuration. If the Tiny Turbo XTra doesn't operate in your compatible, try switching the jumper to the alternate position. COM J1 IBM IBM and most compatibles • • • COM J1 IBM Other compatibles • • • Note: Only use the OTHER COMPATIBLES jumper setting if you have trouble with the default IBM setting. 6 ❐ Installing the 80287 1. Insert the 80287 math chip into the top socket on the Tiny Turbo XTra so that the mark on the chip indicating pins 1 and 40 are at the same end of the socket’s indentation (aiming toward the adapters bracket). 2. Make sure all the pins are aligned with the holes in the socket and press down firmly. Be careful not to bend any of the pins. If you bend some, be careful straightening them, because the pins can only be flexed a few times before breaking. 3. Install the jumper on the pins that correspond to the 80287 clock frequency, 5MHz, 8MHz, or 10MHz. Note: Your system can have two math chips, an 80287 on the Tiny Turbo XTra and an 8087 on the computer’s motherboard. The system will use the 80287 in Turbo mode and the 8087 in PC mode. When using a math chip on the motherboard, be sure to set appropriate motherboard switch in the OFF position: Switch 1, position 2 in an IBM PC Switch 2, position 2 in an IBM XT For compatibles, check the manual for that computer. The two-math chip configuration described above ensures greater software compatibility. This is because programs use different ways of determining if a math chip is present: some look at the setting of the motherboard switch; some look for the 80287 on the accelerator. All of these types of programs will correctly determine that a math chip is present if the above configuration is used. 7 ■ Installing the Tiny Turbo XTra In this procedure you will remove the PC’s 8088, 8088-2 or V-20 processor, put it on the Tiny Turbo XTra, plug the Turbo’s cable into the 8088, 8088-2 or V-20 socket, and plug in the Tiny Turbo XTra. Give yourself room to work by removing all of the cards from the PC. When handling cables be sure that every pin fits its socket without bending. Note: The Tiny Turbo XTra only works in computers that use 8088, 8088-2, or V-20 microprocessors. Installing it in computers that use the 8086, 80186, 80286, or other processors may damage the Tiny Turbo XTra and your computer. 1. Remove the 8088, 8088-2 or V-20 from the PC. Use the small removal tool supplied with the Tiny Turbo XTra. CAUTION: Do not pry up at too much of an angle. Be careful not to bend the pins. 2. Plug the 8088, 8088-2 or V-20 into the socket on the Tiny Turbo XTra. Make sure the mark on the end of the 8088, 8088-2 or V-20 is at the end of the socket with the indentation indication Pins 1 and 40 (the end toward the adapter bracket). 3. Plug the Tiny Turbo XTra’s cable into the PC’s 8088, 8088-2 or V-20 socket. NOTE: The cable has a colored stripe on the end indicating Pin 1 and Pin 40. Plug in the cable so that this stripe is on the same side as the indentation on the 8088, 8088-2 or V-20 socket. See Figure 2, next page. 8 Figure 2: Tiny Turbo XTra with cable 4. Slide the Tiny Turbo XTra into the expansion slot closest to the PC’s 8088, 8088-2 or V-20 socket. 5. Plug the other end of the Tiny Turbo XTra’s cable onto the Tiny Turbo XTra board. If installed properly in the IBM PC or XT, the cable will be gently bent, but should not appear twisted, as this would plug in the connector backwards. 6. Secure the Tiny Turbo XTra by fastening the retaining screw into the adapter bracket and put the system back together. ❐ Verification Testing To verify that the Tiny Turbo XTra is working properly, toggle both switches on the rear of your the Tiny Turbo XTra to the up position, turn on the computer and watch it go through a memory test and load the operating system from the disk. If this process works, you have verified that 95% of the Tiny Turbo XTra works. If not, review your installation for problems and try booting again. 9 Note: Some older software is unable to load at the increased speed provided by your Tiny Turbo XTra. To ensure full compatibility with all software, the Tiny Turbo XTra runs at a reduced speed for the first 90 seconds following boot-up. After 90 seconds, full operating speed is engaged. To verify that the 80287 math co-processor works, if one is installed, run a program that uses it. (DOS does not use the 80287 for its own functions, but some applications, such as AutoCAD, running under DOS do use the 80287.) ❐ Reinstallation You can remove your Tiny Turbo XTra and reinstall it in another computer. Avoid frequent reinstallation because of the chance of damage to the Turbo’s cable due to flexing. Frequent flexing can prematurely break one of the connectors and render the cable useless. If you reinstall your Turbo and it doesn’t work, suspect the cable or the new host computer. 10 2 Operation There are no complicated procedures to learn to operate the Tiny Turbo XTra. Once the Tiny Turbo XTra is installed, your system will work just the way it did before, only faster. To assure full compatibility, the Tiny Turbo XTra has CPU Control and Cache Control ❐ CPU Control It is unnecessary in most cases to switch your Tiny Turbo XTra out of 80286 mode. A limited number of speed-dependent programs will not work in the 80286 mode. Some games operate faster than normal, and old copy protection schemes may not work. Located in the lower position on the rear panel the CPU switch provides for switching between the 80286 of the Tiny Turbo XTra and the processor of the PC. In the up position you are running on the Tiny Turbo XTra 12 MHz 80286 CPU; in the down position you are running on the PC’s 8088, 8088-2, or V-20 CPU. The CPU Switch acts like a reset switch; when you flip the switch, the system waits two seconds and does a cold boot. This is a useful feature if a program crashes and pressing Crtl-Alt-Del won’t cause a warm boot. Simply flip the switch back and forth to reset the system. This is better for the PC than flipping the power switch. Note: Toggling the Tiny Turbo XTra’s CPU Switch causes your system to reboot. Save all data before toggling between the 80286 and processor modes. 11 ❐ Cache Control In most cases your Tiny Turbo XTra will operate flawlessly with the cache memory on. Some non-standard expanded memory systems and some older speed-sensitive, floppy disk based copy protection schemes will not work with cache memory. Furthermore, some systems may not boot with cache on. For these reasons the Tiny Turbo XTra has a toggle switch to disable the cache memory. ❐ The Cache Switch For booting in certain non-IBM PCs, a toggle switch cache control is provided. This switch is located in the upper position of the rear panel. Cache Switch Cache ON Toggle the Cache Switch UP Cache OFF Toggle the Cache Switch DOWN 12 CPU Switch Appendix A Tiny Turbo XTra Technical Specifications ❐ Part Number: TC-402-00 ❐ Computers Supported: IBM PC, XT, 8088, 8088-2, and V-20 based computers ❐ Bus Size/Type: 8-bit Industry Standard Architecture ❐ CPU: 80286 ❐ CPU Clock Speed: 12MHz ❐ RAM: 8KB high speed static RAM ❐ Math Chip: Socket for a 5, 8, or 10MHz 80287 math chip ❐ Power: 11 watts at 5V ❐ Warranty: 4 Years 13 Appendix B Troubleshooting Should you run into any problems with your system, chances are the solution is contained within this section. See if any of the suggestions that follow solves your problem. If not, contact the Orchid Technical Support Department. ❐ Computer does not boot with the Tiny Turbo XTra installed and set for 80286 mode. 1. The board may be installed incorrectly. Review your installation procedures as described in the manual. 2. The Tiny Turbo XTra cable may be defective. If you have another Tiny Turbo XTra cable available, replace the original cable with it, and reboot the system. If your systems reboots successfully, your original cable is probably at fault. Contact Orchid’s Technical Support for a replacement cable. ❐ Computer does not boot with the Tiny Turbo XTra installed and set for 8088 mode. 1. The board may be installed incorrectly. Check the 8088 to ensure it was installed in the proper location and that each pin is securely installed in the socket. 2. The Tiny Turbo XTra cable may be defective. If you have another Tiny Turbo XTra cable available, replace the original cable with it, and reboot the system. If your system reboots 14 successfully, your original cable is probably at fault. Contact Orchid’s Technical Support for a replacement cable. ❐ Inappropriate zeros appear in your spreadsheet program 1. Switch for math co-processor is improperly set. Check to be sure that the switch on the motherboard is set correctly for having a math co-processor installed. 2. Your application requires a math co-processor, and no 80287 is installed on the Tiny Turbo XTra. Install an 80287 on your Tiny Turbo XTra. Note: Some applications, such as Lotus 1-2-3, require that you have an 8087 on the motherboard and an 80287 on the accelrator card. ❐ Your computer locks up for no apparent reason with the Tiny Turbo XTra installed. 1. Problems with your hard disk controller. Check your hard disk controller by removing it, and with the Tiny Turbo XTra installed, try booting up your computer from your floppy drive. Also, check with Orchid Technical Support for known incompatibilities. ❐ Your monitor screen is full of diamonds or snow. 1. You have an older style CGA video adapter installed in your computer. Try installing a newer CGA board. 15 Appendix C Returning a Product If the Technical Analyst determines that you need to return the product for warranty repair service, your Tiny Turbo XTra will be issued a Return Merchandise Authorization (RMA) number. The Orchid Technology RMA guidelines are as follows: 1. Do not return a product unless it has received an RMA number. We cannot accept any unauthorized shipment. Write the RMA number legibly on the outside of the package when you return it to us. This aids our identification of the product, and quickly determines if the product has been given proper authorization. 2. Keep a record of the RMA number in case you need to reference the number in future conversations with our staff. 3. Return a copy of your Tiny Turbo XTra invoice for verification of warranty. Without this proof of purchase, out of warranty repair fees may be charged. If it is determined that your Tiny Turbo XTra is out of warranty, a method of payment for repair must be authorized before an RMA number is issued. 4. Before you return the Tiny Turbo XTra for repair, please include a record of product serial number, model number of the computer system, peripherals and expansion boards installed in system, and the operating system you are running. This aids us greatly in trou16 5. Pack the following items securely in the original shipping carton with the foam packaging (if possible): A. The Tiny Turbo XTra with your name and RMA number attached. B. The Tiny Turbo XTra Software and Manual (if applicable). C. A list of the symptoms that occurred and related troubleshooting information. D. A copy of your invoice. 6. As already mentioned, write the RMA number legibly on the outside of the package when you return it to us. We cannot accept the package if it does not have the RMA number clearly marked. 7. Ship the package to Orchid Technology via any reliable air or surface carrier that handles sensitive freight. Since packages can get lost in shipment you should never mail the package unless you register it. It is wise to insure the package. 8. Once you receive the RMA number, ship the Tiny Turbo XTra as soon as possible. The RMA number is valid for 30 days from the date of issuance. IMPORTANT! Failure to use the original product container may result in damage to the Tiny Turbo XTra. Orchid Technology is not responsible for any damage to the Tiny Turbo XTra that occurs during shipment to us. 17 Shipping charges to us are your responsibility. We do not accept COD shipments. Give us a call or FAX your inquiries to us at: Main Office (415) 683-0300 Technical Support (415) 683-0323 FAX Machine (415) 683-0355 Bulletin Board Service (415) 683-0327 (24-hour service) Our hours are 8:00 AM to 5:00 PM (Pacific Coast time) Monday through Friday Our European customers may contact: Orchid (E) LTD. England 011-44-256-479898 or Orchid France (1) 42931035 18 Appendix D FCC Compliance DDS7EFTWINTURBO Made in the USA Orchid Technology Tiny Turbo XTra Certified compliant with FCC Class B limits, part 15 Class B Computing Device Note: This equipment generates and uses radio frequency energy and if not installed and used properly in strict accordance with the manufacturer's instructions, it may cause interference to radio or television reception. This device has been tested and found to comply with the limits for a Class B computing device in accordance with the specifications in Subpart J of Part 15 of FCC Rules, which are designed to provide reasonable protection against such interference in a residential installation. However, there is no guarantee that interference will not occur in a particular installation. If this equipment does cause interference to radio or television reception, which can be determined by turning the equipment off and on, the user is encouraged to try and correct the interference by one or more of the following measures: Reorient the receiving antenna Relocate the computer with respect to the receiver Move the computer away from the receiver 19 Plug the computer into a different outlet so that the computer and receiver are on different branch circuits. Ensure that card mounting screws attachment connector screws, and ground wires are tightly secured. Ensure that card slot covers are installed in all unused slots. If necessary, consult your dealer, service representative, or an experienced radio/television technician for additional suggestions. The manufacturer is not responsible for any radio or TV interference caused by unauthorized modifications to this equipment. It is the responsibility of the user to correct such interference. The user may find the following booklet prepared by the Federal Communications Commission helpful: How to Identify and Resolve Radio-TV Interference Problems. This booklet is available from the U.S. Government Printing Office, Washington, D.C. 20402, Stock No. 004-000-00345-4. Note: This product has been certified to comply with the limits for a Class B computing device, pursuant to Subpart J of Part 15 of FCC rules. Only equipment (computer input/output devices, terminals, printers, etc.) certified to comply with the Class B limits may be attached to this product. Operation with noncertified equipments is likely to result in interference to radio and TV reception. The user must use shielded interface cables in order to maintain product within FCC compliance. 20